1
!"#$%&'()'*%
© High End Systems, Inc. 1998-2004, All Rights Reserved
Information and Specifications in this document are subject to change without notice.
High End Systems, Inc. assumes no responsibility or liability for any errors or
inaccuracies that may appear in this manual. .
Technobeam User Manual
P/N 60600115 Version 2.1 June, 2004
Printed in the U.S.A.
!"#$%&'"()*+,-".+/(%0(1
2
!"#$%&#"'(
Trademarks used in this text: High End Systems, Technobeam, LAD, Intellabeam,
Emulator, Dataflash, Fusion Fire and LithoPatterns and Laser Aiming Device are
registered trademarks of High End Systems, Inc.
Belden is a registered trademark of Belden, Inc. Philips is a registered trademark of
Philips Lighting Company. ETL and CETL are registered trademarks of Intertek Testing
Services. Other trademarks and trade names may be used in this document to refer to
either the entities claiming the marks and names or their products. High End Systems
disclaims any proprietary interest in trademarks and trade names owned by others.
)#*%+*(
This product may use one or more of the following patents: US 4,392,187; US 4,602,321;
US 4,688,161; US 4,701,833; US 4,709,311; US4,779,176; US 4,800,474; US 4,962,687; US
4,972,306;US 4,980,806; US 5,010,459; US 5,031,078; US 5,073,847; US 5,078,039;
US5,186,536; US 5,209,560; US 5,278,742; US 5,282,121; US 5,307,295; US 5,329,431; US
5,331,822; US 5,367,444;US 5,402,326; US 5,430,629; US 5,432,691; US 5,454,477; US
5,455,748; US 5,506,762; US 5,515,254; US 5,537,303; US 5,545,951; US 5,580,164; US
5,590,954; US 5,590,955; US 5,640,061;US 5,647,662; US 5,665,305; US 5,691,886; US
5,728,994; US 5,758,955; US 5,758,956; US 5,769,527; US 5,774,273; US 5,798,619; US
5,806,951; US 5,823,661; US 5,825,548; US 5,828,485;US 5,829,868; US 5,857,768; US
5,882,107; US 5,934,794; US 5,940,204; US 5,945,786; US 5,953,152; US 5,980,066; US
6,048,080; US 6,327,103; US 6,048,081; US6,057,958; US 6,054,816;US 6,126,288; US
6,142,652; US 6,172,822; US 6,188,933; US 6,208,087; US 6,219,093; US 6,220,730;
US6,241,366; US 6,255,787; US 6,256,136; US 6,278,542; US 6,288,828; US 6,327,103;US
6,421,165; US 6,430,934; US 6,466,357; US 6,502,961; US D347,113; US D350,408; US
D359,574; US D360,404; US D365,165; US D366,712; US D370,080; US D372,550;US
D377,338;US D381,740; US D409,771; EP 0662275; EP 0767398; DE 621495; DE 655144;
DE 797503; EP 0475082; GB 2 043 769 B;GB 2 055 842 B; GB 2 283 808 B; GB 2 290 134 B;
GB 2 291 814 B;GB 2 292 530 B; GB 2 292 896 B; GB 2 294 909 B; GB 2 295 058 B; GB 2 303
203 B; GB 2 306 887 B; GB 2 307 036 B; GB 2 316 477 B; MR0862-1996; M9,604,224.9; US
6693392; US 6719433
Additional patents pending.
22
!"#$%&'"()*+,-".+/(%0(1
,--./+01"&#*21+
This equipment has been tested and found to comply with the limits for a Class A digital
device, pursuant to part 15 of the FCC rules. These limits are designed to provide
reasonable protection against harmful interference when the equipment is operated in a
commercial environment. This equipment generates, uses, and can radiate radio
frequency energy and, if not installed and used in accordance with the instruction
manual, may cause harmful interference to radio communications. Operation of this
equipment in a residential area is likely to cause harmful interference in which case the
user will be required to correct the interference at his own expense.
!"#$%&'"()*+,-".+/(%0(1
222
+#,*'$'-./(%/0%1/(0/$2.-3
',,/$4.(5%-/%67896:1%;).4#%<<%'(4%:=>?@A>
Manufacturer’s name:
Manufacturer’s address:
High End Systems Inc.
2105 Gracy Farms Lane
Austin, Texas 78758 U.S.A.
Distributor’s name:
Distributor’s address:
High End Systems Inc.
2105 Gracy Farms Lane
Austin, Texas 78758 U.S.A.
Declares that the product
Product Name:
Product Number:
Product Options:
Technobeam
All
All
conforms to the following EEC directives:
73/23/EEC, as amended by 93/68/EEC
89/336/EEC, as amended by 92/31/EEC and 93/68/EEC
Equipment referred to in this declaration of conformity first manufactured in
1997 in compliance with the following standards:
Safety:
EMC:
EN 60598-1 : 1993
EN 60598-2-17 : 1989
A1-A3 : 1993
EN 60825-1, 1994
EN 55022, Class A ITE
IEC 801-2, 1991 Level 2 (4/8 kV)
IEC 801-3, Draft 5 Level 2 (3 V/m)
IEC 801-4, 1988 Level 2 (1 kV/0.5 kV)
U.S.A., June 21, 2004
Kenneth Stuart Hansen, Compliance Engineer
23
!"#$%&'"()*+,-".+/(%0(1
/&31"*#+*.4#0%*5./+01"&#*21+
Instructions pertaining to continued protection against fire, electric shock, exposure to
excessive ultraviolet (UV) radiation, and injury to persons are found in Appendix D.
Please read all instructions prior to assembly, mounting, and operating this equipment.
IMPORTANT: INFORMATIONS DE SÉCURITÉ
Les instructions se rapportant à la protection permanente contre les incendies,
l’électrocution, l’exposition à un rayonnement ultraviolet (UV) excessif et aux blessures
corporelles se trouvent dans l’Annexe D.
Veuillez lire toutes les instructions avant d’assembler, de monter ou d’utiliser cet
équipement.
WICHTIGE SICHERHEITSHINWEISE
Sicherheitsanleitungen zum Schutz gegen Feuer, elektrischen Schlag, übermäßige UVStrahlung und Verletzung von Personen finden Sie in Anhang D.
Vor der Montage, dem Zusammenbau und der Inbetriebnahme dieses Geräts alle
Anleitungen sorgfältig durchlesen.
INFORMAZIONI IMPORTANTI DI SICUREZZA
Le istruzioni sulla protezione da incendi, folgorazione, esposizione eccessiva a raggi
ultravioletti (UV) e infortuni sono contenute nell’appendice D.
Si prega di leggere tutte le istruzioni prima di assemblare, montare e azionare
l’apparecchiatura.
INFORMACION IMPORTANTE DE SEGURIDAD
En el Apéndice D de este manual se encuentran instrucciones sobre protección continua
contra incendios, descarga eléctrica, exposición excesiva a radiación ultravioleta (UV) y
lesiones personales.
Lea, por favor, todas las instrucciones antes del ensamblaje, montaje y operación de este
equipo.
)"1$67*.81$2027#*21+.9#"+2+:
High End Systems products are designed and manufactured to meet the requirements of
United States and International safety regulations. Modifications to the product could
affect safety and render the product non-compliant to relevant safety standards.
!"#$%&'"()*+,-".+/(%0(1
3
82(%.;+.<#"$%.-1+*"%.=#.81$2027#*21+.>6.)"1$62*
Les produits High End Systems sont conçus et fabriqués conformément aux exigences
des règlements internationaux de sécurité. Toute modification du produit peut entraîner
sa non conformité aux normes de sécurité en vigueur.
)"1$6'*&1$202'#*21+(?#"+6+:
Design und Herstellung von High End Systemen entsprechen den Anforderungen der
U.S.A. und den internationalen Sicherheitsvorschriften. Abänderungen dieses Produktes
können dessen Sicherheit beeinträchtigen und u. U. gegen die diesbezüglichen
Sicherheitsnormen verstoßen.
@AA%"*%+B#.46CC#.81$2027#.>%C.)"1$1**1
I prodotti di High End Systems sono stati progettati e fabbricati per soddisfare i requisiti
delle normative di sicurezza statunitensi ed internazionali. Qualsiasi modifica al
prodotto potrebbe pregiudicare la sicurezza e rendere il prodotto non conforme agli
standard di sicurezza pertinenti.
@$A%"*%+72#.>%.81$2027#72D+.>%C.)"1$67*1
Los productos de High End Systems están diseñados y fabricados para cumplir los
requisitos de las reglamentaciones de seguridad de los Estados Unidos e internacionales.
Las modificaciones al producto podrían afectar la seguridad y dejar al producto fuera de
conformidad con las normas de seguridad relevantes.
9#""#+*5./+01"&#*21+
=2&2*%$.9#""#+*5
Unless otherwise stated, your!!"#$%&'(is covered by a two (2) year parts and labor limited
warranty. The Laser Aiming Device (LAD™) for Technobeam is covered by a six (6) month
parts and labor limited warranty. Dichroic filters and LithoPatterns® high resolution
glass gobos are not guaranteed against breakage or scratches to coating. It is the owner’s
responsibility to furnish receipts or invoices for verification of purchase, date, and
dealer or distributor. If purchase date cannot be provided, date of manufacture will be
used to determine warranty period.
E%*6"+2+:.#+./*%&.F+$%".9#""#+*5.01".E%3#2"
It is necessary to obtain a Return Material Authorization number (RMA#) from your
dealer or point of purchase BEFORE any units are returned for repair. The manufacturer
will make the final determination as to whether or not the unit is covered by warranty.
Lamps are covered by the lamp manufacturer’s warranty.
Any Product unit or parts returned to High End Systems must be packaged in a suitable
manner to ensure the protection of such Product unit or parts, and such package shall be
clearly and prominently marked to indicate that the package contains returned Product
32
!"#$%&'"()*+,-".+/(%0(1
units or parts and with a Return Material Authorization (RMA#) number. Accompany all
returned Product units or parts with a written explanation of the alleged problem or
malfunction. Ship returned Product units or parts to: 2105 Gracy Farms Lane, Austin, TX
78758 USA.
Please Note:
Freight Damage Claims are invalid for fixtures shipped in nonfactory boxes and packing materials.
,"%2:G*
All shipping will be paid by the purchaser. Items under warranty shall have return
shipping paid by the manufacturer only in the Continental United States. Under no
circumstances will freight collect shipments be accepted. Prepaid shipping does
not include rush expediting such as air freight. Air freight can be sent customer collect
in the Continental United States.
REPAIR OR REPLACEMENT AS PROVIDED FOR UNDER THIS WARRANTY IS THE EXCLUSIVE
REMEDY OF THE CONSUMER. HIGH END SYSTEMS, INC. MAKES NO WARRANTIES, EXPRESS
OR IMPLIED, WITH RESPECT TO ANY PRODUCT, AND HIGH END SPECIFICALLY DISCLAIMS
ANY WARRANTY OF MERCHANTABILITY OR FITNESS FOR A PARTICULAR PURPOSE. HIGH
END SHALL NOT BE LIABLE FOR ANY INDIRECT, INCIDENTAL OR CONSEQUENTIAL
DAMAGE, INCLUDING LOST PROFITS, SUSTAINED OR INCURRED IN CONNECTION WITH
ANY PRODUCT OR CAUSED BY PRODUCT DEFECTS OR THE PARTIAL OR TOTAL FAILURE OF
ANY PRODUCT REGARDLESS OF THE FORM OF ACTION, WHETHER IN CONTRACT, TORT
(INCLUDING NEGLIGENCE), STRICT LIABILITY OR OTHERWISE, AND WHETHER OR NOT
SUCH DAMAGE WAS FORESEEN OR UNFORESEEN.
Warranty is void if the product is misused, damaged, modified in any way, or for
unauthorized repairs or parts. This warranty gives you specific legal rights, and you may
also have other rights which vary from state to state.
!"#$%&'"()*+,-".+/(%0(1
322
B'C*#%/0%1/(-#(-"
6(-$/4),-./(
Features ........................................................................................intro-1
Symbols ........................................................................................intro-3
Document Conventions ................................................................intro-3
Contacting High End Systems ......................................................intro-4
1D'E-#$%@
F$#E'$.(5%-/%6("-'**%G/)$%H.I-)$#
Specifications .....................................................................................1-2
Optional Accessories ..........................................................................1-5
Unpacking the Fixture ........................................................................1-6
Installing the Power Cord Cap ............................................................1-7
Installing the Yoke ..............................................................................1-8
Setting the Fixture Voltage .............................................................. 1-10
Setting the Beam Angle .................................................................... 1-12
1D'E-#$%<
7#--.(5%!E%G/)$%H.I-)$#
Powering On the Fixture .....................................................................2-2
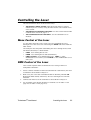
Overview of Controller Operation ......................................................2-4
Linking the Fixtures to the Controller ................................................2-7
Mounting the Fixture ..........................................................................2-8
Configuring the Fixture ................................................................... 2-13
Upgrading Software ......................................................................... 2-18
Troubleshooting .............................................................................. 2-20
1D'E-#$%J
!".(5%-D#%&#()"
Menu System Overview ......................................................................3-2
Menu Map ...........................................................................................3-3
Menu Options .................................................................................. 3-10
1D'E-#$%>
F$#"#-%F$/5$'22.(5
Programming Overview ......................................................................4-2
Creating a Scene .................................................................................4-4
Synchronizing Preset Playback ...........................................................4-9
Capturing Presets ............................................................................ 4-11
1D'E-#$%?
!".(5%-D#%K'"#$%L.2.(5%+#M.,#N%OKL+NP
Safety Precautions ..............................................................................5-2
3222
!"#$%&'"()*+,-".+/(%0(1
Overview ............................................................................................5-3
Controlling the Laser ..........................................................................5-5
Troubleshooting .................................................................................5-6
Maintenance .......................................................................................5-8
1D'E-#$%Q
7#$M.,.(5%G/)$%H.I-)$#
Precautions .........................................................................................6-2
Replacing Fuses ..................................................................................6-2
Replacing Wheel Components ............................................................6-4
Replacing the Lamp ......................................................................... 6-11
Cleaning the Internal Components .................................................. 6-15
Technobeam Laser Aiming Device™ ................................................ 6-19
LEE#(4.I%L +&R%F$/-/,/*"
General Information .......................................................................... A-1
Technobeam® Protocol ...................................................................... A-3
Technobeam-i™ Protocol ................................................................... A-7
MSpeed Movement Times ................................................................ A-12
Macro Channel Assignments ........................................................... A-15
Fixture Number to DMX Start Channel ............................................ A-16
LEE#(4.I%S H',-/$3T6("-'**#4%UD##*"
Technobeam™ Wheels ........................................................................B-1
LEE#(4.I%1 62E/$-'(-%7'0#-3%6(0/$2'-./(
English Version .................................................................................. C-1
Appendice C IMPORTANT: INFORMATIONS DE SÉCURITÉ ................. C-2
Anhang C Wichtige Hinweise Für Ihre Sicherheit ............................. C-3
Appendice C Importanti Informazioni Di Sicurezza ........................ C-4
Apéndice C Información Importante De Seguridad .......................... C-5
Vigtig Sikkerhedsinformation - DANMARK ........................................ C-6
6(4#I
!"#$%&'"()*+,-".+/(%0(1
24
B'C*#%/0%H.5)$#"
Figure 1-1. Identifying yoke components. ..................................................... 1-8
Figure 1-2. Installing the yoke on the fixture. ............................................... 1-9
Figure 1-3. Removing the door allows you to access the fixture’s voltage
selection switches, as well as wheels and optics. ................. 1-11
Figure 1-4. The three voltage selection switches located next to the LED
display. .................................................................................. 1-11
Figure 1-5. Setting the fixture’s voltage and frequency.............................. 1-11
Figure 1-6. The lens tube contains the zoom lenses. ................................. 1-12
Figure 1-7. Squeeze the two latches on each side of the lens tube to open
the cover. ............................................................................... 1-12
Figure 1-8. Components of the factory-installed 11 to 17 degree lens set. 1-13
Figure 2-1. The initial LED menu display shows the fixture’s software
version. ..................................................................................... 2-2
Figure 2-2. Location of the three status LEDs on the fixture’s access door... 2-3
Figure 2-3. Properly-constructed data cabling............................................... 2-5
Figure 2-4. Constructing a data cable terminator. ......................................... 2-6
Figure 2-5. Location of the DMX data in (male) and DMX data Out (female)
ports on the fixture’s rear panel. .............................................. 2-7
Figure 2-6. Connecting fixtures to a controller. Make sure you terminate
the last fixture in the link. ........................................................ 2-8
Figure 2-7. Use a locking washer when attaching a fixture to a truss. ....... 2-10
Figure 2-8. Always use a safety cable when mounting the fixture. ............ 2-11
Figure 2-9. Location of the T-handle you use to adjust the yoke position. 2-11
Figure 2-10. You can slide the yoke all the way back to allow the fixture
to hang upside-down. ............................................................ 2-12
Figure 2-11. Menu navigation buttons. ....................................................... 2-13
Figure 2-12. This fixture has software version 3. ....................................... 2-20
Figure 2-13. Location of the fixture’s exhaust vent. ................................... 2-22
Figure 3-1. Technobeam navigation buttons. ................................................ 3-2
Figure 4-1. Making sure the shutter is open. ................................................. 4-5
Figure 4-2. A dot always appears in the LED display whenever preset
playback is on. .......................................................................... 4-9
Figure 4-3. When you set up fixtures for synchronized playback on a
DMX 512 link, one and only one fixture must be fixture
number 1 or DMX start channel 1. The last fixture on the
link must be terminated. ....................................................... 4-10
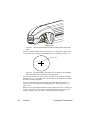
Figure 5-1. The laser light exits the through the same aperture as the
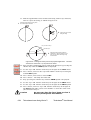
light beam. ................................................................................ 5-4
Figure 5-2. The ideal position of the laser is no more than 2” (5 cm)
directly above the center point of a perfectly round light
beam. ........................................................................................ 5-4
Figure 5-3. Removing the access door. .......................................................... 5-6
Figure 5-4. LAD wiring connections. .............................................................. 5-7
4
!"#$%&'"()*+,-".+/(%0(1
Figure 5-5. The laser aiming device circuit board. ........................................ 5-8
Figure 6-1. Removing the door allows you to access the fixture’s voltage
selection switches and fuses, as well as wheels and optics. .... 6-3
Figure 6-2. Locations of the three fuses on the circuit board........................ 6-4
Figure 6-3. Location of the wheels in Technobeam. ..................................... 6-5
Figure 6-4. Push the dichroic toward the large retaining tab to free it
from the wheel tabs. ................................................................. 6-6
Figure 6-5. You can easily tell which side of a dichroic is coated by placing
a pen or other object near the surface; on the coated side,
the reflection from the object will appear to touch the
object. ....................................................................................... 6-6
Figure 6-6. The rotating litho wheel and rotating effects wheel have
built-in plastic tabs that hold the spring in place. ................... 6-7
Figure 6-7. To replace a static litho in the rotating litho wheel, gently
separate the wheel and reach behind the wheel to push the
litho out. ................................................................................... 6-8
Figure 6-8. Location of the retaining tabs and slot that secure the static
litho in the rotating litho wheel. .............................................. 6-9
Figure 6-9. The gap between the two halves of the rotating litho wheel
must be uniform. ...................................................................... 6-9
Figure 6-10. An aperture ring, if required, must be placed on top of
the litho/effect and under the spring.................................... 6-10
Figure 6-11. When you replace a rotating litho or rotating effect, make
sure the tip of the spring is fully seated under the wheel
tabs; it cannot protrude from under the tabs........................ 6-10
Figure 6-12. Replacing a custom multi-colored litho in the metal holder. . 6-11
Figure 6-13. Loosening the lamp assembly screws gives you access to
the fixture lamp. .................................................................... 6-12
Figure 6-14. Removing the lamp assembly from the fixture. ..................... 6-12
Figure 6-15. Pull straight up on the lamp, grasping its ceramic base, to
remove it from the assembly................................................. 6-13
Figure 6-16. Hold the lamp by its ceramic base and gently press the two
base pins into the socket. ...................................................... 6-13
Figure 6-17. You can look at the lamp label text to make sure the lamp
plate is oriented correctly; incorrect orientation can result
in damage to the fixture and the lamp. ................................. 6-14
Figure 6-18. Lamp optimization screws...................................................... 6-15
Figure 6-19. Opening the fixture’s access door. ......................................... 6-16
Figure 6-20. Location of the anti-reflective glass, lenses and hot mirror... 6-17
Figure 6-21. The lens tube contains the zoom lenses. ............................... 6-17
Figure 6-22. Clean both sides of the hot mirror glass. ............................... 6-18
Figure 6-23. The ideal position of the laser is no more than 2” (5 cm)
directly above the center of a perfectly round light beam.... 6-19
Figure 6-24. High-voltage component location........................................... 6-20
Figure 6-25. Orient the fixture directly facing a wall no less than 10 ft.
(3 m) away.............................................................................. 6-21
!"#$%&'"()*+,-".+/(%0(1
42
Figure 6-26. Locating the center point of the projected light beam. The
laser should be no more than 2” (5 cm) above the center. .... 6-24
Figure 6-27. The laser aiming device assembly has three screws that can
be used to adjust the position of the laser............................ 6-25
Figure B-1. Factory configuration of the Technobeam rotating litho wheel. . B-1
Figure B-2. Factory configuration of the Technobeam color wheel. .............. B-2
Figure B-3. Factory configuration of the Technobeam rotating effects
wheel......................................................................................... B-2
B'C*#%/0%B'C*#"
Table 1-1. Optional Accessories .....................................................................1-5
Table 1-2. Beam Angles for Factory-Installed 11 to 17 Degree Lens Set ..... 1-14
Table 1-3. Beam Angles for Optional 8 to 12 Degree Narrow Angle Lens
Set ............................................................................................. 1-14
Table 2-1. Status LEDs ....................................................................................2-3
Table 2-2. Example: Determining the DMX Start Channel .......................... 2-16
Table 2-3. Example: Determining the Unique Fixture Number .................. 2-17
Table 2-4. Example of Wasted DMX Channels ............................................. 2-18
Table 3-1. Technobeam Menu Map ................................................................3-3
Table 6-1. Replacement Fuses ........................................................................6-2
Table 6-2. Fuse Failure Symptoms .................................................................6-3
Table A-1. Technobeam DMX Protocol .......................................................... A-3
Table A-2. Technobeam-i DMX Protocol ........................................................ A-8
Table A-3. MSpeed Movement Times .......................................................... A-13
Table A-4. Macro DMX Channel Assignments ............................................. A-15
Table A-5. Fixture Number to DMX Start Channel Conversion ................... A-16
422
!"#$%&'"()*+,-".+/(%0(1
!"#$%&'(#)%"
Congratulations on your purchase of the Technobeam® automated
luminaire. Since 1989, High End Systems® has enjoyed a reputation
within the professional lighting industry as the premier manufacturer
of intelligent lighting. This tradition of excellence is carried forward
with Technobeam.
For the first time ever, stunning light output and extended lamp life
are combined with superior photolithographic image projection quality
in a compact package destined to revolutionize intelligent lighting in
retail, themed environment, entertainment, architectural and other
applications.
Technobeam has a factory-installed standard lens set with 11° to 17°
beam angle, and an optional 8° to 12° narrow angle lens set. The
fixture’s remote focus provides razor sharp beam or image projection
at various trim heights and throw distances. As with all High End
Systems intelligent luminaires, Technobeam includes remotelycontrollable and programmable full optical dimming, fade-to-black,
and variable-speed strobe effects.
,%#*6"%(
Programming
•
On-board sixteen scene memory for controller-free, stand-alone
operation.
•
High-resolution DMX 512 control, with optional reduced-channel
protocol.
•
DMX 512 protocol and onboard programming each feature 28
fixture-specific macros (unique combinations of constructs) to
simplify programming.
Optics and Effects
•
Two-piece clear anodized elliptical/spherical reflector system
(patent pending) delivers a remarkable (>50%) gain in light output
compared with the elliptical reflectors used in other fixtures of this
type.
•
Factory-installed 11° to 17° lens set.
•
Optional 8° to 12° narrow angle lens set.
!"#$%&'"()*+,-".+/(%0(1
!"#$%&'(#)%" 5%6.&*7
•
Mirror head providing 180° pan, 95° tilt.
•
12 saturated dichroic colors—including a 3000K color correction
filter—plus open position.
•
Rotating 8-position LithoPatterns® wheel features 7 replaceable
positions plus open.
•
Optional static litho in each of the 7 replaceable rotating litho
positions for layered moire and multi-focus effects.
•
Effects wheel features five replaceable, rotating effects—including
frost, lenticular, and hammered.
•
Optional open slot at one or more effects positions.
•
Improved flat field beam performance.
Note
All beam angles are accurate to ±1°.
Construction
•
Lens tube, wheel gears, front and rear bezels manufactured from
lightweight, rugged, engineering thermopolymer.
•
Tough powder-coated aluminum side panels.
•
Molded handles for easy transportation, lifting and mounting.
Lamp
High End Systems recommends you use an M series, GY9.5 base, 250watt metal halide arc lamp (such as the MSD 250-2) which provides
6500K stable operation and extended lamp life.
The lamp can be remotely switched off, conserving approximately 70%
of the power to the unit compared to the lamp being on.
Other features
•
Remote focus
•
Full dimming and fade-to-black
•
Variable-speed strobe
•
Yoke assembly features sliding track for mounting flexibility
•
Available as standard in black or white
•
Power factor correction
•
Self-adjusting fan speed to compensate for ambient temperature
conditions
5%6.&89 !"#$%&'(#)%"
!"#$%&'"()*+,-".+/(%0(1
45&H1C(
This section explains symbols used in this manual:
Appears adjacent to Caution messages. A Caution is an advisory
provided to protect the equipment; failure to heed a Caution message
could result in damage to the equipment and possibly injury to
persons.
Appears adjacent to Electrical Shock hazards. Failure to heed these
messages could result in injury to persons.
Appears adjacent to Explosion warnings. Failure to heed these
messages could result in injury to persons.
Indicates that eye and hand protection is required. Failure to do so
could result in injury to persons.
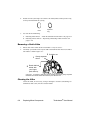
>176&%+*.-1+A%+*21+(
1/(M#(-./(
&#'(.(5
;<"=>
/"%0+<"=-+(."+2%?2#(6"?+'"6@""%+'.(#"-A++B&.+"4()C1"D+
6$"+;E%6".>+<"=+&%+6$"+F2460."G-+<"=+C(?A
S8K+
S8K++6=C"+2-+0-"?+6&+2%?2#(6"+-"1"#62&%-+=&0+)(<"+2%+6$"+
)"%0+-=-6")A
!"#$%&'"()*+,-".+/(%0(1
!"#$%&'(#)%" 5%6.&*:
-1+*#7*2+:.I2:G.;+$.45(*%&(
!V7V%'(4%-D#%L2#$.,'"
7'*#"W
I2J$+E%?+K=-6")-D+5%#A
97LM+N.(#=+B(.)-+O(%"
P0-62%D+!Q++RSRMS
3&2#"T
BPQT
UM79V+S:W899H9
UM79V+S:R8M9XL
1)"-/2#$%7#$M.,#W
I2J$+E%?+K=-6")-D+5%#A
97LM+N.(#=+B(.)-+O(%"
P0-62%D+!Q+RSRMS
3&2#"T
9H8$&0.+BPQT
9H8$&0.+3&2#"+)(21T
&.++
USLLV+SXL8SXSX
UM79V+S:H8X7XM
UM79V+S:R8:LW:+
USLLV+SXL8SXSX
U#"-%1/'"-W
I2J$+E%?+K=-6")-D+5%#A
S9LL+I(-<"11+P3"%0"
Y(%+Z0=-D+[P+X7HLW
3&2#"T
BPQT+
US7SV+XHR8LMML
US7SV+XLS8SXRM
7.(5'E/$#
I2J$+E%?+K=-6")-D+K2%J(C&."+\!EA+O!?A
7+!(%%".=+]&(?+LW8LM
["%#&%+7
K2%J(C&."+7::H
3&2#"T
^WM+RH9+S9WW
BPQT
^WM+RH:+X:99
:)$/E#
I2J$+E%?+K=-6")-+E0.&C"+O!_A
M:+Z&.6$F2"1?+]&(?
O&%?&%+`7:
3&2#"T
^HH+9LASMRXAMWWM
F(4T
^HH+9LASMRXASHWX
U/$*4%U.4#%U#C
$66CTaa@@@A$2J$"%?A#&)
5%6.&8H !"#$%&'(#)%"
!"#$%&'"()*+,-".+/(%0(1
*+,-#.$/0!
1$.-,$)"2/#%/!"3#,44/
5%'$/6)7#'$.
Specifications ..................................................................................................1-2
Model Numbers ..................................................................................1-2
Dimensions (with yoke and handles) .................................................1-2
Weight (including yoke) ......................................................................1-2
Electrical Specifications .....................................................................1-2
Technobeam Laser Aiming Device™ (LAD™) ......................................1-2
LAD Safety Standards ............................................................1-3
Important Power Cord Information - U.K. Only ..................................1-3
Vigtig Sikkerhedsinformation - DANMARK ............................1-3
Dichroic, Litho and Effects Specifications ..........................................1-4
Safety Standards .................................................................................1-4
Electromagnetic Standards .................................................................1-4
Environmental Specifications .............................................................1-5
DMX Data Cabling ...............................................................................1-5
Controllers .........................................................................................1-5
Optional Accessories .......................................................................................1-5
Unpacking the Fixture .....................................................................................1-6
Save the Shipping Materials ...............................................................1-6
Inspecting the Contents .....................................................................1-7
Installing the Power Cord Cap ........................................................................1-7
Important Power Cord Cap Information - U.K. Only ...........................1-7
VIGTIG FIKKER HEDS INFORMATION - DANMARK ...............................1-8
Installing the Yoke ..........................................................................................1-8
Setting the Fixture Voltage ........................................................................... 1-10
Setting the Beam Angle ................................................................................ 1-12
!"#$%&'"()*+,-".+/(%0(1
7*7
43%72027#*21+(
81$%C.J6&H%"(
Model:
Technobeam
Manufacturer:
High End Systems, Inc.®
Distributor:
High End Systems, Inc.
2105 Gracy Farms Lane
Austin, Texas, 78758 USA
>2&%+(21+(.K?2*G.51'%.#+$.G#+$C%(L
in:
cm:
34 L x 13 H x 16 W
86 L x 33 H x 41 W
The height of the fixture without the yoke is 9.6 in. (24
cm).
Note
9%2:G*.K2+7C6$2+:.51'%L
41 lbs (19 kg)
;C%7*"27#C.43%72027#*21+(
•
•
•
•
•
100/120/230 V; 50 Hz; 3.75/3.13/1.6 A
100/120/208 V; 60 Hz; 3.75/3.13/1.8 A
Rated power:
375 W
Power factor, 120V, 60 Hz: 0.96
Power factor, 230V, 50 Hz: 0.90
Fuses:
Voltages:
•
•
•
F1—125V, 4.0A, Fast Blow Only (5mm x 20mm)
F2—250V, 2.5A, Fast Blow Only (5mm x 20mm)
F3—250V, 6.3A, Slow Blow Only (5mm x 20mm)
Class I equipment - This equipment must be earthed.
!%7G+1H%#&.=#(%".@2&2+:.
>%A27%M.K=@>ML
!/
The specifications below apply only to Technobeam fixtures that have
the Laser Aiming Device (LAD) installed.
•
•
789
Class 3a laser product
Beam divergence angle: 0.2mRad to 0.3mRad
+,-().)(/#)%"0
!"#$%&'"()*+,-".+/(%0(1
•
•
•
•
•
Maximum output (continuous): 5mW at 630-650nm
Maximum output (pulsed): <2.5mW
Pulse modulation: 4.25Hz to 255Hz @ 50% duty cycle
Pulse duration: 1.96ms to 117ms
Pulse energy: 9.8µJ to 585µJ
!"#$%&'()*$%)&+,&-,.
•
•
EN60825-1, 1994
21 CFR 1040
PYb5_
EQ\bK,]E
O(-".+.(?2(62&%+2-+")266"?+F.&)+6$2-+(C".60."
12)00)%"3)"&)(/#%$
+L=;:X
OPKE]+]P_5P!5bZ+8+_b+Zb!
K!P]E+5Z!b+dEP/+b]
Y5E`+_5]E[!Oc+`5!I
b\!5[PO+5ZK!],/EZ!K
OPKE]+]P_5P!5bZ+8+PYb5_
_5]E[!+EcE+EQ\bK,]E
/(4+&06C06T++M)`+(6+W:L8WML+%)
[OPKK+:(+OPKE]+\]b_,[!
/(4+&06C06T++M)`+(6+W:L8WML+%)
[OPKK+:(+OPKE]+\]b_,[!
[".6A+6&+EZ+WLS9M87D+7XXH
(%?+97+[B]+7LHL
O(-".+(2)2%J+?"32#"+(--")'1=
U2%-2?"+F2460."V
/&31"*#+*.)1?%".-1"$./+01"&#*21+.N.FOPO.Q+C5
IMPORTANT The cores in the mains lead are colored in accordance
with the following code:
•
•
•
green and yellow: earth
blue: neutral
brown: live
This equipment must be earthed.
/01)01$%022(-3(,.0+'4-5&)04+$6$#"78"9:
Advarsel: Beskyttelse mod elektrisk chock.
Vigtigt!
Lederen med gul/groen isolation maa kun tilsluttes en klemme maerket
eller!
!"#$%&'"()*+,-".+/(%0(1
+,-().)(/#)%"0
7*:
>27G"127R.=2*G1.#+$.;00%7*(.43%72027#*21+(
You can install any High End Systems-manufactured solid dichroic
filters, effects LithoPatterns lithos, ArtGlass, or Fusion Fire®—as long
as they were manufactured for use with Technobeam and not another
fixture; otherwise, the dichroics, lithos or effects might not fit in the
wheels properly.
You can also install gobos or lithos from other manufacturers as long
as they adhere to the following specifications:
Dichroics
•
•
Diameter: 1.125” ± 0.010” (28.5 mm ± 0.25 mm)
Thickness: 0.069” ± 0.010” (1.8 mm ± 0.25 mm)
Lithos
•
•
•
Diameter/image area: 0.996”/0.860” ± 0.005” (25 mm/22 mm ±
0.13 mm)
Maximum thickness (rotating litho only): 0.105” ± 0.005” (2.7
mm ± 0.13 mm)
Thickness (static litho only): 0.069” ± 0.010” (1.8 mm ± 0.25
mm)
Rotating effects wheel
•
•
Diameter/image area: 1.43”/1.04” ± 0.010” (36 mm/26 mm ±
0.25 mm)
Maximum thickness: 0.175” ± 0.010” (4.4 mm ± 0.25 mm)
4#0%*5.4*#+$#"$(
Technobeam conforms to:
•
•
•
•
EN 60598-1 : 1993
EN 60598-2-17 : 1989
A1-A3 : 1993
ANSI/UL-1572
CAN/CSA C22.2 No. 9
;C%7*"1&#:+%*27.4*#+$#"$(
•
•
•
78H
EN 55022, Class A ITE
IEC 801-2, 1991 Level 2 (4/8 kV)
IEC 801-3, Draft 5 Level 2 (3 V/m)
• IEC 801-4, 1988 Level 2 (1 kV/0.5 kV)
+,-().)(/#)%"0
!"#$%&'"()*+,-".+/(%0(1
;+A2"1+&%+*#C.43%72027#*21+(
Maximum ambient temperature (Ta):
Maximum exterior surface temperature:
Minimum distance to flammable objects:
Minimum distance to lighted object:
50° C (122° F)
70° C (158° F)
1.0 m (3.28 ft)
1.0 m (3.28 ft)
>8S.>#*#.-#HC2+:
•
DMX data cables: Belden® 9841 or equivalent (meets
specifications for EIA RS-485 applications) with characteristics
listed below:
•
•
•
•
•
•
2-conductor, twisted pair plus a shield
maximum capacitance between conductors - 30 pF/ft.
maximum capacitance between conductor & shield - 55 pF/ft.
maximum resistance of 20 "/1000 ft.
nominal impedance 100–140 "
22–24 AWG with insulation having a dielectric rating of 300
volts or higher
•
DMX data connectors: 3-pin male and female XLR connectors
•
DMX data terminators: Male XLR connector with 120 ohm
terminator between pins 2 and 3 (see Figure 2-4 on page 2-6)
-1+*"1CC%"(
Technobeam may be controlled with any of the following:
•
•
•
•
The WholeHog III® lighting console
The Hog PC controller
The Technobeam LCD controller
Another DMX 512-compatible controller
Q3*21+#C.@77%((1"2%(
Table 1-1 below shows the optional accessories for Technobeam,
available from your High End Systems® dealer/distributor:
7/85-39*9:334,#)%"/536((-00%$)-0
='2#
bC62&%(1+1"%-+-"6]"C1(#")"%6+/K_+9ML89+1()C
[0-6&)+#&1&.+@$""1+?2#$.&2#+F216".-
!"#$%&'"()*+,-".+/(%0(1
F'$-%=)2C#$
[(11e
[(11e
[(11e
4,#)%"/536((-00%$)-0
7*M
7/85-39*9:334,#)%"/536((-00%$)-0
='2#
O26$&\(66".%EFF"#6!"#$%&'"()+O[_+#&%6.&11".
O(-".+P2)2%J+_"32#"+F&.+!"#$%&'"()+&%1=f
I&J+\[+12J$62%J+#&%6.&11".
`$&1"+I&J+555+12J$62%J+#&%-&1"
I"(3=+?06=+:8C2%+QO]+#('1"+U7LGV
I"(3=+?06=+:8C2%+QO]+#('1"+U9MGV
I"(3=+?06=+:8C2%+QO]+#('1"+UMLGV
I"(3=+?06=+:8C2%+QO]+#('1"+U7LLGV
_"104"+[8#1()C
N(13(%2g"?+-(F"6=+#('1"
O2J$6@(3"+]"-"(.#$+,C1&(?+_&%J1"
F'$-%=)2C#$
[(11e
[(11e
9XL9LLL7
9XLWLLL9
[(11e
[(11e
MMLMLLLM
MMLMLLLW
MMLMLLLR
MMLMLLLS
MMLLLLLH
79LHLLL7
9WLHLLL9
†
- You must obtain the Laser Aiming Device from High End Systems
Customer Service; see “Contacting High End Systems” on page Intro-4.
Call* - Contact either your High End Systems dealer/distributor, High
End Systems Sales, or the High End Systems World Wide Web site.
F+3#7'2+:.*G%.,2T*6"%
Unpack the Technobeam box and verify that the contents arrived
complete and without any damage.
4#A%.*G%.4G2332+:.8#*%"2#C(
Do not discard the shipping carton and packing materials. The carton
and packing materials are specifically designed to protect the product
during transport.
High End Systems, Inc. assumes no responsibility for products
damaged during transport. Therefore, you should return a product for
repair in its original shipping carton and packing materials.
Note
78W
Before sending anything to the factory, call your HES
dealer/distributor for a Return Material Authorization
(RMA) number. The factory cannot accept any goods
shipped without an RMA number.
;",/(<)"=3#>-3?)@#'$-
!"#$%&'"()*+,-".+/(%0(1
/+(3%7*2+:.*G%.-1+*%+*(
Carefully unpack the carton and inspect the contents for damage. If
any items in the list below are missing or damaged you must notify
both the shipping agent and your sales agent immediately.
•
One Technobeam fixture.
•
Separate yoke packaging: one yoke, two yoke slide bezels, two
allen screws, two T-handles.
/+(*#CC2+:.*G%.)1?%".-1"$.-#3
IMPORTANT The cores in the mains lead are colored in accordance
with the following code:
•
•
•
green and yellow: earth
blue: neutral
brown: live
In some cases, you must obtain and install a power cord cap before you
can connect your fixture to a power outlet. The type of power cord cap
you must obtain depends on the location in which you will use
Technobeam; different locations (even within the same country) might
have different power cord cap requirements.
Note
Because of the wide variety of power cord caps used
worldwide, High End Systems, Inc. cannot make specific
recommendations for the particular power cord cap you
should use. Contact a local authority if you are unsure
which type of power cord cap you need.
/&31"*#+*.)1?%".-1"$.-#3./+01"&#*21+.N.FOPO.
Q+C5
Since the colors of the cores in the mains lead of this equipment may
not correspond with the colored markings identifying the terminals in
your plug, proceed as follows:
•
The core which is colored green and yellow must be connected to
the terminal in the plug which is marked with the letter “E” or by
, or colored green or green and yellow.
the earth symbol
•
The core which is colored blue must be connected to the terminal
which is marked with the letter “N” or colored black.
!"#$%&'"()*+,-".+/(%0(1
!"0#/55)"=3#>-3A%B-$3C%$&3C/,
7*R
•
The core which is colored brown must be connected to the terminal
which is marked with the letter “L” or colored red.
Class 1 equipment: This equipment must be earthed.
U/<!/<.,/PP;E.I;>4./J,QE8@!/QJ.N.
>@J8@EP
Advarsel: Beskyttelse mod elektrisk chock.
Vigtigt!
Lederne med gul/groen isolation maa kun tilsluttes en klemme maerket
eller
/+(*#CC2+:.*G%.V1'%
!"#$%&''$())*+
"()$,-./$0'')($%1)(23
This section explains how to install the moving-track yoke. You can
adjust the yoke however you want to distribute the weight of the
fixture. You can even slide the yoke all the way to the end of the
fixture to hang it straight down.
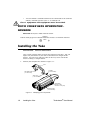
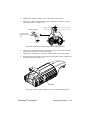
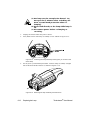
1.
Identify the components shown in Figure 1-1:
c&<"
!8$(%?1"
U7+&%+"(#$+-2?"V
c&<"+-12?"+'"g"1
U7+&%+"(#$+-2?"V
P11"%+-#."@
U7+&%+"(#$+-2?"V
K2?"+$(%?1"
U1&&-"%+9+(11"%
-#."@-+6&+)&3"+=&<"V
/&0%62%J+$&1"U9+&%+"(#$+-2?"V
?)='$-39*9:33!&-"#).E)"=3E%<-3(%2,%"-"#0:
78S
!"0#/55)"=3#>-3D%<-
!"#$%&'"()*+,-".+/(%0(1
2.
Use a 1/4” allen wrench to attach one allen screw to each side of the
fixture (but do not fully tighten it), as shown in Figure 1-2. Make sure
you place a yoke slide bezel between the yoke and each side of the
fixture.
?)='$-39*F:33!"0#/55)"=3#>-3E%<-3%"3#>-3.)@#'$-:
3.
Manually screw one T-handle into each side of the fixture. Do not fully
tighten the T-handles.
4.
If you want to reposition the yoke, use a 1/4” allen wrench to loosen
the allen screws on the side handles shown in Figure 1-1 on page 1-8.
5.
After loosening the side handle allen screws, slide the yoke to the
desired position. If you want to hang the fixture straight down, see the
section titled “Hanging the Fixture Straight Down” on page 2-12 now.
6.
Make sure the yoke is even (i.e., the same distance from the rear of the
fixture on both sides).
7.
Securely tighten the four side handle allen screws (two on each side).
8.
Tilt the fixture to the desired angle, then securely tighten the other
allen screws and T-handle.
!"#$%&'"()*+,-".+/(%0(1
!"0#/55)"=3#>-3D%<-
7*X
4%**2+:.*G%.,2T*6"%.U1C*#:%
Technobeam is shipped from the factory set for 230V, 50Hz and offer
the following switch-selectable voltage/frequency settings:
230 V, 50 Hz
100 V, 50 Hz
120 V, 50 Hz
208 V, 60 Hz
100 V, 60 Hz
120 V, 60 Hz
The recommended fuse F3 for all voltages and frequencies is:
F3 - 250V, 6.3A, Slow Blow Only.
WARNINGS
(1) Check the voltage setting before
proceeding with equipment setup!
(2) The information in this section is
intended to assist qualified service
personnel because this fixture is to be
serviced by qualified service personnel only.
(3) Disconnect power before re-lamping or
servicing.
(4) Replace fuses with specified type and
rating only.
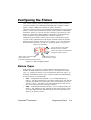
1.
Make sure the fixture is disconnected from the power outlet before
proceeding.
2.
Lay the fixture on its back and locate the door retaining screw, as
shown in Figure 1-3. Loosen the screw and remove the access door.
787L
+-##)"=3#>-3?)@#'$-3G%5#/=-
!"#$%&'"()*+,-".+/(%0(1
_&&.+."6(2%2%J+-#."@
P##"--+?&&.
?)='$-39*H:33I-2%J)"=3#>-3&%%$3/55%B03E%'3#%3/((-003#>-3.)@#'$-K03J%5#/=-3
0-5-(#)%"30B)#(>-0L3/03B-553/03B>--503/"&3%,#)(0:
3.
Locate the three switch blocks—labeled SW1, SW2 and SW3—by the LED
display, as shown in Figure 1-4:
?)='$-39*M:337>-3#>$--3J%5#/=-30-5-(#)%"30B)#(>-035%(/#-&3"-@#3#%3#>-3N1O3
&)0,5/E:
4.
Choose a voltage/frequency setting as shown in Figure 1-5:
Top of
fixture
?)='$-39*P:33+-##)"=3#>-3.)@#'$-K03J%5#/=-3/"&3.$-Q'-"(E:
5.
Replace the access door, unless you want to install the optional narrow
lens set or set the beam angle as shown in the next section.
!"#$%&'"()*+,-".+/(%0(1
+-##)"=3#>-3?)@#'$-3G%5#/=-
7*77
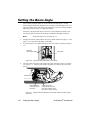
4%**2+:.*G%.W%#&.@+:C%
This section explains how to set the fixture’s beam angle. (It also
shows how to install the optional 8 to 12 degree narrow angle lens set.)
You can change the beam angle, for example, if you are having trouble
focusing precisely on a very detailed image.
Selecting a larger beam angle results in a larger-diameter image, but
can also result in some loss of image resolution and light intensity.
Note
All beam angles are accurate to ±1°.
1.
Unplug the fixture and remove the access door shown in Figure 1-3 on
page 1-11 if you have not done so already.
2.
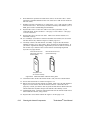
Lay the fixture on its back and locate the lens tube as shown in Figure
1-6.
O(6#$"U9+&%+"(#$+-2?"V
O"%-+60'"
?)='$-39*S:337>-35-"03#'8-3(%"#/)"03#>-3T%%235-"0-0:
3.
The lens tube cover has two latches on each side that secure it in place;
see Figure 1-7. Squeeze the latches together to remove the lens tube
cover.
Kh0""g"+1(6#$"-+
U9+&%+"(#$+-2?"+&F
1"%-+60'"V
B�-+?.23"+-#."@
1&#(6"?+0%?".+1"%-+60'"
U60.%+?.23"+-#."@+6&+)&3"
1"%-+60'"+F&.+"(-2".+(##"--V
?)='$-39*U:33+Q'--T-3#>-3#B%35/#(>-03%"3-/(>30)&-3%.3#>-35-"03#'8-3#%3%,-"3
#>-3(%J-$:
7879
+-##)"=3#>-3R-/236"=5-
!"#$%&'"()*+,-".+/(%0(1
Hint
4.
If the latches are difficult to access, reach under the lens
tube and manually turn the focus drive screw to move
the lens tube toward the rotating effects wheel.
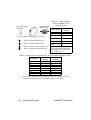
The factory-installed 11 to 17 degree lens set is shown Figure 1-8:
O"%-+60'"+#&3".
]"(.+1"%-"UF&.+77+6&+7R
?"J.""+1"%-"6+&%1=V
65B/E035-/J-3
#>-0-35-"0-0
)"305%#39
P..&@+C&2%6-+6&
F.&%6+&F+F2460."
B.&%6+1"%W%J-3#>)035-"03#%3(>/"=#>-38-/23/"=5-
?)='$-39*V:33C%2,%"-"#03%.3#>-3./(#%$E*)"0#/55-&3993#%39U3&-=$--35-"030-#:
5.
6.
This step applies to the optional 8 to 12 degree narrow angle lens set
only.
a.
Remove all lenses shown in Figure 1-8 and put them in a safe place
where they will not get scratched.
b.
Use Table 1-3 on page 1-14 to install the two lenses in the 8 to 12
degree narrow angle lens set. The name and orientation of each
lens is printed on the side of the lens. The arrow printed on each
lens must point toward the aperture (i.e., away from the lamp).
Lens positions in the lens tube are numbered from 1 to 10, both on the
lens tube cover and on the bottom portion of the lens tube. Use those
numbers in either Table 1-2 on page 1-14 or Table 1-3 on page 1-14 to
move the lenses to correspond with the desired beam angle. The arrow
printed on the lens must point toward the front of the fixture (i.e.,
away from the lamp).
Caution
Handle the lenses by the edge only.
Fingerprints can result in lower image
quality. Use only a soft, lint-free cotton
cloth to clean lenses. Use a mild glass
cleaning solution if necessary to clean builtup dust or dirt.
!"#$%&'"()*+,-".+/(%0(1
+-##)"=3#>-3R-/236"=5-
7*7:
PC".60."+U(..&@+
C&2%6-+6&@(.?V
O()C+U(..&@+C&2%6-+
(@(=+F.&)V
7/85-39*F:33R-/236"=5-03.%$3
?/(#%$E*!"0#/55-&3993#%39U3
O-=$--3N-"03+-#
H$/(-%K#("%
F/".-./(Y
S#'2%L(5*#
b%"+&F+6$"+F&11&@2%J+@211+'"+C.2%6"?+&%+"(#$+1"%-T
B+++`++
B.&%6+1"%-D+F(#6&.=82%-6(11"?+1"%-+-"6
]+++`+
]"(.+1"%-D+F(#6&.=82%-6(11"?+1"%-+-"6
B+++Z++
B.&%6+1"%-D+&C62&%(1+%(..&@+(%J1"+1"%-+-"6
]+++Z++
]"(.+1"%-D+&C62&%(1+%(..&@+(%J1"+1"%-+-"6
77AMi
7L
7:AMi
S
7Mi
W
7WAMi
H
7RAMi
:
e+8+B&.+6$"+77+6&+7R+?"J.""+1"%-+
-"6D+6$"+."(.+1"%-"-+)0-6+(1@(=-+
'"+C1(#"?+2%+-1&6+7+U-""+B2J0."+
78S+&%+C(J"+787:V:
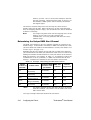
7/85-39*H:33R-/236"=5-03.%$34,#)%"/53V3#%39F3O-=$--3X/$$%B36"=5-3N-"03+-#
X#'$%K#("%
F/".-./(
S#'2%L(5*#
Si
SAWi
XA7i
XARi
7LA:i
7LASi
77AHi
79i
7.
787H
7
9
9
9
:
:
:
:
H$/(-%K#("%
F/".-./(
7L
7L
X
S
S
R
W
M
When you are finished, replace the lens tube cover, making sure to
point the arrow on the cover toward the front of the fixture.
+-##)"=3#>-3R-/236"=5-
!"#$%&'"()*+,-".+/(%0(1
*+,-#.$/8!
9.##)"2/:-/5%'$/6)7#'$.
Powering On the Fixture .................................................................................2-2
Homing the Fixture .............................................................................2-2
LED Display ........................................................................................2-2
Status LEDs .........................................................................................2-3
Overview of Controller Operation ...................................................................2-4
What is DMX 512 Protocol? .................................................................2-4
What Kind of Cabling Should You Use? ..............................................2-4
Constructing Cabling .............................................................2-5
Terminators ...........................................................................2-5
Setting up the Link .............................................................................2-6
Linking the Fixtures to the Controller ............................................................2-7
Mounting the Fixture .......................................................................................2-8
Standing the Fixture on its End Handles ............................................2-9
Mounting the Fixture on a Truss or Other Support System ...............2-9
Hanging the Fixture Straight Down ................................................. 2-12
Configuring the Fixture ................................................................................ 2-13
Fixture Types ................................................................................... 2-13
Selecting a Control Method ............................................................. 2-14
DMX Start Channel Control Method .................................... 2-14
Fixture Number Control Method ......................................... 2-14
Assigning a Fixture Address ............................................................ 2-15
Channel Range .................................................................... 2-15
Determining the Unique DMX Start Channel ...................... 2-16
Determining the Unique Fixture Number ........................... 2-17
Wasted DMX Channels ........................................................ 2-17
Upgrading Software ...................................................................................... 2-18
Crossloading Software ..................................................................... 2-19
Troubleshooting ........................................................................................... 2-20
Troubleshooting DMX Data ............................................................. 2-24
Menu Error Messages ....................................................................... 2-25
Addr Lost ............................................................................ 2-25
Boot Diff ............................................................................. 2-25
EMEM Ack ............................................................................ 2-26
EMEM [message] .................................................................. 2-26
Erse Flsh ............................................................................. 2-26
ID Lost ................................................................................. 2-26
Lamp ................................................................................... 2-27
Link Busy ............................................................................ 2-27
Link Empty .......................................................................... 2-27
Over Temp .......................................................................... 2-28
PRST Lost ............................................................................ 2-28
PGRM Time .......................................................................... 2-28
Shut Down .......................................................................... 2-28
!"#$%&'"()*+,-".+/(%0(1
9*7
)1?%"2+:.Q+.*G%.,2T*6"%
Do all of the following before powering on the fixture:
1.
Select the correct voltage and frequency settings for the power outlet
you will be using. See the section titled “Setting the Fixture Voltage” on
page 1-10.
2.
Install the appropriate power cord cap as described in the section
titled “Installing the Power Cord Cap” on page 1-7.
3.
Replace the access door shown in Figure 2-2 on page 2-3.
I1&2+:.*G%.,2T*6"%
Connect the fixture to an appropriately-rated power outlet; there is no
power switch. You will hear the sounds of the motors and gears as
they home. This is normal.
=;>.>2(3C#5
When the fixture has finished homing, the LED display should show the
fixture’s software version, similar to Figure 2-1:
]
/EZ,
EZ!E]
?)='$-3F*9:337>-3)")#)/53N1O32-"'3&)0,5/E30>%B03#>-3.)@#'$-K030%.#B/$-3
J-$0)%":
Note
The LED display will alternate between the version
number (shown above) and the fixture number or DMX
start channel unless an error occurs during start-up.
If the fixture fails to home, or if the menu displays an error message,
see the section titled “Troubleshooting” on page 2-20 now.
989
A%B-$)"=34"3#>-3?)@#'$-
!"#$%&'"()*+,-".+/(%0(1
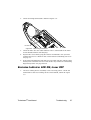
4*#*6(.=;>(
Technobeam fixtures have three status LEDs located on the access
door, as shown in Figure 2-2:
_&&.+."6(2%2%J+-#."@
P##"--+?&&.
?)='$-3F*F:33N%(/#)%"3%.3#>-3#>$--30#/#'03N1O03%"3#>-3.)@#'$-K03/((-003&%%$:
Table 2-1 describes the three status LEDs:
7/85-3F*9:33+#/#'03N1O0
K:+%('2#
/&6&.
7-'-#
-&12?+."?
!.(%-)26
]"#"23"
bBB
bBB
F12#<".2%J+="11&@
-&12?+="11&@
bBB
F12#<".2%J+J.""%
F$/C*#2%
6(4.,'-./(Z
+#",$.E-./(
Z&
!$"+)&6&.-+(."+."#"232%J+(?"h0(6"+
3&16(J"A
c"B0-"+&.+C&@".+F(210."A++K""+'"1&@A
Z&6+%"#"--(.21=e Z&+?(6(+2-+'"2%J+6.(%-)266"?A
Z&
P+-&F6@(."+#.&--1&(?+2-+6(<2%J+C1(#"A
c"-f
K&F6@(."+&.+$(.?@(."+F(210."A
Z&6+%"#"--(.21=e Z&+?(6(+2-+'"2%J+."#"23"?A
Z&
B2460."+2-+."#"232%J+?(6(A
If the LED states indicate a problem, see the section titled
“Troubleshooting” on page 2-20.
* - The Receive LED will not be ON unless the fixture is connected to a
DMX 512 link with a working controller. If you have already connected
!"#$%&'"()*+,-".+/(%0(1
A%B-$)"=34"3#>-3?)@#'$-
9*:
the fixture to a controller and are sending DMX 512 commands to the
fixture, and the Receive LED is OFF, see the section titled
“Troubleshooting” on page 2-20.
† - Unless this fixture is crossloading, the yellow Transmit LED should
never be ON solid. (The Transmit LED will flicker yellow if you have
enabled preset playback and the fixture is set for either fixture number
1 or DMX start channel 1. This is due to preset playback
synchronization, as described in “Synchronizing Preset Playback” on
page 4-9. Try unplugging the fixture, waiting a few minutes, then
plugging it back in. If the Transmit LED continues to be ON, contact
High End Systems Customer Service in one of the ways shown in the
section titled “Contacting High End Systems” on page Intro-4.
More information about crossloading software is shown in the section
titled “Upgrading Software” on page 2-18.
QA%"A2%?.10.-1+*"1CC%".Q3%"#*21+
In order to coordinate the playback of multiple Technobeam fixtures
from a central location, you need to connect the fixtures to a DMX 512compatible controller using XLR data-grade cabling.
9G#*.2(.>8S.XYZ.)"1*171C[
DMX 512 is an industry-standard protocol for controlling lighting
fixtures and other devices (such as lasers and hazers). Developed by
the United States Institute of Theatre Technology (USITT), DMX 512 is
supported by leading entertainment industry equipment
manufacturers.
DMX 512 (D for digital, MX for multiplex and 512 is the number of
channels per link) is a reliable, efficient and well-understood control
protocol. Its strength lies in its ability to control virtually any mix of
DMX-compatible devices on the same link using a DMX-compatible
controller.
9G#*.P2+$.10.-#HC2+:.4G16C$.V16.F(%[
There are two main types of cabling you can use: microphone cable
and data-grade cable. Although pin-compatible microphone cable is
suitable for small-scale designs, data cable is recommended, especially
for longer cable runs. Data cable is designed to carry a higher-quality
signal with less susceptibility to electromagnetic interference.
The cable you use should have the characteristics listed below:
•
•
98H
2-conductor twisted pair plus a shield
maximum capacitance between conductors - 30 pF/ft.
4J-$J)-B3%.3C%"#$%55-$34,-$/#)%"
!"#$%&'"()*+,-".+/(%0(1
•
•
•
•
maximum capacitance between conductor and shield - 55 pF/
ft.
maximum resistance of 20 "/1000 ft.
nominal impedance 100–140 "
22–24 AWG with insulation having a dielectric rating of 300
volts or higher
For example, Belden® 9841 data-grade cabling meets specifications for
EIA RS-485 applications and is highly recommended (or its equivalent)
for use with Technobeam.
;4+.)-<=)0+1$;&>?0+1
If you need to construct cabling, you must use a shielded, twoconductor cable with a male 3-pin XLR connector on one end and a
female 3-pin XLR connector on the other end. Pin 1 is the common
(cable shield), pin 2 is the data complement (negative), and pin 3 is the
data true (positive).
?)='$-3F*H:33A$%,-$5E*(%"0#$'(#-&3&/#/3(/85)"=:
You should test each cable with a voltage/ohm meter (VOM) to verify
correct polarity and to make sure that the negative and positive pins
are not grounded or shorted to the shield or to each other. Also, make
sure that pin 1 is shielded.
Caution
Do not connect anything to the ground lug
on the XLR connectors. Do not connect or
allow contact between the common (cable
shield) and the fixture’s chassis ground.
Grounding the common could cause a
ground loop and/or erratic behavior.
@(-50+&)4-.
The last device on each link must have a 120 ohm, 1/4 watt (minimum)
!"#$%&'"()*+,-".+/(%0(1
4J-$J)-B3%.3C%"#$%55-$34,-$/#)%"
9*M
terminator attached to its Data Out connector.
You can construct terminators by following the instructions below:
7A++b'6(2%+(+)(1"+QO]+#&%%"#6&.A
79
L"
+
9A++_2-(--")'1"+6$"+#&%%"#6&.A
:A++K&1?".+(+79L+&$)+."-2-6&.D+)2%2)0)
+++++&F+7aH+@(66D+'"6@""%+C2%-+9+(%?+:A
HA++]"(--")'1"+6$"+#&%%"#6&.A
MA++5%-6(11+6$"+6".)2%(6&.+2%+6$"+_(6(+b06
+++++C&.6+&F+6$"+1(-6+?"32#"+2%+6$"+12%<A
?)='$-3F*M:33C%"0#$'(#)"=3/3&/#/3(/85-3#-$2)"/#%$:
4%**2+:.63.*G%.=2+'
Follow the guidelines below when setting up the DMX link:
1.
Do not allow the DMX channel ranges (boundaries) used by two
different devices on the link to overlap. Overlapping boundaries can
disable one or both devices. See Chapter 3 for more information about
channel boundaries for Technobeam. Consult the documentation
provided with the other devices for their DMX channel ranges.
2.
You can assign two fixtures of the same type (for example, two
Technobeam fixtures both set to full protocol) to the same DMX
channel range if you want both fixtures to respond to control
commands in exactly the same way.
3.
Software uploads (updates): You must remove or bypass all
controllers, non-High End Systems fixtures, optoisolators and serial
data distributors on the link if you want to perform software uploads
or crossloads as described in the section titled “Upgrading Software”
on page 2-18.
Dataflash® AF1000 xenon strobes, Intellabeam® automated luminaires,
and Emulator® laser simulators will stop software uploads to
Technobeam fixtures farther down the link. Make sure you put all of
the Intellabeam fixtures, Emulator fixtures and AF1000 fixtures after
all of the Technobeam fixtures.
4.
98W
As long as you observe all of the rules above, you can use whatever
DMX channels and cabling scheme you want. You do not, for example,
have to assign the lowest DMX start channel to the fixture directly
connected to the controller. Use whatever channel and cabling scheme
is simplest and results in the least amount of cabling.
4J-$J)-B3%.3C%"#$%55-$34,-$/#)%"
!"#$%&'"()*+,-".+/(%0(1
=2+'2+:.*G%.,2T*6"%(.*1.*G%.
-1+*"1CC%"
Starting with the controller, link fixtures using the procedure below.
1.
Consult the documentation provided with the controller for the
procedure to connect XLR cable to its Data Out connector.
2.
Connect the female end of the XLR cable from the controller to the first
fixture’s male Data In connector.
3.
Connect the male end of another XLR cable to the first fixture’s female
Data Out connector.
4.
Continue connecting the Data Out connector from one fixture to the
Data In connector to the next fixture until you have linked all of the
Technobeam fixtures.
5.
Connect other devices to the Technobeam fixtures as desired, using
the instructions in the documentation provided with those devices.
Place a male 120 ohm terminator on the female Data Out connector of
the last device in the link. The procedure for making a terminator can
be found in the section titled “Terminators” on page 2-5.
_/Q+?(6(+2%+U)(1"V
/b_EO
B:1[=8S:L&
<\HLAAAAAA
KE]5PO
<JA]^%?A[_
BP[!b]c+KE!
B1
_P!E @9<`9\` j[
\(6"%6-+2--0"?+(%?+C"%?2%JA+ +K""+0-". +)(%0(1
F&.+12-62%J- A
_/Q+?(6(+&06+UF")(1"V
?)='$-3F*P:33N%(/#)%"3%.3#>-3OWY3&/#/3)"3Z2/5-[3/"&3OWY3&/#/34'#3Z.-2/5-[3
,%$#03%"3#>-3.)@#'$-K03$-/$3,/"-5:
!"#$%&'"()*+,-".+/(%0(1
N)"<)"=3#>-3?)@#'$-03#%3#>-3C%"#$%55-$
9*R
_(6(+b06
_(6(+5%
_(6(+5%
_(6(+b06
_(6(+b06
[&%6.&11".
_(6(+5%
_(6(+5%
_(6(+b06
!".)2%(6"+6$"
1 6 F2 6
?)='$-3F*S:33C%""-(#)"=3.)@#'$-03#%3/3(%"#$%55-$:33W/<-30'$-3E%'3#-$2)"/#-3#>-3
5/0#3.)@#'$-3)"3#>-35)"<:
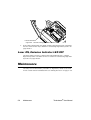
816+*2+:.*G%.,2T*6"%
!"#$%&''$())*+
4$"()$,-./$0'')($%1)(23
4$2'0567$0(*$708)9:$20;')$07$*)721&;)*$&($93&7
$7)29&"(
Your fixture is designed to be mounted in any orientation: you can
even hang it with its aperture pointing straight down or stand it on its
end handles. However you wish to mount the fixture, you must follow
the precautions and suggestions below:
•
•
Verify the input voltage you are using matches the fixture’s voltage
selection switches (see the section titled “Setting the Fixture
Voltage” on page 1-10).
Heed the warnings below to guard against personal injury and
damage to the fixture.
WARNINGS
(1) This equipment for connection to a
branch circuit having a maximum overload
protection of 20 A.
(2) Class I Equipment - This fixture must be
earthed.
98S
W%'"#)"=3#>-3?)@#'$-
!"#$%&'"()*+,-".+/(%0(1
(3) Mount the fixtures and controllers in a
location that is away from direct heat and
protected from moisture. Do not mount on a
flammable surface.
(4) Maintain minimum distance of 1.0 meter
(3.28 feet) from combustible materials.
(5) Observe minimum distance to lighted
objects of 1.0 meter (3.28 feet). This means
the fixture must be positioned at least 1
meter away from the object it is
illuminating.
(6) Use a secondary safety cable when
mounting this fixture.
4*#+$2+:.*G%.,2T*6"%.1+.2*(.;+$.I#+$C%(
The fixture’s end handles are designed to support its weight; however,
make sure you observe the following guidelines:
1.
The fixture must be located away from moving objects that could
strike it and cause it to become unbalanced.
2.
The fixture must be mounted on a sturdy, stable surface.
3.
If the surface is above floor height, make sure you use safety cables as
described in the next section.
816+*2+:.*G%.,2T*6"%.1+.#.!"6((.1".Q*G%".
46331"*.45(*%&
If you are mounting the fixture on a truss or another type of support,
do all of the following:
1.
Verify the truss or support will handle the weight of all the devices you
are mounting. Technobeam fixture weights are listed in the section
titled “Weight (including yoke)” on page 1-2.
2.
The use of user-supplied safety cable is strongly recommended. You
must supply your own safety cable and you must verify the cable is
capable of supporting the weight of the fixture as listed in the section
titled “Weight (including yoke)” on page 1-2. You can order galvanized
safety cables from your High End Systems dealer/distributor (see
“Optional Accessories” on page 1-5).
3.
You must supply your own clamps to attach the fixture to the support.
Verify that the clamp(s) you use are capable of supporting the weight
of the fixture as listed in the section titled “Weight (including yoke)” on
!"#$%&'"()*+,-".+/(%0(1
W%'"#)"=3#>-3?)@#'$-
9*X
page 1-2. You can order deluxe C-clamps for a two-inch truss from
your High End Systems dealer/distributor (part number 55000004).
Also see the section titled “Optional Accessories” on page 1-5.
4.
Make sure the fixture cannot be rotated all the way around (360o).
Allowing the fixture to rotate 360o could loosen the clamp mounting
bolts.
Note
Because of the variety of conceivable lighting designs,
you should consider the procedure below as a suggested
guideline only. High End Systems, Inc. cannot make
specific recommendations for your particular lighting
design or venue.
Suggested mounting procedure:
1.
Use two people to mount each fixture: one person to hold the fixture
while it is being secured in place, and one person to secure the fixture
to its support and to attach clamps and safety cables.
2.
Always stand on a firm, stable surface when mounting a fixture to its
support. The fixture should be at a height where you can comfortably
work on it, and should either be resting on a stable surface or held in a
stable manner. Do not allow one person to both support and mount the
fixture.
3.
Attach a suitable clamp through one of the holes on top of the yoke. If
you are attaching one clamp, use the middle hole on the yoke. If you
are attaching 2 clamps per fixture, attach one clamp to each of the
outer holes on the yoke. Use two locking washers per clamp when
attaching the clamp to the yoke.
!.0-[1()C+-"#0."1=+&%+6.0-,-"+6@&+U9V+1&#<2%J
@(-$".5%-".6+'&16+6$.&0J$+$&1"+2%+6&C+&F+=&<"
?)='$-3F*U:33;0-3/35%(<)"=3B/0>-$3B>-"3/##/(>)"=3/3.)@#'$-3#%3/3#$'00:
987L
W%'"#)"=3#>-3?)@#'$-
!"#$%&'"()*+,-".+/(%0(1
4.
Tighten the clamp(s) firmly to the yoke and to the support.
5.
Loop one or more suitable safety cables around the support and the
top of the yoke (see Figure 2-8).
7.4#%M.#a%/0%3/b#
O&&C+-(F"6=+#('1"+
6$.&0J$+(%=+&F+6$"-"+
$&1"-
B:1[=8S:L&
/b_EO
<\HLAAAAAA
KE]5PO
<JA]^%?A[_
BP[!b]c+KE!
B1
j[
_P!E @9<`9\`
\(6 "%6 -+2 --0"?+(%?+C"%?2%JA ++K""+ 0- ".+)(%0(1
F &.+ 12-6 2%J-A
?)='$-3F*V:3365B/E03'0-3/30/.-#E3(/85-3B>-"32%'"#)"=3#>-3.)@#'$-:
6.
Loosen the T-handles on each side of the fixture (see Figure 2-9) and
orient the fixture to the desired tilt angle.
7.
Tighten the T-handles to secure the fixture in the desired position.
8.
When you have the fixture in the position you want, firmly tighten the
T-handles shown in Figure 2-9.
!8$(%?1"
?)='$-3F*\:33N%(/#)%"3%.3#>-37*>/"&5-3E%'3'0-3#%3/&]'0#3#>-3E%<-3,%0)#)%":
!"#$%&'"()*+,-".+/(%0(1
W%'"#)"=3#>-3?)@#'$-
9*77
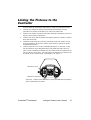
I#+:2+:.*G%.,2T*6"%.4*"#2:G*.>1?+
You can mount Technobeam with the mirror head perpendicular to the
ground for projection onto a stage. This orientation also allows you to
economize truss space by hanging fixtures side by side close to each
other.
You must observe all of the precautions listed on the previous pages
regarding clamps and safety cables.
Caution
You should adjust the yoke position while
the fixture is resting on a flat surface;
otherwise, the fixture may be damaged if it
slides backward.
1.
Use a 1/4” allen wrench to loosen the two yoke allen screws (see Figure
2-10).
2.
Use a 1/4” allen wrench to loosen the four handle allen screws (two on
each handle).
3.
Slide the yoke to the rear of the fixture.
4.
Loosen the T-handles on each side and rotate the yoke toward the rear
of the fixture.
!.0-K(F"6=+#('1"
c&<"+(11"%+-#."@
I(%?1"+(11"%+-#."@-
!8$(%?1"
?)='$-3F*9^:33D%'3(/"305)&-3#>-3E%<-3/553#>-3B/E38/(<3#%3/55%B3#>-3.)@#'$-3#%3
>/"=3',0)&-*&%B":
5.
9879
Tighten the allen screws and T-handles on both sides of the fixture,
then secure the fixture to the truss using a C-clamp with a locking
washer and safety cable as shown in Figure 2-10. When the fixture is
mounted like you want it, securely tighten the fixture’s T-handles.
W%'"#)"=3#>-3?)@#'$-
!"#$%&'"()*+,-".+/(%0(1
-1+02:6"2+:.*G%.,2T*6"%
This section explains how to configure your fixture for operation by
selecting a fixture type and control method and assigning a fixture
address (either a DMX start channel or fixture number).
You must select a fixture type and control method and assign a fixture
address if you want to control the fixture with a DMX 512-compatible
controller. However, you can skip this section if you plan to use the
fixture in stand-alone mode (without a controller) and program the
fixture using preset programming, as shown in Chapter 3.
Configuring your fixture requires you to access the fixture’s menu
system via the alphanumeric LED display and four menu navigation
buttons on the fixture’s front panel (see Figure 2-11). For a detailed
description of the menu system, see “Using the Menus” on page 3-1.
(1C$(%0)".2#+OE_+?2-C1(=
;,C>+(..&@+'066&%T+-#.&11+0C@(.?+
6$.&0J$+)"%0+26")-+&.+&C62&%;_&@%>+(..&@+'066&%T+-#.&11+?&@%@(.?
6$.&0J$+)"%0+26")-+&.+&C62&%/EZ,
;/"%0>+'066&%T+)&3"+'(#<+6&+6$"+
C."32&0-+)"%0+1"3"1
UC."--+(%?+$&1?+6&+"%6".+6$"+)"%0+-=-6")V
EZ!E]
;E%6".>+'066&%T+-"1"#6+6$"+
#0."%6+)"%0+26")+&.+&C62&%
?)='$-3F*99:33W-"'3"/J)=/#)%"38'##%"0:
,2T*6"%.!53%(
Each fixture uses a fixture-specific protocol which determines the
number of DMX channels the fixture will use. To change the fixture
type, see “Setting the Fixture Type and Protocol (TYPE)” on page 3-15.
Available Technobeam fixture types and the number of DMX channels
used per fixture are listed below:
•
•
TB F - Technobeam full protocol - uses 18 DMX channels per
fixture. The full protocol gives you more control over pan and tilt
position and litho spin speed and is for use with fixtures that do
not have an iris. You must select full protocol if you want to use
the Laser Aiming Device™ (LAD™) or macros
TB R - Technobeam reduced protocol - uses 14 DMX channels per
fixture. You should use this protocol if you need to conserve the
extra four DMX channels for other devices on the link, and your
fixtures do not have an iris.
!"#$%&'"()*+,-".+/(%0(1
C%".)='$)"=3#>-3?)@#'$-
9*7:
•
•
TB I - Technobeam iris protocol - uses 18 DMX channels per
fixture. This protocol should only be used with fixtures that have
an iris.
TLCD - Technopro LCD protocol - uses 18 DMX channels per
fixture. This protocol should only be used with Technopro fixtures
that are controlled with an LCD controller.
4%C%7*2+:.#.-1+*"1C.8%*G1$
You must select a control method for each fixture: either a DMX start
channel (recommended) or a fixture number (for a link with fixtures
that all use the same number of DMX channels).
Note
Once you choose a control method, you should use that
same control method for all the fixtures on a link.
#8A$%)&-)$;3&++(?$;4+)-4?$8()34,
If you plan to combine different types of devices (and/or protocols)
that use different numbers of channels on one DMX link, you should
use the DMX start channel control method. Using the DMX start
channel method to control your fixtures allows you to assign an
explicit start channel to each fixture, so no DMX channels are wasted.
For more information, see “Wasted DMX Channels” on page 2-17.
To select the DMX start channel control method:
1.
Press and hold the <Menu> button until “ADDR” appears on the LED
display.
2.
Using the <Up> and <Down> arrow buttons, scroll to the “SET” menu
and press the <Enter> button to select the “SET” menu.
3.
Using the <Up> and <Down> arrow buttons, scroll to the “CHNL” menu
and press the <Enter> button to select the “CHNL” menu.
4.
Using the <Up> and <Down> arrow buttons, scroll to the “DMX” option
and press the <Enter> button to select the “DMX” option.
Note
You must select a control method for each Technobeam
fixture on the link.
B0C)<-($7<5>(-$;4+)-4?$8()34,
When you use the fixture number control method, each fixture “thinks”
all other devices on the link use the same number of DMX channels that
it uses. Therefore, using the fixture number control method is a good
idea only if you plan to link fixtures that all use the same number of
DMX channels.
For example, assign fixture numbers if you have a link that only
controls Technobeams set to iris protocol (or other devices that use 18
DMX channels), or a link that only controls Technobeams set to
987H
C%".)='$)"=3#>-3?)@#'$-
!"#$%&'"()*+,-".+/(%0(1
reduced protocol (or other devices that use 14 channels per link).
To select the fixture number control method:
1.
Press and hold the <Menu> button until “ADDR” appears on the LED
display.
2.
Using the <Up> and <Down> arrow buttons, scroll to the “SET” menu
and press the <Enter> button to select the “SET” menu.
3.
Using the <Up> and <Down> arrow buttons, scroll to the “CHNL” menu
and press the <Enter> button to select the “CHNL” menu.
4.
Using the <Up> and <Down> arrow buttons, scroll to the “ADDR” option
and press the <Enter> button to select the “ADDR” option.
Note
You must select a control method for each Technobeam
fixture on the link.
@((2:+2+:.#.,2T*6"%.@$$"%((
The fixture’s address identifies each fixture’s channel range on the
DMX link. After you have selected a control method, you must assign a
DMX start channel or fixture number to each fixture:
•
If you chose the DMX start channel control method for the fixture,
you must assign each fixture a DMX start channel.
• If you chose the fixture number control method, you must assign
each fixture a fixture number.
You must assign a unique fixture address to each fixture that you want
to respond independently to controller commands. If you want two or
more fixtures to respond to controller commands in exactly the same
way, all fixtures must be the same type (for example two Technobeam
fixtures set to iris protocol) and must share the entire channel range.
;3&++(?$9&+1(
There are 512 available channels on each DMX link. These 512
channels are divided among all the devices in a particular link. The
number of channels each fixture requires is called the fixture’s channel
range. The size of each fixture’s channel range is determined by the
fixture type (see “Fixture Types” on page 2-13).
Each Technobeam set to full, iris, or LCD protocol reserves a block of
18 contiguous channels. Each Technobeam set to reduced protocol
reserves a block of 14 contiguous channels. Therefore, you can control
up to 28 Technobeam fixtures set to full, iris, or LCD protocol (512
DMX channels available / 18 channels used = 28.4 fixtures per link) or
up to 32 Technobeam fixtures set to reduced protocol*.
*Note
Although there are enough available DMX channels to
link up to 36 Technobeam fixtures in reduced protocol,
you must use a DMX splitter to connect more than 32
!"#$%&'"()*+,-".+/(%0(1
C%".)='$)"=3#>-3?)@#'$-
9*7M
fixtures per link. The 32 device limit complies with the
EIA-485 standard. Connecting more than 32 devices per
link without a DMX splitter will eventually deteriorate
the digital signal.
The fixture’s channel range must not overlap any other device’s
channel range on the link. When two devices on the same DMX link
have overlapping channel ranges, one or both devices will be disabled
or behave erratically.
The single exception to the non-overlapping rule is if the
fixtures are the same type (for example two
Technobeams set to iris protocol) and share the entire
channel range.
Note
#()(-50+0+1$)3($D+0E<($#8A$%)&-)$;3&++(?
The DMX start channel is the first channel available to a fixture in its
channel range. To determine each fixture’s DMX start channel in a link,
you must know the number of DMX channels used by each fixture (see
“Fixture Types” on page 2-13).
Knowing that the first fixture on the link will use DMX start channel 1,
you can determine the DMX start channel for each successive fixture by
adding the number of DMX channels used by the fixture to the fixture’s
DMX start channel. For example, in Table 2-2, 18 (channels used by the
Technobeam set to iris protocol) + 1 (DMX start channel for the first
fixture) = 19 (DMX start channel for the next fixture on the link).
7/85-3F*F:331@/2,5-_33O-#-$2)")"=3#>-3OWY3+#/$#3C>/""-5
H.I-)$#%
*/,'-./(%/(%
-D#%*.(bY
B2.-6
K"#&%?
!$2.?
B&0.6$
B2F6$
H.I-)$#%('2#
!"#$%&'"()
U2.2-+C.&6&#&1V
!"#$%&'"()+
UF011+C.&6&#&1V
!"#$%&'"()+
U."?0#"?+C.&6&#&1V
b6$".+_"32#"+
U0-2%J+79+#$(%%"1-V
!"#$%&'"()+
U2.2-+C.&6&#&1V
*Note
=)2C#$%/0%+&R%
+&R%"-'$-%
1D'((#*
,D'((#*"%)"#4%
,D'((#*% $'(5#%)"#4
E#$%0.I-)$#
7S+#$(%%"1-
[LL7
787S
7S+#$(%%"1-
[L7X
7X8:W
7H+#$(%%"1-
[L:R
:R8ML
79+#$(%%"1-
[LM7
M78W9
7S+#$(%%"1-
[LW:
W:8SL
The fixture location on the link does not have to comply
with this example. The fixtures can be addressed in any
order on the link.
To assign a unique DMX start channel for the fixture:
987W
C%".)='$)"=3#>-3?)@#'$-
!"#$%&'"()*+,-".+/(%0(1
1.
Press and hold the <Menu> button until “ADDR” appears on the LED
display.
2.
Press the <Enter> button to enter the “ADDR” menu.
3.
Using the <Up> and <Down> arrow buttons, scroll to the desired DMX
start channel and press the <Enter> button to select the desired DMX
start channel.
t
Note
You must assign a unique fixture address to each Studio
Spot 250 or Studio Color 250 fixture that you wish to
respond independently to controller commands.
#()(-50+0+1$)3($D+0E<($B0C)<-($7<5>(The fixture number is a number you assign that represents each
unique fixture’s channel range in the DMX 512 link. If you are using
one DMX link to control fixtures which all use the same number of DMX
channels (as recommended), you can assign fixture numbers in
ascending order (see Table 2-3).
7/85-3F*H:331@/2,5-_33O-#-$2)")"=3#>-3;")Q'-3?)@#'$-3X'28-$
H.I-)$#%
*/,'-./(%
/(%-D#%*.(b
B2.-6
K"#&%?
!$2.?
B&0.6$
H.I-)$#%('2#
!"#$%&'"()
U2.2-+C.&6&#&1V
!"#$%&'"()
U2.2-+C.&6&#&1V
!"#$%&'"()
UF011+C.&6&#&1V
b6$".+?"32#"+
U0-2%J+7S+#$(%%"1-V
=)2C#$%/0%+&R%
,D'((#*"%)"#4%
E#$%0.I-)$#
H.I-)$#%
()2C#$
1D'((#*%
$'(5#%)"#4
7S+#$(%%"1-
B+L7
787S
7S+#$(%%"1-
B+L9
7X8:W
7S+#$(%%"1-
B+L:
:R8MH
7S+#$(%%"1-
B+LH
MM8R9
To assign a unique fixture number to your fixture:
t
1.
Press and hold the <Menu> button until “ADDR” appears on the LED
display.
2.
Press the <Enter> button to enter the “ADDR” menu.
3.
Using the <Up> and <Down> arrow buttons, scroll to the desired
fixture number and press the <Enter> button.
Note
You must assign a unique fixture address to each
Technobeam fixture that you wish to respond
independently to controller commands.
F&.)(,$#8A$;3&++(?.
If you mix different types of devices (which use different numbers of
channel ranges) on the same DMX link and assign fixture numbers
!"#$%&'"()*+,-".+/(%0(1
C%".)='$)"=3#>-3?)@#'$-
9*7R
(instead of DMX start channels) to these devices, you would waste DMX
channels.
For example, in Table 2-4, if you assigned fixture number 2 (F 02) to
the Technobeam set to reduced protocol, it would assume that all
other fixtures on the link are also using 14 DMX channels, so it will
erroneously try to receive channel 15 as the first channel in its channel
range. This would create channel overlapping because fixture number
1 (Technobeam iris protocol) is already using channel 15 in its 18channel range.
In this example, to prevent overlapping channels, you must assign
fixture number 3 (F 03) to the Technobeam (reduced protocol), even
though it is physically the second fixture on the DMX link. While this
would prevent overlapping channels, it would result in wasted
channels that could not be used (see Table 2-4). +
7/85-3F*M:331@/2,5-3%.3`/0#-&3OWY3C>/""-50
H.I-)$#%
*/,'-./(%
/(%-D#%
*.(b
H.I-)$#%('2#
H.I-)$#%()2C#$W%
=)2C#$%/0%+&R%
X#")*-.(5%
+&R%,D'((#*%$'(5#%
,D'((#*"%)"#4%
,D'((#*"%
)"#4%O-/%E$#M#(-%
E#$%0.I-)$#
a'"-#4
/M#$*'EE.(5P
B2.-6
!"#$%&'"()
U2.2-+C.&6&#&1V
7S+#$(%%"1-
H%A@+T+L787S
K"#&%?
!"#$%&'"()
U."?0#"?+C.&6&#&1V
7H+#$(%%"1-
H%AJ+T+9X8H9
!$2.?
!"#$%&'"()
U2.2-+C.&6&#&1V
7S+#$(%%"1-
H%A>+T+MM8R9
B&0.6$
!"#$%&'"()
U."?0#"?+C.&6&#&1V
7H+#$(%%"1-
H%Ac+T+SM8XS
77+#$(%%"1-+
@(-6"?+
U7X89XV
7:+#$(%%"1-+
@(-6"?+
UH:8MHV
79+#$(%%"1-+
@(-6"?
UR:8SHV
Therefore, if you choose to assign fixture numbers to different types of
devices (and/or protocols) on the same DMX link, refer to “Fixture
Number to DMX Start Channel” on page A-16, which shows the channel
ranges reserved for each Technobeam fixture type. This table will help
you determine the next available DMX start channel/fixture number for
successive Technobeam fixtures on the link.
987S
C%".)='$)"=3#>-3?)@#'$-
!"#$%&'"()*+,-".+/(%0(1
F3:"#$2+:.410*?#"%
There are three ways you can upgrade the software (fixture-specific
operational code) to Technobeam fixtures attached to a DMX link:
•
•
Attaching a High End Systems upload dongle. You will need an
upload dongle, 386-based (or faster) computer, MS DOS® version
3.3 (or later), and one MB of free disk space. To obtain an upload
dongle (with installation and operation instructions), contact your
HIgh End Systems dealer/distributor (see “Contacting High End
Systems” on page Intro-4).
Crossloading software between fixtures. You will need one
Technobeam fixture with updated software and you can then load
the software across the DMX link to all other Technobeam fixtures
on the same link. For more information on crossloading software,
see the next section.
-"1((C1#$2+:.410*?#"%
The procedure that follows assumes you already have some familiarity
with the menu system; if not, see Chapter 3 and the menu map located
inside the back cover of this manual.
1.
Remove or bypass all controllers, non-High End Systems fixtures,
optoisolators or serial data distributors on the link. These devices will
prevent crossloading.
2.
If there are any Dataflash AF1000 xenon strobe fixtures, Emulator laser
simulators or Intellabeam automated luminaires on the same link,
make sure they are all after all of the Technobeam fixtures. If not, you
must bypass all AF1000s, Emulators or Intellabeams until the upload is
complete.
3.
Determine which Technobeam fixture has the newest software. Skip to
Step 4 if you already know the software version on all your fixtures.
a.
Navigate to the INFO menu.
b.
Press <Enter> then use the <Up> or <Down> arrow keys to navigate
to the VER option.
c.
Press <Enter>; the fixture’s software version will be displayed
similar to Figure 2-12:
]
/EZ,
EZ!E]
?)='$-3F*9F:337>)03.)@#'$-3>/030%.#B/$-3J-$0)%"3H:
4.
Once you are sure which fixture has the newest software (the
crossloading fixture), press and keep pressing the <Menu> key on that
!"#$%&'"()*+,-".+/(%0(1
;,=$/&)"=3+%.#B/$-
9*7X
fixture until the ADDR option is displayed.
5.
Use the <Up> or <Down> arrow keys to navigate to the MODE menu.
6.
Press <Enter> and use the <Up> or <Down> arrow keys to navigate to
the XLD option.
7.
Press <Enter> to start the crossload. The Transmit LED on the
crossloading fixture will remain ON (or flicker) during the crossload.
The Transmit and Receive LEDs on other Technobeam fixtures on the
link will flicker while the crossload is in progress.
8.
When the crossload has finished successfully, the following will
happen:
•
9.
DONE will appear briefly in the LED display of the crossloading
fixture, followed by MENU which will alternate with the fixture’s
fixture number or DMX start channel.
• All of the other Technobeam fixtures will home themselves.
Otherwise, if an error message is displayed, see the section titled
“Menu Error Messages” on page 2-25.
!"16HC%(G11*2+:
This section lists typical symptoms and solutions for problems you
might encounter when using your fixture. If you need additional help,
contact your dealer/distributor or High End Systems Customer Service
in one of the ways shown in the section titled “Contacting High End
Systems” on page Intro-4.
WARNING
This information is intended to assist qualified
service personnel because this fixture is to be
serviced by qualified service personnel only.
Fixture does not work: no LEDs, fan, lamp, or other functionality
Possible causes and solutions:
1.
Cause: No input power.
Solutions: Do all of the following:
a.
b.
2.
Verify that the fixture is plugged into a working power supply.
Verify the integrity of the power cord and the wiring of the
power cord cap as shown in the section titled “Installing the
Power Cord Cap” on page 1-7.
Cause: One or more fuses have failed.
Solution: Follow the directions in the section titled “Replacing
Fuses” on page 6-2 to replace the necessary fuses.
Lamp does not strike
989L
7$%'85-0>%%#)"=
!"#$%&'"()*+,-".+/(%0(1
Possible causes and solutions:
1.
Cause: Improper voltage setting or power cord cap wiring.
Solutions: Do both of the following:
a.
b.
2.
Make sure the fixture is set for the same voltage as the power
supply. See “Setting the Fixture Voltage” on page 1-10.
Make sure the power cord cap is wired correctly. See
“Installing the Power Cord Cap” on page 1-7.
Cause: One or more fuses have failed.
Solution: Follow the instructions in the section titled “Replacing
Fuses” on page 6-2 to inspect the fuses and replace them if
necessary.
3.
Cause: Bad lamp.
Solution: Replace with a new or known good lamp.
Lamp shuts off
Possible causes and solutions:
1.
Cause: Over-temperature. An over-temperature condition can be
confirmed by the message OVER TEMP on the fixture’s LED
display.
Solution: See the section titled “Menu Error Messages” on page 225.
2.
Cause: Fan has failed.
Solution: Home the fixture, either by unplugging the fixture and
plugging it back in, or by selecting HOME from the Test menu. Put
your hand over the exhaust vent shown in Figure 2-13. You should
feel a slight breeze from the fan. If not, the fan has failed. Contact
High End Systems Customer Service as shown in “Contacting High
End Systems” on page Intro-4.
E4$(0-6+3"%6
/b_EO
KE]5PO
B:1[=8S:L&
<\HLAAAAAA
BP[!b]c+KE!
_P!E @9<`9\`
<JA]^%?A[_
j[
B1
\(6"%6-+2--0"?+(%?+C"%?2 %JA++K"" +0-". +)(%0(1
F&.+12 -62%J -A
?)='$-3F*9H:33N%(/#)%"3%.3#>-3.)@#'$-K03-@>/'0#3J-"#:
3.
Cause: Lamp socket is loose, causing arcing.
Solution: Replace the lamp socket assembly. Call your High End
Systems dealer/distributor for more information.
!"#$%&'"()*+,-".+/(%0(1
7$%'85-0>%%#)"=
9*97
4.
Cause: Aging lamp.
Solution: Replace with a new or known good lamp.
9899
7$%'85-0>%%#)"=
!"#$%&'"()*+,-".+/(%0(1
Fixture is not responding to control commands—“Receive” LED does
not blink
Possible causes and solutions:
1.
Cause: Faulty XLR cable.
Solutions: Do one or both of the following:
a.
b.
2.
Replace XLR cables going to the fixture’s Data In and Data Out
connectors with known good cables.
Verify cable integrity using cable test equipment.
Cause: There is no controller attached to the link, or the controller
is not generating any output.
Solution: Verify that a controller is attached to the link. Verify that
the controller is generating output by sending commands to a
known working device.
Also see the section titled “Troubleshooting DMX Data” on page 224.
3.
Cause: One or more fuses have failed.
Solution: Follow the instructions in the section titled “Replacing
Fuses” on page 6-2 to inspect the fuses and replace them if
necessary.
Dim flags close, fixture does not respond to control commands, lamp
shuts off, fan turns off
Possible causes and solutions:
1.
Cause: Faulty XLR cable.
Solutions: Do one or both of the following:
a.
b.
c.
2.
Replace XLR cables going to the fixture’s Data In and Data Out
connectors with known good cables.
Verify cable integrity using cable test equipment.
See the section titled “Troubleshooting DMX Data” on page 224.
Cause: One or more fuses have failed.
Solution: Follow the instructions in the section titled “Replacing
Fuses” on page 6-2 to replace the necessary fuses.
Color wheel or litho wheel is not centered in the beam or is in the
wrong position
Cause: Non-High End Systems dichroic or litho does not meet
specifications. A litho that is slightly under the recommended
thickness, for example, can turn in the wheel as the wheel rotates,
causing the litho to become uncentered.
!"#$%&'"()*+,-".+/(%0(1
7$%'85-0>%%#)"=
9*9:
Solution: Make sure all dichroics and lithos meet the specifications
listed in the section titled “Specifications” on page 6-4.
Lithos or dichroic filters are cracking
Possible causes and solutions:
1.
Cause: Improper installation.
Solution:
a.
b.
c.
2.
General: Make sure you are using dichroics and lithos that
meet the specifications shown in the section titled
“Specifications” on page 6-4.
Lithos: Lithos must be oriented with the coated side facing
away from the lamp and the glass (uncoated) side facing
toward the lamp. In the case of textured lithos, face the
textured side away from the lamp and the flat side toward the
lamp.
Color wheel dichroic filters: Dichroic filters should be
oriented with the coated side facing toward the lamp and the
glass (uncoated) side facing away from the lamp. Figure 6-5 on
page 6-6 shows how to tell which side is which.
Cause: Faulty hot mirror allowing overheating inside the fixture.
Solution: Visually inspect the hot mirror for cracks or deep
scratches as shown in the section titled “Cleaning the Lenses and
Mirrors” on page 6-16.
3.
Cause: Fan has failed.
Solution: Home the fixture, either by unplugging the fixture and
plugging it back in, or by selecting HOME from the Test menu. Put
your hands over the air exhaust shown in Figure 2-13 on page 2-21.
You should feel air movement. If not, the fan has failed. Contact
High End Systems Customer Service as shown in “Contacting High
End Systems” on page Intro-4.
Other components cracked or heat damaged
Possible causes and solutions:
1.
Cause: Faulty hot mirror allowing overheating inside the fixture.
Solution: Visually inspect the hot mirror for cracks or deep
scratches (see “Cleaning the Lenses and Mirrors” on page 6-16).
2.
Cause: Fan has failed.
Solution: Home the fixture, either by unplugging the fixture and
plugging it back in, or by selecting HOME from the Test menu. Put
your hands over the air exhaust shown in Figure 2-13 on page 2-21.
You should feel a slight breeze from the fan. If not, the fan has
failed. Contact High End Systems Customer Service as shown in
“Contacting High End Systems” on page Intro-4.
989H
7$%'85-0>%%#)"=
!"#$%&'"()*+,-".+/(%0(1
Fixture will not accept software upload or crossload
Possible causes and solutions:
1.
Cause: No return communication (indicated by Transmit LEDs OFF
for all fixtures on the link when you are trying to perform the
crossload or upload).
Solution: Make sure you bypass any AF1000 fixtures, Intellabeam
fixtures, Emulator fixtures, non-High End Systems fixtures,
optoisolators or serial data distributors. These devices stop the
communication required for software crossloads or uploads. See
the section titled “Setting up the Link” on page 2-6 for more
information.
Low light output, fuzzy images
Possible causes and solutions:
1.
Cause: Incorrect lens installation.
Solution: Make sure you have installed the lenses in the correct
orientation, as shown in the section titled “Setting the Beam Angle”
on page 1-12.
2.
Cause: Aging lamp.
Solution: Replace the lamp with a new or known good lamp.
3.
Cause: Dirty optical path.
Solution: Clean all lenses, filters, lithos and the anti-reflective
glass as shown in the section titled “Cleaning the Internal
Components” on page 6-15.
!"16HC%(G11*2+:.>8S.>#*#
This section explains how to use the DMX diagnostics built into
Technobeam to isolate the origin of data problems either in the fixture
or in the DMX 512 link. The instructions in this section should be
followed only by people with a good understanding of DMX 512
protocol and the fixture’s menu system.
If you are having trouble with a fixture(s) on your DMX 512 link, you
should first review the following:
1.
Are DMX 512 control commands being “misinterpreted” by the fixture?
If so, make sure the controller is configured for the correct fixture
type. For example, if you have a Technobeam set for full, 18-channel
protocol, but the controller is sending Technoray channel values, none
of the values you send from the controller will have the expected
effect. Continuing the same example, sending a value on channel 8
(which is effect wheel spin speed for Technoray) will result in selecting
a rotating litho wheel position on Technobeam.
!"#$%&'"()*+,-".+/(%0(1
7$%'85-0>%%#)"=
9*9M
2.
Is more than one device affected? If so, and the devices are addressed
sequentially on the link, check to make sure addressing was done
properly on all affected devices. In particular, if you are using fixture
numbering, review the DMX channel boundaries for all affected
fixtures. Table A-5 on page A-16 shows fixture number to DMX channel
boundaries for Technobeam.
3.
Make sure the last device on the link is terminated.
4.
Are the gears and motors moving at all? If not, check for a loose cable
connection or a cable break somewhere on the link. If possible, verify
cable integrity or replace questionable cable with known good cable.
5.
Make sure the controller is generating output. Consult the
documentation provided with the controller for more information.
6.
Verify the DMX data for other fixtures on the link (see “Viewing DMX
Status and Construct Values (FIXT)” on page 3-24 or “Viewing DMX Data
for Another Device (DATA)” on page 3-26).
8%+6.;""1".8%((#:%(
This section lists the possible error messages that can appear on the
fixture’s LED display, as well as suggested actions. If the suggested
action does not solve the problem or if you have additional questions,
contact High End Systems Customer Service in one of the ways shown
in the section titled “Contacting High End Systems” on page Intro-4.
",,-$!4.)
The fixture’s software was unable to retrieve the fixture number or
DMX start channel from non-volatile storage. Try unplugging the
fixture, waiting a short time, then plugging it back in. If this error
message reoccurs, contact High End Systems Customer Service in one
of the ways shown in the section titled “Contacting High End Systems”
on page Intro-4.
G44)$#0''
(Boot difference error.) This message may occur after a software
upload or crossload if new boot software has been included in the
upload. Selecting BOOT from the Test menu will copy the new boot to
the boot software storage area, and correct the cause of this error
message.
H8H8$"=2
This error may occur during data storage when an attempted write has
taken too long. Attempt the operation again. If this message reoccurs,
contact High End Systems Customer Service in one of the ways shown
in the section titled “Contacting High End Systems” on page Intro-4.
989W
7$%'85-0>%%#)"=
!"#$%&'"()*+,-".+/(%0(1
H8H8$I5(..&1(J
(Memory error.) This error indicates the fixture was unable to retrieve
one of the following from non-volatile storage:
•
•
•
•
•
•
•
•
•
•
•
•
•
CHNL—the fixture’s DMX start channel.
DPLY—LED display status (on, off, dim).
FHRS—number of fixture operating hours.
LENS—lens set selection (NORM for factory-installed or optional
narrow angle set, WIDE for optional wide angle lens set).
LHRS—number of lamp operating hours.
L/ST—lamp strikes.
MODE—preset playback status (ON/OFF/SCN).
PERS—the fixture’s protocol (e.g., Technobeam full protocol).
PINV—pan invert status.
TINV—tilt invert status.
S/DN—shutdown time.
SWAP—pan/tilt swap status.
TIMB—time base (seconds, minutes, hours) for preset playback.
The most likely cause is that an electrical event occurred and either
interrupted data storage or caused the non-volatile memory to be
corrupted. Try restoring the lost items manually. If the problem
persists, contact High End Systems Customer Service in one of the
ways shown in the section titled “Contacting High End Systems” on
page Intro-4.
H-.($B?.3
Occurs during a crossload when the time required to erase a fixture’s
memory is excessive. Remove the fixture from the link and contact
High End Systems Customer Service. You might need to restart the
crossload as well.
K#$!4.)
The system software was unable to read the fixture’s ID number
(fixture number or DMX start channel) from its non-volatile storage
area. Try unplugging the fixture, waiting a short time, then plugging it
back in. If this error message reoccurs, contact High End Systems
Customer Service in one of the ways shown in the section titled
“Contacting High End Systems” on page Intro-4.
!&5L
The word LAMP can appear on the display in two situations: one is an
error; the other is normal.
•
Normal: LAMP will be displayed when the fixture attempts to
strike the lamp during fixture reset and homing. This is normal.
!"#$%&'"()*+,-".+/(%0(1
7$%'85-0>%%#)"=
9*9R
•
Not normal: If the lamp is running, and for some reason—
probably an electrical event—the fixture’s operating code loses
track of the lamp status, the lamp will turn off and the word
“LAMP” will appear in the LED display. Allow the fixture 5 to 10
minutes to cool before trying to turn the lamp on again.
!0+2$G<.*
Occurs when the crossloading fixture detects that some other source is
driving data on the link. For crossloads to work properly, you must
remove or bypass all of the following if they are on the same link:
•
•
•
•
•
Serial data distributors
Optoisolators
Non-High End Systems fixtures
Controllers
AF1000, Emulator or Intellabeam fixtures: Placing all AF1000,
Emulator or Intellabeam fixtures after all Technobeam fixtures is a
good way to do this.
After removing the offending device(s) from the data link, attempt the
crossload again.
!0+2$H5L)*
Occurs when the crossloading fixture fails to find any other
Technobeam fixtures. If there are indeed other fixtures on the link, a
communication failure has occurred.
Possible causes include:
1.
A bad data cable between the crossloading fixture and the first fixture
on the data link. Verify cable integrity with cable test equipment or
replace with known good cabling.
2.
3.
See “Link Busy” above.
One or more fixtures are powered off. Connect all fixtures on the link
to appropriately-rated power outlets and try again.
If none of the above solves the problem, the most likely cause is that
an electronics failure has occurred in the data section of one of the
fixtures on the data link. Try powering off one fixture at a time and
attempting the crossload. If you can isolate the crossload problem to
one fixture in particular, remove that fixture from the link and contact
High End Systems Customer Service in one of the ways shown in the
section titled “Contacting High End Systems” on page Intro-4.
4.
MN(-$@(5L
The internal fixture temperature has exceeded the maximum allowable
temperature. The lamp and the motors will shut down.
1.
989S
The primary external cause is high ambient air temperature. The
fixture’s maximum ambient temperature rating is shown in the section
7$%'85-0>%%#)"=
!"#$%&'"()*+,-".+/(%0(1
titled “Environmental Specifications” on page 1-5. Unplug the fixture
and wait 5 to 10 minutes for it to cool before plugging it back in.
2.
If allowing the fixture to cool does not solve the problem, check to
make sure the fan is working. Home the fixture, either by selecting
HOME from the Test menu, or by unplugging the fixture and plugging
it back in. Place your hand over the air exhaust shown in Figure 2-13
on page 2-21. You should feel air movement. If not, the fan has failed.
Contact High End Systems Customer Service in one of the ways shown
in the section titled “Contacting High End Systems” on page Intro-4.
3.
If the fan is working, unplug the fixture and verify the voltage setting
matches the power supply as shown in the section titled “Setting the
Fixture Voltage” on page 1-10. If the voltage setting is correct, contact
High End Systems Customer Service in one of the ways shown in the
section titled “Contacting High End Systems” on page Intro-4.
O9%@$!4.)
(Preset Lost.) Scenes (presets) stored in the fixture’s onboard sixteenscene memory were lost.
The causes and solution for this error are the same as for “EMEM
[message]”.
OP98$@05(
Occurs during a crossload when a receiving fixture has exceeded the
maximum allowable programming time. The crossloading fixture will
make a number of attempts to send new program data to each of the
receiving fixtures. If the receiving fixtures fails to respond properly
after a number of programming attempts have been made, the
crossloading fixture will drop the offending fixture from the upload
list, and display this error message.
Remove one fixture at a time from the link and attempt the crossload
again until you can isolate the crossload problem to a particular
fixture. Contact High End Systems Customer Service in one of the ways
shown in the section titled “Contacting High End Systems” on page
Intro-4.
%3<)$#4Q+
The fixture has received a Shutdown command from the controller and
has shut down; i.e., the lamp and motors have been turned off.
Homing the fixture will bring it out of shutdown.
!"#$%&'"()*+,-".+/(%0(1
7$%'85-0>%%#)"=
9*9X
98:L
7$%'85-0>%%#)"=
!"#$%&'"()*+,-".+/(%0(1
*+,-#.$/;!
:3)"2/#+./<."'3
Menu System Overview ...................................................................................3-2
Navigation Buttons .............................................................................3-2
Accessing the Menu System ...............................................................3-2
Menu Map ........................................................................................................3-3
Menu Options ............................................................................................... 3-10
Address Menu (ADDR) ..................................................................... 3-10
Set Menu (SET) ................................................................................. 3-11
Setting Factory Defaults (FACT) .......................................... 3-11
Swapping Pan and Tilt (SWAP) ............................................ 3-12
Inverting Tilt (T/IN) ............................................................ 3-12
Inverting Pan (P/IN) ............................................................ 3-12
Changing the Display Output (DSPL) .................................. 3-13
Inverting LED Characters (D/IN) ......................................... 3-13
Changing the Control Method (CHNL) ................................ 3-13
Setting the Lamp Warning Message (LMPL) ......................... 3-14
Changing the Lens Setting (LENS) ....................................... 3-14
Mode Menu (MODE) .......................................................................... 3-15
Setting the Fixture Type and Protocol (TYPE) ..................... 3-15
Setting the User Type (USER) .............................................. 3-16
Copying User Presets (PRST) ............................................... 3-17
Copying User Settings (SETT) ............................................. 3-18
Copying User Presets and Settings (ALL) ............................ 3-18
Crossloading Fixture Software (XLD) .................................. 3-19
Test Menu (TEST) ............................................................................. 3-20
Homing the Fixture (HOME) ................................................ 3-20
Turning the Lamp On or Off (LAMP) ................................... 3-20
Copying the Boot Code (BOOT) ........................................... 3-21
Performing Self Tests (SELF) ............................................... 3-21
Placing the Fixture in Setup Mode (S/UP) ........................... 3-22
Testing the LED Display (DISP) ........................................... 3-22
Information Menu (INFO) ................................................................. 3-22
Viewing the Logic Board Temperature (TEMP) .................... 3-23
Viewing the Current Lamp Hours (L/HR) ............................ 3-23
Viewing the Current Fixture Hours (F/HR) .......................... 3-23
Viewing the Number of Current Lamp Strikes (L/ST) ......... 3-24
Viewing the Current Software Version (VER) ...................... 3-24
Viewing DMX Status and Construct Values (FIXT) ............... 3-24
Viewing DMX Data for Another Device (DATA) ................... 3-26
Viewing Sensor Information (SENS) .................................... 3-26
Resetting Fixture Hours (F/RS) ........................................... 3-27
Resetting Lamp Hours (L/RS) .............................................. 3-27
Preset Menu (PRST) .......................................................................... 3-28
Setting Preset Playback (PLAY) ............................................ 3-28
Editing or Creating an On-Board Memory Scene (EDIT) ...... 3-29
Copying an On-Board Memory Scene (COPY) ...................... 3-29
Capturing a Preset Scene (CAPT) ......................................... 3-29
Enabling the Preset Default (DFLT) ..................................... 3-30
!"#$%&'"()*+,-".+/(%0(1
:*7
8%+6.45(*%&.QA%"A2%?
The Technobeam menu system allows you to:
•
•
•
Configure your fixture for operation (discussed in Chapter 2)
Access fixture options such as homing the fixture, crossloading
software, and performing self tests (discussed in this chapter)
Use preset programming to create, store, and play back scenes
from the fixture’s onboard memory (see Chapter 4)
J#A2:#*21+.W6**1+(
The navigation buttons on the fixture’s display panel allow you to
navigate through the onboard menu system. As you navigate the menu
system, the alphanumeric display will show the menu items you select
from the menu map.
(1C$(%0)".2#+OE_+?2-C1(=
;,C>+(..&@+'066&%T+-#.&11+0C@(.?+
6$.&0J$+)"%0+26")-+&.+&C62&%;_&@%>+(..&@+'066&%T+-#.&11+?&@%@(.?
6$.&0J$+)"%0+26")-+&.+&C62&%/EZ,
;/"%0>+'066&%T+)&3"+0C
6&+6$"+C."32&0-+)"%0+1"3"1
UC."--+(%?+$&1?+6&+"%6".
6$"+)"%0+-=-6")V
EZ!E]
;E%6".>+'066&%T+-"1"#6+6$"+
#0."%6+)"%0+26")+&.+&C62&%
?)='$-3H*9:337-(>"%8-/23"/J)=/#)%"38'##%"0:
The alphanumeric display will flash when a new option is selected (by
pressing the <Up> and <Down> arrow buttons), and will stop flashing
when a new option is entered (by pressing the <Enter> button).
Note
If you do not press the <Enter> button, the new option
you selected will not be stored.
Pressing the <Menu> button returns you to the previous option or
menu without changing the value of an option.
@77%((2+:.*G%.8%+6.45(*%&
To access the menu system, press and hold the <Menu> key until
“ADDR” appears on the LED display. The menu system is protected
against inadvertent menu changes by requiring the <Menu> button to
be held for a few seconds before allowing entry to the menus.
To exit the menu system, you must keep pressing the <Menu> button
to back out of each menu level until “MENU” appears on the LED
display. “MENU” will be replaced, after a few seconds, with the default
alternating display of the fixture’s software version and the fixture
number/DMX start channel.
:89
W-"'3+E0#-234J-$J)-B
!"#$%&'"()*+,-".+/(%0(1
8%+6.8#3
A complete menu map and explanations of the Technobeam menu
options are listed in this section. See individual subsections in this
addendum for descriptions of each menu item.
Chapter 4 has more information about using the menus to program the
fixture’s sixteen onboard scenes (presets).
If your Technobeam-i does not have an iris and/or Laser
Aiming Device™ (LAD®), the iris and LAD-related menu
items listed below will have no functionality.
Note
Although Technopro and Technoray fixtures have been
discontinued, their menu options still exist in the
protocol, and are listed below.
7/85-3H*9:337-(>"%8-/23W-"'3W/,
&#()% &#()% &#()% &#()% &#()%
K#M#*%@ K#M#*%< K#M#*%J K#M#*%> K#M#*%?
P__]
B44a[444
bZ
BP[!
K`P\
!a5Z
\a5Z
_K\O
KE!
_a5Z
[IZO
O/\O
bBB
bZ
bBB
bZ
bBB+
bZ
bBB
bZ
bBB
_5/
bZ
bBB
_/Q
P__]
bZ
bBB
Zb]/
`5_E
OEZK
ZP]`
!"#$%&'"()*+,-".+/(%0(1
+#",$.E-./(
#$(%J"+6$"+"42-62%J+F2460."+%0)'".a_/Q+-6(.6+
#$(%%"1
-"6+F(#6&.=+?"F(016-+&%
-"6+F(#6&.=+?"F(016-+&FF+
X%#-_3+-5-(#)"=3#>)03%,#)%"3>/03"%3/..-(#3%"3
)"&)J)&'/53,$-0-#3J/5'-0:
-"6+C(%a6216+-@(C+&%
-"6+C(%a6216+-@(C+&FF
-"6+6216+2%3".6+&%
-"6+6216+2%3".6+&FF
-"6+C(%+2%3".6+&%
-"6+C(%+2%3".6+&FF
-"6+OE_+?2-C1(=+&%
-"6+OE_+?2-C1(=+&FF
?2)+OE_+?2-C1(=
2%3".6+OE_+?2-C1(=+&.2"%6(62&%
-"6+%&.)(1+OE_+?2-C1(=+&.2"%6(62&%
-"6+#&%6.&1+)"6$&?+6&+_/Q+-6(.6+#$(%%"1
-"6+#&%6.&1+)"6$&?+6&+F2460."+%0)'".
"%('1"+1()C+$&0.+@(.%2%J+)"--(J"
?2-('1"+1()C+$&0.+@(.%2%J+)"--(J"
F(#6&.=+1"%-+&.+%(..&@+(%J1"+1"%-+-"662%J
@2?"+(%J1"+1"%-+-"662%J
-6(%?(.?+&.+%(..&@+(%J1"+1"%-+-"662%J+6$(6+
2%#."(-"-+6$"+?2-6(%#"+6$"+1"%-+60'"+#(%+)&3"+
6&+(11&@+F&.+(+J."(6".+6$.&@+?2-6(%#"
X%#-_337>)03%,#)%"3)03"%#3.%$3'0-3B)#>3B)&-3/"=5-3
5-"0-0:
W-"'3W/,
:*:
7/85-3H*9:337-(>"%8-/23W-"'3W/,
&#()% &#()% &#()% &#()% &#()%
K#M#*%@ K#M#*%< K#M#*%J K#M#*%> K#M#*%?
!d+B
!d+]
!]+B
!c\E
!]+]
!\]b
!d+5
!O[_
/b_E
QO_
P
d
\]K!
,KE]
[b\c
KE!!
POO
Ib/E
OP/\
ObBB
O+bZ
dbb!
KEOB
POO
\PZ
!5O!
[bO
O!b
BQ
B[,K
5]5K
KI,!
_5/
Ka,\
KE!+
Zb`
!EK!
5ZBb
:8H
_5K\
[b_E
!E/\
OaI]
BaI]
OaK!
YE]
W-"'3W/,
P+8>+d
d+8>+P
P+8>+d
d+8>+P
P+8>+d
d+8>+P
+#",$.E-./(
!"#$%&'"()+F011+C.&6&#&1+U0-"-+7S+#$(%%"1-V
!"#$%&'"()+."?0#"?+C.&6&#&1+U0-"-+7H+
#$(%%"1-V
!"#$%&.(=+F011+C.&6&#&1+U0-"-+7H+#$(%%"1-V
!"#$%&.(=+."?0#"?+C.&6&#&1+U0-"-+79+
#$(%%"1-V
!"#$%&C.&+C.&6&#&1+U0-"-+79+#$(%%"1-V
!"#$%&'"()82+U0-"-+7S+#$(%%"1-V
!"#$%&C.&+0-"?+@26$+(%+O[_+#&%6.&11".+U0-"-+
7S+#$(%%"1-V
#.&--1&(?+F2460."+-&F6@(."+6&+(11+&6$".+
!"#$%&'"()D+!"#$%&.(=D+(%?+!"#$%&C.&+
F2460."-+&%+6$"+12%<
0-".+P+-"662%J0-".+d+-"662%J#&C=+0-".+P+C."-"6-+6&+0-".+d
#&C=+0-".+d+C."-"6-+6&+0-".+P
#&C=+0-".+P+-"662%J-+6&+0-".+d
#&C=+0-".+d+-"662%J-+6&+0-".+P
#&C=+0-".+P+C."-"6-+(%?+-"662%J-+6&+0-".+d
#&C=+0-".+d+C."-"6-+(%?+-"662%J-+6&+0-".+P
$&)"+6$"+F2460."
"462%J02-$+6$"+1()C
-6.2<"+6$"+1()C
#&C=+6$"+'&&6+-"#6&.
-"1F+6"-6+(11+#&%-6.0#6-"1F+6"-6+)2..&.+C(%+)&3")"%6
-"1F+6"-6+)2..&.+6216+)&3")"%6
-"1F+6"-6+#&1&.+@$""1+)&3")"%6
-"1F+6"-6+126$&+@$""1+)&3")"%6
-"1F+6"-6+"FF"#6-+@$""1+)&3")"%6
-"1F+6"-6+1"%-+60'"+)&3")"%6
-"1F+6"-6+2.2-+)&3")"%6
-"1F+6"-6+-$066".+-6.&'"+)&3")"%6
-"1F+6"-6+-$066".+?2)+F1(J+)&3")"%6
C1(#"+6$"+F2460."+2%+-"60C+)&?"+F&.+)"#$(%2#(1+
$&)2%J
X%#-_33`>-"3#>-3&)0,5/E30>%B03a+173X4`Lb3
2-(>/")(/55E3>%2-3#>-3.)@#'$-L3#>-"3,$-003/"E3
<-E3#%3-@)#3#>)032-"'3%,#)%":
-"1F+6"-6+6$"+(1C$(%0)".2#+OE_+?2-C1(=
?/(#%$E3'0-3%"5E
32"@+6$"+F2460."G-+#0.."%6+2%6".%(1+6")C".(60."
32"@+6$"+#0.."%6+%0)'".+&F+1()C+$&0.32"@+6$"+#0.."%6+%0)'".+&F+F2460."+$&0.32"@+6$"+#0.."%6+%0)'".+&F+1()C+-6.2<"32"@+6$"+F2460."G-+-&F6@(."+3".-2&%
!"#$%&'"()*+,-".+/(%0(1
7/85-3H*9:337-(>"%8-/23W-"'3W/,
&#()% &#()% &#()% &#()% &#()%
K#M#*%@ K#M#*%< K#M#*%J K#M#*%> K#M#*%?
d]kK
BE
_/Q
B5Q!
B5Q!
_/Q
5ZBb
bY
K!]!
\PZI
\PZO
!O!I
!O!O
[bO[
[bO
O!b[
O!b
O!]
B[,K
BQ
BQ]
5]5K
KI,!
_5/
/K\_
OP_
[Z!O
_P!P
[LL7+8+
[M79
bZ
O!]
bBB
KEZK
O!b
[bO]
BQ
bZ
bBB
bZ
bBB
bZ
bBB
Ba]K
Oa]K
,Z,/
\]K!
\OPc
bBB
bZ
K[Z
!"#$%&'"()*+,-".+/(%0(1
+#",$.E-./(
32"@+6$"+%0)'".+&F+F.()2%J+"..&.-+@26$+g".&+
?(6(+U_/Q+'."(<-V
32"@+6$"+%0)'".+&F+F.()2%J+"..&.-+@26$+%&%8
g".&+?(6(
32"@+6$"+%0)'".+&F+_/Q+&3"..0%32"@+6$"+_/Q+-6(.6+#&?"+3(10"
32"@+6$"+_/Q+$2J$+."-&1062&%+C(%+3(10"
32"@+6$"+_/Q+1&@+."-&1062&%+C(%+3(10"
32"@+6$"+_/Q+$2J$+."-&1062&%+6216+3(10"
32"@+6$"+_/Q+1&@+."-&1062&%+6216+3(10"
32"@+6$"+_/Q+#&1&.+@$""1+#&%6.&1+3(10"
32"@+6$"+_/Q+F24"?+#&1&.+@$""1+C&-262&%+3(10"
32"@+6$"+_/Q+126$&+@$""1+#&%6.&1+3(10"
32"@+6$"+_/Q+126$&+@$""1+C&-262&%+3(10"
32"@+6$"+_/Q+126$&+.&6(62&%+3(10"
32"@+6$"+_/Q+1"%-+60'"+C&-262&%+3(10"
32"@+6$"+_/Q+"FF"#6-+@$""1+C&-262&%+3(10"
32"@+6$"+_/Q+"FF"#6-+@$""1+.&6(62&%+3(10"
32"@+6$"+_/Q+2.2-+C&-262&%+3(10"
32"@+6$"+_/Q+-$066".+-6.&'"+3(10"
32"@+6$"+_/Q+-$066".+?2)+F1(J+3(10"
32"@+6$"+_/Q+/KC""?+62)"+3(10"
32"@+6$"+_/Q+O(-".+P2)2%J+_"32#"+UOP_V+
3(10"
32"@+6$"+_/Q+#&%6.&1+#$(%%"1+3(10"
32"@+6$"+_/Q+?(6(+F&.+6$"+-"1"#6"?+_/Q+
#$(%%"1
X%#-_33D%'3(/"3%"5E3J)-B3OWY3(>/""-5035%B-$3
#>/"3#>-35/0#3(>/""-53)"3#>-3J)-B)"=3.)@#'$-K03
(>/""-53$/"=-:
6$"+126$&+.&6(6"+U@26$2%+6$"+@$""1V+-"%-&.+2-+%&6+
&'-6.0#6"?
6$"+126$&+.&6(6"+U@26$2%+6$"+@$""1V+-"%-&.+2-+
&'-6.0#6"?
6$"+126$&+@$""1+-"%-&.+2-+%&6+&'-6.0#6"?
6$"+126$&+@$""1+-"%-&.+2-+&'-6.0#6"?
6$"+#&1&.+@$""1+-"%-&.+2-+%&6+&'-6.0#6"?
6$"+#&1&.+@$""1+-"%-&.+2-+&'-6.0#6"?
6$"+"FF"#6-+@$""1+-"%-&.+2-+%&6+&'-6.0#6"?
6$"+"FF"#6-+@$""1+-"%-&.+2-+&'-6.0#6"?
."-"6+F2460."+$&0.-+6&+g".&+Z,$-003/"&3>%5&3#>-3
c1"#-$d38'##%"3'"#)53#>-3&)0,5/E30>%B03a^^^^b[
."-"6+1()C+$&0.-+6&+g".&+U,$-003/"&3>%5&3#>-3
c1"#-$d38'##%"3'"#)53#>-3&)0,5/E30>%B03a^^^^b[
C'0#%2-$3+-$J)(-3'0-3%"5E
-"6+C."-"6+C1(='(#<+&FF
-"6+C."-"6+C1(='(#<+&%
?2-C1(=+@$2#$+-#"%"+2-+#0.."%61=+C1(=2%J
W-"'3W/,
:*M
7/85-3H*9:337-(>"%8-/23W-"'3W/,
&#()% &#()% &#()% &#()% &#()%
K#M#*%@ K#M#*%< K#M#*%J K#M#*%> K#M#*%?
KI,!
_5/
[OK_
\+L7+8++++
\+WL
Z+L7+8
Z+WL
]KL7+8
]KWL
K]L7+8
K]WL
b\EZ
_LLL+8
_9MM
\PZ
!5O!
5_Q
BK\
]K\
[bZ
\]K!
E_5!
KZL7+8+
KZ7W
[bO[
KK[
BK[
]Z_
dOk
/5_Q
/BK\
/]K\
/[bZ
/KK[
/BK[
/]Z_
/dOk
[++7+8
[+7:
[bO
I[+7+8
I[7:
BLLL+8
B9MM
:8W
W-"'3W/,
+#",$.E-./(
-$066".+#1&-"?
C".2&?2#+-$066".+-6.&'"+(6+-C"#2F2"?+2%6".3(1-D+
-1&@+U\+L7V+6&+F(-6+U\+WLV
.(%?&)+-$066".+-6.&'"+(6+.(%?&)+2%6".3(1-D+
-1&@+UZ+L7V+6&+F(-6+UZ+WLV
-$066".+.()C+&C"%D+-1&@+U]KL7V+6&+F(-6+U]KWLVD+
-%(C+-$06
-$066".+-%(C+&C"%D+.()C+-$06+-1&@+UK]L7V+6&+
F(-6+UK]WLV
-$066".+&C"%
-"1"#6+(+?2)+3(10"+F.&)+?(.<+U_LLLV+6&+'.2J$6+
U_9MMV
)2..&.+C(%+F.&)+8SXAX+6&+^SXAX+
)2..&.+6216+F.&)+8HHAX+6&+^HHAX+
#&1&.+@$""1+2%?"4"?+C&-262&%+U@$""1+-%(C-+6&+
#"%6".+&F+#&1&.VD+F011+-C""?
#&1&.+@$""1+F&.@(.?+-C2%D+F011+-C""?
#&1&.+@$""1+."3".-"+-C2%D+F011+-C""?
#&1&.+@$""1+#&%62%0&0-1=83(.2('1"+C&-262&%D+F011+
-C""?
#&1&.+@$""1+-1&@+-#(%%2%JD+F011+-C""?
#&1&.+@$""1+F(-6+-#(%%2%JD+F011+-C""?
#&1&.+@$""1+.(%?&)+#&1&.+C&-262&%-D+F011+-C""?
#&1&.+@$""1+'12%<+-"1"#62&%D+F011+-C""?
#&1&.+@$""1+2%?"4"?+C&-262&%D+/KC""?
#&1&.+@$""1+F&.@(.?+-C2%D+/KC""?
#&1&.+@$""1+."3".-"+-C2%D+/KC""?
#&1&.+@$""1+#&%62%0&0-1=83(.2('1"+C&-262&%D+
/KC""?
#&1&.+@$""1+-1&@+-#(%%2%JD+/KC""?
#&1&.+@$""1+F(-6+-#(%%2%JD+/KC""?
#&1&.+@$""1+.(%?&)+#&1&.+C&-262&%-D+/KC""?
'12%<+-"1"#62&%+U@$""1+-%(C-+6&+#"%6".+&F+#&1&.+
(%?+6$"+-$066".+#1&-"-+'"6@""%+C&-262&%-VD+
/KC""?
-"1"#6+(+F011+#&1&.+C&-262&%+U&%1=+(3(21('1"+2F+=&0+
-"1"#6"?+(+[bO[+#&%-6.0#6+3(10"+&F+5_Q+&.+
/5_QV
-"1"#6+(+$(1F+#&1&.+C&-262&%+U&%1=+(3(21('1"+2F+=&0+
-"1"#6"?+(+[bO[+#&%-6.0#6+3(10"+&F+5_Q+&.+
/5_QV
-"1"#6+(+F&.@(.?+#&1&.+@$""1+-C2%+-C""?+F.&)+
%&%"+UBLLLV+6&+F(-6+UB9MMV+U&%1=+(3(21('1"+2F+
=&0+-"1"#6"?+(+[bO[+#&%-6.0#6+3(10"+&F+BK\+
&.+/BK\V
!"#$%&'"()*+,-".+/(%0(1
7/85-3H*9:337-(>"%8-/23W-"'3W/,
&#()% &#()% &#()% &#()% &#()%
K#M#*%@ K#M#*%< K#M#*%J K#M#*%> K#M#*%?
]LLL+8+
]9MM
_LLL+8
_:MS
K[+7+8
K[9W
[bO
B[+7+8
B[9W
ZLLL+8
Z9MM
d++7+8
d+7:
\]K!
E_5!
Id+7+8
Id7:
KZL78
KZ7W
5_Q
O!b[
BK\
]K\
K[
dOk
]Z_
`K\
/5_Q
/BK\
/]K\
/+K[
/dOk
/]Z_
/`K\
O++7+8
O++S
O!b
OB+7+8
OB+S
!"#$%&'"()*+,-".+/(%0(1
+#",$.E-./(
-"1"#6+(+."3".-"+#&1&.+@$""1+-C2%+-C""?+F.&)+
%&%"+U]LLLV+6&+F(-6+U]9MMV+U&%1=+(3(21('1"+2F+
=&0+-"1"#6"?+(+[bO[+#&%-6.0#6+3(10"+&F+]K\+
&.+/]K\V
-"1"#6+(+#&1&.+@$""1+C&-262&%+2%+?"J.""-+F.&)+Li+
U_LLLV+6&+:MSi+U_:MSV+U&%1=+(3(21('1"+2F+=&0+
-"1"#6"?+(+[bO[+#&%-6.0#6+3(10"+&F+[bZ+&.+
/[bZV
-1&@+-#(%+&F+-"1"#6"?+F011+#&1&.+'(-"+C&-262&%+
UK[+7+8+K[7:V+&.+$(1F+#&1&.+'(-"+C&-262&%+
UK[7H+8+K[9WV+U&%1=+(3(21('1"+2F+=&0+-"1"#6"?+(+
[bO[+#&%-6.0#6+3(10"+&F+KK[+&.+/KK[V
F(-6+-#(%+&F+-"1"#6"?+F011+#&1&.+'(-"+C&-262&%+
UB[+7+8+B[+7:V+&.+$(1F+#&1&.+'(-"+C&-262&%+
UB[7H+8+B[9WV+U&%1=+(3(21('1"+2F+=&0+-"1"#6"?+(+
[bO[+#&%-6.0#6+3(10"+&F+B[+&.+/B[V
-"1"#6+(+C(0-"+62)"+'"6@""%+.(%?&)+#&1&.+
@$""1+C&-262&%+#$(%J"-D+-$&.6+UZLLLV+6&+1&%J+
UZ9MMV+U&%1=+(3(21('1"+2F+=&0+-"1"#6"?+(+[bO[+
#&%-6.0#6+3(10"+&F+]Z_+&.+/]Z_V
-$066".+'12%<+&%+-"1"#6"?+F011+#&1&.+C&-262&%+U&%1=+
(3(21('1"+2F+=&0+-"1"#6"?+(+[bO[+#&%-6.0#6+
3(10"+&F+dOk+&.+/dOkV
-$066".+'12%<+&%+-"1"#6"?+$(1F+#&1&.+C&-262&%+
U&%1=+(3(21('1"+2F+=&0+-"1"#6"?+(+[bO[+
#&%-6.0#6+3(10"+&F+dOk+&.+/dOkV
126$&+@$""1+2%?"4"?+C&-262&%+U@$""1+-%(C-+6&+
#"%6".+&F+126$&VD+F011+-C""?
126$&+F&.@(.?+-C2%D+F011+-C""?
126$&+."3".-"+-C2%D+F011+-C""?
126$&+@$""1+-#(%%2%JD+F011+-C""?
126$&+@$""1+'12%<+-"1"#62&%D+F011+-C""?
126$&+@$""1+.(%?&)+#&1&.+C&-262&%-D+F011+-C""?
126$&+@$""1+-C2%D+F011+-C""?
126$&+@$""1+2%?"4"?+C&-262&%D+/KC""?
126$&+F&.@(.?+-C2%D+/KC""?
126$&+."3".-"+-C2%D+/KC""?
126$&+@$""1+-#(%%2%JD+/KC""?
126$&+@$""1+'12%<+-"1"#62&%+U@$""1+-%(C-+6&+
#"%6".+&F+126$&+(%?+6$"+-$066".+#1&-"-+'"6@""%+
C&-262&%-VD+/KC""?
126$&+@$""1+.(%?&)+#&1&.+C&-262&%-D+/KC""?
126$&+@$""1+-C2%D+/KC""?
-"1"#6+(+126$&+@$""1+C&-262&%+U&%1=+(3(21('1"+2F+
=&0+-"1"#6"?+(+O!b[+#&%-6.0#6+3(10"+&F+5_Q+&.+
/5_QV
-"1"#6+(+F&.@(.?+-C2%%2%J+126$&+C&-262&%+U&%1=+
(3(21('1"+2F+=&0+-"1"#6"?+(+O!b[+#&%-6.0#6+
3(10"+&F+BK\+&.+/BK\V
W-"'3W/,
:*R
7/85-3H*9:337-(>"%8-/23W-"'3W/,
&#()% &#()% &#()% &#()% &#()%
K#M#*%@ K#M#*%< K#M#*%J K#M#*%> K#M#*%?
O]+7+8
O]+S
K[+7+8
K[+S
O!b
d++7+8
d++S
]PZ_
`K\Z
_LLL+8
_:MS
BLLL+8
B9MM
]LLL+8
]9MM
\]K!
E_5!
KZL78
KZ7W
O!]
KLLL+8
K9MM
ZLLL+8
Z9MM
`BL7+8
`B79
`]79+8
`]L7
B[,K
BQ
BQ]
:8S
W-"'3W/,
LLL+8
9MM
BQ+7+8
BQ+M
/BQ7+8
/BQM
BLL7+8
B797
K!5O
]LL7+8
]797
+#",$.E-./(
-"1"#6+(+."3".-"+-C2%%2%J+126$&+C&-262&%+U&%1=+
(3(21('1"+2F+=&0+-"1"#6"?+(+O!b[+#&%-6.0#6+
3(10"+&F+]K\+&.+/]K\V
-#(%+-"1"#6"?+126$&+'(-"+C&-262&%+U&%1=+
(3(21('1"+2F+=&0+-"1"#6"?+(+O!b[+#&%-6.0#6+
3(10"+&F+K[V
-"1"#6+(+126$&+@$""1+C&-262&%+U&%1=+(3(21('1"+2F+
=&0+-"1"#6"?+(+O!b[+#&%-6.0#6+&F+dOk+&.+
/dOkV
U'"#(0-"+l](%?&)m+@(-+-"1"#6"?+F&.+126$&+
#&%6.&1D+%&+126$&+C&-262&%+#(%+'"+(--2J%"?V
U'"#(0-"+l`$""1+KC2%m+@(-+-"1"#6"?+F&.+126$&+
#&%6.&1D+%&+126$&+C&-262&%+#(%+'"+(--2J%"?V
-"1"#6+(+126$&+(%J1"+F.&)+Li+U_LLLV+6&+:MSi+
U_:MSV+U&%1=+(3(21('1"+2F+=&0+-"1"#6"?+(+O!b[+
#&%-6.0#6+3(10"+&F+5_QD+dOkD+/5_QD+&.+/dOkV
-"1"#6+(+126$&G-+F&.@(.?+-C2%+-C""?+F.&)+%&%"+
UBLLLV+6&+F(-6+UB9MMV+U&%1=+(3(21('1"+2F+=&0+
-"1"#6"?+(+O!b[+#&%-6.0#6+3(10"+&F+BK\+&.+
/BK\V
-"1"#6+(+126$&G-+."3".-"+-C2%+-C""?+F.&)+%&%"+
U]LLLV+6&+F(-6+U]9MMV+U&%1=+(3(21('1"+2F+=&0+
-"1"#6"?+(+O!b[+#&%-6.0#6+3(10"+&F+]K\+&.+
/]K\V
-"1"#6+(+126$&+-#(%+-C""?+F.&)+-1&@+UKLLLV+6&+
F(-6+UK9MMV+U&%1=+(3(21('1"+2F+=&0+-"1"#6"?+(+
O!b[+#&%-6.0#6+3(10"+&F+K[+&.+/K[V
-"1"#6+(+C(0-"+62)"+'"6@""%+.(%?&)+126$&+
-"1"#62&%-+F.&)+1&%J+UZLLLV+6&+-$&.6+UZ9MMV+
U&%1=+(3(21('1"+2F+=&0+-"1"#6"?+(+O!b[+
#&%-6.0#6+3(10"+&F+]Z_+&.+/]Z_V
-"1"#6+(+126$&+@$""1+F&.@(.?+-C2%+-C""?+F.&)+
-1&@+U`BL7V+6&+F(-6+U`B79V+U&%1=+(3(21('1"+2F+
=&0+-"1"#6"?+(+O!b[+#&%-6.0#6+3(10"+&F+`K\+
&.+/`K\V
-"1"#6+(+126$&+@$""1+."3".-"+-C2%+-C""?+F.&)+
F(-6+U`]79V+6&+-1&@+U`]L7V+U&%1=+(3(21('1"+2F+
=&0+-"1"#6"?+(+O!b[+#&%-6.0#6+3(10"+&F+`K\+
&.+/`K\V
-"1"#6+6$"+1"%-+60'"+C&-262&%
-"1"#6+(%+"FF"#6-+@$""1+C&-262&%D+F011+-C""?
-"1"#6+(%+"FF"#6-+@$""1+C&-262&%D+/KC""?
-"1"#6+(%+2%?232?0(1+"FF"#6G-+F&.@(.?+-C2%+-C""?+
F.&)+F(-6+UBLL7V+6&+-1&@+UB797V
"FF"#6+?&"-+%&6+-C2%
-"1"#6+(%+2%?232?0(1+"FF"#6G-+."3".-"+-C2%+-C""?+
F.&)+-1&@+U]LL7V+6&+F(-6+U]797V
!"#$%&'"()*+,-".+/(%0(1
7/85-3H*9:337-(>"%8-/23W-"'3W/,
&#()% &#()% &#()% &#()% &#()%
K#M#*%@ K#M#*%< K#M#*%J K#M#*%> K#M#*%?
5]5K
b\EZ
\+L7+8
\+7W
Z+L7+8
Z+7W
5]5K
]KL7+8
]K7W
K]L7+8
K]7W
]]L7+8
]]7W
Z]L7+8
Z]7W
ZKL7+8
ZK7W
/K\_
\]K!
E_5!
KZL78
KZ7W
QBP_
_OPc
/P[]
[OK_
5LL7+8
579R
LA7M+8
9M9AR
Q+LA7+8
Q+XAX
Q+7L+8
Q7WW
_+LA7+8
_+XAX
_+7L+8
_7WW
/[bB
/[L7+8
/[9S
O]bB
O]bZ
O/L7+8+
O/:L
KE[
!5/E
/5Z
Ib,]
pE]b
!"#$%&'"()*+,-".+/(%0(1
bk
+#",$.E-./(
F011=+&C"%+6$"+2.2-"1"#6+(+-C""?+6&+-6.&'"+6$"+'"()+?2()"6".D+
F.&)+-1&@+U\+L7V+6&+F(-6+U\+7WV
-"1"#6+(+.(%?&)+F."h0"%#=+6&+-6.&'"+6$"+'"()+
?2()"6".D+F.&)+1"--+&F6"%+UZ+L7V+6&+)&."+&F6"%+
UZ+7WV
-"1"#6+6$"+-C""?+6&+.()C+&C"%D+-1&@+U]KL7V+6&+
F(-6+U]K7WVD+6$"%+-%(C+-$06
-"1"#6+6$"+-C""?+6&+-%(C+&C"%D+6$"%+.()C+-$06+
-1&@+UK]L7V+6&+F(-6+UK]7WV
-"1"#6+6$"+-C""?+6&+.()C+&C"%D+6$"%+.()C+-$06+
-1&@+U]]L7V+6&+F(-6+UBB7WV
-"1"#6+6$"+.(%?&)+F."h0"%#=+6&+.()C+&C"%D+
F.&)+1"--+&F6"%+UZKL7V+6&+)&."+&F6"%+UZK7WVD+
6$"%+-%(C+-$06
-"1"#6+6$"+.(%?&)+F."h0"%#=+6&+-%(C+&C"%D+
6$"%+.()C+-$06+F.&)+1"--+&F6"%+UZ]L7V+6&+)&."+
&F6"%+UZK7WV
#1&-"+6$"+2.2-"1"#6+(+'"()+?2()"6".D+F.&)+-)(11+U5LL7V+6&+
1(.J"+U579RV
-"1"#6+(%+/KC""?+3(10"+2%+?"#2)(1+-"#&%?-+
F.&)+F(-6+ULA7MV+6&+-1&@+U9M9ARV
-"1"#6+6$"+_5/+(%?+B[,K+#&%-6.0#6G-+
#.&--F(?"+62)"+2%+2%#.")"%6-+&F+LA7
-"1"#6+6$"+_5/+(%?+B[,K+#&%-6.0#6G-+
#.&--F(?"+62)"+2%+2%#.")"%6-+&F+7
-"1"#6+6$"+?"1(=+62)"+2%+2%#.")"%6-+&F+LA7
-"1"#6+6$"+?"1(=+62)"+2%+2%#.")"%6-+&F+7
-"6+)(#.&+bBB
-"1"#6+(+F(#6&.=8C.&J.())"?+)(#.&+F.&)+7+8+9S
-"6+O(-".+P2)2%J+_"32#"+UOP_nV+bBBo
-"6+O(-".+P2)2%J+_"32#"+UOP_nV+bZ+
#&%62%0&0-1=o
-"1"#6+(+OP_n+-6.&'"+-C""?+F.&)+-1&@+UHA9M+
C".+-"#&%?+8+O/L7V+6&+F(-6+U9MM+C".+-"#&%?+8+
O/:LVo
-"1"#6+-"#&%?-+(-+6$"+0%26-+&F+62)"+0-"?+F&.+6$"+
QBP_+(%?+_OPc+#&%-6.0#6-"1"#6+)2%06"-+(-+6$"+0%26-+&F+62)"+0-"?+F&.+6$"+
QBP_+(%?+_OPc+#&%-6.0#6-"1"#6+$&0.-+(-+6$"+0%26-+&F+62)"+0-"?+F&.+6$"+
QBP_+(%?+_OPc+#&%-6.0#6".(-"+(%=+C.&J.())2%J+&F+6$"+#0.."%6+-#"%"+
'=+3&2?2%J+(11+#&%-6.0#6+3(10"-+a+)(.<+6$"+"%?+
&F+(+1&&C
W-"'3W/,
:*X
7/85-3H*9:337-(>"%8-/23W-"'3W/,
&#()% &#()% &#()% &#()% &#()%
K#M#*%@ K#M#*%< K#M#*%J K#M#*%> K#M#*%?
B]b/
[b\c
!b
\]K!
[P\!
KZL7+8+
KZ7W
_BO!
bkq
BPL7+8
BP7W
BdL78
Bd7W
!PL7+8+
!P7W
!dL7
!d7W
+#",$.E-./(
-"1"#6+(+-#"%"+6&+#&C=+F.&)+U-&0.#"+-#"%"V+F&.+
0-".+P
-"1"#6+(+-#"%"+6&+#&C=+F.&)+U-&0.#"+-#"%"V+F&.+
0-".+d
-"1"#6+(+-#"%"+6&+#&C=+6&+U?"-62%(62&%+-#"%"V+
F&.+0-".+P
-"1"#6+(+-#"%"+6&+#&C=+6&+U?"-62%(62&%+-#"%"V+
F&.+0-".+d
-"1"#6+(+-#"%"+6&+#(C60."+(+C."8C.&J.())"?+
-#"%"+6&+UF.&)+=&0.+_/Q+#&%6.&11".V
"%('1"+6$"+F(#6&.=8C.&J.())"?+7W+C."-"6+
-#"%"+-"h0"%#"+8+".(-"-+(%=+C."-"6+-#"%"-+
C."32&0-1=+C.&J.())"?
8%+6.Q3*21+(
The sections below explain how to access the individual menu options
shown in the fixture’s menu map.
@$$"%((.8%+6.K@>>EL
Use the Address menu to quickly change the current fixture number/
DMX start channel. Using this menu option, you can only change the
existing fixture number to another fixture number, or the existing DMX
start channel to another DMX start channel.
If you want to change the way you identify the fixture (i.e. change to a
fixture number instead of a DMX start channel, or vice versa), complete
the procedure described in “Changing the Control Method (CHNL)” on
page 3-13.
To change the current fixture number or DMX start channel:
1.
Press and hold the <Menu> button until “ADDR” appears on the LED
display.
2.
Press the <Enter> button to select the “ADDR” menu.
3.
Use the <Up> and <Down> arrow buttons to select a new DMX start
channel (C001 - C512) / fixture number (F 01 - F xx). The LED display
will flash when a new option is selected.
4.
Press the <Enter> button to accept the new fixture number / DMX start
channel. The LED display will stop flashing when a new option is
entered. If you do not press the <Enter> button, the new option you
selected will not be stored.
or
Note
:87L
W-"'34,#)%"0
Be sure you do not overlap fixture channel ranges when
changing the fixture number/DMX start channel.
!"#$%&'"()*+,-".+/(%0(1
4%*.8%+6.K4;!L
The Set menu allows you to change the control method from a fixture
number to a DMX start channel or vice versa, and either set all factory
options to their default settings or change the factory options
individually. The procedures below are listed in the order that they
appear in the menu map.
%())0+1$B&=)4-*$#('&<?).$RB";@S
Technobeam-i fixtures are shipped from the factory with the following
preset options set to the following defaults:
•
•
•
•
•
•
•
To
Pan/tilt swap = off
pan invert = off
tilt invert = off
preset playback = off
LED display = on and bright
LED display invert = off
lamp hour warning = off
return all preset options to their factory defaults settings:
5.
Press and hold the <Menu> button until “ADDR” appears on the LED
display.
6.
Using the <Up> and <Down> arrow buttons, scroll to the “SET” menu
and press the <Enter> button to select the “SET” menu.
7.
Using the <Up> and <Down> arrow buttons, scroll to the “FACT” menu.
(This will be the first menu displayed.) Press the <Enter> button to
select the “FACT” menu.
8.
Using the <Up> and <Down> arrow buttons, choose “ON” to set the
factory option defaults on and press the <Enter> button to select the
desired option.*
*Note
Although “OFF” is an available option in the FACT menu,
selecting the “OFF” option will have no effect on the
individual preset values. To change the value of any of
the individual presets listed above, you must access
each preset’s corresponding menu item. When you
change any of the preset default values individually, this
menu item will automatically be turned off.
!"#$%&'"()*+,-".+/(%0(1
W-"'34,#)%"0
:*77
%Q&LL0+1$O&+$&+,$@0?)$R%F"OS
To swap the fixture’s pan and tilt motion:
1.
Press and hold the <Menu> button until “ADDR” appears on the LED
display.
2.
Using the <Up> and <Down> arrow buttons, scroll to the “SET” menu
and press the <Enter> button to select the “SET” menu.
3.
Using the <Up> and <Down> arrow buttons, scroll to the “SWAP” menu
and press the <Enter> button to select the “SWAP” menu.
4.
Using the <Up> and <Down> arrow buttons, choose the “ON” option to
swap the fixture’s pan and tilt motion, or the “OFF” option to return the
fixture’s pan and tilt motion to their normal orientation. Press the
<Enter> button to select the desired option.
K+N(-)0+1$@0?)$R@TK7S
To invert the direction of the fixture’s tilt motion:
1.
Press and hold the <Menu> button until “ADDR” appears on the LED
display.
2.
Using the <Up> and <Down> arrow buttons, scroll to the “SET” menu
and press the <Enter> button to select the “SET” menu.
3.
Using the <Up> and <Down> arrow buttons, scroll to the “T/IN” menu
and press the <Enter> button to select the “T/IN” menu.
4.
Using the <Up> and <Down> arrow buttons, choose the “ON” option to
invert the fixture’s tilt motion, or the “OFF” option to return the
fixture’s tilt motion to normal orientation. Press the <Enter> button to
select the desired option.
K+N(-)0+1$O&+$ROTK7S
To invert the direction of the fixture’s pan motion:
1.
Press and hold the <Menu> button until “ADDR” appears on the LED
display.
2.
Using the <Up> and <Down> arrow buttons, scroll to the “SET” menu
and press the <Enter> button to select the “SET” menu.
3.
Using the <Up> and <Down> arrow buttons, scroll to the “P/IN” menu
and press the <Enter> button to select the “P/IN” menu.
4.
Using the <Up> and <Down> arrow buttons, choose the “ON” option to
invert the fixture’s pan motion, or the “OFF” option to return the
fixture’s pan motion to normal orientation. Press the <Enter> button to
select the desired option.
:879
W-"'34,#)%"0
!"#$%&'"()*+,-".+/(%0(1
;3&+10+1$)3($#0.L?&*$M<)L<)$R#%O!S
This menu item allows you to change the appearance of the fixture’s
alphanumeric LED display. You can set the display on or off, or you
can dim the display to reduce visibility.
To change the display output:
1.
Press and hold the <Menu> button until “ADDR” appears on the LED
display.
2.
Using the <Up> and <Down> arrow buttons, scroll to the “SET” menu
and press the <Enter> button to select the “SET” menu.
3.
Using the <Up> and <Down> arrow buttons, scroll to the “DSPL” menu
and press the <Enter> button to select the “DSPL” menu.
4.
Using the <Up> and <Down> arrow buttons, choose the “ON” option to
set the LED display to normal intensity, the “OFF” option to turn the
LED display off, or the “DIM” option to reduce the LED display
visibility. Press the <Enter> button to select the desired option.
Note
If you set the LED display off, the LED display will be
turned off only when you exit the menu system.
K+N(-)0+1$!H#$;3&-&=)(-.$R#TK7S
This menu item allows you to invert the orientation of the LED
display’s alphanumeric characters. This option is useful if your fixture
is standing upright (i.e., resting on its bottom panel on the floor).
To invert the LED display:
1.
Press and hold the <Menu> button until “ADDR” appears on the LED
display.
2.
Using the <Up> and <Down> arrow buttons, scroll to the “SET” menu
and press the <Enter> button to select the “SET” menu.
3.
Using the <Up> and <Down> arrow buttons, scroll to the “D/IN” menu
and press the <Enter> button to select the “D/IN” menu.
4.
Using the <Up> and <Down> arrow buttons, choose the “ON” option to
invert the fixture’s alphanumeric characters, or the “OFF” option to
return the fixture’s alphanumeric characters to normal orientation.
Press the <Enter> button to select the desired option.
;3&+10+1$)3($;4+)-4?$8()34,$R;U7!S
Use this menu item if your fixture is currently set to the fixture
number control method and instead, you want to use the DMX start
channel control method, or vice versa. To simply change an existing
fixture number to a different fixture number (or DMX start channel to a
different DMX start channel), see “Address Menu (ADDR)” on page 3-10.
!"#$%&'"()*+,-".+/(%0(1
W-"'34,#)%"0
:*7:
To change the control method:
1.
Press and hold the <Menu> button until “ADDR” appears on the LED
display.
2.
Using the <Up> and <Down> arrow buttons, scroll to the “SET” menu
and press the <Enter> button to select the “SET” menu.
3.
Using the <Up> and <Down> arrow buttons, scroll to the “CHNL” menu
and press the <Enter> button to select the “CHNL” menu.
4.
Using the <Up> and <Down> arrow buttons, choose either the “DMX”
option to address the fixture using a DMX start channel, or the “ADDR”
option to address the fixture using a fixture number. Press the
<Enter> button to select the desired option.
or
Note
After changing the control method, you must assign a
specific DMX start channel (C001 - C512) or fixture
number (F 01 - F xx) to each fixture (see “Address Menu
(ADDR)” on page 3-10).
%())0+1$)3($!&5L$F&-+0+1$8(..&1($R!8O!S
Use this menu item to enable your fixture to display the warning
message “LAMP LIFE ERR” when the current lamp hours exceed 2,000.
With this option enabled, after the current lamp hours exceed 2,200
hours, the fixture will display the warning message “LAMP OUT ERR.”
Once the lamp is extinguished, the fixture will no longer strike the
lamp until the current lamp is replaced and the current lamp hours are
reset to zero (see “Replacing the Lamp” on page 6-11 or “Resetting
Lamp Hours (L/RS)” on page 3-27).
To enable the lamp warning message:
1.
Press and hold the <Menu> button until “ADDR” appears on the LED
display.
2.
Using the <Up> and <Down> arrow buttons, scroll to the “SET” menu
and press the <Enter> button to select the “SET” menu.
3.
Using the <Up> and <Down> arrow buttons, scroll to the “LMPL” menu
and press the <Enter> button to select the “LMPL” menu.
4.
Using the <Up> and <Down> arrow buttons, choose the “ON” option to
enable the lamp warning message, or the “OFF” option to disable the
lamp warning message. Press the <Enter> button to select the desired
option.
or
;3&+10+1$)3($!(+.$%())0+1$R!H7%S
Use this menu item if you change the lenses in your fixture. Available
lens sets include standard, narrow angle, and wide angle lenses. To
obtain a different lens set, contact your High End Systems dealer/
distributor.
:87H
W-"'34,#)%"0
!"#$%&'"()*+,-".+/(%0(1
To change the lens setting:
1.
Press and hold the <Menu> button until “ADDR” appears on the LED
display.
2.
Using the <Up> and <Down> arrow buttons, scroll to the “SET” menu
and press the <Enter> button to select the “SET” menu.
3.
Using the <Up> and <Down> arrow buttons, scroll to the “LENS” menu
and press the <Enter> button to select the “LENS” menu.
4.
or
Using the <Up> and <Down> arrow buttons, choose the “NORM” option
for standard or narrow angle lenses, the “WIDE” option for wide angle
lenses, or the “NARW” option for standard or narrow angle lenses with
increased lens tube travel for a greater throw distance.
or
Note
5.
The “NARW” option is not for use with wide angle lenses.
Press the <Enter> button to select the desired option.
81$%.8%+6.K8Q>;L
The Mode menu allows you to set the fixture type and protocol and
crossload software versions from one fixture to all other Technobeam-i
fixtures on the link. The procedures below are listed in the order that
they appear on the menu map.
%())0+1$)3($B0C)<-($@*L($&+,$O-4)4=4?$R@VOHS
Use this menu item to change the fixture type and protocol. The
protocol is specific to the fixture and determines the number of DMX
channels the fixture will use.
Note
Although Technopro and Technoray fixtures have been
discontinued, their menu options still exist in the
protocol.
Available protocols are listed below:
•
TB F
•
TB R
(Technobeam full protocol) - for use with Technobeam
fixtures without an iris. This protocol uses 18 DMX
channels and is recommended, unless you need to
conserve the extra four DMX channels for other devices on
the link. The full protocol gives you more control over pan
and tilt position and litho spin speed. This protocol allows
you to access the Laser Aiming Device™ (LAD) or macros.
(Technobeam reduced protocol) - for use with Technobeam
fixtures only. This protocol uses 14 DMX channels. You
should use this protocol if you need to conserve the extra
four DMX channels for other devices on the link, and your
fixtures do not have an iris.
!"#$%&'"()*+,-".+/(%0(1
W-"'34,#)%"0
:*7M
•
•
•
•
•
(Technoray full protocol) - for use with Technoray fixtures
only. This protocol uses 14 channels and is recommended,
unless you need to conserve the extra two DMX channels
for other devices on the link. The full protocol gives you
more control over the rotating litho wheel position and
litho spin speed and allows you to access the macros.
TR R (Technoray reduced protocol) - for use with Technoray
fixtures only. This protocol uses 12 DMX channels.
TPRO (Technopro protocol) - for use with Technopro fixtures
only. This protocol uses 12 DMX channels.
TB I
(Technobeam-i protocol) - for use with Technobeam-i
fixtures (fixtures with an iris). This protocol uses 18 DMX
channels and allows you to access the Laser Aiming
Device™ (LAD) or macros.
TLCD (Technopro LCD protocol) - for use with Technopro fixtures
controlled with an LCD controller. This protocol uses 18
DMX channels and allows you to access the macros.
TR F
To set the fixture type and protocol:
1.
Press and hold the <Menu> button until “ADDR” appears on the LED
display.
2.
Using the <Up> and <Down> arrow buttons, scroll to the “MODE” menu
and press the <Enter> button to select the “MODE” menu.
3.
Using the <Up> and <Down> arrow buttons, scroll to the “TYPE” menu.
(This will be the first menu displayed). Press the <Enter> button to
select the “TYPE” menu.
4.
Using the <Up> and <Down> arrow buttons, choose the desired option
(listed above) and press the <Enter> button to select the desired
option.*
*Note
This option has a 5-second delay to avoid inadvertent
changes. To change the fixture type, you must press and
hold the <Enter> button for at least 5 seconds.
%())0+1$)3($D.(-$@*L($RD%H9S
Use this menu item to change the fixture’s user type from user A to
user B or vice versa. Each user type includes 16 different presets
(scenes) and the following fixture settings:
•
•
•
•
•
•
:87W
Fixture Address
Pan Invert
Tilt Invert
Pan/Tilt Swap
Control Method (addressing via fixture number or DMX start
channel)
Display Settings (On, Off, or Dim)
W-"'34,#)%"0
!"#$%&'"()*+,-".+/(%0(1
• Display Character Invert
• Lamp Warning Message
Changing the user type allows you to access 16 different scenes, and
allows you to access a set of “default” fixture settings. For example, if
your fixture’s settings (listed above) are designed for a specific
location in your truss and you need to move the fixture to a new
location, you could change the user type to user “B” for the settings
needed at the new location, and change the user type back to user “A”
when you move the fixture back to its original location.
To change the user type:
1.
Press and hold the <Menu> button until “ADDR” appears on the LED
display.
2.
Using the <Up> and <Down> arrow buttons, scroll to the “MODE” menu
and press the <Enter> button to select the “MODE” menu.
3.
Using the <Up> and <Down> arrow buttons, scroll to the “USER” menu
and press the <Enter> button to select the “USER” menu.
4.
Using the <Up> and <Down> arrow buttons, choose the “A” option to
select user A settings, or the “B” option to select user B settings. Press
the <Enter> button to select the desired option.
or
;4L*0+1$D.(-$O-(.().$RO9%@S
Use this menu item to copy the fixture’s user preset scenes from user A
to user B or vice versa. Each user type includes 16 different presets
(scenes) which can be copied to a different user type.
Note
This options copies all 16 presets at one time. To copy
an individual scene, see “Copying an On-Board Memory
Scene (COPY)” on page 3-29.
To copy user presets:
1.
Press and hold the <Menu> button until “ADDR” appears on the LED
display.
2.
Using the <Up> and <Down> arrow buttons, scroll to the “MODE” menu
and press the <Enter> button to select the “MODE” menu.
3.
Using the <Up> and <Down> arrow buttons, scroll to the “USER” menu
and press the <Enter> button to select the “USER” menu.
4.
Using the <Up> and <Down> arrow buttons, scroll to the “COPY” menu
and press the <Enter> button to select the “COPY” menu.
5.
Using the <Up> and <Down> arrow buttons, scroll to the “PRST” menu
and press the <Enter> button to select the “PRST” menu.
!"#$%&'"()*+,-".+/(%0(1
W-"'34,#)%"0
:*7R
6.
or
Using the <Up> and <Down> arrow buttons, choose the “A #!$” option
to copy user A presets to user B, or the “B #!%” option to copy user B
presets to user A. Press the <Enter> button to select the desired
option.
;4L*0+1$D.(-$%())0+1.$R%H@@S
Use this menu item to copy the fixture’s user settings from user A to
user B or vice versa. The user settings for each user type are listed in
the section titled “Setting the User Type (USER)” on page 3-16.
Note
This options copies all user settings at one time.
To copy user settings:
1.
Press and hold the <Menu> button until “ADDR” appears on the LED
display.
2.
Using the <Up> and <Down> arrow buttons, scroll to the “MODE” menu
and press the <Enter> button to select the “MODE” menu.
3.
Using the <Up> and <Down> arrow buttons, scroll to the “USER” menu
and press the <Enter> button to select the “USER” menu.
4.
Using the <Up> and <Down> arrow buttons, scroll to the “COPY” menu
and press the <Enter> button to select the “COPY” menu.
5.
Using the <Up> and <Down> arrow buttons, scroll to the “SETT” menu
and press the <Enter> button to select the “SETT” menu.
6.
Using the <Up> and <Down> arrow buttons, choose the “A #!B” option
to copy user A settings to user B, or the “B #!A” option to copy user B
settings to user A. Press the <Enter> button to select the desired
option.
or
;4L*0+1$D.(-$O-(.().$&+,$%())0+1.$R"!!S
Use this menu item to copy the fixture’s 16 user presets and fixture
settings from user A to user B or vice versa. The user settings for each
user type are listed in the section titled “Setting the User Type (USER)”
on page 3-16.
Note
This options copies all user settings and all 16 presets at
one time.
To copy user presets and settings:
1.
Press and hold the <Menu> button until “ADDR” appears on the LED
display.
2.
Using the <Up> and <Down> arrow buttons, scroll to the “MODE” menu
and press the <Enter> button to select the “MODE” menu.
3.
Using the <Up> and <Down> arrow buttons, scroll to the “USER” menu
and press the <Enter> button to select the “USER” menu.
:87S
W-"'34,#)%"0
!"#$%&'"()*+,-".+/(%0(1
4.
Using the <Up> and <Down> arrow buttons, scroll to the “COPY” menu
and press the <Enter> button to select the “COPY” menu.
5.
Using the <Up> and <Down> arrow buttons, scroll to the “ALL” menu
and press the <Enter> button to select the “ALL” menu.
6.
Using the <Up> and <Down> arrow buttons, choose the “A #!B” option
to copy all user A presets and settings to user B, or the “B #!A” option
to copy all user B presets and settings to user A. Press the <Enter>
button to select the desired option.
or
;-4..?4&,0+1$B0C)<-($%4')Q&-($RA!#S
If you have a Technobeam-i fixture with a newer software version, you
can crossload the newer software to all other Technobeam-i fixtures on
the link.
To crossload software:
1.
Disconnect or bypass any controllers, serial data distributors, data line
optoisolators, and any fixtures using RS-422 communications (such as
Dataflash® AF1000 xenon strobes, Intellabeam® fixtures, and Emulator®
laser simulators). These devices will block communication between
your crossloading fixture and any other Technobeam-i fixtures on the
link.
2.
On the crossloading fixture only, press and hold the <Menu> button
until “ADDR” appears on the LED display.
3.
Using the <Up> and <Down> arrow buttons, scroll to the “MODE” menu
and press the <Enter> button to select the “MODE” menu.
4.
Using the <Up> and <Down> arrow buttons, scroll to the “XLD” option
and press the <Enter> button to select the “XLD” option.* The fixture
will upload its software to all other Technobeam-i fixtures on the link.
*Note
This option has a 5-second delay to avoid inadvertent
changes. To crossload fixture software, you must press
and hold the <Enter> button for at least 5 seconds.
The Transmit LED on the crossloading fixture will remain on (or
flicker). The Transmit and Receive LEDs on receiving fixtures will
flicker while the crossload is in progress, and “UPLD” will appear on the
alphanumeric display as each fixture receives the software upload.
When the crossload has finished successfully, “DONE” will appear
briefly in the LED display of the crossloading fixture, and all other
fixtures will home.
Note
If a new boot code was included with the latest software,
the LED will display a “BOOT DIFF” error. To correct the
boot code, you must copy the new boot code for each
fixture (see “Copying the Boot Code (BOOT)” on page
3-21).
!"#$%&'"()*+,-".+/(%0(1
W-"'34,#)%"0
:*7X
!%(*.8%+6.K!;4!L
The Test menu allows you to manually home the fixture, turn the lamp
on or off, store new boot code information, perform fixture self tests,
and place the fixture in setup mode. If you are experiencing problems
that you suspect are mechanical, performing fixture self tests will help
to determine where the problem originates. The procedures below are
listed in the order that they appear on the menu map.
Note
To see the effects of the self tests, the lamp must be on.
If the lamp is off when you run the self test, the LED will
display “STRK” to indicate that the lamp is not struck,
and the fixture will attempt to strike the lamp
automatically.
U450+1$)3($B0C)<-($RUM8HS
This menu item allows you to manually home the fixture. If you want
to remotely home the fixture (using a DMX controller), use the control
channel (DMX channel 18) (see Table 1 on page A-3 or Table 2 on page
A-8).
To manually home the fixture:
1.
Press and hold the <Menu> button until “ADDR” appears on the LED
display.
2.
Using the <Up> and <Down> arrow buttons, scroll to the “TEST” menu
and press the <Enter> button to select the “TEST” menu.
3.
Using the <Up> and <Down> arrow buttons, scroll to the “HOME”
option. (This will be the first option displayed.)
4.
Press the <Enter> button to select the “HOME” option. The LED will
alternately display “RST” and “HOME” while the fixture homes.
@<-+0+1$)3($!&5L$M+$4-$M''$R!"8OS
You can manually turn the lamp on and off using either the TEST menu
or the SET menu.
To manually turn the lamp on or off via the TEST menu:
1.
Press and hold the <Menu> button until “ADDR” appears on the LED
display.
2.
Using the <Up> and <Down> arrow buttons, scroll to the “TEST” menu
and press the <Enter> button to select the “TEST” menu.
3.
Using the <Up> and <Down> arrow buttons, scroll to the “LAMP” menu
and press the <Enter> button to select the “LAMP” menu.
4.
Using the <Up> and <Down> arrow buttons, choose the “ON” option to
strike the lamp, the “OFF” option to extinguish the lamp.
:89L
W-"'34,#)%"0
!"#$%&'"()*+,-".+/(%0(1
5.
Press the <Enter> button to select the desired option.
;4L*0+1$)3($G44)$;4,($RGMM@S
When you upload new software to Technobeam-i fixtures, the new
software may contain a new boot code which must be copied to each
fixture. This is apparent if the LED displays a “BOOT DIFF” error. Do
not remove power from the fixture while performing a boot copy. You
can copy the new boot code using either the TEST menu or the SET
menu.
To accept and store the new boot code using the TEST menu:
1.
Press and hold the <Menu> button until “ADDR” appears on the LED
display.
2.
Using the <Up> and <Down> arrow buttons, scroll to the “TEST” menu
and press the <Enter> button to select the “TEST” menu.
3.
Using the <Up> and <Down> arrow buttons, scroll to the “BOOT” option
and press the <Enter> button to select the “BOOT” option. The fixture
will store the new boot code, then automatically home.
O(-'4-50+1$%(?'$@(.).$R%H!BS
This menu item performs the appropriate self tests for the following:
•
•
•
•
•
•
•
•
•
•
ALL - performs all of the self tests listed below
PAN - moves the pan motor from 0° to 180°
TILT - moves the tilt motor from 0° to 95°
COL - tests color wheel movement
LTO - tests litho wheel movement
FX - tests effects wheel movement
FCUS - tests lens tube movement
IRIS - tests iris movement
SHUT - tests shutter strobe functions
DIM - tests shutter dim flag movement
To perform a self test:
1.
Press and hold the <Menu> button until “ADDR” appears on the LED
display.
2.
Using the <Up> and <Down> arrow buttons, scroll to the “TEST” menu
and press the <Enter> button to select the “TEST” menu.
3.
Using the <Up> and <Down> arrow buttons, scroll to the “SELF” menu
and press the <Enter> button to select the “SELF” menu.
4.
Using the <Up> and <Down> arrow buttons, scroll to the desired option
(listed above). Press the <Enter> button to select the desired option.
The fixture will perform the selected self test.
5.
Press the <Menu> button to exit the test.
!"#$%&'"()*+,-".+/(%0(1
W-"'34,#)%"0
:*97
Note
The self tests will run continuously until you press the
<Menu> button to exit the test.
O?&=0+1$)3($B0C)<-($0+$%()<L$84,($R%TDOS
This menu item allows you to place the fixture in setup mode so that
you can mechanically home your fixture. If the fixture is out of home
(i.e., the iris or dim flags lose position), will emit an unusually loud
clicking noise when strobing or electronically homing. For more
information on how to mechanically home the fixture, contact High
End Systems customer service.
To place the fixture in setup mode:
1.
Press and hold the <Menu> button until “ADDR” appears on the LED
display.
2.
Using the <Up> and <Down> arrow buttons, scroll to the “TEST” menu
and press the <Enter> button to select the “TEST” menu.
3.
Using the <Up> and <Down> arrow buttons, scroll to the “S/UP” option
and press the <Enter> button to select the “S/UP” option.
4.
When the LED displays “SET NOW,” mechanically home the fixture.
5.
After mechanically homing the fixture, press any button. This causes
the fixture to electronically home.
@(.)0+1$)3($!H#$#0.L?&*$R#K%OS
To perform a self-test on the alphanumeric LED display:
1.
Press and hold the <Menu> button until “ADDR” appears on the LED
display.
2.
Using the <Up> and <Down> arrow buttons, scroll to the “TEST” menu
and press the <Enter> button to select the “TEST” menu.
3.
Using the <Up> and <Down> arrow buttons, scroll to the “DISP” option
and press the <Enter> button to select the “DISP” option. The LED will
run through its self test.
4.
Press the <Menu> button to exit the test.
Note
The self test will run continuously until you press the
<Menu> button to exit the test.
/+01"&#*21+.8%+6.K/J,QL
The Information menu allows you to view current fixture information
such as internal temperature, lamp hours, total fixture hours, lamp
strikes, software version, DMX errors, sensor information, and DMX
data for any other device on the link. You can also reset the lamp
:899
W-"'34,#)%"0
!"#$%&'"()*+,-".+/(%0(1
hours or fixture hours. The procedures below are listed in the order
that they appear on the menu map.
/0(Q0+1$)3($!410=$G4&-,$@(5L(-&)<-($R@H8OS
To view the current logic board temperatures:
1.
Press and hold the <Menu> button until “ADDR” appears on the LED
display.
2.
Using the <Up> and <Down> arrow buttons, scroll to the “INFO” menu
and press the <Enter> button to select the “INFO” menu.
3.
Using the <Up> and <Down> arrow buttons, scroll to the “TEMP” option.
(This will be the first menu displayed.) Press the <Enter> button to
select the “TEMP” option.
4.
The LED will display the temperature of the fixture’s logic board in
degrees centigrade.
The maximum temperature reading for the logic board is 76° C. If this
maximum temperature is exceeded, the fixture’s lamp, LAD, and
motors will shut down and the LED panel will display “OVER TEMP.”
/0(Q0+1$)3($;<--(+)$!&5L$U4<-.$R!TU9S
To view the number of hours the lamp has been on since this option
was reset:
1.
Press and hold the <Menu> button until “ADDR” appears on the LED
display.
2.
Using the <Up> and <Down> arrow buttons, scroll to the “INFO” menu
and press the <Enter> button to select the “INFO” menu.
3.
Using the <Up> and <Down> arrow buttons, scroll to the “L/HR” option
and press the <Enter> button to select the “L/HR” option. The LED will
display the number of hours the lamp has been on since this option
was reset.
/0(Q0+1$)3($;<--(+)$B0C)<-($U4<-.$RBTU9S
To view the number of hours the fixture has been on since this option
was reset:
1.
Press and hold the <Menu> button until “ADDR” appears on the LED
display.
2.
Using the <Up> and <Down> arrow buttons, scroll to the “INFO” menu
and press the <Enter> button to select the “INFO” menu.
3.
Using the <Up> and <Down> arrow buttons, scroll to the “F/HR” option
and press the <Enter> button to select the “F/HR” option. The LED will
display the number of hours the fixture has been on since this option
was reset.
!"#$%&'"()*+,-".+/(%0(1
W-"'34,#)%"0
:*9:
/0(Q0+1$)3($7<5>(-$4'$;<--(+)$!&5L$%)-02(.$R!T%@S
To view the number of times the fixture has attempted to strike (turn
on) the current lamp:
1.
Press and hold the <Menu> button until “ADDR” appears on the LED
display.
2.
Using the <Up> and <Down> arrow buttons, scroll to the “INFO” menu
and press the <Enter> button to select the “INFO” menu.
3.
Using the <Up> and <Down> arrow buttons, scroll to the “L/ST” option
and press the <Enter> button to select the “L/ST” option. The LED will
display the number of times the fixture has struck the current lamp.
Note
Lamp strikes are automatically reset when the lamp
hours are reset (see “Resetting Lamp Hours (L/RS)” on
page 3-27 below).
/0(Q0+1$)3($;<--(+)$%4')Q&-($/(-.04+$R/H9S
To view the current software version:
1.
Press and hold the <Menu> button until “ADDR” appears on the LED
display.
2.
Using the <Up> and <Down> arrow buttons, scroll to the “INFO” menu
and press the <Enter> button to select the “INFO” menu.
3.
Using the <Up> and <Down> arrow buttons, scroll to the “VER” option
and press the <Enter> button to select the “VER” option. The LED will
display the fixture’s current software version.
Note
The software version is also displayed when you exit the
menu system and the normal alphanumeric display
cycles between displaying the software version, the
fixture name, and the fixture address.
/0(Q0+1$#8A$%)&)<.$&+,$;4+.)-<=)$/&?<(.$RBKA@S
This menu option allows you to view DMX status and construct values
for the fixture. You should follow this procedure if you are having a
particular problem with a fixture; for example, a color wheel that does
not respond to commands from the controller.
The following DMX status information is available for viewing:
•
•
•
•
:89H
BRKS - number of DMX breaks (framing errors with zero data)
FE - number of framing errors with a non-zero value (errors in data
transmission)
OV - overruns (changing values could indicate data link/connector
problems)
STRT - start code
W-"'34,#)%"0
!"#$%&'"()*+,-".+/(%0(1
The following construct values are available for viewing:
•
•
•
•
•
•
•
•
•
•
•
•
•
•
•
•
•
•
PANH - high 8-bit pan
PANL - low 8-bit pan
TLTH - high 8-bit tilt
TLTL - low 8-bit pan
COLC - color control channel
COL - color wheel position
LTOC - litho control channel
LTO - litho wheel position
LTR - litho rotation
FCUS - lens tube position
FX - effects wheel position
FXR - effects wheel rotation
IRIS - iris position*
SHUT - shutter strobe
DIM - shutter dim flag
MSPD - MSpeed time
LAD - Laser Aiming Device*
CNTL - control channel
*Note
If your Technobeam-i does not have an iris and/or Laser
Aiming Device (LAD), the iris and LAD-related constructs
will have no functionality.
To view the DMX status and construct values:
1.
Press and hold the <Menu> button until “ADDR” appears on the LED
display.
2.
Using the <Up> and <Down> arrow buttons, scroll to the “INFO” menu
and press the <Enter> button to select the “INFO” menu.
3.
Using the <Up> and <Down> arrow buttons, scroll to the “DMX” menu
and press the <Enter> button to select the “DMX” menu.
4.
Using the <Up> and <Down> arrow buttons, scroll to the “FIXT” menu
and press the <Enter> button to select the “FIXT” menu.
5.
Using the <Up> and <Down> arrow buttons, scroll to the desired DMX
status or construct (listed above) and press the <Enter> button to
select the desired option. The LED will display the selected DMX status
or construct value.
If you are having a particular problem with the fixture, follow the steps
above to select a construct and view its value. After noting the value of
the construct you selected, use your controller to change that
construct’s value.
If the value changes on the fixture’s LED display, but the fixture still
does not respond, contact High End Systems customer service.
However, if the value does not change on the fixture’s LED display,
remove the fixture from the DMX link and try to change the construct’s
!"#$%&'"()*+,-".+/(%0(1
W-"'34,#)%"0
:*9M
value using the fixture’s menu system. If the fixture then functions
normally, the problem was likely with the DMX link. Otherwise,
contact High End Systems customer service.
/0(Q0+1$#8A$#&)&$'4-$"+4)3(-$#(N0=($R#"@"S
This procedure allows you to use an Technobeam-i fixture to view DMX
channel values for other devices on the DMX link. You should use this
procedure either for testing devices that do not have built-in DMX
diagnostics, or for fixtures that are physically inconvenient to monitor
directly.
Note
You can only view DMX channel values for devices which
have a channel range less than the viewing fixture’s
channel range.
To view DMX data for another device on the DMX link:
1.
Press and hold the <Menu> button until “ADDR” appears on the LED
display.
2.
Using the <Up> and <Down> arrow buttons, scroll to the “INFO” menu
and press the <Enter> button to select the “INFO” menu.
3.
Using the <Up> and <Down> arrow buttons, scroll to the “DMX” menu
and press the <Enter> button to select the “DMX” menu.
4.
Using the <Up> and <Down> arrow buttons, scroll to the “DATA” menu
and press the <Enter> button to select the “DATA” menu.
5.
Using the <Up> and <Down> arrow buttons, scroll to the desired DMX
channel (C001 - C512) and press the <Enter> button to select the
desired DMX channel. The LED will display the selected channel’s DMX
value.
to
If you are experiencing a particular problem with a device on the link,
follow the steps above to select a DMX channel in the device’s channel
range and view its DMX value. After noting the value of the channel
you selected, use your controller to change that channel’s value.
If the value of the DMX channel you selected does not change, there
may be a problem with the DMX cable or your transmitting device (i.e.
controller).
However, if the DMX channel value changes, but the device does not
respond, the device may be faulty. Consult the documentation
provided with that device for more information.
/0(Q0+1$%(+.4-$K+'4-5&)04+$R%H7%S
This menu option allows you to view whether a specified sensor if
working correctly. If you receive a “SENS ERR” error message on the
alphanumeric LED display, this information may help you determine
where the problem originates.
:89W
W-"'34,#)%"0
!"#$%&'"()*+,-".+/(%0(1
The following sensor information is available:
•
•
•
•
LTR - view whether the litho rotate (within the wheel) sensor is
obstructed (“OFF”) or is not obstructed (“ON”)
LTO - view whether the litho wheel sensor is obstructed (“OFF”) or
is not obstructed (“ON”)
COLR -view whether the color wheel sensor is obstructed (“OFF”) or
is not obstructed (“ON”)
FX - view whether the effects wheel sensor is obstructed (“OFF”)
or is not obstructed (“ON”)
To view the specified sensor information:
1.
Press and hold the <Menu> button until “ADDR” appears on the LED
display.
2.
Using the <Up> and <Down> arrow buttons, scroll to the “INFO” menu
and press the <Enter> button to select the “INFO” menu.
3.
Using the <Up> and <Down> arrow buttons, scroll to the “SENS” menu
and press the <Enter> button to select the “SENS” menu.
4.
Using the <Up> and <Down> arrow buttons, scroll to the desired option
(listed above) and press the <Enter> button to select the desired option
to view its sensor information.
9(.())0+1$B0C)<-($U4<-.$RBT9%S
This menu item allows you to track the number of hours the fixture has
been operating.
To reset the fixture hours to zero:
1.
Press and hold the <Menu> button until “ADDR” appears on the LED
display.
2.
Using the <Up> and <Down> arrow buttons, scroll to the “INFO” menu
and press the <Enter> button to select the “INFO” menu.
3.
Using the <Up> and <Down> arrow buttons, scroll to the “F/RS” option
and press the <Enter> button to select the “F/RS” option*. The LED will
display “0000” when the fixture hours are reset.
*Note
This option has a 5-second delay to avoid inadvertent
changes. To reset the fixture hours, you must press and
hold the <Enter> button for at least 5 seconds.
9(.())0+1$!&5L$U4<-.$R!T9%S
This menu item allows you to track the number of hours the lamp has
been operating. You should reset the lamp hours every time you
change the lamp.
!"#$%&'"()*+,-".+/(%0(1
W-"'34,#)%"0
:*9R
To reset the current lamp hours to zero:
1.
Press and hold the <Menu> button until “ADDR” appears on the LED
display.
2.
Using the <Up> and <Down> arrow buttons, scroll to the “INFO” menu
and press the <Enter> button to select the “INFO” menu.
3.
Using the <Up> and <Down> arrow buttons, scroll to the “L/RS” option
and press the <Enter> button to select the “L/RS” option*. The LED will
display “0000” when the lamp hours are reset.
*Note
This option has a 5-second delay to avoid inadvertent
changes. To reset the lamp hours, you must press and
hold the <Enter> button for at least 5 seconds.
)"%(%*.8%+6.K)E4!L
The Preset menu allows you to turn preset playback off or on, view
which scene is currently playing, and create/edit a scene using the onboard memory to program the fixture for stand-alone operation. This
menu also allows you to copy a scene within the fixture’s on-board
memory, capture a scene from your DMX controller to the fixture’s onboard memory, and enable the fixture’s factory-programmed preset
sequence (self demo).
%())0+1$O-(.()$O?&*>&=2$RO!"VS
This menu option allows you to turn preset playback on or off and
view which scene is currently playing in preset playback mode.
To set preset playback on or off, or to view the current scene:
1.
Press and hold the <Menu> button until “ADDR” appears on the LED
display.
2.
Using the <Up> and <Down> arrow buttons, scroll to the “PRST” menu.
Press the <Enter> button to select the “PRST” menu.
3.
Using the <Up> and <Down> arrow buttons, scroll to the “PLAY” menu.
(This will be the first option displayed). Press the <Enter> button to
select the “PLAY” menu.
4.
Using the <Up> and <Down> arrow buttons, scroll to the “ON” option to
set preset playback on, the “OFF” option to set preset playback off, or
the “SCN” option to display which scene is currently playing. Press the
<Enter> button to select the desired option.
Note
:89S
W-"'34,#)%"0
Scene 1 must be programmed before the fixture can play
back scenes.
!"#$%&'"()*+,-".+/(%0(1
H,0)0+1$4-$;-(&)0+1$&+$M+6G4&-,$8(54-*$%=(+($RH#K@S
This menu item allows you to edit or create a scene using the fixture’s
on-board scene memory. Using this menu option, you can change the
value of any construct in any of the on-board scenes. For detailed
information on editing or creating a scene, see Chapter 4.
To edit/create a scene:
to
1.
Press and hold the <Menu> button until “ADDR” appears on the LED
display.
2.
Using the <Up> and <Down> arrow buttons, scroll to the “PRST” menu
and press the <Enter> button to select the “PRST” menu.
3.
Using the <Up> and <Down> arrow buttons, scroll to the “EDIT” menu
and press the <Enter> button to select the “EDIT” menu.
4.
Using the <Up> and <Down> arrow buttons, scroll to the scene (“SN01”
to “SN16”) that you want to edit or create and press the <Enter> button
to select the desired scene.
;4L*0+1$&+$M+6G4&-,$8(54-*$%=(+($R;MOVS
1.
Press and hold the <Menu> button until “ADDR” appears on the LED
display.
2.
Using the <Up> and <Down> arrow buttons, scroll to the “PRST” menu
and press the <Enter> button to select the “PRST” menu.
3.
Using the <Up> and <Down> arrow buttons, scroll to the “COPY” menu
and press the <Enter> button to select the “COPY” menu.
4.
The LED will display “FROM.” Press the <Enter> button to enter the
“FROM” menu.
5.
Using the <Up> and <Down> arrow buttons, scroll to the scene that you
want to copy from (source scene) for either user A (“FA01” - “FA16”) or
user B (“FB01” - “FB16”). Press the <Enter> button to select the desired
scene.
6.
The LED will display “TO.” Press the <Enter> button to enter the “TO”
menu.
7.
Using the <Up> and <Down> arrow buttons, scroll to the scene that you
want to copy to (destination scene) for either user A (“TA01” - “TA16”)
or user B (“TB01” - “TB16”). Press the <Enter> button to select the
desired scene.
to
to
The fixture will copy the desired scene to the selected scene location.
When the fixture finishes the copy successfully, “DONE” will appear
briefly in the fixture’s LED display.
;&L)<-0+1$&$O-(.()$%=(+($R;"O@S
Preset capturing is a way to automate the creation of scenes on
multiple Technobeam-i fixtures connected to a DMX 512 link. Use a
!"#$%&'"()*+,-".+/(%0(1
W-"'34,#)%"0
:*9X
DMX controller to create a scene, then save (capture) the scene into a
fixture’s presets to play back the scene without the controller.
After creating a scene with your DMX controller, follow the instructions
below for each fixture on which you want to capture preset scenes:
1.
Press and hold the <Menu> button until “ADDR” appears on the LED
display.
2.
Using the <Up> and <Down> arrow buttons, scroll to the “PRST” menu
and press the <Enter> button to select the “PRST” menu.
3.
Using the <Up> and <Down> arrow buttons, scroll to the “CAPT” menu
and press the <Enter> button to select the “CAPT” menu.
4.
Using the <Up> and <Down> arrow buttons, scroll to the scene you
want to copy the preset scene to (destination scene) and press the
<Enter> button.
!"
Pressing the <Enter> button will copy the DMX-512 controller’s preset
scene to the selected scene on your fixture’s on-board 16 scene
memory. When the fixture finishes the capture successfully, “DONE”
will appear briefly in the fixture’s LED display.
Note
You must use the fixture’s on-board scene memory to
manually select values for the XFAD, DLAY, and TIME
constructs, since a DMX controller will not transmit
those construct values. For more information on using
the fixture’s on-board scene memory, refer to the
Technobeam® User Manual.
H+&>?0+1$)3($O-(.()$#('&<?)$R#B!@S
This menu item enables the factory-programmed 16 preset sequence
or fixture self demo. Enabling this menu item will erase any preprogrammed scenes or construct values on your fixture’s on-board
memory for either user A or user B.
To enable the self-demo:
1.
Press and hold the <Menu> button until “ADDR” appears on the LED
display.
2.
Using the <Up> and <Down> arrow buttons, scroll to the “PRST” menu
and press the <Enter> button to select the “PRST” menu.
3.
Using the <Up> and <Down> arrow buttons, scroll to the “DFLT” menu
and press the <Enter> button to select the “DFLT” menu. The LED
display will show “OK?”
4.
Press the <Enter> button to enable the self-demo or press <Menu> to
exit the menu option.
Note
:8:L
W-"'34,#)%"0
To play the fixture’s self-demo, you must set preset
playback on (see “Setting Preset Playback (PLAY)” on page
3-28).
!"#$%&'"()*+,-".+/(%0(1
*+,-#.$/=!
1$.3.#/1$%2$,>>)"2
Programming Overview ...................................................................................4-2
What is a “Scene”? ...............................................................................4-2
Stand-alone Operation vs. a Controller ..............................................4-2
Macros ................................................................................................4-2
Preset Playback Options .....................................................................4-3
General Information ...........................................................................4-3
Subject to Change ..................................................................4-3
Enter and Menu Keys .............................................................4-3
MSpeed vs. Fast Changes .......................................................4-3
Selecting Constructs and Values ...........................................4-4
Creating a Scene ..............................................................................................4-4
Orienting and Powering On the Fixture ..............................................4-4
Turning on the Lamp ..........................................................................4-4
Opening the Shutter ...........................................................................4-5
Positioning the Mirror ........................................................................4-6
Focusing on a Litho ............................................................................4-6
Selecting Color Wheel Constructs ......................................................4-6
Selecting a Color Wheel Pause Time ...................................................4-7
Selecting Effects Constructs ...............................................................4-7
Refocusing the Fixture .......................................................................4-7
Setting a Delay Time ..........................................................................4-7
Creating Scene 2 .................................................................................4-8
Playing Back Both Scenes ...................................................................4-8
Synchronizing Preset Playback .......................................................................4-9
Setting Up the Fixtures .......................................................................4-9
Adding Fixtures ............................................................................... 4-11
Capturing Presets ......................................................................................... 4-11
!"#$%&'"()*+,-".+/(%0(1
H*7
)"1:"#&&2+:.QA%"A2%?
This chapter explains how to create and play back scenes using the
fixture’s onboard 16-scene memory, and has a step-by-step example.
More information about preset programming can be found on the
Technobeam Quick Reference Card (p/n 60600109, v1.0 or later).
9G#*.2(.#.\47%+%][
A scene (which can also be called a page or look) is a combination of the
constructs you configure. A construct is a unique fixture feature—for
example, focus, color or rotating effects. Each scene consists of all of
the constructs you select; you can make each scene as simple or
complex as you want.
When you play back more than one scene in sequence, it becomes a
program (also called a show). A program or show that continuously
repeats is called a loop or a chase.
Technobeam fixtures always play back all contiguously-programmed
scenes in a continuous loop. The loop plays back until you either turn
the fixture off or stop scene playback. You must create the scenes
contiguously (in other words, scene 1, scene 2, scene 3, scene 4, and so
on without skipping a scene) because the fixture automatically repeats
when it encounters the first unprogrammed scene or when all available
scenes are programmed.
4*#+$N#C1+%.Q3%"#*21+.A(O.#.-1+*"1CC%"
You can use a controller or control device (such as DMX control
software), or onboard memory to create and play back scenes, but not
both at the same time.
In other words, you cannot create a scene using the fixture’s onboard
memory and play it back using a controller. You also cannot use a
controller at the same time onboard scenes are playing back.
You can create up to sixteen scenes using a controller and copy the
scenes to the fixture’ onboard memory. However, XFAD and DLAY
construct values cannot be copied this way, so you must manually
(using preset programming) enter values for these two constructs.
8#7"1(
Each Technobeam fixture has 28 selectable macros. A macro is a
factory-programmed set of fixture constructs picked for their ability to
achieve a dramatic and exciting effect. Using a macro can help you
save time while programming your fixture.
Note
H89
You must select the full protocol for the fixture to use
macros.
A$%=$/22)"=34J-$J)-B
!"#$%&'"()*+,-".+/(%0(1
)"%(%*.)C#5H#7'.Q3*21+(
Technobeam offers the following two options for use with preset
programming:
•
•
Preset capture: Use any DMX 512-compatible controller to create
a scene(s) that can then be saved into the fixture’s own presets and
later recalled in stand-alone operation without the controller. The
only constructs that cannot be captured in this way are crossfade
(XFAD) and delay (DLAY); you must configure them manually on
each fixture.
Synchronized preset playback: Use one fixture to synchronize
playback among all fixtures on the link. One fixture must be
configured as fixture number 1 or at DMX start channel 1. No
controllers can be attached to the link containing the synchronized
fixtures. See the section titled “Synchronizing Preset Playback” on
page 4-9 for more information.
<%+%"#C./+01"&#*21+
This section lists general points you need to keep in mind while you
are creating and playing back scenes on the fixture.
%<>W(=)$)4$;3&+1(
The information in the following sections is based on what was
available at the time this manual went to print; however, all
information—particularly constructs and construct values—is subject
to change.
H+)(-$&+,$8(+<$:(*.
Whenever you are creating a scene, the <Enter> key accepts the current
selection, whether that selection is a construct—such as SHUT for the
shutter—or a value for a construct, such as OPEN. Each construct value
is automatically saved when you press <Enter>.
The <Menu> key moves you back to the previous option or menu
without changing a value.
8%L((,$N.X$B&.)$;3&+1(.
Some constructs allow you to choose either fast position selection or
position selection set by MSpeed (motor/mirror speed).
A fast change means the position selection is completed in the shortest
length of time after the wheel starts moving.
An MSpeed (motor/mirror speed) change occurs smoothly over the
entire MSpeed time value. A table of MSpeed times is shown in
Appendix A of the user manual.
!"#$%&'"()*+,-".+/(%0(1
A$%=$/22)"=34J-$J)-B
H*:
%(?(=)0+1$;4+.)-<=).$&+,$/&?<(.
The step-by-step example in the next section suggests particular
constructs and values that will give you an idea of how the fixture
works. You can choose different constructs or values using the
information in Appendix E.
-"%#*2+:.#.47%+%
This step-by-step example involves the following basic steps:
•
•
•
•
•
•
Positioning and powering on the fixture
Turning on the lamp
Opening the shutter
Focusing on a litho
Selecting color and effects options
Enabling preset playback
Q"2%+*2+:.#+$.)1?%"2+:.Q+.*G%.,2T*6"%
1.
Orient (physically position) the fixture so the light will be projected
onto a flat, light-colored object such as a white wall or ceiling. If you
have Technobeam, you will be able to move the mirror to a suitable
position.
2.
Follow the instructions in Chapter 1 to connect the fixture to an
appropriately-rated power outlet, if you have not already done so.
(There is no power switch.) Wait for the fixture to finish homing (the
gears and motors stop moving).
!6"+2+:.1+.*G%.=#&3
1.
Press and hold the <Menu> key until ADDR appears in the LED display.
Note
If you are already in the menu system, keep pressing
(but do not hold down) the <Menu> key until ADDR is
displayed.
If MENU is displayed, press the <Enter> key to view the
ADDR option.
H8H
2.
Use the <Up> and <Down> arrow keys to navigate to the TEST menu.
3.
Press <Enter>, then use the <Up> and <Down> arrow keys to navigate
to the LAMP option.
C$-/#)"=3/3+(-"-
!"#$%&'"()*+,-".+/(%0(1
4.
Press <Enter>, then use the <Up> and <Down> arrow keys to select ON.
5.
Press <Enter>. The lamp is now ON, although it might not be visible if
the dim flags (also called shutter or light gate) are closed.
Q3%+2+:.*G%.4G6**%"
1.
Press and keep pressing the <Menu> key until ADDR appears in the
LED display.
2.
Use the <Up> or <Down> arrow keys to navigate to the PRST menu.
3.
Press <Enter>, then use the <Up> or <Down> arrow keys to select EDIT.
4.
Press <Enter>; the LED display shows SCN1 option, indicating you are
now creating scene number 1. The procedure that follows does not
cover every available construct because each fixture is slightly
different.
5.
Press <Enter> to begin creating scene 1.
6.
If you can see light exiting the fixture, the shutter is already open; skip
to the next section.
7.
Use the <Up> and <Down> arrow keys to navigate to the SHUT
construct.
8.
Press <Enter>, then press the <Up> and <Down> arrow keys to select
OPEN.
9.
Press <Enter>; light should now be visible through the aperture. If so,
see the next section.
10. If no light is visible through the aperture, either the shutter is still
closed or the lamp is not on. First look through the aperture (at an
angle, not directly) and make sure the two black dim flags are open, as
shown in Figure 4-1. (The two dim flags act as both the dimming
mechanism and as the shutter.)
PC".60."+U?2)+F1(J-+(."+'(."1=+32-2'1"+(6+"?J"-+@$"%+-$066".+2-+&C"%V
?)='$-3M*9:33W/<)"=30'$-3#>-30>'##-$3)03%,-":
!"#$%&'"()*+,-".+/(%0(1
C$-/#)"=3/3+(-"-
H*M
11. If the flags are closed, repeat this procedure.
12. If the shutter is open and no light is exiting the fixture, the lamp is off.
(The lamp is automatically turned off after a period of no activity.) In
that case, turn the fixture OFF, wait a few minutes, then repeat the
procedure in the section titled “Turning on the Lamp” on page 4-4.
)1(2*21+2+:.*G%.82""1"
1.
Use the <Up> and <Down> arrow keys to navigate to the PAN
construct.
2.
Use the <Up> and <Down> arrow keys to move the mirror to the
desired location, then press <Enter>.
3.
Use the <Up> and <Down> arrow keys to navigate to the TILT
construct and press <Enter>.
4.
Use the <Up> and <Down> arrow keys to move the mirror to the
desired location, then press <Enter>.
,176(2+:.1+.#.=2*G1
1.
Use the <Up> and <Down> arrow keys to navigate to the LTOC
(control) construct.
2.
Press <Enter>, then use the <Up> and <Down> arrow keys to select
IDX.
3.
Press <Enter> to accept your selection, then use the <Up> and <Down>
arrow keys to navigate to the LTO construct.
4.
Press <Enter>, then press the <Up> or <Down> arrow keys to select any
litho pattern (except L 1, the open position).
5.
Press <Enter> to accept your selection, then use the <Up> and <Down>
arrow keys to navigate to the FCUS construct.
6.
Press <Enter>, then use the <Up> and <Down> arrow keys to bring the
litho into sharp focus.
7.
Press <Enter> when you are finished focusing the fixture.
4%C%7*2+:.-1C1".9G%%C.-1+(*"67*(
H8W
1.
Use the <Up> and <Down> arrow keys to select COLC.
2.
Press <Enter>, then press the <Up> and <Down> arrow keys to select
RND (random color selection).
3.
Press <Enter>. The color wheel spins and stops on a random position,
pausing for a length of time you will set in the next section.
C$-/#)"=3/3+(-"-
!"#$%&'"()*+,-".+/(%0(1
4%C%7*2+:.#.-1C1".9G%%C.)#6(%.!2&%
1.
Use the <Up> and <Down> arrow keys to navigate to the COL
construct.
2.
Press <Enter>, then use the <Up> and <Down> arrow keys to select a
pause time (the higher the value, the longer the pause time).
3.
Press <Enter> to accept your selection.
4%C%7*2+:.;00%7*(.-1+(*"67*(
1.
Use the <Up> and <Down> arrow keys to navigate to the FX construct.
2.
Press <Enter>, then use the <Up> and <Down> arrow keys to select any
effects position other than FX 1 (open).
3.
Press <Enter>, then use the <Up> and <Down> arrow keys to navigate
to the FXR construct.
4.
Press <Enter>, then use the <Up> and <Down> arrow keys to select
either a forward or reverse rotation speed.
5.
Press <Enter> to save your settings.
E%0176(2+:.*G%.,2T*6"%
If you selected the suggested constructs, you should now see a litho
pattern being changed by a rotating effect and random color changes.
This section shows how you can use the fixture’s superior optics to
refocus the image.
1.
Use the <Up> and <Down> arrow keys to navigate to the FCUS
construct.
2.
Press <Enter>, then use the <Up> and <Down> arrow keys to change
the focus. You can focus on the effects wheel, the litho wheel, the
color wheel or anywhere in between.
3.
Press <Enter> when you are done.
4%**2+:.#.>%C#5.!2&%
The DLAY construct determines the length of time scene 1 “plays”
before the next scene begins.
1.
Use the <Up> and <Down> arrow keys to navigate to the DLAY
construct.
2.
Press <Enter>, then use the <Up> and <Down> arrow keys to select a
value of 3.0. This means that scene 1 will “play” for 3 seconds before
moving on to scene 2. (You will not see the effect of the DLAY
construct until you play back your programmed scenes.)
!"#$%&'"()*+,-".+/(%0(1
C$-/#)"=3/3+(-"-
H*R
3.
Press <Enter> to save your setting.
Note
The default unit of time is seconds, but you can change
the units to either minutes or hours using the TIME
construct on the PRST menu.
-"%#*2+:.47%+%.Z
This section shows how to use the convenient scene copy feature to
copy constructs and values from scene 1 to scene 2. Scene copy can
greatly speed up the time required to program the fixture, especially
for scenes that have minor variations in construct values.
1.
Keep pressing the <Menu> key to navigate to the PLAY option. (The
dim flags close when you make this selection, so you will not see any
light exiting the fixture; this is normal).
2.
Use the <Up> and <Down> arrow keys to select COPY.
3.
Press <Enter>; the display then shows FROM.
4.
Press <Enter> and select the scene to copy from. The default option is
the current scene number. (F001 indicates you will copy from scene
1.)
5.
Press <Enter> to select scene 1 to copy from. The display then shows
TO.
6.
Press <Enter>; the LED display shows the previously-selected scene
number. Use the <Up> and <Down> arrow keys to select T002 (scene
2).
7.
Press <Enter> to select scene 2; the LED display shows COPY.
8.
Press <Enter>. The constructs are copied from scene 1 to scene 2.
9.
Keep pressing the <Menu> key to navigate to the PLAY option.
10. Use the <Up> and <Down> arrow keys to select EDIT.
11. Press <Enter>, then use the <Up> and <Down> arrow keys to select
SCN2.
12. Press <Enter> and change the DLAY construct to a value of 1.0.
13. Press <Enter> to accept your selection. Make other construct changes,
if desired (if you have Technobeam, move the mirror to a different
location using the PAN and TILT constructs.)
)C#52+:.W#7'.W1*G.47%+%(
Turning preset playback ON starts all programmed scenes playing back
in a continuous loop. Scenes advance at the rate set by the DLAY
construct and continue playing back until you turn preset playback
OFF.
H8S
C$-/#)"=3/3+(-"-
!"#$%&'"()*+,-".+/(%0(1
If preset playback was enabled when you powered the fixture OFF,
preset playback restarts automatically when you power the fixture
back ON again. You can disable preset playback at any time by
selecting OFF from the PLAY menu.
1.
Keep pressing the <Menu> key until PLAY appears in the LED display.
(The Play option allows you to turn preset playback on and off.) The
dim flags close when you make this selection, so you will not see any
light exiting the fixture; this is normal.
2.
Press <Enter>, then use the <Up> and <Down> arrow keys to select ON.
3.
Press <Enter> to start preset playback.
4.
Your scene(s) start playing back, starting with scene 1, continuing to
the first unprogrammed scene, then returning to scene 1, etc. The LED
display should look similar to the one below:
_&6+2%?2#(6"-+C."-"6+C1(='(#<+2-+&%
/EZ,
EZ!E]
?)='$-3M*F:3363&%#3/5B/E03/,,-/$03)"3#>-3N1O3&)0,5/E3B>-"-J-$3,$-0-#3
,5/E8/(<3)03%":
5.
To turn preset playback off, keep pressing the <Menu> key to select
the PLAY option and press <Enter>.
6.
Use the <Up> and <Down> arrow keys to select OFF and press <Enter>.
That stops preset playback, but leaves the currently-running scene
active. Select an unprogrammed scene to return the fixture to its
default state (with no scene active).
45+7G"1+2B2+:.)"%(%*.)C#5H#7'
Once you have programmed one or more scenes for your Technobeam
fixtures and connected them to a DMX 512 link, you can synchronize
preset playback from one fixture as described in this section.
Note
Do not put a controller on the DMX 512 link if you want
to use synchronized preset playback.
4%**2+:.F3.*G%.,2T*6"%(
Make sure you do all of the following when you set up the link. More
information about setting up a DMX 512 link is shown in Chapter 2.
!"#$%&'"()*+,-".+/(%0(1
+E"(>$%")T)"=3A$-0-#3A5/E8/(<
H*X
1.
One fixture must be set as fixture number 1 or at DMX start channel 1
as described in Chapter 2. Make sure no other fixture on the link is
configured as fixture number 1 or at DMX start channel 1.
2.
The fixture in Step 1 should be physically the first fixture in the link,
as shown in Figure 4-3. The last fixture in the link must be terminated.
3.
You can choose any fixture number or DMX start channel you want for
any of the other fixtures on the link. For example, fixture number 2
does not have to be directly connected to fixture number 1.
4.
Make sure there are no controllers on the link.
5.
Enable preset playback for all fixtures on the link.
Note
6.
After you enable preset playback on the fixture you
configured as fixture 1 or DMX start channel 1, the
Transmit LED on that fixture will continue flickering
yellow until you disable preset playback.
The total delay time of all the scenes on the first fixture (fixture
number 1 or DMX start channel 1) should be longer than the total delay
time of all the scenes on any other fixture in the link. Otherwise, not
all scenes on all fixtures will finish playing before looping back to
scene 1.
B2.-6+F2460."+UF2460."+%0)'".+7+
&.+_/Q+-6(.6+#$(%%"1+7V
_(6(+5%
_(6(+b06
_(6(+b06
_(6(+5%
_(6(+5%
_(6(+b06
!".)2%(6"+6$"+1(-6+F2460."+U6$"+F2460."+(6
6$"+&CC&-26"+"%?+&F+6$"+12%<+F.&)+6$"
F2.-6+F2460."V+
?)='$-3M*H:33`>-"3E%'30-#3',3.)@#'$-03.%$30E"(>$%")T-&3,5/E8/(<3%"3/3OWY3
P9F35)"<L3%"-3/"&3%"5E3%"-3.)@#'$-35#79$;)%.)@#'$-3"'28-$393%$3OWY30#/$#3
(>/""-539:337>-35/0#3.)@#'$-3%"3#>-35)"<32'0#38-3#-$2)"/#-&:
H87L
+E"(>$%")T)"=3A$-0-#3A5/E8/(<
!"#$%&'"()*+,-".+/(%0(1
@$$2+:.,2T*6"%(
Once you have started synchronized preset playback on the link, you
can add other fixtures to the link anytime you want. A fixture added
after synchronized preset playback has begun will start playing the
scene most closely matching the timeline set by the first fixture. (It
will not necessarily begin with scene 1, and it might begin in the
middle of a scene.)
When the first fixture wraps to scene 1, the added fixture also wraps to
scene 1 and continues playing its scenes normally according to the
scenes’ delay times.
-#3*6"2+:.)"%(%*(
Preset capturing is a way to automate the creation of scenes on
multiple Technobeam fixtures connected to a DMX 512 link. You use a
DMX 512-compatible controller to create a scene, save (capture) the
scene into a fixture's presets and later play back the scene without the
controller.
This procedure assumes you are already familiar with your controller;
if not, consult the controller’s documentation. It also assumes you
have some familiarity with using the menu system on Technobeam; if
not, review Chapter 3 and this chapter.
1.
Connect a DMX 512 controller and Technobeam fixtures on a DMX 512
link as described in Chapter 2.
2.
Make sure all Technobeam fixtures are configured for their respective
full protocols (see “Fixture Types” on page 2-13). Selecting the full
protocol takes advantage of all constructs available for the fixture
type.
3.
Create a scene on the controller. The DMX protocols for Technobeam
are listed in Appendix A.
4.
Make sure all construct values on the controller are constant. There
cannot be any mirror movement or scene-to-scene sequencing.
5.
Go to the first fixture you want to store the scene on.
6.
Navigate to the PRST menu.
7.
Press <Enter>, then use the <Up> and <Down> arrow keys to navigate
to the CAPT option.
8.
Press <Enter>, then use the <Up> and <Down> arrow keys to select a
scene to capture to. If you select SCN2, as shown, you will capture
DMX data from the controller into the fixture’s scene 2.
!"#$%&'"()*+,-".+/(%0(1
C/,#'$)"=3A$-0-#0
H*77
9.
Press <Enter>. The scene created on the controller is now stored in the
selected scene number.
10. You will need to manually select values for the XFAD and DLAY
constructs, since the controller does not transmit those constructs.
Note
If the scene you captured to was previously
programmed, you will need to make that scene active in
order to view the newly-captured scene for the first time.
(To make the scene active, select the scene number from
the EDIT menu.)
11. Repeat the procedure for each fixture you want to capture presets to.
H879
C/,#'$)"=3A$-0-#0
!"#$%&'"()*+,-".+/(%0(1
*+,-#.$/?!
:3)"2/#+./@,3.$/A)>)"2/
B.C)(.D/E@ABDF
!/
Safety Precautions ...........................................................................................5-2
Overview .........................................................................................................5-3
Recommended Laser Operation .........................................................5-3
Intended Audience .............................................................................5-3
Using the Laser Aiming Device ...........................................................5-3
Controlling the Laser ......................................................................................5-5
Menu Control of the Laser ..................................................................5-5
DMX Control of the Laser ...................................................................5-5
Troubleshooting ..............................................................................................5-6
Laser gradually loses power ...............................................................5-6
Laser is out of position ......................................................................5-6
Emission Indicator LED OFF, Laser OFF ..............................................5-6
Emission Indicator LED ON, Laser OFF ...............................................5-7
Laser ON, Emission Indicator LED OFF ...............................................5-8
Maintenance ....................................................................................................5-8
!"#$%&'"()*+,-".+/(%0(1
M*7
4#0%*5.)"%7#6*21+(
This section lists precautions you must follow anytime you are using
the Laser Aiming Device™ (LAD™) for Technobeam.
1.
CAUTION: Use of controls or adjustments or performance of
procedures other than those specified herein may result in hazardous
radiation exposure.
2. Using the Laser Aiming Device with any fixture other than Technobeam
may result in damage to both the laser and the fixture as well as
exposure to laser radiation.
3. Do not point the laser at an audience.
4. Precautions should be taken to ensure that the laser beam is not
unintentionally directed at mirror-like (specular) surfaces (most
importantly, at flat mirror-like surfaces).
5. Only qualified and trained employees approved by a laser safety
officer should be assigned to install, adjust and operate the laser
equipment.
6. When not in use, the laser (fixture) should be stored in a location where
unauthorized personnel cannot gain access.
7. Do not remove the labels shown at the bottom of this page; they are
required by U.S. and European safety agencies.
8. Areas in which this product is used should be posted with a standard
laser warning sign.
9. Do not stare directly into the beam and do not view the beam with
optical instruments.
10. The laser path should be located well above or below eye level.
11. The laser beam should be terminated at the end of its useful path.
12. Consult local and state laws regarding laser use and possible
registration requirements.
PYb5_
EQ\bK,]E
O(-".+.(?2(62&%+2-+")266"?+F.&)+6$2-+(C".60."
12)00)%"3)"&)(/#%$
+L=;:X
OPKE]+]P_5P!5bZ+8+PYb5_
_5]E[!+EcE+EQ\bK,]E
/(4+&06C06T++M)`+(6+W:L8WML+%)
[OPKK+:(+OPKE]+\]b_,[!
OPKE]+]P_5P!5bZ+8+_b+Zb!
K!P]E+5Z!b+dEP/+b]
Y5E`+_5]E[!Oc+`5!I
b\!5[PO+5ZK!],/EZ!K
/(4+&06C06T++M)`+(6+W:L8WML+%)
[OPKK+:(+OPKE]+\]b_,[!
[".6A+6&+EZ+WLS9M87D+7XXH
(%?+97+[B]+7LHL
O(-".+(2)2%J+?"32#"+(--")'1=
U2%-2?"+F2460."V
M89
+/.-#E3A$-(/'#)%"0
!"#$%&'"()*+,-".+/(%0(1
QA%"A2%?
The Technobeam LAD makes it easy for you to position the mirror
during daylight or high ambient light conditions. This in turn allows
you the additional flexibility to set up or verify mirror preset positions
in conditions that would otherwise make positioning difficult or
impossible.
E%71&&%+$%$.=#(%".Q3%"#*21+
The most effective and efficient way to use the laser aiming device is
with the fixture’s lamp off and dim flags (shutter) closed. There are
three reasons for this:
•
•
•
The higher the temperature, the shorter the life of the laser aiming
device. Keeping the lamp off minimizes the temperature inside the
fixture, extending the life of the laser.
The higher the temperature, the less bright the laser will be. If the
fixture operates (with the lamp on) at 40°C (104°F) for example,
laser power will be decreased by about 25%.
Technobeam was designed so the laser light can exit the fixture
with the dim flags (shutters) closed or completely open. At certain
intermediate dim flag positions, the laser light might be partially
blocked.
/+*%+$%$.@6$2%+7%
Only qualified and trained employees approved by a laser safety
officer should be assigned to install, adjust and operate the laser
equipment.
F(2+:.*G%.=#(%".@2&2+:.>%A27%
You can control the laser using either the fixture’s onboard programs,
the Technobeam LCD controller, or any DMX 512-compliant controller
as shown in the section titled “Controlling the Laser” on page 5-5.
The laser exits the fixture through the same aperture as the light beam,
as shown in Figure 5-1. Technobeam was designed so that the laser is
visible if the dim flags are completely closed or open.
!"#$%&'"()*+,-".+/(%0(1
4J-$J)-B
M*:
O(-".+(C".60."
?)='$-3P*9:337>-35/0-$35)=>#3-@)#03#>-3#>$%'=>3#>-30/2-3/,-$#'$-3/03#>-35)=>#3
8-/2:
The laser should ideally be no more than 2” (5 cm) directly above the
center point of a perfectly round light beam, as shown in Figure 5-2:
5?"(1+1(-".+-C&6
9r+UM+#)V+)(4
?)='$-3P*F:337>-3)&-/53,%0)#)%"3%.3#>-35/0-$3)03"%32%$-3#>/"3Fb3ZP3(2[3&)$-(#5E3
/8%J-3#>-3(-"#-$3,%)"#3%.3/3,-$.-(#5E3$%'"&35)=>#38-/2:
In its ideal position, the laser path is parallel to the path of the light
and will stay 2” (5 cm) above the center point of the beam at any throw
distance or mirror position.
If the laser becomes out of position, you might need to align it as
shown in the section titled “Technobeam Laser Aiming Device™” on
page 6-19.
However, the decision of whether or not to align the laser is entirely up
to you. If the laser strays from its optimal position, but it gives you
enough accuracy for your needs, you do not have to align it.
M8H
4J-$J)-B
!"#$%&'"()*+,-".+/(%0(1
-1+*"1CC2+:.*G%.=#(%"
You can control the laser in one of three ways:
•
•
•
The fixture’s menu system: Edit one of the fixture’s sixteen
onboard presets (scenes) using the PRST menu as described in the
next section.
Any DMX 512-compliant controller: See the section titled “DMX
Control of the Laser” on page 5-5.
The Technobeam LCD controller: See the controller’s user
manual.
8%+6.-1+*"1C.10.*G%.=#(%"
Use the PRST menu to create scenes (presets) including the laser
aiming device. You access the LAD using the MACR construct from the
PRST menu.
The complete list of options controlling the laser aiming device (with
the MACR construct) is shown below:
•
•
•
LROF: laser aiming device OFF
LRON: laser aiming device ON continuously
LM01 to LM30: laser modulation levels. LM01 is “slow”
modulation at 4.25 times/sec and LM30 is “fast” modulation at 255
times/sec.
>8S.-1+*"1C.10.*G%.=#(%"
This section explains how to control the laser using a DMX 512compatible controller.
1.
Select a fixture number or DMX start channel for each fixture you wish
to control as described in Chapter 2.
2.
Make sure you select the Technobeam full 18-channel protocol (TB
F from the Mode menu); otherwise, the laser aiming device will not
function.
3.
Connect the fixtures to the controller as described in Chapter 2.
4.
See Appendix A for details of DMX 512 control (see in Table A-1 on
page A-3 or Table A-2 on page A-8).
!"#$%&'"()*+,-".+/(%0(1
C%"#$%55)"=3#>-3N/0-$
M*M
!"16HC%(G11*2+:
If laser fails to illuminate, the most likely reasons are lack of power or
a failed laser.
=#(%".:"#$6#CC5.C1(%(.31?%"
This is normal; over time, the laser will gradually lose power until it
finally dims out entirely. If this is happening, contact High End
Systems Customer Service in one of the ways shown in “Contacting
High End Systems” on page Intro-4.
=#(%".2(.16*.10.31(2*21+
Align the laser as shown in the section titled “Technobeam Laser
Aiming Device™” on page 6-19.
;&2((21+./+$27#*1".=;>.Q,,R.=#(%".Q,,
The laser circuit board is not receiving power.
1.
Unplug the fixture and remove the access door shown in Figure 5-3:
_&&.+."6(2%2%J+-#."@
P##"--+?&&.
?)='$-3P*H:33I-2%J)"=3#>-3/((-003&%%$:
M8W
7$%'85-0>%%#)"=
!"#$%&'"()*+,-".+/(%0(1
2.
Check all wiring connections shown in Figure 5-4:
OP_+#('1"-
?)='$-3P*M:33N6O3B)$)"=3(%""-(#)%"0:
3.
Check to make sure the cable labeled “LAD” is connected to the main
circuit board (with the LED display).
4.
Replace the access door, plug the fixture in and make sure you have
enabled the laser as shown in the section titled “Controlling the Laser”
on page 5-5.
5.
If the Emission Indicator LED and laser are both still OFF, contact High
End Systems Customer Service in one of the ways shown in “Contacting
High End Systems” on page Intro-4.
;&2((21+./+$27#*1".=;>.QJR.=#(%".Q,,
1.
The laser aiming device assembly is not receiving power. Check the
connection at the laser aiming device circuit board, shown in Figure
5-5.
!"#$%&'"()*+,-".+/(%0(1
7$%'85-0>%%#)"=
M*R
OP_+#2.#026+'&(.?
?)='$-3P*P:337>-35/0-$3/)2)"=3&-J)(-3()$(')#38%/$&:
2.
If the cable connections are good, contact High End Systems Customer
Service in one of the ways shown in “Contacting High End Systems” on
page Intro-4.
=#(%".QJR.;&2((21+./+$27#*1".=;>.Q,,
The most likely reason is a faulty Emission Indicator LED. Contact
High End Systems Customer Service as shown in “Contacting High End
Systems” on page Intro-4.
8#2+*%+#+7%
The only laser maintenance procedure is alignment, which is covered
in the section titled “Technobeam Laser Aiming Device™” on page 6-19.
M8S
W/)"#-"/"(-
!"#$%&'"()*+,-".+/(%0(1
*+,-#.$/G!
9.$C)()"2/5%'$/6)7#'$.
Precautions .....................................................................................................6-2
Replacing Fuses ...............................................................................................6-2
Replacing Wheel Components .........................................................................6-4
Specifications .....................................................................................6-4
Reference Drawing .............................................................................6-5
Replacing Dichroics in the Color Wheel .............................................6-5
Replacing Lithos in the Rotating Litho Wheel ....................................6-7
Removing a Rotating Litho or Rotating Effect .......................6-7
Removing a Static Litho .........................................................6-8
Cleaning the Litho .................................................................6-8
Litho Installation Instructions ...............................................6-9
Replacing a Static Litho .........................................................6-9
Replacing a Rotating Litho or Effect ................................... 6-10
Replacing a Custom Litho ................................................... 6-11
Replacing the Lamp ...................................................................................... 6-11
Optimizing the Lamp ...................................................................... 6-14
Resetting Lamp Hours ..................................................................... 6-15
Cleaning the Internal Components ............................................................. 6-15
Opening the Fixture ......................................................................... 6-16
Cleaning the Door Vents ................................................................. 6-16
Cleaning the Lenses and Mirrors ..................................................... 6-16
Technobeam Laser Aiming Device™ ............................................................ 6-19
Safety Precautions ........................................................................... 6-19
Live Components ............................................................................. 6-20
Alignment Procedure ....................................................................... 6-21
!"#$%&'"()*+,-".+/(%0(1
W*7
)"%7#6*21+(
This section lists precautions you must follow anytime you are
servicing the fixture.
WARNINGS
Before performing any service or
maintenance, make note of the following:
(1) Hot lamp may be an explosion hazard. Do
not open for 5 minutes after switching off.
Wear eye and hand protection when relamping.
(2) Equipment surfaces may reach
temperatures up to 70° C (158° F). Allow 5
minutes for cooling before handling.
(3) Disconnect power before re-lamping or
servicing.
(4) Replace fuses with the specified type and
rating only.
(5) Never look directly at the lamp while
lamp is on.
(6) The procedures in this chapter are
intended to assist qualified service
personnel because Technobeam fixtures are
to be serviced by qualified service
personnel only.
E%3C#72+:.,6(%(
This section explains how to replace any of the three fuses located on
the fixture’s circuit board. Make note of the warnings in the section
titled “Precautions” on page 6-2.
7/85-3S*9:33I-,5/(-2-"#3?'0-0
B0-"
B7
B9
B:+
Note
W89
A$-(/'#)%"0
P)CHAL+P
9AM+P
WA:P
Y&1679M+Y
9ML+Y
9ML+Y
B0-"+!=C"
B(-6+d1&@+b%1=
B(-6+d1&@+b%1=
K1&@+d1&@+b%1=
All fuses are 5 mm x 20 mm.
!"#$%&'"()*+,-".+/(%0(1
Table 6-2 describes the typical failure symptoms of each of the fuses:
7/85-3S*F:33?'0-3?/)5'$-3+E2,#%20
\.&6"#6-
K=)C6&)-+&F+B(210."
B7
B0-"
/&6&.+C&@".
B9
B:
O&J2#+C&@".
/(2%+F0-"
/&6&.+OE_+2-+bBB+@$"%+F2460."+2-+."#"232%J+C&@".A++]"#"23"+OE_+
)2J$6+'"+bZA++/&6&.-+(%?+J"(.-+@211+%&6+)&3"D+1()C+2-+bBBA
B2460."+-$06-+?&@%D+OE_-+)2J$6+'"+bZA
B2460."+-$06-+?&@%D+OE_-+(."+(11+bBBA
1.
Unplug the fixture from the power supply.
2.
Lay the fixture on its back and locate the door retaining screw, as
shown in Figure 6-1:
_&&.+."6(2%2%J+-#."@
P##"--+?&&.
?)='$-3S*9:33I-2%J)"=3#>-3&%%$3/55%B03E%'3#%3/((-003#>-3.)@#'$-K03J%5#/=-3
0-5-(#)%"30B)#(>-03/"&3.'0-0L3/03B-553/03B>--503/"&3%,#)(0:
3.
Note which fuse(s) needs to be replaced and make sure you replace it
with a fuse of the same type and rating, as shown in Table 6-2.
!"#$%&'"()*+,-".+/(%0(1
I-,5/()"=3?'0-0
W*:
B:
B9
B7
?)='$-3S*F:33N%(/#)%"03%.3#>-3#>$--3.'0-03%"3#>-3()$(')#38%/$&:
4.
Replace the access door and connect the fixture to a power supply.
E%3C#72+:.9G%%C.-1&31+%+*(
This section explains how to remove and replace individual
components in the wheels. Follow the precautions listed in the section
titled “Precautions” on page 6-2.
Always heed the following precautions when handling and using
dichroics, lithos and effects:
•
•
Avoid touching the coated side of the glass. Handle the
edge or uncoated side of the glass when removing or
installing lithos. If possible, wear cloth gloves when
inserting and removing lithos from the litho wheel housing.
If necessary, clean the lithos with a mild glass cleaner and a
soft cloth.
43%72027#*21+(
You can install any High End Systems-manufactured solid dichroic
filters, effects, LithoPatterns lithos, ArtGlass, or Fusion Fire®—as long
as they were manufactured for use with Technobeam, Technopro or
Technoray and not another fixture.
You can also install dichroics, gobos, lithos or effects from other
manufacturers as long as they adhere to the following specifications:
Dichroics
•
•
W8H
Diameter: 1.125” ± 0.010” (28.5 mm ± 0.25 mm)
Thickness: 0.069” ± 0.010” (1.8 mm ± 0.25 mm)
I-,5/()"=3`>--53C%2,%"-"#0
!"#$%&'"()*+,-".+/(%0(1
Lithos
•
•
•
Diameter/image area: 0.996”/0.860” ± 0.005” (25 mm/22 mm ±
0.13 mm)
Maximum thickness (rotating litho only): 0.105” ± 0.005” (2.7
mm ± 0.13 mm)
Thickness (static litho only): 0.069” ± 0.010” (1.8 mm ± 0.25
mm)
Rotating effects
•
•
Diameter/image area: 1.43”/1.04” ± 0.010” (36 mm/26 mm ±
0.25 mm)
Maximum thickness: 0.175” ± 0.010” (4.4 mm ± 0.25 mm)
E%0%"%+7%.>"#?2+:
Figure 6-3 shows the location of each wheel in the Technobeam fixture.
[&1&.+@$""1
]&6(62%J+126$&+@$""1
O"%-+60'"
]&6(62%J+"FF"#6-+@$""1
?)='$-3S*H:333N%(/#)%"3%.3#>-3B>--503)"37-(>"%8-/2:
E%3C#72+:.>27G"127(.2+.*G%.-1C1".9G%%C
This section shows how to change individual dichroic filters in the
color wheel. You can replace dichroics if they are damaged or broken,
to change the order in their respective wheels, to clean them, or to add
new ones. (See the section titled “Optional Accessories” on page 1-5 for
ordering information.)
1.
Manually turn the wheel so the dichroic you wish to replace is easy to
access.
!"#$%&'"()*+,-".+/(%0(1
I-,5/()"=3`>--53C%2,%"-"#0
W*M
2.
Push the dichroic you wish to replace toward the center of the wheel to
free it from the two wheel tabs as shown in Figure 6-4.
?)='$-3S*M:33A'0>3#>-3&)(>$%)(3#%B/$&3#>-35/$=-3$-#/)")"=3#/83#%3.$--3)#3.$%23#>-3
B>--53#/80:
3.
Once the dichroic is free of the two wheel tabs, pull it out of the wheel.
If you intend to reuse this dichroic, put it in a safe place where it will
not get scratched.
4.
Clean the dichroic, if necessary, with a mild glass cleaner (containing
no ammonia) and a soft, lint-free cotton cloth.
5.
Carefully install the replacement dichroic, oriented so the coated side
is facing toward the lamp and the uncoated, glass side is facing toward
the rotating litho wheel.
To determine which side is coated, place the tip of a pen against each
side of the dichroic. Look at the dichroic and pen from a slight angle.
On the coated side, the tip of the pen appears to “touch” its reflection.
On the uncoated side, there appears to be a gap between the pen and
its reflection (see Figure Figure 6-5).
#&(6"?
0%#&(6"?
?)='$-3S*P:3D%'3(/"3-/0)5E3#-553B>)(>30)&-3%.3/3&)(>$%)(3)03(%/#-&38E3,5/()"=3/3
,-"3%$3%#>-$3%8]-(#3"-/$3#>-30'$./(-e3%"3#>-3(%/#-&30)&-L3#>-3$-.5-(#)%"3.$%23
#>-3%8]-(#3B)553/,,-/$3#%3#%'(>3#>-3%8]-(#:
W8W
I-,5/()"=3`>--53C%2,%"-"#0
!"#$%&'"()*+,-".+/(%0(1
6.
Install the new dichroic into its wheel by pushing it under the large
retaining clip, then pull it up so it fits under the wheel tabs. Repeat the
procedure for each dichroic you wish to replace.
7.
Replace the access door shown in Figure 6-1 on page 6-3 unless there
are other dichroics, lithos or effects you want to replace.
E%3C#72+:.=2*G1(.2+.*G%.E1*#*2+:.=2*G1.9G%%C
This section explains how to replace either of the two lithos in each
position on the Technobeam or Technoray rotating litho wheel: the
rotating litho (facing the rotating effects wheel) and the static litho
(directly behind the rotating litho).
You can replace lithos if they are damaged or broken, to change the
order in their respective wheels, to clean them, or to add new ones.
(See the section titled “Optional Accessories” on page 1-5 for ordering
information.)
9(54N0+1$&$94)&)0+1$!0)34$4-$94)&)0+1$H''(=)
1.
Rotate the wheel until the desired litho is easy to access.
2.
Make note of the plastic tabs built into the wheel, as shown in Figure
6-6.
`$""1+6('
!2C+&F+-C.2%J
U0%?".+6('V
?)='$-3S*S:337>-3$%#/#)"=35)#>%3B>--53/"&3$%#/#)"=3-..-(#03B>--53>/J-38')5#*)"3
,5/0#)(3#/803#>/#3>%5&3#>-30,$)"=3)"3,5/(-:
3.
Locate the tip of the metal spring (which should be under one of the
tabs). Carefully grasp the tip of the spring with your finger and push it
from under the tab.
4.
Rotate the spring as you remove it from the housing. Continue
pressing the spring under each tab until the spring is completely free
of the wheel.
5.
Keep the wheel holder in place with one hand and grasp the spring
with the other hand. Grasp the spring and carefully pull it free of the
housing.
!"#$%&'"()*+,-".+/(%0(1
I-,5/()"=3`>--53C%2,%"-"#0
W*R
6.
Reach in with your finger to remove the litho/effect and aperture ring
(if any) from behind the spring.
O26$&
7.
PC".60."
.2%J
See one of the following:
a.
Rotating litho wheel: “Litho Installation Instructions” on page 6-9.
b.
Rotating effects wheel: “Replacing a Rotating Litho or Effect” on
page 6-10.
9(54N0+1$&$%)&)0=$!0)34
1.
Rotate the wheel until the desired litho is easy to access.
2.
Carefully spread the wheel apart and reach behind the wheel to remove
the litho as shown Figure 6-7:
J \011+126$&+&06
@ N"%61=+-"C(.(6"
@$""1
< ]"(#$+'"$2%?
@$""1+@26$
=&0.+F2%J".D
C0-$+126$&+0C
?)='$-3S*U:337%3$-,5/(-3/30#/#)(35)#>%3)"3#>-3$%#/#)"=35)#>%3B>--5L3=-"#5E30-,/$/#-3
#>-3B>--53/"&3$-/(>38->)"&3#>-3B>--53#%3,'0>3#>-35)#>%3%'#:3
;?(&+0+1$)3($!0)34
Clean the litho, if necessary, using a mild glass cleaner (containing no
ammonia) and a soft, lint-free cotton cloth.
W8S
I-,5/()"=3`>--53C%2,%"-"#0
!"#$%&'"()*+,-".+/(%0(1
!0)34$K+.)&??&)04+$K+.)-<=)04+.
These instructions apply to installing either a rotating or a static litho
in the rotating litho wheel. Improper installation can result in damage
to the litho.
•
•
•
Custom multi-colored lithos in metal holder: See “Replacing a
Custom Litho” on page 6-11.
Etched pattern, no texture (LithoPatterns lithos): the coated
side of the litho must face away from the lamp; face the uncoated
(glass) side toward the lamp.
Textured pattern (flat unglazed Art Glass, or Fusion Fire):
the textured side must face away from the lamp; face the nontextured (smooth) side toward the lamp.
9(L?&=0+1$&$%)&)0=$!0)34
1.
Carefully handling the litho by its edges only, separate the wheel and
drop the litho into the retaining slot and between the two retaining
tabs as shown in Figure 6-8:
]"6(2%2%J+6('(%?+-1&6
?)='$-3S*V:33N%(/#)%"3%.3#>-3$-#/)")"=3#/803/"&305%#3#>/#30-('$-3#>-30#/#)(35)#>%3
)"3#>-3$%#/#)"=35)#>%3B>--5:3
2.
Insert a flat blade screwdriver or other thin object between the two
parts of the rotating litho wheel to firmly seat the static litho in the
retaining slots shown in Figure 6-8. Avoid touching any part of the
glass with your fingers.
a.
Examine the gap between the two parts of the rotating litho wheel;
if the gap is uniform along the entire edge of the wheel, you are
finished.
b.
If the gap is not uniform, continue seating the static litho until the
gap is uniform.
N(C
?)='$-3S*\:337>-3=/,38-#B--"3#>-3#B%3>/5J-03%.3#>-3$%#/#)"=35)#>%3B>--532'0#3
8-3'").%$2:
!"#$%&'"()*+,-".+/(%0(1
I-,5/()"=3`>--53C%2,%"-"#0
W*X
9(L?&=0+1$&$94)&)0+1$!0)34$4-$H''(=)
1.
2.
Carefully handling the litho/effect by its edges only, orient it as shown
when you replace it:
a.
Rotating litho wheel: “Litho Installation Instructions” on page
6-9.
b.
Rotating effects wheel: Orient the textured side of the effect
away from the lamp. If the effect does not have a texture (e.g., the
frost filter, orientation is not important).
If the litho/effect you are installing or replacing has an aperture ring,
put the aperture ring on top of the litho. See Figure 6-10.
O26$&
UF2.-6V
PC".60."
.2%J+U%"46V
KC.2%J
U1(-6V
?)='$-3S*9^:336"3/,-$#'$-3$)"=L3).3$-Q')$-&L32'0#38-3,5/(-&3%"3#%,3%.3#>-35)#>%f
-..-(#3/"&3'"&-$3#>-30,$)"=:
3.
Carefully replace the spring, turning it as you compress it, until the
spring is fully seated in the litho holder. Make sure the spring fits
completely under all wheel tabs and that the tip of the spring does not
protrude from under the tabs. See Figure 6-11:
`$""1+6('
[&.."#6+C1(#")"%6
U#&)C1"6"1=+0%?".
6('V
`$""1+6('
5%#&.."#6+C1(#")"%6
U-C.2%J+62C+C.&6.0?"-+
F.&)+0%?".+6('V
?)='$-3S*99:33`>-"3E%'3$-,5/(-3/3$%#/#)"=35)#>%3%$3$%#/#)"=3-..-(#L32/<-30'$-3
#>-3#),3%.3#>-30,$)"=3)03.'55E30-/#-&3'"&-$3#>-3B>--53#/80e3)#3(/""%#3,$%#$'&-3
.$%23'"&-$3#>-3#/80:
4.
W87L
You are finished. Replace the access door shown in Figure 6-1 on page
6-3 unless there are other dichroics, lithos or effects you want to
replace.
I-,5/()"=3`>--53C%2,%"-"#0
!"#$%&'"()*+,-".+/(%0(1
9(L?&=0+1$&$;<.)45$!0)34
If you received a custom, multi-colored litho in an aluminum holder,
you must install it with the litho facing toward the lamp (i.e., the flat
side of the holder against the spring), as shown in Figure 6-12.
Improper installation can damage the litho!
/01628#&1&.+126$&+$&1?".
KC.2%J
?)='$-3S*9F:33I-,5/()"=3/3('0#%232'5#)*(%5%$-&35)#>%3)"3#>-32-#/53>%5&-$:
E%3C#72+:.*G%.=#&3
!"#$%&''$())*+
<$=>?$%099@$A!BC>$;07)@$D$7)1&)7$5)90'$30'&*)$'056
"(':E$
<$F:)$61"9)29&"($
<$G1"9)29&H)$I'"H)7
*Note
Use only the MSD250-2 lamp in your fixture, not the MSD
250. Technobeam fixtures are optimized for the MSD
250-2 lamp and will give reduced performance with
other lamps.
WARNINGS
(1) This equipment is designed for use with an
M series, GY9.5 base, 250 watt (such as the
MSD 250-2) lamp only. Use of any other type
lamp may be hazardous and may void the
warranty.
(2) Change the lamp if it becomes damaged or
thermally deformed.
(3) Change shields, lenses or ultraviolet screens
if they have become visibly damaged to such
an extent that their effectiveness is
impaired, for example, by cracks or deep
scratches.
(4) Do not operate this equipment without
complete lamp enclosure in place or if
shields, lenses or ultraviolet screens are
damaged.
!"#$%&'"()*+,-".+/(%0(1
I-,5/()"=3#>-3N/2,
W*77
(5) Hot lamp may be an explosion hazard. Do
not open for 5 minutes after switching off.
Wear eye and hand protection when relamping.
(6) Never look directly at the lamp while lamp is
on.
(7) Disconnect power before re-lamping or
servicing.
1.
Unplug the fixture from the power source.
2.
Fully back out the two lamp assembly screws shown in Figure 6-13.
?)='$-3S*9H:33N%%0-")"=3#>-35/2,3/00-285E30($-B03=)J-03E%'3/((-003#%3#>-3
.)@#'$-35/2,:
3.
Put on your eye and hand protection. Pull the lamp assembly straight
out of the back of the fixture as shown in Figure 6-14.
?)='$-3S*9M:33I-2%J)"=3#>-35/2,3/00-285E3.$%23#>-3.)@#'$-:
W879
I-,5/()"=3#>-3N/2,
!"#$%&'"()*+,-".+/(%0(1
4.
If you are replacing a lamp, grasp the lamp’s ceramic base and pull the
old lamp straight up and out of the assembly when the assembly is free
of the fixture, as shown in Figure 6-15:
?)='$-3S*9P:33A'5530#$/)=>#3',3%"3#>-35/2,L3=$/0,)"=3)#03(-$/2)(38/0-L3#%3
$-2%J-3)#3.$%23#>-3/00-285E:
5.
Take the new or replacement lamp out of its container. Break the seal
on the inner plastic container and remove the lamp.
6.
Hold onto the ceramic lamp base and gently press the two lamp base
pins into the brass lamp socket as shown in Figure 6-16. Do not force
the lamp into the socket; doing so could break the lamp.
?)='$-3S*9S:33g%5&3#>-35/2,38E3)#03(-$/2)(38/0-3/"&3=-"#5E3,$-003#>-3#B%3
8/0-3,)"03)"#%3#>-30%(<-#:
Caution
Avoid touching any part of your skin to the
lamp’s quartz envelope. Oil and residue
from your fingers can create a “hot spot” on
the lamp, causing premature lamp aging.
7.
Before you insert the lamp assembly back into the fixture, clean the
lamp with the alcohol wipe shipped with the lamp. Otherwise,
fingerprints and other contaminates can shorten lamp life.
8.
Carefully guide the lamp assembly straight back into the fixture. Make
sure the lamp plate is oriented correctly, as shown in Figure 6-17;
otherwise, the lamp power wires could wrap around the lamp,
resulting in damage to the fixture and the lamp.
!"#$%&'"()*+,-".+/(%0(1
I-,5/()"=3#>-3N/2,
W*7:
?)='$-3S*9U:33D%'3(/"35%%<3/#3#>-35/2,35/8-53#-@#3#%32/<-30'$-3#>-35/2,3,5/#-3
)03%$)-"#-&3(%$$-(#5Ee3)"(%$$-(#3%$)-"#/#)%"3(/"3$-0'5#3)"3&/2/=-3#%3#>-3.)@#'$-3
/"&3#>-35/2,:
9.
As you insert the lamp assembly, be careful not to crimp or trap the
lamp wires and make sure the lamp is inserted into the reflector.
10. Firmly tighten the two lamp assembly screws to secure the assembly to
the fixture.
Q3*2&2B2+:.*G%.=#&3
You should optimize the lamp after you replace the lamp, or if you
notice a “hot spot” of brightness anywhere other than the center of the
light beam.
The optimization procedure below describes how to optimize the lamp
using the fixture’s onboard menu system. However, you can access the
same options using your DMX controller.
1.
Orient the fixture so that the beam will project onto a flat, white
surface at least 10 feet (3 m) away.
2.
Turn the lamp on (see “Turning the Lamp On or Off (LAMP)” on page
3-20).
3.
If necessary, set any lithos, colors, or effects values to “0” to achieve an
open, white beam.
4.
Make sure that the light beam is round and not oval. If necessary,
adjust the pan and tilt construct values until the beam is round (see
“Positioning the Mirror” on page 4-6).
5.
Adjust the focus until the edge of the light beam is sharp (see
“Refocusing the Fixture” on page 4-7).
W87H
I-,5/()"=3#>-3N/2,
!"#$%&'"()*+,-".+/(%0(1
6.
Locate the two lamp optimization (adjust) screws (see Figure 6-18).
?)='$-3S*9V:33N/2,3%,#)2)T/#)%"30($-B0:
7.
Loosen the two lamp optimization screws.
8.
Look at the wall where the beam is projected and use the two
optimization screws to adjust the lamp’s position within the fixture.
9.
When the beam is at its maximum brightness and the light level is even
across the beam (or the “hot spot” of brightness is at the center of the
beam), retighten the two optimization screws to secure the lamp in its
new position.
E%(%**2+:.=#&3.I16"(
After changing a lamp, you should reset the number of lamp hours to
zero by selecting L/RS from the Info menu. See the menu system help
card inside the back cover of this manual, or consult Chapter 3 if you
need additional help using the menu system.
-C%#+2+:.*G%./+*%"+#C.-1&31+%+*(
Before continuing, read the cautions and warnings in the section titled
“Precautions” on page 6-2.
!"#$%&''$())*+
4$0$7"89@$'&(9481))$2"99"($2'"93$
4$5&'*$I'077$2')0(&(I$7"'#9&"(
4$%015$7"06:$%09)1
!"#$%&'"()*+,-".+/(%0(1
C5-/")"=3#>-3!"#-$"/53C%2,%"-"#0
W*7M
Q3%+2+:.*G%.,2T*6"%
Unplug the fixture from the power outlet and allow it to cool for at
least 5 minutes if it has been running recently. Remove the access
door shown in Figure 6-19:
_&&.+."6(2%2%J+-#."@
P##"--+?&&.
?)='$-3S*9\:334,-")"=3#>-3.)@#'$-K03/((-003&%%$:
-C%#+2+:.*G%.>11".U%+*(
Once the door is removed, use a soft, lint-free cotton cloth and warm
soapy water if necessary to clean dust and dirt from the inside and
outside of the vents shown in Figure 6-19.
-C%#+2+:.*G%.=%+(%(.#+$.82""1"(
1.
If you need to move the lens tube so you can access the anti-reflective
glass, reach under the lens tube and turn the focus drive screw (see
Figure 6-20).
2.
Clean both sides of the anti-reflective glass (shown in Figure 6-20) with
a soft, lint-free cotton cloth and mild glass cleaning solution.
W87W
C5-/")"=3#>-3!"#-$"/53C%2,%"-"#0
!"#$%&'"()*+,-".+/(%0(1
I&6+)2..&.+(--")'1=
U-$(?"?V
O"%-+60'"
P%628."F1"#623"+J1(--
B�-+?.23"+-#."@
0%?".+1"%-+60'"+U60.%
6&+)&3"+60'"+F&.+"(-2".
(##"--V
?)='$-3S*F^:33N%(/#)%"3%.3#>-3/"#)*$-.5-(#)J-3=5/00L35-"0-03/"&3>%#32)$$%$:
3.
If the black dim flags (located between the lens tube and the antireflective glass) are closed, carefully use your fingers to open them to
clean the inside of the glass.
4.
Locate the lens tube as shown in Figure 6-21:
O"%-+60'"
O(6#$"-+UHV
?)='$-3S*F9:337>-35-"03#'8-3(%"#/)"03#>-3T%%235-"0-0:
5.
Carefully lift the cover from the lens tube. It has two latches on each
side that secure it in place.
!"#$%&'"()*+,-".+/(%0(1
C5-/")"=3#>-3!"#-$"/53C%2,%"-"#0
W*7R
6.
Write down the position of each of the lenses in the lens tube. (Each
position is numbered both on the lens tube cover and on the inside of
the lens tube.)
7.
Handle each lens carefully by its edges only. Use a soft, lint-free cloth
to clean the lenses. If necessary to remove built-up dirt and dust, use a
mild glass cleaner (containing no ammonia).
8.
Replace the lenses in the lens tube in the same positions as you
removed them. Refer to Table 1-2 on page 1-14 or Table 1-3 on page
1-14 for reference.
9.
Replace the cover on the lens tube. Make sure all four latches are
fastened securely.
10. Use a Phillips screwdriver to loosen (but do not remove) the screw on
the hot mirror tab, shown in Figure 6-20 on page 6-17.
11. Carefully remove the hot mirror assembly. Inspect the hot mirror
(shown in Figure 6-22) for cracks, deep scratches or other damage. If
you notice significant damage, High End Systems Customer Service in
one of the ways shown in the section titled “Contacting High End
Systems” on page Intro-4.
B.&%6+-2?"+&F+$&6+)2..&.
UF(#"-+(@(=+F.&)+1()CD+
6&@(.?+@$""1-V
]"3".-"+-2?"+&F+$&6+)2..&.
UF(#"-+6&@(.?+1()CV
!('+U)0-6+F26+2%6&+
-1&6+2%+F2460."+#$(--2-V
?)='$-3S*FF:33C5-/"38%#>30)&-03%.3#>-3>%#32)$$%$3=5/00:
12. Clean both sides of the hot mirror with a soft, lint-free cotton cloth.
13. Orient the hot mirror as shown in Figure 6-22.
14. When you replace the hot mirror assembly, make sure the tab shown in
Figure 6-22 fits into a slot on the fixture chassis. When the tab is
properly seated, you will be able to push the hot mirror down until the
small end of the keyhole-shaped slot touches the Phillips screw.
15. Technobeam only: Clean the elliptical mirror on the mirror head with a
cloth soaked in warm, soapy water.
16. Replace the access door shown in Figure 6-19 on page 6-16.
W87S
C5-/")"=3#>-3!"#-$"/53C%2,%"-"#0
!"#$%&'"()*+,-".+/(%0(1
!%7G+1H%#&.=#(%".@2&2+:.
>%A27%M
!/
You might need to realign the laser periodically in order to maintain its
optimal position—no more than 2” (5 cm) directly above the center
point of the light beam. If you align the laser in this way, the path of
the laser is parallel to the path of the light and will stay 2” (5 cm) above
the center point of the beam at any throw distance or mirror position.
You align the laser using the three mounting/alignment screws shown
in Figure 6-27 on page 6-25.
However, the decision of whether or not to align the laser is entirely up
to you. If the laser strays from its optimal position, but it gives you
enough accuracy for your needs, you do not have to align it.
Figure 6-23 shows the ideal position of the laser from the center of a
perfectly round light beam:
5?"(1+1(-".+-C&6
9r+UM+#)V+)(4
?)='$-3S*FH:337>-3)&-/53,%0)#)%"3%.3#>-35/0-$3)03"%32%$-3#>/"3Fb3ZP3(2[3&)$-(#5E3
/8%J-3#>-3(-"#-$3%.3/3,-$.-(#5E3$%'"&35)=>#38-/2:
4#0%*5.)"%7#6*21+(
In addition to observing all of the cautions in the section titled
“Precautions” on page 6-2, you must observe the following cautions
whenever using or servicing the Laser Aiming Device (LAD):
1.
CAUTION: Use of controls or adjustments or performance of
procedures other than those specified herein may result in hazardous
radiation exposure.
2.
Using the Laser Aiming Device with any fixture other than Technobeam
may result in damage to both the laser and the fixture as well as
exposure to laser radiation.
3.
Precautions should be taken to ensure that the laser beam is not
unintentionally directed at mirror-like (specular) surfaces (most
importantly, at flat mirror-like surfaces).
!"#$%&'"()*+,-".+/(%0(1
7-(>"%8-/23N/0-$36)2)"=3O-J)(-h
W*7X
4.
Only qualified and trained employees approved by a laser safety
officer should be assigned to install, adjust and operate the laser
equipment.
5.
When not in use, the laser (fixture) should be stored in a location where
unauthorized personnel cannot gain access.
6.
Do not stare directly into the beam and do not view the beam with
optical instruments.
7.
The laser path should be located well above or below eye level.
The section titled “Safety Precautions” on page 5-2 has a complete
listing of safety precautions for using the Laser Aiming Device.
=2A%.-1&31+%+*(
You will be accessing live components and adjusting the laser in the
next section. Take special care to avoid contacting high-voltage live
components, located in the area of the main circuit board, shown in
Figure 6-24:
I2J$+3&16(J"+#&)C&%"%6(."+1&#(6"?+2%+)(2%+
#2.#026+'&(.?
?)='$-3S*FM:33g)=>*J%5#/=-3(%2,%"-"#35%(/#)%":
When you activate the laser, observe the following precaution:
Caution
W89L
Do not stare into the beam or view it directly
with optical instruments. Avoid accidental
exposure to laser radiation.
7-(>"%8-/23N/0-$36)2)"=3O-J)(-h
!"#$%&'"()*+,-".+/(%0(1
@C2:+&%+*.)"17%$6"%
The alignment procedure that follows takes advantage of
Technobeam’s built-in program storage capability to turn the laser ON.
1.
Follow the instructions in Chapter 1 to select a voltage setting and
install a power cord cap, if you have not already done so.
2.
Physically orient the fixture as shown in Figure 6-25 (the farther away
the wall is, the more accurate your positioning will be):
`$26"+@(11
K6(%?+F2460."+&%+26-+"%?+$(%?1"-
K60.?=D+F1(6+-0.F(#"+
-0#$+(-+(+6('1"
7L+F6A+U:+)V+)2%2)0)
?)='$-3S*FP:334$)-"#3#>-3.)@#'$-3&)$-(#5E3./()"=3/3B/553"%35-003#>/"39^3.#:3ZH32[3
/B/E:
3.
Connect the fixture to an appropriately-rated power outlet. You will
hear sounds as wheels and motors seek their home positions; this is
normal.
4.
When the fixture has finished homing, press and hold the <Menu> key
until the LED display reads ADDR.
The next steps show how to turn the lamp ON.
5.
Use the <Up> and <Down> arrow keys to navigate to the TEST menu.
6.
Press <Enter>, then use the <Up> and <Down> arrow keys to navigate
to the LAMP option.
7.
Press <Enter>, then use the <Up> and <Down> arrow keys to select a
value of ON.
8.
Press <Enter>; the lamp should now be on (although you will not be
able to tell if the dim flags are closed).
!"#$%&'"()*+,-".+/(%0(1
7-(>"%8-/23N/0-$36)2)"=3O-J)(-h
W*97
The next steps show you how to access the fixture’s built-in
programming menu to begin aligning the laser.
9.
Keep pressing the <Menu> key until the ADDR menu is displayed.
10. Use the <Up> and <Down> arrow keys to navigate to the PRST menu.
11. Press <Enter>, then use the <Up> and <Down> arrow keys to navigate
to the EDIT menu option. The EDIT option allows you to create or edit
up to eight scenes which are stored in the fixture’s onboard memory.
12. Press <Enter>. Use the <Up> and <Down> arrow keys to select the
scene number of an unprogrammed scene. For example, selecting
SCN2 means you will edit scene number 2.
13. Press <Enter> to begin editing the scene you selected.
14. If you selected an unprogrammed scene, skip to Step 17 now;
otherwise, continue with the next step. If the fixture started making
noises of gears and wheels moving as soon as you selected the scene,
and the noises continue for more than a brief period of time, you
selected a programmed scene.
The next two steps show how to unprogram a scene; you need to
unprogram the scene in order to make sure all constructs are set to
default values. This is necessary only if all eight scenes are already
programmed.
15. Use the <Up> and <Down> arrow keys to navigate to the ZERO option.
16. Press <Enter>; you will be required to confirm the action by pressing
<Enter> again.
Step 17 through Step 22 shows how to open the shutter and set the dim
construct to full bright. You can skip these steps if you can clearly see
the light projected onto the wall.
17. Use the <Up> and <Down> arrow keys to navigate to the SHUT option.
18. Press <Enter>, then use the <Up> and <Down> arrow keys to select a
value of OPEN.
19. Press <Enter> to accept your selection.
20. Use the <Up> and <Down> arrow keys to navigate to the DIM option.
21. Press <Enter>, then use the <Up> and <Down> arrow keys to select a
value of D255 (full bright).
22. Press <Enter> to accept your selection.
You should now see the white, round shape of the beam projected onto
the wall or white surface.
•
•
W899
If the beam is round (not oval) in shape, continue with Step 31.
If the beam is not round in shape, see the next step.
7-(>"%8-/23N/0-$36)2)"=3O-J)(-h
!"#$%&'"()*+,-".+/(%0(1
23. Make sure the fixture is oriented directly at the wall, not at an angle. If
the fixture is at an angle to the wall, it might be impossible to align the
laser properly.
24. Use the <Up> and <Down> arrow keys to navigate to the TILT option.
25. Press <Enter>, then use the <Up> and <Down> arrow keys to adjust the
mirror position until the beam is round.
26. Press <Enter> to accept your selection for TILT.
27. If the beam needs further adjustment, use the <Up> and <Down> arrow
keys to navigate to the PAN option.
28. Press <Enter>, then use the <Up> and <Down> arrow keys to adjust the
mirror position.
29. Press <Enter> to accept your selection for PAN.
30. Continue adjusting the mirror using PAN and TILT until the beam is as
round as possible.
If you cannot see the beam at all, the lamp might be off. Select LAMP
from the Test menu and make sure a value of ON is displayed; see Step
5 through Step 8. (If the lamp still does not come on, wait a few
minutes and try again.)
31. Use the <Up> and <Down> arrow keys to navigate to the FCUS option.
32. Press <Enter>, then use the <Up> and <Down> arrow keys to focus on
the edge of the beam until it is sharp.
33. Continue moving the fixture and focusing on the edge of the beam
until the beam is as round as possible, and sharply in focus.
34. When you have focused the beam, press <Enter>.
!"#$%&'"()*+,-".+/(%0(1
7-(>"%8-/23N/0-$36)2)"=3O-J)(-h
W*9:
35. Find the approximate center of the beam using either a tape measure,
ruler or a piece of string, as shown in Figure 6-26.
@
E46"%?+6$"+6(C"+)"(-0."+&.+-6.2%J+?&@%
(6+6$"+@2?"-6+C(.6+&F+6$"+'"()
<
N)=>#5E+)(.<+&%+6$"+@(11
(1&%J+6$"+-6.2%J
O2%"+=&0+)(?"+2%+K6"C+9
5?"(1+1(-".+-C&6
9r+UM+#)V+)(4
J
E46"%?+6$"+-6.2%J+(#.&--+6$"+'"()s@2?"-6+C&2%6A++O(-".+-$&01?+'"+%&+)&."
6$(%+9r+UM+#)V+('&3"+6$"+-6.2%JD+(1&%J
6$"+#"%6".+12%"A
?)='$-3S*FS:33N%(/#)"=3#>-3(-"#-$3,%)"#3%.3#>-3,$%]-(#-&35)=>#38-/2:337>-35/0-$3
0>%'5&38-3"%32%$-3#>/"3Fb3ZP3(2[3/8%J-3#>-3(-"#-$:
36. Once you have marked the center point of the beam, keep pressing the
<Menu> key until the ADDR option is displayed.
37. Use the <Up> and <Down> arrow keys to navigate to the TEST menu.
38. Press <Enter>, then use the <Up> and <Down> arrow keys to navigate
to the LAMP option.
39. Press <Enter>, then select a value of OFF.
40. Press <Enter>. The lamp now shuts off.
41. Keep pressing the <Menu> key until the ADDR option is displayed.
42. Use the <Up> and <Down> arrow keys to navigate to the PRST menu.
43. Use the <Up> and <Down> arrow keys to navigate to the EDIT option.
44. Press <Enter>, then use <Up> and <Down> arrow keys to navigate to
the SCN2 option (this selects scene number 2; select the same scene
you selected in Step 12.
Caution
W89H
Do not stare into the laser beam or view it
directly with optical instruments.
7-(>"%8-/23N/0-$36)2)"=3O-J)(-h
!"#$%&'"()*+,-".+/(%0(1
45. Press <Enter>, then use the <Up> and <Down> arrow keys to navigate
to the MACR option.
46. Press <Enter>, then use the <Up> and <Down> arrow keys to select
LRON (laser on continuously).
47. Press <Enter> to accept your selection.
48. Look at the wall where the beam is projected onto to determine if the
laser is on.
49. If the laser does not come on, see the section titled “Troubleshooting”
on page 5-6; otherwise, continue with the next step.
50. Figure 6-27 shows the 3 mounting/alignment screws located on the
laser aiming device assembly. See the instructions that follow the
drawing.
<
@
J
/&0%62%Ja(12J%)"%6+-#."@-
?)='$-3S*FU:337>-35/0-$3/)2)"=3&-J)(-3/00-285E3>/03#>$--30($-B03#>/#3(/"38-3
'0-&3#%3/&]'0#3#>-3,%0)#)%"3%.3#>-35/0-$:
Alignment screws 1 and 3 (shown in Figure 6-27) move the laser
horizontally, and screw 2 moves the laser vertically. Use the three
alignment screws to adjust the position of the laser so that it is no
more than 2” (5 cm) directly above the center point of the beam, shown
in Figure 6-23 on page 6-19.
51. After you tighten/loosen each screw, release pressure from the
screwdriver before looking at the laser position on the wall; having
pressure on the screw can change the laser’s position. Do not force the
screws or fully tighten them because the ends of the screws might
interfere with the dim flags.
Hint
If you have difficulty aligning the laser or turning the
screws, loosen all three screws and start over.
52. Continue repeating the procedure until the laser is aligned. (If you
cannot get your laser exactly at position shown in Figure 6-23 on page
6-19, but it is still at a position you think will give you enough
accuracy for your needs, you are finished.)
53. When you’re finished, replace the access door shown in Figure 6-19 on
page 6-16.
!"#$%&'"()*+,-".+/(%0(1
7-(>"%8-/23N/0-$36)2)"=3O-J)(-h
W*9M
W89W
7-(>"%8-/23N/0-$36)2)"=3O-J)(-h
!"#$%&'"()*+,-".+/(%0(1
A--."&)7/A!
B<H/1$%#%(%43
<%+%"#C./+01"&#*21+
The information in this section applies to all of the protocols listed in this
Appendix (except where noted).
E16+$2+:.-1+A%+*21+(
The values displayed in the columns “Value (dec.)”, “Value (%)” and “Value
(hex)” in the following tables may vary slightly depending on your controller’s
rounding convention.
Y^NW2*.-1+*"1C
The full protocol for Technobeam gives you 16-bit control over the positioning
of the mirror and the angular position of rotating lithos. However, you always
have smooth, 16-bit control over movement, even if you choose the reduced
protocol—which gives you 8-bit control over mirror and litho positioning.
The full protocols give you two channels of position control: one channel sets
the most significant 8 bits (coarse adjustment), while the second channel sets
the least significant 8 bits (fine adjustment) of a 16-bit value. The high order
bit gives you 256 times the number of litho position stops (65,536 for 16-bit
compared to 256 for 8-bit).
8#7"1(
Technobeam full protocol offers 28 selectable macros to simplify
programming. A macro is a set of preconfigured constructs you can use with
any other combination of constructs you want, except Laser Aiming Device
constructs. Because the Technobeam Laser Aiming Device shares the same
DMX channel, you cannot use both macros and the Laser Aiming Device at the
same time.
!"#$%&'"()*+,-".+/(%0(1
OWY3A$%#%(%50
P*7
843%%$.A(O.,#(*.-G#+:%(
There are two different ways you can choose to move the color and litho
wheels: fast changes or MSpeed changes.
A fast change means the color or litho movement is completed in the shortest
amount of time after the wheel starts moving.
An MSpeed (motor/mirror speed) change occurs smoothly over the entire
MSpeed time value. For example, if you choose a numerical DMX value of 202
for an MSpeed color change from position 2 to position 4, that means the color
wheel changes gradually to position 4 over 11.41 seconds. (Most controllers
also allow you to program advanced features, like crossfade or delay time.
Make sure your MSpeed value is at least as long as the crossfade or delay time;
otherwise, the color or litho change will not complete before the next page or
scene starts.)
MSpeed time values are shown in Table A-3 on page A-13.
E#&3.Q3%+R.4+#3.4G6*
The Shutter construct includes parameters named “Ramp open, snap shut” and
“Snap open, ramp shut”. A snap is an instant shutter movement (opening or
closing); the snap time never varies. What you can vary is the timing of the
ramp, which is a gradual shutter movement. A lower value always means a
longer ramp, and a higher value always means a shorter ramp.
,1"?#"$.#+$.E%A%"(%.432+(
A forward spin on all wheels and positions means the wheel or position spins
clockwise as you’re looking at the projected image. A reverse spin means the
wheel or position spins counter-clockwise.
P89
OWY3A$%#%(%50
!"#$%&'"()*+,-".+/(%0(1
!%7G+1H%#&_.)"1*171C
Table A-1 gives the DMX channel assignments for the Technobeam full 18channel protocol and reduced 14-channel protocol. The column “Ch. (F)” lists
channel assignments for the full protocol and the column “Ch. (R)” lists
channel assignments for the reduced protocol.!
7/85-36*9:337-(>"%8-/23OWY3A$%#%(%5
Ch. (F)
Ch. (R)
Construct
Parameter
Value
(dec.)
Value
(%)
Value
(hex)
7
7
\(%+U)2..&.V+C&-262&%
[&(.-"+(?t0-6)"%6
L+8+9MM
L+8+7LL
LL$+8+BB$
9
%a(
\(%+U)2..&.V+C&-262&%
B2%"+(?t0-6)"%6
L+8+9MM
L+8+7LL
LL$+8+BB$
:
9
!216+U)2..&.V+C&-262&%
[&(.-"+(?t0-6)"%6
L+8+9MM
L+8+7LL
LL$+8+BB$
H
%a(
!216+U)2..&.V+C&-262&%
B2%"+(?t0-6)"%6
L+8+9MM
L+8+7LL
LL$+8+BB$
M
:
1/*/$%aD##*%0)(,-./("
5%?"4"?+U@$""1+-%(C-+
6&+#"%6".+&F+(C".60."V
L+8+7M
L+8+M
LL$+8+LB$
B&.@(.?+-C2%
7W+8+:7
W+8+79
7L$+8+7B$
]"3".-"+-C2%
:9+8+HR
7:+8+7S
9L$+8+9B$
[&%62%0&0-
HS+8+W:
7X+8+9H
:L$+8+:B$
K1&@+-#(%
WH+8+RX
9M+8+:L
HL$+8+HB$
B(-6+-#(%
SL+8+XM
:7+8+:R
ML$+8+MB$
](%?&)
XW+8+777
:S+8+H:
WL$+8+WB$
d12%<+U-()"+(-+2%?"4D+
"4#"C6+-$066".+#1&-"-+
'"6@""%+(C".60."-V
779+8+79R
HH+8+HX
RL$+8+RB$
5%?"4"?+U@$""1+-%(C-+
6&+#"%6".+&F+(C".60."V
79S+8+7H:
ML+8+MW
SL$+8+SB$
B&.@(.?+-C2%
7HH+8+7MX
MR+8+W9
XL$+8+XB$
]"3".-"+-C2%
7WL+8+7RM
W:+8+WS
PL$+8+PB$
[&%62%0&0-
7RW+8+7X7
WX+8+RH
dL$+8+dB$
K1&@+-#(%
7X9+8+9LR
RM+8+S7
[L$+8+[B$
B(-6+-#(%
9LS+8+99:
S9+8+SR
_L$+8+_B$
](%?&)
99H+8+9:X
SS+8+X:
EL$+8+EB$
d12%<+U-()"+(-+2%?"4D+
"4#"C6+-$066".+#1&-"-+
'"6@""%+(C".60."-V
9HL+8+9MM
XH+8+7LL
BL$+8+BB$
1/*/$%aD##*%E/".-./(%'(4%
0)(,-./("
\&-262&%+7+U&C"%V
L+8+9:
9HS+8+9MM
L+8+X
XR+8+7LL
LL$+8+7R$
BS$+8+BB$
\&-262&%+U(C".60."V+-"1"#62&%+F&.+
'12%<+&.+2%?"4+)&?"+U0-"+@26$+
#$A+M+UBV+&.+:+U]VV+++++
\&-262&%+9
9H+8+:7
X+8+79
7S$+8+7B$
\&-262&%+:
:9+8+:X
7:+8+7M
9L$+8+9R$
B(-6+#&1&.+#$(%J"+U(6+'"J2%%2%J+
&F+@$""1+)&3")"%6V
+
K"1"#6+6$"+F0%#62&%+@26$+6$2-+
#$(%%"1A++!$"%+0-"+#$A+W+UBV+&.+H+
U]V+6&+-"6+6$"+C&-262&%+&.+-C2%+
-C""?A
[&1&.+#$(%J"-+-"6+'=+/KC""?+
U0-"+#$A+7W+UBV+&.+7:+U]V+6&+-"6+
/KC""?+62)"VA+
K"1"#6+6$"+C(.()"6".+@26$+6$2-+
#$(%%"1A++!$"%+0-"+#$A+W+UBV+&.+H+
U]V+6&+-"6+6$"+C&-262&%+&.+-C2%+
-C""?A
W
H
!"#$%&'"()*+,-".+/(%0(1
OWY3A$%#%(%50
P*:
7/85-36*9:337-(>"%8-/23OWY3A$%#%(%5
Ch. (F)
Ch. (R)
Construct
Value
(%)
Value
(hex)
\&-262&%+H
HL+8+HR
7W+8+7S
9S$+8+9B$
\&-262&%+M
HS+8+MM
7X+8+97
:L$+8+:R$
\&-262&%+W
MW+8+W:
99+8+9H
:S$+8+:B$
\&-262&%+R
WH+8+R7
9M+8+9R
HL$+8+HR$
\&-262&%+S
R9+8+RX
9S+8+:L
HS$+8+HB$
\&-262&%+X
SL+8+SR
:7+8+:H
ML$+8+MR$
\&-262&%+7L
SS+8+XM
:M+8+:R
MS$+8+MB$
\&-262&%+77
XW+8+7L:
:S+8+HL
WL$+8+WR$
\&-262&%+79
7LH+8+777
H7+8+H:
WS$+8+WB$
\&-262&%+7:
779+8+79R
HH+8+HX
RL$+8+RB$
I(1F+#&1&.+7+(%?+9
79S+8+7H:
ML+8+MW
SL$+8+SB$
I(1F+#&1&.+9+(%?+:
7HH+8+7M7
MR+8+MX
XL$+8+XR$
I(1F+#&1&.+:+(%?+H
7M9+8+7MX
WL+8+W9
XS$+8+XB$
I(1F+#&1&.+H+(%?+M
7WL+8+7WR
W:+8+WM
PL$+8+PR$
I(1F+#&1&.+M+(%?+W
7WS+8+7RM
WW+8+WS
PS$+8+PB$
I(1F+#&1&.+W+(%?+R
7RW+8+7S:
WX+8+R7
dL$+8+dR$
I(1F+#&1&.+R+(%?+S
7SH+8+7X7
R9+8+RH
dS$+8+dB$
I(1F+#&1&.+S+(%?+X
7X9+8+7XX
RM+8+RS
[L$+8+[R$
I(1F+#&1&.+X+(%?+7L
9LL+8+9LR
RX+8+S7
[S$+8+[B$
I(1F+#&1&.+7L+(%?+77
9LS+8+97M
S9+8+SH
_L$+8+_R$
I(1F+#&1&.+77+(%?+79
97W+8+99:
SM+8+SR
_S$+8+_B$
I(1F+#&1&.+79+(%?+7:
99H+8+9:7
SS+8+XL
EL$+8+ER$
I(1F+#&1&.+7:+(%?+7
9:9+8+9HR
X7+8+XW
ES$+8+BR$
[&1&.+@$""1+#&%62%0&0-+F&.@(.?a
."3".-"+-C2%+U0-"+@26$+#$A+M+UBV+
&.+:+U]VV
Z&+-C2%
L+8+:
L+8+7
LL$+8+L:$
K1&@"-6+-C2%+6&+F(-6"-6+
-C2%
H+8+9MM
9+8+7LL
LH$+8+BB$
[&1&.+@$""1+#&%62%0&0-+
3(.2(62&%+U@$""1+C&-262&%+2-+:WL+e+
U#$(%%"1+?"#A+3(10"+a+9MMV
["%6"."?+&%+C&-262&%+7+
U&C"%V
L
9MM
L
7LL
LL$
BB$
["%6"."?+&%+C&-262&%+9
7X
R
7:$
["%6"."?+&%+C&-262&%+:
:X
7M
9R$
["%6"."?+&%+C&-262&%+H
MS
9:
:P$
["%6"."?+&%+C&-262&%+M
RS
:7
HE$
["%6"."?+&%+C&-262&%+W
XS
:S
W9$
["%6"."?+&%+C&-262&%+R
77R
HW
RM$
["%6"."?+&%+C&-262&%+S
7:R
MH
SX$
["%6"."?+&%+C&-262&%+X
7MW
W7
X[$
,-"+@26$+#$A+M+UBV+&.+:+U]V
P8H
Value
(dec.)
Parameter
OWY3A$%#%(%50
!"#$%&'"()*+,-".+/(%0(1
7/85-36*9:337-(>"%8-/23OWY3A$%#%(%5
Ch. (F)
R
Ch. (R)
M
Construct
WX
dL$
7XW
RR
[H$
["%6"."?+&%+C&-262&%+79
97M
SH
_R$
["%6"."?+&%+C&-262&%+7:
9:M
X9
Ed$
5%?"4"?+U@$""1+-%(C-+
6&+#"%6".+&F+(C".60."V
L+8+7M
L+8+M
LL$+8+LB$
B&.@(.?+-C2%
7W+8+:7
W+8+79
7L$+8+7B$
]"3".-"+-C2%
:9+8+HR
7:+8+7S
9L$+8+9B$
K#(%
HS+8+W:
7X+8+9H
:L$+8+:B$
d12%<+U-()"+(-+2%?"4D+
"4#"C6+-$066".+#1&-"-+
'"6@""%+(C".60."-V
WH+8+RX
9M+8+:L
HL$+8+HB$
](%?&)
SL+8+XM
:7+8+:R
ML$+8+MB$
]"-".3"?
XW+8+777
:S+8+H:
WL$+8+WB$
`$""1+-C2%
779+8+79R
HH+8+HX
RL$+8+RB$
5%?"4"?+U@$""1+-%(C-+
6&+#"%6".+&F+(C".60."V
79S+8+7H:
ML+8+MW
SL$+8+SB$
B&.@(.?+-C2%
7HH+8+7MX
MR+8+W9
XL$+8+XB$
]"3".-"+-C2%
7WL+8+7RM
W:+8+WS
PL$+8+PB$
K#(%
7RW+8+7X7
WX+8+RH
dL$+8+dB$
d12%<+U-()"+(-+2%?"4D+
"4#"C6+-$066".+#1&-"-+
'"6@""%+(C".60."-V
7X9+8+9LR
RM+8+S7
[L$+8+[B$
](%?&)
9LS+8+99:
S9+8+SR
_L$+8+_B$
]"-".3"?
99H+8+9:X
SS+8+X:
EL$+8+EB$
`$""1+-C2%
9HL+8+9MM
XH+8+7LL
BL$+8+BB$
K.-D/%aD##*%E/".-./(
\&-262&%+7+U&C"%V
L+8+7M
9HL+8+9MM
L+8+M
XH+8+7LL
LL$+8+LB$
BL$+8+BB$
\&-262&%+U(C".60."V+-"1"#62&%+F&.+
'12%<+&.+2%?"4+)&?"+U0-"+@26$+
#$A+M+UBV+&.+:+U]VV
\&-262&%+9
7W+8+HR
W+8+7S
7L$+8+9B$
\&-262&%+:
HS+8+RX
7X+8+:L
:L$+8+HB$
\&-262&%+H
SL+8+777
:7+8+H:
ML$+8+WB$
\&-262&%+M
779+8+7H:
HH+8+MW
RL$+8+SB$
\&-262&%+W
7HH+8+7RM
MR+8+WS
XL$+8+PB$
\&-262&%+R
7RW+8+9LR
WX+8+S7
dL$+8+[B$
\&-262&%+S
9LS+8+9:X
S9+8+X:
_L$+8+EB$
P%J01(.+C&-262&%+F&.+
'12%<+(%?+2%?"4+)&?"-
L+8+9MM
L+8+7LL
LL$+8+BB$
K.-D/%aD##*%0)(,-./("%%
O26$&+#$(%J"-+-"6+'=+/KC""?+
U0-"+#$A+7W+UBV+&.+7:+U]V+6&+-"6+
/KC""?+62)"V+
K"1"#6+6$"+C(.()"6".+@26$+6$2-+
#$(%%"1A++!$"%+0-"+#$-A+SD+X+u+
7L+UBV+&.+#$-A+W+u+R+U]V+6&+-"6+
&6$".+&C62&%-A
](%?&)+(%?+-#(%+C(0-"+62)"+
-"6+'=+#$A+X+UBV+&.+#$A+R+U]V+
R
Value
(hex)
7RW
](%?&)+(%?+-#(%+C(0-"+62)"+
-"6+'=+#$-A+X+u+7L+UBV+&.+#$A+R+
U]V+
X
Value
(%)
["%6"."?+&%+C&-262&%+77
K"1"#6+6$"+F0%#62&%+@26$+6$2-+
#$(%%"1A++!$"%+0-"+#$-A+SD+X+u+
7L+UBV+&.+#$-A+W+u+R+U]V+6&+-"6+
&6$".+&C62&%-A
W
Value
(dec.)
["%6"."?+&%+C&-262&%+7L
B(-6+126$&+#$(%J"-+U(6+'"J2%%2%J+
&F+@$""1+)&3")"%6V
S
Parameter
K.-D/%$/-'-./(%O,/'$"#%
'4d)"-2#(-P%'(4%0)(,-./("
!"#$%&'"()*+,-".+/(%0(1
OWY3A$%#%(%50
P*M
7/85-36*9:337-(>"%8-/23OWY3A$%#%(%5
Ch. (F)
Ch. (R)
7L
%a(
77
S
Construct
X
Value
(%)
Value
(hex)
](%?&)
](%?&)+C(0-"+62)"D+
-$&.6"-6+6&+1&%J"-6
L+8+9MM
L+8+7LL
LL$+8+BB$
K#(%
K#(%+.(6"D+-1&@"-6+6&+
F(-6"-6
L+8+9MM
L+8+7LL
LL$+8+BB$
O26$&+@$""1+-C2%+U0-"+@26$+#$A+R+
UBV+&.+#$A+M+U]V
B&.@(.?+-C2%D+F(-6"-6+6&+
-1&@"-6
L+8+77X
L+8+HR
L+8+RR$
E%62."+@$""1+-C2%-D+%&6+
2%?232?0(1+126$&-
Z&+-C2%
79L+8+7:M
HR+8+M:
RS$+8+SR$
]"3".-"+-C2%D+-1&@"-6+
6&+F(-6"-6
7:W+8+9MM
M:+8+7LL
SS$+8+BB$
K.-D/%$/-'-./(%O0.(#%
'4d)"-2#(-P
P%J01(.+C&-262&%+F&.+
'12%<+(%?+2%?"4+)&?"-
L+8+9MM
L+8+7LL
LL$+8+BB$
:00#,-"%E/".-./(
\&-262&%+7
L+8+9M
L+8+X
LL$+8+7X$
B(-6+"FF"#6-+#$(%J"-+U(6+
'"J2%%2%J+&F+@$""1+)&3")"%6V
\&-262&%+9
9W+8+M7
7L+8+9L
7P$+8+::$
\&-262&%+:
M9+8+RW
97+8+9X
:H$+8+H[$
K"1"#6+6$"+C&-262&%+@26$+6$2-+
#$(%%"1A++!$"%+0-"+#$A+79+UBV+&.+
#$A+X+U]V+6&+-"6+-C2%+?2."#62&%+
(%?+-C""?A
\&-262&%+H
RR+8+7L9
:7+8+HL
H_$+8+WW$
\&-262&%+M
7L:+8+79R
H7+8+HX
WR$+8+RB$
EFF"#6-+#$(%J"-+-"6+'=+/KC""?+
U0-"+#$A+7W+UBV+&.+7:+U]V+6&+-"6+
/KC""?+62)"V
\&-262&%+7
79S+8+7M:
ML+8+WL
SL$+8+XX$
\&-262&%+9
7MH+8+7RS
W7+8+WX
XP$+8+d9$
\&-262&%+:
7RX+8+9LH
RL+8+SL
d9$+8+[[$
\&-262&%+H
9LM+8+99X
S7+8+SX
[_$+8+EM$
\&-262&%+M
9:L+8+9MM
XL+8+7LL
EW$+8+BB$
B&.@(.?+-C2%+F(-6+6&+
-1&@+F&.@(.?+-C2%
L+8+79L
L+8+HR
LL$+8+RS$
Z&+-C2%
797+8+7:H
HS+8+M9
RX$+8+SW$
]"3".-"+-C2%+-1&@+6&+
F(-6+F&.@(.?+-C2%
7:M+8+9MM
M:+8+7LL
SR$+8+BB$
K"1"#6+6$"+C&-262&%+@26$+6$2-+
#$(%%"1A++!$"%+0-"+#$A+79+UBV+&.+
#$A+X+U]V+6&+-"6+-C2%+?2."#62&%+
(%?+-C""?
79
Value
(dec.)
Parameter
:00#,-"%"E.(%"E##4
U0-"+@26$+#$A+77+UBV+&.+
#$A+S+U]VV
7:
7L
H/,)"
Y(.2('1"+F�-
L+8+9MM
L+8+7LL
LL$+8+BB$
7H
77
7D)--#$
[1&-"?
L+8+R
L+8+9
LL$+8+LR$
\".2&?2#+-6.&'"
S+8+WR
:+8+9W
LS$+8+H:$
](%?&)+-6.&'"
WS+8+79R
9R+8+HX
HH$+8+RB$
]()C+&C"%D+-%(C+-$06
79S+8+7SR
ML+8+R:
SL$+8+dd$
K%(C+&C"%D+.()C+-$06
7SS+8+9HR
RH+8+XW
d[$+8+BR$
bC"%
9HS+8+9MM
XR+8+7LL
BS$+8+BB$
L+8+9MM
L+8+7LL
LL$+8+BB$
O&%J"-6+.()C+62)"+v+1&@"-6+
3(10"+U-%(C+62)"+2-+(1@(=-+
-$&.6V
7M
79
+.2
B011+?(.<+6&+F011+'.2J$6
7W
7:
&7E##4
/&3")"%6+62)"+U-""+!('1"+P8:+&%+C(J"+P87:V
P8W
OWY3A$%#%(%50
!"#$%&'"()*+,-".+/(%0(1
7/85-36*9:337-(>"%8-/23OWY3A$%#%(%5
Ch. (F)
Ch. (R)
7R
%a(
7S
7+
7H
Construct
K'"#$%L.2.(5%+#M.,#%OKL+P
Parameter
Value
(dec.)
Value
(%)
Value
(hex)
OP_+&FF
L+8+R
79L+8+79R
L+8+:
HR+8+HX
LL+8+LR$
RS$+8+RB$
OP_+)&?01(6"+-1&@+6&+
F(-67
79S+8+9HR
ML+8+XW
SL$+8+BR$
OP_+&%+U#&%62%0&0-V
9HS+8+9MM
XR+8+7LL
BS$+8+BB$
/(#.&-
/(#.&+7y9S+U-""+!('1"+P8H+&%+C(J"+P87MV
1/(-$/*<
K(F":
L+8+R
L+8+:
LL$+8+LR$
_2-C1(=+&FF
9H+8+9W
X+8+7L
7S$+8+7P$
_2-C1(=+?2)
:9+8+:H
7:
9L$+8+99$
_2-C1(=+'.2J$6
HL+8+H9
7W
9S$+8+9P$
I&)"H
WH+8+WW
9M+8+9W
HL$+8+H9$
O()C+&%M
SL+8+S9
:7+8+:9
ML$+8+M9$
W
O()C+&FF
XW+8+XS
:S
WL$+8+W9$
K$06?&@%
79S+8+7:L
ML+8+M7
SL$+8+S9$
8+lK1&@m+)&?01(62&%+2-+HA9M+62)"-a-"#+(%?+lF(-6m+)&?01(62&%+2-+9MM+62)"-a-"#D+(6+MLw+?06=+#=#1"A
9
+8+c&0+)0-6+-"6+6$"+K$066".+#$(%%"1+6&+g".&+'"F&."+(##"--2%J+6$"+[&%6.&1+#$(%%"1A
:
+8+`$"%+-"6+6&+K(F"D+6$"+#&%6.&1+#$(%%"1+$(-+%&+"FF"#6+2F+6$"+-$066".+2-+#1&-"?A
H
+8+I&1?+6$"+[&%6.&1+#$(%%"1+(6+6$2-+3(10"+F&.+(6+1"(-6+&%"+-"#&%?A++I&)2%J+6$"+F2460."+2%+6$2-+@(=+
?&"-+%&6+#$(%J"+6$"+-6(6"+&F+6$"+1()C+U2F+6$"+1()C+@(-+&FFD+26+-6(=-+&FFx+2F+6$"+1()C+@(-+&%D+26+-6(=-+
&%VA
M
+8+I&1?+6$"+[&%6.&1+#$(%%"1+(6+6$2-+3(10"+F&.+(6+1"(-6+&%"+-"#&%?A++5F+6$"+1()C+2-+#0.."%61=+&FFD+60.%2%J+
6$"+1()C+&%+2%+6$2-+@(=+#(0-"-+6$"+F2460."+6&+$&)"A++U5F+6$"+1()C+@(-+(1."(?=+&%D+6$"+#&))(%?+$(-+
%&+"FF"#6AV+
W+8+I&1?+6$"+[&%6.&1+#$(%%"1+(6+6$2-+3(10"+F&.+(6+1"(-6+&%"+-"#&%?A++!$"+1()C+@211+(1-&+60.%+&%+
@$"%"3".+=&0+C&@".+0C+6$"+F2460."+&%+(+12%<+@$"%+6$"."+2-+(+#&%6.&11".+C."-"%6+(%?+26+2-+-"%?2%J+?(6(+
#&))(%?-A
!%7G+1H%#&N2M.)"1*171C
!"#$%&'&$()*)&*+%&,-&!%.+/0#%"12(&.0/)*34.*)&"/5&*+%(3&.033%)60/5(/7&89:&.0/*30$$%3&
;"$4%)<&&=>&?04&+";%&"&/41%3(.2*?6%&.0/*30$$%3@&4)%&*+%&A"$4%&8%.(1"$&B5%.<C&.0$41/<&&=>&
?04&+";%&"&>"5%32*?6%&.0/*30$$%3@&4)%&*+%&A"$4%&D%3.%/*"7%&BEC&.0$41/<&&=>&?043&.0/*30$$%3&
"$$0F)&?04&*0&63073"1&+%G&;"$4%)@&4)%&*+%&A"$4%&B+%GC&.0$41/<&&!+%&;"$4%)&(/&*+%&A"$4%&
!"#$%&'"()*+,-".+/(%0(1
OWY3A$%#%(%50
P*R
D%3.%/*"7%&BEC&.0$41/&1"?&;"3?&)$(7+*$?&5%6%/5(/7&0/&?043&.0/*30$$%3H)&304/5(/7&
.0/;%/*(0/<&&&
7/85-36*F:337-(>"%8-/2*)3OWY3A$%#%(%5
Ch.
7
Construct
\(%+U)2..&.V+
C&-262&%
\(%+U)2..&.V+
C&-262&%
!216+U)2..&.V+C&-262&%
!216+U)2..&.V+C&-262&%
[&1&.+B0%#62&%
9
:
H
M
W
[&1&.+`$""1+
\&-262&%
P8S
Parameter
Value
(dec.)
Value
(%)
Value
(hex)
[&(.-"+(?t0-6)"%6+US8'26V
L+8+9MM
L+8+7LL
LL+8+BB
B2%"+(?t0-6)"%6+US8'26V
L+8+9MM
L+8+7LL
LL+8+BB
[&(.-"+(?t0-6)"%6+US8'26V
B2%"+(?t0-6)"%6+US8'26V
B011+KC""?+[&%6.&1
5%?"4"?
B&.@(.?+KC2%
]"3".-"+KC2%
[&%62%0&0K1&@+K#(%
B(-6+K#(%
](%?&)
d12%<
/KC""?+[&%6.&1
5%?"4"?
B&.@(.?+KC2%
]"3".-"+KC2%
[&%62%0&0K1&@+K#(%
B(-6+K#(%
](%?&)
d12%<
5%?"4"?+(%?+d12%<+/&?"[&1&.+7
[&1&.+9
[&1&.+:
[&1&.+H
[&1&.+M
[&1&.+W
[&1&.+R
[&1&.+S
[&1&.+X
[&1&.+7L
[&1&.+77
[&1&.+79
[&1&.+7:
[&1&.-+7+(%?+9
[&1&.-+9+(%?+:
[&1&.-+:+(%?+H
[&1&.-+H+(%?+M
[&1&.-+M+(%?+W
[&1&.-+W+(%?+R
[&1&.-+R+(%?+S
[&1&.-+S+(%?+X
[&1&.-+X+(%?+7L
L+8+9MM
L+8+9MM
L+8+7LL
L+8+7LL
LL+8+BB
LL+8+BB
L87M
7W8:7
:98HR
HS8W:
WH8RX
SL8XM
XW8777
779879R
L8W
R879
7:87S
7X89M
9W8:7
:98:R
:S8HH
HM8ML
LL8LB
7L87B
9L89B
:L8:B
HL8HB
ML8MB
WL8WB
RL8RB
79S87H:
7HH87MX
7WL87RM
7RW87X7
7X989LR
9LS899:
99H89:X
9HL89MM
M78MW
MR8W9
W:8WX
RL8RM
RW8S7
S98SS
SX8XH
XM87LL
SL8SB
XL8XB
PL8PB
dL8dB
[L8[B
_L8_B
EL8EB
BL8BB
L89:
9H8:7
:98:X
HL8HR
HS8MM
MW8W:
WH8R7
R98RX
SL8SR
SS8XM
XW87L:
7LH8777
779879R
79S87H:
7HH87M7
7M987MX
7WL87WR
7WS87RM
7RW87S:
7SH87X7
7X987XX
9LL89LR
L8X
7L879
7:87M
7W87S
7X897
9989M
9W89S
9X8:7
:98:H
:M8:R
:S8HL
H78HH
HM8ML
M78MW
MR8WL
W78W9
W:8WW
WR8WX
RL8R9
R:8RM
RW8RS
RX8S7
LL87R
7S87B
9L89R
9S89B
:L8:R
:S8:B
HL8HR
HS8HB
ML8MR
MS8MB
WL8WR
WS8WB
RL8RB
SL8SB
XL8XR
XS8XB
PL8PR
PS8PB
dL8dR
dS8dB
[L8[R
[S8[B
OWY3A$%#%(%50
!"#$%&'"()*+,-".+/(%0(1
7/85-36*F:337-(>"%8-/2*)3OWY3A$%#%(%5
Ch.
W
U#&%6AV
Construct
[&1&.+`$""1+
\&-262&%+U#&%6AV
Parameter
[&1&.-+7L+(%?+77
[&1&.-+77+(%?+79
[&1&.-+79+(%?+7:
[&1&.-+7:+(%?+7
[&1&.+7
[&%62%0&0-1=+Y(.2('1"+B&.@(.?+KC2%+/&?"
KC2%+K6&C
KC2%+B&.@(.?+K1&@"-6
KC2%+B&.@(.?+B(-6"-6
[&%62%0&0-1=+Y(.2('1"+]"3".-"+KC2%+/&?"
KC2%+K6&C
KC2%+]"3".-"+K1&@"-6
KC2%+]"3".-"+B(-6"-6
[&%62%0&0-1=+Y(.2('1"+/&?"
[&1&.+7+U&C"%V
[&1&.+9
[&1&.+:
[&1&.+H
[&1&.+M
[&1&.+W
[&1&.+R
[&1&.+S
[&1&.+X
[&1&.+7L
[&1&.+77
[&1&.+79
[&1&.+7:
[&1&.+7+U&C"%V
K#(%+/&?"++8+6@&+#&1&.[&1&.+7+(%?+9
[&1&.+9+(%?+:
[&1&.+:+(%?+H
[&1&.+H+(%?+M
[&1&.+M+(%?+W
[&1&.+W+(%?+R
[&1&.+R+(%?+S
[&1&.+S+(%?+X
[&1&.+X+(%?+7L
[&1&.+7L+(%?+77
[&1&.+77+(%?+79
[&1&.+79+(%?+7:
[&1&.+7:+(%?+7
K#(%+/&?"++8+6$.""+#&1&.[&1&.+7:+(%?+7+(%?+9
[&1&.+7+(%?+9+(%?+:
[&1&.+9+(%?+:+(%?+H
[&1&.+:+(%?+H+(%?+M
[&1&.+H+(%?+M+(%?+W
[&1&.+M+(%?+W+(%?+R
[&1&.+W+(%?+R+(%?+S
!"#$%&'"()*+,-".+/(%0(1
Value
(dec.)
Value
(%)
Value
(hex)
9LS897M
97W899:
99H89:7
9:989HR
9HS89MM
S98SH
SM8SS
SX8X7
X98XR
XS87LL
_L8_R
_S8_B
EL8ER
ES8BR
BS8BB
L8:
H
9MM
L87
9
7LL
LL8L:
LH
BB
L8:
H
9MM
L87
9
7LL
LL8L:
LH
BB
L
7X
:X
MS
RS
XS
77R
7:R
7MW
7RW
7XW
97M
9:M
9MM
L
S
7M
9:
:7
:S
HW
MH
W7
WX
RR
SH
X9
7LL
LL
7:
9R
:P
HE
W9
RM
SX
X[
dL
[H
_R
Ed
BB
L89:
9H8:7
:98:X
HL8HR
HS8MM
MW8W:
WH8R7
R98RX
SL8SR
SS8XM
XW87L:
7LH8777
779879R
L8S
X879
7:87M
7W87S
7X897
9989M
9W89S
9X8:7
:98:H
:M8:R
:S8HL
H78HH
HM8ML
LL87R
7S87B
9L89R
9S89B
:L8:R
:S8:B
HL8HR
HS8HB
ML8MR
MS8MB
WL8WR
WS8WB
RL8RB
79S87M7
7M987MX
7WL87WR
7WS87RM
7RW87S:
7SH87X7
7X987XX
M78MX
WL8W9
W:8WW
WR8WX
RL8R9
R:8RM
RW8RS
SL8XR
XS8XB
PL8PR
PS8PB
dL8dR
dS8dB
[L8[R
OWY3A$%#%(%50
P*X
7/85-36*F:337-(>"%8-/2*)3OWY3A$%#%(%5
Ch.
W
U#&%6AV
R
S
X
Construct
[&1&.+`$""1+
\&-262&%+U#&%6AV
O26$&+B0%#62&%
O26$&+`$""1+
\&-262&%
O26$&+]&6(6"
P87L
Parameter
[&1&.+R+(%?+S+(%?+X
[&1&.+S+(%?+X+(%?+7L
[&1&.+X+(%?+7L+(%?+77
[&1&.+7L+(%?+77+(%?+79
[&1&.+77+(%?+79+(%?+7:
[&1&.+79+(%?+7:+(%?+7
](%?&)+/&?"
](%?&)+K1&@"-6
](%?&)+B(-6"-6
B011+KC""?+[&%6.&1
5%?"4"?
B&.@(.?+KC2%
]"3".-"+KC2%
K#(%%2%J
d12%<
](%?&)
]"-".3"?+F&.+B060."+,-"
`$""1+KC2%
/KC""?+[&%6.&1
5%?"4"?
B&.@(.?+KC2%
]"3".-"+KC2%
K#(%%2%J
d12%<
](%?&)
]"-".3"?+F&.+B060."+,-"
`$""1+KC2%
5%?"4"?D+d12%<D+KC2%-D+(%?+K#(%%2%J+/&?"O26$&+7+U&C"%V
O26$&+9
O26$&+:
O26$&+H
O26$&+M
O26$&+W
O26$&+R
O26$&+S
O26$&+7+U&C"%V
5%?"4"?+/&?"
O26$&+\&-262&%
K#(%+/&?"
K1&@"-6+K#(%%2%J
B(-6"-6+K#(%%2%J
](%?&)+/&?"
](%?&)+K1&@"-6
](%?&)+B(-6"-6
`$""1+KC2%+/&?"
B(-6"-6+B&.@(.?+`$""1+KC2%
K1&@"-6+B&.@(.?+`$""1+KC2%
K1&@"-6+]"3".-"+`$""1+KC2%
B(-6"-6+]"3".-"+`$""1+KC2%
OWY3A$%#%(%50
Value
(dec.)
Value
(%)
Value
(hex)
9LL89LR
9LS897M
97W899:
99H89:7
9:989:X
9HL89MM
RX8S7
S98SH
SM8SS
SX8X7
X98XH
XM87LL
[S8[B
_L8_R
_S8_B
EL8ER
ES8EB
BL8BB
L
9MM
L
7LL
LL
BB
L87M
7W8:7
:98HR
HS8W:
WH8RX
SL8XM
XW8777
779879R
L8W
R879
7:87S
7X89M
9W8:7
:98:R
:S8HH
HM8ML
LL8LB
7L87B
9L89B
:L8:B
HL8HB
ML8MB
WL8WB
RL8RB
79S87H:
7HH87MX
7WL87RM
7RW87X7
7X989LR
9LS899:
99H89:X
9HL89MM
M78MW
MR8W9
W:8WX
RL8RM
RW8S7
S98SS
SX8XH
XM87LL
SL8SB
XL8XB
PL8PB
dL8dB
[L8[B
_L8_B
EL8EB
BL8BB
L87M
7W8HR
HS8RX
SL8777
77987H:
7HH87RM
7RW89LR
9LS89:X
9HL89MM
L8W
R87S
7X8:7
:98HH
HM8MW
MR8WX
RL8S7
S98XH
XM87LL
LL8LB
7L89B
:L8HB
ML8WB
RL8SB
XL8PB
dL8[B
_L8EB
BL8BB
L89MM
L87LL
LL8BB
L
9MM
L
7LL
LL
BB
L
9MM
L
7LL
LL
BB
L
79R
79S
9MM
L
HX
ML
7LL
LL
RB
SL
BB
!"#$%&'"()*+,-".+/(%0(1
7/85-36*F:337-(>"%8-/2*)3OWY3A$%#%(%5
Ch.
Construct
7L
5.2-
77
EFF"#6-+`$""1+
\&-262&%
79
EFF"#6-+]&6(6"
7:
B�-
7H
K$066".
7M
_2)
7W
7R
/KC""?
/(#.&aOP_n
Parameter
[1&-"
Y(.2('1"+5.2bC"%
\".2&?2#+K6.&'"
](%?&)+K6.&'"
]()C+bC"%aK%(C+K$06
K%(C+bC"%a]()C+K$06
]()C+bC"%a]()C+K$06
](%?&)+]()C+bC"%aK%(C+K$06
](%?&)+K%(C+bC"%a]()C+K$06
bC"%
B011+KC""?+[&%6.&1
EFF"#6+7
EFF"#6+9
EFF"#6+:
EFF"#6+H
EFF"#6+M
/KC""?+[&%6.&1
EFF"#6+7
EFF"#6+9
EFF"#6+:
EFF"#6+H
EFF"#6+M
]&6(6"+[1&#<@2-"+B(-6"-6
]&6(6"+[1&#<@2-"+K1&@"-6
Z&+.&6(62&%
]&6(6"+[&0%6".8[1&#<@2-"+K1&@"-6
]&6(6"+[&0%6".8[1&#<@2-"+B(-6"-6
B�-+5%
B�-+b06
[1&-"
\".2&?2#+K6.&'"
](%?&)+K6.&'"
]()C+bC"%D+K%(C+K$06
K%(C+bC"%D+]()C+K$06
bC"%
[1&-"
[&%62%0&0-1=+Y(.2('1"
bC"%
K""+!('1"+P8:+&%+C(J"+P87:+F&.+/KC""?+62)"OP_+bFF
/(#.&+7
/(#.&+9
/(#.&+:
/(#.&+H
/(#.&+M
/(#.&+W
/(#.&+R
/(#.&+S
!"#$%&'"()*+,-".+/(%0(1
Value
(dec.)
Value
(%)
Value
(hex)
L
7879R
79S87:M
7:W87M7
7M987WR
7WS87S:
7SH87XX
9LL897M
97W89:7
9:989HR
9HS89MM
L
78ML
M78M:
MH8MX
WL8WW
WR8R9
R:8RS
RX8SH
SM8X7
X98XR
XS87LL
LL
L78RB
SL8SR
SS8XR
XS8PR
PS8dR
dS8[R
[S8_R
_S8ER
ES8BR
BS8BB
L89M
9W8M7
M98RW
RR87L9
7L:879R
L87L
7789L
978:L
:78HL
H78ML
LL87X
7P8::
:H8H[
H_8WW
WR8RB
79S87M:
7MH87RS
7RX89LH
9LM899X
9:L89MM
L
79L
79787:H
7:M
9MM
L
9MM
L8R
S8WR
WS879R
79S87SR
7SS89HR
9HS89MM
L
789MH
9MM
M78WL
W78RL
R78SL
S78XL
X787LL
L
HR
HS8M9
M:
7LL
L
7LL
L8:
H89W
9R8ML
M78R:
RH8XR
XS87LL
L
78XX
7LL
SL8XX
XP8d9
d:8[[
[_8EM
EW8BB
LL
RS
RX8SW
SR
BB
LL
BB
LL8LR
LS8H:
HH8RB
SL8dd
d[8BR
BS8BB
LL
L78BE
BB
L8R
S877
7987M
7W87X
9L89:
9H89R
9S8:7
:98:M
:W8:X
L8:
:8H
M8W
W8S
S8X
X877
77879
7:87H
7H87M
LL8LR
LS8Ld
L[8LB
7L87:
7H87R
7S87d
7[87B
9L89:
9H89R
OWY3A$%#%(%50
P*77
7/85-36*F:337-(>"%8-/2*)3OWY3A$%#%(%5
Ch.
Construct
7R
U#&%6AV
/(#.&aOP_n
U#&%6AV
7S
[&%6.&1
Z&6"T++K$066".+
U#$(%%"1+7HV+)0-6+
'"+-"6+6&+lLm+6&+
(##"--+6$"+#&%6.&1+
F0%#62&%-A
Parameter
/(#.&+X
/(#.&+7L
/(#.&+77
/(#.&+79
/(#.&+7:
/(#.&+7H
/(#.&+7M
/(#.&+7W
/(#.&+7R
/(#.&+7S
/(#.&+7X
/(#.&+9L
/(#.&+97
/(#.&+99
/(#.&+9:
/(#.&+9H
/(#.&+9M
/(#.&+9W
/(#.&+9R
/(#.&+9S
OP_+bFF
OP_+/&?01(6"+K1&@"-6
OP_+/&?01(6"+B(-6"-6
OP_+b%+[&%62%0&0-1=
K(F"
_2-C1(=+bFF
_2-C1(=+_2)
_2-C1(=+d.2J$6
I&)"
O()C+b%
O()C+bFF
K$06?&@%
Value
(dec.)
HL8H:
HH8HR
HS8M7
M98MM
MW8MX
WL8W:
WH8WR
WS8R7
R98RM
RW8RX
SL8S:
SH8SR
SS8X7
X98XM
XW8XX
7LL87L:
7LH87LR
7LS8777
779877M
77W877X
79L879R
79S
9HR
9HS89MM
L8R
9H89W
:98:H
HL8H9
WH8WW
SL8S9
XW8XS
79S87:L
Value
(%)
7W87R
7R87S
7X89L
9L899
9989:
9H89M
9M89W
9R89S
9S89X
:L8:7
:78::
:98:H
:H8:W
:W8:R
:S8:X
:X8HL
H78H9
H98HH
HH8HM
HW8HR
HR8ML
ML
XR
XR87LL
L8:
X87L
7987:
7W87R
9M89W
:78:9
:R8:S
ML8M7
Value
(hex)
9S89d
9[89B
:L8::
:H8:R
:S8:d
:[8:B
HL8H:
HH8HR
HS8Hd
H[8HB
ML8M:
MH8MR
MS8Md
M[8MB
WL8W:
WH8WR
WS8Wd
W[8WB
RL8R:
RH8RR
RS8RB
SL
BR
BS8BB
LL8LR
7S87P
9L899
9S89P
HL8H9
ML8M9
WL8W9
SL8S9
843%%$.81A%&%+*.!2&%(
Use Table A-3 to determine the MSpeed (motor/mirror) movement times for
Technobeam, Technopro or Technoray in seconds.
An MSpeed (motor/mirror speed) change occurs smoothly over the entire
MSpeed time value. For example, if you choose a numerical DMX value of 202
for an MSpeed color change from position 2 to position 4, that means the color
wheel changes gradually to position 4 over 11.41 seconds.
Note
P879
The values displayed in the “Value (%)” , “Value (hex)” and “Value
(num)” columns may vary slightly depending on your controller’s
rounding conventions.
OWY3A$%#%(%50
!"#$%&'"()*+,-".+/(%0(1
7/85-36*H:33W+,--&3W%J-2-"#37)2-0
Time
(sec.)
Value
(dec.)
Value
(%)
Value
(hex)
Time
(sec.)
Value
(dec.)
Value
(%)
Value
(hex)
Time
(sec.)
Value
(dec.)
Value
(%)
Value
(hex)
LA7M
9MM
7LL
BB$
RAX7
977
S:
_:$
:7A7X
7WR
WM
PR$
LA7M
9MH
7LL
BE$
SA9R
97L
S9
_9$
:7AXL
7WW
WM
PW$
LA7R
9M:
XX
B_$
SAW:
9LX
S9
_7$
:9AW9
7WM
WM
PM$
LA7X
9M9
XX
B[$
XALL
9LS
S9
_L$
::A:H
7WH
WH
PH$
LA97
9M7
XS
Bd$
XA:X
9LR
S7
[B$
:HALS
7W:
WH
P:$
LA9M
9ML
XS
BP$
XARR
9LW
S7
[E$
:HAS9
7W9
WH
P9$
LA9X
9HX
XS
BX$
7LA7R
9LM
SL
[_$
:MAMR
7W7
W:
P7$
LA:M
9HS
XR
BS$
7LAMS
9LH
SL
[[$
:WA::
7WL
W:
PL$
LAH7
9HR
XR
BR$
7LAXX
9L:
SL
[d$
:RALX
7MX
W9
XB$
LAHR
9HW
XW
BW$
77AH7
9L9
RX
[P$
:RASR
7MS
W9
XE$
LAMM
9HM
XW
BM$
77ASH
9L7
RX
[X$
:SAWM
7MR
W9
X_$
LAW:
9HH
XW
BH$
79A9S
9LL
RS
[S$
:XAHH
7MW
W7
X[$
LAR:
9H:
XM
B:$
79AR9
7XX
RS
[R$
HLA9:
7MM
W7
Xd$
LAS:
9H9
XM
B9$
7:A7R
7XS
RS
[W$
H7ALH
7MH
WL
XP$
LAXH
9H7
XM
B7$
7:AW:
7XR
RR
[M$
H7ASM
7M:
WL
XX$
7ALM
9HL
XH
BL$
7HA7L
7XW
RR
[H$
H9AWS
7M9
WL
XS$
7A7S
9:X
XH
EB$
7HAMS
7XM
RW
[:$
H:AML
7M7
MX
XR$
7A:7
9:S
X:
EE$
7MALR
7XH
RW
[9$
HHA:H
7ML
MX
XW$
7AHM
9:R
X:
E_$
7MAMW
7X:
RW
[7$
HMA7X
7HX
MS
XM$
7AWL
9:W
X:
E[$
7WALW
7X9
RM
[L$
HWALH
7HS
MS
XH$
7ARM
9:M
X9
Ed$
7WAMR
7X7
RM
dB$
HWAXL
7HR
MS
X:$
7AX9
9:H
X9
EP$
7RALX
7XL
RM
dE$
HRARR
7HW
MR
X9$
9ALX
9::
X7
EX$
7RAW7
7SX
RH
d_$
HSAWM
7HM
MR
X7$
9A9R
9:9
X7
ES$
7SA7H
7SS
RH
d[$
HXAMH
7HH
MW
XL$
9AHW
9:7
X7
ER$
7SAWS
7SR
R:
dd$
MLAH:
7H:
MW
SB$
9AWW
9:L
XL
EW$
7XA9:
7SW
R:
dP$
M7A::
7H9
MW
SE$
9ASW
99X
XL
EM$
7XARX
7SM
R:
dX$
M9A9H
7H7
MM
S_$
:ALR
99S
SX
EH$
9LA:W
7SH
R9
dS$
M:A7W
7HL
MM
S[$
:A9X
99R
SX
E:$
9LAX:
7S:
R9
dR$
MHALX
7:X
MM
Sd$
:AM9
99W
SX
E9$
97AM7
7S9
R7
dW$
MMAL9
7:S
MH
SP$
:ARW
99M
SS
E7$
99A7L
7S7
R7
dM$
MMAXW
7:R
MH
SX$
HALL
99H
SS
EL$
99ARL
7SL
R7
dH$
MWAX7
7:W
M:
SS$
HA9M
99:
SR
_B$
9:A:L
7RX
RL
d:$
MRASR
7:M
M:
SR$
HAM9
999
SR
_E$
9:AX9
7RS
RL
d9$
MSASH
7:H
M:
SW$
HARS
997
SR
__$
9HAMH
7RR
WX
d7$
MXAS7
7::
M9
SM$
MALW
99L
SW
_[$
9MA7R
7RW
WX
dL$
WLARX
7:9
M9
SH$
MA:H
97X
SW
_d$
9MASL
7RM
WX
PB$
W7ARS
7:7
M7
S:$
MAWH
97S
SM
_P$
9WAHM
7RH
WS
PE$
W9ARS
7:L
M7
S9$
MAXH
97R
SM
_X$
9RA7L
7R:
WS
P_$
W:ARX
79X
M7
S7$
WA9M
97W
SM
_S$
9RARW
7R9
WR
P[$
WHASL
79S
ML
SL$
WAMW
97M
SH
_R$
9SAH:
7R7
WR
Pd$
WMAS9
79R
ML
RB$
WASX
97H
SH
_W$
9XA77
7RL
WR
PP$
WWASM
79W
HX
RE$
RA99
97:
SH
_M$
9XASL
7WX
WW
PX$
WRASX
79M
HX
R_$
RAMW
979
S:
_H$
:LAHX
7WS
WW
PS$
WSAXH
79H
HX
R[$
!"#$%&'"()*+,-".+/(%0(1
OWY3A$%#%(%50
P*7:
7/85-36*H:33W+,--&3W%J-2-"#37)2-0
Time
(sec.)
Value
(dec.)
Value
(%)
Value
(hex)
Time
(sec.)
Value
(dec.)
Value
(%)
Value
(hex)
Time
(sec.)
Value
(dec.)
Value
(%)
Value
(hex)
WXAXX
79:
HS
Rd$
79MAR:
RS
:7
HE$
7XRARL
::
7:
97$
R7ALM
799
HS
RP$
79RA7M
RR
:L
H_$
7XXAHS
:9
7:
9L$
R9A7:
797
HR
RX$
79SAMS
RW
:L
H[$
9L7A9S
:7
79
7B$
R:A9L
79L
HR
RS$
7:LAL9
RM
9X
Hd$
9L:ALS
:L
79
7E$
RHA9X
77X
HR
RR$
7:7AHR
RH
9X
HP$
9LHASS
9X
77
7_$
RMA:S
77S
HW
RW$
7:9AX9
R:
9X
HX$
9LWARL
9S
77
7[$
RWAHX
77R
HW
RM$
7:HA:X
R9
9S
HS$
9LSAM9
9R
77
7d$
RRAWL
77W
HM
RH$
7:MASW
R7
9S
HR$
97LA:W
9W
7L
7P$
RSAR7
77M
HM
R:$
7:RA:H
RL
9R
HW$
979A7X
9M
7L
7X$
RXASH
77H
HM
R9$
7:SAS9
WX
9R
HM$
97HALH
9H
X
7S$
SLAXS
77:
HH
R7$
7HLA:9
WS
9R
HH$
97MAXL
9:
X
7R$
S9A79
779
HH
RL$
7H7AS9
WR
9W
H:$
97RARW
99
X
7W$
S:A9R
777
HH
WB$
7H:A::
WW
9W
H9$
97XAW:
97
S
7M$
SHAH:
77L
H:
WE$
7HHASM
WM
9M
H7$
997AM7
9L
S
7H$
SMAMX
7LX
H:
W_$
7HWA:S
WH
9M
HL$
99:AHL
7X
R
7:$
SWARR
7LS
H9
W[$
7HRAX9
W:
9M
:B$
99MA:L
7S
R
79$
SRAXM
7LR
H9
Wd$
7HXAHW
W9
9H
:E$
99RA9L
7R
R
77$
SXA7H
7LW
H9
WP$
7M7AL7
W7
9H
:_$
99XA77
7W
W
7L$
XLA:H
7LM
H7
WX$
7M9AMR
WL
9H
:[$
9:7AL:
7M
W
LB$
X7AMM
7LH
H7
WS$
7MHA7H
MX
9:
:d$
9:9AXW
7H
M
LE$
X9ARW
7L:
HL
WR$
7MMAR7
MS
9:
:P$
9:HAXL
7:
M
L_$
X:AXS
7L9
HL
WW$
7MRA:L
MR
99
:X$
9:WASH
79
M
L[$
XMA97
7L7
HL
WM$
7MSASX
MW
99
:S$
9:SARX
77
H
Ld$
XWAHM
7LL
:X
WH$
7WLAHX
MM
99
:R$
9HLARM
7L
H
LP$
XRARL
XX
:X
W:$
7W9ALX
MH
97
:W$
9H9AR9
X
H
LX$
XSAXM
XS
:S
W9$
7W:AR7
M:
97
:M$
9HHARL
S
:
LS$
7LLA99
XR
:S
W7$
7WMA::
M9
9L
:H$
9HWAWS
R
:
LR$
7L7AHX
XW
:S
WL$
7WWAXW
M7
9L
::$
9HSAWS
W
9
LW$
7L9ARR
XM
:R
MB$
7WSAWL
ML
9L
:9$
9MLAWS
M
9
LM$
7LHALM
XH
:R
ME$
7RLA9M
HX
7X
:7$
9M9AWS
H
9
LH$
7LMA:M
X:
:W
M_$
7R7AX7
HS
7X
:L$
LA7X
:
7
L:$
7LWAWM
X9
:W
M[$
7R:AMR
HR
7S
9B$
LA7X
9
7
L9$
7LRAXW
X7
:W
Md$
7RMA9H
HW
7S
9E$
LA7X
7
L
L7$
7LXA9S
XL
:M
MP$
7RWAX9
HM
7S
9_$
LA7X
L
L
LL$
77LAW7
SX
:M
MX$
7RSAW7
HH
7R
9[$
777AXH
SS
:M
MS$
7SLA:L
H:
7R
9d$
77:A9S
SR
:H
MR$
7S9AL7
H9
7W
9P$
77HAW:
SW
:H
MW$
7S:AR9
H7
7W
9X$
77MAXX
SM
::
MM$
7SMAHH
HL
7W
9S$
77RA:W
SH
::
MH$
7SRA7R
:X
7M
9R$
77SAR:
S:
::
M:$
7SSAXL
:S
7M
9W$
79LA79
S9
:9
M9$
7XLAWM
:R
7M
9M$
797AM7
S7
:9
M7$
7X9AHL
:W
7H
9H$
799AX7
SL
:7
ML$
7XHA7W
:M
7H
9:$
79HA:7
RX
:7
HB$
7XMAX9
:H
7:
99$
P87H
OWY3A$%#%(%50
!"#$%&'"()*+,-".+/(%0(1
8#7"1.-G#++%C.@((2:+&%+*(
Table A-4 below lists the macro channel assignments. This information is
preliminary and subject to change. A macro is predefined set of constructs
you can use when programming a scene. You do not have to use macros in
your scene, but using them can save you programming time.
Use DMX channel number 17 to access Technobeam macros.
7/85-36*M:33W/($%3OWY3C>/""-53600)="2-"#0
Macro Number
Value (dec.)
Value (%)
Value (hex)
&FF
L+8+R
79L+8+9MM
L+8+:
HR+8+7LL
LL$+8+LR$
RS$+8+BB$
7
S+8+77
H
LS$+8+Ld$
9
79+8+7M
M
L[$+8+LB$
:
7W+8+7X
W+8+R
7L$+8+7:$
H
9L+8+9:
S+8+X
7H$+8+7R$
M
9H+8+9R
7L
7S$+8+7d$
W
9S+8+:7
77+8+79
7[$+8+7B$
R
:9+8+:M
7:
9L$+8+9:$
S
:W+8+:X
7H+8+7M
9H$+8+9R$
X
HL+8+H:
7W
9S$+8+9d$
7L
HH+8+HR
7R+8+7S
9[$+8+9B$
77
HS+8+M7
7X+8+9L
:L$+8+::$
79
M9+8+MM
97
:H$+8+:R$
7:
MW+8+MX
99+8+9:
:S$+8+:d$
7H
WL+8+W:
9H
:[$+8+:B$
7M
WH+8+WR
9M+8+9W
HL$+8+H:$
7W
WS+8+R7
9R
HH$+8+HR$
7R
R9+8+RM
9S+8+9X
HS$+8+Hd$
7S
RW+8+RX
:L
H[$+8+HB$
7X
SL+8+S:
:7+8+:9
ML$+8+M:$
9L
SH+8+SR
::+8+:H
MH$+8+MR$
97
SS+8+X7
:M
MS$+8+Md$
99
X9+8+XM
:W+8+:R
M[$+8+MB$
9:
XW+8+XX
:S
WL$+8+W:$
9H
7LL+8+7L:
:X+8+HL
WH$+8+WR$
9M
7LH+8+7LR
H7
WS$+8+Wd$
9W
7LS+8+777
H9+8+H:
W[$+8+WB$
9R
779+8+77M
HH+8+HM
RL$+8+R:$
9S
77W+8+77X
HW
RH$+8+RR$
!"#$%&'"()*+,-".+/(%0(1
OWY3A$%#%(%50
P*7M
,2T*6"%.J6&H%".*1.>8S.4*#"*.-G#++%C
Table A-5 below shows the conversion between fixture number and DMX start
channel. You must understand and use this information if you choose to
control Technobeam using fixture numbering.
7/85-36*P:333?)@#'$-3X'28-$3#%3OWY3+#/$#3C>/""-53C%"J-$0)%"
DMX Start Channel
18-ch. (TB F, TB I)
Fixture Number
DMX Start Channel
14-ch. (TB R)
7
7
7
9
7X
7M
:
:R
9X
H
MM
H:
M
R:
MR
W
X7
R7
R
7LX
SM
S
79R
XX
X
7HM
77:
7L
7W:
79R
77
7S7
7H7
79
7XX
7MM
7:
97R
7WX
7H
9:M
7S:
7M
9M:
7XR
7W
9R7
977
7R
9SX
99M
7S
:LR
9:X
7X
:9M
9M:
9L
:H:
9WR
97
:W7
9S7
99
:RX
9XM
9:
:XR
:LX
9H
H7M
:9:
9M
H::
::R
9W
HM7
:M7
9R
HWX
:WM
9S
HSR
:RX
9X
:X:
:L
HLR
:7
H97
:9
H:M
::e
HHX
:He
HW:
:Me
HRR
:We
HX7
* - A link with more than 32 fixtures requires a serial data distributor to
regenerate and retime the signal.
P87W
OWY3A$%#%(%50
!"#$%&'"()*+,-".+/(%0(1
A--."&)7/I!
6,(#%$JK!"3#,44.&/L+..43
This appendix shows how the litho wheel, rotating litho wheel, color
wheel and effects wheels are configured by the factory when
Technobeam is shipped. The numbers shown around the outside of
the wheels are the position numbers used by a controller to select that
effect. For example, choosing position 6 on the Technobeam rotating
litho wheel (see Figure B-1) with a controller selects the “Rip Wheel”
litho.
!%7G+1H%#&M.9G%%C(
Technobeam rotating litho wheel:
c
B#,D(/a#45#"
`
;'-*.(
Q
X.E%UD##*
?
BSTK)2/.*
@%O/E#(P
O<%*.-D/"f%
/(#%$/-'-.(5^
/(#%"-'-./('$3P
<
JT+%S*/,b"
>
7.*,"e)'$#
J
X/)(4%B$.'(5*#
?)='$-3R*9:33?/(#%$E3(%".)='$/#)%"3%.3#>-37-(>"%8-/23$%#/#)"=35)#>%3B>--5:
!"#$%&'"()*+,-".+/(%0(1
?/(#%$E*!"0#/55-&3`>--50
d*7
Technobeam color wheel:
@@
@A
5%?2J&
\
@<
b.(%J"
]"?
O2J$6
d10"
@J
[!b
`
_(.<
d10"
bC"%
@
c"11&@
c
\2%<
<
P)'".
Q
N.""%
_(.<
/(J"%6(
?
Ph0(
J
>
?)='$-3R*F:33?/(#%$E3(%".)='$/#)%"3%.3#>-37-(>"%8-/23(%5%$3B>--5:
Technobeam rotating effects wheel:
?
H$/"-
>
7*/a
;*'""
@%O/E#(P
J
K#(-.,)*'$
<
F$."2
?)='$-3R*H:33?/(#%$E3(%".)='$/#)%"3%.3#>-37-(>"%8-/23$%#/#)"=3-..-(#03B>--5:
d89
?/(#%$E*!"0#/55-&3`>--50
!"#$%&'"()*+,-".+/(%0(1
A--."&)7/*!
!>-%$#,"#/9,M.#J/
!"M%$>,#)%"
;+:C2(G.U%"(21+
9#"+2+:`.,1".-1+*2+6%$.)"1*%7*21+.@:#2+(*.,2"%
1.
This equipment is designed for use with Phillips M Series 250 watt, GY9.5 base metal
halide lamp only. Use of any other type lamp may be hazardous and may void the
warranty.
2.
Do not mount on a flammable surface.
3.
Maintain minimum distance of 1.0 meter (3.28 feet) from combustible materials.
4.
Replace fuses only with the specified type and rating.
5.
Observe minimum distance to lighted objects of 1.0 meter (3.28 feet).
6.
This equipment for connection to branch circuit having a maximum overload
protection of 20 A.
9#"+2+:`.,1".-1+*2+6%$.)"1*%7*21+.@:#2+(*.;C%7*"27.4G17'
1.
2.
If this equipment was received without a line cord plug, attach the appropriate line
cord plug according to the following code:
•
brown–live
•
blue–neutral
•
green/yellow–earth
As the colours of the cores in the mains lead of this equipment may not correspond
with the coloured markings identifying the terminals in your plug, proceed as
follows:
•
•
•
the core which is coloured green and yellow must be connected to the terminal in the plug which is marked with the letter E or by the earth symbol
, or coloured green or green and yellow.
the core which is coloured blue must be connected to the terminal which is
marked with the letter N or coloured black.
the core which is coloured brown must be connected to the terminal which
is marked with the letter L or coloured red.
3.
Class I equipment. This equipment must be earthed.
4.
Disconnect power before re-lamping or servicing.
5.
Equipment suitable for dry locations only. Do not expose this equipment to rain or
moisture.
6.
Refer servicing to qualified personnel; no user serviceable parts inside.
!"#$%&'"()*+,-".+/(%0(1
!2,%$#/"#3+/.-#E3!".%$2/#)%"
[*7
9#"+2+:`.,1".-1+*2+6%$.)"1*%7*21+.@:#2+(*.;T31(6"%.!1.;T7%((2A%.
FC*"#A21C%*.KFUL.E#$2#*21+
1.
Do not operate this equipment without complete lamp enclosure in place or if
shields, lenses, or ultraviolet screens are damaged.
2.
Change shields, lenses, or ultraviolet screens if they have become visibly damaged
to such an extent that their effectiveness is impaired, for example by cracks or deep
scratches.
3.
Never look directly at the lamp while lamp is on.
9#"+2+:`.,1".-1+*2+6%$.)"1*%7*21+.@:#2+(*./+a6"5.!1.)%"(1+(
1.
Use secondary safety cable when mounting this fixture.
2.
Caution: hot lamp may be an explosion hazard. Do not open for 5 minutes after
switching off. Wear eye and hand protection when re-lamping.
3.
Equipment surfaces may reach temperatures up to 140 degrees C (284 degrees F).
Allow 5 minutes for cooling before handling.
4.
Change the lamp if it becomes damaged or thermally deformed.
@33%+$27%.-../8)QE!@J!`.
/J,QE8@!/QJ4.>;.4b-FE/!b
82(%.%+.:#"$%`..316".6+%.3"1*%7*21+.3%"&#+%+*%.71+*"%.C%(.2+7%+$2%(
1.
Cet appareil est conçu uniquement pour une lampe métallique à halogène Philips
série M, de 250 watts, à base GY9.5. Son utilisation avec tout autre type de lampe
peut être dangereuse et annuler la garantie.
2.
Ne pas monter les lampes sur une surface inflammable.
3.
Maintenir à une distance minimum de 1.0 mètre de matières inflammables.
4.
Ne remplacer les fusibles qu'avec des modèles et valeurs assignées recommandés.
5.
Respecter une distance minimum de 1.0 mètre par rapport aux objets éclairés.
6.
Cet appareil de connection au circuit comporte une protection contre les surcharges
de 20 A.
82(%.%+.:#"$%`..316".6+%.3"1*%7*21+.3%"&#+%+*%.71+*"%.C%(.7G17(.
cC%7*"2d6%(
1.
Si cet équipement est livré sans prise de cable, veuillez connecter la prise de cable
correcte selon le code suivant:
•
•
•
marron - phase
bleu - neutre
vert/jaune - terre
2.
Débrancher le courant avant de changer les lampes ou d'effectuer des réparations.
3.
Cet équipement doit être uniquement utilisé dans des endroits secs. Ne pas
l'exposer à la pluie ou l'humidité.
4.
À l'intérieur de l'équipement il n'y a pas de pièces remplaçables par l' utilisateur.
Confiez l'entretien à un personnel qualifié.
Equipement de Classe I. Cet équipement doit être mis à la terre.
5.
[89
!2,%$#/"#3+/.-#E3!".%$2/#)%"
!"#$%&'"()*+,-".+/(%0(1
82(%.%+.:#"$%`..316".6+%.3"1*%7*21+.3%"&#+%+*%.71+*"%.$%(.%T31(2*21+(.
%T7%((2A%(.#6T."#51+(.6C*"#.A21C%*(.KFUL
1.
Ne pas utiliser cet appareil si le boîtier de la lampe n'est pas complètement fixé ou si
les blindages, lentilles, ou écrans ultraviolets sont endommagés.
2.
Changer les blindages ou les écrans ultraviolets s'ils sont visiblement endommagés
au point que leur efficacité aient été altérée, par exemple par des fissures ou de
profondes égratignures.
3.
Ne jamais regarder directement la lampe quand celle ci est allumée.
82(%.%+.:#"$%`..316".6+%.3"1*%7*21+.3%"&#+%+*%.71+*"%.C%(.HC%((6"%(.
71"31"%CC%(
1.
Lors de l'assemblage, utiliser un câble de sécurité secondaire.
2.
AVERTISSEMENT: les lampes chaudes comportent un risque d'explosion. Après
l'avoir éteinte, attendre 5 minutes avant de la dégager. Lors du remplacement de la
lampe, une protection des yeux et des mains est requise.
3.
Les surfaces de l'appareil peuvent atteindre des températures de 140 C. Laisser
refroidir pendant 5 minutes avant la manipulation.
4.
Changer la lampe si elle est endommagée ou thermiquement déformée.
@+G#+:.-..927G*2:%.I2+?%2(%.,e".
/G"%.427G%"G%2*
9@EJFJ<`.fF8.4-IF!f.UQE.WE@J><;,@IE
1.
Dieses Gerät ist nur für den Gebrauch mit einer 250-Watt, Philips Serie M, MetallHalogen-Lampe mit GY9.5-Sockel konzipiert. Der Gebrauch irgend eines anderen
Lampentyps könnte Sie gefährden und Ihre Garantie außer Kraft setzen.
2.
Das Gerät nie auf einer feuergefährlichen Fläche montieren.
3.
Stets einen Mindestabstand von 1 Meter zu brennbaren Materialien einhalten.
4.
Zum Ersatz nur Sicherungen verwenden, die dem vorgeschriebenen Typ und
Nennwert entsprechen.
5.
Einen Mindestabstand von 1 Meter zu den angestrahlten Objekten einhalten.
6.
Dieses Gerät darf nur an eine Zweigleitung mit einem Überlastungsschutz von
höchstens 20 A angeschlossen werden.
9@EJFJ<`.fF8.4-IF!f.<;<;J.<;,gIE=/-I;.PhE);E4!Eh8;
1.
Wenn dieses Gerät ohne einen Netzkabelstecker erhalten wurde, ist der
entsprechende Netzkabelstecker entsprenchend dem folgenden Code anzubringen:
•
•
•
Braun - Unter Spannung stehend
Blau - Neutral
Grün/Gelb - Erde
2.
Vor dem Austauschen von Lampen oder vor Wartungsarbeiten stets den Netzstecker
ziehen.
3.
Diese Geräte sind nur zum Einbau in trockenen Lagen bestimmt und müssen vor
Regen und Feuchtigkeit geschützt werden.
!"#$%&'"()*+,-".+/(%0(1
!2,%$#/"#3+/.-#E3!".%$2/#)%"
[*:
4.
Servicearbeiten sollten nur von Fachpersonal ausgeführt werden. Das Gerät enthält
keine wartungsbedürftigen Teile.
5.
Dieses Gerät gehört zur Klasse I. Dieses Gerät muß geerdet werden.
9@EJFJ<`.fF8.4-IF!f.<;<;J.iW;E8g44/<;.F=!E@U/Q=;!!.KFULN
W;4!E@I=FJ<
1.
Benutzen Sie dieses Gerät nur, wenn das komplette Lampengehäuse fest eingebaut
ist; ebenfalls dürfen keine der Schutzabdeckungen, Linsen oder der UV-Schutz
Beschädigungen aufweisen.
2.
Die Schutzabdeckungen, Linsen und der UV-Schutz müssen ausgewechselt werden,
wenn sie sichtlich dermaßen beschädigt sind, daß sie ihre Wirksamkeit einbüßen,
z.B. infolge von Rissen oder tiefen Kratzern.
3.
Nie direkt in die eingeschaltete Lampe schauen.
9@EJFJ<`.fF8.4-IF!f.UQE.U;E=;!fFJ<;J
1.
Verwenden Sie bei der Installation des Beleuchtungskörpers ein zusätzliches
Sicherheitskabel.
2.
VORSICHT: Bei einer heiße Lampe besteht Explosionsgefahr. Nach dem Abschalten
der Netzspannung sollten Sie etwa 5 Minuten warten, bevor Sie das Lampengehäuse
öffnen. Schützen Sie beim Auswechseln der Lampen Ihre Hände und tragen Sie eine
Schutzbrille.
3.
Die Oberflächen des Gerätes können Temperaturen bis zu 65 C erreichen. Vor dem
Anfassen stets 5 Minuten lang abkühlen lassen.
4.
Falls die Lampe beschädigt oder durch Wärmeeinwirkung verformt ist, muß sie
ausgewechselt werden.
@33%+$27%.-../&31"*#+*2.
/+01"&#B21+2.>2.4276"%BB#
@UU;E!;Jf@`..);E.)E;U;J/E;./J-;J>/`
1.
Questa apparecchiatura è stata progettata per l'uso esclusivo con lampada a sali
metallici Philips da 250 watt, base GY9.5, serie M. L'uso di qualsiasi altro tipo di
lampada può essere pericoloso e può annullare la garanzia.
2.
Da non montare sopra una superficie infiammabile.
3.
Mantenere l' apparecchio a un minimo di 1.0 metri (3.28 piedi) di distanza dai
materiali combustibili.
4.
Rimpiazare i fusibili usando soltanto quelli del tipo e della taratura adatta.
5.
Mantenere una distanza minima di 1.0 metri (3.28 piedi) dagli oggetti accesi.
6.
Questa apparecchiatura e' da collegarsi ad un circuito con una protezzione da
sovraccarico massima di 20 amperes.
[8H
!2,%$#/"#3+/.-#E3!".%$2/#)%"
!"#$%&'"()*+,-".+/(%0(1
@UU;E!;Jf@`..);E.)E;U;J/E;.=;.4-Q44;.;=;!!E/-I;`
1.
2.
Se questa apparecchiatura è stata consegnata senza una spina del cavo di
alimentazione, collegare la spina appropriata del cavo di alimentazione in base ai
seguenti codici:
•
marrone - sotto tensione
•
blu - neutro
•
verde/giallo - terra
Disinnestare la corrente prima di cambiare la lampadina o prima di eseguire
qualsiasi riparazione.
3.
Questa apparecchiatura e' da usarsi in ambienti secchi. Non e' da essere esposta ne
alla pioggia ne all' umidita'.
4.
Per qualsiasi riparazione rivolgersi al personale specializzato. L' utente non deve
riparare nessuna parte dentro l' unita'.
5.
Aparecchio di Classe I. Questa apparecchiatura deve essere messa a terra.
@UU;E!;Jf@`..);E.)EQ!;<<;E4/.-QJ!EQ.=;.E@>/@f/QJ/.>;/.E@<</.
F=!E@U/Q=;!!/`
"#$!%&'()!*%)&+'!',,'()--./'+%('!&)!/0!&/&+)1'!2/!-./%&%('!2)00'!0'1,'2/$'!$#$!)3!-#1,0)+#!#!
&)!40/!&-%2)++/5!0)!0)$+/5!#!40/!&-.)(1/!%0+('6/#0)++/!&/!&#$#!6/&/7/01)$+)!2'$$)44/'+/!2/!1'$/)('!
+'0)!-.)!0'!0#(#!)88/-'-/'!&/'!&+'+'!(/2#++'!999!'2!)&)1,/#5!&)!6/!&#$#!6/&/7/0/!&,'--'+%()!#!4('88/!
,(#8#$2/:!;'/!4%'(2'()!2/()++'1)$+)!6)(&#!0'!0'1,'2/$'!*%'$2#!&/'!'--)&':
@UU;E!;Jf@`..);E.JQJ.,;E/E;.@>.@=!E;.);E4QJ;`
1.
2.
Al montare questa apparechiatura, usare un secondo cavo di sicurezza.
Avvertenza: la lampadina calda potrebbe esplodere. Spegnerla per 5 minuti prima
di aprirla. Usare protezzioni per le mani e per gli occhi prima di cambiare la
lampadina.
3.
Le superfici della apparecchiatura possono arrivare a temperature di 65 gradi
centrigradi (149 gradi f). Aspettare 5 minuti prima di maneggiare.
4.
Cambiare la lampadina se si danneggia o se si e' deformata dovuto alle alte
temperature.
@3c+$27%.-../+01"HD+./&31"*#+*%.
>%.4%:6"2$#$
@>U;E!;J-/@`.)@E@.)EQ!;--/jJ.-QJ!/[email protected]!E@./J-;J>/Q4`
1.
Este equipo está diseñado para utilizarse únicamente con la lámpara de haluro
metálico Philips serie M, de 250 vatios y base GY9.5. El uso de cualquier otro tipo de
lámpara puede resultar peligroso, pudiendo anular la garantía.
2.
3.
4.
No monte el equipo sobre una superficie inflamable.
Mantenga una distancia mínima de materiales combustibles de 1.0 metro.
Cambie los fusibles únicamente por otros que sean del tipo y la clasificación
especificadas.
5.
6.
Conserve una distancia mínima a objetos iluminados de 1.0 metro.
Este equipo debe conectarse a un circuito que tenga una protección máxima contra
las sobrecargas de 20 A.
!"#$%&'"()*+,-".+/(%0(1
!2,%$#/"#3+/.-#E3!".%$2/#)%"
[*M
@>U;E!;J-/@`.)@E@.=@.)EQ!;--/jJ.-QJ!/[email protected]!E@.
;=;-!EQ-F-/QJ;4
1.
2.
Si se recibió este equipo sin el enchufe de alimentacion, monte usted el enchufe
correcto según el clave siguente:
•
moreno - vivo
•
azul - neutral
•
verde/amarillo - tierra.
Desconecte el suministro de energía antes de recambiar lámparas o prestar servicio
de reparación.
3.
Este equipo se adecua a lugares secos solamente. no lo exponga a la lluvia o
humedad.
4.
Derive el servicio de reparación de este equipo al personal calificado. el interior no
contiene repuestos que puedan ser reparados por el usuario.
5.
Equipo de Clase I. Este equipo debe conectarse a la tierra.
@>U;E!;J-/@`.)@E@.)EQ!;--/jJ.-QJ!/[email protected]!E@.=@.;S)Q4/-/jJ.
@.E@>/@-/jJ.F=!E@U/Q=;[email protected].;S-;4/U@
1.
No opere este equipo sin tener colocada en su lugar la caja protectora completa de la
lámpara o bien, si el blindaje , los lentes o las pantallas ultravioletas están dañadas.
2.
Cambie el blindaje, los lentes o las pantallas ultravioleta si nota una avería visible, a
tal grado que su eficacia se vea comprometida. Por ejemplo, en el caso de grietas o
rayaduras profundas.
3.
Jamás mire directamente a la lámpara en tanto ésta esté encendida.
@>U;E!;J-/@`.)@E@.)EQ!;--/jJ.-QJ!/[email protected]!E@.=;4/QJ;4.
-QE)QE@=;4
1.
Use cable secundario de seguridad al montar este aparato.
2.
Precaución: una lámpara caliente puede constituir un peligro de explosión. No la
abra por 5 minutos luego de haberla apagado. Lleve puestos, un protector ocular, y
guantes al recambiar lámparas.
3.
Las superficies del equipo pueden alcanzar temperaturas máximas de 65 grados
centígrados. Deje que se enfríen por 5 minutos antes de tocarlas.
4.
Cambie la lámpara si ésta se avería o deforma por acción térmica.
U2:*2:.42''%"G%$(2+01"&#*21+.N.
>@J8@EP
Advarsel: Beskyttelse mod elektrisk chock.
Vigtigt!
Lederen med gul/groen isolation maa kun tilsluttes en klemme maerket
eller
[8W
!2,%$#/"#3+/.-#E3!".%$2/#)%"
!"#$%&'"()*+,-".+/(%0(1
6=+:R
L
+
Accessories .................................. 1-5
Addr Lost .................................... 2-25
Address menu (ADDR) ................ 3-10
Aligning LAD ..................6-19 to 6-25
Anti-reflective glass ................... 6-16
Aperture ring ................................ 6-8
Arc lamp ................................. intro-2
Dichroics
coated side .............................6-6
replacing ..................... 6-5 to 6-7
Dimensions .................................. 1-2
Display ....................................... 2-13
DMX 512
cabling ....................................2-4
cabling specifications ............1-5
constructing cabling ..............2-5
control commands not
accepted .............................. 2-22
explanation ............................2-4
fixture number conversion . A-16
linking devices .......................2-7
setting up link ............. 2-6 to 2-8
terminator ..............................2-5
troubleshooting ................... 2-24
DMX 512 protocol
Technobeam ................A-3 to A-7
Technobeam-i ............A-7 to A-12
DMX channel range .................... 2-15
DMX start channel ..................... 2-14
determining ......................... 2-16
DMX start channel control
method ...................................... 2-14
DMX wasted channels ................ 2-17
Down arrow key ........................... 3-2
S
Beam angle, setting ........1-12 to 1-14
Beam angles ............................... 1-14
Boot Diff ..................................... 2-25
1
Cabling
constructing ........................... 2-5
terminators ............................ 2-5
Capturing presets ...................... 4-11
C-clamps
ordering ................................. 1-5
using .................................... 2-10
Channel range ............................ 2-16
assigning .............................. 2-15
overlapping .......................... 2-16
Chase ............................................ 4-2
Cleaning fixture .............6-15 to 6-18
Coated side of dichroic ................ 6-6
Construct ..................................... 4-2
Constructing cabling .................... 2-5
Control method
changing (CHNL) .................. 3-13
selecting .............................. 2-14
Controlling Laser Aiming Device . 5-5
Crossload ................................... 3-19
Crossloading .............................. 2-19
Custom lithos ............................. 6-11
Customer Service ................... intro-4
!"#$%&'"()*+,-".+/(%0(1
:
Effects, replacing ............. 6-7 to 6-11
EIA RS-485 ................................... 2-5
Electrical specifications ............... 1-2
EMEM
CHNL ................................... 2-26
DPLY .................................... 2-26
FHRS .................................... 2-26
L/ST ..................................... 2-26
LENS .................................... 2-26
LHRS .................................... 2-26
MODE ................................... 2-26
5%?"482
PERS ..................................... 2-26
PINV ..................................... 2-26
S/DN ..................................... 2-26
SWAP .................................... 2-26
TIMB ..................................... 2-26
TINV ..................................... 2-26
EMEM Ack ................................... 2-26
Enter key ...................................... 3-2
Environmental specifications ...... 1-5
Erse Flsh ..................................... 2-26
H
Factory defaults (FACT) .............. 3-11
Factory-installed wheels ....... B-1, B-2
Fan failed ................................... 2-21
Fast change .................................. 4-3
Features .................................. intro-1
Fixture
accessories ............................. 1-5
cleaning ...................6-15 to 6-18
controllers ............................. 1-5
crossloading ............... 2-18, 2-20
dichroic, litho, effects
specifications ......................... 1-4
DMX 512 data ....................... 2-24
factory-installed wheels . B-1, B-2
features ............................ intro-1
homing ................................... 2-2
installing power cord cap ...... 1-7
keys ........................................ 3-2
lamp ................................. intro-2
LEDs ................................ 2-3, 2-4
macros ................................... 4-2
menu ...................................... 3-3
mounting ...................2-8 to 2-11
powering on ........................... 2-2
preset programming ....4-2 to 4-9
programming ...............4-2 to 4-9
reflector ........................... intro-1
replacing a lamp ......6-11 to 6-14
replacing fuses ............6-2 to 6-4
safety standards .................... 1-4
setting beam angle ..1-12 to 1-14
setting voltage ............ 1-10, 1-11
specifications ...............1-2 to 1-5
troubleshooting .......2-20 to 2-24
uploading .................... 2-18, 2-20
5%?"4822
wheels ............................. B-1, B-2
yoke ..................................... 2-12
installing ................... 1-8, 1-9
Fixture address, assigning ......... 2-15
Fixture number ........................... 2-14
determining ......................... 2-17
Fixture number control method . 2-14
Fixture number conversion ........A-16
Fixture options ........................... 3-10
Fixture type ................................ 2-13
setting the fixture type
(TYPE) ................................... 3-15
Focus drive screw ..............1-13, 6-17
Fuses ............................................ 1-2
replacing ..................... 6-2 to 6-4
[
Hanging fixture ............... 2-8 to 2-11
Help ........................................ intro-4
Homing ......................................... 2-2
Homing the fixture
manually (HOME) ................. 3-20
Hot mirror .................................. 6-18
6
ID Lost ........................................ 2-26
Installing lenses ............ 1-12 to 1-14
Installing lithos ............................ 6-9
Installing the yoke ................1-8, 1-9
K
Lamp ...................................... intro-2
optimizing ........................... 6-14
turning on or off (LAMP) ...... 3-20
Lamp not working ...................... 2-20
Lamp or replacing ......... 6-11 to 6-14
Lamp warning message, setting
(LMPL) ......................................... 3-14
Laser Aiming Device (LAD)
aligning ................... 6-19 to 6-25
controlling ............................. 5-5
ideal position ......................... 5-4
!"#$%&'"()*+,-".+/(%0(1
maintenance ............6-19 to 6-25
recommended operation ....... 5-3
safety ..................................... 5-2
specifications ......................... 1-2
troubleshooting ...........5-6 to 5-8
LED display ................................ 2-13
changing the output (DSPL) . 3-13
inverting (D/IN) ................... 3-13
LEDs
Emission Indicator .......... 5-7, 5-8
Motor .............................. 2-3, 2-4
Receive ............................ 2-3, 2-4
Transmit ......................... 2-3, 2-4
Lenses, installing ...........1-12 to 1-14
Light source ........................... intro-2
Line cord cap, installing ............... 1-7
Link Busy .................................... 2-27
Link Empty ................................. 2-27
Link, setting up ..................2-6 to 2-8
Linking fixtures ............................ 2-7
Lithos
aperture ring .......................... 6-8
cleaning ................................. 6-8
cracked ................................ 2-22
custom ................................. 6-11
installing ................................ 6-9
replacing ....................6-7 to 6-11
specifications ......................... 1-4
LM01 ............................................. 5-5
LM30 ............................................. 5-5
Look ............................................. 4-2
Loop ............................................. 4-2
LROF ............................................. 5-5
LRON ............................................ 5-5
&
Macros ......................... 4-2, A-1, A-15
Menu key ...................................... 3-2
Menu system, accessing ............... 3-2
Mode menu (MODE) .................... 3-15
Model numbers ............................ 1-2
Motor LED ..............................2-3, 2-4
Mounting fixture ..............2-8 to 2-11
MSpeed change ............................. 4-3
MSpeed movement times A-12 to A-14
!"#$%&'"()*+,-".+/(%0(1
=
Narrow angle lens set ................. 1-14
Navigation buttons ..................... 2-13
Navigational keys ......................... 3-2
8
Optimizing the lamp .................. 6-14
Optional accessories .................... 1-5
Optoisolators ............................... 2-6
Orienting lithos ............................ 6-9
Over Temp ................................. 2-28
F
Page .............................................. 4-2
Pan
inverting (P/IN) .................... 3-12
swapping pan and tilt
(SWAP) .................................. 3-12
PGRM Time ................................. 2-28
Power cord cap, installing ............ 1-7
Powering on fixture ...................... 2-2
Preset programming
capturing ............................. 4-11
chase ...................................... 4-2
construct ................................ 4-2
example ...................... 4-4 to 4-9
fast change ............................. 4-3
loop ........................................ 4-2
macros ................................... 4-2
MSpeed change ...................... 4-3
synchronizing ........... 4-9 to 4-11
Programming
capturing presets ................. 4-11
chase ...................................... 4-2
construct ................................ 4-2
example ...................... 4-4 to 4-9
fast change ............................. 4-3
loop ........................................ 4-2
macros ................................... 4-2
MSpeed change ...................... 4-3
synchronizing ........... 4-9 to 4-11
Protocol, fixture specific ............ 2-13
+5%?"48222
PRST Lost .................................... 2-28
X
swapping pan and tilt
(SWAP) .................................. 3-12
Transmit LED .........................2-3, 2-4
Troubleshooting ............ 2-20 to 2-24
Truss ............................................ 2-9
Receive LED ...........................2-3, 2-4
Reflector ................................. intro-1
Replacing a lamp ............6-11 to 6-14
Rotating litho ............................. 6-10
!
7
Safety standards .......................... 1-4
Sample program .................4-4 to 4-9
Serial data distributor .................. 2-6
Set menu (SET) ........................... 3-11
Setting fixture voltage .......1-10, 1-11
Setting up DMX 512 link ....2-6 to 2-8
Shut Down .................................. 2-28
Software
crossloading ............... 2-18, 2-20
crossloading (XLD) ............... 3-19
uploading .................... 2-18, 2-20
Specifications .....................1-2 to 1-5
controllers ............................. 1-5
dichroics ................................ 1-4
dimensions ............................ 1-2
DMX 512 cabling .................... 1-5
effects .................................... 1-4
electrical ................................ 1-2
environmental ....................... 1-5
lithos ...................................... 1-4
model numbers ...................... 1-2
safety ..................................... 1-4
weight .................................... 1-2
Static litho .............................6-8, 6-9
Synchronizing preset playback .... 4-9
United States Institute of Theatre
Technology. See USITT
Unpacking .................................... 1-6
Up arrow key ................................ 3-2
Updating fixture software .2-18, 2-20
Uploading ................................... 2-18
User presets
copying (PRST) ..................... 3-17
copying presets and settings
(ALL) ..................................... 3-18
User settings
copying (SETT) ..................... 3-18
copying user presets and
settings (ALL) ....................... 3-18
User type, setting (USER) ............ 3-16
Using laser ................................... 5-3
USITT ............................................ 2-4
]
Viewing DMX 512 data ............... 2-24
Voltage, setting .................1-10, 1-11
U
Weight .......................................... 1-2
Wheels ................................... B-1, B-2
B
G
Technical Support .................. intro-4
Terminator ................................... 2-5
Terminators ................................. 2-5
Test menu (TEST) ....................... 3-20
Tilt
inverting (T/IN) .................... 3-12
Yoke
adjusting .............................. 2-12
installing .........................1-8, 1-9
5%?"4823
!"#$%&'"()*+,-".+/(%0(1