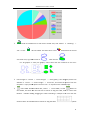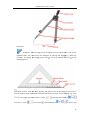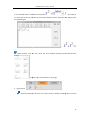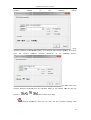
1
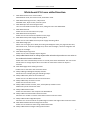
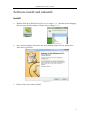
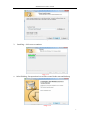
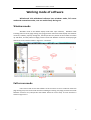
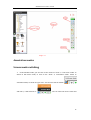
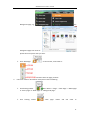
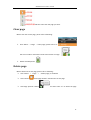
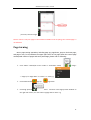
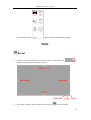
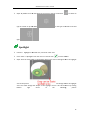
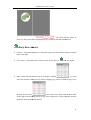
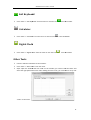
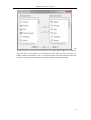
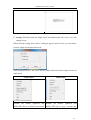
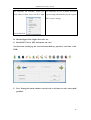
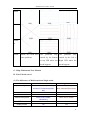
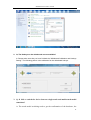
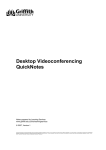
Whiteboard V3.0 User's manual
contents
Whiteboard Introduction .................................................................................................................. 3
Whiteboard V3.0 new added function .............................................................................................. 4
System requirements ..................................................................................................................... 5
Software install and uninstall .................................................................................................... 6
Install ......................................................................................................................................... 6
Uninstall .................................................................................................................................... 8
Working mode of software ............................................................................................................... 9
Windows mode ......................................................................................................................... 9
Full screen mode ....................................................................................................................... 9
Annotation modes................................................................................................................... 10
Screen mode switching ........................................................................................................... 10
Page operation ................................................................................................................................ 11
New page ................................................................................................................................ 11
Clear page ............................................................................................................................... 13
Delete page ............................................................................................................................. 13
Page turning ............................................................................................................................ 14
Flip effect................................................................................................................................. 15
Page zoom in/zoom out and Move page................................................................................. 16
Playback page .......................................................................................................................... 16
Page preview ........................................................................................................................... 17
Page subject ............................................................................................................................ 19
Background grid ...................................................................................................................... 20
Resource management ................................................................................................................... 20
Resource window display, hide, and position of the switch ........................................... 20
Resources preview .................................................................................................................. 21
Network resources .................................................................................................................. 22
File operation .................................................................................................................................. 23
New file ................................................................................................................................... 23
Open file .................................................................................................................................. 23
Save file ................................................................................................................................... 23
Import file ............................................................................................................................... 24
Export file ................................................................................................................................ 24
Send email ............................................................................................................................... 24
Print ......................................................................................................................................... 25
Drawing and writing operation ....................................................................................................... 25
Attribute Settings .................................................................................................................... 25
Drawing pens........................................................................................................................... 27
Graphics .................................................................................................................................. 29
Eraser ...................................................................................................................................... 32
Text and Faculty Tools ..................................................................................................................... 33
Insert Text................................................................................................................................ 33
1
Whiteboard V3.0 User's manual
Disciplinary Tools ..................................................................................................................... 34
Tools ................................................................................................................................................ 39
Reveal ...................................................................................................................................... 39
Spotlight .................................................................................................................................. 40
Easy-Doc camera ..................................................................................................................... 41
Screen Record ......................................................................................................................... 42
Microphone ............................................................................................................................. 42
Blank Screen ............................................................................................................................ 42
Camera .................................................................................................................................... 43
Magnifier ................................................................................................................................. 43
Soft Keyboard .......................................................................................................................... 44
Calculator ................................................................................................................................ 44
Digital Clock ............................................................................................................................. 44
Other Tools .............................................................................................................................. 44
Edit .................................................................................................................................................. 45
Selection .................................................................................................................................. 45
Undo and Redo........................................................................................................................ 46
Copy and Paste ........................................................................................................................ 46
Lock ......................................................................................................................................... 47
Flip and Rotate ........................................................................................................................ 47
Combination functions ............................................................................................................ 47
Alignment Functions ............................................................................................................... 48
Layer Sequence ....................................................................................................................... 48
Custom Buttons ....................................................................................................................... 48
Whiteboard Server .......................................................................................................................... 50
FAQs for using Whiteboard: ........................................................................................................... 56
2
Whiteboard V3.0 User's manual
Whiteboard Introduction
Whiteboard is a kind of teaching software developed by Whiteboard, it is used together
with interactive whiteboard, the operation of software is simple, the writing is fluent, powerful
functions, teachers can use our teaching software when prepare lessons, class section, the
software is used easily on various teaching courses and classroom teaching. Making a vivid and
interactive environment for both students to study.
3
Whiteboard V3.0 User's manual
Whiteboard V3.0 new added function
1. New added several more screen modes.
Add Windows mode, Full screen mode, Annotation mode.
2. New added teaching resources, subject tools
Add Math tools, Physics tools, Chemistry tools
3. New added pie chart and histogram chart.
User can insert different kinds of pie chart, histogram chart into Whiteboard.
4. New added formula.
Enable user to insert formula on the page.
5. New added chemical equation.
Enable user to insert Chemical equation on the page.
6. New added many kinds of page switching effect.
Enable user to select different many kinds of page switching effect.
7. New added magic pen.
When user use magic pen to draw, the writing will disappear slowly, the page will still clear;
when draw circle, it will start spotlight tool; when draw rectangle, it will start magnifier and
enlarge the rectangle.
8. New added object alignment.
Enable user to select multiple objects aligned.
9. Newly added hands shrink or enlarge objects after select the object when two user write on
the multitouch electronic whiteboard.
Enable two users simultaneously written on a multi-point touch whiteboard. The user can be
hands shrink or enlarge objects when use under the multi touch mode if an object is
selected.
10. New added page theme editing functions
Enable users to edit their own classroom theme.
11. Newly added grid background display function.
Allows the user to display the grid and edit grid style.
12. Newly added many kinds of connected lines.
Enable user to use different kinds of connected lines.
13. Newly added a key to lock the screen.
Enable user to lock the screen.
14. Newly added increase recorder, clock, soft keyboard, calculator tools.
Added many kinds of classroom tools.
15. Newly added external tools.
Enable user add tools in the computer into Whiteboard.
16. Newly added customized tool’s button function.
Allow the user to add or remove a tool button under Full Screen mode..
17. Newly added toolbar edge adsorption.
Allow the user to move tool bar to upside edge or bottom side edge under Full Screen mode.
18. New added mathematical tool edge to draw lines
Enable user to draw lines when using mathematical tools.
19. Newly added external images hotkey paste function
4
Whiteboard V3.0 User's manual
Enable user to paste external pictures into Whiteboard after click “Ctrl+V”.
20. Newly added page playback function.
Enable user to playback indicated page.
System requirements
Item name
specification
Processor
Pentium III 800MHz or higher
Memory
1 GHz or higher
DirectX
V9.0c or higher
System
Windows XP / Windows Vista / Windows
2003 /
Windows 7
Resolution (recommend)
1024 x 768
60 Hz
Microsoft Office
Office XP / 2002 / 2003 / 2007
Web Browser
Internet Explorer,Firefox
Video Equipment
DirectX 9.0 and more powerful VGA graphics
Audio Equipment
Built-in sound card and speakers
5
Whiteboard V3.0 User's manual
Software install and uninstall
Install
1.
Double click Setup Whiteboard V3.0.exe as image1-1.1,and then select language
that you want for the software. Please refer to image 1-1.2.:
Image 1-1.1
2.
Image 1-1.2
After selected language, please click “OK”, then following image come out; please select
“Next Step” to go ahead.
Image 1-1.3
1. Choose where you want to install:
6
Whiteboard V3.0 User's manual
Image 1-1.4
2.
Installing,click next to continue:
Image 1-1.5
3. After finishing, fast operation icon will be created in the start and desktop
Image 1-1.6
7
Whiteboard V3.0 User's manual
Uninstall
1.
Enter Start—find Whiteboard
Whit
, click Uninstall as image 1--2.1; or select
Installation Directory and find out “uninst.exe”, double click it same
me as im
image 1-2.2
Image 1-2.1
Image 1-2.2
2.
Click Uninst and
nd will sshow following image as 1-2.3, click “Next Step”,
Step it will show
Whiteboard uninstall
all page same as image1-2.4, if you don’t want to uninstal
uninstall, please select
Cancel. If yes, then please select “Uninstall” .When the green progress
ss baron
bar the right side,
it is uninstalling, please
ease refe
refer to image 1-2.5.
Image 1-2.3
2.3
Image 1-2.4
1
Image 1-2.5
2.5
8
Whiteboard V3.0 User's manual
Working mode of software
Whiteboard V3.0 whiteboard software have windows mode, full screen
mode and annotation modes, user can switch freely during use.
Windows mode
Windows mode is the default display mode after open software, , Windows mode
including main menu bar, page writing area, page preview resource Preview display area network
resources, toolbars, property setting tool, the Recycle Bin. The position of the toolbar can switch
up and down, and the position of Page preview resource & Network resources can display right
and left. Its main interface shown in Figure 2-1.1 as below:
Image 2-1.1
Full screen mode
Full-screen mode means that software to fill the entire screen to maximum extension
page writing area, Full-screen mode interface including the writing area, Page preview resource &
Network resources area, Recycle Bin and toolbar which can move easily. Its main interface is
shown in Figure 2-1.2:
9
Whiteboard V3.0 User's manual
Image 2-2.1
Annotation modes
Screen mode switching
1. Under Window mode, you can click on the menu bar "View" → "Full screen mode" to
switch to Full-screen mode, or click on the "View" → "Annotation mode" switch to
annotation mode, as shown in Figure 2-4.1. You can also click the toolbar
and click it, it will show like it:
, user can select Full screen mode and
10
Whiteboard V3.0 User's manual
Annotation mode freely.
Image 2-4.1
2.
Full-screen mode or Annotation mode you can click on the floating toolbar as shown:
"Window mode" button to switch to Windows mode, please click
Full screen mode on the floating toolbar like:
"Annotation mode"
switch to Annotation mode, please click annotation mode on the floating toolbar shown in
Figure:
"Full screen mode" to switch to Full-screen mode.
Page operation
New page
Means that inserts a blank page in the current file, the new page can be white page, green
page, black page, or a background page with background images.
1.
Please operate one of below under Windows mode:
Click “Menu” →”Page”→”New Page”→”White page/Green page or Black page or
11
Whiteboard V3.0 User's manual
Background page, e.g.
. The
background pages will show as:
please select the picture that you want.
Click “New Page”
on the tool bar, it will show as:
and then select the page you want.
2.
Full-screen mode or Annotation mode please refer to following:
Click floating toolbar
Menu button→”Page”→”New Page”→”White page”
or “Green page” or “Black page” or “Background page”.
Click
floating
toolbar
”New
page”
button
and
will
show
as
12
Whiteboard V3.0 User's manual
and then select the new page you want.
Clear page
Means clear the current page, please refer to following:
Click “Menu” →”Page” →”Clear page”, please refer to it:
Full screen mode or Annotation mode menu button as image:
Double click Recycle bin
。
。
Delete page
Means delete the current page, please refer to following:
Click “Menu” → “Page” → “Delete page”, it will delete
Click tool bar
”Delete page “button” to delete the current page.
Click”Page preview” button
and then select “X” to delete the page
13
Whiteboard V3.0 User's manual
you want, same as image:
Notice: if there is only one page on the software and didn’t write anything, then “Delete page” is
not effective!
Page turning
Means page turning operations, including page up, page down, jump to the home page,
end page or any. In the software the upper right corner of the page shows the current page
number/total number of pages and zoom percentage, please refer to following:
Click “Menu” button(Full screen mode or Annotation mode)
→”Page”
→”Page up” or Page down” or “Home” or “ End”,e.g.
Click toolbar button
Click Page preview
Page up,
page down.
button,and then move Page preview window on
the right side screen, user can select any page that he want. E.g.
14
Whiteboard V3.0 User's manual
Flip effect
Flip effect means added animation effect when turning page,
Let page jump looks vivid, enhance the visual feeling. Whiteboard V3.0 offer
Following 8 kinds of flip effect, they are: Corner of the rotation, the roll-out, folding,
Mobile erase, page curl, flip, three-dimensional rotation, alternating gradient. Software default
no Flip effect.
Under Windows mode, click “View” →”Flip effect”, then it will show following window,
please select the flip effect you want.
15
Whiteboard V3.0 User's manual
Page zoom in/zoom out and Move page
Page zoom in and zoom out means the entire page (including the page size and page
content size) enlarged or reduced, Move page means move page to arbitrary direction of the
page
Please select
on the tool bar to zoom out the page, and click
to enlarge the
page. Or select “ Menu” →” Page” →select ”Zoom in” Or “Zoom out”.
If the page has been filled with content, and would like to continue in the current page
writing, user do not want to erase or emptied the contents of the front, you can continue to
write using “Move page”. Here are the steps: Click
on the tool bar button or click
“Page” on the menu bar→”Move page”, after selection, you will see the cursor become
,and then press left key of the mouse to move page.
Playback page
Playback page is to play back all steps of the current page.
Please click
on the toolbar to playback the current page, or operate via Menu
bar → ”Page” → ”Playback current page”
.User can also
playback any page after select” Playback selection page”, the screen will popup window as
Figure3-7.1. User will see three radio buttons, they are Current page, All page, Select
page.When user click” Select page”, user can select any page that wants to playback, there
are 5 pages to select. Pleasebe kindly note that front page can’t larger than back page, it will
show “Select incorrect page”. And “OK” button also can’t use, please refer to Figure 3-7.2.
16
Whiteboard V3.0 User's manual
Image 3-7.1
Image 3-7.2
After select Playback page, the software will start to playback automatically, the screen will
show a tool to control the playback status, see image as following:
Image 3-7.3
Notice: Please do not operate other tools of the software, please click “Stop play”
to stop it.
Page preview
If the software has multiple pages, page preview function can quickly browse the
page, and some corresponding operation, such as page quick jump, quick to delete a page...
And so on.
Open page preview: operate through “Menu” Bar, click “View” → "Page preview
, or directly click the “Page preview’ on the left or right side of
the software.
"page preview" button will appear below the page shown in figure 3-8.1 preview window.
17
Whiteboard V3.0 User's manual
Iamge 3-8.1
Page preview operation: please refer to figure 3-8.1, there is a scroll bar on the right side
of the Page preview window which can slide up and down in order to quickly browse pages,
we briefly to built five pages for concise illustration. Obviously, the second page is the
currently selected page consists of a red box logo. In front of the “Delete page” section we
already know each Preview page top right corner there is a delete button to delete the
page. Now introduce adjustment page sorting functionality, for example, we now want to
change position of page 2 and page 3, user just need to move the mouse cursor to the
preview page by pressing left key drag on page 2 to page preview the third page, and then
the second page as a reminder of the mirror will appear in the third page as shown in
figure 3-8.2, then releasing the mouse on page 2 and page 3 position switch as shown in
figure 3-8.3.
18
Whiteboard V3.0 User's manual
Image 3-8.2
Image 3-8.3
Page subject
Edit subject
Function: all pages can have the same subject after set the page subject.
Steps: “Menu"→ “Format” →”Page subject” → “Edit subject”, after you see a window
you can edit subject of the page and click “OK”, E.g.
we insert
on the top of the left side and click “OK”, all
other pages will have the same subject shown as below:
19
Whiteboard V3.0 User's manual
Delete subject: “Menu” → “Format” → “Page subject” → “Delete subject”.
Background grid
Show grid: “Menu” → “Format” → “Background pattern” → “ Show grid”
Grid style: “Menu” → “Format” → “Background pattern” → “Grid style” to set
Resource management
Resource management tool mainly contains Page preview, Resources preview, and
Network resources. Page preview seen in the previous chapters, this chapter will not including
this section.
Resource window display, hide, and position of the switch
Display and hide. Menu→View→Page preview or Resources preview or Network resources,
please refer to figure4-1.1. Or select the button to display or hide the resource window
directly
preview have a button:
. On the bottom part of the Page preview and Resources
, after selected this button, the window will hide
20
Whiteboard V3.0 User's manual
automatically when use don’t have operation.
Image 4-1.1
Position switch. After start the software resource management software tool is displayed
in the left side of window, there is a button on the right side of the window:
this is to
switch right and left side of resources button. This function convenient user to operate of
the software when using the whiteboard, avoid walking around to operate resources.
Resources preview
Software resources: Resources preview as shown in figure 4-2.1, Whiteboard V3.0 provide
abundant subject resources, including Math, Chinese, Chemistry, Physical, English, History,
Geography, Biology and so on. Meanwhile, user can add or delete resources, just use this
button to add or delete on your personal computer:
Image 4-2.1
21
Whiteboard V3.0 User's manual
Software resources operation: the software resources operation is mainly a drag-and-drop
operation, such as a picture page as shown in figure 4-2.2 drag and drop to the software,
or a video file into the page as shown in figure 4-2.3 software, Whiteboard V3.0 software
resources support images, MicroSoft office, WORD, Excle, PPT format, PDF and Flash, and
most of the video and audio format file drag and drop to software page shows or play.
Image 4-2.2
Image 4-2.3
Network resources
User can search information and resources through network search, Network resources also
support drag and drop, the image shown as following:
22
Whiteboard V3.0 User's manual
File operation
Operating mainly includes the file of new file, save file, import file, export file, print, and send
email.
New file
Click "Menu" → "file" → "New file" to create a new file, start drawing or writing. The
software will show a notice if user need to save previous file at the same time, Please
select “ Yes” if want to save, and then select a directory to save, if don’t need to save, then
please click on the button” No” to give up the file.
Open file
Click "Menu" → "file" → "Open file" to open a file, or click
on the toolbar to open
a Whiteboard file or other files that Whiteboard V3.0 supports. It will show a notice when
oen file, which is the same as open New file.
Save file
Click "Menu" → "file" → "Save file" to save a file, or click
button on the toolbar.
The file will save as Whiteboard format file.
Auto save: Click "Menu" → "file" → "Auto save", it will popup up a window as following.
23
Whiteboard V3.0 User's manual
User can select “Don’t save file
automatically” or select “Don’t save interval (1-100) , and then set the time, last is to
select a directory to save the file. And click “OK”.
Import file
Click "Menu" → "file" → "Import file" to import a file, please refer to figure5-4.1, and the
please select a PPT, WORD, EXCEL or PDF file, click “ Open” button, and then import the
file into software.
Image 5-4.1
Export file
Click "Menu" → "file" → "Export file" to export a file, select a directory and write down
the file name, then choose the document file such as PPT, WORD, PDF OR JPG to save file.
Send email
Click "Menu" → "file" → "Send email" to send the file to email address, see the image as
24
Whiteboard V3.0 User's manual
below:
and then edit Email
sender’s email address and password, then edit receiver’s email address and subject and
click” Send” button to send the file to reviver.
Print
If the computer connects to printer, user can print the file through "Menu" → "file" →
“Print” to open the winow which is to set, and then user can select accordingly per their
needs and pages. Click “OK” to print the file.
Drawing and writing operation
Attribute Settings
Drawing or writing often has some attributes such as color, width, transparency, style,
25
Whiteboard V3.0 User's manual
sometimes user wants to modify already drawn file, so we describe the attributes here.
Attribute settings under Windows mode:
Attribute settings
Full screen or Annotation mode:
Colors:For the majority of strokes can set the color attribute; if you want to set the
current operating strokes of color, or change the stroke color selected in the software page,
you can click on the color button to open the Color Settings window
Select the appropriate color. Individual strokes are not the color of this property, for example,
the Creative pen, Texture pen inserted pictures can’t set the color attribute, and the color
button is grey under this case.
Line width:Regarding painting line of Plain Shapes and Solid Shapes, user can set
these properties and operating types of line width, the default line width is 4
,
and after select the line width, there is √ front of the line width. If the current operation
stroke doesn’t have line width attribute, the Line width button will be in grey color.
Transparency:For a stroke with transparency attribute, user can click on the button
and then select the corresponding values to set the current stroke the transparency value
26
Whiteboard V3.0 User's manual
operation, user can
an see a hook before the transparency value, it means it is currently in
use.
.Genera
.Generally,
the transparency is 100, if the currnet
rrnet operation stroke
donesn’t have transparency
sparency attribute, the button will in grey color.
Line style and
nd Line
Line’s terminal: Line style means Solid line, dotted line,
lin point, line,
dotted line, double
le line drawing
dra
style such as dotted line. Line’s terminal
minal means
me
start point
and end point style. With line
lin attribute if you want to stroke set line terminal o
operation, you
can click the line
e terminal
termina this button to open the setting tool
ol and th
then select the
corresponding line
e styles, in a highlight status in the style of the line
e styles currently
cu
in use.
Generally the default
ault solid lines and terminal point no arrows.
If the
current operating stroke is neither line style nor have the terminal attribute, then line style
and line terminal button will
w be in grey color
Drawing pens.
Whiteboard V3.0 offer
offe Normal pen, Highlighter pen, Brushed pen, Sof
Soft pen, Texture
pen, Smart pen, Creativee pen, and
an Magic pen. User can choose through “Menu
Menu” → “Drawing”
→ “Normal pen, Highlighter pen, Brushed pen, Soft pen, Texture pen, Smart
art pen
pen, Creative pen,
and Magic pen” to select
ct pen. User can click
one on the toolbar
on the toolbar, “Normal
rmal pen”
pen is on the first
,
after select pens, please select line
li style, we will introduce one by one as following
ollowing.
27
Whiteboard V3.0 User's manual
Normal pen: most often used pens, the line is smooth and no sharp ed
edges, usually is
opaque lines. Whiteboard
teboard list four commonly use color: red, black, green
reen and blue, user can
set other colors also.
Highlighter pens: it
i is a translucent pen. Whiteboard list fourr comm
commonly use color:
yellow, green, blue,, pink highlighter pens, user can set other colors as well.
Brushed pen:
en: it can write the effect of brush pens.
Soft pen: it is a straight
st
line width and the line have same
e turning direction line
width, line terminal
al have bevel
Texture pen: it is a line of brushes can be mapped with
ith the texture
t
effect.
Whiteboard have 10 different
differ
kinds of Texture pens to choose, see some examples as
following:
Smart pen: it is able
a
to draw some simple geometric shapes
hapes to hand-painted
sketch recognition,
n, and th
then converted into a standard geometry.
y. For example,
ex
arrow,
rectangle, triangle,
e, oval.
Creative pen: 6 different kinds of creative pens effect as following:
28
Whiteboard V3.0 User's manual
Magic pen: it iss a kind
k
of paint brush will automatically fade away over
ov time. When
use it to draw an ellipse with
w the magic pen, the spotlights will be open,
open when use it to
draw a rectangular
ar sketches,
sketche the magnifier function will be open.
Graphics
Stamper: enable
ble user to select Stamper on the software. Riotoudio
udio off
offer 10 different
kinds of Stamper for choic
choice
. User can click “Menu”
→ “Drawing” → “Stampe
Stamper” → and then select different Stamper.. Or click
on the
toolbar to select Stamper.
amper.
2D graphic: User can
ca click “Menu” → “Drawing” → “2D graphic
graphic” → and then
select different plane
ane figur
figure. Or click
plane figure
on the toolbar to select different
differ
shapes of
.
ca click “Menu” → “Drawing” → “3D graphic
graphic” → and then
3D graphic: User can
select different graphic.
aphic. Or click
on the toolbar to select different shapes of 3D
29
Whiteboard V3.0 User's manual
graphic
.
Scrape brush and Scrape ar
area: User can click “Menu” → “Drawing” → “Scrape
“
area”, and
then draw a rectangle graph
grap as Scrape area
, if want to scrape “Scrape
area”, please click “Menu”
“Menu → “Drawing” → “Scrape brush”, the
he mouse
mou cursor will
.
become like a brush,
h, and th
then scrape the Scrape area:
Pie chart and
“Histogram”, or click
Histogram: Click “Menu” → “Drawing” → “Pie chart” or
on the toolbar when it is Full screen
n mode or Annotation
mode( (Notice: User
er need to
t add Pie chart button into software, Whiteboard
teboard don’t have this
button by default),The Histogram
Histo
set data image as following:
Please
ase click the data want
to edit or delete when
hen user want to amend or delete data of the chart.
Please click “OK” after
afte set data, the software will show
ow
the
pie
chart:
30
Whiteboard V3.0 User's manual
Flood fill: enable
nable us
user to color fill the closed area, click “Menu” → “Drawing” →
“Fill” or click
on the
t toolbar and then select colors
area to fill color, e.gl. Before color fill
, after color fill
.Please click
c
the closed
.
For 2D graphic
ic or m
many 2D graphic, select them and click Flood fill
fil to fill color:
→
→
Insert images: 1. “Insert”
Insert” → “Insert images” → “From gallery”, then
n drag the
t picture into
software. 2. “Insert” → “Insert images” → “From file”, and selectt the picture
pic
from the
computer. 3. Copy outside p
picture and use “Ctrl + V” to paste on the software
oftware page.
Insert table: Click from
fro Menu bar, “Insert” → “Insert table”, orr click
button on
the toolbar, and then click the left side of mouse to drag the table,
le, there is notice with
Number * Number during dragging the table. Following is example
le of 3 lines and four
columns table. Clickk the lef
left side of mouse to drag the table
please
31
Whiteboard V3.0 User's manual
loosen when display OK
.User can double click if want tto write on the
table.
Insert Multimedia: click
lick from Menu bar, “Insert” → “Insert Multimedi
ultimedia” → choose
multimedia file from
m comp
computer, Whiteboard support many kinds of Audio, V
Video and Flash
documents. Or insert multimedia
mul
file from Resources windows, please
lease ref
refer to Chapter
“Resources preview”.
Insert Hyperlinks:
inks: click
clic from Menu bar, “Insert” → “Hyperlinks” Insert Hyperlink:
Through the "menu" → "insert" → "hyperlink" steps or click the menu button
b
on the
selected object, and then select the menu item" hyperlink "or" sound connection ",
You can open the hyperlink
hyperlin settings window:
Then
set the hyperlink,You
You can see from the above picture can be set not only the website
hyperlinks can
n also set up the software page hyperlink, hyperlinks and local disk file.
We enter the site name in the URL below to choose the angle icon click OK
www.Google.com activate website hyperlink, for example。
Now the page has been added
ad
a website hyperlink
,Click
on the small icon in front can activate the hyperlink and open the site..
Eraser
Eraser: Whiteboard
hiteboard provide big, medium, small and area fourr kinds o
of erasers. Click
from Menu bar , “ Drawing”
Dra
→ “ Eraser” then select different
rent kin
kinds of eraser
32
Whiteboard V3.0 User's manual
. Or click
kinds of eraser
on the tool bar to sselect different
.
Recycle bin:
in: doub
double click Recycle bin will delete the current page content;
con
drag the
selected content into
to Recyc
Recycle bin will delete them from the page.
Text and Faculty Tools
Insert Text
Text: Click “Insert” -> “Inse
Insert Text” ->”Text” from Menu toolbar, then
n drag an area on the
page and enter words.
rds. You could adjust the font from
Toolbar as the following
wing pic
picture:
Handwriting:Click “Inser
Insert” -> “Insert Text” ->”Handwriting” from
m Menu toolbar, and
software could switch
tch to Ha
Handwriting mode.
→
Notice: The Handwritingg functi
function is just for Win7 or above system, click
ick the icon
i
toolbar, if your OS system
ystem is under Win7, the default function of
from
is Text.
33
Whiteboard V3.0 User's manual
Disciplinary
y Tool
Tools
Click the icon
from toolbar to open the Disciplinary Tools
ls windo
windows, there are
Math, Physics and Chemistry
istry Too
Tools.
Math Tool:
Protractor:Click
Click the edge of the Protractor and you could
ld draw the arc as the
protractor. You could
ld move the Protractor by clicking and dragging it, rotate the protractor
by clicking and dragging
agging the circle
picture:
, and exit it by clicking the cross
as the following
Ruler:Click the edge
ed of the ruler and you could draw a line on the graduated side.
You could move the ruler by clicking and dragging it, rotate the protractor
tractor b
by clicking and
dragging the circle
, exit
exi it by clicking the cross
and stretch it by clicking
clic
as the
following picture:
Compasses:open the compasses tool, rotate the top
to draw the
t circle,click
to exit,drag the feet
fee can expand the compasses, drag the area of
can move the
34
Whiteboard V3.0 User's manual
compasses.
Triangular:Click
Click the edge of the Triangular and you could
ld draw a line on the
graduated side. You
ou could move the Triangular by clicking and dragging it, rotate the
protractor by clicking
king and dragging the circle
following picture:
, exit it by clicking
ing the cross
as the
Math formula:Click
Click the Math formula and drag an area on the page, tthere will be a
formula window. Click the sym
symbols that you want from the menu on the wind
window. e.g. input
x2+y2=1 to the page, you
ou need to click “=” from
then click “+” from
, then insert
, then click the left part of
to the left part of
,
, enter x and
35
Whiteboard V3.0 User's manual
y on the boxed and 2 in the lab
label as the picture
. You could set
the color and the size for the ffont of the formula. Double click the formula
ula in the page to open
the window again.
→
Math function: Click
lick the icon, there will be a window including some math
m
function,
drag the
th right one and add it on the page.
Physics Tools
:
Physical mechanic
chanical: Click the icon, there will be a window including
cluding some recourse
36
Whiteboard V3.0 User's manual
about mechanics
, drag the right one and add it on the page
page.
Physical Optical:
ical: Click the icon, there will be a window includingg some recourse about
Optics
, drag
dr the right one and add it on the page.
Physical electric
lectrical: Click the icon, there will be a window including
cluding some recourse
about electrics
Chemistry Tools
, drag the right one and add it on the
he page.
:
Clic the icon and drag an area on the page, there
here wil
will be a chemical
Chemical equation:: Click
37
Whiteboard V3.0 User's manual
equation
window
dow
as
the
following
wing
picture
, there
will be an sample of “CaO+H2O &&
& Ca(OH)2” on the window. Input another equation,
equatio you need to
input the reaction condi
condition between “&”and”&” as the follow
following picture,
, we could
cou select some
common Reaction conditions
ditions ffrom the Pull-down Menu on the window.
ow. Click OK then the
equation
will be shown on the page.
Chemical equipme
equipments: Click the icon, there will be a window
indow in
including some
38
Whiteboard V3.0 User's manual
recourse about electric
, drag the right one and add it on the page.
Tools
Reveal
Function: Can free move the screen cover to cover a certain area, click
to
change the type of cover and exit the function.
Click “Tools”->”Reveal” from the menu or click the icon
from the toolbar.
39
Whiteboard V3.0 User's manual
Steps: By default it’ss from the
t edges to the central, and you could click
type of central to up and d
down
right
to switch to
, or the typee of cen
central to left and
.
Spotlight
Function:Highlights
ts a sele
selected area, and cover other area.
Click “Tools”->”Spotlight
tlight” from the menu or click the icon
from the toolbar.
toolb
Steps: Click the small
all circle on the bottom right corner of the rectangle
gle that out
o of highlight
area as the picture
can change
nge the size
s of highlight
area. You could change
ange th
the shapes of the highlight area or exit this
is funct
function by clicking
bottom
right
ht
corner
as
the
following
llowing
picture
40
Whiteboard V3.0 User's manual
. You could
ld use ttwo fingers to
zoom in or zoom out
ut the ar
area of Spotlight on our multitouch interactive
ve white
whiteboard.
Easy-Doc
oc camera
Function:Using video
ideo equipment
equ
to Read the images from the Exhibition
bition display and show
them on the page.
Click “Tools”->” Easy-Doc
Doc camera”
ca
from the menu or click the icon
Steps: enable easy-doc
doc camera
cam
and we could get a window
from the toolbar.
, you could
select the windowss numbe
number that you want by dragging. E.g. click the mouse to drag a 2 X 2
windows as the picture
then relaxe, there will be four windows show
on the page as the followin
following picture. If your video equipment is ready,
y, just d
double click the
window to show the Exhibition
Exhibit display.
41
Whiteboard V3.0 User's manual
Screen Record
ecord
Function: Record allll the operation
ope
and voice on the screen and save.。
Click “Tools”->”Screen
een Record”
Reco from the menu or click the icon
Steps: Click the first
st icon
from the toolbar.
to start the record,
d, click the
th second icon
to pause, click the last icon
to save
and exit the record.. You need
nee to select the root for the before saving the *.avi file.
Microphone
Function: Record the
he voice and save as audio file.
Click “Tools”->” Microphon
icrophone” from the menu or click the icon
Steps: Same as Screen
een Reco
Record.
from
om the toolbar.
to
Blank Screen
Function: to warn the Stude
Student to keep quiet。
Click “Tools”->” Blank
nk Scree
Screen” from the menu or click the icon
from
rom the ttoolbar.
Steps: Click the screen
een or Space key or ESC to exit.
42
Whiteboard V3.0 User's manual
Camera
Function: Screenshot.
Click “Tools”->” Camera”” from the menu or click the icon
Steps:
from the
he toolb
toolbar.
Select “Rectangular” to cut
cu a rectangular
area, select “Any region”” to cut any shape of area, and select “Full screen
creen” to copy the full
screen
Magnifier
Function: magnify an area on
o the page.
Click “Tools”->” Magnifier
agnifier” from the menu or click the icon
drag an area on thee page.
from the toolbar, then
Steps: by default itt will zoo
zoom in 2X (2 times), you could click
to zoom out,
zoom in or exit the magnifie
magnifier. The zoom in times is from 2 to 8.
43
Whiteboard V3.0 User's manual
Soft Keyboard
yboard
Click “Tools”->” Soft
ft Keyboa
Keyboard” from the menu or click the icon
from the toolbar.
Calculator
Click “Tools”->” Calculator
lculator” from the menu or click the icon
from the too
toolbar.
Digital Clock
Click “Tools”->” Digital Clock”
Cloc from the menu or click the icon
from the toolbar.
Other Tools
Function: Add the other
her tools
too to the software.
Click “Tools”->” Other
her Tools
Tools” from the menu.
Steps: Open the window
indow aand click “Add” on the window, you need to test the Name and
select the right path
th for the tools. After adding the other tools, you could fin
find it on by click
“Tools” on the menu.
44
Whiteboard V3.0 User's manual
Edit
Selection
You can selectt objects or shapes to let it move, modify, rotate or delete.
Click “Edit”->” Select” from the menu or click the icon
from the toolbar
toolbar, then select an
object on the pagee or drag an area to select several objects on thee page. YYou could click
“Edit”->” Select all” to select
sele all the objects on the page. If an objectt is selec
selected, the object
will be surrounded
d by a dotted box as the picture
, you
could move the object
ject by cclick the area inside the box. There are four
ur small circles on the
four corners, you could zoo
zoom in/out by clicking and dragging any of them. Click
C
the yellow
circle to rotate thee object
object. Click the “Menu” icon as the picture to sele
select other more
functions.
45
Whiteboard V3.0 User's manual
Undo and Redo
Undo: Backk to last operation. Click “Edit”->” Undo” or click
from the toolbar.
Redo: Redo
o the last
las operation Click “Edit”->” Redo” or click
from the toolbar.
Copy and Paste
Copy: Copyy the sel
selected object to the page of the software. Steps: Select
S
an object
then click “Edit”->”Copy”” from the menu or click the icon
from toolbar.
Cut: Cut the selected object to the page of the software. Steps:: Select an object then
click “Edit”->”Cut” from the menu or select “Cut” from the object menu .
Paste: Paste
te the copied
c
or cut objects on the page of the softwar
software. Steps: Click
“Edit”->”Paste” from
m the m
menu or click the icon
from toolbar or selec
select “Paste” from
the object menu. “Ctrl
Ctrl + V”
V could be used in the software。
Clone:Clone the selected
ed objects to the page of software. Steps: Select an
n object
ob
then click
“Edit”->”Clone” from
m the m
menu or select “Clone” from the object menu.
Delete: Delete the selected objects. Steps: Select an
n object
obje
then click
“Edit”->”Delete” from
rom the menu or select “Delete” from the object
ect men
menu or drag the
selected objects to the recycle
recy
.
Mirror: Mirror the selected
select object horizontal or vertical. Steps: Select
elect an object, select
“Mirror”, including Horizontal
Horizon Mirror and Vertical Mirror on the object m
menu. E.g.: the
original object is
, the Horizontal Mirror is
, the
46
Whiteboard V3.0 User's manual
Vertical Mirror is
.
Lock
Lock the object on the page. Steps: Select “Lock” from the object menu.
Flip and Rotate
Flip: Flip the selective object horizontal or vertical. Steps: Select an object, select “Flip”,
including Horizontal Mirror and Vertical Flip on the object menu. E.g.: the original object is
, the Horizontal Flip is
, the Vertical Flip is
.
Rotation Angle: Rotate a selected object with different angle. Steps: Select an object, click
Rotation Angle on the object menu, there are four angles 45o, 90o , 135o and 180o. You could
click the yellow circle to Rotate any other angles.
Combination functions
Combination: combine multi objects together. Steps: Click “Combination” on the object
menu -> “Combine”.
Cancel Combination: cancel the combination. Steps: Click “Combination” on the object
47
Whiteboard V3.0 User's manual
menu -> “Cancel Combine”.
Alignment Functions
To align multi objects ( at least two objects) on the page.
Align Left: “Format”->”Alignment”->”Align Left”;
Align Right: “Format”->”Alignment”->”Align Right”;
Align Top: “Format”->”Alignment”->”Align Top”;
Align Bottom: “Format”->”Alignment”->”Align Bottom”;
Align Evenly Distribution Lines: “Format”->”Alignment”->”Evenly Distribution lines”;
Align Evenly Distribution Columns: “Format”->”Alignment”->”Evenly Distribution Columns”.
Layer Sequence
The objects could be overlapped and have their priority sequence to show on the page.
Steps: Select the objects, click “Layer sequence”, you could select “On top”, “Move up”,
“Move down” or “On bottom” for the objects.
Custom Buttons
Function: For Full Screen Model or Annotation Model. The customers could set their own
function shortcut on the toolbar.
Steps: Click “Custom buttons” on Full Screen Model or Annotation Model as the following
picture
,
there
will
be
a
window
on
the
page
48
Whiteboard V3.0 User's manual
,
the
left list includes the tools which have not been in the toolbar and the right one includes the
tools have been in the toolbar. You could select the tools which you want and click “>>”
button to add on the toolbar or click “<<” to delete the tools from the toolbar and click “OK”
to confirm. You could select “Default” to make the toolbar to the default setting.
49
Whiteboard V3.0 User's manual
Whiteboard Server
(1) Device connection
After installing the software,
softwar there will be an icon
on the bottom
b
right
toolbar of your computer, right
r
click it you will see below window:
The icon have below
elow three sstatus with different colors:
A.
Grey means your computer doesn’t connected with a computer
compute or doesn’t
connected well
B.
Orange
ge means the computer has connected with an IWB and it is single
touch
C.
Greenn means the computer has connected with
ith an IWB and it is
multi-touch
(2) Menu Functions
A. Language: currently we have English, Portuguese, Simplified
plified Chinese,
Chine Turkish.
We can also customize languages
lan
for users.
50
Whiteboard V3.0 User's manual
B. Calibrate: Under below circumstances the whiteboard need to be calibrated:
a. After connecting the IWB with projector and computer, please Calibrate before
using.
b. After changing the resolution
c. After adjusting the projector
d. After adjusting the IWB location
There is some differences in Calibration between single touch and multi-touch (for
more about win7 multi-touch, you can also refer to the Win7 multi-touch user manual)
single touch
Multi-touch
51
Whiteboard V3.0 User's manual
C. Setting: Switching between Single touch and Multi-touch, the server icon will
change colors.
When click the setting, there will be a dialogue appear on the screen, you can choose
between single touch and multi-touch.
After setting the device, the server will be a little different between single touch and
multi-touch
single touch
Remark:
the
disable
rightclick
Multi-touch
and Remark:
the
disable
rightclick
and
disable PPT Notes are black, it means this disable PPT notes is grey, it means this
52
14
Whiteboard V3.0 User's manual
two functions are available. When you two functions are not available (because
click either of them, there will be a right it processing automatically by the system
Win7 you are using)
icon in the front
D. Disable Right Click: Right click can’t use
E. Disable PPT Notes: PPT Annotation can’t use
Set Shortcuts: Setting up the two horizontal hotkeys pasted on each side of the
IWB.
F. Test: Testing the board whether it works well or tell users to solve some small
problem,
53
Whiteboard V3.0 User's manual
a. LED Test:
Good
Problem
Remark:
Remark: the lower blank area will show
you the Bad LED
b. Drawing Test: There are three pages for drawing test.
Page
1
3
3
54
Whiteboard V3.0 User's manual
Blank
Good
Proble
m
Remar
Means this IWB have The
k
some problems
problems
may The
problems
may
caused by the bottom caused by the Left or
or top LED where the Right LED where the
break happens
break happens
G. Help: Whiteboard User Manual
H. Exit: Exit the server
(3) The differences of Multi-touch and Single-touch
Multi-touch
Single-touch
Operative System
Windows7 Ultimate (32/64 bits),
windows7 Professional(32/64
bits)
Windows XP, Vista(32/64
bits), windows7(32/64 bits)
Mouse functions
Yes
Yes
Dual touch
Yes
No
Gesture Recognition
Zoom in/out, Rotate,
Handwriting
Zoom in/out, Rotate
PPT Notice
No
Yes
Hotkey funtion
No
Yes
55
Whiteboard V3.0 User's manual
FAQs for using Whiteboard:
1. Q: When repeat to calibrate the device on the multi-touch model, the
calibration interface stop working.
A: The window7 system will save the last calibration data for the multi-touch
device. If the new calibration data is so different from the last one, the calibration
is invalid. Solution: click Esc key to exit the calibration interface, and then open
the control panel to clear the last calibration data as the following pictures:
56
Whiteboard V3.0 User's manual
2. Q: The Hotkeys on the whiteboard are not available?
A: Please make sure that you have finished the “Whiteboard Calibration and Hotkeys
Setting”. The following picture is the calibration for the whiteboard hotkeys:
3. Q: It fails to switch the device between single-touch and multi-touch model
sometimes?
A: The touch model switching need to get the confirmation of the hardware, the
57
Whiteboard V3.0 User's manual
confirmation does fail sometime. Solution: before switching the model, pull up the
USB connector then plug it again.
Thank you for using Whiteboard and hope you have a nice time with our
software.
58