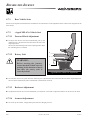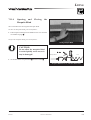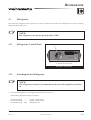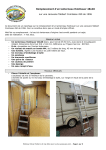
1
MANUAL
MOBILE HOME
COSMOS
PLEASE NOTE
NOTE:
Our mobile homes are subject to continuous further development. We reserve
the right to make changes to the equipment, design and engineering without
notice. This manual is only valid in so far as the mobile home corresponds to the
technology and specifications described within.
For this reason KNAUS TABBERT GROUP GMBH cannot accept any claims
made on the basis of this manual.
KNAUS TABBERT GROUP GMBH accepts no liability for damage to the mobile home that results from the failure to observe this manual.
This manual represents the latest version of the mobile home when going to
print.
Copying, reproduction, including extracts, are prohibited without the written
approval of KNAUS TABBERT GROUP GMBH.
EXPLANATION ON THE EQUIPMENT:
The equipment (standard equipment and optional equipment or accessories) in
our mobile homes varies from model to model.
For this reason the features of both the standard equipment and the features of
the optional equipment are described in this manual as far as an explanation is
necessary.
In addition, the manuals enclosed from the related manufacturers are also to be
observed.
© 2004 KNAUS TABBERT GROUP GMBH Jandelsbrunn
Your local WEINSBERG Service Centre
KNAUS TABBERT GROUP GMBH
Sandweg 1
D-36391 Sinntal-Mottgers
CONTENTS
0.
Contents
1.
Foreword . . . . . . . . . . . . . . . . . . . . . . . . . . . . . . . . . . . . . . . . . . . . . . . . . . . . . . . . . . . . . . . . . . . . . . . . . . . . . . . . . . . . .
1-1
2.
2.1
2.2
2.3
2.3.1
2.4
2.5
2.5.1
2.5.2
2.5.3
2.6
2.7
2.8
Safety Instructions . . . . . . . . . . . . . . . . . . . . . . . . . . . . . . . . . . . . . . . . . . . . . . . . . . . . . . . . . . . . . . . . . . . . . . . . . . . . .
Safety Devices . . . . . . . . . . . . . . . . . . . . . . . . . . . . . . . . . . . . . . . . . . . . . . . . . . . . . . . . . . . . . . . . . . . . . . . . . . . . . . . .
Safety Instructions for Road Travel . . . . . . . . . . . . . . . . . . . . . . . . . . . . . . . . . . . . . . . . . . . . . . . . . . . . . . . . . . . . . . . .
General Safety Instructions . . . . . . . . . . . . . . . . . . . . . . . . . . . . . . . . . . . . . . . . . . . . . . . . . . . . . . . . . . . . . . . . . . . . . .
Fitting Rear Carrier Systems . . . . . . . . . . . . . . . . . . . . . . . . . . . . . . . . . . . . . . . . . . . . . . . . . . . . . . . . . . . . . . . . . . . . .
Safety Instructions for the Gas System . . . . . . . . . . . . . . . . . . . . . . . . . . . . . . . . . . . . . . . . . . . . . . . . . . . . . . . . . . . . .
Fire Safety . . . . . . . . . . . . . . . . . . . . . . . . . . . . . . . . . . . . . . . . . . . . . . . . . . . . . . . . . . . . . . . . . . . . . . . . . . . . . . . . . . .
Prevention of Fire Hazards . . . . . . . . . . . . . . . . . . . . . . . . . . . . . . . . . . . . . . . . . . . . . . . . . . . . . . . . . . . . . . . . . . . . . .
Fire Fighting . . . . . . . . . . . . . . . . . . . . . . . . . . . . . . . . . . . . . . . . . . . . . . . . . . . . . . . . . . . . . . . . . . . . . . . . . . . . . . . . .
In Case of Fire . . . . . . . . . . . . . . . . . . . . . . . . . . . . . . . . . . . . . . . . . . . . . . . . . . . . . . . . . . . . . . . . . . . . . . . . . . . . . . . .
Important Notes for the Sanitary Area . . . . . . . . . . . . . . . . . . . . . . . . . . . . . . . . . . . . . . . . . . . . . . . . . . . . . . . . . . . . . .
Environmental Notes . . . . . . . . . . . . . . . . . . . . . . . . . . . . . . . . . . . . . . . . . . . . . . . . . . . . . . . . . . . . . . . . . . . . . . . . . . .
Supplementary Notes . . . . . . . . . . . . . . . . . . . . . . . . . . . . . . . . . . . . . . . . . . . . . . . . . . . . . . . . . . . . . . . . . . . . . . . . . .
2-1
2-2
2-2
2-3
2-4
2-4
2-6
2-6
2-6
2-7
2-7
2-7
2-8
3.
3.1
3.1.1
Description . . . . . . . . . . . . . . . . . . . . . . . . . . . . . . . . . . . . . . . . . . . . . . . . . . . . . . . . . . . . . . . . . . . . . . . . . . . . . . . . . . .
General Construction and Equipment of the Mobile Home . . . . . . . . . . . . . . . . . . . . . . . . . . . . . . . . . . . . . . . . . . . . . .
Seating Layout . . . . . . . . . . . . . . . . . . . . . . . . . . . . . . . . . . . . . . . . . . . . . . . . . . . . . . . . . . . . . . . . . . . . . . . . . . . . . . . .
3-1
3-1
3-2
4.
4.1
4.2
4.3
4.3.1
4.4
4.5
4.6
4.7
4.7.1
4.7.2
4.7.2.1
4.7.2.2
4.7.2.3
4.7.2.4
4.8
4.9
Before the Journey . . . . . . . . . . . . . . . . . . . . . . . . . . . . . . . . . . . . . . . . . . . . . . . . . . . . . . . . . . . . . . . . . . . . . . . . . . . . .
Before the First Journey . . . . . . . . . . . . . . . . . . . . . . . . . . . . . . . . . . . . . . . . . . . . . . . . . . . . . . . . . . . . . . . . . . . . . . . .
Registering the Mobile Home . . . . . . . . . . . . . . . . . . . . . . . . . . . . . . . . . . . . . . . . . . . . . . . . . . . . . . . . . . . . . . . . . . . .
Payload . . . . . . . . . . . . . . . . . . . . . . . . . . . . . . . . . . . . . . . . . . . . . . . . . . . . . . . . . . . . . . . . . . . . . . . . . . . . . . . . . . . . .
Loading the Mobile Home . . . . . . . . . . . . . . . . . . . . . . . . . . . . . . . . . . . . . . . . . . . . . . . . . . . . . . . . . . . . . . . . . . . . . . .
Checking the Mobile Home Before Starting the Journey . . . . . . . . . . . . . . . . . . . . . . . . . . . . . . . . . . . . . . . . . . . . . . . .
Brakes . . . . . . . . . . . . . . . . . . . . . . . . . . . . . . . . . . . . . . . . . . . . . . . . . . . . . . . . . . . . . . . . . . . . . . . . . . . . . . . . . . . . . .
Tyre Pressure . . . . . . . . . . . . . . . . . . . . . . . . . . . . . . . . . . . . . . . . . . . . . . . . . . . . . . . . . . . . . . . . . . . . . . . . . . . . . . . . .
Adjusting the Vehicle Seats . . . . . . . . . . . . . . . . . . . . . . . . . . . . . . . . . . . . . . . . . . . . . . . . . . . . . . . . . . . . . . . . . . . . . .
Base Vehicle Seats . . . . . . . . . . . . . . . . . . . . . . . . . . . . . . . . . . . . . . . . . . . . . . . . . . . . . . . . . . . . . . . . . . . . . . . . . . . . .
Model »Aguti MILAN« Vehicle Seat . . . . . . . . . . . . . . . . . . . . . . . . . . . . . . . . . . . . . . . . . . . . . . . . . . . . . . . . . . . . . .
Forward-Back Adjustment . . . . . . . . . . . . . . . . . . . . . . . . . . . . . . . . . . . . . . . . . . . . . . . . . . . . . . . . . . . . . . . . . . . . . . .
Rotary Unit . . . . . . . . . . . . . . . . . . . . . . . . . . . . . . . . . . . . . . . . . . . . . . . . . . . . . . . . . . . . . . . . . . . . . . . . . . . . . . . . . .
Backrest Adjustment . . . . . . . . . . . . . . . . . . . . . . . . . . . . . . . . . . . . . . . . . . . . . . . . . . . . . . . . . . . . . . . . . . . . . . . . . . .
Armrest Adjustment . . . . . . . . . . . . . . . . . . . . . . . . . . . . . . . . . . . . . . . . . . . . . . . . . . . . . . . . . . . . . . . . . . . . . . . . . . .
Vehicle Lights . . . . . . . . . . . . . . . . . . . . . . . . . . . . . . . . . . . . . . . . . . . . . . . . . . . . . . . . . . . . . . . . . . . . . . . . . . . . . . . .
Obtaining a Replacement Key . . . . . . . . . . . . . . . . . . . . . . . . . . . . . . . . . . . . . . . . . . . . . . . . . . . . . . . . . . . . . . . . . . . .
4-1
4-1
4-1
4-2
4-2
4-3
4-4
4-5
4-5
4-6
4-6
4-6
4-6
4-6
4-6
4-7
4-7
COSMOS
MJ 2004 • GB-08.2004
0-1
CONTENTS
5.
5.1
5.2
5.3
During the Journey . . . . . . . . . . . . . . . . . . . . . . . . . . . . . . . . . . . . . . . . . . . . . . . . . . . . . . . . . . . . . . . . . . . . . . . . . . . .
Driving the Mobile Home . . . . . . . . . . . . . . . . . . . . . . . . . . . . . . . . . . . . . . . . . . . . . . . . . . . . . . . . . . . . . . . . . . . . . . .
Refuelling the Mobile Home . . . . . . . . . . . . . . . . . . . . . . . . . . . . . . . . . . . . . . . . . . . . . . . . . . . . . . . . . . . . . . . . . . . . .
Changing a Wheel . . . . . . . . . . . . . . . . . . . . . . . . . . . . . . . . . . . . . . . . . . . . . . . . . . . . . . . . . . . . . . . . . . . . . . . . . . . . .
5-1
5-1
5-2
5-3
6.
6.1
6.2
6.3
After the Journey . . . . . . . . . . . . . . . . . . . . . . . . . . . . . . . . . . . . . . . . . . . . . . . . . . . . . . . . . . . . . . . . . . . . . . . . . . . . . .
Parking Brake . . . . . . . . . . . . . . . . . . . . . . . . . . . . . . . . . . . . . . . . . . . . . . . . . . . . . . . . . . . . . . . . . . . . . . . . . . . . . . . .
Setting Up the Mobile Home . . . . . . . . . . . . . . . . . . . . . . . . . . . . . . . . . . . . . . . . . . . . . . . . . . . . . . . . . . . . . . . . . . . . .
Awning . . . . . . . . . . . . . . . . . . . . . . . . . . . . . . . . . . . . . . . . . . . . . . . . . . . . . . . . . . . . . . . . . . . . . . . . . . . . . . . . . . . . .
6-1
6-1
6-1
6-1
7.
7.1
7.2
7.3
7.4
7.5
7.6
7.7
7.8
7.9
7.10
7.11
7.11.1
7.11.2
7.11.3
7.11.4
7.12
7.12.1
7.12.1.1
7.12.1.2
Living . . . . . . . . . . . . . . . . . . . . . . . . . . . . . . . . . . . . . . . . . . . . . . . . . . . . . . . . . . . . . . . . . . . . . . . . . . . . . . . . . . . . . . .
Ventilating the Mobile Home . . . . . . . . . . . . . . . . . . . . . . . . . . . . . . . . . . . . . . . . . . . . . . . . . . . . . . . . . . . . . . . . . . . . .
Opening and Closing the Cab Doors from the Outside . . . . . . . . . . . . . . . . . . . . . . . . . . . . . . . . . . . . . . . . . . . . . . . . .
Opening and Closing the Cab Doors from the Inside . . . . . . . . . . . . . . . . . . . . . . . . . . . . . . . . . . . . . . . . . . . . . . . . . . .
Opening and Closing the Sliding Door from the Outside . . . . . . . . . . . . . . . . . . . . . . . . . . . . . . . . . . . . . . . . . . . . . . . .
Opening and Closing the Sliding Door from the Inside . . . . . . . . . . . . . . . . . . . . . . . . . . . . . . . . . . . . . . . . . . . . . . . . .
Opening and Closing the First Door of the Double Rear Doors from the Outside . . . . . . . . . . . . . . . . . . . . . . . . . . . . .
Opening and Closing the First Door of the Double Rear Doors from the Inside . . . . . . . . . . . . . . . . . . . . . . . . . . . . . . .
Opening and Closing the Second Door of the Double Rear Doors from the Inside . . . . . . . . . . . . . . . . . . . . . . . . . . . .
Opening and Closing the Roof Light . . . . . . . . . . . . . . . . . . . . . . . . . . . . . . . . . . . . . . . . . . . . . . . . . . . . . . . . . . . . . . .
Opening/Closing the Quarter Vent . . . . . . . . . . . . . . . . . . . . . . . . . . . . . . . . . . . . . . . . . . . . . . . . . . . . . . . . . . . . . . . . .
REMItop II Roof Window (optional equipment) . . . . . . . . . . . . . . . . . . . . . . . . . . . . . . . . . . . . . . . . . . . . . . . . . . . . . .
Opening and Closing the Glass Dome . . . . . . . . . . . . . . . . . . . . . . . . . . . . . . . . . . . . . . . . . . . . . . . . . . . . . . . . . . . . . .
Opening and Closing the Glass Dome, Bad Weather Position . . . . . . . . . . . . . . . . . . . . . . . . . . . . . . . . . . . . . . . . . . . .
Extending the Cover . . . . . . . . . . . . . . . . . . . . . . . . . . . . . . . . . . . . . . . . . . . . . . . . . . . . . . . . . . . . . . . . . . . . . . . . . . .
Opening and Closing the Mosquito Blind . . . . . . . . . . . . . . . . . . . . . . . . . . . . . . . . . . . . . . . . . . . . . . . . . . . . . . . . . . .
Sleeping . . . . . . . . . . . . . . . . . . . . . . . . . . . . . . . . . . . . . . . . . . . . . . . . . . . . . . . . . . . . . . . . . . . . . . . . . . . . . . . . . . . .
Preparing for Sleeping . . . . . . . . . . . . . . . . . . . . . . . . . . . . . . . . . . . . . . . . . . . . . . . . . . . . . . . . . . . . . . . . . . . . . . . . . .
Converting the Seating Module Height-Adjustable Table to a Bed (model 551 K) . . . . . . . . . . . . . . . . . . . . . . . . . . . . .
Converting the Seating Module with Hook-In Table to a Bed (model 551 MQ) . . . . . . . . . . . . . . . . . . . . . . . . . . . . . . .
7-1
7-1
7-2
7-2
7-3
7-3
7-4
7-4
7-5
7-5
7-6
7-6
7-7
7-8
7-8
7-9
7-10
7-10
7-10
7-11
8.
8.1
8.2
8.3
8.4
8.5
8.5.1
8.6
8.7
Gas Supply . . . . . . . . . . . . . . . . . . . . . . . . . . . . . . . . . . . . . . . . . . . . . . . . . . . . . . . . . . . . . . . . . . . . . . . . . . . . . . . . . . .
General Notes on the Gas Supply . . . . . . . . . . . . . . . . . . . . . . . . . . . . . . . . . . . . . . . . . . . . . . . . . . . . . . . . . . . . . . . . .
LPG . . . . . . . . . . . . . . . . . . . . . . . . . . . . . . . . . . . . . . . . . . . . . . . . . . . . . . . . . . . . . . . . . . . . . . . . . . . . . . . . . . . . . . . .
Placing Gas Bottles in the Gas Locker . . . . . . . . . . . . . . . . . . . . . . . . . . . . . . . . . . . . . . . . . . . . . . . . . . . . . . . . . . . . . .
General Information on the Gas Consumption . . . . . . . . . . . . . . . . . . . . . . . . . . . . . . . . . . . . . . . . . . . . . . . . . . . . . . . .
Gas Taps . . . . . . . . . . . . . . . . . . . . . . . . . . . . . . . . . . . . . . . . . . . . . . . . . . . . . . . . . . . . . . . . . . . . . . . . . . . . . . . . . . . .
Gas Taps for Cooker and Heater . . . . . . . . . . . . . . . . . . . . . . . . . . . . . . . . . . . . . . . . . . . . . . . . . . . . . . . . . . . . . . . . . .
Outside Gas Connector . . . . . . . . . . . . . . . . . . . . . . . . . . . . . . . . . . . . . . . . . . . . . . . . . . . . . . . . . . . . . . . . . . . . . . . . .
Changing the Gas Bottle . . . . . . . . . . . . . . . . . . . . . . . . . . . . . . . . . . . . . . . . . . . . . . . . . . . . . . . . . . . . . . . . . . . . . . . .
8-1
8-1
8-2
8-2
8-2
8-3
8-3
8-4
8-5
0-2
MJ 2004 • GB-08.2004
COSMOS
CONTENTS
8.8
8.8.1
8.8.2
8.8.3
8.8.4
8.8.4.1
8.8.4.2
Duomatic L Plus (gas regulator set with automatic changeover and remote display for the two-bottle system) . . . . . . .
Instructions for the Duomatic . . . . . . . . . . . . . . . . . . . . . . . . . . . . . . . . . . . . . . . . . . . . . . . . . . . . . . . . . . . . . . . . . . . .
Important Notes on the Use of the Duomatic . . . . . . . . . . . . . . . . . . . . . . . . . . . . . . . . . . . . . . . . . . . . . . . . . . . . . . . . .
Changing the Gas Bottle on the Duomatic . . . . . . . . . . . . . . . . . . . . . . . . . . . . . . . . . . . . . . . . . . . . . . . . . . . . . . . . . . .
Duomatic Remote Display . . . . . . . . . . . . . . . . . . . . . . . . . . . . . . . . . . . . . . . . . . . . . . . . . . . . . . . . . . . . . . . . . . . . . . .
Using the Duomatic in Summer . . . . . . . . . . . . . . . . . . . . . . . . . . . . . . . . . . . . . . . . . . . . . . . . . . . . . . . . . . . . . . . . . . .
Using the Duomatic in Winter . . . . . . . . . . . . . . . . . . . . . . . . . . . . . . . . . . . . . . . . . . . . . . . . . . . . . . . . . . . . . . . . . . . .
8-6
8-6
8-6
8-7
8-8
8-8
8-8
9.
9.1
9.2
9.2.1
9.3
9.3.1
Water Supply . . . . . . . . . . . . . . . . . . . . . . . . . . . . . . . . . . . . . . . . . . . . . . . . . . . . . . . . . . . . . . . . . . . . . . . . . . . . . . . . .
Fresh Water Supply . . . . . . . . . . . . . . . . . . . . . . . . . . . . . . . . . . . . . . . . . . . . . . . . . . . . . . . . . . . . . . . . . . . . . . . . . . . .
Wastewater Disposal . . . . . . . . . . . . . . . . . . . . . . . . . . . . . . . . . . . . . . . . . . . . . . . . . . . . . . . . . . . . . . . . . . . . . . . . . . .
Emptying the Wastewater Tank . . . . . . . . . . . . . . . . . . . . . . . . . . . . . . . . . . . . . . . . . . . . . . . . . . . . . . . . . . . . . . . . . . .
Emptying the Water System . . . . . . . . . . . . . . . . . . . . . . . . . . . . . . . . . . . . . . . . . . . . . . . . . . . . . . . . . . . . . . . . . . . . .
Emptying the Fresh Water Tank . . . . . . . . . . . . . . . . . . . . . . . . . . . . . . . . . . . . . . . . . . . . . . . . . . . . . . . . . . . . . . . . . . .
9-1
9-1
9-1
9-1
9-2
9-2
10.
10.1
10.2
10.3
10.4
10.5
10.6
10.7
10.7.1
10.7.2
10.7.3
10.8
10.9
Power Supply . . . . . . . . . . . . . . . . . . . . . . . . . . . . . . . . . . . . . . . . . . . . . . . . . . . . . . . . . . . . . . . . . . . . . . . . . . . . . . . . .
Power Supply 230 VAC (Mains) . . . . . . . . . . . . . . . . . . . . . . . . . . . . . . . . . . . . . . . . . . . . . . . . . . . . . . . . . . . . . . . . . .
Making Electrical Connection Between Mobile Home and Power Point . . . . . . . . . . . . . . . . . . . . . . . . . . . . . . . . . . . .
12-VDC Power Supply in the Living Area . . . . . . . . . . . . . . . . . . . . . . . . . . . . . . . . . . . . . . . . . . . . . . . . . . . . . . . . . . .
Onboard Control . . . . . . . . . . . . . . . . . . . . . . . . . . . . . . . . . . . . . . . . . . . . . . . . . . . . . . . . . . . . . . . . . . . . . . . . . . . . . .
Protection of the Electrical Circuits in the Mobile Home . . . . . . . . . . . . . . . . . . . . . . . . . . . . . . . . . . . . . . . . . . . . . . . .
Electrical Supply . . . . . . . . . . . . . . . . . . . . . . . . . . . . . . . . . . . . . . . . . . . . . . . . . . . . . . . . . . . . . . . . . . . . . . . . . . . . . .
12 VDC Supply from Backup Battery and Charger . . . . . . . . . . . . . . . . . . . . . . . . . . . . . . . . . . . . . . . . . . . . . . . . . . . .
Backup Battery . . . . . . . . . . . . . . . . . . . . . . . . . . . . . . . . . . . . . . . . . . . . . . . . . . . . . . . . . . . . . . . . . . . . . . . . . . . . . . .
Charger . . . . . . . . . . . . . . . . . . . . . . . . . . . . . . . . . . . . . . . . . . . . . . . . . . . . . . . . . . . . . . . . . . . . . . . . . . . . . . . . . . . . .
Example Showing How to Calculate Electricity Consumption (using 80 Ah battery) . . . . . . . . . . . . . . . . . . . . . . . . . .
Circuit Diagram Model 551 K . . . . . . . . . . . . . . . . . . . . . . . . . . . . . . . . . . . . . . . . . . . . . . . . . . . . . . . . . . . . . . . . . . . .
Circuit Diagram Model 551 MQ . . . . . . . . . . . . . . . . . . . . . . . . . . . . . . . . . . . . . . . . . . . . . . . . . . . . . . . . . . . . . . . . . .
10-1
10-1
10-1
10-2
10-3
10-4
10-5
10-5
10-5
10-6
10-7
10-8
10-9
11.
11.1
11.2
11.2.1
11.2.2
11.2.3
11.3
11.3.1
11.3.2
11.3.3
11.3.4
Heating & Hot Water . . . . . . . . . . . . . . . . . . . . . . . . . . . . . . . . . . . . . . . . . . . . . . . . . . . . . . . . . . . . . . . . . . . . . . . . . . .
General Notes on the Heater and Hot Water Heating . . . . . . . . . . . . . . . . . . . . . . . . . . . . . . . . . . . . . . . . . . . . . . . . . . .
Switching On the Trumatic E Heater . . . . . . . . . . . . . . . . . . . . . . . . . . . . . . . . . . . . . . . . . . . . . . . . . . . . . . . . . . . . . . .
Adjusting the Trumatic E Heater . . . . . . . . . . . . . . . . . . . . . . . . . . . . . . . . . . . . . . . . . . . . . . . . . . . . . . . . . . . . . . . . . .
Switching On the Trumatic E Ventilation . . . . . . . . . . . . . . . . . . . . . . . . . . . . . . . . . . . . . . . . . . . . . . . . . . . . . . . . . . . .
Switching Off the Trumatic E Heater . . . . . . . . . . . . . . . . . . . . . . . . . . . . . . . . . . . . . . . . . . . . . . . . . . . . . . . . . . . . . . .
Trumatic C Heater/Boiler . . . . . . . . . . . . . . . . . . . . . . . . . . . . . . . . . . . . . . . . . . . . . . . . . . . . . . . . . . . . . . . . . . . . . . .
Heating with Hot Water Requirement . . . . . . . . . . . . . . . . . . . . . . . . . . . . . . . . . . . . . . . . . . . . . . . . . . . . . . . . . . . . . .
Heating without Hot Water Requirement . . . . . . . . . . . . . . . . . . . . . . . . . . . . . . . . . . . . . . . . . . . . . . . . . . . . . . . . . . . .
Adjusting the Trumatic C Heater/Boiler . . . . . . . . . . . . . . . . . . . . . . . . . . . . . . . . . . . . . . . . . . . . . . . . . . . . . . . . . . . .
Switching Off the Trumatic C Heater/Boiler . . . . . . . . . . . . . . . . . . . . . . . . . . . . . . . . . . . . . . . . . . . . . . . . . . . . . . . . .
11-1
11-1
11-1
11-2
11-2
11-2
11-3
11-3
11-3
11-4
11-4
COSMOS
MJ 2004 • GB-08.2004
0-3
CONTENTS
11.3.5
11.3.6
11.3.7
Hot Water Supply Using the Trumatic C . . . . . . . . . . . . . . . . . . . . . . . . . . . . . . . . . . . . . . . . . . . . . . . . . . . . . . . . . . . .
Hot Water Heating . . . . . . . . . . . . . . . . . . . . . . . . . . . . . . . . . . . . . . . . . . . . . . . . . . . . . . . . . . . . . . . . . . . . . . . . . . . . .
Emptying the Hot Water Boiler . . . . . . . . . . . . . . . . . . . . . . . . . . . . . . . . . . . . . . . . . . . . . . . . . . . . . . . . . . . . . . . . . . .
11-5
11-5
11-7
12.
12.1
Cooking . . . . . . . . . . . . . . . . . . . . . . . . . . . . . . . . . . . . . . . . . . . . . . . . . . . . . . . . . . . . . . . . . . . . . . . . . . . . . . . . . . . . . .
Using the Gas Cooker . . . . . . . . . . . . . . . . . . . . . . . . . . . . . . . . . . . . . . . . . . . . . . . . . . . . . . . . . . . . . . . . . . . . . . . . . .
12-1
12-1
13.
13.1
13.2
13.3
13.4
13.5
13.6
13.7
Refrigerator . . . . . . . . . . . . . . . . . . . . . . . . . . . . . . . . . . . . . . . . . . . . . . . . . . . . . . . . . . . . . . . . . . . . . . . . . . . . . . . . . .
Refrigerator Control Panel . . . . . . . . . . . . . . . . . . . . . . . . . . . . . . . . . . . . . . . . . . . . . . . . . . . . . . . . . . . . . . . . . . . . . . .
Switching On the Refrigerator . . . . . . . . . . . . . . . . . . . . . . . . . . . . . . . . . . . . . . . . . . . . . . . . . . . . . . . . . . . . . . . . . . . .
Switching Off the Refrigerator . . . . . . . . . . . . . . . . . . . . . . . . . . . . . . . . . . . . . . . . . . . . . . . . . . . . . . . . . . . . . . . . . . .
Defrosting the Refrigerator . . . . . . . . . . . . . . . . . . . . . . . . . . . . . . . . . . . . . . . . . . . . . . . . . . . . . . . . . . . . . . . . . . . . . .
Storing Food . . . . . . . . . . . . . . . . . . . . . . . . . . . . . . . . . . . . . . . . . . . . . . . . . . . . . . . . . . . . . . . . . . . . . . . . . . . . . . . . .
Making Ice Cubes . . . . . . . . . . . . . . . . . . . . . . . . . . . . . . . . . . . . . . . . . . . . . . . . . . . . . . . . . . . . . . . . . . . . . . . . . . . . .
Door Lock . . . . . . . . . . . . . . . . . . . . . . . . . . . . . . . . . . . . . . . . . . . . . . . . . . . . . . . . . . . . . . . . . . . . . . . . . . . . . . . . . . .
13-1
13-1
13-1
13-2
13-2
13-3
13-3
13-3
14.
Air Conditioning . . . . . . . . . . . . . . . . . . . . . . . . . . . . . . . . . . . . . . . . . . . . . . . . . . . . . . . . . . . . . . . . . . . . . . . . . . . . . .
14-1
15.
15.1
Toilet . . . . . . . . . . . . . . . . . . . . . . . . . . . . . . . . . . . . . . . . . . . . . . . . . . . . . . . . . . . . . . . . . . . . . . . . . . . . . . . . . . . . . . . .
Thetford Unit. . . . . . . . . . . . . . . . . . . . . . . . . . . . . . . . . . . . . . . . . . . . . . . . . . . . . . . . . . . . . . . . . . . . . . . . . . . . . . . . .
15-1
15-1
16.
16.1
16.2
16.3
Winter Camping . . . . . . . . . . . . . . . . . . . . . . . . . . . . . . . . . . . . . . . . . . . . . . . . . . . . . . . . . . . . . . . . . . . . . . . . . . . . . .
General Notes on Winter Camping . . . . . . . . . . . . . . . . . . . . . . . . . . . . . . . . . . . . . . . . . . . . . . . . . . . . . . . . . . . . . . . .
Additional Notes on Winter Camping . . . . . . . . . . . . . . . . . . . . . . . . . . . . . . . . . . . . . . . . . . . . . . . . . . . . . . . . . . . . . .
Recommended Accessories for Winter Camping . . . . . . . . . . . . . . . . . . . . . . . . . . . . . . . . . . . . . . . . . . . . . . . . . . . . . .
16-1
16-1
16-1
16-2
17.
17.1
Laying-up . . . . . . . . . . . . . . . . . . . . . . . . . . . . . . . . . . . . . . . . . . . . . . . . . . . . . . . . . . . . . . . . . . . . . . . . . . . . . . . . . . . .
General Notes for Temporary Laying-up . . . . . . . . . . . . . . . . . . . . . . . . . . . . . . . . . . . . . . . . . . . . . . . . . . . . . . . . . . . .
17-1
17-1
18.
18.1
18.1.1
18.2
18.2.1
18.3
18.4
18.5
18.5.1
18.5.2
Cleaning & Care . . . . . . . . . . . . . . . . . . . . . . . . . . . . . . . . . . . . . . . . . . . . . . . . . . . . . . . . . . . . . . . . . . . . . . . . . . . . . .
Cleaning and Care of the Exterior of the Mobile Home . . . . . . . . . . . . . . . . . . . . . . . . . . . . . . . . . . . . . . . . . . . . . . . . .
Cleaning Plastic Parts on the Exterior of the Mobile Home . . . . . . . . . . . . . . . . . . . . . . . . . . . . . . . . . . . . . . . . . . . . . .
Care and Cleaning of the Inside of the Mobile Home . . . . . . . . . . . . . . . . . . . . . . . . . . . . . . . . . . . . . . . . . . . . . . . . . .
Cleaning Plastic Parts Inside the Mobile Home . . . . . . . . . . . . . . . . . . . . . . . . . . . . . . . . . . . . . . . . . . . . . . . . . . . . . . .
Cleaning Acrylic Glass Windows . . . . . . . . . . . . . . . . . . . . . . . . . . . . . . . . . . . . . . . . . . . . . . . . . . . . . . . . . . . . . . . . .
Care and Cleaning of the Roof Window . . . . . . . . . . . . . . . . . . . . . . . . . . . . . . . . . . . . . . . . . . . . . . . . . . . . . . . . . . . .
Care and Cleaning of the Sun Awning . . . . . . . . . . . . . . . . . . . . . . . . . . . . . . . . . . . . . . . . . . . . . . . . . . . . . . . . . . . . . .
Dealing with Mould on the Awning . . . . . . . . . . . . . . . . . . . . . . . . . . . . . . . . . . . . . . . . . . . . . . . . . . . . . . . . . . . . . . . .
Treatment of Stiff Zip Fasteners . . . . . . . . . . . . . . . . . . . . . . . . . . . . . . . . . . . . . . . . . . . . . . . . . . . . . . . . . . . . . . . . . . .
18-1
18-1
18-2
18-3
18-3
18-4
18-5
18-5
18-6
18-6
0-4
MJ 2004 • GB-08.2004
COSMOS
CONTENTS
19.
19.1
19.2
19.3
Maintenance & Inspection . . . . . . . . . . . . . . . . . . . . . . . . . . . . . . . . . . . . . . . . . . . . . . . . . . . . . . . . . . . . . . . . . . . . . .
Servicing . . . . . . . . . . . . . . . . . . . . . . . . . . . . . . . . . . . . . . . . . . . . . . . . . . . . . . . . . . . . . . . . . . . . . . . . . . . . . . . . . . . .
Intervals for Statutory Testing and Exhaust Gas Test . . . . . . . . . . . . . . . . . . . . . . . . . . . . . . . . . . . . . . . . . . . . . . . . . . .
Service Chart . . . . . . . . . . . . . . . . . . . . . . . . . . . . . . . . . . . . . . . . . . . . . . . . . . . . . . . . . . . . . . . . . . . . . . . . . . . . . . . . .
19-1
19-1
19-1
19-2
20.
Troubleshooting . . . . . . . . . . . . . . . . . . . . . . . . . . . . . . . . . . . . . . . . . . . . . . . . . . . . . . . . . . . . . . . . . . . . . . . . . . . . . . .
20-1
21.
21.1
21.1.1
21.1.2
21.2
21.2.1
21.2.2
21.2.2.1
21.2.2.2
21.2.2.3
21.2.3
21.2.3.1
21.2.3.2
21.2.4
21.3
Specifications . . . . . . . . . . . . . . . . . . . . . . . . . . . . . . . . . . . . . . . . . . . . . . . . . . . . . . . . . . . . . . . . . . . . . . . . . . . . . . . . .
Tyres . . . . . . . . . . . . . . . . . . . . . . . . . . . . . . . . . . . . . . . . . . . . . . . . . . . . . . . . . . . . . . . . . . . . . . . . . . . . . . . . . . . . . . .
General Notes on the Tyres . . . . . . . . . . . . . . . . . . . . . . . . . . . . . . . . . . . . . . . . . . . . . . . . . . . . . . . . . . . . . . . . . . . . . .
Tyre Pressure Table . . . . . . . . . . . . . . . . . . . . . . . . . . . . . . . . . . . . . . . . . . . . . . . . . . . . . . . . . . . . . . . . . . . . . . . . . . . .
Payload . . . . . . . . . . . . . . . . . . . . . . . . . . . . . . . . . . . . . . . . . . . . . . . . . . . . . . . . . . . . . . . . . . . . . . . . . . . . . . . . . . . . .
Weights for WEINSBERG Accessories . . . . . . . . . . . . . . . . . . . . . . . . . . . . . . . . . . . . . . . . . . . . . . . . . . . . . . . . . . . . .
Explanations on the Payload Calculation . . . . . . . . . . . . . . . . . . . . . . . . . . . . . . . . . . . . . . . . . . . . . . . . . . . . . . . . . . . .
Mass in Running Order . . . . . . . . . . . . . . . . . . . . . . . . . . . . . . . . . . . . . . . . . . . . . . . . . . . . . . . . . . . . . . . . . . . . . . . . .
Basic Equipment . . . . . . . . . . . . . . . . . . . . . . . . . . . . . . . . . . . . . . . . . . . . . . . . . . . . . . . . . . . . . . . . . . . . . . . . . . . . . .
Maximum Technically Permissible Laden Mass . . . . . . . . . . . . . . . . . . . . . . . . . . . . . . . . . . . . . . . . . . . . . . . . . . . . . .
Weights of the Payload . . . . . . . . . . . . . . . . . . . . . . . . . . . . . . . . . . . . . . . . . . . . . . . . . . . . . . . . . . . . . . . . . . . . . . . . .
Weights of the Accessories . . . . . . . . . . . . . . . . . . . . . . . . . . . . . . . . . . . . . . . . . . . . . . . . . . . . . . . . . . . . . . . . . . . . . .
Weights of the Personal Equipment . . . . . . . . . . . . . . . . . . . . . . . . . . . . . . . . . . . . . . . . . . . . . . . . . . . . . . . . . . . . . . . .
Formula for the Payload Calculation . . . . . . . . . . . . . . . . . . . . . . . . . . . . . . . . . . . . . . . . . . . . . . . . . . . . . . . . . . . . . . .
Specifications and Floor Plan with Heating Diagram . . . . . . . . . . . . . . . . . . . . . . . . . . . . . . . . . . . . . . . . . . . . . . . . . .
21-1
21-1
21-1
21-2
21-3
21-3
21-7
21-7
21-7
21-8
21-8
21-8
21-8
21-9
21-10
22.
22.1
22.2
22.3
Information & Tips . . . . . . . . . . . . . . . . . . . . . . . . . . . . . . . . . . . . . . . . . . . . . . . . . . . . . . . . . . . . . . . . . . . . . . . . . . . .
Statutory Tests . . . . . . . . . . . . . . . . . . . . . . . . . . . . . . . . . . . . . . . . . . . . . . . . . . . . . . . . . . . . . . . . . . . . . . . . . . . . . . . .
Accessories to be Carried on the Vehicle in Case of Emergency . . . . . . . . . . . . . . . . . . . . . . . . . . . . . . . . . . . . . . . . . .
Emergency Telephone Numbers . . . . . . . . . . . . . . . . . . . . . . . . . . . . . . . . . . . . . . . . . . . . . . . . . . . . . . . . . . . . . . . . . .
22-1
22-1
22-1
22-2
23.
23.1
Checklist . . . . . . . . . . . . . . . . . . . . . . . . . . . . . . . . . . . . . . . . . . . . . . . . . . . . . . . . . . . . . . . . . . . . . . . . . . . . . . . . . . . . .
Checklist for Personal Entries . . . . . . . . . . . . . . . . . . . . . . . . . . . . . . . . . . . . . . . . . . . . . . . . . . . . . . . . . . . . . . . . . . . .
23-1
23-2
24.
Index . . . . . . . . . . . . . . . . . . . . . . . . . . . . . . . . . . . . . . . . . . . . . . . . . . . . . . . . . . . . . . . . . . . . . . . . . . . . . . . . . . . . . . . .
24-1
COSMOS
MJ 2004 • GB-08.2004
0-5
SECTION 1
FOREWORD
FOREWORD
1.
Foreword
We wish you all the best for your WEINSBERG mobile home. Your »holiday home on wheels« has been designed and
manufactured to give you the maximum possible enjoyment.
Please read through this manual carefully before using the vehicle to ensure you get the very best out of your mobile home.
Take the time to be able to enjoy the excellent comfort and high technical standards of your WEINSBERG mobile home in a
manner that is as relaxed as possible.
Please pay particular attention to the safety information.
In addition to this manual you should also familiarise yourself with the separate manual for the base vehicle and the appliances fitted.
If your WEINSBERG mobile home is fitted with optional accessories, observe the accompanying special permits and the
related special instructions.
To request maintenance and repair work and if you have any special questions, please call your nearest WEINSBERG dealer.
The staff at your authorised dealership will be happy to advise and assist you on all matters relating to your WEINSBERG
product.
Only approved spare parts from the original manufacturer can ensure quality and a perfect fit.
We cannot fulfil our warranty obligations according to the terms of our warranty if maintenance work has been neglected or
carried out incorrectly.
Please send your completed warranty card to KNAUS TABBERT GROUP GMBH to activate the warranty.
This manual is only valid in so far as the mobile home corresponds to the specifications described within.
The mobile home specifications are particularly important
when making enquiries and ordering spare parts.
Model name:
Type designation:
WEINSBERG Year of manufacture:
Chassis number:
You will find these details on the nameplate behind the driver’s seat.
We wish you plenty of leisure time enjoyment with your new WEINSBERG mobile home.
The Management
COSMOS
MJ 2004 • GB-08.2004
1-1
SECTION 2
SAFETY INSTRUCTIONS
SAFETY INSTRUCTIONS
2.
Safety Instructions
WARNING:
Please note in particular that we cannot accept any liability for damage and
operating problems caused by ignoring this manual.
This section contains safety instructions that must be followed when operating the mobile home.
All safety regulations in this manual are specially marked with the following symbols:
WARNING:
This safety symbol appears when operating procedures must be observed in full to
prevent endangering people.
CAUTION:
This safety symbol appears when operating procedures must be observed in full to
prevent damage to property.
NOTE:
This safety symbol appears when the user must pay particular attention to technical
requirements.
The WARNING and CAUTION symbols are printed in front of the text to which they refer. The NOTE symbol is printed
after the text.
NOTE:
It is imperative that instructions marked in this way are observed!
COSMOS
MJ 2004 • GB-08.2004
2-1
SAFETY INSTRUCTIONS
2.1
Safety Devices
Particular attention should be paid to the safety devices fitted to your mobile home. These safety devices must be regularly
checked to ensure that they are working correctly. The mobile home must not be operated if the safety devices are malfunctioning or not working.
SAFETY ALWAYS COMES FIRST!
2.2
Safety Instructions for Road Travel
The mobile home must be officially registered.
The mobile home is designed for a maximum speed of 120 km/h.
A maximum speed of 130 km/h is shown in the vehicle registration document.
In Germany the admissible top speed for mobile homes is:
Urban areas:
to 3.5
over 3.5
tonnes total weight . . . . .
tonnes total weight . . . . .
50 km/h
50 km/h
Outside urban areas:
to 3.5
over 3.5
tonnes total weight . . . . .
tonnes total weight . . . . .
100 km/h
80 km/h
On motorways:
to 3.5
over 3.5
tonnes total weight
tonnes total weight
. . . . no speed limit
....
80 km/h
It is basically permitted to carry persons in the living area of the mobile home during the journey in accordance with
German traffic regulations. However, these persons are only allowed to occupy the seats designated for this purpose (see
section 3.1.1 »Seating Layout«, page 3-2). Persons facing forward while the vehicle is in motion must wear the three-point
seat belts provided. Persons facing the rear are not required to wear seat belts. The model 551 MQ is equipped with lap seat
belts and head rests.
Due to the vehicle height you need to be aware of the mobile home’s vulnerability to side winds during the journey.
Note the maximum technically permissible laden mass (see vehicle certificate, no. 15) and maximum technically permissible
axle loads (no. 16).
The mobile home payload is to be evenly distributed (see section 4.3ff »Payload«, page 4-2).
During the journey all seats must be turned to face the direction of travel and locked in place.
Prior to starting the journey, the sliding door on the mobile home is to be closed.
2-2
MJ 2004 • GB-08.2004
COSMOS
SAFETY INSTRUCTIONS
If accessories are fitted this will alter the dimensions, the total weight and the handling of the mobile home. Certain
accessories may have to be entered in the vehicle documents to comply with regulations.
Before starting a journey always check that the toilet, bath and cupboard doors, drawers and all flaps, windows and roof
lights are closed and that the refrigerator door latch is secure.
When parking the mobile home, pull the parking brake on as far as it will go.
Use wheel chocks if parking on a slope.
In winter clear the roof of ice and snow before driving off.
Never use snow chains on mobile homes fitted with aluminium wheels.
If the vehicle is transported (e.g. by train, lorry), the vehicle must be loaded in the direction of travel!
2.3
General Safety Instructions
Always ensure there is adequate ventilation when residing in the mobile home. Forced air vents in the roof lights must
never be obstructed (e.g. by winter mats) or sealed because of the risk of suffocation from increased CO (carbon monoxide)
levels in the air.
You must read the individual manuals for all installed systems (e.g. gas heater, gas cooker, refrigerator etc.) and the base
vehicle (engine, brakes etc.).
Note the headroom of the sliding door and the heights of the driver and passenger doors.
Close all doors and windows when leaving the vehicle.
Collect all operating fluids (e.g. lubricants, spent oil and detergents) in suitable containers and dispose of correctly.
Take care not to damage the outer skin of the mobile home!
It is imperative to avoid walking on the roof of the mobile home!
COSMOS
MJ 2004 • GB-08.2004
2-3
SAFETY INSTRUCTIONS
2.3.1
Fitting Rear Carrier Systems
CAUTION:
After fitting rear carrier systems always note the following:
that the load is attached and secured to the rear carrier according to instructions!
the admissible payload capacity of the rear carrier is not exceeded!
that the axle load distribution and the total weight of the mobile home will be altered!
that the handling and braking of the mobile home will be altered!
NOTE:
In Germany removable rear carrier systems need not be entered in the vehicle documents!
Only have rear carrier systems fitted by authorised workshops for safety reasons!
Your nearest WEINSBERG dealer will be glad to inform you about this.
2.4
Safety Instructions for the Gas System
NOTE:
The overall gas system is designed for an operating pressure of 30 millibar [mbar]!
Any installations or modifications to the gas system must be carried out by qualified specialists!
The LPG (liquefied petroleum gas) system is inspected by an engineer before it leaves the factory. The gas system must be
re-inspected every 2 years and following any modifications and repairs.
The regulators and flue pipes must also be checked regularly! Inspections must be recorded on the test certificate according
to DVGW Worksheet G 607.
Observe relevant national legislation outside Germany!
The operator is solely responsible for ensuring the checks are carried out!
Gas bottles must be kept in the gas locker where they must be held upright and secured to prevent them from spinning
round!
2-4
MJ 2004 • GB-08.2004
COSMOS
SAFETY INSTRUCTIONS
The gas locker must be hermetically sealed from the interior of the mobile home and there must be a ventilation opening at
or immediately above the floor of at least 100 cm2. This must never be covered!
Only use pressure regulators with a safety valve!
Other regulators are not permitted!
Connect the pressure regulator to the gas bottle carefully by hand (do not use spanners, pliers or similar!)
Use a de-icing system for the pressure regulator for temperatures below 5 °C (e.g. Eis-Ex).
WARNING:
Failure to observe these instructions will result in a potentially lethal
situation due to lack of oxygen and the possible production of
odourless and poisonous carbon monoxide (CO)!
When using the gas cooker you must open a roof light, a window or the entry door!
The mobile home must never be heated with radiant heaters and other appliances that take their combustion air from the
interior of the vehicle!
When switching on gas appliances which are ignited by pressing a button, this must automatically return to its original
position after pressing!
Never seal the forced air vents in the roof light!
The flue pipe from the gas heater must be rising along its entire length and be fastened securely in place with clips and gas
flue pipe supports if necessary! The flue pipe must be properly connected and sealed to the gas heater and to the flue, and
must not be damaged in any way. Flue pipes from heaters must be made of stainless steel.
Before starting up the heater remove any dirt and snow from the flue and the combustion air inlets to prevent carbon
monoxide (CO) in the exhaust gas increasing to an inadmissible level!
Appliances which operate with gas must not be used while refuelling or in a garage!
Operate the gas system only with propane, butane or a mix of the two gas types!
Propane can gasify down to -32 °C, butane only down to 0 °C.
The gas bottle stop valve must be closed while travelling if no appliances are in use!
Always close the appliance gas tap when you have finished using a gas appliance!
If the mobile home is not to be used for a long period, close the gas bottle stop valve on the gas bottle!
Do not store electrical devices (e.g. batteries) and/or devices which form a source of ignition in the gas locker!
Electrical leads may only be fed through the gas locker if insulated. Do not fasten with clips!
COSMOS
MJ 2004 • GB-08.2004
2-5
SAFETY INSTRUCTIONS
WARNING:
If you suspect a gas leak, proceed immediately as follows:
Close gas bottle stop valve!
Avoid ignition sources of any sort incl. naked flames or smoking!
Provide ventilation through the room!
Clear the danger area!
Inform the campsite superintendent and the fire service if
necessary!
NOTE:
The gas system must be started again by a gas engineer after being checked.
2.5
Fire Safety
2.5.1
Prevention of Fire Hazards
All repairs and modifications to the electrical or LPG systems and equipment must be carried out by trained personnel!
Never leave children unattended in the mobile home!
Keep flammable materials away from heating and cooking appliances!
Never use portable heating or cooking appliances!
2.5.2
Fire Fighting
You must always carry a 1-kg dry powder fire extinguisher in the mobile home!
This extinguisher must be approved, tested and kept within easy reach!
The fire extinguisher must be checked regularly by approved trained personnel (make a note of the inspection date)!
2-6
MJ 2004 • GB-08.2004
COSMOS
SAFETY INSTRUCTIONS
2.5.3
In Case of Fire
Evacuate all vehicle occupants!
Switch off the electrical power supply and disconnect from the mains!
Immediately close gas bottle stop valve!
Sound the alarm and call the fire service!
Try to put out the fire if this is possible without risk!
Be aware of the location and use of emergency exits!
Keep emergency exits clear!
Follow the instructions for use of the fire extinguisher!
2.6
Important Notes for the Sanitary Area
CAUTION:
The wet cubicle is only allowed to be used for showering in conjunction with a
shower curtain or a shower door!
The toilet cubicle is only allowed to the cleaned with a damp cloth!
2.7
Environmental Notes
Collect all operating fluids (e.g. lubricants, spent oil and detergents) in suitable containers and dispose of correctly!
Never dispose of wastewater of any kind or domestic refuse in the gutter or in the countryside.
Always empty the wastewater tank and the Thetford unit at disposal facilities on the campsite or at specially designated
disposal facilities. Observe town and district regulations and ask about disposal facilities.
Use an environmentally friendly and biologically degradable WC chemical in small doses.
Separate domestic refuse into glass, metal tins, plastic and wet refuse.
COSMOS
MJ 2004 • GB-08.2004
2-7
SAFETY INSTRUCTIONS
Never dispose of domestic refuse in waste bins in car parks. Ask about disposal facilities in towns and districts.
If residing for a long period in a town or district, look for a specially designated parking place for mobile homes. Ask about
parking facilities in towns or districts.
Turn off the vehicle engine when parked. The engine operating temperature is reached most effectively by driving fast.
2.8
Supplementary Notes
Read the following brochures from the ADAC which form supplementary information to this handbook:
»Freies Campen und Übernachten in Europa«
»Verkehrsbestimmungen für Gespanne und Wohnmobile in Europa«
»Besondere Verkehrsbestimmungen für Campingfahrzeuge in Deutschland«
2-8
MJ 2004 • GB-08.2004
COSMOS
SECTION 3
DESCRIPTION
DESCRIPTION
3.
Description
3.1
General Construction and Equipment of the Mobile Home
● The WEINSBERG mobile home is based on the FIAT DUCATO Transporter. You can find further information about the
base vehicle in the separate FIAT manual.
● The high quality furnishings are manufactured entirely from upholstered plywood. A very special technique is used to
bend curved furniture. Furniture sections are made with multiple-bonded, upholstered plywood. This type of finish ensures
that furniture surfaces are simple and easy to keep clean.
Certain items of furniture are also made using a combination of plywood and solid wood.
● Particular attention is also paid to the securing of the furniture in all WEINSBERG mobile homes. To enable the absorption
of correspondingly large forces, multi-laminated plywood strips are fastened to the sidewalls at certain places. Because
these attachment points are incorporated during actual manufacture of the sidewalls they ensure a high level of strength.
● All cupboard and locker doors are fitted with high-quality locks to prevent unwanted opening.
All door fittings used in the mobile home have been chosen with great care. Here again, only the very best quality is used.
● The interior of the mobile home features – depending on the model – a permanently installed rear bed and one or more seat
modules which can be easily converted into sleeping berths. Spacious storage lockers are provided around the interior of
the vehicle above the rear bed, the seating modules and the kitchen range. There are no storage lockers above the alcove
bed.
● The kitchen range is fitted with a cooker, a sink and a refrigerator. The kitchen range also provides comprehensive surfaces
and storage facilities.
● There is lighting above the kitchen range in the model 551 MQ.
● The mobile home is fitted as standard with a high-powered heater and a hot air blower and a hot water supply. Each mobile
home also has an integral wet cubicle (toilet, bath and washroom).
● A fresh water tank and wastewater tank is fitted on all Cosmos models; these are also insulated from below with an
insulating shell. Using a dedicated flow of hot air from the heating, these are frost-proof even at very low outside temperatures.
COSMOS
MJ 2004 • GB-08.2004
3-1
DESCRIPTION
3.1.1
Seating Layout
All forward facing seats which are approved for use by persons during the journey are provided with 3-point seat belts and
head restraints.
All the seats facing away from the direction of travel, which are permitted for carrying passengers during a journey, are fitted
with lap seat belts and head rests.
The seating layout of the different models are shown in the floor plans in section »19. Specifications« from page 21-11.
3-2
MJ 2004 • GB-08.2004
COSMOS
SECTION 4
BEFORE THE JOURNEY
BEFORE THE JOURNEY
4.
Before the Journey
4.1
Before the First Journey
WARNING:
Read all safety instructions carefully before using the mobile home!
CAUTION:
The first time you use the vehicle, check that the wheel nuts are still tight after
approx. 50 km and if necessary retighten to a tightening torque of around 150
Nm!
After that, check wheel nuts for tightness at regular intervals!
4.2
Registering the Mobile Home
NOTE:
Never drive the vehicle without a number plate or insurance cover!
Mobile homes are vehicles in the sense of German traffic regulations. Mobile homes must be officially registered before they
are driven on public roads.
Nationality identification is required if travelling abroad »
« . This symbol must be fitted above the right-hand rear lamp.
Mobile homes may not be operated without valid insurance.
Contact your nearest WEINSBERG dealer about the individual formalities required.
COSMOS
MJ 2004 • GB-08.2004
4-1
BEFORE THE JOURNEY
4.3
Payload
CAUTION:
Do not allow payloads to cause the vehicle to exceed the maximum technically
permissible laden mass as entered in the vehicle documents!
Do not allow payloads to cause the vehicle to exceed the maximum technically
permissible laden mass or the maximum technically permissible axle loads!
There is a danger of tyres puncturing if the maximum technically permissible
laden mass is exceeded and the tyre pressure is too low. The mobile home could
veer out of control!
Installing accessories, optional extras and carrying tank contents and gas bottles
and personal equipment reduce the admissible extra payload!
In order not to detrimentally affect the handling of your mobile home, take care when loading that the centre of gravity of the
payload is directly above the vehicle floor or as close to the vehicle floor as possible.
NOTE:
The vehicle document gives only the maximum technically permissible laden mass,
not the inherent mass of the mobile home. We therefore recommend that you have
the vehicle weighed on a public weighbridge before commencing your journey.
4.3.1
Loading the Mobile Home
Ensure that the payload is distributed evenly between the left and right-hand sides of the vehicle.
Secure heavy items (e.g. crockery, cutlery, jars etc.) on the floor or on low storage surfaces whose doors do not open in the
direction of travel, and ensure they cannot slide about!
Place lighter objects (e.g. clothes etc.) in the upper storage areas!
The cycle rack EuroCarry GHT (optional accessory) is only allowed to be loaded with bicycles. The maximum load on the
cycle carrier is 50 kg.
It is imperative to avoid walking on the roof of the mobile home!
The roof bars (optional accessory) may be used to carry only roof loads, e.g. surfboard, rubber dinghies or light canoes!
4-2
MJ 2004 • GB-08.2004
COSMOS
BEFORE THE JOURNEY
Always note the increased total height of the mobile home when the roof bars are loaded!
Roof loads must be tied down securely, do not use bungees!
When calculating the payload, the sections from page 21-7 are to be observed!
4.4
Checking the Mobile Home Before Starting the Journey
We suggest that you check your mobile home against the following checklist before you set off:
Comments:
Date:
1:
Do you have all vehicle papers – including the green card – onboard, and do all passengers have their travel documents (passport, identity card, child's identity card, etc.)? Check validity of travel documents in good time!
2:
Do you have all necessary documents (heath related documentation and vaccination certificate) for any pets carried? Information on the
necessary documents can be obtained from the related consulate, from the tourist office or from an automobile club.
3:
Is the gas test certificate still valid (see gas test sticker)? Check validity in good time!
4:
Do you have a complete set of spare keys (store separately!) for the mobile home and any alarm?
5:
Have all the necessary servicing work and inspections been performed on the mobile home at the correct intervals?
6:
Are you sure that the maximum technically permissible laden mass has not been exceeded (see Specifications, page 21-10 and 21-12)?
7:
Has your mobile home been correctly loaded (see section 4.3, page 4-2)?
8:
Are all doors, flaps, gas locker, windows, roof lights and REMI – except forced air vents – correctly closed?
9:
Have the suspended light(s) been taken down and safely stowed?
10:
Are all tables placed in the sleeping position (see page 7-10 and 7-11)?
11:
Are you sure that all containers with liquids - including those in the refrigerator – cannot tip over?
12:
Are the gas bottles securely fastened with fastening straps in the gas locker, are the gas bottle stop valve and all gas taps closed?
13:
Is the payload securely fastened against sliding?
14:
Have all the tyre pressures (including the spare tyre) on the mobile home been checked as per the Tyre Pressure Table, page 21-2?
15:
Are first-aid kit (check for completeness!) and hazard warning triangle stowed where they are in easy reach?
16:
Do you have a correctly pumped up spare wheel, the corresponding tools and a suitable vehicle jack for the maximum technically
permissible laden mass in case you need to change a wheel?
17:
Do all lights work on the mobile home (test!)?
COSMOS
MJ 2004 • GB-08.2004
4-3
BEFORE THE JOURNEY
CAUTION:
After a few kilometres stop and check once again that the payload inside the mobile home is securely tied down and cannot slip.
NOTE:
At the end of this manual you will find a another copy of the checklist and, along
with ticking off the individual check points, you can enter and tick off important
personal check points. We suggest that you make copies of these pages so you will
always have a blank checklist ready to hand before you set out on a journey.
4.5
Brakes
WARNING:
Any defects in the brake system must be immediately repaired by an authorised
garage.
Ensure that the mobile home’s brake system is operating correctly before commencing any journey.
To do this, proceed as follows:
씰 Test the brakes while driving at moderate speed and ensure that…
the vehicle’s brake system is working,
the wheels brake evenly,
the vehicle does not ‘pull’ to one side.
4-4
MJ 2004 • GB-08.2004
COSMOS
BEFORE THE JOURNEY
4.6
Tyre Pressure
WARNING:
When the mobile home is fully laden, tyres may burst if not inflated to the correct
pressure. You may lose control of the vehicle as a result!
씰 Check tyre pressures before commencing your journey and adjust as necessary. Don’t forget to check the pressure in the
spare wheel as well.
Follow the instructions given in section 20.1 »Tyres« page 21-1.
The correct tyre pressure is given in the »Tyre Pressure Table« in section 21.1.2, page 21-2.
4.7
Adjusting the Vehicle Seats
WARNING:
The vehicle seats are only to be adjusted when the vehicle is stationary!
CAUTION:
When putting on the seat belt it is to be ensured that the seat belt passes inside the
armrest!
WARNING:
Before starting the journey, ensure that both vehicle seats are pointing in the
direction of travel and that the rotary unit is correctly locked!
COSMOS
MJ 2004 • GB-08.2004
4-5
BEFORE THE JOURNEY
4.7.1
Base Vehicle Seats
Please see the separate manual from the manufacturer for information on the adjustment of the vehicle seats integrated in the
base vehicle.
4.7.2
»Aguti MILAN« Vehicle Seat
4.7.2.1
Forward-Back Adjustment
씰 To adjust the vehicle seat forward-backward, pull up the
unlocking lever (1) and at the same time move the seat to the
required position.
The seat rail automatically locks in the required position when
the unlocking lever is released.
4
4.7.2.2
Rotary Unit
3
2
WARNING:
Before starting the journey,
ensure that both vehicle seats are
pointing in the direction of travel
and that the rotary unit is
correctly locked!
1
»Aguti MILAN« Vehicle Seat Adjustments
씰 To rotate the vehicle seat, push down the unlocking lever (2) and at the same time rotate the seat to the required position.
The seat locks automatically when rotated back to the direction of travel.
4.7.2.3
Backrest Adjustment
씰 To adjust the backrest tilt, turn the handwheel (3) to the front or the back to adjust the backrest to the front or the back.
4.7.2.4
Armrest Adjustment
씰 To swivel up the armrest, simply fold up the armrest with light pressure.
4-6
MJ 2004 • GB-08.2004
COSMOS
BEFORE THE JOURNEY
씰 For fine adjustment of the height of the armrest, turn the rotary knob upward (item 4, page 4-6) if the adjustment is to be
corrected upward, or similarly turn downward if the adjustment is to be corrected downward. To make the handwheel
easier to move, the armrest should be lifted slightly.
4.8
Vehicle Lights
Before commencing any journey it is advisable to check all lights on the inside and outside of the vehicle to ensure that they
work properly; replace any bulbs that are defective. You should familiarise yourself with the procedure for changing the
various bulbs before commencing your journey.
We also recommend that you carry a complete set of spare bulbs so that defective bulbs can be immediately replaced ‘on site’
if necessary.
4.9
Obtaining a Replacement Key
Should you ever need to obtain replacement keys for your mobile home then you should have the following information
available:
Keys for:
Information required:
Obtainable from:
FIAT base vehicle
Code no. or code card, second key or chassis number
FIAT Dealer
WEINSBERG Body
Serial no., chassis number, second key or key number
WEINSBERG Service Centre
COSMOS
MJ 2004 • GB-08.2004
4-7
SECTION 5
DURING THE JOURNEY
DURING THE JOURNEY
5.
During the Journey
5.1
Driving the Mobile Home
WARNING:
It is basically permitted to carry persons in the living area of the mobile home
during the journey in accordance with German traffic regulations. However
these persons may only use the seats designated for this purpose.
Persons sitting in the living area of the mobile home and facing forward, and
the driver and front passenger, must wear their 3-point seat belts during the
journey!
Persons sitting in the living area and facing the rear are not required to wear
their seat belts but they are strongly advised to do so!
The mobile home is designed for a maximum speed of 120 km/h. A maximum
speed of 130 km/h is shown in the vehicle registration document. You will find
information on the admissible top speeds for mobile homes in Germany on page
2-2 in this manual.
Always drive attentively and with consideration for other road users. The basic mobile home vehicle is classed as a commercial
vehicle (small truck). You should therefore drive the mobile home in the same way as you would a light commercial vehicle.
CAUTION:
When driving into courtyards, tunnels etc. as well as when manoeuvring, it is
important that you correctly judge the height, width and length of the mobile home!
You will find information on the dimensions of the mobile home on pages 21-10
and 21-12.
Follow these useful hints when driving your mobile home:
Never drive faster downhill than you would uphill.
You may experience a ‘pull’ on the mobile home due to air turbulence when overtaking long vehicles. You can counteract
this effect by gently steering in the opposite direction.
Due to the vehicle height you need to be aware of the mobile home’s vulnerability to side winds during the journey.
Do not underestimate the length of your mobile home.
Remember to change gear in good time.
COSMOS
MJ 2004 • GB-08.2004
5-1
DURING THE JOURNEY
Avoid sudden steering movements. Should the vehicle ever start to skid, take your foot off the brake pedal and gently steer
it back into the correct direction of travel.
NOTE:
Never attempt to regain control of your vehicle by sudden braking - it is easier to
manoeuvre the vehicle without its brakes on!
5.2
Refuelling the Mobile Home
CAUTION:
Your mobile home runs on diesel fuel only!
WARNING:
When refuelling, make sure that all gas-fired appliances in the
living area of the mobile home are turned off!
Fire, naked flame and smoking are strictly forbidden!
Explosion hazard!
You should also observe any local regulations governing the use
of pumps at filling stations.
You will find further information about refuelling the mobile home in the separate FIAT manual.
5-2
MJ 2004 • GB-08.2004
COSMOS
DURING THE JOURNEY
5.3
Changing a Wheel
The spare wheel is located under the mobile home behind the rear axle. You will find the toolkit and jack beneath the front
passenger seat.
WARNING:
You should only change a wheel on firm, level ground and well away from moving
traffic.
Other road users must be made aware of your vehicle according to the national
regulations which apply in the country you are visiting, e.g. by using the hazard
warning triangle.
Never lie under the mobile home when it is jacked up!
The jack is provided for wheel changing only. It must never be used for carrying
out work under the mobile home.
You will find further information about wheel changing in the separate FIAT manual.
COSMOS
MJ 2004 • GB-08.2004
5-3
SECTION 6
AFTER THE JOURNEY
AFTER THE JOURNEY
6.
After the Journey
6.1
Parking Brake
When parking the mobile home, apply the parking brake (handbrake) by pulling the lever to its final position (especially on
inclines).
6.2
Setting Up the Mobile Home
1. Apply the parking brake as far as it will go.
2. Level the mobile home front-to-back using a spirit level. Adjust by blocking up the wheels.
3. Use the spirit level to check that the mobile home is also level side-to-side. Adjust by blocking up the wheels.
6.3
Awning
The following points should be remembered when using the awning:
Do not place the awning on the weather side.
Do not over-tension the awning cover (tent fabric) - it should just be ‘straight’.
Do not touch the awning cover in rain.
Do not retract the awning unless it is thoroughly dry to avoid possible mould and staining (see sections 18.5, page 18-5)
Keep oil and grease away from the tent fabric.
Avoid water collecting on the awning.
Never wash the mobile home with the awning extended.
If you do not intend to use the awning for some time, it should be thoroughly cleaned (see sections 18.5, page 18-5) and the
mechanical parts lightly greased.
COSMOS
MJ 2004 • GB-08.2004
6-1
AFTER THE JOURNEY
To extend and retract the awning, proceed as follows:
CAUTION:
Support the awning on its integral awning support legs after extending to about 1
metre.
1. Set the awning handle to the required length and fit into the awning mechanism.
2. Extend the awning by about 1 metre by turning the handle anticlockwise.
3. Open out both awning support legs and adjust to the correct length.
4. Now extend the awning fully while moving the support legs so that they are always at the correct angle to the ground.
5. Reverse the process to retract the awning.
6-2
MJ 2004 • GB-08.2004
COSMOS
SECTION 7
LIVING
LIVING
7.
Living
7.1
Ventilating the Mobile Home
WARNING:
The integrated safety ventilation openings (forced ventilation in the
roof lights, mushroom vents) must not be obstructed under any
circumstances!
An increased level of carbon monoxide (CO) in the air can be fatal!
Providing adequate and correct ventilation for your mobile home is the best way of ensuring optimum conditions of living
comfort.
Your mobile home features draught-excluding safety ventilation openings (forced ventilation in the roof lights, ‘mushroom’
vents) which should not be obstructed under any circumstances.
Cooking and wet clothing releases water vapour. Every person releases up to 35 grams of water into the atmosphere each hour
just by breathing. This is why your mobile home must be ventilated with the windows and roof lights depending on the level of
humidity.
You will find more hints in section 16 »Winter Camping« page 16-1.
NOTE:
Condensation can form under the upholstery during the night. Cushions (expanded
foam) should be placed upright and aired to remove any moisture.
Condensation may also form inside the acrylic glass double-glazing units in extreme weather conditions. This process is quite
normal and can be explained as follows:
Acrylic glass - the material from which the windows are made - is an organic material and therefore porous, i.e. moisture and/
or gases can pass through it.
With a double acrylic glass panel, extreme weather can change the air conditions in the gap between the two sheets of glass
with the result that different conditions bring about a state of equilibrium.
Put simply, this means that the air between the two panes tries to match the conditions of the atmosphere surrounding it. If the
surrounding atmosphere is continually humid then the space between the two panes of glass also tends to become more humid.
This process can be reversed - in dry conditions the air in the gap also tends to become drier.
COSMOS
MJ 2004 • GB-04.2004
7-1
LIVING
Warm air can store a lot more moisture than cold air. This explains the sudden appearance of condensation - as the air temperature falls the moisture can no longer be held in suspension, i.e. solid particles like water which float in the air, and so it
precipitates out. The water now settles on the surface with the lowest temperature, which in this case is the inside surface of the
outer pane of acrylic glass.
As the temperature rises again the condensation evaporates and the glass demists.
7.2
Opening and Closing the Cab
Doors from the Outside
1. To open the door insert the key in the door lock and turn to
position �, the door lock is unlocked.
2. Withdraw key.
3. Turn door handle in the direction of the arrow.
4. To close the door insert the key in the door lock and turn to
position �, the door lock is locked.
5. Withdraw key.
1
2
Opening/Closing the Cab Doors from the Outside
7.3
Opening and Closing the Cab
Doors from the Inside
2
1. To open the door first pull the door lock button out to position
�, pull the door handle (detail below) in the direction of the
arrow and open door.
1
2. To close the door, pull firmly.
3. To lock the door press the door lock button to position �.
4. To unlock the door pull out the door lock button to position
�.
Opening/Closing the Cab Doors from the Inside
7-2
MJ 2004 • GB-08.2004
COSMOS
LIVING
7.4
Opening and Closing the Sliding
Door from the Outside
1. To open the door insert the key in the door lock and turn to
position �, the door lock is unlocked.
2. Withdraw key.
3. Turn door handle in the direction of the arrow.
4. To close the door insert the key in the door lock and turn to
position �, the door lock is locked.
5. Withdraw key.
1
2
Opening/Closing the Sliding Door from the Outside
7.5
Opening and Closing the Sliding
Door from the Inside
1
2
1. To open the sliding door first pull the door lock button to
position �, pull the door handle in the direction of the arrow
and open sliding door.
2. To close the sliding door, slide firmly.
3. To lock the sliding door press the door lock button to position
�.
4. To unlock the sliding door pull out the door lock button to
position �.
Opening/Closing the Sliding Door from the Inside
COSMOS
MJ 2004 • GB-08.2004
7-3
LIVING
7.6
Opening and Closing the First
Door of the Double Rear Doors
from the Outside
1. To open the rear door insert the key in the door lock and turn
to position �, the door lock is unlocked.
2. Withdraw key.
3. Turn door handle in the direction of the arrow.
4. To close the rear door insert the key in the door lock and turn
to position �, the door lock is locked.
5. Withdraw key.
1
2
1. Opening/Closing the First Door of the Double Rear Doors from the Outside
7.7
Opening and Closing the First
Door of the Double Rear Doors
from the Inside
2
1
1. To open the rear door first pull the door lock button out to
position �, pull the door handle (detail below) in the direction
of the arrow and open door.
2. To close the rear door, pull firmly.
3. To lock the door press the door lock button to position �.
4. To unlock the door pull out the door lock button to position
�.
Opening/Closing the First Door of the Double Rear Doors from the Inside
7-4
MJ 2004 • GB-08.2004
COSMOS
LIVING
7.8
Opening and Closing the Second
Door of the Double Rear Doors
from the Inside
1. To open the second door of the rear doors, turn the handle to
position �.
2
2. To close the second door of the rear doors, turn the handle to
position �.
1
Opening/Closing the Second Door of the Double Rear Doors from the Inside
7.9
Opening and Closing the Roof
Light
The roof light can be opened on one side.
1. To open the roof light, turn the knob clockwise (»Open«
position).
Closed
Open
To open the roof light fully, the knob must be turned several
turns.
2. To close the roof light, turn the knob anticlockwise (»Close«
position).
Opening/Closing the Roof Light
COSMOS
MJ 2004 • GB-08.2004
7-5
LIVING
7.10
Opening/Closing the Quarter Vent
2
The quarter vents on the mobile home are fitted with an automatic
catch mechanism, i.e. the quarter vent automatically engages in
the desired position when opened.
Closed
1. To open the quarter vent, turn the locking lever (1) to the
»Open« position.
Open
2. Open the window to the desired position; the telescopic strut
(2) engages automatically.
1
3. To close the quarter vent, open the vent a little more until the
lock is released and then close the quarter vent.
Open
1
4. Turn locking lever (1) to »Closed« position.
Closed
Opening/Closing the Quarter Vent
7.11
REMItop II Roof Window (optional equipment)
CAUTION:
Do not open roof window in heavy wind, rain, hail, etc. or when the outdoor
temperature is below -20 °C!
Close and lock roof window before starting your journey! Open cover and
mosquito blind (normal position)!
Do not tread on the glass dome (acrylic glass)!
The glass dome should be closed fully and the blackout blinds opened before
commencing your journey and when laying up the mobile home for lengthy
periods of time!
Contact your local Service Centre if the roof window develops any problems!
Any snow, ice and other obstructions must be removed before opening the glass
dome.
Prior to opening the glass dome under trees, in garages or similar, ensure there
is enough clearance!
Hints on the cleaning and care of the roof window are given in section 18.4 page 18-5.
7-6
MJ 2004 • GB-08.2004
COSMOS
LIVING
The roof window is available as an optional extra. It makes the interior of the mobile home lighter, provides improved ventilation
and gives the living area a pleasant sense of space.
There is a cover on the inside of the roof window to act as a curtain and a mosquito blind. The cover and mosquito blind can be
used separately or together.
The bad weather position enables the glass dome to be opened approx. 15 mm in the rain so that no water can enter the interior,
and the wind cannot open the glass dome.
7.11.1
Opening and Closing the Glass Dome
CAUTION:
Prior to opening the glass dome, the opening area must be cleared!
To open the glass dome, proceed as follows:
1. Unlock both rotary locks by pressing the button and at the
same time rotating by 90 degrees.
2. Push glass dome fully upward at the rotary locks with both
hands until the legs engage �.
Push glass dome to the required position �.
To close/lock the glass dome, proceed as follows:
1. Close glass dome by pushing the rotary locks with both hands.
Then pull both rotary locks evenly down until the glass dome
is closed.
�
�
2. Lock both rotary locks by pressing the button and at the same
time rotating by 90 degrees.
Opening/Closing the Glass Dome
COSMOS
MJ 2004 • GB-08.2004
7-7
LIVING
7.11.2
Opening and Closing the Glass
Dome, Bad Weather Position
CAUTION:
Prior to opening the glass dome,
the opening area must be cleared!
To open the glass dome to the bad weather position, proceed as
follows:
�
�
1. Unlock both rotary locks by pressing the button and at the
same time rotating to the middle cut-out on the bracket bolted
to the frame �.
2. Glass dome is then opened by approx. 15 mm. In this way it is
not possible for the rain to enter and the wind cannot open the
glass dome �.
To close the glass dome, proceed as follows:
Opening/Closing the Glass Dome, Bad Weather Position
1. Unlock both rotary locks and pull down evenly until the glass
dome is closed.
2. Lock both rotary locks by pressing the button and at the same
time rotating by 90 degrees.
7.11.3
Extending the Cover
The roof window has an integrated cover.
To close the cover as a curtain proceed as follows:
1. Move cover to the required position using the handle or push
against the mosquito blind handle.
Extending the Cover
7-8
MJ 2004 • GB-08.2004
COSMOS
LIVING
7.11.4
Opening and
Mosquito Blind
Closing
the
The roof window has an integrated mosquito blind.
To close the mosquito blind, proceed as follows:
1. Push mosquito blind against the handle for the cover until the
two handles engage �.
To open the mosquito blind, proceed as follows:
Closing Mosquito Blind
CAUTION:
Do not allow the mosquito blind
to rewind quickly on its own, as it
may be damaged!
3
2
Mosquito Blind
Cover
1
1. Tilt handle on the mosquito blind � and move back �.
Mosquito Blind and Cover (schematic illustration)
COSMOS
MJ 2004 • GB-08.2004
7-9
LIVING
7.12
Sleeping
7.12.1
Preparing for Sleeping
The rear bed in model 551 MQ is ready for use immediately. The seating modules can also be converted to beds in just a few
simple operations.
WARNING:
On the model 551 K it is necessary
to lower the height-adjustable
table and secure it with the wing
bolt before starting your journey!
On the model 551 MQ the hookin table must be removed and
securely stowed in the cupboard
under the rear bed before starting
your journey!
The related warning label in the
visible area of the side window
near the seat module is always to
be observed!
Caution !
STOW THE TABLE UNDER
THE BED PRIOR TO
STARTING THE JOURNEY !
Warning
7.12.1.1 Converting the Seating Module
with Height-Adjustable Table to a
Bed (Model 551 K)
To move the height-adjustable table to the sleeping position,
proceed as follows:
1. Release the table by moving the handle in the direction shown
by the arrow, and lower the table as far as it will go.
The table feet will move like a parallelogram.
2. Pull the side seat cushions into the centre. Place the back
cushions into the spaces.
When raised, the table will automatically engage in its initial
position.
Converting the Height-Adjustable Table to a Bed
7-10
MJ 2004 • GB-08.2004
COSMOS
LIVING
7.12.1.2 Converting the Seating Module
with Hook-In Table to a Bed
(Model 551 MQ)
1
To move the hook-in table to the sleeping position, proceed as
follows:
1. Unhook the hook-in table from the top guide rail and hook it
into the lower guide rail.
2. Lift the table slightly, push the safety catch (Detail �) up and
swivel the lower section of the table leg until it catches (Detail �).
3. Release the safety catch.
4. Pull the side seat cushions into the centre. Place the back
cushions into the spaces.
5. Reverse the process to convert back to the seating module.
2
Converting the Hook-In Table to a Bed
COSMOS
MJ 2004 • GB-08.2004
7-11
SECTION 8
GAS SUPPLY
GAS SUPPLY
8.
Gas Supply
8.1
General Notes on the Gas Supply
NOTE:
The overall gas system is designed for an operating pressure of 30 millibar [mbar]!
WARNING:
Repairs and modifications to the gas system may only be carried
out by the authorised service centre!
It is essential to follow the safety instructions and safety
information when using the gas system or gas appliances!
Altering the gas system or appliances yourself is prohibited and
dangerous!
The customer may only connect the pressure regulator to the gas
bottle. All other work must be carried out by an authorised service
centre.
Never search for gas leaks with a cigarette lighter or other naked
flames!
The entire gas system has been designed according to the applicable regulations governing LPG appliances and fires in mobile
homes, and has been tested and certified by an engineer.
All fitted gas-fired appliances are ignition-protected, so if the flame goes out then the ignition safety system isolates the gas
supply automatically Despite this safety device you should always turn off the appropriate gas tap when any of the appliances
are not in use.
Should a fault ever occur, e.g. gas consumption is excessive or you smell gas, follow the safety information and have the fault
repaired by a service centre.
Get the service centre to certify the repair or modification to the gas system in the gas test certificate (yellow test certificate)
and always insist on a gas leak test being carried out.
NOTE:
The gas system should be checked every 2 years by a gas engineer. The caravan
keeper is responsible for testing the gas system!
COSMOS
MJ 2004 • GB-08.2004
8-1
GAS SUPPLY
8.2
LPG
The appliances can be operated with propane or butane or a mixture of these two LPG types. Retail stockists usually supply the
gas in 5 kg or 11 kg refillable or returnable bottles. These bottles must be kept in the gas locker. The gas locker should be kept
secure from unauthorised access at all times!
NOTE:
You should use pure propane for winter camping as butane will not gasify below
freezing point.
8.3
Placing Gas Bottles in the Gas Locker
CAUTION:
The gas locker flap can be opened and shut by pressing lightly!
씰 Place the gas bottles upright in the gas locker and secure them firmly with the straps provided. Fit the pressure regulator to
the gas bottle by hand (never use spanners, pliers etc.).
8.4
General Information on the Gas Consumption
The amount of gas you use will depend on how much you use the gas appliances:
The Trumatic (heater and hot water boiler) consumes between 170 and 500 g/h depending on the weather and the interior
temperature setting (heater) and amount of use (hot water boiler).
The refrigerator consumes about 300 g/h.
8-2
MJ 2004 • GB-08.2004
COSMOS
GAS SUPPLY
8.5
Gas Taps
8.5.1
Gas Taps for Cooker and Heater
On model 551 K the gas tap for the cooker »
« is underneath
the kitchen range in the cupboard.
The gas tap for the heater »
« is on the left underneath in the
bed module.
Closed
The illustration opposite shows both taps in the open position.
If one of the appliances is not in use it should be isolated from the
gas supply with the appropriate tap.
Opened
Cooker
Heater
Gas Taps for Cooker and Heater (model 551 K)
On model 551 MQ the valve block with a gas tap for the cooker
»
« and a gas tap for the heater » « is on the bottom left in
the cupboard under the bed.
The illustration opposite shows both taps in the closed position.
If one of the appliances is not in use it should be isolated from the
gas supply with the appropriate tap.
Closed
Heater
Cooker
Opened
Gas taps for Heater and Cooker (model 550 MQ)
COSMOS
MJ 2004 • GB-08.2004
8-3
GAS SUPPLY
8.6
Outside Gas Connector
To connect a gas barbeque or similar, the mobile home can be
equipped with an outside gas connector as an option.
This is on the outside of the mobile home.
The illustration opposite shows the tap on the outside gas
connector in the closed position.
Closed
30 mbar
Opened
Outside Gas Connector
WARNING:
No smoking or naked flame while connecting an external gas
appliance!
CAUTION:
The tap for the gas supply can only be turned when an appliance is actually
connected, otherwise the tap handle may be damaged!
1. To connect up a gas barbecue, fit the connecting piece into the outside gas connector (the release ring clicks home to
engage) and then open the gas tap.
2. To disconnect the gas barbecue, first close the gas tap, push the release ring back and withdraw the connecting piece.
8-4
MJ 2004 • GB-08.2004
COSMOS
GAS SUPPLY
8.7
Changing the Gas Bottle
WARNING:
The customer may only connect the pressure regulator to the gas
bottle. All other work must be carried out by an authorised service
centre.
Never use a lighted or other open source of light when changing
the gas bottle!
There is still some gas left even in an »empty« gas bottle. For this
reason exercise extreme caution when changing the gas bottle!
After changing the gas bottle, it is to be checked whether there
are any leaks!
CAUTION:
The gas regulator is only to be fitted and removed by hand. Do not use any tools
for this purpose!
When changing the gas bottle, it is to be ensured that the gas hose is in good
condition and is laid without any kinks!
To change an empty gas bottle proceed as follows:
1
1. Close gas bottle stop valve (1).
2. Unscrew gas regulator (2) from the gas bottle by hand (caution:
left-hand thread).
3. Undo fastening strap (3) and remove empty gas bottle from
the gas locker.
3
2
4. Place empty gas bottle in a suitable place, never leave empty
gas bottles unsecured in the gas locker.
5. Place full gas bottle in the mounting in the gas locker and
secure with fastening strap.
6. Screw gas regulator onto the gas bottle by hand (caution: lefthand thread).
Changing the Gas Bottle
7. Open gas bottle stop valve (1).
COSMOS
MJ 2004 • GB-08.2004
8-5
GAS SUPPLY
8.8
Duomatic L Plus (gas regulator set with automatic changeover and remote
display for the two-bottle system)
8.8.1
Instructions for the Duomatic
2
4
The gas pressure regulator set Duomatic L Plus
comprises a central regulator (A) and a changeover
regulator (B).
These provide an even gas pressure (30 or 50
mbar), independent of which of the two gas bottles
supplies the gas.
1
A
3
B
The indicators on the remote display fitted in the
vehicle interior provide information on whether
the gas bottles are ready to use.
Using a rotary knob on the changeover regulator
(1) you can define from which bottle gas is to be
drawn. If the rotary knob is in the red, gas is
predominantly drawn from the bottle with the
central regulator (A). The gas bottle with the
changeover regulator (B) is then used as a reserve
bottle. If, on the other hand, the rotary knob is in
the green, gas is predominantly drawn from the
bottle with the changeover regulator (B) and the
gas bottle with the central regulator (A) is used as
the reserve bottle.
1 Changeover regulator rotary knob
2 Pressure gauge
3 Gas bottle stop valve B
4 Gas bottle stop valve A
A Central regulator
B Changeover regulator
Configuration of the Duomatic L Plus
NOTE:
The rotary knob must always be turned to the stop.
The bottle defined for use by the rotary knob is always emptied first. The gas pressure regulator set then automatically
switches to the previously defined reserve bottle.
When the remote display is switched on, the related indicator A (item 5, page 8-8) or B (item 6, page 8-8) goes out and
indicates an empty gas bottle.
8.8.2
Important Notes on the Use of the Duomatic
Always place gas bottle – particularly 33 kg bottles – upright and secure against falling over!
8-6
MJ 2004 • GB-08.2004
COSMOS
GAS SUPPLY
The regulators are equipped with a combination fitting and are suitable for commercially available 3 kg, 5 kg, 11 kg and 33
kg gas bottles.
The regulators are always to be fitted such that the protective caps are on top (see figure page 8-6).
Do not kink or tightly bend gas hoses!
If the gas system is to be operated with only one gas bottle (e. g. in summer), the central regulator (item A, page 8-6) is to
be used. Turn the rotary knob (1) on the changeover regulator (B) to the red. Hang the unused changeover regulator on the
regulator bracket (above the gas pressure regulator set) to protect it from damage.
The pressure gauge (2) on the central regulator does not indicate the gas bottle contents, but the current gas pressure in the
bottle; this pressure is dependent on the ambient temperature.
Under normal operating conditions it is recommended, to ensure correct function of the system, to change the gas pressure
regulator at the latest 10 years from the date of manufacture.
8.8.3
Changing the Gas Bottle on the Duomatic
WARNING:
When changing the gas bottles, you must be aware that there is still
gas in an »empty« gas bottle. For this reason smoking and any form
of naked flame are forbidden!
The gas pressure regulator enables an empty gas bottle to be changed without interrupting the operation of the appliances, as
all the appliance continue to be supplied from the reserve bottle.
If one of the indicators A (item 5, page 8-8) or B (item 6, page 8-8) goes out, the related gas bottle is empty. Close gas bottle
stop valve on the empty bottle and unscrew regulator from the bottle.
After the empty gas bottle has been replaced, the rotary knob (item 1, page 8-6) should be turned by 180° to change the gas
source.
NOTE:
This step will result in the previous reserve bottle becoming the bottle that is used
and the new, full gas bottle is then the reserve bottle.
COSMOS
MJ 2004 • GB-08.2004
8-7
GAS SUPPLY
8.8.4
Duomatic Remote Display
If the mobile home is also fitted with a remote display, proceed as per section 8.8.4.1 and 8.8.4.2 to use the system.
8.8.4.1
Using the Duomatic in Summer
1. Move rocker switch down to the »
« position, the power
indicator (4) illuminates.
If the gas bottles are ready, the two light emitting diodes
indicate which of the two bottles is currently delivering gas:
5 Indicator A
6 Indicator B
=
=
4
3
2
gas bottle A
gas bottle B
5
2. To switch off place the rocker switch in the middle »
position, the power indicator (4) goes out.
8.8.4.2
Duomatic L Plus
1
«
6
A
Using the Duomatic in Winter
1. Move rocker switch up to the » « position, the power
indicator (4) illuminates.
In addition to the power indicator, the gas pressure regulators
(items A and B, page 8-6) are heated to ensure a good supply
of gas in winter.
If the gas bottles are ready, the two light emitting diodes
indicate which of the two bottles is currently delivering gas:
B
1
»On« (summer mode)
2
»Off«
3
»On and heating« (winter mode)
4
Operating indicator
5
Indicator A
6
Indicator B
Duomatic Remote Display
5 Indicator A
6 Indicator B
=
=
gas bottle A
gas bottle B
2. To switch off place the rocker switch in the middle »
« position, the power indicator (4) goes out.
You will find further information in the separate manual supplied by the manufacturer.
8-8
MJ 2004 • GB-08.2004
COSMOS
SECTION 9
WATER SUPPLY
WATER SUPPLY
9.
Water Supply
9.1
Fresh Water Supply
CAUTION:
The water pump may only be operated dry for a very short period!
All models have a fresh water tank with a capacity of 90 litres and a water pump that is supplied by the 12 V electrical system.
The fresh water tank is fitted in the seat base on both models.
The water pump is fitted in the fresh water tank and is placed in operation when water is drawn from the taps.
9.2
Wastewater Disposal
NOTE:
The wastewater should only be drained on sites with suitable sewage
systems or specially designated disposal facilities!
All models have a 80 litre wastewater tank in which the wastewater is collected. The wastewater tank is attached under the
floor.
A heater for the wastewater tank as well as pipe heater (for heating the wastewater pipe) is available as an option for both
models. In this way the wastewater tank is frost-proof even in low temperatures.
The wastewater is drained using the drain valve (ball valve) fitted to the wastewater tank.
9.2.1
Emptying the Wastewater Tank
To drain the wastewater tank, proceed as follows:
1. Place valve lever on the wastewater pipe under the vehicle in the »OPEN« position and drain of the wastewater at a suitable
disposal facility.
2. Now move the valve lever to the »CLOSED« position to close the wastewater drain again.
COSMOS
MJ 2004 • GB-08.2004
9-1
WATER SUPPLY
9.3
Emptying the Water System
The complete water system should be drained fully if it is not to be used for a time, especially before the mobile home is laid
up for the winter.
NOTE:
We recommend that you change the water in the fresh water tank
regularly (e.g. weekly) even when the tank is full, as bacteria form in
the fresh water after just a few days and will give the water an
unpleasant taste.
1. Drain wastewater tank as per section 9.2.1, page 9-1.
2. Drain fresh water tank as per section 9.3.1, page 9-2.
3. Drain hot water boiler as per section 11.3.7, page 11-7.
9.3.1
Emptying the Fresh Water Tank
To drain the fresh water tank, proceed as follows:
1. Remove the cleaning cover.
2. Remove the plug from the base of the tank.
3. Allow the fresh water tank to drain fully.
4. Screw the plug back into the drain hole and replace the cleaning cover.
5. Make sure that the water pump (item 10, page 10-4) is turned off at the Onboard Control; all water taps must be open!
9-2
MJ 2004 • GB-08.2004
COSMOS
SECTION 10
POWER SUPPLY
POWER SUPPLY
10.
Power Supply
CAUTION:
The electrical system must be checked over by a qualified service
centre at least once a year!
10.1
Power Supply 230 VAC (Mains)
You can connect your mobile home to an external power supply of 230 VAC (mains voltage). The 230-Volt power supply must
be protected with a residual current circuit breaker (RCCB) rated at 30 mA.
10.2
Making Electrical Connection Between Mobile Home and Power Point
CAUTION:
When using an extension reel without a thermal safety cut-out the electric cable
must be fully unwound from the drum.
The mobile home must be connected to the 230-Volt mains with rubber insulated flexible cable » HO7 RN-F 3G 2.5 mm2 «
or equivalent fitted with connectors complying with » IEC 309 «. The electric cable should not be more than 25 m long in
total!
We recommend the following configuration to ensure that you
are equipped for all types of connection:
� Adapter cable 2.5 mm2
쑱 Connector with ‘scraping’ earth connection
쑱 Plug with ‘scraping’ earth connection
�
� Cable drum with rubber insulated flexible cable HO7 RNF 3G 2.5 mm2 or equivalent
쑱 Socket with ‘scraping’ earth connection
� Adapter cable 2.5 mm2
쑱 Socket with ‘scraping’ earth connection
쑱 Connector with ‘scraping’ earth connection
COSMOS
�
�
Making a Mains Connection
MJ 2004 • GB-08.2004
10-1
POWER SUPPLY
NOTE:
We also recommend that you carry an adapter set so that you can connect a plug
with ‘scraping’ earth connection on one side with the mains socket in the country
you are visiting on the other.
1. When running the cable to the power point, start from the mobile home and connect up to the power point last.
2. When disconnecting the electrical cable, remove the plug from the power point end and then reel the cable in.
When the mobile home is connected to the 230-Volt power supply, both the backup battery (battery 2) and the starter battery
(battery 1) are automatically re-charged via the charger.
All 12-Volt appliances are supplied from the backup battery.
10.3
12-VDC Power Supply in the Living Area
When the 230-Volt power supply is not connected or is switched off, the living area of the mobile home is supplied with 12VDC power from the backup battery (battery 2) whether the vehicle’s engine is running or not.
When the engine is running, the backup battery (battery 2) and the starter battery (battery 1) are both charged up by the
vehicle’s alternator.
The 12-Volt power supply can be switched on and off with the 12-VDC appliance main switch on the Onboard Control (item
9, page 10-3):
CAUTION:
Running the electrical appliances in the mobile home (especially the refrigerator
and the hot air blower as well as the optional equipment in the mobile home with
wastewater tank heater) from the backup battery for too long without a 230-Volt
supply and with the vehicle’s engine off will considerably affect the capacity of the
backup battery!
10-2
MJ 2004 • GB-08.2004
COSMOS
POWER SUPPLY
10.4
Onboard Control
The Onboard Control which is fitted as standard can be used to turn the electrical 12-Volt appliances wastewater heater (8) and
water pump (10) can be switched on and off either separately with their respective switches or together with the 12-VDC
appliance main switch (9).
The electrical appliances are each protected with fuses. The fuses are in the distribution box that on model 551 K is in the
kitchen cupboard and on model 551 MQ in the wardrobe.
Using the Onboard Control, both the charge state of the starter battery (2) and the charge state of the backup battery (1) as well
as the level in the fresh water tank (3) can be checked using the related buttons.
A full wastewater tank is indicated by a red LED (4).
The Onboard Control also incorporates a flat battery monitor. When the battery voltage falls to around 10.0 VDC, all the
appliances that can be switched on and off with the main switch are turned off.
These appliances can be turned on again for about 1 minute by operating the appliance main switch 12 VDC (9); these
appliances will then be turned off again automatically.
When the voltage is greater than 12 VDC, the appliances are automatically switched back on.
1
2
3
4 5
6
7
8
9
G
3/3
2/3
1/3
R
PC-100
11
10
Onboard-Control
COSMOS
MJ 2004 • GB-08.2004
10-3
POWER SUPPLY
Key:
1 »Backup battery charge state (2)« button
2 »Starter battery charge state (1)« button
3 »Fresh water level« LED array
4 »Wastewater tank full« LED
5 »Starter and backup battery charging by the alternator« indicator
6 »230-Volt mains connected« indicator
7 »Starter and backup battery voltage monitoring« LED voltmeter
8 »Wastewater tank heating element« switch (dependent on the appliance main switch)
9 »Appliance main switch« switch
10 »Water pump« (operates the pump relay) switch (dependent on the appliance main switch)
11 »Fresh water level« button
10.5
Protection of the Electrical
Circuits in the Mobile Home
When the mobile home is connected to an external 230-VAC
supply it is protected by a 13 Amp automatic circuit breaker (1).
The electrical appliances in the living area connected to the 12Volt power supply are protected by separate fuses in the
distribution box.
The fuse box is in the kitchen cupboard on model 551 K and in
the wardrobe on model 551 MQ.
1
230 VAC Automatic Circuit Breaker
10-4
MJ 2004 • GB-08.2004
COSMOS
POWER SUPPLY
10.6
Electrical Supply
The electrical supply to the appliances in the mobile home is divided up as follows:
Electrical Supply
230 VAC (mains connection)
12 VDC (backup battery)
➽ 230 Volt sockets
➽ Lights
➽ Charger
➽ Refrigerator
➽ Water pump
➽ Thetford toilet flush
➽ Heate
➽ 12 Volt sockets
➽ Wastewater tank heating/pipe heating (optional)
Electrical Supply
10.7
12 VDC Supply from Backup Battery and Charger
10.7.1
Backup Battery
WARNING:
Observe the separate instructions from the battery manufacturer!
The backup battery (battery 2) with the main appliance fuse is fitted under the passenger’s seat. This means that the mobile
home has its own 12-Volt power supply.
The charge state of the starter battery (battery 1) and the backup battery (battery 2) can be checked by pressing the corresponding
button (Starter battery charge state button item 2, page 10-3, Backup battery charge state button item 1, page 10-3) on the
Onboard Control.
It is advisable to charge the backup battery with the charger for at least 10 hours before use. Switch off all electrical appliances
while charging so as to achieve a rapid and optimum charge. Charging should be supervised. This can be done using the button
and the LED display on the Onboard Control. Before connecting up to the 230-Volt mains you should check the level of charge
in the backup battery by pressing the button (item 1, page 10-3) on the LED array.
COSMOS
MJ 2004 • GB-08.2004
10-5
POWER SUPPLY
Once you have connected up to the 230-Volt supply, press the button again and watch the LED display. The LED display
should now light up at the top around the »FULL« mark. If it does, this indicates that the charger is working correctly. If the
LED display does not change, this indicates that the charger is not charging. The reason must be identified, i.e., the switch on
the charger must be switched on (indicator on the switch illuminates).
NOTE:
A totally discharged battery that cannot be re-charged must be replaced because
this damage is irreparable.
Even when appliances are switched off, the backup battery is still required to
supply a small amount of current to electrical systems such as the frost protection
valve, the charger, the Onboard Control etc., so the level of charge in the backup
battery should always be checked to prevent it being damaged!
CAUTION:
On an extended period without use, the backup battery is to be fully charged
and then the battery terminal on the negative pole ( – ) is to be undone and
removed.
The fully charged battery should be disconnected and removed from the vehicle
in winter.
A complete discharge can damage the battery beyond repair.
The backup battery may only be charged with a suitable charger when out of
the vehicle!
The 12-Volt supply can be switched on and off with the 12-VDC appliance main switch on the Onboard Control (item 9, page
10-3). The electrical supply to the refrigerator and the Truma heater is however maintained.
10.7.2
Charger
The use of high-quality electronics means that the charger operates virtually without loss of power. The automatic charging
process charges the batteries gently and without harmful overloading, thereby considerably enhancing battery life.
The charger is protected against overtemperature, and the 12-Volt output is protected against short circuit.
You will find further information about the battery charger in the separate operating instructions from the manufacturer.
10-6
MJ 2004 • GB-08.2004
COSMOS
POWER SUPPLY
10.7.3
Example Showing How to Calculate Electricity Consumption (using 80 Ah
battery)
These values are »approximate figures« and depend on the related model.
Battery 80 Ah
Rating
Appliance
Summer
Power
Current
Hrs/say
Winter
(operating hours)
Power
per day
Current
per day
(operating hours)
Hrs/say
Power
per day
Current
per day
Spots, each
10 W
0,8 A
2,0
20 W
1,6 Ah
4,0
40 W
6,4 Ah
Kitchen light
8W
0,7 A
1,0
8W
0,7 Ah
2,0
16 W
1,4 Ah
Refrigerator
48 W
4,0 A
5,0
240 W
20 Ah
5,0
240 W
20 Ah
Light, toilet cubicle
8W
0,7 A
1,0
8W
0,7 Ah
1,5
12 W
1,05 Ah
Water pump
40 W
3,4 A
0,5
20 W
1,7 Ah
0,5
20 W
1,7 Ah
Heater/hot water boiler
72 W
6,0 A
3,0
216 W
18,0 Ah
16,0
1.152 W
96,0 Ah
Ceiling/locker light
8W
0,7 A
1,0
8W
0,7 Ah
2,0
16 W
1,4 Ah
TV
40 W
3,4 A
2,0
80 W
6,8 Ah
4,0
160 W
13,6 Ah
Total 씰
600 W
50,2 Ah
Total 씰
1.656 W
141,55 Ah
Power consumption
Approx. 1.5 day between charges
Approx. 0.5 day between charges
Example Showing How to Calculate Electricity Consumption (using 80 Ah battery)
COSMOS
MJ 2004 • GB-08.2004
10-7
MJ 2004 • GB-08.2004
14
15
16
17
18
19
20
21
22
23
24
25
26
Loudspeaker, right
SAT aerial
Earthed socket, cupboard
Supply lead, 12 VDC toilet cubicle light
Water pump
Truma heater E2400
Toilet cubicle tap
Thetford toilet
Fresh water tank indicators
Wastewater tank indicators
Truma heater E2400 control panel
12 VDC socket, cupboard
Truma boiler (optional extra)
Rear
Power plug
Wiring harness B1, D+, ground
Earth
Equipotential bonding - gas
Refrigerator 12 VDC
Water supply pipe
12 VDC socket, kitchen
Earthed socket, kitchen
Supply lead, rear spot
Roof connection 12 VDC left side
Supply lead, front ceiling light
Supply lead, rear ceiling light
Loudspeaker, left
10
10
19
18
12
17
Flöör
22
24
15
16
9
25
8
1
21
7
12
26
3
11
-
6
DS-300KN
CB-513
4
5
23
+
10-8
11
13
20
13
Right side
+
-
+
-
Left side
40 A
2
+
-
10.8
Radio
15 A
1
2
3
4
5
6
7
8
9
10
11
12
13
ELECTRICAL SUPPLY
Circuit Diagram Model 551 K
Engine compartment
Electrical Installation, Model 551 K
COSMOS
40 A
MJ 2004 • GB-08.2004
Rear
Loudspeaker, left
Loudspeaker, right
SAT aerial
Roof connection 12 VDC left side
Toilet cubicle tap
Trumatic
Trumatic control panel
Thetford toilet
Water pump
Supply lead, toilet cubicle light
Fresh water tank indicators
Wastewater tank indicators
Temperature remote sensor
11
17
24
18
24
20
5
10
Kocher
23
Floor
22
14
17
8
7
6
16
4
9
15
22
CB-513
Power plug
Wiring harness B1, D+, ground
Earth
Equipotential bonding - gas
Refrigerator 12 VDC
Water supply pipe
12 VDC socket, kitchen
Earthed socket, kitchen
Roof connection 12 VDC right side
Supply lead, rear spot
Connection, rear spot
3
1
+
15
13
12
Right side
+
-
+
-
Left side
40 A
COSMOS
Radio
15A
2
+
-
10.9
12
13
14
15
16
17
18
19
20
21
22
23
24
1
2
3
4
5
6
7
8
9
10
11
ELECTRICAL SUPPLY
Circuit Diagram Model 551 MQ
Engine compartment
Electrical Installation, 551 MQ
10-9
40A
DS-300KN
SECTION 11
HEATING & HOT WATER
HEATING & HOT WATER
11.
Heating & Hot Water
11.1
General Notes on the Heater and Hot Water Heating
On model 551 K the Trumatic E (optional Trumatic C) gas heater is used. The heater is operated and controlled using the
control panel with a rotary switch and is described from section 11.2.
On model 551 MQ the gas heater is integrated into the hot water boiler. The operation and control of the Trumatic C heater is
described in section 11.3 on page 11-3.
11.2
Switching On the Trumatic E Heater
WARNING:
The separate manual from the manufacturer is to be read prior to using the heater!
1. Remove chimney cover.
«.
8
2
1
4. Turn rotary switch (2) to the required power (4 / 5).
7
3
9
Further information on the operation of the heater can be found
in the separate manual from the manufacturer.
5
3. Place rotary knob (1) at the required thermostat setting 1-9,
green indicator (3) illuminates.
Trumatic E
7
2. Open the gas bottle stop valve and gas tap for the heater »
9
6
1
4
3
5
CAUTION:
Work on the electronic control
unit for the Trumatic may only be
carried out by a qualified and
trained service engineer.
If the green indicator (3) does not illuminate, check the (main)
switch. See separate manual from the vehicle manufacturer.
1 Rotary knob for room temperature, continuously adjustable
(illuminated by green »operating« LED)
2 Operating mode rotary switch
3 Green »operating »indicator«
4 Rotary switch position, small flame symbol »partial load«
5 Rotary switch position, large flame symbol »full load«
6 Rotary switch position, »Off«
7 Rotary switch position, small ventilation symbol »partial load«
8 Rotary switch position, large ventilation symbol »full load«
9 Red »Fault« indicator
Trumatic E Control Panel (Model 551 K)
COSMOS
MJ 2004 • GB-08.2004
11-1
HEATING & HOT WATER
Continuous illumination of the red indicator (item 9, page 11-1) indicates low gas, a shortage of air for combustion, a
heavily soiled fan impeller or a faulty fuse.
The fault is reset by turning the appliance off and then on again.
If the red indicator (item 9, page 11-1) flashes, the operating voltage supplied to the appliance is too high or too low (if
necessary recharge battery).
11.2.1
Adjusting the Trumatic E Heater
씰 Turn the rotary knob (item 1, page 11-1) to the desired room temperature - the integral thermostat will now automatically
maintain a constant temperature to your setting.
11.2.2
Switching On the Trumatic E Ventilation
씰 Set rotary switch (item 2, page 11-1) to the required power (item 7 / 8, page 11-1).
11.2.3
Switching Off the Trumatic E Heater
1. Set rotary switch (item 2, page 11-1) to the » « position (item 6, page 11-1).
2. Close the gas tap for the heater »
« and close the gas bottle stop valve if required.
3. Fit chimney cover.
Further information on the operation of the heater can be found in the separate manual from the manufacturer.
11-2
MJ 2004 • GB-08.2004
COSMOS
HEATING & HOT WATER
11.3
Trumatic C Heater/Boiler
11.3.1
Heating with
Requirement
Trumatic C
Water
2
60°
5
Hot
1
40°
3
7
8
9
9
WARNING:
1. Remove chimney cover.
2. Open the gas bottle stop valve and gas tap for the heater »
«.
3. Place rotary knob (1) at the required thermostat setting 1-9,
green indicator (3) illuminates and indicates the position for
the room temperature set.
7
1
5
3
The separate manual from the
manufacturer is to be read prior
to using the heater!
4
60°
6
1 Rotary knob for room temperature, continuously adjustable 1-9
(illuminated by green »operating« LED)
2 Operating mode rotary switch
3 Green »operating« indicator
4 Summer mode »On«
(Water temperature 40 °C or 60 °C)
5 Winter mode »On«
»Heating without hot water requirement
6 Winter mode »On«
»Heating with hot water requirement«
7 Rotary switch, »Off«
8 Yellow indicator »Boiler warm-up phase
(goes out when the pre-set water temperature is reached)
9 Red »Fault« indicator
4. Set rotary switch (2) in the operating position (6).
Trumatic C Control Panel (Model 551 MQ)
Further information on the operation of the heater can be found in the separate manual from the manufacturer.
CAUTION:
Work on the electronic control unit for the Trumatic may only be carried out by a
qualified and trained service engineer.
11.3.2
Heating without Hot Water Requirement
WARNING:
The separate manual from the manufacturer is to be read prior to using the heater!
1. Remove chimney cover.
COSMOS
MJ 2004 • GB-08.2004
11-3
HEATING & HOT WATER
2. Open the gas bottle stop valve and gas tap for the heater »
«.
3. Place rotary knob (1) at the required thermostat setting 1-9, green indicator (3) illuminates and indicates the position for
the room temperature set.
4. Set rotary switch (2) in the operating position (5).
Further information on the operation of the heater can be found in the separate manual from the manufacturer.
CAUTION:
Work on the electronic control unit for the Trumatic may only be carried out by a
qualified and trained service engineer.
If the green indicator does not light up (no. 3, page 11-3), replace the fuse in the electronic control unit or the fuse for the
battery monitor.
The green indicator (item 8, page 11-3) illuminates while the hot water boiler is heating up.
If the red indicator (item 9, page 11-3) is continuously illuminated, the gas bottle stop valve and/or the gas tap may be
closed or there may be an inadequate supply of air.
The fault is reset by turning the appliance off and then on again.
If the red indicator (item 9, page 11-3) flashes, the operating voltage supplied to the appliance is too low (recharge battery).
You will find further information in the separate manual supplied by the manufacturer.
11.3.3
Adjusting the Trumatic C Heater/Boiler
씰 Turn the rotary knob (item 1, page 11-3) to the desired room temperature - the integral thermostat will now automatically
maintain a constant temperature to your setting.
11.3.4
Switching Off the Trumatic C Heater/Boiler
1. Set rotary switch (item 2, page 11-3) to the » « position (item 7, page 11-3).
2. Close the gas tap for the heater »
« and close the gas bottle stop valve if required.
3. Fit chimney cover.
11-4
MJ 2004 • GB-08.2004
COSMOS
HEATING & HOT WATER
11.3.5
Hot Water Supply Using the Trumatic C
Model 551 MQ is equipped as standard (optional on model 551 K) with a supply of hot water (hot water boiler in the Trumatic).
The 12.5 litre hot water boiler provides hot water within a temperature range of 40 to 70 °C.
CAUTION:
The water pump must not be operated unless a supply of water is ensured!
The switch for the water pump (item 10, page 10-4) is on the Onboard Control. This switch is dependent on the position of the
appliance main switch (item 9, page 10-4).
NOTE:
Switch off the main switch for the water pump during long absences!
Hot Water Heating
Trumatic C
1. Fill fresh water tank.
Ensure that the drain valve in the fresh water tank is closed,
that the button on the safety/drain valve is in the »CLOSED«
position and that the water pump is turned on.
2
5
60°
1
7
11.3.6
40°
3
8
3. To operate the hot water boiler, first switch on the 12 VDC or
230 VAC power supply.
4. Connect a gas bottle and open the gas bottle stop valve on the
gas bottle. Open gas tap » « (on model 551 K at rear left in
the bed base, on module 551 MQ at rear left in the cupboard
under the bed).
5. Select the required mode, summer (4) or winter (5 / 6) with
the rotary switch (1) on the Trumatic control panel. Once one
of the two modes is switched on, a green indicator behind the
rotary knob (3) lights up.
9
3
9
2. Now open the hot water tap (water tap in the »hot« mixer
position) until the hot water boiler has filled, i.e. air has been
forced out of the hot water boiler and the water pipes, and
water is flowing.
4
7
1
5
60°
6
1 Rotary knob for room temperature, continuously adjustable 1-9
(illuminated by green »operating« LED)
2 Operating mode rotary switch
3 Green »operating« indicator
4 Summer mode »On«
(Water temperature 40 °C or 60 °C)
5 Winter mode »On«
»Heating without hot water requirement«
6 Winter mode »On«
»Heating with hot water requirement«
7 Rotary switch, »Off«
8 Yellow indicator »Boiler warm-up phase«
(goes out when the pre-set water temperature is reached)
9 Red »Fault« indicator
Trumatic Hot Water Heating Control Panel
COSMOS
MJ 2004 • GB-08.2004
11-5
HEATING & HOT WATER
6. In »Winter mode with hot water requirement (item 6, page 11-5)« both the heater and hot water heating are turned on. The
green indicator (item 8, page 11-5) illuminates while the heater is warming up.
In the »Summer mode« the hot water is heated with the lowest burner setting. The green indicator (item 8, page 11-5)
illuminates while the heater is warming up.
7. Select the required temperature 60° or 40° with the rotary switch (item. 2, page 11-5). This function is only available in
Summer mode. Once the water has reached the desired temperature the burner shuts off and the yellow indicator goes out.
8. To turn off the heater move the rotary switch (item 2, page 11-5) to the » « position.
Close the gas tap for the heater » « and close the gas bottle stop valve if required.
CAUTION:
Work on the electronic control unit for the Trumatic may only be carried out by a
qualified and trained service engineer.
If the green indicator does not light up (no. 3, page 11-5), replace the fuse in the electronic control unit or the fuse for the
battery monitor.
If the red indicator (item 9, page 11-5) is continuously illuminated, the gas bottle stop valve and/or the gas tap may be
closed or there may be an inadequate supply of air.
The fault is reset by turning the appliance off and then on again.
You will find further information on hot water heating in the separate manual supplied by the manufacturer.
11-6
MJ 2004 • GB-08.2004
COSMOS
HEATING & HOT WATER
11.3.7
Emptying the Hot Water Boiler
CLOSED
To drain the hot water boiler, proceed as follows:
DRAIN
1
CAUTION:
The drain plug on the electric
safety/drain valve must be kept
free from obstructions (slush, ice,
leaves etc.) at all times!
1. Switch off water pump using the switch (item 10, page 10-3)
or appliance main switch (item 9, page 10-3).
2. Open all the hot water taps in the kitchen and bathroom.
3. Push the button (1) to the »DRAIN« position.
This drains the contents of the hot water boiler directly to the
exterior via the safety/drain valve.
During draining check that the entire contents of the hot water
boiler (approx. 12.5 litres) empties completely.
Safety/Drain Valve, Hot Water Boiler
CAUTION:
When heating is off, the safety/drain valve can only be closed again at temperature above 8 °C.
NOTE:
When temperatures at the safety/drain valve are below approx. 10 °C and the
appliance is not in operation or has a fault, the water can drain off by itself!
As all other appliances in the water circuit (water pump, taps etc.) are not protected by the frost protection valve and the
automatic drain could be obstructed by dirt or ice, the water must be drained after the boiler is turned off if there is a risk of
frost.
You will find further information on draining the hot water boiler in the separate manual supplied by the manufacturer.
COSMOS
MJ 2004 • GB-08.2004
11-7
SECTION 12
COOKING
COOKING
12.
Cooking
12.1
Using the Gas Cooker
1. Open gas bottle stop valve and gas tap »
« under kitchen cupboard (model 551 K) or on the valve block at the rear left
in the cupboard under the bed (model 551 MQ).
2. Lift up the cover on the hob.
WARNING:
When using the cooker you must open a window or roof light to
ensure an adequate supply of oxygen to the interior of your mobile home!
The gas cooker should never be used as a heater!
Explosion hazard - Never allow gas to escape unburned!
The user must be able to keep the gas lighting process in full view
- this must not be concealed by pots etc!
The flame safety cover must be lifted up whenever the cooker is
in use!
3. To light the burner, turn the required control knob on the hob to low or high flame, push down and hold.
4. Light the escaping gas with suitable lighter and keep the control knob held down for a further 5 to 7 seconds until the
thermocouple has responded. The flame may go out if the control knob is released too soon. Repeat the operation if this
happens.
5. To switch off the gas cooker turn the control knob to the » « position.
If the thermocouple is bent or faulty the burner will not operate correctly and the flame will keep going out even though the
control knob is held down for a long time.
If this happens a new thermocouple must be fitted by a qualified engineer.
NOTE:
A flame with an indistinct pattern is a sign of poor combustion, and we therefore
recommend annual servicing by a qualified engineer.
You will find further information in the separate manual supplied by the manufacturer.
COSMOS
MJ 2004 • GB-08.2004
12-1
SECTION 13
REFRIGERATOR
REFRIGERATOR
13.
Refrigerator
The compressor refrigerator with a capacity of 65 litres is operated with 12 VDC. The refrigerator will reach its operating
temperature after a few hours.
NOTE:
The refrigerator can only be operated with 12 VDC!
13.1
Refrigerator Control Panel
1
OFF
7
1
by WAECO
6
2
5
3
ERROR CODE
4
1 Thermostat rotary switch
Refrigerator Control Panel
13.2
Switching On the Refrigerator
NOTE:
The refrigerator is ready for use immediately after the vehicle ignition is switched
on.
1. The required temperature is set using the thermostat rotary switch (1).
The following thermostat settings are possible:
Thermostat setting
Thermostat setting
Thermostat setting
COSMOS
1
7
OFF
Lowest cooling setting
Highest cooling setting
Refrigerator off
MJ 2004 • GB-08.2004
13-1
REFRIGERATOR
13.3
Switching Off the Refrigerator
1. Turn the thermostat rotary switch (item 1, page 13-1) to the » OFF « position. The appliance is now turned off completely.
2. To avoid the formation of mould in the refrigerator, place the refrigerator at locking position 1 (see page 13-3). Open and
close the refrigerator door are per the figure on page 13-3.
13.4
Defrosting the Refrigerator
Frost will build up on the cooling fins in time. The refrigerator should be defrosted when the frost is about 3 mm thick.
To do this, proceed as follows:
1. Turn off the refrigerator as described in section 13.3.
2. Remove the ice tray and food.
3. Leave the refrigerator door ajar.
4. After defrosting (frost has disappeared from the froster compartment and the cooling fins) wipe the inside of the refrigerator
dry with a cloth.
5. Soak up the condensation in the froster compartment with a cloth.
6. Turn on the refrigerator again.
CAUTION:
Never use force to remove the frost, and never attempt to speed up the defrosting
process with a radiant heater!
NOTE:
The condensation from the main refrigerator compartment drains into a collector
at the back of the refrigerator. Here the water will evaporate.
13-2
MJ 2004 • GB-08.2004
COSMOS
REFRIGERATOR
13.5
Storing Food
Always keep food in closed containers, aluminium foil etc.
Never place hot food straight into the refrigerator, always allow to cool first.
Foodstuffs which can give off volatile flammable gases must not be kept in the refrigerator.
The 2-star froster compartment (max. -12 °C) is suitable for making ice cubes and for storing frozen foods for a short period
only.
The froster compartment is not suitable for freezing food.
13.6
Making Ice Cubes
Ice cubes are best made at night. At night the refrigerator is used less and the unit has spare power.
CAUTION:
Use only drinking water to make ice cubes!
씰 Fill the ice tray with drinking water and place in the froster compartment.
13.7
Door Lock
UNLOCKED
씰 Unlock and lock the refrigerator door as per the adjacent
figure.
LOCKED
씰 At »position 1« the refrigerator door is ajar. The refrigerator
is left in this position when temporarily laid up.
씰 The refrigerator door is closed in »position 2«. The refrigerator
is left in this position when in use.
You will find further information in the separate operating
instructions supplied by the manufacturer.
POSITION 1
POSITION 2
Refrigerator Door Lock
COSMOS
MJ 2004 • GB-08.2004
13-3
SECTION 14
AIR CONDITIONING
AIR CONDITIONING
14.
Air Conditioning
NOTE:
Please contact your WEINSBERG dealer to talk about the installation of an air
conditioner!
COSMOS
MJ 2004 • GB-08.2004
14-1
SECTION 15
TOILET
TOILET
15.
Toilet
15.1
Thetford Unit
CAUTION:
The Thetford unit should only be drained on sites with suitable sewage
systems or specially designated disposal facilities!
1. Before using the toilet, push down the flush button briefly to allow a small amount of water into the bowl.
Repeat as necessary.
The flow of water stops when the button is released.
2. After use, push down the flush button and turn counter-clockwise at the same time. This turning motion opens the valve in
the WC.
The toilet bowl is flushed thoroughly but is economical on water.
3. After flushing, turn the flush button clockwise to close the valve again. The toilet can also be used with the valve open.
CAUTION:
If there is a risk of frost and the mobile home is not heated the Thetford unit
should be drained to prevent it from freezing.
In winter the toilet flush should not be used until the toilet cubicle has thoroughly
warmed up otherwise the water pump in the Thetford flush may be damaged.
An environmentally friendly and fully bio-degradable chemical WC additive
should be used for the WC.
If environmental concerns exist, the WC can also be used without chemical additives but the Thetford unit will require more frequent draining as a result.
You will find further information on the Thetford toilet in the separate manual supplied by the manufacturer.
COSMOS
MJ 2004 • GB-08.2004
15-1
SECTION 16
WINTER CAMPING
WINTER CAMPING
16.
Winter Camping
16.1
General Notes on Winter Camping
If you plan to enjoy the freedom of camping life in winter as much as in summer, then here are some hints which you should
follow:
After driving on roads that have been sprayed with salt, wash the underbody of the base vehicle with water.
Find out as much as you can about weather and driving conditions before you set out and during your journey.
Your mobile home has all-round insulation and double glazing and is perfectly ‘winter-worthy’ if used correctly. The water
supply is inside the vehicle on all models.
Proper ventilation is just as important in winter as it is in summer. Ski boots and other wet items will increase the level of
moisture and condensation inside the mobile home.
Heating is of course particularly important in winter, For this reason the heating – the heaters installed as standard are
normally adequate – is particularly important for winter camping. Quick removal of the water vapour generated by cooking,
wet clothing and breathing is particularly important for camping in winter. In addition to good ventilation, the heated air
will rapidly eliminate the water vapour, as warm air can absorb much more moisture than cold air. When there is moisture
in the air, the lower the room temperature the quicker that condensation will form if there is a slight difference between the
temperature of the room air and the temperature on the inside wall.
The windows, window frames and the corners of storage lockers are particularly prone to condensation depending on use,
the number of persons, the site and the level of humidity both inside and outside the mobile home. Adequate heating of the
mobile home with the recirculation fan switched on will improve this situation.
16.2
Additional Notes on Winter Camping
Secure the mobile home against rolling away then release the parking brake to prevent it from freezing.
Place all cushions in the mobile home upright to ensure that they are aired and dried.
Use only 100 % propane in winter as butane will not gasify below freezing point. Make sure you have an adequate supply
of gas bottles.
Avoid the use of electrical appliances that consume a lot of power. Campsites do not have unlimited amounts of electricity.
In cold weather the water pipes in the mobile home can freeze if the vehicle is left for long periods with the heating
switched off.
To prevent freezing, drain the wastewater tank with the heating off, please refer to Section 9.2.1, page 9-1.
COSMOS
MJ 2004 • GB-08.2004
16-1
WINTER CAMPING
The backup battery (battery 2) should be kept fully charged at all times.
While heating up the vehicle, open all cupboards, flaps and storage lockers to prevent condensation forming.
Avoid storing containers (bottles, cans etc.) with water, juice or other liquids in the unheated mobile home as they may
freeze.
Carefully remove all snow and ice from the roof of the vehicle and from the awning; it is particularly important to ensure
that the flue on the side wall is kept free at all times.
Always keep the forced air vents open, and open the roof light slightly if required.
Never run power cables on the ground - they may freeze to the soil or be damaged by snow clearing vehicles.
Keep metal taps open in an unheated caravan at low temperatures, even if the water system has been drained. Always
remember to open the mixer lever in both the cold water (blue) and the hot water (red) positions and then to leave it in one
of these opened positions.
16.3
Recommended Accessories for Winter Camping
To be prepared for any eventuality when winter camping, we recommend the following accessories:
❄
❄
❄
❄
❄
❄
❄
❄
❄
❄
❄
Winter cover for refrigerator (optional extra) . . . . . . . . . . . . . . . . . . . . . . . . . . . . . . . . . . . . . . . . . . . . . . . . . . . . . . . . .
❑
Snow shovel . . . . . . . . . . . . . . . . . . . . . . . . . . . . . . . . . . . . . . . . . . . . . . . . . . . . . . . . . . . . . . . . . . . . . . . . . . . . . . . . . .
❑
Brush . . . . . . . . . . . . . . . . . . . . . . . . . . . . . . . . . . . . . . . . . . . . . . . . . . . . . . . . . . . . . . . . . . . . . . . . . . . . . . . . . . . . . . . .
❑
Plastic ice scraper . . . . . . . . . . . . . . . . . . . . . . . . . . . . . . . . . . . . . . . . . . . . . . . . . . . . . . . . . . . . . . . . . . . . . . . . . . . . . .
❑
Deicer spray . . . . . . . . . . . . . . . . . . . . . . . . . . . . . . . . . . . . . . . . . . . . . . . . . . . . . . . . . . . . . . . . . . . . . . . . . . . . . . . . . .
❑
Talcum powder or Vaseline . . . . . . . . . . . . . . . . . . . . . . . . . . . . . . . . . . . . . . . . . . . . . . . . . . . . . . . . . . . . . . . . . . . . . . .
❑
Cooking salt or environmentally friendly anti-freeze additive for the wastewater tank . . . . . . . . . . . . . . . . . . . . . . . . .
❑
Snow slip mats . . . . . . . . . . . . . . . . . . . . . . . . . . . . . . . . . . . . . . . . . . . . . . . . . . . . . . . . . . . . . . . . . . . . . . . . . . . . . . . .
❑
Snow chains (CAUTION: Forbidden for aluminium wheels!) . . . . . . . . . . . . . . . . . . . . . . . . . . . . . . . . . . . . . . . . . . . .
❑
Jump starting cables . . . . . . . . . . . . . . . . . . . . . . . . . . . . . . . . . . . . . . . . . . . . . . . . . . . . . . . . . . . . . . . . . . . . . . . . . . . .
❑
A bag of sand is always useful should you get stuck in snow . . . . . . . . . . . . . . . . . . . . . . . . . . . . . . . . . . . . . . . . . . . . .
❑
16-2
MJ 2004 • GB-08.2004
COSMOS
SECTION 17
LAYING-UP
LAYING-UP
17.
Laying-up
17.1
General Notes for Temporary Laying-up
The mobile home will not suffer from being left outdoors provided a number of precautions are taken.
If the mobile home is to be temporarily laid up you should follow these steps:
NOTE:
You should completely drain the water system even if you are only laying up the
vehicle for a short period. Bacteria will grow in the fresh water after just a few
days, making the water undrinkable!
For the fresh water tank we recommend a disinfectant that is available
from your WEINSBERG dealer.
씰 Completely drain the entire water system.
씰 Charge up the backup battery and disconnect both terminals.
씰 Leave taps open even with the water supply drained. Always remember to open the mixer lever in both the cold water (blue)
and the hot water (red) positions and then to leave it in one of these opened positions.
씰 Remove any traces of corrosion and repair minor damage to paintwork. Products suitable for repairing paintwork are
available from your WEINSBERG dealer.
씰 Thoroughly wash your mobile home and apply a paint care product. Products suitable for the care of your mobile home are
available from your WEINSBERG dealer.
씰 Coat rubber seals, weather strips etc. with talcum powder or Vaseline.
씰 Clean cupboards and refrigerator, then place refrigerator door in »position 1« (see section 13.7, page 13-3).
씰 Place all cushions upright, or keep them indoors.
씰 Ensure that forced air vents are not obstructed.
씰 Open cupboards, flaps and storage lockers.
씰 Grease all moving parts of the support legs.
씰 If you plan to cover the vehicle with a tarpaulin etc., ensure that air can still circulate over the roof, e.g. by placing light
wooden battens on the roof). The tarpaulin or sheet should not stick to the outer skin of the mobile home.
COSMOS
MJ 2004 • GB-08.2004
17-1
LAYING-UP
씰 Clear heavy snow off the roof.
씰 Regularly air the mobile home.
씰 We recommend that you heat the mobile home through and air it thoroughly once a month in the winter.
씰 Before using the mobile home again, open all water taps and thoroughly flush all water pipes with fresh water.
씰 If the mobile home has been laid up for a long period of time, have the brake system checked over by an authorised service
centre before using it again.
17-2
MJ 2004 • GB-08.2004
COSMOS
SECTION 18
CLEANING & CARE
CLEANING & CARE
18.
Cleaning & Care
18.1
Cleaning and Care of the Exterior of the Mobile Home
The outer skin of the mobile home is made from aluminium sheet. The surface of this aluminium sheet is stove enamelled with
an acrylic paint. This process - known as polyester coil coating - is a modern, environmentally friendly way of surface finishing which creates high colour brilliance and is extremely durable.
To maintain the high quality of the finish you should care for the paintwork as described below.
Salt, soot, bird droppings and other aggressive substances should always be removed from the paintwork of the mobile home
immediately before they have time to leave a stain.
씰 Wash your mobile home with water regularly if you are near the sea.
You should clean your mobile home as you would a car:
WARNING:
Take extra caution when walking over the roof of the vehicle when
wet or icy. There is an increased danger of slipping or falling off!
CAUTION:
Avoid localised loads (e.g. kneeling) as far as possible if you need to go onto the
roof of the mobile home! Walk only in the horizontal areas of the mobile home
roof and wear soft-soled shoes (e.g. trainers or pumps)!
Avoid walking on the mobile home roof with textured-soled footwear as any
stones embedded in the soles will dent the outer skin of the mobile home!
씰 Thoroughly wet the vehicle and rinse off with water.
씰 Shampoo your mobile home with a pH neutral product (pH: 6-8). Don’t forget the roof!
씰 Now thoroughly rinse off the vehicle with water, and dry.
씰 Use only sponges, soft cloths or soft brushes. Hard tools can damage the paintwork.
COSMOS
MJ 2004 • GB-08.2004
18-1
CLEANING & CARE
씰 The mobile home should be waxed from time to time to protect and enhance its sheen. Apply the coat of wax as directed by
the manufacturer.
씰 To freshen up old paint, the mobile home can be treated with a suitable polish. Here again, you should follow the
manufacturer’s directions.
Polishing can attack the paint surface of your mobile home (abrasion) so do not apply polish unless absolutely necessary.
씰 Plastic parts must not be treated with aggressive cleaning agents (benzene, methylated spirits, thinners, etc.), on this topic
see section 18.1.1.
씰 Tar stains or other organic stains on the painted surface are best removed with benzene. We strongly advise against the use
of other solvents!
Insects should be softened with water and then removed with a sponge wrapped in a nylon stocking.
씰 Damage to the surface of your mobile home should be repaired immediately with refinish paint to prevent corrosion taking
a hold.
씰 Check the condition of the underbody protection once a year. Please contact your WEINSBERG dealer if the underbody
protection is damaged.
씰 After driving on roads that have been sprayed with salt, wash the underbody of the base vehicle with water.
18.1.1
Cleaning Plastic Parts on the Exterior of the Mobile Home
씰 Plastic products can be carefully cleaned using warm water with the addition of a very slightly acidic, neutral or very
slightly alkaline cleaner.
씰 You can use low concentrations (< 2 %) of mild household cleaners dissolved in water.
씰 Abrasive agents like scouring powder are not recommended as they will scratch plastic surfaces.
씰 Very greasy or oily surfaces can be washed down with petroleum substances free from aromatic compounds such as
ethanol. The use of organic solvents can damage the material.
씰 Plastic mouldings can be damaged by stress cracks caused by a variety of products. Other chemicals can cause the plastic
to swell and soften. These mouldings should therefore only be exposed to contact with the solvents listed above for short
periods (2 minutes maximum) at room temperature.
NOTE:
Please refer to the chemicals compatibility list!
18-2
MJ 2004 • GB-08.2004
COSMOS
CLEANING & CARE
18.2
Care and Cleaning of the Inside of the Mobile Home
CAUTION:
Use only normal household care and cleaning products!
Caustic and abrasive products should not be used!
Avoid using anything that might scratch or score surfaces!
씰 The furniture should only be cleaned with a special cleaner that is available commercially. This cleaner is also available
from your WEINSBERG dealer. Strong, powerful cleaning products should not be used.
씰 Clean table tops and kitchen worktops using only water with washing-up liquid or a mild household cleaner.
씰 The kitchen sink is made from stainless steel and can be cleaned with products that are available in the shops.
씰 Dry clean upholstery covers, curtains and the diolene blinds.
CAUTION:
The toilet cubicle is only allowed to be cleaned with a little water with a mild
cleaner and a damp cloth!
씰 Clean toilet cubicle with a little water with a mild cleaner and a damp cloth.
CAUTION:
Never lay the carpet onto wet PVC floor covering as the carpet can stick to the
PVC and pull the covering with it when the carpet is next taken up!
씰 The PVC floor covering is hard-wearing and easy-care. To clean it, just wet-mop and rub dry, use no wax.
씰 Never use abrasives or aggressive cleaners.
18.2.1
Cleaning Plastic Parts Inside the Mobile Home
씰 Plastic products can be carefully cleaned using warm water with the addition of a very slightly acidic, neutral or very
slightly alkaline cleaner.
COSMOS
MJ 2004 • GB-08.2004
18-3
CLEANING & CARE
씰 You can use low concentrations (< 2 %) of mild household cleaners dissolved in water.
씰 Abrasive agents like scouring powder are not recommended as they will scratch plastic surfaces.
씰 Very greasy or oily surfaces can be washed down with petroleum substances free from aromatic compounds such as
petroleum ether, ethanol or perchloroethylene. The use of organic solvents can damage the material.
씰 Plastic mouldings can be damaged by stress cracks caused by a variety of products. Other chemicals can cause the plastic
to swell and soften. These mouldings should therefore only be exposed to contact with the solvents listed above for short
periods (5 minutes maximum) at room temperature.
WARNING:
Avoid contact with concentrated acids!
씰 While cleaning, keep mechanical stress on mouldings, e.g. squeezing, to a minimum to prevent distortion. Water used for
cleaning should be softened to prevent scaling. Scale deposits can be removed with diluted acids such as acetic acid.
18.3
Cleaning Acrylic Glass Windows
CAUTION:
The acrylic glass windows must not be cleaned using chemical cleaners, glass
cleaners or products that contain alcohol spirit. Cleaning products must not
contain plasticizer as this would cause the acrylic glass windows to become brittle
and crack!
Avoid twisting and distorting the windows when opening and closing them.
씰 The acrylic glass windows should be cleaned using plenty of water with a clean sponge and a soft cloth.
씰 The only liquid which you should allow to come into contact with the acrylic glass is water with the addition of a 10 %
solution of mild washing-up liquid to keep the windows clear and free from static.
씰 To remove stubborn stains use a special acrylic glass cleaner that is available from your WEINSBERG dealer.
씰 Regularly lubricate all hinges, flaps and windows with acid-free battery terminal grease or gun oil (e.g. Ballistol) to ensure
that moving parts continue to move freely and do not seize.
18-4
MJ 2004 • GB-08.2004
COSMOS
CLEANING & CARE
NOTE:
Because of the physical properties of acrylic glass, the colder of the two glass panes,
usually the one on the outside, will mist up on the inside. This condensation will
disappear when the air around the window is very dry, but this process of diffusion
can be quite slow.
18.4
Care and Cleaning of the Roof Window
CAUTION:
Failure to follow the instructions for the care and cleaning of the roof window
will void the manufacturer’s warranty!
When washing the mobile home it is to be ensured that the water jet is not
pointed at the roof window. There is an air gap around the glass dome and the
frame (forced ventilation) through which the water could enter the mobile home.
씰 Never use aggressive cleaners (solvents/scouring agents).
씰 Only clean acrylic glass (glass dome) and frame elements with a damp cloth and mild soap solution, if necessary use a
special cleaner (at your own risk). This special cleaner is available from your WEINSBERG dealer.
Ensure that there is no water on the mechanical parts.
씰 Treat all rubber seals with talcum powder.
씰 The 4 ventilation grilles and light covers can be removed for cleaning.
씰 Clean cover and mosquito blind with a soft brush, if necessary with a damp cloth.
18.5
Care and Cleaning of the Sun Awning
씰 The tent fabric should be regularly cleaned with a sponge and clean water or PVC cleaner as dirt particles can otherwise
quickly create a culture medium for the growth of mould and bacteria.
COSMOS
MJ 2004 • GB-08.2004
18-5
CLEANING & CARE
18.5.1
Dealing with Mould on the Awning
It does not take long for mould to appear on the fabric of the awning if it is not cleaned and aired regularly, e.g. if it is folded
up and stowed away when wet. Avoid the use of strong solvents in this case!
WARNING:
When applying fungicides you must use protective equipment such
as safety glasses, mask and safety gloves, and ensure that the area
is well ventilated!
The directions for use in the leaflet enclosed with the fungicide
must be strictly followed.
씰 Clean the affected area with a 3% caustic soda solution (available from any pharmacist).
씰 Allow the caustic soda solution to act, then thoroughly rinse the fabric and dry.
씰 Repeat this treatment at regular intervals.
18.5.2
Treatment of Stiff Zip Fasteners
The zip fasteners on the awning can sometimes be stiff when new.
씰 This can be cured by rubbing candle wax into the zips or spraying them with a silicone spray.
18-6
MJ 2004 • GB-08.2004
COSMOS
SECTION 19
MAINTENANCE & INSPECTION
MAINTENANCE & INSPECTION
19.
Maintenance & Inspection
19.1
Servicing
For the sake of road safety your mobile home must be regularly and properly serviced, just like a car.
CAUTION:
Carrying out maintenance work on your mobile home requires specialist skills
and knowledge. This is why you should have your mobile home serviced only by
an authorised service centre.
The service centre will stamp your Customer Service Record Book to confirm
that the leak tests on all tanks and pipes, hoses etc. have been carried out.
If any parts need replacing, ensure that the manufacturer’s original spare parts are used.
NOTE:
For mobile homes that are not used very often, servicing should be carried out
once a year and in plenty of time before the start of a journey.
19.2
Intervals for Statutory Testing and Exhaust Gas Test
In Germany all vehicles must also undergo an
exhaust gas test at the intervals shown in the table
opposite. The test sticker on the front number plate
will tell you when the next test is due (see also
section 22.1 »Statutory Tests« page 22-1).
NOTE:
The relevant regulations
which apply in other
countries must be
complied with!
Exhaust gas test (AU)
Under Section 29 StVZO, mobile homes under 3.5 t registered in Germany must be tested every 2 years (by TÜV, DEKRA);
mobile homes over 3.5 t must be tested annually.
Engine
type
Cat.
Maximum technically
permissible laden mass
Inspection
interval
Turbo diesel
Yes
Over 3.5 tonnes
Annually
Turbo diesel
Yes
Up to 3.5 tonnes
Every 2 years
Petrol engine
Yes
–
Every 2 years
Intervals for the Exhaust Gas Test (AU)
COSMOS
MJ 2004 • GB-08.2004
19-1
MAINTENANCE & INSPECTION
The onboard gas system must be tested by a gas engineer every 2 years (see also section 22.1 »Statutory Tests«, page 22-1).
The engineer must issue a gas test certificate certifying that the gas system has been tested. The gas test sticker will be found
near the rear number plate.
19.3
Service Chart
Like any other machine, your mobile home needs to be properly serviced from time to time. The scope and frequency of this
work will depend first and foremost on the conditions under which the vehicle is used and operated.
All servicing work requires specialist skills and knowledge. It is therefore essential for this work to be carried out by trained
specialists.
The following table only lists the service and maintenance work that is carried out on the body of the mobile home.
Please refer to the separate FIAT manual for servicing of the FIAT base vehicle.
Superstructure
Servicing action
How often
Handover inspection (see warranty booklet)
On day of the handover
1. Check for leaks
After 12 - 14 months
2. Check for leaks
After 24 - 26 months
3. Check for leaks
After 36 - 38 months
4. Check for leaks
After 48 - 50 months
5. Check for leaks
After 60 - 62 months
Statutory inspection
See table on page 22-1
Gas inspection
Every 2 years
Check tyre pressures
Every 14 days
Lubricate support legs (optional accessory)
Every 6 months
Service Chart
19-2
MJ 2004 • GB-08.2004
COSMOS
SECTION 20
TROUBLESHOOTING AND FAULT
RECTIFICATION
TROUBLESHOOTING AND FAULT RECTIFICATION
20.
Troubleshooting and Fault Rectification
Troubleshooting should be carried out by reference to the following Troubleshooting table.
If you are unable to deal with malfunctions yourself you should contact the Customer Service department at your local
WEINSBERG Service Centre or at the appliance manufacturer (heater = Truma, refrigerator = Electrolux, Thetford toilet =
Thetford).
WARNING:
For your own safety’s sake you are advised to have repairs to the base vehicle
carried out by a qualified service centre, especially repairs and adjustments to the
brake system!
GAS SYSTEM
Fault
Cause
Gas smell, excessive gas consumption.
Leak in gas system.
No gas.
Tap for appliance is closed.
Open tap for appliance.
Stop valve on gas bottle is closed.
Open gas bottle stop valve
Outdoor temperature too low.
Propane: -32 °C
Butane:
0 °C
Wait for outside temperature to rise.
Faulty appliance.
Call qualified engineer.
No gas.
COSMOS
Action
MJ 2004 • GB-08.2004
Decommission gas system
immediately. Close gas bottle
and gas taps stop valve open
windows and doors and ventilate.
Seek specialist advice and
have the gas system checked.
Do not operate electrical
switches (e.g. ignition), naked
flames and smoking are strictly
forbidden!
20-1
TROUBLESHOOTING AND FAULT RECTIFICATION
TRUMATIC E
Fault
Cause
Action
Red »Fault« indicator on
Trumatic control panel illuminates.
Lack of gas, shortage of combustion air,
heavily soiled fan impeller, faulty
fuse.
Turn off appliance and turn on again.
After two failed attempts to ignite
wait 10 minutes prior to switching on.
Check that the gas bottle stop valve and
appliance gas tap are open.
Connect full gas bottle.
Red »Fault« indicator on
Trumatic control panel flashes.
Green indicator behind rotary knob is on
Trumatic control panel not illuminated.
Operating voltage too low.
Charge backup battery with suitable
charger or have charged, fit new battery,
if necessary seek specialist advice.
Operating voltage too high.
Call qualified engineer.
Fuse in the electronic control
unit has tripped
Call qualified engineer.
Main switch switched off.
Switch on main switch.
If these measures do not rectify the fault,
specialist advice must be sought from
Truma service
20-2
MJ 2004 • GB-08.2004
COSMOS
TROUBLESHOOTING AND FAULT RECTIFICATION
TRUMATIC C
Fault
Cause
Action
After switching on (winter and
summer mode) no indicator
illuminates.
Appliance or vehicle fuse faulty.
Check 12 VDC battery voltage.
Check all electrical
connectors.
Check fuses and replace if necessary.
Red »Fault« indicator on
Trumatic control panel flashes.
Operating voltage too low < 10.5 VDC.
Charge backup battery with suitable
charger or have charged, fit new battery,
if necessary seek specialist advice.
Approx. 30 seconds after switching on
the heater, the red indicator illuminates
continuously.
Check gas bottle stop valve or gas tap
closed.
Check gas supply.
Inadequate air supply.
Check chimney for any covers.
After switching on with 230-Volt
operation no indicators illuminate.
No power supply.
Check 230-VAC supply and
fuses.
After switching off the heater, the
the electrical safety/drain
valve opens.
Outdoor temperature below 4 °C.
Switch on heater.
At temperatures around 4 °C and below
the drain valve opens automatically.
Also after the heater is switched on,
the valve remains open.
12-VDC power supply at the drain valve
missing.
Check 12-VDC power supply and
fuses.
The electrical safety/drain valve
can no longer be closed.
Outdoor temperature below 8 °C.
Switch on heater.
When the heater s not used, the drain valve
can only be closed from temperatures
above 8 °C.
Also after the heater is switched on,
the valve remains open.
12-VDC power supply at the drain valve
missing.
Check 12-VDC power supply and
fuses.
Water drips from the electrical safety
/drain valve.
Water pressure too high.
Check pump pressure (max. 2.8 bar).
On connection to a central water
supply (local supply) a pressure
reducer must be used to prevent the
pressures higher than 2.8 bar in the boiler.
If these measures do not rectify the fault,
specialist advice must be sought from
Truma service
COSMOS
MJ 2004 • GB-08.2004
20-3
TROUBLESHOOTING AND FAULT RECTIFICATION
GAS COOKER
Fault
Cause
Action
Ignition detectors fail to respond
(Flame goes out on releasing
the regulator).
Faulty ignition detector.
Call qualified engineer.
Flame goes out on »Low
flame« setting.
Ignition detector sensor not correctly
adjusted.
Adjust ignition detection sensor
(do not bend!).
The tip of the sensor should project above
the burner by 5 mm.
The sensor neck should be no more
than 3 mm from the burner ring
Call qualified engineer if necessary.
20-4
MJ 2004 • GB-08.2004
COSMOS
TROUBLESHOOTING AND FAULT RECTIFICATION
POWER SUPPLY
Fault
Cause
Action
Backup battery does not charge when
connected to 230-Volt mains. Charging
indication on 230-Volt mains is provided
by green indicator (item 6, page 10-3)
on the Onboard Control.
Automatic circuit breaker in wardrobe
switched off.
Reset automatic circuit breaker.
2 A or 20 A fuse in the charger
is faulty.
Replace fuse.
If the fuse blows again, immediately
seek specialist advice.
Backup battery is flat.
Charge the backup battery.
Start the engine and run for about 1 minute.
Backup battery voltage rises more than
2 V and charging process is started.
If it is not possible to charge the backup
battery replace battery, if necessary
seek specialist advice.
40 A fuse on fuse distribution panel
Starter battery faulty.
Replace fuse.
Relay or electronics in distribution box
faulty.
Call qualified engineer.
Main switch (item 9, page 10-3) on
Onboard Control.
Switch on main switch.
Fuse in distribution box faulty.
Replace fuse.
Main fuse on backup battery faulty.
Replace fuse.
Relay or electronics in distribution box/
Faulty Onboard Control.
Call qualified engineer.
Main switch (item 9, page 10-3) or
water pump switch (item 10, page 10-3)
on Onboard Control switched off.
Switch on related switch.
Fuse in distribution box faulty.
Replace fuse.
Faulty water pump.
Replace water pump.
Electronics in distribution box/
Onboard Control faulty.
Call qualified engineer.
Water tap switch faulty.
Replace water tap.
Backup battery does not charge during
the journey. Charging indication is
provided green indicator (item 5,
page 10-3) on Onboard Control.
12 Volt appliances (lights and
socket) do not work.
Water pump does not work.
COSMOS
MJ 2004 • GB-08.2004
20-5
TROUBLESHOOTING AND FAULT RECTIFICATION
POWER SUPPLY
Fault
Cause
Action
Wastewater tank heating or wastewater
pipe (optional extra) does not work.
Main switch (item 9, page 10-3) or
Heating element switch (item 8, page 10-3)
on Onboard Control switched off.
Switch on related switch.
Fuse in distribution box faulty.
Replace fuse.
Heating element or heating strip faulty.
Have faulty part renewed by a qualified
engineer.
Electronics in distribution box/
Onboard Control faulty.
Call qualified engineer.
Connection between Onboard Control and
Probe faulty.
Identify fault and correct.
Faulty Onboard Control.
Have Onboard Control replaced by a
qualified engineer.
Connection between Onboard Control and
Probe faulty.
Identify fault and correct.
Faulty Onboard Control.
Have Onboard Control replaced by a
qualified engineer.
Probe heavily soiled.
Clean probe.
FW tank display (item 3, page 10-3)
does not work.
Wastewater tank display (item 4,
page 10-3) does not work.
20-6
MJ 2004 • GB-08.2004
COSMOS
TROUBLESHOOTING AND FAULT RECTIFICATION
WATER SUPPLY
Fault
Cause
Action
No fresh water.
Fresh water tank empty.
Fill fresh water tank.
Fuse in distribution box faulty.
Replace faulty fuse, or
insert.
Faulty water pump.
Have water pump replaced by your local
WEINSBERG service centre.
Pinched water hose.
Remove kink from water hose and/or
replace.
Faulty electric terminal block.
Call qualified engineer.
Leak in water system.
Locate the leak, re-clamp supply
hoses.
Water leaking in mobile home.
COSMOS
MJ 2004 • GB-08.2004
20-7
TROUBLESHOOTING AND FAULT RECTIFICATION
REFRIGERATOR
Fault
Cause
Action
Refrigerator does not switch on with
12-Volt operation.
Fuse for refrigerator in distribution box
faulty.
Fit new fuse.
Battery flat.
Charge battery.
Always ensure the battery is charged.
20-8
MJ 2004 • GB-08.2004
COSMOS
SECTION 21
SPECIFICATIONS
SPECIFICATIONS
21.
Specifications
21.1
Tyres
21.1.1
General Notes on the Tyres
WARNING:
Damaged tyres are a hazard and must be attended to immediately!
NOTE:
Always check tyre pressures with cold tyres.
씰 All 4 tyres on your mobile home should be inflated to the same pressure. The recommended tyre pressure is shown in the
tyre pressure table on the next page.
씰 Tyres may deflate in the areas in contact with the ground over long stationary periods when tyre pressures are too low or
tyres can gradually deflate. You should therefore inflate the tyres to 0.3 bar above the pressures shown in the table if your
mobile home is going to be out of use for any length of time.
씰 Inadequate tyre pressure can cause tyres to heat up excessively and damage them internally. At high speeds this can cause
the tread to separate from the tyre and can even lead to a tyre bursting!
씰 Subsequently correcting the tyre pressure will not cure hidden tyre damage.
씰 Kerbs should only be negotiated slowly and at right angles where possible. Avoid driving over steep and sharp-edged kerbs.
Hidden tyre damage can be caused if you drive over kerbs or sharp objects such as stones violently or at too narrow an
angle. This damage will have a ‘delayed action’! An accident may be caused by a tyre bursting at high speed!
씰 Regularly check your tyres for damage, e.g. sharp objects sticking in the tyre, holes, cuts, cracks and blisters in the tyre
wall. An object lodged in the tyre can also damage the tyre’s interior. Damage should always be examined by a qualified
person to see whether it can be repaired. A damaged tyre must be replaced if it cannot be repaired or if a successful repair
is in doubt! A damaged tyre can burst!
씰 Never use tyres if you do not know their ‘history’. All tyres age even if they are little used or not used at all. We recommend
that you replace the tyres on your mobile home when they are 6 years old - don’t forget the spare wheel! Even the spare
wheel should only be used in emergencies after 6 years and driven on with extreme caution!
씰 The tread depth must be checked at regular intervals. The more worn the tread the greater the risk of aquaplaning.
COSMOS
MJ 2004 • GB-08.2004
21-1
SPECIFICATIONS
NOTE:
The minimum statutory depth of tread in the related country must be complied
with!
씰 Check tyre pressures (including spare wheel!) before every journey and adjust as necessary. If you cannot avoid driving
with low tyre pressure, you should not exceed a maximum speed of 20 km/h.
21.1.2
Tyre Pressure Table
These tyre pressures apply to tyres when cold and for a fully laden mobile home.
Version
Tyre type
Tyre size
Tyre pressure [bar]
Front
Rear
10/11
All types
195/70 R15 (104/102) R
4.0
4.0
10/11
All types
205/70 R15 (106/104) R
4.0
4.0
10/11
All types with »Michelin Camping« tyres
215/70 R15 (109/107) Q
5.0
5.0
14/15
All types
205/70 R15 (106/104) R
4.1
4.5
14/15
All types with »Michelin Camping« tyres
215/70 R15 (109/107) Q
5.0
5.0
MAXI
All types
205/75 R16 (110/108) Q
4.5
4.5 *
MAXI
All types
215/75 R16 (113/111) Q
4.5
4.5
MAXI
All types with »Michelin Camping« tyres
215/75 R16 (113/111) Q
5.5
5.5
Tyre Pressure Table
* 4.75 bar when using the vehicle with more than 2.000 kg rear axle load
NOTE:
When tyres are hot the tyre pressure should be 0.3 bar higher than specified.
CAUTION:
The correct tyre is however to be controlled again when the tyres are cold.
21-2
MJ 2004 • GB-08.2004
COSMOS
SPECIFICATIONS
21.2
Payload
21.2.1
Weights for WEINSBERG Accessories
Weights for WEINSBERG accessories are listed adjacent. If used, tick the appropriate items (>>> ❏) and enter their weights
in the enclosed form unless they are already included in the weight of your mobile home. All weights given are »approximate«.
65 litre refrigerator (compressor) . . . . . . . . . . . . . . . . . . . . . . . . . . . . . . . . . . . . . . . . . . . . . . . . . . . 20.0 kg >>>
❏
Air conditioning for driving cab . . . . . . . . . . . . . . . . . . . . . . . . . . . . . . . . . . . . . . . . . . . . . . . . . . . .
Air Lift, extra rear axle springing . . . . . . . . . . . . . . . . . . . . . . . . . . . . . . . . . . . . . . . . . . . . . . . . . . .
Air Lift, extra spring Pneuma Lift (1 set) . . . . . . . . . . . . . . . . . . . . . . . . . . . . . . . . . . . . . . . . . . . . .
Air recirculation system 12 VDC . . . . . . . . . . . . . . . . . . . . . . . . . . . . . . . . . . . . . . . . . . . . . . . . . . .
AL-KO HYF58A trailer hitch . . . . . . . . . . . . . . . . . . . . . . . . . . . . . . . . . . . . . . . . . . . . . . . . . . . . . .
Antenna packet SAMY SAT . . . . . . . . . . . . . . . . . . . . . . . . . . . . . . . . . . . . . . . . . . . . . . . . . . . . . . .
Awning 300 x 250 cm . . . . . . . . . . . . . . . . . . . . . . . . . . . . . . . . . . . . . . . . . . . . . . . . . . . . . . . . . . . .
Awning light . . . . . . . . . . . . . . . . . . . . . . . . . . . . . . . . . . . . . . . . . . . . . . . . . . . . . . . . . . . . . . . . . . .
>>>
>>>
>>>
>>>
>>>
>>>
>>>
>>>
❏
❏
❏
❏
❏
❏
❏
❏
Blaupunkt radio cassette . . . . . . . . . . . . . . . . . . . . . . . . . . . . . . . . . . . . . . . . . . . . . . . . . . . . . . . . . .
Blaupunkt radio CD . . . . . . . . . . . . . . . . . . . . . . . . . . . . . . . . . . . . . . . . . . . . . . . . . . . . . . . . . . . . .
1.0 kg >>>
1.0 kg >>>
❏
❏
Carpeting in cab . . . . . . . . . . . . . . . . . . . . . . . . . . . . . . . . . . . . . . . . . . . . . . . . . . . . . . . . . . . . . . . .
Coil springs . . . . . . . . . . . . . . . . . . . . . . . . . . . . . . . . . . . . . . . . . . . . . . . . . . . . . . . . . . . . . . . . . . . .
Cycle carrier for 2 bicycles (rear mounting) . . . . . . . . . . . . . . . . . . . . . . . . . . . . . . . . . . . . . . . . . . .
Cycle carrier for 3 bicycles (rear mounting) . . . . . . . . . . . . . . . . . . . . . . . . . . . . . . . . . . . . . . . . . . .
6.9
4.6
5.3
5.5
kg
kg
kg
kg
>>>
>>>
>>>
>>>
❏
❏
❏
❏
Duomatic . . . . . . . . . . . . . . . . . . . . . . . . . . . . . . . . . . . . . . . . . . . . . . . . . . . . . . . . . . . . . . . . . . . . . .
Duomatic with remote display . . . . . . . . . . . . . . . . . . . . . . . . . . . . . . . . . . . . . . . . . . . . . . . . . . . . .
Ducato alloy wheel 6 1/2 x 16 . . . . . . . . . . . . . . . . . . . . . . . . . . . . . . . . . . . . . . . . . . . . . . . . . . . . .
Ducato 7 x 15 alloy wheel . . . . . . . . . . . . . . . . . . . . . . . . . . . . . . . . . . . . . . . . . . . . . . . . . . . . . . . . .
1.4
2.0
0.0
0.0
kg
kg
kg
kg
>>>
>>>
>>>
>>>
❏
❏
❏
❏
Electric external rear view mirror . . . . . . . . . . . . . . . . . . . . . . . . . . . . . . . . . . . . . . . . . . . . . . . . . . .
Engine heat exchanger for hot water heater . . . . . . . . . . . . . . . . . . . . . . . . . . . . . . . . . . . . . . . . . . .
1.0 kg >>>
4.0 kg >>>
❏
❏
Fiat driver’s airbag . . . . . . . . . . . . . . . . . . . . . . . . . . . . . . . . . . . . . . . . . . . . . . . . . . . . . . . . . . . . . . .
Fog lamp, base vehicle . . . . . . . . . . . . . . . . . . . . . . . . . . . . . . . . . . . . . . . . . . . . . . . . . . . . . . . . . . .
Front mud flaps . . . . . . . . . . . . . . . . . . . . . . . . . . . . . . . . . . . . . . . . . . . . . . . . . . . . . . . . . . . . . . . . .
2.5 kg >>>
2.0 kg >>>
1.0 kg >>>
❏
❏
❏
COSMOS
MJ 2004 • GB-08.2004
30.0
7.9
7.9
1.2
31.4
20.0
23.5
1.0
kg
kg
kg
kg
kg
kg
kg
kg
21-3
SPECIFICATIONS
Laserline alarm . . . . . . . . . . . . . . . . . . . . . . . . . . . . . . . . . . . . . . . . . . . . . . . . . . . . . . . . . . . . . . . . . 1.5 kg >>>
Molto motorcycle upgrade kit . . . . . . . . . . . . . . . . . . . . . . . . . . . . . . . . . . . . . . . . . . . . . . . . . . . . . . 18.5 kg >>>
Mosquito net door . . . . . . . . . . . . . . . . . . . . . . . . . . . . . . . . . . . . . . . . . . . . . . . . . . . . . . . . . . . . . . . 16.0 kg >>>
❏
❏
❏
Omnivent 12 VDC roof fan . . . . . . . . . . . . . . . . . . . . . . . . . . . . . . . . . . . . . . . . . . . . . . . . . . . . . . . . 5.0 kg >>>
Onboard battery charger, automatic 250 W . . . . . . . . . . . . . . . . . . . . . . . . . . . . . . . . . . . . . . . . . . . 1.8 kg >>>
Onboard gel battery 80 Ah . . . . . . . . . . . . . . . . . . . . . . . . . . . . . . . . . . . . . . . . . . . . . . . . . . . . . . . . 26.0 kg >>>
Oyster DX 65 aerial package . . . . . . . . . . . . . . . . . . . . . . . . . . . . . . . . . . . . . . . . . . . . . . . . . . . . . . 25.0 kg >>>
Oyster DX 85 aerial package . . . . . . . . . . . . . . . . . . . . . . . . . . . . . . . . . . . . . . . . . . . . . . . . . . . . . . 27.6 kg >>>
❏
❏
❏
❏
❏
Pilot seats coordinated to body finish (2 off) . . . . . . . . . . . . . . . . . . . . . . . . . . . . . . . . . . . . . . . . . .
Power awning drive . . . . . . . . . . . . . . . . . . . . . . . . . . . . . . . . . . . . . . . . . . . . . . . . . . . . . . . . . . . . . .
7.4 kg >>>
2.5 kg >>>
❏
❏
Radio preparation . . . . . . . . . . . . . . . . . . . . . . . . . . . . . . . . . . . . . . . . . . . . . . . . . . . . . . . . . . . . . . .
REMI top II 600 x 600 mm . . . . . . . . . . . . . . . . . . . . . . . . . . . . . . . . . . . . . . . . . . . . . . . . . . . . . . .
Roof hood with 12 V fan . . . . . . . . . . . . . . . . . . . . . . . . . . . . . . . . . . . . . . . . . . . . . . . . . . . . . . . . .
2.0 kg >>>
8.8 kg >>>
4.5 kg >>>
❏
❏
❏
SAT (Astra) aerial package, manual . . . . . . . . . . . . . . . . . . . . . . . . . . . . . . . . . . . . . . . . . . . . . . . . . 9.0 kg >>>
Solar power system, 120 W . . . . . . . . . . . . . . . . . . . . . . . . . . . . . . . . . . . . . . . . . . . . . . . . . . . . . . . . 15.0 kg >>>
❏
❏
Toilette fan 12 VDC MPK . . . . . . . . . . . . . . . . . . . . . . . . . . . . . . . . . . . . . . . . . . . . . . . . . . . . . . . .
Track widener (1 set) . . . . . . . . . . . . . . . . . . . . . . . . . . . . . . . . . . . . . . . . . . . . . . . . . . . . . . . . . . . .
Travel-Pilot navigation system (Blaupunkt) . . . . . . . . . . . . . . . . . . . . . . . . . . . . . . . . . . . . . . . . . . .
TV support extension . . . . . . . . . . . . . . . . . . . . . . . . . . . . . . . . . . . . . . . . . . . . . . . . . . . . . . . . . . . .
TV preparation . . . . . . . . . . . . . . . . . . . . . . . . . . . . . . . . . . . . . . . . . . . . . . . . . . . . . . . . . . . . . . . . .
2.5
8.6
2.0
2.0
3.0
>>>
>>>
>>>
>>>
>>>
❏
❏
❏
❏
❏
Video reversing system . . . . . . . . . . . . . . . . . . . . . . . . . . . . . . . . . . . . . . . . . . . . . . . . . . . . . . . . . . .
2.0 kg >>>
❏
Total weight of the WEINSBERG accessories carried . . . . . . . . . . . . . . . . . . . . . . . . . . . . . . . . .
kg
kg
kg
kg
kg
.
kg
NOTE:
On the following pages you can make a note of the weight personal equipment and
add up the weight.
21-4
MJ 2004 • GB-08.2004
COSMOS
SPECIFICATIONS
COSMOS
MJ 2004 • GB-08.2004
:
.
kg
:
.
kg
:
.
kg
:
.
kg
:
.
kg
:
.
kg
:
.
kg
:
.
kg
:
.
kg
:
.
kg
:
.
kg
:
.
kg
:
.
kg
:
.
kg
:
.
kg
:
.
kg
:
.
kg
:
.
kg
:
.
kg
:
.
kg
:
.
kg
:
.
kg
:
.
kg
:
.
kg
:
.
kg
:
.
kg
21-5
SPECIFICATIONS
21-6
:
.
kg
:
.
kg
:
.
kg
:
.
kg
:
.
kg
:
.
kg
:
.
kg
:
.
kg
:
.
kg
:
.
kg
:
.
kg
:
.
kg
:
.
kg
:
.
kg
:
.
kg
:
.
kg
:
.
kg
:
.
kg
:
.
kg
:
.
kg
:
.
kg
:
.
kg
:
.
kg
:
.
kg
:
.
kg
Total weights of the Personal Equipment:
.
kg
MJ 2004 • GB-08.2004
COSMOS
SPECIFICATIONS
21.2.2
Explanations on the Payload Calculation
CAUTION:
The maximum technically permissible laden mass of the mobile home as shown
in the vehicle documents must not be exceeded when the total mass of the payload
is added to the mass of the vehicle in running order!
An excessive payload will have an adverse effect on the handling of your mobile
home. You may lose control of the vehicle as a result!
The mobile home should be loaded as described in Section 4.3.1, page 4-3.
Once you have loaded up your mobile home, have it weighed on a public
weighbridge before you set out on your journey.
If the actual total mass of your mobile home exceeds the maximum technically
permissible laden mass then you will lose your warranty claims against the
manufacturer and your insurance cover will be void!
The payload is the difference between the maximum technically permissible laden mass and the mass is running order
EEC Directive 92/21/EEC governs the payload of mobile homes at European level. The regulations in the Directive broadly
correspond with DIN EN 1646-2 and DIN EN 1645-2.
21.2.2.1 Mass in Running Order
The mass in running order is the weight of the unladen vehicle (including lubricants, toolkit, spare wheel, 90 % full fuel tank),
with factory-fitted standard equipment, plus the weight of the driver (75 kg) and the basic equipment (see section
21.2.2.2).
21.2.2.2 Basic Equipment
The basic equipment comprises all items of equipment and fluids that are necessary for the safe and proper use of the mobile
home. It includes the weights of:
➽ Gas:
COSMOS
Liquid gas bottles (up to 90% full)
➽ Water:
MJ 2004 • GB-08.2004
Fresh water heater (100% full)
Fresh water tank (90% full)
21-7
SPECIFICATIONS
21.2.2.3 Maximum Technically Permissible Laden Mass
This mass allows for specific operating conditions including factors such as material strength, load capacity of the tyres etc.
This mass must not be exceeded under any circumstances!
NOTE:
You will find the maximum technically permissible laden mass, the mass in running
order and the payload in the specifications on page 21-10 and 21-12.
21.2.3
Weights of the Payload
21.2.3.1 Weights of the Accessories
The accessories cover the weights of all objects that are available beyond the standard equipment. You will find the individual
weights in the list on pages 21-3 and 21-4, these are to be totalled at the end of the list.
21.2.3.2 Weights of the Personal Equipment
Personal equipment comprises the weights of all articles carried on the vehicle over and above the optional extras, such as:
➽
➽
➽
➽
➽
➽
➽
➽
➽
Persons carried (except driver)
Pets
Clothing and shoes
Sanitary articles, toilet articles
Kitchen articles, etc.
Food
Sports and leisure articles
TV, radio, VCR etc.
Toys
The individual weights for the personal equipment carried must be accurately determined and recorded in full in the list on
pages 21-5 and 21-6 and totalled.
21-8
MJ 2004 • GB-08.2004
COSMOS
SPECIFICATIONS
21.2.4
Formula for the Payload Calculation
The payload is calculated as using
the following formula:
Maximum technically permissible laden mass
-
Mass in running order
Payload
3,300.00 kg
e.g.
- 2,495.00 kg
805.00 kg
NOTE:
The payload, i.e. accessories + personal equipment must not exceed a weight of
805.00 kg in this example!
NOTE:
The particulars given in the vehicle document are binding for the specifications.
You will find further information on the base vehicle in the separate user manual
supplied by the manufacturer.
Other specifications are not part of this manual. These figures are enclosed
with the mobile home as a separate manual.
COSMOS
MJ 2004 • GB-08.2004
21-9
SPECIFICATIONS
21.3
Specifications and Floor Plan with Heating Diagram
COSMOS 551 K
Chassis / engine
15 / 2.3 JTD
COSMOS 551 K
Gas pressure [mbar]
30
Water pressure [bar]
1.8
Chassis / engine
Max. technically permissible
laden mass [kg]
Mass in running order [kg]
Payload [kg]
PAYLAD [KG]
Capacity [litres]
laden mass [kg]
2,495
Fresh water tank
48
Mass in running order [kg]
805
Wastewater tank
80
Payload [kg]
Hot water boiler
12.5
805
Thetford toilet
2
2,024
Total height [mm]
2,550
Total length [mm]
5,599
Internal height [mm]
1,850
Max. front axle load [kg]
1,750
Max. rear axle load [kg]
1,850
Seats with seat belts
Max. towing load [kg]
2,000
Admissible no. of persons in
Capacity [litres]
2,520
Fresh water tank
48
780
Wastewater tank
80
Hot water boiler
12.5
Thetford toilet
Battery capacity, backup battery [Ah]
Total height [mm]
2,550
Battery capacity, backup battery [Ah]
Wet battery
Total length [mm]
5,599
Wet battery
Internal height [mm]
1,850
Max. front axle load [kg]
1,750
Max. rear axle load [kg]
1,850
Seats with seat belts
Max. towing load [kg]
2,000
Admissible no. of persons in
80
2x5
2
3
2
3
13,700
Beds [mm]
Beds [mm]
Tyre size
1,800/1,880 x 1,800
15”-6J-H
Wheel size
Figures are not binding!
1
2x5
vehicle while travelling
Turning circle [mm]
Rear bed
80
Number of gas bottles [kg]
13,700
205/70-R15 C
17
2,024
vehicle while travelling
Wheel size
1.8
Total width [mm]
Number of gas bottles [kg]
Tyre size
30
Water pressure [bar]
3,300
17
Total width [mm]
Turning circle [mm]
Gas pressure [mbar]
Max. technically permissible
3,300
1
15 / 2.8 JTD
205/70-R15 C
Rear bed
1,800/1,880 x 1,800
15”-6J-H
Figures are not binding!
Mass in running order = Fiat Ducato Hbox van 2.3 JTD + driver+ basic equipment
2
Mass in running order = Fiat Ducato Hbox van 2.8 JTD + driver+ basic equipment
NOTE:
Masses and weights can vary within ± 5 % owing to the use of natural materials!
21-10
MJ 2004 • GB-08.2004
COSMOS
COSMOS
MJ 2004 • GB-08.2004
BA 1
SI
TK
>>> Heater
>>> Heater/hot water boiler
HE
HEB
KS
LG
>>> Starter battery
>>> Backup battery
>>> Hot water boiler
>>> Roof light
BA 1
BA 2
BO
DL
Cosmos 551 K
>>> Charger
>>> Refrigerator
Illustration for information only, not binding!
>>> Hot air blower
>>> Thetford flap
>>> Fuse
REMI >>> REMIstar - roof window
FT
SI KS BA 2
TK
Key to Symbols
DL LG
AT
>>> Fresh water tank
BO
>>> Wastewater tank
REMI
FT
AT
HE
SPECIFICATIONS
21-11
SPECIFICATIONS
COSMOS 551 MQ
Chassis / engine
15 / 2.3 JTD
COSMOS 551 MQ
Gas pressure [mbar]
30
Water pressure [bar]
1.8
Chassis / engine
Max. technically permissible
laden mass [kg]
Mass in running order [kg]
Payload [kg]
Capacity [litres]
laden mass [kg]
3,300
2,613
Fresh water tank
85
Mass in running order [kg]
687
Wastewater tank
80
Payload [kg]
Hot water boiler
12.5
Total width [mm]
2,024
Total height [mm]
2,550
Total length [mm]
5,599
Battery capacity, backup battery [Ah]
Internal height [mm]
1,850
Wet battery
Max. front axle load [kg]
1,750
Number of gas bottles [kg]
Max. rear axle load [kg]
1,850
Max. towing load [kg]
2,000
Thetford toilet
17
80
2 x 11
Seats with seat belts
4
2
Tyre size
Wheel size
1.8
13,700
205/70-R15 C
15”-6J-H
vehicle while travelling
Capacity [litres]
Fresh water tank
85
662
Wastewater tank
80
Hot water boiler
12.5
Total width [mm]
2,024
Total height [mm]
2,550
Total length [mm]
5,599
Battery capacity, backup battery [Ah]
Internal height [mm]
1,850
Wet battery
Max. front axle load [kg]
1,750
Number of gas bottles [kg]
Max. rear axle load [kg]
1,850
Max. towing load [kg]
2,000
Thetford toilet
17
80
2 x 11
Seats with seat belts
4
Admissible no. of persons in
Turning circle [mm]
4
Tyre size
Beds [mm]
Rear bed
1,900 x 1,350/1,150
Side bed
1,750 x 850/550
Wheel size
Figures are not binding!
1
30
Water pressure [bar]
2,638
Admissible no. of persons in
Turning circle [mm]
Gas pressure [mbar]
Max. technically permissible
3,300
1
15 / 2.8 JTD
13,700
205/70-R15 C
15”-6J-H
vehicle while travelling
4
Beds [mm]
Rear bed
1,900 x 1,350/1,150
Side bed
1,750 x 850/550
Figures are not binding!
Mass in running order = Fiat Ducato Hbox van 2.3 JTD + driver+ basic equipment
2
Mass in running order = Fiat Ducato Hbox van 2.8 JTD + driver+ basic equipment
NOTE:
Masses and weights can vary within ± 5 % owing to the use of natural materials!
21-12
MJ 2004 • GB-08.2004
COSMOS
COSMOS
MJ 2004 • GB-08.2004
Key to Symbols
LG
SI
TK
>>> Heater
>>> Heater/hot water boiler
HEB
KS
LG
>>> Backup battery
>>> Hot water boiler
>>> Roof light
BA 2
BO
DL
Cosmos 551 MQ
>>> Charger
>>> Refrigerator
Illustration for information only, not binding!
>>> Hot air blower
>>> Thetford flap
>>> Fuse
REMI >>> REMIstar - roof window
HE
BA 2
>>> Starter battery
SI
BA 1
>>> Fresh water tank
KS
BA 1
FT
DL
FT REMI
>>> Wastewater tank
AT
TK
AT
HEB
SPECIFICATIONS
21-13
SECTION 22
INFORMATION & TIPS
INFORMATION & TIPS
22.
Information & Tips
NOTE:
22.1
All information on this page relates only to Germany.
For journeys abroad the regulations in the specific country are to be observed!
Statutory Tests
Mobile home
up to 2.8 tonnes
Mobile home
2.8 - 3.5 tonnes
Mobile home
over 3.5 tonnes
TÜV/DEKRA
2 years
2 years
1 year
EXHAUST GAS TEST (AU)
2 years
2 years
1 year
INSPECTION OF THE LPG SYSTEM
BY GAS ENGINEER
2 years
2 years
2 years
22.2
Accessories to be Carried on the Vehicle in Case of Emergency
Mobile home
up to 2.8 tonnes
YOU MUST CARRY IN YOUR
MOBILE HOME FOR EMERGENCIES
COSMOS
Mobile home
2.8 - 3.5 tonnes
Mobile home
over 3.5 tonnes
First-aid kit
First-aid kit
First-aid kit
Hazard warning triangle
Hazard warning triangle Hazard warning triangle
Hazard warning lamps
MJ 2004 • GB-08.2004
22-1
INFORMATION & TIPS
22.3
Emergency Telephone Numbers
Country
German embassy
ADAC or partner club emergency number
Breakdown assistance
Legal
alcohol
limit
Tolls
0.5 ‰
none
–
–
ADAC Vejle, 79 42 42 85
79 42 42 85 4) / 79 42 42 42 5)
0.5 ‰
Bridges Gr. Belt / Öresund
1 12
1 10
ADAC Munich, 00 49 (89) 22 22 22
22 22 22
0.5 ‰
none
0 03 58
1 12
1 12
ADAC Munich, 00 49 (89) 22 22 22
(09) 77 47 64 00, 02 00 80 80 1)
0.5 ‰
none
France
(01) 53 83 45 00
00 33
15
17
ADAC Lyon, (04) 72 17 12 22
ADAC Lyon, (04) 72 17 12 22
0.5 ‰
Tolls on motorways
Greece
21 07 28 51 11
00 30
1 66 * / 1 51 **
1 00
ADAC Athens, 21 09 60 12 66
104
0.5 ‰
Tolls on motorways
UK
(01) 53 83 45 00
00 44
9 99 / 1 12
9 99 / 1 12
AA London, (0 87 05) 44 88 66
0 80 00 28 90 18, 08 00 82 82 82; Mobile: (0 16 22) 76 23 42
0.8 ‰
none
Ireland
(01) 2 69 30 11
0 03 53
9 99 / 1 12
9 99 / 1 12
AA Dublin, (01) 6 17 99 99
Dublin, 18 00 66 77 88
0.8 ‰
none
00 39
1 18
1 12
ADAC Milan, (02) 66 15 91
80 31 16, 8 00 11 68 00
0.5 ‰
Tolls on motorways
Croatia
(01) 6 15 81 05
0 03 85
94
92
ADAC Zagreb, (01) 3 44 06 66
9 87; Mobile:: 0 19 87
0.5 ‰
Tolls on motorways
Luxemburg
(0 03 52) 4 53 44 51
0 03 52
1 12
1 13
ACL Luxemburg, (0 03 52) 4 50 04 51
4 50 04 51
0.8 ‰
none
Macedonia
(01) 6 15 81 05
0 03 89
94
92
ADAC Belgrade, 0 03 81(11) 3 42 27 07
(02) 9 87
–
–
Netherlandes
(0 70) 3 42 06 00
00 31
1 12
1 12
ANWB The Hague, (05 92) 39 05 60
08 00 08 88; Mobile: (05 92) 39 05 06
0.5 ‰
none
Norway
23 27 54 00
00 47
1 13
1 12
ADAC Munich, 00 49 (89) 22 22 22
81 00 05 05
0.2 ‰
For some bridges/tunnels
Austria
(01) 7 11 54
00 43
1 44
1 33
ADAC Vienna, (01) 2 51 20 60
1 20 (for fixed and mobile phone network)
0.5 ‰
Motorway Vignette from euro 7.60
Poland
(0 22) 6 17 30 11
00 48
9 99
9 97
ADAC Posen, (0 61) 8 31 98 88
96 37, (0 22) 8 25 97 34
0.2 ‰
for Kattowitz-Krakau motorway
Portugal
(21) 8 81 02 10
00 35 16
1 12
1 12
ADAC Barcelona, 00 34 (93) 5 08 28 28
Algarve: 2 19 42 91 03 2), Other: 2 28 34 00 01 3)
0.5 ‰
Tolls on motorways
Rumania
(01) 2 30 25 80
00 40
9 61
9 55
ADAC Bucharest, (21) 2 23 45 25
Bucharest, 2 23 46 90 oder 92 71
–
–
Russia
(0 95) 9 37 95 00
0 07
03
02
ADAC Munich, 00 49 (89) 22 22 22
–
–
Sweden
(08) 6 70 15 00
00 46
1 12
1 12
ADAC Munich, 00 49 (89) 22 22 22
0 20 91 29 12, 0 87 67 90 00
0.2 ‰
Öresund tunnel/bridge
Country
code
Rescue
Police
00 32
1 00
1 01
TCB Brusselsl, (02) 2 33 22 11
0 70 34 47 77
Bulgaria
(02) 91 83 80
0 03 59
1 50
1 60
ADAC Munich, 00 49 (89) 22 22 22
(02) 9 11 46
Denmark
35 45 99 00
00 45
1 12
1 12
Germany
–
00 49
Belgium
(02) 7 74 19 11
Finland
(09) 45 85 80
Italy
(06) 49 21 31
22-2
MJ 2004 • GB-08.2004
COSMOS
INFORMATION & TIPS
Country
German embassy
Country
code
Rescue
Police
Switzerland
(0 31) 3 59 41 11
00 41
1 44
1 17
Serbia-Montenegro
(0 11) 3 61 42 55
0 03 81
94
92
Slovak Republic
(02) 59 20 44 00
0 04 21
1 55
1 58
Slovenia
23 27 54 00
0 03 86
Spain
(01) 7 11 54
Czech Republic
2 57 11 31 11
Legal
alcohol
limit
Tolls
0.5 ‰
Motorway Vignette SFr. 40
–
–
ADAC Prague, 00 42 (02) 61 10 43 51
1 81 24
0.0 ‰
Motorway Vignette from Kr. 100
1 12
1 13
ADAC Zagreb, 0 03 85 (1) 3 44 06 50
19 87
0.5 ‰
Tolls on motorways
0 03 45
0 61
1 12
ADAC Barcelona, 9 35 08 28 28
9 15 93 33 33
0.5 ‰
Tolls on motorways
0 04 20
1 55
1 58
ADAC Prague, 2 61 10 43 51
(02) 12 30
0.0 ‰
Motorway Vignette from Kr. 100
Turkey
(03 12) 4 55 51 00
00 90
1 12
1 55
ADAC Istanbul, (02 12) 2 88 71 90
via ADAC Istanbul, (02 12) 2 88 71 90
0.5 ‰
Tolls on motorways
Hungary
(01) 4 88 35 00
00 36
1 04
1 07
ADAC Budapest, (0 61) 3 45 17 17
1 88; Mobile: (0 61) 3 45 17 44
0.0 ‰
Motorway Vignette from For. 1,000
USA
–
0 01
9 11
9 11
ADAC emergency call centre Florida: 1-888-222-13 73
–
–
–
0 03 57
1 19/1 12
1 19/1 12
0 03 01 960 12 66
–
–
–
Cyprus
–
1
2
3
4
5
6
=
=
=
=
=
=
ADAC or partner club emergency number
Breakdown assistance
ADAC Munich, 00 49 (89) 22 22 22
1 40; Mobile: 03 18 50 53 11
ADAC Belgrade, (0 11) 42 27 07
9 87; Mobile: 01 19 87
Tourist police
Number only valid for Athens, Thessaloniki, Kavala, Patras, Ioannina and Larissa
Number valid outside large cities
For all calls (also from abroad) always dial the dialling code with the 0
For all calls (also from abroad) always dial the code 9
For all calls (also from abroad) always dial the code 2
From all countries without ADAC emergency call centres, the 24-hour service in the ADAC headquarters in Munich can be
contacted on the following telephone numbers:
+49 (89) 22 22 22 or 76 76 76
Status: 05/2003
Information not guaranteed
COSMOS
MJ 2004 • GB-08.2004
22-3
SECTION 23
CHECKLIST
CHECKLIST
23.
Checklist
Comments:
Date:
1:
Do you have all vehicle papers – including the green card – onboard, and do all passengers have their travel documents (passport, identity
card, child's identity card, etc.)? Check validity of travel documents in good time!
OK: ❑
2:
Do you have all necessary documents (heath related documentation and vaccination certificate) for any pets carried? Information on the
necessary documents can be obtained from the related consulate, from the tourist office or from an automobile club.
OK: ❑
3:
Is the gas test certificate still valid (see gas test sticker)? Check validity in good time!
OK: ❑
4:
Do you have a complete set of spare keys (store separately!) for the mobile home and any alarm?
OK: ❑
5:
Have all the necessary servicing work and inspections been performed on the mobile home at the correct intervals?
OK: ❑
6:
Are you sure that the maximum technically permissible laden mass has not been exceeded (see Specifications, page 21-10 and 21-12)?
OK: ❑
7:
Has your mobile home been correctly loaded (see section 4.3, page 4-2)?
OK: ❑
8:
Are all doors, flaps, gas locker, windows, roof lights and REMI – except forced air vents – correctly closed?
OK: ❑
9:
Have the suspended light(s) been taken down and safely stowed?
OK: ❑
10:
Are all tables placed in the sleeping position (see page 7-10 and 7-11)?
OK: ❑
11:
Are you sure that all containers with liquids - including those in the refrigerator – cannot tip over?
OK: ❑
12:
Are the gas bottles securely fastened in the gas locker with the fastening straps, are the gas bottle stop valve and gas taps closed?
OK: ❑
13:
Is the payload securely fastened against sliding?
OK: ❑
14:
Have all the tyre pressures (including the spare tyre) on the mobile home been checked as per the Tyre Pressure Table, page 21-2?
OK: ❑
15:
Are first-aid kit (check for completeness!) and hazard warning triangle stowed where they are easy to reach?
OK: ❑
16:
Do you have a correctly pumped up spare wheel, the corresponding tools and a suitable vehicle jack for the maximum technically permissible
laden mass in case you need to change a wheel?
OK: ❑
17:
Do all lights work on the mobile home (test!)?
OK: ❑
Copy if necessary
COSMOS
MJ 2004 • GB-08.2004
23-1
CHECKLIST
23.1
Checklist for Personal Entries
Comments:
Date:
:
OK: ❑
:
OK: ❑
:
OK: ❑
:
OK: ❑
:
OK: ❑
:
OK: ❑
:
OK: ❑
:
OK: ❑
:
OK: ❑
:
OK: ❑
:
OK: ❑
:
OK: ❑
:
OK: ❑
:
OK: ❑
:
OK: ❑
:
OK: ❑
:
OK: ❑
Copy if necessary
23-2
MJ 2004 • GB-08.2004
COSMOS
SECTION 24
INDEX
INDEX
A
Accessories to be Carried on the Vehicle in Case of Emergency 22-1
Additional Notes on Winter Camping . . . . . . . . . . . . . . . . . . 16-1
Adjusting the Vehicle Seats . . . . . . . . . . . . . . . . . . . . . . . . . . . 4-5
Base Vehicle Seats . . . . . . . . . . . . . . . . . . . . . . . . . . . . . . . . 4-6
Model »Aguti MILAN« Vehicle Seat . . . . . . . . . . . . . . . . . . 4-6
Forward-Back Adjustment . . . . . . . . . . . . . . . . . . . . . . . . . . 4-6
Rotary Unit . . . . . . . . . . . . . . . . . . . . . . . . . . . . . . . . . . . . . 4-6
Backrest Adjustment . . . . . . . . . . . . . . . . . . . . . . . . . . . . . . 4-6
Armrest Adjustment . . . . . . . . . . . . . . . . . . . . . . . . . . . . . . . 4-6
After the Journey . . . . . . . . . . . . . . . . . . . . . . . . . . . . . . . . . . . 6-1
Air Conditioning . . . . . . . . . . . . . . . . . . . . . . . . . . . . . . . . . . 14-1
Awning . . . . . . . . . . . . . . . . . . . . . . . . . . . . . . . . . . . . . . . . . . 6-1
B
Before the First Journey . . . . . . . . . . . . . . . . . . . . . . . . . . . . . . 4-1
Before the Journey . . . . . . . . . . . . . . . . . . . . . . . . . . . . . . . . . 4-1
Brakes . . . . . . . . . . . . . . . . . . . . . . . . . . . . . . . . . . . . . . . . . . . 4-4
Duomatic L Plus (gas pressure regulator set with
automatic changeover and remote display for the
two-bottle gas system,) . . . . . . . . . . . . . . . . . . . . . . . . . . . . . .
Instructions for the Duomatic . . . . . . . . . . . . . . . . . . . . . . . .
Important Notes on the Use of the Duomatic . . . . . . . . . . . .
Changing the Gas Bottle on the Duomatic . . . . . . . . . . . . . .
Duomatic Remote Display . . . . . . . . . . . . . . . . . . . . . . . . . .
Using the Duomatic in Summer . . . . . . . . . . . . . . . . . . . . . .
Using the Duomatic in Winter . . . . . . . . . . . . . . . . . . . . . . .
During the Journey . . . . . . . . . . . . . . . . . . . . . . . . . . . . . . . . .
8-6
8-6
8-6
8-7
8-8
8-8
8-8
5-1
E
Electrical Supply . . . . . . . . . . . . . . . . . . . . . . . . . . . . . . . . . . 10-5
Emergency Telephone Numbers . . . . . . . . . . . . . . . . . . . . . . 22-2
Emptying the Water System. . . . . . . . . . . . . . . . . . . . . . . . . . . 9-2
Emptying the Fresh Water Tank . . . . . . . . . . . . . . . . . . . . . . 9-2
Environmental Notes . . . . . . . . . . . . . . . . . . . . . . . . . . . . . . . . 2-7
F
C
Care and Cleaning of the Inside of the Mobile Home . . . . . . 18-3
Cleaning Plastic Parts Inside the Mobile Home . . . . . . . . . 18-3
Care and Cleaning of the Sun Awning . . . . . . . . . . . . . . . . . . 18-5
Dealing with Mould on the Awning . . . . . . . . . . . . . . . . . . 18-6
Treatment of Stiff Zip Fasteners . . . . . . . . . . . . . . . . . . . . . 18-6
Care and Cleaning of the Roof Window . . . . . . . . . . . . . . . . . 18-5
Changing a Wheel . . . . . . . . . . . . . . . . . . . . . . . . . . . . . . . . . . 5-3
Changing the Gas Bottle . . . . . . . . . . . . . . . . . . . . . . . . . . . . . 8-5
Checking the Mobile Home Before Starting the Journey . . . . . 4-3
Checklist . . . . . . . . . . . . . . . . . . . . . . . . . . . . . . . . . . . . . . . . 23-1
Checklist for Personal Entries . . . . . . . . . . . . . . . . . . . . . . . . 23-2
Circuit Diagram Model 551 K . . . . . . . . . . . . . . . . . . . . . . . . 10-8
Circuit Diagram Model 551 MQ . . . . . . . . . . . . . . . . . . . . . . 10-9
Cleaning & Care . . . . . . . . . . . . . . . . . . . . . . . . . . . . . . . . . . 18-1
Cleaning and Caring of the Exterior of the Mobile Home . . . 18-1
Cleaning Plastic Parts on the Exterior of the Mobile Home 18-2
Cleaning Acrylic Glass Windows . . . . . . . . . . . . . . . . . . . . . 18-4
Cooking . . . . . . . . . . . . . . . . . . . . . . . . . . . . . . . . . . . . . . . . . 12-1
Fire Safety . . . . . . . . . . . . . . . . . . . . . . . . . . . . . . . . . . . . . . . .
Prevention of Fire Hazards . . . . . . . . . . . . . . . . . . . . . . . . . .
Fire Fighting . . . . . . . . . . . . . . . . . . . . . . . . . . . . . . . . . . . . .
In Case of Fire . . . . . . . . . . . . . . . . . . . . . . . . . . . . . . . . . . .
Foreword . . . . . . . . . . . . . . . . . . . . . . . . . . . . . . . . . . . . . . . . .
Fresh Water Supply . . . . . . . . . . . . . . . . . . . . . . . . . . . . . . . . .
2-6
2-6
2-6
2-7
1-1
9-1
G
Gas System . . . . . . . . . . . . . . . . . . . . . . . . . . . . . . . . . . . . . . . 8-1
Gas Taps . . . . . . . . . . . . . . . . . . . . . . . . . . . . . . . . . . . . . . . . . 8-3
Gas Taps for Cooker and Heater . . . . . . . . . . . . . . . . . . . . . . 8-3
General Construction and Equipment of the Mobile Home . . . 3-1
Seating Layout . . . . . . . . . . . . . . . . . . . . . . . . . . . . . . . . . . . 3-2
General Information on the Gas Consumption . . . . . . . . . . . . . 8-2
General Notes for Temporary Laying-up . . . . . . . . . . . . . . . . 17-1
General Notes on the Gas Supply . . . . . . . . . . . . . . . . . . . . . . 8-1
General Notes on the Heater and Hot Water Heating . . . . . 11-1
General Notes on Winter Camping . . . . . . . . . . . . . . . . . . . . 16-1
General Safety Instructions . . . . . . . . . . . . . . . . . . . . . . . . . . . 2-3
Fitting Rear Carrier Systems . . . . . . . . . . . . . . . . . . . . . . . . 2-4
D
Defrosting the Refrigerator . . . . . . . . . . . . . . . . . . . . . . . . . . 13-2
Description . . . . . . . . . . . . . . . . . . . . . . . . . . . . . . . . . . . . . . . 3-1
Door Lock . . . . . . . . . . . . . . . . . . . . . . . . . . . . . . . . . . . . . . . 13-3
Driving Your Mobile Home . . . . . . . . . . . . . . . . . . . . . . . . . . . 5-1
H
Heating & Hot Water . . . . . . . . . . . . . . . . . . . . . . . . . . . . . . . 11-1
I
Important Notes for the Sanitary Area . . . . . . . . . . . . . . . . . . . 2-7
Information & Tips . . . . . . . . . . . . . . . . . . . . . . . . . . . . . . . . 22-1
Intervals for Statutory Testing and Exhaust Gas Test . . . . . . . 19-1
COSMOS
MJ 2004 • GB-08.2004
24-1
INDEX
L
R
Laying-up . . . . . . . . . . . . . . . . . . . . . . . . . . . . . . . . . . . . . . . 17-1
Living . . . . . . . . . . . . . . . . . . . . . . . . . . . . . . . . . . . . . . . . . . . 7-1
LPG . . . . . . . . . . . . . . . . . . . . . . . . . . . . . . . . . . . . . . . . . . . . . 8-2
M
Maintenance & Inspection . . . . . . . . . . . . . . . . . . . . . . . . . . . 19-1
Making Electrical Connection Between Mobile Home
and Power Point . . . . . . . . . . . . . . . . . . . . . . . . . . . . . . . . . . . 10-1
Making Ice Cubes ................................................................... 13-3
O
Obtaining a Replacement Key . . . . . . . . . . . . . . . . . . . . . . . . . 4-7
Onboard Control . . . . . . . . . . . . . . . . . . . . . . . . . . . . . . . . . . 10-3
Opening and Closing the Cab Doors from the Inside . . . . . . . . 7-2
Opening and Closing the Door from the Outside . . . . . . . . . . . 7-2
Opening and Closing the First Door on the Double Rear Doors
from the Outside . . . . . . . . . . . . . . . . . . . . . . . . . . . . . . . . . . . 7-4
Opening and Closing the First Door on the Double Rear Doors
from the Inside . . . . . . . . . . . . . . . . . . . . . . . . . . . . . . . . . . . . 7-4
Opening and Closing the Roof Light . . . . . . . . . . . . . . . . . . . . 7-5
Opening and Closing the Second Door on the Double Rear Doors
from the Inside . . . . . . . . . . . . . . . . . . . . . . . . . . . . . . . . . . . . 7-5
Opening and Closing the Sliding Door from the Outside . . . . . 7-3
Opening and Closing the Sliding Door from the Inside . . . . . . 7-3
Opening/Closing the Quarter Vent . . . . . . . . . . . . . . . . . . . . . . 7-6
Outside Gas Connector . . . . . . . . . . . . . . . . . . . . . . . . . . . . . . 8-4
P
Parking Brake . . . . . . . . . . . . . . . . . . . . . . . . . . . . . . . . . . . . . 6-1
Payload . . . . . . . . . . . . . . . . . . . . . . . . . . . . . . . . . . . . . . . . . 21-3
Weights for WEINSBERG Accessories . . . . . . . . . . . . . . . 21-3
Explanations on the Payload Calculation . . . . . . . . . . . . . . 21-7
Mass in Running Order . . . . . . . . . . . . . . . . . . . . . . . . . . . 21-7
Basic Equipment . . . . . . . . . . . . . . . . . . . . . . . . . . . . . . . . 21-7
Maximum Technically Permissible Laden Mass . . . . . . . . . 21-8
Weights of the Payload . . . . . . . . . . . . . . . . . . . . . . . . . . . . 21-8
Weights of the Accessories . . . . . . . . . . . . . . . . . . . . . . . . . 21-8
Weights of the Personal Equipment . . . . . . . . . . . . . . . . . . 21-8
Formula for the Payload Calculation . . . . . . . . . . . . . . . . . . 21-9
Payload . . . . . . . . . . . . . . . . . . . . . . . . . . . . . . . . . . . . . . . . . . 4-2
Loading the Mobile Home . . . . . . . . . . . . . . . . . . . . . . . . . . 4-2
Placing Gas Bottles in the Gas Locker . . . . . . . . . . . . . . . . . . . 8-2
Power Supply . . . . . . . . . . . . . . . . . . . . . . . . . . . . . . . . . . . . . 10-1
Power Supply 230 VAC (Mains) . . . . . . . . . . . . . . . . . . . . . . 10-1
Protection of the Electrical Circuits in the Mobile Home . . . . 10-4
24-2
Recommended Accessories for Winter Camping . . . . . . . . . . 16-2
Refrigerator . . . . . . . . . . . . . . . . . . . . . . . . . . . . . . . . . . . . . . 13-1
Refrigerator Control Panel . . . . . . . . . . . . . . . . . . . . . . . . . . . 13-1
Refuelling the Mobile Home . . . . . . . . . . . . . . . . . . . . . . . . . . 5-2
Registering the Mobile Home . . . . . . . . . . . . . . . . . . . . . . . . . 4-1
REMItop II Roof Window (optional equipment) . . . . . . . . . . . 7-6
Opening and Closing the Glass Dome . . . . . . . . . . . . . . . . . 7-7
Opening and Closing the Glass Dome, Bad Weather Position 7-8
Extending the Cover . . . . . . . . . . . . . . . . . . . . . . . . . . . . . . . 7-8
Opening and Closing the Mosquito Blind . . . . . . . . . . . . . . . 7-9
S
Safety Devices . . . . . . . . . . . . . . . . . . . . . . . . . . . . . . . . . . . . . 2-2
Safety Instructions for Road Travel . . . . . . . . . . . . . . . . . . . . . 2-2
Safety Instructions for the Gas System . . . . . . . . . . . . . . . . . . 2-4
Safety Instructions . . . . . . . . . . . . . . . . . . . . . . . . . . . . . . . . . . 2-1
Setting Up the Mobile Home . . . . . . . . . . . . . . . . . . . . . . . . . . 6-1
Service Chart . . . . . . . . . . . . . . . . . . . . . . . . . . . . . . . . . . . . . 19-2
Servicing . . . . . . . . . . . . . . . . . . . . . . . . . . . . . . . . . . . . . . . . 19-1
Sleeping . . . . . . . . . . . . . . . . . . . . . . . . . . . . . . . . . . . . . . . . 7-10
Preparing for Sleeping . . . . . . . . . . . . . . . . . . . . . . . . . . . . 7-10
Converting the Seating Module with Height-Adjustable Table to a Bed
(Model 551 K) . . . . . . . . . . . . . . . . . . . . . . . . . . . . . . . . . . . . 7-10
Converting the Seating Module with Hook-In Table to a Bed
(Model 551 MQ) . . . . . . . . . . . . . . . . . . . . . . . . . . . . . . . . . 7-11
Specifications . . . . . . . . . . . . . . . . . . . . . . . . . . . . . . . . . . . . 21-1
Specifications and Floor Plan with Heating Diagram . . . . . 21-10
Statutory Tests . . . . . . . . . . . . . . . . . . . . . . . . . . . . . . . . . . . . 22-1
Storing Food . . . . . . . . . . . . . . . . . . . . . . . . . . . . . . . . . . . . . 13-3
Supplementary Notes . . . . . . . . . . . . . . . . . . . . . . . . . . . . . . . 2-8
Switching Off the Refrigerator . . . . . . . . . . . . . . . . . . . . . . . 13-2
Switching On the Refrigerator . . . . . . . . . . . . . . . . . . . . . . . . 13-1
Switching On the Trumatic E Heater . . . . . . . . . . . . . . . . . . . 11-1
Adjusting the Trumatic E Heater . . . . . . . . . . . . . . . . . . . . 11-2
Switching On the Trumatic E Ventilation . . . . . . . . . . . . . . 11-2
Switching Off the Trumatic E Heater . . . . . . . . . . . . . . . . . 11-2
T
Thetford Unit . . . . . . . . . . . . . . . . . . . . . . . . . . . . . . . . . . . . . 15-1
Toilet . . . . . . . . . . . . . . . . . . . . . . . . . . . . . . . . . . . . . . . . . . . 15-1
Troubleshooting . . . . . . . . . . . . . . . . . . . . . . . . . . . . . . . . . . . 20-1
MJ 2004 • GB-08.2004
COSMOS
INDEX
Trumatic C Heater/Boiler . . . . . . . . . . . . . . . . . . . . . . . . . . . 11-3
Heating with Hot Water Requirement . . . . . . . . . . . . . . . . . 11-3
Heating without Hot Water Requirement . . . . . . . . . . . . . . 11-3
Adjusting the Trumatic C Heater/Boiler . . . . . . . . . . . . . . . 11-4
Switching Off the Trumatic C Heater/Boiler . . . . . . . . . . . . 11-4
Hot Water Supply Using the Trumatic C . . . . . . . . . . . . . . . 11-5
Hot Water Heating . . . . . . . . . . . . . . . . . . . . . . . . . . . . . . . 11-5
Emptying the Hot Water Boiler . . . . . . . . . . . . . . . . . . . . . 11-7
12 VDC Power Supply in the Living Area . . . . . . . . . . . . . . . 10-2
12 VDC Power Supply via Backup Battery and Charger . . . . . 10-5
Backup Battery . . . . . . . . . . . . . . . . . . . . . . . . . . . . . . . . . 10-5
Charger . . . . . . . . . . . . . . . . . . . . . . . . . . . . . . . . . . . . . . . 10-6
Example How to Calculate the Electricity Consumption
(using 80 Ah battery) . . . . . . . . . . . . . . . . . . . . . . . . . . . . . 10-7
Tyres . . . . . . . . . . . . . . . . . . . . . . . . . . . . . . . . . . . . . . . . . . . 21-1
General Notes on the Tyres . . . . . . . . . . . . . . . . . . . . . . . . . 21-1
Tyre Pressure Table . . . . . . . . . . . . . . . . . . . . . . . . . . . . . . . 21-2
Tyre Pressure . . . . . . . . . . . . . . . . . . . . . . . . . . . . . . . . . . . . . . 4-5
U
Using the Gas Cooker . . . . . . . . . . . . . . . . . . . . . . . . . . . . . . 12-1
V
Vehicle Lights . . . . . . . . . . . . . . . . . . . . . . . . . . . . . . . . . . . . . 4-7
Ventilating the Mobile Home . . . . . . . . . . . . . . . . . . . . . . . . . . 7-1
W
Wastewater Disposal . . . . . . . . . . . . . . . . . . . . . . . . . . . . . . . . 9-1
Emptying the Wastewater Tank . . . . . . . . . . . . . . . . . . . . . . . 9-1
Water Supply . . . . . . . . . . . . . . . . . . . . . . . . . . . . . . . . . . . . . . 9-1
Winter Camping . . . . . . . . . . . . . . . . . . . . . . . . . . . . . . . . . . 16-1
COSMOS
MJ 2004 • GB-08.2004
24-3
NOTES
NOTES
Concept + layout • G & S - Dokumentation • 85521 Ottobrunn
Schaller • Druck + Kopie • 81737 München
Printed on paper bleached without the use of chlorine
Sandweg 1
D-36391 Sinntal-Mottgers
Telephone: +49 (0) 66 64/89-1 84
Fax: +49 (0) 66 64/61 98
Internet: http://www.ci-wilk.de
e-mail: [email protected]
MJ 2004 • GB-09.2004 • R04100068
KNAUS TABBERT GROUP GMBH