1
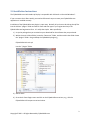
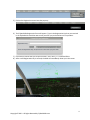
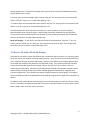
FlyRealHUDs Very Brief Helo
User’s Manual
1
Copyright © 2012 - All Rights Reserved by FlyRealHUDs.com
1.0 Welcome!
Congratulations. You are about to become one of the elite pilots who have mastered the fine art of
flying the most advanced piece of avionics in the modern cockpit – a Head Up Display. Also, thanks for
choosing FlyRealHUDs.com’s Head Up Displays. We are confident you will love these very cool Head-Up
Displays.
So, let’s get started.
2
Copyright © 2012 - All Rights Reserved by FlyRealHUDs.com
2.0 Installation Instructions
The FlyRealHUDs.com Helo Heads-Up Display is compatible with X-Plane 9 or 10 on MS Windows™.
If you are new to the X-Plane world, you need to follow each step to ensure your FlyRealHUDs.com
application is installed correctly.
Installation of the FlyRealHUDs.com plugins is super easy. Basically all you have to do is drag the xpl files
into the X-Plane “plugins” folder and start X-Plane and then type in your registration key in the
FlyRealHUDs.com Registration form. It’s really that simple. More specifically:
1) Unzip the package that you received on your download for the software that you purchased.
2) Within the main X-Plane folder, locate the “Resources” folder, and then within that folder locate
the “plugins” folder. Drag and drop the FlyRealHUDs plugin e.g.,
FlyRealHUDs-Helo-win.xpl
into the “’plugins” folder.
3) Start X-Plane
4) Go to the X-Plane Plugins menu and click on the FlyRealHUDs menu item, e.g., click the
FlyRealHUDs-AirTransport menu item below:
3
Copyright © 2012 - All Rights Reserved by FlyRealHUDs.com
5) Click on the Registration menu item that pops up:
6) The FlyRealHUDs Registration form will appear. Type in the Registration Key that you received
in the FlyRealHUDs email that was sent to you after you purchased one of our products.
7) Click Save to indicate that you accept the EULA. Don’t worry, it’s a standard EULA.
8) After a valid Registration Key is entered, the HUD will immediately show up on the screen.
4
Copyright © 2012 - All Rights Reserved by FlyRealHUDs.com
3.0 HUD Preflight
Select The HUD Version You Wish To Operate
If you have purchased 2 or more FlyRealHUDs plugins and you are running the software on a Windows
PC, you will need to decide which HUD you want to fly and Enable that HUD and disable the other HUDs.
Click on the X-Plane “Plugins” menu and then select “Enable/Disable Plugins” and uncheck the boxes for
the HUD version that you do not wish to operate. Make sure the box is checked for the HUD version
that you want to operate. If it is properly registered, it should appear on the screen.
NOW! — Preflight your aircraft setup so that the HUD will operate correctly.
Set up the Aircraft Instruments and Settings
Each flight should begin with a preflight of the aircraft flight instruments and settings. Most X-Plane
aircraft have a means to set the Barometric Pressure. If the HUD is going to be used for Navigation, one
would have to select the right ILS or VOR or Heading. You could also select a target airspeed or a target
altitude.
Set the HUD View
The FlyRealHUDs Head-Up Displays are all “conformal” HUDs. This means that the symbology will
overlay or project onto the real world outside scene the way one would expect it to. For example, the
Helo HUD has a conformal pitch ladder and flight path vector.
VERY USEFUL NOTE: The conformal elements of the FlyRealHUDs are only conformal if you are in the
“Forward with Nothing” View. Actually, they are also conformal in the “Forward with HUD” view but,
the standard X-Plane HUD would appear as clutter behind the FlyRealHUDs head up display when you
are in the “Forward with HUD” view. SO … normal operation with the FlyRealHUDs generally involves
switching to the instrument panel to set up things like a selected altitude or a selected speed and then
5
Copyright © 2012 - All Rights Reserved by FlyRealHUDs.com
switching back to the “Forward with Nothing” view so that only the conformal FlyRealHUDs Head-Up
Display appears on the screen.
In X-Plane 9 you can switch between these views by using the “W” key to get to the instrument panel
and the “Shift-W” to get to the “Forward with Nothing” view.
“In X-Plane 10 you can switch between these views by using the “W” key to get to the instrument panel
and the “Ctrl-W” to get to the “Forward with Nothing” view.
The Helo HUD will also work with views to the side so, in some respects it is more like a Helmet
Mounted Display than a Head Up Display. When looking to the side remember that the Flight Path
Vector and the other conformal symbols on the HUD are really showing information that is conformal
with the real world for a Forward With Nothing view.
NOTE: EVS Imagery – To see what a real HUD looks like with Enhanced Vision, select the “I” key in XPlane 9 and the “Shift-N” key in X-Plane 10. This is especially cool to do at night. If you forget these
keystrokes, you can find them in the X-Plane View menu.
4.0 How to fly with a Head-Up Display
The operation of a HUD is unique and different than a traditional flight instrument. For one thing, when
flying with a HUD, your eyeballs are always looking outside – which is where they should be most of the
time - especially during an approach and landing. Another major difference (and advantage) provided
by the HUD over traditional instruments is the Flight Path Vector. This symbol provides the pilot with
instant information about the direction of flight, and can also tell you if you are fast or slow and,
accelerating or decelerating. The HUD also provides attitude, altitude, radio altitude, airspeed, vertical
speed, heading, and angle of bank information and flight guidance information for navigation and
instrument approaches. The Helo HUD also displays a digital readout for percent power. EVS imagery
can also be displayed with the FlyRealHUDs head up displays using the built in night vision capabilities of
X-Plane.
For takeoff, climb, cruise, descent and landing the HUD is the perfect way to control any of your X-Plane
aircraft. Transition from takeoff to climb and cruise phases can now be flown in a more precise manner,
and the HUD is easier to fly than most instruments.
6
Copyright © 2012 - All Rights Reserved by FlyRealHUDs.com
Helo HUD Format
The Helo HUD has some unique features that make it different from our other HUDs. For example,
because of the helicopter’s ability to rotate in place, the HSI is located so as to provide greater visibility
of the compass rose. Roll is especially critical in a helicopter so the Roll-Slip-Skid indicator is also more
prominent on the Helicopter HUD. The Flight Path Vector can be caged and uncaged by pressing the
“Esc” key to keep it from appearing so sensitive to the helo’s gyrations while still providing important
vertical guidance cues. Power is also displayed on the lower left side below the Airspeed dial to aid in
power management. The Pitch Ladder is also different from HUDs for fixed wing aircraft. Instead of
pitch lines at 5 and 10 degree increments, it provides pitch lines at 2.5, 5.0, and 10 degree increments
above the horizon and at 1 degree increments for the first 5 degrees below the horizon line.
Using the Flight Path Vector
Because the Flight Path Vector is so different from the normal information displayed on the head down
instruments, and because the FlyRealHUDs Flight Path Vector is also different from the standard X-Plane
Flight Path Vector, it deserves special attention.
The Flight Path Vector symbol is just what its name implies - it shows where the aircraft or helicopter is
actually going or the actual flight path. When the Flight Path Vector appears below the horizon, you are
descending. In a descent, the Flight Path Vector shows where the aircraft or helicopter will land or hit
the ground if it continues on the current flight path. When the Flight Path Vector is above the horizon,
the aircraft is climbing. When the Flight Path Vector is level with the horizon, the aircraft is holding a
constant altitude.
7
Copyright © 2012 - All Rights Reserved by FlyRealHUDs.com
Digital Readouts below the Flight Path Vector provide airspeed (below the left wing), barometric altitude
(below the right wing) and radio altitude (below the center of the Flight Path Vector). The radio altitude
only appears below 2500 feet.
To the left of the left wing is a symbol that looks like a > sign. This symbol is called the acceleration
caret. When the aircraft is not
accelerating or decelerating it is exactly
to the left of the left wing tip. When
the aircraft is accelerating, it moves
above the left wing tip in proportion to
the acceleration. Pilots can use the
acceleration caret in conjunction with
the speed readout. If they see that
their speed is below their desired speed they can adjust power to move the acceleration caret above the
left wing tip (as shown here) and keep it there until the desired speed is reached. Subtle adjustments to
the acceleration caret position can make for very tight control of airspeed.
Looking at the Flight Path Vector on the Helo HUD picture shown at the beginning of this section one is
able to see at a glance that the helicopter is descending (Flight Path Vector below the horizon), and
accelerating (acceleration caret above the left wing tip). The Helicopter is currently at 57 knots, 230 feet
barometric altitude and 230 feet above the water. Learning to take full advantage of the information
provided by the Flight Path Vector is a fundamental skill for HUD pilots.
Notice that just below the Flight Path Vector the word “CAGED” appears. The Flight Path Vector will not
travel laterally when it is caged. You can toggle the FPV between normal and caged mode by pressing
the “ESC” key.
For the Helo HUD, below 30 knots, the Flight Path Vector is removed from the screen. Below this speed
the Flight Path Vector becomes erratic in its movement and it can become distracting to the pilot who is
looking at the outside scene.
Using the Airspeed Dial
The Airspeed round dial shows the selected airspeed at the top of the round dial (in the figure below it is
set to 155 knots). The Airspeed round dial has 10 tick marks surrounding the
digital readout and the triangle on the outside points to the Selected Airspeed.
The arrow pointer points to the current speed and the movement of the arrow
pointer gives the pilot a sense of the speed trend.
8
Copyright © 2012 - All Rights Reserved by FlyRealHUDs.com
Using the Altitude Dial
The Altitude round dial also has 10 tick marks surrounding the digital altitude readout box. The Selected
Altitude is shown above the round dial. The Vertical Speed worm around the
Altitude round dial grows from the middle of the left side and indicates a
positive vertical speed (climb) as the worm grows up from the middle of the dial
and negative vertical speed (descent) as it grows down from the middle. The
scale for the growth of the vertical speed worm changes as the vertical speed
increases so that it is most sensitive for lower vertical speeds and less sensitive
for higher vertical speeds.
Contacts:
[email protected]
[email protected]
9
Copyright © 2012 - All Rights Reserved by FlyRealHUDs.com