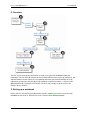
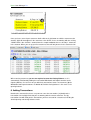
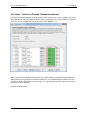
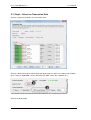
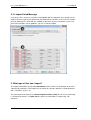
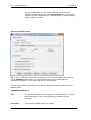
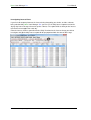
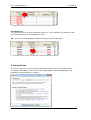
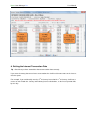
1
Home Money Manager
www.homemoneymanager.com.au
Home Loan Manager Pro 7.1
The Mortgage Checker and Planning Tool …
User Manual
27 January 2012
DOWNLOAD SOFTWARE
Home Loan Manager Pro is available
from www.homemoneymanager.com.au
COPYRIGHT
© 2004-2012 Home Money Manager, all rights reserved worldwide. No part of this
publication may be reproduced, transmitted, transcribed, stored in a retrieval system, or
translated into any language in any form by any means, without written permission from
Home Money Manager
Home Loan Manager Pro
User Manual
Contents
Contents .................................................................................................................................. 2
Welcome ................................................................................................................................. 4
Where to Start ......................................................................................................................... 5
1. Watch the Getting Started Video ...................................................................................... 5
2. Refer to the Help Topics................................................................................................... 5
Software Overview................................................................................................................... 6
Importing Transactions......................................................................................................... 7
Transaction Categories ........................................................................................................ 8
Category Auto-Matching ...................................................................................................... 8
Workbooks........................................................................................................................... 8
What Next? .......................................................................................................................... 8
Sample Workbook ................................................................................................................... 9
“Home Loan - Mrs A Citizen” ................................................................................................ 9
“Home Loan Redraw - Mrs A Citizen” ................................................................................... 9
“Interest Only Loan - Mr A Citizen” ..................................................................................... 10
“Investment Loan - Miss A Citizen” ..................................................................................... 10
“Line of Credit - Mrs A Citizen” ........................................................................................... 10
“Mortgage Offset - Mr & Mrs A Citizen”............................................................................... 10
What Next? ........................................................................................................................ 11
Entering Your Loan Details .................................................................................................... 11
1. Example of a Loan Statement ........................................................................................ 11
2. Overview........................................................................................................................ 13
3. Setting up a workbook .................................................................................................... 13
4. Creating an Account....................................................................................................... 14
5. Adding a Statement........................................................................................................ 15
6. Adding Transactions ...................................................................................................... 17
7. Assigning Transaction Categories .................................................................................. 20
7.1. Manually Selecting Categories .................................................................................... 20
7.2. Using the INTEREST Category ................................................................................... 20
7.3. Automatically Assigning Categories............................................................................. 21
8. Adding Interest Rate Changes........................................................................................ 23
9. Updated Summary View................................................................................................. 24
10. What Next? .................................................................................................................. 24
Importing Transactions .......................................................................................................... 26
1. Overview........................................................................................................................ 26
2. Step-by-Step Instructions ............................................................................................... 26
2.1. Importing Transactions ................................................................................................ 26
2.2. Select a Statement and Choose a File......................................................................... 27
2.3. Using the Import Wizard .............................................................................................. 28
2.4. Step 1 - Specify the File Layout ................................................................................... 28
2.5. Step 2 - Select the Transaction Amount....................................................................... 29
2.6. Step 3 - Select the Second Transaction Amount .......................................................... 32
2.7. Step 4 - Select the Transaction Date ........................................................................... 33
2.8. Step 5 - Select the Transaction Description ................................................................. 34
2.9. Step 6 - Import the Transactions into the Statement .................................................... 35
2.10. Import Failed Message .............................................................................................. 36
3. What type of files can I import? ...................................................................................... 36
4. What is a CSV file? ........................................................................................................ 37
5. How do I get my transactions into an import file? ............................................................ 37
6. How do I import my transactions from a spreadsheet?.................................................... 38
Category Auto Matching ........................................................................................................ 39
Overview ........................................................................................................................... 39
Previously Matched Transactions ....................................................................................... 39
Category Wildcard Patterns ............................................................................................... 39
Restrictions ........................................................................................................................ 39
Running the Auto Match tool .............................................................................................. 40
www.homemoneymanager.com.au
2
Home Loan Manager Pro
User Manual
Offset Accounts ..................................................................................................................... 41
Link the Accounts .............................................................................................................. 41
Statements and Transactions............................................................................................. 41
Interest Rates .................................................................................................................... 41
Reporting ........................................................................................................................... 41
Screens ................................................................................................................................. 43
Account Details Screens .................................................................................................... 43
Statement Details Screens ................................................................................................. 46
Transaction Details Screen ................................................................................................ 47
Interest Rate Details Screens ............................................................................................. 49
Reports.................................................................................................................................. 52
Check For Errors ................................................................................................................... 53
1. Balance Checker Report ................................................................................................ 53
2. Interest Checker Report ................................................................................................. 55
3. Refund Calculator Report ............................................................................................... 57
4. Daily Interest Report ...................................................................................................... 59
Review Your Costs ................................................................................................................ 61
5. Yearly Totals Report ...................................................................................................... 61
6. Yearly Comparison Report ............................................................................................. 63
7. Statement Comparison Report ....................................................................................... 64
Plan For The Future............................................................................................................... 66
8. Increase Repayments Report ......................................................................................... 66
9. Detailed Payout Plan Report .......................................................................................... 66
10. Interest Rate Rise Report ............................................................................................. 67
Be Debt Free Sooner ............................................................................................................. 69
Be Debt Free Sooner ............................................................................................................. 69
11. Your Payout Plan ......................................................................................................... 69
Interest Calculations .............................................................................................................. 71
1. Calculating Your Interest ................................................................................................ 71
2. Interest Checker Report Errors....................................................................................... 72
3. Interest Errors ................................................................................................................ 73
4. Setting the Days In Year Account Value ......................................................................... 74
5. Entering Interest Rates................................................................................................... 75
6. Calculating the Interest Period Date Range .................................................................... 76
7. Using the INTEREST Category ...................................................................................... 78
8. Setting the Interest Transaction Date ............................................................................. 79
9. Other Interest Errors ...................................................................................................... 81
10. Missing or Incorrect Information ................................................................................... 81
11. Interest Rounding Errors .............................................................................................. 83
12. What Next? .................................................................................................................. 84
Transaction Sort Order .......................................................................................................... 85
Transaction Sort Order .......................................................................................................... 85
Workbook Conversion............................................................................................................ 86
Customer Support.................................................................................................................. 87
www.homemoneymanager.com.au
3
Home Loan Manager Pro
User Manual
Welcome
With Home Loan Manager Pro you can track, plan and manage all aspects of your loans, check
the accuracy of your interest charges, and discover how to pay off your mortgage sooner.
It does all the hard work for you, so you will only need a few minutes a year to keep your
mortgage and loans under control.
www.homemoneymanager.com.au
4
Home Loan Manager Pro
User Manual
Where to Start
1. Watch the Getting Started Video
This six part video tutorial will show you everything you need to know about the software, and you
can watch it now by selecting Watch the Getting Started Video from the Help menu.
2. Refer to the Help Topics
Once you’ve watched the getting started video the following help topics will get you started with
Home Loan Manager Pro.
Software Overview
For more information on how this software works and how it will help you manage your loans,
refer to the software overview help topic.
Sample Workbook
When you first start Home Loan Manager Pro, the sample workbook is automatically opened so
you can take the software for a quick test drive. Each account in the workbook is described in the
sample workbook help topic, making it easy for you to find an example account similar to your
own loan.
Entering Your Loan Details
For step-by-step instructions on setting up your own workbook, adding a loan, and entering your
first statement, refer to the entering your loan details help topic.
Help and FAQ
You can find answers to the most commonly asked questions in the frequently asked questions
help topic.
www.homemoneymanager.com.au
5
Home Loan Manager Pro
User Manual
Software Overview
Home Loan Manager Pro has been specially designed to work with the loan details provided to
you by your lender. Using the information on your mortgage statements, the software will allow
you keep an accurate record of all your loans, instantly check the accuracy of your interest
charges, summarize your expenses, and help you plan for the future.
Keep Accurate Records
With Home Loan Manager you can keep an accurate record of all your loans in the one
convenient location. Capture interest rate changes, balances, statement information, and all types
of transactions including extra repayments, fees, taxes, and interest charges.
The software will let you enter as much or as little historical information as you want. When you
first start using Home Loan Manager we recommend that you start with your newest statement
first, and then add your older statements at a later date. This is particularly useful if you want to
start by importing your transactions and your Internet banking site only contains the latest
information.
Check For Errors
Not sure if your lender’s interest calculations are correct? Want to find out if you are receiving the
full benefit of your offset account and any extra repayments you’ve made? The following reports
have been designed to check your mortgage and loans for bank errors:
www.homemoneymanager.com.au
6
Home Loan Manager Pro
User Manual
The Balance Checker will confirm that all your transactions and balances have been correctly
processed by the bank.
The Interest Checker (and Offset Account Checker) will quickly highlights any errors in the
interest charges of your loans.
If your lender has incorrectly calculated your interest, The Refund Calculator (and Error
Compounder) will display the refunds you are due, by calculating the total compounding cost of
each error.
The Daily Interest Report will show a breakdown of the interest you are being charged on each
loan.
Review Your Costs
You can get an instant picture of what your loans are costing you, statement-to-statement and
year-to-year, by letting the mortgage software automatically group and categorize the transactions
on your statements. The following reports will help you discover what your loans are costing you:
The Yearly Totals Report will show you the total costs of your loans for ANY year.
The Yearly Comparison Report will compare totals between two different years.
The Statement Comparison Report will compare totals between to different statements.
Plan For The Future
Worried about interest rate rises? Want to find out how to pay off your mortgage sooner? The
following reports will give you answers and keep you informed as you circumstances change:
The Increased Repayments Report will allow you to work out how much you can save over the
life of your loan, by increasing your mortgage repayments.
The Interest Rate Rise Report will let you prepare for interest rate rises, by showing you the
impact on your repayments, and total cost to your loan.
The Detailed Payout Plan will let you work out how many years you can afford to cut off your
loan, and how much you will save in interest charges.
Be Debt Free Sooner
Do you want to cut years off your mortgage and save thousands? Lock in your target and we’ll
help you every step of the way:
Your Payout Plan lets you decide how quickly you would like to pay off your mortgage, and then
shows you exactly what you have to do to achieve it. It works with your current balance and is
automatically updated every time you enter your latest loan details, keeping you on track every
step of the way.
Importing Transactions
To save you manually typing in all your historical details, if you have access to your transactions
via your Internet banking website (or you currently have them in a spreadsheet), the import wizard
will help you load them in seconds
Refer to the importing transactions help topic for more information.
www.homemoneymanager.com.au
7
Home Loan Manager Pro
User Manual
Transaction Categories
To help you get the most out of the loan information you enter into Home Loan Manager Pro, you
can allocate categories to your transactions (for example, a transaction may be a FEE, or an
INTEREST charge, or a DEPOSIT, or a WITHDRAWAL, etc). You can use the default list of
categories, or you can set up your own.
Category Auto-Matching
To save you manually allocating categories to every transaction, Home Loan Manager Pro
provides you with a Category Auto-Matching tool. This tool will automatically allocate categories
to new transactions by examining categories you allocated in the past, and by using any category
wildcard patterns you set up.
Refer to the category auto matching help topic for more information.
Workbooks
Home Loan Manager Pro stores all your loan information in a file on your computer called a
workbook (with a file extension of .hlnn). Normally you would set up one workbook with all your
loans in it, however there is no limit to the number of workbooks you can create.
What Next?
Open the sample workbook and take the software for a test drive. To find a sample account that is
similar to your own loan, refer to the sample workbook help topic for a description of each of the
accounts in the workbook.
For step-by-step instructions on setting up your own workbook, adding a loan, and entering your
first statement, refer to the entering your loan details help topic.
www.homemoneymanager.com.au
8
Home Loan Manager Pro
User Manual
Sample Workbook
The easiest way to try the features of Home Loan Manager Pro is to open the sample workbook
and have a play with the example accounts. You can open the sample workbook at any time by
selecting Open Sample Workbook from the File menu.
Once the workbook is open, (1) the example accounts are listed on the left hand side of the
screen under the ACCOUNTS title, and (2) you can view the different accounts by clicking on the
name in the list.
The example accounts can be a useful reference when you set up your own loan information in
the software, and the following section provides more information on each one of them.
“Home Loan - Mrs A Citizen”
Example of a typical home loan.
This loan is a 30-year principal and interest home loan, with variable interest rates, and a monthly
account keeping fee.
A payout plan has been set up to show what it would take to cut five years off the loan.
Transactions are downloaded from the Internet once every six months and loaded into the
software with the import transaction wizard. The automatching tool then instantly allocates all the
categories.
Tip - The samples directory contains a .csv file with the latest set of transactions for this account.
As an exercise you may wish to (1) add the next statement for the account, and then (2) import
the transactions.
“Home Loan Redraw - Mrs A Citizen”
Example of a typical home loan with a redraw facility.
www.homemoneymanager.com.au
9
Home Loan Manager Pro
User Manual
This loan is a 30-year principal and interest home loan, with variable interest rates, and a monthly
account keeping fee. The loan has a redraw facility, so all extra money deposited into the account
reduces the amount of interest charged on the loan.
So far the homeowner has made several additional repayments to the loan, from bonus overtime
earned and a tax refund, and has also made one large withdrawal to help with house renovations.
The homeowner has also set up a payout plan to help them cut 2 years off the loan, and is on
track to save over $56,000 in interest charges if they manage to increase their repayments by and
approximately $65 each month.
“Interest Only Loan - Mr A Citizen”
Example of an investment property loan.
This loan is a 20-year investment interest only loan with variable interest rates, and a monthly
account keeping fee.
The homeowner switched the loan in the first three months to remove the account keeping fee
and to take advantage of a better interest rate.
“Investment Loan - Miss A Citizen”
Example of a share trading or margin loan.
This investment loan is a 20-year line of credit with no repayments, and variable interest rates.
The homeowner negotiated a discount of 0.50% off the standard interest rate and all interest
charges are being capitalised back into the balance. Each time a share parcel is purchased it is
funded directly from the loan.
“Line of Credit - Mrs A Citizen”
Example of a mortgage being set up as a line of credit, with all income and expenses going
through the loan.
This loan is a 30-year line of credit, with principal and interest repayments, and the ability to
frequently deposit and withdraw money. The current borrowing limit is 200,000 and the bank
charges a penalty rate on amounts over this limit. A discount of 0.10% off the standard rate was
included as part of a credit card package.
The homeowner deposits all salary and rental income directly into the loan. Day to day living
expenses are being paid for with a credit card, which is paid off once a month via a direct transfer
from the loan. Additional deposits and withdrawals are made as more money becomes available
or is required.
“Mortgage Offset - Mr & Mrs A Citizen”
Example of a mortgage linked to an offset account.
This mortgage is a 30-year principal and interest home loan with variable interest rates.
The homeowners were awarded a discount of 0.25% off the standard rate for being members of a
professional association. In addition the account is linked to a 100% deductible offset account so
that any additional funds can be placed in the account to reduce the monthly interest. A payout
plan has been set up to keep them on track to cutting 15 years off their mortgage, and helping
them save more than $450,000 in interest charges.
www.homemoneymanager.com.au
10
Home Loan Manager Pro
User Manual
What Next?
For information on how this software will help you manage your loans, refer to the software overview
help topic.
For step-by-step instructions on setting up your own workbook, adding a loan, and entering your
first statement, refer to the entering your loan details help topic.
Entering Your Loan Details
This help topic will take you through the steps of setting up your own workbook, adding a loan,
and entering your first statement. All the examples are based on the account “HOME LOAN - Mrs
A Citizen” from the sample workbook, therefore if you open the sample workbook you can work
through the exercises. This help topics contains the following sections:
1. Example of a Loan Statement
2. Overview
3. Setting up a workbook
4. Creating an Account
5. Adding a Statement
6. Adding Transactions
7. Assigning Transaction Categories
8. Adding Interest Rate Changes
9. Updated Summary View
10. What Next?
1. Example of a Loan Statement
Most of the information you need to enter into the software is available on the statements sent to
you by your lender. While statements vary slightly from lender to lender, they generally contain
the following information:
1. The STATEMENT details (start date, end date, opening balance, etc) (1).
2. The INTEREST RATE changes (if any in the period) (2).
3. The TRANSACTIONS that took place in the statement period (3).
www.homemoneymanager.com.au
11
Home Loan Manager Pro
User Manual
The rest of this help topic will show you how to add this sample statement to the software.
www.homemoneymanager.com.au
12
Home Loan Manager Pro
User Manual
2. Overview
The first step to entering your loan details is to (1) set up your own workbook to hold your
information. You can then (2) add your first loan, which will hold each of your (3) statements. (4)
Add transactions to each statement - by importing them from your Internet banking site or by
typing them in manually, and then (5) assign categories to your transactions - using the AutoMatching tool or by selecting them manually. The final step is to (6) set up the interest rate
changes for the account.
3. Setting up a workbook
Before you can start entering your loan details into the software you need to set up your own
workbook to store them in. From the file menu select the New Workbook option.
www.homemoneymanager.com.au
13
Home Loan Manager Pro
User Manual
Tip - The user option “Open Last Workbook At Start Up” allows you to automatically open you
workbook each time you start the software, and by default this option is enabled.
4. Creating an Account
Once you have set up your workbook, you can add your first loan. Click on the Add button under
the ACCOUNTS heading to open the account details screen.
To set up an account you need to enter information into the three sections on the screen:
1. The ACCOUNT DETAILS section allows you to describe the account (1).
2. The INTEREST DETAILS section allows you specify the way the interest is calculated on
the account. This information is used by the software to check your interest charges (2).
3. The OFFSET ACCOUNT DETAILS allows you to link an offset account to a loan account
(3).
If you need more information on what to enter into each field, (4) click on the Help button. Once
you have finished (5) click on the Ok button to create the account.
www.homemoneymanager.com.au
14
Home Loan Manager Pro
User Manual
Tip - “Days in Year” is normally set 365 (sometimes 366), and “Interest Calculated Up to” is
normally set to 1 (sometimes 0). Refer to the Interest Calculations help topic for more information
on what each field does.
5. Adding a Statement
For each statement you receive from your lender, you need to set up a statement in the software.
To add the statement (1) switch to the statements view for the account, and then (2) click on the
Add button to open the statement details screen.
www.homemoneymanager.com.au
15
Home Loan Manager Pro
User Manual
To create the statement you need to (3) enter the statement start date, end date, reporting year
and the opening balance.
Tip - If you type in 337906.55 the software will automatically add the negative sign and change
the format to -337,906.55.
Using the information from our sample statement above, you can find (4) the start date, end date
and opening balance. The reporting year is used by the reports to determine which yearly totals
the statement should be included in, and you can set it to any value you want. As the start and
end date for this statement are both in 2010, we have set the reporting year to 2010.
www.homemoneymanager.com.au
16
Home Loan Manager Pro
User Manual
Once you have entered your statement details click on the Ok button to add the statement to the
account. (5) It will now appear in the statements view. NOTE: As we are working with the existing
“HOME LOAN - Mrs A Citizen” account from the sample workbook there are already 7 statements
in the account. When you set up your first statement, there will only be one in the statement view.
When entering statements you are not required to enter the Closing Balance, as it is
automatically calculated by adding the transaction Withdrawal and Deposit amounts to the
Opening Balance. As we have not yet added any transactions to our new statement, (6) the
Withdrawal and Deposit amounts are both 0.00, and the closing balance is the same as the
opening balance.
6. Adding Transactions
Now that the statement has been set up we can enter the transactions. (1) Switch to the
transaction view and (2) check that you are working with the correct statement. The (3)
transaction view will show you the transactions you have entered for a statement, including the
default opening and closing balance entries.
www.homemoneymanager.com.au
17
Home Loan Manager Pro
User Manual
There are two ways you can add your transactions to the statement, you can type them in, or you
can import them from a file. If you wish to manually type in your transactions (4) click on the Add
button and use the information from your printed statements. In this example we are going to
import the transactions from a file, therefore we’ll (5) click on the Import Transactions button. Full
instructions on how to use the import wizard, including step-by-step instructions on how to load
the statement for this example, can be found in the importing transactions help topic.
www.homemoneymanager.com.au
18
Home Loan Manager Pro
User Manual
After starting the import wizard and working through the required steps, the transactions are
automatically loaded into the statement. (6) They are now visible in the transactions view screen,
(7) the statement description has been updated to include the number of transactions loaded, “(18
transactions)”, and (8) the software is waiting for you to select a category for each of your
transactions.
www.homemoneymanager.com.au
19
Home Loan Manager Pro
User Manual
7. Assigning Transaction Categories
By assigning categories to your transactions, the reports can group and total the costs on your
loans. You can instantly find out the total you are paying in fees, how much interest you paid, how
much you repaid this period, and so on.
7.1. Manually Selecting Categories
To manually select a category for a transaction, (1) click on the transaction category you wish to
change and (2) choose a category from the list.
Tip - You can modify the existing categories, and add your own, by selecting the Maintain
Categories option from the Category menu.
7.2. Using the INTEREST Category
The INTEREST category is a special category that is used by the reports to check your lender’s
interest calculations. All (1) interest transactions in your statements should be (2) assigned the
“INTEREST - Periodic Interest” category.
www.homemoneymanager.com.au
20
Home Loan Manager Pro
User Manual
IMPORTANT - If you assign the INTEREST category to transactions that are not interest charges,
the reports will not produce the correct results.
7.3. Automatically Assigning Categories
One of the unique features of this software is the “Auto-Matching” tool, which will save you having
to manually select categories for every transaction. It is designed to detect patterns in the
categories you are manually selecting, and then automatically match categories for you.
www.homemoneymanager.com.au
21
Home Loan Manager Pro
User Manual
For example, when (1) a category is assigned to the first “INTEREST CHARGED” transaction in
the statement, the software detects that there are another five interest transactions in the
statement that it can automatically match. If you choose to run the tool, it will (2) update the
categories on the other interest transactions. Full details on the category auto matching process
can be found in the category auto matching help topic.
After you have added the transactions to the statement, you can return to the statement view
screen and review the Withdrawal and Deposit amounts, and check that the closing balance
matches the balance on the printed statement.
www.homemoneymanager.com.au
22
Home Loan Manager Pro
User Manual
8. Adding Interest Rate Changes
The last step to entering your statement information is to enter any interest rate changes for the
period. If there have been no rate changes then you can skip this step. To add the interest rate
changes, (1) switch to the interest rates view for the account, and then (2) click on the Add button
to open the interest rates details screen.
Using the example statement from above, (3) there is one interest rate change to add to the
account.
Enter (4) the date the interest rate changed, along with the new rate. If you have a line of credit
loan that charges penalty rates, (5) enter the penalty rate and the agreed amount at which the
rate starts being charged. (6) Click on the Ok button to add the interest rate change to the
account.
www.homemoneymanager.com.au
23
Home Loan Manager Pro
User Manual
Tip - The discount field allows you to capture any special discounts you have negotiated with your
lender.
9. Updated Summary View
Once you have finished entering your first statement return to the account summary view. You
can see that the Latest Information section of the screen has automatically been updated to
reflect the statement that has just been added.
10. What Next?
Continue adding your statements from oldest to newest, entering the transactions and interest
rate changes for each. You can start running the reports after you have added your first
statement.
www.homemoneymanager.com.au
24
Home Loan Manager Pro
User Manual
For instructions on loading your transactions from your Internet banking site, refer to the importing
transactions help topic.
When you first run the audit reports, if things don’t look quite right, refer to interest errors help
topic to find out how to fine-tune your account settings.
www.homemoneymanager.com.au
25
Home Loan Manager Pro
User Manual
Importing Transactions
To save you manually typing in all your transactions, Home Loan Manager Pro provides you with
an import wizard so that you can automatically load your transactions into your statements. For
more information on importing transactions please select from the following topics:
1. Overview
2. Step-by-Step Instructions
3. What type of files can I import?
4. What is a CSV file?
5. How do I get my transactions into an import file?
6. How do I import my transactions from a spreadsheet?
1. Overview
The first part to the import process allows you to the select the statement you want to update, and
to choose the import file that contains your transactions (1).
The import wizard will then take you through the steps needed to specify the layout of your import
file, and to map the columns in your file to the information required to create the transactions (eg
the amount, date, description, etc) (2).
The final step is to physically import the file, where your transactions are automatically loaded into
the nominated statement (3).
2. Step-by-Step Instructions
This section contains step-by-step instructions on importing a CSV file into a statement.
2.1. Importing Transactions
To start the import process click on the Import Transactions button on the toolbar (or from the
Action menu choose Import Transactions).
www.homemoneymanager.com.au
26
Home Loan Manager Pro
User Manual
2.2. Select a Statement and Choose a File
The Import Transactions screen requires that you:
1. Check the “Statement to Update” is set to the statement you wish to load your
transactions into. NOTE: If you want to add your transactions to a new statement, you will
need to create it before starting the import process (1).
2. Enter the filename (including the full directory path) of the import file that contains your
transactions, or Click on the Browse... button to locate the file (2).
3. If you are updating an existing statement and it already contains transactions, decide if
you wish to delete them or append to them (3).
4. Click on the Start Import Wizard button to start working with your file (4).
www.homemoneymanager.com.au
27
Home Loan Manager Pro
User Manual
2.3. Using the Import Wizard
As you work through the import wizard steps you will notice that each step has the following
screen components:
1.
2.
3.
4.
Instructions for the current step (1).
Input fields allowing you to enter the requested information (2).
A File Sample panel that displays the contents of your import file (3).
Navigation buttons allowing you to move between the different steps (4).
2.4. Step 1 - Specify the File Layout
The first step of the Wizard requires that you to specify the layout of the file you wish to import. If
your file contains unwanted header or footer information then you can exclude them by changing
the start and end row fields.
www.homemoneymanager.com.au
28
Home Loan Manager Pro
User Manual
Adjust the Column Delimiters and Text Delimiter fields until your information appears in columns
in the File Sample table. The most common file formats are Comma Separated Values (CSV) files
where the information is separated by commas, and Text files where the information is separated
by Tab characters.
For CSV (.csv) files select the comma delimiter, for Text (.txt) files select the Tab delimiter.
As the information in our sample file is in CSV format, selecting the comma delimiter places the
information neatly into columns.
Click on the Next button.
2.5. Step 2 - Select the Transaction Amount
Once your import file is being displayed as columns in the File Sample panel, select the column
that contains the transaction amounts. If you have two columns with transaction amounts (for
example, debits and credits), select the first column. You can do this by typing in the column
number into the field provided (1), or by clicking on the column in the File Sample panel (2).
www.homemoneymanager.com.au
29
Home Loan Manager Pro
User Manual
If the amounts in your file contain a currency symbol (for example $, £, ¥, A$, Z$, Rp, etc) then
type it into the currency symbol field.
IMPORTANT - If you are importing transactions into a Loan or Mortgage statement, then deposits
should be displayed as positive numbers, and the interest charges and fees should be displayed
as negative numbers in the File Sample panel.
www.homemoneymanager.com.au
30
Home Loan Manager Pro
User Manual
If they are currently being displayed incorrectly then select the “Reverse the sign on the amount”
field to change them.
Click on the Next button.
www.homemoneymanager.com.au
31
Home Loan Manager Pro
User Manual
2.6. Step 3 - Select the Second Transaction Amount
If all your transaction amounts are displayed in the one column, then you can skip this step. If you
have two columns with transaction amounts in them, then choose the second column. If required,
enter the currency symbol and change the signs on the amounts (+/-).
Tip - If you have two columns with amounts (for example, debits and credits) it doesn’t matter in
which order you assign them to Amount and Amount 2. The important thing to check is that the
numbers in each column have the correct sign (+/-), adjusting them with the “Reverse the sign on
the amount” field if required.
Click on the Next button.
www.homemoneymanager.com.au
32
Home Loan Manager Pro
User Manual
2.7. Step 4 - Select the Transaction Date
Select the column that contains the transaction dates.
Select the Date Format (1) and Date Separator (2) to match the dates in the column (for example,
given a date of “20/03/2008” select a date format of “DMY” and a date separator of “/”)
Click on the Next button.
www.homemoneymanager.com.au
33
Home Loan Manager Pro
User Manual
2.8. Step 5 - Select the Transaction Description
Select the column that contains the transaction descriptions.
Click on the Next button.
www.homemoneymanager.com.au
34
Home Loan Manager Pro
User Manual
2.9. Step 6 - Import the Transactions into the Statement
If you have correctly specified a column for each of the required fields, step 5 will show you the
Ready to Import message (1). Start the import by clicking on the Finish button (2), and if
everything is valid the transactions will be loaded into the statement.
www.homemoneymanager.com.au
35
Home Loan Manager Pro
User Manual
2.10. Import Failed Message
If any of the values you have selected are incompatible with the import file, then you will see the
Import Failed message (1). To find out why the import failed, review the errors in the File Sample
panel by clicking on the fields with the red borders (2). Once you have reviewed the errors and
gone back and addressed the problems, you can re-start the import.
3. What type of files can I import?
The import wizard allows you to import delimitered text files (where the information in your file is
separated by a delimiter). Your import file can contain one of more delimiters, including commas,
tabs, semicolons, spaces, etc.
The most common file formats are Comma Separated Values (CSV) files where the information
is separated by commas, and plain text files where the information is separated by Tab
characters.
www.homemoneymanager.com.au
36
Home Loan Manager Pro
User Manual
4. What is a CSV file?
A CSV file is simply a text file where the information is separated by commas. The format dates
back to the early days of business computing, is very simple and widespread, and is supported by
almost all spreadsheets and financial software packages. In addition most Internet banking sites
provide the option of downloading information in CSV format.
You can find an example of a CSV file in the samples directory of the software. If you open this
file in a text editor you will notice that commas separate the transaction information.
If you want to import a CSV file into the software you need to select the Comma as the Column
Delimiter. This will allow the wizard to put each value into a separate column ready for importing.
5. How do I get my transactions into an import file?
Most banks allow you to view your transactions online via their Internet banking site, and provide
you with the option to download your transactions to a CSV file.
When viewing your transactions online, look for the download or export option and select the CSV
format (other names for the CSV file format include: CSV text file, Comma Separated Values
(CSV), Spreadsheet file, Plain Text file). If you can’t see any of these options please contact your
lender for more information on how to download your transactions into a CSV file.
www.homemoneymanager.com.au
37
Home Loan Manager Pro
User Manual
Once you have downloaded your transactions and stored the file on your computer, it is ready to
load directly into the software using the import wizard.
6. How do I import my transactions from a spreadsheet?
Most spreadsheet packages provide you with the option of saving your work as a Comma
Separated Values (CSV) file. Therefore all you have to do is save your spreadsheet as a CSV file,
and then you can load it directly into the software using the import wizard.
www.homemoneymanager.com.au
38
Home Loan Manager Pro
User Manual
Category Auto Matching
To save you manually allocating categories to every transaction, Home Loan Manager Pro
provides you with a Category auto-matching tool.
Note: The Auto Match option will remain disabled until the account contains at least one
statement.
Overview
The category auto-matching tool tries to match categories to transactions automatically, and once
tuned to your needs it will do most of the matching for you.
The tool uses two main techniques, which are covered in more detail below:
1. Previously Matched Transactions.
2. Category Wildcard Patterns.
Previously Matched Transactions
Some transactions come up statement after statement. For example, the transaction that reflects
the interest you are charged may appear on each statement with a description similar to “Interest
Payable”.
The first time you enter a new transaction description into Home Loan Manager Pro, you will need
to manually assign it to an appropriate category (for example “INTEREST - Periodic Interest”).
From then on the auto-matching tool will recognise that the category “INTEREST - Periodic
Interest” should be assigned to all “Interest Payable” transactions and it will automatically match
them for you.
Category Wildcard Patterns
Often a word in a transaction description can make it a good candidate to be placed in a category.
For example, one month your interest transaction may be “Interest Payable to 30 August” with the
following month being “Interest Payable to 28 September”. It would be convenient if any
transaction description containing the words “Interest Payable” could automatically be assigned
the category “INTEREST - Periodic Interest”.
This type of matching can be easily achieved through the Category Wildcard Patterns.
For example, from above, you could set up the wildcard “contains Interest Payable” for the
category “INTEREST - Periodic Interest”.
When you run the auto-matching tool, any transaction containing “Interest Payable” would
automatically have the category “INTEREST - Periodic Interest” assigned to it.
From the Category menu choose Category Maintenance to set up and maintain Category
Wildcard Patterns.
Restrictions
The auto-matching tool has been designed to assign categories to transactions only if they have
not already been matched.
This will prevent it trying to change any categories that you have manually assigned or previously
auto-matched.
www.homemoneymanager.com.au
39
Home Loan Manager Pro
User Manual
Running the Auto Match tool
1. From the Action menu choose Auto Match.
2. Select the statement you wish to auto match.
3. By default the auto-matching tool will use the Category Wildcard Patterns. If you do not
wish to use the category wildcard patterns deselect the “Match to Category Wildcard
Patterns” check box.
4. By default the auto-matching tool will use the transactions you have matched in the
current statement. If you do not wish to use the current statement then deselect the
“Match to Current Statement” check box.
5. By default the auto-matching tool will use all previously loaded statements. You can
select the number of statements to match to by selecting from the drop down list.
www.homemoneymanager.com.au
40
Home Loan Manager Pro
User Manual
Offset Accounts
An offset account is an account designed to reduce the amount of interest you are charged on
your loan or mortgage, by reducing your loan balance before the interest is calculated.
For example, if you have a loan with a value of -100,000, and an offset account with a value of
5,000, then your interest payable would be calculated on -95,000.
If your lender has provided you with an offset account for your loan, then the following steps will
show you how to set it up.
Link the Accounts
You need to set up two separate accounts, one for your loan and one for your offset account. We
recommend that you use the word Offset in the title of the offset account. For example, if your
loan account is named “Home Mortgage”, then we recommend you call the offset account “Home
Mortgage Offset”.
The loan account is set up in the normal way (Add a new account and select the account type
“Loan / Mortgage”).
To create an offset account, Add a new account to the workbook, and select the account type
“Interest Offset”.
To link the offset account to the loan account, you need to:
1. Enter the allowable offset amount (this is the amount of the balance that can be used in
the interest calculations, and is normally set to 100%).
2. Select the loan you want to link it to by choosing an account from the list Loan for this
Offset Account.
Statements and Transactions
All statements and transactions for the offset account are entered separately from the loan
account. You need to create new statements for the offset account and add all the required
transactions (or import them).
Interest Rates
The interest rates for the offset account and the loan account are maintained separately. If your
offset account has the same interest rates as your loan, use the Copy Rates options from the
Interest Rates view for the offset account.
Reporting
Most of the reports are designed to be run against the loan account, not the offset account. That
is, you should select the loan account before running the required report.
The Interest Checker Report will automatically include the balance of the offset account when it
calculates the Estimated Interest Paid for your loan. To see the details of the offset account
interest you are saving, select the Offset Account tab in the report.
The Refund Calculator Report will automatically include the balance of the offset account when it
calculates the refund amounts for your loan.
The Daily Interest Report provides a detailed breakdown of the loan account and offset account
information, including the balances, daily interest rates, interest on each account, the allowable
offset amount and the total interest that should have been charged per day.
www.homemoneymanager.com.au
41
Home Loan Manager Pro
User Manual
The Planning Reports give you the option of including the offset balance in the calculations, so
that you can instantly see how much you will save in interest charges over the life of the loan.
www.homemoneymanager.com.au
42
Home Loan Manager Pro
User Manual
Screens
This page provides an overview of the main screens used to enter your loan information into
Home Loan Manager Pro . Click on the screen name below or scroll down the page for more
details on each.
1. Account Details Screen
2. Statement Details Screen
3. Transaction Details Screen
4. Interest Rate Details Screen
Account Details Screens
The account details screen allows you to maintain your accounts, and contains the following
fields:
ACCOUNT DETAILS
Account Type
For new accounts, if you are adding a loan, mortgage, line of credit, or any
other form of debt, set the account type to Loan / Mortgage. If you are setting
up an account that will offset the interest charges on a loan, set the account
type to Offset Account.
Note: Once you have created (added) an account, you cannot change the
www.homemoneymanager.com.au
43
Home Loan Manager Pro
User Manual
account type.
Account Name
Identifies the account and is used in the title of all the screens and reports.
Account Number
The account number allocated to you by your lender.
Lender Name
The name of the lender or bank providing the account.
Original Loan
Date (or Date
Created)
For a loan or mortgage this is the contract date (usually the date you
borrowed the money). For other account types this is the date the account
was set up with the lender.
Tip - This date lets the software know how old your account is, and therefore
it must always be set to the original contract date of the loan. If you decide
you only want to enter the latest statements for the loan (for example, if you
have a loan that is ten years old and you only want to enter statements for
the last year), this date should still be set to the original date from ten years
ago (and not the date you start entering statements).
Original Loan
Term
For a loan or mortgage this is the loan term in years (Eg 30). If the account
has no loan term then leave this field empty (Eg line of credit account, offset
account).
Original Loan
Amount
For a loan or mortgage this is the amount you have agreed to borrow. For a
line of credit this amount is the total credit limit. For an offset account this
amount would be zero.
Tip - In Home Loan Manager Pro an account balance should be set to a
negative number when you owe money. Therefore all your loan and
mortgage accounts will normally have negative balances.
INTEREST DETAILS
Days In Year
Number of days in the year that Home Loan Manager Pro will use in the
interest calculations. The most common setting is 365, however please
check your loan contract for details on interest calculations.
Tip - Refer to the Interest Calculations help topic for more information.
Interest
Calculated
Up to Day(s) Prior
to Interest
Transaction Date
This field impacts the date range used in the interest checker report.
Normally a lender will calculate interest up to the day prior to them charging
you. For example, if you have an interest transaction on your statement with
a date of the 25th of May, then it is most likely for the period ending the 24th
of May.
www.homemoneymanager.com.au
44
Home Loan Manager Pro
User Manual
Home Loan Manager Pro automatically estimates the date range used by
your lender in their interest calculations, by using the date you enter for the
interest transaction, and the value you enter into this field.
th
For example, if your interest transaction is dated the 25 of May (and this
field is set to 1), then the interest checker report will calculate the interest up
to the 24th of May. If you set this field to 2 then it will calculate interest up to
rd
the 23 of May, and so on.
If your lender does not follow a set pattern, or they process a transaction late
one month, then you can edit the individual interest transactions and
manually specify the required end date in the field “Date Interest Calculated
Up To”.
Tip - Refer to the Interest Calculations help topic for more information on
interest period date ranges.
OFFSET ACCOUNT DETAILS
Offset Account
for this Loan
If you are currently viewing a loan account, then this field will display the
offset account you have linked to it. The drop down box will display all valid
offset accounts in the workbook that can be assigned to this loan.
Note - If you select an offset account that is already linked to another loan, it
will break the link from the old loan, and link it to the current loan account you
are viewing.
Allowable Offset
Deduction
This determines how much of the offset account can be used as a deduction
against the primary loan (default is 100%)
Loan for this
Offset Account
If you are currently viewing an offset account then this field will display the
primary loan account it is linked to. The drop down box will display all valid
loan accounts in the workbook that this offset account can be linked to.
Note - If you select a loan account that is already linked to another offset
account, it will break the link from the old offset account, and link it to the
current offset account you are viewing.
www.homemoneymanager.com.au
45
Home Loan Manager Pro
User Manual
Statement Details Screens
The statement details screen allows you to maintain your statements, and contains the following
fields:
Start Date
The start date of the statement. This field would normally be set to the start
date as it appears on your statement. If you do not receive statements, then
set this field to the start of the transaction date range you wish to process.
Tip - When you first start using Home Loan Manager Pro you don’t have to
start with the oldest statement first. For example, if you have a loan that is
ten years old and you want to get started with the statements for the last
year, you can create your first statement starting a year ago and add older
statements at a later date.
Tip - You should keep the date ranges of your statements in a continuous
time line. That is, the start date of one statement should be the end date of
the previous statement plus one day. When you create a new statement,
Home Loan Manager Pro automatically calculates a default start date for you
(using the end date of the previous statement).
End Date
The end date of the statement. This field would normally be set to the end
date as it appears on your statement. If you do not receive statements, then
set this field to the end date of the transaction date range you wish to
process.
Reporting Year
The reporting year is used in the Summary reports to group information into
yearly totals. Normally you would set it to the same year as the start and end
date. If the statement start date and end date are in different years then you
can select either year as the value for this field. There are no constraints on
the reporting year, except that it must be a number.
Opening Balance The balance of the account as at start date. This field would normally be set
to the opening balance on your statement. If you do not receive statements
then this value must match the balance of the account as at the date you
have nominated in the start date field.
Note: In Home Loan Manager Pro an account balance should be set to a
www.homemoneymanager.com.au
46
Home Loan Manager Pro
User Manual
negative number when you owe money. Therefore all your loan and
mortgage accounts will normally have negative balances. You can enter a
negative or positive number and Home Loan Manager Pro will automatically
set it to negative if required.
Transaction Details Screen
Tip - If you are adding your transactions by typing them in (instead of importing them) you can
use the Add More button to process the current transaction you are working with and
automatically display the screen again ready for the next transaction.
The transaction details screen allows you to add and edit your transactions, and contains the
following fields:
TRANSACTION DETAILS
Date
The date the transaction amount impacted the account balance. This field
would normally be set to the transaction date as it appears on your
statement.
Description
A meaningful description for the transaction.
www.homemoneymanager.com.au
47
Home Loan Manager Pro
User Manual
To save you having to type in all your transaction descriptions, Home Loan
Manager Pro will auto-fill the field as you type, based on previous transaction
descriptions you have entered for the account.
Category
The category the transaction is to be grouped under in the Summary reports.
Note: Set the category to INTEREST if the transaction is an interest charge
that is to be audited. Refer to the entering your loan details help topic for
more information on assigning categories.
Note: You can change the category descriptions by selecting Maintain
Categories from the main Category menu (you will need to close the
transaction details screen first).
Amount
The amount of the transaction. This field would normally be set to the
transaction amount as it appears on your statement.
Balance
The balance amount for this transaction.
Note: If the balance does not match the amount on your statement, check
you have entered all of the transactions before this one in the same order as
they appear on your statement, and check the statement opening balance
you have entered into the software is correct.
ADVANCED OPTIONS
Optional Sort
Order
This field is used by Home Loan Manager Pro to help sort two or more
transactions that have the same transaction date. If you are manually
entering transactions in the same order as they appear on your statement,
then this field will automatically be maintained for you and you can ignore it.
If you import your transactions then you may need to change this value.
For full details refer to the transaction sort order help topic.
Date Interest
Calculated Up to
This field is optional and it is only applicable to transactions that have been
allocated a category of type INTEREST.
If this field is left blank (recommended) then the interest calculator will use
the default value on the account and calculate the end date for the interest
period by using the transaction date, and subtracting the default number of
days nominated in “Interest Calculated Up to Day(s) Prior to Interest
Transaction Date”.
If you enter a date into this field then the interest calculator will use it as the
end date for the interest period when calculating interest, instead of the
default value set on the account.
Tip - For most interest transactions leave this field blank and let the interest
www.homemoneymanager.com.au
48
Home Loan Manager Pro
User Manual
calculator use the default value set on the account. You should only set a
value in this field if your lender doesn’t follow a set pattern with your interest
charges and you need to manually tell the interest calculator the end date of
an interest transaction. Refer to the interest details section on the account
screen for more information on how to use this field.
Manual
Adjustment
to Amount
This field is only applicable to transactions that have been allocated a
category of type INTEREST.
The Interest Checker Report and the Refund Calculator Report use the
“Manual Adjustment to Amount” and “Manual Adjustment to Estimate” values
to adjust the report values before displaying them.
These two fields are normally used as a way of removing small rounding
errors from being displayed on the reports, without having to edit the
transaction amount (which would have a flow on effect to the balance).
Refer to the rounding errors help topic for more details.
Manual
Adjustment
to Estimate
This field is only applicable to transactions that have been allocated a
category of type INTEREST.
Please see explanation for “Manual Adjustment to Amount” above.
Reason for
Manual
Adjustment(s)
This field is only applicable to transactions that have been allocated a
category of type INTEREST.
Enter the reason you are setting values for “Manual Adjustment to Amount”
and/or “Manual Adjustment to Estimate”.
Interest Rate Details Screens
www.homemoneymanager.com.au
49
Home Loan Manager Pro
User Manual
The interest rate details screen allows you to maintain your interest rate changes, and contains
the following fields:
INTEREST RATES
Start Date
The date this interest rate should be applied from (inclusive).
Lender Rate
The yearly interest rate charged by your lender.
If you do not receive a discount (see Discount Rate below) then this field
should be the yearly interest rate that your lender uses to calculate your
interest. Normally the interest rate will be displayed on your statement.
Note: If you are calculating you own values from an index, then this figure
should include the margin applied by your lender.
Discount Rate
This field is optional. If you do not receive a discount then leave the field
blank (or 0.000%).
If you have negotiated a discount from the standard lender rate, then enter it
here. For example, if you belong to an organization that receives a 0.500%
discount, then enter 0.500% in this field.
Note: Before entering a discount rate, check that the interest rate your lender
is providing on your statements hasn’t already been adjusted for the
discount. If your lender is already adjusting the rate, then leave this field
blank, otherwise Home Loan Manager Pro will include your discount twice.
Actual Rate
The actual rate is calculated from the two fields above, and is set to the
“Lender Rate” less the “Discount Rate”. Home Loan Manager Pro uses the
“Actual Rate” value in all internal interest calculations.
If you don’t enter a discount rate, then this field will always match the lender
rate.
Note: The actual rate figure must match the yearly rate being used by your
lender to calculate your interest, therefore if you have set a discount rate,
please make sure this rate is correct.
PENALTY RATES (OPTIONAL)
Penalty Rate
The penalty rate charged by your lender if you borrow over an agreed limit.
This field is optional and is mainly used for line of credit loans. The rate
should be the total penalty rate charged. For example, if your lender normally
charges you 7.5% with a 2% penalty on amounts over 100000, then this rate
should be set to 9.5% (= 7.5% + 2%), and the balance field should be set to
100,000 (see Balance below).
www.homemoneymanager.com.au
50
Home Loan Manager Pro
User Manual
Leave the field blank (or 0.000%) if penalty rates don’t apply.
Balance
The starting balance for the penalty rate.
This field is optional and is used with the penalty rate. If this field is set to a
value greater than zero it will be used in the interest calculations to
determine when the penalty rate should be applied.
Leave the field blank (or 0.00) if penalty rates don’t apply.
Note: The penalty rate is only applied to the proportion of the balance over
the amount specified in this field.
www.homemoneymanager.com.au
51
Home Loan Manager Pro
User Manual
Reports
Home Loan Manager Pro provides you with a set of powerful reports to work with your loan and
mortgage information. Click on the report names below to find out more about each report.
1. Balance Checker Report
2. Interest Checker Report
3. Refund Calculator Report
4. Daily Interest Report
5. Yearly Totals Report
6. Yearly Comparison Report
7. Statement Comparison Report
8. Increase Repayments Report
9. Detailed Payout Plan Report
10. Interest Rate Rise Report
11. Your Payout Plan
Tip - You can copy and paste the results from the of the reports to other software packages
(either use keyboard shortcuts, or use the right mouse button to activate the pop-up menu and
use the menu options to select all and copy).
www.homemoneymanager.com.au
52
Home Loan Manager Pro
User Manual
Check For Errors
Not sure if your lender’s interest calculations are correct? Want to find out if you are receiving the
full benefit of your offset account and any extra repayments you’ve made? The following reports
have been designed to check your mortgage and loans for bank errors:
1. Balance Checker Report
2. Interest Checker Report
3. Refund Calculator Report
4. Daily Interest Report
1. Balance Checker Report
The balance checker report is designed to quickly highlight errors in the balances of a loan. It
checks that the statement opening balance, the sum of the transactions, and the closing balance
are correct from statement to statement. It also checks that the statement date ranges include all
the transactions. If there is an error it will show you the calculated balance, the difference
between the balances and the impact this error is having on the remainder of the statement.
Tip - The balance checker is also a great way to list ALL the transactions in a loan in the one
place.
The report shows:
1.
2.
3.
4.
All transaction in a loan (including interest rate changes) (1).
The balance as it appears on your Statement (2).
Our Estimated balance (when there is an error) (3).
Differences between the balance amounts (when there is an error) (4)
www.homemoneymanager.com.au
53
Home Loan Manager Pro
User Manual
If you find errors in your balances, (5) click on the error for more information. (6) A window will
open with an explanation of the problem, a list of most common reasons for the error, and what to
do to fix it.
Editing Transactions
If you need to change a transaction, you can Edit Transactions directly from the Balance
Checker Report by (7) double-clicking on the transaction you wish to edit. Any changes you make
to transactions will instantly be reflected in the report.
www.homemoneymanager.com.au
54
Home Loan Manager Pro
User Manual
If you only wish to change the transaction sort order then you can change it in the Balance
Checker Report by (8) clicking on the sort order column (and a drop down list will appear). Any
changes to the sort order will instantly be reflected in the report.
2. Interest Checker Report
The interest checker report is designed to quickly highlight errors in the interest charges of
your loans. It recalculates all the interest on the loan (including any offset account benefits) and
compares it to the amount charged by your lender.
Tip - If the report is displaying any errors then the Interest Calculations help topic is the best place
to start.
The report displays the following information:
1. The summary information showing the total interest charged by your lender, the total
estimated interest, and the difference between the two totals (1).
2. A list of all the interest transaction for the loan (2).
3. The option to run the daily interest report for an interest transaction, providing a day-byday break down of the interest charge (3).
4. The Interest Paid tab and the Offset Account tab, allowing you to switch between the
main view and the offset account view (4).
www.homemoneymanager.com.au
55
Home Loan Manager Pro
User Manual
Tip - This report will only show transactions that have been assigned the category “INTEREST Periodic Interest”. Therefore if you can’t see all of your interest transactions, close the report,
switch to the Transaction View and check the category you have assigned to each interest
transaction.
If you find errors in your interest charges, (5) click on the error, and (6) a window will open with an
explanation of how we came up with the error. (7) Click on the View Help Topic Now button and
use the information provided to check that you have entered your loan details correctly.
Information Displayed in the Report
www.homemoneymanager.com.au
56
Home Loan Manager Pro
User Manual
The main section of the report (the Interest Paid tab) shows the following information:
1. All of your interest transactions.
2. The date range for each interest transaction and the number of days in the interest
period.
3. The amount of interest charged by your lender.
4. The amount of interest that you should have been charged, calculated by Home Loan
Manager Pro. NOTE: The amounts include the full benefit of your offset account (if you
have one linked to the loan).
5. The difference between the two interest amounts. If the amount is positive then you have
been overcharged. If the amount is negative then you have been undercharged.
The offset account section of the report (click on the Offset Account tab) has two additional
columns:
1. The amount of interest you have saved by using an offset account.
2. The amount of interest you would have paid if you didn’t have an offset account.
Editing Transactions
If you need to change a transaction, you can Edit Transactions directly from the Interest
Checker Report by double-clicking on the transaction you wish to edit. Any changes you make to
transactions will instantly be reflected in the report.
3. Refund Calculator Report
The refund calculator report is designed to calculate the total cost of the interest errors on
your loans. If an error happened some time ago you will have been charged additional interest on
www.homemoneymanager.com.au
57
Home Loan Manager Pro
User Manual
the error, and the refund amount could be considerably more than just the original error amount.
The refund calculator does all the complex calculations for you, taking into account interest rate
changes, compounding interest on interest, manual adjustments, and all offset account benefits
from the date of the error to the refund date.
Tip - This report will only show interest transactions that were displayed in the Interest Checker
report with an error amount greater than the Error Tolerance value shown on this report.
Therefore if this report is not showing any errors, switch to the Interest Checker report and double
check if there are any errors being reported on your interest transactions.
The report shows:
1. A summary of the errors, the extra compounded interest you’ve been charged, and the
total refund you are due (1). NOTE: If the amount is negative, then this is the total amount
you have to pay back to your lender.
2. A list of all the interest transactions that contain errors (see the Interest Checker report for an
explanation of these columns) (2).
3. The additional compounded interest you have been charged on each error (3).
4. The total refund you are due on each error. If the amount is positive then you have been
overcharged, if the amount is negative then you need to repay the amount to your lender
(4).
The Refund Date field (5) allows you specify the end date for calculating the compounded cost of
each error. When you first run the report the date defaults to today’s date, however you can
change it to any date that you require. A date earlier than today will result in a smaller refund, a
date in the future will result in a larger refund.
The Error Tolerance field (6) allows you to control the minimum refund amount to be displayed in
the report. Interest transactions with an error less than the tolerance amount you specify will not
be displayed. For example, if you don’t want to report on refunds less than $1 then set the error
tolerance to 1.0 and click on the Refresh button.
www.homemoneymanager.com.au
58
Home Loan Manager Pro
User Manual
4. Daily Interest Report
The daily interest report provides a day-by-day breakdown of the interest payable on a loan,
and includes any offset account benefits you are entitled to. The report provides you with all the
details you need to perform thorough audits of your loans and it allows you to investigate
discrepancies reported in the Interest Checker report.
Tip - By default the report show every day in the account from the start date of the first statement,
to the end date of the last statement. To view the report for a single interest transaction click on
the Daily View icon from within the interest checker report.
The report shows:
1. The summary information showing the total interest on your loan, the total interest saved
by your offset account (if applicable) and the total interest you should have paid (1).
2. The daily breakdown of loan information, including the loan balance, interest rates, and
interest payable (2).
3. The daily breakdown of offset account information (if applicable), including the offset
balance, offset interest rates, and the interest the offset account is saving you (using the
percent allowable set on the account) (3).
4. The daily amount of interest your lender should be charging you. It is calculated as the
difference between the daily interest on the loan and the allowable deduction from the
offset account (if any) (4).
www.homemoneymanager.com.au
59
Home Loan Manager Pro
User Manual
Investigating Interest Errors
If you find a discrepancy between the interest being charged by your lender, and the estimates
being calculated by Home Loan Manager Pro, you can use the daily interest report to review the
day-by-day interest charges that make up the estimate. The report will also show you the interest
rate that has been applied on each day.
From the interest checker report click on the Daily View icon for the interest charge you wish to
investigate and (5) the daily interest report will be pre-populated with the correct date range.
www.homemoneymanager.com.au
60
Home Loan Manager Pro
User Manual
Review Your Costs
You can get an instant picture of what your loans are costing you, statement-to-statement and
year-to-year, by letting the mortgage software automatically group and categorize the transactions
on your statements. The following reports will help you discover what your loans are costing you:
5. Yearly Totals Report
6. Yearly Comparison Report
7. Statement Comparison Report
5. Yearly Totals Report
The yearly totals report provides transaction totals grouped by category (detail) or parent category
(summary).
www.homemoneymanager.com.au
61
Home Loan Manager Pro
www.homemoneymanager.com.au
User Manual
62
Home Loan Manager Pro
User Manual
6. Yearly Comparison Report
The yearly comparison report allows the comparison of transaction totals by category (detail) or
parent category (summary) between two years.
www.homemoneymanager.com.au
63
Home Loan Manager Pro
User Manual
7. Statement Comparison Report
The statement comparison report allows the comparison of transaction totals by category (detail)
or parent category (summary) between two statements.
www.homemoneymanager.com.au
64
Home Loan Manager Pro
www.homemoneymanager.com.au
User Manual
65
Home Loan Manager Pro
User Manual
Plan For The Future
Worried about interest rate rises? Want to find out how to pay off your mortgage sooner? The
following reports will give you answers and keep you informed as you circumstances change:
8. Increase Repayments Report
9. Detailed Payout Plan Report
10. Interest Rate Rise Report
8. Increase Repayments Report
Can you really save thousands if you increase your repayments by the smallest of amounts? This
report will show you. Enter a New Repayment Amount and instantly see how much you can
save in interest and how much sooner you will repay your mortgage.
When you first open the report (or press the Reset button), the report will use the latest loan
information and set the New Repayment Amount to the required amount to pay off the loan over
the remaining term. The following are some of the powerful ways to use this report:
1. To find out how much you can save by increasing your repayments, enter the new
repayment amount.
2. To find out how much you can save by making a one off-payment (eg 10,000), simply edit
the balance and enter the new reduced balance. For example, if the balance is currently 100,000, enter a new value of -90,000. The report will then show you how much you will
save if you stick to your current repayment amount with the new balance.
3. If you have an offset account, you can find out exactly how much it is going to save you
over the life of your loan. When you open the report, by default the offset balance is not
included in the calculations. Simple click the Allowable % radio button, and the Estimated
Outstanding Interest will now show you your new total interest bill.
As well as the new repayment amount, you can change any of the following:
1.
2.
3.
4.
5.
The interest rate.
The loan balance.
The option to include the offset balance (if applicable).
The repayment frequency.
The current date.
What is the minimum repayment amount?
The minimum repayment amount is the smallest amount you can enter into the report so that it
just covers the interest charges. If you were to enter a repayment amount smaller than the
minimum, then the loan would continue to grow indefinitely and you would never pay it off (also
referred to as negative amortization). If you try to enter a number smaller than this amount, the
report will override your figure with the minimum repayment amount.
Note: You need to set a Loan Term on the Loan Account for the report information to be accurate.
If the report displays Original Loan Term (years) 0.0 you will need to close the report, Edit the
loan account and enter a value for the Loan Term.
9. Detailed Payout Plan Report
If you are looking to save thousands in interest payments, then this report is the place to start.
Did you know that if you have a variable rate mortgage your lender will regularly adjust your
repayment amount so that you stay on track to paying it off over the full term? They do not want
www.homemoneymanager.com.au
66
Home Loan Manager Pro
User Manual
you to pay it off sooner, so even if you get ahead in you repayments, your lender will reduce the
amount they want you to repay, to stretch it back out to the full term. They know that if you have a
30 year loan, they can maximise their profit by letting the interest accumulate over 30 years.
The power of this report is that it lets you set the terms of your repayment, and then keeps you on
track to achieving your goal. It does not matter if the bank changes the repayment amount, you
make a one-off deposit (or withdrawal), interest rates change, etc, this report will continue to
adjust your repayment amount to suite your payment terms, not the banks.
Each time you run the report it will show you how long you have left to reach your goal, and the
new repayment amount required to achieve it. For example, if you set the target loan term to 20
years, and you are in the second year of repayments, it will show you the required repayment to
finish paying the loan off in 18 years.
All you do is enter a Target Loan Term, and the report does the rest. The report also shows you
the total interest you will save, by comparing the total remaining interest on the original loan term
(for example 30 years) with your new target (for example 20 years).
Note: The repayment amount specified in this report does not include any additional fees your
lender charges you. Therefore if you pay a regular account keeping fee you will need to add it to
the repayment amount displayed in the report.
Example Results
The following example report highlights that you can save 49,402 on a 100,000 loan, just by
paying it off in 20 years instead of 30 years. The report shows this can be achieved by increasing
the monthly repayments by approximately 133.24 for the next 18.06 years.
Loan Plan
Original Payout Plan
Target Payout Plan
Total Impact
Loan
Term
30.00
20.00
Remaining
Loan
Term
Loan End Date
23/04/2033
26/04/2023
28.06
18.06
Estimated
Repayment
Amount
Estimated
Outstanding
Interest
652.37
785.61
133.24
121,925.94
72,523.36
-49,402.58
NOTE: The information was produced for a loan currently in its second year of repayments (that
is, 28 years remaining), with monthly repayments.
As well as the target loan term, you can change any of the following:
1.
2.
3.
4.
5.
The interest rate.
The loan balance.
The option to include the offset balance (if applicable).
The repayment frequency.
The current date.
Note: You need to set a Loan Term on the Loan Account for the report information to be accurate.
If the report displays Original Loan Term (years) 0.0 you will need to close the report, Edit the
loan account and enter a value for the Loan Term.
10. Interest Rate Rise Report
If you are worried about the impact of future interest rate changes (and interest rate rises in
particular) then this report will help.
www.homemoneymanager.com.au
67
Home Loan Manager Pro
User Manual
The report lets you to enter a new interest rate for a loan, allowing you to see how much better
or worse off you will be when interest rates change.
The report shows the old and new estimated repayment amounts and the total outstanding
interest payment for the remainder of the loan.
You will know in advance how much extra a rate rise will cost you, allowing you to better prepare
for it.
As well as the interest rate, you can change any of the following:
1. The loan balance.
2. The repayment frequency.
3. The current date.
Note: You need to set a Loan Term on the Loan Account for the report information to be accurate.
If the report displays Original Loan Term (years) 0.0 you will need to close the report, Edit the
loan account and enter a value for the Loan Term.
www.homemoneymanager.com.au
68
Home Loan Manager Pro
User Manual
Be Debt Free Sooner
Do you want to cut years off your mortgage and save thousands? Lock in your target and we’ll
help you every step of the way:
11. Your Payout Plan
11. Your Payout Plan
Your Payout Plan lets you decide how quickly you would like to pay off your mortgage, and then
shows you exactly what you have to do to achieve it. It works with your current balance and is
automatically updated every time you enter a new statement or update your loan details, keeping
you on track every step of the way.
Note: The repayment amount specified in this report does not include any additional fees your
lender charges you. Therefore if you pay a regular account keeping fee you will need to add it to
the repayment amount displayed in the screen.
Once you have used the detailed payout plan report to work out how many years you can afford
to cut off you loan, (1) lock your Target Loan Term into the screen. You will then (2) be shown
exactly what you have to do to reach your goal, and by clicking on the chart button (3) you can
see exactly when you will be debt free and how much you will save.
www.homemoneymanager.com.au
69
Home Loan Manager Pro
www.homemoneymanager.com.au
User Manual
70
Home Loan Manager Pro
User Manual
Interest Calculations
When you first set up an account in Home Loan Manager Pro you may need to fine-tune the
interest calculation settings to match those used by your lender. This help topic is the best place
to start if the interest checker report is displaying errors:
1. Calculating Your Interest
2. Interest Checker Report Errors
3. Interest Errors
4. Setting the Days In Year Account Value
5. Entering Interest Rates
6. Calculating the Interest Period Date Range
7. Using the INTEREST Category
8. Setting the Interest Transaction Date
9. Other Interest Errors
10. Missing or Incorrect Information
11. Interest Rounding Errors
12. What Next?
1. Calculating Your Interest
In order to check the accuracy of the interest charges on your loans, Home Loan Manager Pro
has to calculate its own estimate for every one of your interest transactions. To do this, the
interest checker report has to:
1.
2.
3.
4.
5.
Identify all the interest charges on your statements.
Calculate the date range each charge applied to.
Find all the changes to the balances in the date range.
Find all interest rate changes in the date range.
Calculate the interest amount.
The following is a quick example of how the interest checker report processes an interest
transaction (along with tips on the information it uses):
1. The software finds an interest charge on the 10th of July.
Tip - Home Loan Manager Pro requires that you assign the category “INTEREST Periodic Interest” to all you interest charge transactions.
th
th
2. It calculates the interest period to be the 10 of June to the 9 of July.
Tip - Home Loan Manager Pro automatically calculates this date range in one of two
www.homemoneymanager.com.au
71
Home Loan Manager Pro
User Manual
ways (1) using the transaction date and then subtracting the default value in the Days
Calculated Up To field on the account, or (2) using the Days Interest Calculated Up To
date on the transaction if you have manually set it.
3. It looks for all balance changes in this interest period.
Tip - Home Loan Manager Pro uses a combination of the statement opening balances
and the transaction amounts to calculate daily balances.
4. It looks for the interest rate changes in the interest period.
Tip - Home Loan Manager Pro uses the interest rates you have entered for the account,
and converts them into values that can be used in the interest calculations using the
value in the Days In Year field on the account.
5. It estimates the interest based on the above information.
Tip - Home Loan Manager Pro uses the standard internationally accepted formula for
calculating interest on the outstanding daily balance, in arrears.
2. Interest Checker Report Errors
If the interest checker can’t calculate the interest, or it calculates the interest and it doesn’t match
the amount charged by your lender, it will display an error. The errors displayed in the interest
checker report will be one of three types.
Interest Errors
The estimated interest has been calculated, however it doesn’t match the amount your lender has
charged you. This could be due to incorrect settings in the software, or it could be due to a lender
error.
Tip - These errors will be displayed under the Difference column in the report.
Missing or Incorrect Information
The report cannot calculate an estimate as you have not entered all the information required.
Tip - These errors will be displayed under the Interest Paid column in the report.
www.homemoneymanager.com.au
72
Home Loan Manager Pro
User Manual
Rounding Errors
The estimated interest has been calculated, and there is a very small difference between it and
the amount you have been charged by your lender.
Tip - These errors will be displayed under the Difference column in the report.
3. Interest Errors
The first time you run the interest checker report you may find errors in most of your interest
transactions. Clicking on an interest error in the report will open a window displaying the key
information used to calculate the estimate.
www.homemoneymanager.com.au
73
Home Loan Manager Pro
User Manual
The following list will help you check that you have entered your information correctly and let you
distinguish between small fine-tunning issues, and lender mistakes:
1.
2.
3.
4.
5.
6.
Setting the Days In Year Account Value
Entering Interest Rates
Calculating the Interest Period Date Range
Using the INTEREST Category
Setting the Interest Transaction Date
Other Interest Errors
4. Setting the Days In Year Account Value
Tip - Check that you have entered the correct value in the Days in Year field on the account (most
common value is 365).
The Days In Year on the account is used to convert the yearly rates provided by your lender into a
value that can be used in the daily interest calculations. If you get this value wrong it will impact
most of interest transactions.
One common mistake when entering your loan details is to change the default value from 365 to
Actual. If you set the value to Actual the software will use 366 days for leap years, and 365 days
for non-leap years.
Lenders generally use a fixed 365 days, even on leap years. You can check the value your lender
uses by looking at your loan contract or accompanying documents your lender has provided you
with explaining you interest charges.
Therefore if you have selected Actual, and the interest checker report is showing a small error on
every interest charge for leap years (eg 1996, 2000, 2004, 2008, etc) then you may need to
change the value back to 365.
Example - Leap Year Problem
The following example is from the Home Loan in sample workbook, where we have changed the
Days In Year field from the correct value of 365 to an incorrect value of Actual. Errors are being
displayed in the leap year.
www.homemoneymanager.com.au
74
Home Loan Manager Pro
User Manual
5. Entering Interest Rates
Tip - Check that you have entered all the interest rate changes for the account. If you miss an
interest rate change, or you enter the wrong date or rate, then all interest calculations from that
point forward will be incorrect.
Each time your interest rate changes, your lender will provide you with a new interest rate along
with the date they started using the rate. Make sure you have created one Interest Rate record for
each interest rate change on the account, and check that you have entered the correct interest
Start Date and Rate.
Example - Missing Interest Rates
The following example is from the sample workbook, where we have deleted the interest rate
st
change on the 1 of February 2004 that was for 7.25%. Errors are being displayed from February
2004 onwards.
www.homemoneymanager.com.au
75
Home Loan Manager Pro
User Manual
6. Calculating the Interest Period Date Range
Tip - If the Days Calculated Up to field on the account contains the wrong value then every
interest transaction in the interest checker report will contain an error. Check that the report is
displaying the correct date range for each transaction and that the days in the interest period
looks correct (eg if you are charged interest monthly then you would expect a days value between
28 and 31).
When Home Loan Manager Pro finds an interest transaction on your statement, it has to calculate
the interest period the transaction relates to:
1. To calculate the end date it uses the date on your interest transaction and then
subtracts the default number of days you have set up in the Interest Calculated Up to ...
field on the account.
2. To calculate the start date it uses the end date of the previous interest period (or the
loan start date if it is the first interest transaction on the account).
www.homemoneymanager.com.au
76
Home Loan Manager Pro
User Manual
By default the Days Calculated Up To value is set to one, so when Home Loan Manager Pro
finds an interest transaction it will use the day before the transaction as the end date. For
st
example, for an interest transaction on the 1 of February it will subtract 1 day from the
transaction date and use the end date of 31 January.
If you lender charges interest on the same day as they calculate the interest period, then you will
need to change the account setting to zero.
If your lender doesn’t follow a set pattern, or they process a transaction late one month, then you
can edit the individual interest transactions and manually specify the required end date in the field
Date Interest Calculated Up To. When you set the value on a transaction Home Loan Manager
Pro will ignore the default value on the account.
Example - wrong Days Calculated Up To value on the account
The following example is from the Home Loan in the sample workbook, where we have changed
the days calculated up to value from the correct value of one to the incorrect value of zero. Errors
are being displayed on every transaction.
www.homemoneymanager.com.au
77
Home Loan Manager Pro
User Manual
7. Using the INTEREST Category
Tip - Check that each interest transaction has been allocated an INTEREST category. Check that
no other transaction has been allocated an INTEREST category.
The Interest Checker Report will only process transactions that have been allocated a category of
type INTEREST. If the report is missing an interest transaction, then close the report, look for the
missing transaction in the account, and assign it an INTEREST category
If the report is displaying transaction that are not interest charges, close the report, look for the
transaction in the account, and change their category to something other than INTEREST
Example - missing INTEREST transaction
The following example is from Home Loan account in the sample workbook, where we have
changed the category on the interest transaction dated 1st April 2007 from the correct value of
“INTEREST - Periodic Interest” to an incorrect value of “FEE - Other”. NOTE: These errors are
fairly easy to find as shown below.
www.homemoneymanager.com.au
78
Home Loan Manager Pro
User Manual
8. Setting the Interest Transaction Date
Tip - Check that you have entered the interest transaction date correctly.
If you enter the wrong date on an interest transaction then it will result in two errors on the interest
checker report.
For example, if you accidentally enter the 2nd of January instead of the 1st of January, it will cause
create an error in both the January and February interest calculations, as the interest period shifts
by one day.
www.homemoneymanager.com.au
79
Home Loan Manager Pro
User Manual
By entering the wrong interest date, the January interest estimate will contain an extra day, and
the February estimate will be missing a day.
Example - Incorrect Interest Transaction date
The following example is from Home Loan account in the sample workbook, where we have
changed the date on the interest transaction from the correct value of 1 January 2007 to an
incorrect vale of 2 January 2007. NOTE: These errors are fairly easy to find as shown below
www.homemoneymanager.com.au
80
Home Loan Manager Pro
User Manual
9. Other Interest Errors
If you have worked through this help topic and you still have an error in the interest checker report
then you should:
1. Check that you have correctly entered all dates and amounts for the transactions in the
interest date range with the error. For example, if the interest transaction has a period of
1 January 2007 to 31 January 2007 then check all the transaction in this period match the
information on your statements.
2. Check that the opening balances on your statements are correct, in particular those that
contain the interest transaction with the error.
10. Missing or Incorrect Information
If any of the information required to calculate the interest estimates is missing, the estimated
interest column will be left empty and an error will be displayed under the in Interest Paid column.
Clicking on the error in the report will display a window explaining what information is missing or
incorrect.
www.homemoneymanager.com.au
81
Home Loan Manager Pro
User Manual
Example - Missing Interest Rate
The interest checker report needs at least one interest rate to be set up on the account before it
can estimate the interest. If you run the report before you set up the interest rate every entry will
be flagged as a Missing or Incomplete Information and you will be asked to set up an interest
rate.
Example - Incorrect Statement Information
Home Loan Manager Pro will not be able to calculate estimated interest amounts for an interest
transaction if there are “holes” in the interest period (days missing between statements) or if the
opening and closing balances between statements don’t match.
rd
For example, if you accidentally create a statement with a start date of the 3 of July (instead of
1st of July) then there would be 2 days missing in the interest period and the interest can be not
be calculated for the 10th of July.
Tip - Run the balance checker report for more information on fixing statement errors.
Example - Partial History
When you first start using Home Loan Manager Pro you may decide that you only wish to enter
the most recent statements for your loans. While the software is designed to handle this, it won’t
be able to check the first interest transaction you enter, as it won’t have all the balance changes.
www.homemoneymanager.com.au
82
Home Loan Manager Pro
User Manual
For example, if you were to start entering your statements from the 1st of July, then Home Loan
th
Manager Pro wouldn’t be able to estimate the interest for the 10 of July, as it wouldn’t have a
th
complete list of all the balance changes. Interest transactions after the 10 of July would be
calculated correctly, and if at a later date you were to enter the older statements it would go back
and calculate an estimate for the 10th of July.
11. Interest Rounding Errors
Tip - If there is a very small difference between the estimate and the interest paid, then it could be
due to different rounding techniques.
There are many different ways to round the numbers in financial calculations, including rounding
up, rounding down, no rounding, rounding to the nearest currency unit, rounding daily, rounding
monthly, etc.
In order to maintain the most accurate calculation possible, Home Loan Manager Pro:
1. Does not round any figures during internal calculations.
2. Rounds the final estimated figures to the number of decimal places you have selected
under the user Options.
If your loan provider uses a different rounding technique, then the interest checker and refund
calculator reports will display a slight difference on most of your interest transactions.
If you decide the errors on the report are due to rounding, and you want to remove them from the
report, you can set the Manual Estimate Adjustment amount on each interest transactions to the
reported difference. This will ensure they do not appear as errors the next time you run the
interest checker and refund calculator report.
Tip - You can edit transactions from within the interest checker report by double-clicking on them.
www.homemoneymanager.com.au
83
Home Loan Manager Pro
User Manual
12. What Next?
If you have worked through this help topic and things still don’t look right, then please contact us
and we will help you get back on track.
www.homemoneymanager.com.au
84
Home Loan Manager Pro
User Manual
Transaction Sort Order
When you enter transactions into Home Loan Manager Pro they must remain in the same order
as they appear on the statement, otherwise the balances and the estimated balances won’t
match.
Home Loan Manager Pro provides a field on every transaction called the Sort Order to help with
the ordering of transactions (although most of the time you will not need to worry about this field).
The Sort Order is only ever used when two or more transactions have the same date.
If you manually enter the transactions in the order they appear in the statement, then Home Loan
Manager Pro will automatically take care of the Sort Order for you.
If you import transactions electronically and the transactions in the raw import file are in date
order (ascending or descending), then the Sort Order will be set automatically as the transactions
are imported.
If all the transactions in the import file are not in date order, then the Sort Order will not be set,
and you may have to manually set the Sort Order on transactions that have the same transaction
date.
Home Loan Manager Pro internally sorts transactions in date order, and any transactions on the
same date are further sorted by their Sort Order (if it is set), and then alphabetically on their
description.
As the alphabetical sorting of transactions on the same date won’t always match the particular
sort order your Loan provider uses, you can manually set the Sort Order on a transaction.
Therefore, if at any time you notice a balance difference, you should compare the order of the
transactions to your statement. If they are different then update the Sort Order on the required
transactions until they match.
You can edit the sort order directly through the Transactions view screen, when editing an
individual transaction, or through the Balance Checker Report.
www.homemoneymanager.com.au
85
Home Loan Manager Pro
User Manual
Workbook Conversion
If you choose to upgrade to a newer version of Home Loan Manager Pro the workbooks
containing your saved information may need to be converted. If a conversion is required, when
you open an existing workbook you will see the following message:
”The workbook being loaded is from an older version of Home Loan Manager Pro and has
automatically been converted to the current version.
Please use a new filename when saving or exporting this workbook, if you wish to keep a backup
of the older workbook.”
The conversion takes place automatically and there is nothing you need to do. However please
note that once a file has been converted to a newer version it will not work with older versions of
Home Loan Manager Pro, therefore we recommend you keep a backup of the older workbook.
If you do not see the above message when you open your workbook then a conversion was not
required.
www.homemoneymanager.com.au
86
Home Loan Manager Pro
User Manual
Customer Support
If you would like to provide us with your feedback, or you are having problems using Home Loan
Manager Pro, please visit the support pages on our website to submit your comments and to
read all the latest help and support information.
www.homemoneymanager.com.au
87