1
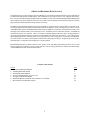
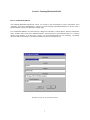
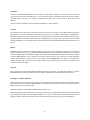
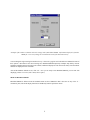
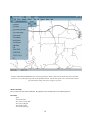
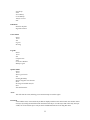
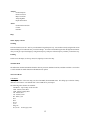
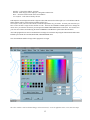
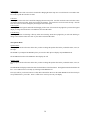
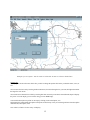
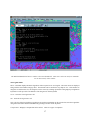
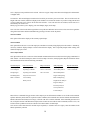
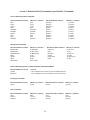
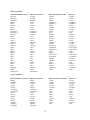
Blackland GRASS Users Guide Version 1.317 Developed by: Raghavan Srinivasan, Greg Spanel, and Abeer Alnaji Texas Agricultural Experiment Station Blackland Research Center Created by: Bruce Byars and Steve Clamons GRASS Research Group Baylor University http://brcsun15.tamu.edu/blgrass http://www.baylor.edu/~grass GRASS and Blackland GRASS Overview Geographic Resource Analysis Support System (GRASS) is a powerful Geographic Information System (GIS) that can be used for data management, spatial analysis, and visualization of many types of data. It was originally developed by the U.S. Army Construction Engineering Research Lab (CERL) to help in environmental planning and land management for the military, but it can be applied to many areas of scientific research. GRASS research and development is currently supported by the GRASS Research Group at Baylor University. In addition to the traditional UNIX-based versions of GRASS, a version has also been developed by researchers at the Texas Agricultural Experiment Station (TAES) that runs under the Windows-95/NT operating system. This new version of the GRASS GIS system, called Blackland GRASS, utilizes a Graphical User Interface (GUI) that allows users to take advantage of the full functionality of the GIS tools on a PC. In addition to the new Windows interface, a standardized command line input is also retained. There is an internal command language that allows users and programmers to create application and demonstration models and to link GRASS with other software packages. Users can input new data through digitization or scanning with a screen pointing device, from a floppy drive, or from tape and CD-ROM. New data can also be created by selecting data elements from existing files for analysis. Outputs range from text files, statistical tables, or maps that can be displayed in color and printed. Blackland GRASS allows scientists to analyze, store, update, model, and display data quickly and easily for use in the fields of engineering, hydrology, physics, geology, statistics, remote sensing, and business, with the same functionality of UNIX GRASS, but with a user friendly interface. Contents of this manual Section 1 - GRASS and Blackland GRASS 2 - Installing Blackland GRASS 3 - Running Blackland GRASS 4 - Notes on GRASS Datasets for New Users 5 - Examples of Blackland GRASS 6 - Blackland GRASS Commands versus GRASS 4.2 Commands 7 - Brief GRASS Command Descriptions 2 Page 3 4 7 20 22 26 28 Section 1 - GRASS and Blackland GRASS GRASS (Geographic Resources Analysis Support System) in its UNIX version, is a public-domain raster Geographic Information System (GIS), vector GIS, image processing system, and graphics production system. The GRASS source code, which may be modified or changed, is provided to users. GRASS comes free with three sample data bases: Spearfish, Imagery, and Global. Most of the GIS programs of UNIX GRASS form the base from which Blackland GRASS is developed. Blackland GRASS can be used for preparing geographical data that are eventually used in some other systems, or for processing and analyzing geographical data, including displaying the results. In the former case, geographical data are imported or digitized, converted, edited, analyzed and processed in Blackland GRASS and then exported to some other system, for instance a modeling or decision support system or an expert system, where they are used to build a geographical information database. For analysis, GRASS offers a number of analytical tools and functions for problem oriented displays. With the release comes many different computer programs that implement a broad range of operations. Most analysis functions are based on raster data, i.e., grid cell files, but many vector based tools are also included. Documentation - The Grass Reference Manual This version of the Blackland GRASS Manual does not list the complete command syntax of the GRASS 4.2 Users Reference Manual. Instead, short descriptions are given of each tool indicating its use. For complete documentation, users are referred to the latest users manual available from the GRASS Research Group or Blackland GRASS web sites. Explanations of all the commands used in the main and alpha distribution of GRASS (which will be called tools in the remainder of this text) are provided by the GRASS 4.2 Users Reference Manual. This consists of ten sections and is thematically organized; for example, all raster tools are put together. Within each theme the tools are presented in alphabetical order. For each tool a short description of its purpose, a synopsis of its parameters, a description of its use, notes explaining some of the background, and a reference to related tools are provided. The Grass File Server Users wishing to obtain more information about GRASS and access GRASS source codes, etc., may login to the official GRASS FTP server (keck.baylor.edu) via anonymous FTP. From its main directory grass on down it has the following file and directory structure: File/Directory name README grass4.1/ grass4.2/ grass5.0/ documents/ incoming/ outgoing/ Contents An up-to-date overview of the contents of the file server GRASS 4.1 source, binaries, databases, and documents dirs.) GRASS 4.2 source, binaries, databases, and documents dirs.) GRASS 5.0 source, binaries, databases, and documents dirs.) GRASS Documentation (Users Guide, Programmers Manual, etc.) Incoming GRASS related files Outgoing GRASS related files New users are urged to start by reading as much documentation as possible. This manual provides information that is not included in documentation normally available in the standard Unix GRASS documentation. If users can not find a particular subject in this manual, they should first make sure that it is not already treated in the GRASS 4.2 documentation available from the GRASS Research Group at Baylor University or the Blackland GRASS web sites. In general, the answers to many frequently asked questions are in the GRASS 4.2 Reference Manual. 3 Section 2 - Installing Blackland GRASS Hardware requirements · · · · A Pentium processor 16 MB RAM or better 50 MB disk space (not including data sets) Windows 95 or NT Operating System File and Directory Sizes: · · · · · · · Blackland GRASS software by disks (blgdisk1.zip, blgdisk2.zip,..., blgdisk9.zip): 1.4 MB each file blgrass.exe (self extracting): 11 MB Blackland GRASS Software (blgrass.zip) zipped: 11 MB Blackland GRASS Software unzipped: 32 MB Windows NT driver (ckntdvr.exe): 680 KB Spearfish GRASS Location zipped: 6 MB Spearfish GRASS Location unzipped: 13 MB NOTE: Spearfish is a GRASS Location, which contains a mapset that has GRASS vector, raster, and site maps. If the user does not have a GRASS Location, Spearfish can be used in testing the Blackland GRASS program. Blackland GRASS Installation Instructions Blackland GRASS runs on a standard Pentium PC with either Windows 95 or Windows NT operating systems installed. The 30-day trial version will not work if installed on any network drive and is accessed that way. On the other hand, the licensed Blackland GRASS software can be installed on a network drive and accessed from Windows 95 or NT, but you need to contact us for a License number. For Windows 95, you can install Blackland GRASS for 30 days without any special setup. For Windows NT, you need to download and install the Windows NT driver before installing the Blackland GRASS demo. Installation Instructions for Windows NT To install Blackland GRASS for Windows NT, you need to: 1. Download Blackland GRASS trial version (it becomes permanent with a license number). 2. Download Windows NT driver executable file, and save it to your local drive 3. Run the executable file (ckntdvr.exe), and follow these steps: · · · · · first window displays the driver version and what it does, click the ok button to continue the next window asks where to unzip this executable file. Select a path then click the Unzip button to continue close the window after it is done running the setup.exe from the directory where the driver was unzipped follow the setup steps when setup is complete, you need to start the server: from the Start menu button, select Programs then select CrypKey Server V4.3 for NT, a window will appear with a path displayed. You need to Add the path where your Blackland GRASS is installed, as an example: C:\blgrass\bin\ Close the window after it is done. Now you are ready to run Blackland GRASS. 4 Licensing Blackland GRASS Blackland GRASS uses a license manager that allows us to distribute a fully functional trial copy that can be licensed with just an authorization code. You must register Blackland GRASS to continue using it past the 30-day trial period. Site Code In order to authorize your copy of Blackland GRASS you must include the Site Code of your machine with your payment. The site code can found by clicking the About menu option General info and Version. It will be found in about the top third of the box just after the copyright notice. Note: If you have already installed Blackland GRASS but the 30 day trial period has expired, you still can get the Site Code number. When running the program, the display box asking for the authorization number also has the Site Code listed in it. Authorization If you need to authorize a copy of the program that has not yet used up its trial period, you need to place the word authorize (buy a License with a permanent authorization) on the command line from a DOS shell window. The easiest way to do this is it to start a DOS prompt window, change directory to the directory that contains the blgrass.exe executable then type blgrass authorize on the command line. Note: This is done after you buy the program and get the License #. This will bring up the Enter your Authorization Code dialog box. · Type in your authorization code in the Authorization code edit box exactly as it is written in your email or fax that you received from us. · Click OK, after a short wait Blackland GRASS will be authorized. · If you receive a message other than Success, double-check if: 1) the License number has been entered correctly; or 2) you have provided the correct Site Code to get the License number for. * The best way to avoid a mis-typed site code & License # is to Copy & Paste instead of typing the Number. Transferring the License to another computer Your license for Blackland GRASS can be transferred to any compatible computer of your choosing. This is done by installing Blackland GRASS on the destination computer then running Blackland GRASS from the command line with authorize on the command line. · · · · · · · This will bring up the Enter your Authorization Code dialog box. Click the Register transfer button. This will bring up a dialog box. Enter the path to your floppy. If it is A:\ just click OK. (Use a blank Floppy) Clicking OK will register this machine on the floppy. The next step is to transfer the license out from the machine that is currently licensed. From the File menu of Blackland GRASS click Transfer License then click To a floppy. Enter the path to the floppy, then click OK. This will transfer the license to the floppy and de-authorize Blackland GRASS on this machine. Blackland GRASS will terminate at this time. This will not remove the Blackland GRASS files, just its license. From the Enter your Authorization Code dialog box on the receiving machine click Import License then enter the path to the floppy and press OK. After a short wait Blackland GRASS will be authorized on this machine. Note: blgrass must already be installed on the receiving (destination) PC(s). 5 Transferring the License to another directory In order to change the directory the Blackland GRASS program resides in, you must first copy the executable and its DLLs to the destination directory. Then from the licensed copys File menu click Transfer License then click To another directory. Type the destination directory in the dialog box and click OK, the license will be transferred and the current copy deauthorized. Multi-copy and Multi-user Licenses If you purchased a license for more than one machine: 1) First install your license on the machine corresponding to the site code you provided to us. 2) From the About box you can see the current status of your license. 3) If you ordered a license for multiple copies, this will be reflected in the Authorized copies field. Ex. if you ordered 5, it will show 5 copies. 4) If you ordered a network license this will be seen in the Authorized users field. 5) If you have a multi-copy license you may transfer these licenses to other computers by following the instructions detailed above under Transferring the license to another computer. 6) If you have a network license, the site code that you provide to us must be from a copy of Blackland GRASS that was installed on your networks server. Just authorize this machine as detailed above under Authorization. Note: All receiving PCs should have blgrass already installed before authorizing them. 6 Section 3 - Running Blackland GRASS How to run Blackland GRASS: After installing Blackland GRASS trial version, you can start it from the Windows95 Start menu button, select Programs, then select Blacklandgrass. Before you can do anything in Blackland GRASS, you need to select a GRASS database (which is the path to the GRASS maps). Once in Blackland GRASS, users must define five things: the GIS Dbase, Location, Mapset, GIS base and Window Name. From the Edit menu, select Database Defaults. Extract the files in your local desired drive (i.e. C:\blgrass) directory using Winzip if you dont have winzip, you can download blgrass.exe (self extracting). The default directories that the files unzip to your database defaults are shown in the figure below. Example of setup for the spearfish location 7 GIS Dbase In order to enable Blackland GRASS to find your data, you must define a Database. This is the directory that will be used to create the Location and Mapset(s) in. You are free in the choice of data path. Most likely the path would be something like c:\grass\data or it could be a mapped network drive; this is what you fill in, when asked for the database. A Browse button is available to help search for the GIS Dbase\ Location\ Mapset. Location The Location is the overall name (top directory) for all the work you are going to do in GRASS within one specific geographic area. This often coincides with the subject of your project, e.g. MARS, BELGIUM or INNERCITY. Besides being the directory that contains all the files of that project, the location also stores the map coordinate system (projection) and the minimum and maximum map coordinates that you are going to use. If you dont have a GRASS Location and Mapset, you can download the spearfish dataset from the Blackland GRASS homepage and use it for testing. Mapset Within the location you must define at least one Mapset. This is the name of a subdirectory, in which you will store all the files relating to one subject, e.g. within the location BELGIUM you may want to define a Mapset ECO for all maps with an ecological subject, and a Mapset INFRA for all maps with an infrastructural subject. GRASS always defines a mapset PERMANENT which is designed to be used as a kind of archive; you will work in a mapset defined by yourself while making use, when necessary, of base maps stored in PERMANENT. The mapsets are transparent to reading operations, but if you want to write, rename or delete maps in another mapset, you must exit GRASS first and re-enter into the correct mapset. GIS base This is the directory where the Blackland GRASS program files are located. By default this location is c:\blgrass. Blackland GRASS needs this location to access the binary executable files in the subdirectories \bin and \etc. The Region - Window Filename When you create a Location you are required to specify the coordinate system, boundaries and resolution of that Location. This information is stored in the file named DEFAULT_WINDOW and will bug you for the rest of your life under the slightly different name of default region. Windows filename: WIND (holds a GRASS default window size). Blackland GRASS assumes that all maps you are going to import or create under that Location have the same coordinate system and have boundaries that fall within its boundaries. If you specify something else, Blackland GRASS may not display your data. GRASS will assign the same resolution to any new map unless you specify something else. 8 Example of the window resolution and scale settings used by Blackland GRASS. Information displayed is from the WIND file. Users may change the resolution and scale of the data interactively You can change the region settings in a number of ways - refer to the gregion tool in the Reference Manual for some of these options. But whatever the current settings are, Blackland GRASS implicitly resamples map data by Nearest Neighbor resampling to them when layers are created, combined or displayed. This can be most clearly seen when linear features are displayed in low resolution. After all the database defaults are set, click ok. Now you are ready to test Blackland GRASS, you can start with displaying a raster or a vector (File menu, select open). Menus in Blackland GRASS Blackland GRASS is different from the standard UNIX version of GRASS in that it does not use any of the d. command syntax, instead all display functions are handled by intuitive pull-down menus. 9 Example of Blackland GRASS Main Screen showing pull-down menu system used to display map layers and data. Pictured is a vector map showing roads in the Spearfich dataset. The location of the user is tracked at the bottom left of the display along with raster categories (if used). Menu Commands Here is a brief list of the menu commands. Descriptions of the commands are in the following section. File Menu Open Save/Load Chart Save Current Color Rule Save Current Region Save/Load Legend Save/Load Drawings 10 Page Setup Print Screen Dump Create Bitmap Transfer License Exit Edit Menu Database Defaults Region Resolution Colors Menu Raster Vector Site Legend Drawing Legends Raster Vector Site Compass Rose Scale Create Text Window Bitmap Legend Options Menu Raster Vector Show region border Site Printing & Bitmap Display diagonal zoom distance Draw Drawing Line Widths & Styles Grid Start Shell Window Clear This will clear the screen, allowing you to load new maps or reset the region. List Menu A list of all the raster, vector and site layers that are displayed on the screen can be found. One can turn on and off a layer by turning on and off the check mark next to that layer. For raster layer that will be only one layer visible, for vector and sites up to 10 layers can be loaded and turned on or off using this menu. 11 Analysis General Purpose Data Conversion Map Conversion Analyzing Data Report Generation About General Info & Version License Purchase Help Other display controls Zooming To Zoom in and out, use the + and - keys on the numeric keypad respectively. You can also zoom by using the left mouse button and drag a box around the area you wish to enlarge. To restore to the default region click the right mouse button. Also you can get to previous display by using the Escape key, each press of the Escape key will take you back one step. Panning To Pan across the maps, use the up, down, left, right keys to move the map. The Edit Menu The Edit menu contains information about the directory structure, database locations, and data resolution. See Section 3 of this manual for details about the Edit Menu and its options. The Colors Menu Color Raster To change the color of the raster map you select COLORS, then RASTER menu. This brings up a selection of many different color schemes. The default color is the COLR file in your mapset. The following color schemes are available: · COLR File: A previously saved color file · YGR: Yellow, Green, Red · YOB: Yellow, Orange, Blue · YR: Yellow, Red · YG: Yellow, Green · BC: Blue, Cyan · Red · Blue · Green · Cyan · Magenta · Grey Scale: 16 color gray scale 12 · · · · Rainbow: Colors of the rainbow spectrum Random: Each category of the map layer is assigned a random color Wave: All colors used are based on the sector numbers User Defined: Color scale created by the user In the maps the colors displayed from left to right are values that decrease from left to right. (Ex. Color Scheme YR: the higher numbers will be yellow and lower numbers will be red.) User Defined: create your own color scheme, to make the map look the way you want to. To create your own colors you have to select at least 2 ranges for the selection to work. Then use the CHOOSE COLOR option box to change the colors. Once you select the colors then you must press the MAKE CHANGES button to take effect. You can also save your own color schemes and load using the SAVE CURRENT COLOR RULE option under the FILE menu. Also in the program the user can save and load their own ranges for each raster map using the SAVE RANGE and LOAD RANGE option under the COLORS, RASTER, USER DEFINED menu. Note: the maximum number of ranges in this program is 10 ranges. The color window is used to edit and change colors interactively. It can be applied to raster, vector, and sites maps. 13 Color Vector To change the color of the vector lines it is much like changing the raster map color. You click on the vector and a color box comes up with the selection of colors. Color Site To change the color of the site is much like changing the raster map color. You click on the site and a color box comes up with the selection of colors. There may be many site displays. You can choose a color for each site map. Also the Text color of the site can be changed by choosing the Text color option Color Legend To change the color legend is much like the changing of the vector color. From the top right side you select the legend display to change then choose the color and then select the OK button. Color Drawing To change the color of a drawing is like any other color choosing. From the top right side, you select the drawing to change color and then choose the color of your choice and click OK button. The Options Menu Options Raster For any options to take effect most of the time you have to change the options first before you load the raster, vector, or site maps. The MASK if your mapset has MASK in place you can select this option to display only MASKED areas. The OVERLAY function will OVERLAY other displays as well Options Vector For any options to take effect most of the time you have to change the options first before you load the raster, vector, or site. LINE WIDTH will display a numerical value for the thickness of the lines drawn. The higher the number the thicker the line. User could turn off a vector map by selecting a LINE WIDTH of 0. Line Style will let you choose between a solid, dash or dotted line. However the LINE WIDTH for all the Line Style except Solid will be 1 pixel wide. There is a limit of 10 vector layers at any one display. 14 Example of vector options. Note the roads are solid while streams are shown as dashed lines. Options Site For any options to take effect most of the time you have to change the options first before you load the raster, vector, or site You can resize the site icons by selecting the Site Name then, Size and selecting the size you want, the higher the number the larger the icon will be. You can also select what the icon will be by selecting Site then, Icon and you can choose from different shapes to display the points. You can display your own icons using your own BMP image. You can add a description to points on the map by clicking on Site Description | Yes. This displays the points and the description of the points as the site map. Also you can change the font of the description under the Site, Description, Font. Note: There is a limit of 10 sites at any one display. 15 Options for Printing and Bitmap Creation The options available to you before printing the map are the following Transparent Legends: This will allow you to turn the box around the legend off or on when printing the map. This makes the outline of the legends transparent on the printer. Show Region: This allows you to see exactly where the print area is and what will be printed. Print Region Border: This turn on a border to display the printable area. Other Options Display Diagonal Distances: When turned on this will display the distance in kilometers across the diagonal of any box drawn using the mouse. Draw: Allows a user to draw arrow lines, lines, circles, and boxes on a display, and save them to a .drw file. Doing so will create directory in the users current mapset called Draw where all .drw files will be stored. Drawing line widths and styles: Allows a user to choose the line along with the thickness and styles to draw on the display. Grid: Displays a map grid on you screen and on your maps. The current unit for the grid display is in 100s of Kilometers. Start Shell Window: Starts an MS-DOS shell titled Blackland GRASS Shell to run command line, and the interactive GRASS programs. This shell will start in the directory that you specify in the GIS BASE under the DATABASE DEFAULTS. Type exit to close the shell window. A list of GRASS program that are available can be found here. When user quits Blackland GRASS program and if the Blackland GRASS Shell still exists, it will be closed automatically. For any reason if this is not done, user can use task manager to close the Blackland GRASS Shell process. Disable Legend Coordinate Tracking: Turns on/off the legend tracking. 16 The Blackland GRASS shell menu is similar to the Unix GRASS shell. Most raster and vector analysis commands are run interactively in this window. The Legends Menu Raster: Box/Bars displays the Raster legends as either a square box or as a long bar. The raster colors are displayed along with the raster number/category label. The Box/Bar can be stretched to any shape or size. If the number of categories exceed the Box size, the categories can be viewed by scrolling up and down using PageUp or PageDown keyboard or scroll up or down one label at a time using arrows on the keyboard. Vector: Turns the vector legend on or off Site: Turns the site legend on or off Note: The size of the font in all the Legend boxes except the Text Window can be resized. First select the Legend box using left mouse button and then simultaneously pressing Ctrl and F on the keyboard Compass Rose: Displays a compass that can be resized. There are 2 types of compasses. 17 Scale: Displays a map scale that can be resized. There are 4 types of map scales that can be displayed in either Metric or English units. Text Window: This menu displays a small text box in which you can enter your own text into. The size of the text is the height of the text window, and the text display in the windows is as wide as the window. If you have a long sentence and you use a small text box it will cut off the end of the sentence. Users can resize the text window, but the text size is controlled by the window size. Bitmap Legend: Allows you to display your own bitmaps (logos) on the map. Note: The size of the font in all the Legend boxes except the Text Window can be resized. First select the Legend box using left mouse button and then simultaneously pressing Ctrl and F on the keyboard The Clear Menu This option will clear the display of all currently opened maps. The List Menu This option allows the user to see what map layers and data are currently being displayed on the monitor. Alternately, users may uncheck displayed maps to remove them from the display. This is especially helpful when working with numerous map layers at one. The Analysis Menu This option allows the user to run some of the GRASS commands from the menu bar, instead of typing commands in a shell window. The General Purpose, Data Conversion, Map Conversion, Analyzing Data, Report Generation menus each contain sub-menus with the following commands: General Purpose Data Conversion Map Conversion Analyzing Data Access Mapsets Importing to GRASS Vector Conversion Vector Manipulation Setting Region Exporting from GRASS Site Conversion Raster Manipulation File Management Projection Conversions Single-cell Reporting Shell Commands Ascii to Binary Multi-cell Reporting Binary to Ascii Neighborhood Analysis Basic Help Extracting Elevation Data Raster Conversion Site Manipulation Report Generation Customizing Reports Other Commands Regional Analysis Proximity Analysis Overlay Functions Terrain Analysis Most of these commands bring up wndows where map layers are defined and variables are set for the each command. Options marked by an asterisk are required to run the command; the command cant function without that information. Blanks without an astersik may be left empty. Click the OK box to run the command. If the command generates a text file, it will place the text in the Windows notepad, where it can be saved or edited. Some commands, such as rrclass, can be started from a pulldown menu, but will also call a shell window for data input. Note: In cases where more than one variable may be required (i.e.: distance zones for rbuffer), enter the numbers in the blank, separated by commas. 18 The About Menu Message about Blackland GRASS, which also includes the Site Code number. This number is needed in order to obtain a Permanent License number for Blackland GRASS. Transfer and License are found under this menu too. The Transfer is a help file that gives detailed steps on how to go about transferring a license from one directory to another or from one PC to another. The License is a license agreement to be read and understood before purchasing the Blackland GRASS software. The Help Menu Accesses the Windows-based on-line help for Blackland GRASS. 19 Section 4 - Notes on GRASS Datasets for New Users The GRASS Data Directory Tree /<locations> One or more locations defined by the user /<mapsets> One or more mapsets defined by the user, plus the mapset PERMANENT, which is created automatically by GRASS /cell /dig /site_lists etc All maps of the same type - for instance, all binary vector maps - are put together in a number of directories created automatically by GRASS /<maps> User-created maps are stored in this directory. Mapset directory structure The mapset level is the most important one in the tree. It will often be useful to know the directory structure created by Blackland GRASS in each mapset, not only to understand more fully what the GIS does to your data, but also if you want to edit and modify files. Some general information is stored in directories with capital letters: · the default region is stored in DEFAULT_WIND · the current imagery group is GROUP · the current region in WIND · the search path used for finding files is stored in SEARCH_PATH · a one line description for the location is stored in MYNAME. Other directories have lower-case names, such as windows and 3d.view, which contain unused region definitions and 3d view parameters, respectively. Some GRASS tools will, when used for the first time, create their own directory structure below the mapset level. These directories include COMBINE (created by the rcombine tool), WEIGHT (the rweight tool), WATERSHED (the rwatershed tool). The main body of GRASS data consists of site, vector, and cell map layers. Each of these is stored in a number of directories: · · · · · · Information about the creation history for each data layer is contained in the directory hist. Site files are stored in the directory site_lists. Vector maps are stored in the directories dig, dig_ascii, dig_att, dig_cats, and dig_plus. The dig_ascii directory is used for the storing of ASCII-type vector files during import and export procedures. GRASSs own (binary) vector files are stored in the dig directory; however, these files contain bare vectors and need to be supported by other files in the dig_att (attributes), dig_cats (categories), and dig_plus (topology support) directories. Cell maps are stored in the directories cell, cell_misc, and cellhd. The cell directory stores the main part of the maps (the cell values); these files are supported by the corresponding files in the cell_misc (histogram, range) and cellhd (header) directories. (The cell_misc directory in fact contains a subdirectory for each map, containing a file range.) Each cell map has a color table assigned to it in the directory colr, with an optional secondary color table in colr2. 20 Practice Data: Spearfish Practice data are provided with Blackland GRASS or it is available from the GRASS Research Group FTP server keck.baylor.edu.. Data is located in the directory /pub/grass/data. The database spearfish contains numerous maps for the spearfish area (Black Mountains, USA); the database imagery contains several raw satellite images of the same area. The database global contains a number of lat-lon maps. Practice data are accessed by linking the practice mapsets to a practice location under your HOME-directory. You can then use the data without damaging them. The process of linking is done as follows: cd $HOME [Go to your Home-directory] pkunzip -d spearfish.zip The Winzip program will work instead of pkunzip. Now you can start Blackland GRASS and fill in the starting screen as follows: Location: spearfish Mapset: practice (or any other name except PERMANENT) Database: the.path.to.your.home.directory Additional Documentation If you do not have access to the full set of GRASS manuals, or somebody pinched them, there is an on-line help facility in Blackland GRASS. This means that, without leaving GRASS, you can consult a file that contains the very same text as the GRASS Command Descriptions do. Of course you do have the disadvantage of seeing only one screen (half a page) of text at a time. To ask for help, type ghelp. Blackland GRASS will ask you what subject you are interested in, and will display a list of possible subjects. By following Blackland GRASSs directions you will obtain information about the tools and options that are available, and a little background. Additional help may be obtained from the Official Users Guides for GRASS 4.2. They are available free of charge, in Adobe PDF format, from the GRASS Research Group web site and FTP server: http://www.baylor.edu/~grass 21 Section 5 - Examples of Blackland GRASS Blackland GRASS is an ideal platform for working with vector-based data. In this example, vector maps for roads, streams, railroads, and major power lines are shown. Interactive tools let users plot legends and scale information. 22 Opening and displaying files is easy in Blackland GRASS. Users only need to go to the File | Open | Raster option in the toolbar to list available maps. 23 SPOT satellite image from the spearfish dataset. 24 Raster soils layer with vector soil boundaries used to highlight the map layer. 25 Section 6 - Blackland GRASS Commands versus GRASS 4.2 Commands General File Management Commands Blackland GRASS command Gask Gcopy gcopy_c Genv Gfilename Gfindfile Ggisenv Glist glist_c Gmanual GRASS 4.2 command g.ask g.copy g.copy g.env g.filename g.findfile g.gisenv g.list g.list g.manual Blackland GRASS command gmanual_c gmapsets gmapsets_c gregion gremove gremove_c grename grename_c gsetproj gtempfile GRASS 4.2 command g.manual g.mapsets g.mapsets g.region g.remove g.remove g.rename g.rename g.setproj g.tempfile Management Commands Blackland GRASS command Mdatumshift Mdemextract Mdmausgsread Mflip mgc2ll mll2u MlulcUSGS GRASS 4.2 command m.datumshift m.dem.extract m.dmausgsread m.flip m.gc2ll m.ll2u m.lulc.USGS Blackland GRASS command mlulcread mproj mregionll mrot90 mtigerregion mu2ll GRASS 4.2 command m.lulc.read m.proj m.region.ll m.rot90 m.tiger.region m.u2ll Related Data Management Commands Specific to Blackland GRASS Blackland GRASS command grs2shp shp2grass Function Convert GRASS vector and site layers into ESRI shape files Convert ESRI shape files into GRASS vector and site layers PostScript Commands Blackland GRASS connand psmap GRASS 4.2 command ps.map Blackland GRASS command psselect GRASS 4.2 command ps.select GRASS 4.2 command Shed s.in.ascii s.out.ascii Blackland GRASS command sroff ssurfidw ssurftps GRASS 4.2 command s.roff s.surf.idw s.surf.tps Sites Commands Blackland GRASS command Shed Sinascii Soutascii 26 Raster Commands Blackland GRASS connand Raverage Raverage_i Rbasinfill Rbuffer Rcats Rclump Rcoin Rcolors Rcompress Rcompress_c Rcontour Rcost Rcovar Rcross Rdescribe Rdrain rdrain_pt Rgrow rgrow_c Rinarc Rinascii Rinfer Rinfo rinfo_c Rinll Rinpoly Rline Rlos Rmapcalc Rmask Rmaskpoints GRASS 4.2 command r.average r.average r.basinfill r.buffer r.cats r.clump r.coin r.colors r.compress r.compress r.contour r.cost r.covar r.cross r.describe r.drain r.drain_pt r.grow r.grow r.in.arc r.in.ascii r.infer r.info r.info r.in.ll r.inpoly r.line r.los r.mapcalc r.mask r.maskpoints Blackland GRASS connand rmedian rmfilter rmode rneighbors rneighbors_c routarc routascii routtga rpatch rpoly rprofile rreclass rreclass_i rreport rresample rrescale rrescale_eq rslopeaspect rslopeaspect_c rstats rsupport rsurf_contour rsurfcontour rsurfidw rsurfidw2 rthin rtransect rvolume rwatershed rwhat GRASS 4.2 r.median r.mfilter r.mode r.neighbors r.neighbors r.out.arc r.out.ascii r.out.tga r.patch r.poly r.profile r.reclass r.reclass r.report r.resample r.rescale r.rescale_eq r.slope.aspect r.slope.aspect r.stats r.support r.surf.contour r.surfcontour r.surf.idw r.surf.idw2 r.thin r.transect r.volume r.watershed r.what GRASS 4.2 command v.alabel v.cadlabel v.clean v.cutter v.import v.in.tigbasic v.in.transects v.in.arc v.in.arc v.in.ascii v.in.dlg v.in.dxf v.mkgrid v.mkgrid v.mkquads Blackland GRASS command voutarc voutascii voutdlg voutdxf voutmoss vpatch vproj vprune vprune_c vstats vsupport vtorast vtosites vtrim GRASS 4.2 v.out.arc v.out.ascii v.out.dlg v.out.dxf v.out.moss v.patch v.proj v.prune v.prune v.stats v.support v.to.rast v.to.sites v.trim Vector Commands Blackland GRASS command Valabel Vcadlabel Vclean Vcutter Vimport vin_tigbasic vin_transects Vinarc vinarc_c Vinascii Vindlg Vindxf Vmkgrid vmkgrid_c Vmkquads 27 Section 7 - Brief GRASS Command Descriptions GRASS file management modules g.ask - Prompts the user for the names of GRASS data base files. g.copy - Copies available data files in the users current mapset search path and location to the appropriate element directories under the users current mapset. g.env - Set gis user environment. g.filename - Prints GRASS data base file names. g.findfile - Searches for GRASS data base files and sets variables for the shell. g.gisenv - Outputs the users current GRASS variable settings. g.list - Lists available GRASS data base files of the specified data type to standard output. g.manual - Access GRASS reference manual entries. g.mapsets - Modifies the users current mapset search path, affecting the users access to data existing under the other GRASS mapsets in the current location. g.region - Module to manage the boundary definitions for the geographic region. g.remove - Remove data base element files from the users current mapset. g.rename - To rename data base element files in the users current mapset. g.setproj - Sets mapset projection. g.tempfile - Creates a temporary file and prints the file name. g.version - Outputs the GRASS version number and date. GRASS data import/processing modules m.datum.shift - Datum shift module. m.dem.extract - Extracts USGS Digital Elevation Model (DEM) data from 1/2-inch magnetic tape. m.dmaUSGSread - Extracts digital terrain elevation data (DTED) produced by the Defense Mapping Agency (DMA) but supplied by the USGS (in a different tape format) on 1/2-inch magnetic tape. m.flip - Flips the orientation of map data. m.gc2ll - Converts geocentric to geographic coordinates. m.ll2u - Converts geographic (latitude/longitude) coordinates to Universal Transverse Mercator (UTM) coordinates. 28 m.lulc.USGS - Creates raster map layers from a Composite Theme Grid (CTG) file created by m.lulc.read. m.lulc.read extracts the CTG data from an ASCII landuse/landcover (lulc) CTG format file supplied by the USGS. m.lulc.read - Extracts Landuse/Landcover data in the ASCII Composite Theme Grid (CTG) data format distributed by the USGS in to a working file for m.lulc.USGS. m.proj - Calculates conversion coordinates for geographic positions. m.region.ll - Converts Universal Transverse Mercator (UTM) coordinates falling within the current geographic region from UTM coordinates to geographic (latitude/longitude) coordinates. m.rot90 - Rotates elevation data extracted by either m.dted.extract or m.dmaUSGSread. m.tiger.region - Module to extract the boundaries of a geographic region sufficient to encompass all data in a userspecified TIGER file. m.u2ll - Converts Universal Transverse Mercator (UTM) coordinates to geographic (latitude/longitude) coordinates. GRASS raster modules r.average - Finds the average of values in a cover map (binary map) within polygons of a user-specified base map. r.basins.fill - Generates a raster map layer showing watershed subbasins. r.buffer - Creates a raster map layer showing buffer zones surrounding cells that contain non-zero category values. r.cats - Prints category values and labels associated with user-specified raster map layers. r.clump - Recategorizes data in a raster map layer by grouping cells that form physically discrete areas into unique categories. r.coin - Tabulates the mutual occurrence (coincidence) of categories for two raster map layers. r.colors - Creates/Modifies the color table associated with a raster map layer. r.compress - Compresses and decompresses raster files. r.contour - Produces a GRASS binary vector map of specified contours from GRASS raster map layer. r.cost - Outputs a raster map layer showing the cumulative cost of moving between different geographic locations on an input raster map layer whose cell category values represent cost. r.covar - Outputs a covariance/correlation matrix for user-specified raster map layer(s). r.cross - Creates a cross product of the category values from multiple raster map layers. r.describe - Prints terse list of category values found in a raster map layer. r.drain - Traces a flow through an elevation model on a raster map layer. r.grow - Generates an output raster map layer with contiguous areas grown by one cell (pixel). r.in.arc - Converts arc to GRASS. 29 r.in.ascii - Converts an ASCII text file into a raster map layer. r.in.ll - Creates a raster file from data in latitude, longitude coordinates. r.in.poly - Create raster maps from ascii polygon/line data file r.infer - Outputs a raster map layer whose category values represent the application of user-specified criteria (rules statements) to other raster map layers category values. r.info - Outputs basic information about a user-specified raster map layer. r.line - Creates a new GRASS vector ( digit ) file by extracting linear features from a thinned raster file. r.los - Line-of-sight raster analysis module. r.mapcalc - Powerful raster map layer data calculation tool for overlays etc.. r.mask - Establish/remove the current working mask. r.median - Finds the median of values in a cover map within polygons of a user-specified base map. r.mfilter - Raster file matrix filter. r.mode - Finds the mode of values in a cover map within polygons of a user-specified base map. r.neighbors - Makes each cell category value a function of the category values assigned to the cells around it, and stores new cell values in an output raster map layer. r.out.arc - Converts GRASS to arc format. r.out.ascii - Converts a raster map layer into an ASCII text file. r.out.tga - Converts a raster map layer into a Targa format file. r.patch - Creates a composite raster map layer by using known category values from one (or more) map layer(s) to fill in areas of no data in another map layer. r.poly - Extracts area edges from a raster map layer and converts data to vector format. r.profile - Plots profiles of a GRASS raster map layer. r.reclass - Creates a new map layer whose category values are based upon the users reclassification of categories in an existing raster map layer. r.report - Reports statistics for raster map layers. r.resample - GRASS raster map layer data resampling capability (nearest neighbour algorithm). r.rescale - Rescales the range of category values in a raster map layer. r.slope.aspect - Generate raster map layers of slope and aspect from a raster map layer of true elevation values. r.stats - Generates area statistics for raster map layers. 30 r.support - Allows the user to create and/or modify raster map layer support files. r.surf.contour - Surface generation module from rasterized vector contour maps. r.surf.idw - Surface generation module, from raster data (for latitude/logitude databases with weighted average). r.surf.idw2 - Surface generation module, using raster data (for projections like UTM etc. with weighted average). r.thin - Thins non-zero cells that denote linear features in a raster file. r.transect - Outputs raster map layer category values lying along user-defined transect line(s). r.volume - Sums cell values within clumps and calculates volumes and centroids of patches or clumps. r.watershed - Watershed basin analysis module: calculates watershed boundaries from DEM, drainage map, streams etc. r.what - Queries raster map layers on their category values and category labels. swatgrass - User interface tools to interface the Soil and Water Assessment Tool (SWAT) hydrology model with GRASS for developing basin-scale inputs for comprehensive, continuous-time hydrologic modeling. GRASS sites management modules s.in.ascii - Converts a GRASS site_lists file in ASCII format to binary format. s.out.ascii - Converts a GRASS site_lists file in binary format to ASCII format. s.surf.idw - Surface generation module from sites data (interpolation with weighted average). s.surf.tps - Topological analysis and interpolation tool for sites data (spline interpolation with tension). GRASS vector modules v.alabel - Bulk-labels unlabeled area features in a binary GRASS vector file. v.cadlabel - Attaches labels to vector contour lines that have been imported to GRASS from DXF format. v.clean - Cleans out dead lines in GRASS vector files. v.import - Converts ASCII Digital Line Graph (DLG) files, binary DLG files, and ASCII vector files into binary vector files and creates the needed vector support files. v.in.arc - Converts data in ARC/INFO format to GRASSs vector format, and gets the input from the user data sored in the current GRASS mapset, subdirecory ./arc. v.in.ascii - Converts ASCII vector map layers into binary vector map layers. v.in.dlg - Converts binary DLG (BDLG) file to binary vector (dig) file. v.in.dxf - DXF format to GRASS vector format conversion module. v.in.transects - import transect data to a GRASS vector map 31 v.mkgrid - Creates a (binary) GRASS vector map of a user-defined grid. v.mkquads - Creates a GRASS vector map layer and/or sites list and/or geographic region definition file for a USGS 7.5minute quadrangle. v.out.arc - Converts data in GRASS format to ARC/INFO vector format, and stores output in the users current GRASS mapset, subdirecory ./arc. v.out.ascii - Converts binary vector map layers into ASCII vector map layers. v.out.dlg - Converts binary GRASS vector data to binary DLG-3 Optional format. v.out.dxf - GRASS vector format to DXF format conversion module. v.out.moss - Converts GRASS site, line, or area data into MOSS import format. v.patch - Creates a new binary vector map layer by combining other binary vector map layers. v.prune - Prunes points from binary GRASS vector data files. v.stats - Displays information about a user-specified GRASS vector file. v.support - Creates GRASS support files for (binary) GRASS vector data. v.to.rast - Converts a map layer in (binary) GRASS vector format to GRASS raster format. v.to.sites - Converts a GRASS vector file to a GRASS site_lists file. v.trim - Trims small spurs, and removes excessive nodes from a GRASS vector ( digit ) file. GRASS Image processing commands i.cca - Canonical components analysis (cca) module for image processing. i.cluster - An imagery function that generates spectral signatures for land cover types in an image using a clustering algorithm. The resulting signature file is used as input for i.maxlik. The algorithm is minimum distance. i.composite - An imagery function that creates a color composite image from three band files specified by the user. i.fft - Fast Fourier Transform (FFT) for image processing. i.gensig - An imagery function that generates spectral signatures for an image based on a trainging map of already classified areas/pixels. The resulting signature file can be used as input for i.maxlik or as a seed signature file for i.cluster. i.grey.scale - An imagery function that assigns a histogram contrast stretch grey scale color table to a raster map layer (linear stretch). To stretch the cell values use r.mapcalc. i.group - An imagery function that creates and edits groups and subgroups of (raster) imagery files. i.ifft - Inverse Fast Fourier Transform (ifft) for image processing. 32 i.maxlik - An imagery function that classifies the cell spectral reflectance in imagery data based on the spectral signature information generated in i.cluster. The classification is the maximum likelihood algorithm. i.pca - Principal components analysis (pca) module for image processing. i.points - An imagery function that enables the user to mark coordinate system points on an image to be rectified and then input the coordinates of each point for creation of a coordinate transformation matrix. The transformation matrix is needed as input for the GRASS module i.rectify. i.rectify - An imagery function that rectifies an image by computing a coordinate transformation for each cell (pixel) in the image using the transformation coefficient matrix created by the GRASS module i.points. i.rgb.his - Red-green-blue (rgb) to hue-intensity-saturation (his) function for image processing. 33