1
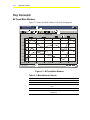
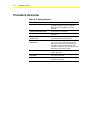
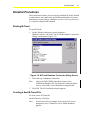
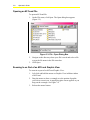
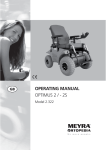
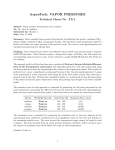
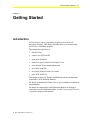
M-Trend User’s Manual
3-1
Chapter 3
Getting Started
Introduction
M-Trend can be run as a standalone program or in an ActiveX
document container. This chapter describes how to get started using
M-Trend as a standalone program.
This chapter describes how to:
•
start M-Trend
•
create a new M-Trend file
•
open an M-Trend file
•
zoom in on part of an M-Trend Graphic View
•
view detailed Trend sample information
•
save an M-Trend file
•
save an M-Trend file with a new name
•
print an M-Trend file
This chapter assumes M-Trend is installed and you have defined and
connected to an M-Historian database.
For details in installing M-Trend, refer to your workstation installation
documentation.
For details on connecting to an M-Historian database or defining a
connection to an M-Historian database, see the Connecting M-Trend to
a Database chapter in this manual.
© May, 2000 Johnson Controls, Inc.
3-2
Operator’s Guide
Key Concepts
M-Trend Main Window
Figure 3-1 shows the Main window of the M-Trend program.
1
Office.htv - M-Trend
File Edit View
Query
2
Help
3
15:52, 67.4
Office Temps
April 13, 1998
130.Paul's Office.Value
132.Secretary Office.Value
4
131.Brad's Office.Value
133.Carole's Office.Value
70.0
DegF DegF DegF
69.5
69.0
68.5
68.0
67.5
67.0
13:00
15 Wed Apr 98
13:30
14:00
5
For Help, press F1
Time
14:30
15:00
15:30
NUM
MT_main
Figure 3-1: M-Trend Main Window
Table 3-1: Main Window Callouts
Callout
Name
Description
1
Title Bar
Shows name of file and program.
2
Main Menu Bar
Shows top level of available menu selections.
3
Toolbar
Provides button access to commonly used
tools.
4
Data Display Area
Area where graphs and tables are viewed.
5
Status Bar
Provides messages about actions being
performed.
Getting Started
3-3
M-Trend Main Window Menus
Table 3-2 describes M-Trend menus.
Table 3-2: M-Trend Main Window Menu Options
Menu
Command
Description
File
New
Creates a new, blank M-Trend document.
Open
Opens an M-Trend document.
Save
Saves the current M-Trend document with a .htv extension.
Save As
Saves the current M-Trend document with a new name.
Print
Prints the current M-Trend view.
Recent File List
Lists recently opened M-Trend documents.
Exit
Exits M-Trend.
Edit Trend
Opens the M-Trend Definition dialog box.
Set Default Connection
Determines or changes M-Historian database connection.
Undo Zoom
If the current display has any zoom factor, this command
returns to normal view.
Toolbar
Toggles the display of the M-Trend toolbar.
Status Bar
If checked, displays a status bar at the bottom of the screen.
Progress Indicator
If checked, displays percentage completed when querying
data.
View Graph
If checked, data appears in a graphic format.
View Text
If checked, data appears in a text format.
Point Symbols
When View Graph is checked, this command adds unique
symbols to each point on the graph. Not available in Text
View.
Mark Data Points
When View Graph is checked, this command marks each data
point on the graph with a small point. Not available in Text
View.
Grid Lines
When View Text is checked, this command adds grid lines to
the displayed table. Not available in Graphic View.
Refresh Data
Starts or restarts the current query.
Cancel Query
Cancels any query in progress.
Help Topics
Displays the Table of Contents for the online help system.
About M-Trend
Displays M-Trend version and copyright information.
Edit
View
Query
Help
3-4
Operator’s Guide
M-Trend Main Window Toolbar
Table 3-3 describes the M-Trend toolbar buttons.
Table 3-3: M-Trend Toolbar Buttons
Button
Name
Description
New
Creates a new blank Trend document.
Open
Opens the Open File document to allow the selection and opening of
a saved Trend document.
Save
Saves the current document. If the document has been saved
previously, it overwrites it; otherwise, the Save As dialog box
appears.
Copy
Copies selected text to the clipboard in View Text mode.
Print
Prints the current graph or table.
About
Opens the M-Trend information box to display version and copyright.
Graphic View
Displays data in a graphic format.
Text View
Displays data as text in a table.
Refresh Data
Starts or restarts the current query.
Cancel Query
Cancels any query in progress.
Edit View
Opens the M-Trend Definition dialog box.
Point Symbols
Adds unique symbols to each point on the graph.
Data Points
Marks each data point on the graph with a small dot.
Grid Lines
Toggles the horizontal grid lines on or off in Text View.
Auto Scroll
If automatically updating data and in Text View, selecting this button
keeps the table scrolled to the latest entry.
Getting Started
3-5
M-Trend Right-click Menu in Graphic View
Table 3-4 lists menu options available in Graphic View by
right-clicking the mouse.
Table 3-4: Right-click Menu Options
Menu Selection
Description
Edit Trend
Opens the M-Trend Definition dialog box.
Undo Zoom
If the current view has any zoom factor, this command returns it to normal
view.
Point Symbols
When View Graph is checked, this command adds unique symbols to
each trended data point on the graph. Not available in Text View.
Mark Data Points
When View Graph is checked, this command marks each data point on
the graph with a small point. Not available in Text View.
Maximize
Provides a full-screen view of the current Trend View.
Print
Prints the current Trend View.
3-6
Operator’s Guide
Procedure Overview
Table 3-5: Getting Started
To Do This
Follow These Steps:
Start M-Trend
On the Windows Start menu select
Programs > Johnson Controls > M-Trend.
Select the type of database connection.
Click OK.
Create a New M-Trend File
On the File menu, click New.
Open an M-Trend File
On the File menu, click Open. Select a file.
Click Open.
Zoom in on Part of an M-Trend
Graphic View
Left-click the mouse on the graphic and drag
over desired portion of graphic data.
View Detailed Trend Sample
Information
With Trend data displayed in either Graphic
View or Text View, move the cursor over a
data point. Left-click to view Trend sample
information about the data point you have
selected. In Text View, you must select sample
data other than the date and time.
Save an M-Trend File
On the File menu, click Save. Enter a name for
the file. Click Save.
Save an M-Trend File with a
New Name
On the File menu, click Save As. Type in a
new name. Click Save.
Print an M-Trend File
On the File menu, click Print. The Print dialog
box appears. Click OK.
Getting Started
3-7
Detailed Procedures
These procedures assume you have already installed M-Trend, defined
a connection to, and connected to an M-Historian database. For more
information on connecting to a database, see the Connecting M-Trend
to a Database chapter in this manual.
Starting M-Trend
To start M-Trend:
1.
On the Windows Start menu, select Programs >
Johnson Controls > M-Trend. The M-Trend Database Connection
Dialog screen appears (Figure 3-2).
Figure 3-2: M-Trend Database Connection Dialog Screen
2.
Select the type of database connection.
Note:
3.
Choose the DSN ODBC name that connects to the
M-Historian Database file. For Johnson Controls installed
servers, select either Access Historian or AspenTech®.
Click OK. The M-Trend Main window appears.
Creating a New M-Trend File
To create a new M-Trend file:
On the File menu, click New.
Note:
If you have made any changes to the current file you are
prompted to save it. Otherwise a new, blank document
appears.
3-8
Operator’s Guide
Opening an M-Trend File
To open an M-Trend file:
1.
On the File menu, click Open. The Open dialog box appears
(Figure 3-3).
Figure 3-3: File - Open Dialog Box
2.
Navigate to the directory where your file is saved and select a file
or type the file name in the File name box.
3.
Click Open.
Zooming In on Part of an M-Trend Graphic View
To zoom in on part of an M-Trend Graphic View:
1.
Left-click and hold the mouse on Graphic View in Main window
of M-Trend.
2.
Drag the mouse to draw a rectangle over the portion of graphic
you wish to zoom in on. A magnifying glass cursor appears as you
drag out the rectangle. See Figure 3-4.
3.
Release the mouse button.
Getting Started
3-9
Johnson Controls.htv - M-Trend
File Edit View Query Help
N 22 Test
14:29, 40.3
41.0
40.9
40.8
40.7
DegF
40.6
40.5
40.4
40.3
40.2
40.1
40.0
39.9
39.8
15 Wed Apr 98
13:30
14:00
Time
14:30
15:00
NUM
For Help, press F1
Zoom1
Figure 3-4: Zooming In on a View
Viewing Detailed Trend Sample Information
To view detailed Trend sample information:
1.
Move the cursor over a data point in the sample. In Graphic View,
the cursor turns into a hand. In Text View, the cursor does not
change.
Note:
2.
You can mark the data points by selecting the data point icon
or from the menu with right mouse click.
Left-click the mouse to display detailed sample information about
the point you have selected. See Figure 3-5 for an example of the
sample data point information label.
3-10
Operator’s Guide
Figure 3-5: Viewing Detailed Sample Information
Table 3-6 contains a description of the fields in the detailed sample
information.
Table 3-6: Detailed Sample Information
Name
Description
Data Source
Name of the sample point being viewed
Data Value
Numerical measurement of the sample point being viewed
Date/Time
Date and time the sample was collected
Reliability
An indication of the likelihood of the sample being correct. Not
available for aggregate data.
Data Offset
If offsetting the values on a piece of trended data, the value of the
offset is indicated on the offset version of the data.
Getting Started
3-11
Saving an M-Trend File
To save an M-Trend file:
1.
On the File menu, click Save. If the file is already named, it is
saved with the current data. Otherwise, the Save As dialog box
appears.
2.
Enter a file name in the file name box.
3.
Click Save.
Saving an M-Trend File with a New Name
To save an M-Trend file with a new name:
1.
On the File menu, click Save As…The Save As dialog box
appears.
2.
Enter a name in the File Name box.
3.
Click Save.
Note:
If you select an existing name from the File name list box
and click Save, all existing data in the selected file is
overwritten with the data in the current file.
Printing an M-Trend File
To print an M-Trend file:
1.
On the File menu, click Print. The Print dialog box appears.
2.
Click OK.
3-12
Operator’s Guide
Troubleshooting
Table 3-7: M-Trend Troubleshooting
Error/Condition
Problem
Solution
There is no Johnson Controls
directory under Program Files
on the Windows Start button.
M-Trend has been installed to a
different program group or not
installed.
Determine if it is in another
directory or install it.
A saved file is opened and
there is no graph displayed.
Data is out of range of current
settings.
Ensure that the study range start
and end times are valid.