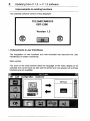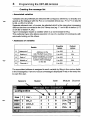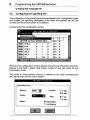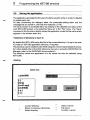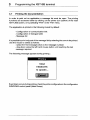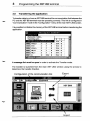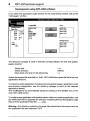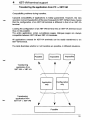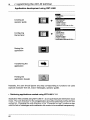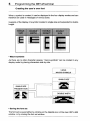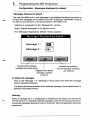
1
XBTLSOOsoftware
Telemecanique
WARNlNG
This guide describes the changes in the functions of XBT-L900 V1.3
software with respect to version V1.2. It is a supplement to the user guide
“Printing messages with XBT-LSOO”.
Used by itself, it does not contain sufficient information for complete
installation of all terminals in the XBT range.
The reader should refer to the user manual for the selected terminal where
he will find details of its functions and all necessary information for setting
it up.
Trademarks : TSX7, TELWAY, UNI-TELWAY, UNI-TE, X-TEL, XBTEL are
Telemecanique trade marks.
MS-DOS, MS-OS/2 and WINDOWS are Microsoft Corporation trademarks.
PC, PS/2 are International Business Machine Corporation trademarks.
MODBUS is a Modicon trademark.
JBUS is an April trademark.
Section
Page
1
Introduction
2
Updating from V1.2 -> V 1.3 software
15
3
Programming the XBT-BB terminal
23
4
XBT-VM terminal support
42
5
Programming the XBT-M terminal
56
6
Appendices
95
6
Contents
Page
Section
1
introduction
6
1 .l XBT-L900 V 1.3 supplement
6
. Structure of the guide
6
1.2 XBT-L900 installation
2
1.3 Using the guides for the terminal selected
13
UDdatina from V1.2 -> V 1.3 software
15
2.1 Improvements to existing functions
15
15
l
Version identification
l
Enhancements to user friendliness
16
Acceleration of PC <-> XBT transfers
17
l
2.2 Enhancements to programming the terminal
l
Improvements to programming of XBT-V terminals
9 Advanced programming of the XBT-M terminal
2.3 Integrating the new terminals
3
7
18
18
19
20
l
Programming the XBT-A4 terminal
20
l
Programming the XBT-BB terminal
21
l
Programming the XBT-M terminal
21
l
XBT-VM terminal support
22
Programming
the XBT-BB terminal
3.1 Summary of operation
l
General
23
23
24
l
Parameter-setting table
25
l
Dialogue table
26
l
Message list
27
3.2 How to create an application using XBT-L900
28
l
Selection of the method
28
l
Stages of creating an application
28
Section
3
Page
Programming the XBT-BB terminal
3.3 Configuring the parameter-setting table
29
l
Access to the parameter-setting table
29
l
Selection of parameters
30
3.4 Creating the message list
32
l
Associated variables
l
Addresses of variables
3.5 Configuring the operating link
3.6 Saving the application
4
(continued)
33
33
34
35
l
Selection of directory to save to
35
l
Saving
35
3.7 Printing the documentation
36
3.8 Transferring the application
37
l
Exporting (PC -> XBT-BB)
38
l
Importing (XBT-BB -> PC)
40
XBT-VM terminal SUDDOI~
42
4.1 Summary of operation
42
l
General
42
l
Creating the pages
42
l
Aoolication script
43
4.2 Development using XBT-L900 software
44
l
Method
45
l
New application
45
l
Retrieving an existing application
45
Page
Section
4
XBT-VM terminal support
4.3 Configuring the XBT-VM terminal
5
(continued)
47
l
General
48
l
Size of requests
49
l
Application configuration
51
4.4 Transferring the application
52
l
Changes to XBT-L900 software from V 1.2 to V 1.3
52
l
Operating modes
52
Programming the XBT-M terminal
56
5.1 Summary of operation
56
l
Using simple functions
58
l
Control system command
58
5.2 Application development using XBT-L900
59
l
Developing a new application
59
l
Retrieving applications created using XBT-L900 V 1.2
60
5.3 Creating the user’s own font
61
l
Tools available
63
l
Macro-symbols
64
l
Saving the font set
64
5.4 Creating the message list
65
New message list
66
l
Entering data
68
l
Selection of the font set
69
l
5.5 Creating macro-messages
73
5.6 Creating the operator guide
78
l
Entry of operator guide
79
l
Using macro-messages
81
Page
Section
5
Programming the XBT-M terminal
5.7 Configuration - Messages displayed by default
6
l
Configuration
l
Messages displayed by default
(continued)
83
83
87
5.8 Saving the application
88
5.9 Printing and transferring the application
90
l
Printino
90
l
Transferring from PC -> XBT-M (Export)
91
l
Transferring from XBT-M -> PC (Import)
94
Appendices
95
8.1 File organization
95
6.2 Erasing
96
l
Erasing an application file
96
l
Erasing a directory
98
6.3 Compatibility
97
l
Communication protocols
97
l
Software ComDatibilitv
98
Possibility of retrieving programs created using
XBT-L400 and XBT-Ll 00 via XBT-L900
98
Compatibility between XBT-L900 V 1.3 / XBT terminals
99
l
l
1
Introduction
1.1
XBT-L900
V 1.3 supplement
This guide is a supplement to the user guide “Printing messages with XBT-LSOO”
which describes the use of version V 1.2 software. The numerous changes and
improvements in version V 1.3 of the software package are described in this
supplement.
The latest version of XBT-L900 V 1.3 software enables the user to program the
new XBT terminals, as well as the new functions on existing terminals.
There have also been improvements in user friendliness and PC <-> XBT
transfers.
The user who already has XBT-L900 V 1.2 software on FTX 507, FTX 417
programming terminals or on a compatible PC will be interested in updating it as
the new software package is completely compatible with the old version, enabling
all developed applications to be retrieved and, at the same time, offering additional
functions.
The user should follow the procedure described in this manual to install or update
the software.
l
Structure of the guide
This supplement to the XBT-L900 software user guide comprises 6 sections,
arranged as follows :
Introduction
This section describes the V 1.3supplement, structure of the guide, software
installation and updating procedures and how to use the guides for XBT
terminals.
Updates from V 1.2 -> V 1.3
This section describes improvements to the software, the updates and
programming of the new terminals in version V 1.3.
Programming the XBT-BB terminal
This section describes how to create an application for the XBT-BB and all
the corresponding operating modes.
XBT-VM terminal support
This section describes the changes and how to import XBT-VA applications
to the new XBT-VM terminals.
1
5.
Introduction
Advanced programming of the XBT-M terminal
This section outlines the programming of the XBT-M terminal already
described in the previous guide and presents all the new functions available.
6.
Appendices
The appendix contains various information concerning the use of XBT-L900
V 1.3 software and problems which may arise for the user.
1.2
XBT-L900
installation
Configuration required
XBT-L900 V 1.3 software runs on Telemecanique FTX 507 and FTX 417 PCcompatible programming terminals.
XBT-L900 V 1.3 will also run on a PC-type microcomputer or compatible or on a
PS/2 equipped with at least :
- MS-DOS or PC-DOS version 3.0 or later,
-
a 5’114 or 3”1/2 format disk drive
10 Megabyte hard disk,
2 Megabyte RAM memory,
a serial port (RS 232 C asynchronous link) for communication with the XBT,
an additional serial port or a dedicated mouse port,
WINDOWS 3.1 or 3.0 (standard or advanced mode).
There are two different situations :
- To install a new version refer to the user guide “Printing messages with the
XBT-LSOO” which describes the software installation procedure (Section 2,
pages 7 to 13).
-To update a previous version of XBT-L900 software to the new V 1.3 version,
the following procedure should be used :
l
Stage 1 : copying the XBT-L900 V 1.3 files to hard disk
- Using DOS
- Select the drive where you wish XBT-L900 to be copied (eg c:)
type
then press a
Ic:
- Create a sub-directory for XBT-L900 V 1.3 :
type
1md xbf1973
]
then press a
7
Introduction
1
installation
XBT-L900
- Change to the new directory :
ICC!xM1913
type
then press a
1
- Place the XBT-L900 disk in the disk drive (a: for example)
- Copy the disk files :
[copy a : l .*
type
I
then press @$
- Remove the disk from the drive and put it in a safe place.
l
Stage 2 : Installing the XBT-L900 application
under WINDOWS 3
- Start WINDOWS
- Activate the “WINDOWS SET UP” icon in the main group (this icon may be
located in another group, depending on how WINDOWS has been installed).
- Select
click
OPTIONS
SET UP APPLICATIONS
OK
Iwithout making any modifications.
- In the list of applications : select XBT-L900
1 ADD
click on
1then 71.
- Close the “WINDOWS SET UP” window.
...................................
.... :‘ ::‘,-”
“““:: :!:‘.li!‘:i‘i’i’i:ii:li.:i-:i:.:::.:::::~:.’.”:.:.:
::
:‘:,.;i
i;,j;
y.,:.::
..:::...y:;
................................
?.
............
. .. . .
::::
:
i~i~-aii~~~:~:~~~~~~~~~~~~~~~~~~~~~~~~,~~~~~~~~~
I;~~d:i~~~~~~~~.
..............
:; .p;,:::;
::
....................
.......:‘Y
.:.:..::I”“.
:(i_iiii.:.:.:.
.....................
. .i:
..
.:.: ..........................
. .......................................
,,,
,,,,
........
,,,
.j:.::i:::‘::::::,~:
,,:.:
i:i:I::::,::~
:,,,:
.....
:,,;:::,:.:
.:::
i
::.,_:_
i&;;;;;;;:;ij;;;i;;:;;ii
gj;;;::,;:,::;
i‘:ii_~;:::li::::_i~~~~~~~~~~~~:~~~~~~
::.:.......::
<...:
..:.:::
>:..
....
.,.:.:.,.:.:.
.....
................................
,,,
.‘“‘.“.:‘:
.‘““”
.................
:.:...:.?z::?~:::?3::
5%:::. ....... :‘:‘:::: ..............
::~
..:.
“Y:::::
;ii:j
...........
::j .j ‘:‘:I
...........
.:
............. ... ..:,:.
:.:.::.:::: .... i :.:..:.....:................................................................................................
.............................
:“.:.
...... :.:.: ........
~,_:t::::‘,
,,.,.::::
:,
...........
,,,
: ..............................
......
. . ..~...~..:~.~::~i:;:~:i’.:i’i:.:.:.:..::
.:.: ...............
‘.j .:::,:,;:,::: _.,:,:. ......................
Version V 1.2
,.,:.:,:,r:,:.i:~~
,:,: :::.:::::; :,:::,
................... ... ...
:: ......... .,::,: :j.:::::.:.:x::i:::.:
........ . . :.:...:.:...: .. i‘i’
i’..
........
....
~~~~~~~~~~~~
..........................................
. . ..~.~..........~.......
.:
~::‘:~::(.i:.:....~:~:::::.:..i~~i:
.:,.:,:,:,
::,:,:,,,:,:,.,.,::.,
::,~:~ :::_::::::
....:
............................
Version V 1.3
... ....... ... ..............
.........
...
...
1
Introduction
XBT-L900
installation
l
Stage 3 : Checking installation
l
If WINDOWS
Type
l
Iwin
is not already open, start as follows :
then press I(er)l.
Open the group “APPLICATIONS
” by double clicking on its icon
Note: You should get the following screen in English from you Windows software.
Eichicr
Options
F@%e
1
Bard-in-a-Box
forwlndowr
Icon @
l
I
appears under the “APPLICATIO~SS” heading selected.
Launch XBT-L900 by double clicking on icon @
The main XBT-L900 application window appears :
XBT-A4
1
Introduction
XBT-L900
installation
Stage 4 : Deleting the old version
l
- After testing the new version of the XBT-L900 V 1.3 software and importing the
applications, the old version can be deleted by the following procedure :
Deleting the application under WINDOWS
After choosing the program icon to delete, go to the “File” menu and select
delete. This operation does not delete the program files, but cancels launching
the program from WINDOWS using the icon.
The deletion is confirmed by answering the following request :
Gestionnairc de programmes
I
Eichier
Options
F&tre
1
Applications
Voulez-vous
supprimer le programme
Note: You should get the above screens in English from you Windows software.
in
1
Introduction
XBT-L900
installation
Deleting program files :
Warning :
Deleting program files should not cause deletion of application files (extension
xtx, .xfn, .xap, xts, .xgr, .fon). These files should not normally be in the same
directory as the program files. If they are, they should be saved before any of
the files in the directory are deleted.
To delete old version XBT-L900 files use WINDOWS File Manager (see the
next page and the WINDOWS documentation) or the following procedure can
be used under DOS :
- Using DOS,
- Select the drive of the old version XBT-L900 (eg. c:)
type
(
c:
I
press Q)
- Select the directory of the old version :
type
I
cdxbt1900
1
press Q)
- Request the list of files in the directory :
type
I
press (Q
dir
- Check there are no files with the following extensions :
(application files)
.XFN
.XTX
.XTS
.XAP
.XGR
.FON
- Delete all the files in this directory
type
I
press I(er)l
de/'.*
- Confirm deletion
type
I
Y
1
press Q)
- Quit the directory
type
1 cd ..
press I(er)l
- Delete the directory
type
)
rdxbt1900
1
press (Q
II
1
Introduction
XBT-L900
l
installation
Deleting an application
file under WINDOWS
Use the “File Manager” in the main WINDOWS group.
- Start File Manager by double clicking on its icon
- Select the folder containing the file to be deleted (click on its icon).
The File Manager displays the file storage tree of the directories in this folder :
Note: You should get the following screen in English from you Windows software.
ichier
Qisque
A&e
Affichage
Qptions
Fmi3re
1
524 16/04/1993
05122134
Select the directory containing the file to be deleted (double click on the name of
the directory)
Repeat this operation as many times as necessary if there is a sub-directory
Click on the file name (eg. : ESSAI.XTX),
Select the command “Eile” then “Delete”
Confirm deletion.
Deleting a directory
Use the same method but select a directory name rather than a file name.
For further information concerning these operations, refer to the WINDOWS user
guide.
W
1
Introduction
1.3
Using the guides for the terminal selected
The new models of XBT terminal can be programmed with the new version of
XBT-L900 V 1.3 software. New functions are also available to the users of existing
models.
As V 1.3 software is completely compatible with its predecessors it is very easy for
users to convert to the new version.
For new users the information found in the user guide “Printing messages with
XBT-LSOO” is very useful to ensure correct use of the software and operating
modes.
The following tables illustrate the manuals and sections the user should refer to
for optimum use of the software.
User guide
: “Printing messages with XBT-LSOO”
1
Introduction
Using the guides for the terminal selected
For new terminals and new functions on existing terminals, refer to the following
sections of the supplement.
User guide : “Printing messages with XBT-LSOO”
Version V 1.3 supplement June 1993
SECTION ON USING THE PROGRAM
XBT TYPE
Terminals with
keyboard/display
XBT-A4
2.2
XBT-BB
3
Multifunction
Display unit
XBT-VM
XBT-M
Screen
terminals
4
5
5
2
Updating from V 1.2 -> V 1.3 software
2.1
Improvements to existing functions
l
Version identification
When several versions of XBT-L900 software are installed (which is pointless due
to the upward compatibility of the versions) it is useful to be able to check quickly
which version is being used.
If the software has not yet been launched, the V 1.3 version can be distinguished
by its new icon.
@
Xbt1900
Xbtl900
Version V 1.2
Version V 1.3
There is no point in using the old version as the two versions are compatible.
W
‘
If the software has been launched, use the “About ” function in the File menu to
access the correct version :
Save As...
_.
Iml
XBT-A4
(
,:::
y
*:.:.:.>.y<<*
1
p
+. i.:.:.:
_>,.:
2
Updating from V 1.2 -> V 1.3 software
Improvements
to existing functions
The selected software version is thus displayed :
TELEMECANIQUE
XET-L900
Version 1.3
l
Enhancements to user friendliness
The integration of new functions and new terminals has improved the user
friendliness of certain commands.
Main window :
The icons in the main window allow the language of the menu display to be
selected, the current back-up disk and the printer are now greyed out as these
functions are not available.
2
Updating from V 1.2 -> V 1.3 software
Improvements to existing functions
Help from the application script in the XBT-V terminal :
In the programming of the XBT-V terminal the order of appearance of key words
in the application window has been modified to take into account the frequency of
these commands. The action of different commands has not been changed.
Application loading to an XBT-V terminal
During the transfer of an application from a PC to an XBT-V terminal the
progression of the transfer is indicated by the percentage achieved.
The user is thus aware of the progression of the transfer and of the time necessary
to complete it.
l
Acceleration
of PC <-> XBT transfers
Being able to store large numbers of messages, particularly in XBT-M terminals,
has considerably increased the time it takes to transfer applications from PC ->
XBT and XBT -> PC.
The new version of XBT-L900 V 1.3 software significantly reduces the transfer
time, particularly when part of the memory is not used (default message).
Both types of transfer times will be halved in normal configuration.
2
Updating from V 1.2 -> V 1.3 software
2.2
Enhancements to programming the terminal
l
Improvements to programming of XBT-V terminals
- Terminal selection
The selection of screen terminals has been improved to take account of changes
in the range.
XBT-L900 version V 1.2 software supported the following XBT-V terminals :
- XBT-VA8
- XBT-VB4
- XBT-VB8
(compact monochrome terminal)
(terminal + colour monitor)
(terminal + colour monitor)
To keep up with changes in the range of screen terminals XBT-LSOOversion V 1.3
can be used for programming the following terminals :
- XBT-VA8
the colour of the icon in the main window of the software has been
changed so monochrome screens can be used (blue -> green)
- XBT-VB4
no change
- XBT-VB8
no change
- XBT-WA8 (compact colour terminal)
- Help during the creation of the application script
The “Help” window of the application menu has been modified :
Qptions
PAGE 1
THT
8CK
ADR
ASS
Keyboard
:
:
:
:
frml.HtH
frml .Hgr
0,254,0,254,0
5
LCK : OFF
FOl :2
Text
:
END
PAGE 2
THT :
Backqround
:
2
Updating from V 1.2 -> V 1.3 software
Enhancements
to programming
the terminal
The pull-down menu which appears during the creation of application scripts is as
follows :
XBT-VA8
XBT-VM8
XBT-VB4
XBT-VB8
~PAGE . . .
I SURV . . .
ON
OFF
Text
enel.xtx
:
Text
:
enel.xtx
This requirement is more user friendly and takes into account the frequent use of
these commands
l
Advanced programming of the XBT-M terminal
The XBT-M terminal is a multifunctional matrix display unit with a wide range of
functions.
The creation of a special character font set, the macro-message option and the
operator guide are among the functions of the XBT-M terminal which contribute to
its high performance.
The new version of XBT-L900 V 1.3 simplifies the development of applications for
XBT-M terminals and provides greater functionality.
In particular, the number of messages which can be programmed as a function of
the size of cartridge used and the management of memory space available under
WINDOWS for XBT-L900 V 1.3 are now managed.
The possible structure of the operator guide has been considerably increased
from 29 x 12 messages to 93 x 12 messages.
All the functions of the XBT-M terminal are described in the XBT-M guide:
Multifunction display unit ref. XBT XM800E. This guide describes in detail the
various uses of the XBT-M terminal.
2
Updating from V 1.2 -> V 1.3 software
2.3
Integrating
l
the new terminals
Programming the XBT-A4 terminal
In version V 1.2 it was possible to program the XBT-A4 terminal by selecting an
XBT-B4 type terminal and the use of the message list had to be limited to message
No 100, which is the memory limit of the XBT-A4, whereas the XBT-B4 can have
up to 150 messages.
The main window of the XBT-A4 terminal can be selected with the new version of
XBT-L900 V 1.3 software.
*
~.:.:.:.:..(.:.
@.
1..
%&,:.. .....:
The message list which appears enables messages 000 to 100, ie 101 messages
to be configured.
All the functions are identical and the message list appears in the same way with
identical message fields.
Applications for XBT-A4 terminals which have been developed using XBT-L900
V 1.2 software (selecting an XBT-B4 terminal) can be retrieved using XBT-L900
V 1.3 software.
The following method should be used for this operation :
- select an XBT-A4 terminal
- open a new message list
- transfer from the XBT-A4 terminal to the PC (Import)
- save the application to disk
2
Updating from V 1.2 -> V 1.3 software
Integrating
l
the new terminals
Programming the XBT-BB terminal
The XBT-BB keyboards with function keys (11 or 23 depending on the model) can
be programmed using XBT-L900 V 1.3 software.
w
These terminals have the following functions :
- assignment of the keys to PLC variables
- serial link configuration
- parameter table configuration
Programming the XBT-BB terminals is described in further detail in section 3 of this
guide.
l
Programming the XBT-M terminal
The new version of XBT-L900 V 1.3 offers all the functions of the XBT-M terminal.
-Creating a usercharacterfont set with special symbols and macro-symbols
- Creating a message list with a choice of character font set and display of
messages
- Creating macro-messages
- Creating an operator guide (size increased from 29 x 12 to 93 x 12)
- Saving displayed default messages
- Configuring operational parameters
- Managing the log memory and the printer link
-Transferring the configuration, the message list and the usercharacterfont
set
- Totally or partially deleting the message list stored in the XBT-M terminal
- Initializing a memory cartridge
- Modifying the size of the message list
The ability to modify the size of the message list enables better management of the
XBT-M terminal and PC memories.
XBT-L900 V 1.3 is compatible with applications developed under the XBT-L900 V
1.2 version of the software and all message list files and character font sets can be
read in local mode.
All these functions are described in further detail in section 5 of this guide.
2
Updating from V 1.2 -> V 1.3 software
Integrating
l
the new terminals
XBT-VM terminal support
In version V 1.2 it was possible to program the XBT-VM terminal by selecting an
XBT-VA type terminal.
The XBT-VM terminal can be selected using the main window of the new version
of XBT-L900 VI .3 software. Thus the programming of two types of terminal can
be managed independently :
- XBT-VA
- XBT-VM
compact monochrome terminal
compact colour terminal
All applications developed for XBT-VA terminals eg text pages, surveillance
pages, graphic pages and the application script are compatible for XBT-VA and
XBT-VM terminals. The new functions of XBT-VM terminals are screen colour and
the ability to configure the size of requests in Uni-Telway or Adjust protocol.
When connected to a Telemecanique TSX 7 programmable controller, the
XBT-VM terminal is able to use requests of 128 bytes (32 for XBT-VA terminals).
This, in conjunction with the use of contiguous variables, allows a considerable
improvement in the update time of on-screen variables.
3
Programming the XBT-BB terminal
3.1
Summarv
of oDeration
The XBT-BB terminal can send orders to a control system via keys. It can receive
orders to lock or unlock these keys, as well as orders to control the indicator lamps
(lit, on with a steady display, blinking, off).
There are two ways of communicating between the XBT-BB terminal and the
control system :
- ASCII protocol
- UNI-TE or ADJUST protocol
l
ASCII protocol
In ASCII protocol data exchanges between the terminal and the control system are
made over a standard serial link using “Escape” sequences.
CONTROL
SYSTEM
w
XBT-BB
These sequences enable control of all the XBT-BB terminal functions and dialogue
from the control system to the XBT-BB and from the XBT-BB to the control system.
ESC
1
C
XBT-BB 811010 : NN = 23
XBT-BB 801010 : NN = 11
f,
TEST key : XX=00
xx
1
LF CR
NN = number of
function keys
NUMBER OF KEYS
Ol<XX<NN
,
Programming the XBT-BB terminal
3
Summary
of operation
UNI-TE or ADJUST protocol
l
Operation of the XBT-BB involves the management in the PLC of a word table
(dialogue table) which represents the status of the terminal indicator lamps and
keys. This table is made up of PLC words containing bits mostly associated either
with a key or with an indicator lamp.
l
l
l
l
They
They
They
They
inform the control system of key status (pressed down or released).
tell the XBT-BB which lamps should be blinking.
tell the XBT-BB which lamps should be on with a steady display.
tell the XBT-BB which function keys should be locked.
The XBT-BB accesses the PLC on a cyclical basis to read the dialogue table
containing thecommands to beexecuted, executes them and then writesthestatus
data to the PLC.
However, for it to be able to update and consult the dialogue table, it needs to be
told where the table is located and its scan period. This is the reason for setting
parameters in the XBT-99. All this information constitutes the parameter-setting
table.
Programming the XBT-BB terminal using XBT-L900 software means creating this
table and sending it to the XBT-BB terminal.
TSX7 I PMX7
PARAMETER-
I
I
DIALOGU
TABLE
I
J
XBT-BB
The parameter-setting table containsthe address on the UNI-TELWAY bus of the
device containing the dialogue table scanned by the XBT-BB terminal, the address
of the 1” Wi word in the word table of the device and the scan period for this table.
3
Programming the Xl3 I -l5B terminal
Summary of operation
The principle of generating the parameter-setting table remains the same if a
different protocol is used.
For further details on operation of the XBT-BB, refer to the XBT-BB terminal user
manual.
l
Parameter-setting table
The parameter-setting table is located in the working memory of the XBT-BB
terminal, and is made up of 7 words which indicate to the terminal :
- the address of the PLC which contains the dialogue table
- the address of the first word in the dialogue table
- the scan period for the dialogue table by the terminal
Parameter
address
Details
20000
Networkno
20001
Stationno
20002
Gate no
20003
Moduleno
20004
Channelno
20005
20006
Addresson the
UNI-TELWAYbus of
the device containing
the dialoguetable
scannedby
the XBT-BB
Possible
values
Default
value
0 to 255
0
0 to 255
254
0 to 255
0
0 to 255
254
0 to 255
0
dialogue table in the PLC
0 to 65525
and 65535
65535
Expressed in ms
Minimum period for the XBT-BB
0 to 65535
320
Addressof the firstwordin the
to scanthe dialoguetable
This parameter-setting table is created using XBT-L900 software and is transmitted
to the XBT-BB terminal.
Programming the XBT-BB terminal
3
Summary
of operation
Dialogue table
l
The dialogue table is located in the PLC memory and is made up of IO words of
16 bits containing the images of the indicator lamps and keys. It is arranged as
follows :
Wn, F
Userlampsblinking
Wn, 0
Wn
Wntl
Bits reserved by the XET-BB
V23 V22 V21 V20 Vl9 Vt8 V17 VI6
Userlampson I off
Wn+2
Wn+3
Bits resewed by the XBT-BB
V23 V22 V21 V20 V19 V18 V17 Vi6
Functionkeys lockedI unlocked
Wn+4
Wn+5
Wn+6
Bits resewed by the XBT-BB
F23 F22 F21 F20
F19 F16 F17 F16
Word reserved by the XBT-BB
XBT cycle number
Wn+7
Functionkey status(presseddownI released)
Wn+8
Wn+9
Bits resewed by the XBT-BB
F23 F22 F21 F20 F19 FIB F17 F16
note : the shaded parts indicate the bits used by the 12 keys of the XBT-BB.
26
3
Programming tne xts I -tm I~IIIIII I~I
Summary of operation
l
Message list
When an XBT-BB terminal is connected to an existing installation or is used in an
installation where the variables controlled by the function keys are divided among
several devices, it may be helpful to assign each function key to a different
variable.
In this case, if the dialogue table is configured in the device connected to the
XBT-BB terminal, two operating modes will be available simultaneously :
- message list
- dialogue table
Example :
XBT-BB terminal connected to a TSX 7 PLC with a dialogue table configured at
w30.
Key F5 on the terminal is represented by bit W38,5 in the PLC, and this key can
be assigned to a different variable in the message list, which can be accessed via
the Uni-Telway bus (eg. bit B14 of station 3).
Possible message list :
Type of
message
Details
Associated
variable
F
Momentary contact command :
the bit corresponding to the
key is set to 1 while the
key is pressed down
bit or
extract word bit
Bi or Wi,j
P
Push-on/push-off command:
the corresponding bit
changes status each time
the key is pressed
bit or
extract word bit
Bi or Wi,j
S
Selective command :
pressing the key sets Wi,j
to 1 and the other bits of word
Wi are set to 0
extract word
bit Wi,j
27
rne XB I -IA3 terminal
3
rruyrammlng
3.2
How to create an application using XBT-L900
XBT-L900 softwaresimplifiesthe creation of an application for an XBT-BB terminal.
It must first be decided if the creation of a message list would be useful.
l
Selection of the method
To create an application for an XBT-BB terminal one or two tables must be created,
depending on the situation :
- parameter-setting table
- message list
The decision to create a message list should be made in conjunction with the
selection of the operating type (refer to section 3.1 Operating summary or the
XBT-BB terminal user guide).
l
Stages of creating an application
The following method should be used to create an application for an XBT-BB
terminal using XBT-L900 software :
- Configure the parameter-setting table
- Create the message list
- Configure the operating link
- Save the application
- Print the documentation
- Transfer the application
The various stages are essential in order to ensure that the application development
cycle includes all steps for correct operation, file saving and maintenance of the
application.
The user interface of the XBT-L900 allows the various stages to be moved through
easily and with low risk of error. Checking all parameters and error messages
enables rapid application development for XBT-BB terminals.
Sections 3.3 to 3.8 describe in further detail the various operations to be performed
at each stage.
28
rw
‘
3
Programming the XBT-BB terminal
3.3
Configuring the parameter-setting table
The parameter-setting table contains the address of the connected device
(Uni-Telway Steve1 addressing system), the dialogue table address, when a TSX 7
programmable controller is being used, and the update period for the table.
l
Access to the parameter-setting
table
After launching XBT-L900 and selecting the XBT-BB terminal, click on the “Message
list” icon.
The directory of the applications can thus be accessed and an existing application
can be opened by selecting its name or a new one created by clicking on “New”.
Directory : c:\xbtl900
After clicking on “New” the file name is defined when the application is saved (click
on the diskette icon).
This application file is called “ESSAI.XTX” by default.
The “Message list” window appears with a single “Configuration” menu which
accesses the configuration of the various tables and is used to initialize the XBT-BB
terminal memory.
Select “Parameter-setting
setting.
table” in the pull-down menu to access parameter-
3
Programming the XBT-BB terminal
Configuring the parameter-setting table
Operating
XBT-BB
!Jne...
Iu
memory
!nitialisation...
Iw
..................................
......................................
; 254 ; 0
i
. . . . .. . .. . . .. .. . .. .. . . . .. .
! 254 : 0
f
i 254 i 0
; 0
..,..:,.....,,.....,,......,.................,.....................
i 254 i 0
; 0
; 254
; 0
!
. . . .. . . . .
; 0
i
/ 254
i 254 ; 0
i 254 ; 0
; 0
. . . . . . . . . . . . . .. . .. . .. . . . . . . . . . . . . . . . . . . . .. . .. . . .. . . . . . . . . . . . . . . . . . . . . . . . . . .
i 254 ; 0
i 254 ; 0
i 0
_
I.....:
. . . . . . . . . . . . . . . .
I8888
I8889
.
. . . . . . . _..:....
_._.
..:..
l”‘...:..
l.i’_
.
.
.
.
.
.
1
.
.
.
.
.
.......................................................;...254
.......;...0.......ii.
..#...:...tt.................i...0.......i...254
.......[...0.......i...254
.......;...0.......i.
8887 I # i #
: 0
: 254
; 0
; 254
; 0
i 254 ; 0
; 8
#I i #
. . . . . . . . . . .. . . . . . . . .. . .. . .. . . . . . . .. . . . . . .. . . . . . . . .. . .. .. . . . . . .. . . . . .. . . . . . . .
Selection of parameters
Possible
values
Details
Default
value
Channel no
Word W no
Cycle time
Addressof word table
update
#to 65527
#
0 to 65535
320
The parameter-setting table appears in a window and contains information on the
5 Uni-Telway address fields, the PLC address for the table of IO words and the
update period for this table.
All values entered by the operator are checked and if there is an error a help
message appears defining the cause.
3
Programming the XBT-BB terminal
Configuring
l
the parameter-setting
table
Selection of word table address
This address must be located in the W words (CW words must not be used as the
XBT-BB terminal would write the data to this table). The table is 10 words long and
if an address is selected at the top of the memory space then the existence of the
10 words must be checked.
Example :
Address selected W3850 => number of words configured t 3860
l
Selection of cycle time in ms
This is the value of the period in which the XBT-BB terminal updates the states of
the function keys in the PLC memory.
The default value is 320 ms, which corresponds to 3 updates per second.
Implementing too short a cycle time is pointless, as this would increase the traffic
on the line without significantly improving the response time.
Example :
Network 2 PLC, station 7
SCM 2116 at slot 4
Address of XBT-BB terminal : 2
PLC table from
word W 148
I
UNI-TELWAYaddress
pzqrJ
I
in PLC
%zA\
I
7
Station
table
address
Dialogue
I
Gate
I
II
15
I I
3
Programming the XBT-BB terminal
3.4
Creating the message list
To create the message list complete the information in the field for each message
(11 or 23) according to the number of function keys on the selected XBT-BB.
Presentation of message list :
Configuration
Num
0001
0002
0003
0004
0005
0006
0007
0008
T
R
Uar.
S
G
U
W
; 2
i 7
; 0
; 254 i 0
;
FjB12
,...,,.......,....,.__......................................................
F i W10,3
i 2
i 7
; 0
i 254 : 0
:
,.,....,...,...........................................
. . . . .. . .. .. . . .. . . . . .
P ; El3
; 2
; 7
; 0
; 254 i 0
i
..,....,...,.,..............................................................
P i WlEi,4
; 2
i 7
j 0
; 254 ; 0
;
,,,....,..,..,..............................................................
S i W8,O
; 2
;7
;o
; 254 i 0
;
,.,....,..,,.,...................................................
,......,.....,...................................................
S ; W8,l
i 2
j 7
j 0
; 254
m
I# ; #
; 0
I 254 ! 0
: 254 f 0
. . . . . . . . . . . . . . . . . . . . . . . . . . . . . . . . . ..‘.........
~.........:.........:.........:
# i #
; 0
I 254 j 0
; 254 ; 0
.,.....,..,,.,.........,...........’....__........,.........................
; 254 i 0
!
;
During data entry use the “ENTER” key to move between fields. If an error occurs
a message describing the type of error is displayed in red in the error message zone.
Example :
Variable error in an S type message
(word extract bit Wi,j required)
Configuration
error
message
zone
C~3nrl.
->
Num
0001
0002
0003
reject
1
:
Uar.
S j 812
.,...:.....
FiW103
.... ... ... ....‘......
P : B13
( T = 2‘ ;’
[R
IS
) 83 f u = “RXX’
IG
IU
i 0
:2
.7
i 254
..:. ,... ..:.........:.........:__.._....
i2
.7
! 0
i 254
]
W
0
! 0
!
:...................:......._.:.... ............_.
i2
‘7
! 0
: 254 ! 0
!
3
Programming the XBT-BB terminal
Creating the message list
l
Associated variables
Variables should preferably be selected with contiguous elements, to simplify and
speed up the dialogue with the PLC or connected device (eg : Fl to F7 on bits BO
to B6, or W3,O to W3,6).
Separate elements can, of course, be selected which is the case when accessing
different devices connected to the Uni-Telway bus (eg : Fl on bit B5 of station 3, F2
on bit 85 of station 4, etc).
Type S messages require a variable which is a word extract bit Wi,j.
This particular type only allows execution of one of a number of commands with
automatic locking on the others.
l
Addresses of variables
Addresson the
UNI-TELWAYbus of the
variable assignedto the key
which correspondsto the
number of the message
The associated address is assigned to each variable by filling in the various fields
in the message list. If an error occurs a message is displayed in red on the entry line
to warn the user.
Network
Qmfiguration
Num
0001
0002
T
Var.
Module
Gate
Station
I
p
1s
p
Channel
I
pJ
w
/7
io
j 254
D
i 2
s j w1,3
. . . . . . . . . . . . . . . . .. . . . . . . .. . . . .. . . . . . . . . . .. . . . . .. . . . .. . . . . . . .. . . . .
i 254 i 0
17
; 0
; 2
F : W10,3
j
. . . . .. . . . . . . .. . . . . . . . . . . . . . . .. . . . . . . .. . . . . . . . . . . . . .. .. .. . . . . . . . . . . . . . .. . . . .
t 254 ! fl
f
.7
IO
: 2
P I El3
3
Programming the XBT-BB terminal
Creating the message
3.5
Configuring
list
the operating
link
Theconfiguration of the operating linkcan be accessed in theConfiguration” menu
and enables the operating parameters of the serial link between the XBT-BB
terminal and the control system to be defined.
Accessing the link configuration window
i 254 i 0
i
i 254 i 0
i
When the link configuration window appears the following information should be
entered in the fields : speed, data format, number of stop bits, parity bit and
transmission mode.
The choice of communication protocol is defined by the cable connecting the
XBT-BB terminal and the control system.
c
Operating
Line:
:
Speed
Format
0
7 bits
@ 8 bits
Parity
:
stop
:
@ 1 bit
0
Mode
:
@ Half Duplc:
0
Full Duplex
2 bits
rp
‘
3
Programming the XBT-BB terminal
3.6
Saving the application
The application generated by the user should be saved in a file on a disk or diskette
for subsequent use.
All data concerning the dialogue table, the parameter-setting table and the
message list are saved in a file with the extension (XTX).
The save function is accessed either by clicking on the diskette icon (blue) of the
main XBT-L900 screen, or by selecting “Save as” in the “File” menu. The “Save”
command in the file menu directly saves the application under the file name which
appears in the window entry line.
l
Selection of directory to save to
By default the XBT-L900 saves this file to the current directory. It is up to the user
to create an XBT-BB application directory, if required.
This directory can be created under DOS using the r&command (Make Directory,
for further details refer to the DOS reference manual) or using the WINDOWS File
Manager (refer to the WINDOWS documentation).
The directory where the application is to be saved can then be selected using
XBT-LSOO.
-
l
Saving
Save As :
c:~btl900
-
h
\
I
Current directory
Return to previous directories
Select directory
-
Select volume
File name
Confirm / cancel
3
Programming the XBT-BB terminal
3.7
Printing the documentation
In order to print out an application a message list must be open. The printing
functions are accessed either by clicking on the printer icon (yellow) of the main
XBT-L900 screen, or by selecting “Print” in the “File” menu.
The application is printed in the following format by default :
- Configuration of communication link
- Configuration of dialogue table
- Message list
It is possible to print only part of the message list by selecting the zone to be printed.
Use the mouse to select as follows :
- select the first message (click on the message number)
- drag down using the left hand mouse button until reaching the last
message required
The following message appears during printing :
Send
ESSAIXTX
to spooler...
Ifaproblemoccursduringprinting,checktheprinterconfigurationintheconfiguration
WINDOWS control panel (Main Group).
3
Programming the XBT-BB terminal
3.8
Transferring
the application
To transferdata to or from an XBT-BB terminal the communication link between the
PC and the XBT-BB terminal must be operating correctly. This link is configured in
“Communication” mode in the “Configuration” menu of the main XBT-L900 screen.
It is possible to initialize the memory of the XBT-BB terminal before transferring the
application.
A message list must be open in order to activate the Transfer mode.
The transfer is launched from the main XBT-L900 window using the arrows to
determine the transfer direction.
XBT-BB8
Import
3
Programming the XBT-66 terminal
Transferring
the application
Two types of transfer are possible, global or partial.
During a global transfer all data is sent to the XBT-BB terminal or to the PC.
During a partial transfer the data to be transferred is selected by clicking on the
corresponding boxes. The message list, dialogue table and configuration of the
operating link can be selected.
l
Exporting (Transferring from PC -> XBT-66)
After opening the message list corresponding to the application to be transferred
(even if it is empty), select the transfer direction (PC to XBT-BB) by clicking on the
“Export” arrow. The window with the choice of data to transfer appears and the
transfer can be launched.
Configuration
0
Parameter Table
IJ Operating Line
Thus a global or partial transfer can be selected. For a partial transfer select the data
to be transferred by clicking on the corresponding boxes and confirm by clicking
“OK”.
Partial transfer of message list
It is possible to transfer only part of the message list. To do this, open the message
list and select the zone to be sent using the mouse (click on the message number,
drag down as for partial printing) and then select the transfer direction.
The window illustrated above does not appear for a partial transfer of the message
list, the XBT-BB terminal window appears immediately.
3
Programming the XBT-BB terminal
Transferring the application
This transfer does not alter configuration of the dialogue table and the operating link
in the XBT-BB terminal.
After confirmation of the transfer the transfer window appears and indicates the
various phases of the transfer.
Recording
If the transfer from the PC to the XBT-BB is interrupted by clicking on the “STOP”
key, the messages already sent to the terminal are confirmed. This would
implement a partial transfer of the message list up to the message number
displayed on the transfer window.
pv
If a problem occurs in communicating with the XBT-BB terminal a window is
displayed indicating the cause of the problem. If this happens, the configuration of
the communication link (‘Configuration” then “Communication” menu of the main
XBT-L900 screen) and the connection of the XBT-BB and PC using an XBT-Z915,
905 or 9052 cable should be checked.
The “COM 1:” or “COM 2:” communication ports should also be checked to make
sure they correspond to those in use.
No response
from the terminal.
nn
3
Programming the XBT-BB terminal
Transferring
l
the application
Importing (XBT-BB -> PC)
The same method is used to transfer from the XBT-BB to the PC. A message list
must be open and the transfer window which appears is used to select the type of
transfer.
@ Partial
0
Message lid
Configuration
0
Operating Line
A global or partial transfer is thus selected. For a partial transfer the data to be
transferred must beselected by clicking on thecorresponding boxes andconfirming
by clicking “OK”.
Partial transfer of a message list
Part of the message list can be read in the memory of the XBT-BB terminal so they
can be reused in another application. To do this, open the message list and select
the zone to be sent using the mouse (click on the message number, drag down as
for partial printing) and then select the transfer direction.
The window illustrated above does not appear for a partial transfer of the message
list, the transfer to the PC window appears immediately.
3
Programming the XBT-BB terminal
Transferring
the application
After confirmation of the transfer, the transfer window appears and indicates the
various phases of the transfer.
Recording
There are two different methods of interrupting transfer from the XBT-BB to the PC,
and these methods have different results.
“Cancel” stops the transfer. The data already transmitted is not saved, and the
application and the message list are not modified. The transfer is completely
cancelled.
“Stop” interrupts the transfer. The data already transmitted is confirmed, and the
message list open is modified up to the message number displayed on the transfer
window at the time of the “Stop” command.
If a problem occurs in communicating with the XBT-BB terminal a window is
displayed indicating the cause of the problem. If this happens, the configuration of
the communication link (“Configuration” then “Communication” menu of the main
XBT-LSOO screen) and the connection of the XBT-BB and PC using an XBT-Z915,
905 or 9052 cable should be checked.
The “COM 1 :I’ or “COM 2:” communication ports should also be checked to make
sure they correspond to those in use.
Al
4
XBT-VM terminal support
4.1
Summary
of operation
The XBT-VM is a compact screen terminal comprising a semi-graphic colour
screen and a keyboard composed of function keys with LEDs, numerical keys and
service keys.
As the XBT-VA terminal, it is intended to be used as an operator dialogue station
and for the maintenance of a production control system. It can also be connected
locally to a printer.
:II
l
I
37 key keyboard :
- 14 functionkeys
with LEDs
12 number keys,
11 edit keys
system lamps
I
General
XBT-L900 is especially designed to speed the development of applications for
XBT-VM terminals.
An XBT-VM application offers the operator three types of function :
- a surveillance application
The variables are scanned automatically, independently of the displayed application
pages (40 variables per station, a maximum of 10 stations). Indication of changes
of state with hard copy to a printer enable this function to be used for centralising
faults in the applications.
- accessing the PLCs Adjust mode
With the XBT-VM terminal, a list of TSX 7 variables and their format can be saved.
This enables the operator to modify or force their status with no risk of error for
control system operation.
- operator dialogue application
The tree structure of these text and graphic pages enables the operator to follow
the progress of the manufacturing process and react to its status.
4
XBT-VM terminal support
Summary of operation
The application and these three functions are accessed from the screen pages.
Application development consists of defining the necessary pages during their
creation or retrieving them from another application and defining the links between
the pages.
l
Creating the pages
Creating the pages involves creating the files containing the different pages. These
are associated during the creation of the application pages script.
The three types of pages used can be created :
- text page (message list)
- surveillance page (message list)
- semi-graphic page
After creating the applications directory, creation of the text or surveillance pages
is accessed by clicking on the “message list”icon of the main XBT-LSOOscreen, and
choosing between text or surveillance pages.
These pages are created by completing the associated message list and assigning
the various message variables.
Semi-graphic pages are created using the software graphic editor.
The XBT-VM terminal also offers the user the possibility of creating a specia
character font set so that he can create his own symbols
All functions concerning the creation of text and graphic pages are described in th
user guide “Printing messages with XBT-LSOO” (Section 4)
43
4
XBT-VM terminal support
Summary of operation
l
Application script
After the creation of the various text and graphic pages, these pages are associated
to create the application. The association of pages is done in the application script.
The first operation involves assigning the various text, surveillance and graphic
pages to the application script.
Options
Keyboard
PAGE 1
TiiT :
ECK :
FiDR :
RSS :
frml.Htx
frml .xgr
0,254,0,254,0
5
LCK : OFF
FOl : 2
Text
:
END
PRGE2
THT :
Backqround
:
This application window enables the userto create or modify an existing application.
Follow the simple instructions in the “Help” window to select the application pages
and to associate them to each other.
The four basic instructions are :
-
PAGE (Application page no)
SURV (Surveillance page no)
ON / OFF (Controlled access to the page)
FOi (association to FOi function key)
These operations are described in the user guide “Printing messages with
XBT-LSOO”, Section 4.5 on programming screen terminals (pages 82 to 97).
AA
4
XBT-VM terminal support
4.2
Development using XBT-L900 software
l
Method
To develop an application for an XBT-VM
implemented :
terminal, the following steps are
- create a special character font set (optional)
- create text pages
- create surveillance pages
- create graphic pages
- create application directory
- application script configuration
- definition of terminal configuration
- save the application
- print application dossier
- transfer to the terminal
M
For further details on using XBT-L900 to develop an application for an XBT-VM
terminal, refer to the user guide “Printing messages with XBT-LSOO”, section 4.4 to
4.6 on programming screen terminals.
l
New application
Developing an application for an XBT-VM terminal using XBT-L900 V 1.3 is done
in the same way as for an XBT-VA terminal using XBT-L900 V1.2.
The only differences are in operating mode configuration and the transfer mode and
are explained in sections 4.3 and 4.4 of this manual.
l
Retrieving an existing application created for an XBT-VA terminal
There are two different situations :
- retrieving application elements, ie semi-graphic or text pages and using
them in a new application using XBT-L900 V 1.3 software.
- retrieving a complete application including the text and graphic pages, the
application script and terminal configuration.
In the first situation the operation is simplified as XBT-L900 V 1.3 enables the pages
selected to be copied to the new directory.
4
XBT-VM terminal
Development
support
using XBT-L900
software
From within the application script window for the script being created, call up the
“Add pages” window.
Configuration...
I
BCK : frml.
ROA: 0,254
ASS : 5
c:\xbil900
Text
Iprclsaxtx
enel.xtx
frml.Htx
frm2.titH
geneAs
K.1
Itmpl
IvmG.wI
[xbtl900]
LCK : OFF
FOl : 2
l-----l
I
I
Background
EN0
PAGE 2
THT :
The directory manager is used to find files corresponding to the text and graphic
pages required.
Select disk
Select directory
Move back one level on the directories
b-1
[XBT2]
i-1
Select the required file and click on “Add”. XBT-L900 then copies the file to the new
application directory.
To import an entire application including text and graphic pages, application script
and terminal configuration, use the directory manager to work on the relevant
application directly.
The modifications are automatically saved by clicking on the diskette icon of the
main XBT-L900 screen.
To create a new application with another name, while in an existing application, use
the WINDOWS file to duplicate the directory containing the text and graphic page
files and the application files (file -.xap).
Warning : the directory containing the page files should have the same name as
the application file with extension .APP.
4
XBT-VM terminal support
4.3
Confiaurina the XBT-VM terminal
l
General
The configuration enables the operating parameters of the terminal to be set for the
operating phase. It can be implemented in two different ways :
- directly on the XBT-VM terminal
- using XBT-L900
Whenconfiguration isdirectlyimplementedontheXBT-VMteninalin”Configuration”
mode, 13 sub-menus can be accessed.
CONFIGURATION
MODE
MAIN MENU
Fl
LANGUAGES
F8
CONFIG. APPLICATION
F2
PASSWORD
F9
TRANSFER APPLIC.
F3
OPERATING
FlO
DISPLAY APPLICATION
F4
STATUSTABLE
Fl 1
SELF TESTS
F5
PRINTER
F12
ADJUST MENU
F6
CLOCK
F13
EVENTS DISPLAY
F7
EXTERNAL MONITOR
F14
MODE
For further details on the direct configuration of the XBT-VM terminal, refer to the
XBT-VM userguide”Compact colourterminal screen”, ref. XBT XVM800E, Section
2.5, pages 29 to 37.
4
XBT-VM terminal support
Configuring
the XBT-VM terminal
Seven of these sub-menus can be configured with XBT-LSOO. They can be archived
to disk and exported to the XBT-VM terminal.
The configuration window is accessed from the application window using the
“Options” menu.
m II
I
Keyboard
The configuration window has 7 sub-menus. Click on the name to access the
corresponding window and enter information into the various fields of the active
window in order to define the parameters.
The use of each parameter is described in further detail in the XBT-VM user guide
“Compact colour screen terminal”, ref. XBT XVM800E, Section 2.5, pages 29 to 37.
4
XBT-VM terminal supporl
Configuring
l
the XBT-VM terminal
Size of requests
One of the main updates in the XBT-VM terminal is the possibility of using of 128
byte object list requests.
This considerably improves the update time for variables during the display of an
operator dialogue page.
Conditions of use :
- the XBT-VM terminal is linked to a PLC in Adjust or Uni-Telway mode
- the PLC selected to read or write the variables to is a TSX 7 series 40 or
series 30 V 3.9.
-forcommunication betweenseveral PLCstheyarelinked bythe Uni-Telway
bus or the MAPWAY and TELWAY network
- all variables in the message list are contiguous
If these conditions are respected the update response time of the pages can be
significantly improved
Example of the choice of variables
PRESSURE FAULT
PRESSURE = -FAULT IN PUMP N”: PUMP SPEED = ----- TWMN
CLOSE VALVE
OPEN DRAIN
CURRENT PHASE = ----OPEN VALVE
DECREASE LEVEL
INCREASE LEVEL
TIME PASSED = ------- MN
NO OF PASSAGES = --REMAINING TIME = ------ MN
TEMPERATURE = --- “C.
878
WI0
w200
WI1
8101
884
c4,v
8103
8117
w11,3
T17,V
c14,v
T8,V
w201
In example 1 the variables are separated, in example 2 they are contiguous.
4
XBT-VM terminal support
Configuring the XBT-VM terminal
In example 1 the terminal transmits 14 read requests to obtain all the variable
values. In example 2 the XBT-VM terminal only sends one request to read objects
to the PLC as all the values are contiguous.
(Request to read object, segment W, address of the first word 17, number of
objects 9).
Thus the time gained is considerable and demand for the PLC communication
kernel is reduced.
Configuration of the size of requests
After clicking on “Operating
appears.
Serial link
:
mode”, the operating mode configuration window
7485
Protocol
:
:
Mode
Speed
:
Parity
:
I
.......
Checksum
Answer
Request
0 Will1 0 Wlllronl
:
:
0
Size
:
With
0 32
0
Without
0
128
Selecting the size of requests is only possible in Uni-Telway or Adjust protocol. Two
values can be chosen :
- 32 bytes (for TSXI 7 PLCs or Telway 7 network)
- 128 bytes (for TSX 7 series 40 PLCs, Uni-Telway bus or Mapway network
The default value is 32 bytes and if 128 bytes are configured, check that this value
is consistent with the communication architecture.
The maximum number of consecutive words is limited to 15 or60 when list of objects
requests are used.
4
XBT-VM terminal support
Configuring
l
the XBT-VM terminal
Application Configuration
The values of the two parameters are displayed in the “Application Configuration”
window close to their respective horizontal scroll bars, used for adjusting their
values.
Variable Refresh
0 Wfh
:
Intensity
Screen stand by
Printing
:
:
i
..__..__
.... Suweill.
....
$4 I
mess.
Display time :
lNonc
:
Events logging
:
@$$&$
jiGz-@j
0
:
101
:g$
s ~.:.:.:.-:l~~~:~~L~~i:.
I-.
B
@Yes
ONo
Type D
0 Type V
0
Type N.1.K
0 Type D
0 Type V
0
Type N.&K
“Intensity” is a parameter which controls the brightness of the screen. It varies from
0 to 100 % and its default value is 50.
“Surveillance of messages” is a parameter
surveillance of messages (N) to be set.
which enables the scan report of
Example :
If N = 10, the XBT-VM terminal implements an update of the surveillance page for
every IO updates of the application page. The value varies between 0 and 255, and
the default value is set at 0 (there is no exchange unless the surveillance pages are
programmed and the value is other than 0).
4
XBT-VM terminal support
4.4
Transferring
l
the application
from PC -> XBT-VM (Export)
Changes to XBT-L900 software from V 1.2 to V 1.3
In version V 1.2 of XBT-L900 the applicatian and configuration had to be transferred
separately, which meant two separate transfer operations.
Version V 1.3 enables XBT-VA and XBT-VM terminals to transfer the configuration
only, or the configuration and application simultaneously, which means only one
transfer operation. The application transfer also includes the configuration and this
is implemented immediately.
CONFIGURATION
TRANSFER
APPLICATION
TRANSFER
VERSION
v 1.2
VERSION
v 1.3
CONFIGURATION
ONLY
CONFIGURATION
ONLY
APPLICATION
ONLY
APPLICATION AND
CONFIGURATION
(configuration, if selected
by operator)
_
l
Operating modes
To implement a configuration transfer only, perform the following operations :
- open the application window
- open the configuration window
- click on the transfer arrow or on Export in the keyboard menu
BCK : frml.
4
XBT-VM terminal support
Transferring
the application
from PC -> XBT-VM
During the transfer the “Export configuration” window appears to indicate the
transfer. A help message if displayed if there is a fault or an error.
Export
Configuration
Transferring the application
During transfer of the application the consistency of the script is checked before the
application is transferred. The time this operation takes depends on the length of the
script and enables simple errors to be avoided (forgetting the page number,
association errors, file name errors, etc).
v
The application transfer is implemented simply by opening the “Application”
window, and clicking on the “Export” arrow. A dialogue window then appears and
enables the configuration to be transferred before the application or not at all.
Do you wish to transfer also the configuration
?
4
XBT-VM terminal support
Transferring
the application
from PC -> XBT-VM
Responding “Yes” implements configuration transfer, then application transfer.
Responding “Cancel” implements a return to the script window with no transfer.
Responding “No” implementstransferof the application only, theformerconfiguration
is still valid.
During the transfer data messages are displayed in the window to enable progression
of the operation to be followed.
The transfer can only be implemented correctly when communication between the
PC and the terminal is operating properly.
If a problem occurs in communicating with the XBT-VM terminal a window is
displayed indicating the cause of the problem.
No response from the terminal.
If this happens, the configuration of the communication link (“Configuration” then
“Communication” menu of the main XBT-L900 screen) and the connection of the
XBT-VM and PC using an XBT-Z915,905 or 9052 cable should be checked.
The “COM 1 :‘I or “COM 2:” communication ports should also be checked to make
sure they correspond to those in use.
4
XBT-VM terminal support
Transferring the application from PC -> XBT-VM
Compatibility problems during transfers.
Upwards compatibility of applications is totally guaranteed. However, the new
operation concerning selection of the size of requests for XBT-VM terminals, means
that the configuration of an XBT-VM terminal is different to that of an XBT-VA
terminal.
Loading the configuration of an XBT-VM terminal into an XBT-VA terminal would
thus not be possible.
The entire application, script, surveillance pages, dialogue pages are always
compatible between XBT-VM and XBT-VA terminals.
All applications created for XBT-VA terminals can be easily transferred to an
XBT-VM terminal.
The table illustrates whether or not transfers are possible, in different situations.
Transferring
application from
XBT-VM -> XBT-VA
Application
only
Configuration
only
J
Transferring
application from
XBT-VA -> XBT-VM
Possible
5
Programming the XBT-M terminal
5.1
Summary
of operation
The XBT-M is a message box type terminal fitted with a fluorescent matrix display
with 128 x 20 pixel resolution.
This terminal has a protected integral clock and a serial printer link. It can control
the display of messages by discrete inputs and has an operator guide function
controlled by three pushbuttons.
c
*Removable
EEPROM memory carlridge
can be disconnected when
powered off (APPLICATION
MESSAGE MEMORY)
lithium battery
(RAM memory +
clock back-up)
,
\
r
-
Serial
communication
*RS232C
serial printer
Port
Port
, i
* XBT-MB041 IX only
Parallel
interface +
3 operator
guide inputs
24V DC powel
supply + relay
output
5
Programmlng tne ~t5 I -IVI
Ierrrllrlal
Summary of operation
Many types of display are possible and various sizes can be used. It is possible to
scroll the message and use symbols set by the operator.
The XBT-M terminal can also display the value of variables in the form of
histograms.
DISPLAY
CAPACfTY
l
l
l
l
DOUBLE
WIDTH
SINGLE
SIZE
El-E%%W-W27
3,
TzzCVV--z%
Al.
P
LIFT SPEED 1.1~~‘s
1357 Ks 7 5387Mm
1 line of :
10 characters (h = 20 mm)
scrolling of 42 characters
1 line of :
21 characters (h = 20 mm)
scrolling of 84 characters
2 lines of :
10 characters (h = 10 mm)
scrolling of 42 characters/line
l
l
2 independant lines of :
21 characters/line (h = 10 mm)
scrolling of 84 characters/line
l
l
DOUBLE
WIDTH
ELE’UR
’ TORT
LIFT SPEED I. lm/s
SINGLE SIZE
2 lines : Display combination of
double width and single size
characters
L
In addition to these functions the XBT-M terminal has an internal memoryforstoring
the displayed messages. The contents of this log memory can be printed at a
command from the operator or the control system.
The displayed messages may come directly from the control system linked to the
terminal or can be called up from the terminal memory cartridge.
Its functions can be summarized as follows :
- data sources (integral memory or control system)
- destinations (display unit, log memory, printer)
57
Summary
l
me nt5 I -vi
rruylarrirrllrlg
il
Using
simple
rermlnal
of operation
functions
:
A command initiates an action.
l
Using
compound
functions
:
A command initiates several actions.
l
Control
system
command
XBT-M terminalssupportthreetypesofserialcommunication(RS232C,
RS 422/485,
current loop) and can communicate using ASCII, ADJUST (Telemecanique) or UniTE (Telemecanique) communication protocols.
A 12 input parallel link is available for connecting to the discrete outputs of a control
system and commands for the serial and parallel ports can be used simultaneously.
For further details on the functions of XBT-M terminals, refer to the guide “XBT-M :
Multifunction matrix display” (ref. XBT XM800E).
58
5
Programming the xl5 I -M ternw lar
5.2
Application
l
-
development
using XBT-L900
Developing a new application
The XBT-M message box hasalarge number of functions and provides sophisticated
operator dialogue. The complexity of developing an application for an XBT-M
terminal using XBT-L900 software is dependent on the functions required by the
application.
The entire method using all the terminal functions is described here.
Analysis of the application must enable a certain number of parameters to be
defined, for example :
- communication protocol used
- creation of a special character font set
- use of macro-messages
- use of the operator guide
- number of application messages
b
The number of messages used determines the size of the memory cartridge
required for the application, taking account of the fact that XBT-L900 V 1.3 allows
the size of the message list and therefore the associated memory cartridge to be
modified during development.
The application development method consists of performing the following steps :
Creating a special
character font set
Creating a
message list
Creating
macro-messages
a
rrogrammlng
tne XBT-M
terminal
Application development using XBT-L900
Creating an
operator guide
Configuring
the terminal
Saving the
application
Transferring the
application
Printing the
application dossier
Naturally, the user should ignore any step corresponding to functions not used
(special character font set, macro-messages, operator guide).
l
Retrieving applications created using XBT-L900 V 1.2
Application files created using XBT-L900 V 1.2 can quite easily be retrieved in local
mode. The work directory for the old application should be selected and the old files
worked on. Changing the work directory in the “Character font set” function is also
valid for lists of messages and enables an old version to be modified transparently.
60
5
Programming the XBT-M terminal
5.3
Creating the user’s own font
The font set supplied with XBT-L900 V 1.3 for XBT-M terminals has 224 characters
and is entitled defaut .xfn. If the user does not find the graphic or special characters
he requires, it is possible to modify one or morecharacters in this font set or to create
a new set using the default character font set as a basis.
The method of creation is verysimple.The operator uses a grid of dots representing
the character to be drawn and can draw the character pixel by pixel.
The creation procedure is as follows :
Select the XBT-M terminal from the main XBT-L900 window.
XBT-M8
*
,+.:<.:.:.v,.
..p.e
1
:‘.<.,,
x.:.,<.:.:.:.:.
‘.<
- Access the font set window : click on the font set icon :
- Open a font set :
for a new font set : click on “New”
for an existing font set
‘
: select the font set then click on “Open”.
This accesses the character editor. First select the character to be modified using
the scroll bar and the mouse.
5
Programming the XBT-M terminal
Creating the user’s
own font
Characters can be drawn in single size or in double height, but they can be used
in four authorized modes :
- single size
- double width
- double height
- double size
When creating a symbol needing more pixels it is possible to place several basic
symbols side by side to create a macro-symbol (see example).
l
0 Single Size
Single size : 6 x 8
0 Double Height
Double height : 6 x 20
Entering I modifying a character
To modify a character, proceed as follows :
- Select the character resolution : Single size or Double height.
- Bring the character into the window by using the scroll bar.
- Select the character you wish to modify by clicking higher up, in the window
located above the scroll bar. It then appears in reverse video.
Using the grid, it is possible to modify each of the pixels which make up the
character. To modify a pixel, click on it. To make the same modification to several
pixels, click on the first pixel, then drag the mouse over all the other pixels you
wish to modify, holding the mouse button down. Release the button once all these
pixels have been modified.
It is also possible to use the tools (available in the window) to perform certain
operations on the selected character, or on the complete font set.
5
Programming the XBT-M terminal
Creating the user’s own font
l
Tools available
These commands are available in the “Tools” menu in the window.
Expand
character
0 Single Size
o IDouble..Heighti
... ...................... .......... .......
t‘,
Grid : toggles the appearance of the grid in the character modification window
Delete : the selected character is replaced by a blank character (all its pixels
are white)
Invert : the selected character is changed to reverse video (each black pixel is
replaced by a white pixel and vice-versa).
Restore : cancel the last modification made to the selected character.
The next two tools are only available in Double Height resolution on the XBT-M :
_ Expand character: automatically draws the selected character, based on the
same character previously created in Single Size resolution.
Use to :
Change to single size,
Create or modify a character,
Change to double height,
Select the Expand character command.
P
_ Expand font set : automatically draws each character in the font set from the
same character previously created in Single Size resolution.
Use to :
- Change to single size,
- Create or modify any characters in the font set which you wish to change,
- Change to double height,
- Select the Expand font set command.
5
Programming the XBT-M terminal
Creating the user’s
own font
When a symbol is created, it can be displayed in the four display modes and can
therefore be used in messages of various sizes.
Example of the display of a symbol created in single size and expanded to double
height.
l
Macro-symbols
As there are no inter character spaces, “macro-symbols” can be created in any
display mode by placing characters side by side.
USING
MACRO-SYMBOLS
SINGLE SIZE
l
Saving the font set
The font set is saved either by clicking on the diskette icon of the main XBT-L9Or
window, or by closing the font set window.
5
Programming the XBT-M terminal
5.4
Creating the message
list
To create a message list, start at the main XBT-L900 window (XBT-M terminal
selected).
- Main window with XBT-M terminal selected
- Create a message list : click on icon
The window for opening a document appears.
enel.xtx
Directory :
m8.xtx
pruelsaxbc
sollacxbc
I-1
[alsth.app)
ItmPl
Ivm8.aPPl
[xbtl900]
c:bbtl900
5
Programming the XBT-M terminal
Creating the message list
l
New message list
In the window for opening a document :
Click on “New” to create a new application or to open an existing file.
After clicking on “New”, a window called “Message list size” appears :
0
4 Kb [lOO Messages]
0
16 Kb [400 Messages)
@
24 Kb [600 Messages]
0
56 Kb [1400 Messages]
0
88 Kb [2200 Messages]
A 24 K cartridge is selected by default. This cartridge corresponds to a list of 600
messages. When there is sufficient information about the application, a different
cartridge size can be defined. The command “Modification of message list size” is
used to change the size of the cartridge.
Warning:
The size of the message list may be limited by the memory available for Windows
in the PC. If there is insufficient memory an error message appears and a smaller
size must be selected, or more memory freed for Windows.
If there is insufficient memory to open an existing message list (file . xtx), the same
error message appears and more memory must be freed for Windows.
If the size options in the “Message list size” window are greyed out, the size of the
message list cannot be selected due to lack of memory available in Windows.
5
Programming the XBT-M
Creating the message
termv-tal
list
After clicking on “Ok” or opening an existing file, the “message list” grid appears
:
Example : Sollac.xtx
Options
~
This list comprises the following parameters :
NUM
TEXT
TYPE
X
Y
A
C
V
F
R
s
G
U
W
w
allows a number to be associated with the message, and the number
to be called up by a command from the control system
message text (21 single size alphanumeric characters) or length of
the histogram
message type (V = fixed display, D = blinking display, H = histogram
display)
position of first character of message in the display unit (OrX284), X +
message length < 84
Select the display line (Y = 1 or 2 according to the size of
characters (Y = A,B,C,D or E for histograms)
Confirm parameters for updating the variables (A = 1 with updating,
A = 2 without updating)
variable conversion coefficient (0.001 5 C I 1)
Associated TSX 7 variable, in Uni-Te or ADJUST protocol
size of message and histogram display (F = 1 double height display,
F = 2 double width display, F = 3 double size display)
Number of network to which the PLC is connected
Station number (PLC address)
Gate number (Uni-Telway addressing)
Module address (slot in the I/O rack)
Channel number (Uni-Telway device address)
For further details on using message parameters in an XBT-M terminal, refer to the
user guide “XBT-M : Multifunction display” ref. XBT XM800E.
67
Programming the XBT-M terminal
5
Creating
l
the message
list
Entering data
- The various parameters can be entered using the mouse and the keyboard
- The parameter to be entered is shown in bold
- To move around the grid, click once on the selected parameter
- To move around using the keyboard use the arrow keys, +, T, 1. Confirm
selection of a message parameter by pressing a.
Important :
Once a message parameter has been selected, entering a single character will
delete the whole of any message field and allow a new message to be defined.
To modify an existing message, the cursor must be placed at the end of the
message by pressing F2 or the (0) key (deletes the preceding character).
Any message definition or movement is then performed from the cursor position.
A syntax check is performed on each parameter, and it is not possible to proceed
to the next parameter until the current parameter has been correctly constructed.
Moving from one line to another can only take place if the defined message is
coherent. If not, a message is displayed which tells the operator the source of the
error.
ODtions
-.
Coatl _
rejr?ct :
(
u .= Bit
‘
Nun Texte
0001
Right
Translation
)
yx (
L 0
^I 1
['IX
1 Y 1 Coeff
iUl0
flil
Uar.
..........................
___..,......,.................................:.....:
Ill:0
1111
0002
Left Translation
....................
_._.,,...,..,.................................:.....:
1#IO!
:u:o
1111
I%
0003
Weight
:
_
Kg
-.__...................,......................~.....:......:.....:.........,,..:.................,,:.....:.....:
1UIO
1111
1#101
i#
0004 ON
When using the keyboard, confirming the final message parameter automatically
brings up the next message.
Notes :
l
l
The operator can call up the “Help Menu” (on-line system help) at any time
for details concerning the window in use.
For information about the significance, the limits and the use of any parameters
associated with a message, refer to the user guide “XBT-M : Multifunction
matrix display” ref. XBT XM800E.
5
Programming the XBT-M terminal
Creating the message
l
\v
list
Selection of the font set (only possible with the mouse)
One of the main advantages of the XBT-M terminal is that the matrix display can
display ASCII messages and symbols at the same time. These symbols must be
created using a special font set which has been saved.
In the message text field, it is possible to use characters which cannot be accessed
from the keyboard, or to use characters in a font set which has previously been
created (see Section 5.3).
The XBT-M supports a default font set of 224 single size characters and a default
font set of 224 double height characters (both these font sets are stored in the same
file).
- When parameter F of the selected message is 0 or 2, the single size font
set is displayed.
- When parameter F of the selected message is 1 or 3, the double height
font set is displayed.
When a font set or special character is used in a message, the font set used to
display the message can be selected.
w
The “Options” menu in the message list window accesses selection of the font set.
lnitialise
cartridge...
This function enables special user-defined characters to be used in a message. The
defined font set is the same for the whole message list.
5
Programming the XBT-M terminal
Creating the message list
Selecting the font set :
Click on the -1
the required font set.
button in the active “Font set” window, then select
Title of active font
set
\
Font set
selection
\
WCDEFGHIJKLMNOPQRSTU
Message
Left
:
Translaticm
Select the .xfn file containing the font set to be used for display of messages
font1 .xfn
font2.xfn
Directory :
14
-c:“
:
c:~btl900\alsth.app
5
Proarammina the XBT-M terminal
Creating the message list
The font set window appears :
Zoom of message currently being edited.
Scroll bar for the selected font set.
Window displaying characters for selection/entry.
Selection of font set.
Current message.
Entering characters in the displayed font set :
With the Message list and active Font set windows both open :
- Click on message field F and select the format in which you wish it to be
displayed.
- Click on the message text field.
- Type in the characters which can be accessed from the keyboard (these
appear in the zoom of the active Font set window).
- Click in the active Font set window.
- Use the scroll bar to bring the required character into view.
- Clickon the required character, which then appears both in the zoom, and in
the text field of the message list.
- Click again in the message text field.
_ TYPE F2 BEFORE CONTINUING TO ENTER FROM THE KEYBOARD.
5
Programming the XBT-M terminal
Creating the message
list
Comment :
Characters which cannot be displayed by the microcomputer show up as black
squares in the message text field. To see how it will actually look, leave the active
Font set window open, and click on the message text field. The message appears
in the zoom window exactly as it will be displayed.
Confirming the active font set
When a special font set is selected in the message list to be used for one or more
messages, the last font set that has been used is confirmed.
The XBT-M only manages one 224 character user-defined font set. This means that
all the active symbols-in an application must be located in the same font set.
This font set is transferred to the XBT-M when the message list is transferred.
Saving the message list
The message list is saved on closing, or by clicking on the diskette icon of the main
XBT-L900 screen.
5
Programming the XBT-M terminal
5.5
Creating macro-messages
A simple message in the message list has a display field of 21 single size
characters. Sometimes data or operator instructions above this size have to be
displayed.
In this case, the XBT-M terminal can use an 84 character display buffer to manage
a function for scrolling the messages, which can link the messages together to
make up a macro-message.
Creating a macro-message :
The message list should be open and completed with the messages which are to
be displayed. A macro-message is made up of a string of messages (8 maximum)
linked together by their numbers.
To create a macro-message, select the first message in the macro-message in the
message list (eg : message N”4). Open the macro-messages window using the
“Options” menu in the message list and the “Macro-message” command.
Configuration...
Font set...
Default messages...
1 Coeff
1 Uar.
5
Programming the XBT-M terminal
Creating
macro-messages
The “Macro-message” window appears with the number of the selected message.
This window has 4 commands which are used to create the macro-message.
Add
Select from the message list the next message to be added and click on “Add”.
This selection is made using the mouse on one of the fields in the message.
The macro-message is constructed in this way, with up to 8 messages (size of the
macro-messages window). The “Add” command enables a message to be inserted
into a macro-message using the following procedure :
- select the message to be inserted from the message list
- select the number of the message in the macro-message window after which
the additional message is to be inserted
- click on “Add”
3
Programming tne xi3 I-M terminal
Creating macro-messages
Previous
This command checks that the first message in a macro-message
selected, while the macro-message is being displayed.
has been
Example :
- message 5 in the message list is selected, the “Macro-message” window
is open, the “Previous” command shows that the macro-message does not
start at 5.
Previous messages :
- Close the “Macro-message” window, select message No4 in the message list,
open the “Macro-message” window, click on “Previous” and see that the
macro-message starts at 4.
Previous messages :
.,._..._......:.....:.....:..
CONUEYOR
BELT
2”“‘.
.,,,,,_._.....:.....:.....:..
5
Programming the XBT-M terminal
Creating macro-messages
Delete
To delete a message from a macro-message, select it in the “Macro-message”
window, and click on “Delete”. If this message is not the last one in the macromessage, a link with the following message is created.
Example :
Deleting message N” 2
Select the message to be deleted
The selected message is deleted.
The new macro-message starts at message N”4, contains message No5 and ends
at message N”7.
Warning :
Deletion cannot be undone. If a mistake is made, the”Add”command
to insert the deleted message.
must be used
5
Programming the XBT-M terminal
Creating macro-messages
This command enables a new macro-message to be created using the following
procedure :
- select the first message of the macro-message to be created from the list
of messages
- click on “New” and create the associations using the “Add” command
The “New” command also enables existing macro-messages to be displayed.
When a message number in the message list has been selected and “New” has
been clicked on, the message will appear in the “Macro-message” window if it is
already a macro-message.
If this happens, check that it is the first message in the macro-message by using the
“Previous” command.
l
Saving macro-messages
The macro-messages are finked to the open message list.
77
5
Programming the Xl3 I -M terminal
5.6
Creating the operator guide
The operator guide is a structured set of messages defined during the creation of
the application. It is intended to help the operator. Special keys are used to move
around the message tree structure, or to implement necessary actions under the
control of the control system depending on how far advanced the process is.
Operator guide structure
The operator guide comprises messages or standard macro-messages from the
message list with two additional parameters (Item and Level). These create the
links between the messages which make up the operator guide.
When creating the operator guide, it is useful to display these links to create the
structure of the operator guide.
ITEM
N”
TEXT + PARAMETERS
LEVEL
When creating the operator guide using XBT-LSOO, the Item and Level parameters
are automatically calculated by the software as a function of the structure defined
for the operator guide. The links between messages are automatically created by
the software.
Three pushbuttons, or commands transmitted by the control system, are used to
enter or move around the operator guide. For clarity in the following examples, the
pushbuttons are used. The result is identical to the commands transmitted by the
control system.
Example of operator guide structure :
level 0
300
level1
310
level 2
329
c-i
+ @
PROCEDURE
CHECKS
0
ELECTRICAL
CHECKS
(ENTER)
310
item 1
lb:,
pg
@(l40/
Y
Y
@
CHECKS
MECHANICAL
H
@b3’
1
47
level 3
340
item2
CHECK
ISOLATION
vsouLpTpALGyE tq
HYDRAULIC
CHECKS
3.41
Y
0
341
PO:%:,,
ACTIVATE
DEFLECTOR
TEST
FLANGE
14
48
w
POSITION
FEEDER
t
#
3
Programming tne ntr I -IVI ~errrwki~
Creating the operator guide
The operator moves around the operator guide either horizontally on one level item
by item or vertically level by level.
The following commands are used to move around:
ENTER
!
I
At the ITEM or LEVEL
message which = *
o+o
0
CANCEL
NEXT ITEM
0
I
1 Cancels last operation
1
Move to last possible
item
I
j t$;;z
NEXT LEVEL
PREVIOUS LEVEL
COMMENT
OPERATOR ACTKWS
GUlDE ACTfGffS
)
@
+ e.
/
0
+
@
0
= 0
last level
j CanretumtolevelO
/ From level 0
For further details on using the operator guide, refer to the user guide “XBT-M :
Multifunction Matrix Display” (ref. XBT XMBOOE) Section 1.7.
l
Entry of operator guide
Entry of the operator guide comes after entry of messages and macro-messages.
The operator guide editor is accessed by the “Options” menu in the “Message list”
window.
/
rrogrammlng tne Xl5 I-M terminal
3
Creating the operator guide
l
Creating the operator guide
The first message in the operator guide should be selected from the message list
using the mouse, then the structure of the guide is created using the “Add H” or
“Add V” commands.
The next message is then selected from the message list, and it is entered in the
operator guide in the same way.
The same procedure is used for all messages in the operator guide.
The first message in an operator guide can only have one link.
Messages are represented in the guide by a box containing the number of the
corresponding message. Messages are selected by clicking on them with the
mouse. The selected message appears in reverse video and it is at this point that
the commands “Add H”, “Add V” and “Delete” are available.
When a branch of the operator guide cannot be represented on screen (overlapping
with another branch), the access arrow is greyed out. To make the missing branch
appear, double-click on the box containing a greyed out arrow.
A message that is already used in the operator guide or is part of a macro-message
is represented by a shaded box. The “Add H” and “Add v” commands do not work
on this type of message.
These three commands are used to create the structure of the operator guide :
This command enables the operator guide to be extended horizontally. It adds
horizontally (Item) the messageselectedfrom the message list to the operator guide
which is being set up.
IAdd
-> LEVEL
This command enables the operator guide to be extended vertically. It adds
vertically (Level) the message selected from the message list to the operator guide
which is being set up.
This command deletes the selected message from the operator guide which is
being set up. Warning : this operation can wipe out an entire branch of the operator
guide and cannot be cancelled.
80
5
Programming the XBT-M terminal
Creating the operator guide
Using macro-messages in the operator guide
Macro-messages can be used in the user guide. A macro-message is represented
by its first and its last message, linked by a double arrow.
\
Macro-message
10 -> 12
The macro-message is selected from the message list by the number of its first
message. The commands used are the same as those used for messages.
A macro-message
message.
example :
in the operator guide is selected by the number of its last
@GjpBI
for the macro-message from 10 to 12.
To delete a message from a macro-message :
- Select it by clicking on its box
- Click on Delete.
Warning : this operation can wipe out an entire branch of the operator guide which
is directly linked to the deleted message.
5
Programming the XBT-M terminal
Creating the operator guide
Displaying the operator guide
- Open the operator guide window.
- Double-click on the boxes containing a greyed out arrow. To view the whole of
the operator guide window, it may be necessary to use the scroll bars.
Saving the operator guide
Only one operator guide is linked to the message list.
Operator guide characteristics
The operator guide is available on XBT-M 80411 X terminals. Its maximum size is
12 levels and 93 items. Control system commands or pushbuttons linked directly to
the XBT-M terminal, and activated by the operator, are used to move through the
items and levels.
5
Programming the XBT-M terminal
5.7
Configuration - Messages displayed by default
l
Configuration
v
Configuring the XBT-M terminal enables the operating parameters to be set. For
certain parameters this configuration can be performed in local mode. Connection
to the XBT-M terminal is necessary to test the other adjustment parameters, such
as screen brightness.
Parameters configured in local mode
- Communication protocol used
- Configuration of the serial operating link
(link with the control system)
- Selection of the printing operation
- Configuration of the serial printer link
- Display language for the XBT-M terminal system messages
- Selection of messages displayed by default
- Configuration of the display unit
- Clock update
l
Accessing the configuration
The configuration isaccessed from the”Message list”window. Select “Configuration”
in the pull-down “Options” menu.
Eont set...
Operator Guide...
Macro-message...
Erase XBTM...
Qefault messages...
5
Programming the XBT-M terminal
Configuration
- Messages
displayed
by default
The “XBT-M8 configuration” window appears :
rDlSPlAY
CONFIGUFIATION
:
jm
~~~
:
Format
0 I
biis
0
~
II bi!s
0
AUXILIARY
LINE
:
LANGUAGE:
:
Prlntlng
FUNCTION
:
Speed
:
Format
Parity
:
Conn.
:
0
7 bits
Lest
lEngllsh
MODES
:
@ 8 bits
0 Rs232 modem
Terminator
q
:
OCR
UNI-TE address
@LFCR
printing
This window has 6 information blocks to be filled in.
Serial operating link configuration menu
- select the protocol (Uni-Te or ASCII)
- serial operating link parameters
Auxiliary line configuration menu (printer on XBT-M80411 X)
- printing operation
“With” printing authorizes the copying of messages and transparent printing
(refer to the XBT-M installation guide : Multifunction display unit ref.
XBT XM800E section 5.4, 6.4 or 7.4 depending on the protocol selected).
Select the “CR” terminator if the printer is configured for auto-LF, if not select
CR LF (line feed generated by the XBT-M terminal).
To print the UNI-TE address (Uni-Te protocol only) : click in the box to select
or deselect printing of the UNI-TE client address (station connected to the
XBT-M terminal where the terminal looks for the value of the variable).
5
Programming the XBT-M terminal
Configuration
- Messages
displayed
by default
- serial printer link parameters
speed (from 110 to 9600 bauds)
number of stop bits (1 or 2)
number of data bits (1 or 2)
parity bit (even, odd or without)
RS 232 (No management of service signals, pins 2-3-7 only)
RS 232 Modem (Management of service signals for the RTS, CTS, DSR,
DTR data flow control, complete version of the RS 232 C cable)
To ensure correct printing these parameters must be identical in the
configuration of the printer used and in the XBT-M terminal.
Language selection menu
Select the language in which the XBT-M system messages will be displayed
(6 languages available : English, French, Spanish, Italian, Russian, German).
Compound function (XBT-M8041 IX only)
The operating modes menu is used to select the type of printing and saving.
FUNCTION
YIStorage
Time :
I
MODES :
and printing
.
.
12 .
1
- Simple
No message is printed systematically, all orders to print come from the
control system.
All messages displayed on the XBT-M terminal are systematically sent to the
printer (“With” printing in the configuration).
- Automatic saving
All displayed messages are saved to the log, and there is no systematic
printing.
5
Programming the XBT-M terminal
Configuration
- Messages
displayed
by default
- Saving and printing
All displayed messages are saved to the log and systematically printed. This
mode corresponds to automatic saving and automatic printing.
Window
for adjusting
the date and the time of the clock
This function is used to adjust the date and time of the internal clock in the
XBT-M terminal. The date and time are initialized by the integral clock in the
PC when the window is opened.
Select the item to be modified and use the arrows to alter its value. The clock
in the XBT-M terminal is initialized to this value when the configuration is
transferred.
Window
for adjusting
the display
parameters
This function is used to adjust the legibility of the display according to the
conditions of use.
-DlSF’lAY
Blinking
Scrolling
CONFIGURATION
:
:
m
:
Brightness
m
:
0 lest
This window is used to adjust how quickly the lamps blink, message scrolling
speed and the brightness of the display. If the XBT-M terminal is connected
to a PC, pressing “Test” will immediately show the result of the modifications.
5
Programming the XBT-M terminal
Configuration
l
-
- Messages
displayed
by default
Messages displayed by default
The user can define one or two messages to be displayed by default on power-up
(if these two messages are not defined, the XBT-M displays “RUNNING” mode on
the first line and the time on the second line for XBT-M80411X).
Selection is accessed from the “Message list” window.
Select Qefault
‘
Messages” in the Qptions menu.
The “Messages Displayed by Default” window appears :
numbers into the terminal
Registers the default
message numbers
in the PC
are retained
To define the messages :
Click on the “Message 1” or “Message 2” entry zones, then enter the message
number using the keyboard.
The display parameters defined in the selected message (s) are implemented, in
particular the display format.
Warning :
When a message list or a configuration is transferred, this data is not sent to the
XBT-M terminal. To display the default messages when the terminal is powered up,
the default messages displayed must be “Exported” after the application has been
transferred.
5
Programming the XBT-M terminal
5.8
Saving the application
Saving an application consists of saving the two files containing the application
developed for the XBT-M to the PC disk (hard disk or diskette).
- the message list and configuration data
- the special font set defined by the user
Saving these files is always done in the same way, using one of three methods.
- select the “Save” or “Save as” commands in the “File” menu of the main
XBT-L900 window
- click on the diskette icon in the main
XBT-L900 window
- close the window by double-clicking on the system menu box
This method does not allow
the file name to be changed.
A document can be saved using its current name or it can be saved as a different
name.
The current name is the name of the document being worked on.
This name appears in the title bar of the window, after “Message list”.
Above example : sollacxtx
The “Save” command in the “File” menu of the main XBT-L900 window saves the
fileunderitscurrent name, withoutaskingforconfirmation.TheoldfileisoveMlritten
by the new one.
Double-clicking on the system menu box enables the user (after confirmation) to
close the window and save the modifications, to cancel the operation and leave the
window open, or to close the window without saving the modifications.
3
Programming the Xt) I-M terminal
Saving the application
Confirmation window :
C:V(BTL9OO~LSTH.AP~aIsth.xtx
save the modifications ?
has changed,
The directory and the name under which the file is saved can be changed by using
the “Save as” command in the “File” menu, or by clicking on the diskette icon of the
main XBT-L900 window.
Save As :
c:\xbtl900
alsthxtx
\
I
h
Current directory
Return to c: directories
Select directory
Select volume
File name
Confirm/cancel
a9
5
Programming the XBT-M terminal
5.9
Printing and transferring
l
the application
Printing
In order to print out an application a message list must be open. The printing
functions are accessed either by clicking on the printer icon (yellow) of the main
XBT-L900 screen, or by selecting “Print” in the “File” menu.
The application is printed in the following format by default :
- Configuration of communication link
- Message list
- Macro-messages and operator guide
It is possible to print only part of the message list by selecting the zone to be printed.
Use the mouse to select as follows :
- select the first message (click on the message number)
- drag down using the left hand mouse button until reaching the last
message required.
The following message appears during printing :
Send
alsthxbc
to spooler...
J
If a problem occursduring printing, checkthe printerconfiguration in the WINDOWS
configuration control panel (Main Group).
3
Programming me iit5 I -NT lermfnal
Printing and transferring
l
hr
the application
Transferring from PC -> XBT-M (Export)
The XBT-M terminal must be in “Running” mode and connected to the PC via the
serial link for all transfer operations. The configuration parameters of the
PC c-> XBT-M serial link are defined in the “Configuration” menu of the main
XBT-L900 window.
To transfer an application created using XBT-L900 to an XBT-M terminal proceed
as follows :
- initialize the cartridge (optional)
- delete the messages (optional)
- transfer the message list
- transfer the special font set
- transfer the configuration
- transfer the default messages
- Initializing the cartridge
w
New cartridges must be initialized. Otherwise this operation is to initialize the
memory and ensure that the application only contains the elements transferred
after initialization.
The operation is executed by the “lnitialise Cartridge” command in the “Options”
menu in the message list.
- Deleting messages
/
This operation deletes the contents of the stored message list from the XBT-M
terminal memory. If the open message list is smaller then the XBT-M terminal
cartridge, there is a partial deletion limited to the message list. The messages to be
deleted can be selected from the message list using the mouse.
This operation is implemented by the “Erase XBT-M” command in the “Options”
menu in the message list.
-
Modification
of message
list Size...
3
rrogrammlng tne xi3 I-M terminal
Printing and transferring
the application
- Transferring the message list
This transfer is only possible if the message list is open and if its size corresponds
to the size of the XBT-M memorycartridge.A partial transfer is possible by selecting
the messages to be transferred.
Transfer is accessed by clicking on the arrow :
There are two possible situations : if the message list uses the default font set, the
messages are sent to and saved by the terminal.
If the message list uses a font set other than the default set, the software suggests
transferring the relevant font set automatically.
Non Standard
Transfer
Font set
Font set
C:WBTLSOOWLSTH.AP~fontl
to the XBTM
.xfn
?
A window showing the various stages of the transfer is displayed. This enables the
user to follow the progress of the transfer and warns him of any problems.
97
3
ProgrammIng
tne xt5 1-M rermlnal
Printing and transferring the application
- Transferring the configuration
To transfer the configuration the message list and the configuration window should
be open. The transfer is initiated by clicking on the arrow.
- Transferring the default messages
If the message numbers are defined in the “Messages displayed by default”
window, these numbers must be transferred to the XBT-M terminal. On the next
power-up these two messages will then be displayed instead of “RUNNING”
appearing on the first line and the time on the second line.
This operation is performed by selecting “Default Messages” in the “Options” menu
in the message list, and by clicking on the “Export” button.
Message
lnitialise
cartridge...
Modification
of message
1
:
l-m-j
I
list Size...
- Adjusting the display unit and the (:lock
The display unit and the date and time of the clock can be adjusted when the XBT-M
terminal is connected to a PC. These adjustments can be made from the
“Configuration” window and are transferred to the XBT-M terminal at the same
time as the configuration.
DISPLAY
Blinking
--
CONFIGURATION
:
:
~~
:
~
Scrolling
Brightness
4djusting and testing the display unit
~
:
0
Iest
93
rrogrammrng
3
me AB I -M lerrmnal
Printing and transferring the application
l
Transferring from XBT-M -> PC (Import)
Transfers can be made from an XBT-M terminal to a PC. A special font set (import
implemented in font set mode) or a message list can be imported.
The message list must be empty and must be the same size or larger than the list
located in the XBT-M terminal.
If the open list is smaller than the message list in the terminal, only a partial transfer
is implemented.
Example :
Size of cartridge in XBT-M terminal : 24 Kb, 600 messages
Size of message list open on PC : 400 messages on a 16 Kb cartridge.
The operator is then warned that only messages 0 to 399 will be transferred.
0 I
l
- Cartridge size 024 Kb [messages 0 to 05991
list size 016 Kb (messages 0 to
0399)
- Message
Import Messages 0000 to 0399 ?
Is also possible for the user to transfer only selected messages. Use the mouse to
select the block of messages to be transferred from the message list, then initiate
the transfer.
Communication error
If there is a problem in communicating with the XBT-M terminal a window is
displayed indicating the cause of the problem. If this happens, the configuration of
the communication link (“Configuration” then “Communication” menu of the main
XST-L900 screen) and the connection of the XBT-M and PC using an XBT-Z915,
905 or 9052 cable should be checked.
The “COM 1 :‘I or “COM 2:” communication ports should also be checked to make
sure they correspond to those in use.
94
6
Appendices
6.1
File organization
XBT-L900 V 1.3 organizes its files as follows :
l
Terminals with keyboard / display and display units
The application directory contains :
r-imgiq
Directory created by the user under WINDOWS or under DOS
- the term “application” defines a message list,
- in the case of the XBT-M display unit, an “application” groups together a
message list, a configuration and a font set in two files.
l
Screen terminals
The application directory contains :
Directorycreatedbythe user
underWINDOWSor underDOS
Files
Page
database
~~
namel XTX
Messagelistor text pages
namel XTS
Surveillancepage
namel XGR
Graphicpages
namel FON
Userfontset
APl*XAP
1
APl*APP
Thisfileisthe applicationscript.It contains
dataconcerning
the applicationAPl :
-the XBT-Vconfiguration,
- nameof fhe pagefiles,
- linkbetweenpages.
] Sub-directory
forapplicationAPl generatedat the
timethe application
was created
-
nom*XTX
-
noml XTS
-
noml XGR
-
nom*FON
I
Filesforpages
usedin application
APl andcopiedautomatically
usingthe pagedatabase,
whenthe applicationpages
are selected
The term “appliition” defines a set of pages as well as the links between the pages.
The name of a file can comprise up to 8 characters followed by an extension of 3
characters. The extension is added by the program and serves to identify the type
of file.
95
0
Appendices
6.2
Erasing
l
Erasing an application
file
Use the “file manager” which is in the WINDOWS main group.
- Launch the file manager by double-clicking on its icon,
- Select the storage drive where the file you wish to erase is located (click on its
icon).
The program manager displays the tree structure of the directories in this drive :
Note: You should get the following screen in English from you Windows software.
Eichicr
Disque
Arbre
Affichage
Options
Ftnetre
1
524 16/04/1993
08:22:34
Select the directory where the file you wish to erase is stored (double-click on the
directory name),
Repeat this operation as many times as necessary if the file is located in a
sub-directory,
Click on the file name (eg : ESSAI.XTX),
Select the command “Eile” then “Delete”,
Confirm deletion.
Erasing a directory
Theprocedureisthesameasforerasing
select a directory name.
afile, but insteadofselectingafilename,
For further information about these operations, refer to the WINDOWS
guide.
user
6
Appendices
6.3
Compatibility
. Communication protocols
XBT terminals
support
the
following communication protocols :
- ASCII mode : allows the XBT to be connected to any system equipped with a
serial link communication module.
- ADJUST protocol : allows the XBT to be connected to the terminal port of any
Telemecanique TSX 7 series PLC.
- UNI-TEprotocol(communicationprotocolfortheTelemecaniqueUNI-TELWAY
multidrop industrial bus) : allows the XBT to be connected to any module which
supports this protocol.
- SCI port on CPUs of TSX 7 series 40 PLCs
- SCM type modules (series 30 or 40 modular PLCs)
- SCG type modules (TSX 17 PLCs).
- JBUS protocol (industrial communication protocol specified by APRIL) :
allows the XBT to be connected to any module supporting this protocol, in
particular JBUS modules on APRIL series 1000 PLCs.
- MODBUS protocol (industrial communication protocol specified by MODICON :
allows the XBT to be connected to any module supporting this protocol.
The protocols supported by the XBT terminal can be identified by the letter in
their product reference.
Protocols supported :
- Series XBT- 4
JBUS/MODBUS
- Series XBT- 7
ASCII/ADJUST protocols
- Series XBT- 8
ASCIVADJUSTAJNI-TE
protocols
protocols
6
Appendices
Compatibility
l
Software compatibility
It is generally possible to retrieve existing applications developed using XBT-Ll 00
and XBT-L400 software by direct connection to the terminal loaded with the
application to be retrieved.
All that is needed is to perform an XBT to PC transfer.
Where message lists have been created using XBT-LlOO or XBT-L400,
possible to retrieve any stored files by using the following method :
it is
- Transfer the whole of the saved list to the XBT terminal (PC + XBT
transfer) using the original program (XBT-LlOO or XBT-L400),
- Retrieve the contents of the XBT memory using XBT-L900
transfer),
(XBT 7) PC
It is then possible to make and save modifications under XBT-LSOO.
l
Possibility of retrieving programs created using XBT-L400 and XBT-LlOO
via XBT-L900
XBT Terminal
TYPE
XBT-A4
PROGRAM CREATED USING :
YES (XBT-L400
XBT-A7 I A8
XBT-B4 I C4
XBT-Lt 00
XBT-L4OO
1.2)
YES
YES
XBT-B7 I C7
XBT-B8 I C8
YES
XBT-C87
YES
XBT-K7 I K8
YES *
XBT-MB
l
XBT-M8 functions are reduced to XBT-K functions if they have been saved using
XBT-LlOO (see XBT-M guide section 3.3).
6
Appendices
Compatibility
Programming the range of XBT terminals
. Compatibility between XBT-L900 V 1.3 / XBT terminals
XBT-L900 can be used to program terminals whose commercial reference begins
with one of the following prefixes:
Terminals with keyboard / display unit :
XBT-A4
XBT-A7
XBT-A8
XBT-B4
XBT-B7
XBT-B8
XBT-C4
XBT-C7
XBT-C8
Display units :
XBT-K7
XBT-K8
XBT-M8
Terminals with keyboard / CRT screen :
XBT-VA8
XBT-VB4
XBT-VB8
Terminals with keyboard :
XBT-BB8
-
XBT-VM8
XBT-C87
Tslemecanique has a policy of ontinuous development and improvement and reserves the right to supply products which
may differ in detail from those described and illuslratx! in this publication. Their description cannot be considered in anyway
to form the basis of a contract.
0 Copyright Telemecanique 1993. All rights reserved. This document may not be reproduced or copied. in whole or in pati,
in any form or by any means, graphic, electronic or mechanical, including photocopying, recording or storage in a retrieval
system.
XET XL901 EN
12/1993
W914083180311
A01