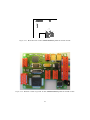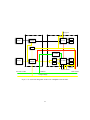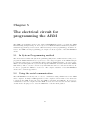
1
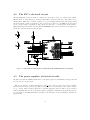
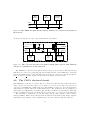
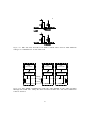
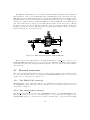
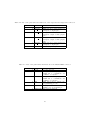
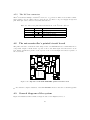
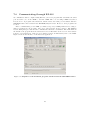
Design of an ARM based microcontroller
circuit board for the Amphibot II robot
EPFL - Semester Project
27 June 2005
Author : Alain Dysli
Supervisor : Alessandro Crespi
Professor : Auke Jan Ijspeert
Abstract
The Amphibot I robot was built in the purpose to mimic animal locomotion like the snake’s
or lamprey’s. But the lack of independence due to weak microcontroller and bus performance
haven’t allowed the robot to be autonomous. The Amphibot II robot comes with a new, more
spacious design that allow a more powerful microcontroller to be integrated.
The Philips ARM LPC2129 is chosen to fulfill the increased demand in computational power in
this new robot. Along with the ARM more connectors appear on the circuit and the Amphibot
II becomes a powerful and expandable robot. But designing the hardware parts doesn’t come
alone and the software to control those new high performances functionalities must be written.
The result is a powerful and expandable circuit that can handle several external devices and
communicate with all the other circuit of the same kind through its high speed CAN bus. Therefore, the design isn’t bug free and some errors have still to be fixed.
Contents
1 Introduction
3
2 Goal of the project
4
3 System architecture
3.1 Description of the ARM LPC2129 microcontroller
3.1.1 The ARM primary functions . . . . . . . .
3.1.2 General purpose input and output pins . .
3.1.3 The analog to digital converter . . . . . . .
3.1.4 Integrated UART . . . . . . . . . . . . . . .
3.1.5 The CAN and I2 C buses . . . . . . . . . . .
3.2 Denomination of the circuit boards . . . . . . . . .
.
.
.
.
.
.
.
.
.
.
.
.
.
.
.
.
.
.
.
.
.
.
.
.
.
.
.
.
.
.
.
.
.
.
.
.
.
.
.
.
.
.
.
.
.
.
.
.
.
.
.
.
.
.
.
.
.
.
.
.
.
.
.
.
.
.
.
.
.
.
.
.
.
.
.
.
.
.
.
.
.
.
.
.
.
.
.
.
.
.
.
.
.
.
.
.
.
.
.
.
.
.
.
.
.
.
.
.
.
.
.
.
.
.
.
.
.
.
.
5
5
5
5
6
6
6
6
.
.
.
.
.
.
.
.
.
.
.
.
.
.
.
.
.
.
.
.
.
.
.
.
.
.
.
.
.
.
.
.
.
.
.
.
.
.
.
.
.
.
.
.
.
.
.
.
.
.
.
.
.
.
.
.
.
.
.
.
.
.
.
.
.
.
.
.
.
.
.
.
.
.
.
.
.
.
.
.
.
.
.
.
.
.
.
.
.
.
.
.
.
.
.
.
.
.
.
.
.
.
.
.
.
.
.
.
.
.
.
.
.
.
.
.
.
.
.
.
.
.
.
.
.
.
.
.
.
.
.
.
.
.
.
.
.
.
.
.
.
.
.
.
.
.
.
.
.
.
.
.
.
.
.
.
.
.
.
.
.
.
.
.
.
.
.
.
.
.
.
.
.
.
.
.
.
.
.
.
.
.
.
.
.
.
.
.
.
.
.
.
.
.
.
.
.
.
.
.
.
.
.
.
.
.
.
.
.
.
.
.
.
.
.
.
.
.
.
.
.
.
.
.
.
.
.
.
.
.
.
.
.
.
.
.
.
.
7
7
9
9
11
11
12
14
14
14
16
16
18
18
18
5 The electrical circuit for programming the ARM
5.1 In System Programming method . . . . . . . . . . . . . . . . . . . . . . . . . . .
5.2 Using the serial communication . . . . . . . . . . . . . . . . . . . . . . . . . . . .
22
22
22
6 Accessing the microcontroller’s functionalities
6.1 The project’s bundled files . . . . . . . . . . . .
6.2 Initialization of the ARM’s primary functions .
6.3 Accessing the LEDs . . . . . . . . . . . . . . .
6.4 Communicating via UART . . . . . . . . . . .
24
24
25
25
25
4 The
4.1
4.2
4.3
4.4
4.5
4.6
4.7
4.8
4.9
microcontroller’s electrical circuit
The ARM’s electrical circuit . . . . . . . . . . . .
The PIC’s electrical circuit . . . . . . . . . . . .
The power supplies’ electrical circuits . . . . . .
The LEDs’ electrical circuits . . . . . . . . . . . .
The I2 C’s electrical circuit . . . . . . . . . . . . .
The CAN’s electrical circuit . . . . . . . . . . . .
External connectors . . . . . . . . . . . . . . . .
4.7.1 The PROG PIC connector . . . . . . . . .
4.7.2 The salam power connector . . . . . . . .
4.7.3 The Capteurs1 and Capteurs2 connectors
4.7.4 The PROG ARM connector . . . . . . . .
4.7.5 The I2 C bus connector . . . . . . . . . . .
The microcontroller’s printed circuit board . . .
General diagram of the system . . . . . . . . . .
1
.
.
.
.
.
.
.
.
.
.
.
.
.
.
with the
. . . . . .
. . . . . .
. . . . . .
. . . . . .
software
. . . . . .
. . . . . .
. . . . . .
. . . . . .
.
.
.
.
.
.
.
.
.
.
.
.
.
.
.
.
.
.
.
.
.
.
.
.
.
.
.
.
6.5
6.6
6.7
6.8
Using the
Using the
Using the
The main
sensors connectors
I2 C bus . . . . . .
CAN bus . . . . . .
file . . . . . . . . .
.
.
.
.
.
.
.
.
.
.
.
.
.
.
.
.
.
.
.
.
.
.
.
.
.
.
.
.
.
.
.
.
.
.
.
.
.
.
.
.
.
.
.
.
.
.
.
.
.
.
.
.
.
.
.
.
.
.
.
.
.
.
.
.
.
.
.
.
.
.
.
.
.
.
.
.
.
.
.
.
.
.
.
.
.
.
.
.
.
.
.
.
.
.
.
.
.
.
.
.
.
.
.
.
.
.
.
.
.
.
.
.
26
26
27
27
. . . . .
. . . . .
. . . . .
RS-232
.
.
.
.
.
.
.
.
.
.
.
.
.
.
.
.
.
.
.
.
.
.
.
.
.
.
.
.
.
.
.
.
.
.
.
.
.
.
.
.
.
.
.
.
.
.
.
.
.
.
.
.
.
.
.
.
.
.
.
.
.
.
.
.
.
.
.
.
.
.
.
.
.
.
.
.
.
.
.
.
.
.
.
.
.
.
.
.
.
.
.
.
.
.
.
.
.
.
.
.
.
.
.
.
.
.
.
.
28
28
28
28
29
8 Known problems
8.1 Software problems . . . . . . . . . . . . . . . . . . . . . . . . . . . . . . . . . . .
8.2 Hardware problems . . . . . . . . . . . . . . . . . . . . . . . . . . . . . . . . . . .
30
30
30
9 Future improvements
9.1 Wireless communication . . . . . . . . . . . . . . . . . .
9.1.1 Goals to achieve . . . . . . . . . . . . . . . . . .
9.1.2 Electromagnetic waves (radio) communication . .
9.1.3 Ultra sonic waves communication . . . . . . . . .
9.1.4 Electromagnetic waves (photons) communication
32
32
32
32
33
33
7 Getting started
7.1 Downloading the tools .
7.2 Compiling your project
7.3 Programming the device
7.4 Communicating through
.
.
.
.
.
.
.
.
.
.
.
.
.
.
.
.
.
.
.
.
.
.
.
.
.
.
.
.
.
.
.
.
.
.
.
.
.
.
.
.
.
.
.
.
.
.
.
.
.
.
.
.
.
.
.
.
.
.
.
.
.
.
.
.
.
.
.
.
.
.
.
.
.
.
10 Conclusion
34
A Philips ARM LPC2129 microcontroller datasheet
36
B SALAMCTRL circuit board datasheet
37
C SALAMPROG circuit board datasheet
38
D National Semiconductor LP3964 800mA Fast Ultra Low Dropout Linear Regulator datasheet
39
E Linear Technology LTC1503-1.8 High Efficiency Inductorless Step-Down DC/DC
Converter datasheet
40
F Microchip MCP2551 High-Speed CAN Transceiver datasheet
41
G Maxim MAX3232 True RS-232 Transceiver datasheet
42
H Source code of the project LPC2129 Project
43
I
I2 C communication protocol
44
2
Chapter 1
Introduction
The Amphibot I robot is a robot capable of snake and lamprey-like locomotion. It is composed of
several identical segments or modules whose orientations relative to each other can be changed.
By generating non-linear oscillations through all the segments, the robot is able to move1 .
However, the robot isn’t capable of generating himself the oscillations and thus it must be
connected to a computer in order to receive the necessary informations. Moreover, the robot
isn’t equipped with any sensors and is therefore totally blind to the external world. In other
words, Amphibot I is not autonomous.
Because lots of tasks demand the robot to be autonomous, a new robot, called Amphibot II
is created. Amongst other things, this robot must be able to generate himself the oscillations’
patterns so that it may move freely without external cables.
Each module contains his battery, as well as a PIC 16F876A microcontroller (on the SALAMUC1 board) that controls the motor’s position while another board (the SALAMMOTOR
board) contains all the necessary components to regulate the voltage and monitor the battery.
The PICs can communicate with each other through an I2 C bus.
However, due to the PIC’s weak performances as well as poor memory capacity, the oscillations
have still to be generated by a computer. The PIC may also not be able to handle high performance devices such as cameras or to be used as a main computational engine communicating
orders to other modules while analyzing informations coming from multiple sensors.
In order to fulfill those objectives, a new high performance control board must be designed.
It is the purpose of this project.
1 [1]
3
Chapter 2
Goal of the project
The goal of the project is to make a new controller circuit board for the Amphibot II robot using
a new more powerful microcrontroller. The PIC is kept in the circuit and serves only as the
motor controller. This circuit should have the following specifications:
1. The new board should have the same dimensions as the old one and respect the same
mechanical restrictions given by the module’s shape.
2. The microcontrollers should be able to communicate between each other using a CAN bus.
The bus shouldn’t be master-slave.
3. The microcontroller should have a hardware built-in controller area network (CAN) controller.
4. The microcontroller should be able to communicate with the PIC and the battery monitor
using a I2 C bus.
5. The microcontroller should have a hardware built-in I2 C controller.
6. The microcontroller should be able to be programmed through the CAN bus.
7. Possibilities to utilize later on some I/O (for sensors in particular) should be left.
8. A library of functions for accessing the I/O and I2 C and CAN buses should be created.
9. The overall designed system should use a minimal amount of energy and take the smallest
place possible.
10. The amount of memory (Flash + RAM) should be far superior as what the PIC contain.
11. The system should be compatible with the already existing SALAMMOTOR circuit.
4
Chapter 3
System architecture
3.1
Description of the ARM LPC2129 microcontroller
From the numerous microcontrollers who where studied, the one who fulfills the most the goal
of the project is the Philips ARM LPC2129 microcontroller (datasheet available in appendix A).
The LPC2129 is a 16/32 bit ARM microcontroller. It’s maximum operating frequency is 60
MHz and it integrates 256 KBytes of flash memory as well as 16 KBytes of SRAM. It has 46
I/O pins and it has a four channels / 10 bits analog to digital converter, an hardware integrated
I2 C controller and a hardware integrated CAN controller. All this combined with its relatively
small size (10*10 mm) makes it a good choice for this application.
3.1.1
The ARM primary functions
Though the CPU maximum frequency is 60 MHz, the ARM can only achieve this speed using
an internal phase locked loop (PLL) which multiply the frequency given by the external quartz
resonator. At startup, the PLL must be launched but before it is locked, the quartz’s frequency
is directly used.
The internal functions of the ARM also need an input frequency in order to work. This
frequency is given by the vlsi peripheral bus (VPB). His frequency is less or equal to the CPU
speed.
When the ARM runs, it must fetch the instructions from the flash memory to the CPU
where they are decoded and executed. However, the flash memory access time only permits to
access it with a maximal frequency of 20 MHz. Therefore, when running with a CPU frequency
of 60 MHz, the flash limits the CPU speed. To achieve maximum performances, the LPC2129
can fetch 4 instructions at a time instead of only one. This is done by enabling the memory
accelerator module (MAM). This technique allows the CPU to run at maximum speed.
One must always have in mind that speed cannot goes without high power consumption and
thus, when battery longevity is more important than power, these functions shouldn’t be enabled.
3.1.2
General purpose input and output pins
The ARM microcontroller contains 46 general purpose input and output pins. Each of these pins
may be used as a digital input or output pin apart from a possible special pin function.
5
3.1.3
The analog to digital converter
A four channels analog to digital converter is also available on the LPC2129. It has a maximal
resolution of 10 bits. It can ether convert voltages continuously or selectively on one or on the
four channels one after the other.
3.1.4
Integrated UART
The ARM comes with an integrated UART controller. This controller manage the signals on the
serial lines and send characters or store the character received.
3.1.5
The CAN and I2 C buses
The LPC2129 integrates hardware controls of the I2 C and CAN buses. This allows the program
to handle other tasks while the dedicated buses controllers do their job on their own.
The I2 C controller handles the signals generation. It indicates the state of the communication
but the proper action has to be taken by the program.
The LPC2129 CAN bus controller is a very complicated device. It handles many tasks such as
sending the messages and filtering the incoming ones. Because the CAN application layer is not
defined, it’s the purpose of the program to define it and thus decide wether the communication
is master-slave or not. In our case, we want each module to communicate with the other and so
the bus shouldn’t be master-slave.
The physical layer is defined by the an external CAN transceiver which communicate with the
ARM’s CAN controller. The CAN transceiver is also connected to the CAN high and CAN low
lines which are the CAN bus lines. It uses a dominant recessive method where the zeros are
dominant over the ones.
3.2
Denomination of the circuit boards
The overall system include a slightly modified SALAMMOTOR circuit board, called SALAMPOWER. This electrical circuit handle the same functions but gives the microcontroller’s circuit
board, called SALAMCTRL, the battery voltage along with the 5 V. The SALAMCTRL circuit
board is described in the next chapter.
6
Chapter 4
The microcontroller’s electrical
circuit
The complete electrical circuit, called SALAMCTRL can be found in appendix B. The next
sections will describe each part found in this electrical circuit.
4.1
The ARM’s electrical circuit
The Philips ARM lpc2129 must be powered by two different voltages: 1.8 V and 3.3 V. The 1.8
V is for the core and the 3.3 V is for the input and output pins. The integrated circuit (IC)
package includes several power pins for the same voltage. Pins V18 (pins 17 and 49) and V18A
(pin 63) need 1.8 V and pins V3A (pin 7) , V3 1 (pin 23), V3 2 (pin 43) and V3 3 (pin 51) need
3.3 V. Pins VSS1 (pin 18), VSS2 (pin 25), VSS3 (pin 42), VSS4 (pin 50) and VSS5 (pin 6) are
connected to ground. Finally pins SSA PLL (pin 58) and VSSA (pin 59), which are PLL and
analog ground pins, are connected to the ground via a solder jump. Each power pin is uncoupled
from the ground with a 100 nF ceramic capacitance.
A 20 MHz quartz resonator is connected to the two clock entries of the ARM and is uncoupled
from the ground with a 47 pF capacitance on each side. As given by the lpc2129 user manual,
the clock speed should be between 10 and 25 MHz so that the ARM can use the phase locked
loop (PLL) and the in-system programming (ISP), which is what we want. Despite the fact that
the clock is only running at 20 MHz, the PLL will allow the chip to speed its internal clock up
to 60 MHz.
To ensure proper start up, the RESET (pin 59) and ISP (pin 41) pins have to be connected
to 3.3 V via a 10 kΩ and 22 kΩ resistor. As we will later see, these pins will also be used as
programming pins along with the serial transmit TxD0 and receive RxD0 pins (pins 19 and 21).
A low voltage on the RESET pin causes the chip to reset.
Figure 4.1 shows the electrical circuit around the ARM.
7
Figure 4.1: Electrical connections around the ARM LPC2129 microcontroller
8
4.2
The PIC’s electrical circuit
The PIC16F876A electrical circuit is a stripped down version of the one found in the SALAMUC1 circuit board designed by A.Crespi, essentially because the PIC now only handle motor
management. This microcontroller requires a 5 V power supply which is uncoupled with a 100
nF and a 10 µF ceramic capacitances. Its clock speed is given by a 20 MHz clock uncoupled
by two 22 pF ceramic capacitances. The pin 26 is connected to 5 V through a 47 kΩ resistor.
This pin has the same function as the LPC2129 RESET pin described in section 4.1. Figure 4.2
shows the electrical circuit around the PIC.
Figure 4.2: Electrical connections around the PIC 16F876A microcontroller
4.3
The power supplies’ electrical circuits
We have seen that the ARM and PIC microcontrollers require several different voltages. We will
see now how we can get them.
The 5 V is directly obtained through the salam power connector (see section 4.7 for further
informations about the connectors). The 3.3 V and 1.8 V are generated by the battery voltage
(∼ 3.6 - 4.2 V), named battpow, which also comes through this connector. The 3.3 V is obtained
with an LP3964 ultra low dropout linear regulator (datasheet available in appendix D) and the
1.8 V is given by an LTC1503 inductorless step-down DC/DC converter (datasheet available in
appendix E).
9
The 3.3 V regulator uses a 100 µF and a 47 µF tantalum electrolytic decoupling capacitance
(see the datasheet for further informations). The SHDWN pin is pulled low by 10 kΩ resistor
ensuring that the IC is always functionning. The SENSE pin is not used and so it must be
directly connected to the output pin, according to the datasheet. Figure 4.3 shows the electrical
circuit used to generate the 3.3 V.
Figure 4.3: The LP3964 ultra low dropout linear regulator and the components used
to produce 3.3 V
The 1.8 V step-down converter uses two 1 µF and two 10 µF ceramic capacitors. The two 1
µF capacitances are used by the IC to produce the 1.8 V and the two 10 µF are used to stabilize
the input and output voltages (see the datasheet for further informations). The SHDN pin must
be connected to the input pin to ensure proper operation. Figure 4.4 show the electrical circuit
used to generate the 1.8 V.
Figure 4.4: The LTC1503 inductorless step-down DC/DC converter and the components used to produce 1.8 V
Each capacitance type and value as well as pin connection were chosen according to datasheet
specifications. Please refer to them before any change.
10
4.4
The LEDs’ electrical circuits
The circuit contains four LEDs. Each microcontroller has a red and a green LED.
The green LED of the PIC is connected to the PIC’s RB1 pin (pin 19) and the red one is
connected to the RB2 pin (pin 20). The LED is placed so that it is active when the corresponding
pin is high. A 220 Ω resistor in series which each led ensure a maximal current of 22 mA. Figure
4.5 shows the PIC’s LEDs electrical circuit.
Figure 4.5: The PIC’s LEDs electrical circuit. The LEDs are active the corresponding
pin is high
The green LED of the ARM is connected to the ARM’s P0.23 pin (pin 3) and the red LED
is connected to the P0.24 pin (pin 5). They are both in series with a 130 Ω resistor thus limiting
the current to 25 mA. The LEDs are active when the corresponding pin is low. Figure 4.6 shows
the ARM’s LEDs electrical circuit.
Figure 4.6: The ARM’s LEDs electrical circuit. The LEDs are active when the corresponding pin is low
4.5
The I2 C’s electrical circuit
The I2 C bus connects the ARM, the PIC and the battery monitor together. The battery monitor
(DS2764BE) is found on the SALAMPOWER circuit. All three are connected in parallel on the
bus. Figure 4.7 shows how the components are connected on the I2 C bus.
The battery monitor and the PIC are communicating with a 5 V logic but the ARM uses
instead a 3.3 V logic. As the operating voltage isn’t the same for the three ICs, a level shifter
is used to allow them to live on the same bus. This circuit is given by Philips in its I2 C
specifications1 . The system uses two BSS138 MOSFETs and four 10 kΩ pull-up resistors. Figure
1 Philips I2 C
specification can be found here [2]
11
ARM
master #1
PIC
slave #1
DS2764BE
slave #2
SCL
SDA
Figure 4.7: The ARM, the PIC and the battery monitor are connected in parallel on
the I2 C bus
4.8 shows the disposition of the components with the level shifter.
Vdd = 3.3 V
Vdd = 5 V
g
arm_sda
s
local_sda
d
g
arm_scl
s
local_scl
d
ARM
3.3 V
PIC
5V
SALAMCTRL
DS2764BE
5V
SALAMPOWER
Figure 4.8: The I2 C bus and the level shifter which allow devices with different
voltages to communicate on the same bus
The ARM microcontroller is the master and the other two are the slaves. The I2 C SCL and
SDA lines are connected to pins SCL (pin 22) and SDA (pin 26) on the ARM and to pins SCL
(pin 11) and SDA (pin 12) on the PIC. The battery monitor is connected to the bus through the
local sda and local scl lines. Figure 4.9 shows the level shifter electrical circuits.
4.6
The CAN’s electrical circuit
Each ARM microcontroller on each module are connected together through a CAN bus. Every
entity connected to the bus is called a node. There is one node per module and each node is
composed of an ARM and a CAN transceiver. The ARM is connected to the bus through the
CAN transceiver which defines the CAN physical layer. The transceiver used is a high speed
CAN transceiver (MCP2551) from Microchip (datasheet available in appendix F). This chip
allows a communication speed of 1 Mb/s and up to 112 nodes to be connected on the same bus.
The bus must be terminated on each side with a 120 Ω resistor which is enabled with a
jumper (JUMP2). Thus only the first and last modules used should have this jumper. Figures
4.10 illustrate the principle of the communication between modules through the CAN bus.
12
Figure 4.9: The I2 C bus and the level shifter which allow devices with different
voltages to communicate on the same bus
ARM
CAN controller
ARM
CAN controller
ARM
CAN controller
CAN transceiver
CAN transceiver
CAN transceiver
Module #2
Module #3
CAN high
Vdiff
CAN low
Module #1
Figure 4.10: The ARM communicates with the other ARMs on the other modules
through the CAN bus. Only the first and last module have the bus termination
resistor enabled
13
The ARM is communicating to the transceiver with the TD1 pin (pin 10) and the RD1 pin
(pin 9) which are connected to the TDX pin (pin 1) and RXD pin (pin 4) of the transceiver. The
RXD pin reflects the differential bus voltage between the CAN high line and the CAN low line.
The MCP2551 is 5 V powered and thus it is communicating with a 5 V logic. So its RXD voltage
is divided by a resistor divider to match the ARM’s logic. The CANH (pin 7) and CANL (pin 6)
pins of the transceiver are connected to the CAN bus lines called “bus A” and “bus C”. The RS
pin (pin 8) connected to the ground means that the circuit is operating at full speed. The Vref
pin (pin 5) is left unconnected. The IC is also uncoupled with a 100 nF ceramic capacitance.
Figure 4.11 shows the can electrical circuit.
Figure 4.11: The electrical circuit of the CAN bus
The two lines of the CAN transceiver are passing through the salam power connector to the
SALAMPOWER circuit where they are connected to the CAN high and CAN low lines named
bus A and bus C. The BUS IN (J3) and BUS OUT (J4) connectors connect those lines with the
other modules.
4.7
External connectors
The circuit contains six Micromatch connectors. Their name and function are resumed in table
4.1. Note that the pins related to the PIC and the SALAMPOWER circuit are not described
because it’s not of the purpose of this project.
4.7.1
The PROG PIC connector
The PROG PIC connector allows the PIC to be programmed. It is the same version as the one in
the SALAMUC1 circuit. Each pin is described in table 4.2. To see where each pin is connected
on the PIC, see figure 4.2.
4.7.2
The salam power connector
The salam power connector connects the SALAMCTRL circuit to the SALAMPOWER circuit.
Each pin is described in table 4.3. Its main purpose is to provide the power supply to the
SALAMCTRL circuit, to connect the motor circuit to the PIC and to conduct the I2 C and CAN
14
Table 4.1: List of the connectors used on the microcontroller circuit
Connector number
J1
Connector name
PROG PIC
J2
salam power
J3
Capteurs1
J4
Capteurs2
J5
PROG ARM
J6
I2 C bus
Function
Allows the PIC to
be programmed
Connects
the
SALAMCTRL
circuit
to
the
SALAMPOWER
circuit
Allows an external sensor the be
plugged
Allows an external sensor the be
plugged
Allows the ARM
to be programmed
using the SALAMPROG circuit and
to communicate via
UART
Allows an external
I2 C component to
be plugged
Number of pin
6
16
6
6
6
4
Table 4.2: List of the pins names and functions of the PROG PIC connector
Pin number
1
2
3
4
5
6
Pin name
progdbg
progpcl
progpdt
GROUND
progvcc
progpgm
Function
Specific PIC programming pin
Specific PIC programming pin
Specific PIC programming pin
Electrical ground pin
5 V pin uncoupled from ground by a 100 nF ceramic capacitance
Specific PIC programming pin
15
buses. To see where each pin is connected on the ARM, see figure 4.1 and figure 4.2 for the
connections with the PIC.
Table 4.3: List of the pins names and functions of the salam power connector
Pin number
1
2
chgEN
3
4
5
6
7
8
9
H INa
H INb
sense
clkLS
MotDir
X4X
5V
10
11
12
13
14
15
16
4.7.3
Pin name
battpow
local sda
local scl
GROUND
bus A
NOT CONNECTED
bus C
GROUND
Function
Contain the battery voltage (∼ 3.6 - 4.2
V)
Pin specific to the battery charger circuit
Control of the H-bridge
Control of the H-bridge
Motor current sensor pin
Pin specific to the motor encoder
Pin specific to the motor encoder
Pin related to the motor encoder
5 V coming from the SALAMPOWER
and uncoupled from ground by a 100 nF
ceramic capacitance and 220 µF electrolytic capacitance
Serial line of the I2 C bus
Clock line of the I2 C bus
Electrical ground pin
The CAN high line of the CAN bus
NOT CONNECTED
The CAN low line of the CAN bus
Electrical ground pin
The Capteurs1 and Capteurs2 connectors
The Capteurs1 and Capteurs2 allow two sensors or devices to be connected. Each pin of the
Capteurs1 connector is described in table 4.4. The Capteurs2 pin names are obtained by replacing
the last 1 by a 2. To see where each pin is connected on the ARM, see figure 4.1.
Each connector contains two pins connected to two analog to digital converters on the ARM.
Also every pins, except the power supply pins may be used as digital input or output. The pins
that aren’t connected to an analog to digital converter have pull-up resistors. Each connector
also contains a 5 V power supply pin and ground pin.
4.7.4
The PROG ARM connector
The PROG ARM allows the ARM LPC2129 to be programmed using the SALAMPROG circuit.
This connector also permits the use of the UART lines to communicate between the ARM and a
computer. Each pin of the connector is described in table 4.5. To see where each pin is connected
on the ARM, see figure 4.1.
16
Table 4.4: List of the pins names and functions of the Capteurs1 and Capteurs2 connectors
Pin number
1
2
Pin name
5V
in1 1(2)
3
anA 1(2)
4
anB 1(2)
5
in2 1(2)
6
GROUND
Function
5 V power pin
This pin can be used whether as
an input or output pin
This pin can be used whether as
an input, output or analog input
pin
This pin can be used whether as
an input, output or analog input
pin
This pin can be used whether as
an input or output pin
Electrical ground pin
Table 4.5: List of the pins names and functions of the PROG ARM connector
Pin number
1
2
Pin name
3.3 V
TXD0
3
RXD0
4
ISP
5
RESET
6
GROUND
Function
3.3 V power pin
This pin is used to program the
ARM and to communicate via
UART to a computer
This pin is used to program the
ARM and to communicate via
UART to a computer
This pin is used to initiate the
programming process
This pin is used to reset the
ARM before programming it
Electrical ground pin
17
4.7.5
The I2 C bus connector
The I2 C bus allows multiple external I2 C devices to be connected. Those devices must communicate with a 5 V logic. This connector gives the two I2 C lines a 5 V power supply and ground
pins. Each pin of the connector is described in table 4.6.
Table 4.6: List of the pins names and functions of the I2 C bus connector
Pin number
1
2
3
4
4.8
Pin name
5V
local sda
local scl
GROUND
Function
5 V power pin
I2 C serial data line
I2 C serial clock line
Electrical ground pin
The microcontroller’s printed circuit board
C7
J6
PIC16F876A
U1
J1
2
5
C9
47U
C23
C13
M2
1
10U
U4
val?
1 2 3 4
3
R10 130
D4
BR1111C
C4 22P
J2
47P
100N
C5
R1 47K
C3 22P
1
XT1
1
R9 130
D3 PG1101C
1
4
220U
220
220
R7
D2
R8 D1
BR1111C
PG1101C
10U
C2
M2
C8
100U
The printed circuit board has the same shape as the old SALAMUC1 but contains much more
components. Figure 4.12 shows the top side of the board while figure 4.13 shows the bottom
side. Figure 4.14 shows a picture of the top side of the board and figure 4.15 shows a picture of
the bottom side.
20MHZ
XT2
C22
J3
47P
J4
1
17
49
33
MCP2551-I/SN
W1
U3
LPC2129FBD64
3K9
U2
2K
R11 R12
J5
M2
C6
100N
120 R19
M2
C18
100N
Figure 4.12: Top side of the SALAMCTRL printed circuit board
Note that the complete datasheet of the SALAMCTRL circuit board can be found in appendix
B.
4.9
General diagram of the system
Figure 4.16 illustrates what’s inside a single module of the Amphibot II robot.
18
10K
R6
T2
13 2
BSS138
C14
10K
R4
47K
R16
47K
R17
47K R18
R15 47K
100N
W2
R13 C16
10K
C17 C20
100N 100N 100N
10K R3
R510K
T1
***
R14 22K
C21
100N
100N
C15
0.500 Inch =
Page 7
19
BSS138
13 2
R2
C19
1U
10K 100N
1U
U5
C11
10U
C12
C1
C10
100N
EPFL ACORT Tue 17.05.2005 8:42 Drawing name = SALAMCTRL Scale = 2.00
LTC1503MS8-1.8
Figure 4.13: Bottom side of the SALAMCTRL printed circuit board
Figure 4.14: Picture of the top side of the SALAMCTRL printed circuit board
Figure 4.15: Picture of the bottom side of the SALAMCTRL printed circuit board
20
Prog bus
SLAMPOWER
SALAMCTRL
LEDs
Motor
Manager
Motor
µc PIC
XTAL
5V
I2C bus
CAN
Controller
1.8 V
Power
Manager
Battery
LEDs
µc ARM
3.3 V
XTAL
Prog ARM
Ext I2C
Sensors buses
Previous module
CAN bus
Charge voltage
Figure 4.16: General diagram of the new Amphibot II module
21
Next module
Chapter 5
The electrical circuit for
programming the ARM
The ARM’s programming circuit board, named SALAMPROG is used to program the ARM
LPC2129 using a simple serial port. It is composed of a MAX3232 RS-232 transceiver (datasheet
available in appendix G), a reset button, a RS-232 serial port and a programming port which connects to the ARM’s circuit programming port. Figure 5.1 shows a picture of the SALAMPROG
circuit.
5.1
In System Programming method
The circuit uses a standard In System Programming (ISP) method which uses the serial port to
program the ARM’s Flash memory. Upon reset, a low voltage is applied on the ARM’s ISP pin
by applying a high voltage on the RTS line which causes the ARM’s internal bootloader to start.
This bootloader will gather the bytes sent through the TXD0 line and write them in the ARM’s
flash memory. The bootloader comes in every LPC2129 and cannot be erased from memory. To
see how to program the ARM, see section 7.3. The complete datasheet of the SALAMPROG
circuit can be found in appendix C.
5.2
Using the serial communication
The SALAMPROG circuit may also be used to communicate using UART between the ARM
and a computer. A simple UART application on the computer can send and receive characters
to and from the ARM. It may also reset the ARM by activating the DTR line. To see how to
communicate between a computer and the ARM, see section 6.4. A reset button is also available
on this circuit. Its purpose is to reset the ARM microcontroller when pushed.
22
Figure 5.1: Picture of the top side of the SALAMPROG printed circuit board connected to a serial port.
23
Chapter 6
Accessing the microcontroller’s
functionalities with the software
Every functionalities of the SALAMCTRL circuit can be controlled by functions written in C.
These functions can initialize the hardware and interact with it to give proper results. The main
goal of these functions are to provide the programmer with a set of functions that permit him
not to write low level code. Thus he can focus on programming algorithms rather than accessing
hardware registers.
6.1
The project’s bundled files
The project, named LPC2129 Project comes with several bundled files:
lpc21xx keil.h Contains the definition of every register.
VIClowlevel.h & .c Contains functions relative to the interruptions.
main.c Contain the main part of the project’s code.
systeme.h & .c Contains functions relative to the primary function of the device.
led.h & .c Contains functions relative to the use of the LEDs.
uart.h & .c Contains functions relative to the use of the UART.
sensors.h & .c Contains functions relative to the use of the sensors ports.
i2c.h & .c Contains functions relative to the use of the I2 C bus.
can.h & .c Contains functions relative to the use of the CAN bus.
LPC CANAll.h & .c Contains functions relative to the use of the CAN bus.
lpc crt0.S Contains some assembly code to initialize the device.
makfile The makefile of the project!
projet.pnproj This file contains informations relatives to the files of the project. It allows
Programmers Notepad to know which file belongs to the project.
24
In this project, you can found examples which use the software functions described in the
following sections. The source code of the project can be found in appendix H.
6.2
Initialization of the ARM’s primary functions
Upon reset, the LPC2129 have to be set up properly. The PLL must be started to achieve a
CPU speed of 60 MHz, the VPB bus speed must be set to maximum speed (60 MHz) and the
MAM have to be fully enabled (mode 2). All this is done by calling the syst init function in the
system.c file. The configuration values can be changed in the system.h file.
void syst init (void) Calls the initialization functions.
6.3
Accessing the LEDs
The ARM can use two LEDs. LEDs may be useful to see if the ARM is running or for debugging.
The led.c file contains all the necessary code to start up the LEDs and to manage them. Here
are the functions available in this file:
void led init (void) Initialize the LEDs pins.
int led on (int led number) Lights up a LED.
int led off (int led number) Deactivate a LED.
int led blink (int led number) Blinks the specified LED.
Use the first function to initialize the LEDs. Then you can use the other functions to play
with them. The informations concerning the LED’s pin are in the header file.
6.4
Communicating via UART
The LPC2129 can communicate with a computer through UART using its SALAMPROG circuit.
The uart.c file provides functions to initialize the communication as well as to send and receive
characters and numbers over the RS-232 lines. Here is the list of the functions:
void uart0 init (void) Initialize the uart pins and uart parameters.
inline void uart0 send string (char * string) Sends a string of characters through UART.
inline void uart0 send char (char ch) Sends a character through UART.
inline void uart0 send number (int hex number) Sends a 32 bit number through UART.
inline char uart0 receive char (void) Return the ascii number of the character received
through UART.
Just call the initialization function to open the UART communication. It opens a 9600 baud,
8 bits word length, no parity and 1 stop bit serial communication. You can then use any given
function to play with the com port. The UART parameters are located in the header file. They
may be changed according to the ARM’s datasheet.
25
6.5
Using the sensors connectors
The sensors connector allow other device to communicate with LPC2129. Each of port pins can
have several functions. They may be used as input or output pins. Some may also be used as
analog to digital converter. The functions can initialize each sensor port in several different ways
and then manage each port pin independently. They are all inside the sensors.c file. Here is the
list of the available functions:
int sensor init (INPUT) Initialize the sensors ports pins. Replace the INPUT word by
”enum SENSORS PIN DEF sensor port, enum SENSORS PIN DEF PIN1, enum SENSORS PIN DEF PIN2, enum SENSORS PIN DEF PIN3, enum SENSORS PIN DEF PIN4”.
int sensor ad conv (enum SENSORS PIN DEF sensor port, enum SENSORS PIN DEF pin)
Starts an A/D conversion.
int sensor read (enum SENSORS PIN DEF sensor port, enum SENSORS PIN DEF pin)
Reads the value of a pin.
int Sensor set (enum SENSORS PIN DEF sensor port, enum SENSORS PIN DEF pin, int value)
Sets the value of a pin.
To use those functions, you must give the functions SENSORS PIN DEF enum type variables.
This type is defined in the sensors.h file.
Call the initialization function for each port and choose what functionality you want on each
pin. The three other functions can read and set pins values. Please look at the C file for a quick
description of the input and output required by each function.
6.6
Using the I2 C bus
The hardware implanted I2 C bus controller acts as a state machine. An hardware register
indicates in which states the controller is and it’s up to the software to check this state and to
take appropriate actions. Thus, after a start bit has been sent, the status register indicates that
he is ready to go on and the software sends the address of the device with which he wants to
communicate. Then the controller waits for an acknowledgment and the communication goes on
the same way.
So the I2 C bus can send how many bytes you want. But in order to communicate with the
battery monitor and the PIC, a known protocol must be followed. This is the I2 C read and write
protocol which can be found in appendix I. As the ARM is the master, it’s the only on which
can initiate a communication.
The I2 C functions are located in the i2c.c file Here is the list of the functions:
void i2c init(void) Initialize the I2 C pins and parameters.
void i2c write (int mod addr, int reg addr, int value) Load the variables to be sent and
start an I2 C communication.
int i2c read (int mod addr, int reg addr) Starts a communication to read a vaulue in a
register of a module.
int i2c state machine (void) I2 C state machine. The states are set by the hardware. Actions
are taken by the software according to those states.
26
The functions uses three global registers to store the address of the module, the address of
the register and the value to be read or written. To begin a communication, initialize the I2 C
bus using the init function. This function initialze the bus with a speed of 100 KHz. Then call
the read or write functions and give them the two or three values needed. The PIC and battery
monitor’s standard address are are given by the MOTOR ADDRESS and BATTERY ADDRESS
constants. All the constants definitions are located in the header file.
6.7
Using the CAN bus
The CAN controller is the most complicated internal device of the ARM. The file LPC CANAll.c
and .h comes from an example found in the WinARM’s web page (see next chapter for informations about WinARM) and they handle the full CAN like procedures. The ARM is not full
CAN capable since it has an hardware bug that prevents this function to be used. However, the
full CAN like method is quite as fast.
The can.c file contain the function that communicates with the functions in the LPC CANAll.c.
Here are the functions found in the can.c file:
void can init (void) Initialize the CAN pins and bus parameters.
void can write (CANALL MSG * msg buf ) Sends a message through the CAN bus.
int can read (CANALL MSG * msg buf ) Reads a message received through the CAN bus.
In order to use the CAN controller, it must first be initialized with the can init function.
This function turns on the CAN interruptions and sets the bus speed to 125 Kbit/s. Then the
enableIRQ function must be called in order to allow the interruptions to happen.
To send or receive a message a message, a CANALL MSG structure has to be created. This
structure contains all the segments of a CAN message (All the informations about the CAN bus
specification can be found here [3]). A call to the read or write function allows the message
stored in the buffer to be sent or a new message to be filled in the structure.
All the informations relative to the structure definition or constants definition are located in
the LPC CANAll.h and can.h files.
6.8
The main file
The main file is the heart of the project. It initialize the functions described above, talk to
the computer via UART and blinks the two LEDs which can be controlled by the computer’s
keyboard. Try pushing the ’1’, ’2’ or ’3’ button on the keyboard and see what it does. You can
also start A/D conversion with the keyboard and send I2 C and CAN messages.
27
Chapter 7
Getting started
This chapter will describe how to get started with the programming of the ARM found on the
SALAMCTRL circuit board. Although numerous applications for various operating systems
can be found on the web, this chapter will only describe using one software bundle under one
operating system. The package used is called WinARM and works under the Windows OS. This
chapter assume that you are familiar with this operating system.
7.1
Downloading the tools
The first thing to do is to get there:
http://www.siwawi.arubi.uni-kl.de/avr_projects/arm_projects/.
Then click on the WinARM link and download the latest WinARM zip archive. You can also
download several examples from this page. Once downloaded, unpack the archive and follow the
instructions found in the readme file in the WinARM folder.
7.2
Compiling your project
To create a program you can use any text editor you want, but a program called Programmer’s
Notepad is bundle into the archive. You can found it in the WinARM/pn folder.
Before compiling, you must ensure that the path to the compiler has been added to the
system or user paths list. You can then type make in a DOS shell to compile your program. Be
sure to be in the same folder as your project when typing the command.
7.3
Programming the device
The application used to program the LPC2129 is called lpc21isp and is located in the WinARM/utils/bin folder. To program the ARM, be sure that the SALAMPROG circuit is connected in the serial com port 1 and that it is also connected to the PROG ARM connector on
the SALAMCTRL circuit. Then, while being in your project’s folder, type make program in a
DOS shell to load the code. The SALAMCTRL circuit must be powered during the operation.
All the informations relative to the compilation and utilization of lpc21isp are contained in the
makefile of your project.
28
7.4
Communicating through RS-232
To communicate with a computer using RS-232, you need a program that can handle the serial
port and some code on the ARM to deal wit UART. The code for using UART is described
in section 6.4. A program called Terminal, which can use the serial port is bundled with the
WinARM archive and is found in the WinARM/utils/bin folder. However, other programs can
be used.
Before communicating to the ARM, you must set up every UART parameters according to
what you defined in your program. Once done, just press the Connect button. The ARM is
reseted during this procedure and the communication should be established. The main frame in
the middle of the program show the characters received. The frame at the bottom of the window
is used to send characters. Just type in a character and it is immediately sent to the ARM.
Figure 7.1 shows the interface of the Terminal application.
Figure 7.1: Snapshot of the Terminal program bundled with the WinARM archive
29
Chapter 8
Known problems
8.1
Software problems
This project, unfortunately, still contains some bugs. The most annoying problem is that the
CAN and I2 C functions don’t work. Still, the I2 C communication had worked for some time but
had ceased working after some changes have been made. Sadly, the working version couldn’t be
restored. As the I2 C bus has worked, the problem should come from somewhere in the program’s
code and not from the hardware.
The CAN bus has also worked but with an example code. Effort to use this example’s code
haven’t been successful. Again, the problem should also be located in the code.
Since those functions are totally implemented, minor changes in the code should be able to
make them work.
8.2
Hardware problems
22k
There are two known problems associating with the hardware. The first one happens when the
PROG ARM connector is unplugged from the SALAMCTRL circuit, while the SALAMPROG
is plugged in a serial port. This sometimes causes the ARM to freezes. This is due to a much too
low voltage on the RTS pin of the serial port. This has the effect the make the ARM enter ISP
mode. Therfore, this problem has been resolved. Figure 8.1 shows how the bug was removed by
limiting the RTS low voltage value with a diode on the SALAMPROG circuit.
Figure 8.1: A diode and a 22 kΩ resistor have been soldered to resolve the freeze
problem
30
The second problem comes from the fact that the ARM doesn’t start up when the battery is
plugged, instead it needs the SALAMPROG circuit board to be connected via the PROG ARM
port to boot. This problem could come from the RESET and ISP pull up resistors, forcing the
ARM to enter ISP mode and thus freezing it. Theses two resistors were exchanged but the result
was that the ARM didn’t started up at all. Further investments should be conduct to in order
to fix this annoying bug.
31
Chapter 9
Future improvements
Now that the Amphibot II robot can be completely autonomous, it would be interesting to
communicate with it in real time to gather sensors informations or camera images or to simply
remotely guide it. The problem is that this robot is able to move on the ground as well as
underwater. Therefore, the integrated wireless communication should be able to work in two
different environments with high flow capability.
The purpose of the next section is to review some possible communication methods that may
suit the purpose.
9.1
9.1.1
Wireless communication
Goals to achieve
Here are the goals we want to achieve:
- maximum flow of 1 Mbits/s
- minimum signal penetration in water of 1 m
- communication distance in the air of maximum 10 m
- small size antenna
Here are the three communication methods possibilities:
- electromagnetic waves (radio) communication
- ultra sonic waves communication
- electromagnetic waves (photons) communication
9.1.2
Electromagnetic waves (radio) communication
Here are the key statements that guide the construction of an antenna:
- The minimum operating frequency for a 1 Mbits/s communication speed is 2.4 GHz.
- Signal penetration in water is only a few centimeter. For more deeper penetration, the
frequency should be lowered and the antenna should have a bigger size.
32
- There must be one antenna per environment (one for water and one for the air).
- The antenna design is very important and depends of the surrounding environment. A well
designed air antenna cannot emit underwater.
For all those reasons, a wireless radio communication doesn’t seems to be a good choice.
9.1.3
Ultra sonic waves communication
Here are the key statements that guide the construction of an ultra sonic transducer:
- Very good water penetration. Good air propagation.
- One transducer per environment is needed.
- Small transducer size.
- The communication is room geometry independent.
- The flow could be as high as 1 Mbits/s.
- Holes should be done in the Amphibot’s hull so that the transducer is in contact with its
environment.
This solution offers a good compromise althought it seems exotic. It offers several advantages
comparable to the ones of the radio communication but hasn’t some of its disadvantages.
9.1.4
Electromagnetic waves (photons) communication
Here are the key statements that guide the construction of a light emitting/receiving device:
- Only one emitter is needed for both air and water.
- The flow could be as high as 1 Mbits/s.
- The communication is room geometry dependent.
- Holes should be done in the Amphibot’s hull because it is not transparent.
This simple solution should be easily and rapidly built. This would be a cheap but working
solution for a wireless communication.
However, further investigations should be done to look for the best solution.
33
Chapter 10
Conclusion
With this new microcontroller circuit, the Amphibot II robot can now be totally autonomous. Its
powerful ARM microcontroller allows multiple tasks to be done in very short times. Its fast CAN
bus allows important amount of data to be transferred between the modules. Furthermore, now
that the PIC only handle motor management, the ARM can truly be used as main computational
engine which could be integrated into an head module. This head could have access to numerous
sensors and could take advantage of their informations to take the right decision.
The new circuit is not only powerful but also very expandable. It integrates two sensors ports
and an I2 C port on which lots of peripherals could be connected.
Moreover, most of the hardware functionalities may be used right now with the given low
level C functions. These functions allows the programmer to concentrate only on its algorithms
and to program platform independent code rather than focusing on using low level hardware
functionalities.
But some work still need to be done as some software and hardware bugs are still present.
Thus it should require a minimal amount of time to fix them.
34
Bibliography
[1] A. Crespi, A. Badertscher, A. Guignard and A.J. Ijspeert. AmphiBot I : an
amphibious snake-like robot, Robotics and Autonomous Systems, vol. 50, issue
4, pages 163-175
[2] Philips (Consulted in June 2005). Philips Semiconductors I2 C-bus Information,
URL: http://www.semiconductors.philips.com/markets/mms/protocols/i2c/
[3] Bosch (Consulted in June 2005). Robert Bosch GmbH - Halbleiter und Sensoren für die Automobil-Zulieferindustrie,
URL:
http://www.semiconductors.bosch.de/de/20/can/3-literature.asp
35
Appendix A
Philips ARM LPC2129
microcontroller datasheet
36
Appendix B
SALAMCTRL circuit board
datasheet
37
Appendix C
SALAMPROG circuit board
datasheet
38
Appendix D
National Semiconductor LP3964
800mA Fast Ultra Low Dropout
Linear Regulator datasheet
39
Appendix E
Linear Technology LTC1503-1.8
High Efficiency Inductorless
Step-Down DC/DC Converter
datasheet
40
Appendix F
Microchip MCP2551 High-Speed
CAN Transceiver datasheet
41
Appendix G
Maxim MAX3232 True RS-232
Transceiver datasheet
42
Appendix H
Source code of the project
LPC2129 Project
43
Appendix I
I2C communication protocol
44