1
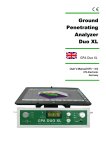
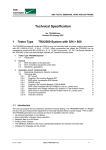
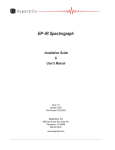
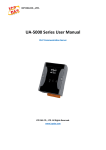
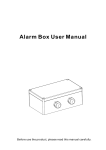
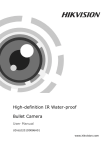
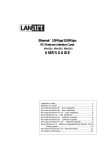
“P u l s e M a s t e r P r o ”
pulse induction metal detector
User’s guide
_______________________________ www.mikronbg.com _______________________________
Made in Bulgaria
1
In order to use the device for a maximum long time and without problems, as well as
to be able to use all of its options, please read carefully the whole instruction
manual and observe the directions in it.
The standard set of Pulse Master Pro comprises:
- searching frame of 1x1m. /1,20x1,20m/
- control unit with built in accumulator;
- automatic charger for 220 V;
- detailed instruction manual for operation.
If any of t hese ite ms are mi ssing, im mediately i nform u s, or our autori zed dealer
where you purchas ed your dete ctor.
Pulse Master Pro has the following parts for control:
- “ON / V OLUM E” – s witches on the detect or and volume control.
- “SENSIST IVITY ” – used to adjust the sensiti vit y. Rotate the c on troller
clock wis e to have a hi gh s ensiti v it y. Rot ate it counter -cloc k wise to lo wer
the sen siti vit y.
-
“THERESHOLD” – used t o adjust threshold level. Rotate t he co ntroller
counter- clock wis e to low positi on to avoi d interf er ence. Cl ock wi se rotate
the cont roller to ha ve hi gh hum level .
- “S AM PLI NG DE L AY ” – sampling delay c ontrol knob .
- “DISC” – discrimination control knob
- Butt on “DISC” – switch on and switch off DISC mode
- Butt on “FAST / SLOW” – toggling between FAST and SLOW modes
- Butt on “VCO” - switch on and switch off VCO mode
-
Button " AUT O TUNE " – s er ves for autom atic setting of t he de vic e to
ground condi tions of terrain where it works i n SL O W mode.
- Button “LIGHT” – switch on and switch off LCD back light.
- Jack PHONE – to connect a headphones
- Jack CHARGE – to charging storage batteries
- LCD for graphic display pointing level of signal and discrimination, selected modes and the
batteries status.
2
1. Assembling of the device:
Assembling the Pulse Master Pro is simple and you don’t need any special
tools.
When use the round coil 14” (36cm.): The bearing rod is assembled by inserting of the
lower part into the upper one. Choose the desired length of the whole construction and the
fixing clamp is tightened between both parts of the bearing rod. The lower part of the
bearing rod is put with the opening between the ears of the coil and the plastic bolt is
tightened by choosing the position of the coil to be parallel to the ground surface. Don't
over-tighten the plastic bolt and nut to not damage the threading of the bolt! The coil cable
is wind up tightly around the bearing rod and is switched to the terminal of the monitor unit.
Upon switching of the cable of the coil to the monitor unit, tighten the well the metal nut of
the coupling to the terminal of the box. Upon switching off, unscrew the nut completely and
pull out the coupling without pulling or twisting the cable of the coil. This way, you will
prevent the cable and the conductors in it from breakdown or short circuit. Fi nall y adjust
search coil angle to your preference and you are ready.
NOTE: Do not allow the cable to flop loosely over the search coil. Since the detector
is sensitive enough to „see“ the tiny wires in the cable, a floppy cable can cause false
signals as the search coil senses the moving wires.
When use the search frames 1x1m. or bigger: The search frame should be held
approximately 4 to 6 inch (10 to 15cm.) to ground surface while searching. Do not
allow one end of the frame to be higher than the other. Make sure that no large metal
objects are close to the search frame for initial adjustment. Also, check your shoes or
boots since most of them contain metal parts and you would receive a signal response any
time you step near to the coil.
In order to avoid interference of the metal parts of the electronic unit, be sure to carry the
Pulse Master Pro on the side of your body that is away from the search frame.
3
1. Setting and use Pulse Master Pro:
Searching frame is assembled and is placed on the ground paying attention to the range
and there don't have to be any metal objects.
Turn on the detector by rotating “VOLUME” knob clockwise to "ON" position
The cable is sub - connected to the device. The display shows on the 2nd row – probably
size of the metal object and state of the battery.
1st row of the display is graphical indicator of the level for more comfortable tracking of the
changes in the signal.
2. Working with the device in ALL METAL mode:
Increase “THRESHOLD” until you hear audible pulse warning (pop). Click for 2-4 sec AUTO
TUNE button and then relax. The sound disappears and graphic indicator of the first row is
returned to zero position in ALL METAL mode, or in middle position in DISC mode. Hold for
a few seconds the coil / frame above the ground. If the sound signal is changed (increased),
lower values of THRESHOLD carefully, until the sound signal disappears or stays to hear
the sound "pop" with a low frequency. Pulse Master Pro is tuned and ready to use.
Should within the coil range there falls in a metal object, it provokes a signal which is
depicted on the level of the graphical indicator. At the same time a sound is heard with a
frequency which depends on the level of the signal. The more louder the signal, the more
higher the sound frequency. This is a very convenient mode for precise localization of the
location of an object.
To more precisely fix the location of the metal object in a strong and continuous signal can
be raised searching frame greater height above the ground. This will reduce the second
reflected signal from the metal object.
At a presence of de-balance, one has to press "AUTO TUNE", as at this, the searching
coil has to be close to the ground, at the distance of search to be.
By changing the value of SAMPLING DELAY can be eliminated and unwanted
signals from highly mineralized soil, ceramics, stones and active slag.
4
When SAMPLING DELAY knob is in high positions (6-10), detector will give you the
greatest sensitivity of any object detected. In low positions (1-4), you can minimize the
effects due to highly mineralized soils. Holding the coil higher will helps to reduce ground
effects as well.
Also, the sensitivity to some ferrous and thin foils will be reduced, when using a high level of
DISC knob – to REJECT positions.
If at work or in the initial setup, you hear irregular pulse sounds, they may be due to external
electromagnetic interference. In this case, turn potentiometer SAMPING DELAY in a
position where this pulsation will disappear or detector will work considerably stable. Other
metal detectors, land cables, railroad tracks, radio transmitters, electric motors, water
pumps etc. produce strong magnetic fields that can interfere. If
electromagnetic
interference
from
your
searching
area,
there
are
lower
the
SENSITIVITY, or change the current searching area. In areas with complicate
soil condition, try to set the SENSITIVITY and THRESHOLD to proper
position. Don’t set the SENSITIVITY and THRESHOLD to high position. Or
you’ll get a false result.
Also, low sensitivity usually used, when a large object is detected at a small depth in earth.
Then the signal is continuous in order to determine the exact place of the object it is more
convenient to use low sensitivity. Thus the signal from the detected object becomes much
shorter.
“Pulse Master Pro” can sometimes react by small objects such as big coins or large caps, if
they are on the earth surface and within just pass over them, but then hear a short sound of
a double crossing of the two arms of the frame over the subject search!
“ Pulse Master Pro” work in switching mode with very low frequency - 240Hz, (same coil at
one time broadcast, a recorded following the adoption of a secondary object signal)
searching is necessary framework to move relatively slowly over the ground to enable to
achieve good depth of search. Should not be run when searching with the detector or to go
very quickly to prevent loss of depth!
2.1 Change of working speed - the device can work with FAST or SLOW speed of
automatic. FAST speed we recommend when using small coils and make fast sweep over
5
the ground surface. Thus the signal from the detected object becomes much shorter. Also,
fast mode is appropriate if there is much trash in the ground where you use detector.
SLOW speed we recommend when use search frame to detect a large object at big
depth under the ground. Then the signal is continuous in order to determine the exact place
of the object.
2.2 Operator can choose the type of sound indication - a constant sound or sound
with variable frequency - VCO. This is done by pressing the VCO button. Accordingly, the
display appears or disappears inscription VCO on the 2th row.
VCO indication is comfortable in slow search and to locate exactly the place of
detected metal.
2.3 LIGHT button - night or when visibility is low, you can switch on the display light to
see better and settings and indication. This is done by pressing the LIGHT button. When
you do not need lights, switch off it to saving energy from the battery.
3. Working with the device in DISC mode:
If you want to work in DIS C mode, push the butt on “DISC” and you
will hear a single sound. Accordingly, the display appears Disc:ON on the 2th row.
Set the SAMPLING DELAY in position”1” (to the red segment), and DISC also in the red
sector, to REJECT.
Discrimination starts working at levels “6” of DISC, having retained the maximum
depth of work. As more DISC increases, the more effective it discrimination of ferrous
objects, but at the same time reduces the depth of search. In position of DISC - 10, it can be
about 20-30 % less than the maximum depth, but at the same time can be eliminated large
iron (ferrous) objects.
You can set your preference discrimination as to what extent be rejected iron (magnetic)
objects. Recommended to work as DISC is “8”. In this case, loss of depth is not as tangible,
while successfully eliminating most magnetic objects.
When the frame moves over a ferrous object, the sound level does not change, and
appears sound after the signal bypass the facility, which disappears gradually or disappears
quickly if the frame back over the object. Once passed, in what direction the sound again
6
appears, and gradually disappears. This is so-called reverse sound effect that occurs only
for ferrous objects especially if the subject is not deep under the surface.
One should bare in mind that the efficiency of the discrimination depends quite on the
size of the metal object and the depth it is situated in the soil. It could be 100%
accurate for small and middle-sized objects situated on the surface layer (with depth
approximately 50-100 cm in the soil), up to 50% accurate for big metal utensil (1x1m
for instance) buried at 2-3 m in the soil. That is to say the bigger the object the
deeper it is buried in the soil and the harder it is to be discriminated. Smaller coils
have better opportunities for discrimination.
4.The detection depth depends on the following:
-size, shape and location of the object in the soil. The bigger the reflecting surface of
the object the deeper it is to be found;
-soil composition and mineralization level – the drier and more homogeneous the soil
the easier it will be to adapt the device and for the device to detect deeper. Under stones,
dry sand or in clay utensil, metals are easier to be found than in freshly dug out or damp
soil.
-the longer the object has been in the soil the easier it will be to be found as a result of
the good contact with the soil. The longer the object has been in the ground the bigger the
field is and imitates bigger object!
-type of detecting coil. The bigger the diameter of the coill the deeper it will be able to
detect metals.
-operator's experience and skills.
You can do field tests by yourself using the device if you bury different metal objects in
different depth but you should leave them in the ground for at least 3 months. Thus the
test results will be more reliable. You should mind the soil type and the moisture
composition in it. Best results are received when the soil is dry.
5.Charging storage batteries and indications for their status.
“Pulse Master Pro” has a built-in accumulator battery 12V/1,3Ah, which is able to provide
12-15 hours of working process without any interruption depending on the chosen power
7
and the type of the used search coil. Bigger coils consume more power and thus the
working time is shorter. The battery’s status is shown on the second row on the right. When
the capacity decreases below 12,0V, the indicator will be empty and you will see on the
display “Battery low!”.
The charging is automatic and begins when the device is SWITCHED OFF and you plug the
charger into the charging jack of the back panel of the device. The jack cage is “+” and the
middle terminal is “-”.The red LED on the charger indicates that the battery is charging. The
charging continues till the moment when the batteries reach their maximum capacity. Then
the charging automatically stoped and red LED on the charger turn off and indicates that the
battery is fully charged.
Always charge device's storage batteries ONLY with the paired chargers to it. Thus
you will prevent damages or confusion between “+” and “-” because the use of other
chargers or adaptors may lead to irretrievable damages in the batteries!
6. Possible problems during exploitation of “Pulse Master Pro”:
6.1. When switching it on you can not hear a sound, there is no information on the
display, no indication that the device is switched on. It might indicate for:
- Accumulator battery is dead (usually after a long period of time). Charge the battery
with the charger. If the problem is not solved contact the service-station (office) of the
company manufacturer or the local distributor.
6.2. The working depth is significantly shallower than the normal. It might indicate for:
- Accumulator battery could be discharged – pay attention to the shown for the capacity of
the battery. If it is under 12V, and if you choose low SENSITIVITY, charge the batteries
with the automatic charger and increase SENSITIVITY at least 8. If you can not solve the
problem contact the service-station (office) of the company manufacturer or the local
distributor.
6.3. During detection the device does not work stable, makes strange sounds which
are not due to a metal detection. It might indicate for:
-irregular electromagnetic external interruptions.
-problems with the aerial cable – disconnected conductor, a shot circuit or bad connection in
the coupling.
8
It is possible after continuance work and many times of switching on and off the
cable's coupling to the jack box the contact between them to be destroyed. There are 2
terminals with sightholes in the jack of the back panel of the device. Put something sharp
like a knife or a screwdriver in the sightholes and make them wider. Thus the coupling will fit
better into the jack which will improve the contact between them. It is possible in the
presence of some kind of dirty like dust or moisture to clean the terminals with cotton-wool
and alcohol. If you can not solve the problem contact the service-station (office) of the
company manufacturer or the local distributor.
6.4. The device works only with headset and when working with amplifier you can not
hear a sound. Usually that happens when the headset jack is damaged. In that case contact
the service-station (office) of the company manufacturer or the local distributor to change
the jack.
6.5.
The battery charge quickly and after that during the working process they go
dead quickly. Usually that happens when the battery is really old and need replacement.
Contact the service-station (office) of the company manufacturer or the local distributor for
change of the storage batteries.
In case that the “Pulse Master Pro” has been exposed to low temperatures, you
should absolutey avoid an abrupt warming. The condensation humidity can provoke a
disturbance of function.
7. Guarantee
The detector Pulse Master Pro is offered with 2 years of guarantee of electronics,
labor and materials used, for harms which are not caused on purpose or
irresponsibly.
We can upkeep your device after period of guarantee if it is necessary.
The Manufacturer (trader) does not bear any responsibility if you use the device in violation
of the law, on archeological or forbidden for search places as well as on private property
without the knowledge or the permission of the owner.
Protect the environment and always fill back in the holes you have dugged out!
_______________________________ www.mikronbg.com _______________________________
9