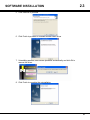
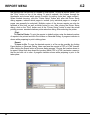
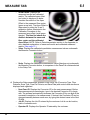
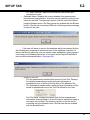
1
AUTOMATED NON CONTACT INTERFEROMETER SYSTEM CC 6000 MANUAL NCC V 4.00 FOR WINDOWS XP OR 2000 NORLAND PRODUCTS INC. CRANBURY, NJ 08512 NORLAND PRODUCTS INC 2540 Route 130 Cranbury, NJ 08512 TEL. 609-395-1966, FAX 609-395-9006 NCC RELEASE NOTES Changes for NCC v4.00: • • • • • • • • • • • Custom Pass/Fail criteria for Fiber Height is now applied correctly when checking and reporting status of Fiber Ht result against this criteria. Graphic image included on a Scan Report has changed from the tested component’s interferometric fringe display (as seen on the unit’s Live View) to a 3D representation of its endface surface. Unlike the previous fringe display, the new report image shows the true apex offset. In this new version, reports can still be created using scan data stored by an older version of NCC. However, those reports will show the fringe image on the report rather than a 3D surface image. Updated IEC factory-default Pass-Fail testing limits to reflect new industry testing specifications. This includes a new set of equations for determining allowable fiber undercut as a function of both Radius of Curvature and Apex Offset. The Custom Criteria area (for defining custom Pass-Fail limits) has also been modified to incorporate these new IEC allowable fiber undercut options. Accompanying these changes are two graphs that illustrate the updated IEC updated equations for determining allowable fiber undercut, shown when the “Fiber Undercut” Criteria Details clicked. Problem with uninitialized fields in the Custom Criteria dialog has been resolved. Access to video system configuration controls is now available only under Debug mode operation. OpenResults function on data tab has been repaired. The state of the 3D-On/Off control on the Measure tab is now saved along with other configuration when Save Setup is activated, and reloaded when Load Setup is activated. Operator ID is added to the Measure tab. This information is saved to the text file and is displayed on the Scan History list. Scans can now be selected for Report generation by Operator ID. An Auto Adjust feature has been added to the Video Control menu for automatic optimization of illumination. Reports can be generated with or without Norland Logo on the top left corner using the check option in the Report Generate Dialog. “Max Key Error” Pass/Fail limit formatting now matches other limit fields on report. Changes for NCC v3.02: • • • • Modified APC Angle calculation to insure correct result when using the current redesigned APC fixture. Changed software to prevent Scales display from showing an incorrect Linear Offset result (different from what is displayed when set to Value display) for the case of a connector having an Linear Offset greater than 70 microns. Removed unneeded “Show Internal Image” button (on the Setup tab). Implemented refresh of 3D display upon user clicking either the TEST tab or any of the Control tabs (MEASURE, SETUP, or CALIBRATION), if the 3D had already been • • • displayed at the end of a scan. This change intended to fix problem where user cannot get back easily seeing the 3D display because they clicked elsewhere causing 3D display to be hidden. Changed default IEC Pass-Fail criteria (specifically for Radius of Curvature and Apex Offset) to comply with recent industry specification changes. Fixed wording on the Driver Install button of the NCC Installation’s main dialog so that if the driver has already been installed, the wording is “Uninstall Norland Driver” and if the driver is not installed, the wording is “Install Norland Driver”. The size of each scan data record stored into the program database has been reduced by a factor of 10. This change allows more data to be saved before reaching the 2Gbyte limit of the Microsoft Access database. The NCC program has also been modified to prevent exceeding that file size limit and to warn the user when that limit is being reached. Changes for NCC v3.01: • • • • • Added a rotatable 3D representation of the connector endface. An option to display or hide this 3D view along with a View/Show3D menu has also been included. The location and timing of Connector ID entry now changes if 3D viewing has been activated (when the new “Show 3D” option is set to ON). See Measure tab section in Chapter 6 in the manual for details. The Fiber height Pass/Fail checking has been repaired so that it now properly uses the IEC or Telcordia curve (allowable fiber recess vs ROC) when the user has selected the IEC or Telcordia criteria (See Setup tab section in Chapter 6 in the manual). In the Report Generate dialog, once a user clicks on the Connector ID or Job ID field, the attention (mouse cursor) now stays with that field until the user clicks or tabs elsewhere in the dialog, regardless of number of characters typed. The display of measurement results has been modified by initializing all APC type measurement fields to 0.0 if the PC scan mode has been selected. Changes for NCC v3.00: • • • • • Added file export capability to the Report Generation feature. Two types of file export are supported; PDF and HTML. PDF export under this implementation no longer requires having Adobe PDF Distiller installed, and unlike the previous PDF export that used Adobe Distiller, the graphics included in each report always appear in the document. This new file export capability is activated directly from the main Report Generation dialog. Added a new “JobID” field to data output collection (Scan History screen list, Text File export, new XL file created from Text File, Database, and generated Reports). This is an alphanumeric value up to 50 characters long optionally entered by the User prior to activating a scan. Redesigned and expanded filtering options in Report Generation dialog to allow scan selection on the basis of JobID (see above “Added a new JobID field” note), overall scan PASS status, scan date, and ConnectorID. NCC reports now print in ascending order of time (oldest scan first) when batch previewing or printing. There is now no limit to the amount of scan records that can be batch printed with the NCC report generation feature (although Print Preview is still limited to 50 at a time). • • • • • • • • • • • • Improved ease of use and intuitiveness of Company Info configuration for Reports. Modified Illumination setup tool and made it available to all levels of NCC users. It’s purpose is to check for illumination saturation and provide guidance to users when called upon to adjust Illumination Gain at the back of the unit. Added it as “BAT” (Brightness Adjust Tool) option under Video Control menu. Repaired [Open in XL] function so that it no longer is “unable to find file” if Text Export full file path is not showing on Export page title. Connector ID is no longer cutoff on Report’s label section if it is less than 25 digits long. Fixed incorrect application of Key Error limits greater than +/-0.05 degree. Changes made to prevent NCC crash when measuring connectors having high apex offset (as much as 400 microns). Changes made to insure NCC reports always shows correct Pass/Fail representation (previously, if a parameter showed FAIL in an earlier report, that same parameter might continue to show fail in a later report though it actually passed in the corresponding scan). The Report Generate dialog now shows the correct dates when activated, even if NCC has remained running more than 24 hours. NCC no longer crashes if attempt made to delete first entry in “Add New Reference” dialog when there are more than one entry in list. In “Add new reference” dialog (under Calibration tab), the CHANGE function now works as intended. Live image now operates correctly for all types of Windows user accounts. Previously, the Live image appeared black for users running NCC in a nonWindows user account lacking Administrator-level rights, only corrected by launching the Video Control dialog. Date controls in the Report Generation dialog now work correctly for any operating system Regional Settings language/locality choice. Changes for NCC v2.51: • • • • Redesigned data storage user interface and operation. Includes the following changes: a Addition of a checkbox allowing Operator to activate a data-save prompt at scan completion. b Moved “AutoSave” On/Off controls from Measure tab to Setup tab on the user interface and renamed it as “Export to Text file”. c User can now define location and name of program database file (used as data source for Scan Reports). Feature added allowing Operator to delete all data records in the program database (“Clear Data” option in Report menu list). Significantly reduced volatile (System RAM) memory use by program as well as the amount of hard disk memory required to store each scan’s data into the program database. Fiber Diameter entry (by Operator) now limited by program to 180 microns maximum. • Changes made to Scan Report format to insure result values and their corresponding Pass-Fail limits are always shown with a proper number of decimal digits. Changes for NCC v2.50: • • • • • • • Added Report Configuration and Generation capability and added option for selecting automatic report generation at scan completion. Company Logos imported into the Report configuration now retain their aspect ratio (i.e.; are not distorted from original shape) when a report is generated. Incorporated data storage into Microsoft Access database (used as data source for generated Reports). Entering a Connector ID having both text and numeric content is now allowed. Any Reference Tools issued before version 2.00 release that does not have the temporary label affixed, must be remarked by reversing the sign of both X and Y markings in order for it to be used with this version. For example, if original marking was "X = -0.004, Y = +0.026", the marking should be changed to read "X = +0.004, Y = -0.026". If temporary label is affixed, please remove the label and use the markings listed. Modification made so that deletion of all Reference Tool configurations is now safely and correctly handled. Software now installs and runs properly on a computer with an operating system whose Regional Settings have been configured to use a comma as the Decimal Symbol in a floating-point number representation (as opposed to the standard decimal point notation in the US). Changes for NCC v2.00: • • • • • • • Modified software to improve correspondence of Fiber Height measurements (for a given connector) between CC6000 and AC3000 systems. Modified Custom Pass-Fail Criteria functionality to allow setting P/F limits for APC Angle and Key Error useful when measuring APC connectors. Also repaired some software errors in the operation of the Custom Criteria entry dialog. Modified Custom Pass-Fail Criteria to allow floating-point (rather than only integer) values in all the Custom Criteria P/F limit fields. The executable “Hws4.exe” (Hardware Snapshot functionality associated with the USB frame grabber driver) is no longer included as part of the NCC driver installation. Made changes to storage/retrieval of Magnification Calibration information, allowing easier recovery if initial NCC installation resulted in an invalid Magnification Calibration value. Repaired intermittent scan error which, under certain defocused initial conditions, could lead to appearance of a “sqrt: DOMAIN ERROR” message. Improved operation of various User Interface controls such as the Reference Tool tab in the Offset Calibration page and the Data Output Filename edit box associated with AutoSave functionality. 1.1 • • • Modified method for identifying and connecting to whatever version of Microsoft Excel is on the end user’s computer system. Repaired NCC startup operation when no CC6000 is attached to USB port of the end user’s computer. Repaired functional error relating to repeated Offset Calibration attempts. Changes for NCC v1.10: • • • • • • • Significant reduction in scan time. Switched to using only Reference Tool mode (single-position) for both APC and PC Offset calibration. Added storing (at NCC shutdown) and reloading (at NCC startup) of last NCC configuration (into STEP.STP file). Fixed printing of data (wasn’t working if AutoSave was OFF). Eliminated errors occurring upon NCC close Fixed various software errors related to Data Output File creation and use. Repaired display of Illumination profile 9 CC 6000 USER MANUAL NCC V 4.00 FOR WINDOWS XP OR 2000 Norland Products, INC. 2540 Route 130, Suite 100 PO BOX 637 Cranbury, NJ 08512 Tel: (609) 395-1966 Fax: (609) 395-9006 Web Address: http://www.norlandproducts.com Email: [email protected] Ta b l e o f C o n t e n t s CHAPTER 1 INTRODUCTION 15 1.1 How It Works. . . . . . . . . . . . . . . . . . . . . . . . . . . . . . . . . . . . . . . . . . . . . . . . . 16 1.2 What is different about the CC 6000? . . . . . . . . . . . . . . . . . . . . . . . . . . . . . . 17 1.3 Novel Features . . . . . . . . . . . . . . . . . . . . . . . . . . . . . . . . . . . . . . . . . . . . . . . 18 1.4 Vibration Issues. . . . . . . . . . . . . . . . . . . . . . . . . . . . . . . . . . . . . . . . . . . . . . . 20 1.5 Specifications . . . . . . . . . . . . . . . . . . . . . . . . . . . . . . . . . . . . . . . . . . . . . . . . 21 1.6 Quick Start . . . . . . . . . . . . . . . . . . . . . . . . . . . . . . . . . . . . . . . . . . . . . . . . . . 22 CHAPTER 2 SYSTEM PREPARATION 24 2.1 Package Inspection and Unpacking . . . . . . . . . . . . . . . . . . . . . . . . . . . . . . . 25 2.2 System Set-Up . . . . . . . . . . . . . . . . . . . . . . . . . . . . . . . . . . . . . . . . . . . . . . . 26 2.3 Software Installation . . . . . . . . . . . . . . . . . . . . . . . . . . . . . . . . . . . . . . . . . . . 27 2.4 Maintenance . . . . . . . . . . . . . . . . . . . . . . . . . . . . . . . . . . . . . . . . . . . . . . . . . 36 CHAPTER 3 NCC PROGRAM 37 3.1 Starting the NCC Program . . . . . . . . . . . . . . . . . . . . . . . . . . . . . . . . . . . . . . 38 CHAPTER 4 MENU BAR FUNCTIONS 39 4.1 Video Control . . . . . . . . . . . . . . . . . . . . . . . . . . . . . . . . . . . . . . . . . . . . . . . . 40 4.2 Report Menu . . . . . . . . . . . . . . . . . . . . . . . . . . . . . . . . . . . . . . . . . . . . . . . . . 44 4.3 View Menu . . . . . . . . . . . . . . . . . . . . . . . . . . . . . . . . . . . . . . . . . . . . . . . . . . 50 4.4 Help Menu. . . . . . . . . . . . . . . . . . . . . . . . . . . . . . . . . . . . . . . . . . . . . . . . . . . 51 CHAPTER 5 DATA TABS 52 5.1 Test Tab . . . . . . . . . . . . . . . . . . . . . . . . . . . . . . . . . . . . . . . . . . . . . . . . . . . . 53 5.2 Test Results Tab . . . . . . . . . . . . . . . . . . . . . . . . . . . . . . . . . . . . . . . . . . . . . . 54 CHAPTER 6 CONTROL TABS 55 6.1 Measure Tab . . . . . . . . . . . . . . . . . . . . . . . . . . . . . . . . . . . . . . . . . . . . . . . . . 56 6.2 Setup Tab . . . . . . . . . . . . . . . . . . . . . . . . . . . . . . . . . . . . . . . . . . . . . . . . . . . 59 6.3 Calibration Tab . . . . . . . . . . . . . . . . . . . . . . . . . . . . . . . . . . . . . . . . . . . . . . . 64 6.3 Offset Calibration Procedure. . . . . . . . . . . . . . . . . . . . . . . . . . . . . . . . . . . . . 66 CHAPTER 7 MEASUREMENT 69 7.1 Connector Measurement Procedure . . . . . . . . . . . . . . . . . . . . . . . . . . . . . . . 72 CHAPTER 8 APPENDIX 73 8.1 Data Interpretation . . . . . . . . . . . . . . . . . . . . . . . . . . . . . . . . . . . . . . . . . . . . 74 8.2 Interferometry basics. . . . . . . . . . . . . . . . . . . . . . . . . . . . . . . . . . . . . . . . . . . 79 8.3 Shipping Instructions. . . . . . . . . . . . . . . . . . . . . . . . . . . . . . . . . . . . . . . . . . . 81 Ta b l e o f C o n t e n t s 8.4 Information Table for Saving Data . . . . . . . . . . . . . . . . . . . . . . . . . . . . . . . . 85 8.5 Installation Problems. . . . . . . . . . . . . . . . . . . . . . . . . . . . . . . . . . . . . . . . . . . 86 CHAPTER 1 INTRODUCTION Congratulations on your purchase of the Norland Connect-Chek CC 6000 Automated NonContact Interferometer System. This system automatically and precisely measure sub-micron variations in the surface contours (radius of curvature, apex offset of polish, and fiber undercut or protrusion) on any PC or APC single fiber connector. The breakthrough technology used in the CC 6000 is unlike any other system on the market today and now allows interferometric connector analysis to be affordable to all users. This manual provides detailed information of the Norland Connect-Chek CC 6000 with the latest NCC software versions, as well as detailed procedures of calibration and measuring processes. Most questions that arise are answered in this manual, but if additional technical support is needed, contact our technical service department at (609) 395-1966, [email protected], or your authorized distributor. Also, be sure to familiarize yourself with our website (www.norlandproducts.com). This allows us to keep you informed about updates to the system as well as what is new for the Fiber Optic Industry from Norland Products Inc. 15 HOW IT WORKS 1.2 Norland Products has taken the knowledge gained from over 20 years of interferometric measuring experience to produce the first low cost, automated, noncontact interferometer for fiber optics. The Norland Connect-Chek® CC 6000 automatically and precisely measures radius of curvature, apex offset of polish, and fiber undercut or protrusion on any PC or APC single fiber connector. Using a Red LED as the light source, an interferometric image with constructive and destructive interference patterns (light and dark fringes respectively), is generated by combining the light reflected off the connector end face with the light reflected off the reference mirror. These interference patterns (fringes) form a contour map on the surface with the dark fringes showing steps of half a wavelength down the surface. This interference pattern is imaged on the CCD camera in the microscope and captured by the frame grabber and sent to the computer through a standard USB. The NCC software then takes the data and uses our advanced algorithms to accurately calculate the spherical radius of curvature, apex offset of polish, and the spherical fiber height. For APC connectors, the polish angle and keying offset are also calculated. 16 WHAT IS DIFFERENT ABOUT THE CC 6000? 1.3 NORLAND PRODUCTS, INC. has taken a whole new approach to interferometric measurements of fiber optic connectors with the CC 6000. The benefit to the customer is affordable quality control and quality assurance of high performance fiber optic connectors. UNIQUE TILTED PHASE Interferometry creates a circular fringe pattern on the connector. It is easiest to visualize this pattern as a topographical map of the surface. Each fringe is ½ a wavelength distance above or below the adjacent fringe and shows the 3D height difference across the surface. The spherical radius of curvature, and linear offset are directly correlated to the diameter and spacing of these circular fringe patterns. Our unique algorithms take advantage of the extra information available when the connector is tilted slightly off axis to measure the fiber height. The spherical fiber height measurement is available because any change in the circular fringe Tilted Phase provides detailed information on the fiber and ferrule. pattern as it crosses the fiber is an indication of spherical protrusion or undercut. Accurate measurements can be made because the change in fiber height is proportional to this change. PRECISION OFFSET MEASUREMENTS Another novel feature is the ability to calculate the apex offset of the polish even in the preset tilted position. When the connector is perpendicular to the optical path, the apex offset is the distance from the center of the fiber to the highest point of the polish. Rotating the connector will not change the offset measurements because the center of the fiber is the center of rotation for the ferrule. If the connector is held in a tilted position to the optical path, the apex offset is the distance from the center of rotation to the highest point of the polish. With the CC 6000, the center of rotation can be calculated for any mount by measuring the connector in 8 positions. The multiple apex points define a circle with the center being the center of rotation. Once this calibration is performed on a mount, the apex offset measurements can be accurately calculated for all connectors measured in that mount. Calibration is even easier with out known reference ferrules in which the angular offset from the center of rotation is known. Type the numbers into the Calibration Tab of the software, take one measurement, and the system is calibrated. These are just two of the unique concepts used to create the CC 6000. For you, the customer, this breakthrough in technology means there is no other instrument on the market that can match it for fast, accurate, and affordable measurements of endface geometry for PC/APC connectors. 17 NOVEL FEATURES Because of the complexity of fiber optic connectors, Norland Products has spent years developing an interferometric system that meets all the needs of our customers for full quality control of fiber optic end face geometry parameters for ceramic and metal connectors. In unison with all the Novel Features that Norland has to offer, it can be assured that measurement results are accurate, repeatable, and reproducible. The Norland CC 6000 is a PLUG & PLAY USB INTERFEROMETER. This compact interferometer attaches to a PC or laptop through a standard USB port and uses the exclusive NCC software to control the interferometer and measure the connectors. No custom boards, or complicated configurations are required. Simply install the software, plug in the CC 6000 and run. Our user-friendly software allows anyone with minimal experience to accurately measure the 3D end face geometry of a fiber optic connector. The CC 6000 is designed for both the factory or the field to provide the crucial quality information needed to assure the long-term performance of your fiber optic connectors. A major advantage of the CC 6000 is NO MECHANICAL ADJUSTMENTS are needed because the connector is held at a constant tilted angle for measurements. All other systems require a mirror or the stage to be adjusted so that the connector is perpendicular to the optical path. No mechanical adjustments are required with the CC 6000 because any small angle is suitable. This is the key to our analysis because when the connector is at a small angle, the fringes cross the ferrule and the fiber. This tilted phase provides all the information needed to measure the connector. After a simple offset angle calibration procedure, our advanced algorithms accurately calculate the spherical radius of curvature, spherical fiber height, and apex offset for the connector. Norland Products offers a wide variety of mounts and calibration tools to meet the varying needs of customers. Locking V Groove Mounts Norland’s patented Locking V groove mounts, with their integral leaf spring design, provide the greatest accuracy and longest wear of any mounting system on the market today. There are two types of Locking V groove mounts that are available - PC and APC. PC mounts are available according to the ferrule size of the connector, for example, a 2.5mm mount is used for 2.50mm diameter ferrules such as FC, SC, and ST connectors. APC mounts bring the polished angle to flat, in order for fringes to appear. APC mounts are connector specific due to the varying “Key” geometries. The locking V-groove mount attaches to the microscope using two thumbscrews for quick, easy, and accurate placement of the mount to the interferometer. To insert the connector into the mount, lift the spring lever up slightly to unlock the mount, insert the connector into the mount until it bottoms out, and then let go of the lever to lock the connector in place. NOTE: Custom designed mounts are available upon request. Norland Products offers calibration tools to provide the customer with the assurance that the system is performing to the extremely high accuracy which is expected of it. 18 1.3 NOVEL FEATURES 1.4 Reference Tool –The Reference Tool, with known endface geometry parameters, assures that the interferometer measures accurately. The known X and Y angular offset angles are compared to an actual measurement taken during the Calibration procedure. The software calculates the calibration factors so the known values are equal to the actual measurement values. There are PC and APC reference tools. The PC reference tool is used in unison with a PC Locking V Groove Mount. The APC reference tool is used in unison with an APC Locking V Groove Mount. As technologies advance, you can be sure that we will continue to improve our system, offering more features and advantages for fiber optic testing. If you have any special requirements, regarding different connectors or related applications, please contact us. We are dedicated to making this product the best on the market and would be happy to provide you with solutions to your special needs. 19 VIBRATION ISSUES Background: Because of their precise nature, interferometric measurements are sensitive to vibration. Vibration can occur from rotating machinery, nearby traffic, acoustic noise and a variety of other sources. Touching the instrument or the surfaces on which it sits during measurements can also affect the measurements. Instrument placement considerations: The instrument should be placed on a solid support away from obvious sources of vibration (e.g. rotating machinery). Ideally, the instrument should rest on a separate surface so that vibrations from using the computer keyboard and vibrations from other activities are not transferred through the surface to the instrument. Vibration Isolators: If the vibration is present even after the instrument is located on its own surface away from vibration sources, then additional vibration isolation needs to be employed. A low cost solution for vibration isolation is to place the instrument on a piece of vibration isolation material such as Sorbothane. More sophisticated vibration isolation tables are available from manufacturers such as Newport, Herzan, and Technical Manufacturing Corporation (TMC). Before purchasing equipment, a technical representative of the isolation equipment supplier should visit the site where the instrument is installed to recommend the appropriate equipment to isolate the instrument from the vibration sources present. 20 1.5 1.6 SPECIFICATIONS DIMENSION (Inches) DEPTH Interferometer 13.9 WIDTH HEIGHT 8.8 5.9 INTERFEROMETER Light Source LED (660 nm) Camera CCTV w/ 6.0mm x 4.96mm (1/3 inch) Sensing Area Lateral Resolution 1 micron Magnification 10X Objective Field of View (H x V) 355µm x 406µm COMPUTER - Requirements Speed Pentium IV 1.5 GHz minimum* USB 2.0 or higher Operating System Microsoft Windows 2000 or XP RAM 128 MB SD RAM installed* MEASUREMENT SPECS. Range Repeatability Reproducibility Spherical Fiber Height (nm) ±160 5 10 Apex Offset (µm) 0-100 2 4 Radius of Curvature (mm) 3 - 50 1% 2% DISPLAY PROPERTIES Color Palette True Color 32 Bit Font Size Small Desktop Area 1024 x 768 pixels 21 QUICK START If you are already familiar with the Norland Interferometer or you just can’t wait to start, go through the following steps to measure a connector: I. System Preparation. (See page 24.) II. Start the NCC Software. (See page 38.) Double click on the NCC icon on the desktop. If opening the software for the first time, a dialog will appear asking you to enter the Magnification Calibration Factor. Please enter the Magnification Calibration Factor listed on the back panel of the microscope. III. Auto Adjust. If the instrument’s illumination is not optimal use the Auto Adjust option from the Video Control menu.(See page 42.) IV. Calibrate the machine. (See page 63.) V. Measure a connector. (See page 68.) The following is a basic procedure for measuring a connector. 1. Adjust ferrule material settings. • If measuring a ceramic connector, switch to Mode 1. • If measuring a metal connector, switch to Mode 2. 2. Adjust Illumination • If BAT option is available in the Video Control menu: a Select BAT to invoke the illumination brightness adjustment dialog. Click start on the BAT dialog to see the Brightness Status. If Status reads “No Change” close the dialog. b If the Status reads INCREASE or DECREASE, turn the Illum Gain until the Brightness status reads “No Change”(See page 40.) • 22 Click the Auto Adjust menu option to activate it(See page 42.). 1.7 QUICK START 1.7 3. Modify/load Set-Up parameters [Setup Tab (See page 58.)] to control the data during the measurement process according to the connector being tested. 4. Modify Option parameters [Set Up Details in Setup Tab (See page 58.)] to control how the data is organized after the measurement process is completed. The data can be controlled to automatically save data to a specific group name and data path, and/or auto print reports of data measurement. 5. Clean connector properly to assure accurate measurements during the scanning process. It is important to clean any residue from polishing that may have collected on the ferrule/fiber. 6. Insert the connector properly into the mount to assure accurate measurements during the scanning process. 7. Adjust focus knob - Adjust the focus knob to optimize the fringe contrast over the entire surface. 8. Measure the connector - Press Measure button in the Measure Tab. At the completion of a scan, a beep is sounded to indicate the completion of frame capturing from the camera. Once the beep has sounded, the connector under test can be removed from the mount and a new connector can be inserted in preparation for the next scan. Results will be displayed when data analysis is complete. 23 CHAPTER 2 SYSTEM PREPARATION 24 PACKAGE INSPECTION AND UNPACKING 2.1 Inspection When your system arrives, check the shipping cartons for wrinkled or damaged corners, holes through the cardboard or other signs of rough handling or abuse. If you find any signs of damage, insist that the delivery service make a note describing the damage on the delivery receipt. NOTE: If your Norland system arrives in very cold weather, allow the boxes to warm to room temperature before opening them. Exposing a cold unit to a warm room causes condensation that could damage the system. If condensation forms, wait for the unit to dry completely before setting it up and connecting it to an electrical outlet. Unpacking Your system is shipped in two boxes. Carefully open both boxes, making sure not to puncture too deeply into the box if using a box cutter. Remove the items from the boxes very carefully. Review the packing list, and check off if received. If any equipment is missing or damaged, please contact Norland Products immediately. NOTE: Norland Products strongly recommends that the original shipping containers be saved for future transportation needs. These containers may be purchased from Norland Products, refer to Parts List for Part Number. 25 SYSTEM SET-UP Your Norland Interferometer System is fully ready to operate. No programming or extensive application software experience is necessary. All functions are self-contained and immediate. The following section will help you get your system up and running. After all items have been carefully unpacked and laid out on an uncluttered sturdy table near a grounded power outlet, following the procedure below: 1. Remove the interferometer and cables from the box and place on the table. 2. Attach the other end of the USB cable to the interferometer. (The USB end will be connected to the computer/laptop during the software installation procedure.) 3. Plug the AC adapter into the back of the interferometer. 4. Plug the AC adapter power cords into a power source. 5. Follow the Software Installation Procedure (See page 27.) NOTE: Because of constantly improving equipment, some models may vary in the location of serial ports 26 2.2 SOFTWARE INSTALLATION 2.3 NOTE: Minimum software requirements: • Pentium IV • 1.5GHz or higher (recommended) • USB 2.0 or higher • 128 MB RAM • Windows 2000 or XP Operating system • 1024 x 768 Pixels Resolution • Microsoft 0ffice 2000 installed I. Install Norland NCC Software 1. If the CC 6000 is currently connected to the computer via a USB cable, disconnect the CC 6000 USB plug from the computer. 2. Insert the NCC CD into the CD/DVD drive. Installation should begin automaticaly. If not, open the directory to view the files on the CD. Double click the Norland_Installation file to begin the installation process. 3. The Norland Products Installation Dialog will appear on the screen. Click on the Install Norland button. This installs the Norland NCC Software. 4. Click on the Next button when the Welcome screen appears. Another screen will appear. Click Next to proceed. 27 SOFTWARE INSTALLATION 5. On the next screen, enter the Name and Company Information. Click Next to proceed. 6. The next screen allows the user to change the default location of the software to be installed. Change the default location if desired. Click Next to proceed. 7. The software is now ready to be installed. Click Install to proceed. 28 2.3 SOFTWARE INSTALLATION 2.3 8. This step will take some time to install and register necessary files. It displays the following screens upon completion. Do not run the application. Click Finish to complete NCC Installation. II. Installation for NCC Video Drivers 1. In the Norland Products Installation Dialog, click on the Install Video Drivers button. 2. Click Next in the Norland_CC6000_Drivers set up screen for the following screens 29 SOFTWARE INSTALLATION 3. Upon completion Click finish to install another video driver, which automatically starts) 4. Click Next in the CC60XX set up screen. Follow the directions on the dialog and click Next when completed. (NOTE: Depending on what OS you have, there may be three other dialogs that appear after this step. If they appear, press Continue Anyway or OK to proceed. 5. Upon completion of Video Driver Installation, the software may ask you to restart the computer. Select Yes and press finish. (NOTE: Depending on what OS you have, this dialog may or may not appear. If it does not appear, please move on to Install New Hardware.) 30 2.3 SOFTWARE INSTALLATION 2.3 I. Install the Harware: 1. Insert the USB plug into the USB port. 2. The following message will appear at the bottom of the screen, when the computer detects the USB. 3. The following New Hardware screen will appear when the computer detects the USB. Click Next to proceed 31 SOFTWARE INSTALLATION 4. A screen will appear saying the Norland Products CC60XX did not pass Windows Logo testing. Press Continue Anyway 5. The following screens follows to search and transfer the files 6. The Hardware has been installed. Press Finish to complete installation 32 2.3 SOFTWARE INSTALLATION 2.3 7. A screen will appear saying to Install the drivers for Norland Products CC6000 Camera, Click Next. 8. A screen will appear to finish the installation. Click Finish. II. Starting the software 1. Double click the NCC icon on the desktop to start the software. 2. The software will ask you to enter the Magnification Calibration Factor, which is located on the label on the rear panel of the interferometer (shown by arrow). Enter value and press OK. 3. Upon first installation, the software will also inform you to Calibrate the machine (See page 63.) 33 SOFTWARE INSTALLATION III. If softare Uninstallation is desired: Norland Software 1. Go to the Control Panel, Click Add/Remove Programs. Choose the Norland CC6000 Software and click remove to uninstall the software 2. To uninstall video drivers, please click Uninstall Video Drivers 3. Click Next to following screen. 4. Select Remove choice from the following screen to remove the drivers. 34 2.3 SOFTWARE INSTALLATION 2.3 5. Click Remove to proceed. 6. Click Finish to proceed to uninstall another video driver 7. Uninstalling another video drivers proceeds automatically and click Ok to remove the driver. 8. Click Finish to complete the uninstallation 35 MAINTENANCE Your Norland Automated Interferometer requires minimal maintenance. In the event that it proves necessary to move your unit to another location or to ship it to another facility, use the following guidelines to prevent damage to your Norland system. Cleaning the CPU, Monitor, and Interferometer Use a damp, lint free cloth to clean the outer housing of the interferometer. If any dust or dirt has collected on the mount, remove the mount from the mount base on the microscope and use compressed air to blow off particles. If any dust or dirt has collected on the mount base, wipe off dirt with a lint free wipe. An alcohol wipe can be used on the mount base and mounts if excessively dirty. NOTE: Do not attempt to clean the internal parts of the microscope unit. Use of a dust cover when the unit is not in use will prevent foreign particles from collecting on the equipment and will make maintenance of the system much easier. Repacking Unit For Shipment If the interferometer needs to be repacked for moving or shipping, it is very important that it is packed as it was received. Follow the Shipping Kit Instructions. NOTE: Norland Products strongly recommends that the original shipping containers be saved for future transportation needs. 36 2.4 CHAPTER 3 NCC PROGRAM 37 3.1 STARTING THE NCC PROGRAM 1. Turn on the Computer, Monitor, and Interferometer. Allow the interferometer to warm up for at least 2-3 minutes. 2. Double Click on the NCC icon on the desktop. 3. The Main Screen will appear when the program is activated. Menu Bar Data Tabs Control Tabs Live Image Note: On start of the NCC software, If the instrument’s illumination is not optimal use the Auto Adjust option from the Video Control menu.(See page 42.) 38 CHAPTER 4 MENU BAR FUNCTIONS 39 VIDEO CONTROL BAT (Brightness Adjustment Tool) BAT tool provides assistance to the user when illumination adjustment is needed. BAT can be invoked manually, and automatically launched upon the first time a MEASURE is activated. NOTE: For some units, this tool is only enabled when in Debug mode. Selecting the BAT option in the Video Control menu launches a (Brightness Adjustment Tool), that assists the user to manually adjust illumination for optimal scanning. It should be activated upon first use of your CC6000, and at least every 6 months afterwards. Upon selection of the BAT option, the following dialog will appear: The instruction text specifies what user should do. On clicking the Start button an illumination profile and Brightness status are shown. 40 4.1 VIDEO CONTROL 4.1 Brightness Status: The status box will show one of the following four values, depending on illumination characteristics, and the instructions shown will change to indicate what action should be taken to improve the illumination. • Decrease: If the status reads ‘Decrease’, decrease the illumination level using the CC6000’s rear Illum Gain adjustment turned in the LOW direction. Picture of rear IIIum Gain Properties: • Increase: If the status reads ‘Increase’, increase the illumination level using the CC6000’s rear Illum Gain adjustment turned in the HIGH direction. instruments rear potentiometer. • NoChange: If the status reads ‘No Change’, the illumination level is optimal, so no adjustment is required. Danger: If the status reads ‘Danger’, please contact Norland Products service department. • 41 VIDEO CONTROL Auto Adjust: This tool is used to adjust the illumination automatically. Choose Auto Adjust from Video Control menu.. A following message is displayed after the illumination is adjusted. Click ok to the message. 42 4.1 4.2 REPORT MENU Report Menu allows for printing of quantitative results, images, and setup parameters of connectors measured. Generate (Report\Generate): When selected, the Generate Report dialog appear. In its top section, users can define company information and logo that appear on a scan report. In the bottom section, users can choose which stored scans (See page 44.) and to what form of output the reports will be generated. For more information on report output to screen and printer (See page 45.), or for file export (See page 46.). Company Information Navigation Tools Scan selection Preview Print Export Description OF DIALOG: Company Information: All the fields in this section can only be changed if user enters Edit mode by clicking the navigation tools Edit Record button. Also, once in Edit mode the Insert New Logo button will appear which, when clicked, allows adding or changing a company logo for a scan report. To save any changes made in the Company Information section, one must click the navigation tools Post Edit button, or click Cancel Edit button to undo changes. Navigation Tools: These tools allow you to navigate, edit, etc. the Company Information Records. First Record: Pressing this button will bring you to the first saved 43 REPORT MENU company Information. Prior Record: Pressing this button allows you to scroll backwards through the saved Company Informations one by one. Next Record: Pressing this button allows you to scroll forwards through the saved Company Informations one by one. Last Record: Pressing this button will bring you to the last saved Company Information. Insert Record: If users need to insert a new record of company information any where in the list of company record, pressing this button will clear all parameters and allow you to enter all new Company Information. Press Post Edit after all information has been entered in order to save the information. Delete Record: Deletes the Company Information that is in view. A confirmation dialog will appear. Edit Record: Allows you to edit any parameters in CompanyInformation. Press Post Edit after all information has been entered in order to save the information. Save changes: Allows you to save all data entered. Cancel Edit: Cancels all changes made. 1. Company Name: Enter name of Company. 2. Address: Enter the street address of the company. There are two lines available if needed. 3. City: Enter city of company. 4. Phone: Enter phone number of company. 5. Fax: Enter fax number of the company. 6. Country: Enter the country of the company. 7. Insert New Logo: This button is visible only in “Edit Record mode”. Press the button. An Open dialog will appear, allowing you to navigate to any directory where your logo is located. Adjust directory location as desired and press Open. Scan Selection: Select reports to generate using following criteria. • Pass Only: Check this option to limit reports to only those scans that passed 44 4.2 REPORT MENU 4.2 • Connector ID: Check this option to limit reports to those scans having particular Connector IDs (and/or IDs containing a particular text string). Multiple selection criteria can be entered, using “,” to separate each criteria. Wild card character “*” can also be used, for example ‘MyConn*’ to select all Connector IDs beginning with the letters “MyConn”. • Job ID: Check this option to select scans having particular Job ID. The same selection criteria entry method applies as for Connector ID. • Operator ID: Check this option to select scans having particular Operator ID. The same selection criteria entry method applies as for Connector ID. • Date: Use this option to choose scans for reporting by scan date, specifying a date range with FROM and TO choices. After selecting and configuring any or all search options, click on “Find” button to view how many scans matched the selection criteria. If it is desired to generate reports for less than the total number of scans found, enter a smaller number into “Retrieve Oldest” box than is initially shown. When ready to generate reports, click Preview, Print or Export buttons. Include Norland Logo: Check this option if the Norland Logo to be visible top left corner of the Report. Preview: TO Screen/Preview: To view the report on screen enter the desired number of reports to be viewed and click Preview button. Printer Print setup The left side of the Print Preview dialog graphic shows the thumbnails of the reports generated. Click on one of them for viewing in the main section. From the software version 4.00 the report shows the 3d view of the image under Image Information. Earlier saved reports show fringe picture under the image information. From 45 REPORT MENU this preview one can print all or a subset of total reports. To print all reports shown, click the “Print” button on top of the dialog. To print a subsest, first browse through the thumbnails and choose which reports to select for printing (note their ‘page number’). When finished choosing, click the “Printer Setup” button and, after the Printer Setup dialog appears, indicate which pages to include (only individual pages or a range of pages can presently be selected). Multiple copies of the chosen reports can also be selected at this time, as well as which printer to use. After closing the Printer Setup dialog, click on the “Print” button next to the “Printer Setup” button to start the actual printing process. standard windows printer selection dialog. After selecting the printer. Print: To Print to Printer: To print the reports to default printer, enter the desired number of reports to be printed and click Print button on Generate Dialog. A progress indicator is shown while preparing to print is taking place. Export: To save to file: To save the desired reports to a file can be possible by clicking Export button on Generate Dialog. Users can save the reports in PDF or HTML formats. After clicking the Export button a file save dialog appears. Choose the location where to be saved, format from drop down file type box (either PDF or HTML) and enter a name to the file and click ok to save. A progress indicator shows while preparing to print to file takes place. 46 4.2 REPORT MENU 4.2 Example of PDF Saved Report: After saving to PDF format, users can view new PDF file in PDF viewer. After opening the file you can browse through the entire span of reports using the tools at the bottom of the viewer. 47 REPORT MENU Example of the HTML Saved Report: After saving to HTML format, the single report or collection of reports (depending on how many exported) can be viewed using the system’s default Internet browser. Clear Data (Report\Clear Data): When selected, all data will be cleared from the current Database (See page 60.). NOTE: It will clear the current database even if Save Data is in the OFF position. 48 4.2 4.3 VIEW MENU Selecting the Show3D option in the View menu displays the most recently created 3D Image. The 3D view is the mesh display showing the shape, fiber height, and apex offset of the scanned connector endface based on the connector’s measured values. The brightest area indicates location of the highest point of the polish. In the center of the display the fiber area illustrates the measured fiber height. The size of the 3D view matches the Region of Interest by the user (See page 62.). Fiber View Angles How to Activate 3D view creation: To generate 3D display upon successful scan completion, more the 3D slider control on the Measured tab on the ON position.(SEE PAGE 55.) How to Rotate 3D: To rotate the 3D in X direction (horizontal), use the left/right arrows keys on the keyboard. Use the up/down arrow keys for Y rotation (vertical). The resulting viewing angle (in X and Y) is shown at the lower right of the view. 49 HELP MENU Help Function displays the Software version as well as Norland Products company information.. 50 4.4 CHAPTER 5 DATA TABS 51 5.1 TEST TAB CONTROL TABS LIVE IMAGE FIBER SCAN HISTORY Test Tab: All major functions needed to control and display the data are contained within this tab. The main areas of the Test Tab are the following: • Live Image: Displays the live image of the connector being measured. When correctly focused, the live image shows the fringe pattern that represents specific heights across the surface. There is also a yellow circle close to the center of the live image. The fiber should be completely inside the yellow circle. If the fiber is not within the yellow circle, conduct an Offset Calibration (See page 63.) • Upon completion of a measurement, the live image will also display measurement details if “Show Details” is selected in the Show section of the Measure Tab. • Scan History: Displays the quantitative results and scan information of measurements. Note: This field is active only when certain features are selected in the Save Data section of the Setup Tab. Review Information Table for Saving Data in the Appendix for more information (See page 85.) • Control Tabs: Refer to the Control Tabs (See page 54.) for more detailed explanations and procedures. • Measure Tab (See page 55.) • Setup Tab (See page 58.) • Calibration Tab (See page 63.) 52 TEST RESULTS TAB 5.2 Displays and organizes the end face geometry measurements of the connectors analyzed. The name of the tab is dependent upon the name entered in the Text File Name field in the Setup Tab (See page 60.). • • • Open Results: Opens saved *.txt files (saved with Auto Save feature or with the Save Test As button in the Measure Tab) and displays it in the Test Results Tab. The name of the Test Results Tab will change to the name of the saved file. Open with Excel: Loads the current data in the Test Results Tab to an Microsoft Excel application for viewing. Default saving from this view is to an ASCII text file, but user can choose to save data into an Excel format by first changing the default Save File Type to “XLS” in the SAVE AS Dialog. Print Results: Prints the data in the Test Results Tab in column layout. 53 CHAPTER 6 CONTROL TABS 54 6.1 MEASURE TAB 1. Activates the scanning and measurement of the connector mounted in the interferometer. To activate a measurement, press the Measure Connector button. While the measurement is in process, the button displays “Measurement wait”. During this time, make sure not to cause excess vibration during data collection. Upon completion of a measurement, the circular pass/fail indicator (on the left side of the button) will turn green or red depending on the measurements results in comparison to the Pass/Fail criteria selected in the Setup Tab. 2. Displays the quantitative measurement results (Value or Scale - explanation in #3 below) of the end face geometry. Upon completion of a measurement, the circular pass/fail indicator (to the left of the end face parameter) will turn green or red depending on the measurements results in comparison to the Pass/Fail criteria selected in the Setup Tab. Some or all of the following parameters will be displayed (depending on the connector type and scan type selected in the Setup Tab). • ROC (mm) • Offset (microns) • Fiber Height (nm) • APC Angle (°) • Key Error (º) 1 2 6 3 4 5 3. Controls how the measurement results are displayed visually in the Live Image and the Measure Tab upon completion of a measurement scan. • Hide Details: Hides the “calibrated” measurement details in the Live Image. The measurement details displayed in the Live Image show the measured fiber center (green cross hair), the fiber diameter (large green circle), and the measured apex offset (small green triangle). NOTE: Due to the Tilted Phase Measurement collection, the measured displays do not show the true relation of the fiber center to the apex. Refer to Data Interpretation section in the Appendix for more detailed explanations of measured results and calibrated measured results. (See page 73.) 55 MEASURE TAB • • • Show Details: Displays the measured results and calibrated results. The calibrated apex offset (red circle) is displayed to better visualize the relation of the Apex Offset to the measured fiber center (green cross hair). The Apex Offset is determined by using the X and Y calibration factors calculated in the Calibration Procedure to the measured apex offset (small green triangle). The blue line shows the distance between the measured fiber center and the calibrated Apex Offset. NOTE: Refer to Data Interpretation section in the Appendix for more detailed explanations of measured results and calibrated measured results. (See page 73.) Value: Displays the calibrated quantitative measurement values underneath the Measure Connector button. Scale: Displays the calibrated measurement values (black arrow) underneath the Measure Connector button, in comparison to the Pass/Fail criteria selected in the Setup Tab. 4. Displays the Setup parameters selected in the Setup Tab (Connector Type, Fiber Diameter, Scan Type, Pass/Fail Criteria, and Save Data) and controls how results are displayed and organized. • Next Conn ID: Displays the Connector ID for the next measurement. Before the measurement process begins, type in the desired Connector ID to begin with. The software automatically increases the Connector ID by one digit at the successful completion of a measurement. If desired, the Connector ID can be changed manually between each scan, by typing the desired name in the Next ID field. • Job ID: Displays the Job ID entered by the customer. Job id can be location, batch of connectors etc. • Operator ID: Displays the Operator ID entered by the customer. 56 6.1 MEASURE TAB 6.1 5. Only displayed if Export to Text File in the Setup Tab is On. Controls what to do with measurement results upon completion of data collection. • Print: Prints measurement data in the Test Tab (ie, the data that is displayed underneath the Live Image. The data will be printed in column layout.) • Save History to Text File: Saves the measurement as a *.txt file. If the measurement results are being saved to an existing text file, the operator has the option of appending to the file or overwriting it. Once saved, the data can be opened, viewed and exported in the Test Results Tab. 6. 3D slider control for showing the 3d view at the end of the measurement • On: Creates and automatically displays a 3d view of a connector endface upon its successful scan completion. This option also triggers a connector ID entry dialog box, when the MEASURE button is been clicked, for connector ID input(See page 56.) To proceed with the scan, either type in a new ID, use a barcode scanner to enter one, or accept the default auto increment value presented, and then click the OK button. • Off: No new 3D view will be created and no connector ID entry dialog box will be presented after MEASURE button click. ID entry, instead will be available at the lower right section of the Measure tab for input before the MEASURE button is clicked. 57 6.2 SETUP TAB 1. Connector Type: Choose one of the following according to the connector type being measured: • PC: Physical Contact (zero degree polish) • APC: Angled Physical Contact (angled polish). NOTE: APC is only limited to 8° angle polishes. 1 2. Fiber Diameter: Specifies the fiber diameter in microns of the connector being tested - 126 microns is the default setting (This number actually represents the average diameter between the fiber O.D. and ferrule I.D). Enter the fiber diameter of the connector being measured to assure accurate measurements. 4 3. Pass/Fail Criteria: At the completion of a successful scan, the quantitative results are compared against the Pass/ Fail Criteria selected. • IEC - choose the choice of the ferrule diameter and depending on the ferrule diameter new IEC equation is applied for the fiber undercut calculation. • • 2 3 5 6 7 8 Telcordia Custom - allows for customer specific Pass/Fail parameters. When selected, a drop down menu appears (where you can select previously saved Custom Criteria), as well as an Add/Edit Criteria button (where custom criteria can be entered and saved). • Add/Edit Criteria a To Add: Enter all the data fields as desired and press Add Criteria. b To Change: Select one of the criteria names listed, by clicking on the desired criteria name. Change the data fields as desired, and press the 58 6.2 SETUP TAB Change button. A dialog will appear asking to Overwrite Parameters, Click Yes to overwrite or No to cancel. c To Delete: Select the desired criteria to delete by clicking on the criteria name, and press delete. A dialog will appear asking to verify whether you want to delete. Click Yes to delete or No to cancel. d Fiber Undercut limit can be defined two ways. 1. Select Use Eqtn and choose the appropriate Equation to be applied to the end fiber undercut result. 2. By entering a value which will be applied directly to the end results NOTE: For method 1 Choose equation by diameter of ferrule for currently tested connector. Select option with diameter that has closest value if neither match, or use “Telcordia” which applies to all ferrule diameters. Criteria Details: Displays the Pass/Fail values in table and graphical form according to the selection in “Pass/Fail Criteria”. When IEC, Telcordia or certain customer setups are selected, the Fiber Undercut Pass/Fail Criteria is determined by one of the following a equations.Press the Fiber Undercut button in this section to view the graph . TELCORDIA 59 6.2 SETUP TAB IEC-1.25 IEC-2.50 1. Save Data [NOTE: The selections in this area determines where data is displayed and saved. Review “Save Data Table” in the Appendix for detailed information (See page 85.)] • Off: When selected, no measurement information (quantitative results, images, and scan setup information) will be saved to the database and no reports can be generated. • On: If selected, save data and export options will appear. All measurement information (quantitative results, images, and scan setup information) will be saved to the database listed in the Database Name field. This feature must be selected if it is desired for Reports to be generated and printed (See page 43.). The following features will also be displayed: • • 60 Ask: If the Ask option is selected, and User response to the “Save Data?” prompt at the end of a scan is ‘Yes, measurement results will automatically be stored in the database, and, if Export to Text File is “ON’’ in the Setup Tab, also to a *.txt file, regardless of Setup Tab options. Auto Print Report: If selected, this feature allows the user to enable automatic printing of a Report to occur after each successful scan, in a report format determined in the Report/Generate dialog (See page 43.) All data will be sent to the Default printer of the computer, or the printer selected in the print setup in the print dialog of Report/Generate. NOTE: If “Ask” is also selected, and the operator chooses not to save the measurement data into the database, a report will not automatically be printed. - Off: When selected, reports will not be printed automatically upon completion of scan. If it is desired to print a report after a measurement is conducted, a report must be generated manually. 6.2 SETUP TAB - • On: When selected, reports will automatically be printed upon completion of scan. Database Name: Displays the current database that measurement information is being stored to. A new file can be created by typing a new name into the field. The directory location of the file can be controlled using the Browse button. Old files can also be enabled with the Browse button. If the file size is reaching 2GB limit a following warning message is issued to the user If the user still wants to save to the database which has reached its limit, the following error message is issued and save to the database is aborted. To reduce the file size either the user can create a new database by simply typing a new name in the Database Name box or run menu choice Report\ClearData to remove all the data saved before. (See page 48.) • Export to Text File: - Off: No measurement results will be saved to a Text File. Displays the detailed measurement results and scan information in spreadsheet form in the Scan History Area of the Measure Tab. - On: Quantitative measurement results and scan information will be saved in spreadsheet form to the Text File defined by the User.. - Text File Name: Displays the current text file that measurement information is being stored to. A new file can be created by typing a new name into the field. The directory location of the file can be controlled using the Browse button. Old files can also be enabled with the Browse button. 61 SETUP TAB 2. Measurement Areas: • • • REGION OF INTEREST (ROI): Specifies the diameter in microns of a circular window from the center of the fiber to the outer most ring in the figure above. The allowable range for the ROI is from 170 to 500µm (Default value: 250µm). The ROI is used to calculate the Radius of Curvature. To obtain the fitting area as defined by the IEC, the extraction area is subtracted from the ROI, as shown by the shaded area in the figure above. EXTRACTION AREA: Specifies a circular portion within the ROI (centered at the fiber center and includes the fiber end face region and the adhesive region) which will be extracted from the data. This extracted data will not be used in the quantitative analysis of the Radius of Curvature. (Default value: 140 µm) AVERAGING AREA: Specifies the averaging area in the center of the fiber used to calculate the fiber height. (Default value: 50 µm). NOTE: For measuring Multimode-fiber connectors, the User must change this parameter before measurement to 100 µm (or load a previously saved Setup Configuration with that value already pre configured). 3. Load Setup: loads previously saved setup configurations. 4. Save Setup: saves setup configurations 62 6.2 CALIBRATION TAB 6.3 The Calibration Tab contains all needed calibration features to assure the microscope measures accurately. Some features are hidden and can only be used by administrator level users. All Calibrations should be done in Mode 1, which is located on the back of the microscope (See page 68.) Offset Calibration Procedure: A Reference Tool, with known endface geometry parameters, is supplied with the microscope and assures that the interferometer measures accurately. The known X and Y angular offset angles are compared to an actual measurement taken during the Calibration procedure. The software calculates the calibration factors so the known values are equal to the actual measurement values. There are PC and APC reference tools. The PC reference tool is used in unison with a PC Locking V Groove Mount. The APC reference tool is used in unison with an APC Locking V Groove Mount. You can save the Reference Tool X and Y Angular Offset measurements in the software so they do not have to be entered in manually prior to every calibration. In order to save the factors, do the following after the “Add New Reference Tool” button is pressed. • To Add: Enter all the data fields as desired and press Add Criteria. The X and Y Offset angles are on the tool’s label. • To Change: Select one of the criteria names listed, by clicking on the desired criteria name. Change the data fields as desired, and press the Change button. A dialog will appear asking to Overwrite Parameters, Click Yes to overwrite or No to cancel. • To Delete: Select the desired criteria to delete by clicking on the criteria name, and press delete. A dialog will appear asking to verify whether you want to delete. Click Yes to delete or No to cancel. The Offset Calibration procedure should be conducted after every mount change. 63 CALIBRATION TAB Magnification Calibration Procedure: The Magnification Calibration procedure is an Administrator level procedure that is conducted at Norland Products. The robust design does not require a Magnification Calibration to be conducted by the customer. The customer only has to enter the magnification calibration factor located on the back of the interferometer into the software after it has been installed. Magnification Calibration assures that the correct system magnification is being used during measurement scans, for accurate radius of curvature (ROC) and fiber height results. A calibration standard, with NIST Traceable 10mm and 25mm ROC, is used during this procedure. The Magnification Calibration Procedure is not shown in the manual. If for any reason a calibration is called for by Norland Products, the procedure will be sent as required If there is a need to confirm the system is in calibration, the Norland Products NISTTraceable standard can be purchased and measured in the same way as for a connector. Radius of Curvature result that i within 2% of the calibraion standard’s endface curvature is sufficient to confirm being in calibration. 64 6.3 OFFSET CALIBRATION PROCEDURE 6.3 A STEP 1 • Obtain the following: • PC or APC Reference Tool (2.50mm or 1.25mm depending on the mount being used)* • Computer and Monitor powered up with NCC software running. • CC 6000 Microscope • 2.50mm or 1.25mm Locking V groove Mount specific to the connectors that will be analyzed and mount screws* • Alcohol & Lint free wipes or the supplied connector cleaner * This procedure can also be used for Customer specific mounts/leveling tools. STEP 2 • If mount is not attached to the interferometer: • Make sure the locking lever is in the unlocked position by pushing the lever up. (Picture A) • Use compressed air to blow dirt/dust off the surface of the mount area. (DO NOT use compressed air when the mount is attached to the microscope.) • Place the mount onto the interferometer so the groove on the bottom of the mount rests on the locating pin on the left and the cutout rests on the pin on the right. (Picture A) • Secure the mount into place using the two thumb screws.(Picture B) A Locating Pin B STEP 3 • Make sure the mount is in the unlocked position by pushing the locking lever upwards. • Clean the Reference Connector and insert it into the mount so that it is inserted all the way into the mount AND that the lever is resting on the locating pin as shown. • Lock into place by pushing the locking lever down. • Look at he Live Image and make sure all dust is cleaned off the reference tool. Both on the surface and inside of the hole of the connector. The edges of the ID of the ferrule should be fairly smooth. 65 OFFSET CALIBRATION PROCEDURE STEP 4 • Press the Setup Tab. • If measuring a PC Reference Connector, select PC in Connector Type. • If measuring an APC Reference Connector, select APC in Connector Type. STEP 5 • Press the Calibration Tab/Offset Calibration Tab/Reference Tool. • Do one of the following: 1. Select a previously saved Reference Tool ID from the drop down menu. 2. Press Add new reference tool. Enter Reference ID and X and Y factors printed on the Reference Tool and press Add. Exit dialog box (NOTE: Add, Change, and Delete procedures same as Custom Criteria Dialog.) 3. Type in the X and Y factors printed on the Reference Tool into the two fields indicated. STEP 6 • Adjust the focus knob to maximize the fringe pattern (i.e. greatest contrast between black and white fringes). • Press the Calibrate button. • Make sure not to cause any vibration during the scanning process. 66 1 2 3 6.3 A OFFSET CALIBRATION PROCEDURE 6.3 A STEP 7 • After the measurement is complete, the actual measurements are displayed under Measurement results and X & Y correction factors are displayed in the area indicated by the box. • A dialog also appears indicating that the calibration is complete. Press OK to save and exit. • NOTE: The green and yellow circle should be perfectly concentric with the ID of the ferrule. If it is not , please run another Offset Calibration untill they are centered. • If performing an Offset Calibration Procedure for the first time, the green circle may not appear. If it is desired for the green circle to appear, for an extra check, run a normal measurement and check to make sure the green circle is concentric with the fiber. If so, you have conducted the Offset Calibration successfully. If not, please conduct Offset Calibration procedure again untill they are centered. STEP 8 • Proceed to Connector Measurement procedure. 67 CHAPTER 7 MEASUREMENT The CC 6000 is a fully automated, non-contact, interferometric microscope system designed to measure the end face geometry of fiber optic single fiber connectors. The system measures the radius of curvature, eccentricity of polish (also known as apex offset), and the fiber height for fiber optic connectors. This section provides detailed procedures, explanations, and pictures of the measuring process to familiarize our customers of what to expect from the CC 6000 system and NCC software. 1. Calibration procedures to level the mount prior to taking measurements. (See page 63.) Calibrations should be conducted in Mode 1 (Ceramic Ferrule Material Setting). 2. Adjust ferrule material settings. • If measuring a ceramic connector, switch to Mode 1. • If measuring a metal connector, switch to Mode 2. 3. Adjust Illumination • Select BAT under Video Control Menu to adjust the illumination, brightness. Click start on the BAT dailog to see the Brightness Status. If Status reads “No Change” close the dialog. • If the Status reads INCREASE or DECRESE, turn the Illum to Low ot High untill the Brightness status reads “No Change”(See page 40.). 4. Modify/load Set-Up parameters [Setup Tab (See page 58.)] to control the data during the measurement process according to the connector being tested. 5. Modify Option parameters [Set Up Details in Setup Tab (See page 58.)] to control how the data is organized after the measurement process is completed. The data can be controlled to automatically save data to a specific group name and data path, and/ or auto print reports of data measurement. 6. Clean connector properly to assure accurate measurements during the scanning process. It is important to clean any residue from polishing that may have collected on the ferrule/fiber. 68 CONNECTOR MEASUREMENT PROCEDURE 7.1 7. Insert the connector properly into the mount to assure accurate measurements during the scanning process. 8. Adjust focus knob - Adjust the focus knob to optimize the fringe contrast over the entire surface. 9. Measure the connector - Press Measure button in the Measure Tab. At the completion of a scan, a beep is sounded to indicate the completion of frame capturing from the camera. Once the beep has sounded, the connector under test can be removed from the mount and a new connector can be inserted in preparation for the next scan. Results will be displayed when data analysis is completed. 69 CONNECTOR MEASUREMENT PROCEDURE STEP 1 • Obtain the following: • Computer and Monitor powered up with NCC software running. • CC 6000 Microscope • Mount • PC - Specific to the ferrule size of the connectors being measured. OR • APC - Specific to the connector type (i.e. FC, ST, or LC) • Mount screws • Alcohol & Lint free wipes or the supplied connector cleaner • Connectors to be analyzed. * This procedure can also be used for Customer specific mounts. STEP 2 • Calibrate the mount: • Reference Tool Procedure • Adjust for Ferrule Material. STEP 3 • Go into the Setup Tab • Do one of the following: • Select Set-Up Parameters so they are specific to the connector being measured and mount being used: • Load a previously saved Setup Configuration. 70 7.1 A CONNECTOR MEASUREMENT PROCEDURE 7.1 A STEP 4 • Go to the Measure Tab and adjust the Show and Setup Details section as desired to control how the data is displayed and saved. STEP 5 • If mount is not attached to the interferometer: • Make sure the locking lever is in the unlocked position by pushing the lever up. (Picture A) • Use compressed air to blow dirt/dust off the surface of the mount area. (DO NOT use compressed air when the mount is attached to the microscope.) • Place the mount onto the interferometer so the groove on the bottom of the mount rests on the locating pin on the left and the cutout rests on the pin on the right. • Secure the mount into place using the two thumb screws. STEP 6 • Make sure the mount is in the unlocked position by pushing the locking lever up. • Clean the connector. • Insert the connector into the mount until it is fully inserted. • Lock the connector into place by pushing the locking lever down. 71 CONNECTOR MEASUREMENT PROCEDURE STEP 7 • Adjust the focus knob to maximize the fringe pattern (i.e. greatest contrast between black and white fringes). • Press "Measure Connector" button. • Make sure not to cause any vibrations. STEP 8 • After the measurement, the measurement results will appear (according to the Show parameters selected). • NOTE: If the green circle is not exactly concentric around the fiber, please conduct another Offset Calibration (See page 65.) If the green circle, is larger or smaller than the fiber diameter, please adjust the fiber diameter to the correct value in the Setup Tab (See page 58.) STEP 9 • Remove the connector. • Repeat STEP 6 - STEP 9 to measure the rest of the connectors. 72 7.1 A CHAPTER 8 APPENDIX 73 8.1 DATA INTERPRETATION The CC 6000 and the NCC Software uses Tilted Phase Data Collection. Using Tilt Phase technology, the connector is held at a constant tilted angle for measurements, which allows for fringes to cross the ferrule and fiber surfaces. With the fringe pattern generated, all information needed for data calculation is displayed in the Live Image. Since the connector is held at a slight angle, the relationship between the fiber center and the apex offset is not true to scale, therefore it is imperative to conduct calibration procedures prior to connector measurements. During the calibration procedures, the software automatically detects the X and Y correction factors that will give accurate and repeatable end face measurements. At the completion of a successful scan, the scan details on the live image and the quantitative measurements of the endface parameters are displayed: (NOTE: The screen capture below may be different depending on the parameters selected in the Show and Setup Details section of the Measure Tab as well as the parameters selected in the Setup Tab. Illustration below is an APC measurement with “Hide Details”, “Value”, and “Auto Save Off” selected.) 1. Radius of Curvature (mm) 2. Offset (microns) 3. Fiber Height (nm) 4. APC Angle (°) 5. Key Error (°) 1 2 3 4 5 74 DATA INTERPRETATION 8.1 1. RADIUS of CURVATURE (mm) - Displays the radius of curvature (ROC) determined by the curvature of the fringes located within the fiber diameter. 2. OFFSET (microns) - Displays the apex offset. The apex offset is defined as the distance from the vertex (high point) of the ferrule sphere to the center of the fiber. Interferometry, because of its three dimensional contours, visually shows the vertex of the apex offset as the center of the circular fringes that define the sphere. • Using Tilted Phase Data Collection, the relationship between the fiber center and the apex offset is not true to scale with the center of rotation of the apex offset no longer the same as the fiber center. The Live Image, therefore shows the Apex Offset much further away from the fiber center, and calibration procedures must be conducted to compensate for the connector being held at a constant angle. To visually show the calibrated Apex Offset measurement, Show Details should be selected for the true to scale relationship between the fiber center and the calibrated apex offset. a Show Details displays the measured results and calibrated results, as described below: - Measured Results: • Measured fiber center (green cross hair) • Fiber diameter (large green circle • Measured apex offset (small green circle) - Calibrated Results • Calibrated apex offset (red circle) • True Distance between the measured fiber center and Calibrated Apex Offset (blue line) 75 DATA INTERPRETATION 3. Fiber Height (nm) Displays the amount of undercut or protrusion of the fiber in the connector. The NCC software determines the Spherical Fiber Height, which is defined as the difference in the height between the center of the fiber and the theoretical height in the center based on the ferrule. This is the method recommended in the TIA and IEC test procedures. The TIA use a sliding scale for the amount of undercut recommended as a function of the Radius of Curvature. The formula below shows this relationship • SIGN CONVENTION FOR FIBER HEIGHT: • + = Protrusion • - = Undercut U = (-0.02) * ROC3 * (1.3 * ROC2) - 31 * ROC + 325 where U is Fiber Undercut and ROC is Radius of Curvature 76 8.1 DATA INTERPRETATION 8.1 The IEC uses different formula depending on the ferrule diameter, and is a function of both Radius of Curvature and Apex Offset 1. For the Ferrule diameter 1.25mm the following shows the relationship. U = 1798 * ROC (-0.795) - ROC * 10 6 +√ (ROC 2 * 10 6 - AO 2) * 10 3 - 60 where U is Fiber Undercut , ROC is Radius of Curvature and AO is Apex Offset 2. For the ferrule diameter 2.50 mm the following shows the relationship. U = 1998 * ROC (-0.795) - ROC * 10 6 +√ (ROC 2 * 10 6 - AO 2) * 10 3 - 60 where U is Fiber Undercut , ROC is Radius of Curvature and AO is Apex Offset 77 DATA INTERPRETATION 3. APC ANGLE (°) Displays the angle of polish calculated using the calibrated Y Offset. Note: Only 8° angle polished connectors can be measured with the CC 6000 and NCC Software. NOTE: Angle measurements are only displayed if APC is selected as the Connector type in the Setup Tab. 4. KEY ERROR (°) Displays the keying error of the connector endface calculated using the calibrated X Offset. NOTE: Key error measurements are only displayed if APC is selected as the Connector type in the Setup Tab. 78 8.1 INTERFEROMETRY BASICS 8.2 Light wave interference occurs when two or more waves of the same frequency or wavelength combine to form a single wave whose amplitude is the sum of the amplitudes of the combined waves. Constructive and Destructive interference is the most striking examples of light wave interference. Constructive interference occurs when the light waves are completely in phase with each other (the peak of one wave coincides with the peak of the other wave). Destructive interference occurs when the light waves are completely out of phase with each other (the peak of one wave coincides with the trough of the other wave). Refer to figure below for an illustration of Constructive and Destructive interference. Interferometers can produce images and data to sub micron accuracy using the principle of wave interference. Interferometers use a single coherent light source. In order to produce two separate light waves for interference to occur, a partially reflective beam splitter is used. As the light hits the beam splitter, one wave front is transmitted through the beam splitter, though an objective lens, and to the object being examined. The other light wave reflects off of the beam splitter onto a stationary reference mirror. After both light waves are reflected off of the surfaces (the surface of the object being examined and the reference mirror), the waves combine to produce constructive and destructive interference waves, also known as light and dark fringes respectively. Each dark fringe identifies a specific height on the surface of the object being examined. Typically, two adjacent dark fringes have a height difference of 1/2 a wavelength of the 79 INTERFEROMETRY BASICS light being used and can thus show a surface contour of the connector end face, very similar to the concept of Contour maps which are used to show the different elevations of a land surface. 80 8.2 8.3 SHIPPING INSTRUCTIONS NOTE: If Hard Case was purchased with the Microscope, follow steps 1,2 and 4 in the procedure below. Place the unit and accessories into the appropriate cutout in the foam. Place the Hard Case into the box that it was originally sent with, obtain an RMA # and send back to Norland as indicated in Step 12. STEP 1 • Unlock the lock arm by pushing the lever indicated by arrow A into the upward position. • Unscrew the two knurled thumbscrews indicated by arrow B and then remove the mount. • Place parts back into original packaging. A B STEP 2 • Remove the USB cable from the CC 6000 unit and computer. • Remove the power supply. • Tie cables with cable ties. STEP 3 • Insert the foam insert corners into the smaller box as shown in picture. • NOTE: The long edge of the cutout in the foam insert should be placed along the long edge of the box. 81 SHIPPING INSTRUCTIONS STEP 4 • Place the CC 6000 unit in the supplied plastic bag. Secure with tape. STEP 5 • Place the CC 6000 unit into the smaller box as shown. STEP 6 • Place the accessories into the box as shown. • Reel cleaner, USB Cable, Power Supply on one side. • Software CD, mounts, Reference tools on the other side. (Protect it bubble wrap if needed.) • Manual placed on top of the unit. • NEVER PLACE ACCESSORIES OR ANY OTHER PARTS IN THE AREA WHERE THE FRONT OF THE INTERFEROMETER IS LOCATED. DOING THIS MAY DAMAGE COMPONENTS. 82 8.3 8.3 SHIPPING INSTRUCTIONS STEP 7 • Tape the box closed. STEP 8 • There are three sizes (small, medium, and large) of rectangular foam inserts (2 of each size). • In the larger box, place the medium and large sizes into the box as shown. • NOTE: Foam pieces are not actually labeled. Labels in picture are for illustration purposes only. M L L M STEP 9 • Place one of the small size foam inserts into the bottom of the box. 83 SHIPPING INSTRUCTIONS STEP 10 • Place the smaller box containing the CC 6000 unit in between the foam pieces. STEP 11 • Place the second small size foam insert on top of the smaller box. STEP 12 • Close the box and seal it with strong shipping tape. • Send back to: Norland Products, Inc. 2540 Rt. 130 Suite 100 Cranbury, NJ 08512 • Returns without a RMA number on the outside of the box will be refused. Please contact Norland Products for a RMA number 84 8.3 INFORMATION TABLE FOR SAVING DATA The table below illustrates where data will be sent to and displayed, depending on the settings selected in the Setup Tab Save Data section. Save Data (On/Off) UserResponse if ASK box checked: (See note 1) Export Data sent to: to Text Database Export File Text (On/Off) (for Report) File Off No Off ----- ----- YES Off No On ----- ----- YES Off Yes Off ----- ----- YES Off Yes On ----- ----- YES On No Off ----- ----- YES On No On ----- ----- ----- On Yes Off YES ----- YES On Yes On YES YES ----- Screen Scan History Note 1: If ASK box is not checked, data output will occur same as if ASK was checked and User-Response at scan end is “Yes”. 85 8.4 INSTALLATION PROBLEMS 8.5 In most cases, carrying out the instructions for the CC6000 system installation listed in its User Manual will result in smooth and automatic recognition of the CC6000 video hardware at the time it is plugged into a computer already running the Windows 2000 or XP operating system. Occasionally a computer will falsely identify the CC6000 hardware, leading to the following error message when launching the installed CC6000 NCC application, and subsequent inability to perform measurements. In the event this error message is encountered, Norland Products suggests the following steps to be taken to achieve correct operation of your CC6000 system. 1. Try plugging the USB cable from the CC6000 into a different USB port on the computer: • The correct port will be one that displays the following message when the USB connector is attached to that port for the first time.. • NOTE: All available USB ports on the computer should be tried before giving up on this corrective approach. 2. Check for the correct minimum version of the operating system service called DirectX: a• Click START and select RUN. b• Type in ‘dxdiag’ and click on OK button. c• Answer NO if asked to check if drivers are digitally-signed. d• Click the SYSTEM tab. e• Read the current DirectX version from the System Information list. It mus be version 9.0 or later. 3. Checking for operating system false identification:. The Windows operating system’s Device Manager can be used to verify successful installation and activation of the Norland Products CC6000 frame grabber hardware. If successful, “Norland Prodcucts, CC60XX” will be visible in the list of Imaging Devices (as shown below) after the CC6000 has been attached to a computer via the USB cable and “new hardware” installation has been completed. The Device manager can be accessed as follows... a• For Windows XP - Click START at lower left of the Windows XP desktop, right-click on My computer and then left-click the Properties 86 INSTALLATION PROBLEMS option. In the System Properties display, click the Hardware tab and then click the Device Manager button. b• For Window 2000 - Click START, then select Settings, Control Panel, System, click on the hardware tab, and finally the Device Manager button. c• Repairing False Identification: If something other than the above CC60XX device is shown, perform the following procedure to replace the incorrect ID of imaging device with the correct one. (NOTE: This procedure may only be effective for as long as the CC6000 is attached to the computer’s USB port. If disconnected and later reconnected, this procedure may need to be repeated.) 87 8.5 INSTALLATION PROBLEMS I. 8.5 Right click on the device listed under “Imaging devices” in the Device Manager display and select “Update Driver option. 88 INSTALLATION PROBLEMS II. In the Hardware Update Wizard display that appears, choose the “No, not this time” option and click NEXT. III. In the next displayed form, select “Install from a list or specific location” option and click NEXT. 89 8.5 INSTALLATION PROBLEMS 8.5 IV. In the next form, select “Don’t search.. “ and click NEXT. V. You should now be presented with the correct Norland Products device as an option for installation. Click on that device name and click NEXT. 90 INSTALLATION PROBLEMS VI. You are presented with the Microsoft warning (shown below) to which you should answer “Continue Anyway”.(See page 31.) VII. Click “Finish” when the opportunity arises. VIII. You will then be called upon to repeat steps II. through VII. a second time to install the associated USB controller. After these steps, you should be able to perform the operations successfully. 91 8.5