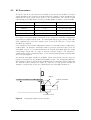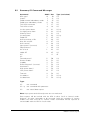
1
N63xx Series
Ku-Band Antenna Mount
Amplifier Product Range
Operation Manual
# 2003 e2v technologies limited
This work must not be copied in whole or in part without the prior written permission of e2v technologies limited.
e2v technologies, Waterhouse Lane, Chelmsford, Essex CM1 2QU, UK
Telephone: +44 (0)1245 493493 Fax: +44 (0)1245 492492 Internet: www.e2vtechnologies.com
Holding Company: e2v holdings limited
HBN63xx-1 Issue 8, July 2003
186/3511
This Operation Manual covers the following amplifier type numbers:
N6312, N6312C, N6312D, N6312DUA, N6312DUB,
N6312UA, N6312UB, N6312W, N6312DW
N6315, N6315C, N6315D, N6315DUA, N6315DUB,
N6315UA, N6315UB, N6315W, N6315DW
N6318, N6318C, N6318D, N6318DUA, N6318DUB,
N6318UA, N6318UB, N6318W, N6318DW.
SAFETY NOTES
The following warnings and precautions are for your safety and the prevention of
injury. Please read them carefully and observe at all times when installing or operating
a Stellar Travelling Wave Tube Amplifier. Hazard warning signs, as defined in BS5378
Safety Signs and Colours, are used on the equipment to highlight any possible
hazards.
Earthing
A protective earth must be connected to the amplifier before applying the mains
supply. This protective earth must only be removed after disconnecting the amplifier
from the mains supply. The protective earth must be connected to the local system
earth point, must be capable of carrying 30 A and must conform to the regulations in
the British Standard Codes of Practice BS7430 (1991 Earthing), or equivalent
national regulations.
Mains Supply
A mains supply disconnection device must be provided to isolate this amplifier from
the mains supply source. Either a socket outlet or a two pole isolation switch must be
used as the mains supply disconnection device, and it must be easily accessible. The
mains connector must not be used as the mains supply disconnection device.
Toxic Material
The Travelling Wave Tube (TWT) within the amplifier contains beryllium oxide. Dust
created by breakage, or fumes from a beryllium oxide fire, are highly toxic if inhaled,
or if particles enter the body via a cut or abrasion.
Consult e2v technologies and the appropriate national authorities for details
regarding the disposal of damaged or old TWTs and amplifiers.
HBN63xx-1, Issue 8, Page 2
High Voltage
High voltages in excess of 6 kV are present within the amplifier. However, the
equipment is designed so that personnel cannot come into contact with high voltage
circuits unless the covers are removed.
RF Radiation
Exposure of the human body to microwave radiation can constitute a hazard (ANSI/
IEEE C95-1-1992). Personnel must be protected from microwave energy produced by
the TWT.
All RF connectors must be correctly fitted before operation, so that there is no
leakage of RF energy. The amplifier must not be operated unless the RF output
connection is correctly terminated. It is particularly hazardous to look into open
waveguides, coaxial feeders, or transmitter antennae when the amplifier is operating.
Input Drive
Damage to the amplifier may occur if the RF input drive level or the input frequency
are outside the limits given in the specification (section 8, also summarised in section
3.2).
Environmental
*
Do not block, or poke objects through, the amplifier ventilation slots.
*
Do not spray aerosol cleaners directly on to the amplifier surfaces when
cleaning.
*
Do not operate the amplifier on an unstable or unsafe surface.
*
Ensure that all cables cannot be walked on, tripped over or damaged by
furniture or movable equipment.
*
Do not place objects inside the waveguide.
STANDARDS COMPLIANCE
Stellar amplifiers comply with the following requirements. Further details may be
provided if necessary.
*
EEC Directive 89/336/EEC Electromagnetic compatibility.
*
EEC Directive 93/97/EEC Satellite earth station equipment.
*
EEC Directive 73/23/EEC Low voltage directive
e2v technologies’ quality management system is certificated to the requirements of
ISO9001.
HBN63xx-1, Issue 8, Page 3
CUSTOMER CARE
Stellar 24-Hour Hotline
In the event of a Stellar product operational problem or urgent application
enquiry:
1. Complete a Product Service Report Form before calling the Hotline. A copy can
be found at the back of this manual.
2. Contact the Stellar Hotline on +44 (0)1245 355398, where your enquiry will be
dealt with.
Return Procedure
In the event of a Stellar product requiring return to e2v technologies:
1. Have as many of the following details as possible to hand before contacting e2v
technologies. This will help us to respond promptly to your request.
* Type number (found on the end panel, below the control interface socket).
* Serial number (found on the end panel, below the control interface socket).
* Has the product been damaged?
* Description of any operational fault or problem.
* Return address.
2. The Customer Service Team will issue you a Reference Number for the return.
3. Complete a Product Service Report Form (a copy can be found at the back of this
manual), noting in particular any unusual occurrences before or at the time of
failure. The form must be returned with the product.
4. If the original packaging is in good condition, use it to return the product. If the
original packaging is damaged, e2v technologies can supply suitable replacement
packaging for a small charge.
5. Clearly mark the outer packaging with the following information:
* Reference number.
* Type number.
* Serial number.
* Return address.
For further details, refer to the e2v technologies Standard Conditions of Warranty, a
copy of which can be found at the back of this manual.
HBN63xx-1, Issue 8, Page 4
CONTENTS
SAFETY NOTES . . . . . . . . . . . . . . . . . .
STANDARDS COMPLIANCE . . . . . . . . . . . . .
CUSTOMER CARE . . . . . . . . . . . . . . . . .
Stellar 24-Hour Hotline . . . . . . . . . . .
Return Procedure . . . . . . . . . . . . .
CONTENTS . . . . . . . . . . . . . . . . . . . .
1 THANK YOU FOR BUYING STELLAR . . . . . . . .
1.1 Range of Options . . . . . . . . . . . . .
2 CARE OF YOUR AMPLIFIER . . . . . . . . . . . .
2.1 Storage . . . . . . . . . . . . . . . . .
2.2 Handling . . . . . . . . . . . . . . . .
2.3 Unpacking . . . . . . . . . . . . . . . .
2.4 Cleaning . . . . . . . . . . . . . . . .
2.5 Maintenance . . . . . . . . . . . . . . .
3 INSTALLATION CONSIDERATIONS . . . . . . . .
3.1 Mounting . . . . . . . . . . . . . . . .
3.2 RF Connections . . . . . . . . . . . . .
3.3 Cooling Considerations . . . . . . . . . . .
3.4 Mains Supply Connection . . . . . . . . .
3.5 User Interface Connections . . . . . . . . .
4 BASIC OPERATION OF THE AMPLIFIER . . . . . .
4.1 Applying The Mains Supply . . . . . . . . .
4.2 Mains Supply Interruptions . . . . . . . . .
4.3 Functions . . . . . . . . . . . . . . . .
4.4 Upconverter Operation . . . . . . . . . . .
4.5 RF Sample Port . . . . . . . . . . . . .
5 USER INTERFACES . . . . . . . . . . . . . . .
5.1 Pin Identification . . . . . . . . . . . . .
5.2 User Interface Features . . . . . . . . . .
6 RS-485 SERIAL BUS . . . . . . . . . . . . . . .
6.1 General Description and Features . . . . . .
6.2 Protocol . . . . . . . . . . . . . . . . .
6.3 Summary Of Command Messages . . . . . .
6.4 Examples Of Command And Response Messages
6.5 Application Notes . . . . . . . . . . . . .
7 FAULT FINDING . . . . . . . . . . . . . . . .
8 SPECIFICATION . . . . . . . . . . . . . . . . .
8.1 Electrical . . . . . . . . . . . . . . . .
8.2 Mechanical . . . . . . . . . . . . . . .
8.3 Environmental . . . . . . . . . . . . . .
8.4 RF Characteristics . . . . . . . . . . . . .
9 RELATED DOCUMENTS . . . . . . . . . . . . .
APPENDIX A . . . . . . . . . . . . . . . . . . .
.
.
.
.
.
.
.
.
.
.
.
.
.
.
.
.
.
.
.
.
.
.
.
.
.
.
.
.
.
.
.
.
.
.
.
.
.
.
.
.
.
.
.
.
.
.
.
.
.
.
.
.
.
.
.
.
.
.
.
.
.
.
.
.
.
.
.
.
.
.
.
.
.
.
.
.
.
.
.
.
.
.
.
.
.
.
.
.
.
.
.
.
.
.
.
.
.
.
.
.
.
.
.
.
.
.
.
.
.
.
.
.
.
.
.
.
.
.
.
.
.
.
.
.
.
.
.
.
.
. 2
. 3
. 4
. 4
. 4
. 5
. 6
. 6
. 7
. 7
. 7
. 7
. 7
. 7
. 8
. 8
10
11
13
15
17
17
17
17
18
19
20
20
21
27
27
32
35
36
40
41
43
43
43
44
44
44
45
APPENDIX
APPENDIX
APPENDIX
APPENDIX
.
.
.
.
.
.
.
.
.
.
.
.
46
47
48
49
B
C
D
E.
.
.
.
.
.
.
.
.
.
.
.
.
.
.
.
.
.
.
.
.
.
.
.
.
.
.
.
.
.
.
.
.
.
.
.
.
.
.
.
.
.
.
.
.
.
.
.
.
.
.
.
.
.
.
.
.
.
.
.
.
.
.
.
.
.
.
.
.
.
.
.
.
.
.
.
.
HBN63xx-1, Issue 8, Page 5
1
THANK YOU FOR BUYING STELLAR
Thank you for buying a Stellar TWTA. This e2v technologies antenna mount
amplifier range provides RF power amplification at up to 180 W in the Ku-band. The
amplifier is:
*
Compact
*
Lightweight
*
Portable 7 can run off a wide range of mains input voltages and frequencies
*
Designed for high reliability.
Before using your new amplifier, we recommend that you spend a little time to read
this manual to familiarise yourself with its operation and features.
If you have any further questions, or recommendations about this manual, please
contact your distributor.
In addition to this manual your amplifier should be supplied with:
1.1
*
a mains connector plug,
*
a control connector plug,
*
test results,
*
an air inlet cowl,
*
6-32 UNC-2A x 1/2-inch waveguide screws (4 off).
Range of Options
The N63xx series of antenna mount amplifiers includes the following variants and
options:
RF output power variants
120 W (N6312), 150 W (N6315) and 180 W (N6318)
RF system options
Product type numbers with a C suffix indicate that the unit is not fitted with an
integrated solid state preamplifier.
Product type numbers with a D suffix indicate that the unit is fitted with a digital
electronically variable attenuator.
Product type numbers with a UA or UB suffix indicate that the unit is fitted with
an integral L-band to Ku-band upconverter (see section 4.4 for upconverter
details).
Product type numbers with a W suffix indicate that the unit is capable of
operating over the wider bandwidth of 12.75 to 14.5 GHz.
HBN63xx-1, Issue 8, Page 6
2
2.1
2.2
CARE OF YOUR AMPLIFIER
Storage
*
Store the amplifier in its normal horizontal orientation
*
Storage temperature is from 740 to +80 8C.
*
Do not use amplifier boxes to support the weight of any other item.
*
Retain the amplifier boxes for future use.
*
Avoid severe shocks.
Handling
The amplifier nominally weighs 12 kg, so care must be taken when attempting to lift
or carry it.
2.3
Unpacking
Only install and use the amplifier within the specified environmental limits.
2.4
Cleaning
The amplifier is designed to be used in harsh environments, without additional
protective covers.
The internal forced air cooling system relies on the internal and external airways being
free from blockages. The cooling air enters and exits the unit through slotted panels,
which are designed to prevent large items of foreign matter from entering and
potentially blocking the internal airways. A maintenance plan should be developed to
check and clean the amplifier slotted panels regularly, along with any external filters/
restrictions. The frequency of cleaning will be dependent upon the installation and
the environment. The maintenance plan should be regularly reviewed and modified
according to changes in the environment (this can be seasonal, e.g. airborne seed
pods can cause regular blockages at certain times of the year).
The paint used on this product is designed to provide maximum reflection of solar
radiation; for this reason, any exposed faces of the amplifier should be regularly
cleaned with soapy water to maintain these reflective characteristics. Dirty exposed
faces will absorb more solar radiation, increase the temperature within the unit and
ultimately reduce the reliability and life of the amplifier.
Do not use detergents or other cleaners without consulting e2v technologies. The
amplifier must be disconnected from the mains supply before cleaning.
2.5
Maintenance
Airways should be checked regularly for blockages (see section 2.4).
Desiccant should be replaced every 3 to 5 years, depending upon environmental
conditions. The typical life of desiccant is 5 years in sub-tropical conditions, assuming
that the seal on the lid has not been disturbed.
HBN63xx-1, Issue 8, Page 7
3
3.1
INSTALLATION CONSIDERATIONS
Mounting
The amplifier can be:
*
used free standing;
*
mounted in a flight case;
*
mounted on the roof of a vehicle;
*
mounted to an antenna system.
The amplifier has a flange which should be used to mount the amplifier solidly to the
chosen platform. Six M5 clearance mounting slots (three each side) are provided, to
allow fixing from above. Suitable load spreading washers should be used to protect
the amplifier from damage during the mounting process. Suitable locking nuts and/
or locking washers should be used to prevent the amplifier from working loose under
vibration and shock conditions that each installation may impose. This is especially
important for mobile applications.
"
The amplifier should be positioned so as to avoid the direct entry of rain water into
the ventilation slots. The amplifier is provided as standard with an air inlet cowl, the
normal orientation of which is pointing towards the base of the unit, to avoid the
direct entry of driving rain. When used with this arrangement, the unit should not be
mounted closer than 42 mm from any flat surface, to avoid choking of the forced air
cooling system (see figure 1).
COWL
143 mm MIN
"
FLAT SURFACE
Figure 1
Mounting distance from a flat surface (cowl fitted)
HBN63xx-1, Issue 8, Page 8
Circular duct adaptors and alternative cowl orientations are discussed further in
section 3.3.2.
"
If the amplifier is to be installed where a secondary rain cover is used, the air inlet cowl
may be removed and the amplifier mounted closer to a flat surface (see figure 2).
106 mm MIN
"
FLAT SURFACE
Figure 2
Mounting distance from a flat surface (no cowl).
When designing the installation, a space of approximately 162 mm should be allowed
for the disconnection and the bend radius of connection cables (see figure 3).
"
Figure 3
162 mm NOM
"
Interface connector and cable space allowance.
HBN63xx-1, Issue 8, Page 9
3.2
RF Connections
RF input is via an N type connector mounted on the end of the amplifier. RF input
signals applied to this connector must be within the frequency range and below the
maximum RF input power levels given in the specification (see section 8) and
summarised in the table below. Ensure a suitable grade of cable is used externally.
Product type number
Maximum RF input drive level RF input frequency range
N63xx and N63xxD
10 mW
13.75 to 14.5 GHz
N63xxC
1W
13.75 to 14.5 GHz
N63xxUA and N63xxDUA
1 mW
950 to 1450 MHz
N63xxUB and N63xxDUB
1 mW
950 to 1700 MHz
RF output is via a waveguide connection on the end of the amplifier. Waveguides
type WG17 or WR75 may be used. The waveguide flange (type 154 IEC UBR 120,
with 4 tapped holes 6-32 UNC) requires four screws 6-32 UNC-2A x 1/2-inch fully
threaded, as supplied.
If the amplifier is to be used in applications where it is exposed to rain or subjected to
condensation, all attempts should be made to prevent moisture ingress into the
waveguide system. It is recommended that all external waveguide joints are made
using flanges fitted with ’O’ rings to prevent moisture ingress. The amplifier is
supplied with a plain waveguide flange, so the external mating flange should include
an ’O’-ring and groove.
An optional waveguide window is available, which when fitted correctly stops the
ingress of moisture into the amplifier waveguide system. The waveguide window is
approximately 10 mm in length and is fitted between the amplifier output flange and
the external system flange (see figure 4), with the ‘O’-ring groove toward the
amplifier. Longer fixing screws are supplied with the waveguide window kit.
WINDOW
EXTERNAL WAVEGUIDE
"
"
"
RF OUTPUT FLANGE
Figure 4
Waveguide window option position
HBN63xx-1, Issue 8, Page 10
3.3
Cooling Considerations
Temperature affects the life and reliability of high power electronic devices. As the
temperature of the device increases, generally reliability and life expectancy
decrease; TWTAs are no exception. Please follow the cooling considerations for
your amplifier to ensure many trouble free years of use.
e2v technologies engineers have many years of experience, working with customers
to integrate equipment successfully and to ensure that long and reliable product lives
are achieved. The information contained within this section has been gained from
both field experience and theoretical cooling system design knowledge. As most
installations differ, the advice given is only general. Any specific aspects of
installation design can be discussed further by contacting, or faxing the Stellar
Product Support Team at e2v technologies.
3.3.1 Some Cooling Facts and Figures
Minimum Air Flow . . . . . . . . . . . . . .
Minimum Duct Area . . . . . . . . . . . . .
Total Maximum Core Duct Length:
corrugated . . . . . . . . . . . . . . . .
smooth . . . . . . . . . . . . . . . . . .
Typical internal power dissipation
(no RF drive): . . . . . . . . . . . . . . . .
Typical temp.difference across device . . . . . . .
Absolute max temp.difference across device . . . .
where temp.difference = temp.out 7 temp.in
. 28 litre/s (60 feet3/minute)
. . . . . 58 cm2 (9 inch2)
. . . . . 0.5 m (1.65 feet)
. . . . . . 1 m (3.3 feet)
. . . . . . . . . 900 VA
. . . . . . . . .
40 8C
. . . . . . . . .
50 8C
The amplifier utilises an efficient, integral, forced-air cooling system and is equipped
with two thermal sensors to protect it in the event of an over-temperature condition.
When the temperature of either thermal sensor exceeds preset levels, the amplifier is
automatically removed from the XMIT mode and placed into the STBY mode. In the
STBY mode the dissipation within the amplifier is greatly reduced and if the airflow is
normal, the amplifier will rapidly cool. At this stage, the installation cooling system
should be visually inspected for blockages and cleaned as necessary. When normal
airflow is confirmed, the amplifier can be taken back into the XMIT mode.
The amplifier is automatically placed in the OFF mode if the over-temperature
condition exists for more than 4 minutes. The mains supply should be removed and
the amplifier isolated before a full inspection is made of the installation cooling system.
The amplifier should be left for 20 minutes before any attempt is made to re-start.
Following an over-temperature condition, the TWT OVER TEMPERATURE or
BASEPLATE OVER TEMPERATURE fault conditions are set, these can be monitored
via the user interface or accessed through the serial communications port (see
section 5).
When deciding on the location of the amplifier the following points should be
observed:
*
It is important not to obstruct the air inlet or the air exhaust
*
In any system, prevent hot exhaust air from recirculating to the inlet, otherwise
the inlet air temperature will increase, resulting in potential thermal runaway.
This is a prime consideration when designing common ducting systems for
multiple amplifiers.
HBN63xx-1, Issue 8, Page 11
*
In any other instance, if there is significant additional obstruction to the air
flow, then it may be necessary to provide externally forced/cooled air to the
amplifier.
3.3.2 Ducting Considerations
The amplifier is provided as standard with an air inlet cowl, the normal orientation of
which is pointing towards the base of the amplifier (see section 3.1). Additional cowls
are available from e2v technologies and can be fitted to the air outlet, in a similar
orientation to that of the inlet cowl. The cowls can be turned through 908 for an
alternative amplifier mounting configuration.
These cowls are designed to avoid driving rain entering the unit if a secondary cover
is not utilised. The cowls can be removed and replaced with circular duct adaptors,
which utilise the same fixing holes. These circular duct adaptors are available from
e2v technologies and are designed to accept 8.9 cm (3.5 inch) diameter ducting.
Any ducting connected to the inlet or exhaust will create additional back pressure,
reduce the airflow and increase the internal temperature of the amplifier. Each
amplifier is designed to handle some additional back pressure, but this must be
minimised. When designing ducting systems:
*
Keep ducting lengths to a minimum; check the amplifier maximum operating
temperature derating for the length of duct required.
*
Route ducting directly; avoid sharp bends and ensure that the minimum bend
radius is three times the ducting diameter.
*
Use the largest cross sectional area of ducting possible.
*
Use smooth walled ducting; avoid corrugated ducting as it is more restrictive to
airflow.
*
Transitions in ducting sizes should be smooth; avoid step changes.
*
Do not use ducting adaptors that reduce the internal cross sectional area of the
ducting.
If the installation dictates restrictive duct systems, install additional external fans to
provide adequate airflow and counteract the effects of ducting. Additional fans
should be installed on the air input to the amplifier, where the air is at its coolest.
3.3.3 Equipment Housings
All equipment housings, including basic flight cases, roof mount enclosures, cabins
and air conditioned rooms, have common cooling system design requirements:
*
Maintain an adequate supply of air to the inlet; a 58 cm2 (9 inch2) unimpeded
aperture should be provided into any enclosure for each Stellar amplifier.
*
The local source and destination of cooling air should ideally be common, to
avoid back pressure caused by differential pressure effects.
*
Housings that are exposed to environmental wind effects should use a common
face for inlet and exhaust vents, to avoid back pressure caused by differential
wind effects.
*
Terminations of inlet and exhaust vents should be of a design that prevents
direct environmental wind effects, whilst avoiding creating additional restriction
to airflow.
*
If a sealed cooling system, with recirculating air conditioners, is used, an over
temperature alarm should be fitted to the cabin to detect air conditioner failures.
HBN63xx-1, Issue 8, Page 12
*
In any system, prevent hot exhaust air from recirculating to the air inlet,
otherwise the inlet air temperature will increase, resulting in potential thermal
runaway. This is a prime consideration when designing common ducting
systems for multiple amplifiers.
3.3.4 Commissioning the Installation
When commissioning the installation, the temperature difference across each
amplifier should be checked to assess the suitability of the cooling system.
Temperature measurements should be taken as follows:
3.4
*
Under the worst case operating conditions; with the amplifier in XMIT mode,
with no RF drive applied (beam only), and after the amplifier has thermally
stabilised (typically 2 hours after XMIT has been selected).
*
As close to the amplifier inlet and exhaust cowls as possible (to reduce the
effects of inaccuracies caused by radiation from duct walls).
*
As an average across the cross sectional area of the aperture/duct (to avoid
inaccuracies caused by uneven temperature distribution).
Mains Supply Connection
The safety notes at the start of this manual should be read before connecting the
amplifier to the mains supply.
The amplifier can be operated from mains supplies of 99 to 265 V ac without any user
adjustments. Both the live and the neutral connections on the amplifier are fully rated
and isolated for maximum line voltage, full transient and noise immunity.
The amplifier is supplied with one mains plug but no cable. Additional mains plugs are
available from e2v technologies, please contact your distributor. The connector
details are shown in figure 5. If the amplifier is to be used in applications where it is
exposed to rain or subjected to condensation, all attempts must be made to prevent
moisture ingress into the mains connector. The mains connector is supplied with a
range of cable retention bungs, these should be selected to suit the size of cable
chosen (see section 3.4.1). The cable bungs, if correctly selected, will seal to the
cable and prevent moisture ingress.
A
C
Figure 5
B
A: NEUTRAL
B: EARTH
C: LIVE
The mains connector pin identification
3.4.1 Mains Supply Cable Selection
Cable size and distribution protection must be determined by the user, and will
depend on the mains supply voltage to be applied to the amplifier.
If the amplifier is always used in an environment with a 240 V mains supply, then a
cable capable of carrying at least 15 A can be fitted.
HBN63xx-1, Issue 8, Page 13
It is important when using lower mains supply voltage sources of 110 V and 120 V
nominal, to ensure that the required voltage is available at the input connector of the
amplifier under conditions of maximum current demand.
It is also important to ensure that for any supply selected, the mains supply source no
load to full load voltage drop is less than 10 V rms. On full load, the amplifier mains
supply voltage must be greater than 99 V.
Under conditions of a low voltage power source with long power connection leads,
this may require selecting a cable for low voltage drop and not just basing the
selection on a nominal current rating.
3.4.2 Earthing
A protective earth must be connected to the amplifier before applying the mains
supply. This protective earth must only be removed after disconnecting the amplifier
from the mains supply. The protective earth must be connected to the local system
earth point, must be capable of carrying 30 A and must conform to the regulations in
the British Standard Codes of Practice BS7430 (1991 Earthing), or equivalent national
regulations.
A supply wiring earth can be connected between the mains supply source and the
amplifier rear panel connector.
3.4.3 Mains Supply Distribution System
A mains supply disconnection device must be provided to isolate the amplifier from
the mains supply source. Either a socket outlet or a two-pole isolation switch must be
used as the mains supply disconnection device. It must be installed near the amplifier
and be easily accessible. The mains connector must not be used as the mains supply
disconnection device. It is provided for convenience during installation and for ease
of operation.
It is strongly recommended that the mains supply for the amplifier is fed via a double
pole Residual Current Circuit Breaker (RCCB). The amplifier earth leakage current is
56 mA rms under nominal operating conditions.
In some circumstances on low voltage 3-phase systems (e.g. 115 V line to neutral and
200 V line to line), it may be preferable to operate the amplifier bi-phase. In this case,
the amplifier may be connected across any two lines of the 3-phase system to obtain
what is effectively a 200 V single phase source. Under these circumstances the
neutral of the 3-phase system is not connected to the amplifier. With smaller, 3-phase
generators this may offer a method of partially balancing a number of lower power
single phase loads.
If the amplifier is connected bi-phase, an external 2-pole protection device must be
provided that disconnects both line connections in the event of a fault on either line.
This equipment has not been designed for connection to an IT power system.
The mains input surge current for this unit is dependent upon mains voltage. The
following table shows the I2t products during the ’power up’ phase for 110/120 V and
220/240 V; it should be used to determine the rating of any current overload
protection devices. The half cycle average surge current is less than the maximum
running current of the unit, therefore typically a 13 A HRC fuse to BS 1362 is
adequate for the over-current protection of each amplifier (this can be reduced to a
10 A HRC fuse to BS 1362 if the unit is to be used on high mains voltage supplies).
HBN63xx-1, Issue 8, Page 14
High Line Conditions (220/240 V nominal)
Time
Peak I (A)
I2t
t0 (switch on)
10
51
t0 + 100 ms
40
55
t0 + 250 ms
8
50.7
Low Line Conditions (110/120 V nominal)
3.5
Time
Peak I (A)
I2t
t0 (switch on)
5
50.3
t0 + 100 ms
18
53.5
User Interface Connections
Refer to the appendices at the end of the manual for examples of wiring.
The amplifier is supplied with a user interface connector plug, but no cable.
Additional connectors are available from e2v technologies; please contact your
distributor.
If the amplifier is to be used in applications where it is exposed to rain or subjected to
condensation, all attempts must be made to prevent moisture ingress into the
connector and cable loom. The connector plug accepts cable diameters up to a
maximum of 15 mm.
For use with cable diameters less than 15 mm the effective cable diameter should be
increased to approximately 14 to 15 mm to allow an effective seal to be made when
the connector is assembled. Self amalgamating tape or layers of adhesive heat shrink
cable are recommended. Connector back shells that accept adhesive heat shrink
boots are available, please contact your distributor.
Fully screened cable should be used for interface requirements.
3.5.1 Redundant Switch Configuration
If two amplifiers are to be connected to a redundant switched system, the control
circuitry within the amplifiers can be used to implement a cost effective switch
control solution. The diagram on the following page shows the wiring connections
required to implement a basic redundant switched system using the N6143 as the
controlling device. The N6143 control unit is connected to the serial interface of both
amplifiers, allowing remote switching and monitoring of switch position and amplifier
operation (for further details on the N6143, contact your distributor).
As the amplifiers do not have a master/slave relationship, the position of the
waveguide switch is pre-selected by the user either manually, via the user interface or
from the N6143 control unit. The low power alarms on both amplifiers are set if
required, then both amplifiers are placed into the XMIT mode. The automatic mode
enable (AUTO ENA) input is then selected, via the user interface or from the N6143
control unit, control of the switch is then passed to the amplifiers.
With both amplifiers operating ‘normally’ in the XMIT mode and giving 41 W of RF
output power, the waveguide switch will remain as set. Each amplifier monitors the
status of the other amplifier for potential faults. If the amplifier routed to the antenna
develops a fault condition, or its RF output power drops below the low power alarm
setting (1 W minimum low power alarm level), the other amplifier takes control,
HBN63xx-1, Issue 8, Page 15
switching the waveguide switch. If the N6143 control unit is used, an audible alarm
will activate indicating the fault condition to the operator.
The amplifiers will remain in the automatic mode as before. If the faulty amplifier
does not recover, a fault on the second amplifier will not result in switching of the
waveguide switch.
The waveguide switch coil should be a 24 V type and a tell back switch within the
waveguide switch should be configured so that each amplifier knows if it is
connected to the antenna.
Switching time is dependent upon the waveguide switch selected but will be typically
50 to 100 ms.
The interface between the control unit and the amplifiers is via the local serial
communications bus. As the amplifiers do not contain a transmitter/receiver
termination, the local serial communications bus should be fitted with 120 O
terminating impedances. This should be done within the control connector backshell
of the amplifier furthest from the N6143 control unit. 120 O + 1%, 1/4 W carbon film
or similar resistors should be fitted between pin d (Rx+) and pin e (Rx7), also
between pin b (Tx+) and pin c (Tx7) of the 41-pin amplifier control connector.
Termination of the serial communications bus is dependent upon the length and type
of cable used, and should follow normal transmission line practice.
N6143 CONTROL UNIT
LOCAL SERIAL
COMMUNICATIONS BUS
AMPLIFIER A
RED FLT O/P
RED FLT I/P
RED FLT I/P
RED FLT O/P
GND
SWITCH SENSE
AMPLIFIER B
GND
RED SW1
RED SW2
SWITCH SENSE
RED SW1
RED SW2
COIL A COIL B
"
TELL BACK SWITCH
RF WAVEGUIDE
SWITCH
Figure 6
SHOWN WITH RF WAVEGUIDE
SWITCH COIL A ENERGISED.
AMPLIFIER A IS ROUTED TO THE ANTENNA
Redundant switch configuration
Notes
1. A wiring schematic diagram is given in the appendices for the connection of two
amplifiers, the N6143 control unit and a waveguide switch.
2. If an AUTO ENA signal is not received by the amplifiers, the RED FLT O/P will not
be enabled. Therefore, if an external controlling device other than the N6143 is used,
this must be taken into account if the RED FLT O/P is to be used to trigger switchover. Alternatively, the SUM FLT IND multiplexed fault lines or inverted XMIT IND
outputs can be used as the trigger for switch-over.
HBN63xx-1, Issue 8, Page 16
4
4.1
BASIC OPERATION OF THE AMPLIFIER
Applying The Mains Supply
Before applying the mains supply to the amplifier, the operator must be satisfied that:
*
both the RF input and RF output connections are correctly terminated (see
section 3.2),
*
safety and cooling requirements are complied with (see safety notes and section
3.3),
*
the correct type of mains cable is in use (see section 3.4).
Once the above has been verified apply the mains supply to the amplifier. The fans
will be heard to start.
It is good practice to allow the TWT to cool for three to four minutes after leaving the
transmit mode, before disconnecting the amplifier from the mains supply.
4.2
Mains Supply Interruptions
It is common on some mains or local generator derived supplies, for the supply to be
temporarily interrupted. This section details the behaviour of the amplifier under
these conditions when it is transmitting.
Interrupt 530 ms - the amplifier will continue to operate normally.
Interrupt 430 ms 55 seconds - a degradation of RF performance can be expected,
the amplifier will leave the XMIT mode. When the mains supply returns, the amplifier
will automatically re-enter the XMIT mode within 1 second. All operating parameters
will be as previously set.
Interrupt 45 seconds - a degradation of RF performance can be expected, the
amplifier will leave the XMIT mode. When the mains supply returns, the amplifier will
remain in the OFF mode until the user selects another mode of operation either
manually or automatically.
4.3
Functions
As the amplifier has no direct human interface for control or monitoring, the 41-pin
control connector is used to effect control either via the serial communications bus or
the discrete control connections.
This section describes the control functions available to the user.
4.3.1 Amplifier OFF mode
Applying prime power to the unit results in the amplifier entering the OFF mode until
another mode is selected. In this mode, only the Amplifier control, auxiliary circuits
and fans are operational, the main cooling fan operating at half speed.
Following transmission, the OFF mode can be requested to remove the amplifier from
the XMIT mode.
HBN63xx-1, Issue 8, Page 17
4.3.2 Amplifier WARMUP mode
Requesting either the STBY or XMIT mode from the OFF mode will result in the TWT
cathode heater power being applied and the warmup timer (180 seconds) being
initiated.
Note: If the ambient temperature is less than 710 8C, the warmup timer period is
10 minutes.
During WARMUP, the STBY or XMIT modes can be requested, to select the mode
that the amplifier will enter at the end of the warmup period.
4.3.3 Amplifier STBY (Standby) mode
In this mode, the TWT cathode is at its operating temperature and is ready to enter
the XMIT mode. Power is applied only to the TWT cathode heater. Unless XMIT
mode has been requested, the amplifier will enter STBY mode when the warmup is
complete.
Following transmission, the STBY mode can be requested to remove the amplifier
from the XMIT mode.
4.3.4 Amplifier XMIT (Transmit) mode
With the amplifier in the STBY mode, selecting the XMIT mode results in the
application of helix and collector voltages to the TWT, allowing RF transmission. In
the XMIT mode, the RF output power and TWT helix current monitor features are
operational and the control of gain is possible using the (optional) Digital
Electronically Variable Attenuator.
4.4
Upconverter Operation
Products in the antenna mount range which include a UA or UB suffix in the type
number (e.g. N6315UA, N6318DUB) contain an integral block upconverter. The UA
suffix indicates an upconverter which operates over the RF input frequency range
950 to 1450 MHz, corresponding to an RF output frequency range 14.0 to 14.5 GHz.
The UB suffix indicates an upconverter which operates over the RF input frequency
range 950 to 1700 MHz, corresponding to an RF output frequency range 13.75 to
14.5 GHz.
The block upconverter comprises four main elements as shown in the block diagram
below; this modularity gives design flexibility allowing gain and frequency variants to
be accommodated. All modules are fully integrated within the standard package
outline, with the amplifier control system providing all power and control interfaces.
The L-band input signal should be connected to the N-type socket labelled ‘RF IN’.
The external 10 MHz locking reference input is fed into the unit modulated onto the
L-band input signal. This 10 MHz signal is split from the L-band input within the
amplifier, converted to 50 MHz and used to phase lock the frequency of the DRO.
The L-band input is fed to the mixer where it is combined with the LO and
subsequently fed to the bandpass filter. The waveguide filter is used to remove the
LO and other mixer products; it gives excellent rejection performance, with low loss
and a flat response. The output of the filter is connected to the input of the solidstate amplifier (fixed gain or digital electronically variable attenuator version).
An ‘out of lock’ alarm signal is fed from the upconverter to the amplifier control
system (see note 1); this in turn is processed and provided as an advisory
‘upconverter fault’ alarm signal, available from the 41-pin user interface connector
(see sections 5 and 6, and note 2).
HBN63xx-1, Issue 8, Page 18
Notes
1. If the 10 MHz signal is too low or not present.
2. The upconverter also contains its own stabilised internal reference that enables it
to be used without an external 10 MHz locking signal. This feature is activated
automatically when the external 10 MHz locking signal is too low or not present.
Basic Upconverter Specification
Output frequency:
UA variants . . . . . . . . .
UB variants . . . . . . . . .
Input frequency:
UA variants . . . . . . . . .
UB variants . . . . . . . . .
L-band input level:
minimum . . . . . . . . . .
maximum . . . . . . . . . .
External locking signal. . . . . .
. . . . . . . . . . . . 14.0 to 14.5 GHz
. . . . . . . . . . . 13.75 to 14.5 GHz
. . . . . . . . . . . . 950 to 1450 MHz
. . . . . . . . . . . . 950 to 1700 MHz
. . . . . . . . . . . . . . . 710 dBm
. . . . . . . . . . . . . . . . 0 dBm
. . . . 10 MHz (0 dBm max, 75 dBm min)
fed through IF cable
Stability using internal 10 MHz reference . . . . . . . . . . . . . . 2 ppm
Notes
1. When using amplifiers fitted with both an upconverter and a digital electronically
variable attenuator (DEVA) (e.g. N6315DUB, N6318DUA etc), the L-band input drive
level should be set between 710 and 0 dBm and the DEVA control used to adjust the
amplification. For any upconverted amplifier, if the L-band input level is too high, the
mixer can be driven into saturation and intermodulation products may be
experienced.
If the L-band input level is too low (5720 dBm), signal mixing will be poor,
possibly with intermittent signal locking.
2. If the wider band (750 MHz) UB variant is used with exciter chain equipment that
is operating over a narrower band (500 MHz), the lowest frequency reference point
will be 13.75 GHz, resulting in an output frequency range of 13.75 to 14.25 GHz and
not the desired 14.0 to 14.5 GHz.
MIXER
DEMODULATOR
BANDPASS FILTER
950 TO 1450/1700 MHz
INPUT
L-BAND
& 10 MHz
10 MHz TO 50 MHz
FREQUENCY
50 MHz
MULTIPLIER
PHASE
LOCKED
OSCILLATOR
13.05/12.80 GHz
OUTPUT
UPCONVERTER FAULT
4.5
RF Sample Port
Provided as an optional N-type (female) connector, mounted at the opposite end of
the amplifier to the waveguide flange. It allows external monitoring of the output
power, providing a signal approximately 50 dB lower than the RF output power. It is
provided with calibration data across the amplifier’s frequency range.
HBN63xx-1, Issue 8, Page 19
5
USER INTERFACES
The amplifier is provided with two interfaces that are used to control the amplifier:
the user port and the serial communications interface (RS-485). All interfaces are
available on the 41-pin control connector, located next to the mains supply
connector. This section identifies each control connector pin and describes the
function of each pin, including the electrical specification.
5.1
Pin Identification
Code
Function
OFF IND
off indicator output
A
WARMUP IND
warm-up indicator output
B
STBY IND
standby indicator output
C
XMIT IND
transmit indicator output
D
SUM FLT IND
summary fault indicator output
E
spare
F
RF INHIB
RF inhibit control input
G
INV RF INHIB
inverted RF inhibit control input
H
OFF
off control input
J
STBY
standby control input
K
XMIT
transmit control input
L
spare
M
FWD PW MON
forward power monitor analogue output
N
GND
ground
P
EXT INTLK
external interlock input
R
ADD 0
address select 0
S
ADD 1
address select 1
T
+15 V
+15 V output
U
ADD SEL
address select
V
CTRL O/R
control override select
W
MUX 0
multiplexed fault line 1 indicator output
X
MUX 1
multiplexed fault line 2 indicator output
Y
MUX 2
multiplexed fault line 3 indicator output
Z
MUX 3
multiplexed fault line 4 indicator output
a
RS TX+
serial interface Tx+
b
RS TX7
serial interface Tx7
c
RS RX+
serial interface Rx+
d
HBN63xx-1, Issue 8, Page 20
User interface
pin identification
Code
Function
User interface
pin identification
RS RX7
serial interface Rx7
e
HX I MON
helix current monitor analogue output
f
ADD 2
address select 2
g
ADD 3
address select 3
h
ADD 4
address select 4
i
ADD 5
address select 5
j
RED FLT O/P
redundancy fault indicator output
k
RED SW 1
redundancy RF switch drive 1 – this HPA to antenna
m
RED SW 2
redundancy RF switch drive 2 – this HPA to load
n
RS GND
serial interface signal return
p
SWITCH SENSE redundancy RF switch sense input
q
AUTO ENA
redundancy automatic mode enable input
r
RED SEL
redundancy select input
s
RED FLT I/P
redundancy fault input
t
5.2
User Interface Features
5.2.1 Indicator Outputs - Type 1
Normally open relay contact outputs switched to GND (pin P on the user interface
connector) when condition is true.
Example 1 amplifier in the OFF mode is indicated by pin A on the user interface
connector closing to pin ’P’.
Example 2 MUX 0 fault line is at binary 1 when pin X on the user interface
connector closes to pin P.
OFF IND
Indicates power is applied and that the unit is in the OFF mode.
WARMUP IND Indicates the TWT cathode three minute warm-up timer is operating
and that the unit is in the WARMUP mode.
STBY IND
Indicates the TWT Cathode warm-up is complete, the unit is in the
STDBY (standby) mode and is ready to enter the XMIT mode.
XMIT IND
Indicates the unit is in the XMIT (transmit) mode.
SUM FLT IND Indicates the unit has detected a fault condition.
MUX 0
Four binary coded discrete lines that indicate the fault conditions;
MUX 1
the following list gives a breakdown of these fault conditions with a
MUX 2
brief description of reset conditions.
MUX 3
HBN63xx-1, Issue 8, Page 21
Fault Code
MUX 3210
1101
Fault Type
Upconverter fault
Reset Code
I
1100
Baseplate over-temperature condition
M
1011
TWT Collector over-temperature condition
M
1010
Cooling fan #2 fault
P
1001
Cooling fan #1 fault
P
1000
Heater fault
P
0111
HV fault
A
0110
DC bus fault
P
0101
PFC fault
P
0100
External interlock trip
M
0011
Reflected power trip
A
0010
Mean helix over-current trip
A
0001
Peak helix over-current trip
A
Reset Code Description
A (Automatic reset). Units that exhibit faults with this reset code will be immediately
removed from the XMIT mode and placed into the STBY mode. The unit will
automatically attempt to reset to the XMIT mode after 3 seconds; if this fails the unit
will attempt a further two reset cycles. If after the three reset attempts the amplifier
still exhibits the fault condition, the unit will remain in the STBY mode for 4 minutes
before returning to the OFF mode, unless the fault clears and the XMIT mode is
reselected.
I (Advisory) Units that exhibit faults with this reset code will remain in the XMIT
mode; the fault display will remain until the fault clears.
M (Manual reset). Units that exhibit faults with this reset code will be immediately
removed from the XMIT mode and placed into the STBY mode. The unit will remain
in this mode for a period of 4 minutes before returning to the OFF mode, unless the
fault clears and the XMIT mode is reselected.
P (Prime power reset). Units that exhibit faults with this reset code will be
immediately removed from the XMIT mode and placed into the OFF mode. If the
fault is seen to clear, the mains supply should be removed for nominally 10 seconds
before reapplying to reset the trip.
5.2.2 Indicator Outputs - Type 2
Normally open relay contact outputs switched to GND (pin P on the user interface
connector) when condition is false.
Example Unit is operating normally with no fault condition when pin k on the user
interface connector is closed to pin P.
RED FLT O/P Part of the redundant switch control facility. Indicates that the unit
has suffered a low power alarm or a fault condition that has resulted
in removal from the XMIT mode. This output would normally be
connected to the RED FLT I/P (pin t on the user interface
connector) of the other amplifier in the redundant switch system.
Note: Only active if an AUTO ENA input has been received by the amplifier.
HBN63xx-1, Issue 8, Page 22
5.2.3 Analogue Outputs
The following analogue outputs are provided to allow the user to implement a simple
and cost effective monitoring system; these outputs are also available in digital form
via the RS-422 or RS-485 serial communications interface (see section 6). These
outputs are referenced to GND (pin P on the user interface connector).
It is recommended that a screened cable is utilised to avoid RFI effects.
FWD PW MON Provides a 0 to +10 V dc analogue output that corresponds to an RF
output power range of 0 to 200 W. This output is a linear 20 W/V.
Maximum output impedance 100 O
HX I MON
Provides a 0 to +10 V dc analogue output that corresponds to a
TWT Helix current range of 0 to 20 mA. This output is a linear 2 mA/
V. Maximum output impedance 100 O
5.2.4 Control Inputs - Type 1
The following control inputs are of the momentary edge-triggered type. The inputs
are internally pulled up to +15 V by 2k7 resistors. The input is asserted on the falling
edge i.e. as the input is switched to GND (pin P on the user interface connector).
Only one input should be asserted at a time and should be relinquished for at least 10
ms prior to asserting another type 1 input.
Note: The operation of the XMIT control input is modified while the CTRL O/R input
is asserted. See section 5.2.6.
Minimum pull down time . . . . . . . . . . . . . . . . . . . . . 1ms
Maximum external switch ‘on resistance’ . . . . . . . . . . . . . .
100 O
OFF
Selects the OFF mode directly from any of the other three operating
modes (WARMUP, STBY or XMIT).
STBY
Selects the STBY mode directly from the XMIT mode. When
selected from the OFF mode the unit is placed into the WARMUP
mode for three minutes before automatically entering the STBY
mode.
XMIT
Selects the XMIT mode directly from the STBY mode. When
selected from the OFF or WARMUP modes, the XMIT mode is
automatically entered after the end of the three minute heater warm
up time.
RED SEL
Part of the redundant switch control facility, selects the amplifier to
be routed to the antenna.
5.2.5 Control Inputs - Type 2
The following control inputs are of the level active type. The inputs are internally
pulled up to +15 V by 2k7 resistors.
Maximum external switch ‘on resistance’ . . . . . . . . . . . . . .
AUTO ENA
RF INHIB
100 O
Part of the redundant switch control facility, toggles between the
automatic and manual change over mode. In the automatic mode, a
failure of the other amplifier will automatically route this amplifier to
the antenna. GND = Automatic mode, Not Connected = Manual
mode.
Only operational with the solid state amplifier option. Allows the RF
signal to be inhibited, giving a minimum RF output attenuation of 45
dB. GND = RF Inhibited, Not Connected = RF enabled.
HBN63xx-1, Issue 8, Page 23
INV RF INHIB As above except inverted.
GND = RF enabled, Not Connected = RF Inhibited.
SWITCH SENSE Part of the redundant switch control facility, provides the
waveguide switch position tell-back input. Should be connected to
the waveguide switch so that this pin is connected to ground when
the amplifier is routed to the dummy load.
GND = RF output routed to dummy load, Not Connected = RF
output routed to the antenna.
RED FLT I/P Part of the redundant switch control facility, receives the status
feedback signal from the other amplifier. When the other amplifier
indicates a fault condition, the RF output from this unit should be
switched to the antenna. This pin should be connected externally to
the RED FLT O/P (Pin k on the user interface connector) of the
other amplifier in the redundant switch system.
GND = Other amplifier operational, Not Connected = Fault on
other amplifier, therefore switch.
EXT INTLK
An external interlock input that operates as a fault trip. If the EXT
INTLK input is opened whilst the amplifier is in the XMIT mode, the
amplifier is automatically placed into the STBY mode. In order to
return to the XMIT mode the EXT INTLK input must first be closed
(reset conditions are detailed in section 5.2.1). If the external
interlock is open in any other mode, the fault condition is indicated
but the amplifier mode is not changed. If this feature is not required,
this pin should be linked to GND within the 41-pin user interface
connector.
GND = XMIT available, Not Connected = Inhibit XMIT.
5.2.6 Control Inputs - Type 3
The following control inputs set the modes of operation of the unit. They are
designed to be linked within the 41-pin user interface connector during equipment
installation and therefore do not form part of the everyday control functions of the
unit. To set the mode, the appropriate pins should be linked to +15 V (pin U on the
user interface connector).
Maximum external link resistance. . . . . . . . . . . . . . . . . . 100 O
Note: Although designed to operate using the internally generated +15 V, with local
links, an external supply can be used to remotely set these modes of operation. Any
external supply should be capable of nominally +15 V @ 5 mA per pin and should
conform to the following requirements:
Maximum logic 0 voltage . . . . . . . . . . . . . . . . . . . . 0.8 V dc
Minimum logic ‘1’ voltage. . . . . . . . . . . . . . . . . . . +12 V dc
Maximum logic ‘1’ voltage . . . . . . . . . . . . . . . . . . +30 V dc
ADD 0
Six binary coded discrete lines that allow the user to set the
ADD 1
address of the unit when using the RS-422 or RS-485 serial
ADD 2
communications interfaces (this hardware address select mode
ADD 3
is only active when ADD SEL is not connected to +15 V).
ADD 4
+15 V = binary ‘1’, Not Connected = binary ‘0’.
ADD 5
HBN63xx-1, Issue 8, Page 24
The following gives the binary and equivalent hexadecimal code of these discrete
lines.
Address code
ADD 543210
Address in Hex
000000
30H
000001
31H
000010
32H
"
"
"
"
111110
6EH
111111
6FH
ADD SEL
Allows the user to select the method of setting the serial
communications interface. The address can be set either in
hardware using the ADD 0 to ADD 5 lines above, or in software
over the serial interface itself (see section 6.3).
Note: With hardware address selection, the only valid baud rate is
9600.
+15 V = Software selection, Not Connected = Hardware
selection.
This feature allows the user to return to a known address, in the event of the
software losing contact with the unit, by simply cutting the ADD SEL to +15 V link.
The amplifier is supplied with no links, hence the interface is set to:
address
30H
baud rate
9600
CTRL O/R
This allows the user to select the ‘black box’ mode. When selected,
as soon as the mains supply is applied to the unit, the three minute
WARMUP mode is initiated and subsequently the unit automatically
enters the STBY mode. If the XMIT control input is linked to GND
the unit then enters the XMIT mode. Switching the XMIT control
input between GND and open circuit will switch the unit between
XMIT and STBY. In addition, as the mains supply is applied to the
unit, the internal digital electronically variable attenuator (DEVA) will
be set to minimum attenuation if fitted (units with a D suffix to the
product type number). This feature provides operation with the
minimum of control connections. Whilst in this mode, all indicator
outputs and other control inputs excluding the XMIT operate as
normal.
+15 V = Black box mode, Not Connected = Normal mode.
5.2.7 Miscellaneous functions
+15 V
Auxiliary supply output of nominally +15 V dc +5% at 100 mA
maximum. Provides the user with a local low voltage output for use
with type 3 user port control inputs and other external control
interface circuitry.
GND
Provides the ground return reference for many of the user interface
lines.
HBN63xx-1, Issue 8, Page 25
RED SW 1
RED SW 2
RS
RS
RS
RS
RS
TX+
TX7
RX+
RX7
GND
HBN63xx-1, Issue 8, Page 26
Part of the redundant switch control facility, provides two
waveguide switch coil drive outputs. Each output is nominally
+24 V dc at 1.6 A, pulsed for 100 ms. An internal 1.8 A current limit
is provided along with flywheel diodes for protection, further
simplifying the waveguide switch interface considerations. RED SW
1 should be connected so that when asserted, the RF output from
the unit is switched to the antenna. RED SW 2 should be connected
so that when asserted, the RF output from the unit is switched to
the dummy load.
Provides connection for a RS-485 or RS-422 interface allowing
connection as a slave to an asynchronous, half duplex, multi-drop,
four-wire bus. This gives full remote control and monitoring of the
HPA as part of an integrated system. The main features, protocols
and operation of the serial bus are described in section 6.
6
6.1
RS-485 SERIAL BUS
General Description and Features
The amplifier (HPA) is equipped with a RS-485 interface allowing connection as a
slave to an asynchronous, half-duplex, multi-drop, four-wire bus. This gives full
remote control and monitoring of the HPA as part of an integrated system.
The following section describes the main features, protocols and operation of the
HPA with the multi-drop serial bus.
6.1.1 HPA Type?
A data request command that prompts a response giving the amplifier type number
and the software issue (see section 6.4.3).
6.1.2 Status?
A data request command that prompts a response of 7 data bytes, within which the
status flags are contained (see section 6.4.3). The following list summarises the
status flags available on the 7 data bytes:
D1
D2
summary fault; If set, indicates that the amplifier has seen at least one
of the fault conditions described in this section. The amplifier operation
and reset conditions will be dependent upon the fault present.
transmitting; If set, indicates that the amplifier is operating in the
transmit mode (full details of the operating modes are given in
section 4.3).
standby; If set, indicates that the amplifier is operating in the standby
mode (full details of the operating modes are given in section 4.3).
warm-up; If set, indicates that the amplifier is operating in the warmup mode (full details of the operating modes are given in section 4.3).
off; If set, indicates that the amplifier is operating in the off mode
(full details of the operating modes are given in section 4.3).
output to antenna; When using the redundant switch control
feature, if set, indicates that the amplifier is routed to the Antenna. If
not set, indicates that the amplifier is routed to the Load. See
section 6.1.3 for details on the operation of the redundant switch
control feature.
auto-redundancy; If set, indicates that the automatic mode for
redundant switch control is enabled. If not set, indicates that the
manual mode for redundant switch control is enabled. See section
6.1.3 for details on the operation of the redundant switch control
feature.
power too high; If set, indicates that the high power alarm is set and
that the RF output power is above the alarm level. The amplifier will
remain in the transmit mode, but with the RF inhibited, until either:
i/
the RF output power falls below the alarm level (decrease the
RF input power or increase the internal digital attenuator, if
fitted) and an ‘RF enable’ request is sent to clear the ‘RF
inhibit’ or
ii/
the high power alarm is disabled (see section 6.1.4.2).
HBN63xx-1, Issue 8, Page 27
high power alarm enabled; If set, shows that the high power
alarm is enabled. See section 6.1.4 for details on enabling/disabling
and operation of the power alarms.
D3
D4
D5
HBN63xx-1, Issue 8, Page 28
power too low; If set, indicates that the low power alarm is set and
that the RF output power level is below the alarm level. The amplifier
will remain in the transmit mode, but the fault flag will only clear
once either:
i/
the RF output power level exceeds the alarm level or
ii/
the low power alarm is disabled (see section 6.1.4.1).
low power alarm enabled; If set, shows that the low power alarm
is enabled. See section 6.1.4 for details on enabling/disabling and
operation of the power alarms.
RF enabled; If set, shows that the RF is enabled. The RF enabled/
inhibited commands are accepted in any of the operational modes. See
section 6.1.7 for details on enabling/disabling the RF inhibit feature.
remote enabled; If set, shows that the amplifier is in the remote
mode, allowing control via the serial communications interface. See
section 6.1.12 for details on enabling/disabling the remote mode.
heater current; If set, indicates that the amplifier has seen an
internal heater fault trip. The amplifier will revert to the off mode
automatically; prime power must be removed and re-applied to reset
the trip.
HV overload; If set, indicates that the amplifier has seen an internal
HV overload fault trip. The amplifier will revert to the standby mode
and automatically attempt to reset three times; for full reset details
see section 5.2.1.
PFC fault; If set, indicates that the amplifier has seen an internal
power factor corrector fault trip. The amplifier will revert to the off
mode automatically, prime power must be removed and re-applied
to reset the trip.
external interlock; If set, indicates that the external interlock input
is asserted. This prevents the amplifier from entering the transmit
state until the input becomes unasserted. The amplifier will revert to
standby if the external interlock is asserted while in transmit (see
section 5.2.5).
reflected power; If set, indicates that the amplifier has seen an
excessive reflected power trip. The amplifier will revert to the
standby mode and automatically attempt to reset three times; for full
reset details see section 5.2.1.
mean helix current; If set, indicates that the amplifier has seen an
excessive mean helix current trip. The amplifier will revert to the
standby mode and automatically attempt to reset three times; for full
reset details see section 5.2.1.
peak helix current; If set, indicates that the amplifier has seen an
excessive peak helix current trip. The amplifier will revert to the
standby mode and automatically attempt to reset three times; for full
reset details see section 5.2.1.
D6
D7
case too hot; If set, indicates that the amplifier has seen an
excessive internal case temperature trip. The amplifier will revert to
the standby mode automatically until the fault condition clears.
upconverter fault; If set, indicates that the amplifier has not
detected an external 10 MHz locking signal (provided, multiplexed
onto the RF input). This flag is only active if the amplifier contains an
upconverter module (type numbers with a U in the suffix). This is an
advisory alarm only and will remain set until the fault condition clears
- the amplifier will remain in the transmit mode.
baseplate too hot; If set, indicates that the amplifier has seen an
excessive PSU baseplate temperature trip. The amplifier will revert
to the standby mode automatically until the fault condition clears.
TWT too hot; If set, indicates that the amplifier has seen an
excessive TWT collector temperature trip. The amplifier will revert to
the standby mode automatically until the fault condition clears.
fan #2 fault; If set, indicates that the amplifier has seen an internal
cooling fan fault trip. The amplifier will revert to the off mode
automatically, prime power must be removed and re-applied to reset
the trip.
fan #1 fault; If set, indicates that the amplifier has seen an internal
cooling fan fault trip. The amplifier will revert to the off mode
automatically, prime power must be removed and re-applied to reset
the trip.
6.1.3 Redundancy Mode
The following simple command messages that do not have an associated return of
data allow control of the built-in redundancy waveguide switching feature (see
section 3.6 for details of operation; see section 6.4.1 for details of message format).
6.1.3.1 Enable Manual Redundancy Mode; Cancels the automatic redundant
mode, described below.
6.1.3.2 Enable Auto Redundancy Mode; Selects the automatic redundant
operating mode. In the event of an amplifier failure, the waveguide switch will be
automatically positioned so as to route the output from the good amplifier to the
antenna.
6.1.3.3 This HPA to Antenna; Selects the appropriate position of the waveguide
switch that routes this amplifier to the antenna.
6.1.3.4 This HPA to Load; Selects the appropriate position of the waveguide
switch that routes this amplifier to the load.
6.1.4 Power Alarms
The following command messages allow the control/monitoring of the built in high
and low power alarms feature. The associated fault flags are detailed in section 6.1.2.
6.1.4.1 Set Low Power Alarm; Allows the low power alarm level to be set in
watts, or disabled when set to zero (see section 6.4.5 for details of passing
parameters).
6.1.4.2 Set High Power Alarm; Allows the high power alarm level to be set in
watts, or disabled when set to zero (see section 6.4.5 for details of passing
parameters).
HBN63xx-1, Issue 8, Page 29
6.1.4.3 Low Power Alarm?; A command message requesting data, that results in
a response showing the current low power alarm setting in watts (see section 6.4.2
for details of command and response format).
6.1.4.4 High Power Alarm?; A command message requesting data, that results
in a response showing the current low power alarm setting in watts (see section 6.4.2
for details of command and response format).
6.1.5 Warm-up Time?
A command message requesting data, that results in a response showing the
remaining warm-up time in seconds (see section 6.4.2 for details of command and
response format). Only active when in the warm-up mode, returns zero seconds in all
other operating modes including the off mode.
6.1.6 Attenuator Control
The following command messages allow the control/monitoring of the built in digital
attenuator feature, if fitted.
6.1.6.1 Set Attenuator; Allows the digital attenuator level to be set in nominal
units. Units range from 0 to 255, 0 signifies zero attenuation or maximum gain (see
section 6.4.5 for details of passing parameters).
6.1.6.2 Attenuator?; A command message requesting data, that results in a
response showing the current attenuator setting in nominal units of 0 to 255, 0
corresponding to zero attenuation or maximum gain (see section 6.4.2 for details of
command and response format).
6.1.7 RF Control
The following simple command messages that do not have an associated return of
data allow control of the RF by switching on/off the power supply to the active RF
input components, if fitted (see section 6.4.1 for details of message format).
6.1.7.1
Enable RF; Cancels the RF inhibit mode, described below.
6.1.7.2 Inhibit RF; Inhibits the RF output from the unit by removing the power to
the active RF input components.
6.1.8 Helix Current Monitoring
The following command messages allow the control/monitoring of the built in helix
current monitoring and recording feature.
6.1.8.1 Helix Record Top of File; A simple command message that returns the
helix current record pointer to the top of the non-volatile historical helix current file,
detailed below. The ‘top of the file’ corresponds to the earliest record (see section
6.4.1 for details of message format).
6.1.8.2 Next Ihlx Record?; A command message requesting data, that results in a
response showing the historical helix current record in mA. During operation in the
transmit mode, the amplifier automatically stores in non-volatile memory a reading of
helix current every 15 minutes. After 50 hours (200 readings) an average is taken and
stored to the non-volatile historical helix current file. Each request automatically steps
the file pointer to the next entry, allowing easy data retrieval. Resetting to the top of
the file (earliest entry) is detailed in section 6.1.8.1, above (see section 6.4.2 for
details of command and response format).
HBN63xx-1, Issue 8, Page 30
6.1.8.3 Helix Current?; A command message requesting data, that results in a
response showing the helix current in mA. If a request is sent in any mode other than
transmit, the response will show zero helix current (see section 6.4.2 for details of
command and response format).
6.1.9 Elapsed Hours?
A command message requesting data, that results in a longer data string response
showing the total elapsed hours and the elapsed hours in the transmit, standby and
off modes (see section 6.4.4 for details of command and response format).
6.1.10 Operating Modes
The following simple command messages that do not have an associated return of
data allow control of the amplifier operating modes (see section 4.3 for details of
operating modes, see section 6.4.1 for details of message format).
6.1.10.1 Off; Selects the off mode of operation.
6.1.10.2 Standby; Selects the standby mode of operation. Results in the automatic
initiation of the cathode heater warm-up timer (180 seconds) if selected from the off
mode.
6.1.10.3 Transmit; Selects the transmit mode of operation. Results in the
automatic initiation of the cathode heater warm-up timer (180 seconds) if selected
from the off mode.
6.1.11 Forward Power?
A command message requesting data, that results in a response showing the RF
output power in watts. If a request is sent in any mode other than transmit, the
response will show zero forward power (see section 6.4.2 for details of command and
response format).
6.1.12 Interface Set Up
To use the serial communications interface, the amplifier must be placed into the
remote mode of operation; this can only be done over the serial communications
interface. To send the remote enable command, the address and baud rate must be
correctly set. This can be done either:
i/
in hardware, on the 41-pin control connector using links (see section 5) or
ii/
via the master controlling device by polling all combinations of address and
baud. Once captured either the address or baud rate can be modified.
The following command messages allow the set-up and control of the serial
communications interface feature:
6.1.12.1 Set Address; Allows the address to be set in nominal units between 48
and 111, 48 corresponding to address Hex: 30h, 111 corresponding to address Hex:
6Fh (see section 6.4.5 for details of passing parameters).
6.1.12.2 Set Baud Rate; Allows the baud rate to be set in nominal units between 1
and 6, 1 corresponding to a baud rate of 600, 2 = 1200, 3 = 2400, 4 = 4800, 5 =
9600 and 6 = 19200 (see section 6.4.5 for details of passing parameters).
HBN63xx-1, Issue 8, Page 31
6.1.12.3 Go To Local; A simple command message that places the amplifier into
the local mode, allowing control via the ‘user interface’ discrete control lines. Data
requests via the serial communications interface will continue to be serviced in the
local mode, however commands other than ‘Remote enable’ will be rejected as nonexecutable (see section 6.4.1 for details of message format).
6.1.12.4 Remote Enable; A simple command message that places the amplifier
into the remote mode, allowing control via the serial communications interface.
When in the remote mode, the standby and transmit ‘user interface’ discrete control
inputs are disabled; all other control inputs and monitor outputs remain active.
6.2
Protocol
6.2.1 Interface and Termination
RS-485 compatible 4-wire with no receiver biasing option. When using this amplifier
with the serial communications interface, a 120 O bus termination should be fitted
externally between the Rx+ (pin d) and Rx7 (pin e) connections of the 41-pin
control connector. If used in the redundant mode with another amplifier, or on a
multi-drop system, the bus termination is only required on one equipment, typically
the furthest from the master device.
A screened cable, terminated to the backshell of the user interface connector, should
be used to prevent radio frequency interference from adversely affecting operation;
when connecting the screen of the cable to the backshell, a full 3608 electrical
connection should be made (pig-tailed connections should be avoided).
For short cable runs up to approximately 5 m, a suitable data transmission cable
would include a twin twisted pair conductor arrangement, typical conductor size of
24 to 26 AWG, screened in aluminised tape with an overall tinned copper braid. A pin
is provided on the connector for the connection of a drain wire if available on the
cable. For cable runs above 5 m, an additional insulated conductor core should be
used as a signal return connection.
6.2.2 Data format
The format is:
1 start bit
8 data bits with most significant bit sent as EVEN parity
1 stop bit
Which can be realised as:
1 start bit
7 data bits
EVEN parity
1 stop bit
6.2.3 Data Rate
The default data rate is 9600 baud but other baud rates may be selected using the
appropriate command.
HBN63xx-1, Issue 8, Page 32
6.2.4 Generalised Message Format
5delimiter4 address command
data 5delimiter4 checksum
delimiter:
Function
Start of text
End of text
Acknowledge
Not acknowledge
ASCII
5STX4
5ETX4
5ACK4
5NAK4
Hex
2h
3h
6h
15h
address:
The unique address of the HPA in the range:
Dec: 48 to 111
ASCII: 0 to o
Hex: 30h to 6Fh
The HPA will respond only to messages containing this address and
will ignore all other messages.
command:
A character specifying a particular function for the HPA to perform.
The character can be in the range:
ASCII: 0 to 5DEL4
Hex: 30h to 7Fh
data:
A parameter qualifying a command or data returned in response to a
command. Characters can be in the range:
ASCII: 5SP4 to 5DEL4
Hex: 20h to 7Fh
checksum:
Bit by bit exclusive OR of all characters in message between and
including the delimiters. Characters can be in the range:
ASCII: 5NUL4 to 5DEL4
Hex: 0h to 7Fh
6.2.5 Command Message Format
5STX4 address command 5ETX4 checksum
Command message with no qualifying data.
5STX4 address
command data 5ETX4 checksum
Command message including a qualifying parameter.
HBN63xx-1, Issue 8, Page 33
6.2.6 Response Message Format
All valid command messages are acknowledged in the following forms. The address
and command characters are a reiteration of those in the command message.
5ACK4 address command 5ETX4 checksum
Simple acknowledgment.
5ACK4 address
command data 5ETX4 checksum
Acknowledgment with data.
Any unrecognised or unexecutable commands will be acknowledged in the form
shown below.
5NAK4 address command data 5ETX4 checksum
Not acknowledge, with explanation for the command rejection.
Any command containing a parity, framing, overrun, or checksum error will be
ignored and consequently the master must re-issue the command.
6.2.7 Message Timing
The maximum time between each character of a message must not exceed 10 ms,
and a pause of 10 ms minimum should be inserted after a command message to allow
units to recognise bus inactivity between commands.
HBN63xx-1, Issue 8, Page 34
6.3
Summary Of Command Messages
Command
ASCII Hex
HPA type?
0
30
Status?
1
31
Enable manual redundancy mode
5
35
Enable auto redundancy mode
6
36
This HPA to antenna
7
37
This HPA to load
8
38
Set low power alarm
A
41
Set high power alarm
B
42
Warm-up time?
C
43
Set attenuator
D
44
Enable RF
E
45
Helix record top of file
F
46
Next Ihlx record?
G
47
Helix current?
H
48
Input power? (see note)
I
49
Elapsed hours?
J
4A
Go to local
L
4C
Inhibit RF
N
4E
Off
O
UC
Forward power?
P
50
Remote enable
R
52
Standby
S
53
Reflected power? (see note)
T
54
Attenuator?
U
55
High power alarm?
V
56
Low power alarm?
W
57
Transmit
X
58
Set address
Y
59
Set baud rate
Z
5A
Type (see below)
US
US
UC
UC
UC
UC
UC+p
UC+p
US
UC+p
UC
UC
US
US
US
US
UC
UC
4F
US
UC
UC
US
US
US
US
UC
UC+p
UC+p
Type:
UC
user command
UC+p
user command with parameter
US
user status/data request
Note: Input power and reflected power are not monitored.
Data requests will be serviced with the HPA in either ‘local’ or ‘remote’ mode.
However, for other commands to be executed, (with the exception of ‘remote
enable’) the HPA must be in ‘remote’ mode. Commands will be rejected as
unexecutable with the HPA in ‘local’ mode.
HBN63xx-1, Issue 8, Page 35
6.4
Examples Of Command And Response Messages
Examples for each command type are given in a generalised, ASCII and hexadecimal
form using the address 5 (35h) for the specific examples. The expected response
message for each command is shown using the same format.
Note:
*
ASCII non-printable characters are enclosed thus 5 4.
*
The final character in each example is the checksum.
6.4.1 Simple Command Message (no return of data)
Command
ASCII Hex
Enable manual redundancy mode
5
35
Enable auto redundancy mode
6
36
This HPA to antenna
7
37
This HPA to load
8
38
Enable RF
E
45
Helix record top of file
F
46
Go to local
L
4C
Inhibit RF
N
4E
Off
O
4F
Remote enable
R
52
Standby
S
53
Transmit
X
58
Command:
Response:
Gen: 5STX4 address S 5ETX4 checksum
ASCII: 5STX4 5S 5ETX4 g
Hex: 02 35 53 03 67
Gen: 5ACK4 address S 5ETX4 checksum
ASCII: 5ACK45S5ETX4c
Hex: 06 35 53 03 63
6.4.2 Command Messages Requesting Data
Command
Warm-up time?
Next Ihlx record?
Helix current?
Elapsed hours?
Forward power?
Attenuator?
High power alarm?
Low power alarm?
Command:
Response:
HBN63xx-1, Issue 8, Page 36
ASCII Hex
C
43h
G
47
H
48
J
4A
P
50
U
55
V
56
W
57
Gen: 5STX4 address H 5ETX4 checksum
ASCII: 5STX45H5ETX4|
Hex: 02 35 48 03 7C
Gen: 5ACK4 address H xx.xmA 5ETX4 checksum
ASCII: 5ACK45H 12.4mA5ETX4M
Hex: 06 35 48 31 32 2E 34 6D 41 03 4D
6.4.3 Universal Command Messages Requesting Data
Command
HPA type?
Command:
Response:
ASCII Hex
0
30h
Gen: 5STX4 address 0 5ETX4 checksum
ASCII: 5STX4505ETX45EOT4
Hex: 02 35 30 03 04
Gen: 5ACK4 address 0 mmmmnn 5ETX4 checksum
ASCII: 5ACK4506315015ETX45NUL4
Hex: 06 35 30 36 33 31 35 30 31 03 00
The amplifier type is returned as 631501. N6315 operating with control software issue
01.
Command
Status?
Command:
Response:
ASCII Hex
1
31h
Gen: 5STX4 address 1 5ETX4 checksum
ASCII: 5STX4515ETX45ENQ4
Hex: 02 35 31 03 05
Gen: 5ACK4 address 1 D1 D2 D3 D4 D5 D6 D75ETX4 checksum
ASCII: 5ACK451P@A@@A@5ETX4Q
Hex: 06 35 31 50 40 41 40 40 41 40 03 51
HBN63xx-1, Issue 8, Page 37
D1 to D7 are seven data bytes representing the status of the amplifier, defined as
follows:
D1
bit 7
bit 6
bit 5
bit 4
bit 3
bit 2
bit 1
bit 0
(parity)
1
0
summary fault
transmitting
standby
warm-up
off
D2
bit 7
bit 6
bit 5
bit 4
bit 3
bit 2
bit 1
bit 0
(parity)
1
0
0
output to antenna
auto-redundancy enabled
power too high
high power alarm enabled
D3
bit 7
bit 6
bit 5
bit 4
bit 3
bit 2
bit 1
bit 0
(parity)
1
0
0
power too low
low power alarm enabled
RF enabled
remote enabled
D4
bit 7
bit 6
bit 5
bit 4
bit 3
bit 2
bit 1
bit 0
(parity)
1
0
0
heater current
HV overload
0
PFC fault
D5
bit 7
bit 6
bit 5
bit 4
bit 3
bit 2
bit 1
bit 0
(parity)
1
0
0
external interlock
reflected power
mean helix current
peak helix current
D6
bit 7
bit 6
bit 5
bit 4
bit 3
bit 2
bit 1
bit 0
(parity)
1
0
0
0
0
case too hot
Upconverter fault
D7
bit 7
bit 6
bit 5
bit 4
bit 3
bit 2
bit 1
bit 0
(parity)
1
0
0
baseplate too hot
TWT too hot
fan #2 fault
fan #1 fault
6.4.4 Command messages requesting longer data strings
The command J (elapsed hours?) returns longer data strings than other commands.
The format is as follows:
Command
Elapsed hours?
HBN63xx-1, Issue 8, Page 38
ASCII Hex
J
4A
Command:
Response:
5STX4 address J 5ETX4 checksum
5ACK4 address J Tnnnnn Xnnnnn Snnnnn
Onnnnn 5ETX4 checksum
where:
Tnnnnn - total elapsed hours
Xnnnnn - elapsed hours in transmit mode
Snnnnn - elapsed hours in standby mode
Onnnnn - elapsed hours in off mode
6.4.5 Command Messages Passing Parameters
Command
Set low power alarm
Set high power alarm
Set attenuator
Set address
Set baud rate
Command:
Response:
ASCII
A
B
D
Y
Z
Hex
41h
42h
44h
59
5A
Gen: 5STX4 address A=nnn 5ETX4 checksum
ASCII: 5STX45A=1505ETX4 |
Hex: 02 35 41 3D 31 35 30 03 7C
Gen: 5ACK4 address A 5ETX4 checksum
ASCII: 5ACK45A5ETX4q
Hex: 06 35 41 03 71
The alarm setting is sent as ’=nnn’, where ’nnn’ is in watts (leading zeros not
required). The alarms are disabled by setting to zero (A=0, B=0).
The attenuator setting is sent as ’=nnn’ where ’nnn’ is in nominal units (leading zeros
not required).
If the ‘=’ is omitted, the command will be considered invalid and a ‘not
acknowledge’ response sent.
6.4.6 Response To An Invalid Command Message:
Command messages will be classed as invalid if the command is not recognised, a
parameter is out of range or not numeric or the command cannot be executed. For
example, if a command which is not part of the amplifier command set is used, the
response will be as follows:
Command:
Response:
Gen: 5STX4 address B 5ETX4 checksum
ASCII: 5STX45b5ETX4v
Hex: 02 35 42 03 76
Gen: 5NAK4 address B D1 5ETX4 checksum
ASCII: 5NAK45Bp5ETX45DC14
Hex: 15 35 42 70 03 11
HBN63xx-1, Issue 8, Page 39
D1 is a byte representing the invalid command code. It is defined as follows:
D1
bit 7
bit 6
bit 5
bit 4
bit 3
bit 2
bit 1
bit 0
6.5
(parity)
1
1
1
0
0
command not executed
command/data invalid
Application Notes
The following application notes apply to amplifiers with operating software SAMOS
issue 1 or higher.
Before attempting to control the amplifier using the RS-485 4-wire multi-drop bus,
check the following:
*
Ensure that the data connector is correctly wired (Rx+, Rx7 are not reversed
etc.)
*
Check that the amplifier data rate is the same as that of the master (should be
set to 9600 baud).
*
Ensure that the amplifier has a unique address.
*
Check that the master has the same data format as the amplifier (1 start bit, 7
data bits, EVEN parity and 1 stop bit).
HBN63xx-1, Issue 8, Page 40
7
FAULT FINDING
If the amplifier does not work correctly, consult the following table before contacting
either the helpline or your distributor for further assistance.
Fault experienced
Possible cause
No cooling air flow
Mains connector not connected
Mains supply not present at amplifier input check all external trips, fuses, breakers and
cabling
Fans operate but amplifier fails to
respond to user port control inputs
User port connector not connected
External control system fault
Control cable damaged/severed
No RF output, exhaust air is cool
Transmit mode not selected
No RF output, exhaust air is warm
No or low RF input
Damaged/severed external RF cable
Internal gain adjust is set to minimum (only
on units fitted with DEVA option)
RF Inhibit facility active. Check external RF
inhibit circuitry. If external RF inhibit circuit
is not used, check user interface connector
mating half has a link between pins H and P
(see section 5.2)
BASEPLATE OVER
TEMPERATURE condition
Inadequate cooling for the amplifier (see
section 3.3)
Obstruction within the cooling airflow system
The lower lid is removed or incorrectly fitted
External ducting is too long or restrictive
(see section 3.3)
TWT OVE R TEMPERATURE
condition
Inadequate cooling for the amplifier (see
section 3.3)
Obstruction within the cooling airflow
system
The lower lid is removed or incorrectly fitted
External ducting is too long or restrictive
(see section 3.3)
COOLING FAN 2 fault
Contact your distributor.
COOLING FAN 1 fault
Contact your distributor
HEATER FAULT fault
Contact your distributor
HBN63xx-1, Issue 8, Page 41
Fault experienced
Possible cause
HV FAULT fault
Contact your distributor
DC BUS FAULT fault
Contact your distributor
PFC FAULT fault
Mains supply lower than the minimum 99 V
EXTERNAL INTERLOCK TRIP
fault
External interlocks activated code active
External interlock cable damaged/severed
If external interlock is not used, check user
interface connector mating half has a link
between pins R and P (see section 5.2)
REFLECTED POWER TRIP fault
Poor match with external equipment
External waveguide incorrectly fitted or
damaged
Protective bung still fitted to amplifier waveguide output or other foreign object within
waveguide (including water/moisture)
MEAN HELIX OVER CURRENT
TRIP fault
Contact your distributor
PEAK HELIX OVER CURRENT
TRIP fault
Contact your distributor
INTERMODULATION PRODUCTS
too high / out of specification
With the upconverter option, L-band drive
level too high (see section 4.4)
UPCONVERTER fault
With the upconverter option, 10 MHz locking
signal not present on L-band input of the
upconverter; check correct connection of Lband input cable and correct operation of
previous equipment
UPCONVERTER SIGNAL ‘out of
lock’ but no UPCONVERTER fault
indication
With the upconverter option, L-band drive
level too low (see section 4.4)
HBN63xx-1, Issue 8, Page 42
8
8.1
SPECIFICATION
Electrical
Output frequency:
UA and DUA variants . . . . .
W variants . . . . . . . . .
all other types . . . . . . . .
Input frequency:
UA and DUA variants . . . . .
UB and DUB variants . . . . .
W variants . . . . . . . . .
all other types . . . . . . . .
Typical output power at the output
N6312 . . . . . . . . . . .
N6315 . . . . . . . . . . .
N6318 . . . . . . . . . . .
Gain at rated power:
C variants . . . . . . . . . .
D variants . . . . . . . . . .
UA and UB variants . . . . .
DUA and DUB variants . . . .
all other types . . . . . . . .
RF input level:
C variants . . . . . . . . . .
DUA, DUB, UA and UB variants
. . . . . . . . . . . . 14.0 to 14.5 GHz
. . . . . . . . . . . 12.75 to 14.5 GHz
. . . . . . . . . . . 13.75 to 14.5 GHz
. . .
. . .
. . .
. . .
flange:
. . .
. . .
. . .
.
.
.
.
.
.
.
.
.
.
.
.
.
.
.
.
.
.
.
.
.
.
.
.
.
.
.
.
.
.
.
.
.
.
.
.
.
.
.
.
.
.
.
. . 950 to 1450 MHz
. . 950 to 1700 MHz
. 12.75 to 14.5 GHz
. 13.75 to 14.5 GHz
. . . . . . . . . . . . .
. . . . . . . . . . . . .
. . . . . . . . . . . . .
120 W
150 W
165 W
.
.
.
.
.
typical
typical
typical
typical
typical
.
.
.
.
.
.
.
.
.
.
.
.
.
.
.
.
.
.
.
.
.
.
.
.
.
.
.
.
.
.
.
.
.
.
.
.
.
.
.
.
.
.
.
.
.
36
62
50
47
65
dB
dB
dB
dB
dB
. . . . . . . . . . . . . +30 dBm max
. . . . . . . . . . . . . . 0 dBm max
710 dBm min
all other types . . . . . . . . . . . . . . . . . . . . . +10 dBm max
Prime power:
voltage . . . . . . . . . . . . . . . . . . . . . . . . . 99 to 265 V
frequency . . . . . . . . . . . . . . . . . . . . . . . . 47 to 63 Hz
power . . . . . . . . . . . . . . . . . . . . . . . . . 1050 W max
power factor . . . . . . . . . . . . . . . . . . . . . . . 0.95 nom
8.2
Mechanical
Dimensions (19-inch rack):
width . . . . . . . .
height . . . . . . . .
depth . . . . . . . .
Weight (nominal) . . . . .
.
.
.
.
.
.
.
.
.
.
.
.
.
.
.
.
.
.
.
.
.
.
.
.
.
.
.
.
.
.
.
.
.
.
.
.
.
.
.
.
.
.
.
.
.
.
.
.
.
.
.
.
. 206 mm (8.1 inch)
. 203 mm (8.0 inch)
. 436 mm (17.2 inch)
. . . . 12 kg (26 lb)
HBN63xx-1, Issue 8, Page 43
8.3
Environmental (for operation outside these parameters, refer to e2v
technologies for guidance)
Operating temperature . . . . . . . . . . . . . . . . . . 740 to +45 8C
Derating . . . . . . . . . . . . . . . . . . . 2 8C/300 m above sea level
Storage temperature . . . . . . . . . . . . . . . . . . . 740 to +80 8C
Relative humidity (non-condensing) . . . . . . . . . . . . . . . . . 100%
Altitude:
operating . . . . . . . . . . . . . . . . . . . 4.5 km (15,000 ft) max
non-operating. . . . . . . . . . . . . . . . . . 12 km (40,000 ft) max
Vibration. . . . . . . MIL-STD-810E; common carrier and field transportation
Shock . . . . . IEC Publication 68-2-27 Part 2 Test Ea 25 g for 11 ms, half-sine
Electromagnetic compatibility . . . . . . . . . . EMC Directive 89/336/EEC
Safety. . . . . . . . . . . . . . . . .
Low Voltage Directive 73/23/EEC
8.4
RF Characteristics
This amplifier meets the requirements of INTELSAT/EUTELSAT for TWTAs in the
Ku-band. Full details are shown on the appropriate data sheet.
9
*
RELATED DOCUMENTS
Data Sheets A1A-N6312, A1A-N6315 or A1A-N6318
HBN63xx-1, Issue 8, Page 44
N.C.
+
7
+
7
RED FLT I/P
RED FLT O/P
RED SW1
RED SW2
RS GND
SWITCH SENSE
RS Tx
RS Tx
RS Rx
RS Rx
GND
EXT INTLK
INV RF INHIB
HPA ‘A’
F
G
H
J
K
L
M
N
P
R
S
T
U
V
W
X
Y
Z
a
b
c
d
e
f
g
h
j
k
m
n
p
q
r
s
t
A
SERIAL BUS
120R 1/4 W
D
B
1
3
4
5
6
9
C
E
Rx+ to Rx7
TERMINATING
RESISTOR
FITTED
INTERNALLY
A
W/G SWITCH
(SHOWN USING
AST.75/24
TYPE SWITCH)
SCREEN
Tx+
Rx+
RS485 0V RTN
Rx7
Tx7
9-WAY ‘D’ TYPE ‘PL1’
F
N6143 CONTROLLER CONNECTIONS
120R
/4 W
1
SERIAL BUS
120R
1
/4 W
t
k
m
n
p
q
b
c
d
e
1 LOAD
(RED SW1)
(RED SW2)
NOTE :
TERMINATING RESISTORS
120R + 1%, 1/4 W CARBON FILM
(+15V)
U
2
HPA ‘A’
ADDRESS SELECT (31 H)
ANTENNA 3
P
R
S
H
HPA ‘B’
HPA ‘B’
4
APPENDIX A
Dual Amplifier Redundant Configuration using N6143 Controller
If the requirement is for a two-amplifier redundant system, the following wiring can be used.
A personal computer can be used in place of the N6143 controller; commands and protocols
are detailed in this manual.
HBN63xx-1, Issue 8, Page 45
APPENDIX B
Dual Amplifier Redundant Configuration with Manual Control
Basic control functions can be obtained by using manual toggle switches. An example of the
interface wiring for this is as follows:
HPA ‘A’
WAVEGUIDE SWITCH
HPA ‘B’
A
A
H
B
B
E
C
C
D
D
E
E
U
U
F
J
OFF
K
STBY
L
XMIT
P
D
J
G
C
A
B
OFF
J
STBY
K
XMIT
L
P
AUTO/MAN
SELECT
r
r
SELECT A/B
s
s
k
k
m
m
n
n
p
p
q
q
t
t
HBN63xx-1, Issue 8, Page 46
APPENDIX C
Phase Combination using the Compact Redundant Combiner Assembly (CRCA)
If there is a requirement to provide two amplifiers with phase combination to give increased
power at the antenna, the N6145 controller is required as shown below. With the amplifiers
connected in this way, an RF INHIBIT will be generated as the CRCA waveguide switch
changes position.
HPA ‘A’
k
b
c
d
e
p
HPA ‘B’
P
R
H
t
t
p
R
H
k
b
c
d
e
p
S
U
120 O, 1/4 W
TO CRCA
4
6
3
9
5
AMP. INT.
N6143
CONTROLLER
1
9
8
3
5
HPA ‘A’
INTERFACE
9
8
5
3
HPA ‘B’
INTERFACE
N6145 CONTROLLER
HBN63xx-1, Issue 8, Page 47
APPENDIX D
Single Amplifier Configuration with N6143/N6081D Controllers
If operating in single amplifier mode, the remote interfacing becomes easier to provide. A
simple RS-485 link is required between the amplifier and the controller to give full functionality. The dual amplifier controller (N6143) can still be used in this set-up as it is fully
configurable to either single or dual amplifier mode of operation. The N6081D is a low-cost,
single amplifier controller that also provides the amplifier parameter display (it uses the low
voltage DC supply from the amplifier, so it does not require a mains power connection).
Examples of the interface wiring for this method of control are as follows:
USING N6143
H
P
N6143
CONTROLLER
R
1
HPA
b
4
c
6
d
3
e
9
p
5
120 O, 1/4 W
Cable: screened twisted pair
USING N6081D
HPA
A
2
B
4
C
3
D
5
E
6
H
14
J
7
K
8
L
9
N6081D
CONTROLLER
P
R
1
U
b
c
d
e
p
HBN63xx-1, Issue 8, Page 48
10
120 O, 1/4 W
11
Twisted pairs
13
120 O, 1/4 W
120 O, 1/4 W
12
APPENDIX E
Single Amplifier Configuration with Manual Control
When operating in single amplifier mode with no serial bus controller, it is possible to provide
full control manually as shown below.
Notes:
1. If switch 2 is set to XMIT on application of prime power, the amplifier will automatically
enter the XMIT state after 3 minutes warm-up.
2. To enter the OFF state, switch 2 must be in the STBY position prior to the OFF state
being selected via switch 1.
3. The resistor values will depend on the type of LED used.
4. If specific fault indication is required, this circuit can be used. Refer to section 5.2.1 for
codes.
OFF
A
WARM UP
B
STBY
C
XMIT
D
SUM FLT
E
U
W
MUX
X
0
SEE NOTE 4
Y
Z
a
1
2
3
H
J
K
L
SWITCH 1 MOMENTARY
ACTION CENTRE BIAS
OFF
STBY
XMIT
SWITCH 2 (SPST) SHOWN
IN ‘STBY’ POSITION
STBY
P
R
Printed in England
HBN63xx-1, Issue 8, Page 49