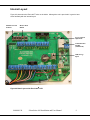
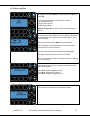
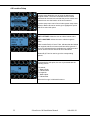
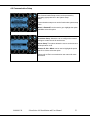
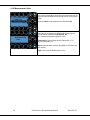
1
™ iPonic 600 INTELLIGENT ENVIRONMENTAL CONTROLLER Installation and User’s Guide November 2011 Preliminary Edition Copyright © 2011 Corporation iPonic 600 ™ INTELLIGENT ENVIRONMENTAL CONTROLLER Installation and User’s Guide November 2011 Preliminary Edition Copyright © 2011 Corporation Table of Contents Introduction ..................................................................................... 1 Link4 Corporation Contact Information ........................................................................ 1 Terms and Conditions .................................................................................................. 2 Warranty ....................................................................................................................... 2 Installation ....................................................................................... 3 Content Inspection ....................................................................................................... 3 Mounting the iPonic 600 ............................................................................................ 4 Before you Begin ............................................................................ 5 Temperature Control.................................................................................................... 5 Deadbands .................................................................................................................. 5 Setpoint ....................................................................................................................... 5 Ramping ...................................................................................................................... 6 Control Strategy ........................................................................................................... 7 Setpoint and Staging Worksheets ............................................................................... 7 Internal Layout ............................................................................................................. 9 Connecting to the iPonic 600 ................................................................................... 11 Indoor Sensor Module Installation ............................................................................. 11 Optional Ethernet Cable Installation .......................................................................... 11 Equipment Installation ............................................................................................... 12 Low Voltage Output Installation ................................................................................. 13 Programming ................................................................................. 15 Before You Begin....................................................................................................... 15 iPonic 600™ Main Status Screens ............................................................................ 15 Navigation .................................................................................................................. 15 Main Status Screen Entries .............................................................................. 18 Programming Screens ............................................................................................... 20 1.0 CURRENT SETPOINT PROGRAMMING ............................................................ 21 1.1 Temperature Setpoint ................................................................................... 22 1.1.1 Global Temperature Settings.............................................................. 23 1.2 Humidity Setpoint ......................................................................................... 23 1.2.1 Global Humidity Settings ..................................................................... 24 1.3 CO2 SetPoint................................................................................................ 25 1.3.1 CO2 Global Settings ............................................................................. 25 1.4 Light Settings ................................................................................................ 27 1.4.1 Global Light Settings ............................................................................ 27 2.0 GROWTH SCHEDULE ......................................................................................... 28 3.0 REPORTS ............................................................................................................ 31 3.1 Sensor Reports............................................................................................. 31 3.2 Graphing ....................................................................................................... 31 3.2.1 Temperature ........................................................................................ 32 3.2.2 Humidity .............................................................................................. 33 3.2.3 Light .................................................................................................... 33 3.2.4 CO2 ..................................................................................................... 33 4.0 SYSTEM SETUP .................................................................................................. 34 4.1 Equipment Setup .......................................................................................... 35 4.1.1 Quick Setup .......................................................................................... 35 4.1.2 Advanced ............................................................................................. 35 4.1.2.1 Timed Override ......................................................................... 36 4.1.2.2 Initial Settings ........................................................................... 37 4.2. Scheduling Setup (Growth Curve Setup) ..................................................... 42 4.3. Sensor Setup ............................................................................................... 43 4.3.1 Advanced ............................................................................................ 43 4.3.1.1 Map Sensors............................................................................ 44 4.3.1.2 Calibrate Sensors .................................................................... 44 4.3.1.3 Self-Test Set Up ...................................................................... 44 4.3.1.4 Analog Sensor Mapping .......................................................... 45 4.4 Alarms Setup ................................................................................................ 46 4.5 Time/Date Setup ........................................................................................... 47 4.5.1 Set Time .............................................................................................. 47 4.5.2 Set Date .............................................................................................. 47 4.6 Advanced...................................................................................................... 48 4.6.1 Air Exchange Settings ......................................................................... 48 4.6.2 Diagnostics .......................................................................................... 49 4.6.3 Time Settings ...................................................................................... 49 4.6.4 Clear Data ........................................................................................... 49 4.7 Save/Restore ................................................................................................ 50 4.7.1 Save/ Restore Configuration ............................................................... 50 4.7.2 Save Log Files..................................................................................... 51 4.7.3 Save/Restore Schedule ....................................................................... 51 4.8 Location Setup.............................................................................................. 52 4.9 Communication Setup .................................................................................. 53 4.10 Measurement Units .................................................................................... 54 5.0 SAVE/RESTORE CONFIG ................................................................................... 55 6.0 STAGES ............................................................................................................... 56 6.1 Temperature Stages ..................................................................................... 57 6.2 Humidity Stages ........................................................................................... 57 Introduction Welcome to iPonic 600TM, Link4‟s Intelligent Hydroponic Environmental Controller. The iPonic 600TM represents the latest in indoor hydroponic environmental control automation. This UL and cUL procuct enables you to control and integrate a variety of equipment in your hydroponic facility. Your heating, cooling, venting, humidity, CO2, and lighting needs are linked together into one flexible, easy-to-use system. Link4 can offer reliable service because we are staffed by the designer and engineers that developed the iPonic TM 600TM. In designing the iPonic 600 it was our purpose to design a controller specifically for the unique demands for the indoor growers. Your control system should improve the quality and efficiency of your TM operation. iPonic 600 offers quick installation, and dynamic programming flexibility for easier and more accurate grow room management giving you the freedom for you to focus on plants and profits. The reason why we stand out from others is because of our Link4 Promise: Our passion is to provide growers with intelligent control solutions. We understand controlling your growing environment is critical to your success. Therefore, our commitment is to build outstanding controllers and to provide excellent support so that you can know with confidence that the iPonic 600TM system is right for you. Customer Service Link4 has a well-trained customer support staff that is ready to help. Our customer service center is committed to your hydroponic facility business 24/7 through our website or service line for access to solutions for your controller needs. Before you contact us, please write down the model number and serial number located inside TM the iPonic 600 enclosure so that we can serve you better. Link4 Corporation Contact Information Address 22725 La Palma Ave. Yorba Linda, CA 92887 Website link4corp.com iponic.link4corp.com Additional support information available to online registered users. Telephone Service Sales 866.755.5465 714.524.0004 Email Service Sales 960-0001-20 [email protected] [email protected] iGrowSeries 100 Installation Manual 1 Terms and Conditions Warranty Link4 warrants that the iPonic 600 Controller with the exception of the sensor module sold under this contract will be free from defects in material and workmanship for a period of 36 months after the date of purchase. The sensor module is warranted for 12 months from the date of purchase. This warranty will be limited to the repair and replacement of parts and the necessary labor and services required to repair the goods. IT IS EXPRESSLY AGREED THAT THIS WARRANTY WILL BE IN LIEU OF ALL WARRANTIES OF FITNESS AND IN LIEU OF THE WARRANTY OF MERCHANTABILITY Moreover, any description of the goods contained in this contract is for the sole purpose of identifying them, is not part of the basis of the bargain, and does not constitute a warranty that the goods will conform to that description. The use of any sample or model in connection with this contract is for illustrative purposes only, is not part of the basis of the bargain, and is not to be construed as a warranty that the goods will conform to the sample or model. No affirmation of fact or promise made by Link4, whether or not in this contract, will constitute a warranty that the goods will conform to the affirmation or promise. Link4 shall not be responsible for replacement(s) or repair(s) which become defective from user negligence, modification, abuse and/or any types of improper usage. Nonconformance to any of the specifications in the product manual will void the warranty. Furthermore, our liability to the goods sold, whether on warranty, contract, or negligence, will be released upon the expiration of the warranty period when all such liability shall terminate. Link4 shall not be responsible for any loss or claims due to consequential damages afford by the Buyer. Link4 also reserves the right to make any necessary changes to features and specifications to condition or warranty. Returns Merchandise cannot be returned without a Return Merchandise Authorization (RMA) number from Link4. Requests for permission to return defective items must be made within (14) fourteen days after receipt of shipment. A Link4 RMA # for approved returns must appear on both the customer's shipping carton and the related receipt memo. Parts under warranty will be repaired at no charge. Other returned items will be subjected to the following restocking charges: 20% for no value added items, 40% for value added items, and 75% for custom designed or built to specification items. Repair A repair order must also have a Link4 Return Merchandise Authorization (RMA) number. Repairs that are not covered by the warranty will be billed on a material and labor basis. Items returned for repair must be sent to Link4 with prepaid return transportation Link4 will not be responsible for damage(s) due to improper packaging or shipping and delivery of items returned for repair. Additional Costs It is expressly agreed that Buyer will reimburse Link4 for any additional costs attributable to changes in the specifications, directions, or design of the items furnished which are requested or approved by Buyer at Link4‟s listed retail prices in effect at the time such changes are ordered. Governing Law The validity of this contract and of any of its terms or provisions, as well as the rights and duties of the parties under this contract, shall be construed pursuant to and in accordance with the law of California. The parties specifically agree to submit to the jurisdiction of the courts of California. 2 iGrowSeries 100 Installation Manual 960-0001-20 Installation Content Inspection The package should come complete with an iPonic 600 unit, a sensor module with 50‟ of cable attached, and 4 – Self Drilling Screws. Upon arrival, check the contents with the packing list for damaged or missing components (If you have the Integrated iPonic 600 Series Model, simply mount the panel using the two holes on each side of the unit.. Make sure you have all items, all associated hardware, and necessary tools before you begin installation. If there is any visible damage or missing parts, please contact our customer service at [email protected] or 1-866-755-LINK or fax us at 714.558.9782. 1. iPonic 600 unit 2. Sensor module with 16ft. cable (sensor is packed inside the controller) 3. Quick Start guide 4. Soft copies of a. User Manual b. Factory default configuration file (factory.icf) c. Factory default growth curve (factory.tab) d. Optional growth schedule (flower.tab) Recommended tools and hardware 1. Drill 2. 3/8” socket drive drill bit with 3” extender 3. Adjustable Wrench 4. 1/8” high speed steel drill bit 5. Appropriate mounting screws For example: 4 pcs – 3/8” Drive, Hex Head Self Drilling Screws 6. Level (optional) 7. Pencil 960-0001-20 iGrowSeries 100 Installation Manual 3 Mounting the iPonic 600 1. First, find a secure location to mount the iPonic 600 controller. The area should be away from direct sunlight, condensing humidity, water, rain, or extreme temperatures. It should be mounted in an easily accessible location at the user‟s eye level. 2. Since the iPonic 600 is equipped with a hinged door and a hinged access panel for easy service and installation, make sure there is adequate workspace, especially below the controller. 3. The iPonic 600 comes with a 115 VAC power cord. Make sure there is a power outlet within approximately 6 feet. It is recommended that the outlet is not switched and is on a circuit that is independent of any noisy, high power equipment. The use of a sealed outlet is recommended if the power output is exposed to moisture. 4. Identify what type of surface you will be mounting the iPonic 600 and use appropriate hardware to ensure proper mounting and load bearing. Consider the additional weight of the external equipment‟s power cords. 5. There are 4 mounting holes on the outside of the iPonic 600 . Use the appropriate tools and hardware depending upon the surface which the unit will be mounted on to. 4 iGrowSeries 100 Installation Manual 960-0001-20 Before you Begin Temperature Control TM With the iPonic 600 you can program a cooling temperature target called a “Cool Setpoint” and a heating temperature target called a “Heat Setpoint”. The temperature range between these two targets is called the “Normal” temperature range. If the hydroponic grow room temperature is within the Normal temperature band usually none of the cooling or heating equipment is on. However, some circulation fans (often called horizontal air flow (HAF) fans) may be active to maintain air movement within the hydroponic environment. Whenever the temperature within the hydroponic facility moves above the cool setpoint, or below the heat TM setpoint (falls outside the Normal temperature range) the iPonic 600 will enter cooling or heating stages to TM bring it back in line. With the iPonic 600 you can program up to six cooling and two heating stages. These stages go from Cool 1 to Cool 6 and Heat 1 to Heat 2. Cool 1 and Heat 1 are the least aggressive with Cool 6 and Heat 2 the most aggressive. In your program you will determine what equipment you want to be active in each of the stages. When the air temperature in the hydroponic facility rises above the Cool Setpoint, the system enters the first stage of cooling, referred to as Cool 1. If the temperature continues to rise, the system will enter the second stage, Cool 2, then the third stage, Cool 3 and so forth. At each increasing cooling stage, more cooling will be brought to attempt to bring the air temperature below the cool setpoint and within the target “Normal” temperature range. Heating works the same way. In considering the difference between each heating and cooling stage there is a variable increment in the program which is the number of degrees between each heating and cooling stage called the “Stage Separation” 0 TM or „Stage Width”. Whenever the temperature rises 1 degree above the cool setpoint (70 ) then the iPonic 600 will activate the appropriate equipment to bring the hydroponic facility to the normal temperature range. If the temperature rises 2 degrees above the cool setpoint then the controller will be active in C2 cooling stage. The same goes for the heating stage when the temperature drops below the heating setpoints. In Figure 2.1, there is an example with four cooling stages and two heating stages. Deadbands If the temperature is below the cool setpoint and rises into the first stage of cooling, some cooling equipment will be turned on. This may then lower the temperature and bring it into the normal range. In order to keep the equipment from oscillating, a “Deadband” is employed when the temperature is between stages. In Figure 2.1 the dead band is set at 1 degree so that when the hydroponic facility is attempting to return to Normal temperature from C4 to C3 the controller will use a deadband of 1 degree to keep the equipment from oscillating off and on. Now, when the temperature drops below the cool setpoint, the system remains in the Cool 1 stage until the temperature drops below the Cool Deadband. The concepts that we described for cooling operate in the same manner for heating. Setpoint You will be able to use up to 3 setpoints in a 24 hour time period. Within each day Setpoints are based on time and temperature to produce an ideal environment. By placing setpoints during different times of the day you can regulate the temperature within a range for target temperatures and humidity. When a setpoint is in effect at a certain time length the controller will activate the necessary equipment in heating and cool stages to bring the environment back to Norm. The same applies when the humidity rises or falls beyond the target low/high setpoint. When one or more setpoints are used the second or subsequent setpoints will become the active setpoint at the start time and the previous setpoint will end. 960-0001-20 iGrowSeries 100 Installation and User Manual 5 Ramping In addition, you have the option of a temperature ramp between the setpoints. Each setpoint time period begins with a Ramp time. The benefit of ramping allows for you to make smooth transitions within the hydroponic facility so that the plants don‟t experience temperature shock. Ramping also saves energy, which translates directly into lower operating costs. Setpt 1 72.5°F End of Ramp time 6:30pm Beginning of Ramp time 6:00pm End of Ramp time 9:00am Beginning of Ramp time 8:00am In the example below, the start time is 8:00a with a 30-minute ramp time. The ramp time enables a smooth transition of the target temperatures between the setpoint time periods. Of course, the ramp times can be set to 0 and in this case there will be an immediate step transition in the set points. This is best explained by the illustration shown below. Setpt 2 70.5°F 1°F Deadbands 75°F Cool Stage 4 Cool Stage 3 Cool Stage 2 Cool Stage 1 70°F Normal Temp Range Heat Stage 1 Heat Stage 2 65°F 12am 1 2 3 4 5 6 7 8 9 10 11 12pm 1 2 3 4 5 Setpt 1 68.0°F 6 7 8 9 10 11 Setpt 2 67.0°F in this Example: Setpoint 1 is set to 9:00am with a 60minute Ramp, Temp is set as 68 to 72.5F Setpoint 2 is set to 6:00pm with a 30minute Ramp, Temp is set as 67 to 70.5F Figure 2.1 Example of Setpoints, Staging, & Deadbands 6 iGrowSeries 100 Installation Manual 960-0001-20 Control Strategy Prior to installing and programming the iPonic 600 it is important to determine an overall strategy to control the environment in the hydroponic facility. The iPonic 600 is an extremely flexible and powerful device, thus additional care and planning are required. In order to aid you with the process, Link4 has provided several worksheets in the following pages. It is assumed that you already possess a general understanding of hydroponic growth room controls. If not, please review this section carefully. It is recommended that you make copies of these sheets before using them. They will be useful in the future should your control needs change. Setpoint and Staging Worksheets Figure 3.2 Factory default settings for setpoints and stages 960-0001-20 iGrowSeries 100 Installation Manual 7 Figure 3.3 Blank worksheet for setpoints and stages 8 iGrowSeries 100 Installation Manual 960-0001-20 Internal Layout Figure 4.2 shows how the iPonic 600 looks on the inside. Although the unit is pre-wired it is good to have some familiarity with the internal layout. Manual Override Switches Master Reset Button Screen contrast adjustment Communication Module (OPTIONAL) USB Storage Input Figure 4.2 Board Layout of the iPonic 600 PCB 960-0001-20 iGrowSeries 100 Installation and User Manual 9 Figure 4.3 Electrical Connection Diagram of the iPonic 614 10 iGrowSeries 100 Installation Manual 960-0001-20 Connecting to the iPonic 600 Warning: Do Not Plug-in the power cord or any of the equipments into the iPonic 600 without checking to make sure all the manual override switches are in the OFF position. Indoor Sensor Module Installation The iPonic 600 ships with a sensor module. The module includes a 50-foot sensor cable. Normally you will want to hang the module near the crop level close to the center of the controlled environment. It is important to keep the module away from irrigation emitters, unit heaters, etc. that will affect the accuracy of the sensor. 1. Connect the sensor module at the bottom of the iPonic 600 as shown in Fig. 5.1 screwed in tight. Make sure it is 2. You may extend the sensor cable as needed, but be sure to use an adapter and wire approved by Link4 to make any extensions (the wire and adapter can be purchased from Link4). It should be noted that the controller is calibrated for a 50 ft. temperature probe. If additional wires are added or removed, software calibration will be necessary to ensure proper temperature measurement accuracy. Note: If any splices are needed to extend cable length, make certain they are WATERTIGHT. Water or fertilizer infiltration WILL cause unstable sensor readings. 3. Keep sensor cables away from interference sources, including high voltage power wiring, inverters, motor controllers, mercury arc, or sodium lamp circuits. Placing sensor cable near such wiring may cause erratic sensor readings. Optional Ethernet Cable Installation If you want to connect to your local network or directly to the internet, you will need to connect an Ethernet cable. Insert the cable through the socket as shown in the Fig 5.1. Plug in the cable to the socket provided on the iPonic PCB board. For access to the internet, an optional communications module is required and can be purchased from your dealer or distributor. 960-0001-20 iGrowSeries 100 Installation and User Manual 11 Power Cord 15A Resettable Breaker Sensor Module Connector Ethernet Connection (Optional) Fig 5.1 Sensor Module and Ethernet Connections Equipment Installation The iPonic 600 has eight (8) 115 VAC electrical outlets, a resettable 15 ampere fuse and a six foot power cord. On each side of the unit the bottom two outlets are ganged, as shown in the Fig.5.2 below, whereas, the top two are independent. This gives a total of six outputs that can be controlled independently. These outputs are numbered from 1-3 on the left side from top to bottom and 4-6 on the right side, also from top to bottom. In a typical installation, the equipment are connected as follows: Output 1 – Lights Output 2 – CO2 injector Output 3 – Irrigation pump Output 4 – Dehumidifier Output 5 – Heater Output 6 – Vent Fan(s) 12 iGrowSeries 100 Installation Manual 960-0001-20 5.2 Equipment Installation Warning: The total amperage drawn from the iPonic 600 must not exceed 15 amps. Low Voltage Output Installation Your iPonic 600™ has two (outputs #7 and #8) relays that are provided as dry contacts, i.e. switch closures. If an output is activated to ON, the switch is “closed” (shorted); and if it is activated to OFF, the switch is “open” (no continuity between the positive and negative terminals). The board mounted relays are intended as “pilot” relays. For most loads you will want the iPonic 600™ outputs to control a load relay or contactor that is connected to the motor. However, in some cases such as and alarm unit or irrigation valves that are 24 VAC, you can drive them directly assuming that you are wiring only one or two valves per relay. The maximum current load recommended for each of the iPonic 600™ relays is 1.0 amp. Warning – Do not exceed 1 Ampere or 24 Volts for outputs 7 and 8 Figure below shows the low voltage connection points for outputs 7 and 8. 960-0001-20 iGrowSeries 100 Installation and User Manual 13 14 iGrowSeries 100 Installation Manual 960-0001-20 Programming Before You Begin Before the iPonic 600™ is programmed, it is recommended that the following steps are followed: Hardware is properly installed and tested with manual switches. All internal switches have been restored back to the OFF state. All the templates from Chapter 3: Control Strategies that are relevant to your application are understood and are completely filled out. You can upgrade your controller to the latest firmware by going to iponic.link4corp.com. Follow the provided instruction to upgrade your controller. iPonic 600™ Main Status Screens These are the status screens that you will see when you first power up the system. Pressing the HOME button will let you toggle between the two screens. Navigation The following figures are designed to explain the features of these status screens. Please review carefully. 960-0001-20 iGrowSeries 100 Installation and User Manual 15 Navigation – This screen is designed to assist you in navigating about the screens and where you can find further information in this manual. The iPonic 600™ has a unique touch sensitive navigation design that utilizes a touch wheel and 4 navigational touch sensitive “buttons” ( HOME, CANCEL, OK, BACK). The behaviors of the wheel and buttons are TOUCH WHEEL o On menu type screens, the wheel is used to rotate the selected choices. Once the desired choice is highlighted, press OK to make the selection. o If an alphanumeric field is highlighted, the wheel can be used to increment or decrement the data entry. o Note that the center of the wheel is not a button. HOME o CANCEL o Pressing CANCEL in the middle on an entry will bring the user back up a level, without making any changes. o Pressing OK will prompt the system to accept the most recent data entry. OK BACK o 16 Pressing HOME will bring the unit back to the Main screen. If data saving might be required, user will be prompted for input. BACK will bring the user back up one level. User will be prompted to save data, if needed. There are also EIGHT soft “buttons” surrounding the display. Their behaviors will be described by the notations displayed either below or above the buttons. iGrowSeries 100 Installation Manual 960-0001-20 960-0001-20 iGrowSeries 100 Installation and User Manual 17 Graphical display. Back light will turn off after 5 minutes. NOT A TOUCH SCREEN AUTO FORCE ON FORCE OFF SETTINGS OK TO CONFIRM 8 TOUCH buttons Press to show the pop up screen below: (page Button numbers match outlet numbers 1, 2, 4, and 5 control ONE power outlet each. 3 & 6 control TWO. 7 & 8 are for low voltage switching only. Wire internally (page 37) 8 green output status indicators. Will turn off after 5 minutes. 1 TOUCH WHEEL Use to navigate and change values 4 TOUCH navigational buttons 18 iGrowSeries 100 Installation Manual (page 57) Current temperature stage (page 22) Temperature targets Current temperature (page 46) Alarm indicators Highlighted means output is ON CO2 mode messages: FanCut = Shut off due to fan on Active = in CO2 maintenance mode (page 25) Label showing auto or manual operations. (page 25) Light turn on delay timer Output 7 & 8 are INTERNAL & defaulted to OFF (page 37) (page 33) Humidify mode active (page 57) Current humidity stage Current humidity level (page 23) 28) Grow Schedule is ACTIVE (page CO2 target level (page 25) Current CO2 level (page 25) Main Status Screen Entries 960-0001-20 Note that the display area itself is not touch sensitive. The main status screen displays the current status of your hydroponic growth room compartment. The numbers shown are only sample numbers and will differ for each user, but a description for each display will be explained. Normal – This is the current temperature stage. It can go from Cool 6, to Normal, to Heat 2. Night SetPoint –.This is the current setpoint, normal stage. For this both the lower and upper setpoints are shown, respectively. For heating or cooling stage, it will be the heat or cool setpoint The large 72.3F is the current indoor temperature reading from the indoor temperature probe. Humidity – This is the current relative humidity reading in the zone. 850 PPM – This is the current CO2 level, Whereas 1500 PPM fives the target CO2 level to be obtained Alarm Indicators – This shows which type of alarm is set. In the above case Humidity Low and Co2 low have been set. G-Curve – This shows that the growth schedule is active. It also shows the growth week in this case i.e., 5 Light turn on delay is shown when the light bank is in the cooling period and it needs to turn on. Fancut is shown Vent Fans are ON. In this case the CO2 pump is switched off. For each of the outputs, the equipment‟s name is displayed, as well as the current controlled state that it is in: o AUTO – equipment is being automatically controlled by the iPonic controller o OFF – equipment is being manually FORCED to OFF. o ON – equipment is being manually FORCED to ON. o If the current state is highlighted it means that that output is switched ON. The software output override can be activated by touching the respective button above/below the channel. The controller also has manual mechanical override switches inside the unit. These switches need to be in the AUTO position. If they are used to force the output OFF or ON, they will override all software settings. 960-0001-20 iGrowSeries 100 Installation and User Manual 19 Programming Screens Once the WHEEL or the OK button is activated, the following six choices will be displayed. This is the main menu for the program. These are the six main programming and report areas:. 1. Current Setpoints - this is where the user can program the temperature and humidity setpoints and the CO2 and light targets. 2. Growth Schedule - if you are using the growth schedules, this is where you program the vegetative and flowering phases and other related parameters. 3. Reports - a variety of sensor data can be graphed and viewed here. 4. System Setup - initial and advance programming parameters are set here 5. Save/Restore – here is where you can save your program to a file and restore it at a later date. 6. Stages- this takes you to a matrix where you can set the state for each piece of equipment for the temperature and humidity stages. The following pages describe the programming for each of the above six sections. 20 iGrowSeries 100 Installation Manual 960-0001-20 1.0 CURRENT SETPOINT PROGRAMMING From the main menu when you select 1. Current Setpoints, you will see the following screen. Setpoint programming enables the user to program three different setpoints for temperature and humidity during the 24 hour day. The Setpoints Menu can be entered by highlighting the Current Setpoints option on Main Menu using the Wheel or Button #1 and pressing OK. There are two parameters for each humidity setpoint: Humidify - if the Relative Humidity (RH) reading is below this parameter, the condition is considered too dry, and the system will go into humidification stage. Dehumidify - if the RH reading is above this parameter, the condition is considered too damp, and the system will go into dehumidification stage Press OK to go to the humidity set point screen The iPonic controller has the capability to maintain up to three target CO2 levels for each 24 hour period. One for each daily time periods, aka SetPoints (Day, Night, and DIF). By default, the day CO2 level is set at 800PPM and the night is at 400PPM. The DIF period is not set. Press OK to go to the CO2 day set point screen This Light Setting option is where you set the light start and stop times and other light based parameters. Press OK to go to the Light Setting screen 960-0001-20 iGrowSeries 100 Installation and User Manual 21 1.1 Temperature Setpoint There are three set points provided for the user. DAY NIGHT DIF DAY and NIGHT are active by default. DIF can be turned on if desired. To select Day, Wheel or Button #1 can be used to highlight Day option Day and Night options are the same. This shows the temperature setpoints for all the heating and cooling stages. The user can modify the Heat Setpoint and Cool Setpoint by pressing #5, #6 respectively. The temperature is adjusted by turning the Wheel. Pressing the Set Time button (#7) will allow the start time for the Day Time Setpoint to be set. Night Settings The only difference between the Day and Night screens is Tab #1 which is used to activate the Night setpoint option (ON) or to deactivate it (OFF). The DIF screen is identical to the Night setting screen. It will rd simply enable a 3 setpoint option. Corresponding Diagram shows when day, night and DIF options are activated. Note that there are now three start times being displayed, which can be modified as needed. 22 iGrowSeries 100 Installation Manual 960-0001-20 1.1.1 Global Temperature Settings Deadband functions as a hysteresis when temperature drops to a lower stage of cooling or heating. This prevents the adjacent stages from oscillating back and forth from small temperature fluctuations. Press #1 followed by wheel to increase or decrease deadband value. The number of degrees between each heating and cooling stage is called the “Stage Separation” or „Stage Width”. Press # 2 followed by wheel to increase or decrease stage width value For example, when the temperature in the zone goes above the cool setpoint, the system will go into Cool 1. If the temperature continues to rise and goes above the Cool Setpoint + the Stage Separation temperature, the system will go into Cool 2, and so forth. Press # 3 followed by wheel to increase or decrease OutTemp OverrideThreshold. This is the temperature at or below which the outside air exchange is disabled. 1.2 Humidity Setpoint The same process as temperature can be used to modify the humidity Set Points Press #6 followed by wheel to change humidify setting. You can togglee to dehumidify settings by pressing #6 again. Note that the start and end times are the same for Temperature Setpoints and Humidity Setpoints There are two parameters for each humidity setpoint: Humidify - if the RH reading is below this parameter, the condition is considered too dry, and the system will go into the humidification stage. Dehumidify - if the RH reading is above this parameter, the condition is considered too damp, and the system will go into the dehumidification stage. You can switch the Night humidity on or off by pressing #5 960-0001-20 iGrowSeries 100 Installation and User Manual 23 This is the screen you will get when the setpoint is turned OFF. Pressing Tab #1 will turn it back ON. 1.2.1 Global Humidity Settings We can reduce the humidity of the hydroponic facility by turning on the vent fan. But if the outdoor temperature is low or the outside humidity is high we disable the fan. In this case we may switch on the dehumidifier. Low Outside Temperature Threshold is the temperature below which the vent fan will be off. Outside humidity override has two options On/Off and Offset. On/Off is where it enables or disables this option. Offset option allows you to input the minimum amount of humidity. Let say if the inside humidity is 70% and offset is 10% then the humidity override takes place when the outside humidity is greater than 60% On Time is time that the humidity override is enabled after which it switches back to temperature set point control for the designated Off Time. Press #1,2 to change On Time minutes and seconds Press #3,4 to change Off Time minutes and seconds Press #5 to change Outside Temperature Threshold Press #6 to change Outside Humidity Override Press #8 to change Deadband 24 iGrowSeries 100 Installation Manual 960-0001-20 1.3 CO2 SetPoint The CO2 setpoint is the threshold below which the CO2 injection will be enabled. Use the wheel to increase or decrease the setpoint value. Press #7 to set the Day and Night start times. Press #8 to go to the Global CO2 settings screen. If the Night CO2 setpoint is ON, then you will see this screen. Press #5 to toggle between enabling the Night CO2 setpoint or disabling it. The night threshold functions the same as the day setpoint described above. This is the display you will get when you turn the CO2 night or the DIF setpoints Off. Pressing #5 will turn it back On. 1.3.1 CO2 Global Settings DeadBand: This is the number of PPM that the CO2 must drop below the Setpoint before CO2 injection is resumed. Press #1 to set the CO2 deadband There are a few conditions that will override the CO2 injection process: CO2 cut off: If enabled, the controller will not inject CO2 into the grow room if the lights are turned off. There are two ways that the controller determines whether or not the lights are off: a. Using the "light controls". In this case, the controller is controlling the lights. So whenever the lights output (usually #1) are off, the CO2 injection process stops. b. Using the light sensor/meter. In this case, the controller is probably not controlling the lights. The controller will use the light sensor on the sensor module to detect if the lights are off or not. It has two parameters: light threshold and 960-0001-20 iGrowSeries 100 Installation and User Manual 25 deadband. If the light level falls below the threshold, the controller will consider this condition to be the "night" condition and stop injecting/ generating CO2. Once the light level has increased beyond the threshold + deadband, the CO2 injection process (if needed) will resume. Press #2 to go to these settings, Use Wheel to select which setting you want. Press OK Fan cut off: If enabled, the controller will not inject CO2 into the grow room when the ventilation fan (if there is one) is turned on. Press #5 lets you to enable/disable this option. The CO2 level, if needed to, is raised using two methods: Cyclical: In this mode, the CO2 output will be pulsed whenever the CO2 level has fallen below the CO2 setpoint (minus the deadband amount). By default, the controller has been programmed to cycle on for 10 seconds (i.e. inject CO2 for 10 seconds) and cycle off for 50 seconds. The cycle repeats again until the CO2 level has increased beyond the setpoint. Press #6 to switch on/ off the cycle time settings. Once you selected the option, Press OK. Now you can change the On/ Off time as shown in screen. 2. Adaptive control/ CO2 Fuzzy Settings: In this mode, the controller will intelligently inject the CO2 into the room to bring the level up to the desired level as quickly as possible with minimal overshoot. The iPonic controller will actually learn the characteristics of the growroom and adapt its parameters accordingly to optimize the CO2 responsiveness and accuracy. You will observe that the CO2 gas is being injected/ generated more aggressively in the beginning. As the gap between the desired setpoint and the level measured narrows, the CO2 level being added will taper off accordingly to maintain the optimal response curve. 26 iGrowSeries 100 Installation Manual 960-0001-20 1.4 Light Settings Press #1 Change Light Mode. Options are: st 1 bank only Alternate banks nd 2 bank only Both banks Press #2 Change Light Time The option lets you either to set a fixed time window, i.e,, a Turn ON .and a Turn OFF time, or to synchronize the lights ON with the Day Setpoint. Press #5 to enter Start Time of light enable window Press #6 to enter End Time of light enable window. Press #4 to go to Global Light Settings – see next screen. Ref Page No: 47 to change start time end time 1.4.1 Global Light Settings Bank Switch Delay is the time delay to switch between two banks of light. Press #1 followed by wheel to change the value Power Cool Down Time is the amount of time required for the grow lights to cool off before they are switched on again. This is done to extend bulb life. Press #2 followed by wheel to change the value. 960-0001-20 iGrowSeries 100 Installation and User Manual 27 2.0 GROWTH SCHEDULE The growth schedule enables the user to set specific temperature, humidity, CO2 and light levels setpoints on a weekly or growing stage basis. The purpose is to eliminate the need to regularly alter the setpoints as the plants are growing but to let the controller do it automatically for you. The Vegetative phase and the Flowering phase let you program one set of setpoints for the entire phase. For example, the Veg phase may be 4 weeks. The setpoints will be the same for all 4 weeks. Similarly, the Flowering phase will be the same for whatever duration you set. In the Setpoint by Week option you can vary the setpoints on a week by week basis over a maximum of 16 weeks. You can use this option to modify a particular week or weeks setpoints within the Vegetative or Flowering time windows. The “Growth Curve Setup” is the screen where you will enter the start date for the whole process, the total duration in weeks, and the start dates for the vegetative and flowering phases. This takes you to the Vegetative stage of the growth schedule. This is section where you can change the setpoints for the whole phase which is terms of weeks. Press OK to go to the next screen. Select the desired setpoint option and press OK. If you select Temp Setpoint, you will go to screens described in Section 1.1 above. If you select Humidity Setpoint, the screens will be described in Section 1.2. If you select CO2 Setpoint, the screens will be described in Section 1.3 If you select Light Setpoint, the screens will be described in Section 1.4 This takes you to the Flowering stage of the growth schedule. This is where you can change the setpoints for the whole phase. Press #2 followed by OK to go to the next screen. After entering the screen please refer to setpoint screen to change the settings This option enables you to change the setpoints on a weekly basis over a period of up to sixteen weeks. Press OK to go to the next screen. 28 iGrowSeries 100 Installation Manual 960-0001-20 Here you select which group of four weeks you want to program. Press OK to select. You will then go to the next screen. Here you can select which week you want to program. Press OK to select. You will then go to the screens shown in sections 1.1 -1.4 above. This option lets you enter the start date, that is, when week 1 is to begin, for this growing approach. Other entries include, total duration, vegetative duration, flowering duration and so forth. This takes you to the growth curve setup screen shown on the next screen. Press #1 to enable or disable the growth curve process Press #2 to enter the total number of weeks for the growing process. Press #3 to enter the number of weeks for the Vegetative phase. Press #4 the number of weeks for the Flowering phase Press #5 to enter the Start date Press #6 to enter the Vegetative Start date Press #7 to enter the Flowering Start date This option lets you save the growth schedule settings into a USB, SD card or System Memory. This is similar to Save /Restore Configuration. Please refer to Page 51 960-0001-20 iGrowSeries 100 Installation and User Manual 29 Press #1 to save your current growth schedule Press #2 to restore a previously stored schedule Press #3 delete a previously stored schedule Please refer to Page No: 51 30 iGrowSeries 100 Installation Manual 960-0001-20 3.0 REPORTS The third main section of the iPonic 600 controller is the Reports section. This section provides a brief overview of the options available. This section gives the reports and graphs and equipment usage as well as operational costs. User can go to reports submenu by pressing OK There are 2 subsections under Reports: 1. Sensor Reports 2. Graphs To highlight the sub options Wheel or Buttons #1, #2 can be used to go to the corresponding options. Pressing OK will let user select the options 3.1 Sensor Reports This Section allows the you to see the minimum and maximum temperature, humidity and CO2 readings recorded in past 24 hrs and from the time you pressed reset button. Press #1 and OK to go to the next screen. This report gives you the minimum and maximum temperature, humidity and CO2 readings recorded in past 24 hrs and from the time you pressed reset button. 3.2 Graphing 960-0001-20 iGrowSeries 100 Installation and User Manual 31 This section allows the user to view the historical data collected by the controller in a graphical manner. Pressing Button #2 from Reports submenu will take the user to graphing submenu. The graphs for the following sensors can be seen: Temperature Humidity Light CO2 To highlight the sub options Wheel or Buttons #1 - #4 can be used to go to the corresponding options. Pressing OK will let user select the options 3.2.1 Temperature In the temperature option user can view graphs for the following • • • • Inside Temperature Outside Temperature Heat Setpoint Cool Setpoint To highlight the sub options Wheel or Buttons #1 - #4 can be used to go to the corresponding options. Pressing OK will let user select the options User can view the graphs for the following time periods • • • • Since Reset Last Hour Last 24 hour Last 7 days To highlight the sub options Wheel or Buttons #1 - #4 can be used to go to the corresponding options. Pressing OK will let user can view the graphs. 32 iGrowSeries 100 Installation Manual 960-0001-20 3.2.2 Humidity In the humidity option user can view graphs for the following • Inside Humidity • Humidity Setpoint • Dehumidify Setpoint To highlight the sub options Wheel or Buttons #1 - #3 can be used to go to the corresponding options. Pressing OK will let user select the options. Similar to temperature option user can view graphs for different time periods. 3.2.3 Light In the light option user can view graphs for the following time periods • Since Reset • Last Hour • Last 24 hour • Last 7 days To highlight the sub options Wheel or Buttons #1 - #4 can be used to go to the corresponding options. Pressing OK will let user can view the graphs. 3.2.4 CO2 In the CO2 option user can view graphs for the following time periods • Since Reset • Last Hour • Last 24 hour • Last 7 days To highlight the sub options Wheel or Buttons #1 - #4 can be used to go to the corresponding options. Pressing OK will let user can view the graphs 960-0001-20 iGrowSeries 100 Installation and User Manual 33 4.0 SYSTEM SETUP The fourth option in the menu selection – System Setup – is where the user can set up the equipment at installation time, as well as other miscellaneous operations. Pressing OK or Button #3 will let the user to go to system setup submenu The subsections under the system setup are : 1. Equipment Setup 2. Scheduling Setup 3. Sensor Setup 4. Alarm Setup 5. Time/Date Setup 6. Advanced Setup 7. Save/Restore 8. Location Setup 9. Communication Setup 10. Measurement Units To highlight the sub options Wheel or Buttons #1 - #8 can be used to go to the corresponding options. Pressing OK will let user select the options 34 iGrowSeries 100 Installation Manual 960-0001-20 4.1 Equipment Setup In Equipment setup you have two options to choose from- Quick Setup and Advanced. For most grow room applications, Quick Setup will be sufficient. The Advanced option lets the user customize the equipment types, the outputs to which they are connected and the names displayed. 4.1.1 Quick Setup In this screen you can select the equipment that will control your Growth Room and the setup is automatically run by your iPonic. The equipment to be controlled is noted by a check mark. This selection is made by pressing #3 4.1.2 Advanced In the advanced setting you can program equipment individually. All subsequent screens are applicable to the selected equipment only. In advanced setting you have different channels to choose from. Press on the respective number to further advance into the screen 960-0001-20 iGrowSeries 100 Installation and User Manual 35 Selecting a channel gets you to the equipment screen. Here you can: Press #1 for Timed Override Press #3 for Initial Settings (set the equipment name, its type, the energy type, etc.) Press #4 for Assign Stages to each of the equipment channels – see 5.0 Stages section on Page No: 56 for details. Press #5 for Reset runtime The runtime counter for an equipment channel can be reset in the main Equipment Settings menu. This is useful when a user changes any equipment previously mapped to a channel. Note: The runtime is set to 0 if yes is selected. Note: This cannot be undone. 4.1.2.1 Timed Override Timed Override, if enabled, will FORCE the equipment to switch ON or OFF. The time override is provided for the user to set either a daily recurring event or a single event. Press #1 to enable or disable the override Press #2 to switch on/ off the equipment when the override is enabled. Press #5 to change the start time. Press #6 to change the duration Press #7 to set it daily or one time. Please refer to Page No: 47 to change time 36 iGrowSeries 100 Installation Manual 960-0001-20 4.1.2.2 Initial Settings 4.1.2.2.1 Set Type Before equipment can be utilized the proper equipment type must be defined. Press #1 to go to further screens. You can assign a name to the equipment by pressing on #3. This name will be displayed at the MAIN status screen. Please refer to Page No: 41 to change time There are 9 equipment types you can choose from for your particular output.: LIGHT refers to grow lights CO2 refers to CO2 pump IRRIGATION refers to irrigation valves ON/OFF Refers to any piece of equipment that turns on and off in each of the heating/cooling/dehum stages. For example, heater, fan, cool pad, pump, etc. FAN refers to the “Vent Fan” or Ventilation Fan AC refers to air conditioning equipment VENT Refers to a proportionally controlled ventilation equipment, e.g. side wall, ridge vent. CURTAIN Refers to a shading system. ALARM Use the alarm output to turn an output on depending upon crossing a temperature level. This is normally connected to a telephone dialer such as the Sensaphone. To highlight the sub options use Wheel or Buttons #1 - #8 corresponding to the options and OK to select the options By default all equipment are marked as On/Off device. If a type that has already been chosen (i.e. surrounded by parenthesis) is selected again, we get this prompt. 960-0001-20 iGrowSeries 100 Installation and User Manual 37 In order to change the type to some other type like, from On/Off to Vent as shown in the figure, we get a warning popup as shown in figure. Vents require 2 consecutive output channels (1&2, 3&4, 5&6, 7&8). The first channel (odd numbered) must be wired to Open vent, and the other (even numbered) to CLOSE it. On selecting a vent the user needs to do the setup of the following: • Open to Close time • Overrides To highlight the sub options use wheel or Buttons #1 and #2 and OK to select the options The Vent Open- Close Time is the time in minutes and seconds that it takes for the vent to go from full closed to full open position and vice versa. On selecting the Set Open-Close Duration the following screen comes up. By pressing Button #1 user can to go Set Open/Close time duration option. The screen enables to set the Open- Close Duration. Buttons (#2, #3, and #4) are used to highlight the fields and the Wheel is used to increment and decrement the field values. Note: To determine the vent open/close time turn the manual toggle switch on and use a clock or stopwatch to time the vent as it goes from its fully closed to open position. Navigating back to the Setup Overrides menu, you get this screen. These overrides are important for safe and effective vent operations. To highlight the sub options Wheel or Buttons #1 - #3 can be used. Options can be selected by pressing OK. Note: The weather station or some of its core components need to be installed to setup these overrides. 38 iGrowSeries 100 Installation Manual 960-0001-20 Rain Vent Open Limit: This is the maximum position the vent can be open when the rain is detected. The value can be changed by selecting Button #1 and the Wheel can be used to modify the value. Wind Vent Override Set Vent Open Limit: This is the maximum position the vent can be open when the wind is at or exceeding a user-specified speed. Set Wind Speed Limit: This is the user- specified wind speed value which triggers the Vent Open Limit. These values can be changed by selecting Buttons #1 and #2. Wheel can be used to modify the value Outside Temp Vent Override Set Vent Open Limit: This is the maximum position the vent can be open when the outside temperature is below the set temperature limit. Set Temp Limit: This is the user specified temperature value which triggers the Vent Open Limit when temperature drops below set value. These values can be changed by selecting Buttons #1 and #2. Wheel can be used to modify the value The curtains are also a dual channel device and can only be programmed starting on an odd channel. The curtain can be programmed for the Day and Night mode. By pressing Buttons #1, #2 users can to go to these options. The duration for the start of each mode can be set using Set Start/End Time. User can select this option by pressing Button #5 and then OK. Open Close Time: It is the time taken for the curtain to go from full covered to full uncovered mode and vice versa. By pressing Button #3 user can to go to this option. Light Threshold: The light threshold value at which the curtain should shade/ cover. By pressing Button #6 user can to go to this option. Reopen Delay Time: the time delay after which the curtain 960-0001-20 iGrowSeries 100 Installation and User Manual 39 can again be opened. By pressing Button #8 user can to go to this option. Wheel can be used to increase or decrease the values Shock Protection: Selecting a shock protection mode helps in opening the curtain slowly, preventing it to open all at once and thus preventing sudden temperature changes. Press Button #2 to go to night mode setup option. Then, press Button #6 to go to this option Note: Covered % is the amount by which the curtain should be covered. By pressing Button #7 user can to go to % covered option. Wheel can be used to increase or decrease the value The day mode and the night mode start time can be set to an absolute value using the screen as shown or to the sunrise and sunset values. Location setup can be used to input the coordinates Press Button #5 and OK to confirm. Then user can change the time by pressing Buttons #1, #2, #3, #5, and #6. Note: The sunrise and sunset values will correctly calculated only if the location coordinates are entered correctly. Any one of the available 8 channels can be selected to be an alarm output. However, typically one would select channels 7 or 8. Now that you have selected a channel where you can connect an audible or visual alarm indicator device or a device such as a “Sensaphone”, you can link this output to an alarm setting programmed at option 4 of the System Setup Menu. See Page XXXX below. The next screen lets you check which alarm conditions will trigger the relay output. Alarm Condition Setup On this screen you can check which alarm conditions you want to trigger the relay output. Use button #3 to select. Pressing it a second time will remove the checkmark. 40 iGrowSeries 100 Installation Manual 960-0001-20 Irrigation option If you selected Irrigation option in the equipment type, you can see this screen. This option allows you to change the start, end and the amount of time you want to water plants. Press #2 to go to this option. You can enable/ disable this option by pressing #1 Press #5 to change the start time. Press #6 to change the end time. Press #7 to change the on time. Press #8 to change the off time. Please refer to Page no 47 to change the time 4.1.2.2.2 Set Name This screen is similar to the mobile phone SMS screen. To select a given alphabet press the required button the number of times = the position of the alphabet in the button. E.g. to type C press Button #1 three times. To enter numbers use the wheel. 960-0001-20 iGrowSeries 100 Installation and User Manual 41 4.2. Scheduling Setup (Growth Curve Setup) Press #1 to enable or disable the growth curve process Press #2 to enter the total number of weeks for the growing process. Press #3 to enter the number of weeks for the Vegetative phase. Press #4 the number of weeks for the Flowering phase Press #5 to enter the Start date Press #6 to enter the Vegetative Start date Press #7 to enter the Flowering Start date 42 iGrowSeries 100 Installation Manual 960-0001-20 4.3. Sensor Setup The Sensor Setup menu can be found under the System Setup menu. Scroll to the appropriate line using the Wheel or quickly navigate by pressing Button #3 and then OK. In Sensor Setting you have two options Basic: In this option you can select sensor module or an outdoor sensor. Press #1 followed by selection of the option which you want to choose using Wheel. Press OK Advanced setup: This takes you to another screen. Press #2 to go to advanced settings 4.3.1 Advanced The Sensor Setup page is where the user can map the sensor that is used for inside temperature readings. Sensors can also be calibrated and averaged in this section. Map Sensors: This is where the user can set up the system according to the various sensors available. Calibrate Sensor: The sensors can be calibrated to adjust for offsets/software setup here. Self-Test Setup: This is where the diagnostic mode test setup for digital sensor is done. Analog Sensor Mapping: This option allows the user to average the data from separate analog sensors. Buttons #1 - #4 are used to go to the corresponding options. 960-0001-20 iGrowSeries 100 Installation and User Manual 43 4.3.1.1 Map Sensors The mapping of the inputs to the different sensors is done here. The figure below shows the different inputs available for mapping. InTemp: Inside Temperature sensor In Hum: Inside Humidity sensor Light: Light sensor OutTemp: Outside temperature sensor Wind: Wind direction and speed sensor Rain: Rain sensor Back up Temp: Back up temperature sensor On selecting a given input you are presented with options to map that input to different sensors. You can also enable/disable that sensor. E.g. if are you are using an analog probe to measure the inside temperature then select analog for In- Temp. If you don‟t have a particular sensor selects None/Disabled for that sensor. 4.3.1.2 Calibrate Sensors To calibrate an input the sensor is selected. The Previous and Next buttons are used to scroll through the different sensors. Raw Value: This is the direct reading from the sensor. CAL: This is the offset which will be added to raw value to generate the adjusted value (ADJ). The Wheel can be used to increase and decrease the values. ADJ: This is the value which will be reflected on the status screen. 4.3.1.3 Self-Test Set Up This section enables the user to set up the test parameters for automatic testing of the digital temperature sensors. If a digital sensor is present and automatic testing of that sensor is desired, map the sensor to one of the digital values in the Map Sensors screen. Note: This section only applies to mapped digital sensors. Enable/Disable Test: Sets the test to enabled or disabled. Button #1 is used to go to this option 44 iGrowSeries 100 Installation Manual 960-0001-20 Self Test Time: The time interval between planned sensor tests. Set Retest Time: The delay after which a test should repeat once a previous test has failed. Button #4 is used to go to this option. Set Temp Difference: Temperature difference which should be seen when the test is in progress. Button #5 is used to go to this option. Set Self Test Time Min Value: Adjusts the time period in minutes. Set Self Test Time Hrs Value: Adjusts the time period in hours. Buttons #2 & #3 are used to go to the corresponding option. Wheel can be used to increase or decrease the values. Note: In the event that a sensor failsthe test and no backup sensor is in place, significant crop damage can occur. It is the responsibility of the end user to maintain sensors in good working order. 4.3.1.4 Analog Sensor Mapping This section enables the user to average the data from separate analog sensors. This is useful in situations where the user needs to take temperature data from multiple locations in a zone and average them to form an accurate temperature reading for the entire zone. Use the Arrows and Wheel to navigate to a desired analog sensor and map it to be averaged using the Enable/ Disable toggle or the OK button. 960-0001-20 iGrowSeries 100 Installation and User Manual 45 4.4 Alarms Setup Selecting this option takes you to the Alarm Settings screen. When an alarm condition occurs, an indication of the alarm will be displayed on the main screen of the controller. If you want the alarm to trigger an external device, such as a “Sensaphone”, you will need to have programmed a channel which you designated as an “Alarm” output. See page 35. Use the alarm output to turn an output on depending upon crossing a temperature level. This is normally connected to a telephone dialer such as the Sensaphone. High Temp Alarm Threshold is the maximum temp above which the alarm is triggered. Press #1 followed by wheel to change the value. Low Temp Alarm Threshold is the minimum temp below which the alarm is triggered. Press #5 followed by wheel to change the respective value. Similarly, you can set high and low value for Humidity and CO2. Press #2, #3, #6, #7 followed by wheel to change the respective value. Alarm delay lets you set a wait time before the alarm is triggered. Press #4 followed by wheel to change the time. Light Off Delay is the amount of time required for the light banks to cool off. 46 iGrowSeries 100 Installation Manual 960-0001-20 4.5 Time/Date Setup This section allows the user to change the time and date values on the iPonic controller. Time and Date setup menu can be found under system setup menu Wheel or Button #5 can be used to go to highlight this option and OK to select this option. After selecting Time & Date Setup the user can choose to select either Set Time or Set Date from the menu. Highlight your choice by using the Wheel or Button #1, #2 and press OK to go to the highlighted selection. 4.5.1 Set Time The time on the system clock can be adjusted by highlighting a chosen field (Button #1, #2, #3) and using the Wheel to modify the field value. If a given field is already highlighted repressing that button causes the value in that field to be increased. 12H/24H: Used to set the time display as 24 hr/12 hr duration. Set Hour: Used to highlight the hour field. Set Min(X0): Used to highlight the tens place of minutes value. Set Min (0X): Used to highlight the single place of minutes value. AM/PM: Used to set AM/PM value. Note that when the clock is set to 24H, the AM/PM button increments the time by 12 hours. 4.5.2 Set Date The date on iPonic controller can be adjusted by highlighting a chosen field (Button #1, #2, #3) and using the Wheel to modify the field value. If a given field is already highlighted repressing that button causes the value in that field to be increased. The date is displayed in MM/DD/YYYY format. Set Month: Used to highlight the month field. Set Day: Used to highlight the day field. Set Year: Used to highlight the year field. 960-0001-20 iGrowSeries 100 Installation and User Manual 47 4.6 Advanced Press #1 to go to Global Humidity setting Press #2 to go to Global Temp setting Press #3 to go to Global CO2 setting Press #4 to go to Global Light setting Press #5 to go to Air Exchange Press #6 to change Password Press #7 to run diagnostics Button #8 takes you to more options in Advanced setup Ref Page No: 23 for global settings Press #1 to go to Time setting Press #3 to Clear Data Bootload is used for firmware upgrade options. Please go to iponic.link4corp.com to upgrade your controller to the latest firmware. Use a USB stick to upload the binary into the controller. Press #4 to Bootload Stage On/Off enables/ disables the stage option. Press #5 to go to Stage On/Off Start Wizard Enable: This option lets you enable the startup wizard i.e., when you reset the controller you will have to set up time, date, equipment and growth start date. Press #6 to toggle between enable/disable option Heat Stages: This gives the total number of heat stages you want to consider. Press #7 followed by wheel to change the value. Press OK to confirm Cool Stages: This gives the total number of cool stages you want to consider. Press #8 followed by wheel to change the value. Press OK to confirm Ref Page No: 49 for time settings 4.6.1 Air Exchange Settings In this setting you can override the stages and open the air pump for air flow. Air Dump On/Off option switches on/off this option. Press #1 for this option. Air Dump On time is the amount of time when the air pump is switched on. Press #2 followed by wheel to change this value. Air Dump Off time is the amount of time when the air pump is switched off. . Press #2 followed by wheel to change this value. 48 iGrowSeries 100 Installation Manual 960-0001-20 4.6.2 Diagnostics Save FS: This option lets you save all the files into a USB. The files include log and configuration files. UI Test This tests the functionality of the touch sensitive user interface. Press #2 followed by conformation to run the test. Pressing a given button highlights it on the screen. To come out form this mode press button #1 to #8 one after another. 4.6.3 Time Settings Stage Delay is used to set the time delay between stages. Press #1 followed by wheel to change the value. Bump Off Time: This option lets you to check whether the curtain is fully closed or open. Bump off time is the time interval after which the system checks the curtain position. Press #2 followed by wheel to change the value. Note: this option is valid only when the curtain is in fully open or close position. Back Light Time: It is the time interval through which the back lights remain on. Press #3 followed by wheel to change the value. Button Light Time: It is the time interval through which the button lights remain on. Press #4 followed by wheel to change the value. 4.6.4 Clear Data Clear History formats the data flash and deletes all log files (all history files) on the unit. Press #1 followed by OK to clear the data. Format FS system will remove all the files. Press #2 followed by OK to format FS system. 960-0001-20 iGrowSeries 100 Installation and User Manual 49 4.7 Save/Restore This option lets you label and store your program in either the internal memory of the iPonic controller or a USB drive or SD Card. You may have programs for different crops or for different seasons of the year. This will be a convenient way of storing your programs with the capability to restore the program whenever desired. Save Configuration: Allows the user to store the controller settings/configuration to onboard memory/USB. Restore Configuration: Allows the user to restore the configuration stored on the onboard system memory or USB. Delete Configuration: Allows the user to delete the configuration files stored in system memory/USB. On selecting Save/Restore button and pressing OK we get a menu to choose from. Save/ Restore Config: Store and restore the configuration file Save Log Files: Save the log file to USB Save/Restore Sched: Store and restore the schedule file 4.7.1 Save/ Restore Configuration Save Configuration: Allows you to store controller settings/configuration to SD Card/ USB/System Memory Restore Configuration: Allows you to restore configuration stored on SD card or USB or system memory. Delete Configuration: Allows you to delete the files stored in system/ SD card/ USB Once the user has selected what action they would like to perform, the system prompts for a destination to perform the action to. Currently supported save/load devices include: • SD Card • USB Drive • System Memory Wheel is used to highlight the desired option and OK to go the option Once a save/restore option is selected the user is prompted to enter the file name in the screen indicated below. 50 iGrowSeries 100 Installation Manual 960-0001-20 4.7.2 Save Log Files To save the log file select the Save Log Files option by highlighting it using the Wheel or by pressing Button #2 and press OK. Currently supported Save Log File options include: • Save History Log File • Save Event Log Files • USB Logging Setup Buttons #1, #2 or #3 are used to go to the corresponding options. On selecting the Save History Log Files a popup indicating the file formats pop-ups. Log files can be saved in either .xml or .csv file formats. Select a given format using Wheel and pressing OK After selecting the required format the user is promoted to choose the drive to store the file in. User can select an option by scrolling and pressing OK The system prompts the user to enter a file name. Note: The process of writing from system memory to USB can be time consuming. USB Logging setup will let you set the time interval in which you want to log files. Press #1 to enable/ disable the option Press #2 to change the file format. Press #3 to change the logging period 4.7.3 Save/Restore Schedule This is similar to save/restore configuration settings 960-0001-20 iGrowSeries 100 Installation and User Manual 51 4.8 Location Setup Location setup allows the user to setup the latitude and longitude values. The iPonic controllers have an internal astronomical clock and can calculate the precise sunrise and sunset times once the location of the unit is entered. Location setup menu can be found under system setup menu. Wheel or Button #8 can be used to go to highlight this option and OK to select this option EDIT LATITUDE: Allows the user to edit the latitude value. EDIT LONGITUDE: Allows the user to edit the longitude value. Valid Location SetUp: If set to False, indicates that the latitude and longitude values are incorrect and should be ignored. If set to true indicates that the coordinates are valid/correct and can be used for sunrise and sunset time calculations. Buttons 5, 6, 7 can be used to go to the corresponding options. On selecting the edit option, the user is presented with the following screen. For latitude: “-“: Means South “+“: Means North For longitude: “-”: Means West “+”: Means East Note that if no sign is indicated it means + 52 iGrowSeries 100 Installation Manual 960-0001-20 4.9 Communication Setup The Communication Setup screen can be accessed by navigating appropriate line in the System Setup Menu. Communication setup menu can be found under system setup menu Wheel or Button #7 can be used to go to highlight this option and OK to select this option IP Address Setup: Allows the user to configure the network settings to enable the unit for web access Server Setup: This options allows the user to set the sever to link4corporation cloud. Buttons #1, #2 or Wheel can be used to highlight the option and OK is used to select the option Please refer to iPonic communication user manual for more information 960-0001-20 iGrowSeries 100 Installation and User Manual 53 4.10 Measurement Units The units for temperature, wind speed, as well as light can be adjusted under the Measurement Units section of the System Setup. Scroll the Wheel to the desired menu and select OK. The units can be changed by pressing the buttons for the corresponding measurement (Button #5, #6, #7). Pressing the buttons toggles the units. Temperature: Choose either degree Fahrenheit (°F) or degree Centigrade (°C) Speed: Choose either miles per hour(Mph) or kilometers per hour (kmph) Light: Choose either Watts/meter2 or klux. 54 iGrowSeries 100 Installation Manual 960-0001-20 5.0 SAVE/RESTORE CONFIG This option lets you label and store your program in either the internal memory of the iPonic controller or a USB drive or SD Card. You may have programs for different crops or for different seasons of the year. This will be a convenient way of storing your programs with the capability to restore the program whenever desired. Save Configuration: Allows the user to store the controller settings/configuration to onboard memory/USB. Restore Configuration: Allows the user to restore the configuration stored on the onboard system memory or USB. Delete Configuration: Allows the user to delete the configuration files stored in system memory/USB. Save Configuration: Allows you to store controller settings/configuration to SD Card/ USB/System Memory Restore Configuration: Allows you to restore configuration stored on SD card or USB or system memory. Delete Configuration: Allows you to delete the files stored in system/ SD card/ USB Once the user has selected what action they would like to perform, the system prompts for a destination to perform the action to. Currently supported save/load devices include: • SD Card • USB Drive • System Memory Wheel is used to highlight the desired option and OK to go the option Once a save/restore option is selected the user is prompted to enter the file name in the screen indicated below. Note: This is same as Save Restore Configuration – in section 4.7 above. 960-0001-20 iGrowSeries 100 Installation and User Manual 55 6.0 STAGES The last main section of the iPonic controller is the Stages section. This is where you assign equipment to particular cooling, heating, humidification and dehumidification stages. The Stage settings can be set for: • Temp Stages • Humidity stages Note: There are up to 8 temperature stages and 4 humidity/dehumidify stages. There are 2 heating (H1, H2) and up to 6 cooling (C1, C2, C3, C4, C5, C6) stages. The normal stage (N) is when neither heating nor cooling is required. C1 is the lowest stage of cooling and C6 the highest while H1 is the lowest heating stage and H2 is the highest. 56 iGrowSeries 100 Installation Manual 960-0001-20 6.1 Temperature Stages Here you can quickly set the temperature stage options for every piece of equipment. The arrows are used for moving the highlight cell to the desired stage. The Setup and OK buttons are used to select or deselect the highlighted stage for a device. For On/Off device types all stages are active i.e. they can selected or deselected. For Vents, the heating stages H2 and H1 are not applicable and the desired percentage of the vent position is set using the wheel. Note: For dual channel devices (vents/curtains) the second channel is disabled. 6.2 Humidity Stages When choosing to assign individual equipment to a humidity stage the following screen is shown. The arrows are used for moving the highlight and the On/Off/Non Effective button is used to select or deselect a given stage for a device. Note: If the channel is mapped to a Vent or a Curtain, Button #1 change contextually. Humidify: is engaged when the humidity value is below the Humidify (Low humidity)setpoint value. Dehumidify: is engaged when the humidity value goes above the Dehumidify (High Humidity) setpoint value. Cold De-humidify: is engaged when the outside temperature goes below the threshold value set in advanced screen. Note: Curtains and Vents are adjusted incrementally (%) using the scroll wheel. 960-0001-20 iGrowSeries 100 Installation and User Manual 57 NOTES AREA 58 iGrowSeries 100 Installation Manual 960-0001-20 NOTES AREA 960-0001-20 iGrowSeries 100 Installation and User Manual 59 VISIT US ON THE WEB! • Product Information • User Manuals • Quick Start Guides • Firmware Upgrades www.iponic.link4corp.com 60 iGrowSeries 100 Installation Manual 960-0001-20 Terms and Conditions Warranty Link4 warrants that the iPonic 600 Controller with the exception of the sensor module sold under this contract will be free from defects in material and workmanship for a period of 36 months after the date of purchase. The sensor module is warranted for 12 months from the date of purchase. This warranty will be limited to the repair and replacement of parts and the necessary labor and services required to repair the goods. IT IS EXPRESSLY AGREED THAT THIS WARRANTY WILL BE IN LIEU OF ALL WARRANTIES OF FITNESS AND IN LIEU OF THE WARRANTY OF MERCHANTABILITY Moreover, any description of the goods contained in this contract is for the sole purpose of identifying them, is not part of the basis of the bargain, and does not constitute a warranty that the goods will conform to that description. The use of any sample or model in connection with this contract is for illustrative purposes only, is not part of the basis of the bargain, and is not to be construed as a warranty that the goods will conform to the sample or model. No affirmation of fact or promise made by Link4, whether or not in this contract, will constitute a warranty that the goods will conform to the affirmation or promise. Link4 shall not be responsible for replacement(s) or repair(s) which become defective from user negligence, modification, abuse and/or any types of improper usage. Nonconformance to any of the specifications in the product manual will void the warranty. Furthermore, our liability to the goods sold, whether on warranty, contract, or negligence, will be released upon the expiration of the warranty period when all such liability shall terminate. Link4 shall not be responsible for any loss or claims due to consequential damages afford by the Buyer. Link4 also reserves the right to make any necessary changes to features and specifications to condition or warranty. Returns Merchandise cannot be returned without a Return Merchandise Authorization (RMA) number from Link4. Requests for permission to return defective items must be made within (14) fourteen days after receipt of shipment. A Link4 RMA # for approved returns must appear on both the customer's shipping carton and the related receipt memo. Parts under warranty will be repaired at no charge. Other returned items will be subjected to the following restocking charges: 20% for no value added items, 40% for value added items, and 75% for custom designed or built to specification items. Repair A repair order must also have a Link4 Return Merchandise Authorization (RMA) number. Repairs that are not covered by the warranty will be billed on a material and labor basis. Items returned for repair must be sent to Link4 with prepaid return transportation Link4 will not be responsible for damage(s) due to improper packaging or shipping and delivery of items returned for repair. Additional Costs It is expressly agreed that Buyer will reimburse Link4 for any additional costs attributable to changes in the specifications, directions, or design of the items furnished which are requested or approved by Buyer at Link4‟s listed retail prices in effect at the time such changes are ordered. Governing Law The validity of this contract and of any of its terms or provisions, as well as the rights and duties of the parties under this contract, shall be construed pursuant to and in accordance with the law of California. The parties specifically agree to submit to the jurisdiction of the courts of California. 2 iGrowSeries 100 Installation Manual 960-0001-20 Ramping In addition, you have the option of a temperature ramp between the setpoints. Each setpoint time period begins with a Ramp time. The benefit of ramping allows for you to make smooth transitions within the hydroponic facility so that the plants don‟t experience temperature shock. Ramping also saves energy, which translates directly into lower operating costs. Setpt 1 72.5°F End of Ramp time 6:30pm Beginning of Ramp time 6:00pm End of Ramp time 9:00am Beginning of Ramp time 8:00am In the example below, the start time is 8:00a with a 30-minute ramp time. The ramp time enables a smooth transition of the target temperatures between the setpoint time periods. Of course, the ramp times can be set to 0 and in this case there will be an immediate step transition in the set points. This is best explained by the illustration shown below. Setpt 2 70.5°F 1°F Deadbands 75°F Cool Stage 4 Cool Stage 3 Cool Stage 2 Cool Stage 1 70°F Normal Temp Range Heat Stage 1 Heat Stage 2 65°F 12am 1 2 3 4 5 6 7 8 9 10 11 12pm 1 2 3 4 5 Setpt 1 68.0°F 6 7 8 9 10 11 Setpt 2 67.0°F in this Example: Setpoint 1 is set to 9:00am with a 60minute Ramp, Temp is set as 68 to 72.5F Setpoint 2 is set to 6:00pm with a 30minute Ramp, Temp is set as 67 to 70.5F Figure 2.1 Example of Setpoints, Staging, & Deadbands 6 iGrowSeries 100 Installation Manual 960-0001-20 Internal Layout Figure 4.2 shows how the iPonic 600 looks on the inside. Although the unit is pre-wired it is good to have some familiarity with the internal layout. Manual Override Switches Master Reset Button Screen contrast adjustment Communication Module (OPTIONAL) USB Storage Input Figure 4.2 Board Layout of the iPonic 600 PCB 960-0001-20 iGrowSeries 100 Installation and User Manual 9 Power Cord 15A Resettable Breaker Sensor Module Connector Ethernet Connection (Optional) Fig 5.1 Sensor Module and Ethernet Connections Equipment Installation The iPonic 600 has eight (8) 115 VAC electrical outlets, a resettable 15 ampere fuse and a six foot power cord. On each side of the unit the bottom two outlets are ganged, as shown in the Fig.5.2 below, whereas, the top two are independent. This gives a total of six outputs that can be controlled independently. These outputs are numbered from 1-3 on the left side from top to bottom and 4-6 on the right side, also from top to bottom. In a typical installation, the equipment are connected as follows: Output 1 – Lights Output 2 – CO2 injector Output 3 – Irrigation pump Output 4 – Dehumidifier Output 5 – Heater Output 6 – Vent Fan(s) 12 iGrowSeries 100 Installation Manual 960-0001-20 5.2 Equipment Installation Warning: The total amperage drawn from the iPonic 600 must not exceed 15 amps. Low Voltage Output Installation Your iPonic 600™ has two (outputs #7 and #8) relays that are provided as dry contacts, i.e. switch closures. If an output is activated to ON, the switch is “closed” (shorted); and if it is activated to OFF, the switch is “open” (no continuity between the positive and negative terminals). The board mounted relays are intended as “pilot” relays. For most loads you will want the iPonic 600™ outputs to control a load relay or contactor that is connected to the motor. However, in some cases such as and alarm unit or irrigation valves that are 24 VAC, you can drive them directly assuming that you are wiring only one or two valves per relay. The maximum current load recommended for each of the iPonic 600™ relays is 1.0 amp. Warning – Do not exceed 1 Ampere or 24 Volts for outputs 7 and 8 Figure below shows the low voltage connection points for outputs 7 and 8. 960-0001-20 iGrowSeries 100 Installation and User Manual 13 960-0001-20 iGrowSeries 100 Installation and User Manual 17 Graphical display. Back light will turn off after 5 minutes. NOT A TOUCH SCREEN AUTO FORCE ON FORCE OFF SETTINGS OK TO CONFIRM 8 TOUCH buttons Press to show the pop up screen below: (page Button numbers match outlet numbers 1, 2, 4, and 5 control ONE power outlet each. 3 & 6 control TWO. 7 & 8 are for low voltage switching only. Wire internally (page 37) 8 green output status indicators. Will turn off after 5 minutes. 1 TOUCH WHEEL Use to navigate and change values 4 TOUCH navigational buttons 18 iGrowSeries 100 Installation Manual (page 57) Current temperature stage (page 22) Temperature targets Current temperature (page 46) Alarm indicators Highlighted means output is ON CO2 mode messages: FanCut = Shut off due to fan on Active = in CO2 maintenance mode (page 25) Label showing auto or manual operations. (page 25) Light turn on delay timer Output 7 & 8 are INTERNAL & defaulted to OFF (page 37) (page 33) Humidify mode active (page 57) Current humidity stage Current humidity level (page 23) 28) Grow Schedule is ACTIVE (page CO2 target level (page 25) Current CO2 level (page 25) Main Status Screen Entries 960-0001-20