Transcript
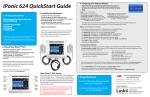
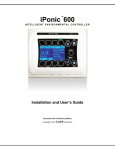
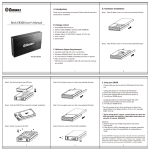
iPonic 614 QuickStart Guide
1. Verifying the Contents
2. Installing the Sensor Module
Your package should come complete with:
1. An iPonic 614 Grow Room Controller
2. A D.I.S.M. Sensor Module
3. A USB Thumb Drive
Take the following steps to connect the included
D.I.S.M. Digital Integrated Sensor Module:
1. Uncoil the 16’ Sensor Cable.
2. Affix the blue plug to the port at the bottom
of the iPonic 614 enclosure.
3. Hand-tighten the plug.
NOTE: The D.I.S.M. Digital Integrated Sensor Module comes
packaged inside the iPonic 614 enclosure.
NOTE: The USB Thumb Drive contains the User Manual and other
supporting documentation.
NOTE: There is a fine line on the surface of the iPonic Controller
window extending from the wheel toward the center.
This artifact is created by the plastic mold during the injection
process and does not affect the integrity or performance of the
unit in any way
4. Powering On & Startup Wizard
Plug the iPonic 614 power cord into a clean power outlet to reduce noise
and interference. Once powered up the iPonic 614 controller will initiate
the Startup Wizard.
Step 1 Set Time & Set Date
The time & date on the system clock can be adjusted by highlighting a
field (Button #1, #2, #3) and using the Menu Wheel to modify the
field value.
Press OK to advance to the next screen.
Step 2 Basic Equipment Setup
This screen allows you to select the equipment you will control with
your iPonic 614. A default set of equipment has already been selected
for you. To change this selection use the navigation arrows (#5 - #8)
and the Setup button (#3) to select or deselect equipment.
NOTE: To ensure consistent and accurate sensor readings, keep the
sensor cables away from interference sources such as high-voltage
power wiring, inverters, motor controllers, and mercury arc or
sodium lamp circuits.
Press OK to advance to the next screen.
After pressing OK, you will be asked to select one of the following two options:
1. Enter the Start Date for Growth Schedule
2. I will enter the start date later
Your iPonic 614 can automatically control the growth schedule starting on the entered date. For more
information about Growth Schedules, refer to Page 26 in the user manual.
3. Installing the Equipment
The iPonic 614 has eight 115 VAC electrical outlets. Each
controller has a total of six independent control outputs
arranged according the figure below.
For more information on how to arrange your
equipment refer to the User Manual on the included
USB Thumb Drive.
Select your desired option using the Menu Wheel and Press OK to advance to the next screen.
WARNING: The total amperage of the equipment connected
to the iPonic 614 must not exceed 15 amps.
Step 2 Set Growth Schedule Start Date
WARNING: Actual installation may differ. Use caution not
to exceed equipment power ratings. Follow all applicable
national and local electrical and safety regulations.
Press OK to complete the Startup Wizard.
Output Number
Equipment Type
If you chose to enter the Growth Schedule Start Date, the following screen
will be displayed. The date is set in the same manner as Step 1.
# Outlets
Default iPonic 614 Equipment Configuration
1
2
3
4
5
6
Output #1
Lights
one
Output #2
CO2 Injector
one
Output #3
Irrigation Pump
two
Output #4
Dehumidifier
one
Output #5
Heater
one
Output #6
Vent Fans
two
5. Congratulations!
Your iPonic 614 Controller has been set up and is
ready to grow immediately!
To configure and optimize your iPonic 614 please
refer to the User Manual on the included USB
Thumb Drive for additional information.
Delivering Confidence Through
Intelligent Environmental Controls
and Automation Solutions
Link4 Corporation
22725 La Palma Ave., Yorba Linda CA 92887
866.755.5465
[email protected]
iponic.link4corp.com