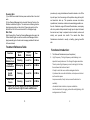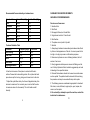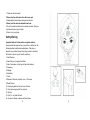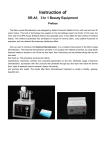
1
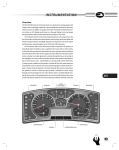
DIAMOND
Instruction Manual
For 7 Functions Diamond
Dermabrasion Unit
Please read through the entire instruction manual
Before using this machine
Instruction of
7 Functional Diamond
Dermabrasion Unit
Preface
The Micro-crystal Dermabrasion was designed by Italian Florence's
Mattioli at first, until now had over 20 years’ history. This kind of
technology only supplies to the dermatology expert and doctor at
first uses, but more and more SPA House & Beauty Saloon also
gradually uses, it was called the best method of medical beauty.
This method successfully has developed in Europe for several
years, cures patient thousands of examples, and has obtained the
extremely satisfactory effect.
Now we want to introduce the Diamond Dermabrasion, it is a
creative improvement of the Micro-crystal Dermabrasion. The
Diamond Dermabrasion provided a non-surgical skin refinish
1
Safety Warning:
1. Never operate this equipment on a person has or suffers from
the following medical conditions: Heart diseases, Sensitive Skin,
Damaged, Inflamed, or Infected skin.
2. When proceed deep cleaning or Galvanic, accompanies with
suitable emulsion or gel.
3. Never stop the handle’s blade on the skin in one spot, always
keep the blade moving on the skin.
4. Never point the blade towards the eyes or throat.
5. Do not modify the equipment.
6. Do not immerse the handle or the machine into water.
7. After usage, clean the Handle and store in a cool and dry place.
The machine should be grounding.
Specifications
Voltage: 240V/50/60Hz □
220V/50/60Hz □
115V/60Hz □
Power: 100/230 VA Fuse: 3A
14
Cleaning Skin
(1) Just hold the scrubber flank two piece metal and then it can start
work
(2) Use Cleaning/Massage button to select Cleaning Function, the
Scrubber indicator will light on. The machine is at cleaning function.
Apply cleansing lotion on the skin for 20 seconds; gently rub the
skin with the front of the scrub head at 35 to 40 degree angle.
Skin Care
After Cleaning Skin, Press the Cleaning/Massage button again, the
Patter indicator lights on and the machine is at Massage function.
Apply essential gel on the skin and massage parallel with the back
of the scrub head.
Treatment Reference Table
Functions Introduction:
Operate
Mode
Output
Intensity
Time
Cleaning
Level 1-4
2-3 Mins
Massaging
Level 1-4
2-3 Mins
Remove
Acarid
Worms
Cleaning
Level 5-6
2-3 Mins
Clear Lead
Poison
Cleaning
Level 7-8
2-3 Mins
Function
Lifting and
Melanin Cure
Nutrition
Conduction
Caution: Do not over adjust the intensity, should be
adjust from low to high till reach comfort zone.
13
procedure, by using sterile diamond heads to abrade or rub off the
top skin layer, then Vacuuming out the particles along with any dirt
and dead skin back up. This procedure removes skin debris,
imperfections, blemishes, wrinkles and unwanted pigmentation on
the skin. Moderate usage of Diamond Dermabrasion, accompany
with skin products that penetrate through top skin layer that reach
the dermis level, helps to replenish natural nutrients, restore cell
activity, and promote skin health. The results after Micro
Dermabrasion treatment is usually a healthy, glowing, beautiful
skin.
1. The Diamond Dermabrasion (see the preface)
2. .High Frequency -The high frequency electrotherapy is an
important beauty instrument. It is through the glass electrode
Tube to product high frequency current, and apply to the face,
thus achieves the treatment result.
-It helps to calm the nerve and has analgesia function.
-It produces the ozone for sterilization, can help wound to heal
and to restrain pores.
-Improve secretion, the pH value, causes the skin lean to
neutrality.
-Accelerate blood circulation, improve metabolism.
-Has the function of anti-aging, anti-wrinkle and tightening. alth
and appearance of the skin.
2
3. The hot & cold treatment function. The cold treatment function is
specially designed for claming down the skin after peeling. The skin
is sensitive after peeling treatment, so the cold treatment procures
is necessary. The hot treatment function is designed for
accelerating the absorption of nutrition.
4. Ultrasonic function. Ultrasonic utilizes sonic vibrations; it works
one million times per second (1 MHz). The ultrasonic wave could
stimulate skin tissue and improve permeability of the membrane to
promoted collagen tissue, reduced wrinkle and invisible appeared
fine line, also lift the skin result for younger and healthy look.
Ultrasonic generate frictional heat which accelerate blood
circulation, muscle relaxation, and decompose the cellulite to break
down exceed fat. BL-668A Ultrasound with 3 probes provided
non-surgical lifting. This machine utilizes sonic vibrations to reduce
lines, leaving the skin firm and smooth.
5.Photon Treatment
Red: The 650nm red light is for wakening and activating the skin
Blue: The 462nm blue light is for calming and diminishing
inflammation.
Green: The 527nm green light is for comforting the skin.
Purple: The 600nm purple light is for toxin elimination.
Orange: The 610nm light is for Balancing and recomposing.
Turquoise:The 470nm turquoise light is for relaxation.
Yellow:The 590nm yellow light is for tightening and oxygen supply
3
Super Skin Scrubber Introduction
Super Skin Scrubber is a superior beauty instrument of
the same kinds. Each Person after treatment a period of
time, can proved to be having significant effects on skin,
especially for facial treatment. It employs a variety of
currents, to produce vibrations with a frequency of 28000
times per second. It provides the ability to penetrate skins
and activate pores underneath. Moderate usage of
ultrasound, accompany with suitable emulsion or gel can
eliminate pigmentation, wrinkle, acne, dead skin and dirt,
making the skin shining and elastic.
Operating Instructions
Preparation
(1) Set the machine to No time limited or Time limited mode. The
machine is set to No time limited mode at default, the Time window
displays “--”.
To set Time limited mode, use Time adjuster to set desired time.
When the time is up, the Time window displays “00”. To operate the
machine again, use Time Adjuster to adjust.
(2) The Scrub Head output classify into 8 degree. Level 1-4 degree
working under regular function. Level 5-6 can eliminate acarid
worms. Level 7-8 can clear out lead poison. At level 5 and above,
the machine adds Galvanic
automatically on the Scrub head. To control the intensity of the
Scrub head, press “UP” or “DOWN” button as desired.
12
Trouble Shooting
6-BIO Face Lift
If the machine does not function properly, please follow these
procedures before requesting maintenance.
1. Low suction power/ low vacuum pressure:
Please check again the vacuum hose should be connected well to
the socket and then hand pieces. And then turn the Vacuum
Regulator to the maximum, and then start the Diamond
Dermabrasion, and then use finger to block the hole of the hand
pieces. Normally the vacuum Gauge can reach the 24 inch Hg.
** Please check the O ring in the Diamond pens & O ring in the
socket!
If you cannot settle the problem finally, please contact your
distributor. Don’t open the machine by yourself without the
technician guidance.
2. No response when turn on the power.
Please exchange the fuse. And connect the power cord correctly. If
cannot settle the problem, please contact to your distributor.
3. Supersonic hand piece cannot work properly.
Please connect again the plug. If cannot settle the problem, please
contact to your distributor.
4.Hot & Cold treatment cannot use.
Please connect again the plug. If cannot settle the problem, please
contact to your distributor.
11
-Microcurrent is a low level of electricity that mirrors the body's own natural
electrical impulses. A microcurrent face lift is a non-surgical, non-invasive
cosmetic technique that safely and effectively improves the health and
appearance of the skin
perating Instruction for Diamond
Dermabrasion
1. Push in the movable ring of copper nozzle at the hand piece, and
pull out the 6x4 size vacuum hose. Then push in the black plastic
ring on the vacuum hose.
2. Put a drop of cream or milk lotion on the vacuum hose nozzle,
push in the movable ring and insert in the vacuum hose to the limit.
3. Insert a cotton swab into the Diamond Head, then tight up the
Diamond Head on the hand piece. Remove the cotton swab after
every treatment.
4. Turn on the power switch.
5. Adjust the Vacuum intensity by Vacuum Regulator according to
the following reference table, the intensity displays on Vacuum
gauge and check with the client for comfort.
4
Recommended Vacuum intensity on treatment area
Treatment Area
Normal Skin (inHg)
Sensitive Skin (inHg)
Face
12-22
8-12
Forehead
12-22
10-12
Chest
15-20
15-18
Nose
10-15
10-14
Neck
18-18
10-15
Near Eye Area
8-12
8-10
Treatment Schedule Table
Treatment
Frequency (days)
Total Visits
Face Peeling
6-10
3-5
Fine Lines
7-13
6-8
Neck
12-14
3-5
Acne Scars
7-12
8-10
Hyperpigmentation
7-12
8-10
6. Use the incline area of Hand piece to contact with the skin
surface. Proceed with a slow sliding motion. Do not place the hand
piece at one spot for too long, doing so will cause harm to the skin.
7. Adjust the crystal flow rate by the Vacuum Regulator slowly from
minimum to maximum. For commonly use, do not set the flow rate
to maximum unless it is of necessity. This is for better comfort
intensity.
5
DIAGRAM OF SUGGESTED MOVEMENTS
AND AREAS FOR DERMABRASION
Do not use on these areas:
1. Sensitive Skin
2. Skin Rash
3. Damaged, Inflamed, or Infected Skin.
4. Surgical scar less than 12 months old.
5. Skin Swollen.
6. The probes can not point to Eye ball.
7. Genitals.
1. Always begin treatment conservatively and observe the effects
by the touch and appearance of the skin. A vacuum power that is
too high or too big may cause an inflammatory response.
2. Edema and erythema can occur following treatment, but will
resolve in few hours.
3. Overly aggressive techniques can cause mild flaking over the
next 3-4 days. Epidermis that is treated too aggressively can lead
to bleeding in the superficial dermis.
4. Diamond Dermabrasion should not be used on sensitive areas
such as eyelids. The eyelids should be closed at all times during
the procedure and may be covered with damp cotton pads.
5. The following areas are considered inappropriate for treatment:
Skin tumor, moles, birthmark, angioma, lips, eyes, herpes, skin
cancer, and liver spots.
6. Do not modify or attempt to repair the machine, contact the
technician for maintenance.
10
1. Clean skin with clear water.
2. Never stop the electrode on the skin in one spot.
3. Always keeps the electrode moving across the skin.
4. Never point the electrode towards chest area.
5. Do not immerse the handle or the machine into water. Doing so
could cause serious injury or death.
6. Store in a dry cool place.
Safety Warning
Important Notice of Caution before using this machine:
Never operate this equipment on a person has or suffers from the
following medical conditions described below. (The salon or
operator may consider having a client sign a waiver to the effect
that he/she is free of any poor health conditions.)
1. Heart Disease
2. Heart Murmur or Irregular Heart Rate
3. Has a Pacemaker or other type of heart rate balancer.
4. Pregnancy
5. Epilepsy
6. Alcoholism
7. Ulcers
8. Disease of Stomach, Intestine, Liver, or Pancreas.
9. Breast Cancer.
10. Undergoing treatment for any form of Cancer.
11. Had major surgery within the past year.
12. Asthma
13. Cold, Flu, or Upset Stomach
14. Any serious illness or disease not listed above
9
6
Please follow direction of arrows.
9. After treatment, brush off all remaining dead skin with a soft
brush and rinse with damp sponges or damp cool towel.
10. Allow skin to dry then apply desired skin product.
11. To clean the Diamond Head, use toothbrush or cotton
swab damped with a little alcohol to wipe off the dirty impurity,
and then use UV light or high temperature for sterilization.
Operating Instruction for hot & cool treatment
1. Connect the hot & cold plug to the machine; please note the
socket is in the “Hot & Cold” Area.
2. Start the machine: To turn on the machine, press the “on” button.
And then start the hot & cold treatment function.
3. Please wait 3 minutes, and then you can apply the treatment. For
the machine need time to warming up or cool down the treatment
probe.
4. Normally one treatment program is about 5 ~30 minutes. Please
note that do not stay in one treatment place over time when
applying the treatment to avoid any hurt caused by cool head.
5. After treatment, please turn off the machine and then pull out the
plug, make clean the probe.
*** Please clean the treatment probe before treatment and after
treatment.
Operating Instruction for Ultrasonic function
I. Preparation
(1). Before start the ultrasonic, cleanse the area to be worked. After
cleansed, apply suitable lotion and gel to the skin.
7
(2). Press Power On/Off for Ultrasonic to start the function.
(3). Output intensity display on Intensity window, Press Intensity
“up” and “down” button to set output intensity, output intensity
classify into 9 levels, from minimum 0 to maximum 0.8 Watts/cm.
Each level is 0.1 Watts/cm. For Facial work, low to mid intensity is
recommended. For Body work, mid to maximum intensity is
recommended.
II. Face Treatment
(1). Connect Face Electrode (big one) into Face Electrode output.
(2). Press Intensity “up” and “down” button to set output intensity to
your need.
(3). Press Pulse/Continuing mode to select Pulse or Continuing
wave, Pulse/Continuing wave indicator will light on.
(4). Apply the Electrode working on the face.
III. Eye Treatment
(1). Connect Eye Electrode (small one) into Electrode output.
(Should take out the Face Electrode first)
(2). Press Intensity “up” and “down” button to set output intensity to
your need.
(3). Press Pulse/Continuing mode to select Pulse or Continuing
wave, Pulse/Continuing wave indicator will light on.
(4). Apply the Electrode working around the Eye area.
*** Important:
1. Clean skin with clear water.
2. Never stop the electrode on the skin in one spot.
3. Always keeps the electrode moving across the skin.
4. Never point the electrode towards chest area.
5. Do not immerse the handle or the machine into water. Doing so
8