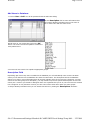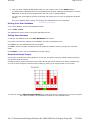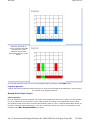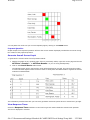
1
Welcome
Page 1 of 50
ACTIVote
Instant feedback during teaching
This help is designed to walk you through the main concepts of ACTIVote. We recommend all new ACTIVote
users to browse through the help topics and familiarize yourself with using the program. If you are an
experienced ACTIVote user, you may wish to view the What's New section to familiarize yourself with new
features and enhancements.
Click on one of the icons below to begin. You can also navigate through the help using the Contents, or search
for specific topics by using index keywords.
What's New
Learn about new features and product enhancements.
ACTIVote
More information about using the ACTIVote system.
Question Master
Learn about how to prepare questions in advance and changing their appearance.
Question Library
Learn about generating a question paper using questions stored in a special library.
User Database
Organize your users and associate them into groups.
Promethean website
Visit regularly to check for updated drivers, software, Flipchart resources and
documentation.
Access the User Forum to share comments from ACTIVusers around the world.
© Copyright Promethean Technologies Group Inc.
All Rights Reserved.
ACTIVote
Concept
The purpose of ACTIVote is to generate user response via the ACTIV board when called upon to do so by the
presenter. It gives instant feedback on user performance. Questions can be prepared using the Question
Master software, alternatively you may ask adhoc questions. Both of which can receive feedback. Feedback
can be displayed in various formats immediately on screen or may be exported to a spreadsheet for further
analysis.
There are several modes available when using the ACTIVote tool. The simplest mode is the Demo mode where
you use simulated devices to practice using the program. Anonymous mode requires that physical devices are
file://C:\Documents and Settings\cffteacher148.CAMPUSWIFI\Local Settings\Temp\~hh9... 2/25/2009
Welcome
Page 2 of 50
registered to the ACTIV board and then any registered device can be used by any user. Named mode is the
most complex and offers the most features in terms of feedback on user response. This mode not only
requires that devices are registered with the ACTIV board but that each user is allocated a specific device.
The following is a list of modes available:
Ask an adhoc question using Anonymous mode
Ask a prepared question using Anonymous mode
Ask an adhoc question using Named mode
Ask a prepared question using Named mode
Ask an adhoc question using Demo mode (for training use only)
Ask a prepared question using Demo mode (for training use only)
What's New
ACTIVote
View the response times to questions by each individual.
Temporarily pause the timeout for further explanations or adhoc discussion.
Overwrite the timeout of prepared questions to ensure continuity during an ACTIVote session, by altering
the timeout option in the ACTIVote Settings.
Question Master
Select a background style from your Shared Resource Library.
Define a font style and color for your question and answer text.
Open question flipcharts from and save question flipcharts to your Resource Library.
Question Library
Open a question library or save changes to your question library in your Resource Library.
Type your questions and answers into a text file and import the text file into the question library.
User Database
Open an alternative User Database file.
Getting Help
You can find more information about using ACTIVote in the following resources.
User Guides on product CD
You can find information about ACTIV products in the User Guides, which can be accessed from the Product
CD.
If Auto Play is enabled on your PC, the main menu screen will automatically appear. If this menu does not
automatically appear, choose Run from the Start menu. In the Run dialog box, type the drive letter that
contains the CD and type \Menu.exe. For example d:\Menu.exe.
Click on the documentation icon to access the product user guides.
Help System
ACTIVote includes complete documentation on all of the tools and features in this accessible help system.
The help opens in a new window. The format is designed to allow easy navigation so you can view each topic
using the contents list, or find information about a specific topic by using the index or search options.
User Forums
The User Forum is an interactive online resource, where you can post discussion topics and share information
file://C:\Documents and Settings\cffteacher148.CAMPUSWIFI\Local Settings\Temp\~hh9... 2/25/2009
Welcome
Page 3 of 50
surrounding the use of ACTIV products with other users around the world. It provides additional support from
your peers and allows you to combine knowledge, skills and inspiration so you get the most out of your ACTIV
products. The Forum is moderated by product experts who can offer guidance, solutions and answer your
product related questions.
We invite all new users to register and become members of our growing online community. You are
encouraged to join and visit the forum regularly for news about updates to the ACTIV range of products,
software and resources. Visit the forum
http://www.prometheanworld.com/common/html/vb_forum/index.php
Contacting Promethean
Promethean
address
1165 Sanctuary Parkway,
Suite 400, Alpharetta
GA 30004
Website
www.prometheanworld.com
Available from the website:
z
Notification of related products or software releases
z
Free upgrades or revisions to keep you informed of the latest features
z
Access to the User Forum
z
Helpful resources and education material for you to download
z
Links to useful websites
Technical Support
http://www.prometheanworld.com/n-america/en/html/customer_care/contact.shtml
Telephone
Numbers
Sales (888) 652-2848
Fax Number
(678) 762-7700
Email
For more information about Promethean products:
Technical Support (678) 762-1500
[email protected]
Send an email to Technical Support:
[email protected]
ACTIVote Mode Essential Steps
Register Devices
Why register the ACTIVote devices?
How to register ACTIVote devices
Select Session and ask question
The following list shows the necessary steps that must have been carried out before you can use each of the
ACTIVote modes. Single click on the mode you are interested in to reveal the steps, a further click will hide
the steps.
Adhoc Question in Demo Mode
Adhoc Question in Anonymous Mode
Adhoc Question in Named Mode
Prepared Question in Demo Mode
file://C:\Documents and Settings\cffteacher148.CAMPUSWIFI\Local Settings\Temp\~hh9... 2/25/2009
Welcome
Page 4 of 50
Prepared Question in Anonymous Mode
Prepared Question in Named Mode
Start Countdown
About the Timeout Bar
Graphical Outputs
Demo Mode Graph Output
Anonymous Mode Graph Output
Named Mode Graph Output
Export Results
Export results to a text file
Export results to Excel
About Registering the ACTIVote Devices
Your ACTIVote devices work by sending radio signals to and receiving them from your ACTIV board. Therefore
it is essential that before you can start using the ACTIVote devices you must register their existence with the
ACTIV board in the room that they will be used. Once the devices are registered they can then be used by
your audience for the purpose of answering questions.
Prior to registering your ACTIVote devices it is essential that the ACTIV board is switched on and attached to
the computer as per the recommendations contained in the ACTIV board user manual.
Note: You only need to register your devices once, once registered they are ready to use in any of
the ACTIVote modes. It is not necessary to register your devices each time you change
mode. It is however necessary to re-register devices if you change channels (see below) or
if you have to replace the batteries in a device.
Learn how to register the ACTIVote devices
Register ACTIVote Devices
Note: Before you can use ACTIVote in Anonymous Mode or Named Mode, you must register the
ACTIVote devices.
To register your ACTIVote devices you must run the Device Registration program:
Click on Menu > ACTIVote > Devices
Note: If you are running ACTIVprimary, first click on the Teacher Tools Menu button so
you can access Menu > ACTIVote > Devices.
You will see the Device Registration program.
Initially there will be no devices registered and the list will be empty.
First, click on the drop down arrow and select the country in which you are using ACTIVote. When you select a
country, the software will check your hardware to ensure that it is approved for use in your selected country.
If permitted, you can then continue with registering your ACTIVote devices. If your hardware and software
combination is not permitted, a warning will be displayed and you will be blocked from using ACTIVote. In this
case, or if your country does not appear in the list, contact Technical Support for advice.
Channels and Board ID
Because ACTIVote uses radio signals, it is possible for the system to receive data from other ACTIVote
systems in close proximity. A typical scenario would be two adjacent rooms, each containing an ACTIV board
and ACTIVote devices. In this situation you would not want the ACTIVote devices in the first room to interfere
with the system in the second room (and vice versa).
In order to prevent radio interference between systems, the Device Registration program provides two
settings:
file://C:\Documents and Settings\cffteacher148.CAMPUSWIFI\Local Settings\Temp\~hh9... 2/25/2009
Welcome
Page 5 of 50
Channel – This allows you to set ACTIVote devices to use one of three unique channels.
Board ID – This allows you to set the ACTIV board to be defined with one of 99 unique ID numbers.
Therefore with systems in close proximity, you should set the channel and Board ID to different values in each
room. Continuing with our example, you could set the following values:
Room 1 : Channel = 1 and Board ID = 1
Room 2 : Channel = 2 and Board ID = 2
While potential interference problems are negligible when systems are over 20 meters apart, it is good
practice to always set different board IDs and channel numbers for ACTIVote systems within the same
building.
Registering Devices
Once you have chosen the appropriate channel and board ID, perform the following:
Click on the Register button.
The registration button of the ACTIVote image will flash with a yellow border to indicate that the program is
now waiting for you to register the first device. The top row of the list will highlight in red, this indicates that
the ACTIV board is in registration mode and is searching for signals from any ACTIVote device.
Take the first ACTIVote device and depress the Registration button, hold it down until you see the red LED
flash briefly followed by a longer intermittent flash from the green LED. You will see the ACTIVote device has
been registered and allocated a device name. The red highlight has moved down a line, waiting for the next
device to be registered.
Repeat the above procedure for each device you wish to register.
Once you have successfully registered all devices click on the Stop button.
Naming your ACTIVote devices
Each device is automatically given a Device Name (A1, A2, A3 etc). It is
possible to assign any name you wish to each device. These names will
be used later within the software in Anonymous mode and are an easy
way for you to monitor which devices are registered.
Note: It is NOT possible to have NO Device name.
Click into the Device Name field and type in a suitable name that would
uniquely identify the device.
Adding Further Devices
It possible at any time to return to the Device Registration program and click once more on the Register
button. Follow the procedure outlined above to add more devices to the list.
Removing Devices
It is possible to remove selected devices or all devices from the list. To remove all devices click on the
Remove All button. To remove selected devices simply highlight the devices you wish to remove and click
the Remove button.
Battery Low Warning
When you register a device, the software interrogates each device to ascertain the power level of the batteries
powering the device. If a device reports back that the batteries are low then the software will display a
warning:
file://C:\Documents and Settings\cffteacher148.CAMPUSWIFI\Local Settings\Temp\~hh9... 2/25/2009
Welcome
Page 6 of 50
If this occurs you are recommended to physically remove the device from use until the batteries have been
replaced. In addition remove the registration information for that particular device by selecting the device
name in the list and clicking on the Remove button.
Please refer to the Device Maintenance section for further details on battery replacement.
Exiting the Device Registration Program
Click onto the OK button
The device registration file will be recorded.
If you try to exit the device registration program by clicking the Cancel button, you will be prompted to save
the registration information.
Choose Yes to record the registration information. The program will now close and the ACTIVote devices are
ready for anonymous mode. If you do not wish to record the changes you have made then press No, the
program will close.
Device Testing
The Device Registration program also has a test facility. This is useful at the beginning of the day to check
that all devices are functioning correctly and in addition have sufficient power levels.
To test your registered devices run the device registration program once more:
Click on Menu > ACTIVote > Devices
Note: If you are running ACTIVprimary, first click on the Teacher Tools Menu button so
you can access Menu > ACTIVote > Devices.
Click on the Test button
All registered devices in the list will highlight in red, we recommend that you take one device at a time. Press
one of the keypad letters in order to send a signal to the ACTIV board. Once the signal is received the red
highlight for the device will turn off and display in white. If at the end of testing any devices are still
highlighted in red then they have not successfully communicated with the ACTIV board.
Click on the End Test button if all devices tested OK you will be returned to the Device Registration program.
You may now exit by clicking the OK button.
Undetected Devices
If you have devices that failed the test then you will receive a warning. The warning advises you that one or
more devices remained undetected and asks you if you would like to remove those devices from the list.
Click Yes to remove the undetected devices from the list
Click No to leave the undetected devices in the list
Battery Low Warning
When you test a device the software interrogates each device to ascertain the power level of the batteries
powering the device. If a device reports back that the batteries are low then the software will display a
warning:
If this occurs you should remove the device from use until the batteries have been replaced. In addition,
remove the registration information for that particular device by selecting the device name in the list and
clicking on the Remove button.
file://C:\Documents and Settings\cffteacher148.CAMPUSWIFI\Local Settings\Temp\~hh9... 2/25/2009
Welcome
Page 7 of 50
User Device Allocation
Note: Before you can use ACTIVote in Named Mode, you must add your users to the User Database
so you can allocate a user to each ACTIVote device.
The following procedure assumes that the All Users folder, created during installation, is intact.
Start a Named Mode session
Click on Menu > ACTIVote > Session.
Note: If you are running ACTIVprimary, first click on the Teacher Tools Menu button so
you can access Menu > ACTIVote > Session.
You will be presented with the ACTIVote Session Program:
When you do this for the first time there will not be any ACTIVote
devices allocated to Users. You need to click onto the Users... button
to associate each member belonging to one of your ACTIVote groups
with the ACTIVote devices.
Note: For purposes of training, if a group already exists and is
listed, continue with the following procedure to learn how
to associate users with devices.
Click on the Users.. button now.
You will see the User Device Allocation program:
file://C:\Documents and Settings\cffteacher148.CAMPUSWIFI\Local Settings\Temp\~hh9... 2/25/2009
Welcome
Page 8 of 50
Select the User Database
The User Device Allocation program automatically opens the default User Database, as specified in the
ACTIVote Settings.
To open an alternative User Database, click on the Open button then navigate to the required .udb file. Click
on the filename to select it, then click Open to open the User Database file, or Cancel to use the User
Database which is currently open.
Select User Names
If you are using the default database, the All Users folder will be automatically selected in the Folder list.
This is a folder containing lots of typical names that you can choose for your voting activities until you
construct your own.
Alternatively, if you have already constructed a folder of names, you can choose a different folder by clicking
on the Folder down arrow and selecting a name from the list.
file://C:\Documents and Settings\cffteacher148.CAMPUSWIFI\Local Settings\Temp\~hh9... 2/25/2009
Welcome
Page 9 of 50
Note: If you have selected an alternative folder, it may contain a list of names within a series of
sub folders. In this case, click on the Sub Folder down arrow to see a list of names contained
in that sub folder.
Select User Names for Registered Devices
If the folder list contains the same amount of names as devices registered, click on the Select Group
button. All names in the folder list will be added to User Name list. Example
To add individual names to the list, highlight the user you want to add then click on the Select button
add the user. You can also use the Shift and Ctrl keys to select a group of user names in the folder list.
to
Example
Use the Clear Users button to remove all users from the allocation list.
You may use the Absent column to exclude a user who is unable to participate with the group. This facility
allows you to select whole groups from your User Database and selectively remove those that may be absent.
To declare someone absent, click into the Absent column for the user name to mark the column with a cross.
Allocate Devices
Once a User Name list has been created you now need to allocate devices to each of the users in your list.
Click on the Allocate Devices button. The screen will update to display the User Name list with a unique
three letter code displayed at the side of each User.
It is now up to each user to enter their associated code on their ACTIVote device. All users may submit this at
the same time, there is no need to do this one at a time.
You will also notice the following instruction dialog:
file://C:\Documents and Settings\cffteacher148.CAMPUSWIFI\Local Settings\Temp\~hh9... 2/25/2009
Welcome
Page 10 of 50
You may close this window if it is in the way of the User Names. Otherwise leave it displayed for instructional
purposes.
1. Ask each user to press and hold down the orange Register button on their device until both red and
green LED lights indicate on their device. Remember that the devices use radio frequencies and do not
need to be pointed towards the ACTIV Board.
2. Each User must now enter their three letter code which is displayed at the side of their name.
Sequence: There is a feedback sequence that will occur via the LED lights located on the ACTIVote device.
User enters first letter - Red light goes out, Green is still on
User enters second letter - Red light comes on, Green goes out
User enters third letter - Red light goes out, Green light flashes then goes out
At the end of this sequence the User Name will update in the software program and display in green to
indicate that the device has been allocated successfully to the user.
If the User name remains red then the device has not been allocated correctly - this is usually due to miskeying letters. Ask the user to try once more taking care to follow the correct procedure and key in the correct
letters.
POINT TO CONSIDER
If someone enters a code by mistake, that has already been allocated to a different user then two things will
occur:
z
The user who just submitted the code will not be successful and their User Name will remain highlighted
in red.
z
The user who already entered that code successfully will no longer be associated with that device and
their User Name will revert to red once more.
This is open to misuse of course in that a malicious user may purposely 'wipe out' another users device
allocation. More probably it could happen if a user misreads his/her code by mistake.
If this happens then both users must re-enter their correct codes.
file://C:\Documents and Settings\cffteacher148.CAMPUSWIFI\Local Settings\Temp\~hh9... 2/25/2009
Welcome
Page 11 of 50
Once all users have successfully entered their codes you need to click on the Back button located at the
lower right hand corner of the screen. You will be returned to the initial view of the Device Allocation program.
The Device list will now show that, in this example four people successfully registered their three letter code
and a device is now allocated to each of those users. This information will now be used by ACTIVote to display
the user name, when that person takes part in an ACTIVote Named Mode Session.
Battery Low Indicator
If you notice while users are keying in their three letter codes that a User Name has been allocated
successfully but in addition to the User Name cell turning green you also notice the Low Battery Warning
indicator
against a User Name. This is informing you that the batteries in the ACTIVote device are nearly
exhausted.
This warning will also appear in the listing of Allocated devices:
The device will probably work satisfactorily for that particular session and we recommend that the device is
used in this session. However, you should change the batteries in the device before the next session.
See Device Maintenance for details of what to do if a registered ACTIVote device requires new batteries. It
is important to follow the procedure outlined in this section to correctly re-register the device.
Exiting the program
Click on the Exit button to conduct a Named Mode Session, asking questions using adhoc Mode or using
Prepared Question Mode.
If you elect to exit the User-Device Allocation program by clicking on the Cancel button you will be prompted
to save the changes you have made.
Click Yes to save the Device registration file and exit the program.
Click No to exit the program without saving any changes you have made.
Click Cancel to return to the User Device Allocation program.
Device Maintenance
Changing batteries in a device that has been registered.
When you remove batteries from an ACTIVote device it will lose the settings it stores within the device, and
file://C:\Documents and Settings\cffteacher148.CAMPUSWIFI\Local Settings\Temp\~hh9... 2/25/2009
Welcome
Page 12 of 50
the device will need to be registered with the system once more. Before you replace the batteries, it is
recommended that you remove the existing registration details for this device from the Device Registration
program.
How do I know which device entry needs to be removed?
To be absolutely sure you should use the Test routine. Open the Device Registration program:
Click on Menu > ACTIVote > Devices.
Note: If you are running ACTIVprimary, first click on the Teacher Tools Menu button so
you can access Menu > ACTIVote > Devices.
Click the Test button, then press one of the keypad buttons on the device you suspect has low battery power.
Assuming the device communicates with the program, it will turn off the red highlight for that particular
device, it will also report back that the battery level is low.
Stop the test by clicking on the End Test button, You will receive a warning dialog, click No to leave the
undetected devices in the list.
Highlight the entry for that particular device which should be the only one reporting (Battery Low) then click
on the Remove button. This device will now be removed from the list of registered devices.
Replace Batteries
Now that you have removed the registration entry for the device that reported a Low Battery you may now
change the batteries.
When replacement of the batteries is necessary, remove the anti tamper screw with the tool provided.
Carefully slide the carriage out of the main ACTIVote body. Remove the old batteries and replace with 3 new
AAA alkaline cells. Observe the battery icons on the carriage which indicate which way the batteries should be
inserted. Slide the carriage back into the main body and gently tighten the anti tamper screw.
To re-register the device containing the new batteries, click on the Register button in the Device
Registration program. For full information on registering devices see the Register ACTIVote Devices
section.
Demo Mode using adhoc question
You may use Demo Mode along with the concept of the adhoc question.
The term 'adhoc' is used to represent 'on the spur of the moment' questions. For example you may think of a
question while half way through a presentation. At this point, you could either ask the question to your
audience or write it on a Flipchart page. The system has been designed to easily accommodate the asking of
such adhoc questions.
1. Click on Menu > ACTIVote > Session.
Note: If you are running ACTIVprimary, first click on the Teacher Tools Menu button so
you can access Menu > ACTIVote > Session.
2. Choose Demo Mode.
3. Click in the box and type in the number of 'assumed' devices you
require
4. Click on the OK button
To use this feature, Turn to a new Flipchart Page and either ask your
audience a question and give possible answers verbally or write the
question and possible answers onto a new Flipchart Page using the
ACTIVpen.
file://C:\Documents and Settings\cffteacher148.CAMPUSWIFI\Local Settings\Temp\~hh9... 2/25/2009
Welcome
Page 13 of 50
5. When ready to accept your audience response, click on the ACTIVote tool button. The timeout bar will
appear.
Anonymous Mode using adhoc Question
Note: You must have done the following before you can use this ACTIVote mode:
1. You must have registered your ACTIVote devices.
You may use Anonymous Mode along with the concept of the adhoc question.
The term 'adhoc' is used to represent 'on the spur of the moment' questions. For example you may think of a
question while half way through a presentation. At this point, you could either ask the question to your
audience or write it on a Flipchart Page. The system has been designed to easily accommodate the asking of
such adhoc questions.
To use this feature, open a new Flipchart Page then ask your audience a question and give possible answers
either verbally or by manually writing the question and possible answers onto the new Flipchart Page using
the ACTIVpen (recommended).
Procedure:
1. Click on Menu > ACTIVote > Session.
Note: If you are running ACTIVprimary, first click on the Teacher Tools Menu button so
you can access Menu > ACTIVote > Session.
You will be presented with the ACTIVote Session Program:
2. Choose Anonymous Mode, select the number of devices to
use (i.e. one per user) then click the OK button.
The ACTIVote session program will close.
3. Ask Your adhoc question or write your adhoc question on the
current Flipchart Page using the Pen Tool.
4. Click on the ACTIVote tool button. You will see the timeout bar
file://C:\Documents and Settings\cffteacher148.CAMPUSWIFI\Local Settings\Temp\~hh9... 2/25/2009
Welcome
Page 14 of 50
appear at the top of the screen.
Named Mode Using adhoc Question
Note: You must have done the following before you can use this ACTIVote mode:
1. You must have registered your ACTIVote devices.
2. You must add users to the User Database in order that you can choose them from the
user group selection screen, however a sample group is provided for training
purposes.
3. You must have allocated ACTIVote Devices
You may use Named Mode along with the concept of the adhoc question.
The term 'adhoc' is used to represent 'on the spur of the moment' questions. For example you may think of a
question while half way through a presentation. At this point, you could either ask the question to your
audience or write it on a Flipchart Page. The system has been designed to easily accommodate the asking of
such adhoc questions.
If you require feedback on how individual users voted you will need to switch to Named mode.
Procedure:
1. Click on Menu > ACTIVote > Session.
Note: If you are running ACTIVprimary, first click on the Teacher Tools Menu button so you can
access Menu > ACTIVote > Session.
You will be presented with the ACTIVote Session Program:
2. Click on Named Mode
Your current users should be listed since you were
asked at the beginning of this section to register
users. If your current users are not listed then refer
to the section on Allocating Devices.
3. Click the OK button.
file://C:\Documents and Settings\cffteacher148.CAMPUSWIFI\Local Settings\Temp\~hh9... 2/25/2009
Welcome
Page 15 of 50
4. Turn to a new Flipchart Page then either ask
your adhoc question or write your adhoc
question on the current Flipchart Page using
the Pen Tool.
5. When ready to accept the response tell your
users to observe the ACTIV board and click
once on the ACTIVote tool button.
The timeout bar will appear at the top of the screen.
Demo Mode using a Prepared Question
Note: You must have done the following before you can use this ACTIVote mode:
1. You must have created your Flipchart containing your questions. You can use the
Question Master program to do this.
Procedure:
1. Open the Flipchart containing your questions.
2. You will automatically be asked to choose the type of
ACTIVote session you require, choose Demo.
3. Click in the box and type in the number of 'assumed'
devices you require
4. Click on the OK button
5. Turn to the first question page and when ready click once
on the ACTIVote tool button.
file://C:\Documents and Settings\cffteacher148.CAMPUSWIFI\Local Settings\Temp\~hh9... 2/25/2009
Welcome
Page 16 of 50
You will see the timeout bar appear at the top of the screen.
Anonymous Mode using a Prepared Question
Note: You must have done the following before you can use this ACTIVote mode:
1. You must have registered your ACTIVote devices.
2. You must have created your Flipchart containing your questions. You can use the
Question Master program to do this.
Procedure:
1. Open the Flipchart containing your questions.
2. You will automatically be asked to choose the type of ACTIVote
session you require, choose Anonymous.
3. Select the number of devices you will use (i.e. one per user).
4. Click on the OK button.
5. If you elected to have a title page in your question Flipchart then
this page will be displayed now.
This is your cue to introduce your question paper and give any
instructions you feel are necessary.
file://C:\Documents and Settings\cffteacher148.CAMPUSWIFI\Local Settings\Temp\~hh9... 2/25/2009
Welcome
Page 17 of 50
6. Turn to the first question page.
Give your users appropriate reading time, then to instigate the response click once on the ACTIVote
tool button.
The timeout bar will be displayed.
Named Mode using a Prepared Question
Note: You must have done the following before you can use this ACTIVote mode:
1. You must have registered your ACTIVote devices
2. You must add users to the User Database in order that you can choose them from the
user group selection screen, however a sample group is provided for training
purposes.
3. You must have allocated ACTIVote Devices
4. You must have created your Flipchart containing your questions. You can use the
Question Master program to do this.
If you require feedback on how individual users answered on your question Flipchart you will need to switch to
Named mode.
Procedure:
1. Open the Flipchart containing your questions.
You will automatically be asked to choose the type of
ACTIVote session you require - choose Named
Your current users should be listed since you were
asked at the beginning of this section to register
users. If your current users are not listed then refer
to the section on Allocating devices.
Click the OK button
file://C:\Documents and Settings\cffteacher148.CAMPUSWIFI\Local Settings\Temp\~hh9... 2/25/2009
Welcome
Page 18 of 50
2. If you elected to have a title page in your Question
Flipchart then this page will be displayed now.
This is your cue to introduce your question paper and
give any instructions you feel are necessary.
3. Turn to the first question page
Give your users appropriate reading time, then click once on the ACTIVote tool button.
The timeout bar will be displayed.
About the Timeout Bar
When ready to accept your audience response, click on the ACTIVote tool button to display the timeout bar.
After a few seconds the timeout bar will say Answer Now and will start to shrink, indicating the time
remaining:
Click on the Pause button
change
to temporarily pause the countdown. The symbol on the button will
. Click on this button once more to restart the countdown.
The timeout bar will remain on screen until one of the following occur:
1. The ACTIV board has accepted all responses from your audience, whereupon it will disappear from the
screen.
2. The timer has timed out having accepted all responses received within the set timeout period.
Whereupon it will disappear from the screen.
3. It has received no responses, whereupon the message No answers received! will appear.
file://C:\Documents and Settings\cffteacher148.CAMPUSWIFI\Local Settings\Temp\~hh9... 2/25/2009
Welcome
Page 19 of 50
4. All simulated responses have been received (Demo Mode ).
Once ACTIVote has accepted all responses it will automatically display the results in the form of a graph, see:
Demo Mode Graph Output
Anonymous Mode Graph Output
Named Mode Graph Output
Change how ACTIVote behaves by altering the ACTIVote settings, see the ACTIVote Options section for
more information.
Question Master
In addition to asking adhoc questions it is also possible to pre-prepare one or more questions and store them
in a Flipchart for subsequent presentation. To simplify the task of preparing Flipchart questions, you can use
the Question Master software.
Procedure:
1. Click on Menu > ACTIVote > Question Master.
Note: If you are running ACTIVprimary, first click on the Teacher Tools Menu button so
you can access Menu > ACTIVote > Question Master.
You will be presented with the Question Master program.
Device Type
The ACTIVote device type you are using will be auto-detected, so that the software imaging and procedures
will reflect the devices you have. In addition, the correct help file will be loaded to suit your device type.
Quick Guide
The Question Master program uses the following procedure to create a question Flipchart.
First Check device type and select the appropriate radio button then:
Step
Step
Step
Step
1
2
3
4
Set Title Page
Set Questions
Flipchart Options
Create Flipchart
Once you have created your Flipchart you may wish to save the source file you have just been working on.
This is a separate step from creating and saving the Flipchart.
Saving your source file
Step 1 - Set Title Page
You can elect to include a title page or not, the default is that a title page will be included. If you wish to
include a title page, click in the Title text box and type in a suitable heading representing the topic of your
Flipchart questions. Now click into the Description text box to provide a suitable description for your
question paper. You may choose to type instructions here for users undertaking your test. Having done this a
Checkmark will appear next to the Set Title Page step. A Checkmark is used to indicate the steps you have
completed.
If you do not require a title page, click onto the check box that is labelled Add Title Page to remove the
Checkmark. The text input boxes will be grayed out and a check will appear in the Set Title Page step to
indicate that the step is complete.
Click the Next> button to progress to step 2.
Step 2
Step 2 - Set Questions
file://C:\Documents and Settings\cffteacher148.CAMPUSWIFI\Local Settings\Temp\~hh9... 2/25/2009
Welcome
Page 20 of 50
1. The cursor will ready for you to type in your first question. Otherwise, click on the New Question
button to add a new question.
2. Now choose the Question Type. Choose one of the following question types:
3. Choose the Correct Answer by clicking on the down arrow and choose the corresponding letter for
the correct answer. This will be used by the output graph to indicate the correct answer. You can omit
this stage if you wish to manually chose the correct answer when providing feedback to your users, or if
the question does not have a correct answer.
4. You may specify a Timeout by selecting the checkbox then entering a time in seconds into the text box
that appears. Each question can have the same or a different timeout value. If you elect not to use the
timeout feature then you will need to click on the ACTIVote stop button to manually end the timeout
period.
5. Next Select a Layout. Choose from the following layout types:
Short Question - Long Answers
Long Question - Short Answers
Short Question - Image with optional label Answers
Long Question - Image with optional label Answers
Short Question + Medium Image - Short Answer
Long Question + Large Image - Short Answer
It is possible to alter the Layout of a question at any time without losing your answers.
4. If you would like to use the same layout for all of your questions, select the Use this layout for all
questions checkbox. This eliminates the need to manually select the layout you require each time.
5. If you chose a multiple choice type question as your question type, enter your possible answers to the
current question by typing each answer in the text boxes of the Answers column.
Note: Depending upon the Question type and Layout chosen you will need to type in the answer
and, if an image layout is chosen, select suitable images that go with your questions. See
how to insert images in the topic about Image Questions and Text with image Questions
topics.
file://C:\Documents and Settings\cffteacher148.CAMPUSWIFI\Local Settings\Temp\~hh9... 2/25/2009
Welcome
Page 21 of 50
Having finished inputting Question 1 you may now add new questions by clicking on the New Question
button. When you have inputted all your questions, click on the Next> button to move onto Step 3.
Step 3
Step 3 - Flipchart Options
Having input all of your questions you can now choose a style for your Question Flipchart and also the screen
resolution that it will be created in.
Style
This option allows you to output your Question Flipchart in a variety of styles from very simple black on white
to detailed texture rich backgrounds.
The program points to a folder called Question Master, located in your shared backgrounds folder. This gives
you a greater choice of styles because it allows you to choose from any background which has been placed in
this folder. When you have selected a background, it will be tiled to fit the page if it is smaller than the page.
You can choose not to apply a background style, in which case your page will contain a plain white background
instead.
Font
Select a specific font to use in your Question and Answer text by clicking on the drop down arrow and
selecting a font from the list.
Color
To select a color for your Question and Answer text, click on the color box and select or create a color from
the Windows Color Palette.
Size
You can increase or decrease the relative sizes of the Question and Answer text size, use the up or down
arrows to change the font size as you require. The range is from 20/18 point size 28/26 point size.
Click on the Next> button to proceed to Step 4.
Step 4 - Create Flipchart
Having entered your questions and possible answers, using the layout and styles of your choice, it is now time
to output this as a Question Flipchart.
Clicking onto the Create Flipchart tab will open up the Create Flipchart dialog. This points to the Flipchart
resources folder in your personal Resource Library.
Type in a suitable file name reflecting the type of questions you have used then click on the Save button.
At this stage you can leave the Question Master open and switch to the program to view your generated
Question Flipchart. Open the Question Flipchart like you would for a normal Flipchart.
Refer to the appropriate ACTIVote mode to read about using a prepared Question Flipchart.
Click on the Exit button to close Question Master program, or click on Maintain Library to open the
Question Library.
file://C:\Documents and Settings\cffteacher148.CAMPUSWIFI\Local Settings\Temp\~hh9... 2/25/2009
Welcome
Page 22 of 50
When you exit Question Master you will be asked to save your Question Master Source File. See Saving your
Question Master Source File for more information.
Text only Questions
There are two text layouts you can apply within the Question Master program.
Layout 1 Short Question - Long Answers
This question style is used where your answers may require more detail
This type of question requires you to input your question and choose the question type
(i.e. multiple choice, yes/no, or true/false). If you choose a multiple choice question type
you will need to type in your possible answers. Select the correct answer from the drop
down list.
Layout 2 Long Question - Short Answers
This question style is used where your answers may require less detail
This type of question requires you to input your question and choose the question type
(i.e. multiple choice, yes/no, or true/false). If you chose a multiple choice question type
you will need to type in your possible answers. Select the correct answer from the drop
down list.
Image Questions
There are two image layouts you can use within the Question Master program.
Layout 3 Short Question - Image with optional label Answers
This question style is used where your answers require the use of images.
This type of question requires you to input your question and choose the question type (i.e.
multiple choice, yes/no, or true/false). If you choose a multiple choice question type you will
need to type in your possible answers.
You also need to locate appropriate images for each possible answer.
To locate an image click in the image field and then click on the Browse button
You will be presented with the Select Image File dialog. This points to the images folder in
your personal Resource Library.
Highlight the image you require and click the Open button, you will see a thumbnail of your
selected image appear.
file://C:\Documents and Settings\cffteacher148.CAMPUSWIFI\Local Settings\Temp\~hh9... 2/25/2009
Welcome
Page 23 of 50
Note: When you include images with your Question Master files, you are loading the
location reference only into Question Master, not the image itself. If the image
is subsequently moved or deleted then the reference to the image will be lost.
You are advised to copy all images used in your Question Flipcharts into a
known place in your Resource Library, to prevent such an occurrence. The
Flipchart itself will still contain all images since copies of the images are
embedded into the Flipchart.
Select the correct answer from the drop down list.
Layout 4 Long Question - Image with optional label Answers
This question type is the same as above except that you have much more space for a longer
question, and the images are displayed at the side of the question.
Text with Image Questions
There are two text with image layouts you can apply within the Question Master program.
Layout 5 Short Question + Medium Image - Short Answer
This question style is used where your question is to be supported by the use of an image
This type of question requires you to input your question and choose the question type (i.e.
multiple choice, yes/no, or true/false). If you choose a multiple choice question type you will
need to type in your possible answers.
You also need to locate an appropriate image to support your question.
To locate an image click in the image field and then click on the Browse button.
You will be presented with the Select Image File dialog. This points to the images folder in
your personal Resource Library.
Highlight the image you require and click the Open button, you will see a thumbnail of your
selected image appear:
file://C:\Documents and Settings\cffteacher148.CAMPUSWIFI\Local Settings\Temp\~hh9... 2/25/2009
Welcome
Page 24 of 50
Note: When you include images with your Question Master files, you are loading the
location reference only into Question Master, not the image itself. If the image
is subsequently moved or deleted then the reference to the image will be lost.
You are advised to copy all images used in your Question Flipcharts into a
known place in your Resource Library, to prevent such an occurrence. The
Flipchart itself will still contain all images since copies of the images are
embedded into the Flipchart.
Select the correct answer from the drop down list.
Layout 6 Long Question + Large Image - Short Answer
This question type is the same as above except that you have much more space for a longer
question, and a larger image, the answers are displayed beneath the image.
Add Question from Library
The Question Library is a utility that allows you to very quickly add questions to your project from pre-written
questions.
To add a question to your current question paper:
1. Click on the Show Library button.
The Answers column will be replaced by the Question Library column:
file://C:\Documents and Settings\cffteacher148.CAMPUSWIFI\Local Settings\Temp\~hh9... 2/25/2009
Welcome
Page 25 of 50
The default view displays All Questions
If you have organized your questions into Folders and Sub Folders, you can navigate through the folder
structure by using the down arrows to display the questions according to the categories you have
setup.
2. Click on the question(s) you require and click on to the Use Question (s) button.
The question(s) will be added to your current project, you may at this stage edit the question if you wish.
Add Question to Question Library
In addition to outputting your question to a Flipchart and saving it within the Question Master Source file,
you can also add your question to the Question Library. The Question Library is a utility that allows you to
very quickly create a question paper from pre-written questions.
To add a question to the library:
1. Click on the question you wish to save so that it is highlighted.
2. Click on Question on the menu.
3. From the popup choose Add to Library.
You question will be added to the question library. It will not at this stage be categorized. You may wish to
organize the question within the question library, see Maintaining the Question Library for more
information.
Deleting Questions From Your Source File
To delete a question from your Question Master source file:
1. Click on the question(s) you wish to delete.
2. Click on Question from the menu.
3. From the popup choose Delete Question(s). You will be prompted with the Delete Question(s)
dialog:
file://C:\Documents and Settings\cffteacher148.CAMPUSWIFI\Local Settings\Temp\~hh9... 2/25/2009
Welcome
Page 26 of 50
Click the Yes button to remove the question(s).
Click the No button to leave the question in place.
Random Generation of Questions
To add a random set of questions to your project:
1. Click on Question on the menu
2. From the popup choose Random Generation. You will be presented with the Random Question
Selector dialog:
By default All Questions will be displayed. You can use the Folder and Sub Folder groups to
randomly select questions from a particular topic, provided you have setup these topics and populated
them with questions.
2. Click on the down arrow and select the Number of Questions you wish to add.
3. Click on the Select button. The questions will be added to your project.
You may click the Exit button if you change your mind about adding random questions.
file://C:\Documents and Settings\cffteacher148.CAMPUSWIFI\Local Settings\Temp\~hh9... 2/25/2009
Welcome
Page 27 of 50
Note: Question Master will not add multiple instances of the same question
Saving Your Question Master Source File
Having generated your Question Flipchart, you may at this stage exit the Question Master program. You may
choose to save the current question project for later use. Saving your Question Master source file enables you
to re-load this question set for further editing or outputting in different styles or layouts.
1. Click File.
2. Select Save to... and select whether to save it to your personal or shared Question Master resource
folder, or browse to save it in another location.
3. Type in a suitable filename for your Question Master Source File, then click on the Save button. The
file will be saved with a .qmf extension.
Opening a Question Master Source File
To open an existing source file:
1. Click on File.
2. Choose Open from... and select whether to open a source file from your personal or shared resource
library, or from another location.
If you have previously been working on a question project and have not saved it you will be prompted
to save changes. Click Yes to save your current question project. Your current Question Master source
file will be saved. If you have not yet given your current project a filename you will be prompted with
the Save Question Master File dialog. Type in a suitable filename and click on the Save button to
save your current project.
The Open Question Master File dialog will then be displayed.
Locate and click on your question master project file, which will have the extension .qmf. Then click on the
Open button.
Your Question Master source file will open so you can edit the file or output your Question Flipchart.
Starting a New Question Master Source File
To start a new question master project:
1. Click on File.
2. Click on New.
If you have previously been working on a question project and have not yet saved it, you will be prompted to
save changes. Click Yes to save your current question project. If you have not yet given your current project
a filename, you will be prompted with the Save Question Master File dialog. Type in a suitable filename
and click on the Save button to save your current project. Click No to abandon your current file.
All information in Question Master will now be reset as if the program was newly opened with a blank project.
You may now start to compile your new question project.
Maintaining the Question Library
In order to use the Question Library effectively it will need to be organized. Click on the Maintain Library
button to open the Question Library:
file://C:\Documents and Settings\cffteacher148.CAMPUSWIFI\Local Settings\Temp\~hh9... 2/25/2009
Welcome
Page 28 of 50
All questions added to the question library are placed in the main index, it is up to you to categorize and
organize your questions into Folders and Sub Folders, so that they are readily available by topic.
Creating Categories
You need to create topics and sub-topics by renaming main Folders and their associated Sub Folders.
1. Double click on the Folder 1 tab to open a text box where you may enter a classification or category.
2. Type in your chosen folder name. For example, 'Mathematics'.
3. Click the OK button to rename the Folder label.
4. Double click on the Sub Folder 1 tab and type in a suitable name, for example 'Equations'.
5. Click the OK button to rename the Sub Folder label.
6. Continue to rename the Folders and Sub Folders according to your preference
Naming convention is entirely dependant upon the type of questions you generate. You may, for example, be
the math teacher and have your questions categorized by syllabus subject and by level, or you may categorize
your questions by suitability for various classes etc.
Adding Questions to Categories
Having established your question categories you can now start to move your questions into suitable
categories:
1. Highlight the question(s) you wish to categorize.
2. Select the Folder and Sub Folder you require into which you want to copy the questions.
3. Click on the Arrow to copy the highlighted questions to the selected Folder.
Sort Questions in Library
To sort the list of questions into alphabetical order:
1. Click on the Question menu item.
2. Click on Sort Questions.
The Question file will be sorted into ascending alphabetical order.
file://C:\Documents and Settings\cffteacher148.CAMPUSWIFI\Local Settings\Temp\~hh9... 2/25/2009
Welcome
Page 29 of 50
Add to Library
To add new questions directly to the library:
1. Click on Question.
2. Click on Add to Library. The Add Question dialog will be displayed:
Use the Add Question dialog to:
z
Type in a new question
z
Type in the possible answers
z
Select the type of question, for example change from a Multiple Choice 6 to a Multiple Choice 4
z
Select the correct answer setting
z
Set a timeout in seconds
z
Choose a question layout. For example you may choose a long question short answer type or a short
question with Image and short answer type layout.
Once you have added your new question, click on the OK button to add your new question to the library.
Click on the Cancel button to exit the editor without adding your new question.
Import Questions from CSV File
This import feature allows you to type your questions into a text file or Excel spreadsheet, in a format that you
can import into the question library. This may be more convenient than entering the questions and answers in
the normal manner.
Enter data into Text File
Open a text file and enter your data. Each part should be separated by a comma in the following format:
Row 1 = Title (or leave blank, since the import will always start from row2)
Row 2 = Question,Number of answers,Correct answer (numerical
value),Answer1,Answer2,Answer3,Answer4,Answer5,Answer6,Timeout (optional numeric value)
Example:
Capital Cities
What is the capital of France?,2,1, Paris,London,,,,,10
If your data, such as your question, contains a comma within it, make sure that you surround that part with
quote marks ("). This ensures that the comma is treated as normal data.
file://C:\Documents and Settings\cffteacher148.CAMPUSWIFI\Local Settings\Temp\~hh9... 2/25/2009
Welcome
Page 30 of 50
Ensure that you save your file with the filename extension .csv. If your text editor does not allow you to do
this, you will have to rename the file within Windows Explorer so that the file extension reads '.csv'. This file is
then ready to import.
Enter data into Excel Spreadsheet
Open a new spreadsheet and enter your data so that each part of your question resides in its own cell. Enter
the data in the same order as described in the text file method above.
Example:
Save the file as a comma separated variable (.csv) file. This file is then ready to import.
Import Question
Click on the Question menu and select Import questions from csv file from the menu.
Navigate to your csv file and click Open. A message will be displayed to tell you if the import has been
successful. When imported, your question will appear in the library.
Remove Question from Question Library
To remove redundant questions from the library
1. Highlight the question(s) you wish to remove.
2. Click on Question.
3. Click on Remove from Library.
Edit Question in Library
The Question Library has a built in facility to edit any question previously added to the library.
Procedure:
1. Highlight the question you wish to edit.
2. Click on Question.
3. Click on Edit Question. The Edit Question dialog is displayed:
file://C:\Documents and Settings\cffteacher148.CAMPUSWIFI\Local Settings\Temp\~hh9... 2/25/2009
Welcome
Page 31 of 50
From here you can:
z
Re-type or edit the question
z
Re-type or edit the possible answers
z
Alter the type of question, for example change from a Multiple Choice 6 to a Multiple Choice 4
z
Change the correct answer setting
z
Alter the timeout setting
z
Alter the question layout, for example you may switch from a long question short answer type to a
short question with Image and short answer type.
Once you have edited the question, click on the OK button to save your changes.
Click on the Cancel button to exit the editor without saving any changes.
Save a Copy of the Question Library
Since the Question Library automatically saves any editing or additions to the library, there is another facility
available that allows you to save a copy of your library. This allows you to share your question files with other
users.
1. Click on File.
2. Choose Save to... and select whether to save a copy of the question library to your personal or shared
Question Master resource folder, or browse to save it in another location. You will be prompted with the
Save Question File dialog box.
3. Type in a suitable filename for your question library file. The file will be saved with a .qns extension.
Note: If you save the file to a shared area, other users will be able to see your saved question
library file if they use the Merge command.
Merge Question Library
This facility allows you to load a different question library file into your own:
file://C:\Documents and Settings\cffteacher148.CAMPUSWIFI\Local Settings\Temp\~hh9... 2/25/2009
Welcome
Page 32 of 50
1. Click on File.
2. Click on Merge. You will be presented with the Merge Question File dialog.
You can select any file that has the extension .qns. If you can't locate the file you require, you will need to ask
the user to save their question library into a shared resource folder. You may also browse to the users folder
and locate the file you require. You should of course ask for the users permission before you do this.
Note: The default .qns file is used by all users. This file should not be altered in any way.
3. Once you have chosen a question library file to merge, click on the Open button
The questions in the chosen library file will be merged. If any questions match existing questions in your
library, then you will be prompted to overwrite your existing question. Click Yes to have the new question
overwrite your existing question. Click No to retain your question and prevent the new question being
merged.
Once all questions have been merged you will need to copy them to the appropriate categories. Refer to
Maintaining the Question Library for more information about how to organize your questions.
Exit Library
Click on the Exit Library button to exit the Question Library when you have completed any maintenance.
If you have not saved any changes you may have made you will be prompted to save. Click Yes to save your
changes and return to the Question Master program. Click No to abandon any changes and return to the
Question Master program. Click Cancel to return to the Question Library program.
Altering Question Order
To alter the order of the questions in your question file:
1. Click on the question you wish to move.
2. Click on either the up
or down
arrow to move the question up or down the list of questions:
To move multiple questions at once, use the Shift and Ctrl keys to select the questions you want to move,
then click the up or down arrows.
Altering Answer Order
To alter the order of your answers:
1. Highlight the answer you wish to move.
2. Click on either the up
or down
arrow to move the answer up or down the list of possible answers:
file://C:\Documents and Settings\cffteacher148.CAMPUSWIFI\Local Settings\Temp\~hh9... 2/25/2009
Welcome
Page 33 of 50
To move multiple answers at once, use the Shift and Ctrl keys to select the answers you want to move, then
click the up or down arrows.
Note: If you have previously selected the correct answer as being for example answer number
three, then move answer number three, the correct answer indicator will move with the
answer to the new location.
Adjusting line width
To alter the width of the question and answer placeholders:
Note: You should only need to do this if your Questions or Answers are particularly long.
1. Position the screen cursor on the line between any two questions or answers:
2. Click and drag downwards to widen or drag upwards to narrow the text boxes containing either your
questions or answers:
file://C:\Documents and Settings\cffteacher148.CAMPUSWIFI\Local Settings\Temp\~hh9... 2/25/2009
Welcome
Page 34 of 50
Exiting Question Master
To exit from the Question Master program, click on File > Exit.
If you have not saved you will be prompted to do so:
Click Yes to save your Question Master source file. If you have not previously saved your work, you will be
prompted to type in a suitable filename and click the Save button.
Click No to close down the program instantly and not save your source file.
Click Cancel to return you to the Question Master program.
User Database
The user database is a separate program that allows you to organize your users by adding them to the
database and associating them with ACTIVote groups.
To open the User Database, click on Menu > ACTIVote > User Database.
Note: If you are running ACTIVprimary, first click on the Teacher Tools Menu button so
you can access Menu > ACTIVote > User Database.
You will be presented with the User Database program:
Initially this will only contain the Man UT folder with three sub folders, this is provided for training purposes
and is referenced in this help system. You will need to decide how you will categorize your groups of users,
this may be by class name or subject group etc. or any classification that uniquely identifies them as the
group of users you will use the ACTIVote devices with.
file://C:\Documents and Settings\cffteacher148.CAMPUSWIFI\Local Settings\Temp\~hh9... 2/25/2009
Welcome
Page 35 of 50
Add Users to Database
1. Click on User > Add. You will be presented with the Add User dialog:
Use the Description field to enter information that
will uniquely identify individual users in the event of
two or more users with the same name.
Add all users in your group then click on the OK
button. The main user list will update to include the
newly added users:
Your users will now need to be copied to appropriate groups.
Description Field
Depending upon how many users are added to the database you will undoubtedly come across a situation
where you will add users to the database who have the same name. The description field of the database
allows you to type in some information that will uniquely identify which of the users are referenced. You may
choose to use class groups as a description, you may decide to input more personal descriptions such as 'the
cheeky one'. However you decide to distinguish them it is important that you do so, since all users are entered
into a single list. It only becomes crucial if you have users of the same name within the same groups.
To help to identify individual users you can switch this field on by clicking the Descriptions checkbox:
file://C:\Documents and Settings\cffteacher148.CAMPUSWIFI\Local Settings\Temp\~hh9... 2/25/2009
Welcome
Page 36 of 50
Deleting Users from Database
To delete users from the database:
Highlight the user(s) you want to remove, click on the User menu, then click on Remove.
A warning message is displayed asking if you want to remove the highlighted users. Click the Yes button to
remove the users, or the No button to cancel the operation.
You may use the following key strokes in combination with mouse clicks to modify your selection. for example
holding down the Shift key while clicking on user names will select a range of users in-between the first
selected user and the second selection. You may also use the Ctrl key to add individual users to the selected
group. Each click on a user will add them to the selection. Further clicks onto the selected users will remove
them from the selection.
Editing Existing User Details
You may need to edit the database to reflect a change in one or more of your users, for example a school
pupil may have changed classes from class 1a to class 2a.
1. Highlight the user or users you want to edit.
2. Click on User.
3. Click on Edit. The database grid will open displaying the details for the users you selected.
4. To make a change, click in the field against the user name and type in your alteration to the database
record.
5. Repeat this until all editing has been completed.
6. Click on the OK button to update the database.
Changing your mind
If you are not happy with the editing you have done it is possible to reset the database to how it was when
you first opened it.
1. Click on File.
2. Click on Reload.
This action reloads the database file, overwriting any changes you have made.
Note: This function will work provided that you do not save the database before reloading. Once
you issue the save command it will overwrite the database file.
Remember to save your database on exit. Any changes are not written to disk until you save them.
Define Groups
file://C:\Documents and Settings\cffteacher148.CAMPUSWIFI\Local Settings\Temp\~hh9... 2/25/2009
Welcome
Page 37 of 50
The next stage is to define your ACTIVote groups. You will need to rename the Folder and Sub Folder tabs
with suitable names reflecting your activity. The following illustration shows grouping by class and subgrouping by subject.
1. Double click on the Folder 1 tab. A text box will open where you may enter a classification or category:
2. Type in your chosen category name.
3. Click the OK button to rename the group label.
4. Double click on the Sub Folder 1 tab and rename it to your choice.
5. Continue to rename the tabs according to your preference. When you have finished re-naming the
Folder and Sub Folder tabs it may look like the illustration below:
Add Users to Groups
In order to use Named Mode you must add the appropriate users to the ACTIVote user groups that they
belong to.
To add users to the Geography ACTIVote group, you must first ensure that you have selected the Class 1a
Folder, and then select the Geography Sub Folder by clicking onto the tab. Now click and drag over the user
names until all are highlighted. You can also use the Shift and Ctrl keys to select multiple names. Click onto
the arrow and all of the highlighted users will be added to the Geography ACTIVote Sub Folder.
file://C:\Documents and Settings\cffteacher148.CAMPUSWIFI\Local Settings\Temp\~hh9... 2/25/2009
Welcome
Page 38 of 50
The database will update as follows:
Continue adding users to all appropriate ACTIVote groups.
Removing Users from a Group
To remove an individual user or multiple users from an ACTIVote group you must display the ACTIVote group
in question.
Select the user(s) you want to remove, then click on the left arrow
to remove them from the group.
Note: This action only removes the names of users from ACTIVote groups, it does not delete the
user from the database.
Copying Users Between Folders
You may have setup an ACTIVote group consisting of a selection of people who will form the basis of other
ACTIVote groups.
An easy way to add this selection of people to another group is to display the Folder and Sub Folder that
contains them e.g. the Class 1a Folder along with Geography Sub Folder as shown below:
file://C:\Documents and Settings\cffteacher148.CAMPUSWIFI\Local Settings\Temp\~hh9... 2/25/2009
Welcome
Page 39 of 50
In order to copy the group to another Sub Folder, you need to highlight the users you wish to copy, then click
on the Up Arrow
When you click on the arrow you will be presented with the Folder Selection dialog:
If necessary, use the vertical scroll bar to locate the correct folder, then click on the folder you require. The
selected users will be copied to the chosen folder.
Repeat this procedure for each group you wish to copy.
Saving User Database
When you have added your users, created ACTIVote groups and associated your users with appropriate
groups you will need to save the database. Click on File > Save to save the database in the program folder.
If you edit the database in any way without saving, then close the program down, a message will be displayed
asking if you want to save:
Click Yes to save the database and exit the program.
file://C:\Documents and Settings\cffteacher148.CAMPUSWIFI\Local Settings\Temp\~hh9... 2/25/2009
Welcome
Page 40 of 50
Click No to exit the program immediately and not update the database with any changes you may have
made.
Click Cancel to return to the database for further editing.
Importing User Details
A facility exists that will allow you to import database information from other sources. You must save the
information from your other database file in the form of a comma de-limited file. The file must have the
extension .csv in order for it to be imported. Most database programs have the facility to do this, it is usually
an export feature, consult the documentation that accompanies your proprietary database for further
information. Basically the data will be saved as a simple text file and each row of data will usually be
separated by a comma:
Example:
Employee ID,Last Name,First Name,Title, Title of
1,"Davolio","Nancy","Sales Representative","Ms."
2,"Fuller","Andrew","Vice President Sales","Dr."
3,"Leverling","Janet","Sales Representative","Ms"
4,"Peacock","Margaret","Sales Representative","Mrs."
5,"Buchanan","Steven","Sales Manager","Mr."
6,"Suyama","Michael","Sales Representative","Mr."
7,"King","Robert","Sales Representative","Mr."
8,"Callahan","Laura","Inside Sales Coordinator","Ms."
9,"Dodsworth","Anne","Sales Representative","Ms."
In the case of this example csv file, the first row contains the field names. Each field of information is
separated by a comma. The field names may or may not match the fixed ones in the User Database, it is not
essential that they match since you are given the opportunity to map the User Database field name to your
imported data.
Procedure:
1. Create your csv text file from your proprietary database program.
Ensure that you save it with the filename extension .csv. If your database does not allow you to do this
you may rename the file within Windows Explorer (a file management utility of the Windows operating
system, consult your windows documentation for further details). Also ensure that you use a comma as
the separator if given a choice.
2. Within the User database program click on File > Import. You will be presented with the Import
comma-delimited file dialog. Browse your system to locate the csv file you wish to import.
3. Click on the CSV file you require then click the Open button. You will be presented with the CSV
Import dialog:
file://C:\Documents and Settings\cffteacher148.CAMPUSWIFI\Local Settings\Temp\~hh9... 2/25/2009
Welcome
Page 41 of 50
You will notice that each field is separated and currently has the Not Mapped status. Also note the
first gray column entitled Ignore. This column is used to exclude records from the import.
You may need to exclude the first row from being imported, this would be the case if the first row of
information is the field names from the original database.
4. To exclude a row, click once in the gray column at the side of any entry you wish to exclude.
You may also go through the list and exclude any users you do not require in the same way.
You now need to map your CSV file to match the data to the appropriate field name in the user
database
5. Click onto the red Not Mapped window above the column that contains the Last Name of the users in
the imported file, you will see a drop down arrow appear. Click on the arrow to reveal a list of field
names that are available. In this case the field in question contains the Surname information.
Once you click on the Surname entry the list will close and the data, when imported, will be mapped
to the Surname field:
6. Repeat the procedure for each field of information you require to import. In this example, the first
name field needs to be mapped to the User database Forename.
Note: Leave any un-required fields in the not mapped state. This information will then be ignored
during the import process.
file://C:\Documents and Settings\cffteacher148.CAMPUSWIFI\Local Settings\Temp\~hh9... 2/25/2009
Welcome
Page 42 of 50
7. Once you have mapped all appropriate fields you may continue. Click on the Import button.
A message will be displayed when the User Database has finished importing the information. Click the
OK button to see the new users appended to the end of your existing database.
You may now go through the process of selecting and copying the new users to appropriate ACTIVote
groups
Save your database before exiting, see Saving User Database for more information.
Sorting Your User Database
To sort your database records into alphabetical order:
Click on User > Sort.
The database file will be sorted in ascending alphabetical order.
Exiting User Database
To exit the user database click on the Exit Database menu button.
If you have not saved any changes to the database, you will be prompted to save:
Click Yes to save the database and exit the program.
Click No to exit the program immediately and not update the database with any changes you may have
made.
Click Cancel to return you to the database for further editing.
Demo Mode Graph Output
Demo mode is intended for training purposes, in that you can practice using the software without having to
use physical ACTIVote devices.
All adhoc question graphs output from Demo mode assume the correct answer to be answer number three,
you can of course change the Correct answer setting by clicking on an answer button of your choice.
You can take a look at Who Answered What style graph. Each device is listed and you can see at a glance
the number of people who submitted a response for each possible answer.
file://C:\Documents and Settings\cffteacher148.CAMPUSWIFI\Local Settings\Temp\~hh9... 2/25/2009
Welcome
Page 43 of 50
You can view a pie chart showing the percentage of who got it right, wrong or didn't know/respond
The correct answer will be displayed provided it was chosen during creation of prepared question.
Anonymous Mode Graph Output
adhoc Question
Once all responses have been accepted, the results will be displayed in the form of a graph. It is then possible
for you to indicate the correct answer to your adhoc question by clicking on the appropriate answer button.
None is the default until you
select the correct response
file://C:\Documents and Settings\cffteacher148.CAMPUSWIFI\Local Settings\Temp\~hh9... 2/25/2009
Welcome
Page 44 of 50
Assuming answer B is
correct, selecting button B
will now give a visual
indication of how many
participants gave the correct
answer.
You can also Paste this result into your current Flipchart page by clicking on the Paste button.
Prepared Question
Graphs output from Prepared questions will have the correct answer displayed provided that it was set during
the creation of the prepared question.
Named Mode Graph Output
adhoc Question
Once all responses have been accepted, the results will be displayed in the form of a graph. It is then possible
for you to indicate the correct answer to your adhoc question by clicking on the appropriate answer button.
The graphical output is the same no matter what ACTIVote mode you are in. However Named Mode allows you
to see the registered names appearing in a list with an indication of how they voted. This information is only
available in the Who Answered What style graph:
file://C:\Documents and Settings\cffteacher148.CAMPUSWIFI\Local Settings\Temp\~hh9... 2/25/2009
Welcome
Page 45 of 50
You can paste this result into your current Flipchart page by clicking on the Paste button.
Prepared Question
Graphs output from Prepared questions will have the correct answer displayed provided that it was set during
the creation of the prepared question.
Generate Overall Scores Graph
To generate the overall results from all questions asked:
1. Display the graph on any question page. If this is not already visible, right click on the page and choose
ACTIVote > Results..., or ACTIVote Results... if you are using ACTIVprimary.
2. Click on the Overall Scores radio button.
The Flipchart pages will be read and the result will be displayed as a graph. This will show the number
of correct answers against either the device name in Anonymous and Demo Mode or against the named
individual in Named Mode.
The information provided here tells you how many questions each anonymous device or named user got right.
View Response Times
Select the Response Times checkbox to view how long it took each individual to answer each question.
The time is displayed in seconds.
file://C:\Documents and Settings\cffteacher148.CAMPUSWIFI\Local Settings\Temp\~hh9... 2/25/2009
Welcome
Page 46 of 50
Display the graph on any question page (if not already visible, right click and choose ACTIVote >
Results..., or ACTIVote Results... if you are using ACTIVprimary.
Click on the Response Times checkbox.
When the checkbox is selected, the graph will display the response time, in seconds, for each individual to
answer each question.
Note: The response time will only be displayed on graphs which show individual user feedback.
Summary Graph
Having generated an overall score you will also be able to see the summary graph:
The information presented here is a detailed list of each device (anonymous) or user (named) and what they
voted for in each question. The number in the box underneath each question indicates the answer they chose.
The color indicates if they got it right (green) or wrong (red) or didn't respond (gray). If the color in the box is
blue, it indicates that a correct answer was not set. For example, if None was set as the answer.
Note: You may click on the Summary radio button before choosing the Overall Score, either option
will generate both sets of data.
file://C:\Documents and Settings\cffteacher148.CAMPUSWIFI\Local Settings\Temp\~hh9... 2/25/2009
Welcome
Page 47 of 50
View ACTIVote Results
The results of each question asked are stored in the current Flipchart page.
Prepared Question Flipchart
When using a prepared question Flipchart, the results will be stored on each question page and can be viewed
immediately or you may go back to a question page and use the right click popup to view the ACTIVote
results.
adhoc Question Flipchart
When using adhoc questions the results are also stored in the Flipchart page. However they are not linked
with any particular question as in the prepared method. Subsequent questions asked on the same Flipchart
page will overwrite previous results. Therefore the best way to use the adhoc system is to turn to a new
Flipchart page for each question. In addition you should write the question and possible answers on each
Flipchart page, then when the results are stored and later viewed, they relate to the correct question. If you
ask your question rather than write it down, it would be a good idea to at least write something on the
Flipchart page that will remind you of the question you asked.
Saving Your Results
It is possible to save your Flipchart containing the results. If you have a prepared question Flipchart you will
be asked to provide a filename. This is so that you do not overwrite the original question Flipchart. If your
Flipchart contains results from an adhoc question, then you will also need to provide a filename for your
Flipchart.
When you re-open such a Flipchart, you can view the results by turning to the question page then right click
and choose ACTIVote > Results... from the popup menu, or ACTIVote Results... if you are using
ACTIVprimary.
Exporting Text Results
You can export the ACTIVote results in order to have hard copy for yourself or to provide feedback to your
users. This method outputs the results to a file, indicating the results of each of the questions that have taken
place and are stored in the current Flipchart.
In ACTIVstudio, click on Menu > Flipchart > Export > ACTIVote Results > TXT (Notepad)
In ACTIVprimary, click on Teacher Tools Menu button > Menu > ACTIVote > Export Results to
Notepad.
The output will be generated for each page containing a result. When finished your default text reader will
open and display the textual results.
Exporting ACTIVote Results to Excel
You can export the results in the current Flipchart to Excel.
Having conducted your ACTIVote session:
In ACTIVstudio, click on Menu > Flipchart > Export > ACTIVote Results > XLS (Excel)
In ACTIVprimary, click on Teacher Tools Menu button > Menu > ACTIVote > Export Results to
Excel.
An Excel worksheet will be generated that contains the overall results summary. If you wish to save the Excel
worksheet use the File, Save routine of the Excel program.
ACTIVote Options
There are several options that you can alter, that effect the way the ACTIVote system works:
To access the ACTIVote options:
Click on Menu > ACTIVote > Settings...
Note: If you are running ACTIVprimary, first click on the Teacher Tools Menu button so
file://C:\Documents and Settings\cffteacher148.CAMPUSWIFI\Local Settings\Temp\~hh9... 2/25/2009
Welcome
Page 48 of 50
you can access Menu > ACTIVote > Settings.
The ACTIVote settings allow you to define options for setting up and voting with the ACTIVote system.
Display results
You may elect to have the graph automatically display after all responses are received. If you choose not to
display the graph, but then decide you would like to see it, right click on the Flipchart page and select
ACTIVote > Results, or ACTIVote Results if you are using ACTIVprimary, to view them.
Automatic page advance
Check this option if you the page to be turned automatically after receiving answers when using a Question
Flipchart. This would be a useful option if you require to give your audience a timed question paper. Use this
in association with the timeout setting of each question.
ACTIVote User Database
Displays the location of the User Database used by the ACTIVote program. Click on the Browse button to
select another database.
Adhoc/demo mode
Question timeout
You can set a default timeout that will be used when you ask an adhoc question
and also when you are using Demo Mode. To change the default timeout, type
in a new value.
Apply timeout to
prepared questions
Apply the question timeout for prepared questions.
Results to new
Flipchart page
Select this option if you would like to save the results of the current question on
a new Flipchart page. Each subsequent question, will create a new Flipchart
page for the purposes of storing the question results. Clear this option to paste
the results in the current Flipchart page, in which case subsequent responses
will overwrite any existing results.
Fullscreen snapshot
(ACTIVstudio only)
Allows you to capture the screen associated with the adhoc question you are
asking. This will take a full screen snapshot and place it on either the current
page if the setting 'Results to new Flipchart page' is off. If the preceding option
is set to on then the snapshot will be taken after all of the answers are received
and the resultant image will be placed on a new Flipchart page along with the
results.
Answers
Take users first answer If selected, your users will only be allowed to submit one response and further
only
responses will be ignored. When all devices have voted, the timeout will stop
immediately and if set the graph will be displayed.
Allow users to alter
their answer
If selected, your users can answer, change their mind and submit further answers
during the timeout period. They can continue to submit answers for the duration
of the timeout period. When the timeout period has ended, further answers will be
ignored and the results will be displayed, if Display Results has been selected.
Display names
This option will display user names during Named Mode or device names during an
Anonymous or Demo Mode. The names will be displayed beneath the timeout bar
and will light up when a response is received from the user. The display allows
you and the group to see who has answered and who has not by using color
indicators:
Gray:
No response from user
Yellow: Valid Answer from user
Black:
Out of range answer from user (e.g. the user pressed 3 to a question
with 2 answers)
file://C:\Documents and Settings\cffteacher148.CAMPUSWIFI\Local Settings\Temp\~hh9... 2/25/2009
Welcome
Page 49 of 50
Fill in
This option gives you the ability to allow your users further chances to answer the
question set. For example if you have a large audience say 50 people it is possible
that not all users will answer in the allotted timeout period.
Question Flipcharts
If you open a Flipchart that contains ACTIVote questions then you will immediately be presented with the
ACTIVote Session window:
Note: If the Flipchart also contains results (from a previous ACTIVote session), you will see the
warning message 'The current Flipchart contains results..'
Click on the Remove Results button if you want to remove the results and use the question Flipchart with
a new group. You also have the option the leave the results in place if you wish to review them.
You may also at this time choose the Mode you require if you intend to use the question Flipchart with a user
group.
Update Thumbnails
Note: This information is relevant to ACTIVstudio users only.
The Question Master software will have generated outline thumbnail images, these
images are used by the Page Selector to show previews of each page in a Flipchart.
These images are not a true thumbnail of the actual page.
The diagram to the left shows the thumbnails as generated by Question Master. Note the
black blocks representing images.
It is however, possible for the correct images to be generated. To do this, select Menu
> Flipchart > Update Thumbnails.
file://C:\Documents and Settings\cffteacher148.CAMPUSWIFI\Local Settings\Temp\~hh9... 2/25/2009
Welcome
Page 50 of 50
file://C:\Documents and Settings\cffteacher148.CAMPUSWIFI\Local Settings\Temp\~hh9... 2/25/2009