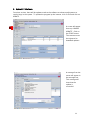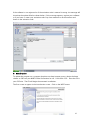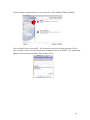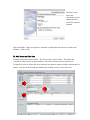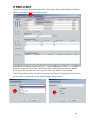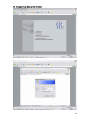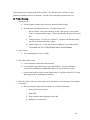
1
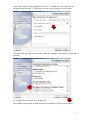
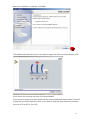
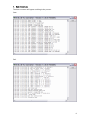
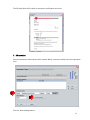
SIS 10 User Guide
1
SIS10 User Guide
INDEX
Add New Items to Inventory .......................28
Purchase Orders .......................................... 29
Create and Edit Repair Orders....................22
Set up a SIS 8.x or 9.x Customer ............... 2
Add Parts to a Close Repair Order.............26
Create Barcodes for Inventory....................29
Create Purchase Orders Manually..............30
Customer Help Desk on the Internet ........37
Customer Registration ................................10
Data Conversion .............................................8
Install SIS 10 ...................................................3
Receive Items to a Purchase Order. .......... 32
Set up Customer Information ...................... 9
Set up Insurance Companies. .................... 21
SIS Activation................................................ 12
Software & Hardware Installation................ 2
Software Set Up’ .......................................... 19
Statistics and Reports ................................. 35
Main Screen and Tool Bars..........................16
Tools.............................................................. 33
Print Invoices ................................................25
Update SIS 10 Software............................... 13
Manual Update..............................................14
Trouble Shooting ......................................... 38
2
SIS10 User Guide
1. Set up a SIS 8.x or 9.x Customer
Your SIS software must be Version 8.3.6 or Version 9.x for the data conversion tool to work.
The new version of the software will automatically ask if you want to convert the data upon
installation.
You must complete all Open Repair Orders in the old version of the SIS Software before doing
the data conversion.
Purge the Repair Orders by clicking on the button in the Invoicing Menu in the older versions
of SIS.
Back up the Data Files for the old version of SIS to a folder called SIS backup. You are now
ready to install SIS 10.
The old laminated sheets from SIS 9 WILL NOT WORK WITH SIS 10. The techs must enter a
QTY on the scanner. DO NOT USE THE LAMINATED SHEETS from SIS Version 9.x or lower.
2. Software & Hardware Installation
To hook up the Phaser:
a. Insert the cable underneath the cradle.
b. Plug in the power underneath the cradle and plug the other end into the wall
3
3. Install SIS 10
Insert CD into CD Drive. The software will automatically start to load.
The first screen will
be the introduction
to the installation.
Click NEXT
Click on the FULL
INSTALLATION
button. Click NEXT
4
This next step will ask you where you want to install the SIS 10 Software. If you have a
previous version of SIS already on your computer, you may want to change the destination to
SIS10.
If you already have data in the selected destination, the software will show a warning and
close.
You will have to begin the installation process over.
5
If you are successful in your installation, this next screen will appear.
You will next be asked to choose a language. Click NEXT
6
Choose the location of the SIS Program and files. It is usually best to locate them in a
program group called SIS. This will place an icon on your desktop for easy access.
The next screen will give you information about the installation and how much disk space is
required…
To complete the installation, click on INSTALL
The software will begin the installation and the installation screen will be displayed.
7
When the installation is complete, click DONE
The software will load and ask you if you want to merge data from a previous version of SIS.
If you choose not to merge the data, click NO and READY.
If you choose to merge your data, make sure you have completed all Repair Orders in the old
system and you have purged your Data. If you want to begin the data conversion for earlier
versions of SIS to SIS 10, click YES.
8
4. Data Conversion
The data converter will appear and begin the process.
Start:
End:
9
5. Set up Customer Information
The Customer Information screen will automatically come up after installation of SIS 10.
Please fill out the information exactly as it is on the customer profile and invoices. This
must match SAP information exactly.
All fields except fax and email must be completed.
In this box, you can set up the first mark up for the products. This will be the first default
mark up. (The option to mark up by insurance company and by specific products is also
available in other areas of the program)
To find this information again, click on File and on Program and Settings then on Client
Information. You can make corrections or changes in these fields and change the mark up
or sales tax.
10
6. Customer Registration
SIS10 comes with a free 30 day trial period. At the end of 30 days, the customer must
register the software.
Apply for Registration in SIS
In SIS, go to menu File\Registration and hit the button “Register”
Enter the customer’s data, including the Client number (Wurth customer number). Click NEXT
11
Select a profile and a product and hit the button “Add”
You will get the following registration form which needs to be sent to Wurth USA
Fax to 888-258-0158 and the Help Desk will fax you back an activation code
12
The SIS Help Desk will fax back an activation confirmation and code
7. SIS Activation
Enter the activation code and the client number (Wurth customer number) into the registration
form
Click on “Activate Registration”
13
8. Update SIS 10 Software
From time to time, there will be updates made to the software to enhance performance to
resolve bugs in the system. To update the program by the internet, click on FILE and click on
UPDATE.
A screen will appear
that says “ONLINE
UPDATE”. Click on
the START button.
The customer must
be registered to
download updates.
A message from the
server will appear in
the message box.
This message will
show that the
update is
successful.
14
If the software is not registered or if the activation code is entered in wrong, the message will
show that the update failed as shown below. If this message appears, register your software
or if you have, re-enter your activation code. Pay close attention to all the numbers and
letters in the activation code.
9. Manual Update
To update the program on a computer that does not have internet access, obtain the latest
release on CD from your WURTH Sales Professional or call 1-800-864-6561. Place the CD in
your CD Drive. The CD will begin the automatic installation.
The first screen to appear is the Introduction screen. Click on the NEXT button.
15
The next screen to appear will ask if you want to do a FULL INSTALLATION or UPDATE.
Click on UPDATE and click on NEXT. The system will search for existing versions of SIS on
your computer. Choose the version you wish to update and click on SELECT, This update only
applied to SIS10 and will not effect older versions of SIS..
16
The next screen
shows the
information on the
update and how
much disk space is
required.
Click on INSTALL. When the update is complete, a dialog box will ask you to restart your
software. Click on YES.
10. Main Screen and Tool Bars
The Main Screen has three sections. The first section is Quick Check. This allows the
customer to check prices on their products. This section shows the List and the cost.
To Search for a Price, Either click on a number from above or enter a product number and hit
search. You can scroll through the database by clicking on Prior 100 or Next 100.
17
If you do not know the part number, you can click on the description column and it will sort
this alphabetically
The second section is Open Repair Orders. You will see a list of Open Repair Orders that are
waiting to be invoiced. You can create new Repair Orders, Edit existing Repair Orders or Print
Invoices.
18
To Create a New Repair Order from the main screen, click on New. If you would like to edit a
repair order, select a repair order from the grid by clicking on the number and clicking on
EDIT. To print invoices for one or several RO’s, you can select an RO by clicking on the
number in the grid and holding down the Control Key on your keyboard, you can click on
other RO numbers.
Highlighted the repair orders you want to print invoices. Click on the PRINT INVOICES button.
A dialog box will appear asking you want to print all or selected.
To
print
the
highlighted
Items
click on YES. If you
want to print all the
invoices for all the
Open Repair Orders,
click on NO.
19
The third section of the Main Screen is for Parts Below Minimum Quantity and Creating
Purchase Orders.
You can select the items listed in the grid by selecting the first item you want to purchase and
by holding down the Control Key on your keyboard and clicking on the next item. Holding
the Shift Key down on your keyboard and clicking on the last item will select all items in the
grid. When you have all the items you want on your purchase order, click on CREATE PO.
This will take you to the Purchase Order Screen.
On the PURCHASE ORDER screen, to edit the quantity of the items to order, click on the part
number in the gird and click on the EDIT ORDER button on the bottom left hand side.
20
11. Software Set Up’
Set up Technicians, Print Technician Barcodes, and Set up Insurance Companies must be done
before Repair Orders are entered or scanning data.
To enter a Technician, click on MASTER DATA then click on TECHNICIANS
21
The Technician Screen will appear. Click on NEW and assign a number to your tech. When
done, Click on SAVE
22
To help the techs scan their tech numbers, you should create a Technician Barcode Scan
Sheet. To Print Technician Barcodes, choose the tech from the grid and click on the PRINT
BARCODE. Button. Continue down the list until you have completed this task for all
Technicians. A barcode collector will appear.
Click on the
button
BARCODES
on the
Barcode
Collector.
Regular
Avery Labels
5160 for
laser
printers or
8160 for Ink
Jet printers.
To print the
Scan Sheet
you can use
a plain sheet
of paper.
23
12. Set up Insurance Companies.
Click on Master Data then click on Insurance Companies.
Click the NEW button to set up a new Insurance Company. . You can set the MARKUP on an
individual insurance company if you have a contract with them that only allows a certain
markup.
This markup
will override
all other
markups.
Click on
Save after
you have
completed
your entry.
24
13. Create and Edit Repair Orders
To create Repair Orders using the scanner, follow the instructions below:
1. Display Reads “ 1. Repair Order” - Hit Red Enter Button
2. Display Reads “ Technician Number” – Scan your Tech Number
3. Display Reads “ Repair Order” – Type Repair Order Number
4. Scan Part
5. Enter Qty – Hit Red Enter Button
6. Continue to scan until completed
7. Hit Blue Function (Func) button and then the Star (*) Key
To create Repair Orders Manually:
1. Click on the Heading ROs, Invoices, Purchasing, Tools
2. Click on REPAIR ORDERS AND INVOICES
25
Click on the NEW button. Enter your corresponding repair order number. At this time, you
may if you choose, assign an insurance company, enter the claim number, enter the customer
name, and give a brief description of the car. Click on the SAVE button when complete.
To Edit this information in the repair order click the EDIT button.
There are two ways to add parts manually to a repair order. The first is to click on the Add
Part button, enter the part number, hit the ENTER keyn on your keyboard and enter the
technician number. Hit the ENTER key on your keyboard again and enter the quantity. Hit the
ENTER button on your keyboard and this part will be added to the repair order. Continue to
add parts until completed and click on the SAVE button when completed.
If you do not know the part number, but have a partial description, click on the BROWSE
PARTS button. This will take you to the Inventory Screen.
26
Type in a partial description (see example) and click on the SEARCH button. This will bring up
all the Hex bolts and their part numbers that are in the database.
27
Click on the part number you want and it will highlight the part. By holding down the Control
key on your keyboard, you may select several items. By holding down the Shift key on your
keyboard you may select a block of items. When you have finished selecting the item, click
the ADD TO RO button.
Occasionally, you will need to edit a quantity or a part. To edit a part, open the repair order
and click on the part number in the grid. This will highlight the part. Click on the Edit button
in the lower left corner of the repair order.
This will allow you to edit the technician or qty. You can also delete a part that doesn’t
belong on the repair order by clicking on the Delete Button on the lower left hand side of the
screen. You can enter partial quantities of products in the Quantity area by simply entering
.75 or .25.
To print a barcode for the Repair Order, click on the button PRINT BARCODE. Repair Order
barcodes can be used to label incoming parts for cars and for the technician to scan.
14. Print Invoices
There are two ways to print invoices. The first is from the Main Screen. See Section 5. Main
Screen/Toolbars. The second is from the Repair Order itself.
28
Once you have printed an invoice, you can not add additional parts to the Invoice. The SIS
system will create another invoice for the new parts. SIS will print a separate invoice for each
supplier.
If you click on PRINT INVOICES button from the repair order, you will print all the invoices that
are assigned to this repair order. This allows reprinting of invoices. Each invoice assigned to
the repair order will be given a different number.
29
15. Add Parts to a Close Repair Order
Once all the invoices are printed on a Repair Order, the repair order is “Closed” in the system.
If you need to reactivate a Repair Order, there are two ways to achieve this.
Scan a part to the repair order. This will automatically reopen the repair order.
Click on the Heading ROs,Invoices,Purchasing,Tools
Click on REPAIR ORDERS AND INVOICES
Click on the box SHOW OPEN AND CLOSED RO’s
30
Select from the pull down menu the repair order you wish to edit.
31
Click the EDIT button and uncheck the CLOSED box on the repair order. Click on the SAVE
button.
32
16. Add New Items to Inventory
Some customers like to keep track of their inventory. Some even track shop supplies such as
paper towels and sandpaper. To add a new item to inventory, click on MASTER DATA and
click on INVENTORY.
33
Click on the NEW button and fill out all the information. Be sure to choose a supplier. Click
Save when complete,
34
17. Create Barcodes for Inventory.
Click on a part in the grid. By using the Control key on the keyboard or the Shift key on the
keyboard, you can either select a few or a block of items.
Click on the PRINT BARCODE button. This will add these items to the Barcode Collector to be
printed on Avery 5160 for Laser labels or 8160 for Inkjet labels.
35
18. Purchase Orders
Purchase Orders can be issued from the SIS software for any Inventory Item. This feature
allows you to receive inventory using the scanner as well as manually creating and receiving
purchase orders.
To create a Purchase Order using the Scanner:
•
Display Reads “1. Repair Order” - Use the White Down Arrow Button till Display Reads
“2. Purchase Orders”. Hit Red Enter Button
•
•
•
•
•
Display Reads “PO Number” – Enter PO Number. Hit Red Enter Button
Display Reads “Part” – Scan Part
Enter Qty – Hit Red Enter Button
Continue to scan until completed
Hit Blue Function (Func) button and then the Star (*) Key to reset the scanner.
To create a Receive Goods using the Scanner:
•
Display Reads “1. Repair Order” - Use the White Down Arrow Button till Display Reads
“3. Receiving”. Hit Red Enter Button
•
•
•
•
•
Display Reads “PO Number” – Enter PO Number. Hit Red Enter Button
Display Reads “Part” – Scan Part
Enter Qty – Hit Red Enter Button
Continue to scan until completed
Hit Blue Function (Func) button and then the Star (*) Key to reset the scanner.
36
19. Create Purchase Orders Manually
Click on the Heading ROs,Invoices,Purchasing,Tools then click on Purchase Orders
37
Click on NEW. Give the PO a number or use the one already assigned and click SAVE
38
Begin adding parts by either clicking on ADD PART, if you already know the part numbers, or
by clicking on BROWSE PARTS, if you only have a partial number or name.
The ADD PART button will bring up a pop up screen. Add your part number and Click OK.
39
When you are done adding parts, Click on SAVE and PRINT if you wish to have a copy.
40
20. Receive Items to a Purchase Order.
Choose a PO# in the drop down menu
41
Click EDIT and click on a Part Number in the Grid. Click the Button Edit Receiving and enter in
quantity’ and click SAVE. When all items are received, the PO is considered Closed.
42
21. Tools
SIS 10 allows shops to track their tools. This feature is useful if a particular tool seems to
disappear or is an expensive piece of equipment and needs to be kept well maintained.
To get to the Tool Menu, click on the Heading ROs,Invoices,Purchasing,Tools and click on
Tool Tracking.
43
Click the NEW button and begin entering your information. You can enter in the location of
the tool and the comment section gives you another place to enter any information that is
important about the tool.
You can check out a tool simply by clicking on the tool you select from the grid and click on
the button CHECK OUT. To check in a tool, click on the tool from the grid and click on
RETURN TOOL. Be sure to choose the shop technician when checking in and out tools.
44
Reports can be run from the TOOLS menu. You can print a list of your tools, a history of the
tools usage and a history of tools by technician. This can be useful in deciding what tools
need to be purchased or replaced.
45
22. Statistics and Reports
From this menu, lists of Open Purchase Order, Open Repair Orders, Below Minimum Quantity
reports, and Technician Reports can be printed.
By Selecting Open Purchase Order, Open Repair Orders, Below Minimum Quantity reports,
these reports will automatically send a report to the printer without a Print Preview.
The Technician Report gives you options to print by ALL Techs or Individual Techs and it gives
you the option to choose which time frame you would like to review.
46
The Technician Report will give you all the Repair Order numbers and each line item the tech
has scanned or entered in the given time frame. The report will also show the Gross Profit
Dollars and Gross Profit percentage that this technician has generated.
47
23. Customer Help Desk on the Internet
48
The password the customer help desk is SISR10. This will allow the customer to post
questions regarding the SIS 10 Software. The SIS Team constantly monitors this site.
24. Trouble Shooting
1. Scanner Errors
a. Screen popped up with tech#, barcode, quantity and RO. Why?
b. Scanner said “Communication error” Possible reasons are:
i. Part not found. Check the inventory to see if the part is in the system.
If not in inventory add the part. Then manually add the part back to the
RO.
ii. Check barcode – Is it old? If so replace it. Create a new Barcode using
the SIS 10 software and Avery Labels.
iii. Check technician – Is tech set up in the software? If not, add the tech.
TECHS MUST BE SET UP FIRST BEFORE USING THE SOFTWARE
2. Out of range
a. Try scanning again closer to cradle
3. The update didn’t work
a. Is the computer connected to the Internet?
b. Is the software registered? If not, go to File Register. See the Installation
Instructions available from WURTHSIS.COM or as part of the User Guide.
c. Is the client number correct and all fields filled in? Call 800-864-6561 for help
with registration or updating the software.
4. There is an RO in the list on the main screen that doesn’t correspond to a RO number
in the shop
a. Did the shop tech enter wrong number? If so, follow these steps:
i. Print out RO (not invoices)
ii. Delete RO
iii. Find out which parts belong to which RO
iv. Add parts to correct RO
49