1
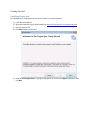
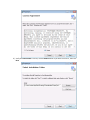
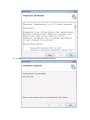
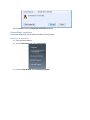
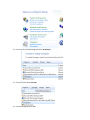
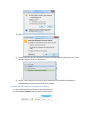
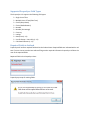
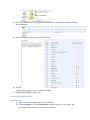
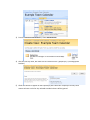
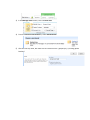
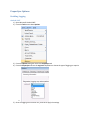
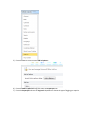
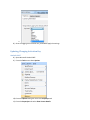
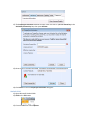
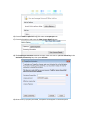
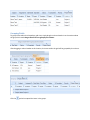
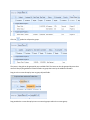
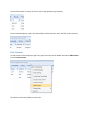
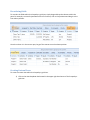
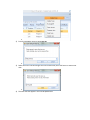
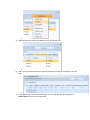
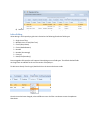
ProperSync 1.2 User Manual Rev 2 Contents Overview of ProperSync................................................................................................................................ 4 What is ProperSync ................................................................................................................................... 4 What’s new in ProperSync 1.2 .................................................................................................................. 4 Getting Started.............................................................................................................................................. 5 Installing ProperSync ................................................................................................................................ 5 Activating ProperSync ............................................................................................................................... 9 To activate ProperSync within an Outlook appointment or task item ................................................. 9 To Activate ProperSync from Add-in Options ..................................................................................... 10 Uninstalling ProperSync .......................................................................................................................... 14 Windows 7 & Vista Users .................................................................................................................... 14 Windows XP Users .............................................................................................................................. 16 Basics........................................................................................................................................................... 18 Connecting SharePoint lists to Outlook .................................................................................................. 18 Connect a SharePoint 2007 List to Microsoft Outlook ....................................................................... 18 Connect a SharePoint 2010 List to Microsoft Outlook ....................................................................... 19 Viewing ProperSync Fields in Outlook .................................................................................................... 21 Supported ProperSync Field Types ......................................................................................................... 23 Required Fields in Outlook ...................................................................................................................... 23 Customizing ProperSync ............................................................................................................................. 25 Controlling Fields in Outlook................................................................................................................... 25 Using the Default View of the List....................................................................................................... 25 Creating a [propersync] View.............................................................................................................. 27 ProperSync Options .................................................................................................................................... 32 Enabling Logging ..................................................................................................................................... 32 Updating/Changing Activation Key ......................................................................................................... 35 Outlook 2007 ...................................................................................................................................... 35 Outlook 2010 ...................................................................................................................................... 36 Using the ProperSync Grid View ................................................................................................................. 40 Sorting Fields ........................................................................................................................................... 40 Grouping Fields ....................................................................................................................................... 41 Filtering Fields ......................................................................................................................................... 43 Hide Columns .......................................................................................................................................... 44 Show Columns......................................................................................................................................... 45 Re-ordering fields.................................................................................................................................... 47 Creating Custom Views ........................................................................................................................... 47 Inline Editing ........................................................................................................................................... 50 Opening an Item from Grid View ............................................................................................................ 51 Refresh Grid View ................................................................................................................................... 51 Overview of ProperSync What is ProperSync ProperSync is an Outlook add-in that exposes SharePoint custom fields within Outlook. ProperSync supports the following items connected to Outlook SharePoint Calendars SharePoint Tasks SharePoint Discussion Boards SharePoint Contacts What’s new in ProperSync 1.2 ProperSync Grid View Custom “[propersync]” views on SharePoint lists Performance Enhancements SharePoint Contact Item Support Getting Started Installing ProperSync For individual users, ProperSync has one simple installer. To install ProperSync: 1) 2) 3) 4) Close Microsoft Outlook Open the ProperSync zip file downloaded from http://www.propersync.com/downloads.aspx Run the setup.exe file Click Next from the main screen 5) Read the License Agreement, if you agree with the terms, click on the I Agree radio button, then click Next 6) Verify the Install Folder is correct, use the Browse button if you wish to correct it, then click Next 7) When ready to Install ProperSync, click Next on the Confirm Installation page 8) The ProperSync installer will complete the installation of ProperSync on your machine. When the installation is complete the ProperSync Information screen will appear 9) Click Next after reading the ProperSync ReadMe information 10) The installation is now complete. Press Close to close the installer Activating ProperSync ProperSync can be activated directly within an Outlook appointment item or task. It can also be activated within the ProperSync settings area. To activate ProperSync within an Outlook appointment or task item 1) Open Microsoft Outlook 2) Browse to a SharePoint calendar or task list within Outlook 3) Open an item from the list or select New Item from the Outlook menu 4) On top of the ProperSync Pane, click the Activate Now link on the top of the ProperSync Fields pane (if this link is not present, then ProperSync is already activated) 5) The ProperSync Activation window will open. Enter your license key in the Activation/License Key box, then press Activate. 6) Once the key is properly activated, a response will be appear in the blank space 7) Click Close to close the ProperSync Activation dialog box To Activate ProperSync from Add-in Options Outlook 2007 1) Open Microsoft Outlook 2007 2) From the Tools menu select Options 3) From the Options dialog box select the ProperSync tab 4) From the ProperSync tab select View License Details 5) The ProperSync Activation window will open. Enter your license key in the Activation/License Key box, then press Activate. 6) Once the key is properly activated, a response will be appear in the blank space 7) Click Close to close the ProperSync Activation dialog box Outlook 2010 1) Open Microsoft Outlook 2010 2) Click on the File button 3) From the File menu select Options 4) From the Options dialog box select Add-ins 5) From the Add-ins sections select Add-in Options… 6) From the Add-ins Options dialog box select the ProperSync tab 7) From the ProperSync tab press the View License Details button 8) The ProperSync Activation window will open. Enter a license key in the Activation/License Key box, then press Activate. 9) Once the key is properly activated, a response will be appear in the blank space 10) Click Close to close the ProperSync Activation dialog box Uninstalling ProperSync To uninstall ProperSync, use the default Windows uninstall process Windows 7 & Vista Users 1) Close Microsoft Outlook 2) Click the Start Menu and select Control Panel 3) From the Control Panel select Uninstall a Program 4) From the list of installed programs select ProperSync 5) From the menu select Uninstall 6) From the dialog box press Yes 7) ProperSync will be uninstalled from the system Windows XP Users 1) Close Microsoft Outlook 2) From the Start Menu select Control Panel 3) From the Control Panel select Add or Remove Programs 4) From the Add or Remove Programs windows select ProperSync and press Remove 5) From the dialog box press Yes 6) ProperSync will be uninstalled from the machine Basics Connecting SharePoint lists to Outlook Users with Microsoft Outlook can attach any SharePoint calendar or task list they have permission to see. This is a simple client side operation that brings the functionality of SharePoint directly to your desktop. Why connect SharePoint calendars and tasks to your Outlook client? Reminders on team events from team calendars in SharePoint SharePoint tasks appear in the Outlook to-do list Reminders on tasks from SharePoint tasks lists Bring your SharePoint calendars and tasks offline View/Update your team calendars directly from Outlook, no need to open a browser Drag and drop calendar items Copy items to your personal calendar Connect a SharePoint 2007 List to Microsoft Outlook To connect a SharePoint calendar or task list to Microsoft Outlook 1) Open a web browser and browse to your SharePoint List 2) From the Actions menu select Connect to Outlook (or Connect to Client) a. 3) When prompted by Internet Explorer press OK to connect the list 4) When prompted by Outlook click Yes 5) The SharePoint list will be connected to Outlook. Calendars appear underneath your current calendar and tasks under the tasks section a. 6) The list is now ready to use online or offline. Outlook will synchronize with SharePoint approximately every five minutes to check for updates. Connect a SharePoint 2010 List to Microsoft Outlook 1) Open a web browser and browse to your SharePoint List 2) Select List (or Calendar) tab from the SharePoint ribbon 3) In the Connect & Export section of the List (or Calendar) tab, press Connect to Outlook 4) When prompted by Internet Explorer press OK to connect the list 5) When prompted by Outlook click Yes 6) The SharePoint list will be connected to Outlook. Calendars appear underneath your current calendar and tasks under the tasks section 7) The list is now ready to use online or offline. Outlook will synchronize with SharePoint approximately every five minutes to check for updates. For more information on SharePoint and Outlook integration: http://office.microsoft.com/en-us/outlook-help/view-and-create-tasks-on-a-sharepoint-site-by-usingoutlook-HA010082030.aspx http://sharepoint.microsoft.com/Blogs/GetThePoint/Lists/Posts/Post.aspx?ID=73 Viewing ProperSync Fields in Outlook To view the custom columns on a SharePoint list, simply open a task or appointment from a SharePoint list, after ProperSync has been installed. ProperSync pane in an appointment item: ProperSync pane in a task item: Tasks can also be seen in the ProperSync grid view: For more on the ProperSync Grid view, refer to Using the ProperSync Grid View, later in this documentation. Supported ProperSync Field Types The ProperSync 1.2 supports the following field types: Single Line of Text Multiple Lines of Text (Plain Text) Choice (Drop Down) Choice (Radio Buttons) Number Number (Percentage) Currency Lookup Date/Time (v 1.1) User & Groups - Users Only (v 1.1) Calculated Columns (v 1.1) Required Fields in Outlook ProperSync will enforce required fields within the Outlook item. Required fields are indicated with a red text. If a user tries to save the item without filling out the required information ProperSync will alert the user of the required fields. Required fields in the ProperSync Pane: ProperSync prompt for missing fields: Note: ProperSync only enforces the required fields that appear in Outlook. The fields that appear in Outlook can be controlled by list administrators. If a list administrator hides a required field from ProperSync, ProperSync cannot enforce the field. To control which fields are provided to ProperSync, refer to Controlling Fields in Outlook, later in this documentation. Customizing ProperSync Controlling Fields in Outlook There are two ways to control what fields are displayed on the ProperSync pane within Outlook. For each connected list, one of these approaches can be taken to control the ProperSync fields. Without any customizations, ProperSync will refer to the default view on the SharePoint list. ProperSync will show the selected columns in the order provided by the view. List administrators have the option of creating a special view for ProperSync. If a list has a view with the term “[propersync]” (including square brackets) in the name, ProperSync will use that view instead of the default view on the list. Notes: All users connected to the list with ProperSync will see the same fields Updates to the list view will propagate to all users within ten minutes of the change (users must be online) ProperSync only shows custom fields on a list. Default columns will be ignored, as they are already in the Outlook form ProperSync only supports the selected columns and column order on a view. It does not currently support any other properties of the view (e.g. sort, filter, etc…). Future updates will improve upon this functionality Using the Default View of the List SharePoint 2007 1) Open a web browser and browse to the SharePoint list 2) From the Settings menu, select List Settings (if the settings menu is not present, the current user does not have correct permission to the list) 3) Scroll to the bottom of the page to see the Views on the list. The default view will be indicated with a checkmark 4) Click on the default view to see the selected columns 5) The columns that are checked are the columns in the view. Any custom columns selected will appear in the ProperSync pane, in the order specified. 6) Update and press OK to save the view. SharePoint 2010 1) Open a web browser and browse to the SharePoint list 2) Select List (or Calendar) tab from the SharePoint ribbon 3) In the Settings section, click on List Settings 4) Scroll to the bottom of the page to see the Views on the list. The default view will be indicated with a checkmark 5) Click on the default view to see the selected columns 6) The columns that are checked are the columns in the view. Any custom columns selected will appear in the ProperSync pane, in the order specified. 7) Update and press OK to save the view. Creating a [propersync] View SharePoint 2007 1) Open a web browser and browse to the SharePoint list 2) From the Settings menu, select Create View (if the settings menu is not present, the current user does not have correct permission to the list) 3) From the Choose a view format list, select Standard View 4) Give the view any name, but make sure to include the term “[propersync]” (including square brackets) 5) Check the columns to appear on the ProperSync pane. Reminder: ProperSync will only show custom columns on the list. Any selected standard columns will be ignored. 6) Select the order in which you would like the columns to appear on the ProperSync pane 7) Press OK to save the list view SharePoint 2010 1) Open a web browser and browse to the SharePoint list 2) Select List (or Calendar) tab from the SharePoint ribbon 3) In the Manage Views section, click on Create View 4) From the Choose a view format list, select Standard View 5) Give the view any name, but make sure to include the term “[propersync]” (including square brackets) 6) Check the columns to appear on the ProperSync pane. Reminder: ProperSync will only show custom columns on the list. Any selected standard columns will be ignored. 7) Select the order in which you would like the columns to appear on the ProperSync pane 8) Press OK to save the list view ProperSync Options Enabling Logging Outlook 2007 1) Open Microsoft Outlook 2007 2) From the Tools menu select Options 3) From the Options dialog box select the ProperSync tab 4) From the ProperSync tab use the Log Level dropdown to choose the type of logging you require. a. 5) Once the logging level has been set, press OK to apply the settings Outlook 2010 1) Open Microsoft Outlook 2010 2) Click on the File button 3) From the File menu select Options 4) From the Options dialog box select Add-ins 5) From the Add-ins sections select Add-in Options… 6) From the Add-ins Options dialog box select the ProperSync tab 7) From the ProperSync tab use the Log Level dropdown to choose the type of logging you require. a. 8) Once the logging level has been set, press OK to apply the settings Updating/Changing Activation Key Outlook 2007 8) Open Microsoft Outlook 2007 9) From the Tools menu select Options 10) From the Options dialog box select the ProperSync tab 11) From the ProperSync tab select View License Details 12) The ProperSync Activation window will open. Enter the new or updated license key in the Activation/License Key box, then press Activate. 13) Once the key is properly activated, a response will be appear in the blank space 14) Click Close to close the ProperSync Activation dialog box Outlook 2010 11) Open Microsoft Outlook 2010 12) Click on the File button 13) From the File menu select Options 14) From the Options dialog box select Add-ins 15) From the Add-ins sections select Add-in Options… 16) From the Add-ins Options dialog box select the ProperSync tab 17) From the ProperSync tab press the View License Details button 18) The ProperSync Activation window will open. Enter the new or updated license key in the Activation/License Key box, then press Activate. 19) Once the key is properly activated, a response will be appear in the blank space 20) Click Close to close the ProperSync Activation dialog box Using the ProperSync Grid View The ProperSync Grid view allows users to view SharePoint tasks in a gird format. This is useful for grouping, sorting and filtering tasks. To access the ProperSync grid view: 1) Click on a SharePoint Task List within Microsoft Outlook 2) Immediately above the tasks a blue bar with the text Folder View will appear 3) Click on the symbol to access the ProperSync grid view Sorting Fields To sort items within the ProperSync grid view, simply click on the column heading. For example, to sort on Project Name, click on the Project Name header in the grid view: Clicking on the heading item again will sort the same field in the other direction. The first time a user clicks on the column heading, the items will be sorted from A-Z. The second time a user clicks on the same column heading, the items will be sorted from Z-A. First click (Sorted by Project Name A-Z): Second click (Sorted by Project Name Z-A): Grouping Fields To group items within the ProperSync grid view, simply drag the column header in to the section above the grid, which reads Drag a column here to group by this column. After dragging a column header to this location, the items within the grid will be grouped by the column: Click the symbol to expand the items in the group: Click the symbol to collapse the group: The items in the grid can be grouped by any available field. The items can also be grouped by more than one field. Simply drag additional column headers to group the items by the additional headers. Drag in to the current Group By item to group by both fields: Drag outside the current Group By item to create sub groups within the current group: Filtering Fields The following items cannot be filtered in ProperSync: Choice (Drop Down) Choice (Radio Buttons) Lookup Future ProperSync updates will allow filtering on additional fields. To filter items in the ProperSync grid view, use the row directly below the column headers: Click on the symbol to choose the filtering option: Once the filter option is chosen, click on or next to the operation (e.g. Contains). Once the textbox appears, type in the desired filter to filter the items. Note: The filter is case-sensitive. Hide Columns To hide columns in the ProperSync grid view, right click on the column header and choose Hide Column from the context menu. The column will then be hidden from the view: Show Columns To show columns in the ProperSync grid view, use the grid’s Column Chooser tool. To access the column chooser, right click on any column header and choose Column Chooser from the context menu. The column chooser will load on the users screen: To add a column to the grid, click and drag the item from the column chooser to the desired position. Let go of the mouse button to set the column position Note: If the column chooser is empty or no fields are shown, then all available fields are already added to the grid. Re-ordering fields To re-order the fields within the ProperSync grid view, simply drag and drop the columns within the pane. For example, to move Project Name to the first column, click on Project Name and drag it to the first column position. Once the column is in the correct spot, let go of the mouse to set the column position Creating Custom Views To create a custom view within the ProperSync grid view: 1) Click on the view dropdown box located in the upper right hand corner of the ProperSync grid view a. 2) From the dropdown options select Save As a. 3) Select the text in the box and give the view a new name, then click Save to create a new view a. 4) The new view will appear in the view dropdown box a. 5) Select the new view from the dropdown list to see the new view a. 6) Now sort or group the fields by the appropriate columns to apply the settings to the new view a. 7) The ProperSync grid view will automatically save the view settings. Switching back to Default View will show the list ungrouped a. 8) Switch back to your new view to ensure the settings have been properly saved Inline Editing Inline editing in the ProperSync grid view is limited to the following SharePoint fields types Single Line of Text Multiple Lines of Text (Plain Text) Choice (Drop Down) Choice (Radio Buttons) Number Number (Percentage) Currency Date/Time (Date Only) Future upgrades of ProperSync will support inline editing on more field types. The default Outlook fields on the grid are not editable in the current version of ProperSync . To edit items directly from the grid, double click on the item and column to edit. Once the item has been changed, select a different row or the filter row above to save the update to SharePoint. Opening an Item from Grid View To open a single item, from within the ProperSync grid view, double click on the first column in the grid with the symbol: The Outlook item form will open for the item selected: Refresh Grid View To refresh the ProperSync grid view, simply press the refresh button in the upper right hand corner of the grid.