1
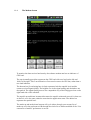
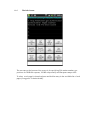
AndPskmail User's Manual
For Version BETA-0.99-2
John Douyere (VK2ETA) on 10-December-2013
1
Quick start
To install, download the .apk file to the device and select from a file manager. Note that
“Allow unknown sources” needs to be selected in the security or application section
of the device settings.
When launched, the applicaton displays the terminal screen. Navigating to the other
screens is done by a left or right swipe movement on the screen.
The menu button (phones) or menu icon on the screen (tablets) brings a menu to exit the
application and setup the preferences.
Before using the application on air, please set these key preferences:
a. The default server callsign to call
b. The User's call sign (in the User Data section)
c. In the Modem section, check the audio frequency (default 1000Hz)
d. If wanting to access email, the return address and the rest of the Email Data
section).
The default list of modes stops at PSK250, so it should be compatible with all
regions band plans.
Once these key preferences are set you can navigate (swipe) to the APRS screen and
send a PING. The list of servers and their frequencies are listed on the
www.pskmail.org web site.
This will allow ANY server that hears the request to respond. If the Android device
microphone is placed near the radio's speaker, it will decode and display the reply.
This would indicate that the setup is working and the propagation is open on that band.
If you desire to use a more robust mode, navigate to the Modem screen (left swipe) and
press the Mode Down button to get to the desired mode.
If this is successful, a Beacon (APRS position report) for example can be sent, provided
the GPS is active on the device. Or navigating back to the terminal screen, a
connection to a server can be initiated.
Note that as long as AndPskmail is running (I.e has not been “exited”), it will use the
microphone as its input and therefore will prevent other apps like Skype for example
to use it.
Always press Menu then Exit when you are finished with AndPskmail.
A Pskmail icon is now displayed as a reminder at the top or bottom of the screen while
the application is running (on Android version 3.0 and above).
2 What is new in version B0.99-2
a. Screen navigation is done by left or right “swipe” movements on the screen. The new
screen is shifted into view in the direction of the swipe gesture.
b. GPS time is now available for out of cellular reception areas where the internal device
clock can drift significantly. Important for conversing with scanning servers.
c. Reformatted the Menu section to make access to Exit, Bluetooth on/off and
Preferences functions easier.
d. Received text in the terminal, modem and APRS screens can be selected, then copied
for pasting in another application. Only on Android version 3.0 and above.
e. When displaying an Inbox or Outbox email in the pop-up window (after a Long Press
in the list), a new “Copy to Clipboard” button copies the whole email text to the
clipboard. Available on all versions of Android.
f. A notification Icon appears in the top or bottom system status bar to remind the user
when the modem of the application is ON. Clicking on the notification brings the
AndPskmail application back to the foreground. Only on Android version 3.0 and above.
g. A server callsign prompt pops-up when a Connect, Link or Inquire request is made.
The server callsign from the preferences is used as the default value.
h. Confirmation pop-up windows are now used on all important actions: Exit, Clear
headers, inbox, outbox, sent mail as well as for deleting outstanding uploads or
downloads.
i. Bug fix: When de-selecting auto-Beacons, the last auto-beacon would be kept in the
queue and still be sent one more time. Now it clears all queued beacons and stops
immediately.
j. Issue fix: on large screen devices the text input field at the botton of the mail screen
would be stretched down past the visible part of the screen.
3 Acknowledgements
I want to thank Rein Couperus (PA0R) for his relentless development of new Pskmail
features and solutions. Without his drive and persistence Pskmail would not simply
be, or not be what it is today, a feature reach bridge with the Internet with very
practical use for mobile and portable stations needing access to key services.
I want to thank Rein and Per Crusefalk (SM0RWO) for their support and the jPskmail
Java code under open source license. I believe this demonstrates the benefits of such
approach for our hobby. By the way, Rein still accepts a beer as a donation. Thank
you to Per for hosting the subversion system which allows the development team to
efficiently share the source code of the applications.
I also want to thank David (Dave) Freese (W1HKJ) and team for Fldigi which code
under GPL was the basis of the modem's implementation in AndPskmail and
specifically Dave who supported me when developing the PSK-Robust modes for
Fldigi.
Thank you to Franz-Josef Maas (DB3CF) who translated the PSK modem code from
Fldigi into Java, providing a strong starting point for the PSK modes implementation
in this development.
Finally, thank you to the Pskmail community for their ongoing feedback and support.
4 Introduction
The main objective of this development is to provide an ultra-portable, as in backpack or
bicycle for example, Pskmail client solution.
Rigs like the Yaesu's FT-817, Icom's 703 and Elecraft's KX3 would be the typical
companions of the Android phone or tablet running AndPskmail, thereby providing a
low weight, low energy requirement, access to most Pskmail services.
The situations targeted are where the operator, most likely being in an area outside of
mobile phone coverage, is primarily concerned in reporting his situation and GPS
position, plus raising alert if necessary. Secondary considerations will be exchanging
emails and accessing web pages information like weather forecasts.
Other uses would be in energy constrained situations like Maritime Mobile where the
device could report position on a regular basis (in typical APRS fashion) without the
battery drain of a laptop or netbook.
Finally, since speaker to microphone audio coupling is showing good results, for
"quick" transactions when mobile or maritime mobile and wanting to send a simple
status back to the server without setting up the laptop. Just run an APRS beacon or
message in front of the transceiver's microphone. This could be applicable for
VHF/UHF FM operations too.
5 Why Android?
The key considerations where the re-use of the code available under open source GPL
license in jPskmail, the PC version that Rein and Per developed, AND the wide
availability of devices. About 60 to 70% of the Java code used in AndPskmail is
directly from jPskmail, dramatically reducing the development and testing time of
the project.
Also, the frequent presence of an integrated GPS receiver and hands free connection
(meaning speakers and microphone connections and/or Bluetooth connectivity), the
plethora of built-in services in the Android OS and it's open source development kit
approach makes it a very attractive platform to develop a Pskmail client for ultraportable situations.
It is designed to run on on various devices (phones with limited screen space as well as
tablets) from Android version 2.1 onwards. It works both in portrait and landscape
mode.
6 Typical hardware configuration
Android phone or tablet running Android 2.1 onwards. Integrated GPS would be a plus
for automatic position reporting (Beacons).
Simple audio coupling (speaker to microphone) is giving very good results provided the
environment is not too noisy.
The Bluetooth interface is now fully integrated and easy to use, especially with the
Android version 2.2 onwards. This permits a completely wire free link between the
phone or tablet and the transceiver. The major additional advantage is the absence of
RF feedback to the capacitive touch screen of the devices.
At the end of this document I have included the details for modifying these simple and
low cost Bluetooth handsfree car kit (the type that clips on the sun visor)
There is separate document describing how to use a Bluetooth headset for the as a
miniature audio interface.
I have also made an interface cable without galvanic isolation between the FT-817 and
an HTC Desire Android phone (circuit towards the end). The only issue with a nonisolated interface is that the touch screen of these devices may not respond when RF
is present. This means timing the screen input during RX periods. This is probably ok
for regular beacons but not for a connected session where user's interaction is
required.
Antennas are of course what you use normally. I use a Fuchs antenna and tuner. This is a
41 metres wire end-fed antenna that tunes to all bands with good efficiency, but I
have used G5RVs and car mounted antennas effectively too.
So in summary and as an example, here is my set-up: HTC Desire Android phone, micro
Bluetooth interface, FT-817, low weight Lithium-ion (labelled as 9800mAh) battery
pack, Fuchs antenna (41M long) and tuner. Since I also use the phone for digital
mapping (OruxMaps and Androzic) when “out bush”, there is no additional weight
required.
Compatibility: has been tested on HTC EVO 4G, HTC Desire, HUAWEI Sonic, DELL
Streak (Mini 5), Motorola XOOM 10.1” 3G, Medion Lifetab 10.1” 3G, HTC
Velocity 4G. It should run on any device with Android 2.1 or later.
7 What does it do?
Basically most of what the fully featured version on the PC does. In no particular order:
•
In unconnected mode: send position reports (using the integrated GPS if
there is one), Pings, Inquiries, Link to server and APRS messages.
I use this last feature in conjunction with an Email-To-SMS provider,
allowing me to send SMSs to any mobile phone without having to go
through the process of a connected session. Very handy in my experience.
•
In connected mode: List email headers, send and receive emails in
compressed or uncompressed format, request all the services from the
server like fleetcodes, WWV propagation data, GRIB files and last but not
least access to any web page text, again in compressed or uncompressed
format.
If using the compressed format, AndPskmail will also handle the
uncompleted transactions and will resume the uploads or downloads from
where they were left at during the previous sessions. The choice is
available to the operator to reject or discard uncompleted transaction.
The new STOP Transaction allows to receive just the minimum amount of
data necessary by manually stopping the transaction because it is
unwanted or when the critical information is received on the portable
device. This is also handy with emails and web pages in uncompressed
format, as the operator can see the text being downloaded in the terminal
screen
All usual Pskmail modes are now available on the Android plarform:
THOR 8, 11 and 22, MFSK 16 and 32, PSK Robust 125, 250 and 500 as
well as PSK63 to PSK500.
The custom mode list is also available across the whole range of modes
listed above.
This allows for the modes to be changed automatically by the server and
this independently in RX and TX to adapt to the conditions and noise.
This requires server 1.4.12 or later. Earlier servers will work with this
client's version but will limit the modes used to a fixed table.
What is NOT available at this point (but may well be in the development pipeline, see
below):
• Files Uploads and Downloads (already implemented but requires typing
commands by hand in the terminal window. E.g. ~LISTFILES, ~GETBIN
etc...).
•
•
•
TTY mode for ARQ message exchanges between clients.
Access to Local mail (non-internet email) on the server.
Telnet access through the server (possible but requires typing commands
by hand)..
8 Installation
Download the AndPskmail.apk file from the website at:
http://www.pskmail.org/AndPskmail.html
And save it to the SD card, either from within the phone or on a PC to which the phone
is connected to and has the USB driver installed for that phone to allow access to the
SD card content from the PC.
From there use either a file explorer on the device or the automatic install function (like
in the Huawei Sonic) to install the .apk file.
You may have to allow non-Android market application to be installed for this to
work. This is found under Settings / Security / Unknown Sources OR Setting /
Applications / Unknown Sources, for older versions of Android.
You will be asked to accept a series of permissions that are explained below:
a. Your location: to allow the application to access your position for APRS beacons and
some information requests like GRIB files.
b. Storage: Read and write to the SD card. All the working files are stored directly on
the SD card under the “pskmail” directory.
c. Your Personnal Information (read contacts and log data): for accessing the device's
contact list and extracting the email address when composing a new mail. To allow
reporting of the context of an error in case of an application crash (the user can
decide to send or not the information after reviewing it).
d. Network Communication as in Bluetooth ONLY: to allow connection to the
Bluetooth handsfree kits or headsets used as audio interfaces.
e. Phone calls (as in reading phone status): to disconnect the Bluetooth interface when
AndPskmail is running through the Bluetooth interface AND a phone call comes in.
This is to prevent the call's audio from going to the radio.
f. Hardware controls (audio settings and recording): required for receiving and
transmitting sound.
g. Bluetooth administration: to redirect the sound via Bluetooth.
In your applications list you should now have a Pskmail logo called AndPskmail.
9 Usage
I have tried to maintain a similar philosophy of operation with the PC version.
One key difference with PC environments is the fact that the sound devices cannot
be shared between applications. Therefore if AndPskmail is running and the
modem is active (which is the default when the application starts), the
microphone will not be available for other applications like Skype and others.
The microphone (or Bluetooth interface if selected) will be released on either
toggling of the modem OFF (in the Modem screen) OR when the application is
exited (from the menu).
If the application is just send in the background by calling another application, the
modem will keep running and will still keep the microphone input for itself.
New: A notification Icon now appears in the top or bottom system status bar to remind
the user when the modem of the application is ON. Clicking on the notification
brings the AndPskmail application back to the foreground. This is only available
on devices with Android version 3.0 and above.
When you launch the AndPskmail application you are presented with the terminal screen
with the typical buttons to Connect/Disconnect, send mail stored in the Outbox,
Abort the session or Stop the current transaction (but remain connected).
The other screens available are:
•
Email screen, where the list of headers , inbox, outbox and sent items are
displayed and all the email actions are performed from . From this screen we also
access the New Mail entry screen plus the listing of Inbox and Outbox mails and
their display.
•
Modem screen, where all the received and transmitted characters are shown and
where the modem can be turned ON and OFF to conserve batteries. The squelch
is also adjusted there and the waterfall is accessible from that screen.
•
APRS screen, where only APRS data received from the servers is shown and
where Beacons, Pings, Inquiries, Link-to and APRS messages can be sent.
•
Info screen, where all the requests for information including web pages are made
from.
•
About screen. The usual, accessible via the menu only.
New: Movement between these screens is done by a “swipe” movement on the screen
either towards the left or the right. This makes navigating between screens much
easier.
From the menu we also access the exit function, the user's preferences and the list of
clean-up options (clear mail headers, Inbox, Outbox etc...).
There is automatic bug reporting, but with user's control, in case of a program error
causing a “Forced close”: the user is presented with the option to email the stack
trace (where the fault occurred) and a very brief history of the event log prior to the
crash. The use can review the email and decide to sent it if happy with the content.
10
Screens description
10.1
Terminal Screen
New: note the small AndPskmail icon in the notification area at the top of the screen
to reming the user that the modem is running. Pulling down the notifications and
clicking on the AndPskmail notification brings the application back to the
foreground. Only on Android version 3.0 and above.
At the top of the application window, the status line shows the session's status: Listening
(meaning not in a connected session), “Connecting”, “Connected” and “Disconnecting”.
In the title bar we also display the Rx and Tx modes and the RX / TX status (Light Blue
= RX, Yellow = TX, White = Modem OFF).
New: Below is the time, displayed as MM:SS.
This is used when conversing with scanning servers which allocate only one minute
per frequency/band.
The colour yellow indicates that only the internal clock of the device is used to
calculate the current time.
If you select “Use GPS Time” in the preferences AND the GPS is active (see device
“Location” settings), then the time's colour will turn green when the GPS time is used
instead. This is a very accurate time and is almost a must when working for long
periods outside of cellular network coverage as the clocks on these devices tend to
drift quite a lot if not resynchronised regularly.
The received text can be scrolled up and down.
New: the received text can be selected for copy and paste in another application like a
text editor. Just “Long Press” on the text to bring the select/copy dialog on the screen.
This is only available on devices with Android version 3.0 and above.
The “CONN. DISC.” button send a Connect command when the status is “Listening”
and a Disconnect command when the status is “Connected”.
The server's call sign is set in the preferences.
“Send Mail”, is a duplicate of the same button in the email screen and is here for
convenience. It send outstanding emails from the Outbox, resuming previous downloads
if possible to minimise traffic.
“Abort” to cancel abruptly the current session. It is preferable to use the Disconnect
button above, but this button can be useful in case the link is lost and the server still
tries to contact the client.
“Stop” is a new command that stops the current transactions (email or web page
download for example) but does not disconnect the session. This is useful for preventing
an unwanted transmission to be processed before we can move on to the next request.
This can be used in uncompressed mode as well for stopping the remaining unwanted
portion of an email or web page to minimise TX and RX time when operating from
batteries.
Also note that the AndPskmail application will continue to run even if the phone's
screen is switched off so that batteries can be conserved during the data exchange.
Also, navigating away from the AndPskmail application does not prevent it from
running in the background.
Remember that while the modem is running, the microphone is used by the app
and is not available for other applications.
10.2
Email Screen
The data entry box at the bottom of the screen is used to type in email numbers.
The list is can be scrolled up and down.
Headers, Inbox, Outbox and Sent Items buttons cycle the screens between these folders.
Note: the Inbox display can be slow if the Inbox file is more than a few kilobytes long.
This will be worked on next.
A “long press” (i.e. press and hold) on an email header will request that email to be
downloaded. Therefore there is no READ button.
A “long press” on the Inbox and Outbox screen list will display the email in question in
a pop-up window. New: Press the copy to Clipboard if required, then the return button
to return to the list.
QTC is to request email headers. Without data entered at the bottom, it will request new
headers past the last on in the list. If a number is entered it will request headers from that
number.
The download will be compressed or uncompressed depending on your selection in the
preferences
New Mail will open a new dialogue for typing-in the new email.
Send Mail, as per the terminal button of the same name.
Delete, request deletion of your email as per the supplied number below.
Be mindful that email deletion results in all emails of higher position to be shifted down
by one, so the numbering in the list above becomes obsolete with the first delete action.
An example of an email pop-up display:
10.3
The New Mail screen
This screen is “scrollable” in it's entirety, meaning that you can press and move the
screen up and down, would the text entered cause it to become bigger than the device's
screen.
Useful when trying to find the Post to Outbox button when the text expands.
To access the device's address book and selecting a person, press the “To:” button
next to the address field and select the person from the address book. The first
email address of that contact will be pasted in the To: field.
Note: navigating away from that screen, like pressing the device's home button, will
result in the loss of the text typed in. This will be resolved in the future.
10.4
The Modem Screen
To monitor the data received and sent by the software modem and see an indicator of
CPU load.
The top (normally green) bar represents the CPU load with zero load on the left and
100% on the right. This is an indication of how much reserve the CPU has, rather than a
true load indicator.
The bottom bar (2 overlaying bars in fact) represents both the squelch level and the
current received signal quality. The brighter one is the signal quality and the darker one
the squelch. The signal quality moves in a comparable way to the Fldigi green bar on the
right hand side of the waterfall.
The squelch up and down increases/decreases the squelch value and stores it for later use
so that it it set to the same value the next time the application starts. The darker bar
represent the squelch level.
The mode up and mode down buttons will cycle either through your custom list of
modes as set in the preferences OR through the whole list of modes available if the “Use
custom list of modes” preferences is not set.
Modem ON/OFF stops/restarts reception and processing of incoming audio. This is to
conserve processing and therefore batteries.
Note: Digital Modem reception is very CPU intensive and the battery drain
increases quite a lot compared with a device in standby.
The Tune button produces a 3 seconds tune at the current set level of the modem's
volume. Handy for testing SWR and tuning.
The Stop TX button is for immediate silencing of the modem in case of unwanted
transmission.
The decoded RSID mode and centre frequency are displayed in the Modem screen.
The waterfall can now be displayed by pressing the W.FALL on/off button. See screen
copy below.
Be aware that the CPU load increases when displaying the waterfall and on some
(mostly older) devices doing so while on PSK500R or any of the THOR modes can
lead to losses of data AND making RSID not detectable.
Use this waterfall display sparingly on these devices.
10.5
The APRS screen
Upon entry to this APRS screen, the GPS will automatically be switched on, if it was not
disabled at the device level by the operator. See phone/tablet “Settings” / “Location”
options.
At the top of the screen are the controls for automatic beacons and automatic links to the
server. The selection remains even if we exit and return to the application.
New: The time displayed in MM:SS format is either yellow (device time) or green
(GPS time – see terminal screen section for details).
The text displayed in this screen is only APRS type of received traffic.
The text entry at the bottom of the screen is for APRS messages (short unconnected
emails or pure APRS messages).
New: For Inquire and Link commands, a pop-up window will prompt for the server's
callsign, using the the one from the preferences as a start.
The Beacon button will request the position from the built-in GPS and send the “Last
known position”, which could be old data if the GPS has been just switched on.
Better handling of old position data will be integrated in future versions. Ideas are
welcomed in that regard.
10.6
The Info Screen
The text entry at the bottom of the screen is for specifying Tide station number, gps
positions for GRIB file requests, V/UHF relays nearby and European camper sites.
To select a web page for download press and hold an entry in the scrollable list of web
pages (“long press” in Android talk).
10.7
The Navigating Menu
Upon pressing the menu button on the device (phone) OR the menu icon on the screen
(tablet), the menu is displayed as per the left screen copy above. Pressing the “More”
button will bring the remaining part of the menu as a list as seen on the right screen
copy.
In the first section is the EXIT option which returns to the previous displayed
application or main device screen, and stops the software modem (which is important
for the power consumption of the device anf freeing the microphone for other
apps).
It also completely removes the application from the device's memory, therefore the
next launch will be from a cleanly restarted application.
This section also accesses the preferences for the application.
The Bluetooth ON should be selected AFTER the Bluetooth (headset) interface has
connected to the phone or tablet. From then-on, and until the Bluetooth OFF option is
selected, the audio in and out will be through the Bluetooth interface.
If you are using Android 2.2 (Froyo) and only in that version, there is a bug (corrected in
2.2.1) that causes the phone to reset when the Bluetooth is turned off, after having used
programs that require an audio channel to a headset. This is not a bug in AndPskmail,
and the workaround is to exit AndPskmail with the option/exit action, then kill the
process using one of the many “memory cleaners” available on Android Market. If I can
program a workaround I will include it in the future.
For Android 2.3 and above there is also an automatic disconnect of the Bluetooth
interface when a phone call is received. This is to prevent the phone call audio from
being routed to the radio via the Bluetooth interface.
The other buttons are self-explanatory and similar to the jPskmail client.
Update server will send your email access details in an unreadable format for the server
to get your mail. That information will be kept in an encrypted format on the server for
the next time you connect.
There is an About screen which displays the version and some information as usual.
10.8
The Preference screen
Preferences are now grouped in preference screens (accessed by clicking on the item)
with the most common preferences on top of the list.
This is a scrollable list of options. In a nutshell:
- Server Callsign, default TX and RX modes are self explanatory.
- “Connect with list of mode” for connecting to servers 1.4.0 and beyond. Fill-in the
mode list (next option down in the list).
- “Custom list of modes” brings a muti-selectable list (see screen above right) that the
server will choose for the link. Tick the modes wanted.
The modes are ordered in ascending order of average robustness / approximate
descending order of speed.
Note that THOR modes in particular but also PSK500R can be very CPU
demanding. If your device is consistently close to 100% CPU when in these modes
(the top bar in the Modem screen), and you have already ticked the “slow CPU”box
in the MODEM preferences, then it is better not to use them as it will result in
missed characters requiring numerous re-send of data blocks. Select PSK250
and/or PSK250R instead and MFSK modes instead of THOR.
Afterwards, ensure that the TX and TX modes in the preferences are included in this list
before connecting. Otherwise the program will choose the slowest mode in the list as
the start-up mode for TX and RX.
The MODEM preferences are:
- Modem volume and audio frequency since the modem is integrated in the
application. A normal value for the Volume is around 60 to 80%.
- Slow CPU selection: if your CPU load bar in the Modem screen stays above
75% more than half of the time, then select that option. Otherwise CPU
intensive modes like THOR or PSK500R could miss sections of the received data
and cause more repeats than necessary.
Selecting the Slow CPU option degrades slightly the receiving capability of the
PSK and THOR modems.
- TX Delay: this should be a minimum of 1500 milliseconds (1800 to 2000
recommended) otherwise there is overlap between the RX and TX at the server's
side.
- Busy detect time: for delaying un-connected exchanges if there is activity detected.
Typically 3 to 10 seconds.
- Delay for switching modem off: upcoming auto off feature – not used yet (greyed
out).
- Block length is not used (greyed out).
The APRS preferences:
- Beacon status. This is the default beacon status text used if no text is entered in the
APRS text entry field.
- Beacon and auto link period in minutes: 10, 20 ,30 or 60 minutes intervals.
A reminder that Auto Link requests are used to keep reminding the server that any
new APRS message sent to my client's call sign are to be forwarded to me (using it's
default mode). These messages are displayed in the APRS screen.
If both Auto Beacon and Auto Link are enabled, auto links will occus 5 minutes after
the auto beacons to ensure the same scanning minute is used.
Also note that Autolink requests are sent at a maximum of 20 minutes intervals even
if the selected beacon's period is longer.
- Beacon QRG is the minute in the 5 minutes scan cycle of Pskmail. Note that for
Beacons that means minutes 0 to 4 and for Auto Link that means minutes 5 to 9.
For example if the Beacons Period is 20 minutes and the Beacon QRG is minute 2,
then Beacons will be sent on 2 minutes, 22 minutes and 42 minutes past the hour and
the Auto Link requests will be sent on 7 minutes, 27 minutes and 47 minutes past the
hour.
- “Delay in Seconds”: an additional delay within the minute when beacons and
Autolinks are sent to ensure the server has changed mode and frequency. I usually
select 10 seconds here. Can also be used to “spread” clients in the same minute.
- “Compressed Beacons”: should always be selected as it increases the chances of the
packet to be decoded properly.
- “APRS Icon” : the single character representing the station on a map (at Findu.com
or aprs.fi for example).
New: The “Gps Time Selection” preferences.
In this section we can elect to use the GPS time (as sent by the GPS satellites). The
“Leap Seconds Correction” is normally not needed and should be left at zero as
the devices GPS engines automatically correct the GPS time to bring it to the
UTC time despite regular (almost yearly) increases in the leap-seconds.
On some devices (e.g. Motorola Xoom), the current leap seconds are not included,
and the value 16 (as of 2013) needs to be entered in that field.
Note that the devices own clock is not changed, only the time displayed in the
Terminal and APRS screens.
11 Know bugs and quirks in version Beta 0.99-2:
11.1
Remember this is BETA software and is released for testing purposes mainly and
although fully functional has most likely bugs, some of which that may be critical to the
application.
11.2
Quirk: The list of headers is not refreshed automatically after a QTC command is
processed or a Clear Headers is performed. Re-calling the Email Header's screen will
refresh it. This will be fixed.
11.3
Quirk: When creating a new mail, navigating away from the screen before
performing a “Post to Outbox” will result in loss of data entered. Will be fixed in the
future.
11.4
Quirk: Not a bug per say but and annoyance: the display of the inbox list of
mails is slow and can take 20 seconds for a 50KByte inbox file. This will be resolved.
12
What is in the development pipeline?
12.1
Backup and restore of configuration data for easy upgrades and re-installation.
12.2
Access the device's phone list when composing APRS messages (for selecting
phone numbers for sending SMSes). Details of email-to-SMS provider to be stored in
preferences for completing the email address after the phone number.
12.3
Done: Adding a clock showing the seconds in the terminal and APRS screen
for synchronising with scanning servers.
12.4
Adding a simple dashboard showing the conditions of the current session, current
command progress, ARQ exchange, signal quality.
12.5
Done: Copy/Paste sections of the terminal's data or storage in a text file on the
SD card (useful when downloading web pages or emails and the information needs to
be kept for later). But is only available on devices with Android 3.0 and above. Simply
“Long Press” on the text to select it, then choose “copy”.
12.6
Abandoned: “Double tap” in terminal or APRS to bring the Modem monitor
information to see what is happening at the modem level (useful in case of bad
reception). Not required with the new “swipe” navigation.
12.7
Done: Investigate “Swipe” gesture management for “flicking” between
screens. This may be easier and more natural than using the menu for changing
screens. There is a simple and not too CPU intensive “animation” of the screen as it is
“swiped-in” to highlight the change of screen to the user.
12.8
Done: User confirmations for critical buttons like DISCONNECT, ABORT,
STOP, DISCARD Email to avoid errors. Also for the Exit function.
12.9
Automatic switching of RX modem on and off to conserve batteries: will go on
when connecting, and off when disconnected. Will go on for a selected period (e.g. 2
minutes) when sending an APRS message to allow for the server's reply. Useful with the
auto-beacon, auto-link feature.
12.10
Summoning the server to a new frequency. Rig control will be manual of course.
12.11
Extended lead-in (option) when Txing for audio coupling to allow enough time
for the operator to key-in the transceiver's PTT.
12.12
Handling of coordinates if no GPS available (or disabled by operator) with
option to prompt for position or use the pre-recorded position.
12.13
Sending of attachments with emails.
12.14
Handling of Files uploads and downloads via a screen. At present this is possible
but the commands have to be keyed in the terminal window (~LISTFILES, ~GETBIN
etc...) while connected.
12.15
TTY ARQ text and file exchange (later).
12.16
Handling of local mail on server. Again this is available now but requires typing
of commands in the terminal window.
12.17
CPU power permitting, maybe a Wefax receiver.
12.18
That's all for now :)
Enjoy, 73 John (VK2ETA)
P.S: Circuit diagram for a simple audio cable and the Bluetooth interface below
R2
10 Ohms
R1
47 Ohms
R3
10 Ohms
R4
1K Ohms
R6 (*)
1K Ohms
R5
100 Ohms
Ground
Mic Input
Headset JACK
HTC Desire
Audio OUT
This interface requires the use of the VOX to key in the transceiver
Note (*):
If changing the R6 value, be mindful that two low values are read as control inputs by the HTC phone (call/hangup etc...)
Speaker JACK
FT-817
To MIC GND
To MIC
Simple audio interface cable for FT-817 (857/897/450)
Using a Bluetooth Adapter with Android Phones running Pskmail
1 Usage Context:
1.1
The objectives of the Bluetooth project were:
1.1.1
To provide most importantly a galvanic isolation between the rig and
the phone. I have noticed through field testing that the touch screens of the
devices is sensitive to RF even with a good antenna and some ferrite beads
on the (non-isolated) interface cable I built.
1.1.2
To eliminate wires and provide possible “remote” running of the
AndPskmail application. Remote here means being a few metres away (as in
near the fire with a nice drink in my hand). More seriously, it could be having
the Android device at the front of the bicycle and the FT-8x7 at the rear for
example.
1.2
The key considerations were:
1.2.1
Small power budget
1.2.2
Little additional RF noise
1.2.3
Simple to build
1.2.4
Simple to operate
1.2.5
Low cost (of course)
2 Concept:
2.1
Since almost all Android phones and a fair proportion of Android tablets
have an integrated Bluetooth interface it seemed logical to try to use it since that
would fit the bill of most of the objectives above.
2.2
I looked at what has been done in that area and there are some interesting
developments on the internet (see Youtube videos of K7AGE for example) but
with the opposite end in mind: the adapter connected to the rig communicates
with a Bluetooth headset. The rig side is the master and the headset the slave.
Here we do the opposite: the phone in that case is the master connecting to a
headset (or hands free) slave device, itself attached to the transceiver.
2.3
Therefore the natural devices to start with are either headsets or hands
free car kits. I settled on the later simply for simplicity purposes: by removing the
internal speaker I was able to fit all the signal level adaptation and the VOX
inside the unit rather than have a separate box. The price ranges from $15 or so
on that “auction site” to around $250 for the top of range unit.
2.4
The type I found practical, typically clips on the sun-visor of the car and
has a built-in rechargeable battery giving a claimed 10 hours of run time, is small
(approx in cm 10 x 5 x 1.7 or in inches: 4 x 2 x 0.7) and light weight (74g
originally)..
The minimal device specifications are that it handles either the handsfree or the
headset Bluetooth profile. The A2DP profile is of no use in that case.
2.5
The thicker the unit, the easier it will be to fit the electronics inside.
2.6
The model I use is an Advantalk Nova, but I am sure a lot of other units
would fit the bill. The key criterion is that these units pair with your phone or
tablet and can be used in a phone call as interface for audio in and out.
3 Required adaptation:
3.1
I basically left all the electronics of the units as is which is a plus as it all small
surface mount components. Only the integrated speaker and microphone were removed.
3.2
The two functions required to be added are signal level and impedance
adaptation for the input and output to/from the transceiver and the VOX circuit if
necessary.
It is worth noting that most modern radios integrate a digital mode VOX and therefore
only need the signal adaptation. But for portable work with the FT-817 I wanted both so
that I could use the data plug at the back of the unit.
Luckily there is ample signal strength to allow simple resistive circuits for the signal
adaptation both way.
I wanted the VOX circuit to be simple and not pull energy from the battery of the unit or the
transceiver.
The original audio output circuit of the Bluetooth unit is based on a H circuit as there is not
much supply voltage to go around at 3.7V (single cell integrated lithium battery) and
therefore it is not reference to ground. So I used a transformer to isolate it and at the same
time boost the voltage so that the VOX has ample voltage to work with.
A small output transformer normally used on the final stage of a low power audio amplifier
is used for that purpose. It has an 8 Ohms secondary and a 2 x 500 Ohms primary. I use it
“in reverse” so that I can get 10-15Vpep on the secondary at full volume. Ample to trigger
the VOX circuit even at low volume settings which is a great plus.
A few decoupling capacitors are required for signal cleanliness and stability.
I added for good measure some ferrite sleeves on the short cable between the unit and the
radio just in case.
The circuit diagram is shown with the pictures further down. Please note that it can be
adapted to most other rigs quite easily.
4 Results so far:
4.1
I was concerned about the RF hash and birdies as well as the degradation of
signal quality as headsets can be on the “low fidelity side”.
4.2
I have found some birdies but they have been outside of the frequencies of
interest so far. The hash is quite low and barely noticeable.
A remedy could be to add a shield inside the unit but this has not been necessary so far.
4.3
The transmitted signal quality is excellent. The receiving Fldigi notes a 30 to
32dB IMD which is good. The Bluetooth volume adjustment is usable on 60% of the
range before the VOX gives up. From the quick tests I did, this seems to represent about
12dB of range of output power which is quite good.
4.4
The receiving side is not as perfect though. The key issue is the noise reduction
function of the unit which normally tries to eliminate ambient noises like road or office
noises. It does a pretty good job at that, but the problem is that it can interpret a nice
PSK signal as noise. It will not blank it, but it will reduce it's level.
The end-result is still very good in fact and by slightly overloading the mic input of the
Bluetooth adapter we reduce the influence of the DSP noise reduction quite a lot.
I was able to use all modes up to PSK500 on RX which is a rather demanding mode
when it comes to signal quality. More tests side by side between the Bluetooth interface
and the cable interface need to be done to get a real feel for the impact on reception.
If the DSP function could be reduced or eliminated it would be perfect. More forensic
work is required.
4.5
In summary, it is a really worthwhile and convenient way to link the phone or
tablet to the transceiver. And, what is a plus, “it looks pretty cool”.
5 Usage with AndPskmail on Android phones
5.1
The unit works on the principle that we set the phone and the device as if we
opened a “Voice dialling” channel.
5.2
From a programming perspective there may still be more work required as the
method varies, since the Bluetooth functions got refined between each version of
Android. In the version 3 and above it is a simple command, but in 2.1, which is the
lowest version we set the objective to work with, it requires an external program to get
this to work. It worked well on an HTC Desire and a HUAWEI Sonic but this may not
be true on all phones.
From Android version 2.2 onwards it should be working reliably, which is the situation
for all recent phones and tablets.
5.3
Operation:
5.3.1
Only on devices running Android 2.1 (skip this step if you have Android 2.2
and above): download and install the program “testinband.apk” found at Google
code.
Link: http://code.google.com/p/android/issues/detail?id=7906
“testinband.apk”
search for
5.3.2
Every time you want to use the Bluetooth interface, perform in that sequence:
5.3.2.1 Start Bluetooth on the phone
5.3.2.2 Assuming the handsfree kit was paired before, start the handsfree kit and
ensure it is connected (This is typically done by waiting 10 to 30 seconds or by a
short press on the multifunction button of the handsfree kit).
5.3.2.3 If you are using Android 2.1, launch the “testinband” application.
5.3.2.4 Launch AndPskmail
5.3.2.5 Call the menu in AndPskmail, select “Bluetooth ON”
5.3.2.6 Ensure that the modem's volume in the Preferences is at 60 to 80%.
5.3.2.7 From now on, the audio received should be from the radio and not the
microphone, and the sound output should be redirected towards the transceiver
5.3.2.8 To stop redirecting the audio to the Bluetooth and return to the
speaker/Audio plug, select “Bluetooth OFF” from the AndPskmail menu.
5.3.3
Note that the Bluetooth volume need to be around 50% and above to provide
enough signal output voltage to trigger the VOX (dependant on your VOX circuit
and Bluetooth unit).
Adjusting the volume up and down on the Bluetooth unit or on the phone should
display a “Bluetooth volume” bar on the phone.
Also I noted on my phone that the media playback level also had an impact, although
not very large, on the final output volume.
So in summary there is: the modem volume in the AndPskmail preferences
(normally set and left at 50 to 80%), the Bluetooth volume (adjustable when the
Bluetooth device is connected from the handsfree kit or the phone) and the media
volume (to a lesser extent).
P.S: It should also possible to use a small Bluetooth headset device mounted directly
onto the plug which connects to the radio since these devices are very lightweight.
The signal adaptation resistances could be placed directly in the body of the plug and
have the wires come out of what is normally inserted in the ear. This should be the
smallest/lightest Bluetooth interface available..maybe my next project...
This would be particularly of value if the rig had built-in VOX for digital modes, or
the microphone input is used with it's audio VOX capability.
6 Pictures and schematics:
5.1
5.2
Original unit, opened, with the internal speaker removed, transformer soldered.
Veroboard cut to shape. Note the usage of a very small speaker that was removed
after initial testing.
5.3
Unit wired ready to plug in the transceiver. Note the six ferrite sleeves on the
audio cable to the TRX.
5.4
Connected, clipped on the FT-817
5.5
The whole portable set-up: 41M wire and tuner for end-fed Fuchs antenna, FT817 with Bluetooth adapter, Android phone, 5Ah battery in sealed box.
C3
10nF
C5
22nF
R1
1KOhms
R2
1KOhms
C1
1microF
C2
1microF
R6 (*2)
10KOhms
R5
1KOhms
D2
Signal
Diode
D1
Signal
Diode
R4
2.2KOhms
R3
47KOhms
Q1
BC338
C4
22nF
Notes (*):
1. T1 is an output transformer for push-pull amplifier (minimum capacity around 300mW). It is required for:
a) isolating the final amplifier stages of t he BT unit and
b) providing enough voltage to control the PTT transistor
2. Adjust R6 depending on the sensitivity of the BT unit's microphone input
To mic. input
of BT adapter
Ground
T1 (*1)
8 Ohms Primary
2 x 500 Ohms Sec.
300mw capability
minimum
To speaker output
of BT adapter
Digital Modes Bluetooth Adapter with Vox circuit for
Yaesu FT-8X7/FT-450 transceivers by VK2ETA
1 = DATA IN
2 = PTT
3 = GND
4 = DATA OUT
1200bps
6 Pins
Min-Din
Data
plug
5.6
Circuit Diagram: note that the VOX circuit is only required for the FT-817 as the
other units have a Digital Modes VOX that triggers the PTT on reception of an audio
input.