1
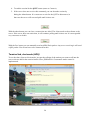
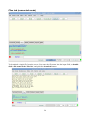
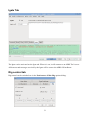
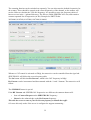
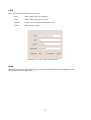
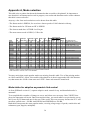
jPSKmail User guide User manual updated 12/12/10 Reflecting jPSKmail version 0.8.5 Contents Preface..................................................................................................................................................5 A brief attempt at writing the history of the project........................................................................5 What is PSKmail?............................................................................................................................6 So, what makes PSKmail special?...................................................................................................6 In summary, what is pskmail?.....................................................................................................6 Installation and getting started..............................................................................................................7 Install procedure..............................................................................................................................7 Installation Instructions for RXTX..................................................................................................8 Windows 98/NT/2000/XP:..........................................................................................................8 Linux:..........................................................................................................................................8 Others, manual procedure...........................................................................................................8 Hardware selection...............................................................................................................................9 Transceiver.......................................................................................................................................9 Soundcard interface........................................................................................................................9 Antenna............................................................................................................................................9 Setting up Fldigi.............................................................................................................................10 Carrier frequency (Hz)..............................................................................................................10 AFC range (Hz).........................................................................................................................10 Reset to Carrier.........................................................................................................................10 RS ID.........................................................................................................................................11 User Interface tour..............................................................................................................................14 Preferences window............................................................................................................................16 User data........................................................................................................................................16 Beacon minute and server channel............................................................................................17 Choosing the appropriate modes...............................................................................................17 Email settings.................................................................................................................................18 Configuration Terminal tab, connected operation (ARQ).............................................................19 Devices...........................................................................................................................................20 Modem...........................................................................................................................................21 Main user interface, tabs.....................................................................................................................22 Terminal tab, connected operation (ARQ).....................................................................................22 Terminal tab, chat mode (ARQ)....................................................................................................24 Composing an email......................................................................................................................25 Preparing an email....................................................................................................................25 PSKaprs emails.........................................................................................................................26 Receiving email.........................................................................................................................26 Mail headers tab.............................................................................................................................27 Files tab (connected mode)............................................................................................................28 APRS tab, Unconnected Operation...............................................................................................29 Bottom part of the client.....................................................................................................................30 Status Indicators.............................................................................................................................30 Main menu..........................................................................................................................................31 1 File ................................................................................................................................................31 Mode .............................................................................................................................................32 Edit ................................................................................................................................................32 Mbox .............................................................................................................................................32 Info ................................................................................................................................................32 Twitter ...........................................................................................................................................32 Link ...............................................................................................................................................32 Help ...............................................................................................................................................37 Appendix A, Mode selection..............................................................................................................38 Mode tables for adaptive asymmetric link control........................................................................38 APRS Mode choice...................................................................................................................39 Copyright (c) 2010 Pär Crusefalk Permission is granted to copy, distribute and/or modify this document under the terms of the GNU Free Documentation License, Version 1.3 or any later version published by the Free Software Foundation; with no Invariant Sections, no Front-Cover Texts, and no Back-Cover Texts. A copy of the license is included in the section entitled "GNU Free Documentation License". Contributors: Rein Couperus 2 Preface A brief attempt at writing the history of the project The PSKmail project was started by Rein Couperus early 2005. The baby steps were taken with a modification of gMFSK, the mode of choice was PSK63 and traffic was handled by the one and only server (PI4TUE) that existed. Soon another server joined the effort, SM0RWO in Stockholm, and suddenly the project had “multiple” users (two) and had to evolve. For a time there was only the server in Stockholm and two clients (PA0R and SM0RWO) and the project made necessary adjustments for the hf environment. Soon more servers started to appear, IS0GRB/Roberto, added a much needed server in the Mediterranean. Then more and more servers joined, such as WB5CON/Fred and DL9YCS/Jörg. The Intermar group then followed with several servers. At the start only email traffic was handled and, as stated earlier, only done so using PSK63. Soon more services were added, web browsing was one of those. One of the more important additions was APRS. Traffic was handled nicely by PSK63 but yours truly, SM0RWO, felt the need for speed and noticed that the Fldigi project offered PSK125. Quickly Fldigi was integrated and PSK125 was the mode of choice for a long time. That urge for faster modes resulted in a move to PSK250 which is an excellent mode, it is of course faster and thus wider (abt 250 Hz). Wait a second, we almost always use 500 Hz filters in our rigs. Why not aim for a 500 Hz wide mode then? That mode was PSK500 and we moved there around summer of 2009. Lengthy discussions within the group resulted in the consensus that it was time to break free from the chains of the old PSK31 keyboard to keyboard concept. PSK31 was indeed a fine idea but it had to make some sacrifices in order to reach its goal of being a suitable successor to rtty. Processing times could not be long, it had to deliver data pretty much in a similar way that the rtty operators were used to and one apparent problem was a lack of forward error control. A missing character here and there can mostly be handled by the human brain, not so by a computer with checksum control of received frames. VK2ETA, John Douyere, made it his task to create the more robust modes where FEC and an interleaver net was added to the PSK modes, the new mode is designated as PSKRobust 500/250/125 and has been a real success. In fact PSK robust 500 has been the default EU mode ever since. Mode profiles were added by Rein, these control the server speed and mode that can be adapted by the server. The server can move a connected session to a faster mode when the conditions are right and can of course select a more robust mode when the conditions deteriorate. While writing this there is activity to include asymmetric linkup. By that we refer to a connection that does not use the same mode and speed in both directions. For instance its now possible to have a weak client use a slow and robust mode while the server uses a very fast one. The mode scope now ranges from THOR8 to PSK500, using PSK, MFSK and THOR modes to cater for differing adverse conditions, including polar flutter, multipath, doppler and QRN. 3 What is PSKmail? PSKmail is a system that uses data modes to enable clients to access both the internet and to communicate with other pskmail clients. Data modes are used over a suitable radio, mostly its an hf radio but higher frequencies are also in use. Just saying internet access could mean that the system should support a whole range of services, and indeed it does just that: •Messaging ◦Handles the users regular email account, including gmail etc. ◦For emergencies its even possible to handle messaging off the internet (the whole internet could be down, messaging works anyway) •Web browsing, fetch and read any web page •Twitter, send and read tweets •File up and download •Supports APRS including position reports, messages and short emails. But, that's just part of what's there now. Servers can also fetch your weather report periodically, show you where the nearest camp site is and tell what other users are nearby and so on... So, what makes PSKmail special? PSKmail is designed with the mobile/portable (maritime too) ham in mind. There is no big, power hungry and expensive modem to carry along. PSKmail is designed to use your pc soundcard as modem, right now the digital modem program Fldigi is what is being used for that very purpose. A mobile/portable station is mostly not what we sometimes refer to as a “big gun”, antennas and power output tend to be on the modest side. With that in mind PSKmail uses bandwidth efficient modes, hardly ever wider than 500 Hz (for higher frequencies that may of course be the case). Wide data modes require a better signal to noise ratio than narrow ones, PSKmail is even able to adapt the speed and the mode so that the client can select a really narrow and efficient mode. Then again as the signal to noise ratio increases or the qrm goes away it will use wider and faster modes. In summary, what is pskmail? The main characteristics of PSKmail can be summed up as: ● An internet connection that can be used where there is no internet connection. Such as from a boat at sea or a cottage somewhere or on expedition or... ● Narrow, efficient, data modes are used. Thus enabling even the most modest setup. ● Servers on short wave provide long range connectivity ● No expensive and bulky modem, all you need is a pc, a transceiver and an antenna ● Available on multiple operating systems (Linux and Windows, MacOS and FreeBSD) 4 Installation and getting started To use PSKmail you need: •A ham radio license •An hf transceiver with a working antenna solution, for boats that may include an antenna tuner and an insulated backstay or a whip antenna. •A computer running Linux, Mac OS or Windows. ◦FreeBSD should also be fine but we lack test reports there. •An interface for connecting the computer soundcard to the hf transceiver •A narrow filter (500 Hz) in the transceiver is highly recommended. A bandpass dsp may also be very nice but is normally not a replacement for a real filter. To install and use the jPSKmail client you will need: •A java runtime environment. ◦For Linux and MacOS you should be able to get that through your software distribution system (software update). ◦For all others, windows, its here: http://java.com/en/download/manual.jsp •A suitable modem, we use Fldigi for that now. ◦Fldigi can be found here: http://www.w1hkj.com/Fldigi.html Install procedure The install procedure is in principle the same for all operating systems, there are subtle differences and they will be shown further below. But, the steps are: 1. Get and install Fldigi 2. Install jPSKmail 3. Make sure you have a java runtime environment 4. Launch the actual installer 5. Configure Fldigi and the jPSKmail client 5 Installation Instructions for RXTX jPSKmail needs a JAVA Communication API to communicate with a GPS via the serial line (RS232 or USB), that library is the rxtx package. These steps are only necessary if you intend to actually use a GPS. Windows 98/NT/2000/XP: For installing the RXTX package you will find the necessary dll and jar files within the directory where you installed jPSKmail. Installation procedure: copy rxtxSerial.dll to %JAVA_HOME%\bin, (%JAVA_HOME% is the folder where JRE is installed on your system; e.g. c:\Program Files\Java\j2re1.4.1_01) • copy RXTXcomm.jar to %JAVA_HOME%\lib\ext • Linux: If you are using Ubuntu you may very easily take care of that by installing “librxtx-java” using synaptic or from a terminal with “sudo apt-get install librxtx-java”. Others, manual procedure For others, linux other than ubuntu, the simple procedure that follows involves copying files from the folder where jPSKmail was installed. Installation procedure: copy librxtxSerial.so to %JAVA_HOME%/jre/lib/i386, (%JAVA_HOME% is the folder where JRE is installed on your system; e.g. /usr/local/j2sdk1.4.1_01) • copy RXTXcomm.jar to %JAVA_HOME%/jre/lib/ext • 6 Hardware selection Transceiver There are many kinds of transceivers in use, many work really well with pskmail. Selecting a transceiver can be tricky and is of course guided by many factors. A few words of advice may be helpful for the beginner anyway. A good transceiver should have an optimized digital mode, a mode where a narrow filter can be used for better reception. Adding a 500 Hz narrow filter is a very good way to enhance the S/N ratio on receive and may be the difference between a working and a non working connection. Older transceivers may lack a dedicated digital mode and may require special handling in order to employ a narrow filter. One way around that is to use a split and listen in cw, with filter, and transmit in usb. That method may also require tweaking the rig BFO for cw. A memory for all of that is then useful. A server that intends to use some kind of scanning will require a computer control connector, such as CI-V or CAT or whatever hamlib will support. Computer control is not necessary for a client at the moment but could be useful for handling the PTT. Soundcard interface A soundcard interface is used to connect the computer to the transceiver. It may in theory be possible to connect straight lines between sound in/out and the microphone connector on the transceiver but that method has so many drawbacks that it is not recommended. A soundcard interface will provide isolation between the pc and the radio, it will normally be attached to the transceiver data connector and that helps keep the receive level correct. Its also much better to have the interface control the keying of the PTT instead of using a VOX. In all, please do consider using a soundcard interface. Antenna This is a favourite subject among radio amateurs and I suppose whatever I write here will be subject to discussion :-). Anyway, an old truth may help: big antennas are good antennas and small antennas are only small. You are more than welcome to discuss antenna choice on the pskmail mailing list, many experienced hams should be ready to help. For a sailing boat a classical antenna is to use an insulated backstay with a tuner mounted close to that wire. Illustration 1: SM0RWO portable setup, from left Yaesu FT-817ND, SB-2000 interface and EEE PC 7 Setting up Fldigi PSKMail needs a modem to work, that modem is Fldigi and setting it up properly is absolutely crucial. General Fldigi setup is best described by the help provided by the Fldigi project. But, there are a few things that need to be taken care of for pskmail. The necessary settings can be found through the menu configure->modems, the tab Mail can be found through the PSK tab. Carrier frequency (Hz) Carrier frequency is the audio frequency you wish to use with your transceiver. Many use 1000 Hz here as that makes frequency calculation easy. For instance if the server uses the assigned frequency 10147 and you enter 1000 Hz then the dial should say 10146 (upper sideband). It is important that the carrier frequency is in the center of your narrow filter. E,g, if the center of your dsp filter in an IC756 is on 1500 Hz, set your carrier frequency to 1500 Hz. AFC range (Hz) Its good to have the client and server stay on the same frequency, the modems will try to find each other by adjusting the frequency (AFC). That is why we limit how far away that AFC will be able to move the frequency. AFC range is the setting to take care of, a 50 Hz limit should be fine for wide modes. Narrow modes such as PSK 63 will require a more narrow setting, say 10 Hz. Reset to Carrier Reset to Carrier kicks in when there is no signal present and forces the audio frequency back to the set carrier frequency, it is recommended to enable that. These settings are only valid when Fldigi is connected to the pskmail client. If Fldigi drifts away from the frequency and seems to ignore what you have entered here then perhaps the connection between the client and the modem was not successful. The initialization will only take place when the client or server connects to the modem (Fldigi). This means you should always start Fldigi prior to starting the pskmail client or server. 8 Please ensure: •That Fldigi is started before the server or client is started. •If Fldigi is restarted for any reason, the server or client must also be restarted. RS ID The next to take care of is RS ID settings, which is very simple. Just uncheck everything in the RS ID frame, illustration of that below: Illustration 2: RS ID settings It is advantageous to disable RSID receive and transmit for modes which pskmail is not using, that makes sure fldigi does not switch to an invalid mode. When Fldigi works you can try to send some pings on one of the server frequencies, if your signal is decoded by a server then you will get a reply. In some configurations Fldigi will not send the last character of a frame (<EOT>. When this is the case you can add some random characters to the frame in the Modem Tab of the Edit>Preferences screen. Once you get answers from a server the preparations are done. You could ask another station on frequency to take a look at the transmitted signal, make sure it is not too wide. The TX audio should just touch the ALC. You are now ready to join the fun. But, you will of course read through the rest of the manual first? 9 User Interface tour The jPSKmail application has an interface with some permanently visible parts and some that are grouped and accessible through tabs. Upon starting the application it will display the main window, a window seen here below. The main tabs and their purpose are: •Terminal, shows the error corrected exchange with other stations. Its not like the modem monitor further down in that only session text is displayed. •Email, where you can send and receive emails. •Files, where you can upload and download files to a server or to another client. •APRS, the center of the APRS action including positions, messages, beacons etc. Many will have that tab page up whenever not connected to a server. •Modem, shows S/N, mode and lots of modem statistics, also includes statistics on what servers can be used. •Igate, shows all relevant information on what beacons have been relayed to the internet. •Rigctl, allows access to the scanner and summoning functions. 10 The main user interface is divided into several sections, the sections have different main purpose and they are as follows: Main menu Buttons for important functions on the selected tab. Tab area, contents depend upon selected tab Grouping tabs Modem monitor area, always visible Application status, outgoing text, Server selector etc. But, before we go into detail about the main user interface we need to dive into configuring and setting up the client. 11 Preferences window User data The first thing to do is to set up your preferences. The preference window can be reached through the menu, choose the “preferences” item and then “edit” The fields on the first tab page needs editing, the fields are: 1. Call Please use capitals for your call, and don't use additions like ZL/ or /M. SSID's (-2, -15) are allowed. Your email settings are stored at the server using the callsign as key. If you wish to check several email accounts then you could tie them to an ssid each, I use no ssid for my primary email account and -2 for gmail. Just type in the first, update the server and repeat the procedure for the next account. 2. Servercall Call of the server or client you want to connect, normally the one you can hear best. There is a list of servers on the pskmail wiki, server operators are requested to keep that list up to date: http://pskmail.wikispaces.com/PSKmailservers The servercall can also be set with the server selector at the bottom of the page. 3. Mode profile The mode profile sets the starting mode of the server at connect time. Mode 0, 'Tx follows Rx', is compatible with older servers. In that case the client mode follows the server mode. Any other mode sets the server to asymmetric operation, both Rx and Tx modes are automatically adapted to optimum throughput for the actual channel conditions. 4. Latitude In decimal degrees.... in case you do not use a gps unit. You may leave this field empty if you intend to use the devices tab to declare how a gps is connected. 5. Longitude In decimal degrees.... in case you do not use a gps unit may leave this field empty if you intend to use the devices tab to declare how a gps is connected. 12 6. Set Beacon minute and server channel The beacon minute runs from 0...4. It is used to make sure you don't tx on top of someone else. Also some servers are scanning several frequencies, and you can choose the channel this way. Beacon minute and server channel A server sysop may want to cover several frequencies, using only one transceiver. By switching between several bands its possible to have both local coverage on 80 meters and DX on higher bands (provided the antenna is capable of that). PSKMail uses a five minute continuous scan loop where servers can monitor one frequency per minute. The beacon minute setting in the client controls what minute to send aprs position beacons, a correct value there is then the minute that the server you want to link to listens to the frequency you are tuned to. The server scans during minute 0-4 and can use one default mode and frequency per minute. The scan loop goes on and on so minute 5 of the hour is minute 0 in the loop and so on. Lets say that the server scans 80,40,30,20 and 17 meters. It listens during one minute on each frequency and all the servers update their scan table on the wiki, that way you can find what frequency and mode the server is on. So, if you would like to try 30 meters then the server in the example is there during minute 2. So, you should set minute 2 and the server name on the client and it will handle beacons etc. on the proper minute. This means its important to sync your pc clock using ntp or manually. There are numerous ways about this, from GPS (GPS time is visible beneath the position on the aprs tab if you are connected to a GPS). At this time jPSKmail will not update the system time, the reason for that is that it requires different user privileges on different operating systems. Choosing the appropriate modes Receiving conditions can be completely different at server and client. Often the server runs more power than the client, and the client's antenna is often too small, badly tuned and in the middle of an electro-magnetic field we usually call 'local qrm'. The latter is typical for camp sites with lots of RV's, or boats in a harbour. That is why PSKmail can use asymmetric link control. providing different modes for uplink and downlink. Link control for both up- and downlink is done by the server. Mode changing is established using RSID, a separate super robust MFSK signal telling the modem at the other end of the link which mode to listen in. Proper reception of RSID signalling is critical to efficient arq operation, and it is the lower limit of what can be achieved on a link. It is important to choose modes which are capable of connecting to the other end of the link. A good choice for the client mode is the default listening mode of the server (PSK500R or PSK250), or MFSK16. Once the connect has been established, the server will take over mode control, and will use the proper modes for up- and downlink channels. 13 Setting operating modes First, set the server mode. This is normally the default mode on the channel, used for beacons etc... When idle, the client will switch back to default mode automatically. Before connecting to a server or client, set the required client mode... You can call a server in any available mode, make sure TXID is set on fldigi.... As soon as the session is established, the other side will control your mode. 14 Email settings Edit->Preferences->Mail options: 1. Pop host The name of your pop server, e.g. pop.myisp.com. If you intend to use a gmail account then enter pop.gmail.com here. 2. Pop User Your POP userid. For gmail it is your full account name (including @gmail.com or @your_domain.com) 3. Pop Password Your POP password 4. Return address When sending emails an smtp server checks whether your return address is valid. This is also necessary for sending one-line emails via APRS. A server which does not have your return address may be unable to send your email. For gmail this is your full account name (including @gmail.com or @your_domain.com). 5. Compressed OTA Check this to enable compressed email handling and web page downloads over the air. Compressed means that emails and web pages are transferred as binary zipped files, this can speed up the transfer by a factor of 2x. 15 Configuration Terminal tab, connected operation (ARQ) Edit->Preferences->configuration 1. Log file 2. Max retries Maximum number of retries in TTY (chat) mode 3. Idle time Max. time (seconds) the client waits for the end of a session when idle (in chat mode only) 4. TX delay Time delay in seconds before the tx starts sending 5. Beacon second You can fine tune the time your beacon is sent by changing this value. 6. Offset minute Deprecated 7. DCD hang time The DCD hang time sets the sensitivity of the rx to noise on the channel. A value of 1..3 is adequate in most cases. A value of 0 effectively switches DCD off. If the value is too high, the delay can interfere with the arq timing of the system. If there is a lot of noise on the channel (random characters received) the client may not be able to send a status packet in time... 16 Devices This tab controls external devices and for the moment that means an external GPS. The GPS is used for updated position beaconing and also GPS time is fetched and shown on the client. 1.GPS is connected If the rxtx libs are installed then this checkbox can be used. Select it to have the client look for, and use, a gps. 2 Use gpsd Gpsd is a gps data server which is only available in Linux. It allows several programs to use the data of the gps unit. Uncheck this if you are running windows. JPSKmail uses the new gpsd protocol, so you must use gpsd version > 2.9.0. 2.Serial port Where is the GPS connected? The client will attempt to fetch the systems serial ports and in the example above the client is running on linux. Other systems will refer to the ports by other names (such as COM1 etc.). 3.Speed Standard NMEA speed is usually 4800 bps but if other speeds are used then just select the correct one here. 17 Modem This tab controls the connection to the modem (Fldigi). In most cases they will coexist on the same computer but its perfectly fine to have them run on separate computers on a local area network. 1.IP Address Where is the modem, if on the same PC then enter localhost or 127.0.0.1, if it is somewhere on the local area network (or on the internet) then enter the IP address of that PC 2.IP Port This is the port that the modem (Fldigi) uses and the one the client will try to connect to. Standard now is port number 7322. 3.Frame preamble Some setups have reported trouble with incomplete frames being transmitted. If the start of the frame is missing then its possible to add extra characters to transmit before the start of the frame. In most cases this will be empty. 4.Frame postamble Works kind of like preamble, only after the frame. The characters in this field will be sent after the frame. 18 Main user interface, tabs Terminal tab, connected operation (ARQ) With the terminal tab you can start a connected session with the server. 1. Choose the server call on the server drop-down list (you can make this one permanent by hitting OK in the preferences dialog). 1. Hit the Connect Button 2. Wait until server acks and starts the session. The Connect Status will change from "Listening" to "SERVERCALL", and the small colored indicator on the bottom right will turn green... PSKmail uses a 3-way handshake for connect, you know for sure the connect was successful when you receive the 'greeting message' from the server. 3. You can now issue any command the server will recognize . The most important functions can be reached with a button or via the menu. 19 4. To end the session hit the QUIT button (same as Connect). 5. If the server does not receive this command, you can abort the session by hitting the Abort button. It is courteous to wait for the QUIT to disconnect, in that case the server will not send polls until it times out... With the abort button you can close a connection one-sided. The client sends an abort frame to the server. If the server does not notice that, it will continue polling until it times out. It is not regarded very courteous to do this. With the Pos. button you can manually send an APRS Posit packet. Any server receiving it will send a QSL packet. You do not have to be connected for this. Terminal tab, chat mode (ARQ) To use the chat (client to client) mode, just put the callsign of the station you want to call into the server selector and hit the connect button. Since jPSKmail 0.8.5 automatic mode control is implemented. 20 For File upload go to the Files Tab, and hit the Upload button. After choosing a file to upload, the client will ask you what the addressee for the file is. JPSKmail is being prepared for Delay Tolerant Networking in future... Composing an email There are two basic ways to create and transmit emails from jPSKmail: •Proper emails with custom subject and possibly an attachment •Very short emails, called pskaprs emails, with fixed subject and no attachment 21 Preparing an email The email editor can be reached from the main menu File->New and the New button on the Email tab. The email editor is rather simple, there are fields for address, subject and message content. •To Enter the addressee email address here. Multiple recipients can be entered, its important to then separate them with a comma like: “[email protected], [email protected]” •Subject This way of creating an email allows entering a subject, keeping it somewhat short is good •Message body The message text, the actual content of the message •Add attachment If you wish to add an attachment then browse for it after clicking this button. The attachment will be compressed and packed into the message so please bear in mind that it needs to be small. I would not add attachments bigger than a few kb. 22 PSKaprs emails This is a way to transmit a short text with a fixed subject to one email address. Its done in unconnected mode and a server that receives it will transmit an acknowledge packet. This email is sent in unconnected mode so keeping the text short helps it get through to a server. Actually, the APRS system limits messages to 167 characters. Receiving email Received emails are added to a file called 'Inbox'. This file is in mbox format, so you can use it as a spool file for mail clients like Sylpheed or Thunderbird. That way the mail you receive via PSKmail can be integrated with your regular mail. To read your mail using jPSKmail, • Connect to the server • Go to the email tab • Hit the QTC button, your headers will be added to the list. • When you want to download a mail, double click on the header,it will be added to the Inbox. • When you want to read a mail, go to the Inbox tab and double click on the header. 23 Mail headers tab This tab will display the message list fetched from your email account while connected to a pskmail server. You can choose a mail for download by double clicking on the header. One mail at the time. Mail tab buttons The New button starts a dialog which allows composition of a new email. It is possible to add a small attachment (~6k) The QTC button requests the new mail headers from your email account. It first reads the headers file to see what the last header is that was downloaded. It will request only the new headers. You can override that behaviour by either cleaning the headers file (File->Clear->headers), or send 24 ~QTC To the server. The Read button allows you to request a particular email for reading. Enter the number of the email (see Mail headers tab) into the input field and click the read button. As soon as the download starts the progress bar will start indicating: The progress bar goes to zero as soon as it reaches 100%. As from version 0.4.2 you can double click the header in the mail headers screen, which will choose the right mail and send it to the Inbox.. The Send button starts the upload of the first email in the Outbox. As soon as "message sent..." has been received from the server the email will be deleted from the Outbox. It is still available in the 'Sent' file. With the Delete button you can delete mails from your mailbox at the ISP. Enter the numbers of the mails to be deleted in the input field. You can enter more than 1 number, separated by spaces. The server will answer with "Mails x x deleted..." in case of success. The numbers reflect the numbering in your mailbox. After a delete mail operation you should clear your headers list and rebuild it so the list reflects the numbers in the mailbox. 25 Files tab (connected mode) To download a single file from the server, first enter the file name into the input field, or double click a file name in the 'files list', and push the download button. 26 File download is binary, compressed with gzip and base64 coded. The client decodes and unzips it and puts it into the Downloads directory. After download the file can be READ, or UPDATED. There is a file chooser dialog to make that easy. 27 APRS tab, Unconnected Operation Unconnected operation (like UI frames in packet radio) is done from the APRS screen. From this screen you can organize position beacons, send aprs messages to other pskmail stations, to VHF units, or to the internet (Uiview, Xastir), or send APRS short emails to any email address. You do this via a PSKmail server which is a gateway to the internet. Servers are interconnected through the APRS Internet backbone (APRS-IS). You can set the server you want to use on the servers drop list, at the bottom line of the screen. On program start the server is loaded from the configuration file. Your pskmail client will automatically add more servers to the drop down list as QSL's of beacons and messages are received. To be able to receive messages via a server it is necessary to be in its link table. The server link table makes sure messages are sent by only one server at the time. To get an entry into the link table you can manually send a link request (ctrl-l) to the server. The server will acknowledge the request and enter your call into its link table. This can also be done automatically. The client checks if the last link equals the preferred server and will send a new link request if necessary. Auto-linking can be switched off on the APRS tab. On the APRS tab you can set the aprs beacon icon, the beacon period and the status message. Beacon minute (0...4) can be set on the bottom of the screen, the beacon second on the Preferences->Edit->configuration tab. It Is common practice to set the aprs beacon time to 30 minutes or 60 minutes for non-moving objects. To send a position beacon manually you can use ctrl-b or the Pos button on the Terminal tab. 28 To send an APRS text message just enter “CALLSIGN Texttexttext” into the text input field at the bottom of the screen. Use upper case for the callsign. If the callsign is known at a VHF aprs digipeater it will be delivered to VHF. To send a short email enter “[email protected] Texttexttext” into the text input field. Bottom part of the client Status Indicators There are 2 status indicators, the channel indicator and the link status indicator. The left hand one is the channel indicator. Colors mean: Grey Idle, no data Yellow Data, not valid Blue Data block in progress Red Transmitting data The right hand indicator shows link status. The colors mean: •Green: no errors on the link •Yellow: rx error •Blue: tx error •Red: rx + tx errors 29 Modem tab This tab shows some interesting facts about the current modem status. For instance it shows both the receive and transmit datamode, this can differ during a connected session thanks to the asymmetric linkup capability. S/N-value get fed back immediately and this is can/will also used to rank heard servers. Rx CPM shows the receive speed (Characters Per Minute). The maximum possible speed has been measured as 1862 charcters/minute (PSK500-PSK500). 30 Igate Tab The Igate can be activated on the Igate tab. When it is on, it will connect to an APRS Tier2 server. All beacons and messages received by the Igate will be sent to the APRS=IS backbone. Rig control tab Rig control can be switched on via the Preferences->Edit.>Rig options dialog. 31 The scanning function can be switched on separately. You can also enter the default frequencies for the scanner. These should be entered as the center frequencies of the channel, as the scanner will use the Offset to calculate the VFO dial frequency. It is possible to store the frequency tables of known servers in the ~/.pskmail directory. The files are called SERVERCALL.chn, and contain a comma-separated list of frequencies (in Hz). Example for PI4TUE.chn: 29250000,10147000,10147000,10147000,18106000 Whenever CAT control is activated on Fldigi, the transceiver can be controlled from the rigctl tab. SERVERCALL will follow the server.frequency table The Set button will this into Rx Current , which is the CAT frequency in fldigi. Rx Current can be incremented and decremented with the '+' and '-' buttons. The transceiver will follow. The SUMMON button is special: If the RX Current and SERVERCALL frequencies are different, the summon button will: • Issue a Connect Request on the SERVERCALL frequency • Listen for the acknowledge on the Rx Current frequency. This tells the server to come to your Rx Current frequency to handle the traffic. Of course this only works if the server is configured to support summoning... 32 Main menu The main menu is divided into these main sections: •File General operations like creating a new email, clearing lists and closing the app. •Mode Controls the main mode of the client and the modem mode including mode profiles for adaptive speed during connected sessions •Preferences The way to edit or save the preferences dialog •Mbox The way to handle local messages on a server during connected session •Info Commands to send to a server during a connected session •Twitter Send and get status updates •Link Here is where we handle the link to servers •Map Not currently used. An integrated map that displays aprs data has been evaluated and an even better one will be worked on later. •Help Opens the interactive help which will be created from this manual and also displays license information about the application. File Handles general operations like creating a new email, clearing lists and closing the app. •New •Open and save draft •Clear mail queue 33 •Clear headers •Clear bulletins •Quit Mode Controls the main mode of the client and the modem mode including mode profiles for adaptive speed during connected sessions. For a description see Appendix A Preferences The way to find the preferences dialog Mbox The way to handle local messages on a server during a connected session By local messages we mean messages addressed to user@server. These messages are stored locally only, not forwarded to other pskmail servers (now). Info Commands to send to a server during a connected session Twitter Send and get status updates for the pskmail channel. These updates will be sent to the pskmail user so follow that to get the news. 34 Link Here is where to handle the link to servers: •Ping Send a ping frame on frequency •Link Send a link request to the server •Update Update server with your mail data record •Telnet Start the telnet agent Illustration 3: Telnet connection dialogue Help Opens the interactive help which will be created from this manual and also displays license information about the application. 35 Appendix A, Mode selection This table tries to gather data about the datamodes that are usable with pskmail. Its important to note that this is an attempt and a work in progress, test results and data that can be used to enhance this table is most welcome! Anyway, a few facts and conclusions can be drawn from this table: –The fastest mode is PSK500, live tests have shown speeds of 1862 char/min with arq –The fastest mode for US hams on HF is PSK250 –The slowest mode here is THOR 8 at 28 wpm –The most narrow mode is PSK63, 63 Hz wide Mode PSK63 PSK125 PSK250 PSK500 PSKR125 PSKR250 PSKR500 MFSK16 MFSK32 Choice (1-3) for Baud Speed wpm Speed wpm Speed* Bandw. SNR Weak High Flutter, rate capital letters small letters bps (hz) at least NVIS signals Speed fading 63 74 102 88 63 -2 3 3 3 3 125 148 204 176 125 -1 3 3 3 3 250 296 408 352 250 -1 3 3 2 3 500 592 816 704 500 2 3 3 1 3 125 250 500 15,6 31,25 74 148 296 102 204 408 88 176 352 125 250 500 -8 -5 -3 2 2 2 2 2 3 3 2 1 2 3 3 58 120 58 120 58 120 316 630 -8 -6 1 1 1 1 3 2 1 1 Dominoex 11 Dominoex 16 Dominoex 22 10.8 15.6 21.5 70 100 140 70 100 140 70 100 140 262 355 524 -7 -6 -5 3 3 3 2 2 2 3 3 2 3 3 3 THOR8 THOR11 THOR16 THOR22 7.8 10.7 15.6 21.5 28 40 58 78 28 40 58 78 28 40 58 78 346 262 355 524 -6 -5 1 1 1 1 1 X X X 3 3 3 2 2 2 2 2 Description and use Vy narrow bt also vy slow Better Good all round mode Very fast, best 4 good condx Best allround mode? fldigi implementation flawed? fldigi implementation flawed? fldigi implementation flawed? * Speed is an attempt. Varicode and different ways to measure makes this difficult ** SNR is whatever I could find, most at 3 Khz bandwidth.. You may notice that certain popular modes are missing from this table. Two of the missing modes are Olivia and MT63. Olivia is not usable with pskmail as it doesn't support the full 8-bit character set, that means the <SOH> frame start and <EOT> frame end cannot be transferred. Mode tables for adaptive asymmetric link control As from jPSKmail version 0.5, separate adaptive mode control for up- and downlink modes is automatic. To accomplish this a number of changes to server and client were necessary. John, VK2ETA has played an important role herein. Based on empirical data, two mode tables were put into the server, one for use by US hams and one for the rest of the world. This was necessary because the FCC will not allow symbol rates > 300 Bd. And PSK500 and PSK500R use 500 Bd. Both tables incorporate the most popular modes, covering a large range of speeds, sensitivities and robustness (qrm, doppler, multipath). 36 Table A: PSK500 – PSK500R – PSK250R – MFSK32 – THOR22 – MFSK16 – THOR8 Table B (US and Intermar): PSK250 – PSK250R – PSK125R – MFSK32 – THOR22 – MFSK16 – THOR8 The modes in these tables run from fast to slow, and become more robust and sensitive from right to left. The server knows the S/N ratio and the download success rate in the client, and chooses the modes which allow the best throughput for the present channel conditions. Initial tx and rx modes are set on the client prior to issuing a connect frame. This is (still) under operator control. Before sending a frame the server decides if a mode change is possible (up) or necessary (down) based on the S/N ratios of both links and arq success history. In that case the server switches one position up or down in the table. APRS Mode choice For the APRS functions the best mode is normally the default channel mode. In Europe there are two nets. One on 10147 kHz listening in PSK500R mode, and one on 10148 kHz listening in PSK250 mode. US servers will also use PSK250. In case a station does not come through in the default mode it is possible to use a lower speed mode with RSID on. TX RSID can be switched on manually in fldigi. On receipt of a QSL from a server the client's TXID will automatically be switched off again. This to prevent mode chaos on the frequency... 37 Appendix B: PSKmail ARQ protocol specification (2nd draft) Introduction PSKmail is an ARQ data transmission system. It has been optimized for use on short wave (HF) radio frequencies. PSKmail has a client/server architecture. The servers are gateways to diverse services on the internet. The clients enable mobile or portable radio stations to access the internet where there is no other coverage. To use PSKmail, one uses a short wave radio and a PC with a sound card, and often a hardware interface between the radio and the PC. The communications protocol has been optimized for the specific conditions on short wave: ● Varying propagation conditions on short wave, with multi-path, doppler effects, and often weak signals near the noise floor. ● Often the mobile stations run low power and compromise antennas. ● As ham radio uses shared frequencies, interference levels are high. To cater for this wide range of conditions, PSKmail does not use a single digital radio mode. Instead it uses a range of modes with separate adaptive control on up- and download channels. The maximum bandwidth of the HF system is 500 Hz, and speeds range from 44 CPS for ideal channels down to 2 CPS for the most problematic ones. For clean (single hop) channels PSK modes are used, for fuzzy channels MFSK modes are employed, including convolutional coding, Viterbi decoders, and interleavers to counteract static noise... Radio interface The radio is always used in USB mode, as several of the modes used are polarized. THOR modes, e.g., are derived from DominoEx. Often a hardware interface is needed between modem and radio, to provide galvanic isolation for audio signals and PTT signal. The protocol timing also allows the use of VOX. Modem interface PSKmail uses Fldigi (>= 3.20) as a modem, which is a multi-mode digital modem program using the computer sound card. PSKmail uses ASCII characters 0x01 (<SOH>, 0x04 <EOT>, 0x06 <ACK>, 0x12 <DC2> and printable ASCII characters 32 ... 127 to talk to the modem. The system uses RSID signaling to notify the link layer protocol engine of mode changes, and also makes signal/noise ratio data available to the application. PTT signaling is generated by Fldigi. The modem program is available for all operating systems. 38 Link layer protocol The PSKmail system uses a master/slave protocol. The server is the master, the client is the slave. In case two clients connect each other for a TTY (chat) session, the caller is the slave. All control functions are in the master, which makes timing a lot easier than in the first PSKmail implementations, where client and server would compete until they were transmitting synchronously on top of each other. Status diagram Protocol details All transactions between server and client are packed in frames. Every frame consists of maximum 10 blocks, viz. 0 ... 8 data blocks, 1 status block, and 1 optional identification block (at start of session and every 10 minutes thereafter). Frame structure: 39 <SOH>[<ident block>]<data block>... <data block><status block><EOT> All blocks have the same structure. They contain a header, a data partition, and a CRC16 number. The start of a block is marked with a <SOH> (ASCII 0x01) character. A status block ends with a <EOT> (ASCII 0x04) character. The data partition can be 0 ... 64 characters long. Block structure: <SOH><header><data><CRC> or <SOH><header><data><CRC><EOT> (status block) The header consists of 3 characters. The meaning of these characters is different for master (server) and slave (client), and also depending on block type. For the client header: Block type Character 1 Character 2 Character 3 Status Rx s/n [0x20 - 0x7A] Session [0x20 - 0x5F] s Data 0 Session [0x20 - 0x5F] Blocknr. [0x20 - 0x5F] Connect Protocol version [0,1] 0 c Summon 0Protocol version [0,1] 0 n Abort 0 Session [0x20 - 0x5F] a Ident 0 Session [0x20 - 0x5F] i For the server header: Block type Character 1 Character 2 Character 3 Status Next Txmode [0 -8] Session [0x20 - 0x5F] s Data 0 Session [0x20 - 0x5F] Blocknr. [0x20 - 0x5F] Connect ack Protocol version [0,1] Session [0x20 - 0x5F] k Disconnect 0 Session [0x20 - 0x5F] d Ident 0 Session [0x20 - 0x5F] i Some blocks have a fixed data field: Block type Data partition Connect PI4TUE:24 PA0R:1024 x (x = 0 – 8, initial server TX mode) Connect ack PA0R:1024 PI4TUE:24 x (x = block data length) Summon PI4TUE:24 PA0R:1024 10146000 x ( x= 0 – 8, initial server TX mode) Ident PA0R de PI4TUE 40 ARQ control and repeats The receive buffer is a circular buffer with room for 64 blocks. The status block data field carries the status of the receive buffer: Char 1 Char 2 Char 3 Chars 4-12 Last block sent this frame Buffer o.k. until/incl. block x Last good block received Missing blocks [0x20 - 0x5F] [0x20 - 0x5F] [0x20 - 0x5F] 0 -8 x [0x20 - 0x5F] Missing blocks are repeated by adding them to the next frame. Adaptive mode control The server controls both its own digital mode and that of the client. The mode table covers a broad range of speeds and modes: PSK500 PSK500R PSK250R MFSK32 THOR22 MFSK16 THOR8 For use in USA , where Baud rates over 300 Baud are not allowed on ham radio frequencies below 30 MHz, an alternative mode table is available: PSK250 PSK250R PSK125R MFSK32 THOR22 MFSK16 THOR8 Both client and server measure S/N ratio of the frame received, and the client sends its SNR data to the server in every status block. The server signals mode changes to the client via RSID and through a flag in its status block header. If a status block is not received, a poll frame is sent, which is just an empty frame without data blocks. TX and RX modes are controlled in such a way that the number of ARQ repeats are limited, providing optimum throughput for the relative channel. The server uses RSID on receive, so the client can connect in any of the available modes. Default listening mode is PSK500R, but the server can scan more sensitive modes for DX if necessary. Compression techniques The PSKmail server uses gzip to compress web pages, emails and binary files. This zipped image is then Base64 coded for transmission with the ASCII127 character set. Coding and decoding are automatic. 41 Unproto (non-ARQ) operation There are 3 PSKmail functions which use unproto frames. These functions are: ● Ping ● Link to server ● APRS Beaconing and Messaging Like ARQ frames, unproto frames consist of a header,a data field and a CRC. When the client sends a ping frame, all servers answer with a ping reply frame. Ping frame <SOH>00uPA0R:7 ABCD<EOT> Ping reply frame <SOH>PI4TUE:71 BCDA<EOT> Every PSKmail server has a link table containing client calls. A client can only be in the link table of 1 server. This function is used when the server sends an APRS message to a specific client. This way, the message is only sent by one server. The client sends a link request to a specific server, and on receipt of the request the server acknowledges the request: Link request <SOH>00uPA0R><PI4TUE ABCD<EOT> Link acknowledge <SOH>00uPA0R<>PI4TUE ABCD<EOT> The server and the client can send a beacon on HF, containing its APRS position and a status message: Server beacon: <SOH>00uIS0GRB-3:72 Pskmail_Server_0.9.34-10147.0KHz -DD6E<EOT> Client beacon <SOH>00uIK2YXT:26 !4507.95N/01044.65E-I1B80<EOT> When the server hears a client beacon or an APRS message, it confirms reception with a short QSL message: QSL message <SOH>QSL PA0R de PI4TUE 555F<EOT> An APRS message has the same format as the client beacon, an APRS email starts with an [email protected] . APRS message <SOH>00uDJ0LN:26 PA0R This is the APRS message 1B80<EOT> APRS email <SOH>00uDJ0LN:26 [email protected] This is the email message 2A97<EOT> 42 RSID signaling RSID (Reed Solomon Identification) is used for mode change signaling. Thereby the following rules are applied: TX RSID RX RSID Client Idle (APRS) OFF OFF (manual switch ON) Client receives acknowledge OFF OFF Client connect request ON ON Client data transfer OFF ON Server Idle (APRS) OFF ON Server sends acknowledge ON ON Server data transfer OFF OFF Server changes mode ON OFF References MFSK modes http://www.qsl.net/zl1bpu/MFSK/ PSK modes http://aintel.bi.ehu.es/psk31.html Fldigi descriptions http://www.w1hkj.com/FldigiHelp-3.12/Modes/psk.htm http://www.w1hkj.com/FldigiHelp-3.12/Modes/mfsk.htm http://www.w1hkj.com/FldigiHelp-3.12/Modes/thor.htm Fldigi http://www.w1hkj.com/beginners.html PSKmail: http://www.pskmail.com Mailing list: http://www.freelists.org/archive/pskmail REV.2 Authored by: Rein Couperus, PA0R, 28-02-2010 43