1
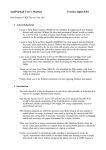
AndFlmsg User's Manual
For Version 1.2.0
Flmsg with integrated Fldigi modems for Android
John Douyere (VK2ETA) on 6th of September 2015
Page 1
•
Introduction
The main objective of this development is to provide a low power highly-portable, as in
mobile or backpack, Flmsg/Fldigi solution.
Rigs like the Yaesu's FT-817, Icom's 703 and Elecraft's KX3 would be the typical
companions of the Android phone or tablet running AndFlmsg, thereby providing a low
weight, low energy requirement, access to most Flmsg services.
The integration of Internet sharing/forwarding makes this solution attractive as a relay
option, possibly a mobile or portable station in a pertinent geographical location.
The inclusion of modes like MT-63 and long interleave MFSK modes allows audio coupling
to be used effectively without the need for an audio interface.
The addition of images and GPS data inclusion opens the usage to practical field reporting
too.
In a more developed configuration, for example with a 10” tablet connected to a Bluetooth
or USB keyboard plus mouse, and maybe also with an audio interface, the operation we
get, including data input, nears the performance and practicality of a laptop
configuration but without the power consumption and cost of the later.
Also, the data entry forms can be re-modeled independently of the display forms in order to
match the screen real-estate of the target devices.
•
What does it do?
Basically most of what the fully featured version on the PC does.
- Receive Flmsg formatted messages (any Form).
- Forward any form message as-is over the radio in Flmsg format OR over the internet via
email, instant messaging (Facebook, Tweeter, ...) or cloud services (Dropbox, Google
drive...), print services (E.g. Google Cloud Print).
- Copy and edit received messages for replying or further forwarding (all custom forms plus
the following “hard coded forms”: Blank form, Radiogram, IARU message, Plaintext,
CSV, all ICS and HICS forms at present, plus the “Picture Form”).
- Create new messages using any custom forms or the current set of "hard coded” forms.
- Send created messages over the radio or internet.
- Define and save templates for facilitating the creation of new messages.
- Consult the activity log and the messages as-sent.
- The implemented modems are the FLMSG modems (including extra modes), that is all
PSK/PSKR modes, including multi-carrier modes, some of the 8PSK modes, THOR,
MFSK, OLIVIA, MT-63 and Domino-Ex modes.
Page 2
•
Installation
Download the AndFlmsg apk file from the website at:
http://www.w1hkj.com/vk2eta/
And save it to the SD card, either from within the phone or on a PC to which the Android
device is connected to and has the USB driver installed for that device to allow access to
the SD card content from the PC.
From there use a file explorer to install the .apk file.
You have to allow non-Android market application to be installed for this to work.
This is found under Settings / Security / Unknown Sources OR Setting / Applications /
Unknown Sources, for older versions of Android.
You will be asked to accept a series of permissions that are explained below:
a. Your location: to provide GPS location for Picture forms or provide accurate time when
out of cellular range (available but not displayed yet).
b. Storage: Read and write to the SD card. For storing and accessing the working files under
the "NBEMS.files" directory.
c. Your Personnal Information (log data): to allow reporting of the context of an error in
case of an application crash (the user can decide to send or not the information after
reviewing it).
d. Network Communication as in Bluetooth and Full Internet access: to allow connection to
the Bluetooth handsfree kits or headsets used as audio interfaces AND to share / Forward
messages over the internet.
e. Phone calls (as in reading phone status): to disconnect the Bluetooth interface when
AndFlmsg's audio is running through the Bluetooth interface AND a phone call comes in.
This is to prevent the call's audio from going to the radio.
f. Hardware controls (audio settings and recording): required for receiving and transmitting
sound.
g. Bluetooth administration: to redirect the sound via a Bluetooth interface.
In your applications list you should now have an Flmsg logo called AndFlmsg.
Page 3
•
Usage
I have tried to maintain a similar philosophy of operation with the PC version. The key
difference is the organization by folders like an e-mail system.
One other difference with a PC environment is the fact that the sound devices cannot
be shared between applications. Therefore if AndFlmsg is running and the modem
is active (which is the default when the application starts), the microphone will not
be available for other applications like Skype and others.
The microphone (or Bluetooth interface if selected) will be released on either toggling
of the modem OFF (in the Modem screen) OR when the application is explicitly exited
from the menu.
If the application is just sent in the background by calling another application, the
modem will keep running and will still keep the microphone input for itself.
A notification Icon now appears in the top or bottom system status bar to remind the user
when the modem of the application is ON. Clicking on the notification brings the
AndFlmsg application back to the foreground. This is only available on devices with
Android version 3.0 and above.
When you launch the AndFlmsg application you are presented with the Terminal screen
which displays key functional messages and errors.
The other screens available are:
• Message screen, where the content of the folders inbox, compose, templates, drafts,
outbox, sent and logs are displayed.
• Modem screen, where all the received and transmitted characters are shown and
where the modem can be turned ON and OFF to conserve batteries. The squelch is also
adjusted there and the waterfall is accessible from that screen. RSID Tx and Rx are
enabled/disabled here and the modes are cycled through their list.
Movement between these screens is done by a “swipe” movement on the screen either
towards the left or the right.
The menu is called by pressing the “Menu” button on the device (phones typically) or the
“three vertical dots” screen button on tablets and later devices.
From the menu we access the exit function, the user's preferences and the switching of the
audio Bluetooth interface on/off.
There is automatic bug reporting, but with user's control: in case of a program error causing
a “Forced close” the user is presented with the option to email the stack trace (where the
fault occurred) and a very brief history of the event log prior to the crash. The user can
review the email and decide to sent it if happy with the content.
Page 4
Screens description
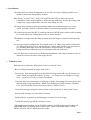
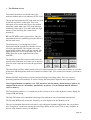
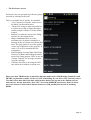
1. Terminal Screen
Note the small yellow “FLDIGI” icon in the
notification area at the top of the screen to
remind the user that the modem is running.
Pulling down the notifications and clicking on
the FLDIGI notification brings the application
back to the foreground. Only on Android
version 3.0 and above.
At the top of the application window, the
status line shows the session's status:
“Listening”, “Transmitting” and “Modem
OFF”.
In the title bar we also display the current
Rx/Tx mode and the RX / TX status (Light
Blue = RX, Yellow = TX, White = Modem
OFF).
Below is the time, displayed as MM:SS.
This is used when working for long periods
outside of cellular network coverage as the
clocks on these devices tend to drift quite a lot
if not resynchronised regularly.
The colour yellow indicates that only the
internal clock of the device is used to calculate
the current time.
If you select “Use GPS Time” in the preferences AND the GPS is active (see device “Location”
settings), then the time's colour will turn green when the GPS time is used instead. This is a very
accurate time.
The received text can be scrolled up and down.
The received text can be selected for copy and paste in another application like a text editor. Just “Long
Press” on the text to bring the select/copy dialogue on the screen. This is only available on devices with
Android version 3.0 and above.
The single line field and the “Send Text” button are for sending short unformatted messages over the
radio. Since this is not a “ragchew” or contesting PSK31 application it does not have macros and other
QSO logging facilities.
When messages are being received, the details appear in the terminal, including the latest received
message and if they were received correctly or not.
Page 5
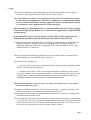
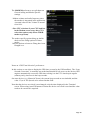
If the checksum of a received message is wrong,
the received text will be displayed here. The text
received will be saved in the message named
“Last_Bad_CrC_Rx”.
Example on the right:
Page 6
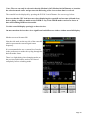
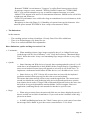
2. Message Screen
The buttons Inbox, Compose, Templates,
Drafts, Outbox, Sent and Logs cycle the view
between their respective folders.
Shown here is the Inbox view which lists all
received messages. The list is can be scrolled
up and down.
To select an entry, long-press on the message.
Once selected, the message is displayed,
together with the actions available for that
message (see screen copy below).
Page 7
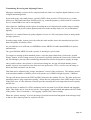
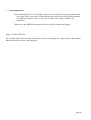
4. Inbox View, message display and associated actions:
Buttons behavior is as follow:
•
•
•
•
•
•
View as Html, Html delivery and plan text. If the
required form is not available, the raw message
will be displayed and a warning issued.
Share/Forward is for sending the message over
the internet using the Android Share facility. This
means any installed application that can handle
the “sharing” will be proposed for the action.
This includes email client, cloud services, instant
messaging and file transfer facilities.
Copy to Drafts is typically used when a message
needs editing before being sent or forwarded. The
file name becomes “Copy_of_” then the old file
name.
Copy to Outbox is for direct forwarding without
changes. The file name is preserved as received.
Delete will popup a verification window.
Return is the same as pressing the hardware
return button twice and reverts to the message
list.
Page 8
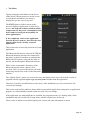
5. Compose View
To Create a new Message using a listed form, long-press on the desired form. A new blank message
will be created and will automatically display.
The “Save” buttons are located at the bottom of the form and include saving to Outbox, ready for
sending, saving to Drafts for further editing and saving as as Template (in the Flmsg sense). See screen
copy below left.
Date and time, or date/time combined fields with auto-fill buttons will use the preferences options to
format the time and date (screen copy below-right).
The file name is currently fixed as defined in the preferences options. When saving a message as a
Template, a file name dialogue will be proposed for choosing a meaningful file name. In this case the
extension is not mandatory (E.g. the Template name can be “Ics-213_for_Net123”).
Page 9
Example of Radiogram below-right: form specific popups are triggered by the the buttons HX and ARL
MSG. The Check button will reformat the message and update the check field.
6. The Template View is identical to the Compose view except that saved Templates files will be
displayed instead of blank forms.
7. The Drafts View is again similar to the Compose View with the addition of a Delete button if the
draft needs to be discarded.
Page 10
8. Outbox View
Note that in the main Message Screen, the “Send
All Messages” button is only enabled when the
Outbox list of messages is shown.
This will queue all messages in the Outbox using
the current mode. If TxRSID is enabled, it will be
sent before each message. The Status line at the top
of the screen will display the progress of the Txing
process.
When selecting a specific message, the message is
displayed and the following actions are
available: “Send Over Radio” sends only that
message, “Share Over Internet” performs as
described before, Prev and Next Mode cycles
through the list of modes and, if available for that
mode, will display the calculated TX time for the
message based on the message content and the
compression settings.
When a message is sent, it will automatically be
moved to the Sent folder, UNLESS the STOP TX
button in the Modem Screen was pressed before
the end of transmission.
In that later case it is assumed that the transmission
did not take place entirely and therefore the
message is kept in the Outbox.
When the message is sent, the Outbox list is refreshed if it is the currently displayed screen.
Page 11
•
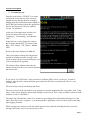
The Modem Screen
To monitor the data received and sent by the
software modem and see an indicator of CPU load.
The top bar represents the CPU load with zero load
on the left and 100% on the right. This is an
indication of how much time reserve the modem
thread has, rather than a true CPU load indicator.
Consistent values above 70 to 80% indicates high
chances of not decoding the current mode
accurately.
RX and TX RSID can be selected here. They are
remembered between AndFlmsg sessions and so is
the last mode used.
The bottom bar (2 overlaying bars in fact)
represents both the squelch level and the current
received signal quality. The brighter one is the
signal quality and the darker one the squelch. The
signal quality moves in a comparable way to the
Fldigi green bar on the right hand side of the
waterfall.
The squelch up and down increases/decreases the
squelch value and stores it for later use so that it is
set to the same value the next time the application
starts.
The Next Mode and Prev Mode buttons will cycle either through your custom list of modes as set in the
preferences OR through the whole list of modes available if the “Use custom list of modes” preferences
is not set.
Modem ON/OFF stops/restarts reception and processing of incoming audio. This is to conserve
processing and therefore batteries as well as freeing the microphone input for other applications.
Note: Digital Modem reception is very CPU intensive and the battery drain increases quite a lot
compared with a device in standby, particularly on phones. Use the Modem On/Off button to
conserve battery.
The Tune button produces a 3 seconds tune at the current set level of the modem's volume. Handy for
testing SWR and tuning.
The Stop TX button is for immediate silencing of the modem in case of unwanted transmission.
The decoded RSID mode and center frequency are also displayed in the Modem screen.
The received modem data can be selected for copy and paste in another application like a text editor.
Just “Long Press” on the text to bring the select/copy dialog on the screen. This is only available on
devices with Android version 3.0 and above.
Page 12
Note: The text can only be selected when the Modem is Off (Modem On/Off Button) as it makes
the selection much easier and prevents the flickering of the screen when data is received.
The waterfall can be displayed by pressing the W.FALL on/off button. See screen copy below.
Be aware that the CPU load increases when displaying the waterfall and on some (old and slow)
devices doing so while on multi-carrier PSKR or any of the THOR modes can lead to losses of
data AND making RSID not detectable.
Use this waterfall display sparingly on these devices.
On most modern devices there is no significant load difference with or without waterfall display.
Modem screen with waterfall:
Note the tick mark on the top side of the waterfall
which represents the current signal centre
frequency.
It is recommended to use a custom list of modes
in the preferences to make the cycling through the
desired modes faster.
There is a slight delay when changing modes as
the previous audio buffer needs to be cleared
completely before switching mode.
Page 13
Transmitting, Receiving and Adjusting Pictures
Messages containing a picture can be composed and sent either in a complete digital fashion or a mix
of digital and analog modes.
In practical terms, only small pictures, typically JPEG colour pictures of 50x50 pixels (e.g. avatar
pictures) or PNG black and white 200x50 pixels (e.g. scanned signatures), which result in a saved file
size of around 2kB or less can be sent digitally.
Above that size AndFlmsg has the option of sending the text in digital mode and the image in analog
mode. The received picture is then digitized and saved in the message body as if it was transmitted
digitally.
Therefore it is a tradeoff between quality (digital of course is 100%) and speed (faster in analog mode
for larger pictures).
In analog image mode, in most cases, the wider the mode and the slower the transmission speed, the
better the quality of transfer will be.
So, provided the s/n is sufficient, use MFSK64 or better MFSK128 rather than MFSK16 for picture
transmissions.
On a good FM link, MFSK128 with a speed a 4x should give good results.
To compose a message with an attached picture, select the picture.html form, click on the “Attach
Picture” button. A list of image sources is presented. It typically includes the Camera, the Gallery and
any File Manager, plus any other installed app that advertize itself as being able to supply an image.
Once you have taken a new picture or selected an existing one, the app will check that the picture
number of pixels is not superior to the limit set in the preferences. If it is, it will re-size the image to
below that limit and insert it in the form.
That limit can be adjusted in the “Image Attachment” section of the preferences. The number entered
is the maximum number of MEGA pixels of the picture (as in Width x Height in pixels / 1Million).
The app will choose between the JPEG and PNG format for the smallest file size. The other preference
parameter named “Jpeg compression quality” affects the size (and quality) of the JPEG images, but not
of the PNG ones. A value between 60 and 80 provides normally the best compromise between quality
and file size.
Once the image is attached, it's GPS coordinates can be extracted to pre-fill the latitude and longitude
fields. This works only if your device has the “Geo-tagging” option enabled and updates the Exif fields
of the picture. There is normally a “Geo-tagging” option in the Camera setting.
When the “picture message” if saved, the image is base64 encoded and integrated in the message body
so that it can be shared, printed or copied as one file.
Page 14
To Tx the message, proceed as usual from the Outbox
folder.
Extra buttons are shown to adjust the mode and the method
of sending the picture.
The “Image Mode” button cycles through “Digital”,
“MFSK16” to “MFSK128”.
The “Speed/Color” button cycles through a combination of
Color and Grey-scale and the different speeds of
transmission.
Note that at that moment only speeds x1 to x4 are
compatible with Fldigi MFSK image mode. X8 speed is
only available between Android devices and requires fast
devices. If the CPU is not fast enough for the x8 speed, the
received picture will be torn horizontally.
On the Rx side, the picture receiving pop-up window shows
the progressive reception of the image.
When the reception is completed three extra buttons will be
enabled to allow for the correction of the image if it is
slanted.
As illustrated in the picture on the right, the image is slanted
due to a difference in the clocks of the Tx and Rx devices
soundcards (visible as the left hand side triangle of pixels
which belong to the right hand side of the picture). A small
difference of 100PPMs is sufficient to create a visibly
skewed picture.
Use the Slant Left and Right buttons repetitively to adjust the
picture as shown here, then press the Save Again button to
save the corrected picture.
Page 15
•
The Menu
Upon pressing the menu button on the device
(older phone) OR the menu icon on the screen
(recent phones and tablets), the menu is
displayed as per the screen copy here:
The EXIT option is used to returns to the
previous displayed application or main device
screen, and stops the software modem (which
is important for the power consumption of the
device and for freeing the microphone for
other applications).
It also completely removes the application
from the device's memory, therefore the next
launch will be from a cleanly restarted
application.
This section also accesses the preferences for the
application.
The Bluetooth ON must be selected AFTER the
Bluetooth (headset) interface has connected to
the phone or tablet. From then-on, and until the
Bluetooth OFF option is selected, the audio in
and out will be through the Bluetooth interface.
There is also an automatic disconnect of the
Bluetooth interface when a phone call is
received. This is to prevent the phone call audio
from being routed to the radio via the Bluetooth
interface.
The “Update Forms” option is to restore the entry and display forms as per the default version as
supplied with the application plus copy any new forms included with the application.
Therefore if you have modified forms on the device after installation (see next section) this will
overwrite the changes.
This is also used useful to add new forms while keeping all the application setting after an application
upgrade, as a full uninstall/re-install would also wipe out your settings.
If the application was uninstalled then re-installed, the program assumes it is dealing with a fresh
installation and will override all existing forms with the original ones at first run.
There is also an About screen which displays the version and some information as usual.
Page 16
•
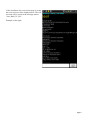
The Preference screen
Preferences are now grouped in preference groups
accessed by clicking on the item.
This is a scrollable list of options. In a nutshell:
– “Use Custom list of modes” makes active
the Mode List described below.
– “Mode List” brings a multi-selectable list
to reduce the cycling of modes through a
smaller sample of modes. Tick the modes
wanted.
– Modem is a reduced version of the Fldigi
options. See description below.
– Image Attachment allow to set the
maximum size of pictures attached in a
message before it is down-sized below that
limit. The jpeg quality is to set the quality
versus size compromise of the jpeg file. A
value of 70 to 80 is normally the best
compromise.
– Data Exchange, Personal Data, Date/Time
Format, File Name and Radiogram mimic
most of the Flmsg options. There is also an
“Extract Timeout” for message reception
reset like in Fldigi.
– GPS time Selection is for using the GPS
time when not in mobile reception area.
Please note that THOR modes in particular but also multi-carrier PSKR modes, DominoEx and
MFSK Long Interleave modes can be very CPU demanding. If your device CPU load stays above
70 to 80% more than half of the time when in these modes (the top bar in the Modem screen),
and you have already ticked the “slow CPU” box in the MODEM preferences, then it is better
not to use them as it will result in missed characters AND possibly non-decode of incoming
RSIDs.
Page 17
The MODEM preferences are split between
General setting and Modes Specific
settings.
- Modem volume and audio frequency since
the modem is integrated in the application.
A normal value for the Volume is around
60 to 80%.
- Slow CPU selection: if your CPU load bar
in the Modem screen stays above 75%
select that option (only affects THOR
modes at present).
The modes specific options bring up similar
choices as the Fldigi options for these
modes.
Only the options relevant to Flmsg have been
brought over.
Notes on “GPS Time Selection” preferences:
In this section we can elect to display the GPS time (as sent by the GPS satellites). The “Leap
Seconds Correction” is normally not needed and should be left at zero as the devices GPS
engines automatically correct the GPS time to bring it to the UTC time despite regular
(almost yearly) increases in the leap-seconds.
On some devices (e.g. Motorola Xoom), the current leap seconds are not included, and the
value 15 (as of 2014) needs to be entered in that field.
Note that the devices own clock is not changed, only the time displayed in the Terminal
screen. When using Auto-Fill buttons in forms the device own clock is used and the value
needs to be corrected is required.
Page 18
•
Typical hardware configuration
Android phone or tablet running Android 2.2 onwards.
Simple audio coupling (speaker to microphone) is giving good results with the proper modes
(MT-63 in particular). But for sending images a cable interface is recommended for best
picture quality.
A simple, easy to make single cable (plus six resistances) interface is described in the
appendix section of this manual.
An alternative to an audio interface cable is a Bluetooth audio device which allows for a
“cable free” link between the android device and the radio. The devices used are the typical
Bluetooth Handsfree car kit, or the Headset version. The adaptation of two of these is
described in the appendix.
There is also to my knowledge at least one commercial interface for Android devices
(Google "Wolphi-link interface").
This is a homebrew interface similar to the Wolphi-Link (3 parts blog):
http://waynemerry.wordpress.com/2012/08/16/designing-a-phoneradio-interface/
http://waynemerry.wordpress.com/2012/08/22/ft-817-phone-audio-interface-part-2/
http://waynemerry.wordpress.com/2012/11/02/ft-817-ft-897-phone-audio-interface-part-3/
Application compatibility: has been tested on HTC EVO 4G, HTC Desire, HUAWEI Sonic,
DELL Streak (Mini 5), Motorola XOOM 10.1” 3G, Medion Lifetab 10.1” 3G, HTC
Velocity 4G, HTC One XL, Asus Memo Pad 7 (X86 CPU), Samsung Galaxy Tab 7 v2,
LG G3, Samsung S3, Dragon Touch tablet A1X. It should run on any device with
Android 2.2 or later to the exception of some devices due to ROM incompatibilities with
Android (see below in the Quirks section).
•
What is new in version 1.2.0
- Added CSV form. Editing is in plain text OR via an external CSV handling app (e.g.
OfficeSuite).
- Added some 8PSK modes which are usable on phone devices.
- Added “Picture form”. Transmission of attached image is done either digitally as part of
the message (small images/fast modes) or in MFSK image modes immediately after the
transmission of the message text. GPS coordinates fields can be auto-filled with picture
Geo-tagging information.
- When viewing a received picture message, a clickable link bring Google Maps with the
GPS position shown.
- Added received slanted images correction plus Save-Again Picture buttons.
- Added size limit with auto-resize when attaching pictures. Selection of jpeg and png
format for the smallest file size is done automatically.
- Added handling of HTML5 elements, without data entry help and validation at this time.
The forms used on PC Flmsg are recognized but the data entry does not show date choosers
and does not validate at this point.
- Changed defaults at new install: RxRSID and TxRSID are ON, mode is MT63-2000-L.
Page 19
- Renamed "FORM" screen button to "Compose" to reflect Email concept more closely.
- In message compose screen, renamed "TFER by RADIO" button into "TFER FORM
ONLY" as it could be mistaken as a way to send the composed message over radio.
- Added UTF-8 support in Rx and Tx for international characters. Should works will all leftto-right texts and Asian text.
- Fixed GUI performance issue visible after large accumulation of received characters in the
modem screen
- Brought up-to-date with Flmsg-2.0.12 handling of custom forms special characters. Also
removed quotes around TEXTAREA. Now escapes all text/numeric fields).
•
The limitations
At this moment:
–
–
–
The encoding options are base 64 and base 128 only. Base 256 will be added later.
There is no Export/Import of Q-forms files yet.
There is no sound card PPM clock adjustments.
Know limitations, quirks and bugs in version 1.2.0:
•
Limitations:
• When attaching pictures, large images (typically above 2 to 4 Mega Pixels) may
crash the app with an “Out of Memory” error. Keep the Preference “Maximum Mega
Pixels” below that value. In any case transmitting large images will take a (very) long
time too.
•
Quirks:
• Some Samsung and Wiko devices, but only those running android version 4.2, will
crash due to an incompatibility in their ROM with the Google libraries. Upgrading to a
more recent Android version (most will upgrade to at least 4.4) will fix the issue. To
implement a workaround would affect all other devices, so I decided to leave it as-is.
• Some devices (e.g. HTC Velocity 4G) seem to have an issue with the keyboard
prediction window which pops up just above the on-screen keyboard.
This means that when entering a form it may crash the application. The current workaround is to disable the word prediction in the device keyboards preferences (not the
best solution, but it works). Using a USB or Bluetooth keyboard resolves the issue since
the built-in on-screen keyboard then remains hidden. I will investigate if there are
application (AndFlmsg based) work-arounds for that device specific issue.
•
Bugs:
• When using a custom form, the password fields are not always displayed correctly. I
haven't worked out in which circumstances. If you work out the conditions of this bug
please let me know.
• In IARU and Radiogram forms, the "Check” button gives a word count of one when
the message field is blank. It gives the correct count otherwise. To be fixed.
Page 20
•
What is in the development pipeline?
• When calculating the transmission time of a message, will add the single or double
RSID TX time to the calculated time.
•
Add some of the 8PSK FEC modes, plus multi-carrier versions
•
Add auto-fill of coordinates fields with device GPS.
•
Add progress indicator of Image Tx when sending in MFSK Image mode
•
Add option of viewing message in external browser (of choice)
•
Add framed display of CSV data in HTML like in Flmsg
•
Add HTML-5 new field input helps like calendar, time, week etc...
• Add option of saving received pictures in jpeg format as well as grey-scale to
reduce file size (can be important for forwarding a received message)
•
Add notification when new messages are received
•
Add option to extract pictures from picture message into a file
•
Add "Log all Rx and Tx Characters"
• Add Signature capture on screen by signing with finger. Save in black and white
PNG image file (less than 1KB)
•
Add the AndPskmail adjustable TX tune option including toggle ON/OFF
•
Add AFC screen tick box and restore AFC code for PSK and MFSK modes
That's all for now :)
Page 21
•
Acknowledgements
I want to thank David Freese (W1HKJ) and team for the Fldigi and Flmsg programs which
code under GPL was the basis of the modem's and message processing implementation
in AndFlmsg. David's vision of a GPL set of software for Amateur Radio is an
inspiration.
Thank you to the NBEMS community for their ongoing feedback and support.
Enjoy, 73 John (VK2ETA)
P.S: In-depth folders structure and custom forms, plus circuit diagram for a simple audio cable and two
Bluetooth interfaces below in the appendix.
Page 22
Appendix
•
Storage, Folders and Forms
Android devices normally provide an “sdcard” storage area which can be either internal or mapped to a
real external SD card if present.
The root folder NBEMS.files of AndFlmsg is created in that memory space by default, but can now be
included in any other folder or sub-folder.
The sub-folders under that root folder are Inbox, Drafts, Templates, EntryForms, DisplayForms,
Outbox, Sent, Temp, Logs and NBEMS-Images.
The content of the folders is pretty evident, with the particularity of having display and entry forms
split in two separate folders.
This has been done to cater for devices with reduced screen real-estate as it allows to have say a
“standard” display form, but a customized entry form (narrower and taller for example) to facilitate
data entry on smaller devices.
AndFlmsg will handle any custom form, plus the set of per-defined forms as supplied with the
application.
But unlike the PC version, the entry and display forms can be customized even if they are part of the
pre-defined set. The limitation to ensure compatibility with the PC version is that all the field names
MUST be kept as-is (the names between the two “:” like for example “:from:”).
But the display format (E.g. number of columns per line, column width, font size, column title, etc...)
can be changed while still allowing exchange with the PC version of Flmsg.
Please note that the file name of the form must be in lower case for NON-custom forms(E.g. ics213,
radiogram, etc..).
In the “DisplayForms” folder there can be up to three files for the same form: xyz.html, xyz.fc.html and
xyz.txt. They relate respectively to the HTML display form, the HTML File Copy form and the plain
text form.
If the requested display form is not present, AndFlmsg will instead display the raw data file and alert
the operator.
This is handy for using the app as a relay station as any message from any form can be relayed even if
it cannot be displayed under the “standard” format on the Android device.
In the “EntryForms” folder there can be multiple files for the same custom or “hard-coded” form to
accommodate different screen size or orientation preferences (as in portrait or landscape). For example
we can have radiogram.html radiogram.portrait.html and radiogram.landscape.html.
The only musts are: the prefix which defines the form (E.g. “radiogram”), terminated by a dot, and the
suffix made up of a dot then “html”. What is between the first and the second dot is of no significance
to the application.
Page 23
•
Making custom forms and modifying existing form
Existing forms, either custom or hard-coded can be modified both for data entry and display purposes.
For data entry forms, the typical data entry field will be a one line text field which in the html form file
will be something like (E.g. the “Station of Origin” field in the radiogram form):
<INPUT NAME=":org:" TYPE="text" SIZE=20 MAXLENGTH=40>
This means that (And)Flmsg will record this as the “org” field with its value being text. It can be 40
characters maximum in length (limited at time of data entry), with only 20 characters being displayed
in a sliding window on screen.
A multi-line text field is described in the html file as follow:
<TEXTAREA NAME=":to:" ROWS=4 COLS=34></TEXTAREA>
In AndFlmsg there are a number of pre-defined buttons that can be associated with a field to allow
faster data entry like for time and dates. Some are form specific and their usage would probably not
make sense outside of the intended form like for the radiogram ARRL predefined messages.
Here is the list as their appear in the html data entry forms and an examples of their usage:
1.
Combined now date and time formatted as per preferences (local/zulu etc...). Replace datetime1
by your field name in both places. Replace “...” by whatever description you want to show for
the button.
<INPUT NAME=":datetime1:" TYPE="text" SIZE=11 MAXLENGTH=20><INPUT
TYPE="button" onclick="datetimeprefill(':datetime1:')" VALUE="...">
2. Now date formatted as per preferences (local/zulu etc...). Replace date1 by your field name in
both places. Replace “...” by whatever description you want to show for the button.
<INPUT NAME=":date1:" TYPE="text" SIZE=11 MAXLENGTH=20><INPUT
TYPE="button" onclick="datetimeprefill(':date1:')" VALUE="...">
3. Now time formatted as per preferences (local/zulu etc...). Replace time1 by your field name in
both places. Replace “...” by whatever description you want to show for the button.
<INPUT NAME=":time1:" TYPE="text" SIZE=11 MAXLENGTH=20><INPUT
TYPE="button" onclick="timeprefill(':time1:')" VALUE="...">
4.
Radiogram specific button, delivery field (:hx:). Brings up a dialog popup and updates the
specified field (here “:hx:”).
<INPUT TYPE="button" onclick="arlhxdialog(':hx:')" VALUE="HX">
5.
Radiogram specific button, checks the message specified in first paramter (here “:msg:”), reformat it as required. The field in the second parameter (here “:ck:”) is updated with the work
“ARL” if ARRL messages are included in the first field value, plus the word count of that same
Page 24
field. The third parameter (here “:std:”) is the check-box field which indicates if the message
must be reformatted (changed to all capital letters and limited in words per line). If the third
parameter is blank (as in open quote close quote), then it is assumed TRUE and reformatting
always occurs. This is used for the IARU message form.
<INPUT TYPE="button" onclick="arlmsgcheck(':msg:',':ck:',':std:')" VALUE="CHECK">
6.
Radiogram specific button. Brings up a dialog popup to select ARRL messages and their
parameters if any, then updates the specified field (here “:msg:”).
<INPUT TYPE="button" onclick="arlmessagesdialog(':msg:')" VALUE="ARL MSG">
Page 25
R2
10 Ohms
R1
47 Ohms
R3
10 Ohms
R4
1K Ohms
R6 (*)
1K Ohms
R5
100 Ohms
Ground
Mic Input
Headset JACK
HTC Desire
Audio OUT
This interface requires the use of the VOX to key in the transceiver
Note (*):
If changing the R6 value, be mindful that two low values are read as control inputs by the HTC phone (call/hangup etc...)
Speaker JACK
FT-817
To MIC GND
To MIC
Simple audio interface cable for FT-817 (857/897/450) and many other radios
Page 26
Using a Bluetooth HandsFree car-kit Adapter with Android Phones running AndFlmsg
The price ranges from $15 to around $250 for the top of range units. Low cost units seem to work well.
By removing the internal speaker I was able to fit all the signal level adaptation and the VOX inside the
unit rather than have a separate box, but that is a personal choice as keeping the loud-speaker can
provide extra feedback.
These units typically clips on the sun-visor of the car and have a built-in rechargeable battery giving
around 10 hours of run time, are small (approx in cm 10 x 5 x 1.7 or in inches: 4 x 2 x 0.7) and light
weight (around 100g originally).
The minimal device specifications are that it handles either the hands-free or the headset Bluetooth
profile. The A2DP profile is of no use in that case as it is for one way high resolution stereo audio.
The thicker the unit, the easier it will be to fit the electronics inside.
The model I used is an Advantalk Nova, but I am sure a lot of other units would fit the bill. The key
criterion is that these units pair with your phone or tablet and can be used in a phone call as interface
for audio in and out.
Required adaptation:
I basically left all the electronics of the units as is which is a plus as it is all small surface mount
components. Only the integrated speaker and microphone were removed.
The two functions required to be added are signal level and impedance adaptation for the input and
output to/from the transceiver and the VOX circuit if necessary.
It is worth noting that most modern radios integrate a digital mode VOX and therefore only need the
signal adaptation. But for portable work with the FT-817 I wanted both so that I could use the data
plug at the back of the unit.
Luckily there is ample signal strength to allow simple resistive circuits for the signal adaptation both
way.
I wanted the VOX circuit to be simple and not pull energy from the battery of the unit or the
transceiver.
The original audio output circuit of the Bluetooth unit is based on a H circuit as there is not much
supply voltage to go around at 3.7V (single cell integrated lithium battery) and therefore it is not
referenced to ground. So I used a transformer to isolate it and at the same time boost the voltage so that
the VOX has ample voltage to work with.
A small output transformer normally used on the final stage of a low power audio amplifier is used for
that purpose. It has an 8 Ohms secondary and a 2 x 500 Ohms primary. I use it “in reverse” so that I can
get 10-15Vpep on the secondary at full volume. Ample to trigger the VOX circuit even at low volume
settings which is a great plus.
Page 27
A few decoupling capacitors are required for signal cleanliness and stability.
I added for good measure some ferrite sleeves on the short cable between the unit and the radio just in
case.
The circuit diagram is shown with the pictures further down. Please note that it can be adapted to most
other rigs quite easily.
Operation:
Every time you want to use the Bluetooth interface, perform in that sequence:
Start Bluetooth on the phone
Assuming the handsfree kit was paired before, start the handsfree kit and ensure it is connected (This is
typically done by waiting 10 to 30 seconds or by a short press on the multifunction button of the
handsfree kit).
Launch AndFlmsg
Call the menu in AndFlmsg, select “Bluetooth ON”
Ensure that the modem's volume in the Preferences is at 60 to 80%.
From now on, the audio received should be from the radio and not the microphone, and the sound
output should be redirected towards the transceiver
To stop redirecting the audio to the Bluetooth and return to the speaker/Audio plug, select “Bluetooth
OFF” from the AndFlmsg menu.
Note that the Bluetooth volume need to be around 50% and above to provide enough signal output
voltage to trigger the VOX (dependent on your VOX circuit and Bluetooth unit).
Adjusting the volume up and down on the Bluetooth unit or on the phone should display a “Bluetooth
volume” bar on the phone.
Also I noted on my phone that the media playback level also had an impact, although not very large, on
the final output volume.
So in summary there is: the modem volume in the AndFlmsg preferences (normally set and left at 50 to
80%), the Bluetooth volume (adjustable when the Bluetooth device is connected from the handsfree kit
or the phone) and the media volume (to a lesser extent).
Page 28
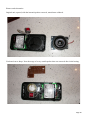
Pictures and schematics:
Original unit, opened, with the internal speaker removed, transformer soldered.
Veroboard cut to shape. Note the usage of a very small speaker that was removed after initial testing.
Page 29
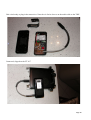
Unit wired ready to plug in the transceiver. Note the six ferrite sleeves on the audio cable to the TRX.
Connected, clipped on the FT-817
Page 30
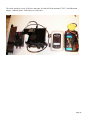
The whole portable set-up: 41M wire and tuner for end-fed Fuchs antenna, FT-817 with Bluetooth
adapter, Android phone, 5Ah battery in sealed box.
Page 31
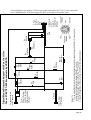
C3
10nF
C5
22nF
R1
1KOhms
R2
1KOhms
C1
1microF
C2
1microF
R6 (*2)
10KOhms
R5
1KOhms
D2
Signal
Diode
D1
Signal
Diode
R4
2.2KOhms
R3
47KOhms
Q1
BC338
C4
22nF
Notes (*):
1. T1 is an output transformer for push-pull amplifier (minimum capacity around 300mW). It is required for:
a) isolating the final amplifier stages of t he BT unit and
b) providing enough voltage to control the PTT transistor
2. Adjust R6 depending on the sensitivity of the BT unit's microphone input
To mic. input
of BT adapter
Ground
T1 (*1)
8 Ohms Primary
2 x 500 Ohms Sec.
300mw capability
minimum
To speaker output
of BT adapter
Digital Modes Bluetooth Adapter with Vox circuit for
Yaesu FT-8X7/FT-450 transceivers by VK2ETA
1 = DATA IN
2 = PTT
3 = GND
4 = DATA OUT
1200bps
6 Pins
Min-Din
Data
plug
Circuit Diagram: note that the VOX circuit is only required for the FT-817 as the other units
have a Digital Modes VOX that triggers the PTT on reception of an audio input.
Page 32
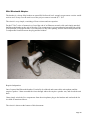
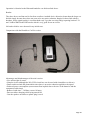
Mini Bluetooth Adapter
The headset is a cheap eBay headset at around $10 delivered, but I strongly suspect most version would
work as well. In my case the total cost of the project comes to around $13 - $15.
The circuit is very simple, consisting of four resistors and one capacitor.
For the FT-8x7 series of transceivers I used the end of an Ethernet network cable and simply attached
the Bluetooth headset at the end of the plug. The arrangement is given mechanical strength with a blob
of Polymorph (Polycaprolactone is it's real name) or any other potting solution which encapsulates the
5 components located between the plug and the headset.
Required adaptation:
Once I opened the Bluetooth headset, I basically de-soldered and removed the microphone and the
earpiece speaker. I then extended the wires through where the earpiece speaker was, and closed the unit
back.
I then simply wired the five components from the microphone plug to the headset and enclosed the lot
in a blob as mentioned above.
The circuit is shown at the bottom of this document.
Page 33
Operation is identical to the Bluetooh handsfree car-kit described above.
Results:
They have been excellent and in fact from a radio to Android device direction, better than the larger car
kit unit simply because there does not seem to be any noise reduction function in these little (cheap)
headsets. So the signal quality is excellent both ways. I get the receiving Fldigi reporting between -36
and -30dB of IMD in the PSK modes which is very good for an on-air test.
No hash or birdies were detected in my initial tests.
Comparison with the Handsfree Car Kit version
Advantages and disadvantages of the mini version:
+ Size and weight of course.
+ Simpler circuit (although the NO-VOX circuit here can be used with a handsfree car kit too).
+ Better audio towards the phone/tablet since there is no noise reduction applied to the signal.
+ Reduced power consumption (not measured but implied due to the size of the batteries and the
comparative talk times)
- Reduced “talk time”: 3-4Hours versus 10 hours.
- Does not allow charging while being turned ON.
- Cuts the speaker out unless a splitter plug is used.
Page 34
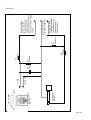
Speaker JACK
of FT-817
Microphone plug
of FT-817
To MIC GND
To MIC
C1
10 nF
R2
10 Ohms
R4
10K Ohms
R1
1K Ohms
R3
1K Ohms
Microphone Input
of Bluetooth headset
(try both wires as in
some cases it is a
balanced input)
Ground (most likely
also battery negative)
Earpiece speaker
Audio OUT from
Bluetooth headset
(either wire should
work since most of these
devices have an H output
circuit)
Schematic:
Page 35