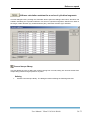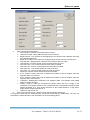
1
VibtorV3 User manual Vibtor V3.03.014-R1660 User Manual : VibtorV3.03.014-R1660 1/ 75 Table of content Table of content ........................................................................................................ 2 File ............................................................................................................................. 5 New ...................................................................................................................... 5 Open .................................................................................................................... 5 Close .......................................................................................................................... 5 Delete ......................................................................................................................... 5 Insert model ................................................................................................................ 5 Comments .................................................................................................................. 5 Save .................................................................................................................... 6 Save As ...................................................................................................................... 6 Graph view manager .................................................................................................. 7 Print...................................................................................................................... 7 Print preview ........................................................................................................ 7 Format ........................................................................................................................ 7 Computation note ....................................................................................................... 7 Exit ............................................................................................................................. 8 Edit ............................................................................................................................. 9 Undo .................................................................................................................... 9 Undo list...................................................................................................................... 9 Redo .................................................................................................................... 9 Redo list...................................................................................................................... 9 Copy ........................................................................................................................... 9 Cut ............................................................................................................................ 10 Paste ........................................................................................................................ 10 Selection ............................................................................................................ 10 View ......................................................................................................................... 13 Enlarge............................................................................................................... 13 Reduce............................................................................................................... 13 User Manual : VibtorV3.03.014-R1660 2/ 75 Full-screen display ............................................................................................. 13 Grid-calibrated display ....................................................................................... 13 Information bar ......................................................................................................... 13 Preferences ............................................................................................................. 15 Language ........................................................................................................... 15 Units ................................................................................................................... 15 Visualization options .......................................................................................... 16 Font .................................................................................................................... 16 Grid .................................................................................................................... 16 Default values .................................................................................................... 17 Number of modes .............................................................................................. 17 Model definition ...................................................................................................... 19 Model ................................................................................................................. 19 Creation of stiffnesses ........................................................................................ 20 Creation of inertias ............................................................................................. 21 Creation of gear trains ........................................................................................ 22 Creation of planetary gear trains ........................................................................ 23 Creation of differential gear trains ...................................................................... 24 Creation of belts ................................................................................................. 25 Predefined structures ......................................................................................... 27 Symmetry ........................................................................................................... 27 Renumbering ...................................................................................................... 27 Identify ................................................................................................................ 28 Definition of stiffness properties ......................................................................... 29 Definition of inertia properties ............................................................................. 30 Definition of gear train properties ....................................................................... 32 Definition of gearing stiffness properties............................................................. 33 Definition of planetary gear train properties ........................................................ 35 Definition of differential gear train properties ...................................................... 40 Définition of belt properties ................................................................................. 45 Tableau de propriétés......................................................................................... 48 User Manual : VibtorV3.03.014-R1660 3/ 75 Assistant de calcul de l'inertie d'une série de tronçons cylindriques ....... 49 Stiffness calculation assistant for a series of cylindrical segments ......... 50 Conrod torque library ......................................................................................... 50 Cam torque library ............................................................................................. 54 User-defined torque library ................................................................................. 55 Torque on Inertia ................................................................................................ 57 Measurement import........................................................................................... 58 Deletion .............................................................................................................. 61 Reference speed ..................................................................................................... 63 Rotational reference speed ................................................................................ 63 Calculation launch .................................................................................................. 64 Calculation parameter and calculation launch .................................................... 64 Results interpretation............................................................................................. 66 Results ............................................................................................................... 66 Vibration modes ................................................................................................. 66 Proximity diagram .............................................................................................. 67 Campbell diagram .............................................................................................. 68 Eigenfrequencies and active excitation frequencies .......................................... 69 Table of results .................................................................................................. 70 Forced vibrations deform ................................................................................... 70 Forced vibrations graph ..................................................................................... 73 Forced vibrations export .................................................................................... 76 User Manual : VibtorV3.03.014-R1660 4/ 75 File File New This menu option allows generating a new “Torsional vibration” project. Selecting this command triggers the creation of an empty window whose title is the name of the new project (“Vibtor1”, as a default). This window is positioned superimposed on the preexisting set of windows. The “Window“ menu option serves to reorganize all active windows. Open This menu option enables opening a “Torsional vibration” project that has already been saved. The “Torsional vibration” projects are all given either the suffix .VTS (for standard projects) or .VTR (reference projects). Opening a project triggers the creation of a window containing the corresponding model, with the project name serving as the title. This window is positioned superimposed on the preexisting set of windows. The “Window" menu option allows reorganizing all active windows. Close This option is used for closing the project associated with the active window, without exiting the application. In the case where the project has been modified, the user is prompted to save project work before closing. Should the response be negative, any modification performed since the previous save will be lost. Opting to close a project triggers the closing of all associated windows. Delete This option serves to delete all files associated with a given project. It is not possible to delete an "open" project. Insert model This option enables inserting the model associated with a previously-defined project into the model corresponding with the active window. By default, all inserted elements are assigned the "selected" attribute and may be positioned interactively within the given model. This option can only be activated in cases where "Model definition" has been set as the active software function. Comments A list of comments is associated with each project. This option opens a dialogue box that enables defining or modifying some of these comments. The set of information characterizing a project would be the following: -Plant name -Workshop name User Manual : VibtorV3.03.014-R1660 5/ 75 File -(1) Name of first user -(2) Date of initial use -(3) Name of most recent user -(4) Date of last modification -Device -Subset -Date of service startup -Notes: Unrestricted comments limited to 500 characters. Fields designated 1 through 4 above may not be modified by the user. Fields 1 and 2 are automatically updated when the given project is saved for the first time. Fields 3 and 4 are automatically updated each time the project is saved. The "Name of plant" and "Name of workshop" fields are completed by choosing entries from predefined lists. The list of plant names is contained within the "Companies.dat" file located in the software installation directory. This file has been formatted in the following form: Plant1=FilePlant1.dat Plant2= FilePlant2.dat Plant3= FilePlant3.dat Planti= FilePlanti.dat In each row of this file, the chain of characters positioned before the "=" sign contains the name of the given plant; this name will be displayed in the drop-down list corresponding to the heading: "Name of plant". The chain of characters positioned after the "=" sign contains the name of the file within which the workshops at the considered plant have been specified. Each of these files (e.g. FilePlant1.dat) displays the following format: D1=Workshop 1 D2=Workshop 2 D3=Workshop 3 Di=Workshop i Each row of this file contains the name of the given workshop in the chain of characters positioned after the "=" sign. The keyword in front of the "=" sign is arbitrary. Save This option allows saving the project corresponding to the active window. When this command is used for the first time (default project name: “Vibtor1”), the command “Save As” automatically gets activated. Save As This option serves to save the project corresponding to the active window; its activation opens a dialogue box that enables defining the name preferred for the project as well as the storage directory. By default, the working directory is proposed for this saving operation. All “Torsional vibration” projects possess the ".vts" suffix. User Manual : VibtorV3.03.014-R1660 6/ 75 File Graph view manager This option primarily allows saving the graphical image corresponding to the active window with the intention of inserting it into the computation note. Saving a graphical view 1. 2. Identify the name of the graphical view in the cell marked "Name". Introduce any eventual comments characterizing the view by completing the cell marked "Description". 3. Click the "Save" button in order to effectively save the graphical view. 4. Click the "Close" button to close the dialogue box. This option also enables deleting a previously-saved graphical view. Deleting a graphical view 1. 2. 3. Select the name of the graphical view to be deleted from the list of previously-defined views. Press the "Delete" button. Click the "Close" button to close the dialogue box. Note herein that activating the tool triggers the automatic saving of the view displayed on the screen. The views saved in this manner are named with a program-defined default. Print This option enables printing the graphical image corresponding to the active window. Print preview This option serves to visualize, in the same format as the eventual printout, the graphical image corresponding to the active window on the screen. Format This option allows both choosing the print format and configuring the printer. Computation note This option makes it possible to obtain a computation note in RTF (Rich Text Format). This format has been chosen by virtue of being recognized by the majority of current commercial word processing applications and generating very high quality reports. Activating this option allows the user to define the following elements : List of tables to be included in the computation note List of graphical views to be included in the computation note Screen or file destination of the computation note. User Manual : VibtorV3.03.014-R1660 7/ 75 File Obtaining a computation note 1. Define the content (tables and graphical views) of the computation note. Pressing the button marked with the ">>" symbol serves to incorporate the selected table or graph within the list summarizing computation note contents. Clicking the "All" button incorporates all tables or graphical views within the computation note. Pressing the "Delete" button deletes the selected entity from the content summary list. 2. Choose the computation note destination (screen or file) using the drop-down list denoted "Destination". 3. Click the "OK" button to initiate production of the computation note l. Exit This option allows the user to exit the “Torsional vibrations” program. In the case where open projects had been modified since the time of their last save, the application proposes saving these latest modifications. User Manual : VibtorV3.03.014-R1660 8/ 75 Titre du chapitre 1 Edit Undo This option enables canceling the most recent action performed. It is possible to undo several successive operations by activating the "Edit-Undo" menu option several times or by clicking the "Undo" button several times. The "Edit-Undo list" option serves to visualize the headings of actions capable of being cancelled. The list of actions capable of being cancelled or reinstated is cleared after each task change. Undo list... The "Edit-Undo list" menu option allows visualizing the headings of actions capable of being undone. Redo This option allows reinstating the most recent action cancelled. It is possible to redo several operations previously cancelled by activating the "Edit-Redo" menu option several times or by clicking the "Redo" button several times. The "Edit-Redo list" option serves to visualize the headings of actions capable of being reinstated. The list of actions capable of being reinstated is cleared after completion of any new action that does not correspond to the "Undo" function. Redo list... The "Edit-Redo list" menu option allows visualizing the headings of actions capable of being reinstated. Copy This option enables copying the selected elements onto the “clipboard” (temporary memory). These copied elements are then available for a subsequent "pasting" operation. Copying onto the clipboard 1. 2. Select the nodes and elements to be copied. Press the "Edit-Copy" menu option. The selected objects are then saved onto the clipboard User Manual : VibtorV3.03.014-R1660 9/ 75 Titre du chapitre 1 Cut This option allows deleting the selected set of model elements, which are copied onto the clipboard (temporary memory). These "cut" elements are still available for pasting. Cutting selected items 1. 2. Select the elements to be cut. Press the "Edit-Cut" menu option. The selected objects are then deleted from the model and saved onto the clipboard. Paste Those model elements either copied or cut during a previous action may be pasted into the model of your choice, as characterized by the active working window on the screen. Pasting 1. Click the window corresponding to the project within which you would like to paste the elements saved onto the clipboard. 2. Press the "Edit-Paste" menu option. 3. Position the elements to be pasted using the mouse. Selection When the "Selection" button has been activated, the mouse is working in "Selection" mode, with this mode serving as the default. A selected element is characterized by a dashed frame; in addition to this frame, four rectangles are displayed that correspond to "handles" used for modifying the horizontal and vertical dimensions of an element. Selecting objects one at a time 1. 2. Click on an element in order to select it. To add an object to the list of selected items, hold the SHIFT key down during the selection process. 3. To "deselect" an object, click on the object while holding the SHIFT key down. 4. To "deselect" all previously-selected objects, click on a point of the screen far from any object Selecting objects within a rectangle defined using the mouse 1. To select a set of elements, click on a point in the graphics window and move the mouse, while holding the left mouse button down and outlining a rectangle. 2. To add objects to the list of selected items, hold the SHIFT key down during the selection process. If the mouse is being moved left to right, only those elements entirely contained within the defined rectangle will be selected. If the mouse is being moved right to left, all elements either entirely or partially contained within the defined rectangle will be selected. User Manual : VibtorV3.03.014-R1660 10/ 75 Titre du chapitre 1 Modifying the size of an element 1. Position the mouse on one of the four handles of the selected element. The mouse cursor then takes the form of a horizontal or vertical arrow. 2. While holding the right mouse button down, modify the size of the element. The frame corresponding to the element always coincides with the grid points. User Manual : VibtorV3.03.014-R1660 11/ 75 Preferences View Enlarge This tool allows maximizing the view proposed on the screen. For this step, the rectangular portion to be shown in a full-screen display is defined using the mouse. Defining a zoom range 1. 2. Activate the "Enlarge" tool. Click on a screen point that serves as a corner of the rectangle defining the zoom range, by using the left mouse button. 3. Hold the button down and move the mouse to where the obtained rectangle is acceptable. 4. Release the mouse button Reduce This tool is used in order to decrease the apparent size of the model within the active view. Reducing the view 1. Activate the "Reduce" tool. The apparent size of the structure is then reduced. Full-screen display Activating this option triggers an automatic modification of the scale used for model representation, whereby model visualization occupies the entire screen space. Grid-calibrated display Activating this option triggers an automatic modification of the scale used for model representation, whereby visualization of the grid (Xmin, Xmax, Ymin, Ymax) occupies the entire screen space. Information bar The "Information bar" option constitutes a status indicator, to be checked ( ) or not, for informing whether the display of a help function row at the bottom of the “Torsional vibrations” window is preferred or not. User Manual : VibtorV3.03.014-R1660 13/ 75 Model definition Preferences Language This menu option enables choosing the language to be used by the "Torsional vibrations" software application as regards both the user interface and the computation notes. The texts appearing in the software interface have all been defined in external formatted files and may thus be adapted by the user. The pertinent files are located in the software installation directory and have been given the following names : Menu file Menu.fr: French language Menu.en: English language Menu.dt: German language Dialogue box file Lang.fr: French language Lang.en: English language Lang.dt: German language Message file msg.fr: French language msg.en: English language msg.dt: German language Units This option opens a dialogue box that enables modifying the units associated with each of the magnitudes used in the application. As indicated in the figure below, it is possible to adjust the "format" of magnitudes associated with each unit by setting the number of decimal places and specifying whether scientific notation is preferred or not. Pressing the following buttons : International system Anglo-Saxon units Default units allows updating the units associated with each magnitude within the selected system. The "Save as default" button allows saving the current units as the default. The system of units used may be modified at any point in time. User Manual : VibtorV3.03.014-R1660 15/ 75 Model definition Visualization options This option enables selecting the information that will be displayed on the screen to characterize the model. It is possible to display or define the following elements: Element number Element identifier Value of the properties associated with the element Type of symbols used for stiffnesses, inertias and gear trains Stiffnesses Inertias Gear trains Belts Planetary and differential gear trains Font This option makes it possible to modify attributes of the font currently used for displaying characters within graphics windows. Grid The grid is employed during the model-definition phase. From a conventional standpoint, both the position and size of each model element coincide with the grid defined on the screen. This option serves to define the grid size displayed by default on the screen. Defining grid characteristics 1. Set the values Xmin, Xmax, Ymin and Ymax that define grid characteristics. User Manual : VibtorV3.03.014-R1660 16/ 75 Model definition 2. The grid is then visualized on the screen by a sequence of points. Activating the "Grid-calibrated display" option enables, at any point in time, visualizing on the screen the previously-defined grid. Default values This option will serve to modify the following default parameters : 1. Size of the symbol used for stiffnesses, inertias and gear trains. The size of these elements is defined in terms of number of grid squares. 2. % deviation for the proximity diagrams 3. % variation in both inertia and stiffness for the sensitivity computations.. Number of modes This option allows defining the following elements : 1. Number of eigenmodes considered when presenting the tables of results. In dealing with larger models, it may be advisable not to discard the last modes corresponding to the less interesting higher frequencies. 2. The highest harmonics level to be considered for the excitation frequencies (multiplier for the exciter speeds). User Manual : VibtorV3.03.014-R1660 17/ 75 Reference speed Model definition Model This option enables defining the model; it activates the display of a toolbox containing the following elements. Creation of stiffnesses Creation of inertias Creation of gear trains Creation of planetary gear trains Creation of differential gear trains Creation of belts Predefined structures Symmetry Numbering Identification Definition of stiffness properties Définition des propriétés des inerties Definition of stiffness properties Definition of gearing stiffness properties Definition of planetary gear train properties Definition of differential gear train properties Definition of belt properties Table of properties Conrod torque library Cam torque library User-define torque library Torque on inertia Measurement Import Deletion User Manual : VibtorV3.03.014-R1660 19/ 75 Reference speed Creation of stiffnesses Activating this tool serves to create and position a "stiffness" element. The element is placed in the model thanks to a "grid" that acts as a guide. As a default, this element is represented by a drawing of a spring inscribed within a rectangle (see the "Preferences / Visualization options" section), whose default dimensions were set in the "Preferences / Default values" option. Unconnected element Connected element The connection with an adjacent element is visualized by a red rectangle positioned at the exact spot of the connection. The only elements capable of being connected to a stiffness element are of the type : Stiffness (in the axis) Inertia (in the axis) Gear train (in the axis) Planetary and differential gear train (in the axis) Creating a stiffness element 1. Click on the "Creation of stiffness" tool. A rectangle symbolizing the stiffness element then becomes "attached" to the mouse cursor. 2. Position the element at the desired place in the model by means of moving the mouse cursor. 3. When the element is in the desired position, make a left-click with the mouse The element position is rejected in the case where it has been superimposed either totally or partially onto an existing element. Modifying the size of a stiffness element 1. Select the target element. A selected element is characterized by a dashed frame; in addition to this frame, four rectangles are displayed that correspond to "handles" used for modifying the horizontal and vertical dimensions of an element. 2. Position the mouse cursor on one of the handles used to resize the element. The mouse cursor then takes the form of a horizontal or vertical arrow. While holding the right mouse button down, modify the size of the element. The frame corresponding to the element always coincides with the grid points. Moving a stiffness element 1. 2. Select the target element. Position the mouse cursor inside the frame symbolizing the element, yet beyond the handles used to resize the element. The mouse cursor then takes the form of a cross. 3. While holding the right mouse button down, move the target element. User Manual : VibtorV3.03.014-R1660 20/ 75 Reference speed 4. Release the right mouse button once the element is in the desired position. Creation of inertias Activating this tool serves to create and position an "inertia" element. The element is placed in the model thanks to a "grid" that acts as a guide. As a default, this element is represented by a line inscribed within a rectangle and then completed with a circle at each of its extremities (see the "Preferences / Visualization options" section), whose default dimensions were set in the "Preferences / Default values" option. Unconnected element Connected element The connection with an adjacent element is visualized by a red rectangle positioned at the exact spot of the connection. The only elements capable of being connected to an inertia element are of the type : Stiffness (in the axis) Inertia (in the axis) Gear train (in the axis) Planetary and differential gear train (in the axis) Belt (on the side) Creating an inertia element 1. Click on the "Creation of inertia" tool. A rectangle symbolizing the inertia element then becomes "attached" to the mouse cursor. 2. Position the element at the desired place in the model by means of moving the mouse cursor. 3. When the element is in the desired position, make a left-click with the mouse. The element position is rejected in the case where it has been superimposed either totally or partially onto an existing element. Modifying the size of an inertia element 1. Select the target element. A selected element is characterized by a dashed frame; in addition to this frame, four rectangles are displayed that correspond to "handles" used for modifying the horizontal and vertical dimensions of an element. 2. Position the mouse cursor on one of the handles used to resize the element. The mouse cursor then takes the form of a horizontal or vertical arrow. While holding the right mouse button down, modify the size of the element. The frame corresponding to the element always coincides with the grid points. User Manual : VibtorV3.03.014-R1660 21/ 75 Reference speed Moving an inertia element 1. 2. Select the target element. Position the mouse cursor inside the frame symbolizing the element, yet beyond the handles used to resize the element. The mouse cursor then takes the form of a cross. 3. While holding the right mouse button down, move the target element. 4. Release the right mouse button once the element is in the desired position. Creation of gear trains Activating this tool serves to create and position a "gear train" element. The element is placed in the model thanks to a "grid" that acts as a guide. As a default, this element is represented by a horizontal line inscribed within a rectangle and then completed with two vertical lines at each of its extremities (see the "Preferences / Visualization options" section), whose default dimensions were set in the "Preferences / Default values" option. Unconnected element Element connected to a stiffness element Element connected to another gear train The connection with an adjacent stiffness element is visualized by a red rectangle positioned at the exact spot of the connection. The connection between two gear train elements is symbolized by red coloring on the vertical line located in the contact zone between the two elements. The only elements capable of being connected to a gear train element are of the type : Stiffness (in the axis) Inertia (in the axis) Gear train (in the axis and on the side) Planetary gear train (in the axis) Differential gear train (in the axis and on the side) Creating a gear train element 1. Click on the "Creation of gear train" tool. A rectangle symbolizing the gear train element then becomes "attached" to the mouse cursor. 2. Position the element at the desired place in the model by means of moving the mouse cursor. User Manual : VibtorV3.03.014-R1660 22/ 75 Reference speed 3. When the element is in the desired position, make a left-click with the mouse. The element position is rejected in the case where it has been superimposed either totally or partially onto an existing element. Modifying the size of a gear train element 1. Select the target element. A selected element is characterized by a dashed frame; in addition to this frame, four rectangles are displayed that correspond to "handles" used for modifying the horizontal and vertical dimensions of an element. 2. Position the mouse cursor on one of the handles used to resize the element. The mouse cursor then takes the form of a horizontal or vertical arrow. 3. While holding the right mouse button down, modify the size of the element. The frame corresponding to the element always coincides with the grid points. Moving a gear train element 1. 2. Select the target element. Position the mouse cursor inside the frame symbolizing the element, yet beyond the handles used to resize the element. The mouse cursor then takes the form of a cross. 3. While holding the right mouse button down, move the target element. 4. Release the right mouse button once the element is in the desired position. Creation of planetary gear trains Activating this tool serves to create and position a "planetary gear train" element. The element is placed in the model thanks to a "grid" that acts as a guide. Unconnected element Connected element The connection with an adjacent element is visualized by a red rectangle positioned at the exact spot of the connection. The only elements capable of being connected to a planetary gear train are of the type : Stiffness (in the axis) Inertia (in the axis) Gear train (in the axis) Planetary and differential gear train (in the axis) Creating a planetary gear train element 1. Click on the "Creation of planetary gear train" tool. A rectangle symbolizing the planetary gear train element then becomes "attached" to the mouse cursor. 2. Position the element at the desired place in the model by means of moving the mouse cursor. 3. When the element is in the desired position, make a right-click with the mouse. User Manual : VibtorV3.03.014-R1660 23/ 75 Reference speed 4. The element created thus lies in the direction: element in the other direction, i.e. right-clicking the mouse. . In order to create the , hold the SHIFT key down when The element position is rejected in the case where it has been superimposed either totally or partially onto an existing element. Modifying the size of a planetary gear train element 1. Select the target element. A selected element is characterized by a dashed frame; in addition to this frame, four rectangles are displayed that correspond to "handles" used for modifying the horizontal and vertical dimensions of an element. 2. Position the mouse cursor on one of the handles used to resize the element. The mouse cursor then takes the form of a horizontal or vertical arrow. 3. While holding the right mouse button down, modify the size of the element. The frame corresponding to the element always coincides with the grid points. Moving a planetary gear train element 1. 2. Select the target element. Position the mouse cursor inside the frame symbolizing the element, yet beyond the handles used to resize the element. The mouse cursor then takes the form of a cross. 3. While holding the right mouse button down, move the target element. 4. Release the right mouse button once the element is in the desired position. Creation of differential gear trains Activating this tool serves to create and position a "differential gear train" element. The element is placed in the model thanks to a "grid" that acts as a guide. Unconnected element Connected element The connection with an adjacent elements is visualized by a red rectangle positioned at the exact spot of the connection. The only elements capable of being connected to a differential gear train are of the type : Stiffness (in the axis) Inertia (in the axis) Gear train (in the axis and on the side) Planetary gear train (in the axis) Differential gear train (in the axis and on the side) Creating a differential gear train element 1. Click on the "Creation of differential gear train" tool. A rectangle symbolizing the differential gear train element then becomes "attached" to the mouse cursor. 2. Position the element at the desired place in the model by means of moving the mouse cursor. User Manual : VibtorV3.03.014-R1660 24/ 75 Reference speed 3. When the element is in the desired position, make a left-click with the mouse. The element position is rejected in the case where it has been superimposed either totally or partially onto an existing element. Modifying the size of a differential gear train element 1. Select the target element. A selected element is characterized by a dashed frame; in addition to this frame, four rectangles are displayed that correspond to "handles" used for modifying the horizontal and vertical dimensions of an element. 2. Position the mouse cursor on one of the handles used to resize the element. The mouse cursor then takes the form of a horizontal or vertical arrow. 3. While holding the right mouse button down, modify the size of the element. The frame corresponding to the element always coincides with the grid points. Moving a differential gear train element 1. 2. Select the target element. Position the mouse cursor inside the frame symbolizing the element, yet beyond the handles used to resize the element. The mouse cursor then takes the form of a cross. 3. While holding the right mouse button down, move the target element. 4. Release the right mouse button once the element is in the desired position. Creation of belts Activating this tool serves to create and position a "belt" element. The element is placed in the model thanks to a "grid" that acts as a guide. Unconnected element Connected element The connection with an adjacent element is visualized by a red rectangle positioned at the exact spot of the connection. The only elements capable of being connected to belts are of the type. Les seuls éléments pouvant être connectés à des courroies sont les éléments de type : Inertia (on the side) Creating a belt element 1. Click on the "Creation of belts" tool. A rectangle symbolizing the element then becomes "attached" to the mouse cursor. 2. Position the element at the desired place in the model by means of moving the mouse cursor. 3. When the element is in the desired position, make a right-click with the mouse. The element position is rejected in the case where it has been superimposed either totally or partially onto an existing element. User Manual : VibtorV3.03.014-R1660 25/ 75 Reference speed Modifying the size of a belt element 1. Select the target element. A selected element is characterized by a dashed frame; in addition to this frame, four rectangles are displayed that correspond to "handles" used for modifying the horizontal and vertical dimensions of an element. 2. Position the mouse cursor on one of the handles used to resize the element. The mouse cursor then takes the form of a horizontal or vertical arrow. 3. While holding the right mouse button down, modify the size of the element. The frame corresponding to the element always coincides with the grid points. Moving a belt element 1. 2. Select the target element. Position the mouse cursor inside the frame symbolizing the element, yet beyond the handles used to resize the element. The mouse cursor then takes the form of a cross. 3. While holding the right mouse button down, move the target element. 4. Release the right mouse button once the element is in the desired position. User Manual : VibtorV3.03.014-R1660 26/ 75 Reference speed Predefined structures Activating this tool allows inserting predefined structures into the model. In the present version of the software, two types of predefined structures are implemented: the first is composed of n inertias and n-1 stiffnesses positioned in series; while the second structure serves to generate reduction train data whose number of levels is defined by the user. When activated, this tool opens a dialogue box that enables choosing the type of predefined structure and setting the structure-definition parameter. The structure itself is then positioned within the model in a way analogous to that described for the simple elements. Creating a predefined structure 1. 2. 3. 4. Click on the "Predefined structure" tool. Choose the type of predefined structure. Set the number of inertias or number of levels. Move the mouse cursor outside the dialogue box. A series of rectangles symbolizing the predefined structure then become "attached" to the mouse cursor. 5. Position the predefined structure at the desired place in the model by means of moving the mouse cursor. 6. When the predefined structure is in the desired position, make a right-click with the mouse. The position of the predefined structure is rejected in the case where an element of this structure has been superimposed either totally or partially. Symmetry This tool allows duplicating, by means of symmetry around a vertical axis, the set of selected elements. Symmetrize 1. 2. 3. Select the elements to be symmetrized. Click on the "Symmetry" tool. Enter the x coordinate that defines the position of the axis of symmetry or click on an existing element positioned on the axis of symmetry. 4. Press the "OK" button to introduce symmetry. The position of the elements is rejected in the case where one of the symmetrized elements has been superimposed either totally or partially onto an existing element. Renumbering This tool is used to change the label number of the element. The label creates a sort order for the element. This order is used to sort the elements in the result lists. Renumbering 1. Activate the “Renumbering” tool. The following dialog box appears. User Manual : VibtorV3.03.014-R1660 27/ 75 Reference speed 2. 3. 4. Select the element type to be renumbered with the corresponding option button. Click successively on the element of the same type in the ascending order desired. Change the element type to continue with the other element type if desired. Renumber first the most interesting elements for the results display. These first elements will be gathered at the beginning of the result list. Once the most interesting elements are renumbered the process can be stop. Identify This tool allows the user to change the default Id for the elements. Identify 1. Activate the “ Identify ” tool. The foolowing dialog box appears. 2. 3. Set the Id to be assigned. Click on the elements to assign the Id. To return to the default Id, leave the field empty and click on the elements.. Multiple-selection is allowed to assign the same Id to several elements. User Manual : VibtorV3.03.014-R1660 28/ 75 Reference speed Definition of stiffness properties Activating this tool serves to assign the characteristics of one or several stiffness elements. Assigning properties to a stiffness element 1. Press the "Stiffness definition" tool. The following dialogue box is then displayed. 2. 3. The element name is displayed in the Id edit box of the dialog box. The element number is displayed in the Label edit box of the dialog box. 4. Define the stiffness of the target element. The button opens the calculation assistant for the stiffness of cylindrical segments in series. 5. Define the auxiliary properties of damping, hysteresis and stress rate. 6. Click directly on the target element in order to assign these properties. Assigning the same characteristics to several elements 1. 2. 3. 4. 5. Select those elements featuring the same stiffness. Activate the "Stiffness definition" tool. Indicate the stiffness of the target element. Define the auxiliary properties of damping and stress rate. Click the "Validate" button in order to assign this stiffness to the entire set of selected elements. Within the "Validate" option, both the "Identifier" and "Number" fields are ignored. Displaying the properties of an element 1. 2. Activate the "Stiffness definition" tool. Right-click on the target element. The assigned properties are then displayed in the dialogue box. Right click on stiffness directly opens the properties dialog box for the selected element. The damping is only used in forced vibrations. The stress rate is only used to display stress in the element following forced vibrations calculations. User Manual : VibtorV3.03.014-R1660 29/ 75 Reference speed Definition of inertia properties Activating this tool serves to assign the characteristics of one or several inertia elements. Assigning properties to an inertia element 1. Press the "Inertia definition" tool. The following dialogue box is then displayed. 2. 3. The element name is displayed in the Id edit box of the dialog box. The element number is displayed in the Label edit box of the dialog box. 4. Identify the inertia of the target element. The button opens the calculation assistant for the inertia of cylindrical segments in series. 5. Define the auxiliary properties of damping, pendulum inertia and pendulum tuning. 6. Check the brake property to create a static torque brake on the disk. 7. Click directly on the target element in order to assign these properties. Assigning the same characteristics to several elements 1. 2. 3. 4. Select those elements featuring the same inertia. Activate the "Inertia definition" tool. Indicate the inertia of the target element. Click the "Validate" button in order to assign this inertia to the entire set of selected elements. Within the "Validate" option, both the "Identifier" and "Number" fields are ignored. Displaying the properties of an element 1. 2. Activate the "Inertia definition" tool. Right-click on the target element. The assigned properties are then displayed in the dialogue box. Right click on stiffness directly opens the properties dialog box for the selected element. The damping is only used in forced vibrations. User Manual : VibtorV3.03.014-R1660 30/ 75 Reference speed The tuning must be defined as a harmonic on engine speed even though it is located on a different speed level. User Manual : VibtorV3.03.014-R1660 31/ 75 Reference speed Definition of gear train properties Activating this tool serves to assign the properties characterizing a gear train. Assigning properties to a gear train 1. Press the "Gear train properties definition" tool. The following dialogue box is then displayed. 2. 3. 4. The element name is displayed in the Id edit box of the dialog box. The element number is displayed in the Label edit box of the dialog box. Define both the inertia and the number of teeth of the considered gear train. The button opens the calculation assistant for the inertia of cylindrical segments in series. 5. Define the auxiliary property of damping. 6. Click directly on the target element in order to assign these properties. Assigning the same characteristics to several elements 1. 2. 3. 4. 5. Select the gear trains that feature the same inertia and the same number of teeth. Activate the "Gear train properties definition" tool. Indicate both the inertia and the number of teeth of the considered gear train. Define the auxiliary property of damping. Click the "Validate" button in order to assign this inertia and number of teeth to the entire set of selected elements. Within the "Validate" option, both the "Identifier" and "Number" fields are ignored. Displaying the properties of an element 1. 2. Activate the "Gear train properties definition" tool. Right-click on the target element. The assigned properties are then displayed in the dialogue box. Right click on gear directly opens the properties dialog box for the selected element. User Manual : VibtorV3.03.014-R1660 32/ 75 Reference speed Definition of gearing stiffness properties Activating this tool serves to assign gearing stiffnesses. Assigning a gearing stiffness 1. 2. 3. Press the "Gearing stiffness definition" tool. The following dialogue box is then displayed. The element name is displayed in the Id edit box of the dialog box. Identify the gearing stiffness. Activating the "Calculate" button initiates the gearing stiffness computation (see the theoretical manual) on the basis of the following elements : Number of teeth for each gear train (this number may be recovered by right-clicking on the gearing), Toothing offset X for each gear train, Real modulus min, Real pressure angle an, Inclination angle , Toothing width, Wheel body (WB) factor User Manual : VibtorV3.03.014-R1660 33/ 75 Reference speed The equivalent torsional stiffness is the stiffness relative to the gears. The equivalent torsional stiffness can be modified the other stiffnesses will be calculated in consequence. 4. The wheel body factor WB may itself be computed thanks to the WB coefficient calculation assistant. Simply click on the displayed : . button and the following dialogue box is 5. Enter the values of both the gear rim thickness (sr) and the thickness of the central wheel wobble (bs), then click "OK". 6. Click on the vertical red line characterizing the target gearing in order to assign these properties. Assigning the same characteristics to several elements 1. 2. 3. 4. Select those gearing stiffnesses that feature the same stiffness values. Activate the "Gearing stiffness definition" tool. Indicate the appropriate gearing stiffness. Click the "Validate" button in order to assign this stiffness to the entire set of selected elements. Within the "Validate" option, the "Number" field is ignored. Displaying the properties of an element 1. 2. Activate the "Gearing stiffness definition" tool. Right-click on the target element. The assigned properties are then displayed in the dialogue box. The equivalent stiffness is the rotational stiffness expressed for each gear. This result is informative. Right click on gearing stiffness area directly opens the properties dialog box for the selected element. User Manual : VibtorV3.03.014-R1660 34/ 75 Reference speed Definition of planetary gear train properties Activating this tool serves to define planetary gear train properties. Defining the properties of a planetary gear train 1. 2. Press the "Planetary gear train definition" tool. The element name is displayed in the Id edit box of the dialog box. 3. Input the set of properties under the second tab "Solar". Inertia: solar inertia. The button opens the calculation assistant for the inertia of a series of cylindrical segments. Number of teeth: number of solar gearing teeth. User Manual : VibtorV3.03.014-R1660 35/ 75 Reference speed 4. Input the set of properties under the third tab " Satellites and crown " Number of satellites: Number of satellites in the planetary system. Unit inertia: The polar inertia of a satellite. The button opens the calculation assistant for the inertia of a series of cylindrical segments. Unit mass: The mass of a satellite. Number of satellite teeth: Number of gearing teeth on a satellite. Number of ring teeth: Number of gearing teeth on the ring. 5. Damping. Enter the set of properties under the fourth tab "Satellite port". User Manual : VibtorV3.03.014-R1660 36/ 75 Reference speed 6. Inertia: Value of inertia specific to the satellite frame. The button opens the calculation assistant for the inertia of a series of cylindrical segments. Center distance: Value of the center distance between the axis of rotation of the satellite frame and the axis of rotation of a satellite. Damping for the satellite frame. Enter the set of properties under the fifth tab "Toothing stiffnesses". User Manual : VibtorV3.03.014-R1660 37/ 75 Reference speed Ring side stiffness: Value of the torsional toothing stiffness between the ring and each satellite. The button opens the standard dialogue box that enables calculating toothing stiffnesses. User Manual : VibtorV3.03.014-R1660 38/ 75 Reference speed 7. 8. Solar side stiffness: Value of the torsional toothing stiffness between the solar and each satellite. The button opens the standard dialogue box that enables calculating toothing stiffnesses. Damping and Hysteresis in the meshing. Stress rate per unit strain to display equivalent stress as results. Click directly on the target element in order to assign these properties. Click on the "Close" button to end this session. Assigning the same characteristics to several elements 1. 2. 3. 4. Select the planetary gear trains that feature the same characteristics. Activate the "Planetary gear train definition" tool. Input all associated properties. Click the "Validate" button in order to assign these same characteristics to the entire set of selected elements. Displaying the properties of an element 1. 2. Activate the "Planetary gear train definition" tool. Right-click on the target element. The assigned properties are then displayed in the dialogue box. Right click on Planetary directly opens the properties dialog box for the selected element. User Manual : VibtorV3.03.014-R1660 39/ 75 Reference speed Definition of differential gear train properties Activating this tool serves to define differential gear train properties. Defining the properties of a differential gear train 1. 2. Press the "Differential gear train definition" tool. The element name is displayed in the Id edit box of the dialog box. 3. Input the set of properties under the second tab "Crown". User Manual : VibtorV3.03.014-R1660 40/ 75 Reference speed 4. Input the set of properties under the third tab " Satellites " Number of satellites: Number of satellites in the differential system. Unit inertia: The polar inertia of a satellite. The button opens the calculation assistant for the inertia of a series of cylindrical segments. Unit mass: The mass of a satellite. Damping. Number of satellite teeth: Number of gearing teeth on a satellite. Number of ring teeth: Number of gearing teeth on the ring. Satellite to planetary axes dist.: Distance between planetary axes and satellite axes or pitch center. 5. Inertia: Crown inertia. The button opens the calculation assistant for the inertia of a series of cylindrical segments. Number of teeth: number of the crown gearing teeth. Damping. Enter the set of properties under the fourth tab "Planetaries". User Manual : VibtorV3.03.014-R1660 41/ 75 Reference speed Inertia: Value of inertia specific to the satellite frame. The button opens the calculation assistant for the inertia of a series of cylindrical segments. Number of planetary teeth: Number of gearing teeth on a planetary. Damping. Reference speed: The relative speed for the planetary. This parameter is used for free and forced vibration display in reference speed. It is also used for relative displacement or acceleration between inertias.. The two ref speed cannot be zero at the same time. Depending on the planetary teeth numbers, the model drawing can one of the following: Top and bottom planetary teeth numbers are equal. Top planetary teeth number is greater than bottom planetary teeth number. Top planetary teeth number is lesser than bottom planetary teeth number. User Manual : VibtorV3.03.014-R1660 42/ 75 Reference speed 6. Enter the set of properties under the fifth tab "Toothing stiffnesses". Top side stiffness: Value of the torsional toothing stiffness between the top planetary and each satellite. The button opens the standard dialogue box that enables calculating toothing stiffnesses. User Manual : VibtorV3.03.014-R1660 43/ 75 Reference speed 7. 8. Bottom side stiffness: Value of the torsional toothing stiffness between the bottom planetary and each satellite. The button opens the standard dialogue box that enables calculating toothing stiffnesses. Damping and Hysteresis in the meshing. Stress rate per unit strain to display equivalent stress as results. Click directly on the target element in order to assign these properties. Click on the "Close" button to end this session. Assigning the same characteristics to several elements 1. 2. 3. 4. Select the differential gear trains that feature the same characteristics. Activate the "Differential gear train definition" tool. Input all associated properties. Click the "Validate" button in order to assign these same characteristics to the entire set of selected elements. Displaying the properties of an element 1. 2. Activate the " Differential gear train definition" tool. Right-click on the target element. The assigned properties are then displayed in the dialogue box. Right click on Differential directly opens the properties dialog box for the selected element. User Manual : VibtorV3.03.014-R1660 44/ 75 Reference speed Définition of belt properties Activating this tool serves to define belt properties. Defining belt properties 1. Activate the "Belt connection stiffness" tool. The dialogue box presented allows defining the following elements: Ident.: This field refers to the ID of the belt connection used both for the graphics display and in the computation note. Number: This field refers to the belt connection number as regards the stiffness used in the sensitivity table. The "Wheel ID" fields indicate the numbers of the two wheels to which the belts are connected. Right-clicking on the target belt enables recovering these numbers. 2. Select the computation mode for equivalent stiffnesses. If the chosen option is "User-defined equivalent stiffness", the following dialogue box is displayed: User Manual : VibtorV3.03.014-R1660 45/ 75 Reference speed 3. If the option selected is "Calculated equivalent stiffness", the following dialogue box is displayed: 4. 5. 6. Diameters - Left wheel - Right wheel: These fields represent the belt winding diameter values. When in user-defined mode, these diameters are used for calculating both the speed ratio and the equivalent stiffness with respect to the right wheel. Linear stiffness : the stiffness in traction of the belt. Equivalent stiffness - Wheel: This value represents the equivalent stiffness with respect to the left wheel. Number of belts: Number of identical belts used in parallel within the connection. Belt side cross-section: Net cross-section dimensions of a belt side. Elasticity modulus: Modulus of elasticity in the axial direction of a belt side. Center distance: Distance separating the axes of rotation of the wheels. Assembly coefficient: Multiplier that depends on both the assembly tension and the type of belts. This coefficient must be situated between 1 and 2. Set the auxiliary properties of damping, hysteresis and stress rate. Click directly on the target element in order to assign these properties. Click on the "Close" button to end this session. User Manual : VibtorV3.03.014-R1660 46/ 75 Reference speed Assigning the same characteristics to several elements 1. 2. 3. 4. Select the belt connections featuring the same characteristics. Activate the "Belt connection stiffness" tool. Input all associated properties. Click the "Validate" button in order to assign these same characteristics to the entire set of selected elements. Within the "Validate" option, both the "Ident." and "Number" fields are ignored. Displaying the properties of an element 1. 2. Activate the "Belt connection stiffness" tool. Right-click on the target element. The assigned properties are then displayed in the dialogue box. Right click on belt directly opens the properties dialog box for the selected element. User Manual : VibtorV3.03.014-R1660 47/ 75 Reference speed Tableau de propriétés Activating this tool triggers the appearance of a dialogue box with five tabs. Each tab enables either visualizing or modifying the following elements, respectively. Inertias Stiffnesses Gear trains Gear train stiffnesses Belts User Manual : VibtorV3.03.014-R1660 48/ 75 Reference speed Assistant de calcul de l'inertie d'une série de tronçons cylindriques In some dialogue boxes, pressing the "Calculate" button opens the dialogue box below, wherein a tool enables calculating the inertia of a series of cylindrical segments on the basis of the following geometrical characteristics: thickness (e), inside diameter (Di), outside diameter (De), and mass density of each segment. User Manual : VibtorV3.03.014-R1660 49/ 75 Reference speed Stiffness calculation assistant for a series of cylindrical segments In some dialogue boxes, pressing the "Calculate" button opens the dialogue box below, wherein a tool enables calculating the equivalent stiffness of a series of cylindrical segments, defined from data on the length, inside diameter (Di), outside diameter (De), and shear modulus (G) or stiffness. Conrod torque library This tool allows the user to define the torques coming from conrods, taking into account inertias from reciprocating masses and gas pressure on piston. Defining 1. Activate Conrod torque library. The dialog box allows defining the following elements. User Manual : VibtorV3.03.014-R1660 50/ 75 Reference speed 2. 3. 4. 5. 6. 7. Fill the ID name. Fill the numerical fields. Click on the button “ Import diag. PV ”.to display the following dialog box : Press the “ Import…“ button to open the file selection dialog box. Press OK to validate the import. In the conrod torque dialog box, click on Add button to add the conrod torque in the library list. User Manual : VibtorV3.03.014-R1660 51/ 75 Reference speed To modify a torque entry, select the ID in the list. Once the modification are completed, click on “Add” and validate following dialog box : The pressure import is limited to 20 columns. Each column must start with the engine speed followed by 720 pressure entries for each crankshaft angle. The zero angle represents the combustion top dead center for the first cylinder. Torque viewer You can have a graph view of the torques defined in the list. 1. Select the torque in the list, click the « show » button, the following dialogue box appears. User Manual : VibtorV3.03.014-R1660 52/ 75 Reference speed 2. 3. 4. Fill the speed and speed number fields then press the “show” button to refresh the graph. Select the “Angle” option button to switch to the cycle view of the torque. Fill the speed field then press the “show” button to refresh the graph as shown bellow; User Manual : VibtorV3.03.014-R1660 53/ 75 Reference speed You can left click in the graph view to obtain (X-Y) values on the curve. You can stretch the dialog box border to size the graphic view as you wish. Cam torque library This tool allows the user to define the torques coming from cam, taking into account inertias from reciprocating masses and spring force. Defining 1. Activate “Cam torque library”. The dialog box allows defining the following elements. 2. 3. 4. 5. 6. Fill the ID name. Chose between mechanical spring and air spring with the option buttons. Fill the numerical fields. Click on the « Import valve lift » button to display the following dialog box. User Manual : VibtorV3.03.014-R1660 54/ 75 Reference speed 7. 8. 9. Press the “ Import…“ button to open the file selection dialog box. 10. Press OK to validate the import. 11. In the cam torque dialogue box, click on Add button to add the cam torque in the library list. To modify a torque entry, select the ID in the list. Once the modification are completed, click on “Add” and validate following dialog box : The valve lift import is limited to the first column. The column must be filled with 720 valve lift entries one for each crankshaft angle. The zero angle represents the combustion top dead center for the first cylinder. The valve lifts must describe in keeping with this timing. You can visualize the cam torques, please refer to the Conrod torque library section. User-defined torque library This tool allows the user to define the torques based on harmonic decomposition. User Manual : VibtorV3.03.014-R1660 55/ 75 Reference speed Defining 1. Activate “User-define torque library”. The dialog box allows defining the following elements. 2. 3. 4. 5. Fill the ID name. Fill the numerical fields. Click on the “ Import…”.button to display the file dialog box to choose the data file. Click on “Add” button to add the user defined torque in the library list. To modify a torque entry, select the ID in the list. Once the modification are completed, click on “Add” and validate following dialog box : The torque import is defined with max 20 lines of data. The first column must contain the speed sort by ascending order. The next 40 columns contain the A and B coefficient of the harmonic decomposition. C = A0 + ∑Aqcos(qΩt)+ ∑Bqsin(qΩt) with 0.5≤q≤20, Ω : engine speed User Manual : VibtorV3.03.014-R1660 56/ 75 Reference speed The torque coefficient table can be copy/paste from Excel. You can visualize the cam torques, please refer to the Conrod torque library section. Torque on Inertia This tool allows the user to apply the torques on the inertia disk. Defining 1. Activate “Torque on inertia”. The dialog box allows defining the following elements. 2. 3. 4. Click on a torque in the list then press the button « Select » Fill the phasis field. Click directly on the inertia in order to assign this torque. Assigning the same characteristics to several elements 1. 2. 3. 4. Select the inertias that feature the same torque. Activate the “Torque on inertia” tool. Input all associated properties.. Click the "Validate" button in order to assign these same characteristics to the entire set of selected elements. Removing torques on one or several disks 1. 2. 3. 4. Select the inertias where to remove torques. Activate the “Torque on inertia” tool. Keep all fields empty. Click the "Validate" button. Displaying the properties of an element 1. Activate the “Torque on inertia” tool. User Manual : VibtorV3.03.014-R1660 57/ 75 Reference speed 2. Right-click on the target element. The assigned properties are then displayed in the dialogue box. When assigning, the characteristics that shall not be altered can be kept by leaving the corresponding field empty. If both field are empty the torque is removed. The phasis represents the firing angle for considered torque. The cylinder 1 phasis must then be set to zero. It is possible to fine tune the cam torque timing using a slightly different phasis from the normal firing angle for the considered cylinder. Measurement import This tool allows the user to import acyclism measurements. The measurements can be assigned on inertia disks in order to be compared to calculations or to be imposed as forced displacements in calculations. Defining 1. Activate the tool “Measurement import”. The dialog box allows the setting of the following elements. Click on the “Parameter header” check button to specify if the import parameters are present at the beginning of the file. 3. Click on the “Import parameter” button to open the dialog box where to set the parameters to read from the measurement file. 2. User Manual : VibtorV3.03.014-R1660 58/ 75 Reference speed 4. Fill the import parameter fileds :. Item numbers : Number of measurements to import. Harmonic number. Check Static Present if H0 is in the file. Begin first bloc : Line number for the beginning of a n harmonic bloc definition removing the useless header lines. Begin second bloc: Line number for the beginning of the second bloc harmonic bloc. First data line : Beginning line number for the harmonic data in the bloc. Last data line : End line number for the harmonic data in the bloc. Item name line : Line number where the item name is located. Item name col : Column number where the item name is located. Item order line : Line number where the order is located. Item order col : Column number where the order is located. Speed col: Column number where the speed is located. A col : Column number where the A coefficent is located. In case of negative value the opposite value of A is stored. B col : Column number where the B coefficent is located. In case of negative value the opposite value of B is stored. Coefficient : Multiplicative coefficient to be applied to data. The software must handle angles in radian as import. Phasis : Angle to make the measurement phasis match with the 0 angle of the calculation. If the phasis reference of the measurements is X deg before 0 angle set this Phasis parameter to X. If the phasis reference of the measurements is Y deg after 0 angle set this Phasis parameter to -Y. Valider en cliquent sur OK 5. Click on the “Import mesure ” button to open the file selection dialog box. The right list is filled with the measurements, the left list is filled with the inertia disks. The user can associate the measurements to the calculations in the two following ways. : User Manual : VibtorV3.03.014-R1660 59/ 75 Reference speed 6. Click on a measure and on a disk, then click on « Forced displacement », the measured acyclism are applied on the selected model disk. Selecting « Compared displacement », allows the user to compare the measure to forced vibration calculations. The graph display in forced vibrations with measurements is shown bellow, bold line is calculation and dash line is measurement. User Manual : VibtorV3.03.014-R1660 60/ 75 Reference speed When you make an export of the forced vibration results, the header is always present so you don’t have to enter the parameter manually. You can edit your import file to manually add the import parameter to avoid having to set them each time. You can take an example with an exported file generated by the software. Don’t forget to have the number 1 at the beginning of the header which is the version number of the reading routine. Sample of export file header : 2 *Header_version* 13 *Item number* 20 *Harmonic number* 1 *Static present* 1 *First bloc begin line number (starting after header)* 24 *Second bloc begin line number* 3 *Data begin line number* 23 *Data end line number* 1 *Name line number* 1 *Name column number* 2 *Harmonic line number* 1 *Harmonic column number* 1 *Speed column number* 2 *A real part column (if <0 take opposite value)* 3 *B imaginary part column (if <0 take opposite value)* 1.000000 *Global multiplicative coefficient to apply* 0.000000 *Phase shift (deg) to apply (Positive if import is in advance)* 1-I1_I_1 0.5 1000.00 -0.790374064 0.589448400 1250.00 -0.504391283 0.376626848 1500.00 -0.349175730 0.260841482 1750.00 -0.255608835 0.190990810 …. The phasis doesn’t need to be set if the measurement are only import for amplitude comparison only. Deletion Activating this tool causes deletion of the set of selected elements. Pressing the "Del" key serves the same purpose. User Manual : VibtorV3.03.014-R1660 61/ 75 Reference speed Reference speed Rotational reference speed Activating this option allows setting the rotational reference speed associated with a given model stiffness, along with all eventual complementary exciter speeds that had not been incorporated by default within the application. Note that it would be advisable to provide the engine (or furnace) speed in order to facilitate analysis of the Campbell diagram. We would like to recall herein that the application automatically considers the following default excitation frequencies: Rotational speeds at each level, Frequencies due to gearings, Harmonics of these rotational speeds. Defining the rotational reference speed 1. 2. 3. Click on the "Rotational reference speed" tool. Input the stiffness element number that serves to characterize the reference level. Set the reference speed of this level. It should be noted that setting this reference speed initiates an update of the list denoted "Category 1 default exciter speeds", which contains the rotational speed of each level as well as the exciter speeds due to gearings. Defining the complementary exciter speeds 1. Input, when applicable, the additional excitation frequencies (those not incorporated by default) within the dedicated table. User Manual : VibtorV3.03.014-R1660 63/ 75 Results interpretation Calculation launch Calculation parameter and calculation launch Activating this option allows the user to choose the calculations to perform and to define the calculations parameter : The calculation speed for the free vibration. Min and max speed and speed number for the forced vibrations calculations. The speed number must be greater than 2. Progress messages are displayed at the bottom side of the dialog box. When a property is missing a message box gives a warning to the user. Calculations are aborted and the element where the property is missing is selected. The free vibrations results are stored in an export file whose name in based on the study name with _MODES.txt postfix. This option can be activated by editing the Vibtor3.ini file. You have to set ModesAsTxtFile variable to 1 to export or to zero not to export. You must restart the software to take the modifications into account. See bellow the corresponding section of the Vibtor3.ini file [CalculationsExport] ModesAsTxtFile=0 User Manual : VibtorV3.03.014-R1660 64/ 75 Results interpretation To speed up the calculations it is possible to skip deform drawing calculations. This will disable the Forced vibrations deform results. To speed up the calculations it is possible to skip sensibility matrix calculations for the eigenmodes. User Manual : VibtorV3.03.014-R1660 65/ 75 Results interpretation Results interpretation Results This option serves to visualize program results and, when activated, opens a toolbox containing the following elements : Modes de vibration Diagramme de proximité Diagramme de Campbell Fréquences propres et excitatrices actives Tableau de résultats Déformation en vibration forcée Affichage graphique des vibrations forcées Vibration modes Activating this tool displays the eigenform visualization of the eigenmodes. The eigenfrequency is displayed in the corresponding dialog box. It is possible to modify the active vibration mode by choosing another mode in this same list. The “Reference amplitude” checkbox selection displays the displacement in the speed level defined by the reference speed. User Manual : VibtorV3.03.014-R1660 66/ 75 Results interpretation As indicated above for purposes of example, the modal strain profiles are represented by a graph such that each horizontal line is proportional to the angular rotation characterizing the given eigenmode. Proximity diagram This tool allows visualizing the proximity diagram, which contains logarithmic scales and resembles the following : Diagramme de proximité (15%) Fréquences propres [trs/mn] 1000 100 10 11 10 100 1000 Fréquences excitatrices [trs/mn] 10000 User Manual : VibtorV3.03.014-R1660 67/ 75 Results interpretation The y-axis represents the scale corresponding to the model eigenfrequencies, while the x-axis is used to characterize the excitation frequencies. Both the eigenfrequency and excitation frequency values are shown by means of red-colored vertical and horizontal lines, respectively. It should be noted that only the "visible" frequencies are represented herein (see Diagram parameters). The two blue slanted lines serve to characterize the "proximity zone" (see section on Preferences Default values). This diagram thus makes it possible to verify whether the intersection points of the lines representing eigenfrequencies and excitation frequencies are located inside the proximity zone (hazardous behavior) or not (acceptable behavior). Right-clicking on the graphics window opens a dialogue box that enables modifying the attributes of both the x and y axes. It becomes possible, in particular, to modify the following elements. Minimum axis value, which may be modified using a drop-down list containing the predefined values 1, 10, 100, 1000 and 10000 Maximum axis value Caption Representation of the primary grid (values 1, 10, 100, 1000,…) Representation of the secondary grid (intermediate values). Campbell diagram Activating this tool allows visualizing the Campbell diagram, which contains linear scales and resembles the following : User Manual : VibtorV3.03.014-R1660 68/ 75 Results interpretation The x-axis represents the scale that measures speed of the reference level, while the y-axis is used to characterize eigenfrequencies. Eigenfrequency values are shown by horizontal red lines and excitation frequency values by slanted blue lines. Note that only the "visible" frequencies are represented herein (see Diagram parameters). The dashed vertical lines correspond to the intersections of eigenfrequencies with excitation frequencies. This diagram thereby facilitates visualization of hazardous speeds within the system. Right-clicking on the graphics window opens a dialogue box that enables modifying the attributes of both the x and y axes. Eigenfrequencies and active excitation frequencies Activating this tool opens a dialogue box that enables setting the excitation frequencies and eigenfrequencies to be considered within the representation of both the proximity and Campbell diagrams. Defining active eigenfrequencies 1. 2. 3. Activate the "Eigenfrequencies and active excitation frequencies" tool. Click the "Eigenfrequencies" tab. Double-click on an eigenvalue to modify its state as either active (yes) or inactive (no). You can show or hide all. You can invert the state of the selection. You can select a range by holding the Shift key between two clicks. Or make a multiple selection by holding the Ctrl key while clicking in the list. Defining active excitation frequencies 1. 2. Activate the "Eigenfrequencies and active excitation frequencies" tool. Click the "Excitation frequencies" tab. User Manual : VibtorV3.03.014-R1660 69/ 75 Results interpretation 3. Double-click on an excitation value to modify its state as either active (yes) or inactive (no). You can show or hide all. You can invert the state of the selection. You can select a range by holding the Shift key between two clicks. Or make a multiple selection by holding the Ctrl key while clicking in the list. Table of results Activating this tool opens a dialogue box that enables visualizing the primary results in tabular form. It is thus possible to visualize the following results. Vibration eigenfrequencies expressed in hertz and in revolutions/min; Excitation frequencies expressed in hertz and in revolutions/min; Position of the vibration nodes associated with each mode. Each vibration node has been characterized herein by its position (value lying between 0 and 1) in the stiffness element, whose number is given in the second row. The type of stiffness element considered is specified by the letter K in the case of a shaft and by the letter E for a gear train stiffness element. Sensitivity matrix: The values given in this matrix are expressed in percent. Proximity table: The values given in this table are expressed in percent. Forced vibrations deform Activating this tool enables the dialog box to select the forced vibrations results to display. The following results can be displayed. User Manual : VibtorV3.03.014-R1660 70/ 75 Results interpretation Displacement, distortion in the elements and torque applied on the model. The display type allows the selection of the speed to be used for the deformed visualization. For the harmonic display, the harmonic can be chosen in the corresponding list box. For the overall display it is possible to remove the static component, the H0 order. The “Reference amplitude” checkbox selection displays the displacement in the speed level defined by the reference speed. The user can choose the angle to be used for the display with the corresponding cursor (see dialog box before). User Manual : VibtorV3.03.014-R1660 71/ 75 Results interpretation As shown in the following figure the display shows the deformed on the model mesh and the recall of visualization option. User Manual : VibtorV3.03.014-R1660 72/ 75 Results interpretation Activating the tool leads to the automatic saving of the displayed screen. The saved screenshots are automatically named by the software. For the forced vibrations graph the names are constructed the following way: Root : « RES_ » for results, Followed by graph « DRAW_ » for forced vibrations deform drawing, Followed by a three char Id describing the graph type : « AMP » for amplitude, « DIS » for distorsion, « TOR » for torque. Followed by the id« SP » with the chosen speed. Followed by the id « HA » with the harmonic order or « OVL » and « OVL_NoH0 » for an overall with or without static H0. Ex : « RES_DRAW_TOR_SP6100.00_HA6._ANG194_REF15 » specify a torque view for the th 6100Rpm speed of harmonic 6 for the 194deg angle with a reference display relative to the 15 stiffness speed level. The graph views are save on the hard disk drive using the same name as described before with the file extension “*.wmf”. Activating the tool leads to the automatic saving of the animated displayed screen. The default recording is made every 5 deg. It is possible to change this behavior in the file « vibtor.ini » in the following section : [VideoGraph] OneImageEvery=5 Forced vibrations graph Activating this tool displays the dialog box allowing the forced vibrations to be plotted as graphs. The following results can be displayed. Amplitude or relative amplitude in the elements. For the last option the user has to select the reference element in the second list box. Notice that the relative amplitude are displayed corresponding to the speed level of reference element or the reference speed if the corresponding check box is selected. User Manual : VibtorV3.03.014-R1660 73/ 75 Results interpretation Acceleration and relative acceleration. Elements distortions. Depending of the element type the distortion is expressed as an angle or as a length. Stress in the elements. This display is valid when the stress rate is specified in the model elements. Torque or force depending if the element stiffness is torsional or linear. Damping power in the elements where the damping has been specified. The “Reference amplitude” checkbox selection displays the displacement in the speed level defined by the reference speed. The setup button displays the dialog box where harmonic selection can be made for the current graph. Double-click on an harmonic to modify its state as either active (yes) or inactive (no). You can show or hide all. You can invert the state of the selection. You can select a range by holding the Shift key between two clicks. Or make a multiple selection by holding the Ctrl key while clicking in the list. The following view shows a graph with the recall of visualization options. User Manual : VibtorV3.03.014-R1660 74/ 75 Results interpretation The right click in the graph displays the following dialog box allowing the modification of X Y axis attributes. It is possible to modify the following entries. Notice that the activation of the tool leads to the automatic saving of the displayed screen. The saved screenshots are automatically named by the software. For the forced vibrations graph the names are constructed the following way : Root : « RES_ » for results, Followed by graph « GRAPH_ » for forced vibrations graph, Followed by a three char Id describing the graph type : « AMP » for amplitude, « AMR » for relative amplitude, « ACC » for acceleration, « ACR » for relative acceleration, « DIS »for distorsion, « TOF » for torque or force, « POW » for power. User Manual : VibtorV3.03.014-R1660 75/ 75 Results interpretation Followed by the element number in the list box. In case of relative displacement the reference element is added with the « % » prefix. When the reference amplitude option is selected the « Ref » Id is added, followed by the stiffness number of the reference element. For a display in speed axis the « Sp » Id is added, for a display in frequency the « Fr » Id is added. Ex : « RES_GRAPH_AMR2%20Ref1Sp » specify a relative amplitude of inertia #2 relative to #20 in speed level relative to #1, displayed in speed. The graph views are save on the hard disk drive using the same name as described before with the file extension “*.wmf”. With the graph view storing a text file is created with the same data as the graph view. The filename is the same as previously described, the file extension is “*.txt”. A raw export file (*.rxp) can be generated as well. It contains raw data (real and imaginary parts for each calculation speed and each harmonic). To activate these options you have to edit the Vibotr3.ini file and put a 1 to activate the option and a zero to deactivate. The options names are self-explanatory as follows in the corresponding Vibtor3.ini section. You must restart the software to take the modifications into account. [ScreenCopy] SaveGraphAsTxtFile=0 SaveGraphRawDataAsRxpFile=0 Forced vibrations export Activating this tool displays the dialog box allowing the forced vibrations to be exported. To export results you must select the data line in the drop down list box and press the Add button to add the selection in the main list box. When the selection is completed, you can save the data by pressing the “Save…” button. The File save dialog box will allow the user to choose the filename. You can delete a data in the list or add and delete all the data in the list, with the corresponding button. The export order in the data file will reflect the order in the main list box, you can move up or down an item in the list, by selecting the proper line and pressing the up or down button. User Manual : VibtorV3.03.014-R1660 76/ 75 Results interpretation The exported file can be imported to allow results comparisons (see Model measurement import section) User Manual : VibtorV3.03.014-R1660 77/ 75 Results interpretation Developped by : 25 rue François Barbin 91540 MENNECY FRANCE Tel : +33 1 64 99 70 78 12-16 rue de Vincennes 93100 MONTREUIL FRANCE Tél. : 01 48 70 47 41 Fax : 01 48 59 12 24 www.itech-soft.com [email protected] Edited by User Manual : VibtorV3.03.014-R1660 78/ 75