1
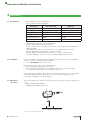
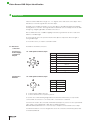
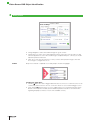
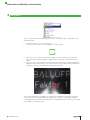
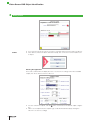
Vision Sensor BVS Quick Guide English Vision Sensor BVS Object Identification 1 2 3 Notes to the user 1.1 1.2 1.3 1.4 1.5 About this manual Structure of the manual Typographical conventions Symbols Abbreviations Safety 2.1 Intended use 2.2 Safety instructions Getting Started 3.1 3.2 3.3 3.4 3.5 3.6 3.7 3.8 Requirements Installation Mechanical connection Electrical connection Overview Connection First Inspection Setup Troubleshooting Appendix 3 3 3 3 3 3 4 4 4 5 5 5 5 6 7 7 9 14 15 Vision Sensor BVS Object Identification 1 Notes to the user 1.1 About this manual This manual contains the startup instructions for the immediate use of the BVS OI. 1.2 Structure of the manual The manual is structured so that the sections are build sequential on one another. Section 2: Basic safety information. Section 3: The main steps for installing the BVS OI system. 1.3 Typographical conventions Enumerations The following conventions are used in this manual: Enumerations are shown in list form with bullet points. – Entry 1, – Entry 2. Actions Action instructions are indicated by a preceding triangle. The result of an action is indicated by an arrow. � Action instruction 1. ⇒ Action result. � Action instruction 2. Syntax Numbers: – Decimal numbers are shown without additional indicators (e.g. 123), – Hexadecimal numbers are shown with the additional indicator hex (e.g. 00hex). Parameters: Parameters are shown in italics (e.g. CRC_16). Directory paths: References to paths in which data are stored or are to be saved to are shown in small caps (e.g. Project:\Data Types\User Defined). Cross-references Cross-references indicate where additional information on the topic can be found (see "Getting Started" on page 5). 1.4 Symbols Caution! This symbol indicates a security notice which must be observed. Note This symbol indicates general notes. 1.5 Abbreviations www.balluff.com BVS EMC IP OI TCP Balluff Vision Sensor Electromagnetic Compatibility Internet Protocol Object Identification Transmission Control Protocol Vision Sensor BVS Object Identification 2 Safety 2.1 Intended use The BVS OI is a sensor captures images of an object. These images are compared by the means of so called “tools” with a previously teached-in reference image taken from a reference object. With the “tools” you can check for certain attributes like contrast or width to determine a pass or fail status. The ConVis software is needed for the adjustment and configuration of the sensor. It allows for the visualisation of the images taken by the sensors and to create and set up inspections. The most current version of the BVS ConVis Software is available via internet at: Balluff Europe: www.balluff.com Balluff North America: http://www.balluff.com/Balluff/us/ResourcesChannel/Downloads/?menuLevel=2 2.2 Safety instructions Please read this Operation Manual carefully prior to installing the BVS. Ensure that the product is suitable for your application without any restrictions. If the operating instructions or technical data are not adhered to, personal injury and/or damage to property may occur. Caution! – Ensure proper polarity and assembly of the connections. – Do only use a power supply which complies to the Technical data. – Protect the device from moisture and dirt during operation. – Do not spill any liquids on the device. – This is not a safety component, according to EU machine guidelines. – Do not install or run this software on any PC or PLC used for machine control. – Observe the local prevailing safety regulations. – Take the system out of service if defects or non-clearable faults occur. – Do not use the device in areas with risk for explosion. – Do not expose this device to strong and continuous vibration. – Any damage from unauthorized manipulation and or improper use voids the direct vendors guarantee and warranty. Vision Sensor BVS Object Identification 3 Getting Started 3.1 Requirements – IBM compatible PC with hard disk drive. The PC shall meet these requirements: Component – – – – – – – 3.2 Installation Recommended Minimum Processor(s) Pentium 4 Pentium 4 Operating System Windows XP (Service Pack 2) Windows XP (Service Pack 1) Clock frequency >= 2 GHz >= 1 GHz RAM 1024 MB = 1GB 512 MB Free hard drive space 50 MB 35 MB Monitor resolution 1280 x 768 pixels 1024 x 768 pixels CD-ROM drive. Installed Ethernet network card and installed driver. One free 10/100 Mbps Ethernet port at the PC. A sensor cable to connect the sensor to power and to the converter (example: BKS S139 cable from Balluff). A parameterisation cable for connecting the sensor to the Ethernet port on the PC (example: BKS AD-05-RJ45/GS180-1.5 cable from Balluff). A power supply unit capable of providing 24V DC, +/- 1.5V DC, minimum 1.2A. The BVS Configuration software "ConVis" from Balluff (supplied with the sensor). Insert the CD-ROM containing the BVS Configuration Software ConVis into a CD compatible drive of the local PC. The CD will start automatically. � Choose Install BVS from the menu shown. Follow the instructions on the screen and in this guide: � Select the program language; then click "Next". � Select the folder where the program should be installed to. Proceed with next steps ... ⇒ The program will install. As soon as it finishes, click "Close". The program will also install the .NET Framework from Microsoft on the users PC, if not already installed. This program library is absolutely necessary for running the program correctly. Please allow this program to install if prompted. 3.3 Mechanical connection The following image shows mechanical mounting of the sensor by use of these mounting accessories: – Mounting bracket BVS Z-MB-01 – Clamping cylinder BMS-CS-M-D12-IZ Fig. 1: Sensor mounting and Alignment www.balluff.com Vision Sensor BVS Object Identification 3 Getting Started Please mount the BVS with an angle of 5 – 15° degrees to the vertical axis of the object. This is mandatory to avoid strong reflections from the object. The BVS sensor shall be mounted as close to the object as possible, but within the minimum working distance of 50 mm. The larger the distance between sensor and object the more ambient light e.g. daylight, light bulbs can influence the sensor. We recommend the use of additional lighting for distances greater than 30 cm to reduce the influence of ambient light. Do not mount the sensor at a position thus that the object is exposed to direct sun light or strong ambient light. To mount the sensor you need 4 screws M4 x 6mm. 3.4 Electrical connection Connector 1: Power Supply and Input & Output Connector 2: Ethernet The BVS has two M12 Connectors. X1 - Male panel connector, 8-pin PIN Function 1 Digital input 2 24 V DC 3 Trigger Output (Ext. Illuminator)S 4 OUT 1 5 OUT 2 6 OUT 3 7 GND (0 v or -V DC) 8 Trigger Input X2 - Male panel connector, 4-pin PIN Function 1 Rx+ 2 Tx+ 3 Rx- 4 Tx- � Connect power supply to port X1. � Connect data line for host system to port X2. To use the sensor without being integrated into the machine environment, you only need to connect PIN2 of Connector 1 to 24 V DC; PIN 7 of Connector 1 to Ground. Connector X2 needs to be connected an Ethernet 10/100 port of your PC for sensor parameterisation using a "Crossed Ethernet" cable. We recommend using the BKS-AD-05RJ45/GS180-01.5. It is not necessary to keep X2 connected after sensor setup. For further information on how to integrate the sensor into a machine environment, please refer to the full User Manual. Vision Sensor BVS Object Identification 3 Getting Started 3.5 Overview Fig. 2: BVS OI - Overview LED indicators The BVS OI is equipped with four LEDs. Item 3.6 Connection LED Display Function 1 LED 1 green Power On 2 LED 2 orange Output 1 Indicator 3 LED 3 orange Output 2 Indicator 4 LED 4 green Network Connection Be sure that Connector 1 is connected to 24 V DC and PIN 7 to Ground. � Please disconnect all existing ethernet cables from your PC. � Connect Connector 2 to the Ethernet 10/100 port on the PC. To establish connection between the sensor and PC, check the Network Connection settings and adapt them as necessary. Note Please be sure to have administrator rights established for the present user logged in, otherwise you can not follow the instructions for network connections. If this is not the case, please contact your local IT manager for assistance in creating this. www.balluff.com Vision Sensor BVS Object Identification 3 Getting Started Network connections Please follow these instructions to check network connections: � Press the WINDOWS START BUTTON. � Select Control Panel --> Network Connections --> LAN Connection. � Now press the right mouse button and select "Poperties" (as shown below). � Select "Internet Protocol (TCP/IP)" then click the "Poperties" button again. Vision Sensor BVS Object Identification 3 Getting Started � Select: "Use The Following IP Adress" option. Now enter the following: 1.IP ADRESS: 172.27.101.1 2.SUBNET MASK: 255.255.0.0 Note No entries for "Default Gateway" or "Use The Following DNS Server Adress" are necessary. � Now click OK to close the dialog TCP/IP Properties and also click OK at the LAN Properties dialog. � Start the BVS ConVis software. � Select in STEP 1: "Online", then select: "Find". The found BVS sensors are shown on the CONTROL PANEL pane. � Click the "Connect" button and the software will show: "Connected to BVS". 3.7 First Inspection Setup STEP 1 There are 3 Steps needed for building an inspection. The ConVis Software will lead the user through each. If a step is active, the ConVis Software will show this step in a bright red highlight; inactive Steps are shown as blue. Image Setup Note If the instructions in Section 3.6 have been followed successfully, the user will be in the middle of STEP 1 in Image Setup. Please do not proceed with the instructions in this chapter unless Section 3.6 has been completed successfully. � Click the below the "Select a Task" label and select "New Inspection". � The ConVis software will now display the "Basic Settings" at the right side of the screen in the Control Panel pane. Pressing the "Live" button will start showing the live images the BVS is taking of the object. � Set Internal Illuminator to "Standard Mode". www.balluff.com Vision Sensor BVS Object Identification 3 Getting Started � Change Brightness and Contrast till the image has good contrast. � Change the focus of the sensor manually by the means of the sensors front-side focus ring until a sharp picture is seen. If the current image is sharp but with poor contrast you should repeat the previous instruction. � Click "Stop", then click "Set Reference". Now you have set the present image as the reference image to configure the tools to. STEP 2 Step 1 has now been completed successfully, Step 2 should now highlight. Teaching the application: � Click the below the "Select Trigger" label and select "Continuous" to allow the sensor to run continuously. Select "External Falling" or "External Rising" to use en external trigger source. � Now click the below the "Select Control" label and choose a Control from the list shown based on the inspection needed. (See the detailed operation manual for more information regarding the purpose and use of each of the available controls.) 10 Vision Sensor BVS Object Identification 3 Getting Started Once a Control has been selected, drag the Control icon over the image to the position of the desired inspection. � Click the Control icon to anchor its position. ⇒ Now you will see what is called a „Region of Interest" frame. � Place the cursor over any of the other three edges, a 4 arrow head cursor should arrear. Click and hold than drag the Region of interest frame to adjust the overall position in the image. � Place the cursor over the Region of interest frame; Click and hold then drag the small box in the bottom right corner. Now you can re-size the frame over the objects area needing to be inspected so it is fully covered like this example (the red frame). The ConVis software will now display the selected Control parameters at the right side of the screen in the Control Panel pane. Make the adjustments needed to create the most reliable Control performance. (See the online Help pane or the detailed operation manual for more details on individual tool settings and use.) www.balluff.com 11 Vision Sensor BVS Object Identification 3 Getting Started STEP 3 � If you want to insert more Controls you have to start with "Select Control" again (see above)". � Once all the Controls have been created and setup, click on the "Output Setup" button next to Step 3. Running the application: The ConVis software will now display the "Output Configuration" settings for the three available outputs, the "Images Saving" and "Teach Button". � For each of the three outputs, click the next to each mode to the desired output configuration. � Next to each output mode, the outputs logic can be inverted functionally by clicking the "Negative Logic" box accordingly. 12 Vision Sensor BVS Object Identification 3 Getting Started Below the output settings, the overall "Output Duration" and "Output Delay" can be set to allow for handshaking between a controller and the sensor. (See the online Help pane or the detailed operation manual for more details how these settings can be used.) The "Image Saving" settings can be used to save images in the sensor or to the host PC (if connected). The saved images will be saved using a FIFO (first in, first out) method for the settings used. The "Teach Button" can be enabled to allow a user to teach a new reference image one the sensor is in operation. To allow the use of the teach button, click the "Enabled" setting. Note Enabling the use of the teach button during operation can seriously detriment the performance of the sensor and permanently change the operational settings of the sensors tools. Caution should be considered when enabling this setting. � Once all the outputs have been created and setup, click on the "Test" button directly under the "Output Setup" button in Step 3. ⇒ The ConVis software will now display the "Output Status" and "Reference Image" for the inspection configured and allows the user to "Load Images" from the PC if the software is being used offline or "Start" testing using live images if a sensor is online. If you are in Offline Mode you can only perform an "Off Line Test": � To do so click the "Load Images" button and select up to 19 images to cycle through for testing. If you are in Online mode you can perform an "On Line Test": � Clicking the "Start" button. ⇒ The sensor will begin loading live images and testing each according to the tool settings made. For both online and offline testing, the "Outputs Status" will change according to the settings made for each output. Note The outputs are physically disabled during test. � To stop an online test, click the "Stop" button below the "On Line Test" indicator. � To Run the inspection, click on the "Run" button directly under the "Test" button in Step 3. www.balluff.com 13 Vision Sensor BVS Object Identification 3 Getting Started Besides having the "Outputs Status" and "Reference Image" remain, the bottom of the "Control Panel" pane will change to "Run" settings. Two choices can be made regarding the display while in run mode. Either graphics can be enabled or statistics and timing can be displayed. To run the sensor and view the live image graphics, click the "Graphics Enabled" setting. If the inspection has not been saved to the sensor, a dialog box will pop up and asked to save the inspection to one of the sensors 8 available inspection slots. Each inspection can be given an individual name for easier identification. Note Enabling graphics will greatly slow the performance of the sensor. To allow optimal performance, click the "Statistics and Timing" setting to show only the "Execution Results", "Execution Timing" and statistics for the overall and individual tools configured in the sensor. The sensor has now been configured and is ready for operation. Once all settings have been made and saved, the sensor can be disconnected from the ConVis software and run in a machine environment. 3.8 Troubleshooting If the connection between the sensor and the software does not work immediately, check the following issues: � Reset the sensor (see chapter RESET in the manual) to be sure that the sensor works with the initial parameters. � Exit the Software and restart it again. � Check the Connection as described in Section 3.6 (Connection). � Check the wiring of the sensor to the power supply and the com cable. � If this still does not work, try to connect another sensor with the PC to verify if the interface of the sensor has been damaged. 14 Vision Sensor BVS Object Identification Appendix Ordering code BVS OI – 3 – 00X – E Balluff Vision Sensor Sensor/function OI = Object Recognition & -identification Resolution in pixels 3 = 640x480 Type 001 = Switching outputs: PNP Workingdistance 50 mm / Field of View (Normal): 25 x 20 mm Workingdistance 1000 mm / Field of View (Normal): 460 x 380 mm 002 = Switching outputs: NPN Workingdistance 50 mm / Field of View (Normal): 25 x 20 mm Workingdistance 1000 mm / Field of View (Normal): 460 x 380 mm 003 =Switching outputs: PNP Workingdistance 50 mm / Field of View (Tele): 17 x 12 mm Workingdistance 1000 mm / Field of View (Tele): 320 x 210 mm 004 =Switching outputs: NPN Workingdistance 50 mm / Field of View (Tele): 17 x 12 mm Workingdistance 1000 mm / Field of View (Tele): 320 x 210 mm Interface E = Ethernet Contact Support If there are any questions, or if problems still occur, please refer to the detailed operation manual. For additional technical support, contact Balluff at For Europe: Telephone: +49 7158 173-0 Email: [email protected] [email protected] For North America: Telephone: 1-800-543-727-2200 Email: [email protected] Additional information about other Balluff products and solutions are available on the Internet at: www.balluff.com/balluff/ Wishes and Suggestions Please contact Balluff with any improvements and suggestions for this product. Please use the contact information stated above. www.balluff.com 15 World Headquarter Subsidaries Germany Balluff GmbH Schurwaldstrasse 9 73765 Neuhausen a.d.F. Phone +49 7158 173-0 Servicehotline +49 7158 173-370 Fax +49 7158 5010 [email protected] USA Balluff Inc. 8125 Holton Drive Florence, Kentucky 41042-0937 Phone 8 59/7 27-22 00, 1-8 00-5 43-83 90 Fax 8 59/7 27-48 23 [email protected] No. 858249 E • Edition 0710 • Subject to modification. www.balluff.com