1
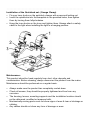
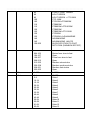
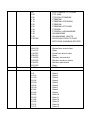
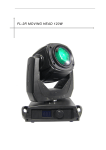
User Manual
HYPERION 5R
SLI-MHB-HYP5R
Table of Contents
1.BEFORE USAGE
- Packaging
- Introduction
- Specifications
- Features
2.INSTALLATION
- Installation Requirements
- Lamp
- Maintenance
- Power Connection
- DMX 512 Connection
3. OPERATION
- Menu Map
- Operating Instructions
- DMX 512 Control
- DMX Channels
1. BEFORE USE
This package contains
• 1x Hyperion 5R
• 1x Quicklock Set
• 1x Power Cable
• 1x User Manual
Unpacking
• Thank you for purchasing this product, it has been thoroughly tested
and has been shipped in perfect operating condition.
• Carefully check the packaging for damage that may have occurred during
shipping.
• If the packaging appears to be damaged, carefully inspect your fixture
for any damage and be sure all equipment necessary to operate the unit has
arrived intact.
• If damage has been found or parts are missing, please contact your vendor
or our customer support number for further instructions.
Introduction
• This fixture can operate in two different operating modes: DMX control or
manual setup on the LCD.
• For best results use fog or special effects smoke to enhance
the beam projection.
• Warning! To prevent or reduce the risk of electrical shock or fire, do not
expose this unit to rain or moisture.
• Warning! This product may cause severe eye damage. Avoid looking directly
into the light source at all times!
Specifications
• Light source: Philips Platinum 5R Lamp
• Electronic Ballast
• High-grade 3-layer glass Fresnel lens
• 540° pan, 270° tilt, 16 bit control with self-correction
• 9 colors + white + 4 CTO filters color wheel
• 17 fixed gobo's + open with gobo shake
• 8-facet prism with rotation
• Frost filter for wash effect
• Beam angle: 0-3.8°
• Strobe: 0~13HZ
• Motorised focus
• Pulse effect, random strobe and random pulse
• Output @10m: 150.000 lux
• Input Voltage: AC100V~240V, 50-60HZ
• Max Power Consumption: 250W
• Packing Dimensions: 440x410x540mm
• Gross weight: 16,5 Kg
Features
• 3PIN XLR DMX in and out
• Neutrik PowerCON input
• Remote lamp control + remote reset over DMX
• 2 control modes: DMX512, manual setup
• LCD Touchscreen for easy setup
• All DMX channels manually adjustable through LCD touchscreen for
maintenance and debugging without DMX controller
• Push-pull cooling system with dust screens for long lamp life
• Indoor operation temperature range: -20°C~+40°C
• 2 DMX Modes: 14ch/18ch
• Dimmer: 0-100%
Please Note: Specifications and improvements in the design of this unit and this
manual are subject to change without any prior written notice.
2. INSTALLATION
Installation requirements:
The product can be hung with the double mounting brackets or placed on a solid
surface.
• If you install the light in a hanging position, always use a suitable mounting
position and a clamp or screw that is strong enough to hold the product
without stress. Always use a safety wire to secure the light.
• Always keep a distance of minimum 0.5m to all objects or persons
• Installation should always be done by a trained professional.
• Make sure the fixture always has good ventilation
• It is recommended to always use 110 Ohm DMX cable to prevent data
corruption of your DMX control signal
Lamp:
• This product is equipped with an extremely powerful gas-discharge lamp
which reaches high temperatures during operation. Never operate the
product with the lamp exposed. Touching the lamp during operation, or even
after operation may cause severe burns. Items that come into contact with
the lamp when it is operational may melt or catch fire. Therefore always make
sure the casing of the light is completely assembled and never open the
casing before 15 minutes have passed after shutting down the light.
• Always replace the lamp within the lifetime of the bulb. When the lamp shows
noticeably reduced brightness or discoloration, it is time to replace the bulb.
Failure to replace the bulb within this period may result in an explosion of the
bulb due it's gas-discharge nature. Any damage resulting to the product as a
result of this failure will not be covered by warranty.
• When replacing the lamp, always make sure the lamp is completely cooled.
Never touch any part of the lamp with your bare hands, always wear
protective gloves as any residue on the lamp will burn and severely reduce
it's lifetime. Always use a Philips MSD Platinum 5R lamp, never use a more
powerful lamp as they generate excessive heat which can potentially damage
the product and induce a risk of fire. Any damage or accident caused by
installing an unsuitable lamp is not covered by warranty and in no
circumstances Stagg Pro Lighting can be held responsible for this.
Lamp Replacement procedure:
• Always wear antistatic gloves before starting this procedure
• Switch off and unplug the unit, wait 15 minutes until it is completely cooled
down
• Use the lock handles to lock the unit's tilt movement after setting it in a
position where the lens is facing the same direction as the LCD screen
• Use a screwdriver to open the cover of the head by removing the screw
• Remove the fan covering the lamp compartment
• Remove the lamp gently out of the lamp compartment
• Remove the cables from the lamp
• Attach the cables to the new lamp
• Gently insert the lamp into the lamp compartment
• If you touched the lamp with your bare hands, clean it with pure cleaning
alcohol thoroughly
• If necessary, you can adjust the lamp hotspot using the adjuster screw next
to the lamp
• Make sure no wires touch the lamp
• Reinstall the fan
• Place the cover back on the head and reinstall the screws
• Clear the running hours of the lamp in the Advanced Menu
Installation of the Quicklock set: (Omega Clamp)
• Fix your truss hooks on the quicklock clamps with screw and locking nut
• Insert the quicklocks into the baseplate in the provided holes, then tighten
them by turning them fullyclockwise
• Hang the truss hooks on the truss and tighten them. Always attach a safety
cable to the light when installing the light in a hanging position.
Maintenance:
This product shoud be freed regularly from dust, other deposits and
contamination. Before cleaning, always disconnect the product from the mains.
Maintenance should be performed on a regular basis.
• Always make sure the product has completely cooled down
• Check all screws, they should be properly tightened and free from any
corrosion.
• The housing, lenses, mounting supports and the installation location should
not be deformed, modified or tampered with.
• Mechanically moving parts must not show signs of wear & tear or blockage or
rubbing.
• Any cables should not show any form of damage or wear.
• Clean the outside lens with glass cleaner and a soft cloth, dry carefully after
cleaning.
• Clean the outside of the product with a damp soft cloth. Only use water
without any detergents. Never immerse the device in any liquid. Dry carefully
after cleaning.
• Remove dust from the inside by blowing compressed air through the
ventilation holes to expel
Power connection:
The equipment has an auto-switching power supply that can accommodate a
wide range of input voltages. The only thing necessary to do before powering on
the unit is to make sure the line voltage you are applying is within the range of
accepted voltages.This equipment will accommodate between 100V and 240v
AC 50-60HZ.
Color
Brown
Blue
Green/Yellow
Connection
AC live wire
AC zero curve
AC ground wire
PIN
1
2
3
DMX 512 Connection:
1. Connect the male 3pin DMX input of the first fixture to the female 3pin DMX
output of the lighting controller using 110 Ohm DMX cable, for example a Stagg
Commandor 10 (skip this step when not using a controller)
2. Connect the output of the first fixture to the input of the next fixture using 110
Ohm DMX cable. Repeat this process until you reach your last fixture. Here it is
recommended to connect a DMX terminator to the output of the last fixture in the
chain.
Always use proper 110 Ohm DMX cable, such as the Stagg NDX series. Using
regular 600 Ohm microphone cable can cause data corruption and unwanted or
bizarre response from your lights.
It is also recommended to place a DMX terminator on the last light in your DMX
chain, such as the Stagg NDXTERMINR-3.
Operating Instructions:
NEVER TURN THE LIGHT OFF AND ON IN RAPID SUCCESSION, THIS WILL
CAUSE THE BALLAST TO RESTRIKE THE LAMP MULTIPLE TIMES AND
WILL DEGRADE LAMP LIFE SUBSTANTIALLY
The Hyperion 5R is completely set up through the large LCD touchscreen.
Alternatively, the rotary wheel can be used. Rotating to the left and right cycles
through menu and functions, while clicking the wheel has the same effect as
tapping the touch screen.
Main Menu
• Set Up : Tap this button to enter the main setup menu
• Information : Tap this button to enter the Info menu (runtime, dmx data,
errors, etc...)
• Manual : Tap this button to enter the manual troubleshooting menu. All DMX
channels can be set manually trough this menu for maintenance and
troubleshooting
• Advanced : Tap this button to enter the Advanced settings menu. This menu
contains the touch screen calibration, startup calibration, lamp reset, etc...
• 180° (right top): Tap this button to change the orientation of the display 180°
for when installing the light in a hanging position. Tap it again to return to
normal orientation.
Set Up Menu
Move up and down trough the menu with the buttons on the right of the touch
screen, or by turning the rotary wheel. Push OK or click the rotary wheel to
select a setting or confirm a change. Press Back on the touch screen, or select
Back on the bottom of the menu and click the rotary wheel to return to the main
menu.
• Run Mode : DMX allows you to run the light in DMX512 control mode
• DMX Address : Set the start adress for DMX512 control here, corresponding
to Channel 1 in the DMX channel table at the en of the user manual
• Channel Mode : Select 14 for 14 channel mode or 18 for 18 channel mode
• Invert Pan: Select OFF to run the Pan movement in normal control, select
ON to run the Pan movement 180° inverted
• Invert Tilt: Select OFF to run the Tilt movement in normal control, select ON
to run the Tilt movement 180° inverted
• Swap Pan-Tilt : Select OFF to run Pan and Tilt movent normally, select ON
to make the Pan channels control the Tilt movement and vice-versa
• Encoder Pan-Tilt : When set to ON, the Pan and Tilt encoders are activated.
This function allows the light to auto-correct the Pan and Tilt function to return
to the last received DMX values if accidentally moved by hand. When the
Pan or Tilt position is changed by external influence, the encoders will
automatically correct the position to return to the last stored value.
• No DMX Signal : Select KEEP to let the fixture keep it's position when DMX
signal is cut, select CLEAR to let the fixture return to it's startup position when
DMX signal is cut
• Display Power Save : Select OFF and the display will remain on at all time
the fixture is turned on, select ON and the display will turn off after a short
time of not being used
• Burn On Startup : Select OFF and the lamp will wait for DMX signal or
manual signal trough the menu to turn on, select ON and the lamp will
automatically turn on with the fixture during startup
• Load Default : Select this setting and confirm with "ON" to reset all settings
to default factory settings, cancel by pressing Cancel
Information Menu
Move up and down trough the menu with the buttons on the right of the touch
screen, or by turning the rotary wheel. Push OK or click the rotary wheel to
select a setting or confirm a change. Press Back on the touch screen, or select
Back on the bottom of the menu and click the rotary wheel to return to the main
menu.
• Software Version : Here the installed software version is displayed
• Total Fixture Hours : Displays the total amount of time the fixture has run
since first startup
• Partial Fixture Hours : Displays the amount of time the fixture has run since
the last startup
• Total Lamp Hours : Displays the total amount of time the lamp has run since
first startup
• Partial Lamp Hours : Displays the amount of time the lamp has run since
the last startup
• DMX Information : Enters the DMX Information page. Here real-time
information about the DMX channels of the fixture
• System Errors : Enters the System Errors page, here all System Errors (if
present) are displayed
Manual Control Menu
Move up and down trough the menu with the buttons on the right of the touch
screen, or by turning the rotary wheel. Push OK or click the rotary wheel to
select a setting or confirm a change. Press Back on the touch screen, or select
Back on the bottom of the menu and click the rotary wheel to return to the main
menu.
All functions in this menu are for maintenance and testing purposes only, and
will only function when no DMX input signal is present.
• Reset : Resets all the fixture's DMX channels to default value
• Lamp Control : Turn the fixture's lamp on or off. NEVER turn the lamp on
and off quickly after eachother multiple times. This will shorten lamp life
severely
• All the following functions allow you to change the different DMX channels of
manually. Select the channel with up and down on the touchscreen or by
turning the rotary wheel, confirm with OK. First you will adjust the hundreds
value of the channel (0, 1 or 2), then the tenths (0,1,2,3,4,5,6,7,8,9) and then
the single digits (0,1,2,3,4,5,6,7,8,9). Moving trough them is done by pressing
OK or the rotary wheel. Take in mind that when you have selected the singles
and you go past 9, the tenths will increment by one. The same for when you
have selected the tenths, then the hundreds will increment.
Advanced Menu
When trying to access this menu, a password is required to be entered on the
following screen. The password is UP, DOWN, UP, DOWN and then confirming
with OK.
Move up and down trough the menu with the buttons on the right of the touch
screen, or by turning the rotary wheel. Push OK or click the rotary wheel to
select a setting or confirm a change. Press Back on the touch screen, or select
Back on the bottom of the menu and click the rotary wheel to return to the main
menu.
• Touch Screen Calibration : Selecting this will open the calibration page for
the Touch Screen. Tap on the cross in each corner to re-calibrate the input
from the display
• Reset Calibration : Selecting this will open the sub-menu where you can
adjust the default values for the startup and reset position. You can adjust the
position of Pan, Tilt, Gobo Wheel, Color Wheel and Focus
• Lamp Life Hours : Here you can enter the maximum life time of the lamp
you have installed
• Lamp Hours Clear : Select this to reset the total runtime of the lamp in the
Information menu. This should be done every time a lamp is replaced
DMX 512 Control
This function allows you to use a universal DMX-512 controller such as the
Stagg COMMANDOR 10 to control the HYPERION 5R, a DMX controller allows
you to create unique programs tailored to your individual needs. The HYPERION
5R uses 14 and 18 DMX channel modes, this will allow you to create custom
light-shows. Follow the instruction on the following DMX address charts.
DMX Channels
14 Channel mode
No.
Channel
DMX value
Description
1
Color Wheel
0
5
10
15
20
25
30
35
40
45
50
55
60
65
70
75
80
WHITE
WHITE + RED
RED
RED + YELLOW
YELLOW
YELLOW + AQUAMARINE
AQUAMARINE
AQUAMARINE + BLUE
BLUE
BLUE+ MAGENTA
MAGENTA
MAGENTA + ORANGE
ORANGE
ORANGE +PINK
PINK
PINK+ CYAN
CYAN
2
Shutter
3
Dimmer
4
Gobo
85
90
95
100
105
110
115
120
125
130
135
140
145
150-255
CYAN + LIGHT GREEN
LIGHT GREEN
LIGHT GREEN + CTO190K
CTO 190K
CTO190K+CTB8000K
CTB8000K
CTB8000K+CTB 6500K
CTB6500K
CTB6500K+CTO 260K
CTO260K
CTO260K+ AQUAMARINE
AQUAMARINE
AQUAMARINE +WHITE
SLOW ROTATION TO FAST
ROTATION (RAINBOW EFFECT)
000-003
004-103
104-107
108-207
208-212
213-225
226-238
239-251
252-255
0-255
Closed
Strobe from slow to fast
Open
Pulse from slow to fast
Open
Random slow strobe
Random medium strobe
Random fast strobe
Open
0-100%
0-4
5-9
10-14
15-19
20-24
25-29
30-34
35-39
40-44
45-49
50-54
55-59
61-64
65-69
WHITE
Gobo1
Gobo2
Gobo3
Gobo4
Gobo5
Gobo6
Gobo7
Gobo8
Gobo9
Gobo10
Gobo11
Gobo12
Gobo13
70-74
75-79
80-84
85-89
90-129
Focus
0-127
128-255
0-255
Gobo14
Gobo15
Gobo16
Gobo17
Gobo fast rotation-slow rotation,
backward
Stop
Gobo fast rotation-slow rotation,
forward
Gobo1 Shake (slow to fast)
Gobo2 Shake (slow to fast)
Gobo3 Shake (slow to fast)
Gobo4 Shake (slow to fast)
Gobo5 Shake (slow to fast)
Gobo6 Shake (slow to fast)
Gobo7 Shake (slow to fast)
Gobo8 Shake (slow to fast)
Gobo9 Shake (slow to fast)
Gobo10 Shake (slow to fast)
Gobo11 Shake (slow to fast)
Gobo12 Shake (slow to fast)
Gobo13 Shake (slow to fast)
Gobo14 Shake (slow to fast)
Gobo15 Shake (slow to fast)
Gobo16 Shake (slow to fast)
Gobo17 Shake (slow to fast)
No prism
8-facet Prism
Prism angle adjustment 0-540°
Prism rotation from fast to slow
(backwards)
Stop
Prism rotation from slow to fast
(forwards)
No Frost Filter
Frost Filter
0-100%
Pan
0-255
PAN 0-540º
10
Pan fine
0-255
PAN 16 bit (1.8°)
11
Tilt
0-255
Tilt 0-270º
130-134
135-170
171-175
5
Prism
6
Prism rotation
176-180
181-185
186-190
191-195
196-200
201-205
206-210
211-215
216-220
221-225
226-230
231-235
236-240
244-245
246-250
251-255
0-127
128-255
0-127
128-190
191-192
193-255
7
Frost
8
9
12
Tilt fine
0-255
Tilt 16 bit (1.8°)
13
RESET
0-25
26-76
77-127
128-255
NO Function
Reset
Gobo/Color/Frost/Prism/Focus
Reset Pan/Tilt
Full Reset
14
Lamp Control
0-9
10-100
101-255
RESET WILL BE INITIATED
AFTER HOLDING THE DMX
VALUE FOR 10 SECONDS
No function
Lamp Off
Lamp On
LAMP WILL BE SWITCHED
AFTER HOLDING THE DMX
VALUE FOR 10 SECONDS
18 Channel mode
No.
Channel
DMX value
Description
1
Color Wheel
0
5
10
15
20
25
30
35
40
45
50
55
60
65
70
75
80
85
90
WHITE
WHITE + RED
RED
RED + YELLOW
YELLOW
YELLOW + AQUAMARINE
AQUAMARINE
AQUAMARINE + BLUE
BLUE
BLUE+ MAGENTA
MAGENTA
MAGENTA + ORANGE
ORANGE
ORANGE +PINK
PINK
PINK+ CYAN
CYAN
CYAN + LIGHT GREEN
LIGHT GREEN
2
Shutter
3
Dimmer
4
Gobo
95
100
105
110
115
120
125
130
135
140
145
150-255
LIGHT GREEN + CTO190K
CTO 190K
CTO190K+CTB8000K
CTB8000K
CTB8000K+CTB 6500K
CTB6500K
CTB6500K+CTO 260K
CTO260K
CTO260K+ AQUAMARINE
AQUAMARINE
AQUAMARINE +WHITE
SLOW ROTATION TO FAST
ROTATION (RAINBOW EFFECT)
000-003
004-103
104-107
108-207
208-212
213-225
226-238
239-251
252-255
0-255
Closed
Strobe from slow to fast
Open
Pulse from slow to fast
Open
Random slow strobe
Random medium strobe
Random fast strobe
Open
0-100%
0-4
5-9
10-14
15-19
20-24
25-29
30-34
35-39
40-44
45-49
50-54
55-59
61-64
65-69
70-74
75-79
WHITE
Gobo1
Gobo2
Gobo3
Gobo4
Gobo5
Gobo6
Gobo7
Gobo8
Gobo9
Gobo10
Gobo11
Gobo12
Gobo13
Gobo14
Gobo15
80-84
85-89
90-129
Focus
0-127
128-255
0-255
Gobo16
Gobo17
Gobo fast rotation-slow rotation,
backward
Stop
Gobo fast rotation-slow rotation,
forward
Gobo1 Shake (slow to fast)
Gobo2 Shake (slow to fast)
Gobo3 Shake (slow to fast)
Gobo4 Shake (slow to fast)
Gobo5 Shake (slow to fast)
Gobo6 Shake (slow to fast)
Gobo7 Shake (slow to fast)
Gobo8 Shake (slow to fast)
Gobo9 Shake (slow to fast)
Gobo10 Shake (slow to fast)
Gobo11 Shake (slow to fast)
Gobo12 Shake (slow to fast)
Gobo13 Shake (slow to fast)
Gobo14 Shake (slow to fast)
Gobo15 Shake (slow to fast)
Gobo16 Shake (slow to fast)
Gobo17 Shake (slow to fast)
No prism
8-facet Prism
Prism angle adjustment 0-540°
Prism rotation from fast to slow
(backwards)
Stop
Prism rotation from slow to fast
(forwards)
No Frost Filter
Frost Filter
0-100%
Pan
0-255
PAN 0-540º
10
Pan fine
0-255
PAN 16 bit (1.8°)
11
Tilt
0-255
Tilt 0-270º
12
Tilt fine
0-255
Tilt 16 bit (1.8°)
130-134
135-170
171-175
5
Prism
6
Prism rotation
176-180
181-185
186-190
191-195
196-200
201-205
206-210
211-215
216-220
221-225
226-230
231-235
236-240
244-245
246-250
251-255
0-127
128-255
0-127
128-190
191-192
193-255
7
Frost
8
9
13
RESET
0-25
26-76
77-127
128-255
NO Function
Reset
Gobo/Color/Frost/Prism/Focus
Reset Pan/Tilt
Full Reset
14
Lamp Control
0-9
10-100
101-255
15
Pan/Tilt
speed
Color wheel
speed
Dimmer\Pris
m\Frost
speed
Gobo Speed
0-255
RESET WILL BE INITIATED
AFTER HOLDING THE DMX
VALUE FOR 10 SECONDS
No function
Lamp Off
Lamp On
LAMP WILL BE SWITCHED
AFTER HOLDING THE DMX
VALUE FOR 10 SECONDS
Linear Speed Control
0-255
Linear Speed Control
0-255
Linear Speed Control
0-255
Linear Speed Control
16
17
18
iMPORTANT SAFETY INSTRUCTIONS
READ AND KEEP THESE INSTRUCTIONS. HEED ALL WARNINGS.
• If, after you have followed the instructions outlined above, this device fails to function, please
contact your dealer. Under no circumstances should this device be opened. Leave all servicing to
qualified personnel.
•,Electrical appliances must never be used in conditions of high humidity or heat. To prevent any risk
of fire or electric shock, never spill or splash liquids on this device. Should this happen, unplug the
power cable from the mains outlet and switch off the mixer immediately.
MARKING & CONFORMITY
1. The CE mark on this product means it conforms to the EMC Directive (2004/108/CE), CE marking
Directive (93/68/EEC) and Low Voltage Directive (2006/95/EC).
2. The «Crossed-out Wheeled Bin» is to draw your attention to the WEEE (Waste Electric &
Electronic Equipment) Directive (2002/96/EC). It means this apparatus must be collected separately
for recycling.
3. «RoHS compliant» means this device conforms to the Directive (2002/95EC) on the restriction of
the use of certain hazardous substances in electrical and electronic equipments, such as: Mercury,
Lead, Cadmium, Hexavalent Chromium, Polybrominated Buphenyl (PBB) and Polybrominated
Diphenyl Ethers (PBDE).
05/11/13