1
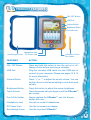
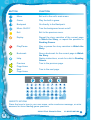
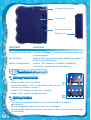
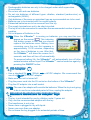
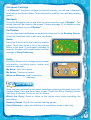
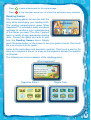
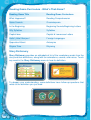
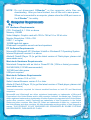
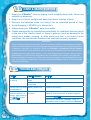
User’s Manual
Dear Parent,
At VTech® , we know how important reading is for your child’s development.
We want to introduce children to reading in a dynamic, engaging way
that will make them readers for life. That’s why we created V.ReaderTM,
where reading comes alive with animated storytelling!
In these animated books, stories come to life through colorful scenes, voices,
sounds and music. V.ReaderTM creates a magical world that keeps children
interested in the story while they learn letters, words, comprehension,
and more!
Watching their favorite characters in fun-loving stories engages children
in play, as they gain the tools to grow from a pre-reader into a fluent and
confident reader. As their reading skills grow, their self-esteem grows, and
their appetite for reading will, too!
With a USB connection to a computer, you can even track your child’s
reading progress, and download and print awards for each completed
story.
At VTech®, we are dedicated to helping kids discover the magic of reading.
We thank you for trusting VTech® with the job of helping your child
learn and grow!
Sincerely,
Your friends at VTech®
To learn more about V.ReaderTM and other VTech® toys, visit
www.vtechkids.com
CONTENTS
Introduction ..................................................................
1
Included in This Package ......................................................
1
Product Features ....................................................... 2
Getting Started ...........................................................
Battery Installation .................................................................
Battery Notice ........................................................................
AC Adaptor ............................................................................
Standard Guidelines for Adaptor Toys......................................
How to Play ...........................................................................
• STEP 1: Insert the Storybook Cartridge ......................................
• STEP 2: Turn the V.ReaderTM On ............................................
• STEP 3: Personalize Your V.ReaderTM .....................................
• STEP 4: System Menu ............................................................
4
4
4
5
5
6
6
6
6
6
Activities ...........................................................................
7
8
9
• Story Dictionary ...................................................................... 10
• Watch the Story ......................................................................
• Reading Games .....................................................................
Using the V.ReaderTM Touch Screen ..................................... 11
Cleaning the V.ReaderTM Touch Screen ................................ 11
Inserting an SD Card ............................................................. 11
Connecting to a Computer ..................................................... 12
Computer Requirements ........................................................ 13
CARE & MAINTENANCE ................................................... 14
TROUBLESHOOTING ........................................................ 14
TECHNICAL SUPPORT ..................................................... 15
Copyright Notices .................................................................. 16
Disclaimer and Limitation of Liability ..................................... 16
INTRODUCTION
Thank you for purchasing the VTech® V.Reader Animated E-Book System!
V.Reader is an animated storyteller that brings books to life in a kid-tough,
touch screen reading system for 3 - 7 year olds. With V.Reader your child will
discover the joy of reading while watching well-loved characters and stories in
vivid animations.
TM
TM
TM
User’s Manual
V.ReaderTM
(including V.ReaderTM Pen)
V.ReaderTM
Storybook Cartridge
Soft Cloth
USB Cable
User’s Manual
Included in This Package
•
•
•
•
•
One VTech® V.Reader Animated E-Book System (including V.Reader Pen)
One V.Reader Storybook Cartridge (What’s That Noise?)
One Soft Cloth
One USB Cable
One User’s Manual
WARNING:
TM
TM
TM
All packing materials such as tape, plastic sheets, wire ties and
tags are not part of this toy and should be discarded for your child’s
safety.
Note: Please keep the user’s manual as it contains important information.
PRODUCT FEATURES
ON / OFF Button
USB Port
Volume Button
Brightness Button
Touch Screen
See-through Cover
Headphone Jack
DC Power Jack
V.Reader
TM
Pen Holder
Pen &
FEATURES
ACTION
On / Off Button
Press and hold this button to turn the unit on or off.
Always do this before removing a cartridge.
USB Port
Plug the included USB cable into this USB port to
connect to your computer. Please see pages 12 & 13
for more information.
Volume Button
Press “+” or “-” to adjust the sound volume. You can
set the volume to the lowest setting to mute the sound
entirely.
Brightness Button
Press this button to adjust the screen brightness.
Touch Screen
Touch the screen with your finger or with the V.Reader
pen to play.
Pen & Pen Holder
Always replace the V.Reader
holder after use.
Headphone Jack
Use this to connect headphones.
DC Power Jack
Use this to connect an adaptor.
See-through Cover
Use this to protect V.Reader .
TM
TM
pen into the pen
TM
BUTTON
FUNCTION
Menu
Exit out to the unit’s main menu.
Game
Play the built-in game.
Backpack
Go directly to the Backpack.
Music ON/OFF
Turn the background music on/off.
Exit Exit to the previous menu.
Replay
Repeat the story narration of the current page
in Watch the Story, or repeat the question in
Reading Games.
Play/Pause
Play or pause the story narration in Watch the
Story.
Bookmark
Save a bookmark for the current page in Watch
the Story.
Replay instructions, or ask for a hint in Reading
Games.
Turn to the previous page.
Help
Previous
Page Arrow
Next
Page Arrow
Turn to the next page.
QWERTY KEYPAD
Press the keys to type in your user name, write a welcome message, or enter
answers for some reading game questions.
2010 © VTech Printed in China
91-002452-007-000
Storybook Cartridge Slot
SD Card Slot
Battery Compartment
Battery Cover
FEATURES
FUNCTION
Storybook Cartridge Slot Insert the V.Reader
to read and play.
TM
storybook cartridge into the slot
SD Card Slot
Insert an SD card (not included). Please see pages 11
&12 for more information.
Battery Compartment
Insert 4 “AA” batteries. For battery installation
instructions, please see the next section.
GETTING STARTED
Battery Installation
• Make sure the unit is turned off.
• Locate the battery cover on the back of the unit and
remove it as shown in image 1.
• Insert 4 “AA” batteries as shown in image 2.
• Make sure to replace the battery cover.
Battery Notice
1
2
• The use of new alkaline batteries is recommended for maximum
performance.
• Non-rechargeable batteries are not to be recharged.
• Rechargeable batteries are to be removed from the toy before being charged
(if removable).
• Rechargeable batteries are only to be charged under adult supervision
(if removable).
• Do not mix old and new batteries.
• Do not mix batteries of different types: alkaline, standard (carbon-zinc) or
rechargeable (Ni-MH).
• Only batteries of the same or equivalent type as recommended are to be used.
• Batteries are to be inserted with the correct polarity.
• Exhausted batteries are to be removed from the toy.
• The supply terminals are not to be short-circuited.
• The toy is not to be connected to more than the recommended number of power
supplies.
• Do not dispose of batteries in fire.
NOTE: When the V.Reader is running on batteries, you may see this icon
appear on the screen
. This indicates
that battery power is low, and you should
replace the batteries soon. Battery time
remaining once the icon first appears is
approximately 10-30 minutes, depending
on the type of batteries in use. After that,
the V.Reader will show the screen for 5
seconds, and then will turn off automatically.
To preserve battery life, the V.Reader will automatically turn off after
several minutes without input.The V.Reader can be turned on again by
pressing the ON/OFF button.
TM
TM
TM
TM
AC Adaptor
300mA
• Use a standard 9V
use of a VTech® 9V AC/DC adaptor.
• Make sure the unit is turned off.
AC/DC adaptor. We recommend the
• Plug the power cord into the 9V socket on the bottom of the V.Reader .
• Plug the AC adaptor into a wall socket.
NOTE: The use of an adaptor will override the batteries. When the toy is not going
to be in use for an extended period of time, unplug the adaptor.
TM
Standard Guidelines for Adaptor Toys
•
•
•
•
•
•
The toy is not intended for use by children under 3 years old.
Only use the recommended adaptor with the toy.
The transformer is not a toy.
Never clean a plugged-in toy with liquid.
Never use more than one adaptor.
Do not leave the toy plugged in for extended periods of time.
How to Play
STEP 1: Insert the Storybook Cartridge
Make sure the unit is turned off.
Insert the V.Reader storybook cartridge firmly down into the cartridge slot located
on the back of the unit and push until it clicks into place. The label should face
away from you (image 3).
TM
3
STEP 2 : Turn the V.ReaderTM On
Turn the V.Reader on by holding down the ON/OFF button for a few seconds.
TM
STEP 3: Personalize Your V.ReaderTM
The first time you power on the V.Reader , you will see My Name and My Avatar
screens. These allow you to personalize your V.Reader by adding your name
and a picture for your avatar. Use the keyboard to type in your name, and press
the green checkmark when you’re done. Use the blue arrows to scroll through
the avatar choices, and touch one to choose. Press the green checkmark when
you’re done.
TM
TM
STEP 4: System Menu
In the System Menu, there are five icons:
Storybook Cartridge
If a V.Reader storybook cartridge is inserted properly, you will see it displayed
as a book in the System Menu. Touch the book to read the story and play reading
games.
TM
Backpack
Touch the Backpack icon to see what you have saved on your V.Reader . The
stored items will be listed on the screen. Please see page 12 for details on how
to download items to your V.Reader .
TM
TM
Certificates
You can download certificates as rewards for doing well in the Reading Games.
Touch the Certificate icon to see your certificates.
Game
Touch the Game icon to play a built-in reading
game. Touch the moles to fill in the missing
letters in the word. If a storybook cartridge is
inserted, the game will include words from that
cartridge’s Story Dictionary.
Setup
Touch the Setup icon to change your personal
information, including name, avatar and
welcome message.
My Name: Input your name.
My Avatar: Choose an avatar.
Welcome Message: Input a welcome
message.
ACTIVITIES
Once you have entered the storybook cartridge by selecting the book icon in the
System Menu, there are three ways to play: Watch the Story, Reading Games
and Story Dictionary. Touch an icon to choose.
Watch the Story: Read or listen to the whole story while watching the
animations.
Reading Games: Play 8 story-related reading games.
Story Dictionary: Learn the definitions of vocabulary words in the story.
Settings:
Touch the Settings icon to turn the background
music and vocabulary highlight feature on or
off.
Watch the Story
There are two ways to start Watch the Story.
You can choose Whole Story to enjoy the entire
story narration from the beginning, or touch
Bookmark to go right to your bookmarked
page. If you have not saved a bookmarked
page, this submenu will be deactivated and you
will automatically enter Whole Story when you
choose Watch the Story.
You can press
or touch anywhere on the
screen to pause the story narration and enter
Free Play. When the story narration of each
book page has finished, you will enter Free
Play automatically.
To pause the story narration, press
. To
continue the story narration, press
again.
Free Play
To stop the automatic story narration and
enter Free Play, touch anywhere on the
screen. In Free Play, you can touch the words
one by one to read the story at your own
pace, touch highlighted vocabulary words to
hear their definitions, or touch images in the
art to see animations and hear fun voices and
sounds. If you don’t touch the screen for a while, the story narration will continue
automatically from the next page.
• Touch any word in the story text to hear the word read aloud.
• Touch pictures to see animations and hear fun voices and sounds.
• Press
• Press
or
to move to the next or previous page.
to listen to the current page’s story narration.
• Press
to save a bookmark for the current page.
• Press
or the onscreen arrow icon to restart the automatic story narration.
Reading Games
Play 8 reading games to have fun with the
story while developing your reading skills.
The reading comprehension game “What
Happened?” is included in every storybook
cartridge to reinforce your understanding
of the stories you read. The other 7 games
teach a variety of age-appropriate reading
skills. Choose the game you wish to play
from the Reading Games menu. Simply
touch the arrow button on the screen to see your game choices, then touch
the icon to enter into the game.
Listen to the instructions and questions carefully. Then touch a word in the
story text, a picture in the art, or a key on the keypad to answer the question
as directed.
The following are some examples of the reading games.
What Happened?
Opposites Attract
Rhyme Time
Reading Game Curriculum - What’s That Noise?
Reading Game Title
Reading Game Curriculum
What Happened?
Reading Comprehension
Same Sounds
Onomatopoeia
In the Beginning
Beginning Sounds/Beginning Letters
Silly Syllables
Syllables
Capital Idea
Capital & Lowercase Letters
Hello! ¡Hola! Bonjour!
Foreign Languages
Opposites Attract
Antonyms
Rhyme Time
Rhyming
Story Dictionary
Story Dictionary provides an alphabetical list of the vocabulary words from the
story and their definitions, along with fun animations, sounds, and voices. Touch
any word in the Story Dictionary menu to hear its definition.
To deepen your understanding, some definitions have follow-up questions that
relate to the definition you just read.
10
Using the V.Reader Touch Screen
TM
V.Reader has a touch-sensitive screen that you can interact with by using your
finger or the included pen. Lightly touch the screen with your finger or the pen.
TM
or
MENU
MENU
GAME
GAME
HIGHLIGHT
HIGHLIGHT
MUSIC
OFF OFF
MUSIC
NOTE:
• Use only enough pressure to operate the game. Too much pressure may
damage the touch screen.
• Do not use the pen if it is broken.
• Do not use any other pens on the touch screen other than the V.Reader pen.
• Put the pen back in the pen holder when not in use.
TM
Cleaning the V.Reader Touch Screen
TM
If the screen on your V.Reader has visible smudges, fingerprints or other material
on it, you can clean it with the included soft cloth.
1.Slightly dampen the cloth with an alcohol-based cleaner and wipe the screen
to loosen dirt.
2.Using a clean, dry cloth, wipe the screen dry. Repeat these two steps as
needed.
TM
Inserting an SD Card
You can insert an SD card (not included) into your V.Reader , to store downloaded
content.
• Make sure the unit is turned off.
• Open the battery cover, as shown in image 4.
• Make sure the batteries have been removed.
• Locate the SD card slot inside the battery cover.
• Insert the SD card as shown in image 5.
• Make sure to replace the battery cover.
TM
11
4
5
Connecting to a Computer
• Download the setup program from www.vtechkids.com/download for US and
www.vtechcanada.com/toysdownload for Canada and install it onto your
computer.
• Insert an SD card into your V.Reader , as shown above.
• Turn on your V.Reader .
• Locate the USB port on the upper right-hand side of your V.Reader and open
the rubber port cover.
• Insert the smaller end of the included USB cable into the USB port on your
V.Reader .
• Insert the larger end of the USB cable into a USB port on your computer. The
USB port is usually marked with the symbol that appears on the USB port cover
of your V.Reader . Please refer to images 6 and 7.
TM
TM
TM
TM
TM
6
7
• After connecting to your computer with the USB cable, your V.Reader screen
TM
will show a pop-up window (image 8). Touch
(image 9). Touch
8
12
to connect to the computer
to close the window and continue to play and read.
9
NOTE : Do not disconnect V.Reader or the computer while files are
downloading. After you have finished, turn off the unit to save power.
When not connected to a computer, please close the USB port cover on
the V.Reader , for safety.
TM
TM
Computer Requirements
PC Hardware Requirements:
CPU: Pentium® 4, 1 GHz or above
Memory: 256MB
Video Adaptor: Graphic card with 1024 x 768 at 16 or 32 bit color
Monitor Resolution: 1024 x 768
USB 1.1 or higher
100MB hard disk space
Windows® compatible sound card and speakers
PC Software Requirements:
Microsoft® Windows® XP, Windows Vista® or Windows® 7 Operating System
Internet Explorer® version 6 or above
Adobe® Flash® Player 10 (to get the latest version of Flash player, please visit
www.adobe.com)
Macintosh Hardware Requirements:
Macintosh Computer with an Intel or PowerPC G4 (1GHz or faster) processor
256 MB RAM (512 MB recommended)
100 MB hard disk space
USB port required
Macintosh Software Requirements:
Mac OS X version 10.5 or 10.6
Safari Internet Browser version 3.0 or later
Adobe ® Flash ® Player 10 (to get the latest version of Flash player, please visit
www.adobe.com)
*Internet connection required for Internet enabled functions on both PC and Macintosh
computers.
Microsoft® and Windows® are either registered trademarks or trademarks of Microsoft
Corporation in the United States and/or other countries. Adobe®, the Adobe logo, Flash® are
either registered trademarks or trademarks of Adobe Systems Incorporated in the United States
and/or other countries. Intel®, Pentium® are trademarks of Intel Corporation in the United
States and other countries. Mac, Mac OS, Safari are trademarks of Apple Inc., registered in
the United States and other countries. All other trademarks are the property of their respective
owners. THIS PRODUCT IS NOT ENDORSED OR SPONSORED BY ADOBE SYSTEMS
INCORPORATED, PUBLISHER OF FLASH.
13
CARE & MAINTENANCE
1. Keep your V.Reader clean by wiping it with a slightly damp cloth. Never use
solvents or abrasives.
2. Keep it out of direct sunlight and away from direct sources of heat.
3. Remove the batteries when not using it for an extended period of time.
4. Avoid dropping it. NEVER try to dismantle it.
5. Always keep your V.Reader away from water.
6. Please examine the toy transformer periodically for conditions that may result
in the risk of fire, electric shock, or injury to persons (such as damage to the
output cord, blades, housing, or other parts) and that, in an event of such
conditions, the transformer should not be used until properly repaired.
TM
TM
WARNING
A very small percentage of the public, due to an existing condition, may experience epileptic
seizures or momentary loss of consciousness when viewing certain types of flashing colors
or patterns, especially on television. While the V.ReaderTM Animated E-Book System
does not contribute to any additional risks, we do recommend that parents supervise their
children while they play video games. If your child experiences dizziness, altered vision,
disorientation, or convulsions, discontinue use immediately and consult your physician.
Please note that focusing on an LCD screen at close range for a prolonged period of time
may cause fatigue or discomfort. We recommend that children take a 15-minute break
for every hour of play.
TROUBLESHOOTING
Problem
Possible Reason
Screen displays with Volume is turned
no sound
down
Headphones are
connected
Screen turns on, then Battery power low
immediately off
No picture (or
Program needs to
incorrect picture) on be reset
screen, and pressing
the ON/OFF button
has no effect.
14
Solution
Adjust the volume control.
Unplug headphones from the headphone jack.
Replace the battery.
Disconnect all power supplies (batteries and
adaptor), then reconnect all power supplies.
Press the ON/OFF button.
Remove the storybook cartridge, clean it if
necessary, then re-insert it into the V.Reader .
TM
No screen display
after pressing
ON/OFF button
Battery power low
Replace the battery.
Incomplete battery
installation
Make sure batteries are installed in both
battery compartments.
No AC adaptor
power
Securely connect the AC adaptor or car
adaptor to both the V.Reader and the power
source.
Poor storybook
Remove the storybook cartridge, clean it if
cartridge connection necessary, then re-insert it into the V.Reader .
“Please insert a
cartridge” icon
displays
USB connection
Poor USB cable
window does not pop
up after connecting
Connection is
to computer
running through
USB hub
TM
TM
Securely connect the USB cable to the
V.Reader and the computer.
Connect the V.Reader directly to the
computer, without using a hub.
TM
TM
If your V.Reader does not respond to an inserted storybook cartridge, please
carefully try the following:
• Remove all batteries and unplug all wiring.
• Use a cotton swab dipped in rubbing alcohol or an alcohol-based window cleaner
to gently clean the contact area of the cartridge slot.
• If necessary, dry all the clean contact areas with a soft, lint-free cloth.
• Please make sure that all parts are completely dry before restoring electricity.
TM
TECHNICAL SUPPORT
• If you have a problem that cannot be solved by using this manual, we encourage
you to visit us online or contact our Consumer Services Department with any
problems and/or suggestions that you might have. A support representative will
be happy to assist you. Before requesting support, please be ready to provide
or include the information below:
• The name of your product or model number (the model number is typically
located on the back or bottom of your product).
• The actual problem you are experiencing.
• The actions you took right before the problem occurred.
Internet : www.vtechkids.com
Phone : 1-800-521-2010 in the U.S. or 1-877-352-8697 in Canada
15
Copyright Notices
Copyright 2010 VTech Electronics North America, L.L.C. All Rights Reserved.
VTech and the VTech® logo are registered trademarks of VTech®. V.Reader is
a trademark of VTech® Electronics North America, L.L.C. All other trademarks are
property of their respective owners.
TM
IMPORTANT NOTE:
Creating and developing the V.Reader Animated E-Book System is accompanied
by a responsibility that we at VTech® take very seriously. We make every effort
to ensure the accuracy of the information that forms the value of our products.
However, errors sometimes can occur. It is important for you to know that we
stand behind our products and encourage you to call our Consumer Services
Department at 1-800-521-2010 in the U.S. or 1-877-352-8697 in Canada, with
any problems and/or suggestions that you might have. A service representative
will be happy to help you.
TM
Disclaimer and Limitation of Liability
VTech® Electronics North America, L.L.C. and its suppliers assume no responsibility
for any damage or loss resulting from the use of this handbook. VTech® Electronics
North America, L.L.C. and its suppliers assume no responsibility for any loss or
claims by third parties that may arise through the use of this software. VTech®
Electronics North America, L.L.C. and its suppliers assume no responsibility for
any damage or loss caused by deletion of data as a result of malfunction, dead
battery, or repairs. Be sure to make backup copies of important data on other
media to protect against data loss.
Company: VTech® Electronics North America, L.L.C.
Address: 1155 West Dundee Rd., Suite 130, Arlington Heights, IL 60004 USA
Phone :
1-800-521-2010 in the U.S. or 1-877-352-8697 in Canada
Notice: This equipment has been tested and found to comply with the limits for a
Class B digital device, pursuant to Part 15 of the FCC Rules.
These limits are designed to provide reasonable protection against harmful
interference in a residential installation. This equipment generates, uses and can
radiate radio frequency energy and, if not installed and used in accordance with the
instructions, may cause harmful interference to radio communications. However,
there is no guarantee that interference will not occur in a particular installation. If this
equipment does cause harmful interference to radio or television reception, which
can be determined by turning the equipment off and on, the user is encouraged to
try to correct the interference by one or more of the following measures:
16
• Reorient or relocate the receiving antenna.
• Increase the separation between the equipment and receiver.
• Connect the equipment into an outlet on a circuit different from that to which
the receiver is connected.
• Consult the dealer or an experienced radio/TV technician for help.
This device complies with Part 15 of the FCC Rules. Operation is subject
to the following two conditions: (1) this device may not cause harmful
interference, and (2) this device must accept any interference received,
including interference that may cause undesired operation.
This Class B digital apparatus complies with Canadian ices-003.
Cet appareil numérique de la classe b est conforme à la norme nmb-003 du
Canada.
Caution : Changes or modifications not expressly approved by the party
responsible for compliance could void the user’s authority to operate
the equipment.
17