1
User's Guide
2015
I
RoboTask User's Guide
Table of Contents
Part I Quick Start Guide
2
1 Features
................................................................................................................................... 2
2 Getting...................................................................................................................................
Started in the RoboTask Window
3
3 Create ...................................................................................................................................
Tasks
5
4 Run Tasks
................................................................................................................................... 5
5 Edit Tasks
................................................................................................................................... 6
6 Customize
...................................................................................................................................
RoboTask
6
7 Purchasing
................................................................................................................................... 6
8 License...................................................................................................................................
Agreement
6
9 Trademarks
...................................................................................................................................
and Copyrights
7
Part II Several practical recommendations
9
1 Using Variables
...................................................................................................................................
in Tasks
9
Using Variables.......................................................................................................................................................... 9
System variables
.......................................................................................................................................................... 10
Custom variables
.......................................................................................................................................................... 11
Local Variables
.......................................................................................................................................................... 11
Create a Variable
.......................................................................................................................................................... 13
Add Variables..........................................................................................................................................................
to a Task
13
Saving of a result
..........................................................................................................................................................
into a variable
14
Rules for using
..........................................................................................................................................................
variables in expressions
14
2 Macro...................................................................................................................................
recorder
15
Macro Recorder
..........................................................................................................................................................
Settings
16
3 Running
...................................................................................................................................
tasks simultaneously
17
4 Debugging
...................................................................................................................................
of the task
18
5 Task synchronization
................................................................................................................................... 19
6 Using ...................................................................................................................................
built-in Basic
19
7 Running
...................................................................................................................................
RoboTask as an NT service
19
Service vs Application
.......................................................................................................................................................... 19
Installing and ..........................................................................................................................................................
running
22
Using UNC nam
..........................................................................................................................................................
es
23
Authentication
..........................................................................................................................................................
param eters
23
RoboTask Service
..........................................................................................................................................................
m anager
24
Peculiarities of
..........................................................................................................................................................
w orking in the system service m ode
30
The visual differences betw een the w ork in ordinary application mode and
in the system
.........................................................................................................................................................
service mode
30
Peculiarities.........................................................................................................................................................
of RoboTask Service w orking in RDC mode
31
Peculiarities of RoboTask Service w orking under OC Vista/ Window s 7/
Window s 2008
.........................................................................................................................................................
Server
31
How to get.........................................................................................................................................................
an access RoboTask Service
31
8 Errors...................................................................................................................................
handling
36
9 Control
...................................................................................................................................
of RoboTask through network
37
Netw ork Server
.......................................................................................................................................................... 37
© 2004-2015 Neowise.com
Contents
II
Netw ork Client
.......................................................................................................................................................... 39
Connect to......................................................................................................................................................... 39
Define connections
......................................................................................................................................................... 39
41
Part III Menus
1 Task ................................................................................................................................... 41
Task
Task
Task
Task
Task
Task
Task
Task
Task
Task
Task
Task
Task
Task
Task
-
New .......................................................................................................................................................... 41
Edit
.......................................................................................................................................................... 47
Delete .......................................................................................................................................................... 47
Run .......................................................................................................................................................... 47
Stop .......................................................................................................................................................... 47
Find the
..........................................................................................................................................................
task
47
Local running
..........................................................................................................................................................
task
48
Export .......................................................................................................................................................... 48
Im port .......................................................................................................................................................... 48
Copy .......................................................................................................................................................... 48
Paste .......................................................................................................................................................... 48
Duplicate
.......................................................................................................................................................... 49
Create ..........................................................................................................................................................
Shortcut on Desktop
49
Create ..........................................................................................................................................................
Batch File
49
Exit
.......................................................................................................................................................... 49
2 Remote
................................................................................................................................... 49
Rem ote - Connect
..........................................................................................................................................................
to
49
Rem ote - Disconnect
.......................................................................................................................................................... 50
Enable Rem ote
..........................................................................................................................................................
Autom ation
51
Rem ote Variable
..........................................................................................................................................................
& Settings
51
Rem ote Running
..........................................................................................................................................................
Tasks
53
Define connections
.......................................................................................................................................................... 53
The list of predefined
..........................................................................................................................................................
connections
53
3 Options
................................................................................................................................... 53
Options
Options
Options
Options
-
View
..........................................................................................................................................................
Log
53
View
..........................................................................................................................................................
Toolbar
53
Settings
.......................................................................................................................................................... 53
Variables
.......................................................................................................................................................... 59
4 Tools ................................................................................................................................... 61
Tools
Tools
Tools
Tools
Tools
-
Enable..........................................................................................................................................................
Autom ation
61
Lock Task
..........................................................................................................................................................
Editor
62
Enable..........................................................................................................................................................
All Tasks in List
62
Disable
..........................................................................................................................................................
All Tasks in List
62
Start selected
..........................................................................................................................................................
tasks sequentially
62
5 Help ................................................................................................................................... 62
Help Help Help Help Help -
Help Topics
.......................................................................................................................................................... 62
Send Bug
..........................................................................................................................................................
Report
63
Technical
..........................................................................................................................................................
support
63
Check for
..........................................................................................................................................................
updates
63
About .......................................................................................................................................................... 63
Part IV Actions
65
1 General
................................................................................................................................... 65
Run Program /Open
..........................................................................................................................................................
Docum ent
65
Run Com m and-Line
..........................................................................................................................................................
Utility
66
© 2004-2015 Neowise.com
II
III
RoboTask User's Guide
Print Docum ent
.......................................................................................................................................................... 68
Send Keystrokes
.......................................................................................................................................................... 70
Shift Keys State
.......................................................................................................................................................... 73
Log Off
.......................................................................................................................................................... 74
Pause
.......................................................................................................................................................... 74
SQL Query .......................................................................................................................................................... 75
Wait for Process
..........................................................................................................................................................
Finish
76
Wait for Process
..........................................................................................................................................................
Start
77
Term inate Process
.......................................................................................................................................................... 78
Com m ent
.......................................................................................................................................................... 79
2 Dialogs
...................................................................................................................................
and Notifications
79
Show Message/Play
..........................................................................................................................................................
Sound
79
Question Dialog
.......................................................................................................................................................... 82
Open Dialog .......................................................................................................................................................... 83
Save Dialog .......................................................................................................................................................... 84
Brow se for Folders
.......................................................................................................................................................... 85
Brow se for Com
..........................................................................................................................................................
puters
86
Input Box
.......................................................................................................................................................... 87
Show Notification
.......................................................................................................................................................... 88
Choice Dialog.......................................................................................................................................................... 91
Multichoice Dialog
.......................................................................................................................................................... 92
3 Files and
...................................................................................................................................
Folders
93
Copy/Move File
.......................................................................................................................................................... 93
Renam e File .......................................................................................................................................................... 94
Delete File
.......................................................................................................................................................... 95
Write Text File.......................................................................................................................................................... 97
Search for Files
.......................................................................................................................................................... 98
Change Folder
.......................................................................................................................................................... 103
Create Folder
.......................................................................................................................................................... 103
Renam e Folder
.......................................................................................................................................................... 104
Rem ove Folder
.......................................................................................................................................................... 104
Synchronize ..........................................................................................................................................................
Folders
105
Wait for file .......................................................................................................................................................... 107
SortText
.......................................................................................................................................................... 108
Unique File Nam
..........................................................................................................................................................
e
110
File Attributes
.......................................................................................................................................................... 111
File Date and..........................................................................................................................................................
Tim e
112
4 Zip ................................................................................................................................... 113
Pack Files .......................................................................................................................................................... 113
Extract Files .......................................................................................................................................................... 115
5 Internet
................................................................................................................................... 116
Check for Em..........................................................................................................................................................
ail
116
Send Em ail .......................................................................................................................................................... 117
Dow nload Files
.......................................................................................................................................................... 120
Ping Host .......................................................................................................................................................... 121
Check HTTP ..........................................................................................................................................................
address
122
Wake On LAN
.......................................................................................................................................................... 124
6 FTP ................................................................................................................................... 125
FTP Log On .......................................................................................................................................................... 125
FTP Log Off .......................................................................................................................................................... 126
FTP Dow nload
.......................................................................................................................................................... 127
FTP Upload .......................................................................................................................................................... 127
© 2004-2015 Neowise.com
Contents
IV
FTP Renam e ..........................................................................................................................................................
File
128
FTP Delete File
.......................................................................................................................................................... 129
FTP Change Folder
.......................................................................................................................................................... 129
FTP Create Folder
.......................................................................................................................................................... 130
FTP Rem ove ..........................................................................................................................................................
Folder
131
FTP PWD
.......................................................................................................................................................... 131
FTP Transfer..........................................................................................................................................................
Type
132
FTP Com m and
.......................................................................................................................................................... 132
FTP File Loop.......................................................................................................................................................... 132
FTP Synchronization
.......................................................................................................................................................... 136
7 SSL FTP
................................................................................................................................... 138
SSL FTP Log..........................................................................................................................................................
On
138
SSL FTP Log..........................................................................................................................................................
Off
142
SSL FTP Dow..........................................................................................................................................................
nload
142
SSL FTP Upload
.......................................................................................................................................................... 143
SSL FTP Renam
..........................................................................................................................................................
e File
143
SSL FTP Delete
..........................................................................................................................................................
File
144
SSL FTP Change
..........................................................................................................................................................
folder
145
SSL FTP Create
..........................................................................................................................................................
Folder
145
SSL FTP Rem..........................................................................................................................................................
ove Folder
146
SSL FTP PWD.......................................................................................................................................................... 146
SSL FTP Transfer
..........................................................................................................................................................
Type
147
SSL FTP File ..........................................................................................................................................................
Loop
147
SSL FTP Synchronization
.......................................................................................................................................................... 151
8 SFTP...................................................................................................................................
(SSH FTP)
153
SFTP Log On.......................................................................................................................................................... 153
SFTP Log Off.......................................................................................................................................................... 155
SFTP Dow nload
.......................................................................................................................................................... 155
SFTP Upload .......................................................................................................................................................... 156
SFTP Renam e
..........................................................................................................................................................
File of Folder
157
SFTP Delete File
.......................................................................................................................................................... 158
SFTP Change..........................................................................................................................................................
Folder
159
SFTP Create ..........................................................................................................................................................
Folder
159
SFTP Rem ove
..........................................................................................................................................................
Folder
160
SFTP PWD (print
..........................................................................................................................................................
w orking directory)
160
SFTP File Loop
.......................................................................................................................................................... 161
SFTP Synchronization
.......................................................................................................................................................... 165
SFTP File Perm
..........................................................................................................................................................
issions
167
SFTP Com m and
.......................................................................................................................................................... 168
9 Dial-Up
................................................................................................................................... 168
Dial Up/Hang ..........................................................................................................................................................
Up
169
Check connection
.......................................................................................................................................................... 170
10 Variables
................................................................................................................................... 170
Create Variable
.......................................................................................................................................................... 170
Set Variable .......................................................................................................................................................... 172
Rem ove Variable
.......................................................................................................................................................... 173
Increm ent Variable
.......................................................................................................................................................... 173
Delim ited variable
.......................................................................................................................................................... 174
11 Task ...................................................................................................................................
Commands
174
Enable Task .......................................................................................................................................................... 174
Disable Task.......................................................................................................................................................... 175
Start Task .......................................................................................................................................................... 176
© 2004-2015 Neowise.com
IV
V
RoboTask User's Guide
Stop Task .......................................................................................................................................................... 177
Wait for Task.......................................................................................................................................................... 177
12 Loops
...................................................................................................................................
and Flows
178
File Loop
.......................................................................................................................................................... 178
Text Loop .......................................................................................................................................................... 183
Dataset Loop.......................................................................................................................................................... 184
Window loop.......................................................................................................................................................... 185
Sim ple Loop.......................................................................................................................................................... 187
While loop .......................................................................................................................................................... 187
End Loop
.......................................................................................................................................................... 189
Break
.......................................................................................................................................................... 189
Continue
.......................................................................................................................................................... 189
If Then
.......................................................................................................................................................... 189
Else
.......................................................................................................................................................... 191
End If
.......................................................................................................................................................... 191
ElseIf Then .......................................................................................................................................................... 191
Exit
.......................................................................................................................................................... 193
13 Window
................................................................................................................................... 193
Window Com..........................................................................................................................................................
m and
193
Check for Window
.......................................................................................................................................................... 195
Wait for Window
.......................................................................................................................................................... 196
Window Size..........................................................................................................................................................
and position
198
14 For Windows
...................................................................................................................................
NT
199
Start Service.......................................................................................................................................................... 199
Stop Service.......................................................................................................................................................... 200
Service status
.......................................................................................................................................................... 201
Lock Workstation
.......................................................................................................................................................... 203
Run Program..........................................................................................................................................................
as User
203
15 RoboTask
...................................................................................................................................
Commands
204
Minim ize RoboTask
.......................................................................................................................................................... 204
Restore RoboTask
.......................................................................................................................................................... 204
Exit RoboTask
.......................................................................................................................................................... 205
Enable Autom
..........................................................................................................................................................
ation
205
Disable Autom
..........................................................................................................................................................
ation
205
Log Message
.......................................................................................................................................................... 205
16 Clipboard
................................................................................................................................... 206
Cut
.......................................................................................................................................................... 206
Copy
.......................................................................................................................................................... 207
Paste
.......................................................................................................................................................... 207
Clear Clipboard
.......................................................................................................................................................... 208
Get text
.......................................................................................................................................................... 208
Put Text
.......................................................................................................................................................... 209
17 Mouse
................................................................................................................................... 209
Move to an object
.......................................................................................................................................................... 209
Click
.......................................................................................................................................................... 211
Move
.......................................................................................................................................................... 212
18 Registry
................................................................................................................................... 212
Add key
.......................................................................................................................................................... 212
Delete Key .......................................................................................................................................................... 213
Renam e Key.......................................................................................................................................................... 214
Read Value .......................................................................................................................................................... 215
Write Value .......................................................................................................................................................... 216
© 2004-2015 Neowise.com
Contents
VI
Delete value .......................................................................................................................................................... 217
Renam e value
.......................................................................................................................................................... 218
Export
.......................................................................................................................................................... 219
Im port
.......................................................................................................................................................... 220
19 Network
................................................................................................................................... 221
Send Com m and
.......................................................................................................................................................... 221
Send Netw ork
..........................................................................................................................................................
Message
222
Netw ork Plugin
..........................................................................................................................................................
settings
223
20 Email................................................................................................................................... 224
POP3 Open .......................................................................................................................................................... 225
POP3 Close .......................................................................................................................................................... 226
POP3 Mail Loop
.......................................................................................................................................................... 226
POP3 Dow nload
..........................................................................................................................................................
Em ail
227
POP3 Delete ..........................................................................................................................................................
Em ail
228
POP3 Messages
..........................................................................................................................................................
Count
229
Parse Em ail .......................................................................................................................................................... 229
IMAP Open .......................................................................................................................................................... 233
IMAP Close .......................................................................................................................................................... 234
IMAP Select Mail
..........................................................................................................................................................
Folder
234
IMAP Mail loop
.......................................................................................................................................................... 234
IMAP Dow nload
..........................................................................................................................................................
Message
236
IMAP Get Message
..........................................................................................................................................................
Flags
238
IMAP Set Message
..........................................................................................................................................................
Flags
238
IMAP Delete ..........................................................................................................................................................
Marked Messages
239
IMAP Copy Message
.......................................................................................................................................................... 239
IMAP Folder ..........................................................................................................................................................
Info
240
21 Strings
................................................................................................................................... 241
STR Replace .......................................................................................................................................................... 241
STR Trim
.......................................................................................................................................................... 242
STR Delete .......................................................................................................................................................... 244
STR Insert .......................................................................................................................................................... 244
STR Extract .......................................................................................................................................................... 245
STR Pos
.......................................................................................................................................................... 246
STR Betw een.......................................................................................................................................................... 247
TXT Num ber ..........................................................................................................................................................
of Lines
249
TXT Extract Line
.......................................................................................................................................................... 250
TXT Com m a-Text
..........................................................................................................................................................
Conversion
251
22 Basic................................................................................................................................... 252
Evaluate
.......................................................................................................................................................... 252
Basic script .......................................................................................................................................................... 253
23 Web ...................................................................................................................................
Documents
253
Fill Web Form.......................................................................................................................................................... 254
Add or Edit
.........................................................................................................................................................
Web Form Parameter dialog
258
Wait for Done.......................................................................................................................................................... 259
Web Page inform
..........................................................................................................................................................
ation
262
24 Regular
...................................................................................................................................
Expressions
267
RegExp Loop.......................................................................................................................................................... 267
RegExp Replace
.......................................................................................................................................................... 270
RegExp Match
.......................................................................................................................................................... 273
RegExp COM..........................................................................................................................................................
object
275
25 Screenshot
................................................................................................................................... 278
Window Snapshot
.......................................................................................................................................................... 278
© 2004-2015 Neowise.com
VI
VII
RoboTask User's Guide
Window Pixel.......................................................................................................................................................... 282
Screenshot .......................................................................................................................................................... 284
Screen Pixel.......................................................................................................................................................... 285
Color Com pliance
.......................................................................................................................................................... 286
26 XML ...................................................................................................................................
Documents
287
XML Create Node
.......................................................................................................................................................... 287
XML Add Childnode
.......................................................................................................................................................... 288
XML Loop .......................................................................................................................................................... 289
XML Save .......................................................................................................................................................... 293
27 Script...................................................................................................................................
tools
294
Script extesions
.......................................................................................................................................................... 294
JS script
.......................................................................................................................................................... 295
JS Evaluate .......................................................................................................................................................... 297
VB Script
.......................................................................................................................................................... 299
VB Evaluate .......................................................................................................................................................... 302
28 Excel................................................................................................................................... 304
Excel Open Docum
..........................................................................................................................................................
ent
304
Excel Get Cells
.......................................................................................................................................................... 305
Excel Set Cells
.......................................................................................................................................................... 306
Excel Save Docum
..........................................................................................................................................................
et
307
Excel Close .......................................................................................................................................................... 307
Part V Triggering Events
310
1 Scheduler
................................................................................................................................... 310
How to enable
..........................................................................................................................................................
w ake tim er
311
2 Hot Keys
................................................................................................................................... 313
3 Tray ...................................................................................................................................
Icon
314
4 Cyclic
................................................................................................................................... 315
5 File Monitor
................................................................................................................................... 316
6 Dial-Up
...................................................................................................................................
Connection Monitor
321
7 Expression
...................................................................................................................................
monitor
322
8 Window
...................................................................................................................................
Watcher
322
9 On Time
...................................................................................................................................
Changed
325
10 On Battery
...................................................................................................................................
Power is Low
325
11 On Spooler
...................................................................................................................................
Changed
326
12 On Device
...................................................................................................................................
Changed
326
13 On Palette
...................................................................................................................................
Changed
327
14 On Display
...................................................................................................................................
Changed
327
15 On Log
...................................................................................................................................
Off
327
16 On Idle
................................................................................................................................... 327
17 On Resume
................................................................................................................................... 328
18 Listener
................................................................................................................................... 328
Part VI Appendix
331
1 RoboTaskApp
...................................................................................................................................
object
331
© 2004-2015 Neowise.com
Contents
VIII
2 Full list
...................................................................................................................................
of system variables
337
3 Command
...................................................................................................................................
Line Parameters
341
Part VII Other software
Index
343
344
© 2004-2015 Neowise.com
VIII
Part
I
Quick Start Guide
Quick Start Guide
1
Quick Start Guide
1.1
Features
2
RoboTask can easily automate any series of tasks on your computer system, whether you are a
novice or advanced user. You don't even have to know how to program—use RoboTask to build
your own automated solutions quickly and easily. Yet RoboTask is powerful.
For example, RoboTask can help you avoid losing important data when you create a backup task
for placing files on a remote server.
The software can manage and trigger a wide variety of repetitive tasks to save your valuable
time. With RoboTask, you don't need complicated batch files or scripts.
Here are many examples of what RoboTask can do for you:
Runs applications and open documents.
Manages automatic backups.
Alerts you of any changes in your folders.
Shuts down Windows and powers off your computer triggered by any event you choose.
Processes files and folders (copies, moves, renames, deletes).
Works with FTP and Web servers (downloads, uploads, etc).
Sends letters and files by e-mail.
Starts and stops Windows NT services.
Sends network messages as WinPopups.
Acts as an alarm clock.
Much more!
RoboTask can be used for an unlimited number of tasks. When creating a task, you decide what
the task needs to do and when. Every task has two parts:
1. Actions
2. Triggering events
Actions
First, you must decide what actions you want to accomplish. You can select built-in actions in
RoboTask to accomplish the following:
Run applications.
Open or print documents.
Emulate your keystrokes.
File and folder processing (copy, move, delete, rename, synchronize folders).
Work with FTP servers (download, upload, rename, delete).
Work with e-mail (check for e-mail, send e-mail).
Work with ZIP files (pack files, extract files).
Work with windows (focus, maximize, minimize, restore, close, hide, unhide).
Flow control (if-then, file loop, text loop, dataset loop, and so forth).
Triggering events
A triggering event can be one of the following:
A specific time
© 2004-2015 Neowise.com
3
RoboTask User's Guide
When something happens on your computer.
Practically anything that happens on your computer can trigger RoboTask to perform an action.
An example would be when RoboTask automatically updates a log and uploads it to a website
whenever you receive an email with a subject that is a particular string of words or contains a
word such as "Important".
The following are examples of triggering events:
Scheduler (at a specified time).
Hot Keys (when a special key is pressed).
Tray Icon (when you double-click it).
File Monitor (when a particular file is created, destroyed, changed, renamed).
Dial-up Connection Monitor (when a connection is made or broken).
Window Watcher (when a window is created, activated, closed, and so forth).
System Events (time, spooler, device, display changed, log on, log off, on idle).
1.2
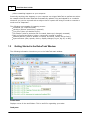
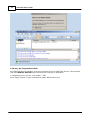
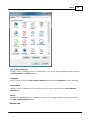
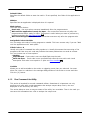
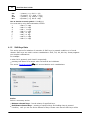
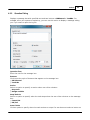
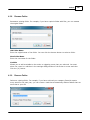
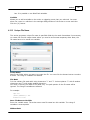
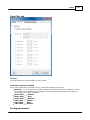
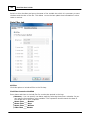
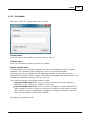
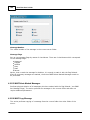
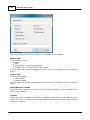
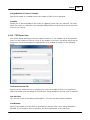
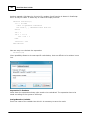
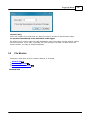
Getting Started in the RoboTask Window
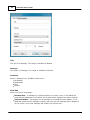
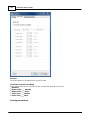
The following information introduces you to the RoboTask main window.
Folder Pane
Displays a tree of the task folders. This is useful for organizing your tasks.
Task pane
© 2004-2015 Neowise.com
Quick Start Guide
4
Task Name Column
Displays the name of the task.
Status Column
Displays whether the task is enabled or disabled. You must run the task manually if the task is
disabled by double-clicking it. You can change the status of a task: select the task and rightclick.
Log Pane
Displays the log messages when you open RoboTask or when a task runs. You can set options
for the log when you add a task or edit one on the Advanced tab of the Add Task dialog box.
New Task
Allows you to add a new task. You can select actions and triggering events.
Edit Task
Allows you to modify a task. You can edit the settings for actions and triggering events.
Delete Task
Removes the task that you select in the main window.
Run Task
Starts the task that you select in the main window.
Stop Task
Stops the task that you select in the main window.
Show/Hide Task Tree
Displays or hides the task tree at the left of the main window.
Settings
Allows you to set preferences for RoboTask.
New Folder
Allows you to create a new folder and enter the name.
Remove Folder
Removes the task folder that you select.
Rename Folder
Allows you to rename the selected task folder.
Expand All
Hides the folders in the tree and displays only the top level folder.
Expand All
© 2004-2015 Neowise.com
5
RoboTask User's Guide
Displays all the folders in the tree.
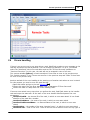
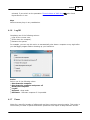
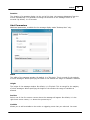
Shortcut Menus
If you select a task in the Task Name column and right-click, the following commands appear
on the shortcut menu:
Enabled - Allows the task to start automatically when a triggering event in the task occurs.
New - Creates a new task.
Edit - Modifies the task that you select.
Delete - Removes a task.
Run - Starts a task.
Stop - Ends a task.
Duplicate - Copies a task. This is useful if you want to create a new task quickly and then
modify it.
Create Shortcut - Adds a shortcut to the task on your desktop. This is useful if you want to
quickly start a task without opening RoboTask.
If you point to the Log pane and right-click, the following commands appear on the shortcut
menu:
Clear Log - Removes all messages from the Log pane.
Copy Selected to Clipboard - Copies the lines that you have selected in the Log pane and
places them on the Windows Clipboard.
Select All - Selects all the lines in the Log pane so that you can quickly copy them.
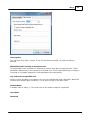
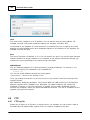
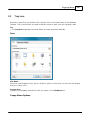
1.3
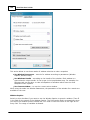
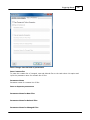
1.
2.
3.
4.
5.
6.
7.
8.
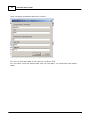
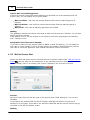
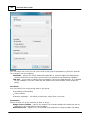
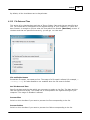
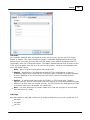
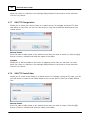
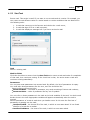
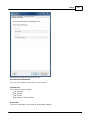
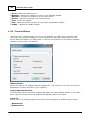
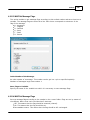
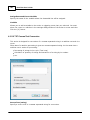
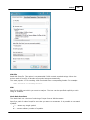
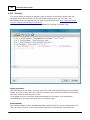
Create Tasks
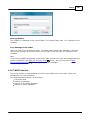
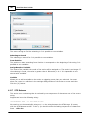
Click Task > New 41 .
On the Actions tab, click the Add button.
Select an action. Some of the actions require additional settings. A dialog box appears with
specific settings that you can select.
After entering the settings, click the Triggering Events tab.
Click the Add button.
Select a triggering event. Some of the triggering events require additional settings. A dialog
box appears with specific settings that you can select.
After entering the settings for the triggering event, click OK.
To run your task, click the Run Selected Task button in the main window.
Tip
Some actions or triggering events do not have specific settings that you can enter.
1.4
1.
2.
Run Tasks
In the right pane of the RoboTask window, select a task.
Click Task > Run or press CTRL + ENTER on the keyboard
© 2004-2015 Neowise.com
Quick Start Guide
3.
6
In the right pane of the RoboTask window, the status column displays the results of running
the task.
Tip
You can run a task without opening RoboTask. Select a task in the RoboTask window and
click Task > Create Shortcut on Desktop. This adds a shortcut to that task on your
desktop. You can double-click the task to start it.
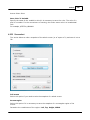
1.5
1.
2.
3.
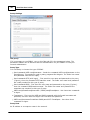
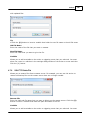
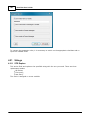
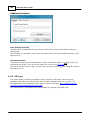
Edit Tasks
In the RoboTask window, select a task.
Click Task > Edit.
On the Edit Task dialog box, select the options that you want.
Tip
To remove a task from the list in the RoboTask window, select a task and click Task >
Delete.
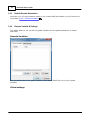
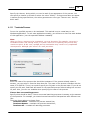
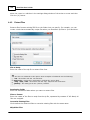
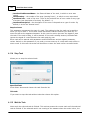
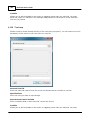
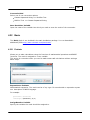
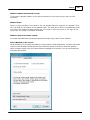
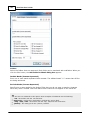
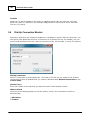
1.6
1.
2.
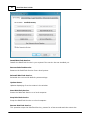
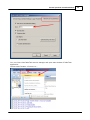
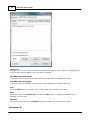
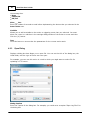
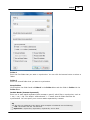
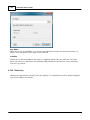
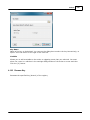
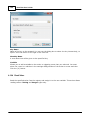
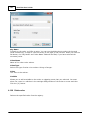
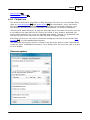
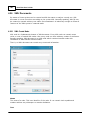
1.7
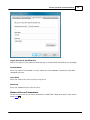
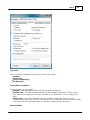
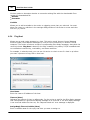
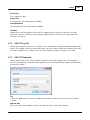
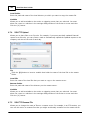
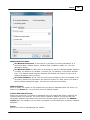
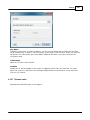
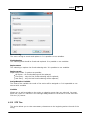
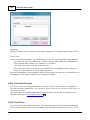
Customize RoboTask
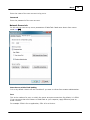
Click Options > Settings.
On the Preferences dialog box, set the options you want.
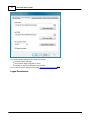
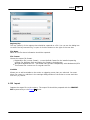
Purchasing
Click Help > Purchase. Also you may purchase full version of RoboTask from official web site.
1.8
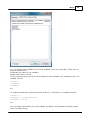
License Agreement
The RoboTask is distributed as try-before-you-buy. This means:
1.
All copyrights to RoboTask are exclusively owned by the author - NeoWise Software.
2.
Anyone may use this software during an evaluation period of 30 days. Following this
evaluation period of 30 days or less, if you wish to continue to use RoboTask, you must
purchase it.
3.
Once purchased, the user is granted a non-exclusive license to use RoboTask on one
computer (i.e. a single CPU), for any legal purpose, at a time:
Personal license entitles you to use RoboTask only on a single computer at home for
© 2004-2015 Neowise.com
7
RoboTask User's Guide
personal purposes.
Business license entitles you to use RoboTask on server or workstation by employees
of your company or organization at single location.
If you need to use RoboTask on a few computers (servers or workstations) you must
purchase corresponding amount of licenses.
4.
Registered user is granted free upgrades of RoboTask within one year period since
purchasing of RoboTask. In order to prolong the period of free upgrades, user must
purchase new registration code with discount.
5.
The licensed RoboTask software may not be rented or leased, but may be permanently
transerred, if the person receiving it agrees to terms of this license. If the software is an
update, the transfer must include the update and all previous versions.
6.
The trial version of RoboTask may be freely distributed, provided the distribution
package is not modified. No person or company may charge a fee for the distribution trial
version of RoboTask without written permission from the copyright holder.
7.
RoboTask IS DISTRIBUTED "AS IS". NO WARRANTY OF ANY KIND IS EXPRESSED OR
IMPLIED. YOU USE AT YOUR OWN RISK. THE AUTHOR WILL NOT BE LIABLE FOR DATA
LOSS, DAMAGES, LOSS OF PROFITS OR ANY OTHER KIND OF LOSS WHILE USING OR
MISUSING THIS SOFTWARE.
8.
You may not use, copy, emulate, clone, rent, lease, sell, modify, decompile, disassemble,
otherwise reverse engineer, or transfer the licensed program, or any subset of the
licensed program, except as provided for in this agreement. Any such unauthorized use
shall result in immediate and automatic termination of this license and may result in
criminal and/or civil prosecution. All rights not expressly granted here are reserved by
NeoWise Software.
9.
Installing and using RoboTask signifies acceptance of these terms and conditions of the
license.
10. If you do not agree with the terms of this license you must remove RoboTask files from
your storage devices and cease to use the product.
Thank you for using the original RoboTask.
NeoWise Software
www.robotask.com
1.9
Trademarks and Copyrights
RoboTask is a trademark of NeoWise Software.
Microsoft, the Windows logo, Windows, and Windows NT are registered trademarks of Microsoft
Corporation. All other brands and product names are trademarks or registered trademarks of
their respective owners.
© 2004-2015 Neowise.com
Part
II
Several practical recommendations
9
RoboTask User's Guide
2
Several practical recommendations
2.1
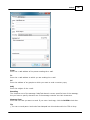
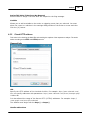
Using Variables in Tasks
2.1.1
Using Variables
For building complex automation schemes, RoboTask provides two types of variables that you
can use in actions and triggering events:
System variables that are pre-defined.
User variables that you can define yourself.
When you insert a variable name as a parameter or part of a parameter in an action or
triggering event, the variable content is processed, instead of the variable name.
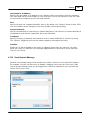
For example, if you want to show a message containing the day of the week, you should use
the {DayOfWeek} variable.
When you run the task that contains the {DayOfWeek} variable, the variable is replaced by the
name of current week day. If you insert this variable in a Show Message action that includes
the message defined as "Today {DayOfWeek}!", when you run this task on Wednesday, the
following message displays: "Today Wednesday!".
You can use as many variables as you need in an event or action. Any time that you define the
same parameter many times, you should use a variable. This allows you to change the variable
in one place and all your tasks that contain the variable update automatically.
The Usage of variable names in actions.
Beginning with the version of RoboT a sk 5.3 all the actions where variables are assigned allow
to use other variables in the variable name. That can be useful, for example, when creating
enumerated variables like these:
Line1
Line2
...
Line10
In this case it is possible to specify a variable name like Line{num}, where num contains the
ordinal iteration number of a cycle. Thereby, it is possible to create pseudo array.
How e v e r, it is st rongly re c om m e nde d not t o a buse t ha t fe a t ure . Alt hough suc h a pproa c h
prov ide s m ore fle xibilit y , it is e a sy t o ge t c onfuse d in v a ria ble s na m e s. T he re fore w e a dv ise
t o spe c ify t he v a ria ble s na m e s e xplic it ly , if it is possible t o a v oid dy na m ic na m e s.
Variables that Contain Other Variables
You can even use variables within other variables; this is useful if you want to specify a value
of a variable for other variables. For example, you can define a variable with a name
{Yesterday}. {Yesterday} contains another variable with a value {M ont hInc Da y s(-1)}/
{Inc Da y s(-1)}/{Y e a rInc Da y s(-1)}. When you use the {Yesterday} variable, it returns
yesterday's date.
© 2004-2015 Neowise.com
Several practical recommendations
10
Arrays
To make your tasks even more powerful, you can use variables as arrays. This means you can
specify more than one values separated with commas. To access the first value, use index 0:
{MyVar(0)}. To access the second value, use index 1: {MyVar(1)}. And so on.
For example, if to add a variable with name {M y Arra y } and value One , T w o, T hre e , you can use
that variable as shown below:
{MyArray} = One, Two, Three
{MyArray(0)} = One
{MyArray(1)} = Two
{MyArray(2)} = Three
Another example:
{MyArray} = "First item", "Second item", "Third item"
{MyArray(0)} = First item
{MyArray(1)} = Second item
{MyArray(2)} = Third item
2.1.2
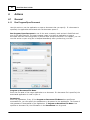
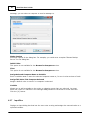
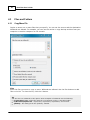
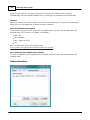
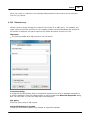
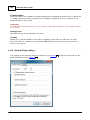
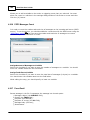
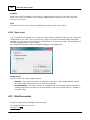
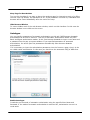
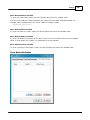
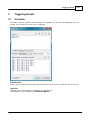
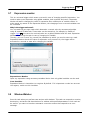
System variables
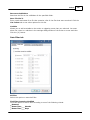
You can view system variables 337 in the RoboTask variables dialog box ( t he Opt ions | V a ria ble s
m e nu). The list is divided into categories. Each variable in the list has a brief description. Thus,
it will not be difficult to study the set of variables 337 and we will not describe them here.
There are more than 80 system variables available now. Actually they are functions that are
executed at the moment of line generation.
Some variables require a parameter, for example:
ExtractFileNameNoExt()
You should specify the full name of the file as the parameter of this variable. For example:
{ExtractFileNameNoExt(C:\Folder\File.ext)}
It is possible to use embedded variables. Suppose we have a custom variable named
M y F ile Na m e containing the name of a file. To extract the file name without its extension, type:
{ExtractFileNameNoExt({MyFileName})}
In this case, RoboTask will find {M y F ile Na m e } first and then use the found string as a
parameter.
This rule applies to all system variables that require a parameter.
© 2004-2015 Neowise.com
11
2.1.3
RoboTask User's Guide
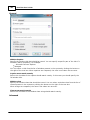
Custom variables
RoboTask allows you to save intermediate data in users variables. There is also a whole set of
actions that cannot work without user variables. For instance, loops. While using variables, you
should remember about some peculiarities.
User variables are global for all tasks
It means that one and the same variable is visible, can be used and can be modified in any
task. On the one hand, it is very convenient: data can be passed from one task to another. But
on the other hand, if you have two tasks running simultaneously, they use one and the same
variable and it is done unintentionally, you may get a completely unexpected result.
Tip
If y ou use v a ria ble s t ha t a re not suppose d t o be use d in ot he r t a sks, use spe c ia l pre fixe s of
t his t a sk in t he na m e s of t he se v a ria ble s.
F or e xa m ple :
T SK1_Count e r, T SK1_Curre nt F ile , e t c .
Also y ou m a y sim ply de c la re ne c e ssa ry v a ria ble s a s loc a l. Se e Loc a l v a ria ble s 11 t opic
RoboTask saves user variables for future sessions
Variables you create in tasks are stored until you remove them using the «RoboTask variables»
form (Options | Variables) or the «Remove Variable» action inside the task. When you exit
RoboTask, variables save their values for future sessions.
As a rule, variables make sense only for the task they are created in and after using RoboTask
for a while, you may get a rather long list of user variables that you do not need anymore.
Tip
Inse rt a c t ions re m ov ing unne c e ssa ry v a ria ble s a t t he e nd of t a sks.
2.1.4
Local Variables
What local variables are
Local variables of a task are custom variables that "live" only while the task is running.
Differences between local and global variables:
Local variables "live" only while their task is running. Unlike local variables, global variables
live starting from RoboTask startup (or since such a variable is created) and until
RoboTask is exited or until such a variable is deleted.
The values of local variables are not preserved till the next session of working with
RoboTask.
Local variables can be edited and accessed only within the running task. Global variables
can be accessed and edited in any task.
They are similar to global variables in all other aspects.
Advantages of using local variables:
We do not have to take care of deleting unnecessary variables when the task is complete
because local variables are deleted from memory automatically when their task is complete.
When you use local variables, you do not have to worry that they will be changed by another
task. And vice versa: the use of local variables guarantees that the values of variables will be
© 2004-2015 Neowise.com
Several practical recommendations
12
preserved while the task is running.
If several tasks that can change one and the same variable are running simultaneously, the
result may be unpredictable. Suppose we have two similar tasks that go through files in a loop,
but they do it in different folders. Both tasks assign the name of the current file to the
C urre ntFile variable. If these tasks are running simultaneously, we may end up with quite a few
problems. It is easy to avoid it if you declare the C urre ntFile variable as local in both tasks.
Such a situation is not a rare one, especially if you have several hundreds of tasks. You can
also create new tasks by copying an existing one and changing a few steps in it.
How to declare local variables
You can declare local variables on the "Local variables" tab 45 of the task editor. There are two
ways to declare them:
Enumerate the names of the variables;
Assign initial values to them.
If you enumerate them, just fill the list of names for local variables: one variables per line. For
example, like this:
LineCount
FileToUpload
CurrentFile
etc.
To assign an initial value, specify this value after the "=" character. For example, like this
LineCount = 0
FileToUpload = c:\incoming\list.txt
CurrentFile = note.txt
etc.
You can assign initial values not to all variables. By default, local variables contain an empty
value (an empty string).
By default, the list of local variables is empty. It means that all variables that are used in a task
will be processed as global ones when you run the task.
How to use local variables
There are no additional requirements regarding the use of local variables. The same tools are
used to work with local variables as with global ones:
Actions from the Variables group
Create variable 170
Set Variable 172
Remove variable 173
Increment variable 173
Delimit Variable 174
Inserting variables into strings in various actions.
For example:
Current folder is "{CurrentFolder}"
Using the methods of the R o bo Ta s kApp 331 object: E xpa ndTe xt, Se tUs e rVa ria ble , etc.
© 2004-2015 Neowise.com
13
RoboTask User's Guide
The rules according to which RoboTask processes local variables are very simple:
Once a variable is called, RoboTask first tries to find it among the local variables of the task.
Calling a variable means any call: assigning a new value or calculating the variables value when
macro insertions with the help of variables are substituted.
If the local variable is declared, further operations (reading or assigning the value) will be
applied to the local variable. Otherwise, RoboTask will process the variable as a global one.
Thus, if we declare a local variable that has the same name as a global variable, the local
variable will completely override the global variable. The running task will not simply see the
global variable.
It is better to declare all internal variables as local ones for most tasks. As a rule, these
variables are used in a loop or to pass data from one step in the task to another. When you use
local variables, you need not worry that the new task will mess up data from other tasks. And
vice versa – that some other task running simultaneously changes the data of the current task.
On the other hand, if you need to pass some data to another task, you should make sure that
the necessary variables are absent in the list of local variables.
2.1.5
1.
2.
3.
4.
Create a Variable
To define a variable, click Options > Variables.
On the User Variables tab, click the Add button.
On the User Variable dialog box, enter the name of the variable in the Variable Name
box.
Enter the values in the Initial Values box.
Tip
In the Initial Value edit box, you can also type the names of other variables to define a
variable.
2.1.6
Add Variables to a Task
You can add variables to an action or triggering event contained in a task.
1.
2.
3.
4.
When you create a task, on the Edit Task dialog box, select an action or triggering event.
When you do this, some actions or triggering events display a dialog box in which you can
enter specific settings for the action or event. On this dialog box, select a field and click
the {V} button.
On the RoboTask Variables dialog box, select a variable in the list and click the Select
button.
The variable appears in the field that you selected on the dialog box for the action or
triggering event.
© 2004-2015 Neowise.com
Several practical recommendations
2.1.7
14
Saving of a result into a variable
During their operation almost all actions of the RoboTask demand that their results should be
assigned into user variables. In this case it is necessary to specify the variable name.
A variable name is some string composed of Latin letters (ASCII symbols) and numbers without
any spaces.
It is better to specify the variable name explicitly, that is without curly brackets.
But composing of a variable name using other variables is permitted. In this case variables
should be separated with curly brackets like when composing any expression in the RoboTask.
What happens if you use curly brackets in a variable name?
The RoboTask tries to compute the values of expressions in curly brackets (expand
variables) and substitute the value into the expression.
Then, the got expression is checked whether it is correspond to the rules of variable
names.
If the got name is correct, the RoboTask assigns the necessary value into a variable
with this name.
2.1.8
Rules for using variables in expressions
Using variables in actions permits to achieve more flexibility of an algorithm. Sometimes you
just can’t do without using variables. For example, in cycles.
If you use expressions with variables in parameters of actions, RoboTask at first expands all
variables, and only after that uses the result for the action. In other words, RoboTask
computes the variable value and substitutes the value for the variable in the expression.
For example, the expression
Temporary file is {UniqueFileName({TempDir}\*.tmp)}
will approximately have the following form after its computation:
Temporary file is C:\Users\User1\AppData\Local\Temp\DA0PUY08.tmp
The rules for computing values are simple:
The rule of visibility. At first, RoboTask tries to find the variable in the list of local
variables. Then, if it fails, it looks up among global ones. If the variable isn’t found,
substitution doesn’t occur. System variables are always global. Inherently they are
functions which return the result of some computations. This rule is described in the unit
“Local Variables”.
The depth of expanding variable. If variables are used in an expression by means of
braces {}, the variables are expanded to the whole depth. That is, firstly the value of
variable is computed, and then the result is expanded if it contains variables. And so on,
to the end. However, sometimes it is necessary to expand only the specified variable
without further recursive processing. To do this you have to specify variables with the
character # after an opening brace: {#MyVariable}. More details in this unit below.
By default, RoboTask tries to expand all variables in the specified expression. Then it
recursively reiterates the attempt to expand variables in resultant expression until all variables
© 2004-2015 Neowise.com
15
RoboTask User's Guide
are expanded. However, sometimes it is necessary to protect a text from expanding variables.
These can be some technical texts for automated processing. These texts aren’t directly
related to RoboTask. They can contain inserts coinciding with the variables of RoboTask. The
use of braces is quite a widespread method of inserting some macros when texts are
processed automatically.
For example, there is such a text file:
To automate mailing you can use macros to create a message:
insert of a customer address - {Email}
insert of a customer name - {User}
insert of a sender name - {SenderEmail}
insert of a current date into the message - {Date}
insert of current time into the message - {Time}
insert of a signature - {Signature}
You have to process this text in a cycle together with other files by means of RoboTask. For
example, add HTML tags and save it as HTML file preserving all the file contents without
changing. It is easy to see that if we try to write the file contents into a variable by means of
a system variable {TextFile(file_name)}, expressions {Date} and {Time} will be replaced
with current meanings of date and time.
To save a text to a variable without changing, you have to use the symbol # after the
opening brace: {#TextFile(file_name)}. In this case RoboTask doesn’t try to expand all
variables in the text recursively, but only returns the contents of the text file without
changing. Naturally, you also have to use the variable containing the text with the symbol #,
in order to prevent from expanding expressions in text. For example: {#CurrentText}.
2.2
Macro recorder
RoboTask has powerful tools of interactive automation, such as «Send Keystroke» operations
and the mouse actions (Move, Move to object, Click). However, it is obviously not convenient
to create an incremental task that implies mouse shortcuts. Sometimes several operations need
to be performed as a single block.
For example:
Activate the contextual menu;
Select the menu item;
Click on the needed element of the pop-up dialog.
In a step-by-step configuration, it is rather difficult to hit the required menu item.
To simplify the creation of the interactive mouse shortcuts sequence you can use the
automatic macro recording feature by clicking on «Record a macro» button in the task editor.
Macro recorder allows automatic recording of the sequence of mouse pointer movements:
namely, mouse button ups and downs, pauses between the shortcuts. When the recording is
over Macro Recorder transforms the recorded macro into actions and specifies them as the task
steps.
To record the mouse shortcuts do the following:
Open the task editor 47
© 2004-2015 Neowise.com
Several practical recommendations
16
Click «Record a macro». At that, all the RoboTask windows will be hidden and the window
with start and stop recording buttons will be displayed.
Click on start recording button
.
Then make the required mouse shortcuts (mouse pointer movements and pressing the
buttons on the required window elements) and click on stop recording button
.
When the recording is over Macro Recorder will recover the task editor window and insert
the recorded shortcuts into the editor.
As a rule, the recorded macro is ready to use. However, it is strongly recommended to edit the
created steps manually. Macro Recorder records the actions properties exactly as they were
made, and that is not always useful for the task creation.
For example, in such action as «Move to Object 209 » it is almost always needed to replace the
full title bar with the specific title bar fragment. It should be done because the Windows
application windows almost always change their title according to the window contents or the
context. If the window properties are left unchanged, during the operation flow RoboTask may
not find the window according to the properties. In this case, the task will be stopped with an
error.
It is also useful to edit the pauses between the operations. As a rule, they can be significantly
reduced to speed up the task execution. However, it is not recommended to remove the pauses
at all, because you should wait a certain period of time until the application can respond to the
mouse shortcut (e. g. load some data or open a new window).
2.2.1
Macro Recorder Settings
You can open the settings dialog of macro recorder by pressing the button
Record Mouse
If you want to record actions of a mouse, switch on this option.
Mouse record mode
© 2004-2015 Neowise.com
17
RoboTask User's Guide
The recording of the mouse actions can be performed in two modes:
Smart Mode – in this mode a macro recorder fixes windows and control elements where
mouse clicks take place. Also macro recorder records coordinates concerning the window
and the control element.
Use absolute coordinates only – a simplified mode of recording. In this mode recording
only by absolute coordinates of a screen takes place. This mode can be useful in certain
cases when elements of a window are absent.
Use Real Pauses Between key presses
If you want to record pressings of keyboard keys, switch on this option.
In certain cases it is important to record pauses between pressings of keys. For example, if
you use different combinations of keys to open a dialog window. If the pauses are not
important, you can switch off this option. For example, when simply typing a text in entry
field. In this case the standard 40 milliseconds pause is used (approx 25 pressings per
second).
2.3
Running tasks simultaneously
Each task runs in the background mode independently of other tasks. You can effectively use
this feature while scheduling your tasks. Suppose you need to pack several independent folders
into different archive files. You can create the following task:
Pack "Folder1" into "folder1.zip"
Pack "Folder2" into "folder2.zip"
Pack "Folder3" into "folder3.zip"
In this case, the task will pack Folder1, Folder2 and Folder3 one by one. That is, each next
folder will be processed only after the previous one is packed.
The use of background processes would be more effective. In this case you need to create
three different tasks and each of them will pack the corresponding folder. In this case, the main
task will look like this:
Start task "Pack folder1" without waiting
Start task "Pack folder2" without waiting
Start task "Pack folder3" without waiting
Running such a task will be the same as running three tasks "Pack folder1", "Pack folder2" and
"Pack folder3". Each of these tasks will run independently of the others and the total time of
packing all three files will be a bit shorter than in case with successive processing.
© 2004-2015 Neowise.com
Several practical recommendations
2.4
18
Debugging of the task
In this chapter we will consider some recommendations (guidelines) concerning the debugging of
the generated task. If the task consists of 3-5 sequential steps, there is no need for debugging
as a rule. But if there are more than 30 steps with loops and branching in the task (if .. then ..
else 189 ), then there are surely hidden mistakes in it, that aren't visible ex facte.
By all means check the generated task by test example.
For lack of experience, it is difficult to reproduce the entire algorithm in the mind, and to write it
as a task without any mistakes. To err is human.
Testing is necessary to check workability and correctness of the task. It is possible to check
the implementation of the task, for example, by files of the test folder or by files which are
easily restored from a backup copy.
The task can be invoked only after checking its correct working. Otherwise you may break
working files. Or the task will not work in time, and you will not get a necessary result.
Output of values of variables into the log file or into the screen.
The task often works incorrectly because there is the wrong value in the variable: the empty
value or the incorrect one.
In order to make sure the variables are filled in correctly it is possible to verify the values of
variables before the implementation of the key actions. It can be done in the process of
performing the task by several means:
Output of values of required variables into the screen before the implementation of the
necessary action. You can use the action "Show message" for it.
Output of variable values or expressions into log of the task. Use the action "Log
message".
As a text you can output one or several variables. For example:
{MyVar1}
{MyVar2}
Also you can output the whole expression if you use the composite value consisting of some
variables. For example:
"{CurrentUser}" <{CurrentEmail}>
Using of local variables.
It is strongly recommended to use local variables 11 in the task. Their advantage is that they
"live" only while the task is being implemented, and they are visible only in the context of the
implemented task.
Imagine the situation:
You have created a task by copying an existing task. After copying you change the task a bit.
All variables in it are global by default. By some reason you have forgotten to change the names
of variables. What will happen if both these tasks are implementing at a time? The result must
be unpredictable. Both tasks can change the same variables. The algorithm of every single task
will be broken.
We can avoid it easily if we use local variables. Choose the tab "Local variables" in the editor of
the task and enumerate the variables used in the task, one by one into a line (see the chapter
"Local variables" 11 ).
The global variables are necessary only in two cases:
To transfer some data into another task.
To save a variable value between sessions of RoboTask.
© 2004-2015 Neowise.com
19
RoboTask User's Guide
In other cases you'd better use local variables.
2.5
Task synchronization
Let us try to make the task described in the previous section a bit more complicated. Suppose
you need to pack three folders in three different files and then write them to a CD. As you
remember, we have started three different tasks to pack the folders. It means that we must
wait until all three tasks are finished before we can write the archives to a CD.
The "Wait for Task" action is used for that. Let us modify our task in the following way:
Start task "Pack folder1" without waiting
Start task "Pack folder2" without waiting
Start task "Pack folder3" without waiting
Wait for Task "Pack folder1" for 10 min.
Wait for Task "Pack folder2" for 10 min.
Wait for Task "Pack folder3" for 10 min.
Write files folder1.zip, folder2.zip, folder3.zip to CD
Thus, we start three simultaneous processes in order to pack the necessary data and after all
three processes are sure to be finished, we write the archive files to a CD.
2.6
Using built-in Basic
Sometimes we need to make some nonstandard calculation, analyze a string or modify it
according to a certain algorithm. The Basic programming language will help you in that. The
Basic plugin for RoboTask is not included in the main distribution package. You can download it
from the RoboTask site and install additionally.
Basic is a simple and at the same time quite powerful programming tool oriented towards both
beginners and professionals. You can use a BASIC script to access user and system variables in
RoboTask, as well as other tasks. The BASIC plugin comes together with the full help on the
BASIC language. The installation file also includes some sample uses. The description of the
Evaluate 252 and Basic script 253 actions, as well as the mechanism of interaction with
RoboTask is described below.
Almost anyone can learn how to write small procedures in the BASIC language. The use of
BASIC in tasks extends available actions beyond the set of RoboTask actions. Experienced users
can use Windows APIs and third-party COM objects in their procedures written in BASIC without
any limitations.
2.7
Running RoboTask as an NT service
2.7.1
Service vs Application
RoboTask can work in two modes:
As a common application
© 2004-2015 Neowise.com
Several practical recommendations
20
As a system service.
Almost everybody knows what a common application is. Many people have an idea about what
a system service is. But very often they know only that the service works even if a user has
not logged in.
Yes, it is right. A user session is not necessary for a service. It is, undoubtedly, convenient.
But it also puts a number of limitations. And it is necessary to remember about this. Let us
consider all the pros and cons.
Fundamental differences between modes of the service and application
for RoboTask.
Service and application have different sets of tasks.
RoboTask application keeps its tasks in a user profile. Thereby, every user will have their own
set of tasks by default. It is convenient, for example, in the mode of a terminal-server, when
several users work on one server in the mode RDC (Remote Desktop Connection). Every
instance of RoboTask will work independently from others and not interfering with others.
RoboTask service keeps tasks in its folder in Program Files. To make RoboTask perform
necessary actions in the service mode, it is not enough to simply install the service. It is
necessary to import or create required tasks for the service as well.
Different sets of tasks allow the application and the service to work simultaneously and
independently.
Service and application have different environment.
The application inherits the environment of a user session as any other application which the
user has run in their session.
The service uses the environment Loc a lSy st e m . Despite the fact that you can see both
windows application and service on the screen (for example, in Windows 2000 and Windows
XP), RoboTask will use different environments in these modes. More details below.
Application mode
After the installing, RoboTask is ready to work in the application mode. By default, RoboTask
runs automatically every time when a user opens a user session (log on to Windows).
Adv a nt a ge s
Additional settings are not necessary; RoboTask is ready to work immediately after installing.
Easy access to the main window and to the settings of RoboTask.
The work of RoboTask in the user session allows to get access to the same resources which
are available to the user (for example, network folders and disks, windows of other
applications, etc.). This is inheritance of a user session environment.
Disa dv a nt a ge s
In order that RoboTask may begin to work, it is necessary to log on.
Logging off the session RoboTask also turns off as all other user applications. No tasks are
© 2004-2015 Neowise.com
21
RoboTask User's Guide
performed after that.
In operation system Vista and further ones, the system UAC (User Access Control) demotes
the privileges of the started applications. It is done to increase security against malware
and viruses.
Problems connected with the UAC manifest themselves in a possible error “Access Denied”
during some operations. In case of starting certain applications with elevating of privileges (for
example, by means of the utility RG.EXE from the package RoboTask) you have to confirm
running of programs manually.
The problems of the UAC can be solved in two ways:
Turning off the UAC. In this case all the applications in the session will work with user
privileges. This mode is possible but not recommended because the security of the
system against malware decreases
Running of RoboTask in the mode “As Administrator”. It is enough to turn on the
checkbox “Run as Administrator” in the dialog Settings (menu Options -> Settings). But
in this case you will have to confirm running of RoboTask manually when the UAC
requests.
System service mode
To install RoboTask service you can use the utility "RoboTask Service Manager" 24 from the
package RoboTask. The utility allows to install, delete, start or stop the service. Also the
utility allows to specify initial common settings of RoboTask for working in the service mode.
The usage of RoboTask as a system service has unquestionable advantages, but it causes
some inconveniences as well.
Adv a nt a ge s
RoboTask service begins the work when the system starts. There is no need to log on. It is
enough just to turn on the computer.
By default, all the tasks of RoboTask work with system privileges.
Disa dv a nt a ge s
As a rule, the system service works in a hidden mode. In the system Windows Vista and
further systems all interactive services work in a separate system session. A user cannot
see the main window of RoboTask without additional manipulations. That complicates manual
control of RoboTask.
By default, services working with the privileges LocalSystem do not have access to network
recourses (i.e. the network folders on remote computers)
It is necessary to avoid any interactive actions in service tasks: moving a mouse, pressing
mouse keys, sending keystrokes or calling any dialogs.
The first two items cause some inconvenience, but these problems can be solved. See below
how to do it.
The last rule is to be fulfilled for the following reasons:
The system ignores moving the mouse and pressings the keys inside of a locked session.
© 2004-2015 Neowise.com
Several practical recommendations
22
This is done for security of the system. For this reason, the simulation of mouse and
keyboard actions will not work if the user session is locked. The user session is locked by
default, when screensaver is activated .
As a rule, a user does not have a direct access to windows of RoboTask in the system
service mode. All the dialog windows require to press OK or Cancel. If the user does not do
it, the task comes to a stop and waits for a user action endlessly.
How to get an access to the service in the OS Windows Vista/7/2008/8/2012
Access to the main window of service can be got by means of the system service "Interactive
Service Detection". That is described in the chapter "How to get an access RoboTask Service
31 ". Then it is possible to change settings of RoboTask and service tasks.
The owners of Business License can get the access to the service through a local network.
That is described in the chapter "Control of RoboTask through network 37 " and related
chapters. The work of a network client of RoboTask is integrated into the main window of
RoboTask and must not cause any difficulty.
Initial settings of the service (a number of a port, privileges of access, parameters of
authentication, etc.) can be set with the utility "RoboTask Service Manager 24 ".
How to get an access to the network resources in the service mode
By default, the RoboTask service works with privileges LocalSystem and does not have any
access to network folders. This problem can be solved in two ways:
1. Start a service with privileges of any user. It can be done in system settings of the
service. In this case the service inherits privileges of the stated user (including the
privileges within the local network). But then interactivity of the service will be
disabled.
2. Take notice that the user is to have the permission “Log on as a service”. Input correct
parameters of the user on the tab Logon Parameters in RoboTask Service Manager. In
this case all started tasks by default inherit privileges of the user. The inheritance can
be turned off in Task Editor if necessary. See the parameter “Log on Task as User” on
the tab “Advanced”.
Summary
Both modes have their own advantages and disadvantages. You can use RoboTask as an
application and as a service simultaneously. Thereby, you can fulfill the whole circle of tasks
that can be solved by means of RoboTask.
How you will manage the process of automation on your computer or in a local network
depends only on your needs.
2.7.2
Installing and running
RoboTask can run in two modes:
As a regular application
© 2004-2015 Neowise.com
23
RoboTask User's Guide
As an NT service
An NT service is started together with the operating system and runs even if you are not
logged on. If you correctly create your tasks and configure triggering events, it will be enough
just to switch on the computer for RoboTask to start doing what it is supposed to do. This
mode is important for those computers that are used as servers in your office.
The NT service mode is not available on the Windows 9x/Me platform. The NT service mode is
not installed by default. In order to install the RoboTask service, you should use RoboTask
Service Manager 24 utility.
RoboTask Service Manager allows to start, stop RoboTask service, and make the initial
adjustment of the service.
2.7.3
Using UNC names
If you access various network resources in your tasks, we recommend that you use UNC (UNC Universal Naming Convention) names.
For example, instead of the path
z:\documents\report.doc
you can use
\\server1\incoming\documents\report.doc
A UNC name is formed in the following way:
\\<Server_Name>\<Resource>\<subfolders>\<file_name>
I.e. you should use the name of the server and the name of the resource instead of the disk
name ("z:").
What benefits you get:
A UNC name is always valid within your local area network and does not depend on how
network drives are mapped on a particular computer.
You can use UNC names to access network resources even if you have no connected
(mapped) network devices. It is simply necessary in the NT service mode when there are no
mapped drives for RoboTask in principle.
2.7.4
Authentication parameters
When RoboTask is running in the NT service mode, it does not see network resources by
default. It happens because in this case RoboTask has not the rights of your session account,
but the rights of the virtual "SYSTEM" account despite the fact that you can see the green
icon in the tray and can manually control the program. To allow the program to log on to the
network, you should specify authentication parameters. These settings make sense and are
available only in the NT service mode. Open the Settings dialog box (Options | Settings) and
switch to the "NT Service" tab.
Also RoboTask Service Manager 27 allows you to make this adjustment too.
© 2004-2015 Neowise.com
Several practical recommendations
24
Log on Process as specified user.
Select this checkbox if you want to allow RoboTask to log on to the local area network
automatically when the RoboTask service is started. After that you should specify the
authentication parameters.
Domain Name.
Specify the domain name where the user is registered. If the user is registered on the local
computer, enter a dot (.) instead of the domain name.
User Name.
Specify the username.
Password.
Specify the password for the specified user.
Try to Logon
To test the authentication parameters and log RoboTask manually, click this button. RoboTask
will try to log on using the specified parameters and you will see either "Log on successful" or
"Log on failed".
2.7.5
RoboTask Service manager
The RoboTask Service Manager is a separate utility within the installation package of
RoboTask. The RoboTask Service Manager allows to install the RoboTask Service and perform
the necessary initial settings of the service.
The functions of the service setting are separated according to their subjects onto different
tabs.
Service Setup
The functions of installing, starting and stopping of a service are located on this tab. It is also
possible to change system settings of the service and to get access to the main window of
the service here.
© 2004-2015 Neowise.com
25
RoboTask User's Guide
Install RoboTask Service.
Installs the RoboTask Service in your system if the service has not installed yet.
Remove RoboTask Service.
Removes the RoboTask Service from a local system.
Reinstall RoboTask Service.
Reinstalls the service with default system settings.
Update Status.
Updates displaying of service status in the window.
Start RoboTask Service.
Starts the RoboTask Service on a local computer.
Stop RoboTask Service.
Stops the RoboTask Service on a local computer.
Restart RoboTask Service.
This operation stops the RoboTask Service, pauses for a few seconds and then starts the
© 2004-2015 Neowise.com
Several practical recommendations
26
service again.
Service configuration
You can perform system settings of the service here as well as in the system Service Manager
(Control Panel => Administrative tools => Services). For ease of operation, the settings of the
RoboTask Service are included into this utility.
Start Interactive Service Detection
This function is destined specially for operation systems Windows Vista and the later ones
(Windows 7, Windows Server 2008, Windows 8). The function allows to start and stop
Interactive Service Detection
The RoboTask service is an interactive service. This means that a user can get an access to
the service window and do settings interactively. In the OS Vista (and in later OSs) the
system hides interactive services by default. To get the access to the system window it is
necessary to start the system service Interactive Service Detection. After that you can get
an access to the session SYSTEM and then work with the window RoboTask Service
interactively.
Allow Interactive Services.
To get an access to the service window, interactive services must be allowed in the system.
In the OS Windows 7/ Server 2008 R2 (and previous OS) interactive services are allowed by
default. In systems beginning from Windows 8 interactive services are forbidde n by default.
This option does not prevent RoboTask service from working. The service starts and works
normally in any case. But if the option is off, you cannot get any access to the main window
of the RoboTask service. If interactive services are not allowed, you will get an error when
starting Interactive Service Detection.
To allow interactive services in the system it is enough just to switch on this checkbox.
General Settings
© 2004-2015 Neowise.com
27
RoboTask User's Guide
You can find general settings for the service on this tab:
Location of tasks and logs.
The maximum length of log-files (in lines).
Switching on and off the automatic work of tasks.
You can also find these settings in the dialog Settings on the General tab
54
.
Logon Parameters
© 2004-2015 Neowise.com
Several practical recommendations
Logon Process as Specified User
Select this option if you want the RoboTask log on as Specified User and get its privileges.
Domain Name
Enter the name of the domain or server whose account database contains the specified
UserName account.
User Name
Enter the name of the user account to log on to.
Password
Enter the password of the user account.
Network Server Parameters.
On this tab you can set up server parameters of RoboTask. Read more about client-server
mode here 37 .
© 2004-2015 Neowise.com
28
29
RoboTask User's Guide
Start Server at RoboTask loading
It is on by default. Switch off this checkbox if you want to refuse from remote administration.
Port
This is the number of a port, on which the server accepts connections. By default, it is 5500.
If you use more than one instance of RoboTask at your computer, apply different ports to
avoid conflicts.
For example: 5500 is for an application, 5501 is for a Service.
Encrypt data
This is the mode of traffic encryption. By default, it is on. The mode of ciphering is specified
by server. A client is tuned on the mode of encryption automatically. RoboTask provides the
traffic encryption with dynamic keys using CryptoAPI system functions.
Compress data
This is the mode of traffic compression. By default, it is on. The mode of traffic compression
can be useful when connection is slow (for example, DialUp or GPRS). The mode of traffic
compression (packing) is specified by server. A client is tuned on the mode of compression
automatically.
User Rights
© 2004-2015 Neowise.com
Several practical recommendations
30
This is the check mode of user’s rights at connection. It is possible to choose between two
modes of user checking:
Use Internal list. When you press the button “Edit Internal List of Users” in this mode,
you can define users, who have the right of connect to the server. This is just text in
the form USERNAME=PASSWORD on every line.
For example:
a dm in=1234567890
At the checking of a user, the server inspects presence of the user in a list and
correctness of a password.
System Administrators. In this mode the server checks presence of administrator’s rights
on a local computer when a client connects.
If the user isn’t checked, the server returns an error and closes the connection.
By default, the System Administrators mode is on.
2.7.6
Peculiarities of working in the system service mode
In this chapter we will consider the base differences between the two modes of RoboTask:
The general application
System Service
RoboTask is designed so that the application and the service could work at the same time, not
preventing each other. When installing RoboTask Service interaction with the desktop is allowed
by default. Sometimes this mode of the service tangles understanding.
Related Topics
The visual differences between the work in ordinary application mode and in the system service
mode 30
Peculiarities of RoboTask Service workin in RDC mode 31
Peculiarities of RoboTask Service working under OC Vista/ Windows 7/ Windows 2008 Server 31
2.7.6.1
The visual differences between the work in ordinary application mode and in the system
service mode
The RoboTask Service has a green icon in the system tray. The ordinary application has a
blue one.
The main window title of RoboTask terminates in the line "(NT Se rv ic e )". For example:
RoboT a sk 3.5 (NT Se rv ic e ). The tool tip of the green icon also contains the substring "(NT
Se rv ic e )".
RoboTask in application mode has another set of tasks than RoboTask Service. The tasks for
the application mode are in the local folder of the user's profile (by default). The concrete
name of the folder depends on the operating system and on the user name. The tasks for the
service mode are in the subfolder <RoboTask_Folder>\Tasks (by default "C:\Program
Files\RoboTask\Tasks").
You can see and change the path to the task folder in the settings of RoboTask (the menu
Options | Settings)
© 2004-2015 Neowise.com
31
2.7.6.2
RoboTask User's Guide
Peculiarities of RoboTask Service working in RDC mode
In RDC (Remote Desktop Connection) mode you can't see the green icon. The system prohibits
the interaction of service with desktop in RDC regardless of the settings of service. You can see
the green icon and the main window of RoboTask only in the local session (i. e. from the local
terminal).
But Windows 2003 Server gives an opportunity to intercept the local session for RDC. It is
necessary for it to start up the client RDC with the parameter /admin.
The command line is:
%SystemRoot%\system32\mstsc.exe /admin
To know about the possible parameters you should implement the command:
%SystemRoot%\system32\mstsc.exe /?
2.7.6.3
Peculiarities of RoboTask Service working under OC Vista/ Windows 7/ Windows 2008 Server
Operation systems Vista/ Windows 7/8/Windows 2008/2012 Server prohibit interaction of
services with the desktop within the user's session. After launching of RoboTask you can see
the dialog box from system service "Interactive Service Detection" on the screen that the
program can't display a message on your desktop. If you click the button "Show me the
message", Windows opens the system session where you can see the main window of RoboTask
service. Then, as usual, you can tune the work of RoboTask, edit the task list, etc.
You should run service "Interactive Service Detection" manually under the operation system
Windows 2008. In addition the manual rerun of the service "Interactive Service Detection"
activates the display of the service message on the screen immediately, or in a few minutes.
In RDC mode under the OC Window 2008 you can get the access to the RoboTask the same
way as from the local terminal. You should run service "Interactive Service Detection". But only
users with administrative rights can get the access to the service.
If you don't want to get messages from service "Interactive Service Detection" any more, you
can just stop this service.
You can also prohibit RoboTask service to interact with the desktop. Do the following:
Open the properties of service "RoboTask service"
Open the tab "Log on"
Turn off the property "Allow service to interact with desktop"
Rerun the service.
If you need to change something in the tuning of RoboTask, allow the interaction with the
desktop for the RoboTask service.
2.7.6.4
How to get an access RoboTask Service
As we know Windows Vista/7/2008/8/2012 prohibits the interaction with service applications
by default.
How to access RoboTask service in this case?
There are two ways to solve the problem
1-st way. By using "interactive service detection" service
© 2004-2015 Neowise.com
Several practical recommendations
32
- start RoboTask Service Manager 24 and start "Interactive service detection". Pay attention
that parameter "Allow Interactive Services" must be turned on. Otherwise turn it on and
restart RoboTask service.
- You will see this message. Press "View the message"
- You can see RoboTask window in the system session. Configure tasks interactively (or
import prepared tasks) and press Return Now button on system dialog.
© 2004-2015 Neowise.com
33
RoboTask User's Guide
2-nd way. By using network client.
Run RoboTask Service manager, and setup network server for RoboTask Service. Pay attention
that port MUST be different from network server settings of application
I recommend you to use the next number - 5501
press "Apply" button to save settings and restart RoboTask service.
© 2004-2015 Neowise.com
Several practical recommendations
You can close close RoboTask service manager and open main window of RoboTask
application.
Choose menu Remote->Connect to...
© 2004-2015 Neowise.com
34
35
RoboTask User's Guide
Input necessary parameters and press "Connect"
You can see new Root folder in the task tree: localhost:5501
You can select it and edit remote tasks (also you can import, run interactively and remove
tasks)
© 2004-2015 Neowise.com
Several practical recommendations
2.8
36
Errors handling
If there is an error occurs in any step during a task, RoboTask records an error message to the
task log and stops the task by default. You can change this behavior. To do it, you should
select the "Advanced" tab in the task editor and set the "If Error Occurred" parameter to
"Continue Execution". In this case, the task will not be stopped in case of an error.
The system variable {IsError} is used to analyze if there was an error in the previous step.
This variable contains "True" if there was an error in the previous step and "False" if there was
no error in the previous step.
Another method of the error handling is the starting up of another task when an error is raised.
For this purpose you need to tune the task like this:
Open task editor and go to the tab "Advanced 43 "
Choose the point "Run the Error Handling Task" of parameter "If Error Occurred"
Choose the task in a drop-down list "Error Handling Task".
If an error was raised in any step when you perform the task, RoboTask starts up the handlertask and stops the main task. At the start of the error handler RoboTask passes the next
parameters:
LastErrorTaskID – the internal ID of the task, in which an error was raised. It is a formal
identifier of the task like a number.
LastErrorTaskName - the name of the task, in which an error was raised.
LastErrorTaskExternalName – an External Name of the task, in which an error was
raised.
LastErrorStep – the number of the step (starting from 1), in which an error was raised.
LastErrorCode – code of the error. There is the own kit of codes of errors for any type of
© 2004-2015 Neowise.com
37
RoboTask User's Guide
actions (see description of actions). By default – 0.
LastErrorDescription – the description of the error. It depends on a type of action. By
default, it is the line "General error".
This set of parameters is enough to definitely identify the error and to undertake any actions.
For example:
Send an email message with the notice and description of error;
Make an record into text log file;
and etc.
2.9
Control of RoboTask through network
RoboTask has the feature of the controlling over tasks through network. This opportunity is
available to owners of the B us ine s s Lice ns e . The operation of major components of ClientServer is also available in trial mode for a testing.
The control of remote RoboTask is necessary in the next cases:
The control of a local RoboTask service. Beginning with Windows Vista, the system forbids
interaction between a service and a desktop within a user session. Therefore the control of
tasks is related with certain inconveniences (see the chapter Peculiarities of work RoboTask
Service under OS Vista/ Windows 7/ Windows 2008 Server). The mode Client-Server permits
to edit on-the-fly, to add, to delete, and to start service tasks, and also to view the tasks
logs without calling at a system console.
The control of RoboTask installed at the other network computers. RoboTask in client mode
can connect to several instances of RoboTask simultaneously. It allows to view and to edit
tasks at the other computers in the main window of RoboTask without using RDC (Remote
Desktop Connection) or similar tools.
Notice: At startup of a task at a remote RoboTask the task is performed in the session in
which the RoboTask server is working. It can be tracked only on a client the course of
performing by the task log. If the task demands some interaction with the program (for
example, dialog windows) it can’t be done from a client.
2.9.1
Network Server
The server doesn’t contain any visual interactive elements and serves only for authorization
and handling of client requests. The server must be active if you want to control this copy of
RoboTask remotely
All tunings of the server are in the dialog window of RoboTask Settings
Settings) on the tab "Network Server 58 ".
53
(menu Options |
Start Server at RoboTask loading
© 2004-2015 Neowise.com
Several practical recommendations
38
It is on by default. Switch off this checkbox if you want to refuse from remote administration.
Port
This is the number of a port, on which the server accepts connections. By default, it is 5500.
If you use more than one instance of RoboTask at your computer, apply different ports to
avoid conflicts.
For example: 5500 is for an application, 5501 is for a Service.
Encrypt data
This is the mode of traffic encryption. By default, it is on. The mode of ciphering is specified
by server. A client is tuned on the mode of encryption automatically. RoboTask provides the
traffic encryption with dynamic keys using CryptoAPI system functions.
Compress data
This is the mode of traffic compression. By default, it is on. The mode of traffic compression
can be useful when connection is slow (for example, DialUp or GPRS). The mode of traffic
compression (packing) is specified by server. A client is tuned on the mode of compression
automatically.
User Rights
This is the check mode of user’s rights at connection. It is possible to choose between two
modes of user checking:
Use Internal list. When you press the button “Edit Internal List of Users” in this mode, you
can define users, who have the right of connect to the server. This is just text in the form
USERNAME=PASSWORD on every line.
For example:
a dm in=1234567890
At the checking of a user, the server inspects presence of the user in a list and correctness
of a password.
System Administrators. In this mode the server checks presence of administrator’s rights on
a local computer when a client connects.
If the user isn’t checked, the server returns an error and closes the connection.
By default, the System Administrators mode is on.
Start Server
It starts the server.
Stop Server
It stops the server. At that rate, all opened connections are closed.
View/Edit connections
Here it is possible to view all opened connections and to close selected connections.
© 2004-2015 Neowise.com
39
2.9.2
RoboTask User's Guide
Network Client
Network Client is integrated into the main window of RoboTask. At connection to remote
RoboTask, a new branch, fitted to the service tasks, is added on the tree of tasks.
Subsequent work with network tasks is completely "transparent". That is, you can trigger,
edit, and delete tasks, just as if you would work with local tasks.
RoboTask can open several connections at the same time: one connection on each server. All
connections are visible at the tree of tasks.
2.9.2.1
Connect to
Choose the menu item Remote | Connect to 49 for fast connecting to a server. For
connecting it is necessary to specify following parameters:
Computer Name or IP address. It can be also the global network name (for example:
www.mydomain.com), if the server is in a global Internet network. One can use the name
localhost or the address 127.0.0.1 for access to a local computer (for example, to connect
to a local service).
Port. For example, the port number which is specified on the server. By default, 5500.
Domain. This parameter is necessary if only the mode of authorization System
Administrators is specified on the server. Specify a domain name or "." (Point) for a local
user on the server.
User Name
Password
2.9.2.2
Define connections
If you need to constantly control the group of servers, you can create predefined
connections. At that rate, corresponding items of menu Remote appear and then you can
connect to the server “in one click.”
Choose the menu item Remote | Define Connections
connections.
53
for creating/editing of predefined
To create a define connection, you need to specify a name of connection for a menu item and
then to specify parameters of connection.
If you not switch on the CheckBox "Save Password", RoboTask doesn’t save a password for
the next sessions. In this case, when trying to connect, a network client will request a
password.
© 2004-2015 Neowise.com
Part
III
Menus
41
RoboTask User's Guide
3
Menus
3.1
Task
3.1.1
Task - New
Allows you to add a new task. After you select the command, the Add Task dialog box displays,
allowing you to select the following tabs to create a task:
Actions tab 41
Triggering Events tab 42
Advanced tab 43
Local variables tab 45
Actions tab
Action List
Displays a list of the actions you have selected for the task you are creating or modifying. Click
the Add button to add an action. Select an action in the Action List and click the Edit button
to modify the action parameters.
© 2004-2015 Neowise.com
Menus
42
When you start the current task, the actions run in the order in which they appear in this list.
Click the
&
buttons to move an action up or down in the order listed.
Record a macro
In order to record mouse actions "as is" click this button. Macro recorder
actions and saves them as a sequence of task actions.
15
catches mouse
Add
Place the cursor in a row of the Action List where you want to add an action. You can then
click the Add button to display a list of actions that you can add to the task.
Edit
Select an action in the Action List and click the Edit button to modify the parameters, or
settings, for the action.
Remove
Select an action and click the Remove button to remove the action from the task.
Move Step Up
Select an action in the Action List and click
to move the action up in the list. This ensures
the action runs earlier in the process when the task runs.
Move Step Down
Select an action in the Action List and click
to move the action down in the list. This
ensures the action runs later in the process when the task runs.
Enabled
If the check box is cleared, the task is disabled and you must run it manually by double-clicking
the task in the RoboTask window.
Tip
To change the Enabled setting, select a task in the RoboTask window and right-click.
Triggering Events tab
© 2004-2015 Neowise.com
43
RoboTask User's Guide
Event List
Displays a list of the events you have selected for the task you are creating or modifying. The
order in which events appear in the list does not matter.
Run When RoboTask Starts
If this check box is selected, the task will run automatically when RoboTask starts.
Run When RoboTask Quits
If this check box is selected, the task will run automatically when RoboTask quits.
Add
Click the Add button to display a list of events that you can add to the task.
Edit
Select an event in the Event List and click the Edit button to modify the parameters, or
settings, for the event.
Remove
Select an event and click the Remove button to remove the event from the task.
Advanced tab
© 2004-2015 Neowise.com
Menus
44
Log Level
Select the status messages you want to record in the log file:
Nothing
Errors Only
Errors and Warnings
All Messages
Action After Completion
Select an option to run a task:
Nothing - Nothing happens when the task completes all actions.
Disable Task - The task is disabled when the task completes all actions. This is useful if
you want to run a task once and save the task to use again later. You can change this
later.
Delete Task - The task is removed from the computer permanently when the task
completes all actions. This is useful if you want to run a task once and do not need it again.
You cannot use the task again when you select this option and run the task.
External Name
© 2004-2015 Neowise.com
45
RoboTask User's Guide
You can define an external name by hand. External Name is, per se, an alternative identifier of a
task, which can help you to refer to a task (see object RoboTaskApp 331 ). RoboTask controls
the uniqueness of the External Name and, in case of name clash, resets it to the default value.
The default value looks like TaskNNNN, where NNNN – is just an ordinal number.
If Error Occurred
Here you can define the behavior of a task when an error is raised in any step. You can choose
from 3 variants:
Stop Task – the default action. When an error is raised, performance of a task is stopping.
Continue Execution – when an error is raised, performance of a task is going on. In other
words – it is ignoring of the error. We recommend to use this mode only if it is really
necessary.
Run the Error Handling Task – run the other task if an error is raised. The running task,
per se, is an error handler. In this case, performance of the main task is stopping. See
below the describing of the transferred parameters.
Error Handling Task
Choose the task of error handler in a drop-down list. This task will be started up in case of
appearance of error. When the task is being started up, the fixed kit of parameters is
transferring to it:
LastErrorTaskID – the internal ID of the task, in which an error was raised. It is a formal
identifier of the task like a number.
LastErrorTaskName - the name of the task, in which an error was raised.
LastErrorTaskExternalName – an External Name of the task, in which an error was
raised.
LastErrorStep – the number of the step (starting from 1), in which an error was raised.
LastErrorCode – code of the error. There is the own kit of codes of errors for any type of
actions (see description of actions). By default – 0.
LastErrorDescription – the description of the error. It depends on a type of action. By
default, it is the line "General error".
LastErrorCode and LastErrorDescription depend on a type of action. Descriptions of error codes
are put into the help of actions (help file)
Local variables tab
© 2004-2015 Neowise.com
Menus
46
You can declare local variables on the "Local variables" tab of the task editor. There are two
ways to declare them:
Enumerate the names of the variables;
Assign initial values to them.
If you enumerate them, just fill the list of names for local variables: one variables per line. For
example, like this:
LineCount
FileToUpload
CurrentFile
etc.
To assign an initial value, specify this value after the "=" character. For example, like this
LineCount = 0
FileToUpload = c:\incoming\list.txt
CurrentFile = note.txt
etc.
You can assign initial values not to all variables. By default, local variables contain an empty
value (an empty string).
© 2004-2015 Neowise.com
47
RoboTask User's Guide
By default, the list of local variables is empty. It means that all variables that are used in a task
will be processed as global ones when you run the task.
See more information about local variables 11 .
3.1.2
Task - Edit
Allows you to edit a task. After you select the command, the Edit Task dialog box displays,
allowing you to select the following items to edit the task:
Actions tab 41
Triggering Events tab 42
Advanced tab 43
Local variables tab 45
3.1.3
Task - Delete
Removes a task from the RoboTask and deletes its associated file.
3.1.4
Task - Run
Starts the task that you selected in the RoboTask window. This is useful for testing your task
to ensure it runs correctly.
3.1.5
Task - Stop
Allows you to stop the task that you are running in the RoboTask window.
3.1.6
Task - Find the task
This is the service of a quick search of a task by the task name. You can see a dialog with a
complete task list. Just begin typing a search string. The dialog will be filtering the task list
when typing the string. Only the tasks containing the typed string in their name will be
present in the list.
© 2004-2015 Neowise.com
Menus
48
To go to the task, highlight the searched task and press the button OK. You also can jump to
the task using the Double-Click on the searched task.
3.1.7
Task - Local running task
This is the service of a search of the task running at the moment. You will see only running at
the moment tasks in the list of the dialog window.
To go to the task highlight the searched task and press the button OK or use the Double-Click
on the searched task.
3.1.8
Task - Export
Export of a task to an external file. You can also export several tasks. To export tasks
highlight the task (or several tasks) in the list and select this menu item. RoboTask will export
the tasks into a text file.
3.1.9
Task - Import
Import of a task from a text file to the repository of RoboTask. When you import you will be
proposed to select the task file (or several files). The tasks will be imported to the active
selected task folder.
No te : Pa y a t t e nt ion t ha t t he im port e d t a sks a re a lw a y s disa ble d a ft e r im port ing. Y ou ha v e t o
e na ble it m a nua lly .
3.1.10 Task - Copy
You can copy a task by means of the method Copy-Paste using the system clipboard. Just
highlight one or several tasks in a list and press Ctrl-C (or select this item of the main or
context menu).
3.1.11 Task - Paste
If in the system clipboard is the copied task (or several tasks), you can paste them in an
active task folder pressing Ctrl-V or selecting this item of the main or context menu.
The method of copying of tasks by means of the clipboard works with remote tasks too if the
network connection with remote RoboTask is open. That is you can copy a local task and
paste it in a remote session and vice versa.
No te : Pa y a t t e nt ion t ha t t he pa st e d t a sks a re a lw a y s disa ble d a ft e r t he ope ra t ion. Y ou ha v e
t o e na ble it m a nua lly .
© 2004-2015 Neowise.com
49
RoboTask User's Guide
3.1.12 Task - Duplicate
Copies the task that you have selected in the RoboTask window. This is useful if you want to
quickly create several tasks and then edit them.
3.1.13 Task - Create Shortcut on Desktop
Adds a shortcut to the task on your desktop. This is useful if you want to quickly start a task
without opening RoboTask window. After you select one or more tasks in the RoboTask window,
click Task > Create Shortcut on Desktop. The shortcut appears on your desktop with the
name of the task.
For example, if you select a task named "Hello, World!" and click this command, a shortcut
called "Hello, World!" appears on your desktop.
3.1.14 Task - Create Batch File
Create a batch file to run a separate task from a command line. To create a batch file
highlight the task in a list and select this menu item. After that the program will propose to
select a folder and a file name.
3.1.15 Task - Exit
Closes the RoboTask window and stops the software.
3.2
Remote
The actions for working with remote RoboTask are collected in this group.
3.2.1
Remote - Connect to
Connecting to remote RoboTask. It is necessary to fill in the fields in the connection
parameters window
© 2004-2015 Neowise.com
Menus
50
Computer Name or IP Address
The name of a computer in a local network or an IP address explicitly. The IP address should
be specified according to the IPv4 standard.
Port
The port for connection. On default, the port of the RoboTask server is 5500 for the RoboTask
application and 5501 for the RoboTask system service.
Domain
The name of a user domain for authorization. It is used if the network server of RoboTask uses
a system authorization. It is necessary to specify the domain name of the server or a dot (.) if
a local user of the server is specified.
User Name
Password
The parameters of connecting should correspond to the parameters of the RoboTask network
server (see the Server Settings 58 )
3.2.2
Remote - Disconnect
Closes an active connection with the remote RoboTask.
© 2004-2015 Neowise.com
51
3.2.3
RoboTask User's Guide
Enable Remote Automation
Switches on or off the automation mode for the remote RoboTask similarly to such function for
local tasks (Tools - Enable Automation 61 ).
3.2.4
Remote Variable & Settings
This dialog allows to see and edit the global variables and the global parameters of remote
RoboTask.
Remote Variables
You can edit the list of the global variables of the remote RoboTask on the tab of global
variables.
Global settings
© 2004-2015 Neowise.com
Menus
52
Max Log Size
The max size of log files in strings. If the size has been exceeded, the older records are
deleted.
When RoboTask is running as system service
These parameters are necessary to authorize a process with rights of specified user. These
parameters make sense in the system service mode only. If the remote RoboTask is working in
the mode of a common application, these parameters are inaccessible.
Log on Process as specified user.
Switch on this checkbox if you want to turn on the authorization mode. Otherwise, RoboTask
will work with default rights (SYSTEM). This is quite enough in the most cases.
Domain Name
A domain name or a dot (.) if the local user of the remote computer is specified.
User Name
Password
© 2004-2015 Neowise.com
53
3.2.5
RoboTask User's Guide
Remote Running Tasks
Get the list of tasks which are active at the moment in the remote RoboTask. To go to a task,
highlight the task in the list and press the button Select. Double-click on the highlighted task
performs the jump to the task too.
3.2.6
Define connections
To connect to the necessary server of the RoboTask quickly, you can specify the connect
parameters in advance. Predefined connections appear at the end of the menu Remote.
Also see Network Client
3.2.7
39
chapter
The list of predefined connections
You can see the list of predefined connections at the end of the menu Remote. Connection
occurs in a single click. If you didn't specify any password for the connection, you will be
proposed to type the password for the connection.
3.3
Options
3.3.1
Options - View Log
Displays or hides the log window at the bottom of the RoboTask window. The log window shows
the results of the task that you run and any errors that occur.
3.3.2
Options - View Toolbar
Displays or hides the buttons at the top of the RoboTask window. These buttons allow you to
add, edit, run, and stop tasks.
3.3.3
Options - Settings
Allows you to set preferences for RoboTask. You can set preferences for how RoboTask starts,
plug-ins, or service mode.
General tab
54
© 2004-2015 Neowise.com
Menus
Plug-ins tab 55
NT Service tab 56
Network Server Tab
54
58
General tab
Minimize on Run
Click this check box so that RoboTask is minimized when you run the software.
Run on Windows Startup
Runs RoboTask as soon as Windows starts up.
Run As Administrator
This parameter is available only when the RoboTask is used in application mode in the
operating systems using the UAC (User Access Control). That is in Windows Vista and the
following versions.
If a user has the administrator’s rights on the given computer, the UAC, by default, demotes
the rights of started applications in the session. Due to this, an error Access Denied is possible
during some operations that demand entire rights. For example, when attempting to start or
© 2004-2015 Neowise.com
55
RoboTask User's Guide
stop the system services, write down a value in a system register into the branch
HKEY_LOCAL_MACHINE\SOFTWARE, etc.
Switch on this flag if you want the RoboTask to run with entire rights. In this case you have
to confirm running the RoboTask manually when the UAC requests confirmation.
Close as Minimize
If this option is selected, when you click the X button on the main window caption, RoboTask
will minimize. This is useful for preventing of casual closing of RoboTask.
Task Folder
Set the folder where you want to save tasks that you create. You can click the browse
button to select a folder.
Log Folder
Enter a folder where you want to save log files. You can click the browse button to select a
folder.
Max Log Size (in Lines)
Enter how many lines of data to record in a log file. For example, if you enter 300, the log file
will contain no more than 300 lines of text.
Plug-ins tab
© 2004-2015 Neowise.com
Menus
56
List of Active Plug-ins
Displays a list of available plug-ins for RoboTask. You can get more information when you click
the Information or About buttons.
Configure
Select a plug-in from the List of Active Plug-ins box and click Configure to enter settings.
Information
Displays a list of components for the plug-in that you have selected in the List of Active
Plug-ins box.
About
Displays information about the company or authors of the plug-in that you have selected in
the List of Active Plug-ins box.
Service tab
© 2004-2015 Neowise.com
57
RoboTask User's Guide
On Windows NT, Windows 2000 and Windows XP you can run RoboTask as a Service. An
Service is a background process that is loaded by the Service Control Manager of the
Windows NT operating system. Services are usually loaded when Windows boots up, before
anyone logs on.
Service mode is useful if you want to run a process in the background. However, services are
background programs that run all the time and are activated automatically when Windows NT
boots up. Services stop when Windows NT shuts down.
You can tune the save setting of RoboTask service by using RoboTask Service Manager
27
.
When RoboTask is Running as NT Service
Allows you to specify settings when you want to run RoboTask as a Service.
Logon Process as Specified User
Select this option if you want the RoboTask log on as Specified User and get its privileges.
Domain Name
Enter the name of the domain or server whose account database contains the specified
UserName account.
User Name
© 2004-2015 Neowise.com
Menus
58
Enter the name of the user account to log on to.
Password
Enter the password of the user account.
Network Server tab
On this tab you can set up server parameters of RoboTask. Read more about client-server
mode here 37 .
Start Server at RoboTask loading
It is on by default. Switch off this checkbox if you want to refuse from remote administration.
Port
This is the number of a port, on which the server accepts connections. By default, it is 5500.
If you use more than one instance of RoboTask at your computer, apply different ports to
avoid conflicts.
For example: 5500 is for an application, 5501 is for a Service.
© 2004-2015 Neowise.com
59
RoboTask User's Guide
Encrypt data
This is the mode of traffic encryption. By default, it is on. The mode of ciphering is specified
by server. A client is tuned on the mode of encryption automatically. RoboTask provides the
traffic encryption with dynamic keys using CryptoAPI system functions.
Compress data
This is the mode of traffic compression. By default, it is on. The mode of traffic compression
can be useful when connection is slow (for example, DialUp or GPRS). The mode of traffic
compression (packing) is specified by server. A client is tuned on the mode of compression
automatically.
User Rights
This is the check mode of user’s rights at connection. It is possible to choose between two
modes of user checking:
Use Internal list. When you press the button “Edit Internal List of Users” in this mode, you
can define users, who have the right of connect to the server. This is just text in the form
USERNAME=PASSWORD
on every line.
For example:
a dm in=1234567890
At the checking of a user, the server inspects presence of the user in a list and correctness
of a password.
System Administrators. In this mode the server checks presence of administrator’s rights on
a local computer when a client connects.
If the user isn’t checked, the server returns an error and closes the connection.
By default, the System Administrators mode is on.
Start Server
It starts the server.
Stop Server
It stops the server. At that rate, all opened connections are closed.
View/Edit connections
Here it is possible to view all opened connections and to close selected connections.
3.3.4
Options - Variables
Allows you to define variables for RoboTask. This command also displays a list of system
variables available in RoboTask.
System Variables tab 60
User's Variables tab 60
© 2004-2015 Neowise.com
Menus
60
Variables are strings that contain information such as drive, path, or file name. Variables can
control the behavior of various processes. For example, the {TEMPDIR} system variable
specifies the location where processes, such as tasks or programs, place temporary files.
You can not modify System variables, but can add, modify, or remove your own variables on
the User Variables tab.
System Variables tab
The System Variables tab displays a list of the system variables.
Categories
Displays a list of all the system variables and their values. You can click [All] to see a complete
list or click one of the following categories:
Date & Time
Files & Folders
System Info
Window
etc...
Variables
Displays the system variable names and their descriptions.
User's Variables tab
© 2004-2015 Neowise.com
61
RoboTask User's Guide
Name
Displays the name of the user variables that you create.
Value
Lists the value of the user variables that you set when you create or modify the variable.
Add
Allows you to create a new user variable to use in many tasks.
Edit
Allows you to edit the value of a variable.
Remove
Allows you to remove the selected variable.
3.4
Tools
3.4.1
Tools - Enable Automation
If this option is cleared, the tasks will not run automatically, i.e. all your tasks are disabled. You
© 2004-2015 Neowise.com
Menus
62
may run tasks only manually.
3.4.2
Tools - Lock Task Editor
Locking of functions of task editing. The next functions are blocked in this case:
Editing of tasks.
Editing of a tasks tree.
Editing of a global variables list.
Import of new tasks.
Thereby, RoboTask goes to the Read-Only mode.
When you switch on the locking, you will be proposed to type the password of unblocking
twice. Remember this password without fail.
3.4.3
Tools - Enable All Tasks in List
Enables all tasks that are listed in the current task folder. To enable one task, double-click it
and, in the appeared dialog window, select the Enabled check box and click OK.
3.4.4
Tools - Disable All Tasks in List
Disables all tasks that are listed in the current task folder. To disable one task, double-click it
and, in the appeared dialog window, clear the Enabled check box and click OK.
3.4.5
Tools - Start selected tasks sequentially
Starting of highlighted tasks sequentially. The tasks will be started according the list. The
next task will be started only after finishing the previous one. This mode is sometimes useful
for the manual start of tasks.
3.5
Help
3.5.1
Help - Help Topics
Displays this RoboTask Help.
© 2004-2015 Neowise.com
63
3.5.2
RoboTask User's Guide
Help - Send Bug Report
Displays a dialog window which allows to send a report about a bug you found to the developers
of RoboTask. Enter information about a problem and then click the Submit button.
3.5.3
Help - Technical support
This menu item redirect you to the page of a support site of the product.
There you can get links to additional information about the product, ask a question or go to
our forum.
3.5.4
Help - Check for updates
Get the information about updates of RoboTask for your version. On default, checking for
updates occurs one time a week. You can specify another periodicity or switch on the manual
check mode.
3.5.5
Help - About
Displays information about your version of RoboTask.
© 2004-2015 Neowise.com
Part
IV
Actions
65
RoboTask User's Guide
4
Actions
4.1
General
4.1.1
Run Program/Open Document
Use this action to run the application or open a document that you specify. If a document is
specified, the application associated with the document opens it.
Run Program/Open Document is one of the most commonly-used actions in RoboTask and
one of the most powerful. The most common usage is to start an application or open a
document and then send keystrokes or perform other interactive actions. For example, you can
use this action to open a log file in Notepad immediately after you back up your files.
Program or Document File Name
Enter the file name of the target application or a document. If a document file is specified, the
associated application is used to open it.
Parameters
Enter the parameters, if any. If the Program or Document File Name box specifies an
executable file, you can specify the parameters to be passed to the application. The format of
this parameter is determined by the application. If Program or Document File Name box
specifies a document file, the information in the Parameters box is ignored.
© 2004-2015 Neowise.com
Actions
66
Default Folder
Specifies the default folder to start the task in. If not specified, the folder of the application is
used.
Window
Specifies how an application is displayed when it is opened.
Wait Options
There are three choices:
Don't wait - the next action executes immediately after the program starts.
Wait until the application is ready for input - the next action executes only after the
program started and is ready for input. This option is useful when you want to perform any
interactive actions like Send Keystrokes 70 .
Wait untill the application exits - the next action executes only after the program exits.
Assign Exit Code to Variable
You can assign exit code of running program to variable. This have a sense only if you set "Wait
until the application exits" wait option.
If Exit Code <> 0
Usually exit code of command line utility equals to 0. Usually this means that executing of the
program is OK. Non zero exit code may indicate that some problem has occurred at runtime.
You can choose one of three options:
Nothing
Stop the task - if exit code is non-zero RoboTask stop the task
Raise the Error - if exit code is non-zero RoboTask rases the error with code 1 and
description "Exit code is not equal to 0" (also see Error Handling 36 )
Variable
Allows you to add a variable to the action or triggering event that you selected. You must
place the cursor in a edit box in the settings dialog window of the action or event and then
click the {V} button.
4.1.2
Run Command-Line Utility
This action is intended for console command utilities. Sometimes it is important not only
perform such utility with certain parameters but analyze output data, that is, the text
displayed on the screen by the utility.
The action allows to save an output stream of the utility into a variable. Then in the task you
can save this information into a file or analyze the output text.
© 2004-2015 Neowise.com
67
RoboTask User's Guide
Program Name
Specify the file name of an/the utility. Unlike the action Run Program/Open Document Parameters, it is
prohibited specifying of a document file in this field. Only the name of the executed document must be
specified here.
You can specify the parameters of a command line here. For convenience, it is possible to type each
parameter on a new line. When executing the action, the RoboTask forms the common parameter line from
multi-line text.
Default Folder
Specify the folder name, which will be current when the utility starts.
Assign the Output Text into Variable
If you need to save the output text, switch on this checkbox and specify a variable name.
Then you can use this variable for the next processing.
Convert to ANSI format
Some utilities output a text with non-latin symbols in OEM format (or in the format DOS). In
this case switch on this checkbox for automatically transformation of the string in ANSI
coding.
© 2004-2015 Neowise.com
Actions
68
Assign Exit Code into Variable
If you need to save the exit code of the utility into a variable, switch on this checkbox and
input the variable name. The exit code is a number. As a rule, it is 0 when it works regularly or
an error code when some trouble appears. It depend on the started utility.
If Exit Code <> 0
The action when the exit cod is not 0. Select one of the 3 alternatives:
Nothing
Stop the task
Raise the Error.
On default it is Nothing
4.1.3
Print Document
Use this action to print one or more document files, such as Microsoft Word .Doc files, to the
default printer. For example, you can use this action to automatically print daily backup logs.
To print a document, the Print Document action uses a default application for the specified
kind of documents. For example, for a Word document (DOC file) it is usually the MS Word
from the MS Office package, for a PDF file it is the Acrobat Reader, etc.
The action can direct a document to any printer registered in the system. Of course, the
default application is supposed to support printing on the specified printer. As a rule, all the
basic applications support this function.
© 2004-2015 Neowise.com
69
RoboTask User's Guide
Files to Print
Enter the files that you want to print. This is a required option. Wildcards are allowed. Click
the Plus button to add files to the list. To clear the list, click the X button.
Tip
You can also use wildcards in this option. Some examples of wildcards are the following:
C:\Text Files\*.txt - all the files with the .txt extension in the C:\Text Files folder.
C:\Doc Files\mydoc?.doc - mydoc1.doc, mydoc2.doc, mydocA.doc, and so forth.
{bakext} - file mask(s) from the {bakext} variable.
To printer
Default printer – direct a document to a default printer;
This printer – direct a document to the specified printer. When you select a printer you
can pick out the one from a dropdown list or write the name of the printer in the entry
field. When writing the name of a printer, variables can be used. For example,
{PrinterName}.
Wait options
This parameter defines the timeout in seconds to wait until the document is being printed. You
© 2004-2015 Neowise.com
Actions
70
can also specify an infinite timeout.
If the timeout is over, the action stops the printing application.
Variable
Allows you to add a variable to the action or triggering event that you selected. You must
place the cursor in a edit box in the settings dialog window of the action or event and then
click the {V} button.
4.1.4
Send Keystrokes
Sends keystrokes to a window that you specify or the window that is currently in focus. After you have opened
an application programmatically, you can use this action to access menu commands using shortcut, or hot,
keys, such as ALT + F to open the File menu. Send Keystrokes is one of the most powerful actions for
manipulating applications.
© 2004-2015 Neowise.com
71
RoboTask User's Guide
Target
Specifies the window to send the keystrokes to. There are two choices:
Current Window - the keystrokes are sent to the currently focused window.
Specified Window - the specified window will be focused and the keystrokes are sent to it.
Part of Window Caption
Enter the caption, or part of the caption, of the window to send keystrokes to. This option is available only
when you the Specified Window option is selected.
Fixed Window
Click this check box when you want to prevent a user from switching windows during the time that the action
runs.
Keystrokes
Specifies the keystrokes that the action sends to the window. For the alpha-numeric characters, type these
keys on the keyboard. For the special keys, such as Esc, F11, Left Arrow Key, and Ctrl+Alt+A, click the
Insert a Key button.
© 2004-2015 Neowise.com
Actions
72
Insert a Key
Click this button to insert special keys such as Esc, F11, Left Arrow Key, and Ctrl+Alt+A. You can also
insert a pause between keystrokes to give time for program operations, such as opening a file.
Send Kind
You can send keystroke in two ways: Emulate Keypresses or As Simple Text. The question is
that different programs response on the simulation of keystroke differently.
Emulate Keypresses –RoboTask emulates a hardware keystroke in this mode. It is
possible to send keys combinations with Ctrl, Alt, Shift in this mode. Please note, that
symbols ^, %, +, #, {, }, (, ) are used for recording keys combinations. These symbols
are reserved for this mode. How to simulate sending of these keys is shown below.
Send As Simple Text – simulation of a simple typesetting is produced in this mode. The
text is sent as is, without using combinations. Pay attention that the sending of key
presses is sensitive to the current Keyboard Locale.
Forced Release of Shift-keys
Switch on this parameter, if you want to make forced release of Shift-keys. You can turn off
this parameter if you want to send some keystrokes when some of Shift-keys are held down
(see Shift Keys State 73 ).
Insert Pause Between Keypresses
Insert pauses between separate keys presses in milliseconds. This is important particularly for
the "Emulate Keypresses" mode. Pauses are necessary to give the application some time for
response to the press of keys or keys combinations. By default, 20 milliseconds are preset. As
a rule, this is enough for most cases.
Variable
Allows you to add a variable to the action or triggering event that you selected. You must
place the cursor in a edit box in the settings dialog window of the action or event and then
click the {V} button.
Standard keys for GDI windows
When you work with emulated key presses, we recommend that you use standard key combinations for
controlling dialog boxes. These combinations work in most dialog boxes in Windows applications and you will
not have to use the mouse.
Tab – move to the next control element of the dialog box;
Shift-Tab – move to the previous control element of the dialog box;
ESC – the same as a click on the Cancel button in most cases;
Enter – the same as a click on the OK button in most cases;
Ctrl-Tab – move to the next tab if the dialog box contains tabs;
Ctrl-Shift-Tab - move to the previous tab;
Key combinations
© 2004-2015 Neowise.com
73
RoboTask User's Guide
Ctrt
Alt
Shift
Win
- ^(<Letter>) , e.g. Ctrl-S -> ^(S)
- %(<Letter>) , e.g. Alt-W -> %(W)
- +(<Letter>) , e.g. Shift-W -> +(W)
- #(<Letter>) , e.g. Win-E -> #(E)
How to simulate reserved symbols: ^ % + # { } ( )
You can do this by using Shift combinations, like this
^
- Shift-6 , i.e. +(6)
%
- Shift-5 , i.e. +(5)
+
- Shift-= , i.e. +(=)
#
- Shift-3 , i.e. +(3)
{
- Shift-[ , i.e. +([)
}
- Shift-] , i.e. +(])
(
- Shift-9 , i.e. +(9)
)
- Shift-0 , i.e. +(0)
4.1.5
Shift Keys State
This action serves for imitation of retention of Shift-keys in pressed condition or in forced
release. Shift-keys are used in various combinations: Shift, Ctrl, Alt, Win-key. Some programs
use complex combinations.
For example:
when Ctrl is pressed, push K and C sequentially
pressing Left Button of a mouse when Ctrl and Alt are held down
The action "Send Keystrokes
70
" can’t ensure imitation such combinations.
Action
Select a necessary action:
Release selected keys – forced release of specified keys.
Hold down selected keys – pressing of specified keys and holding them in pressed
condition, until you see the action Release of Keys. Please note that all Shift-keys will be
© 2004-2015 Neowise.com
Actions
released, if you switch on the parameter "Forced release of Shift-keys
Keystrokes are in use.
70
74
" when Send
Keys
Mark necessary keys in any combination.
4.1.6
Log Off
Completes one of the following actions:
Logs off the current user,
Shuts down the computer,
Restarts the system.
For example, you can use this action to automatically shut down a computer every night after
your defragger program finishes cleaning up your hard drive.
Action
Select one of the following values:
Shut down the computer
Shut down the computer and power off
Restart the computer
Log Off
Suspend - sleep mode
Hibernate - hibernate computer if it's possible.
4.1.7
Pause
Waits for a specified number of milliseconds and then continues executing tasks. This action is
useful when you want to perform extensive operations that require a delay between actions.
© 2004-2015 Neowise.com
75
RoboTask User's Guide
For example, you might want to create a pause between printing a document and closing it to
prevent a printer error. This pause allows time for the document to spool.
Pause
Enter the pause. You can specify the dimension as:
Milliseconds
Seconds
Minutes
4.1.8
SQL Query
Executes an SQL query. This action is useful when you want to update a database. If you want
to SELECT from a database, use the Dataset Loop 184 action instead.
Connection String
A string with attribute/value pairs for information required to log on to a database and point to
© 2004-2015 Neowise.com
Actions
76
a specific database. Click the browse button to open the Microsoft Data Link Properties dialog
box. You can press F1 to access Help about this dialog box.
SQL Query
Enter the query string in SQL syntax.
Variable
Allows you to add a variable to the action or triggering event that you selected. You must
place the cursor in a edit box in the settings dialog window of the action or event and then
click the {V} button.
4.1.9
Wait for Process Finish
Pauses the task and waits until the selected process (processes) is finished. After the
monitored process is finished, the task is resumed. If the specified process is not in the memory
at the moment when the action is due, the task is not paused.
This action is necessary to synchronize your task with an external application. For example, you
may need to wait until the packing program finishes its work before you can copy the packed
file to the Backup folder.
Process
You can either select the process from the list of processes that are currently running or type
its name manually. You do not have to write the full path to the EXE file if it does not matter
where this application was launched from.
© 2004-2015 Neowise.com
77
RoboTask User's Guide
If more than one matching process
If there are several running processes matching the specified one at the moment when the
action is due, you can specify one of three modes
Wait for Oldest - wait until the process launched first from the matching group is
finished;
Wait for Newest - wait until the process launched last from the matching group is
finished;
Wait for All - wait until all matching processes are finished.
Waiting
This parameter defines the timeout in seconds to wait until the process is finished. You can also
specify an infinite timeout.
If the timeout is over, but the process is not finished, the action will generate the following
error: Timeout is over.
Assign Exit Code of Process to Variable
If you select waiting for one process (Wait for Oldest or Wait for Newest), you can assign its
exit code to a user variable. A lot of console utilities (for example, packing software) can use
this code to inform the application that initialed them about errors in their work.
4.1.10 Wait for Process Start
Pauses the task and waits until the selected process is started. Unlike action "Wait for Process
Finish 76 ", this one waits for the appearance of the specified process in memory. If that process
is there already, there is no waiting, and control is passed to the next step of a task.
Process
Specify or select from the list the name of the process that needs waiting for. You can use
variables.
If you specify the name of EXE-file with a full path, RoboTask will look for the process in
memory by its full name. If the path is not specified, RoboTask will look for the process only by
the name of the EXE-file without a path.
Waiting
© 2004-2015 Neowise.com
Actions
78
Specify the timeout, during which you need to wait for an appearance of the process. You
can specify a timeout in seconds or select the value "Infinity". If the process does not appear
in memory during specified time, the action generates an error type "Timeout error. Process
didn't start"
4.1.11 Terminate Process
Forces the specified process to be terminated. This method is not a normal way to exit
Windows applications. To exit some application normally, you will have to close the main window
of this application. (see the operation Window command).
Note:
Whe n y ou forc e a proc e ss t o be t e rm ina t e d, y ou m a y lose da t a (for e xa m ple , a proc e ss is
t e rm ina t e d w he n a file is be ing sa v e d) or sy st e m re sourc e s oc c upie d by t he proc e ss m a y
re m a in oc c upie d. In t his c a se , m ult iple proc e ss t e rm ina t ion m a y re sult in v e ry unple a sa nt
c onse que nc e s. Alt hough quit e oft e n it is a sa fe proc e dure .
Process.
Enter the name of the process that should be terminated. If the process already exists in
memory, you can select it from the drop-down list. The name of the process coincides with the
name of its EXE file. There is no need to specify the full path in the process name. If you do not
specify the full path, RoboTask will search for the specified process without taking into account
its path. Also, you can use variables when specifying the name of the process.
If more than one matching process.
Specify what should be done, if there are several matching processes in memory at the moment
of the operation. For example, you started several instances of Notepad.exe with different text
files.
There are three options to choose from:
Terminate Oldest – terminate the process started first;
Terminate Newest – terminate the process started last;
Terminate All – terminate all matching processes.
© 2004-2015 Neowise.com
79
RoboTask User's Guide
4.1.12 Comment
This action does nothing and is used only as a visual comment for the task.
4.2
Dialogs and Notifications
4.2.1
Show Message/Play Sound
Displays a message box that displays custom text or plays a sound file. For example, you can
use this action to display a message and play a sound every time your backup finishes archiving
the files.
Tip
The message box displayed by this action has an OK button. You can display a message box
with a Yes and No button with the Question Dialog 82 action.
© 2004-2015 Neowise.com
Actions
Show Message
Click this check box to display the message box.
Message Text
Enter the text for the message box.
Message Icon
Select the style of the icon for the message box:
Exclamation
Information
© 2004-2015 Neowise.com
80
81
RoboTask User's Guide
Question
Error
Play Sound
Click this check box to play a sound. When you click the check box, you can click the browse
button to select a .wav file on the computer.
Test
Click this button to ensure that the parameters for the current action work.
Variable
Allows you to add a variable to the action or triggering event that you selected. You must
place the cursor in a edit box in the settings dialog window of the action or event and then
click the {V} button.
© 2004-2015 Neowise.com
Actions
4.2.2
82
Question Dialog
Displays a message box with specified text and two buttons: OK&Cancel or Yes&No. For
example, after your system is backed up, you can use this action to display a message asking
you if you want to open the log file.
Question Text
Enter the text for the message box.
Buttons
Click to set the style of buttons that appear on the message box.
OK & Cancel
Yes & No
Action
Select an option to specify an action when user clicks a button:
Stop task
Assign variable
Stop Task On
Select an option to specify when the task stops when the user clicks a button on the message
box:
Cancel/No
OK/Yes
Auto Choice
Click an option to specify when the task continue or stops if a user does not select a button on
© 2004-2015 Neowise.com
83
RoboTask User's Guide
the message box.
None
Cancel/No
OK/Yes
After ___ Sec.
Enter the number of seconds to wait before implementing the button that you selected in the
Auto Choice area.
Variable
Allows you to add a variable to the action or triggering event that you selected. You must
place the cursor in a edit box in the settings dialog window of the action or event and then
click the {V} button.
Test
Click this button to ensure that the parameters for the current action work.
4.2.3
Open Dialog
Displays a dialog box that allows you to open file. You can set the title of the dialog box, the
initial folder, and the type of files a user can open.
For example, you can use this action in a task in which you might want to select file for
uploading to FTP server.
Dialog Caption
Enter the caption of the dialog box. For example, you could enter a caption "Open Log Files" for
the dialog box.
© 2004-2015 Neowise.com
Actions
84
Initial Folder
Set the folder that you want as the starting folder for the dialog box. For example, you could
enter "My Documents" or "Daily Backups." Click the browse button to select a folder.
Filter
Enter the criteria for including file types that you want the dialog box to open. These types
appear in options for opening files on the dialog box, such as Files of Type. Click the ... button
to add types with the Filter Editor dialog box. You can click a field in this dialog box and add
file type extensions and a name for the file type.
Assign Selected File Name to Variable
Enter a variable name to store the selected file name to; for use in other actions of task.
Assign This Value if No File Selected
Assign a value to store if no file is selected, i.e. the Cancel button was clicked.
Variable
Allows you to add a variable to the action or triggering event that you selected. You must
place the cursor in a edit box in the settings dialog window of the action or event and then
click the {V} button.
4.2.4
Save Dialog
Opens a dialog box that allows users to save a file. You can specify the title of the dialog box,
the start folder, and which types of files a user can save. For example, you might want to use
this action that copies a file and you want to specify where to copy the file.
© 2004-2015 Neowise.com
85
RoboTask User's Guide
Dialog Caption
Enter the caption of the dialog box. For example, you could enter a caption "Save Log Files" for
the dialog box.
Initial Folder
Set the folder that you want as the starting folder for the dialog box. For example, you could
enter "My Documents" or "Daily Backups." Click the browse button to select a folder.
Filter
Enter the criteria for including file types that you want the dialog box to save. These types
appear in options on the dialog box, such as Files of Type. Click the ... button to add types
with the Filter Editor dialog box. You can click a field in this dialog box and add file type
extensions and a name for the file type.
Assign Selected File Name to Variable
Enter a variable name to store the selected file name to; for use in other actions of task.
Assign This Value if No File Selected
Assign a value to store if no file is selected, i.e. the Cancel button was clicked.
Variable
Allows you to add a variable to the action or triggering event that you selected. You must
place the cursor in a edit box in the settings dialog window of the action or event and then
click the {V} button.
4.2.5
Browse for Folders
Displays a dialog box that allows users to browse folders on a local or remote drives. You can
set the title of the dialog box, the start folder, and what type of files a user can select. For
example, if you create a task that downloads files from Internet, you can display this dialog box
so you can select where to save the downloaded files.
© 2004-2015 Neowise.com
Actions
86
Dialog Caption
Enter the caption of the dialog box. For example, you could enter a caption "Select Destination
Folder" for the dialog box.
Initial Folder
Set the folder that you want as the starting folder for the dialog box. For example, you could
enter "My Documents" or "Daily Backups." Click the browse button to select a folder.
Filter
This option is not available for this action.
Assign Selected Folder Name to Variable
Enter a value to store the selected file name in a variable expression for use in other actions or
tasks.
Assign This Value if No Folder Selected
Assign a value to store if no folder is selected, i.e. the Cancel button was clicked.
Variable
Allows you to add a variable to the action or triggering event that you selected. You must
place the cursor in a edit box in the settings dialog window of the action or event and then
click the {V} button.
4.2.6
Browse for Computers
Displays a dialog box that allows a user to select computers on the local network. You can set
the title of the dialog box and other settings. For example, in a task that sends a network
© 2004-2015 Neowise.com
87
RoboTask User's Guide
message, you can select a computer to send a message to.
Dialog Caption
Enter the caption of the dialog box. For example, you could enter a caption "Browse Backup
Server" for the dialog box.
Initial Folder
This option is not available for the Browse for Computers action.
Filter
This option is not available for the Browse for Computers action.
Assign Selected Computer Name to Variable
Enter a variable name to store the selected computer name to; for use in other actions of task.
Assign This Value if No Computer Selected
Assign a default value to store if no computer is selected.
Variable
Allows you to add a variable to the action or triggering event that you selected. You must
place the cursor in a edit box in the settings dialog window of the action or event and then
click the {V} button.
4.2.7
Input Box
Displays an input dialog box that lets the user enter a string and assigns the entered value to a
specified variable.
© 2004-2015 Neowise.com
Actions
88
Prompt String
Specify the text that prompts the user to enter input in the edit box.
Assign Entered Value to Variable
Enter a variable name to store the entered value to; for use in other actions of task.
Assign this Value, if Cancel Pressed
Assign a default value to store if Cancel is pressed.
Variable
Allows you to add a variable to the action or triggering event that you selected. You must
place the cursor in a edit box in the settings dialog window of the action or event and then
click the {V} button.
Test
Click this button to ensure that the parameters for the current action work.
4.2.8
Show Notification
This action is for displaying different popup messages on a screen. These messages do not
demand any interactive action (e.g. pressing the key OK). The message closes automatically
in several seconds after its displayed. The message can be displayed in two ways:
As a tray icon balloon
As popup windows in the corner of the screen
You can press the button Test in the editor of action parameters and then watch how your
message looks with the specified parameters.
General
© 2004-2015 Neowise.com
89
RoboTask User's Guide
Title
The title of a message. The usage of variables is allowed.
Message
The body of a message. The usage of variables is allowed.
Icon kind
Select a message icon. Available variants are:
Information
Exclamation
Error
Default
Alert Kind
Select the kind of a message:
Desktop Alert – a message as a popup window in a screen corner. If the RoboTask
sends several messages in succession, all of them will be displayed one above another.
Tray Icon Balloon – the display of the message as a standard system balloon. If the
RoboTask sends several messages running, then only the last message will be displayed
on the screen. Every next message will overlay the previous one.
© 2004-2015 Neowise.com
Actions
90
Duration
The duration of a message display. At the end of this time, the message disappears from the
screen automatically. It is possible to change the duration of the message from 2 to 20
seconds. By default, it is 5 seconds.
Alert Parameters
Additional parameters, available for the message display mode “Desktop Alert” only.
Width
The width of the message window. On default, it is 330 pixels. This is enough for the majority
of short messages. When specifying the width of the window the usage of variables is allowed.
Height
The height of the message window. On default, it is 76 pixels. This is enough for the majority
of short messages. When specifying the height of the window the usage of variables is
allowed.
Position
Select one of the four screen corners where the message will appear. On default, it is the
right lower screen corner, i.e. where the system tray is.
Variable
Allows you to add a variable to the action or triggering event that you selected. You must
© 2004-2015 Neowise.com
91
RoboTask User's Guide
place the cursor in a edit box in the settings dialog window of the action or event and then
click the {V} button.
4.2.9
Choice Dialog
The Choose Dialog is necessary to select one value of several alternatives. The action saves
the number of chosen alternative (beginning from 1) into a variable. Then it is possible to do
actions according to a choice.
If a user rejects a choice (that is, the button Ca nc e l is pressed), the value of the choice is 0.
Dialog Title
Specify a title for a choice menu.
Items
A list of menu items for a choice. The list can be edited with buttons Add, Edit , De le t e .
Also it is possible to change the order of options using buttons M ov e Up and M ov e Dow n.
Save Selected Item Number to Variable
Specify the name of a variable into which is necessary to save the choice result. If one of
items is chosen, the number of the item will be saved beginning from 1.
If the button Cancel is pressed, then 0 will be saved.
© 2004-2015 Neowise.com
Actions
92
4.2.10 Multichoice Dialog
The Multi Choice Dialog allows to switch on or off each option of the proposed set.
For example, a task collects certain information and allows to pass the information to several
workers:
Send the Message to Mike;
Send the Message to administrator;
Copy Message to Boss.
The Multi Choice Dialog allows to select alternatives in any combination. The RoboTask saves
the values of a choice into separate variables for each option (True or False)
Dialog Title
Specify the title for a choice menu.
Items
The list of menu items for a choice. Each item is related to a variable into which the value of a
choice of the item is saved. True or False.
Save True (OK) or False (Cancel) into Variable:
Specify the variable into which it is necessary to save the work result of dialog. If a choice is
made, the value True is saved. If not (that is, the button Cancel is pressed), the value False
is saved.
© 2004-2015 Neowise.com
93
RoboTask User's Guide
4.3
Files and Folders
4.3.1
Copy/Move File
Copies or moves one or more files that you specify. You can set the source and the destination.
Wildcards are allowed. For example, you can use this action to copy backup archives from your
computer to another computer on the network.
Files
Enter the files you want to copy or move. Wildcards are allowed. Use the Plus buttons to add
files to the list. To clear the list, click the X button.
Tip
You can also use wildcards in this option. Some examples of wildcards are the following:
C:\Text Files\*.txt - all the files with the .txt extension in the C:\Text Files folder.
C:\Doc Files\mydoc?.doc - mydoc1.doc, mydoc2.doc, mydocA.doc, and so forth.
{bakext} - file mask(s) from the {bakext} variable.
© 2004-2015 Neowise.com
Actions
94
Destination Folder
Enter the folder to which you want to move or copy the files. You can click the browse button
to find folders.
Rename to (you can use wildcards)
If you want to change the original name of file you should turn on this checkbox and specify
new file name or the mask of new name in the field below. This option allows you to copy the
file to new filename in the same folder.
If File Exists
Specify the action to take if a file already exists in the destination location.
Overwrite - replaces the destination file with the file you are copying or moving.
Rename - renames the source file when you copy or move it to the new location.
Recurse to Subfolders
Copies or moves all the files in the subfolders of the current directory.
Move
Deletes the original files after you copy or move them to a new location.
Variable
Allows you to add a variable to the action or triggering event that you selected. You must
place the cursor in a edit box in the settings dialog window of the action or event and then
click the {V} button.
4.3.2
Rename File
Renames one or more specified files. Wildcards are allowed. For example, you can copy the files
to another folder and automatically rename them using this action.
© 2004-2015 Neowise.com
95
RoboTask User's Guide
Files
Enter the files you want to rename. Use the Plus buttons to add files or folders to the list. To
clear the list, click the X button.
Tip
You can also use wildcards in this option. Some examples of wildcards are the following:
C:\Text Files\*.txt - all the files with the .txt extension in the C:\Text Files folder.
C:\Doc Files\mydoc?.doc - mydoc1.doc, mydoc2.doc, mydocA.doc, and so forth.
{bakext} - file mask(s) from the {bakext} variable.
Rename To
Enter the name or partial name for the new filename. You can use a wildcard if you want to
rename part of the filename.
Recurse to Subfolders
Renames the files in the subfolders of the current directory.
Variable
Allows you to add a variable to the action or triggering event that you selected. You must
place the cursor in a edit box in the settings dialog window of the action or event and then
click the {V} button.
4.3.3
Delete File
Deletes one or more files you specify. Wildcards are allowed. For example, you can use this
action to automatically delete cookies from your Internet cache every day to protect your
privacy and computer security.
© 2004-2015 Neowise.com
Actions
96
Files
Enter the files you want to delete. Use the Plus buttons to add files or folders to the list. To
clear the list, click the X button.
Tip
You can also use wildcards in this option. Some examples of wildcards are the following:
C:\Text Files\*.txt - all the files with the .txt extension in the C:\Text Files folder.
C:\Doc Files\mydoc?.doc - mydoc1.doc, mydoc2.doc, mydocA.doc, and so forth.
{bakext} - file mask(s) from the {bakext} variable.
Delete to Recycle Bin
Moves files to the Windows Recycle Bin. Use this flag to prevent possible data loss.
Recurse to subfolders
Deletes the files in the subfolders of the current directory.
Delete Folders
Removes the subfolders. This option works only with wildcards.
Variable
Allows you to add a variable to the action or triggering event that you selected. You must
© 2004-2015 Neowise.com
97
RoboTask User's Guide
place the cursor in a edit box in the settings dialog window of the action or event and then
click the {V} button.
4.3.4
Write Text File
Creates a text file with the specified text. For example, you can write a text file listing which
user is logged into a computer at a particular time.
Text File
Enter the name of the text file to save. You can click the browse button to select a file.
Text
Enter the text that you want saved in the file.
Text Encoding
The action can provide the following coding:
ANSI text
UTF-8 text
Unicode text
© 2004-2015 Neowise.com
Actions
98
If File Exists
Specify the action to take if a file already exists in the destination location.
Overwrite - replaces the destination file with the new file.
Append - append specified text at the end of existing text file.
Suppress Trailing End-Of-Line symbols
If you want to remove trailing EOL symbols switch on this checkbox.
Variable
Allows you to add a variable to the action or triggering event that you selected. You must
place the cursor in a edit box in the settings dialog window of the action or event and then
click the {V} button.
4.3.5
Search for Files
Looks for files and creates a file list. This action is useful with pre-defined variables, such as %
TextFile(file_name)%. You can create a file list, such as a list of all .Png files, and then use this
in a list of actions, such as copying, moving, or deleting files.
General tab
© 2004-2015 Neowise.com
99
RoboTask User's Guide
Search for Files
Enter the file path with file mask that you want to search for. Use the Plus buttons to add files
or folders to the list. To clear the list, click the X button.
Tip
You can also use wildcards in this option. Some examples of wildcards are the following:
C:\Text Files\*.txt - all the files with the .txt extension in the C:\Text Files folder.
C:\Doc Files\mydoc?.doc - mydoc1.doc, mydoc2.doc, mydocA.doc, and so forth.
{bakext} - file mask(s) from the {bakext} variable.
Exclude Masks (Comma Separated)
Enter one or more file masks separated with commas that you do not want to search.
Tip
You can also use wildcards in this option. Some examples of wildcards are the following:
*.txt - all the files with the .txt extension.
mydoc?.doc - mydoc1.doc, mydoc2.doc, mydocA.doc, and so forth.
*.tmp, *.$$$, *.bak - all the files with the .tmp, .$$$ and .bak extensions.
{bakext} - file mask(s) from the { bakext} variable.
© 2004-2015 Neowise.com
Actions
100
Recurse to Subfolders
Searches the files in the subfolders of the specified folder.
Save File List To
Enter a path and name for a file that contains a list of the files that were searched. Click the
List Format tab to set other options for this list.
Variable
Allows you to add a variable to the action or triggering event that you selected. You must
place the cursor in a edit box in the settings dialog window of the action or event and then
click the {V} button.
Date Filter tab
All Files
Select this option to search all files.
Find Files Created or Modified
Click this option to search files according to one of the following criteria:
Between
Newer Than ___ Months
Newer Than ___ Days
© 2004-2015 Neowise.com
101
RoboTask User's Guide
Older Than ___ Months
Older Than ___ Days
List Format tab
Without Path Name
Lists files without the path names (i.e. file names only).
Insert Text Before
You can specify a text that will be inserted at the beginning of the list file.
Insert Text After
You can specify a text that will be inserted at the end of the list file.
Insert Text Before Each Line
You can specify a text that will be inserted at the beginning of each line.
Insert Text After Each Line
You can specify a text that will be inserted at the end of each line.
List Sorting options
© 2004-2015 Neowise.com
Actions
102
Parameters of internal sorting of the file list
Sort the list of filenames
Turn on the checkbox if you want to sort the list
How to sort
There are four sorting modes:
By file name
By file time
By file size
By depth of nested folders
Sort order
There are two modes: ascending or descending ordering
Variable
Allows you to add a variable to the action or triggering event that you selected. You must
place the cursor in a edit box in the settings dialog window of the action or event and then
click the {V} button.
© 2004-2015 Neowise.com
103
4.3.6
RoboTask User's Guide
Change Folder
Allows you to the change the current folder. This is useful if you need to set the current folder
during a series of actions or tasks. This action is useful with other file actions like copy, move.
Folder Name
Enter the name of the destination folder. You can click the browse button to select a folder.
Variable
Allows you to add a variable to the action or triggering event that you selected. You must
place the cursor in a edit box in the settings dialog window of the action or event and then
click the {V} button.
4.3.7
Create Folder
Makes a new folder on a local or remote drive. For example, you could automatically create a
new folder for your backups based on the current date.
New Folder Name
Enter the name for the new folder. You can click the browse button to select a folder.
Variable
Allows you to add a variable to the action or triggering event that you selected. You must
place the cursor in a edit box in the settings dialog window of the action or event and then
click the {V} button.
© 2004-2015 Neowise.com
Actions
4.3.8
104
Rename Folder
Renames a existing folder. For example, if you have copied a folder with files, you can rename
the original folder.
Old Folder Name
Enter the original name of the folder. You can click the browse button to select a folder.
New Folder Name
Enter the new name for the folder.
Variable
Allows you to add a variable to the action or triggering event that you selected. You must
place the cursor in a edit box in the settings dialog window of the action or event and then
click the {V} button.
4.3.9
Remove Folder
Deletes a existing folder. For example, if you have archived your company financial reports
every week for the past year, you can create a task that automatically deletes folders that are
more than a year old.
© 2004-2015 Neowise.com
105
RoboTask User's Guide
Folder Name
Enter the name of the folder that will be removed.
Remove Folder if It's Not Empty
If this option is selected, the specified folder will be deleted even it is not empty (i.e. contains
files and subfolders), otherwise the specified folder will be deleted only if it is not empty (i.e.
does not contain files and subfolders).
Variable
Allows you to add a variable to the action or triggering event that you selected. You must
place the cursor in a edit box in the settings dialog window of the action or event and then
click the {V} button.
4.3.10 Synchronize Folders
Synchronizes the two folders that you specify. The synchronization method may be bidirectional or uni-directional. For example, if you travel a lot, you might want to create a task
that synchronizes data in a folder on your laptop computer and a folder on your desktop
computer.
© 2004-2015 Neowise.com
Actions
106
Folder 1
Enter the first folder that you want to synchronize. You can click the browse button to select a
folder.
Folder 2
Enter the second folder that you want to synchronize.
Swap Folders
Click to place the folder listed in Folder 2 in the Folder 1 box and the folder in Folder 1 in the
Folder 2 box.
Include Masks (Comma Separated)
Enter one or more masks separated with commas to specify which files to synchronize, such as
*.exe, *.cnt, *.hlp. The default wildcard mask "*.*" means that all folders and files are
synchronized. You can specify one or more masks separated by commas.
Tip
You can also use wildcards in this option. Some examples of wildcards are the following:
*.txt - all the files with the .txt extension.
mydoc?.doc - mydoc1.doc, mydoc2.doc, mydocA.doc, and so forth.
© 2004-2015 Neowise.com
107
RoboTask User's Guide
*.tmp, *.$$$, *.bak - all the files with the .tmp, .$$$ and .bak extensions.
{bakext} - file mask(s) from the { bakext} variable.
Exclude Masks
Enter one or more masks separated with commas to specify which files to skip in the
synchronization. You can specify one or more masks separated by commas; for example, *.bak,
*.old, *.$$$.
How to Synchronize
Select one of the following options:
Folder 1 <=> Folder 2 (Bi-directional) - new or newer files that are available in Folder 1
are copied to Folder 1, and vice versa.
Folder 1 ==> Folder 2 (Uni-directional) - only new or newer files that are available in the
Folder 1 are copied to Folder 2; the contents of Folder 2 does not affect the contents of
Folder 1.
Include Subfolders
Click this check box to synchronize all files in the subfolders.
Exact Copy in Folder 2
Available only with unidirectional synchronization when you select Folder 1 ==> Folder 2. This
option ensures that files that are available in Folder 2, but not in Folder 1, are deleted.
Sync an Empty Folders
If this checkbox is switched on, the action copies the structure of empty folders. Otherwise,
only files will be synchronized.
Output Activity to Log
If you want to write the log of synchronization into the task log, switch on this checkbox. The
action will put the information about coped and removed files into the task log.
Output Activity to variable
If you want to write the log of synchronization into a variable, switch on this checkbox and
put the variable name in the field. The action will put the information about coped and
removed files into the log.
Variable
Allows you to add a variable to the action or triggering event that you selected. You must
place the cursor in a edit box in the settings dialog window of the action or event and then
click the {V} button.
4.3.11 Wait for file
Pauses the task and waits until the selected file will be available. After the monitored file is
been available, the task is resumed. If the specified file is not opened in another process at the
moment when the action is due, the task is not paused.
© 2004-2015 Neowise.com
Actions
108
Wait for file
You can either select the file name or type its name manually.
Waiting
This parameter defines the timeout in seconds to wait until the process is finished. You can also
specify an infinite timeout.
If the timeout is over, but the process is not finished, the action will generate the following
error: Timeout is over.
Variable
Allows you to add a variable to the action or triggering event that you selected. You must
place the cursor in a edit box in the settings dialog window of the action or event and then
click the {V} button.
4.3.12 SortText
This action is used to sort strings in a text or in a text file in the ascending or descending order.
It is possible to assign the sorted text to a variable for further processing (e.g. in "Text Loop")
or save it to a file. You can specify the source text explicitly using variables or read it from an
external file.
© 2004-2015 Neowise.com
109
RoboTask User's Guide
Source
You can select the source for the source text in this group of parameters: specify an external
file or specify the text explicitly.
File Name – specify the full file name either manually or using the Open File dialog box by
clicking the button to the right from the field. It is possible to use RoboTask variables.
This text – if you want to specify the text explicitly, fill the text field manually. It is possible
to use variables in the text. RoboTask will replace them with variable values during the
action.
Sort Mode
You can specify the string sorting mode in this group
Ascending or Descending
Case Sensitive
Remove duplicates - this allows to keep only unique lines in the text.
Destination
Select at least one of the variants (or both at once) :
Assign text to Variable – specify the name of the custom variable the sorted text will be
assigned to. It is impossible to use variables.
Save text to File – specify the full file name either manually or using the Open File dialog
© 2004-2015 Neowise.com
Actions
110
box. It is possible to use RoboTask variables.
Variable
Allows you to add a variable to the action or triggering event that you selected. You must
place the cursor in a edit box in the settings dialog window of the action or event and then
click the {V} button.
4.3.13 Unique File Name
The action generates unique file name in specified folder by the mask. Sometimes it's necessary
to create the file with unique name where you need to store some temporary data. Next, the
file name have to be saved into variable.
Folder Name
Specify the folder where you want to create the file. You can click the browse button to select
a folder. The using of variables are allowed.
File Mask
It is the ordinary file mask with using characters "*" and "?". Action replaces "*" with 8 random
characters and "?" with single random character.
You have to specify the mask of file name only. The path portion of the file name will be
ignored. The using of variables are allowed.
For example:
tmp*.txt
{Hours}{Minutes}-*.dat
FileList-???.txt
Save File Name to Variable
Enter the variable name. The action saves new file name into this variable. The using of
variables is unacceptable.
Without Path
© 2004-2015 Neowise.com
111
RoboTask User's Guide
If you want to save the file name only without path, check this checkbox.
Variable
Allows you to add a variable to the action or triggering event that you selected. You must
place the cursor in a edit box in the settings dialog window of the action or event and then
click the {V} button.
4.3.14 File Attributes
Sometimes you need to change file attributes in file operations. As a rule, the ReadOnly
attribute inconveniences most of all. This action serves for changing of file attributes.
File or Folder name
Specify the name of a file or a folder. You can use buttons on the right of an edit field. A file
mask is inadmissible; that is, the action can process only the specified file.
You can use variables.
Attributes
Specify the attributes, which you want to set or to remove. This action can control 4
attributes:
Archive
Hidden
Read Only
System
Please, notice that Checkboxes have three positions:
Switched on – this means that you want to set an attribute
Switched off – this means that you want to remove an attribute
Grayed, or intermediate state – this means that you want to leave this attribute
without changing.
© 2004-2015 Neowise.com
Actions
112
By default, all the checkboxes are in Grayed state.
4.3.15 File Date and Time
This action is for changing date and time of files or folders. Date and time are specified as a
line. The format has to correspond to the regional settings of your computer. To check the
date format it is enough to find out what the form which the variable {DateTime} returns. If
the date and time are specified incorrectly, you will get run-time error.
File and Folder Names
Enumerate file names, one name per line. The usage of a file mask is allowed (for example, c:
\incoming\*.txt). It is also allowed to use variables when the file name is formed.
Set This Date and Time
Specify the date and the time which are necessary to assign to the files. The date and the
time are specified as string. The format has to correspond to the regional settings of your
computer. The usage of variables is allowed.
Process Files
Switch on this checkbox if you want to process the files corresponding to the list.
Process Folders
Switch on this checkbox if you want to process the folders corresponding to the list.
© 2004-2015 Neowise.com
113
RoboTask User's Guide
At least one of two options “Process Files” or “Process Folders” has to be on. It is possible to
switch on both options at the same time.
4.4
Zip
4.4.1
Pack Files
Creates and adds files to zip files. You can use this action to back up your files. For example,
you can use this action to create a task that automatically zips weekly status reports files so
that they can be copied to the central server for company summary reports every month.
Files to Zip
Enter the files you want to add to a zip file. Wildcards are allowed. Use the Plus buttons to add
files or folders to the list. To clear the list, click the X button.
Tip
You can also use wildcards in this option. Some examples of wildcards are the following:
© 2004-2015 Neowise.com
Actions
114
C:\Text Files\*.txt - all the files with the .txt extension in the C:\Text Files folder.
C:\Doc Files\mydoc?.doc - mydoc1.doc, mydoc2.doc, mydocA.doc, and so forth.
{bakext} - file mask(s) from the {bakext} variable.
Destination File
Enter the filename for the resulting .zip archive.
Action
Select one of the following actions for creating or adding to the zip file:
Add and replace files - add all files to the archive.
Freshen existing files - add only changed files to the archive.
Move files - add files to the archive and remove them from the local folder.
Update and add files - add only changed or new files to the archive.
Compress
Select one of the items on the dropdown list to determine the level of compression, or size, of
the archive file:
Maximum - creates the smallest zip file possible, while requiring the most time to create the
archive.
Normal - creates a slightly compressed zip file taking the usual amount of time to create the
zip file.
Fast - produces slightly less compression than Normal.
Super Fast - produces an archive with even less compression than Fast and Normal.
None - produces an archive file that is not compressed. This level of compression is the
fastest.
Folders
Include Subfolders
Click this check box to include the subfolders in the archive. Files are archived with the paths
stored in the archive file.
Junk Folder Names
Does not include folder paths in the archive file. For example, if you add C:\documents\*.doc,
the .doc files are included into the root folder of the zip archive.
Store Filenames in 8.3 Format
Ensures that filenames are stored with the 8.3 name format, such as foo_mon.txt, especially
important for FAT file systems.
Include System and Hidden Files
Archives system and hidden files in the zip file.
Password
Enter a password that is required to unzip the archive, if you want to protect the file.
Comment
Enter a memo note for the zip file.
Variable
Allows you to add a variable to the action or triggering event that you selected. You must
© 2004-2015 Neowise.com
115
RoboTask User's Guide
place the cursor in a edit box in the settings dialog window of the action or event and then
click the {V} button.
4.4.2
Extract Files
Extracts files from an existing ZIP file to the folder that you specify. For example, you can
create a task that automatically unzips files when you download .zip files to your hard drive.
File to Unzip
Enter the name of the zip file to extract files from.
Tip
You can also use wildcards in this option. Some examples of wildcards are the following:
*.txt - all the files with the .txt extension.
mydoc?.doc - mydoc1.doc, mydoc2.doc, mydocA.doc, and so forth.
*.tmp, *.$$$, *.bak - all the files with the .tmp, .$$$ and .bak extensions.
{bakext} - file mask(s) from the { bakext} variable.
Destination Folder
Enter the destination folder where you want to extract files.
Files to Extract
Enter the names of the files to unzip from the zip file, separated by commas. If left blank, all
files are unzipped.
Overwrite Existing Files
Click to allow the extracted files to overwrite existing files with the same name.
Skip Older Files
© 2004-2015 Neowise.com
Actions
116
Click to ensure the files in the zip archive are not extracted if they are older than the existing
files on the local computer.
Use Folder Names
Click this check box to extract files and the directory paths that are archived in the zip file. For
example, if a file is zipped with the path \temp\foo.txt, a \temp folder is created in the local
directory and the foo.txt file is unzipped to that folder.
Password
Enter the password for the zip file, if the zip file is password-protected.
Variable
Allows you to add a variable to the action or triggering event that you selected. You must
place the cursor in a edit box in the settings dialog window of the action or event and then
click the {V} button.
4.5
Internet
4.5.1
Check for Email
Checks to see if email exists on a POP3 server that you specify. For example, you can create a
task that checks e-mail in the morning and the evening automatically for you, thus minimizing
distractions during your work day.
POP3 Server
Enter the POP3 server for e-mail.
Port
Enter the port number. The default port number is 110.
© 2004-2015 Neowise.com
117
RoboTask User's Guide
Use SSL
Select this checkbox if you want to use SSL connection.
Username
Enter the user name for the e-mail account on the mail server.
Password
Enter the password for the e-mail account.
Stop this Task if
Enter whether you want the current task to do one of the following before e-mail is downloaded
from the mail server:
Mail is Waiting - stops the task if mail is on the mail server.
Mail is Not Waiting - stops the task if mail is not on the mail server.
4.5.2
Send Email
Sends email through the specified SMTP server. Messages can have attachment files. For
example, you can create a task that automatically e-mails monthly invoices to a specific
customer outlining the sales charges for that month.
Message tab
© 2004-2015 Neowise.com
Actions
118
From
Enter the e-mail address of the person sending the e-mail.
To
Enter the e-mail address to which you are sending the e-mail.
CC
Enter the address of any people to which you want to send a courtesy copy.
Subj
Enter the subject of the e-mail.
Encoding
The character set of the message. RoboTask doesn't convert specified text of the message,
but you have to specify character set if the message contains non-latin characters.
Message Text
Enter the text that you want to send. If you enter .html tags, click the Is HTML check box.
Tip
You can cut and paste .html code from Notepad into this window with the CTRL+V keys.
© 2004-2015 Neowise.com
119
RoboTask User's Guide
Is HTML
Click this check box if you have entered .html tags in the Message Text box.
Attachments
Click the plus button to add attachments to the e-mail. You can add more than one
attachment. Click the X button to remove attachments from the list.
Variable
Allows you to add a variable to the action or triggering event that you selected. You must
place the cursor in a edit box in the settings dialog window of the action or event and then
click the {V} button.
SMTP Server tab
Host
Enter the name of the host to which you want to send the e-mail using SMTP (simple mail
transfer protocol).
Port
Enter the port number to use.
© 2004-2015 Neowise.com
Actions
120
Use SSL
Click this checkbox if you want to use SSL connection.
Authentication Required
Click this check box if the remote mail server requires user authentication and enter the user
name and password to log into the remote server.
Variable
Allows you to add a variable to the action or triggering event that you selected. You must
place the cursor in a edit box in the settings dialog window of the action or event and then
click the {V} button.
4.5.3
Download Files
Downloads one or more files through the Internet from specific Web or FTP sites. For example, if
you are participating in a beta test program for new software, you can automatically download
updates to the beta software on a daily basis so that you stay up-to-date.
Important
Wildcards are not supported.
Files to Download
Enter the http, https or ftp URLs that you want to download.
Save in Folder
Enter the path of the folder in which you want to save the files.
If File Exists
© 2004-2015 Neowise.com
121
RoboTask User's Guide
Click an option to determine whether to overwrite existing files with the downloaded file or
rename the downloaded file.
Rename
Overwrite
Variable
Allows you to add a variable to the action or triggering event that you selected. You must
place the cursor in a edit box in the settings dialog window of the action or event and then
click the {V} button.
4.5.4
Ping Host
Allows you to send a ping message to a host. This action sends Internet Control Message
Protocol (ICMP) Echo Request messages to verify IP-level connectivity to another TCP/IP
computer. The action receives a receipt of corresponding Echo Reply messages, along with the
round-trip times. Ping Host is based on the Ping command, the primary TCP/IP command used
to troubleshoot connectivity, reachability, and name resolution.
For example, in a backup task, you can use this action to check to see if a host is up before
you start a process to copy files to that host.
Host Name
Enter the name or IP address of the host.
Timeout (Msec)
Indicates the amount of time, in milliseconds, for the action to wait for the Echo Reply message
that corresponds to a given Echo Request message to be received. If the Echo Reply message
is not received within the time-out, the "Request timed out" error message is displayed.
Assign Reply Time to Variable (Msec)
Enter a variable name for the reply time that you want to assign to.
© 2004-2015 Neowise.com
Actions
122
Assign This Value if Host Does Not Respond
Enter a value to assign if the host does not respond to the Ping message.
Variable
Allows you to add a variable to the action or triggering event that you selected. You must
place the cursor in a edit box in the settings dialog window of the action or event and then
click the {V} button.
4.5.5
Check HTTP address
This action is for checking the Web URL and receiving the captions of the response to analyze. The action
works according to the HTTP and HTTPS protocols.
General tab
URL
Specify the HTTP address of the checked click link. For example: ht t p://w w w .robot a sk.c om /
You can specify addresses with parameters: ht t p://w w w .robot a sk.c om /forum /v ie w t opic .php?
f=4&t =1441
It is also allowed the usage of the Secure HTTP (HTTPS) addresses. For example: ht t ps://
w w w .google .c om /se a rc h?q=robot a sk
The address must begin from the http:// or https://
Handle redirections
© 2004-2015 Neowise.com
123
RoboTask User's Guide
Switch on this option if you want the action to process the redirection of the query
automatically. But you should remember that you will get the response from the final URL.
Referrer
Specify a referrer for a query. Referrer is the URL from which this HTTP query was performed.
Many sites use this parameter of query to form a response.
Save HTTP Result into Variable
If you need to save the HTTP result into a variable, switch on this checkbox and input the
variable name. HTTP result is a number. For example:
200 – OK
403 Forbidden
404 – page not fond
etc.
You can read more about HTTP results here:
http://www.w3.org/Protocols/rfc2616/rfc2616-sec10.html
Save Raw Response Headers into Variable
To save all captions of the response into a variable, switch on this checkbox and input the
variable name.
Request headers
© 2004-2015 Neowise.com
Actions
124
You can define the user captions of the request on this tab. You can add captions on a list,
edit or remove the selected caption.
Response headers
If you need to save values of certain captions into variables, you should use this tab.
To add a caption on a list, it is necessary to specify the caption of the response and the
name of the variable into which you need to save the value of the caption. If the specified
caption does not exist, the action saves empty value.
4.5.6
Wake On LAN
The action permits to "wake up" another computer by means of sending the special signal
through a net. You can read about this technology here in detail: https://en.wikipedia.org/
wiki/Wake-on-LAN. To have the computer awoken, this function should be permitted in the
setting BIOS of the computer. As a rule, this function is permitted on default.
The function Wake-on-LAN works stably for stationary (desktop) computers with wire
connection to network. The Wake-On-LAN permit to "wake up" a computer out of any status:
sleep, hibernate and even switched off. The necessary condition is that the computer should
be connected to a power supply (an outlet) and have physical connection to a network.
The possibility of awakening for laptop depends on the manufacturer and the model of
computer and perhaps it depend on the observance certain condition. For example, in our
tests it is necessary that the lid of the laptop was opened and the computer was connected
to its power module.
© 2004-2015 Neowise.com
125
RoboTask User's Guide
Host
The name of the computer or an IP address. You can specify both an exact address (for
example, 192.168.1.36) and a broadcast address (for example, 192.168.1.255).
In the mode of one segment of a local network it is permitted even not to specify any exact
address of a sub-network and to do a broadcast request to all computers of the segment (for
example, 255.255.255.255).
Port
The port of recipient. On default, it is 9. You can specify any port if you use the local network
without firewall. If a target computer is in a segment of the network closed with firewall, you
should tune a port forwarding to the signal can get the target.
MAC address
This is a hardware address of a network interface (a physical address). To retrieve it, it is
necessary to specify the command in the command line:
ipconfig /all
You can see a MAC address through the control panel:
Cont rol Pa ne l -> Ne t w ork a nd Sha ring Ce nt e r
Then, you should click the link Loc a l Are a Conne c t ion (or another connection) and open the
window "Details".
MAC address is important parameter. The function Wake-On-LAN works only if the specified
address coincides with a hardware one. Otherwise, the target computer just ignores the
command. Therefore, in the local network it is possibly only to send a broadcast request,
because the computer reacts only when MAC address coincides. The rest of computers of the
segment just ignore the request.
4.6
FTP
4.6.1
FTP Log On
Allows you to log on to an Ftp site, or remote server. For example, you can create a task to
automatically Ftp updated daily reports from a co-worker's computer every day.
© 2004-2015 Neowise.com
Actions
126
Host
Enter the name of the remote host that you want to log into.
Port
Enter the number of the port that you want to use. The default port is 21.
Authentication
Connect as Anonymous
Click this check box if the remote server allows anonymous logins.
Username
Enter the name of the log in account.
Password
Enter the password of the log in account.
Variable
Allows you to add a variable to the action or triggering event that you selected. You must
place the cursor in a edit box in the settings dialog window of the action or event and then
click the {V} button.
4.6.2
FTP Log Off
Allows you to log off an Ftp site, or remote server. No specific settings are associated with this
action. For example, when you work from home, you can create a task that Ftps daily files that
you have worked on to a remote server in your company's network to protect your data.
© 2004-2015 Neowise.com
127
4.6.3
RoboTask User's Guide
FTP Download
Copies remote files to the local computer using the current file transfer type. For example, if
you are participating in a software beta program, you can download daily updates automatically
to stay up-to-date.
Tip
Click the {V} button to insert a variable that holds the name of the local file or the remote
folder.
Remote File
Enter the name of the remote file that you want to copy to the local computer.
Local Folder
Enter the path and name of the local directory to which you want to copy the remote file.
Variable
Allows you to add a variable to the action or triggering event that you selected. You must
place the cursor in a edit box in the settings dialog window of the action or event and then
click the {V} button.
4.6.4
FTP Upload
Allows you to place files on an Ftp site. For example, if you must post daily updated financial
reports to a web site, you can create a task to automatically upload the updated reports to the
company web site at the end of each day.
© 2004-2015 Neowise.com
Actions
128
Tip
Click the {V} button to insert a variable that holds the name of the local file or the remote
folder.
Local File
Enter the name of the local file that you want to copy to the remote server.
Remote Folder
Enter the path and name of the directory on the remote server.
Variable
Allows you to add a variable to the action or triggering event that you selected. You must
place the cursor in a edit box in the settings dialog window of the action or event and then
click the {V} button.
4.6.5
FTP Rename File
Allows you to change the name of files on a remote server. For example, in an FTP session, you
can use this action to rename files that you might accidentally overwrite on the remote server
with updated files.
Tip
Click the {V} button to insert a variable that holds the new file name or the old file name.
Old File Name
© 2004-2015 Neowise.com
129
RoboTask User's Guide
Enter the name of the file that you want to rename.
New File Name
Enter the name that you want to give the file.
Variable
Allows you to add a variable to the action or triggering event that you selected. You must
place the cursor in a edit box in the settings dialog window of the action or event and then
click the {V} button.
4.6.6
FTP Delete File
Allows you to remove files from a remote server. For example, you can use this action to
remove old backup files on the remote server that are no longer needed.
Remote File
Enter the path and file name that you want to delete on the remote server. Click the {V}
button to insert a variable that holds the path and name of the file.
Variable
Allows you to add a variable to the action or triggering event that you selected. You must
place the cursor in a edit box in the settings dialog window of the action or event and then
click the {V} button.
4.6.7
FTP Change Folder
Allows you to switch the current folder on a remote server. For example, during an FTP task
that backs up your files, you can use this action to copy files to different directories on the
remote server.
© 2004-2015 Neowise.com
Actions
130
Remote Folder
Enter the path or folder name on the remote server that you want to switch to. Click the {V}
button to insert a variable that holds the name of the folder.
Variable
Allows you to add a variable to the action or triggering event that you selected. You must
place the cursor in a edit box in the settings dialog window of the action or event and then
click the {V} button.
4.6.8
FTP Create Folder
Allows you to create a new folder on a remote server. For example, during an FTP task, you can
use this action to create a new folder based on the current date for each set of daily backup
files.
Remote Folder
Enter the path or folder name on the remote server that you want to create. Click the {V}
button to insert a variable that holds the name of the folder.
Variable
Allows you to add a variable to the action or triggering event that you selected. You must
place the cursor in a edit box in the settings dialog window of the action or event and then
click the {V} button.
© 2004-2015 Neowise.com
131
4.6.9
RoboTask User's Guide
FTP Remove Folder
Allows you to delete a folder on a remote server. For example, you can create a task to remove
company reports that are more than six months old from the remote server.
Remote Folder
Enter the path or folder name on the remote server that you want to remove. Click the {V}
button to insert a variable that holds the name of the folder.
Variable
Allows you to add a variable to the action or triggering event that you selected. You must
place the cursor in a edit box in the settings dialog window of the action or event and then
click the {V} button.
4.6.10 FTP PWD
Allows you to print the current directory on the remote computer.
This action saves the task log to the current directory on the FTP server. Also, you can assign
the current directory to a custom variable for future use.
Assign Remote Folder to Variable
If you want to assign the name of the current FTP directory to a custom variable, select this
checkbox and type the name of the variable in the field below.
© 2004-2015 Neowise.com
Actions
132
4.6.11 FTP Transfer Type
Sets or displays the type of file you are transferring. For example, if you are transferring
Microsoft Word reports to the company server every day, you must set the transfer type to
binary. The default transfer type is binary.
Transfer Type
Select whether you want to transfer the files as ASCII or binary during an FTP session. You
should select ASCII when you want to transfer files that contain text strings, such as .html, .
txt, or .xml. You should use Binary when transferring executable files, such as Office
documents, .Exe files, and so forth. In binary mode, files are transferred in one-byte units.
4.6.12 FTP Command
Allows you to execute custom FTP commands.
Command
Enter the name of the command that you want to execute.
Variable
Allows you to add a variable to the action or triggering event that you selected. You must
place the cursor in a edit box in the settings dialog window of the action or event and then
click the {V} button.
4.6.13 FTP File Loop
Executes a series of commands on files or folders on a remote server during an FTP session.
© 2004-2015 Neowise.com
133
RoboTask User's Guide
General tab
Loop Kind
Select the items you want to perform actions on: folders only, or files only.
Remote Folder
Enter the path or folder name on the remote server.
Save Results
Enter information about how you want to save the result of the file loop.
Assign File Name to Variable
Enter the name of the variable into which it is necessary to save the file name
Assign File Size to Variable
Switch on this checkbox and enter the name of the variable into which it is necessary to save
the size of the file. This allows to use the file size data in other actions or tasks.
Assign Last Update Time to Variable
Switch on this checkbox and enter the name of the variable into which it is necessary to save
the date and the time of the file. This allows to use the last update time information in other
tasks or actions.
© 2004-2015 Neowise.com
Actions
134
Datе Filter tab
All Files
Click this option to include all files in the file loop.
Find Files Created or Modified
Enter dates and times to include files for certain time periods in the loop.
Between – You can specify two dates explicitly selecting them from a calendar. Or you
can specify the expression using variables. This expression should contain the date in
the format set on your computer.
Newer Than ___ Months
Newer Than ___ Days
Newer Than ___ Minutes
Older Than ___ Months
Older Than ___ Days
Older Than ___ Minutes
Sorting parameters
© 2004-2015 Neowise.com
135
RoboTask User's Guide
Parameters of internal sorting of the file list
Sort the list of filenames
Turn on the checkbox if you want to sort the list
How to sort
There are four sorting modes:
By file name
By file time
By file size
By depth of nested folders
Sort order
There are two modes: ascending or descending ordering
Variable
© 2004-2015 Neowise.com
Actions
136
Allows you to add a variable to the action or triggering event that you selected. You must
place the cursor in a edit box in the settings dialog window of the action or event and then
click the {V} button.
4.6.14 FTP Synchronization
Synchronizes files between a local folder and a remote folder on the FTP server. This high-level
operation is very similar to "Synchronize folders", but there are several important differences:
The time when a file is created on the FTP server is determined with the accuracy of one
minute. So, if the difference in the versions of a file is several seconds, no file exchange will
take place.
Some FTP servers do not support time zones. In this case, the time when a file was created
(last modified) corresponds to the local server time. Here is an example:
You upload a file to the FTP server. Suppose your time zone is GMT+5 and the server is
located in the GMT+8 time zone. After you upload the file, it will become 3 hours «younger».
If your server supports time zones, it does not happen. The server makes all necessary
corrections automatically.
When you upload a file to the FTP server, the time when the file was last modified is not
saved. The time when the file was created will correspond to the time when you finished
uploading it to the server. So, the file you have just uploaded to the server becomes a bit
«younger» than the initial file.
These differences present certain inconveniences while synchronizing folders with an FTP
server, but still this operation will free you from creating a rather complicated synchronization
task.
© 2004-2015 Neowise.com
137
RoboTask User's Guide
Local Folder.
The local folder for synchronization. You can specify the path to the folder manually or you can
use the folder selection button to the right from the input field. Also, you can use variables in
the path to the folder.
Remote Folder.
The folder on the FTP server for synchronization. You can use variables in the path to the
folder.
Include Mask.
The list of file masks that you need to synchronize. You should separate file masks with a
comma. All files are specified by default ("*.*").
Exclude Mask
The list of comma-separated file masks that should be excluded from synchronization. For
example, you can specify *.* in the Include mask option and *.txt in the Exclude mask option.
It will mean that all files except *.txt should be synchronized.
Synchronization mode.
There are 3 options to choose from:
Local => Remote – newer files from the local folder will be copied to the FTP server
Local <= Remote – the reverse operation, i.e. copying new files from the server to the local
folder.
Local <=> Remote – bidirectional synchronization. Downloading newer files from the FTP
© 2004-2015 Neowise.com
Actions
138
server and uploading new files to the server.
Include Subfolders.
Select this checkbox if you want to include all subfolders in the specified folders to be included
in the synchronization process.
Exact copy.
This option works only when the synchronization is one-directional. It does not make sense in
case of bidirectional synchronization and so it is unavailable. If you want to get the exact copy
of the initial folder, select this checkbox.
Not e t ha t t he "Exa c t Copy " m ode first c opie s ne w e r file s from t he sourc e folde r t o t he t a rge t
folde r a nd t he n re m o v e s a ll file s fro m the ta rge t fo lde r tha t a re a bs e nt in the s o urce
fo lde r.
Variable
Allows you to add a variable to the action or triggering event that you selected. You must
place the cursor in a edit box in the settings dialog window of the action or event and then
click the {V} button.
4.7
SSL FTP
Encryption of traffic lets using of the FTP server in a public network safely (SSL - Secure
Sockets Layer). At present most types of servers support the SSL FTP. Also there are freeware
servers supporting SSL FTP (for example, FileZilla Server). Plugin SSL FTP allows using an
ordinary FTP protocol with encryption. Functions of the plugin can be applied for the standard
FTP protocol without encryption.
Thus the plugin SSL FTP can replace actions of FTP plugin.
4.7.1
SSL FTP Log On
Performs a connection to the FTP server and authentication of a user.
General
© 2004-2015 Neowise.com
139
RoboTask User's Guide
Host
Enter the name of the remote host that you want to log into.
Port
Enter the number of the port that you want to use. The default port is 21.
Authentication:
Connect as Anonymous
Click this check box if the remote server allows anonymous logins.
Username
Enter the name of the log in account.
Password
Enter the password of the log in account.
SSL/TLS Settings
TLS – Transport Layer Security.
© 2004-2015 Neowise.com
Actions
140
TLS mode
Two separate methods were developed to invoke client security for use with FTP clients:
Explicit or Implicit. The explicit method is a legacy compatible implementation where FTPS
aware clients can invoke security with an FTPS aware server without breaking overall FTP
functionality with non-FTPS aware clients. The implicit method requires that all clients of the
FTPS server be aware that SSL is to be used on the session, and thus is incompatible with
non-FTPS aware clients.
None – plain FTP without encryption. SSL mode is OFF.
Implicit – Negotiation is not allowed with implicit FTPS configurations. A client is
immediately expected to challenge the FTPS server with a TLS/SSL ClientHello message.
If such a message is not received by the FTPS server, the server should drop the
connection.
Explicit – In explicit mode (also known as FTPES), an FTPS client must "explicitly
request" security from an FTPS server and then step-up to a mutually agreed encryption
method. If a client does not request security, the FTPS server can either allow the client
to continue insecure or refuse/limit the connection.
Auto – it is auto-detection of a mode. Please note, that not all types of servers allow
auto-detection of a mode.
TLS Flags
Specifies modes of using SSL versions. It is usually enough only to turn on the flag Use TLS.
Use SSL2
Use SSL3
Use TLS
© 2004-2015 Neowise.com
141
RoboTask User's Guide
Proxy Settings
Use proxy
If it is necessary to use PROXY, turn on this flag and full in the parameters below. The
parameters PROXY can be learned from the documentation for your PROXY or from your
network administrator.
Proxy Type
It is necessary to choose the type of PROXY.
Send command USER user@hostname - Sends the command USER user@hostname to the
firewall/proxy. This method is used by many programs like Wingate. The fields 'user name'
and 'password' must be left empty.
Send command SITE (with logon) - First send the user name and password to the proxy
(if given), then the command 'SITE machine name'. The fields 'user name' and 'password'
are usually needed for this type of proxy.
Send command OPEN - First send the user name and password to the proxy (if given),
then the command 'OPEN machine name'. The fields 'user name' and 'password' are
sometimes not needed for this type of proxy.
USER user@firewalluser@hostname / PASS pass@firewallpass - Use these two commands
to logon.
Transparent - First use the USER and PASS command with the firewall username and
password, and then with the target host username and password.
USER user@hostname firewalluser PASS pass ACCT firewallpass - Use these three
commands to logon.
Proxy Host
An IP address or a computer name in the network.
© 2004-2015 Neowise.com
Actions
142
Proxy Port
The number of a port.
Proxy User
A username for the authorization in PROXY.
ProxyPassword
The password for the authorization in PROXY.
Variable
Allows you to add a variable to the action or triggering event that you selected. You must
place the cursor in a edit box in the settings dialog window of the action or event and then
click the {V} button.
4.7.2
SSL FTP Log Off
Allows you to log off an Ftp site, or remote server. No specific settings are associated with this
action. For example, when you work from home, you can create a task that Ftps daily files that
you have worked on to a remote server in your company's network to protect your data.
4.7.3
SSL FTP Download
Copies remote files to the local computer using the current file transfer type. For example, if
you are participating in a software beta program, you can download daily updates automatically
to stay up-to-date.
Tip
Click the {V} button to insert a variable that holds the name of the local file or the remote
folder.
Remote File
Enter the name of the remote file that you want to copy to the local computer.
© 2004-2015 Neowise.com
143
RoboTask User's Guide
Local Folder
Enter the path and name of the local directory to which you want to copy the remote file.
Variable
Allows you to add a variable to the action or triggering event that you selected. You must
place the cursor in a edit box in the settings dialog window of the action or event and then
click the {V} button.
4.7.4
SSL FTP Upload
Allows you to place files on an Ftp site. For example, if you must post daily updated financial
reports to a web site, you can create a task to automatically upload the updated reports to the
company web site at the end of each day.
Tip
Click the {V} button to insert a variable that holds the name of the local file or the remote
folder.
Local File
Enter the name of the local file that you want to copy to the remote server.
Remote Folder
Enter the path and name of the directory on the remote server.
Variable
Allows you to add a variable to the action or triggering event that you selected. You must
place the cursor in a edit box in the settings dialog window of the action or event and then
click the {V} button.
4.7.5
SSL FTP Rename File
Allows you to change the name of files on a remote server. For example, in an FTP session, you
can use this action to rename files that you might accidentally overwrite on the remote server
© 2004-2015 Neowise.com
Actions
144
with updated files.
Tip
Click the {V} button to insert a variable that holds the new file name or the old file name.
Old File Name
Enter the name of the file that you want to rename.
New File Name
Enter the name that you want to give the file.
Variable
Allows you to add a variable to the action or triggering event that you selected. You must
place the cursor in a edit box in the settings dialog window of the action or event and then
click the {V} button.
4.7.6
SSL FTP Delete File
Allows you to remove files from a remote server. For example, you can use this action to
remove old backup files on the remote server that are no longer needed.
Remote File
Enter the path and file name that you want to delete on the remote server. Click the {V}
button to insert a variable that holds the path and name of the file.
Variable
Allows you to add a variable to the action or triggering event that you selected. You must
© 2004-2015 Neowise.com
145
RoboTask User's Guide
place the cursor in a edit box in the settings dialog window of the action or event and then
click the {V} button.
4.7.7
SSL FTP Change folder
Allows you to switch the current folder on a remote server. For example, during an FTP task
that backs up your files, you can use this action to copy files to different directories on the
remote server.
Remote Folder
Enter the path or folder name on the remote server that you want to switch to. Click the {V}
button to insert a variable that holds the name of the folder.
Variable
Allows you to add a variable to the action or triggering event that you selected. You must
place the cursor in a edit box in the settings dialog window of the action or event and then
click the {V} button.
4.7.8
SSL FTP Create Folder
Allows you to create a new folder on a remote server. For example, during an FTP task, you can
use this action to create a new folder based on the current date for each set of daily backup
files.
Remote Folder
Enter the path or folder name on the remote server that you want to create. Click the {V}
button to insert a variable that holds the name of the folder.
© 2004-2015 Neowise.com
Actions
146
Variable
Allows you to add a variable to the action or triggering event that you selected. You must
place the cursor in a edit box in the settings dialog window of the action or event and then
click the {V} button.
4.7.9
SSL FTP Remove Folder
Allows you to delete a folder on a remote server. For example, you can create a task to remove
company reports that are more than six months old from the remote server.
Remote Folder
Enter the path or folder name on the remote server that you want to remove. Click the {V}
button to insert a variable that holds the name of the folder.
Variable
Allows you to add a variable to the action or triggering event that you selected. You must
place the cursor in a edit box in the settings dialog window of the action or event and then
click the {V} button.
4.7.10 SSL FTP PWD
Allows you to print the current directory on the remote computer.
This action saves the task log to the current directory on the FTP server. Also, you can assign
the current directory to a custom variable for future use.
Assign Remote Folder to Variable
If you want to assign the name of the current FTP directory to a custom variable, select this
© 2004-2015 Neowise.com
147
RoboTask User's Guide
checkbox and type the name of the variable in the field below.
4.7.11 SSL FTP Transfer Type
Sets or displays the type of file you are transferring. For example, if you are transferring
Microsoft Word reports to the company server every day, you must set the transfer type to
binary. The default transfer type is binary.
Transfer Type
Select whether you want to transfer the files as ASCII or binary during an FTP session. You
should select ASCII when you want to transfer files that contain text strings, such as .html, .
txt, or .xml. You should use Binary when transferring executable files, such as Office
documents, .Exe files, and so forth. In binary mode, files are transferred in one-byte units.
4.7.12 SSL FTP File Loop
Executes a series of commands on files or folders on a remote server during an FTP session.
General tab
© 2004-2015 Neowise.com
Actions
148
Loop Kind
Select the items you want to perform actions on: folders only, or files only.
Remote Folder
Enter the path or folder name on the remote server.
Save Results
Enter information about how you want to save the result of the file loop.
Assign File Name to Variable
Enter the name of the variable into which it is necessary to save the file name.
Assign File Size to Variable
Switch on this checkbox and enter the name of the variable into which it is necessary to save
the size of the file. This allows to use the file size data in other actions or tasks.
Assign Last Update Time to Variable
© 2004-2015 Neowise.com
149
RoboTask User's Guide
Switch on this checkbox and enter the name of the variable into which it is necessary to save
the date and the time of the file. This allows to use the last update time information in other
tasks or actions.
Datе Filter tab
All Files
Click this option to include all files in the file loop.
Find Files Created or Modified
Enter dates and times to include files for certain time periods in the loop.
Between – You can specify two dates explicitly selecting them from a calendar. Or you
can specify the expression using variables. This expression should contain the date in
the format set on your computer.
Newer Than ___ Months
Newer Than ___ Days
Newer Than ___ Minutes
Older Than ___ Months
© 2004-2015 Neowise.com
Actions
Older Than ___ Days
Older Than ___ Minutes
Sorting parameters
Parameters of internal sorting of the file list
Sort the list of filenames
Turn on the checkbox if you want to sort the list
How to sort
There are four sorting modes:
By file name
By file time
By file size
By depth of nested folders
Sort order
© 2004-2015 Neowise.com
150
151
RoboTask User's Guide
There are two modes: ascending or descending ordering
Variable
Allows you to add a variable to the action or triggering event that you selected. You must
place the cursor in a edit box in the settings dialog window of the action or event and then
click the {V} button.
4.7.13 SSL FTP Synchronization
Synchronizes files between a local folder and a remote folder on the FTP server. This high-level
operation is very similar to "Synchronize folders", but there are several important differences:
The time when a file is created on the FTP server is determined with the accuracy of one
minute. So, if the difference in the versions of a file is several seconds, no file exchange will
take place.
Some FTP servers do not support time zones. In this case, the time when a file was created
(last modified) corresponds to the local server time. Here is an example:
You upload a file to the FTP server. Suppose your time zone is GMT+5 and the server is
located in the GMT+8 time zone. After you upload the file, it will become 3 hours «younger».
If your server supports time zones, it does not happen. The server makes all necessary
corrections automatically.
When you upload a file to the FTP server, the time when the file was last modified is not
saved. The time when the file was created will correspond to the time when you finished
uploading it to the server. So, the file you have just uploaded to the server becomes a bit
«younger» than the initial file.
These differences present certain inconveniences while synchronizing folders with an FTP
server, but still this operation will free you from creating a rather complicated synchronization
task.
© 2004-2015 Neowise.com
Actions
152
Local Folder.
The local folder for synchronization. You can specify the path to the folder manually or you can
use the folder selection button to the right from the input field. Also, you can use variables in
the path to the folder.
Remote Folder.
The folder on the FTP server for synchronization. You can use variables in the path to the
folder.
Include Mask.
The list of file masks that you need to synchronize. You should separate file masks with a
comma. All files are specified by default ("*.*").
Exclude Mask
The list of comma-separated file masks that should be excluded from synchronization. For
example, you can specify *.* in the Include mask option and *.txt in the Exclude mask option.
It will mean that all files except *.txt should be synchronized.
Synchronization mode.
There are 3 options to choose from:
Local => Remote – newer files from the local folder will be copied to the FTP server
Local <= Remote – the reverse operation, i.e. copying new files from the server to the local
folder.
Local <=> Remote – bidirectional synchronization. Downloading newer files from the FTP
© 2004-2015 Neowise.com
153
RoboTask User's Guide
server and uploading new files to the server.
Include Subfolders.
Select this checkbox if you want to include all subfolders in the specified folders to be included
in the synchronization process.
Exact copy.
This option works only when the synchronization is one-directional. It does not make sense in
case of bidirectional synchronization and so it is unavailable. If you want to get the exact copy
of the initial folder, select this checkbox.
Not e t ha t t he "Exa c t Copy " m ode first c opie s ne w e r file s from t he sourc e folde r t o t he t a rge t
folde r a nd t he n re m o v e s a ll file s fro m the ta rge t fo lde r tha t a re a bs e nt in the s o urce
fo lde r.
Output Activity to Log
If you want to write the log of synchronization into the task log, switch on this checkbox. The
action will put the information about downloaded, uploaded and removed files into the task
log.
Output Activity to variable
If you want to write the log of synchronization into a variable, switch on this checkbox and
put the variable name in the field. The action will put the information about downloaded,
uploaded and removed files into the variable as text.
Variable
Allows you to add a variable to the action or triggering event that you selected. You must
place the cursor in a edit box in the settings dialog window of the action or event and then
click the {V} button.
4.8
SFTP (SSH FTP)
Plugin unites functions SFTP (according to the protocol SSH). SSH is a very popular protocol
on Linux servers. In spite of similarity with FTP protocol, SFTP is an absolutely different
protocol of file exchange and has only similarity in appearance with FTP.
The work of the plugin is supported by the console utility PSFTP.EXE from the PUTTY package
(free open source software).
4.8.1
SFTP Log On
Connecting to the SFTP server. This action have to be done to provide normal work of the
rest of SFTP actions.
© 2004-2015 Neowise.com
Actions
Host
The name or IP-address of the SFTP server. The usage of variables is allowed.
Port
The number of a server port. It is 22 by default. The usage of variables is allowed.
User Name
The name of a user. The usage of variables is allowed.
Password
The password of a user. The usage of variables is allowed.
Choose connection profile
© 2004-2015 Neowise.com
154
155
RoboTask User's Guide
Additional settings of a connection (for example, the usage of a proxy) can be done in a
connection profile PUTTY. It is necessary to install PUTTY packet, to do necessary settings
and then to save them into the separate profile. This profile can be used when connecting to
the server.
Variable
Allows you to add a variable to the action or triggering event that you selected. You must
place the cursor in a edit box in the settings dialog window of the action or event and then
click the {V} button.
4.8.2
SFTP Log Off
This action completes an SFTP session and closes the connection with a server. The action
does not required any additional settings.
4.8.3
SFTP Download
This action allows to download a file from a server to a local disc.
Remote File or Folder
Specify the name of the file or the folder which is necessary to download to a local disc. If
the folder is specified, the action downloads all files of the remote folder.
Local folder
Specify the folder on a local disc or in a local network where is necessary to download a file or
a folder from a server.
© 2004-2015 Neowise.com
Actions
156
Recursively fetch a directory (if a source is a directory)
Switch on this parameter if you want to download the whole folder with all subdirectories. This
parameter makes sense only if a folder is specified as a source. If a source is a file, the
parameter is ignored.
This mode is similar to SFTP Synchronization 165 action.
If a destination file exists (if a source is a file)
This parameter makes sense only if a file is specified as a source. There are 2 alternatives:
Rename – if such file exists, it will be renamed when downloading. In this case, the
existent file will be saved.
Overwrite – a file will be downloaded with an original name. If such file exists, it will be
overwritten.
Variable
Allows you to add a variable to the action or triggering event that you selected. You must
place the cursor in a edit box in the settings dialog window of the action or event and then
click the {V} button.
4.8.4
SFTP Upload
The action allows to upload files and folders from a local disc to the SFTP server.
Local File or Folder
Specify the name of a file or folder which is necessary to upload from a local disc to a server.
If a folder is specified, the action uploads all files from the local folder.
Remote Folder
© 2004-2015 Neowise.com
157
RoboTask User's Guide
Specify a folder on SFTP server where it is necessary to upload the file or the folder from a
local disc.
Recursively fetch a directory (if a source is a directory)
Switch on this parameter if you want to upload the whole folder with all subdirectories. This
parameter makes sense only if a folder is specified as a source. If a source is a file, the
parameter is ignored.
This mode is similar to SFTP Synchronization 165 action.
If a destination file exists (if a source is a file)
This parameter makes sense only if a file is specified as a source. There are 2 alternatives:
Rename – if such file exists, it will be renamed when downloading. In this case, the
existent file will be saved.
Overwrite – a file will be downloaded with an original name. If such file exists, it will be overwritten.
Variable
Allows you to add a variable to the action or triggering event that you selected. You must
place the cursor in a edit box in the settings dialog window of the action or event and then
click the {V} button.
4.8.5
SFTP Rename File of Folder
The action allows to rename a file or a folder on the SFTP server.
Old File Name (or Directory Name)
Specify the name of the file or the folder which are necessary to rename.
New File Name (or Directory Name)
Specify a new name of the file or the folder.
Usage:
It is possible to rename separate files/folders:
© 2004-2015 Neowise.com
Actions
158
OldFile.txt -> NewFile.txt
OldFile.txt -> SubFolder/NewFile.txt
It is possible to move one or several files to another folder. For this it is necessary to specify
the file names separated by a space and, in the capacity of a new file name, the name of the
folder which the files have to be moved into.
File1.txt File2.txt -> /home/user/newfolder
Variable
Allows you to add a variable to the action or triggering event that you selected. You must
place the cursor in a edit box in the settings dialog window of the action or event and then
click the {V} button.
4.8.6
SFTP Delete File
The action deletes specified files from the SFTP server.
Remote file
Specify the name of the file that has to be deleted. The usage of a mask is allowed. It is also
possible to specify several files separated by a space.
For example:
file.dat
file1.txt file2.txt
*.txt
Variable
Allows you to add a variable to the action or triggering event that you selected. You must
place the cursor in a edit box in the settings dialog window of the action or event and then
click the {V} button.
© 2004-2015 Neowise.com
159
4.8.7
RoboTask User's Guide
SFTP Change Folder
The action changes the current work folder on the server.
Remote folder
Specify a new work folder. It is possible to specify the folder from the root or current folder.
For example:
/home/user/test
test/subfolder
It is possible to get the current folder during (as a result of) the action SFTP PWD 160 .
Variable
Allows you to add a variable to the action or triggering event that you selected. You must
place the cursor in a edit box in the settings dialog window of the action or event and then
click the {V} button.
4.8.8
SFTP Create Folder
The action creates a new folder.
Remote Folder
Specify new folder name.
Variable
Allows you to add a variable to the action or triggering event that you selected. You must
place the cursor in a edit box in the settings dialog window of the action or event and then
© 2004-2015 Neowise.com
Actions
160
click the {V} button.
4.8.9
SFTP Remove Folder
Allows you to delete a folder on a remote server.
Remote Folder
Enter the path or folder name on the remote server that you want to remove.
Variable
Allows you to add a variable to the action or triggering event that you selected. You must
place the cursor in a edit box in the settings dialog window of the action or event and then
click the {V} button.
4.8.10 SFTP PWD (print working directory)
Allows you to print the current directory on the remote computer.
This action saves the task log to the current directory on the SFTP server. Also, you can
assign the current directory to a custom variable for future use.
Assign Remote Folder to Variable
If you want to assign the name of the current FTP directory to a custom variable, select this
checkbox and type the name of the variable in the field below.
© 2004-2015 Neowise.com
161
RoboTask User's Guide
Variable
Allows you to add a variable to the action or triggering event that you selected. You must
place the cursor in a edit box in the settings dialog window of the action or event and then
click the {V} button.
4.8.11 SFTP File Loop
Allows a task to iterate through the list of files or folders on SFTP server.
General tab
Loop Kind
Select the items you want to perform actions on: folders only, or files only.
Remote Folder
Enter the path or folder name on the remote server.
© 2004-2015 Neowise.com
Actions
162
Include Subfolders
Switch on this checkbox if you want to perform the cycle through all the files, including all
nested folders.
Save Results
Enter information about how you want to save the result of the file loop.
Assign File Name to Variable
Enter the name of the variable into which it is necessary to save the file name.
Assign File Size to Variable
Switch on this checkbox and enter the name of the variable into which it is necessary to save
the size of the file. This allows to use the file size data in other actions or tasks.
Assign Last Update Time to Variable
Switch on this checkbox and enter the name of the variable into which it is necessary to save
the date and the time of the file. This allows to use the last update time information in other
tasks or actions.
Datе Filter tab
© 2004-2015 Neowise.com
163
RoboTask User's Guide
All Files
Click this option to include all files in the file loop.
Find Files Created or Modified
Enter dates and times to include files for certain time periods in the loop.
Between – You can specify two dates explicitly selecting them from a calendar. Or you
can specify the expression using variables. This expression should contain the date in
the format set on your computer.
Newer Than ___ Months
Newer Than ___ Days
Newer Than ___ Minutes
Older Than ___ Months
Older Than ___ Days
Older Than ___ Minutes
Sorting parameters
© 2004-2015 Neowise.com
Actions
Sorting parameters
Parameters of internal sorting of the file list
Sort the list of filenames
Turn on the checkbox if you want to sort the list
How to sort
There are four sorting modes:
By file name
By file time
By file size
By depth of nested folders
Sort order
There are two modes: ascending or descending ordering.
© 2004-2015 Neowise.com
164
165
RoboTask User's Guide
Variable
Allows you to add a variable to the action or triggering event that you selected. You must
place the cursor in a edit box in the settings dialog window of the action or event and then
click the {V} button.
4.8.12 SFTP Synchronization
Synchronizes files between a local folder and a remote folder on the SFTP server. This highlevel operation is very similar to "Synchronize folders", but there are several important
differences:
The time when a file is created on the FTP server is determined with the accuracy of
one minute. So, if the difference in the versions of a file is several seconds, no file
exchange will take place.
When you upload a file to the FTP server, the time when the file was last modified is not
saved. The time when the file was created will correspond to the time when you finished
uploading it to the server. So, the file you have just uploaded to the server becomes a
bit "younger" than the initial file.
These differences present certain inconveniences while synchronizing folders with an SFTP
server, but still this operation will free you from creating complicated synchronization task.
Local Folder.
© 2004-2015 Neowise.com
Actions
166
The local folder for synchronization. You can specify the path to the folder manually or you
can use the folder selection button to the right from the input field. Also, you can use
variables in the path to the folder.
Remote Folder.
The folder on the FTP server for synchronization. You can use variables in the path to the
folder.
Include Mask.
The list of file masks that you need to synchronize. You should separate file masks with a
comma. All files are specified by default ("*.*").
Exclude Mask.
The list of comma-separated file masks that should be excluded from synchronization. For
example, you can specify *.* in the Include mask option and *.txt in the Exclude mask option.
It will mean that all files except *.txt should be synchronized.
Synchronization mode.
There are 3 options to choose from:
Local => Remote – newer files from the local folder will be copied to the FTP server
Local <= Remote – the reverse operation, i.e. copying new files from the server to the
local folder.
Local <=> Remote – bidirectional synchronization. Downloading newer files from the FTP
server and uploading new files to the server.
Include Subfolders.
Select this checkbox if you want to include all subfolders in the specified folders to be
included in the synchronization process.
Exact copy.
This option works only when the synchronization is one-directional. It does not make sense in
case of bidirectional synchronization and so it is unavailable. If you want to get the exact
copy of the initial folder, select this checkbox.
Not e t ha t t he "Exa c t Copy " m ode first c opie s ne w e r file s from t he sourc e folde r t o t he t a rge t
folde r a nd t he n re m ov e s a ll file s from t he t a rge t folde r t ha t a re a bse nt in t he sourc e folde r.
Output Activity to Log
If to switch on this parameter, the action will display the information about operations with
files (download, upload, delete files) during the work.
Output Activity to variable
If you want to write the log of synchronization into a variable, switch on this checkbox and
put the variable name in the field. The action will put the information about downloaded,
© 2004-2015 Neowise.com
167
RoboTask User's Guide
uploaded and removed files into the variable as text.
Variable
Allows you to add a variable to the action or triggering event that you selected. You must
place the cursor in a edit box in the settings dialog window of the action or event and then
click the {V} button.
4.8.13 SFTP File Permissions
The action allows you to modify the file permissions on files and directories on the server.
The file permissions on the SFTP server are assigned like in the UNIX systems. Every file or folder has 3
groups of permissions:
Owner permissions;
Group permissions. That is, the permissions of users of the group, which the file owner belong to.
Public permissions. That is, the permissions for all the rest users.
Every group contains 3 types of permissions:
Read - permission to read the file
Write - permission to write to the file
Execute - permission to execute the file
Please, notice that Checkboxes have three positions:
Switched on – this means that you want to set a permission
Switched off – this means that you want to remove a permission
Grayed, or intermediate state – this means that you want to leave this permission without changing.
By default, all the checkboxes are in Grayed state.
© 2004-2015 Neowise.com
Actions
168
Variable
Allows you to add a variable to the action or triggering event that you selected. You must
place the cursor in a edit box in the settings dialog window of the action or event and then
click the {V} button.
4.8.14 SFTP Command
The action allows to perform a arbitrary SFTP command and save the result of performing into
a variable.
SFTP command
Specify any SFTP command. For example, the command he lp.
Save Response to Variable
Specify the name of the variable, into which it is necessary to save the result of command
performing as a text.
Variable name can be empty. In this case the text of the result will be ignored.
Variable
Allows you to add a variable to the action or triggering event that you selected. You must
place the cursor in a edit box in the settings dialog window of the action or event and then
click the {V} button.
4.9
Dial-Up
The actions Dial-Up can be used for such Internet connections as these:
Connection by the use of an usual telephone modem;
VPN of connections;
Connections to Internet through mobile net by means of a mobile modem.
© 2004-2015 Neowise.com
169
RoboTask User's Guide
These connections use the same system interface.
4.9.1
Dial Up/Hang Up
Establishes or disconnects a Windows RAS connection, also known as Dial Up Networking.
Usually this feature is used to make a connection to the Internet and then complete a task and
disconnect from the Internet. For example, you can create a task to automatically connect to
the Internet every morning and check e-mail.
Dial-up Connection
Select the name of the dial-up connection that you want to connect or disconnect. You create
this connection in the Windows Control Panel.
How to Use the Dial-up Connection
Select one of the following options to specify the action on the connection:
Disconnect this Connection - breaks the connection to the Internet or remote network.
Establish this Connection - connects the computer to the Internet or remote network.
Connection Parameters
Enter the following optional parameters to establish a connection:
© 2004-2015 Neowise.com
Actions
170
Domain
Username
Password
Callback Number
Number of Attempts
4.9.2
Check connection
Checks the status of the selected dial-up connection and assigns the corresponding value to a
user variable: TRUE if the connection is active and FALSE otherwise. This value can be later
used in the "IF Then" action as a Boolean one.
Dial-Up connection
Select the connection you need from the list.
Assign Connection Status to Variable
Specify the name of the variable the status of the connection should be assigned to.
4.10
Variables
4.10.1 Create Variable
Creates a new variable when you run a task. If you create a variable and then use it in several
different tasks, you can change the variable once and update every task at the same time.
The action allows to create both a global variable and a local one within a task. Local variables
can also be generated by means of creating a list of local variables (see Local variables tab 45
of task editor).
© 2004-2015 Neowise.com
171
RoboTask User's Guide
Variable Name
Enter the name of the variable you want to set the value of.
Variable Kind
Global variable (for all tasks) – in this case a global variable will be created. If the
variable already exists, a specified value will be assigned to it.
Local variable (for this task only) – in this case a local variable will be created within
a task. The local variable will be deleted from the memory automatically when the task is
finished. See the chapter Local Variables 11 for details about local variables.
Variable Value
Enter the value that you want to set for the variable.
Expand variable value.
If this parameter is on, RoboTask computes the value of an expression (that is, expands
variables in the expression) before assigning a value to the specified variable.
Otherwise, the value is assigned without expanding variables. In this case the value is
computed while further using the variable. Meanwhile, the variable value and the value of all
variables are expanded recursively until the very end.
There can be necessity of using both modes in tasks:
Expand variable value is on – when you have to fix the value in the moment of
assigning it to the variable. For example: current time
Expand variable value is off – when you have to compose a complex expression of
many variables and then you have to use only one variable in further steps. You also
don’t need to turn on the expanding of variables if an assigned expression contains a
static text and doesn’t contain other variables.
By default, the parameter is off.
© 2004-2015 Neowise.com
Actions
172
4.10.2 Set Variable
Defines the value of a variable when you run a task.
Variable Name
Enter the name of the variable you want to set the value of.
Variable Value
Enter the value that you want to set for the variable.
Expand variable value.
If this parameter is on, RoboTask computes the value of an expression (that is, expands
variables in the expression) before assigning a value to the specified variable.
Otherwise, the value is assigned without expanding variables. In this case the value is
computed while further using the variable. Meanwhile, the variable value and the value of all
variables are expanded recursively until the very end.
There can be necessity of using both modes in tasks:
Expand variable value is on – when you have to fix the value in the moment of
assigning it to the variable. For example: current time
Expand variable value is off – when you have to compose a complex expression of
many variables and then you have to use only one variable in further steps. You also
don’t need to turn on the expanding of variables if an assigned expression contains a
static text and doesn’t contain other variables.
By default, the parameter is off.
© 2004-2015 Neowise.com
173
RoboTask User's Guide
4.10.3 Remove Variable
Deletes a variable when you run a task. This ensures that all variables are cleared from memory
if a new task starts.
Variable Name
Enter the name of the variable you want to delete.
4.10.4 Increment Variable
Increments or decrements a variable by a specified value.
Variable Name
Specify a variable name you want to increment or decrement
Increment by
Enter a positive or negative value
Variable
Allows you to add a variable to the action or triggering event that you selected. You must
place the cursor in a edit box in the settings dialog window of the action or event and then
click the {V} button.
© 2004-2015 Neowise.com
Actions
174
4.10.5 Delimited variable
Turns a string with any delimiters into a standard comma-separated string. This standard
comma-separated string can be used in user variables as an array 10 .
String to process
Specify the string to process. You can use variables.
Delimiters
Select which delimiters should be processed. You can select one or several delimiters.
Quote Char
Specify the character that should be interpreted as quotation marks.
Assign standard comma-separated text to variable
Specify the variable the processed string should be assigned to.
Variable
Allows you to add a variable to the action or triggering event that you selected. You must
place the cursor in a edit box in the settings dialog window of the action or event and then
click the {V} button.
4.11
Task Commands
4.11.1 Enable Task
Enables a task. Disabled tasks cannot run automatically, i.e. their triggering events are disabled.
© 2004-2015 Neowise.com
175
RoboTask User's Guide
Specified Task
Press Select button and choose the task from the list.
This task
If you want to enable this task without selection choose this option.
4.11.2 Disable Task
Disables a task. Disabled tasks cannot run automatically, i.e. their triggering events are
disabled.
Specified Task
Press Select button and choose the task from the list.
This task
If you want to disable this task without selection choose this option.
© 2004-2015 Neowise.com
Actions
176
4.11.3 Start Task
Runs a task. This action is useful if you want to run several tasks in a series. For example, you
can create several different tasks in a series based on certain conditions that are detected in
the following order:
1.
2.
3.
A task that connects to the Internet and checks the e-mail server,
A task that logs off if no e-mail is present,
A task that displays a message box if you have received e-mail.
Task
Select a existing task.
Wait for Finish
Click this check box to ensure that the Start Task action starts a task and waits for completion
of that task, then continues running. If the check box is clear, the action starts a task and
continues running immediately.
Parameters
You can pass some parameters into started task. By default, the list of parameters is empty.
You need write down parameters like the text, each line should be like:
Pa ra m e t e rNa m e =Pa ra m e t e rV a lue
ParameterName – the name of parameter, any word consisting of letters and numbers;
ParameterValue – value of parameter like any set of symbols.
You can refer to these parameters in the task as the local variables of the task. You don't need
declare them in the task. Appropriate variables will appear automatically when the task is
started.
Pass of parameters of a task is used when you handle errors. In this case the fixed set of
parameters is passing into the task:
LastErrorTaskID – the internal ID of the task, in which an error was raised. It is a formal
identifier of a task like a number.
LastErrorTaskName - the name of the task, in which an error was raised.
© 2004-2015 Neowise.com
177
RoboTask User's Guide
LastErrorTaskExternalName –the External Name of the task, in which an error was
raised.
LastErrorStep – the number of the step (starting from 1), in which an error was raised.
LastErrorCode – code of the error. There is the particular set of error codes for any type
of actions (see description of actions). By default – 0.
LastErrorDescription – the description of the error. It depends on a type of action. By
default, it is the line "General error".
Required start
This parameter guarantees the start of a task. The problem is that the task can be working
when you try to start it. In the most cases that doesn't matter because you need only to
start the task at the appointed moment. In this case the action just sent the signal to start
the task. If the task is idling, it will be started. If the task is already started, the RoboTask
ignores the signal of a start because the task works by now.
But a task can be started with parameters and fulfill different actions against parameter
values. Switch on this parameter if you need to ensure start up of a task when each effort to
start a task. In this case the action will do efforts to start the task until a successful result.
4.11.4 Stop Task
Allows you to stop the selected task.
Specified Task
Press Select button and choose the task from the list.
This task
If you want to stop this task without selection choose this option.
4.11.5 Wait for Task
Waits until the selected task is finished. This actions pauses the current task until the selected
task is finished. If the selected task in not running at the moment when the action is due, the
© 2004-2015 Neowise.com
Actions
178
current task is not paused.
If the selected task is not finished during the specified timeout, the "Timeout is over" error is
generated.
Task
Select a task from the list.
Waiting
Specify the timeout in seconds to wait for the task to be finished. You can also specify an
infinite timeout.
4.12
Loops and Flows
4.12.1 File Loop
Allows a task to iterate through the results of a file search. For example, you can create a task
that searches all the employee status reports and identifies all status report files for the first of
the month.
General tab
© 2004-2015 Neowise.com
179
RoboTask User's Guide
Search for Files
Enter the files that you want to include in the loop. You can click the browse buttons to the
right of the list to add files, add folders, and remove items from the list.
Tip
You can also use wildcards in this option. Some examples of wildcards are the following:
C:\Text Files\*.txt - all the files with the .txt extension in the C:\Text Files folder.
C:\Doc Files\mydoc?.doc - mydoc1.doc, mydoc2.doc, mydocA.doc, and so forth.
{bakext} - file mask(s) from the {bakext} variable.
Exclude Masks (Comma Separated)
Enter one or more file masks separated by commas for files that you do not want to include in
the loop.
Tip
© 2004-2015 Neowise.com
Actions
180
You can also use wildcards in this option. Some examples of wildcards are the following:
*.txt - all the files with the .txt extension.
mydoc?.doc - mydoc1.doc, mydoc2.doc, mydocA.doc, and so forth.
*.tmp, *.$$$, *.bak - all the files with the .tmp, .$$$ and .bak extensions.
{bakext} - file mask(s) from the { bakext} variable.
Recurse to Subfolders
Click this check box to include subfolders in the loop.
Assign Current Filename to Variable
The current filename and path to the file in the loop is stored in the variable that you specify.
You can use this information in other actions.
Without Full Path
Click this check box to save only the filename and not the path to the variable.
Assign File Size to Variable
The current file size in the loop is assigned to the variable that you specify. You can use this
information in other actions.
Assign File Time to Variable
The current time of the file in the loop is assigned to the variable that you specify. You can use
this information in other actions.
Date Filter tab
© 2004-2015 Neowise.com
181
RoboTask User's Guide
All Files
Click this option to include all files in the file loop.
Find Files Created or Modified
Enter dates and times to include files for certain time periods in the loop.
Between
Newer Than ___ Months
Newer Than ___ Days
Older Than ___ Months
Older Than ___ Days
Sorting parameters
© 2004-2015 Neowise.com
Actions
Parameters of internal sorting of the file list
Sort the list of filenames
Turn on the checkbox if you want to sort the list
How to sort
There are four sorting modes:
By file name
By file time
By file size
By depth of nested folders
Sort order
There are two modes: ascending or descending ordering
© 2004-2015 Neowise.com
182
183
RoboTask User's Guide
Variable
Allows you to add a variable to the action or triggering event that you selected. You must
place the cursor in a edit box in the settings dialog window of the action or event and then
click the {V} button.
4.12.2 Text Loop
Allows a task to iterate through all lines of the text that you specify. You can enter text in the
parameters of the action or you can refer to a text file.
External Text File
Enter the path and name of text file or click the browse button to select a text file.
Specified Text
Enter the text you want to loop through.
Store Current Line to Variable
Enter a variable name to store with the current line of text.
Variable
Allows you to add a variable to the action or triggering event that you selected. You must
© 2004-2015 Neowise.com
Actions
184
place the cursor in a edit box in the settings dialog window of the action or event and then
click the {V} button.
4.12.3 Dataset Loop
Allows a task to iterate through the values of the results of an SQL query. For example, you
might create a task that connects to the company human resources database and queries for
all records of employee sick leave reports every month and saves a report to a file.
Important
You must be familiar with SQL syntax to use this action.
Connection String
A string with attribute/value pairs for information required to log on to a database and point to
a specific database. Click the browse button to open the Microsoft Data Link Properties dialog
box. You can press F1 to access Help about this dialog box.
SQL Query
Enter the query string in SQL syntax.
Assign Field Names to Variable
Stores the field names separated by commas in a specified variable.
© 2004-2015 Neowise.com
185
RoboTask User's Guide
Assign Field Values to Variable
Stores the field values separated by commas in a specified variable.
With Memo Fields
Specifies that the query should include memo fields.
Store Memos as "Comma Text"
Indicates that the memo fields should be stored as comma delimited text.
Variable
Allows you to add a variable to the action or triggering event that you selected. You must
place the cursor in a edit box in the settings dialog window of the action or event and then
click the {V} button.
Test SQL
Allows you to test the SQL syntax of your query.
4.12.4 Window loop
Enumerates windows existing in the system and allows you to assign their parameters to
variables. You can use these values inside the loop.
General
Assign Window Caption to variable
© 2004-2015 Neowise.com
Actions
186
You can specify the variable you want to assign the window caption to. If you clear this
checkbox, the window caption will not be saved.
Assign Window Class to variable
You can specify the variable you want to assign the window class to. If you clear this
checkbox, the window class will not be saved.
Assign Window Handle to variable
Specify the variable you want to assign the window handle to. You cannot disable this option
because the handle of a window is its unique identifier. You can use the value of this variable in
the "Window Command" action.
Window Filters
Process Hidden Windows
If you want to enumerate hidden windows, you should select this checkbox. By default, Window
loop enumerates only visible windows.
Process Child Windows
Select this checkbox to enumerate child windows.
Window caption
You can use this parameter to apply a filter to the captions of windows. Either select the
caption you need from the list or type it manually.
Window class
You can use this parameter to apply a filter to the classes of windows. Either select the class
you need from the list or type it manually.
The "Window caption" and "Window class" lists depend on the "Process Hidden Windows" and
© 2004-2015 Neowise.com
187
RoboTask User's Guide
"Process Child Windows" checkboxes.
Variable
Allows you to add a variable to the action or triggering event that you selected. You must
place the cursor in a edit box in the settings dialog window of the action or event and then
click the {V} button.
4.12.5 Simple Loop
Allows a task to iterate through a loop.
Start From
Enter the number at which to start the loop.
To
Enter the number at which to end the loop.
Destination Variable
Stores the current value of the loop. For example, if you enter 1 in the Start From box and 5 in
the To box, then, in the first iteration, the destination variable contains 1. In the second
iteration, the destination variable contains 2, and so forth.
4.12.6 While loop
The While loop is used if the number of iterations is unknown, but you know the condition that
should be met for the loop to continue. The settings of this action are similar to the If.. then
action and it has similar parameters.
Attention: it is possible to make an infinite loop with While Loop if you specify the condition
incorrectly. So, be careful while creating a task if you do not intend to make an infinite loop, of
course.
© 2004-2015 Neowise.com
Actions
188
Compare Values As
Select the type of data for the expressions that you want to compare.
As String - compares two values with alphanumeric characters.
As Number - compares two integer values.
As Date and Time - compares two date/time values.
As Boolean - checks for a true/false or yes/no condition. If you select this option, the If
Value Is option appears, allowing you to select the condition of the Boolean.
If Value Is
Appears if you select As Boolean in the Compare Values As area. This option allows you to
set the value of the Boolean check. You can select false for certain actions to occur if a
condition does not exist. You can select true for certain actions to occur if a condition does
exist.
First Operand
Enter the value of the first expression you want to compare.
Comparison Type
Select the operator for the comparison from the following:
= Equal to
<> Not equal
>= More than or equal to
> More
<= Less than or equal to
< Less than
Case Sensitive
Click to make the comparison dependent on whether upper case or lower case characters are
used in the expressions.
Second Operand
Enter the value of the second expression you want to compare.
© 2004-2015 Neowise.com
189
RoboTask User's Guide
Variable
Allows you to add a variable to the action or triggering event that you selected. You must
place the cursor in a edit box in the settings dialog window of the action or event and then
click the {V} button.
4.12.7 End Loop
Indicates the end of the loop block. Any loop, including a file loop, simple loop, and so forth,
must contain the corresponding End Loop action.
4.12.8 Break
Stops the execution of the current loop so that the task can continue executing the actions
after the End Loop action. The Break action is often used in conjunction with the If Then
action.
4.12.9 Continue
Skips all the actions between it and the End Loop action and begins a new iteration. No
specific settings are associated with this action. The Continue action is used in conjunction
with the If Then action.
4.12.10 If Then
Allows a task to make a comparison of several conditions and execute actions based on that
comparison. You can use this action to run a specific statement or a block of statements,
depending on the value of a condition. If...Then...Else statements can be nested to as many
levels as you need.
Important
The If Then action must be used in conjunction with the End If action.
© 2004-2015 Neowise.com
Actions
190
Compare Values As
Select the type of data for the expressions that you want to compare.
As String - compares two values with alphanumeric characters.
As Number - compares two integer values.
As Date and Time - compares two date/time values.
As Boolean - checks for a true/false or yes/no condition. If you select this option, the If
Value Is option appears, allowing you to select the condition of the Boolean.
If Value Is
Appears if you select As Boolean in the Compare Values As area. This option allows you to
set the value of the Boolean check. You can select false for certain actions to occur if a
condition does not exist. You can select true for certain actions to occur if a condition does
exist.
First Operand
Enter the value of the first expression you want to compare.
Comparison Type
Select the operator for the comparison from the following:
= Equal to
<> Not equal
>= More than or equal to
> More
<= Less than or equal to
< Less than
Case Sensitive
Click to make the comparison dependent on whether upper case or lower case characters are
used in the expressions.
Second Operand
Enter the value of the second expression you want to compare.
© 2004-2015 Neowise.com
191
RoboTask User's Guide
Variable
Allows you to add a variable to the action or triggering event that you selected. You must
place the cursor in a edit box in the settings dialog window of the action or event and then
click the {V} button.
4.12.11 Else
Allows a task to execute an action if certain conditions are not met. This action is used in
conjunction with the If Then action. You can use this action to run a specific statement or a
block of statements, depending on the value of a condition. If...Then...Else statements can be
nested to as many levels as you need. No specific settings are associated with this action.
4.12.12 End If
Indicates the end of the If Then block.
4.12.13 ElseIf Then
This action allows to build a construction of a complex selection with several conditions. For
example:
If <condition1> then
DoSomething1
ElseIf <condition2> then
DoSomething2
ElseIf <condition3> then
DoSomething3
.........
Else
DoSomethingN
End if
This action can be put in the block “If Then - EndIf” (between If..Then 189 and End If 191 ).
Such construction works in the following way:
RoboTask checks the condition <Condit ion1>. If the condition is fulfilled (the logical value
true) then RoboTask performs the steps DoSom e t hing1.
Otherwise, RoboTask checks the next condition <Condit ion2>. If the condition is fulfilled
(the logical value True) then RoboTask performs the steps DoSom e t hing2
Otherwise, RoboTask checks the next condition <Condit ion3>. And so on.
If none of enumerated conditions is fulfilled, the performing of the task moves to the
© 2004-2015 Neowise.com
Actions
192
block Else and then RoboTask performs the steps DoSom e t hingN.
Of course, it is possible to realize this algorithm by means of actions If..Then, Else, and End If.
But apparently such construction is less convenient and less demonstrable. An algorithm with
three conditions will look like this:
If <condition1> then
DoSomething1
Else
If <condition2> then
DoSomething2
Else
If <condition3> then
DoSomething3
Else
DoSomethingN
End If
End If
End if
The parameter editing dialog of the action ElseIf Then is completely identical to the window
of configuration for the action If Then.
Compare Values As
Select the type of data for the expressions that you want to compare.
As String - compares two values with alphanumeric characters.
As Number - compares two integer values.
© 2004-2015 Neowise.com
193
RoboTask User's Guide
As Date and Time - compares two date/time values.
As Boolean - checks for a true/false or yes/no condition. If you select this option, the If
Value Is option appears, allowing you to select the condition of the Boolean.
If Value Is
Appears if you select As Boolean in the Compare Values As area. This option allows you to
set the value of the Boolean check. You can select false for certain actions to occur if a
condition does not exist. You can select true for certain actions to occur if a condition does
exist.
First Operand
Enter the value of the first expression you want to compare.
Comparison Type
Select the operator for the comparison from the following:
= Equal to
<> Not equal
>= More than or equal to
> More
<= Less than or equal to
< Less than
Case Sensitive
Click to make the comparison dependent on whether upper case or lower case characters are
used in the expressions.
Second Operand
Enter the value of the second expression you want to compare.
Variable
Allows you to add a variable to the action or triggering event that you selected. You must
place the cursor in a edit box in the settings dialog window of the action or event and then
click the {V} button.
4.12.14 Exit
This action makes an immediate exit from the current task. No specific settings are associated
with this action.
4.13
Window
4.13.1 Window Command
Manipulates certain windows that you specify.
© 2004-2015 Neowise.com
Actions
194
Window Selection Mode
Use Window Parameters. In this case it is necessary to specify parameters of a
required window: Window Caption, Window Class, compliance mode, etc. (see the
description below).
Use Window Handle. In this case it is necessary to specify a Window Handle. Handle is
a number, an identifier of a window. It can be got, for example, in the action “Window
loop”. The Window Handle uniquely identifies the window in a system, so the rest of
window parameters have no sense.
Use Current Window. In this case a current active window is used. For example, if the
necessary window was activated in the previous actions of a task, there is no need to
specify window parameters again. Just use the current active window.
Window Caption
Enter or select the caption of the window that you want to manipulate with the action you
select in the Action list. You can enter part of a window caption.
Caption Must Match Exactly
Select this check box if you want to manipulate only the window that exactly matches the
window caption you selected. This check box is cleared by default so that the task can
manipulate windows that contain only part of the window caption entered in the Window
Caption box. For example, you can enter <notepad> for the window with a caption <Untitled Notepad>.
Action
Select the action for manipulating the window.
© 2004-2015 Neowise.com
195
RoboTask User's Guide
Focus - makes the window active.
Minimize - reduces the window to an icon on the Windows taskbar.
Maximize - restores the window to fill the entire screen.
Restore - restores the window to its previous state.
Close - closes the window.
Hide - hides the window from view on the screen and Windows taskbar.
Unhide - displays the hidden window.
4.13.2 Check for Window
Checks to see if a window exists or is active. For example, you might want to create a task
that starts your HotSync Manager for your Palm PDA every day and synchronizes the Palm
device data with Outlook. You might want to check for the existence of the HotSync Manager
window to ensure that it has started.
Window Caption
Select the name of the window from the dropdown list. The contents of this list vary with the
applications currently launched on your computer.
Caption Must Match Exactly
Click the check box to check only windows that match the entire window caption. If this check
box is clear, the action checks for windows that partially match the caption.
Check For
Select one of the following options to check for existing windows or windows that are open.
Window Exist
Window Active
© 2004-2015 Neowise.com
Actions
196
Abort Task If
Stops task executing according with selected option:
Window Not Exists/Active - stops the task if the window does not exist or is not active.
Window Exist/Active - stops the task if the window exists or is active.
4.13.3 Wait for Window
This action is used to synchronize the task with opening or closing a certain window. The action
pauses the task and waits for the necessary window operation for the specified timeout and
after that resumes the task. If the action does not detect the necessary window operation
within the timeout, the "Timeout is over" error occurs.
General tab
Window Caption – Window caption. You can specify only the distinctive part of the caption if
the window has no constant caption. You can select the window you need from the list if you
click the button to the right from the input field.
Caption must match exactly – If you need the window caption to match the specified string
exactly, select this checkbox.
Window class – Window class (or window type). You should either type the window class
manually or select the window you need from the list by clicking the button to the left from the
input field. You can type part of the window class as well.
© 2004-2015 Neowise.com
197
RoboTask User's Guide
Class name must match exactly – If you need the window class to match the specified string
exactly, select this checkbox. The class of a window does not change all the time the window
exists. So, as a rule, you have to enable this option.
Advanced tab
Watch hidden windows – select this checkbox if you want the action to monitor hidden
windows.
Watch child windows – select this checkbox if you want the action to monitor child windows.
As a rule, these windows are dialog boxes and secondary windows opened by Windows
applications.
Assign window handle to variable – if you want to save the HANDLE (or the system number)
of a window to a variable, type the name of this variable in the field. Otherwise leave the field
empty. The HANDLE of a window is a unique window identifier. And you can use it later in the
Window command action or in Basic script while using it in the script of system API functions.
Common settings
Watch for – select the window operation to wait for. There are 4 options to choose from:
Window activated;
Window created;
Window destroyed;
Window deactivated;
Window changed caption.
Waiting – specify the timeout in seconds or select the Infinity option.
© 2004-2015 Neowise.com
Actions
198
4.13.4 Window Size and position
This action allows to change sizes and position of a specified window. The dialog of parameter
editing resembles the editor of parameters of the action "Window command 193 "
Window Selection Mode
Use Window Parameters. In this case it is necessary to specify parameters of a
required window: Window Caption, Window Class, compliance mode, etc. (see the
description below).
Use Window Handle. In this case it is necessary to specify a Window Handle. Handle is
a number, an identifier of a window. It can be got, for example, in the action “Window
loop”. The Window Handle uniquely identifies the window in a system, so the rest of
window parameters have no sense.
Use Current Window. In this case a current active window is used. For example, if the
necessary window was activated in the previous actions of a task, there is no need to
specify window parameters again. Just use the current active window.
Window Caption
Enter or select the caption of the window that you want to manipulate with the action you
select in the Action list. You can enter part of a window caption.
© 2004-2015 Neowise.com
199
RoboTask User's Guide
Caption Must Match Exactly
Select this check box if you want to manipulate only the window that exactly matches the
window caption you selected. This check box is cleared by default so that the task can
manipulate windows that contain only part of the window caption entered in the Window
Caption box. For example, you can enter <notepad> for the window with a caption <Untitled Notepad>.
Change position
Switch on this checkbox if you want to change a window position. After that, fill in parameters
X and Y.
X – Specify the horizontal position of the left window edge. The usage of variables is allowed.
The result of the expression must be an integer. Otherwise, the action uses default value,
which is 0.
Y – Specify the upright position of the upper window edge. The usage of variables is allowed.
The result of the expression must be an integer. Otherwise, the action uses default value,
which is 0.
Change size
Switch on this checkbox if you want to change a window size. After that, fill in parameters H
and W.
H – Specify a new height of the window. The usage of variables is allowed. The result of the
expression must be an integer. Otherwise, the action uses default value, which is 480.
W - Specify a new width of the window. The usage of variables is allowed. The result of the
expression must be an integer. Otherwise, the action uses default value, which is 640.
4.14
For Windows NT
4.14.1 Start Service
Important
This action is not available on Windows 9x/Me.
Starts a service already installed on the local or remote NT server or workstation. A service is a
special process that can be launched during operating system boot. The most important feature
of a service is that you do not have to log on to the computer.
A service is started in the Local System account. You can start an existing service or a service
that you created. Examples of services include FTP/HTTP servers, print spoolers, file sharing,
and so forth.
Usually, Windows services do have not a user interface, but are managed through the Services
applet of the Windows Control Panel, or a separate application or applet. Using the standard
Services applet, you can start, stop, pause, or continue a previously installed service. The
common way for a service to report a warning or error is recording an event into the system
event log. You can review the log using the Event Viewer from Administrative Tools in
Windows.
© 2004-2015 Neowise.com
Actions
200
Computer Name
Enter the remote computer name. If you want to start a service on the local computer, use
{ComputerName}. You can click the browse button to select a computer from the local area
network.
Service
Select a service that you want to stop from the dropdown list. The items on this list depend on
which services are present on the computer.
Parameters
Specify optional parameters for the service that you want to start.
Refresh
Click this button to refresh the Service list.
Variable
Allows you to add a variable to the action or triggering event that you selected. You must
place the cursor in a edit box in the settings dialog window of the action or event and then
click the {V} button.
4.14.2 Stop Service
Important
This action is not available on Windows 9x/Me.
Stops a service already installed and started on the local or remote server or workstation. For
more information, see Start Service. 199
© 2004-2015 Neowise.com
201
RoboTask User's Guide
Computer Name
Enter the remote computer name. If you want to start a service on the local computer, use
{ComputerName}. You can click the browse button to select a computer from the local area
network.
Service
Select a service that you want to stop from the dropdown list. The items on this list depend on
which services are present on the local computer.
Refresh
Click this button to refresh the Service list.
Variable
Allows you to add a variable to the action or triggering event that you selected. You must
place the cursor in a edit box in the settings dialog window of the action or event and then
click the {V} button.
4.14.3 Service status
Important
This action is not available on Windows 9x/Me.
This action allows to read the status of a specified system service and to assign a value to a
variable.
The value of a service status can be assigned as a line or a number. The values correspond to
the Microsoft documentation. There are 7 statuses:
SERVICE_STOPPED = 1 – The service is not running.
SERVICE_START_PENDING = 2 – The service is starting
SERVICE_STOP_PENDING = 3 – The service is stopping.
SERVICE_RUNNING = 4 – The service is running.
SERVICE_CONTINUE_PENDING = 5 – The service continue is pending.
SERVICE_PAUSE_PENDING = 6 – The service pause is pending.
© 2004-2015 Neowise.com
Actions
202
SERVICE_PAUSED = 7 – The service is paused
Computer Name
Specify the computer name of a local network. The usage of variables is allowed. For example,
{ComputerName}. If the name of computer is not specified (an empty line), a local computer is exploited.
Service
Specify the name of a service. The name can be typed or selected from a dropdown list.
Usage of variables in the name of a service is allowed.
Assign Status to Variable
Assign the name of the variable where it is necessary to write the service status.
Status Value as
Specify the form of the value which is necessary to get.
Integer value – the number from 1 to 7.
String value – one of possible values:
SERVICE_STOPPED,
SERVICE_START_PENDING,
SERVICE_STOP_PENDING,
SERVICE_RUNNING,
SERVICE_CONTINUE_PENDING,
SERVICE_PAUSE_PENDING,
SERVICE_PAUSED
Variable
Allows you to add a variable to the action or triggering event that you selected. You must
place the cursor in a edit box in the settings dialog window of the action or event and then
© 2004-2015 Neowise.com
203
RoboTask User's Guide
click the {V} button.
4.14.4 Lock Workstation
This action submits a request to lock the workstation's display. Locking a workstation protects
it from unauthorized use.
4.14.5 Run Program as User
This action allows running some application with rights of another user. It is especially useful for
the system service mode because the application (a spawned process) is implemented by
default with the rights of SYSTEM account. Sometimes it can cause some problems. For
example, the launched application needs the access into the network with certain rights, or it
needs some user settings.
Program name
Enter the program name into this field. You can type the text manually or select a file via
© 2004-2015 Neowise.com
Actions
204
dialog. You can also specify the document name in this field. In this case the document is
opened by the default program according to the system settings.
Parameters
Enter the parameters of the program.
Current folder
The name of the current folder when the program is started. You can leave this field empty. In
this case the folder is specified automatically.
Domain
The domain name. If you want to use the username of a local computer, write the dot symbol
(.)
User Name
The name of user.
Password
The password of user.
Save Exit Code to Variable
If you want to save the exit code of the program, turn on this flag and write the variable name
below. It is possible to save the code of the program completion only if the idle mode of the
program completion is on.
Variable
Allows you to add a variable to the action or triggering event that you selected. You must
place the cursor in a edit box in the settings dialog window of the action or event and then
click the {V} button.
4.15
RoboTask Commands
4.15.1 Minimize RoboTask
Collapses the RoboTask window and displays the RoboTask icon on the Windows Taskbar. No
specific settings are associated with this action.
This action is useful if you do not want RoboTask to appear on the computer while the task
runs.
4.15.2 Restore RoboTask
Activates RoboTask and displays the RoboTask window on the computer screen. No specific
settings are associated with this action.
This action is useful for system administrators who want to troubleshoot a process. For
© 2004-2015 Neowise.com
205
RoboTask User's Guide
example, if a "critical error" occurs, you can use the Disable Automation action, trap an error
message with the message box, and then use the Restore RoboTask action.
4.15.3 Exit RoboTask
Closes RoboTask. No specific settings are associated with this action.
4.15.4 Enable Automation
Enables task triggering. If task triggering is disabled, the tasks will not run automatically, i.e. all
your tasks are disabled. You may run tasks only manually.
4.15.5 Disable Automation
Disables task triggering. If task triggering is disabled, the tasks will not run automatically, i.e. all
your tasks are disabled. You may run tasks only manually.
4.15.6 Log Message
Records a message to the task's log. This action is a powerful tool for recording the results of
actions when they occur in a log text file. This action is useful for system administrators who
want to troubleshoot a process.
The log filename is based on the internal unique ID number of the task. Each task has an
internal unique ID number and its filename is NNNNNNNN.tsk where NNNNNNNN is its ID number.
The log file name is NNNNNNNN.log.
Important
You can set options for logging on the Advanced tab
Edit Task dialog box.
43
of the Add Task dialog box or the
© 2004-2015 Neowise.com
Actions
206
Message Text
Enter the text that you want to appear in the message.
Message Type
Select a type, such as Information, Warning, etc. The type determines the style of log
message:
Information - a blue text and "i" icon appears.
Warning - an olive text and "!" icon.
Error - a red text and "X" icon.
Neutral (user message) - black text without icon. This kind of message can't be hidden
even if you specify "Nothing" in "Log Level" parameter of the task.
Variable
Allows you to add a variable to the action or triggering event that you selected. You must
place the cursor in a edit box in the settings dialog window of the action or event and then
click the {V} button.
4.16
Clipboard
4.16.1 Cut
Cuts the selected text fragment (image) into the system clipboard from the active Windows
application.
© 2004-2015 Neowise.com
207
RoboTask User's Guide
Do it by…
There are two ways to cut a fragment:
1. by sending a Windows message to the corresponding edit element
2. by emulating the key combination
It is recommended to use the second method because it is a universal mechanism for any
application and any data type.
4.16.2 Copy
Copies the selected text fragment (image) into the system clipboard from the active Windows
application.
Do it by…
There are two ways to copy a fragment:
1. by sending a Windows message to the corresponding edit element
2. by emulating the key combination
It is recommended to use the second method because it is a universal mechanism for any
application and any data type.
4.16.3 Paste
Pastes the copied fragment from the system clipboard to the current Windows application.
© 2004-2015 Neowise.com
Actions
208
Do it by…
There are two ways to paste a fragment:
1. by sending a Windows message to the corresponding edit element
2. by emulating the key combination
It is recommended to use the second method because it is a universal mechanism for any
application and any data type.
4.16.4 Clear Clipboard
Clears the system clipboard. It has no parameters.
4.16.5 Get text
Assigns the text from the system clipboard to a variable. If the clipboard contains a graphic
object or an object of some other type that cannot be converted into text, an empty string will
be assigned to the variable.
Assign Clipboard Content to variable
Specify the variable the text from the system clipboard should be assigned to.
© 2004-2015 Neowise.com
209
RoboTask User's Guide
4.16.6 Put Text
Copies the specified text into the system clipboard. You can take text from a file or type it
directly in the "Specified text" field. User and system RoboTask variables can be used.
External Text File
Specify the name of the file to take the text from.
Specified Text
Type the fragment that should be copied into the clipboard.
Variable
Allows you to add a variable to the action or triggering event that you selected. You must
place the cursor in a edit box in the settings dialog window of the action or event and then
click the {V} button.
4.17
Mouse
4.17.1 Move to an object
Moves the mouse pointer to the specified object. You can select a control element in a window
(button, menu, toolbar, etc.) or a window as an object.
© 2004-2015 Neowise.com
Actions
210
To make editing this parameter more comfortable, you can drag the message "Drag this text to
desired control" to the object you need. While you are moving the mouse pointer, elements
recognized by RoboTask are highlighted with a frame. After you release the left mouse button, all
the parameters are specified automatically depending on the position of the mouse pointer. After
that you can edit the parameter manually if necessary.
Window caption
Specify the window caption completely or any part of it. If the caption does not matter, leave
the field blank.
Window caption must match exactly
If you need the caption to match exactly the specified caption, select this checkbox. If you do
not need the exact match, you can specify any part of the window caption.
Window class
Specify the window class completely. If the class does not matter, leave the field blank.
Control Text
Specify the text of the window control element completely or partially.
Control Text must match exactly
If you need the control text to match exactly the specified text, select this checkbox. If you do
© 2004-2015 Neowise.com
211
RoboTask User's Guide
not need the exact match, you can specify any part of the control element text.
Control class
Specify the control class completely. If the class does not matter, leave the field blank.
Control position
Specify the coordinates of the control element. The values are specified relatively to the
window. The coordinates of the control are necessary in order to identify the control element
because the window may contain several elements with the same Control Text and Control
Class.
Mouse Cursor Position
Specify the position of the mouse pointer relatively to the control element.
Variable
Allows you to add a variable to the action or triggering event that you selected. You must
place the cursor in a edit box in the settings dialog window of the action or event and then
click the {V} button.
4.17.2 Click
Emulates a mouse click in the current position.
Button
Select the mouse button:
Left Button
Right Button
Middle Button.
Action
Select the action. There are 4 variants to choose from:
Click
Double Click
Button Down
© 2004-2015 Neowise.com
Actions
212
Button release
4.17.3 Move
Moves the mouse pointer the specified distance away from the current position or to the
specified point.
Coordinates mode
Coordinates: absolute or relative.
Absolute coordinate - the absolute coordinates of a point on the screen will be specified
in the next parameter.
Relative coordinates - the coordinates of a point on the screen relative to the current
position of the mouse pointer will be specified in the next parameter.
Absolute or Relative coordinates
The coordinates of a point where the mouse pointer should be moved. The type of coordinates
is determined by the previous parameter.
In order to set the coordinates interactively, you should drag the text in the upper part of the
dialog box to the necessary point on the screen. The coordinate values will be specified
automatically.
4.18
Registry
4.18.1 Add key
Adds a key (branch) to the registry.
© 2004-2015 Neowise.com
213
RoboTask User's Guide
Key Name
Name of the key to be added. You can use the dialog box to select the key interactively; to
open it click the button to the right of the text box.
Variable
Allows you to add a variable to the action or triggering event that you selected. You must
place the cursor in a edit box in the settings dialog window of the action or event and then
click the {V} button.
4.18.2 Delete Key
Deletes the specified key (branch) from the registry. The specified key will be deleted together
with all its subkeys and entries.
© 2004-2015 Neowise.com
Actions
214
Key Name
Name of the key to be deleted. You can use the dialog box to select the key interactively; to
open it click the button to the right of the text box.
Variable
Allows you to add a variable to the action or triggering event that you selected. You must
place the cursor in a edit box in the settings dialog window of the action or event and then
click the {V} button.
4.18.3 Rename Key
Renames the specified key (branch) of the registry
© 2004-2015 Neowise.com
215
RoboTask User's Guide
Key Name
Name of the key to be renamed. You can use the dialog box to select the key interactively; to
open it click the button to the right of the text box.
New Key Name
A new name that will be given to the specified key.
Variable
Allows you to add a variable to the action or triggering event that you selected. You must
place the cursor in a edit box in the settings dialog window of the action or event and then
click the {V} button.
4.18.4 Read Value
Read the specified value from the registry and assign it to the user variable. This action allows
reading values of String and Integer types only.
© 2004-2015 Neowise.com
Actions
216
Key Name
Full path to the value you want to read. You can use the dialog box to select the key and value
interactively; to open it click the button to the right of the text box. When you click the OK
button, the "Key Name" and "Value Name" fields will be filled, if you have selected the necessary
value.
Value Name
Name of the value to be read. If you leave Value Name empty, RoboTask will read the default
value of the key.
Assign to Variable
Name of the user variable that should be assigned the value we have read.
Variable
Allows you to add a variable to the action or triggering event that you selected. You must
place the cursor in a edit box in the settings dialog window of the action or event and then
click the {V} button.
4.18.5 Write Value
Write the value to the specified key in the registry. This action allows writing values of String
and Integer types only.
© 2004-2015 Neowise.com
217
RoboTask User's Guide
Key Name
Full path to the value you'd like to write. You can use the dialog box to select the key and
value interactively; to open it click the button to the right of the text box. When you click the
OK button, the "Key Name" and "Value Name" fields will be filled, if you have selected the
necessary value.
Value Name
Name of the value to be written.
Value Type
Select the type of value to be written: String or Integer.
Value
The value to be written.
Variable
Allows you to add a variable to the action or triggering event that you selected. You must
place the cursor in a edit box in the settings dialog window of the action or event and then
click the {V} button.
4.18.6 Delete value
Deletes the specified value from the registry.
© 2004-2015 Neowise.com
Actions
218
Key Name
Full path to the value you'd like to delete. You can use the dialog box to select the key and
value interactively; to open it click the button to the right of the text box. When you click the
OK button, the "Key Name" and "Value Name" fields will be filled, if you have selected the
necessary value.
Value Name
Name of the value to be deleted.
Variable
Allows you to add a variable to the action or triggering event that you selected. You must
place the cursor in a edit box in the settings dialog window of the action or event and then
click the {V} button.
4.18.7 Rename value
Renames the specified value in the registry.
© 2004-2015 Neowise.com
219
RoboTask User's Guide
Key Name
Full path to the value you'd like to rename. You can use the dialog box to select the key and
value interactively; to open it click the button to the right of the text box. When you click the
OK button, the "Key Name" and "Value Name" fields will be filled, if you have selected the
necessary value.
Value Name
Name of the value to be renamed.
New Value Name
New name that will be assigned to the specified value.
Variable
Allows you to add a variable to the action or triggering event that you selected. You must
place the cursor in a edit box in the settings dialog window of the action or event and then
click the {V} button.
4.18.8 Export
Exports the specified registry branch to the specified file. The saved file has a format
compatible with the REGEDIT.EXE system utility. This operation is useful when you make a
backup copy of some information or move settings to another computer. You can easily import
the export file using REGEDIT or the Import 220 action of RoboTask.
© 2004-2015 Neowise.com
Actions
220
Registry Key
The key (branch) of the registry that should be exported to a file. You can use the dialog box
to select the key interactively; to open it click the button to the right of the text box.
File Name
Name of the file where information should be exported.
File Format
Choose the export file format.
Registration file (current format) - current default format for the installed operating
system. For Windows 2000 and higher the format is Unicode text.
Win9/NT4 Registration File - old format that provides compatibility with Windows 9x/NT4.
This format has a structure of a regular text file.
Variable
Allows you to add a variable to the action or triggering event that you selected. You must
place the cursor in a edit box in the settings dialog window of the action or event and then
click the {V} button.
4.18.9 Import
Imports the export file to the registry. The export file should be prepared with the REGEDIT.
EXE system utility or the Export 219 action.
© 2004-2015 Neowise.com
221
RoboTask User's Guide
File Name.
Name of the file to be imported.
Variable
Allows you to add a variable to the action or triggering event that you selected. You must
place the cursor in a edit box in the settings dialog window of the action or event and then
click the {V} button.
4.19
Network
4.19.1 Send Command
Allows you to send a string to a copy of RoboTask on another computer. This action works
together with the "Listener" triggering event 328 . The Listener event receives the string and can
start some task according to its settings. Thus, you can synchronize several copies of
RoboTask working on the local area network of your office or via the Intranet/Internet.
F or e xa m ple , it m a y be a c om m a nd t o pa c k IIS log file s on t he se rv e r a nd se nd t he pa c ke d file
by e -m a il.
© 2004-2015 Neowise.com
Actions
222
Host Name or IP Address
Specify the Host Name or IP address of the computer where you need to send the command.
The Host Name can be either similar to w w w .m y dom a in.c om for the Internet or just the name
of the necessary computer for the local area network.
Port
Specify the port the command should be sent to. By default, the "Listener" listens to port 5254.
The port number can be changed to any other number (see Plugin settings).
Access Password
Specify the password for connecting to remote RoboTask. If the Listener on remote RoboTask is
configured to work without a password, leave this field blank.
Command
Specify the string (command) that should be sent to remote RoboTask. It can be any string.
The "Listener" triggering event on the remote computer will analyze the string.
Variable
Allows you to add a variable to the action or triggering event that you selected. You must
place the cursor in a edit box in the settings dialog window of the action or event and then
click the {V} button.
4.19.2 Send Network Message
Sends a text message using a local network area (LAN) connection to the specified computer.
For example, you can use this action to display a message every time you receive an e-mail
from a special customer when you are logged into a different computer on your network and
cannot check your e-mail.
© 2004-2015 Neowise.com
223
RoboTask User's Guide
Computer Name
Enter the name of the computer or domain name that the message should be sent to. When the
"*" symbol (without quotes) is specified, the message is broadcast to every computer in the
primary domain of the system.
Im po rta nt
If t he Window s M e sse nge r se rv ic e is not running on t he t a rge t c om put e r, t he m e ssa ge w ill not
be re c e iv e d.
Message Text
Specifies the text of the message to be sent.
Variable
Allows you to add a variable to the action or triggering event that you selected. You must
place the cursor in a edit box in the settings dialog window of the action or event and then
click the {V} button.
4.19.3 Network Plugin settings
The settings of the Network plugin are related to the "Listener 328 " triggering event and set the
global parameters of the "Listener 328 ".
© 2004-2015 Neowise.com
Actions
224
Listener port
Specify the port the "Listener" will listen to. The default is 5254, but it can be changed for any
other available port.
To Change Listener Access Password…
To change the access password for the Listener, specify the old password and enter the new
password twice. By default, the password is empty, i.e. the access is granted without a
password.
Encryption Required
Select this checkbox if you want to encrypt information when it is transferred between the
computers. An 128-bit asymmetric encryption key is used for that. The key is generated
randomly for each session.
IP Filter
You can use this tab to configure filtering requests by IP addresses. By default, the Listener is
available for all IP addresses.
4.20
Email
This plugin contains email action which work with POP3 and IMAP protocols.
© 2004-2015 Neowise.com
225
RoboTask User's Guide
4.20.1 POP3 Open
Opens a connection with the POP3 server. This action should be performed before you perform
the "POP3 Mail Loop 226 ", "POP3 Download Email 227 " and "POP3 Delete Email 228 " actions. There
can be only one open connection with the POP3 server within a task. If you need to process
several mail servers one by one, you should close the previous connection before opening the
next one (see the "POP3 close 226 " action).
Host
IP-address or Host Name of the POP3 server.
Port
Port of the POP3 server. By default it's 110.
Use SSL
Select this checkbox if you want to use SSL connection.
User Name
Name of the mailbox user.
Password
User password.
Variable
Allows you to add a variable to the action or triggering event that you selected. You must
place the cursor in a edit box in the settings dialog window of the action or event and then
click the {V} button.
© 2004-2015 Neowise.com
Actions
226
4.20.2 POP3 Close
Closes the open connection with the POP3 server. It doesn't require any additional parameters.
When a task is finished, the opened server connection closes automatically.
4.20.3 POP3 Mail Loop
Allows processing messages on the POP3 server one by one in a loop. This action also allows
parsing main parameters of a message without downloading the complete message from the
server. You can assign parameters of each message to a user variable and perform initial parse
within a loop.
Order Number
This loop parameter is compulsory as the current order number of a message serves as its
identifier on the POP3 server. The numbering of messages starts with 1. The variable that
contains the number of a message should be used in the loop in "POP3 Download Email 227 " and "
POP3 Delete Email 228 " actions.
Subject
Optional parameter. Allows saving the message subject to a variable and parsing it in the loop.
© 2004-2015 Neowise.com
227
RoboTask User's Guide
Sender (FROM)
Optional parameter. Allows saving the sender address to a variable and using it within the loop.
Receipt (TO)
Optional parameter. Allows saving the recipient address to a variable as a string and using it
within the loop.
Carbon Copy (CC)
Optional parameter. Allows saving the address of the recipient (or recipients) of a message
copy to a variable as a string and use it within the loop.
Message Size
Optional parameter. Allows saving the message size in bytes to a variable and using it within the
loop.
Note:
Addresses in the message can be written in form of:
E-mail address only. For example:
[email protected]
Recipient's name and address. For example:
John Smith <[email protected]>
Several recipients separated with a semicolon. For example:
John Smith <[email protected]>; Melissa Carver <[email protected]>
4.20.4 POP3 Download Email
Receives a message from the POP3 server and saves it to a file.
© 2004-2015 Neowise.com
Actions
228
Order Number of Message
Order number of the current message. It can be generated in the "POP3 mail loop" using a
variable or you can set it manually. If the message number is invalid, an "Invalid number of
message" error will occur when the action is carried out.
Save Message to File
Specify the name of file where the message should be saved. You can use variables to generate
the file name. By default, the
{TempDir}\{Year}{MonthNo}{Day}{Hours}{Minutes}{Seconds}{mSeconds}.eml
string is specified. It provides a unique name and makes it more convenient to sort files by the
time when the message was received.
Extract Attachments to Folder
When you receive a message, you can extract all attachments to separate files. To do it, you
should specify a folder where all attachments should be extracted.
If File Already Exists
Specify an action that should be performed if the application file already exists.
Rename - in this case a suffix with an order number will be added to the file name;
Overwrite - the file will be saved with the original name and the old file will be
overwritten.
Variable
Allows you to add a variable to the action or triggering event that you selected. You must
place the cursor in a edit box in the settings dialog window of the action or event and then
click the {V} button.
4.20.5 POP3 Delete Email
Deletes the email message from the POP3 server.
Order Number of Message
Order number of the message to be deleted. It can be generated in the "POP3 mail loop 226 "
using a variable or you can set it manually. If the message number is invalid, a "No such
message" error will occur when is action is carried out.
Variable
© 2004-2015 Neowise.com
229
RoboTask User's Guide
Allows you to add a variable to the action or triggering event that you selected. You must
place the cursor in a edit box in the settings dialog window of the action or event and then
click the {V} button.
4.20.6 POP3 Messages Count
It is used to count the number and total size of messages on the incoming mail server (POP3
server). To use this action, you should establish a connection with the POP3 server using the
"POP3 Open" action 225 . You can save the number and total size of messages to custom
variables to process them later in a task.
Assign Amount of Messages to Variable
Select this checkbox if you want to save the number of messages to a variable. You should
enter the variable name into the field below.
Assign Total Size to Variable
Select this checkbox if you want to save the total size of messages (in bytes) to a variable.
You should enter the variable name into the field below.
While editing the step, you should specify at least one variable.
4.20.7 Parse Email
Parses message in the file. It separates the message into its main parts:
Message subject (the SUBJECT field);
Sender (the FROM field);
Recipient (the TO field);
Recipient of a copy (the CC field);
Message body (the text);
Attachments.
© 2004-2015 Neowise.com
Actions
230
File Name
Specify the filename of the message you want to parse. Such files usually have EML extension.
General tab
Subject
Specify the name of variable where the message subject should be saved.
Sender (FROM)
Specify the name of variable where the sender's address should be saved.
Recipient (TO)
Specify the name of variable where the recipient's address should be saved. This field can
contain several addresses separated with a comma or a semicolon.
Carbon Copy (CC)
Specify the name of variable where the address of the recipient of a copy should be saved. This
field can contain several addresses separated with a comma or a semicolon.
Message Text tab
© 2004-2015 Neowise.com
231
RoboTask User's Guide
Assign Message Text to Variable
Specify the variable where the message body should be saved.
Prefer
Specify the format that should be preferred if the message body contains both message
formats. The message body can contain the following formats:
Plain Text
HTML Text
If the message body contains one format only, this message text will be assigned to the
variable no matter what value the Prefer parameter has.
Attachments tab
© 2004-2015 Neowise.com
Actions
232
Extract Attachments to Folder
Specify the folder where all attachments should be extracted.
If File Already Exists
Specify an action that should be performed if the specified folder already contains a file with
the application name.
Rename - in this case a suffix with an order number will be added to the file name;
Overwrite - the application will be saved with the original name and the existing file will be
overwritten.
Variable
Allows you to add a variable to the action or triggering event that you selected. You must
place the cursor in a edit box in the settings dialog window of the action or event and then
click the {V} button.
Note:
Addresses in the message can be written in form of:
E-mail address only. For example:
[email protected]
Recipient's name and address. For example:
John Smith <[email protected]>
© 2004-2015 Neowise.com
233
RoboTask User's Guide
Several recipients separated with a semicolon. For example:
John Smith <[email protected]>; Melissa Carver <[email protected]>
4.20.8 IMAP Open
The action opens the connection with the IMAP server. All actions with the IMAP server have to
begin from the opening of the connection. Otherwise it is impossible to use the actions of the
IMAP. It is possible to perform only one connection with the IMAP within one task. If you need
to switch over another IMAP server within a task, at first, you should close the current
connection (see the IMAP Close 234 ).
Server
The name or the IP address of a server.
Port
The number of a port for connection. On default, the port of the IMAP is 143 for a simple
connection and 993 for the SSL connection.
Use SSL
Need for using the SSL (Secure Socket Layer)
User Name
A username for authentication.
© 2004-2015 Neowise.com
Actions
234
Password
A password for authentication.
Select Mail Folder
Specify the folder which is necessary to be open after opening the connection. The folder can
be specified manually or selected from the list pressing the button on the right of entry field.
On default, the folder INBOX (the folder of incoming mail) is specified. The composition and
names of folders depend on a mail server.
Almost all IMAP actions work with the current folder of a mail server. So it is necessary to
select the current folder before to start working with IMAP messages.
4.20.9 IMAP Close
The action closes the previously opened connection. If the connection has not opened, the
action is ignored.
The action does not need any additional settings.
4.20.10 IMAP Select Mail Folder
The action is designed for changing of the current folder of the mail server during execution of a
task.
Select Mail Folder
Specify the name of a folder of the IMAP server. The folder name can be typed manually
explicitly or using variables. Also the folder name can be selected from the list pressing the
button on the right of entry field.
4.20.11 IMAP Mail loop
This action allows to process by cycle all messages from server. As with any another cycle, the
group of cycle steps should be finished with the action End Loop. The IMAP Mail Loop uses a
© 2004-2015 Neowise.com
235
RoboTask User's Guide
current folder on the server. The folder can be set when the connection is opened or with the
action IMAP Select Mail Folder.
In each iteration of the cycle you can save various characteristics of the current message
into variables for processing by steps inside of the cycle.
Order Number
Specify the name of the variable into which it is necessary to save the ordinal number of the
current message. Next actions with messages will execute according to the number of the
message in the folder (for example, IMAP Download Message 236 , IMAP Set Message Flags 238 ,
etc).
Subject
To save the subject of the current message, switch on this checkbox and specify the variable
name.
Sender (FROM)
© 2004-2015 Neowise.com
Actions
236
To save the address and the sender name of the current message, switch on this checkbox
and specify the variable name.
Recipient (TO)
To save the list of recipients of the current message, switch on this checkbox and specify the
variable name.
Carbon Copy (CC)
To save the list of recipients of the carbon copy of the current message, switch on this
checkbox and specify the variable name.
Message Date
To save the date and time of sending of the current message, switch on this checkbox and
specify the variable name.
Message Size
To save the size in bytes of the current message, switch on this checkbox and specify the
variable name.
Message Flags
To save flags (attributes) of the current message, switch on this checkbox and specify the
variable name. Flags of the message will be saved as string. Every letter corresponds to
existence of a flag of the message.
A - Answered
F - Flagged
D - Deleted
S - Seen
T - Draft
R - Recent
For example,
AS - means that the message is answered and seen.
R – recent message.
4.20.12 IMAP Download Message
The action permits to download a whole message from the server and save it into a file.
© 2004-2015 Neowise.com
237
RoboTask User's Guide
Order Number of the Message
An order number of a message. This number can be got in a cycle or specified explicitly.
Numbers of messages begin from number 1.
Save Message to File
Specify the name of a file into which it is necessary to save the message. On default, it is
proposed a file name based on a system date and time:
{TempDir}\{Year}{MonthNo}{Day}{Hours}{Minutes}{Seconds}{mSeconds}.eml
Such file name enables you to avoid name clashes. Also, you get a possibility to sort files
according to the receiving time.
Extract Attachments to Folder
If you want to extract attached files , switch on this checkbox and specify the folder name.
If File Already Exists
Specify a necessary action if the file already exists when saving attachments:
Rename
Overwrite
Save attached file names to variable as comma separated
To save the list of attached file names into a variable, switch on this checkbox and specify
the name of the variable.
© 2004-2015 Neowise.com
Actions
238
4.20.13 IMAP Get Message Flags
The action enables to get message flags according to their ordinal number and save them into a
variable. The message flags are saved as a line. Each letter corresponds to existence of the
flag of the message.
A - Answered
F - Flagged
D - Deleted
S - Seen
T - Draft
R - Recent
Order Number of the Message
An order number of a message. This number can be got in a cycle or specified explicitly.
Numbers of messages begin from number 1.
Save Flags to Variable
Specify the name of the variable into which it is necessary to save message flags.
4.20.14 IMAP Set Message Flags
Sets up message flags according to the number in the current folder. Flags are set by means of
checkboxes. Notice that each checkbox has 3 statuses:
Off. This means that the flag should be resetted (cleared).
On. This means that the flag should be set.
Intermediate status. This means that the flag should be left unchanged.
© 2004-2015 Neowise.com
239
RoboTask User's Guide
Message Number
The ordinal number of the message in the current server folder.
Message Flags
Set up new message flags by means of checkboxes. There are 6 checkboxes which correspond
to the message flags:
Answered
Flagged
Deleted
Seen
Draft
Recent
Notice, that to mark the message for deletion, it is enough to mark it with the flag Deleted.
After all necessary messages are marked, the action IMAP Delete Marked Messages needs to
be performed.
4.20.15 IMAP Delete Marked Messages
Performs physical deletion of all messages which are marked with the flag Deleted ( see IMAP
Set Message Flags). The action performs for messages in the current folder and does not
require additional parameters.
4.20.16 IMAP Copy Message
The action performs copying of a message from the current folder into other folder of the
server.
© 2004-2015 Neowise.com
Actions
240
Message Number
The number of a message in the current folder. The numbers begin from 1. It is allowed to use
variables.
Copy Message to this Folder
Input the name of the destination folder. The folder name can be input manually or selected
from the list pushing the selection button on the right of the field. Also it is allowed to use
variables.
Note:
If you want to MOVE the message into another folder you have to copy the message and then
mark it as DELETED (see IMAP Set Message Flags 238 action). Also you can put the IMAP
Delete Marked Messages 239 after moving all necessary messages.
4.20.17 IMAP Folder Info
The action enables to read parameters of the current folder and to save their values into
variables for the next processing.
The folder parameters which can be extract:
The folder name
Amount of messages
Amount of not shown messages
Amount of resent messages
© 2004-2015 Neowise.com
241
RoboTask User's Guide
To extract the parameter value, it is necessary to switch on the appropriate checkbox and to
input the variable name.
4.21
Strings
4.21.1 STR Replace
This action finds and replaces the specified string with the one you need. There are three
replacement modes:
All Entries;
First entry;
Last Entry.
The result is assigned to a user variable.
© 2004-2015 Neowise.com
Actions
242
Source String
The source string to search and replace in. It is possible to use variables.
Find Substring
The substring that should be found and replaced. It is possible to use variables.
Replacement
The substring to replace the found substring with. It is possible to use variables.
Replace mode
Replacement mode. 3 options are possible:
All Entries – all found substrings will be replaced;
First Entry – only the first found substring will be replaced;
Last Entry – only the last found substring will be replaced;
Assign Result to Variable
The name of the variable the result of the action will be assigned to. It is impossible to use
macros with variables
Variable
Allows you to add a variable to the action or triggering event that you selected. You must
place the cursor in a edit box in the settings dialog window of the action or event and then
click the {V} button.
4.21.2 STR Trim
This action allows you to trim unnecessary characters at the beginning and at the end of the
string.
© 2004-2015 Neowise.com
243
RoboTask User's Guide
Source String
The source string to perform the action in. It is possible to use variables.
What to Trim
The characters to trim.
Spaces
Tabs
EOL symbols – end-of-line characters
Custom symbol - you may specify any symbol
You can select the options independently of each other. It is enough to select at least one
option.
How to Trim
2 options are possible:
Lead Symbols
Trailing Symbols
You can select the options independently of each other. It is enough to select at least one
option.
Assign Result to Variable
The name of the variable the result of the action will be assigned to. It is impossible to use
macros with variables
Variable
Allows you to add a variable to the action or triggering event that you selected. You must
place the cursor in a edit box in the settings dialog window of the action or event and then
click the {V} button.
© 2004-2015 Neowise.com
Actions
244
4.21.3 STR Delete
The action deletes the specified number of characters from the specified position in the source
string.
Source String
The source string to delete the characters in. It is possible to use variables.
From Position
Specify the position to start deleting characters from. The value must be a positive integer.
The positions of characters in a string start from 1. It is possible to use variables.
Amount of Chars
Specify the number of characters that should be deleted starting from the specified position.
The value must be a positive integer. It is possible to use variables.
Assign Result to Variable
Specify the name of the variable the result of the action will be assigned to. It is impossible to
use macros with variables
Variable
Allows you to add a variable to the action or triggering event that you selected. You must
place the cursor in a edit box in the settings dialog window of the action or event and then
click the {V} button.
4.21.4 STR Insert
The action inserts a substring into the specified position in the source string.
© 2004-2015 Neowise.com
245
RoboTask User's Guide
Source String
The source string to insert the substring to. It is possible to use variables.
Substring to Insert
The substring to insert to the source string. It is possible to use variables.
Into Position
Insertion position. The positions of characters in a string start from 1. If you specify a position
less than 1, the substring will be inserted at the beginning. If the position of the insertion is
greater than the number of characters in the source string, the substring will be added to the
end of the source string. It is possible to use variables.
Assign Result to Variable
The name of the variable the result of the action will be assigned to. It is impossible to use
macros with variables
Variable
Allows you to add a variable to the action or triggering event that you selected. You must
place the cursor in a edit box in the settings dialog window of the action or event and then
click the {V} button.
4.21.5 STR Extract
The action cuts the specified number of characters from the string starting from the specified
position. The cut substring is assigned to a user variable.
© 2004-2015 Neowise.com
Actions
246
Source String
The source string to cut the substring from. It is possible to use variables.
From Position
Specify the position to start cutting characters from. The value must be a positive integer. The
positions of characters in a string start from 1. If the position is less than 1, the substring will
be cut from the beginning of the source string. It is possible to use variables.
Amount of Chars
Specify the number of characters that should be extracted starting from the specified position.
The value must be a positive integer. It is possible to use variables.
Assign Result to Variable
The name of the variable the result of the action will be assigned to. It is impossible to use
macros with variables
Variable
Allows you to add a variable to the action or triggering event that you selected. You must
place the cursor in a edit box in the settings dialog window of the action or event and then
click the {V} button.
4.21.6 STR Pos
The action determines the position of the found substring in the source string. If the substring
is found, the result will be positive. Otherwise, the result is 0.
© 2004-2015 Neowise.com
247
RoboTask User's Guide
Source String
The source string to find the substring in. It is possible to use variables.
Substring to Search
The substring to search for. It is possible to use variables.
From Position
The position to start searching from. Position 1 corresponds to the beginning of the string. It is
possible to use variables.
Assign Result to Variable
The name of the variable the result of the action will be assigned to. The result is an integer. If
the substring is found, the value is greater than 0. Otherwise, it is 0. It is impossible to use
macros with variables.
Variable
Allows you to add a variable to the action or triggering event that you selected. You must
place the cursor in a edit box in the settings dialog window of the action or event and then
click the {V} button.
4.21.7 STR Between
This action cuts a substring that is enclosed by two sequences of characters out of the source
string.
Suppose we have the following string:
<h3><b>Another news - at last week</b></h3>
We need to cut the meaningful string out, i.e. the string between the HTML tags. It is easy
with the STR Between action. To do it, you should create the limiting sequences of characters:
Start - <h3><b>
© 2004-2015 Neowise.com
Actions
248
End - </h3></b>
The action cuts the string between the start and end marks out and assigns the result to a
custom variable for further processing. If at least one mark is not found in the source string,
the action will return an empty string.
Source String
Specify the source string to be processed. It is possible to use variables.
Begin Mark
The start mark of the substring. It is possible to use variables
End Mark
The end mark of the substring. It is possible to use variables
Case Sensitive
You can make the search for the substring case-sensitive. By default, the search for the
substring is case-insensitive.
Start Position
The position of the character the search will be started from. Number 1 corresponds to the
beginning of the string. If the number is greater than the length of the string, the action will
return en empty result. It is possible to use variables.
Assign Result to Variable
Enter the name of the custom variable to assign the result to.
Save Next Start Position to Variable
If necessary, you can specify the name of the variable you can assign the start position for the
next substring search to. If we reach the end of the string, the next start position will be equal
to 0.
© 2004-2015 Neowise.com
249
RoboTask User's Guide
It is necessary, for example, in order to get all substrings meeting the specified criteria in the
source string.
Suppose we need to get all substrings enclosed by parentheses in the following string:
Just (a few minutes) with RoboTask will give you (plenty of ideas) of how you can
(increase) your productivity
You can easily do it using a loop. See the following example: "[DEMO] STR Between - extract
all entries"
Variable
Allows you to add a variable to the action or triggering event that you selected. You must
place the cursor in a edit box in the settings dialog window of the action or event and then
click the {V} button.
4.21.8 TXT Number of Lines
The action is intended to count the number of lines in a text. It allows to count the number of
lines in a specified file as well as in a specified text with variables. The action assigns the
result to a specified variable for using it in the following steps.
Text from External File
Specify the file name where it is necessary to count the number of lines. It is possible to
select the name using the dialog of file selection. Using variables in the file name is possible.
Use this Text
You can set a text in the editing field explicitly. The text can also contain variables.
© 2004-2015 Neowise.com
Actions
250
Assign Number of Lines to Variable
Specify the name of a variable where the number of lines is to be assigned.
Variable
Allows you to add a variable to the action or triggering event that you selected. You must
place the cursor in a edit box in the settings dialog window of the action or event and then
click the {V} button.
4.21.9 TXT Extract Line
This action allows extracting a line by number from a text. The number has to be specified
from 1 to the quantity of lines in a text. If the number is incorrect, the action will return an
empty line. The action assigns the specified line to a variable for using it in the following
steps.
Text from External File
Specify the file name where it is necessary to count the number of lines. It is possible to
select the name using the dialog of file selection. Using variables in the file name is possible.
Use this Text
You can set a text in the editing field explicitly. The text can also contain variables.
Line Number
Specify the number of a line which is necessary to extract from a text. Using variables is
possible. If non-numeric value is specified, the action generates a run-time error.
© 2004-2015 Neowise.com
251
RoboTask User's Guide
Assign Extracted Line to Variable
Specify the name of the variable where the demanded line will be assigned.
Variable
Allows you to add a variable to the action or triggering event that you selected. You must
place the cursor in a edit box in the settings dialog window of the action or event and then
click the {V} button.
4.21.10 TXT Comma-Text Conversion
This action is designed for conversion of a comma-separated string in a multiline text and vice
versa.
Often data for machine processing is given as comma-separated string. At the same time a
multiline text is easier for processing.
Processing of strings in the cycle (Text Loop)
Calculation of quantity of strings and extraction of a string by its number.
etc.
Source Text (string)
Specify a source text or a comma-separated string for conversion.
© 2004-2015 Neowise.com
Actions
252
Conversion kind
Select one of two conversion options
Comma-Separated String ==> Multiline Text
Multiline Text ==> Comma-Separated String
Save Result into Variable
Input the name of the variable into which you need to save the result of the conversion.
4.22
Basic
The Basic plugin is not included in the main installation package. You can download it
additionally from http://www.robotask.com/downloads/.
4.22.1 Evaluate
Allows you to make calculations using the functions of mathematical operations and BASIC
functions. The result is assigned to a user variable.
This action is convenient when you need to make some small calculations without writing a
Basic script.
Expression to Evaluate
Mathematical expression. The result can be of any type. For more details on expression syntax
see description of BASIC language.
For example:
{TotalSize}/{FileCount}
Left(Right( "{DateTime}",8),2)
Assign Result to Variable
Specify the variable the result should be assigned to.
© 2004-2015 Neowise.com
253
RoboTask User's Guide
Variable
Allows you to add a variable to the action or triggering event that you selected. You must
place the cursor in a edit box in the settings dialog window of the action or event and then
click the {V} button.
Test
Click this button to ensure that the parameters for the current action work.
4.22.2 Basic script
It is a universal tool allowing you to execute scripts written in BASIC. Scripts can be virtually as
complicated as you need. You can use such a script to access the RoboTaskApp COM object
allowing you to access service functions of RoboTask, as well as other tasks. The description of
the RoboTaskApp object is given below.
See additional information about the BASIC language in the BASIC help.
Script source
You can select the script storage method
Internal - the script is stored in the task file in this case. This storage method is good
for small scripts consisting of one or several procedures.
External Script - the script is stored in a separate file. This storage method is good for
complex subroutines consisting of several modules (see the keyword "uses" or "include" in
the Basic help).
4.23
Web Documents
Plugin for workinf with web pages and web forms.
The plugin contains next actions:
Fill Web Form 254 ;
© 2004-2015 Neowise.com
Actions
254
Wait for done 259 ;
Web Page Information 262 .
4.23.1 Fill Web Form
This action is destined for automation of filling web forms. Of course you can automate filling
forms by "Send Keystrokes 70 " and mouse actions 209 . But unfortunately, this is much more
difficult and unreliable, because RoboTask tries to influence your external application (your
web browser) and can’t control the reaction of the program to this influence completely.
"Fill Web Form" works differently. It loads the web page with a form under its control, waits for
a full loading of the page and can fill a form on the inside. If auto-submit is performed, the
action will be waiting for the end of the resultant page loading. Thereby it is guaranteed that
the task can pass to the next step only after the end of the page loading.
After filling the form you can keep on interactive working with the site (see the action "Wait
For Done 259 ") or close embedded Web browser.
The embedded web browser will be in of memory only during the work of a task. RoboTask will
unload the object "embedded web browser" out of memory after the end of the task or in case
an error appears.
Genearal options
© 2004-2015 Neowise.com
255
RoboTask User's Guide
Web Address
Fill the web address of the page which needs loading. You can leave its field empty if you
want to use the page which was loaded in the previous steps of the task. You can use
variables.
On the right of the field there is the "Load" button. When you press it, the specified address
will be opened in embedded web browser. After loading, there will be available the lists of
forms, elements of a form and the lists of item values kind of "Select" and "Multiselect".
After the form loading into embedded web browser, all the visual elements of all forms at the
page will have pop-up hints, where the next information will be specified:
The name of a form
The name of the field
The common ordinal number of the field
The type of the edit field
Form to Fill
The name of a form that you should fill. You can choose the name of a form from the dropdown list if you have loaded the page. You can also fill the name of the form manually. You
can use variables.
There may be nameless forms on any pages. This is allowed by the HTML standard. In this
case you can refer to the form according to an ordinal number in the list beginning from 0. In
other words, the first form on the page will have the number 0, the second – 1, etc.
Fill the form
After loading the web page in embedded web browser, you can fill the necessary form on the
page manually, then press the button "Fill the List". After confirmation, an editor will fill the
field list from the chosen form.
After auto filling, you can edit the list manually: to add/delete elements or to change the
elements that are existing.
Form Filling Parameters
A parameter list for a form. You can edit a list using buttons on the right. (See "Add or Edit
Web Form Parameter dialog 258 ")
Autosubmit the Form
Turn on this checkbox if you want to submit a form automatically after filling. By default this
parameter is turned on. If auto-submit is performed, an action will be waiting for finishing
loading of the resultant page. Otherwise, you need to submit manually. In this case the next
step of the task must be the action "Wait for Done" and then performing necessary actions
manually. This can be useful if you need to input the value CAPTCHA before pressing the
button "Submit" or to perform any other interactive actions.
Click the Form Button
To reproduce a button click on a web form, switch on this checkbox and select the button
name from dropdown list or input it by hand.
© 2004-2015 Neowise.com
Actions
256
Keep Page for Next Actions
Turn on this checkbox if you want to leave the resultant page for interactive work or for filling
the next form. By default, this parameter is off. If this parameter is turned off, embedded web
browser will be closed immediately after the end of the step.
Hide Browser Window
To ensure hidden work of the web browser window, switch on this checkbox. In this case the
browser window is not visible on the screen.
Autologon
You can specify parameters of automatic authorization on this tab if WEB browser demands
authorization for access to resource. This way of automatic authorization works only with
Basic and Digest authorization modes. In this case browser demands to input a user name and
a password into the pop-up system window. If you specified parameters of automatic
authorization, the action puts the parameters automatically when browser demands
authorization.
If it is necessary to input the authorization parameters into the form on a page, then it is the
so-called cookie authorization. In this case you should use the automatic filling of WEB form.
Enable Autologon
It switches on the mode of automatic authorization using the specified User Name and
Password. If the mode of automatic authorization is switched off, authorization occurs in a
usual mode.
© 2004-2015 Neowise.com
257
RoboTask User's Guide
User name
A name of a user for authorization. Variables can be used.
Password
A password for authorization. Variables can be used.
Auto Download file
On this tab you can tune parameters of automatic file downloading from a site.
For example, this mode is useful for automation of file downloading from the zone protected by
a password. It occurs approximately in such a way:
You specify URL of a file.
When you try downloading a file, the browser demands a password or redirects the request
to the Login form subject to the authorization mode on the site.
When a password is requested, it is necessary to set up Autologon. When the request is
redirected to a form, you should perform the automatic filling of the form.
After you input parameters of authorization, the file will be downloaded into the specified
folder automatically.
Enable Auto-download File
It switches on the mode of automatic file downloading. If auto-download is off, downloading
occurs in a usual mode requesting a folder and a file name.
Download Folder
Specify the folder in which the file will be downloaded automatically. It will be downloaded
with the file name by default.
© 2004-2015 Neowise.com
Actions
258
Overwrite File If Exists.
Switch on this checkbox if you want the action to overwrite a file, on condition there is a file
with the same name in this folder. Otherwise the downloaded file will be renamed.
Variable
Allows you to add a variable to the action or triggering event that you selected. You must
place the cursor in a edit box in the settings dialog window of the action or event and then
click the {V} button.
4.23.1.1 Add or Edit Web Form Parameter dialog
Every parameter has four components for filling a form:
Field name
Field number
Field Type
Field value
Field Name
The name of the field that needs filling with a new value. You can input the name manually or
choose it from dropdown list. Pay attention that the dropdown list will be filled only if you
have loaded the web-form into embedded web browser.
Field Number
HTML standard allows of presence of several fields with the same name on a form. In this
case, you need to specify the field number among the fields with the same name. Numeration
© 2004-2015 Neowise.com
259
RoboTask User's Guide
begins from 0. If fields on the form have unique names the number of each field will be 0.
Field Type
For right filling a field you need to specify its type. It is supported seven types in all;
Edit – a simple single-line string field;
Memo – multi-line text;
Select – choice one option among the several from the proposed list;
Multiselect – choice several options from the proposed list;
Check – usually checkbox;
Radio – radio button;
Hidden – a hidden field of a form. This field is recommended to change only if you
imagine clear, why you need to change values. As a rule, hidden fields are necessary for
keeping various service information of a field.
Field Type will take the necessary value automatically when you choose the name of a field
from a list (see the Field Name)
Editing value of a field
View of a field value editor changes subject to its type
Edit – input a field value. You can use variables.
Memo – input .a text in the field. You can use variables
Select – input a line (or part of a line), that need doing chosen. You can use variables. If
the form is loaded, you can choose the necessary line from a dropdown list.
Multiselect – input lines (or parts of lines), that need doing chosen. You can fill the list
using available options pressing the button "Fill Up by Available Options", and then delete
the needless.
Check – choose one value form two – Unchecked and Checked
Radio – choose one value form two – Unchecked and Checked
Hidden – input a field value. You can use variables.
Variable
Allows you to add a variable to the action or triggering event that you selected. You must
place the cursor in a edit box in the settings dialog window of the action or event and then
click the {V} button.
4.23.2 Wait for Done
This action is destined for free work with a web page. The action stops work of task until a user
presses the button "Done" in the window Embedded Web Browser.
During of work of the action, buttons of navigation "Go Back" and "Go Forward" and button
"Done" appear in the window Embedded Web Browser. The action is useful when the
© 2004-2015 Neowise.com
Actions
260
interactive interference of a user is needed. For example, to fill the value of CAPTCHA. Any
interactive work with a web page is allowed: click on links, filling and submit of forms, etc.
After finishing the interactive work it is necessary to press the button "Done".
General options
Web Address
Fill the web address of the page that need loading. You can leave a field empty if you want to
use the current page that has been loaded during the previous steps of the task. You can use
variables.
Keep Page for Next Actions
Turn this checkbox on if you want to leave the resultant page for interactive work or for filling
the next form. By default, this parameter is turned off. If this parameter is turned off,
Embedded Web Browser will be closed immediately after the finish of work of a step.
Autologon
© 2004-2015 Neowise.com
261
RoboTask User's Guide
Enable Autologon
It switches on the mode of automatic authorization using the specified User Name and
Password. If the mode of automatic authorization is switched off, authorization occurs in a
usual mode.
User name
A name of a user for authorization. Variables can be used.
Password
A password for authorization. Variables can be used.
Auto Download file
© 2004-2015 Neowise.com
Actions
262
Enable Auto-download File
It switches on the mode of automatic file downloading. If auto-download is off, downloading
occurs in a usual mode requesting a folder and a file name.
Download Folder
Specify the folder in which the file will be downloaded automatically. It will be downloaded
with the file name by default.
Overwrite File If Exists.
Switch on this checkbox if you want the action to overwrite a file, on condition there is a file
with the same name in this folder. Otherwise the downloaded file will be renamed.
Variable
Allows you to add a variable to the action or triggering event that you selected. You must
place the cursor in a edit box in the settings dialog window of the action or event and then
click the {V} button.
4.23.3 Web Page information
This action simulates a visit to the specified web page by means of built-in web browser. If
the address of a page is not specified, the action uses the current page which has been
loaded in the previous steps. Also the action allows to extract the following information from
the web page:
HTML code – the source code of the page as HTML text.
Text – the plain text of the page without HTML tags
Links – the list of links as a text on the page : one link per line.
The extracted information can be assigned to variables for the following processing.
General options
© 2004-2015 Neowise.com
263
RoboTask User's Guide
Web Address
The address of a web page which is necessary to download. If the address is not specified,
the action uses the current page which has been downloaded in the previous steps.
Keep the Page for Next Actions
If you need the downloaded page to be available in the following steps, switch on this
parameter. Otherwise, the page will be deleted from the memory immediately after performing
this action.
Hide Browser Window
To ensure hidden work of the web browser window, switch on this checkbox. In this case the
browser window is not visible on the screen.
Get HTML Code of the Page
Switch on this checkbox if you want to get an HTML code.
© 2004-2015 Neowise.com
Actions
264
Assign HTML code to Variable
Specify the name of the variable in which the HTML code will be assigned.
From Body Section Only (HTML code)
If the information of the HTML page title is not needed, switch on this flag. In this case, the
action will process only the section <body>...</body>.
Get Text of the Page
Switch on this checkbox if you want to get extract the text from the page. The action
extracts the text only, without any HTML tags.
Assign Text to Variable
Specify the name of the variable in which the extracted text will be assigned.
From Body Section Only (text)
If the information of the page title is not needed, switch on this flag. In this case, the action
will process the section <body></body> only.
Get Links from the Page
If you want to get a list of links on the page, switch on this checkbox and specify the name of
the variable in which you need to assign the received list. The action extracts the list of links
as a text, one link per line. Then you can process this list in a loop (e.g. in Text Loop).
Autologon
© 2004-2015 Neowise.com
265
RoboTask User's Guide
Enable Autologon
It switches on the mode of automatic authorization using the specified User Name and
Password. If the mode of automatic authorization is switched off, authorization occurs in a
usual mode.
User name
A name of a user for authorization. Variables can be used.
Password
A password for authorization. Variables can be used.
Auto Download file
© 2004-2015 Neowise.com
Actions
266
Enable Auto-download File
It switches on the mode of automatic file downloading. If auto-download is off, downloading
occurs in a usual mode requesting a folder and a file name.
Download Folder
Specify the folder in which the file will be downloaded automatically. It will be downloaded
with the file name by default.
Overwrite File If Exists.
Switch on this checkbox if you want the action to overwrite a file, on condition there is a file
with the same name in this folder. Otherwise the downloaded file will be renamed.
Variable
Allows you to add a variable to the action or triggering event that you selected. You must
place the cursor in a edit box in the settings dialog window of the action or event and then
click the {V} button.
© 2004-2015 Neowise.com
267
4.24
RoboTask User's Guide
Regular Expressions
This plugin is for experts and connoisseurs of regular expressions. Regular expressions are very
powerful mechanism for searching and replacing expressions in a text.
We give neither description nor syntax of regular expressions here because they would occupy
a lot of space. Many books are devoted to regular expressions. Our description of them would
virtually copy other sources.
If you read the book M a s te ring R e gula r E xpre s s io ns by Je ffre y E .F. Frie dl you will know
everything about regular expressions (or almost everything). For quick study visit the site
http://www.regular-expressions.info/ . The site is completely devoted to regular expressions
and different dialects. You can also find short manuals on syntax of regular expressions there.
For example:
http://www.regular-expressions.info/reference.html
http://www.regular-expressions.info/refadv.html
http://www.regular-expressions.info/refreplace.html
You can find links to other editions on regular expressions here:
http://www.regular-expressions.info/books.html
In a few words, by means of regular expressions you can seek a phrase (an expression) in a
text using an expression mask. You write a mask of an expression you seek and then the
engine of regular expressions will find real phrases in a text which corresponds to the mask.
Search of a substring (or of a symbol combination) in a text is the simplest example of using
regular expressions.
4.24.1 RegExp Loop
Using RedExp Loop you can find all entries of a phrase you seek in a text and process them in
a loop. A phrase mask is specified by a regular expression. The search result of every iteration
is saved in a variable as a standard comma-separated string. The whole sought-for phrase is
always a zero element. The following elements contain sub-expressions if they are present in a
regular expression. Sub-expressions are a part of phrase which is put into parentheses. A subexpression number is the ordinal number of an opening parenthesis if you read the expression
from the left to the right.
For example, the regular expression for search of links addresses in HTML text is:
<a\s+href\s*=\s*"([\S]*)">\s*(<?[^<>]*>?)\s*</a>
This regular express contains two sub-expressions:
- The link address
- The link description
You can put the modifier which is not a sub-expression in the beginning of expression: (?i).
This combination means the search has to be done with no account taken to the register. The
symbol ? in modifier always follows an opening parenthesis but goes before a closing one.
For example: (?im). Modifiers can be in any place of a regular expression. See below the
description of search modes and corresponding modifiers.
© 2004-2015 Neowise.com
Actions
268
General
External Text
Input the name of the text file in which the search will be implemented. Variables can be used.
Specified Text
In this field specify the text in explicit form on which you want to search. You can use
variables.
Pattern (Regular Expression)
Input a regular expression (a phrase mask) for the search in a text. You can find description of
regular expression syntax and manuals on the site http://www.regular-expressions.info/
Save Found Expression to Variable
Input the name of a variable in which you want to save the search result. If the search-for
phrase is found, the search result will be saved in the variable like a standard commaseparated string. To extract a separate element you need to refer to the variable as an array.
For example:
{MyVar(0)}
{MyVar(1)}
Etc.
The zero element of array is always the search-for phrase as a whole.
The next array elements are sub-expressions in the search-for phrase which are highlighted in
the regular expression by parenthesis (certainly, if there are such). If you didn’t specify any
sub-expressions in the regular expression, the resultant array would consist of a single
element, which is zero element.
© 2004-2015 Neowise.com
269
RoboTask User's Guide
Additional options
Case Insensitive
Tries to match the regex without paying attention to case. If set, 'Bye' will match 'Bye', 'bye',
'BYE' and even 'byE', 'bYe', etc. Otherwise, only 'Bye' will be matched. Equivalent to (?i)
modifier. The modifier (?-i) switches off the mode case insensitive.
MultiLine
The ^ (beginning of string) and $ (ending of string) regex operators will also match right after
and right before a newline in the Subject string. This effectively treats one string with
multiple lines as multiple strings. Equivalent to Perl's (?m) modifier. The modifier (?-m)
switches off the mode multiline.
Single Line
Normally, dot (.) matches anything but a newline (\n). With Single Line mode, dot (.) will
match anything, including newlines. This allows a multiline string to be regarded as a single
entity. Equivalent to Perl's (?s) modifier. The modifier (?-s) switches off the mode single line.
Note that MultiLine and Single Line can be used together.
Extended Style
Allow regex to contain extra whitespace, newlines and Perl-style comments, all of which will
be filtered out. This is sometimes called "free-spacing mode".
Anchored
Allows the regex to match only at the start of the subject or right after the previous match.
Ungreedy
© 2004-2015 Neowise.com
Actions
270
Repeat operators (+, *, ?) are not greedy by default (i.e. they try to match the minimum
number of characters instead of the maximum).
No Autocapture
Is a non-capturing group, only named groups will be captured.
Save Offsets to Variables
If you want to determine positions of found expressions from the beginning of a text switch on
this flag and input a variable name, the positions will be saved as a comma-separated string. A
zero element - this is a position of a whole expression. The next elements are positions of
subexpressions. The beginning of a text corresponds to the position 1.
Save Lengths to Variables
If you want to determine the lengths of found expressions (by symbols), switch on this flag
and input the variable name. The lengths will be saved as a comma-separated string. A zero
element is a length of a whole expression. The next elements are lengths of subexpressions.
4.24.2 RegExp Replace
This action performs search and replacement of regular expressions in a text. You can both
replace the found expression entirely and combine a new one from the found subexpressions.
Text
External Text
Input the name of the text file in which the search will be implemented. Variables can be used.
Specified Text
© 2004-2015 Neowise.com
271
RoboTask User's Guide
In this field specify the text in explicit form on which you want to search. You can use
variables.
Regular Expression & Replacement
Pattern (Regular Expression)
Input a regular expression (a phrase mask) for the search in a text. You can find description of
regular expression syntax and manuals on the site http://www.regular-expressions.info/
Replacement
Input a text for replacement of the found expression. Variables and the found subexpressions
can be used in the expression.
$0 corresponds to the whole found expression.
$1-$9 are subexpressions from 1 to 9, one after another.
F or e xa m ple :
If y ou w a nt t o put found e xpre ssion int o quot a s w rit e t he follow ing re pla c e m e nt :
"$0"
Replace Mode
All e nt rie s - all matched entries will be replaced
F irst e nt ry - the action make replacement only at first entry
La st Ent ry - the action make replacement only at last entry
Save Result to Variable
Input a variable name in which you want to put a text after performed replacements.
© 2004-2015 Neowise.com
Actions
272
Additional options
Case Insensitive
Tries to match the regex without paying attention to case. If set, 'Bye' will match 'Bye', 'bye',
'BYE' and even 'byE', 'bYe', etc. Otherwise, only 'Bye' will be matched. Equivalent to (?i)
modifier. The modifier (?-i) switches off the mode case insensitive.
MultiLine
The ^ (beginning of string) and $ (ending of string) regex operators will also match right after
and right before a newline in the Subject string. This effectively treats one string with
multiple lines as multiple strings. Equivalent to Perl's (?m) modifier. The modifier (?-m)
switches off the mode multiline.
Single Line
Normally, dot (.) matches anything but a newline (\n). With Single Line mode, dot (.) will
match anything, including newlines. This allows a multiline string to be regarded as a single
entity. Equivalent to Perl's (?s) modifier. The modifier (?-s) switches off the mode single line.
Note that MultiLine and Single Line can be used together.
Extended Style
Allow regex to contain extra whitespace, newlines and Perl-style comments, all of which will
be filtered out. This is sometimes called "free-spacing mode".
Anchored
Allows the regex to match only at the start of the subject or right after the previous match.
Ungreedy
Repeat operators (+, *, ?) are not greedy by default (i.e. they try to match the minimum
number of characters instead of the maximum).
No Autocapture
© 2004-2015 Neowise.com
273
RoboTask User's Guide
Is a non-capturing group, only named groups will be captured.
Save the number of Replacements to Variable
If you need to save the number of performed replacements, switch on this checkbox and then
input the variable name.
4.24.3 RegExp Match
This action is in fact a simplified version of RegExp Loop. By means of this action it is possible
to determine if a string (or a text) corresponds to the specified regular expression and also to
extract the first or the last entry.
General
External Text
Input the name of the text file in which the search will be implemented. Variables can be used.
Specified Text
In this field specify the text in explicit form on which you want to search. You can use
variables.
Pattern (Regular Expression)
Input a regular expression (a phrase mask) for the search in a text. You can find description of
regular expression syntax and manuals on the site http://www.regular-expressions.info/
© 2004-2015 Neowise.com
Actions
274
Save TRUE or FALSE to variable
Input the variable name in which you want to save the check result.
Additional options
Case Insensitive
Tries to match the regex without paying attention to case. If set, 'Bye' will match 'Bye', 'bye',
'BYE' and even 'byE', 'bYe', etc. Otherwise, only 'Bye' will be matched. Equivalent to (?i)
modifier. The modifier (?-i) switches off the mode case insensitive.
MultiLine
The ^ (beginning of string) and $ (ending of string) regex operators will also match right after
and right before a newline in the Subject string. This effectively treats one string with
multiple lines as multiple strings. Equivalent to Perl's (?m) modifier. The modifier (?-m)
switches off the mode multiline.
Single Line
Normally, dot (.) matches anything but a newline (\n). With Single Line mode, dot (.) will
match anything, including newlines. This allows a multiline string to be regarded as a single
entity. Equivalent to Perl's (?s) modifier. The modifier (?-s) switches off the mode single line.
Note that MultiLine and Single Line can be used together.
Extended Style
Allow regex to contain extra whitespace, newlines and Perl-style comments, all of which will
be filtered out. This is sometimes called "free-spacing mode".
Anchored
© 2004-2015 Neowise.com
275
RoboTask User's Guide
Allows the regex to match only at the start of the subject or right after the previous match.
Ungreedy
Repeat operators (+, *, ?) are not greedy by default (i.e. they try to match the minimum
number of characters instead of the maximum).
No Autocapture
Is a non-capturing group, only named groups will be captured.
Save Found Subexpressions
If you need to save a found expression in a variable, switch on this checkbox and then fill in
the saving parameters. You can save either the first entry or the last one. The found
expression with its subexpressions will be saved as a comma-separated string. A zero element
is the whole expression. The next elements are subexpressions in order.
4.24.4 RegExp COM object
RegExp COM object is designed for using in Basic script.
Object name: RegExpCOM.RegexpClass
Object GUID: ['{0762F9AA-BD80-4BFC-B469-854866F114CC}']
Example of using
Below is an example of using RegExp COM object in Basic script
Sub Main
Dim
Dim
Dim
Dim
Dim
obj As Object
i As Long
cnt As Long
res As Boolean
s As String
Set obj = CreateObject( "RegExpCOM.RegexpClass" )
obj.Subject = RoboTaskApp.ExpandText("{txt}")
obj.RegExp = RoboTaskApp.ExpandText("{regex}")
res = obj.Match
While res
cnt = obj.SubExpressionCount
s = ""
For i = 0 To cnt
s = s + obj.SubExpression( i ) + Chr(10)
Next i
MsgBox( s )
res = obj.MatchAgain
Wend
End Sub
© 2004-2015 Neowise.com
Actions
276
Also you can make permanent link to RegExpCOM Library in the script. In this case you should
declare the object so:
Dim obj As RegExpClass
And create the object by using New directive
Set obj = New RegExpClass
Members of object
Anchored
Read-Write property, type – Boolean
Get or set anchored mode of object.
Caseless
Read-Write property, type – Boolean
Get or set case insensitive mode of object.
Extended
Read-Write property, type – Boolean
Get or set extended mode of object.
Match
Read-only property, type – Boolean
Find first match. Returns TRUE if expression was found.
MatchAgain
Read-only property, type – Boolean
Find next match. Returns TRUE if expression was found.
Multiline
Read-Write property, type – Boolean
Get or set multiline mode of object.
NoAutoCapture
Read-Write property, type – Boolean
Get or set NoAutoCapture mode
RegExp
Read-Write property, type – String
Get or set regular expression.
© 2004-2015 Neowise.com
277
RoboTask User's Guide
Replace
Read-only property, type - String
It replaced found expression by "replacement" and returns new expression.
This property can be used only after successful M a t c h or M a t c hAga in.
ReplaceAll
Read-only property, type – Long
Replace all matches. Returns the number of replacements.
Replacement
Read-Write property, type – String
The replacement string. Used in Re pla c e and Re pla c e All.
SingleLine
Read-Write property, type – Boolean
Get or set single line mode of object.
SubExpression(ByVal idx as Long)
Read-only property, type- String
Returns sub-expression by index.
This property can be used only after successful M a t c h or M a t c hAga in.
SubExpressionCount
Read-only property, type- Long
Returns the number of sub-expressions.
This property can be used only after successful M a t c h or M a t c hAga in.
SubExpressionLength(ByVal idx as Long)
Read-only property, type – Long
Returns the length of sub-expression by index.
This property can be used only after successful M a t c h or M a t c hAga in.
SubExpressionOffset(ByVal idx as Long)
Read-only property, type – Long
Returns the offset (position) of sub-expression by index.
This property can be used only after successful M a t c h or M a t c hAga in.
© 2004-2015 Neowise.com
Actions
278
Subject
Read-Write property, type – String
Get or set the text to process.
Ungreedy
Read-Write property, type – Boolean
Get or set un-greedy mode of object.
4.25
Screenshot
This plug-in unites actions of taking a screenshots, snapshots of necessary window or color of
pixel on the screen or in the window.
4.25.1 Window Snapshot
This action allows to take a snapshot of a window and save the window image into a file.
Window parameters.
© 2004-2015 Neowise.com
279
RoboTask User's Guide
This action allows to use three modes of window selection to take a snapshot:
Use Window Parameters – search of a window according to parameters (Window
Caption, Window class);
Use Windows Handle – according to the Handle of the window. Each window in a
system has its unique Handle. It can be got in the loop Window Loop. For example, the
following task can be done: to take all snapshots of windows which have the word
Notepad in their captions.
Use Current window – to use the current active window.
When using the mode Use Window Parameters, the parameters of the window for a search are
available to the user.
Window Caption
Switch on this checkbox if you want to use the Window Caption to search a window. Then fill
in the field for the search of the Window Caption. The field can be filled in automatically when
you select the window from the window list. You need to click the button to the right of the
entry field. The usage of variables is allowed.
© 2004-2015 Neowise.com
Actions
280
Window caption must match exactly
If you want a Window Caption to be exactly matched to the input string, switch on this
checkbox.
Window Class
Switch on this checkbox if you want to use the Window Class for a search of a window. Then,
fill in the field for the search of the Window Class. The field can be filled in automatically when
you select the window from the window list. You need to click the button to the right of the
entry field. The usage of variables is allowed.
Window class must match exactly
If you want a Window Class to be exactly matched to the input string, switch on this checkbox.
Select Window on the screen
Using this button you can select any window in a screen and fill in fields automatically. Just direct the mouse
cursor onto the necessary window and click Ctrl to select the window or the Esc to cancel the operation.
When moving the mouse cursor, the current window is highlighted in a red frame. You can use the mouse to
manipulate with windows.
© 2004-2015 Neowise.com
281
RoboTask User's Guide
Window Handle
When using of the mode Use Window Handle, this parameter is available to the user. The
Window Handle identifies the window explicitly. It is convenient to use this mode in the
Window Loop. The loop allows to perform the selection of windows according to necessary
criteria and save the window handle into a variable. By means of the window handle it is
possible to take a snapshot
Capture mode
The action allows to take snapshot of the whole window or of a part of him.
Full Window.
Select this point if you want to take the screenshot of the whole window.
Window Region.
If you want to take the screenshot only of a part of a window, select this point and input the
position data of a rectangular region of the window: Left, Top, Height, Width. You can also
© 2004-2015 Neowise.com
Actions
282
specify the rectangular region on a screenshot interactive clicking the button Select Region on Window
Snapshot.
Picture Format
Snapshot of a window is a graphic image. It can be saved in the different formats:
BMP – standard Windows bitmap;
Jpeg – Joint Photographic Experts Group format;
PNG – portable network graphics format
GIF – Graphics Interchange Format
Save the snapshot to file
Specify the file name into which the snapshot need to be saved.
4.25.2 Window Pixel
This action allows to get the color of a window pixel according to the specified coordinates and save it into a
variable. The color of a pixel is a number. It can be compared with a sample like an ordinary number or with
another color using a tolerance.
© 2004-2015 Neowise.com
283
RoboTask User's Guide
Window Selection Mode
The action allows to use three selection modes of a window to take a screenshot:
Use Window Parameters – the search of a window according parameters (Window
Caption, Window class);
Use Window Handle – according the Window Handle. Each window in a system has the
unique Handle. It can be got in the loop Window Loop. For example, the following task
can be made: to take all screenshots, which have the word Notepad in their captions.
Use Current window – use the current active window.
Window Caption
Switch on this checkbox if you want to use the Window Caption for a search of a window.
Then, fill in the field for the search of the Window Caption. The field can be filled in
automatically when you select the window from the window list. You need to click the button
to the right of the entry field. The usage of variables is allowed.
Window caption must match exactly
If it is necessary the Window Caption to be match exactly with the entry string, switch on
this checkbox.
Window Class
Switch on this checkbox if you want to use the Window Class for a search of a window. Then,
fill in the field for the search of the Window Class. The field can be filled in automatically when
you select the window from the window list. You need to click the button to the right of the
entry field. The usage of variables is allowed.
Window class must match exactly
If it is necessary the Window Class to be match exactly with the entry string, switch on this
checkbox.
Select Window on the screen
Using this button you can select any window in a screen and fill in fields automatically. Just
direct the mouse cursor on the necessary window and click Ctrl to select the window or Esc
to cancel the operation. When moving the mouse cursor, the active window is highlighted in a
red frame. You can use the mouse to manipulate with windows.
Window Handle
When using of the mode Use Window Handle, this parameter is available to the user. The
Window Handle identifies the window explicitly. It is convenient to use this mode in the
Window Loop. The loop allows to perform the selection of windows according to necessary
criteria and save the window handle into a variable. By means of the window handle it is
possible to take a snapshot
Coordinates
Specify the coordinates of a pixel from the top left corner of a window snapshot. The usage of
variables in the expression is allowed. You can specify the coordinates interactive clicking the
© 2004-2015 Neowise.com
Actions
284
button Select Point.
Save Color To Variable
Specify the name of the variable in which it is necessary to save the color. The color of a
pixel is a number. For the convenience of sensing, the action saves color in a hexadecimal
look.
For example, $FFFF00, $800000
4.25.3 Screenshot
The action allows to take a snapshot of the whole screen (or of a part of it) and save it into a
file.
Full screen
Select this option if you need to take the snapshot of a whole screen.
Screen region
Select this option if it is necessary to save the snapshot of a rectangular region of the
screen.
Determine the coordinates of the region: Left, Top, Height, Width.
© 2004-2015 Neowise.com
285
RoboTask User's Guide
You can determine the coordinates of a rectangular region interactive clicking the button
"Select Region on Screenshot".
Picture Format
Screenshot is a graphic image. It can be saved in the different formats:
BMP – standard Windows bitmap;
Jpeg – Joint Photographic Experts Group format;
PNG – portable network graphics format
GIF – Graphics Interchange Format
Save screenshot to file
Specify the file name into which the snapshot need to be saved.
4.25.4 Screen Pixel
This action allows to get the color of a window pixel according to the specified coordinates
and save it into a variable. The color of a pixel is a number. It can be compared with a sample
like an ordinary number or with another color using a tolerance.
Coordinates
Specify the coordinates of a pixel. The usage of variables is allowed. You can specify the
coordinates interactive in the picture clicking the button "Select Point on the screen".
Save Color to Variable
Specify the name of the variable in which it is necessary to save the color. The color of a
pixel is a number. For the convenience of sensing, the action saves color in a hexadecimal
look.
For example, $FF80E0, $808080
© 2004-2015 Neowise.com
Actions
286
4.25.5 Color Compliance
This action allows to compare a color with the standard sample color. To identify color
compliance it can be specified some tolerance. 0 means exact compliance. The maximum value
of a tolerance is 255. The maximum value of a tolerance means that the result of the
compliance check of any two color always is TRUE.
The compare result can be saved into a variable for the next processing in following steps of
the task.
1-st color, 2-nd color
Specify two colors for comparing. You can specify the color as an ordinary number or in a
hexadecimal look (beginning from the symbol $). The color can be selected from a palette or
from any point of a screen clicking the button to the right of the edit field. The usage of
variables is allowed.
Tolerance
Specify the necessary tolerance to compare two colors. On default, it is16. 0 corresponds to
the exactly coincidence.
255 is the maximum value. When a value is maximum the result of comparing of any two colors
is TRUE.
Save TRUE or FALSE to variable
Input the name of the variable in which it is necessary to save the result of the comparing.
© 2004-2015 Neowise.com
287
4.26
RoboTask User's Guide
XML Documents
By means of these actions can be created an XML document or analyze a ready one. XML
document is a text file written according to the syntax XML. Generally speaking, XML file can
be created or opened with any text editor. But sometimes it is laboriously enough to follow all
features of the XML syntax in a manual mode.
4.26.1 XML Create Node
XML node is a fundamental element of XML document. Every XML node can contain some
value or a set of nested XML nodes. Also every node can have arbitrary number of attributes.
Roughly speaking, XML document is an XML node which contains inserted nodes with
information or with another inserted nodes.
That is, an XML document can contain any structured information.
Name
The name of a node. This is an identifier of the node. It can contain Latin symbols and
numbers without any whitespace or another delimiters.
Text
© 2004-2015 Neowise.com
Actions
288
This is a value of a node. Every node can contain either some value or inserted nodes.
Attributes
Attributes of a node. Every identifier has the name and the value. The composition of
attributes depends on purpose of a documents and defined tasks. The order of attributes does
no matter. A node can be without any attributes.
Save XML to Variable
Enter the name of a variable into which created node will be saved. The node will be saved as
a text in the XML format.
4.26.2 XML Add Childnode
The action allows adding a child node to another node.
Parent Node (XMLText)
Specify a parent node. The node can be specified as an XML text explicitly. For example:
<books description="My books">
<book>
<author>George Orwell</author>
<name>1984</name>
</book>
<book>
<author>George Orwell</author>
© 2004-2015 Neowise.com
289
RoboTask User's Guide
<name>Animal Farm</name>
</book>
</books>
Also the node can be specified by means of the variable in which the node is written down.
For example:
{record}
Child node (XML text)
Specify the child node which is necessary to add into parent node. The node can be also
specified as a XML text or by means of variables.
Save XML to Variable
Specify the variable into which the result is necessary to save. The result is saved as a text
in XML format.
4.26.3 XML Loop
The XML Loop allows to get the information about nodes of the document in a loop. When of
every cycle iteration it is possible to save various parameters of the node and the node itself
into variables. By means of the XML Loop it is possible to analyze or to process the information
enclosed in XML.
General parameters
© 2004-2015 Neowise.com
Actions
290
XML File
Read XML from file. This option is recommended if XML contain encoded strings. When the
action reads it from file it decodes all encoded strings automatically.
The most popular UT F -8 encoding. XML file should have corresponding header. For example:
<?xml version="1.0" encoding="utf-8"?>
XML
Specify the XML text which you want to analyze. The text can be specified explicitly or with
using of variables.
Node Path from Root
The Node Path is a criterion of selecting of loops from an XML document.
Specify a path of nodes from/of a root that you want to enumerate. It is possible to use mask
symbols:
? - means any single symbol.
* - means arbitrary number of symbols.
© 2004-2015 Neowise.com
291
RoboTask User's Guide
Instances of usage:
*\*\description
breakfast_menu\*\description
breakfast_menu\food\description
breakfast_menu\food\*
If you want to enumerate all nodes beginning from a root, specify just the symbol "*" with
switched parameter Wit h Subnode s.
With Subfolders
If you want to enumerate all nodes including nested nodes, switch on this checkbox.
Save Node Text to variable
If you need to save a node text, switch on this checkbox and enter the variable name.
Save node parameters
The rest of node parameters are collected in this group of parameters.
Save XML Node to Variable
To save the whole node, switch on this checkbox and enter the variable name.
© 2004-2015 Neowise.com
Actions
292
Save Node Name to Variable
To save the node name, switch on this checkbox and enter the variable name.
The fact of the matter is that sometimes you cannot know a node name beforehand. For
example, this is possible when you select nodes according a mask:
breakfast_menu\food\*
Save Node Path to Variable
To save the path of a node, switch on this checkbox and enter the variable name.
Save Node Depth to Variable
To save the depth of enclosure of the node, switch on this checkbox and enter the variable
name. A node depth is a number, 0 corresponds to a root element.
Save Child Count to Variable
To save quantity of child nodes, switch on this checkbox and enter the variable name.
Save Node Attributes
© 2004-2015 Neowise.com
293
RoboTask User's Guide
On this tab one can specify the attributes which values are necessary to be saved into
variables. It is necessary to specify parameters for every attribute:
Name - The attribute name
Variable - The name of the variable in which it is necessary to save the attribute value.
Default value - The value which is written into a variable if the attribute is absent.
4.26.4 XML Save
The action saves an XML text into a file. In some cases it possible to use the action Write
Text File. But it is better to use the XML Save because this action automatically corrects the
text format when saves it:
Adds a header of XML
Automatically converts non-ASCII symbols into the UTF8 format.
The action always saves the text as a common ASCII text with necessary conversions. Such
conversions are not need to save in the memory because the XML document is always saved
in the memory in the Unic ode mode.
XML
Specify the text of the XML document which you want to save. The text can be specified
explicitly or with using of variables.
File Name
Specify the name of the file into which is necessary to save the XML document.
If File Exists
The action if the specified file exists already:
© 2004-2015 Neowise.com
Actions
294
Rename - The file will be saved under a different name
Overwrite - The file will be overwritten.
Raise an Error - The action generates the error File Already Exists.
4.27
Script tools
This plug-in uses a system script engine and allows to apply program inserts directly in a
task. Scripts can be written in JavaScript (JS) or VB Script (VBS)
Syntax of JavaScript language is described in Microsoft documentation: http://msdn.microsoft.
com/en-us/library/hbxc2t98(v=vs.84).aspx
Syntax of VB Script language is described in Microsoft documentation: http://msdn.microsoft.
com/en-us/library/t0aew7h6(v=vs.84).aspx
4.27.1 Script extesions
The RoboTask gives some extensions of the language: several additional functions. You can
use this functions freely in your texts of scripts. Notice that the JavaScript is case sensitive.
But the functions of extensions work insensitive to a using register. Thereby, the expressions
LogMessage("Hello World!!!");
logmessage("Hello World!!!");
are identical.
function LogMessage(AMessage)
The function outputs a message to a log. In edit mode of a script, the function outputs a
message to the log of the editor. When a task works, a message is output to a log of the task
in the mode Use r M e ssa ge .
AM e ssa ge - the string to output
function include(ScriptFileName)
This function allows to insert a text from an external file into a script. The script engine loads
a text from the specified file and executes this text in this part of the paste.
Sc ript F ile Na m e – The name of file which is necessary to load.
function RoboTaskApp()
This function returns the COM object RoboTask. This object allows to use some functions of
the RoboTask directly from a script. The description of the object is in the chapter
"RoboTaskApp Object" 331 .
© 2004-2015 Neowise.com
295
RoboTask User's Guide
4.27.2 JS script
This action allows to perform a program, which is written in JavaScript. Notice that the
languages Java and JavaScript are not the same, although they are very alike. The
documentation for the language can be read on the Microsoft site: http://msdn.microsoft.
com/en-us/library/hbxc2t98(v=vs.84).aspx
The action editor is a specialize text editor adapted for editing a program code.
Popup proposals.
When pressing the Ctrl-Space, a popup menu with some functions and objects of JavaScript
shows up on the screen. One can choose a necessary point from the list and then the editor
will insert a proper line/string into a text.
If you began to enter a function name and pressed the Ctrl-Space, only alternatives
corresponding to the input line will be left in the popup menu.
Autocomplete.
This function allows to insert standard language constructions into a text automatically. For
this you need to enter 2-5 key constructions (identifier of construction) and press the
© 2004-2015 Neowise.com
Actions
combination Ctrl-J. The editor inserts the whole construction instead of the key word.
The editor supports the next constructions:
Identifier
Description
if
Simple "if"
ife
"if .. else"
statement
for
Simple "for" loop
func
Function
declaration
try
"try .. catch ..
finaly" block
do
"do .. while" loop
while
"while" loop
with
"with" keyword
Insert Statement
if (|)
{
}
if (|)
{
}
else
{
}
for (i=0; i< |; i++)
{
}
function |()
{
return 0;
}
try {
}
catch(e) {
}
finally {
}
do
{
} while (|)
while ()
{
}
with ()
{
}
swi
"switch" statement
Interface
Load from file
Load the text of a script from a file.
© 2004-2015 Neowise.com
switch ()
{
case 0:
break;
case 1:
break;
default:
}
296
297
RoboTask User's Guide
Save script as file
Save the text of a script into a file.
Additional options
Expa nd V a ria ble s in t he sc ript - If to switch on this mode, the RoboTask expands all inserts of
variables in a text before running of the script.
Sa v e F ina l sc ript int o v a ria ble – If it is necessary to monitor the final text of the script, switch
on this checkbox and enter the variable name. This mode is need only for control and
checkout. The fact of the matter is that the substitution of variable values can break down
the syntax of a script text. By means of this mode it is possible to get the final script and
analyze it if it is necessary.
The field of a log is under the editor. The messages about runtime errors of the script are
output into this field. Also the text of messages LogMessage is output here.
Run script
Running of a script from the editor to test. If a runtime error arises, you can see a message
about the error in the field of the edit log.
Help
Activation of a help system.
4.27.3 JS Evaluate
This action allows to calculate an expression value and then save it into a variable. The
expression has to be written according to the syntax of JS language. The documentation for
the language can be read on the Microsoft site: http://msdn.microsoft.com/en-us/library/
hbxc2t98(v=vs.84).aspx
The action also allows to connect the function library from an external file or directly in an
additional script.
For example, try to calculate the expression
sum(5,6) + multi(3,4)
And we get the error. The JavaScript language doesn't contain functions sum and multi.
To solve this, it is possible to specify a little library of user functions:
function sum(a, b)
{
return a+b;
}
function multi(a, b)
{
return a*b;
}
© 2004-2015 Neowise.com
Actions
298
In this case the action calculates the result without any troubles. The given example is too
simple and is cited for the demonstration solely.
Another example. Calculate the fa c t oria l of a number. Such function is absent in JavaScript.
But it is easy to evade. It takes only to create the simply function:
function factorial(a)
{
if (a>30)
{ //this is synthetic limitation
throw new Error(1, "Parameter more than 30");
}
res = 1;
for (i=1; i<=a; i++)
{
res *= i;
}
return res;
}
Now we easy can calculate the expression:
factorial(15)
Given possibility allows to do some specific calculations, that are difficult to be written in one
line.
General Tab
Expression To Evaluate
Write down the expression whose value needs to be calculated. The expression has to be
made according to the syntax of JavaScript.
Assign Result to Variable
Enter the name of the variable into which it is necessary to save the result.
© 2004-2015 Neowise.com
299
RoboTask User's Guide
Additional Functions
Load JS Script from File
Load the library of additional functions from an external file. Enter a file name or choose it
interactively.
The file name can be empty. In this case the action works only with standard functions and
objects of JS.
Use Internal Script
If you want to specify functions directly in a task, choose this option. To edit a script, click
the button Edit Script. You can see the editor like in the action JS Script 295 .
The text of a script can be empty. In this case the action works only with standard functions
and objects of JS.
4.27.4 VB Script
This action allows to perform a program, which is written in VB Script. Notice that the
languages Visial Basic and VB Script are not the same, although they are very alike. The
documentation for the language can be read on the Microsoft site: http://msdn.microsoft.
com/en-us/library/t0aew7h6(v=vs.84).aspx
The action editor is a specialize text editor adapted for editing a program code.
© 2004-2015 Neowise.com
Actions
300
Popup proposals.
When pressing the Ctrl-Space, a popup menu with some functions and objects of VB Script
shows up on the screen. One can choose a necessary point from the list and then the editor
will insert a proper line/string into a text.
If you began to enter a function name and pressed the Ctrl-Space, only alternatives
corresponding to the input line will be left in the popup menu.
Autocomplete.
This function allows to insert standard language constructions into a text automatically. For
this you need to enter 2-5 key constructions (identifier of construction) and press the
combination Ctrl-J. The editor inserts the whole construction instead of the key word.
The editor supports the next statements:
Identifier
Description
Insert statement
do
"do" loop
do
loop |
© 2004-2015 Neowise.com
301
RoboTask User's Guide
foreach
"For each" loop
for each | in
next
for
Simple "for" loop
for i=0 to | step 1
next
func
Function declaration
template
function |()
end Function
if
Simple "IF"
if | then
end if
ife
IF .. Else stetement
if | then
else
end if
select
Select case statement
select case |
case
case
case
end select
sub
Sub procedure
declaration
sub |()
end sub
while
"While" loop
while |
wend
with
"With" statement
with |
end with
Interface
Load from file
Load the text of a script from a file.
Save script as file
© 2004-2015 Neowise.com
Actions
302
Save the text of a script into a file.
Additional options
Expa nd V a ria ble s in t he sc ript - If to switch on this mode, the RoboTask expands all inserts of
variables in a text before running of the script.
Sa v e F ina l sc ript int o v a ria ble – If it is necessary to monitor the final text of the script, switch
on this checkbox and enter the variable name. This mode is need only for control and
checkout. The fact of the matter is that the substitution of variable values can break down
the syntax of a script text. By means of this mode it is possible to get the final script and
analyze it if it is necessary.
The field of a log is under the editor. The messages about runtime errors of the script are
output into this field. Also the text of messages LogMessage is output here.
Run script
Running of a script from the editor to test. If a runtime error arises, you can see a message
about the error in the field of the edit log.
Help
Activation of a help system.
4.27.5 VB Evaluate
This action allows to calculate an expression value and then save it into a variable. The
expression has to be written according to the syntax of JS language. The documentation for
the language can be read on the Microsoft site: http://msdn.microsoft.com/en-us/library/
t0aew7h6(v=vs.84).aspx
The action also allows to connect the function library from an external file or directly in an
additional script.
For example, try to calculate the expression
sum(5,6) + multi(3,4)
And we get the error. The VB Script language doesn't contain functions sum and m ult i.
To solve this, it is possible to specify a little library of user functions:
function sum(a, b)
sum = a + b
end Function
function multi(a, b)
multi = a * b
end function
In this case the action calculates the result without any troubles. The given example is too
simple and is cited for the demonstration solely.
© 2004-2015 Neowise.com
303
RoboTask User's Guide
Another example. Calculate the fa c t oria l of a number. Such function is absent in JavaScript.
But it is easy to evade. It takes only to create the simply function:
function factorial(a)
if a > 30 then
'this is synthetic limitation
err.raise 1, , "Parameter more than 30"
end if
res = 1
for i = 1 to a
res = res * i
next
factorial = res
end function
Now we easy can calculate the expression:
factorial(15)
Given possibility allows to do some specific calculations, that are difficult to be written in one
line.
Expression To Evaluate
Write down the expression whose value needs to be calculated. The expression has to be
made according to the syntax of VB Script.
Assign Result to Variable
Enter the name of the variable into which it is necessary to save the result.
© 2004-2015 Neowise.com
Actions
304
Load VB Script from File
Load the library of additional functions from an external file. Enter a file name or choose it
interactively.
The file name can be empty. In this case the action works only with standard functions and
objects of VB Script.
Use Internal Script
If you want to specify functions directly in a task, choose this option. To edit a script, click
the button Edit Script. You can see the editor like in the action VB Script 299 .
The text of a script can be empty. In this case the action works only with standard functions
and objects of VB Script.
4.28
Excel
This group of actions is for working with MS Excel documents. All actions ensure the work by
means of application M S Exc e l. Thereby, the MS Office package must have been installed on
your computer.
4.28.1 Excel Open Document
This action starts the application MS Excel and opens an existent document or creates a new
one. You have to open document first before using other Excel actions.
© 2004-2015 Neowise.com
305
RoboTask User's Guide
Open Existing File
Open the specified file. If the file does not exist, the action generates a task error.
Create New Empty Document
Create a new file with a specified name. If such file is already exist, the action just opens it.
File Name
Specify the file name. Usage of variables is permitted.
Hide Excel Application
If you need all actions with the document to occur in a hide mode, switch on this checkbox.
4.28.2 Excel Get Cells
This action permits to read the values of table cells and write them into variables of RoboTask.
304
This action demand the document to be opened by means of the Excel Open Document
© 2004-2015 Neowise.com
Actions
306
Worksheet
Specify the name or the number of a worksheet of a document. The ordinal number begins
from 1.
List of Cells
The list of cells and variables. The coordinates of every cell can be specified with two ways:
In a style A1, that is an address of a column is written with letters but an address of a
row is written with numbers. For example: C3, D5, BD15.
The next column after Z is the column AA, AB, etc.
In a style R1C1. After the letter R is the number of a row beginning from 1, after the
letter C is the number of a column beginning from 1.
Each cell corresponds to the variable name in which the action saves the cell value. The
variable name can be specified in an explicit form or by using of another variables.
4.28.3 Excel Set Cells
This action permits to change the cell value. This action demand the document to be opened
by means of the Excel Open Document 304
© 2004-2015 Neowise.com
307
RoboTask User's Guide
Worksheet
Specify the name or the number of a document worksheet. The ordinal number begins from 1.
List of Cells
The list of cells and variables. The coordinates of every cell can be specified with two ways:
In a style A1, that is an address of a column is written with letters but an address of a
row is written with numbers. For example: C3, D5, BD15.
The next column after Z is the column AA, etc.
In a style R1C1. After the letter R is the number of a row beginning from 1, after the
letter C is the number of a column beginning from 1.
Each cell corresponds to the expression which will be written into the cell. The expression is a
string which can be written explicitly or by using of variables.
4.28.4 Excel Save Documet
This action saves the changed document in the disk. If you need to save the changing in a
file, use this action without fail. T he a ut om a t ic sa v ing doe s not oc c urs w he n a t a sk e nds or a
doc um e nt is c lose d.
This action does not demand additional settings and saves the file with the name which is
specified in the action Excel Open Document 304 .
4.28.5 Excel Close
This action closes the opened document. The opened document will be closed automatically
when a task is executed. As it was said before, the automatic saving does not occur. If you
© 2004-2015 Neowise.com
Actions
308
need to save the changes in the document, use the action Excel Save Document 307 before
the closing of the document or the ending of the task.
If you want to open two different documents in the task, at the beginning close the first
document and then open the second one by means of the Excel Open Document 304 .
© 2004-2015 Neowise.com
Part
V
Triggering Events
Triggering Events
5
Triggering Events
5.1
Scheduler
310
Executes a task at a given time or interval. For example, you can use this triggering event to
ensure your backup runs every day at midnight.
Add This Time
Enter a time to execute the action and then click the Plus button to add the time to the list.
Time List
Displays a list of times that you add with the Plus button.
The Magnifier button displays the Add Time Wizard.
© 2004-2015 Neowise.com
311
RoboTask User's Guide
To remove a time, select a time in the Time List and click the Minus button. To clear the list,
click the X button.
Wake the Computer to Run the task
Switch on this checkbox if you want to wake computer from "sleep" or "hibernate" mode.
System timer will wake the computer 20 seconds before specified time and then the trigger will
start the task.
Note:
Your system must have "Allow wake timers" enabled if you want to use this
feature. This parameter is disabled by default in system installed on notebook.
See here how to enable it 311
Time Period
Enter whether you want the action to start every day, week, or month.
Start
Select the date that you want the event starts to execute a task.
5.1.1
How to enable wake timer
1. Open Control panel
2. Open Power options
3. Click on "Change plan settings" link
© 2004-2015 Neowise.com
Triggering Events
4. Click on "Change Advanced power settings"
5. Enable "Allow wake timers" parameter for your power plan
© 2004-2015 Neowise.com
312
313
5.2
RoboTask User's Guide
Hot Keys
Executes a task that should be started manually. You can set up a combination of hot keys,
such as CTRL + ALT + F. For example, you could set up a combination of hot keys to start
Internet Explorer from your keyboard every time you want to browse the Internet.
Tip
The Tray Icon triggering event also allows you start processes manually.
Hot Keys
Place your cursor in the box and press the keys you want on the keyboard. For example, press
the ALT key to see "Alt" appear in the box.
© 2004-2015 Neowise.com
Triggering Events
5.3
314
Tray Icon
Executes a task when you double-click a specific icon in the system tray of the Windows
Taskbar. This is useful when you want a specific action to start, such as checking e-mail.
Tip
The Tray Icon triggering event also allows you start processes manually.
Icon
File Name
Enter the name and path of an .Exe or .Dll file to select an icon from. You can click the browse
button to select a file.
Current Icon
Displays icons available from the file that you select in the File Name box.
Popup Menu Options
© 2004-2015 Neowise.com
315
RoboTask User's Guide
One can define the popup menu items for an icon on this tab. In this case the ordinal number
(beginning from 1) of selected will be passed into a/the task as a parameter.
Items
The list of menu items. This list can be edited with buttons Add, Edit and De le t e . Also it is
possible to change the order of options using buttons M ov e Up and M ov e Dow n.
To select Default Menu Item use the button Se t De fa ult .
Pass Item Number as Parameter
Specify the name of parameter in which the number of menu item must to be passed. On
double click on the icon, the default item number of menu will be passed.
If the menu is empty, the parameter is 0 always.
Variable
Allows you to add a variable to the action or triggering event that you selected. You must
place the cursor in a edit box in the settings dialog window of the action or event and then
click the {V} button.
5.4
Cyclic
Executes a task at the interval in seconds that you specify. This is useful if you want to repeat
a series of actions at a specific interval. For example, you can ping your web site every two
minutes or check for new e-mails every five minutes.
© 2004-2015 Neowise.com
Triggering Events
316
Interval (Sec)
Enter the number of seconds that you want the task or actions to wait between loops.
Do not start immediately at the activation of the trigger
By default Cyclic trigger starts the task immediately when the trigger is being started. switch
ON this checkbox if you want to prohibit the first running of the task. In most cases this
doesn't matter, but may be helpful sometimes.
5.5
File Monitor
Executes a task when a file is created, deleted, or changed.
General tab 316
Save Changes tab 318
Pass as Parameters tab 319
General tab
© 2004-2015 Neowise.com
317
RoboTask User's Guide
Folders
Select the folders that are monitored. Each folder can be monitored with subfolders. When you
click the Plus button, the Add Folder for Watch dialog box appears.
Include Masks (Comma Separated)
Enter one or more masks separated with commas. The wildcard mask "*.*" means that all files
are being monitored.
Exclude Masks (Comma Separated)
Specify one or more masks for the kinds of files that you do not want to monitor. Separate
each entry with a comma. Files that match these criteria do not appear on the result list.
Tip
You can also use wildcards in this option. Some examples of wildcards are the following:
*.txt - all the files with the .txt extension.
mydoc?.doc - mydoc1.doc, mydoc2.doc, mydocA.doc, and so forth.
*.tmp, *.$$$, *.bak - all the files with the .tmp, .$$$ and .bak extensions.
{bakext} - file mask(s) from the { bakext} variable.
© 2004-2015 Neowise.com
Triggering Events
318
Filter Condition
Select one or more check boxes to specify which changes in files you want to monitor:
Watch for New Files
Watch for Deleted Files
Watch for Changed Files
Time Changed
Size Changed
Attributes Changed
Poll Interval (Sec)
Enter the time in seconds that you want the event to wait between requests for data.
Variable
Allows you to add a variable to the action or triggering event that you selected. You must
place the cursor in a edit box in the settings dialog window of the action or event and then
click the {V} button.
Save Changes tab
Save Changes
Click the check box to enable the task to save changes to files during the file monitoring
© 2004-2015 Neowise.com
319
RoboTask User's Guide
session in a log.
Save in Common List
Enter the name of a log file that includes all changes during the file monitoring session. Click
the browse button to select a file on the local system.
List File Name
Enter the file name of the log. Click the browse button to select a file on the local system.
Save in Different Lists
Click the check box to enable the task to save changes to file during the file monitoring
session to several different logs based on the criteria you select.
Tip
You can click a browse button next to each of the following options to select a file on the
local system.
List File Name (for New Files)
Saves a log of the names of files created during the monitoring session.
List File Name (For Deleted Files)
Saves a log of the names of files deleted during the monitoring session.
List File Name (For Changed Files)
Saves a log of the names of the files modified during the monitoring session.
Pass as parameters tab
© 2004-2015 Neowise.com
Triggering Events
320
Pass Changes into the task as parameters
Pass Common list
To pass the common list of changed, new and deleted files to the task select this option and
input the parameter name for common list of files.
Parameter Name
Parameter name for common list of files
Pass as Separate parameters
Parameter Name for New Files
Parameter Name for Deleted Files
Parameter Name for Changed Files
© 2004-2015 Neowise.com
321
RoboTask User's Guide
Variable
Allows you to add a variable to the action or triggering event that you selected. You must
place the cursor in a edit box in the settings dialog window of the action or event and then
click the {V} button.
5.6
Dial-Up Connection Monitor
Executes a task when the computer completes or terminates a specific dial-up connection. You
can specify that RoboTask check for a connection at a specific interval; for example, you can
specify that RoboTask check for a dial-up connection every 300 seconds, or every five minutes.
Dial-up Connection
Select a connection in the dropdown list. The items on the list are the names of the Internet
connections for dial-up modems that you create in Windows with Network Connections in the
Control Panel.
Interval (sec)
Enter the number of seconds that you want the task to wait between checks.
What to Check
Click one of the following options to tell the task to check if the connection is active or
disconnected:
Disconnect
Connect
© 2004-2015 Neowise.com
Triggering Events
5.7
322
Expression monitor
This is a universal trigger which starts up a task in case of changing specified expression. You
need to make up an expression using global variables, both systemic and user’s. Expression
Monitor will watch changing the value of expression after substitution of variable values. In
other words, by means of the Expression Monitor, the changing of one or several variables can
be controlled.
Why is the trigger universal?
You can make up your own tasks which determine a certain value by necessary algorithm
using all arsenal of RoboTask. These tasks can be started up, for example, by means of
trigger Cyclic 315 . You save the received value into a global variable inside the task. Expression
Monitor will start up the task in case of changing the variable.
Thereby, you can “invent” by yourself the parameter by which you need to start up a task.
Expression Monitor checks the value of expression every second. So, the trigger will be
activated in a second at most after changing the variable.
Expression to Monitor
Input any expression using necessary variables. Notice that only global variables can be used.
Case Sensitive
Expression Monitor is insensitive to a register By default. If it is important to take into account
the register, switch on this checkbox.
5.8
Window Watcher
Runs the task when you perform some actions with windows. This task can respond to creation,
destruction, activation and deactivation of a window with specified parameters. Such task can
be useful if you want to introduce automatic corrective actions that respond to an error
message.
© 2004-2015 Neowise.com
323
RoboTask User's Guide
General
Window Caption
Specify the window title that should be traced. You can specify a specific part of the title if it
shouldn't match completely. For example:
- Microsoft Internet Explorer
Notepad
You can select a title from the list of windows present in the system by clicking the button to
the right of the text box. When captions are compared, the case is not taken into account.
Caption must match exactly
Select this checkbox if the caption should match exactly. In this case you should specify the
full window title.
Window class
Specify the window class that should be traced. You can select a window class from the list of
classes present in the system by clicking the button on the right of the text box.
When strings are compared, the case is not taken into account.
Class must match exactly
Select this checkbox if the window class string should match exactly.
Advanced
© 2004-2015 Neowise.com
Triggering Events
324
Watch hidden windows
Select this checkbox if you want the event to trace hidden windows.
Watch child windows
Select this checkbox if you want the event to trace child windows.
Assign window handle to variable
If you want to save Window Handle for further processing in the task, specify the name of the
variable. Window Handle is a unique numeric identifier of a window in the system. It can be used
in the Window Command 193 action.
Watch For
Click one of the following window states:
Window Activated - the event is triggered when a new or existing window is activated.
For example, a window activates when a user presses ALT+Tab on the keyboard.
Window Destroyed - the event is triggered when the window is closed.
Window Created - the event is triggered when a new window is created.
Window Deactivated - the event is triggered when a new or existing window is
deactivated. For example, a window deactivates when a user presses ALT+Tab on the
keyboard.
Window changed caption - the event is triggered when an existing window has changed
own caption.
Variable
Allows you to add a variable to the action or triggering event that you selected. You must
place the cursor in a edit box in the settings dialog window of the action or event and then
click the {V} button.
© 2004-2015 Neowise.com
325
5.9
RoboTask User's Guide
On Time Changed
Executes a task when the computer system time changes. No specific settings are associated
with this triggering event.
5.10
On Battery Power is Low
This trigger reacts to the low battery to the specified level.
No te : t his t rigge r m a ke s se nse only for t he c om put e rs w hic h ha v e a ut onom ous ba t t e ry
(la pt op) or for c om put e r c onne c t e d t o Sm a rt UPS.
The trigger is activated if the computer is running on battery and battery charge has dropped
to the specified level. If battery charge is low but the computer is running on a network, the
trigger is not activated. The parameter editor will notify you if there is not set a battery on
your computer.
Start task when battery is lower than
Specify the battery level from 3% to 100%
Start task mode
Start task only once – a task is started only once when the specified level has reached.
Start Task every time when battery is low. – a task is started approximately one time a
minute if the battery level is lower or equal to the specified one
When power supply is restored, this trigger goes to the initial waiting status.
© 2004-2015 Neowise.com
Triggering Events
5.11
326
On Spooler Changed
Executes a task when the printer spooler has changed. For example, you can use this triggering
event to display a message if a particular document is sent to a printer. No specific settings are
associated with this triggering event.
5.12
On Device Changed
Runs the task when a device (for example, CD or Flash Drive) is changed. The device name can
be saved to a variable and used in the task.
Device Kind
Specify a type of device that triggers the task.
All (Logical Volume & Port) - any type of device;
Logical Volume - a logical volume mounted dynamically (CD, Flash Drive, etc.);
Port - a COM or LPT port.
Change Kind
Specify a type of change that triggers the task.
All (Arrival & Remove) - any type of event;
Arrival - a device (drive) appears in the system. For example, you have inserted a new
CD;
Remove - a device is removed from the system. For example, you have pressed the eject
button of the CD drive.
Assign Device Name to Variable
Switch on this checkbox and specify a name of variable where you want to save the name of
the device that has been changed.
© 2004-2015 Neowise.com
327
RoboTask User's Guide
Pass Device Name into the Task as Parameter
Switch on this checkbox and specify a name of parameter which will be passed into the task at
starting.
5.13
On Palette Changed
Executes a task when the display palette, or colors on the computer screen, for Windows
changes. This can happen when you switch between an MS-DOS application and a Windowsbased application. No specific settings are associated with this triggering event.
5.14
On Display Changed
Executes a task when the display on the computer screen changes. No specific settings are
associated with this triggering event.
5.15
On Log Off
Executes a task when a user logs off or the computer shuts down. No specific settings are
associated with this triggering event.
5.16
On Idle
Executes a task when the computer has been idle for a specified period of time.
Run Job When Computer Has Been Idle for ___ Minutes
Enter the time that you want in minutes.
© 2004-2015 Neowise.com
Triggering Events
5.17
328
On Resume
This trigger starts a task when the computer "awakes" out of the Sleep Or Hibernate mode. It
does not demand any additional settings.
5.18
Listener
Allows you to start a task when a command from another computer is received. Works together
with the Send Command action. Performs the primary analysis of the received string and starts
the corresponding task if the received string meets the specified conditions.
Wait For Option
Select the mode of waiting for a string.
Any string - any received string will start the task. For example, it is convenient if you
exchange messages that should be just recorded to the log.
Beginning of String - the received string should start with the key substring.
Substring - the key substring can be in any position of the received string.
Exact String - the received string must exactly match the key string.
Wait for String
Specify the key string that will start the task. This parameter does not make sense if the "Any
String" mode is on.
Case Sensitive
Select this checkbox if strings should be compared with their letter case taken into account.
Assign Received String to Variable
© 2004-2015 Neowise.com
329
RoboTask User's Guide
Specify the name of the variable if the received string should be assigned to a variable. This
value can be used in the task.
The simplest sample use is message exchange: the Listener receives a string, assigns it to a
variable and starts the task. The task displays this variable as an informational message.
Plugin settings
You can set up parameters of Network plugin 223 .
Variable
Allows you to add a variable to the action or triggering event that you selected. You must
place the cursor in a edit box in the settings dialog window of the action or event and then
click the {V} button.
© 2004-2015 Neowise.com
Part
VI
Appendix
331
RoboTask User's Guide
6
Appendix
6.1
RoboTaskApp object
There is no need to create the RoboTaskApp object when you are running or editing the script.
It is created before you run the script and is available as a global object inside the script.
RoboTaskApp.AddUserVariable(By Val Name as String, By Val Value as String)
Method.
Creates a user variable with the specified "Na m e " and assign the specified "V a lue " to it.
RoboTaskApp.Automation
Read-Write property, type - boolean
It is available for reading and writing. It contains the value of the RoboTask automation mode.
RoboTaskApp.Close
Method
Exits RoboTask.
RoboTaskApp.DelUserVariable(By Val Name as String)
Method.
Deletes the user variable with the specified "Na m e ".
RoboTaskApp.DesktopAlert(ByVal Title as String, ByVal Msg as String, ByVal IconKind as
Long, ByVal AlertKind as Long, ByVal Duration as Long, ByVal Width as Long, ByVal
Height as Long, ByVal Corner as Long)
Method.
Shows desktop alert or balloon of tray icon with specified text
T it le - [in] Title of the alert
M sg - [in] Message of the alert
Ic onKind - [in] The number of icon
0 - Information
1 - Warning (Exclamation)
2 - Error
3 - Default icon. When IconKind contains incorrect number the method shows default
icon
Ale rt Kind - [in] 0 - Alert window; 1 - Tray icon balloon.
Dura t ion - [in] Duration in seconds
Widt h - [in] Width in pixels. If the value less that 330 the method uses default value (330).
This parameter is being ignored if AlertKind=1
He ight - [in] Width in pixels. If the value less that 76 the method uses default value (76). This
parameter is being ignored if AlertKind=1
Corne r - [in] The corner of alert window (This parameter is being ignored if AlertKind=1):
0 - top-left
1 - top-right
2 - bottom-left
3 - bottom right
RoboTaskApp.EventInfoEnabled(ByVal TaskNum as Long, ByVal EventNum as Long)
Read-only property. Value type - boolean.
© 2004-2015 Neowise.com
Appendix
332
Returns event status (enabled or disabled) by number of the task and event number.
T a skNum – [in] task number
Ev e nt Num – [in] event number
RoboTaskApp.EventInfoEventID(ByVal TaskNum as Long, ByVal EventNum as Long)
Read-only property. Value type - String.
Returns event identifier by number of the task and event number. For example:
E_NET_LISTENER, E_WINDOW_WATCHER, E_GENERAL_CYCLIC, etc.
T a skNum – [in] task number
Ev e nt Num – [in] event number
RoboTaskApp.EventParameters(ByVal TaskNum as Long, ByVal EventNum as Long)
Read-only property, type - String.
Returns the event parameters as text. Each text line is an expression of the following type:
ParameterName = ParamaterValue
The set of parameters depends on the event type (EventID)
T a skNum – [in] task number
Ev e nt Num – [in] the event number in the task
RoboTask.EventsCount(ByVal TaskNum as Long)
Read-only property, type - Long
Returns the amount of events of the task.
T a skNum – [in] task number
RoboTaskApp.ExpandText(By Val Text as String)
Read-only property, type - String.
Expands a string containing RoboTask variables and returns the value of the string type.
For example: the string "File c:\autoexec.bat has length {FileSize(c:\autoexec.bat)} bytes" will
be turned into the string "File c:\autoexec.bat has length 153 bytes"
RoboTaskApp.ExternalName(By Val ThreadID)
Read-only property, type - String.
Returns the "External Name" of a task by its T hre a dID. You can specify an External Name on the
"Advanced" tab of the task editor. You can find out the ThreadID of the current task using the
RoboT a skApp.T hre a dID property. A sample use is given below.
Sub Main
Dim extName As String
extName = RoboTaskApp.ExternalName(RoboTaskApp.ThreadID)
MsgBox("External name is "+ extName)
End Sub
RoboTaskApp.Minimize
Method.
Minimizes RoboTask into the tray icon.
RoboTaskApp.Restore
Method.
Restores the RoboTask window from the tray icon.
RoboTaskApp.ServiceMode
Read-only property. It contains a Boolean value: "True" if RoboTask is running as an NT service;
"False" if RoboTask is running as a regular Windows application.
© 2004-2015 Neowise.com
333
RoboTask User's Guide
RoboTaskApp.SetUserVariable(By Val Name as String, By Val Value as String)
Method
Sets the value of the "Na m e " user variable to the specified "V a lue "
RoboTaskApp.StartTask(By Val ExternalName as String, By Val TaskParameters as
String)
Method
Starts the task with the specified "Ext e rna l Na m e ".
T a skPa ra m e t e rs - you can pass some parameters into started task. May be an empty string.
You need write down parameters like the text, each line should be like:
Pa ra m e t e rNa m e =Pa ra m e t e rV a lue
Pa ra m e t e rNa m e – the name of parameter, any word consisting of letters and numbers;
Pa ra m e t e rV a lue – value of parameter like any set of symbols.
RoboTaskApp.StepInfoActionID(ByVal TaskNum as long, ByVal StepNum as long)
Read-only property. Value type - string.
Returns the action identifier by task number and the step number.
Returned value is an action type identifier (for example: A_TASKS_START,
A_TASK_WAITCOMPETE, A_GENERAL_RUN_PROG, etc.)
T a skNum – [in] task number
St e pNum – [in] step number. Step number begins from 0.
RoboTaskApp.StepInfoName(ByVal TaskNum as long, ByVal StepNum as long)
Read-only property. Value type - string.
Returns step status (enabled or disabled) by task number and the step number.
T a skNum – [in] task number
St e pNum – [in] step number. Step number begins from 0.
RoboTaskApp.StepInfoEnabled(ByVal TaskNum as long, ByVal StepNum as long)
Read-only property. Value type - boolean.
Returns step name by task number and the step number.
T a skNum – [in] task number
St e pNum – [in] step number. Step number begins from 0.
RoboTaskApp.StepParameters(ByVal TaskNum as Long, ByVal StepNum as long)
Read-only property, type - String
Returns the step parameters as text. Each text line is an expression of the following type:
ParameterName = ParamaterValue
The set of parameters depends on the action type (ActionID)
T a skNum – task number
St e pNum – step number. Step number begins from 0.
RoboTaskApp.StepsCount(ByVal TaskNum as long)
Read-only property, type - Long
Returns the number of steps in the task by the task number
T a skNum – task number
RoboTaskApp.StopTask(By Val ExternalName as String)
Method.
Stops the task with the specified "Ext e rna l Na m e ".
RoboTaskApp.TaskCount
© 2004-2015 Neowise.com
Appendix
334
Method.
The read-only attribute of the numerical type. Returns the number of tasks registered in
RoboTask.
RoboTaskApp.TaskEnabled(By Val ExternalName as String)
A Boolean attribute available for reading and writing. Allows you to read or set the "Enabled"
parameter of the task with the specified "Ext e rna lNa m e ".
For example:
RoboTaskApp.TaskEnabled("Check_email") = False
RoboTaskApp.TaskInfoExtname(ByVal NumTask as Long)
Read-only property, value type - string
Returns External name of the task by number of task (NumTask)
Num T a sk – [in] task number
Example of usage (Basic):
Sub Main
Dim cnt As Long
Dim nam As String
Dim extNam As String
Dim id As Long
Dim i As Long
cnt = RoboTaskApp.TaskCount
RoboTaskApp.WriteToLog(1,"Total "+Str(cnt)+" tasks",RoboTaskApp.ThreadID)
For i = 0 To cnt - 1
extNam = RoboTaskApp.TaskInfoExtName(i)
nam = RoboTaskApp.TaskInfoName(i)
id = RoboTaskApp.TaskInfoID(i)
RoboTaskApp.WriteToLog(3,extNam+"; "+nam+"; "+Str(id),RoboTaskApp.ThreadID)
Next
End Sub
RoboTaskApp.TaskInfoName(ByVal NumTask as Long)
Read-only property, value type - string
Returns the name of the task by number of task (NumTask)
Num T a sk – [in] task number
RoboTaskApp.TaskInfoID(ByVal NumTask as Long)
Read-only property, value type - long integer
Returns folder ID of the task by number of task (NumTask)
Num T a sk – [in] task number
RoboTaskApp.TaskInfoFolderID(ByVal NumTask as Long)
Read-only property, value type - long integer
Returns ID of the task by number of task (NumTask)
T a skNum – [in] task number
RoboTaskApp.TaskInfoState(ByVal NumTask as Long)
Read-only property, value type - long integer
Returns status of the task by number of task (NumTask)
© 2004-2015 Neowise.com
335
RoboTask User's Guide
Possible returned values are:
0 - (tsManual) the task has no triggering events or its triggering events are disabled (see
the RoboTaskApp.TaskEnabled property). It waits to be run manually or from another task.
1 - (tsIdle) the task has some enabled triggering events. It waits to be run automatically
2 - (tsDisabled) the task is disabled while it is being edited.
3 - (tsRunning) the task has been launched and it is running.
4 - (tsStopping) the task received the stop command, but it is yet running. After the task
is completely stopped, its status becomes either tsManual or tsIdle.
T a skNum – [in] task number
RoboTaskApp.TaskNumByExternalName(ByVal ExternalName as String)
Read-only property, value type - Long
Returns the task number by ExternalName.
You can use the TaskInfo method to get ExternalName by the task number.
Ext e rna lNa m e – external task name. It is any string of characters. You can specify it while
editing a task (see the "External Name" parameter on the "Advanced" tab of the task editor)
RoboTaskApp.ThreadID
Read-only property, type - Long
Returns the thread ID of the task. This value is required in the Ext e rna lNa m e property and
Writ e T oLog method.
RoboTaskApp.Version
A read-only property of the string type. Contains the version number of RoboTask in it.
RoboTaskApp.WHandle
A read-only property of the Long type. Contains the Handle of the main RoboTask window. This
value is necessary for some Windows API functions to work properly (for example,
SendMessage, PostMessage).
RoboTaskApp.WriteToLog(By Val MsgType as Integer, By Val MessageStr as String, By
Val ThreadID as Long)
Method
Records a message to the task log. To record a message to the system log of RoboTask, you
should set the T re a dID to 0.
M sgT y pe – [in] message type: 0 – regular message, 1 – warning, 2 – error, 3 - user message;
M e ssa ge St r – [in] message string
T hre a dID – [in] the Thread ID of the current task. It can be obtained using the RoboT a skApp.
T hre a dID property. If you set it to 0, the message will be recorded to the system log of
RoboTask.
A sample use is given below.
Sub Main
Dim thr As Long
thr = RoboTaskApp.ThreadID
RoboTaskApp.WriteToLog(3, "Hello World", thr)
End Sub
Deprecated methods
These methods are not preferred, because they are not supported by scripting languages:
© 2004-2015 Neowise.com
Appendix
336
Javascript and VB Script.
RoboTaskApp.EventInfo(ByVal TaskNum as Long, ByVal EventNum as Long, EventID as
String, Enabled as Boolean)
Method. (de pre c a t e d m e t hod)
Allows you to get information about the triggering event by the task number and the step
number in the task
T a skNum – [in] task number
Ev e nt Num – [in] event number
Ev e nt ID – [out] event type identifier (for example: E_NET_LISTENER, E_WINDOW_WATCHER,
E_GENERAL_CYCLIC, etc.)
Ena ble d – [out] event status (enabled or disabled)
RoboTaskApp.StepInfo(ByVal TaskNum as long, ByVal StepNum as long, ActionID as
String, Enabled as Boolean, Name as String)
Method. (de pre c a t e d m e t hod)
Allows you to get information about the step using the task number and the step number in the
task
T a skNum – [in] task number
St e pNum – [in] step number
Ac t ionID – [out] action type identifier (for example: A_TASKS_START, A_TASK_WAITCOMPETE,
A_GENERAL_RUN_PROG, etc.)
Ena ble d – [out] step status (enabled or disabled)
Na m e – [out] action name
RoboTaskApp.TaskInfo(By Val NumTask as Long, ExtName as String, Name as String, ID
as Long)
Method. (de pre c a t e d m e t hod)
Sets the properties of the task with the specified number ("Num T a sk").
Num T a sk - [in] task number
Ext Na m e – [out] External Name;
Na m e – [out] task name;
ID – [out] internal numerical identifier.
This method is used to enumerate all tasks and extract the parameter of each task. A sample
use is given below.
Sub Main
Dim cnt As Long
Dim nam As String
Dim extNam As String
Dim id As Long
Dim i As Long
cnt = RoboTaskApp.TaskCount
RoboTaskApp.WriteToLog(1,"Total "+Str(cnt)+" tasks",RoboTaskApp.ThreadID)
For i = 0 To cnt - 1
RoboTaskApp.TaskInfo(i,extNam,nam,id)
RoboTaskApp.WriteToLog(3,extNam+"; "+nam+"; "+Str(id),RoboTaskApp.ThreadID)
Next
RoboTaskApp.WriteToLog(3,"Total " + Str(cnt) + " tasks",RoboTaskApp.ThreadID)
End Sub
RoboTaskApp.TaskInfo2(ByVal NumTask as Long, FolderID as Long, State as TaskState)
© 2004-2015 Neowise.com
337
RoboTask User's Guide
Method (de pre c a t e d m e t hod)
An additional method for getting information about the task. It allows you to get the task folder
identifier and the task status by the task number.
Num T a sk – [in] task number
F olde rID – [out] the identifier of the folder with the task.
St a t e – [out] the task status at the moment when the method is called. It can take one of the
following values:
tsManual – 0, the task has no triggering events or its triggering events are disabled (see
the RoboTaskApp.TaskEnabled property). It waits to be run manually or from another task.
tsIdle – 1, the task has some enabled triggering events. It waits to be run automatically
tsDisabled – 2, the task is disabled while it is being edited.
tsRunning – 3, the task has been launched and it is running.
tsStopping – 4, the task received the stop command, but it is yet running. After the task is
completely stopped, its status becomes either tsManual or tsIdle.
6.2
Full list of system variables
Example of usage
Description
{AddressOnly(John Smith <[email protected]>)} Returns address only from full address
{Asc(©)}
Returns ASCII code of specified
character.
{CapsLockState}
Checks CapsLock state
{CDDiskSpace(E)}
Available CD free space
{CDDriveCount}
CD drives count
{CDDriveLeter(0)}
CD drive letter by number
{CDDriveModel(0)}
CD drive model
{CDDriveVendor(0)}
CD drive vendor
{CDMediaType(E)}
CD media type
{Chr(169)}
Returns the symbol with specified
ASCII code.
{ClipBoardContent}
Clipboard content as Text
{CommaSeparatedToText("item 1","item 2","item 3")} Converts commaseparated string to
multiline text
{ComputerName}
Computer name
{CurrentWindowCaption}
Returns the title (caption) of current
active window
{CurrentWindowClass}
Returns the class name of current
active window
{CurrentWindowHandle}
Returns the handle of current active
window
{Date}
Current date
{DateIncDays(-7)}
Current date ± number of days
{DateTime}
Current date & time
{DateTimeToFormat({Date},yyyy-mm-dd)}
Returns formatted date and time in
specified format
{Day}
Current day
{DayOfTheYear({Date})}
Returns the day of the year of
specified or current date
{DayOfWeek}
Current day of week
© 2004-2015 Neowise.com
Appendix
{DayOfWeekNo}
{DefScriptDir}
{DiskLoad(c:\)}
{EnvironmentVar(Path)}
{Eol}
{ExtractFileDrive(C:\Folder\File.ext)}
{ExtractFileExt(C:\Folder\File.ext)}
{ExtractFileName(C:\Folder\File.ext)}
{ExtractFileNameNoExt(C:\Folder\File.ext)}
{ExtractFilePath(C:\Folder\File.ext)}
{ExtractFilePathNoDrive(C:\Folder\File.ext)}
{FileAttributes(C:\AUTOEXEC.BAT)}
{FileExists({TempDir}\file.tmp)}
{FilesCount({TempDir})}
{FileSize(c:\autoexec.bat)}
{FileTime(c:\autoexec.bat)}
{FolderExists({TempDir})}
{FoldersCount({TempDir})}
{FolderSize({TempDir})}
{FormatToDateTime(2014-02-19,yyyy-mm-dd)}
{FreeDiskSpace(c:)}
{GetCurrentFolder}
{Hours}
{IncDays(-1)}
{IncMonths(-1)}
{IncYears(-1)}
{IPAddress({ComputerName})}
{IsDriveWriter(0)}
{IsError}
{IsFileFree(c:\autoexec.bat)}
{IsProcessExists(notepad.exe)}
{IsWindowActive(Notepad)}
{IsWindowHidden(Notepad)}
{IsWindowMaximized(Notepad)}
{IsWindowMinimized(Notepad)}
{IsWindowVisible(Notepad)}
{LastErrorCode}
{LastErrorDescription}
{LastErrorStep}
{LastErrorTaskExternalName}
{LastErrorTaskID}
© 2004-2015 Neowise.com
338
Current day of week number
Default Basic script folder
Returns the disk load in percents
Get environment variable
End of line
Extracts file drive from full path
Extracts file extension from full path
Extracts file name from full path
Extracts file name without extension
Extracts file path from full path
Extracts file path from root folder
Returns attributes of file as string, like
this: "AHRS"
Check file existence
Returns the amount of files in
specified folder
File size in bytes
Returns the time of last update
Checks folder existence
Returns the amount of folders in
specified folder
Returns the total size of files in
specified folder (in bytes)
Returns standard date and time from
formatted string
Free disk space in bytes
Returns full path of current folder
Current hours
Current day ± number of days
Current month ± number of months
Current year ± number of years
Returns IP address by computer name
True if CD drive is writer
Returns "True" when error occurred at
previous step
Checks file for free access
Checks existence of process in
memory
Check window existence
Returns "True" if window invisible
Returns "True" if window maximized
Returns "True" if window minimized
Returns "True" if window visible
Error code. Parameter of error
handling task.
Error description. Parameter of error
handling task.
Error step number. Parameter of error
handling task.
External name of error task.
Parameter of error handling task.
Error task ID. Parameter of error
handling task.
339
RoboTask User's Guide
{LastErrorTaskName}
{LogFileName}
{LogFolder}
{LowerCase(Sample String)}
{Minutes}
{MonitorCount}
{MonthIncDays(-1)}
{MonthName}
{MonthNo}
{mSeconds}
{NumLockState}
{RandomValue(1000)}
{ScreenBottom(0)}
{ScreenH(0)}
{ScreenHeight(0)}
{ScreenLeft(0)}
{ScreenRight(0)}
{ScreenTop(0)}
{ScreenW(0)}
{ScreenWidth(0)}
{ScrollLockState}
{Seconds}
{ShortDayOfWeek}
{ShortMonthName}
{ShortYear}
{ShortYearIncDays(-1)}
{StrLength(Sample String)}
{SystemDir}
{TaskCategoryID}
{TaskExtName}
{TaskFileByID({TaskId})}
{TaskFileName}
{TaskFolder}
{TaskID}
{TaskLogFileById({TaskId})}
{TaskName}
{TempDir}
{TextFile(file_name)}
{TextFileANSI(file_name)}
{TextFileUNICODE(file_name)}
{TextFileUTF8(file_name)}
Error task name. Parameter of error
handling task.
Log file name (works only in context
of the task)
Folder of logs
Converts a string to lowercase.
Current minutes
Number of Monitors
Current month ± number of days
Current month name
Current month number
Current milliseconds
Checks NumLock state
Returns random integer value between
0 and parameter (default 1000)
Bottom edge of specified screen
Height of specified screen
Height of specified screen
Left edge of specified screen
Right edge of specified screen
Top edge of specified screen
Width of specified screen
Width of specified screen
Checks ScrollLock state
Current seconds
Current day of week short name
Current month short name
Two-digits current year
Two-digits current year ± number of
days
Returns the length of specified string.
Windows system directory
Category ID of current task (works
only in context of the task)
External name of current task (works
only in context of the task)
Task filename by ID
Task file name (works only in context
of the task)
Folder of tasks
ID of current task (works only in
context of the task)
Task log filename by ID
Name of current task (works only in
context of the task)
Temporary directory
Contents of text file
Reads the text file as ANSI text and
returns the text
Reads the text file as UNICODE text
and returns the text
Reads the text file as UTF8 text and
returns the text
© 2004-2015 Neowise.com
Appendix
{TextToCommaSeparated(Line 1{EOL}Line 2)}
{Time}
{TotalDiskSpace(c:\)}
{UniqueFileName({TempDir}\*.tmp)}
{UpperCase(Sample String)}
{UserName}
{UTF8Decode(Symbols: €, ВЈ, Вј, ВЅ, Вѕ, Г
)}
{UTF8Encode(Symbols: €, £, ¼, ½, ¾, Ø)}
{ValidFileName(c:\"My<Invalid:File*Name>.txt")}
{VolumeLabel(c:\)}
{WeekOfTheYear({Date})}
{WinDir}
{WindowCaption({CurrentWindowHandle})}
{WindowClass({CurrentWindowHandle})}
{WindowExists(Notepad)}
{Year}
{YearIncDays(-1)}
340
Converts multiline text to
commaseparated string
Current time
Returns the total size of specified disk
(in bytes)
Returns unique random file name by
the mask
Converts a string to uppercase.
User name
Decodes string from UTF8 format
Encodes string to UTF8 format
Returns valid file name
Returns the label of specified volume
Returns the week of the year of
specified or current date
Windows directory
Returns the title (caption) of specified
window handle
Returns the class name of specified
window handle
Check window existence
Current year
Current year ± number of days
(*) Format options for format variables:
d
Displays the day as a number without a leading zero (1-31).
dd
Displays the day as a number with a leading zero (01-31).
mm
Displays the month as a number with a leading zero (01-12). If the mm
specifier immediately follows an h or hh specifier, the minute rather than the
month is displayed.
yy
Displays the year as a two-digit number (00-99).
yyyy
Displays the year as a four-digit number (0000-9999).
h
Displays the hour without a leading zero (0-23).
hh
Displays the hour with a leading zero (00-23).
n
Displays the minute without a leading zero (0-59).
nn
Displays the minute with a leading zero (00-59).
s
Displays the second without a leading zero (0-59).
ss
Displays the second with a leading zero (00-59).
am/pm
Uses the 12-hour clock for the preceding h or hh specifier, and displays 'am'
for any hour before noon, and 'pm' for any hour after noon. The am/pm
specifier can use lower, upper, or mixed case, and the result is displayed
accordingly.
a/p
Uses the 12-hour clock for the preceding h or hh specifier, and displays 'a' for
any hour before noon, and 'p' for any hour after noon. The a/p specifier can
use lower, upper, or mixed case, and the result is displayed accordingly.
© 2004-2015 Neowise.com
341
6.3
RoboTask User's Guide
Command Line Parameters
/ASADMIN
Start RoboTask with full rights. For operating systems with UAC (i.e. Windows Vista and
later).
/REGSERVER
Register built-in COM server in your system.
/UNREGSERVER
Unregister built-in COM server from your system.
/INSTALL
Install RoboTask service
/UNINSTALL
Remove RoboTask service
/REINSTALL
Reinstall RoboTask service with default parameters.
© 2004-2015 Neowise.com
Part
VII
Other software
343
7
RoboTask User's Guide
Other software
Instant Gallery Maker
fo r W ind o w s 98/M E/2000/X P /2003/V is ta /W ind o w s 7/W ind o w s 8
Create professional-looking image galleries with a few mouse clicks.
All you have to do is to click a few buttons and watch your new
gallery come alive!
Learn more...
NeoDownloader
fo r W ind o w s 98/M E/2000/X P /2003/V is ta /W ind o w s 7/W ind o w s 8
Download thousands of pictures, music and videos.
Forget about pop-ups, banners and saving every file manually - just
let this fully automatic tool do the work for you.
Learn more...
© 2004-2015 Neowise.com
Index
Index
-Aaction
Window position
198
Window size
198
Actions
Add key
212
Break
189
Browse for Computers
86
Browse for Folders
85
Change Folder
103
Check connection
170
Check for E-mail
116
Check for Window
195
Check HTTP address
122
Color Compliance
286
comma-separated
251
comment
79
Continue
189
Copy/Move File
93
Create Folder
103
Create Variable
170
Dataset Loop
184
Delete File
95
Delete key
213
Delete Value
217
Delimited variable
174
Dial Up/Hang Up
169
Disable Automation
205
Download Files
120
Else
191
ElseIf Then
191
Enable Automation
205
Enable Task
174, 175
End If 191
End Loop
189
Exit RoboTask
205
Export
219
Extract Files
115
File Attributes
111
File Loop
178
FTP Change Folder
129
FTP Command
132
FTP Create Folder
130
© 2004-2015 Neowise.com
FTP Delete File
129
FTP Download
127
FTP File Loop
132
FTP Log Off 126
FTP Log On
125
FTP PWD
131
FTP Remove Folder
131
FTP Rename File
128
FTP Upload
127
If Then
189
Import
220
Increment Variable
173
Input box
87
Lock Workstation
203
Log Message
205
Log Off 74
Minimize RoboTask
204
multiline text
251
Open Dialog
83
Pack Files
113
Pause
74
Ping Host
121
Print Document
68
query
75
Question Dialog
82
Read Value
215
Remove Folder
104
Remove Variable
173
Rename File
94
Rename Folder
104
Rename key
214
Rename Value
218
Restore RoboTask
204
Run as User
203
Run Command-Line Utility
66
Run Program/Open Document
65
Save Dialog
84
Screen Pixel
285
Screenshot
284
Search for Files
98
Send command
221
Send Email
117
Send Keystrokes
70
Send Network Message
222
Set Variable
172
Shif Keys State
73
Show Message/Play Sound
79
Simple Loop
187
344
345
RoboTask User's Guide
Actions
Sort Text
108
Start Service
199
Start Task
176
Stop Service
200
Stop Task
177
Synchronize Folders
105
Terminate Process
78
Text Loop
183
Transfer Type
132
TXT Comma-Text Conversion
251
Unique File Name
110
Wait for File
107
wait for process finish
76
wait for process startfinish
77
Wait for Task
177
Window Command
193
Window Loop
185
Window Pixel
282
Window snapshot
278
Write Text File
97
Write Value
216
Add key
212
administrative commands
204, 205
alarm clock
310
archiving
files
113
Ascending
108
assistance
getting
62
automation
disabling
205
enabling
61, 205
-Bbasic
331
evaluate expression
252
RoboTaskApp object
331
script
253, 331
Basic script
275
battery power
triggering event
325
beginning
RoboTask
3
Break
189
breaking
loops
189
browse dialog box
displaying
85, 86
bugs
reporting
63
buying
RoboTask
6
-CCatch the output text
66
Change Folder
159
changing
103
directories
103
folders
103
Check connection
170
Check email
229
checking
e-mail
116
for windows
195
choice
91, 313
Clear Clipboard
208
Click the button
211
Client-Server
37
Clipboard
copy
207
Cut
206
get
208
paste
207
put
209
Clipoard
clear
208
closing
windows
193
Color Compliance
286
commands
using ftp
132
comma-separated string
174, 251
comment
79
computer display
triggering event
327
computer idle
triggering event
327
computers
locking
203
shutting down
74
conditional statements
using
189, 191
Connect to
39
© 2004-2015 Neowise.com
Index
connecting
dial-up connections
169
Continue
189
Copy
207
copying
files
93
tasks
49
Create Folder
159
creating
13, 103
directories
103
expressions
13
file lists
98
folders
103
tasks
5, 41
text files
97
variables
13, 170
Zip files
113
Custom variables
11
customizing
options
6
Cut
206
cyclic
triggering event
315
making
169
directories
changing
103, 129
creating
103, 130
printing
131
removing
104, 131
renaming
104
synchronizing
105
transferring
132
disabling
tasks
62, 175
display
triggering event
327
documents
opening
65
printing
68
Download
155
Downloading
email
227
files
120
ftp
127
duplicating
tasks
49
-D-
-E-
database
75
datasets
looping
184
Define connections
39
delaying
tasks
74
delete email
228
Delete file
158
Delete key
213
Delete Value
217
deleting
129
files
95, 129
ftp
129
tasks
47
Descending
108
device changed
triggering event
326
Dial Up
Check connection
170
dial-up connection monitor
triggering event
321
dial-up connections
editing
tasks
6, 47
Else statements
using
191
ElseIf Then
using
191
e-mail
checking
116
sending
117
enabling
automation
61
tasks
62
End If statements
using
191
End Loop
189
error handling
36
error processing
36
evaluate expression
252
events
Cyclic
315
Dial-Up Connection Monitor
Expression Monitor
322
© 2004-2015 Neowise.com
321
346
347
RoboTask User's Guide
events
File Monitor
316
Hot Keys
313
On Battery Power is Low
325
On Device Changed
326
On Display Changed
327
On Idle
327
On Log Off 327
On Palette Changed
327
On Spooler Changed
326
On Time Changed
325
Scheduler
310
Tray Icon
314
Window Watcher
322
exiting
RoboTask
49, 205
Export Registry
219
Expression Monitor
triggering event
322
expressions
173
creating
13, 170
deleting
173
modifying
59
overview
9
removing
173
setting
172
starting
176
-FFile Attributes
111
file lists
creating
98
File Loop
161, 178
file loops
ftp
132
file monitor
triggering event
316
File Permissions
167
files
93, 113, 115
archiving
113
copying
93
creating
97
deleting
95, 129
downloading
120, 127
extracting
115
looping
178
moving
93
renaming
94, 128
searching
98
synchronizing
105
transferring
132
unzipping
115
uploading
127
zipping
113
Fill
Web Form
254
Fill web form
253
focusing
windows
193
folders
changing
103, 129
creating
103, 130
printing
131
removing
104, 131
renaming
104
synchronizing
105
transferring
132
ftp
changing folders
129
creating folders
130
deleting
129
download
127
file loops
132
log off 126
log on
125
PWD
131
removing folders
131
renaming files
128
transfer
132
uploading
127
using commands
132
FTP File Loop
132
-GGet Text
208
getting started
3
-HHelp
opening
hiding
windows
62
193
© 2004-2015 Neowise.com
Index
hosts
pinging
121
hot keys
triggering event
313
HTTP
downloading
120
request
122
response
122
result
122
-I-
starting
stopping
JS Evaluate
174, 205
47, 175, 205
297
-Kkeyboard
hold down keys
73
release keys
73
strokes for
70
keystrokes
sending
70, 73
idle
triggering event
327
If Then statements
using
189
IMAP
233, 234, 236, 238, 239, 240
close connection
234
delete marked messages
239
download message
236
folder info
240
get flags
238
mail folder
234
mail loop
234
move message
239
open connection
233
set flags
238
Import Registry
220
Incoming email
225, 226, 227, 228, 229
increment
173
Input box
87
introduction
2
IsError
36
-JJavascript
295, 297
Javascrript
331
jobs
175
adding variables
13
creating
5, 41
creating shortcuts
49
deleting
47
disabling
62, 175
duplicating
49
editing
6, 47
running
5, 47
© 2004-2015 Neowise.com
-LLastErrorCode
36
LastErrorDescription
36
LastErrorStep
36
LastErrorTaskExternalName
LastErrorTaskID
36
Legal notice
6
listener
328
local variables
11, 18
locking
computers
203
log off 155
ftp
126
triggering event
327
Log on
153
ftp
125
logging
messages
205
logging off
computers
74
logoff 74
logs
viewing
53
Loop
226
looping
184
datasets
184
files
178
queries
184
simple
187
text
183
Window
185
loops
187
breaking
189
36
348
349
RoboTask User's Guide
loops
187
continuing
189
ending
189
iterating
132
-MMacro recorder
15
Mail loop
229
maximizing
windows
193
messages
displaying
79
logging
205
sending
222
Messages count
229
minimizing
RoboTask
204
windows
193
Mouse
15
click
211
move pointer
212
move to object
209
Move mouse pointer
212
Move pointer to object
209
Move to Object
209
moving
files
93
Multichoice
92
-NNetwork
Client
39
Connect to
39
Control remote
37
Defined connections
39
listener
328
plugin settings
223
send command
221
Server
37
network messages
sending
222
networking
dial-up connections
169
-Oopen dialog box
displaying
83
options
customizing
6
setting
53
overview
2
-Ppacking
Zip files
115
palette
triggering event
327
Parse
229
Paste
207
pinging
hosts
121
Pop3 Server
225, 226, 227, 228, 229
practical recommendations
19
custom variables
11
Debugging
18
task synchronization
19
tasks
17, 19
print working directory
160
printing
documents
68
folders
131
process
76, 77
programs
running
65
purchasing
RoboTask
6
Put Text
209
-Qqueries
looping
184
query
75
querying
loops
184
question dialog box
displaying
82
quitting
© 2004-2015 Neowise.com
Index
quitting
RoboTask
205
-RRDC
31
Read Value
215
Record a macro
15
RegExp
267
loop
267
match
273
replace
270
RegExp Com object
275
registering
RoboTask
6
Registry
Add key
212
Delete key
213
Delete Value
217
Export
219
Import
220
Read Value
215
Rename key
214
Rename Value
218
Write Value
216
Regular Expressions
267, 270, 273, 275
remote servers
checking
121
Remove Folder
160
removing
104
directories
104
folders
104
variables
173
Rename file
157
Rename key
214
Rename Value
218
renaming
104, 128
directories
104
files
94, 128
folders
104
ftp
128
reporting
bugs
63
restoring
RoboTask
204
windows
193
RoboTask
exiting
205
© 2004-2015 Neowise.com
minimizing
204
restoring
204
stopping
49
RoboTask Service
Advantages
19
Authentication
23
configure service tasks
Disadvantages
19
get access
31
Install
22, 24
Settings
24
Start
22, 24
Stop
22, 24
UNC names
23
Run as User
203
Run Script
253
running
tasks
5, 47
-Ssave dialog box
displaying
84
schedulers
triggering event
310
Screen Pixel
285
Screenshot
284
Color Compliance
286
Screen Pixel
285
Window Pixel
282
Window snapshot
278
script
294
JS Evaluate
297
JS Script
295
VB Evaluate
302
VB Script
299
searching
files
98
Send command
221
Send Keystrokes
65
sending
e-mail
117
keystrokes
70, 73
Service
start
199
status
201
stop
200
services
31
350
351
RoboTask User's Guide
services
starting
199
stopping
200
setting
options
53
variables
172
SFTP
153
Change Folder
159
Create Folder
159
Delete file
158
Download
155
File Loop
161
File Permissions
167
Log off 155
Log on
153
print working directory
160
PWD
160
Remove Folder
160
Rename file
157
Synchronization
165
Upload
156
SFTP Command
168
shortcuts
creating
49
Show
balloon
88
message
88
notification
88
shut down
triggering event
327
shutting down
computers
74
Simple Loop
187
simple loops
using
178, 187
Sort Text
108
sound
playing
79
spooler
triggering event
326
SQL
loops
184
query
75
SSH FTP
153
starting
services
199
tasks
174, 176
Stop Task
177
stopping
RoboTask
49, 205
services
200
tasks
47
String
247
between
247
delete
244
extract
245, 247
pos
246
replace
241
trim
242
Strings
241, 242, 244, 245, 246, 247
Synchronization
165
synchronize tasks
177
Synchronize workstations
221, 328
synchronizing
105
directories
105
files
105
folders
105
System services
199, 200, 201
system time
triggering event
325
System variables
10, 11, 337
displaying
59
-Ttask synchronization
19
tasks
15, 19, 49, 174, 175
adding variables
13
copying
49
creating
5, 15, 41
creating shortcuts
49
delaying
74
deleting
47
disabling
62, 175
duplicating
49
editing
6, 15, 47
enabling
62, 174
running
5, 47
starting
174, 176, 205
stopping
47, 175, 177, 205
waiting
177
technical support
62
Terminate Process
78
text
97
looping
183
Text file
108
© 2004-2015 Neowise.com
Index
text files
creating
97
toolbars
viewing
53
Total size
229
transferring
files
132
tray icon
triggering event
314
triggering events
Cyclic
315
Dial-Up Connection Monitor
321
Expression Monitor
322
File Monitor
316
Hot Keys
313
On Battery Power is Low
325
On Device Changed
326
On Display Changed
327
On Idle
327
On Log Off 327
On Palette Changed
327
On Spooler Changed
326
On Time Changed
325
Scheduler
310
Tray Icon
314
Window Watcher
322
-Uunhiding
windows
193
Unique File Name
110
unzipping
files
115
Upload
156
uploading
ftp
127
user variables
displaying
59
user-defined variables
13
Using Basic
19
-VVariables
10, 11, 173
adding to tasks
13
creating
13, 170
© 2004-2015 Neowise.com
deleting
173
Delimited variable
increment
173
list
337
modifying
59
overview
9
removing
173
setting
172
VB Evaluate
302
VB Script
299
viewing
logs
53
toolbars
53
Vista
31
174
-WWait for File
107
wait for process
76, 77
Wait for Task
177
Wait for window
196
Web
document
253, 262
Documents
259
form
253, 254, 262
Forms
259
links
262
page
262
While loop
187
Window
196
Window loop
185
Window pixel
282
Window snapshot
278
window watcher
triggering event
322
Windows
Change Position
198
Change Size
198
checking for
195
focusing
193
hiding
193
manipulating
193
maximizing
193
minimizing
193
restoring
193
unhiding
193
Windows 2008 Server
31
Windows 7
31
352
353
RoboTask User's Guide
WinPopup
sending
222
Working as system service
differences
30
RDC
31
Vista
31
Write Value
216
30
-XXML Document
287, 288, 289, 293
-ZZip files
creating
113
extracting
115
© 2004-2015 Neowise.com