1
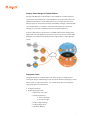
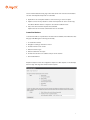
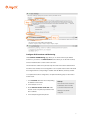
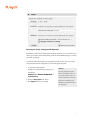
Stingray Content Delivery Cloud
Executive Summary
The Riverbed Stingray Content Delivery Cloud (CDC) is a fast and efficient application
delivery platform for end-users. However, unlike a CDN which leverages a global
network of servers to deliver content for all CDN customers, the Content Delivery Cloud
utilizes Joyent public or private infrastructure to provide the points of presence that offer
a private ‘CDN like’ experience for the delivery of a company’s content. Stingray enables
these services without the need for large initial capital investment or a complex
infrastructure.
Typical deployments will utilize Stingray Traffic Managers auto-scaling, content caching,
bandwidth management, performance monitoring and optimization features. Additional
functionality such as Stingray Application Firewall for deeper application level threat
identification and mitigation, and Stingray Aptimizer for user content optimization will
help enhance the performance and security of the application.
Introducing the Riverbed Stingray Content Delivery Cloud
The Riverbed Stingray Content Delivery Cloud (CDC) is a fast and efficient application
delivery platform for end-users. However, unlike a CDN which leverages a global
network of servers to deliver content for all CDN customers, the Content Delivery Cloud
utilizes Joyent public or private infrastructure to provide the points of presence that offer
a private ‘CDN like’ experience for the delivery of a company’s content. Stingray enables
these services without the need for large initial capital investment or a complex
infrastructure.
Typical deployments will utilize Stingray Traffic Managers auto-scaling, content caching,
bandwidth management, performance monitoring and optimization features. Additional
functionality such as Stingray Application Firewall for deeper application level threat
identification and mitigation, and Stingray Aptimizer for user content optimization will
help enhance the performance and security of the application.
How a Stingray Content Delivery Cloud Works
Extending a deployment by provisioning additional traffic managers closer to users
accelerates performance. Stingray Traffic Manager can be used to deliver your entire
application, including dynamic, static, and streaming content using a global network of
Stingray Traffic Managers.
Stingray proxies user
requests to the
application, connections
to the origin are
monitored and optimized
by Traffic Manager. With
Global Load balancing users
are routed to the location
In minutes extend Stingray functionality to existing
application deployments.
closest to them. If any
Provision edge sites when, where, and as needed for
monitor detects location is
user performance.
too busy or unavailable
Stingray will automatically send the request to the next best location. Requests are
examined by Traffic Manager to determine if the object is available in local Content
Cache and to deliver the response directly. If the resource is not available locally or is
dynamic, the edge Traffic Manager will request the data from the origin site and store
any objects for subsequent requests.
Increase the performance of more than just static content and provide users with a
consistent and reliable, yet personalized experience for their applications.
2
Stingray Traffic Manager: A Flexible Solution
Stingray Traffic Manager is advanced layer 7 ADC available as a software install on a
Joyent Private Cloud deployment or virtual appliance in the Joyent Public Cloud. This
flexibility ensures that the content delivery solution is not compromised as it can be
deployed (and torn down) quickly and easily. The flexibility of Stingray software enables
you to quickly deploy on the platform and location that best fits your needs. With
Stingray you can provision unlimited sites across all supported platforms.
Support multiple origins for performance or availability AND Provision Stingray at the
edge based upon user distribution and demand. Pay for what you use and with Traffic
Manager’s auto scaling and dynamically provision edge locations or origin application
servers.
Deployment Tasks
This guide assumes an understanding into the basic concepts of configuring and
working with Stingray Traffic Manager, DNS, and Cache Headers for deploying a content
delivery cloud on Joyent infrastructure. For complete information and configuration
steps please refer to the User Manual
• Configure DNS Zones
• Stingray Deployment Tasks
• Deployment with Joyent
• Create Virtual Servers
• HTTP at the Origin
• HTTP at the Edge
• DNS for Origin and Edge
• Configure Edge Cache
• Create Site Monitors
3
• Create GLB Locations
• Create GLB Service
• Configure GLB Details
Architecture Considerations
• Content caching requires Stingray 1000L or above. GLB requires Stingray 2000L or
above.
• All sites must have content caching enabled; for optimal performance it is
recommended that all sites perform GLB address resolution.
• For a deployment with minimum redundancy GLB functionality can be deployed in
two sites and additional sites can be deployed with just content caching. Reference Architecture
Configure DNS Zones
To send the users to the best location, Stingray Global Load Balancing will used to
respond to the users DNS query for www.example.com with the address of the site the
will respond to the request.
When a service is hosted in multiple locations, each instance of the service will be
available from a different IP address. However, an end user will use a single domain
name to access the service.
Stingray manipulates the DNS resolution of this domain name to control how each user
is directed to a location. It monitors the performance and availability of each location to
inform the load-balancing decisions it makes.
4
Stingray works with a standard round-robin DNS configuration. The DNS servers are
configured to return the IP addresses of all of the locations hosting a service. Stingray
operates as a proxy in front of DNS servers and rewrites the round-robin DNS
responses, ensuring that the client is directed to the single most appropriate location.
The IP address for each location that will serve traffic should be added as an “A” Record
for the DNS name of the service for global load balancing.
This deployment is for http://www.example.com/, but to ensure functionality for the
people who don’t use www (i.e. http://example.com) included is example.com. This
could also be achieved with DNS redirection, CNAME records.
.
Deployment with Joyent Public Cloud
This section assumes the user has established an account with the Joyent Public Cloud
and is able to provision virtual machines.
Create the Stingray instance
1. Sign on to the Joyent Cloud portal at https://my.joyentcloud.com/. The console
displays a summary of the virtual machines created in the Joyent Cloud.
2. Click ‘Add a machine’
3. Select the data center where the Stingray instance is to be deployed. As of May 2013
the available data center locations are:
1. US-West-1 San Francisco, CA
2. US-SW-1
Las Vegas, NV
3. US-East-1 Ashburn, VA
4. EU-AMS-1 Amsterdam
4. In the ‘Select an image’ section enter ‘stm’ in the search field. Then select the image
with the desired bandwidth and features:
5
Create the Stingray instance (continued)
5. Select the option with the desired combination of RAM, disk space and CPU. Enter a
name for the instance and click “Create instance’.
6. The virtual machine just created is displayed on the console with a status of
‘provisioning’.
6
Connecting to Stingray
1. Wait for the status of the Stingray instance to change to ‘running’ then click on the
machine name.
2. Two IP addresses are displayed for the machine. The first IP address is public.
3. Click on the ‘Credentials’ link to display the account names and passwords for
access.
4. Open a browser to: https://publicIPaddress:9090/. The Stingray login screen is
displayed.
5. Enter ‘stingray’ in the Username field, and the password displayed for the stingray
user from step 2 in the Password field.
Configure Origin Virtual Servers
In this deployment, the original application is configured in an active/active configuration
across two data centers. Each origin site will have Stingray (origin1 and origin2) are
configured with an application (in this example HTTP) and DNS virtual server to use the
actual application servers local to each Traffic Manager as the pool nodes.
HTTP Virtual Servers
Each origin Stingray is configured as it would be with or without a distribution network.
Create a Virtual server for the application (HTTP Port 80) and configure the actual
servers as the load balanced pool members.
7
Please refer to Stingray Documentation and Community for application specific
configuration and performance optimizations for each virtual server configuration
DNS Virtual Servers.
Each site providing global load balancing is configured with a DNS (UDP 53) Virtual
server to use the real DNS servers hosting the example.com zone as the pool nodes.
Configure Edge Virtual Servers
Each edge site will have a virtual server to deliver the application, and a virtual server to
deliver GLB managed DNS responses to the users.
With each edge Stingray deployment, the virtual servers created are similar to the virtual
servers created at the origin sites, with the exception of the application (HTTP) virtual
server. The HTTP virtual server at the edge is configured as to use the Traffic Managers
8
at the origin as the pool nodes. Utilizing Traffic Manager’s functionality at the origin
enables optimal performance and control for the application delivery.
HTTP Virtual Servers
The virtual server at each edge site is configured to use the origin sites as the pool
nodes.
DNS Virtual Servers.
Each site providing global load balancing is configured to use the real DNS servers
hosting the example.com zone as the pool nodes.
Tech Tip!
The Edge DNS Virtual Servers are configured the same as the origin sites.
For this deployment the DNS virtual servers at both the edge and origin are configured the
same and use the same application nodes.
Tech Tip!
Although not required, consider configuring the origin pools to use IP persistence to ensure all
requests for the session go back to the same origin location.
Configure Edge Caching
The key difference between the edge and origin is not just where the content is coming
from, but the ability to serve the requests from local cache.
9
This allows Stingray to store objects, and when another client requests the object,
Stingray will send the content directly, rather than forwarding the request to the origin
site.
To enable content caching:
1. Navigate to the edge virtual server settings, then content caching.
2. Select the “Yes” radio button.
3. Click update at the end of the page.
!
1
2
3
Caching Details
What can be cached?
By Default not all web content can be cached. Stingray Traffic Manager conforms to the
caching recommendations of RFC 2616, which describe how web browsers and server
can specify cache behavior. However, if an application is misconfigured, and does not
provide the correct cache control information, then a TrafficScript or RuleBuilder can be
10
used to override default caching logic. Client and Server HTTP Cache-Control headers
can also make requests/responses not cacheable.
• Applications can use expires header to control how long to cache an object.
• Objects can use the vary header to control which requests can use a cached copy.
This allows different versions of objects to be cached for different users.
• Only HTTP GET and HEAD requests are cacheable.
Objects that use HTTP basic-authentication are not cacheable.
Create Site Monitors
To ensure that traffic is only directed to the sites that are available, the GLB service uses
Stingray Traffic Manager’s monitoring functionality.
1. To create site monitors:
2. Navigate to Catalogs > Monitors in the UI
3. Provide a Name for the monitor
4. Select the monitor type
5. Select Pool/GLB for the scope
6. Provide the hostname or IP address and port for the location
7. Click Create Monitor
Repeat the steps for each site configured to respond to client requests. In this example,
both the origin and edge sites will serve client requests.
11
Create GLB Locations
GLB locations are used by Global Load Balancing Services to identify where the services
are that they are load balancing across.
To create a GLB Location:
1. Navigate to Catalogs > Locations in the UI. (figure 1)
2. Provide a Name for the location and click Add Location. (figure 2)
3. The settings page for the created monitor is now loaded. Define the location with one
of the radio button options. (figure 3)
4. Click Update Location to save the settings. (figure 3)
!
figure'1
!
!
figure'2
!
Tech Tip!
To ensure Traffic Manager sends the request to the
closest location available, an accurate location must
be configured.
!
figure'3
!
Configure GLB Service
Now that the GLB Service has been created, some additional settings need to be
configured.
Step 1: In the Basic Settings section, Next to Enabled Select the Yes radio button and
click Update
Step 2: The GLB Service now needs to know what IP addresses and monitors to use
for each site, click on Locations and Monitoring
12
Configure GLB Locations and Monitoring
The Locations and Monitoring page allows you to add and remove pre-defined
locations to your service. The Add Location section allows you to add new locations,
and each added location contains a link to remove it.
The GLB Service created in the previous step will contain the locations selected when
the service was created, but the configuration is not complete. Each location will should
be configured with its corresponding IP address and Site Monitor previously created.
To complete the locations configuration, complete the following steps for each site or
location used.
1. In the Local IPs: field enter the corresponding
IP address for the location.
• In this example 10.2.0.2
2. Under Add new monitor to the list: select
the site monitor we previously created for that
site or address.
Tech Tip!
The Local IPs: value is one of the
IP addresses used in the DNS
round robin A Records for load
balancing in the domain
configured.
• In this example Origin2 example.com
13
Directing the Traffic, Configure GLB Algorithm
By default the GLB Service created with the Adaptive algorithm with a 50% effect on the
clients’ geo location. Several load balancing methods are available allowing you to direct
your traffic accordingly.
To distribute traffic based solely on the geographic location of each client, you should
change the GLB service configuration to use the Geographic algorithm
1. To Change the GLB algorithm:
Navigate to the load balancing setting for the
GLB service:
GLB Services > SERVICE NAME HERE >
Load Balancing
2. Select the Geographic radio button
3. Click Update to save your changes
Tech Tip!
Using the geographic algorithm
seems to be the best choice, but
in a situation where the load on a
particular site results in lower user
performance the Adaptive with
Geo Effect could provide the best
user experience.
14
Apply GLB Service
The final step in the configurations is to apply GLB Services configuration to the DNS
Virtual Server.
1. Navigate to the GLB Services setting for the DNS Virtual Server.
Services > VIRTUAL SERVER NAME HERE > GLB Services
2. Select the GLB Service name previously created from the drop down list.
3. Click Add Service to apply and save your changes
15
Conclusion
Riverbed Stingray Content Delivery Cloud offers an application owner flexibility and
control of content delivery. It can offer significant improvements in end-user experience
in application environment where there is rapid business growth or change. It can
reduce management overhead and CAPEX commitments while providing the scalability
to meet business requirements.
About Joyent
Joyent is the high-performance cloud infrastructure and data analytics company. The
Joyent Cloud is built from the ground up to meet the requirements of today's
demanding real-time web and mobile applications. The Joyent Manta Storage Service is
the first compute-on-storage innovation that eliminates data movement and enables
inexpensive, lightning fast big data analysis in-place, transforming the economics and
utility of object storage and real-time big data.
For more information visit http://www.joyent.com
About Riverbed
Riverbed delivers performance for the globally connected enterprise. With Riverbed,
enterprises can successfully and intelligently implement strategic initiatives such as
virtualization, consolidation, cloud computing, and disaster recovery without fear of
compromising performance. By giving enterprises the platform they need to understand,
optimize and consolidate their IT, Riverbed helps enterprises to build a fast, fluid and
dynamic IT architecture that aligns with the business needs of the organization.
Additional information about Riverbed (NASDAQ: RVBD) is available at
www.riverbed.com
16