1
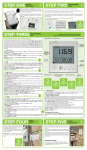
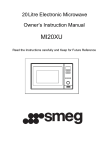
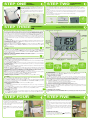
STEP ONE
INSTALL
BATTERIES
STEP TWO
SYNCHRONISE
UNITS
Using a cross head or flat bladed screwdriver, remove
the Sender Unit battery compartment cover and insert
3AA batteries. Press the RESET button located on the
rear of the Transmitter
Press and hold the CHECK key on the front of the Sender until the red LED flashes.
Slide the rear battery compartment off the Display Unit.
Insert 3 AA batteries in the Display Unit. You will hear a
short beep.
The two units will now connect. Please note, this may take up to 2 minutes. Once connected the
radio wave icon in the top left of the screen will be fully illuminated and a “0” will be displayed in
the main display.
Press and hold the SEARCH key, located on the rear of the Display Unit. Release the SEARCH
key on hearing a short beep. The radio wave icon, in the top left hand corner of the main screen,
will flash.
You can position the Display Unit up to 30 metres away from the Sender
(subject to building construction).
?
If the
synchronisation
process fails turn
over to find out
what to do
STEP THREE
PROGRAMMING
YOUR MONITOR UNIT HAS THREE SCREENS.
The RADIO WAVE icon
The SEARCH button
The CHECK button
Starting at the top, left hand side, follow these
instructions to fully set-up and programme your monitor.
SIGNAL INDICATOR
REAL TIME DATA SCREEN
MODE INDICATOR
The main screen displays real time data. The lower left hand screen displays the time, date and
room temperature. The lower right hand screen displays accumulated and average data to date.
You will hear a short beep every time you press one of the keys, MODE, ADJUST, SET. We
recommend you use the sound to help you programme the settings accurately. If you would prefer
not to hear the beep, you can turn the sound off by pressing the MODE and ADJUST keys at the
same time. Hold for 2 seconds. When the sound indicator icon is no longer visible, the sound has
been turned off. This icon is only visible when the sound is on. To resume sound, press the two
keys again and hold for 2 seconds. You will hear a short beep and the sound indicator icon will
reappear
ACCUMULATED
AVERAGE
DATA SCREEN
A. TIME/CLOCK:
Press and hold the SET key until you hear a beep. SET icon will appear in bottom left hand corner.
CLOCK will be displayed.
Press SET again. Press ADJUST or MODE key to display the time in either 12 hour clock or 24
hour clock mode. Press SET to confirm.
HOUR will be displayed. Press the ADJUST or MODE key to set the correct hour. Press SET to confirm.
MINU will be displayed. Press the ADJUST or MODE key to set the correct minutes. Press SET to
confirm.
DATE will be displayed
TIME, DATE
AND ROOM
TEMPERATURE
SCREEN
SET ICON
SOUND
INDICATOR
(displayed when
in SET mode)
B. DATE:
Press SET to set the date. DDMM (Day/Month/Year) will be displayed. Press ADJUST or MODE if
you wish to change the date display to MMDD (Month/Day/Year). Press SET to confirm. YEAR will be
displayed. Default setting is 10 (2010). Press SET to confirm or ADJUST or MODE to change the
year. Press SET to confirm.
MNTH will be displayed. Press ADJUST or MODE to set the month. Press SET to confirm. DAY will be
displayed. Press ADJUST or MODE to set the day. Press SET to confirm.
TAR 1(tariff) will be displayed.
MINI-USB
CONNECTION
C. TARIFF RATE:
Your OWL can be programmed with up to 6 different tariff settings, to allow for different tariff rates
according to time and/or days of the week. TAR 1 is your main setting. You can choose to switch
TAR 2-6 settings on or off, depending which apply to you.
Press the SET key again and £ will flash in the left hand side of the screen or the Pence will flash
on the right hand side of the screen.
Press the ADJUST or MODE key and choose to enter your rate as £ per hour or pence per hour.
Press SET to confirm.
The first digit of the rate will flash. Check your tariff and enter your rate. e.g. 10.50 pence using the
ADJUST or MODE key.
Press SET to confirm and enter the next digit. Continue this sequence until all four digits of your
rate have been set. Press SET to confirm.
W.DAY will be displayed in the main screen and the days of the week will flash in the lower left hand
screen. Press ADJUST or MODE to choose your tariff rate period. Choose between the five week
days, MON-FRI, or weekend only, SAT-SUN or all week, MON-SUN. Press SET to confirm.
HOUR will be displayed and the first digit of the clock in the lower left hand screen will flash. Press
ADJUST to set the start time hour for this tariff rate. Press SET to confirm.
MINS will be displayed. Press ADJUST or MODE to set the minutes. You have now set the specific
start time for this tariff. Press SET to confirm. TAR 2 and OFF will be displayed.
Enter other tariff menus by pressing the SET key or MODE to skip.
Continue this sequence for all variations in tariff rate and time, pressing SET to confirm.
ALARM will be displayed and OFF.
D. ALARM:
Press the SET key again. OFF will flash in the window. Change this setting if you would like an
alarm to sound when the usage peaks above a specified rate.
Press ADJUST or MODE to change to ON. Press SET to confirm. The default setting is 10.00 KW.
You can choose to change this from 0 up to 999.9 KW. Press the ADJUST or MODE key to set the
maximum rate to trigger the alarm.
After each digit change, press SET to confirm. Press the SET key again.
CURR will be displayed and a £ sign.
E. CURRENCY:
Your default setting is £pounds sterling. This will display the cost of your energy consumption in
your chosen currency.
Press the SET key again if you wish to choose a different currency. Your options are €, $, ¥, F, P, R,
& Kr. Press ADJUST or MODE to choose the correct currency. Press SET to confirm.
VOLT and 230 will be displayed.
TARIFF INDICATOR
LOW BATTERY INDICATOR
NAVIGATION CONTROLS
(displayed when batteries in
monitor/sender are low
USB ICON
(displayed when
connected to a pc)
? ? ? ? ?
To find out what a
tariff rate is, simply
turn over the
sheet for more
information
If you’re on a tiered
tarif simply turn
over to find out how
to set up OWL
What is the
ALARM function?
Turn over this sheet
to find out.
Want to view your
historical data?
We show you how
on the other side of
this sheet.
Want to connect
to your PC?
Full instructions
are included on the
enclosed CD.
G. TEMPERATURE:
Your default setting is Centigrade, shown as °C. You can choose to display the temperature in
Fahrenheit, shown as °F. Press ADJUST or MODE to change. Press SET to confirm.
GHG and 0.46kg/kwh will be displayed.
H. GREEN HOUSE GAS UNITS:
Your OWL can calculate the amount of CO2 emissions per unit of electricity used. You have four
options for displaying this data. With each option you have real time data and accumulated data.
Real time data is shown in the main screen. Accumulated data is displayed in the lower right hand
screen. You can choose to display this data in either metric or imperial values.
Press the SET key. The measures will flash in both the main screen and lower right hand screen.
Press ADJUST or MODE to choose between these options:
i)
Real time in kilogrammes (KG) & accumulated in kilogrammes (KG)
ii) Real time in pounds (LB) & accumulated in pounds (LB)
iii) Real time in kilogrammes (KG) & accumulated in metric tonnes (TONNE)
iv) Real time in pounds (LB) & accumulated in imperial tons (TON)
When you have chosen press SET to confirm. The digits in the main screen will start to flash. Press
ADJUST or MODE to select the conversion value between 0.00kg to 1.90kg for metric, or 0.00LB
to 4.00LB. Press SET to confirm.
END will be displayed.
F. VOLTAGE:
TO REVIEW YOUR SETTINGS
Your default setting is 230 Volts.
Press the SET key if you wish to choose a different voltage. Your options are between 100 and 400
volts. Press ADJUST or MODE to set the correct voltage for your country. Press SET to confirm.
°C and TEMP will be displayed.
Press the SET button and then the MODE button to scroll through your settings. You can exit the
setup at any time by pressing and holding the SET key, and all changes made to this point will be
saved.
STEP FOUR
Identify live outgoing supply cable to electricity
meter (usually grey, red or brown and located on
the right as you look at the meter).
Unclip the Sensor and fit around live cable. Snap
the clip shut to fasten securely in place (see the
images to the right).
Please Note: It is normal for the sensor
to be loose fit or be able to slide along the
cable.
?
If you have a
3-phase
installation turn
over to find out how
to connect OWL
LOCATE
OUTGOING
CABLE
STEP FIVE
FIT THE
TRANSMITTER
Fix the mounting bracket (optional) to the wall or the baseboard used to mount your meter, next to the fuse box or
nearby.
Slot the Sender into its bracket and connect the Sensor cable
to any one of the three Sender sockets, located on the base
of the unit.
The photograph on the right shows a typical installation, with the
Sender mounted on it’s bracket to the right of the meter and
the Sensor fitted around the live electricity cable (usually grey,
red or brown).
CONGRATULATIONS
You have now set up and installed your
successfully.
For Troubleshooting and additional information please turn
over this sheet or visit www.theowl.com
SAFETY INFORMATION
Keep the equipment out of the reach of children, especially infants.
Installation of this product must be carried out by adults only and if there is any doubt, a qualified
electrician.
Do not install your equipment in a humid room (bathroom, laundry, kitchen etc) or in close proximity to a
tap or water source. Do not expose the equipment to moisture, splashes or spray.
The equipment and all associated components are for indoor use and in normal temperature conditions only.
Avoid extreme temperatures. Store away from sources of heat, ignition or fire.
Do not attempt to open, disassemble or repair the equipment, other than to change the batteries.
The equipment contains a radio transmitter, which may affect the operation of medical or emergency
equipment. Before using this equipment in a medical environment, always seek the advice of a qualified
medical expert.
The LCD screen is made of glass and may break if dropped.
Please take special care when handling a damaged Display screen, as the liquid crystals may be harmful to
your health.
Do not cover the ventilation holes on the equipment.
Please ensure you read this Installation and Programming Guide carefully before using the equipment.
If OWL+USB is used in a manner not specified by 2 Save Energy Ltd, the protection provided by the
equipment may be impaired.
2 Save Energy Limited
The Annexe, Field House Barn, Chineham Lane, Sherbourne St John, Basingstoke, Hants RG24 9LR
Tel: +44 1256 383 431 [email protected]
WARRANTY INFORMATION
+USB
Installation and Programming Guide
BEFORE YOU START
CHECK YOUR BOX CONTENTS
2 Save Energy Limited guarantees that the OWL +USB will work for a minimum period of 12 months
from date of purchase and that it will be free from defects in materials, workmanship or design. If during
this limited 1 year period of guarantee, from date of purchase, you find that the equipment is not working
properly, you may return it to us and we will replace, or, (at our discretion) repair it, free of charge.
If something is missing, please contact us: [email protected]
CD SOFTWARE APPLICATION
6 X AA BATTERIES
2 Save Energy Limited will not accept any liability for defects arising from fair wear and tear, accidental
or wilful damage, misuse or failure to follow product or safety instructions.
If you return any equipment as faulty, 2 Save Energy Limited reserves the right to test the
equipment and if found to be in perfect working order, to return it to you. In this event, 2 Save Energy
Limited reserves the right to charge for any testing or postage costs incurred. This does not affect your
legal rights relating to equipment, which is faulty.
Warranty conditions only apply where Proof of Purchase is provided.
To return your OWL +USB contact [email protected] to report the issue and reason for
returning your product. 2 Save Energy Limited will issue you a form and reference number. Once we have
received the completed form and proof of purchase we will commence the returns process.
COMPLIANCE
The CE marking certifies that this product meets the main requirements of the European Parliament and
Council Directive 1999/5/EC. A copy of the signed and dated Declaration of Conformity is available on
request.
MONITOR UNIT
SENDER
USB CABLE
INSTALLATION GUIDE
SENSOR
Thank you for choosing the OWL+USB.
Follow these simple steps to set up your OWL+USB and you will be able to:
Calculate the amount of power being used, the cost of that power, the amount of associated green
house gas emissions and download recorded data to your PC.
Before setting up your OWL+USB, please ensure you carefully read the Safety Precautions.
Before you start installation please ensure you have:
Turn over for full
installation instructions
Your OWL +USB is manufactured under an ISO 9001 Quality Management System.
1. An electricity bill with details of your tariff and rates
2. A small cross head or flat bladed screwdriver
TROUBLESHOOTING
ADDITIONAL INFORMATION
ISSUE
POSSIBLE CAUSE
TRY THIS
USB RATING INSTALLING OWL IN A 3-PHASE SUPPLY
If you have a 3-phase supply you will need two additional Sensors and possibly larger sensors
depending on the size of your cables. Fitting the sensors is the same process as above but you will
need to identify the correct cables using the information below:
5Vdc 50mA
Display is blank
Batteries
Check they are correctly installed or
replace batteries
“0” is displayed
No current detected
1. Check Sensor is correctly
attached to and closed properly
over Live cable (SEE STEP 5)
2. Check Sensor is connected
to Sender
3-PHASE WIRING CODES
L1
UK until April 2006
Red
L2
Yellow
L3
Blue
Neutral
Black
Earth
Green/yellow striped
(green on old installations)
Europe (inc UK)
from April 2006
Black
Grey
Blue
Green/yellow striped
Check batteries are correctly
installed or replace batteries or
start full reset process.
If you are unsure about installation please consult a qualified electrician or visit www.theowl.com for more information
“•”“----” are
displayed
Batteries or lost synchronisation
Readings appear high
Tariff or voltage settings may be
incorrect
Check your tariff and voltage
settings (see overleaf) and reset if
necessary
Sensor not closed properly
Although the sensor clip maybe
closed, if it is a tight fit then the core
may not close properly. Check the
diameter of your cable (up to 10mm
cable for standard sensors and
17mm for large sensor).
Reposition the clip on a straight
piece of cable.
Readings appear low
1. Press the RESET button on the
back of Sender Unit (The end
of a paperclip is ok for this)
2. Press and hold the green
CHECK button on the Sender
until the RED light starts to flash
Synchronisation fails
In the unlikely event that
3. Press and hold the SET & RESET
in STEP 2
synchronising fails you will need
buttons of the Monitor at the
to reset your OWL back to factory
same time (Use end of paperclip).
settings and clear the unit’s memory 4. Release the RESET button and
by following these instructions:
a tone should be heard.
All the segments should appear
on the Display.
5. On hearing a second tone the
Tip: After resetting the Display Unit, it
SET button can be released.
can take up to 2 minutes to establish a
The signal indicator will flash
link with the Transmitter. Press and hold
meaning that the display is
the CHECK button on the Transmitter
searching for the Sender, and
until the red LED flashes.
will be fully illuminated when it
This will then transmit every 2 seconds.
has synchronised to the Monitor.
6. A “0” should now be displayed in
the middle of the screen.
“----” in display
Monitor Unit & Sender have lost
radio link and repeating STEP 2
synchronise units has failed
Brown
WHAT IS THE ALARM FUNCTION?
The alarm function is designed to warn you when your pre-determined electricity usage peaks
above a specified rate. This is useful if your household is running on a budget and you need to
monitor costs closely.
UNDERSTANDING TARIFFS AND TIERED TARIFFS
Electricity suppliers sell electricity at different rates to different people across the country. Rates
may also vary at different times of the night or day. The rate you pay for your electrity is called a
“tariff” and is clearly identified on your electrity bill.
Some electricity users will have primary/secondary rates based on usage. To make use of this data
you will need to calculate an average based on usage and enter this figure into tariff 1.
CAN I MONITOR APPLIANCE LEVEL?
The Sensor is unable to detect current flow when clipped an appliance lead with earth, neutral and
live cables. The sensor will only work when clipped over a live phase cable as per STEP 4.
HOW MUCH DATA CAN BE STORED ON MY OWL+USB?
Data is stored for the last 720 days as a daily value of electricity used, cost of electricity used
based on Tariff rates entered for that day, and amount of CO2 emissions based on conversion
factor for that day. This data is accessible through the History function of the Monitor (see below).
Data is also stored every minute for the last 30 days and this is accessed using the automatic
download function of the software application supplied with the Monitor.
INSTALLING THE SOFTWARE APPLICATION TO DOWNLOAD THE DATA TO PC?
Please read the User Manual on the Software Application CD supplied with OWL+USB Electricity
Monitor. Install the software following the installation guide in the user manual.
Follow the Getting Started section of the User Manual, to get the New Hardware installed, and to
add the USB as a “Connected To” device in the software.
HOW DO I DOWNLOAD THE DATA TO MY PC?
Simply connect the mini-USB port of the monitor to the PC, and the last 30 days data (or number days data stored if less than 30 days) will automatically download to the OWL USB Connect2
database.
HOW OFTEN DO I NEED TO DOWNLOAD THE DATA TO MY PC?
Data should be downloaded every 30days since last data download or sooner.
If 30 days is exceeded since last download, then the data for the days between the last 30 days
and last download of data will be overwritten in the monitor, hence there will be no data saved for
those days in the database.
OWL Rechargeable Alkaline Batteries can be used to operate your OWL Wireless Electricity Monitor. Please note the OWL Rechargeable Alkaline Batteries need to be charged using a separate charger
as the OWL Wireless Electricity Monitor does not have an in-built charging circuit.
Please Note: If you are concerned or confused by the installation process please call customer
services on 01256 383 431 or email [email protected]
REVIEWING YOUR SETTINGS AND READING YOUR DATA
If you wish to review any of the programmed settings at any time, press and hold the SET key until the SET icon
appears and you hear a short beep.
CLOCK will appear in the lower right hand screen.
Press MODE key to scroll between the different program settings, DATE, TAR 1, TAR 2, TAR 3, TAR 4, TAR 5, TAR
6, ALARM, CURR, VOLT, TEMP, GHG, END until you reach the one you wish to change.
Press SET key to confirm.
Refer to Programming Your OWL again and follow the instructions in this guide to change the settings.
HOW TO READ YOUR DATA:
Your Display unit will show COST in the main screen.
To view ENERGY consumption, press MODE key once.
To view GREEN HOUSE GAS Emissions, press MODE key again.
To return to the main screen, press MODE key again.
HOW TO READ YOUR AVERAGE DATA:
Press and hold the ADJUST key and AVERAGE data will appear in the bottom right-hand corner. AVERAGE
DAY (based on 30 days rolling) will appear first. Press adjust again and AVERAGE WEEK (based on 30 days
rolling) will appear, press ADJUST key again and AVERAGE MONTH (based on 30 days rolling) will appear.
To return to the real time data display press MODE key and hold for 2 seconds until you hear a short beep.
HISTORICAL DATA:
The data displayed in the lower right hand screen of your Display Unit will always show the cumulative
energy/emissions consumption and the total cost to date, or since your last reset.The OWL can store and show
accumulated historical data for up to 2 years.
At any time, you can choose to view historical data for comparative purposes. You can choose to view this data from a
specific day, week, month or 3 month period.
To set the start date for your historical data, press MODE key and hold for 2 seconds. HIST will be
displayed in the main screen and YEAR in the lower right hand screen. The year in the lower left hand
screen will flash. Press MODE key to reduce the Year or ADJUST key to increase the year that you wish the data to be
reviewed from. Press SET key to confirm.
MONTH will be displayed in the lower right hand screen and the month will flash in the lower left hand screen.
Press MODE key to reduce the month or ADJUST key to increase the month. Press SET key to confirm.
DAY will be displayed in the lower right hand screen and the date will flash in the lower left hand screen. Press
MODE key to reduce the day or ADJUST key to increase the day. Press SET key to confirm. You now have your
start date set.
You can now choose your review period. Choose between this day, one week, one month or three months from
this date. Press ADJUST to scroll between these options. The data in the lower right hand screen will change according to your selection.
HOW TO READ YOUR HISTORICAL DATA:
Your Display unit will show HIST in the main screen and COST in the top right hand corner of the main screen.
According to the start date and time period you have set you can now view historical cost data.
To view historical energy consumption during this period, press MODE key once.
To view historical green house gas emissions during this period, press MODE key again.
To return to the main historical cost screen, pressand hold the MODE key again.