1
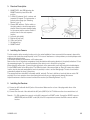
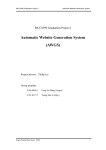
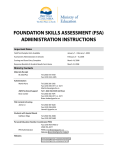
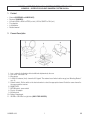
AVMOD9 – WIRELESS B/W 2.4GHz CAMERA SYSTEM WITH IR LEDS
AVMOD10 – WIRELESS COLOUR CAMERA SYSTEM 2.4GHz
1. Content
•
•
•
•
•
•
Camera (AVMOD9BC or AVMOD10CC)
Receiver (AVMODRX)
A/V cable (RCA to RCA for NTSC (not incl.); RCA to SCART for PAL (incl.)
Two adapters
8 AA-batteries
Detailed manual
2. Camera Description
1.
2.
3.
4.
5.
6.
7.
8.
9.
10.
11.
Lens : automatic focalisation, without additional adjustments by the user.
Lens body : can rotate 170°
Microphone.
2.4GHz A/V antenna (front) : transmits A/V signals. The antenna has a limited rotation range (see “Orienting Devices”
on p. 3).
Channel switch : Put the switch on the desired number to select the appropriate channel. Select the same channel for
the camera and the receiver.
ON/OFF LED
OFF/ON switch : power switch
Plug for 9V-adapter
Mounting hole
Battery compartment
IR LEDs : 8 IR LEDs for night vision (ONLY FOR AVMOD9)
AVMOD9 & 10
1
GB
3. Receiver Description
1. ON/OFF LED : this LED light when the
ON/OFF switch is placed in the ON
position.
2. 2.4GHz A/V antenna (front) : receives and
transmits A/V signals. The antenna has a
limited rotation range (see “Orienting
Devices” on p. 3).
3. Channel DIP switches : Put the switch on
the right number to select the appropriate
channel. Select the same channel number
for the camera and the receiver. Switch 5
sets the timer for the auto sequence
function.
4. Left audio jack (white)
5. Right audio jack (red)
6. Video jack (yellow)
7. 9V adapter plug
8. ON/OFF switch
4. Installing the Camera
Test the reception at the mounting location prior to the actual installation. Have someone hold the camera in place while
someone else checks the reception quality on the TV. In case of interference or other problems you should perhaps select
a different mounting location.
The camera operates on AA batteries or AC mains power:
Remove the cover of the battery compartment. Insert the batteries while paying attention to the polarity indications ! Close
the compartment again. Tip : remove the batteries if the device is not to be used for a long time.
When using AC mains power : Connect the jack at the back of the camera with a wall outlet using the included adapter.
Put the POWER switch in the ON position. The LED at the back of the camera lights up. Place the camera in a suitable
location, aim the lens and manipulate the lens body carefully in order to set the viewing angle. The auto focus function
automatically adjusts the focus of the picture.
The camera head can rotate 200° horizontally and 30° vertically. The lens is built into a lens body that can rotate 170°
vertically. Do not use excessive force when turning the lens body as you might severely damage the camera.
Adjust the antenna so that the concave front faces the receiver (see “Orienting Devices” on p. 3).
5. Installing the Receiver
a) Connect an A/V cable with the A/V jacks of the receiver. Make sure the colours of the plugs match those of the
receiver's jacks.
b) Connect the other end of the cable with the A/V jacks (LINE IN) of the TV. Make sure the colours match here, too!
Remark : For PAL systems the connector on the A/V component is a SCART socket. Connect the SCART connector
(RECEIVER) with the SCART socket (IN) of the A/V component and connect the RCA connector with the
receiver.
AVMOD9 & 10
2
GB
c) Connect one end of the supplied adapter with the wall outlet and connect the other end with the jack at the back of the
receiver. Put the power switch in the ON position. The LED on the receiver's front panel lights up.
d) Place the receiver in a suitable location and aim the antenna in such a way that the concave front is facing the camera
(see “Orienting Devices” below).
6. Installing Other Applications
a) Reception on a Computer
• The yellow plug of the A/V cable is connected with the video jack of the TV tuner or the video capture card of the
computer on the one hand and with the video jack of the receiver on the other hand.
• Connect the mini stereo plug of the adapter (available in most electronics shops) with the AUDIO IN jack at the back of
the computer and the red and white A/V plugs with, respectively, the AUDIO LEFT and AUDIO RIGHT jacks of the
receiver.
b) Night Vision (ONLY FOR AVMOD9)
• The AVMOD9 is equipped with 8 IR LEDs capable of picking up clear images in low-light conditions. Put the
OFF/ON/NIGHT switch at the back of the device in the NIGHT position to engage the night vision function. Deactivate
the night vision function when you don't need it as this saves electricity.
7. Orienting Devices
Place the camera and the receiver on a flat and stable surface. Place the devices as high off the ground as possible so the
operation of the devices will not be impeded by people walking between the camera and the receiver.
Microwave ovens can cause interference. Make sure there is no microwave oven between the camera and the receiver.
Make sure the convex side of the A/V antennas of camera and receiver are facing each other. There is no need to raise the
antennas if camera and receiver are less than 3m apart.
Remark : The A/V antennas were designed to be able to rotate but their rotation range is still limited. The antenna and the
stopper will both be damaged irreparably if you try to rotate the antennas too far.
8. Auto Sequence Function for Monitoring Multiple Locations
The built-in auto sequence function of the receiver is ideal for security purposes. You can purchase additional wireless
cameras with built-in transmitters that transmit picture and audio to the receiver. The receiver is equipped with 4 channels
and uses up to 4 cameras. It displays the picture of these 4 cameras sequentially on 1 single TV/monitor. Thanks to the DIP
switches you can choose several receiver settings. In the default setting only the first DIP switch is in the ON position.
DIP switches 1 through 4 set the auto sequence function of the channels. Place the switch of the channel you want to
display in the ON position. Switch 5 sets the time in between sequences : ON switches channels every 8 seconds, OFF
switches every 4 seconds.
AVMOD9 & 10
3
GB
Remark :
The receiver automatically detects the receiving channels and displays them in sequence. One single channel is received
continuously if the switch for that channel is the only one to be placed in the ON position, regardless of the position of the
fifth switch. If more than channel has its switch in the ON position, then the auto sequence function will be work for the
activated channels.
The receiver automatically sets channel 1 as the receiving channel if not a single channel switch is in the ON position.
9. Troubleshooting
There is no signal :
•
•
•
•
•
•
•
Check if the receiver is connected correctly to the TV you're using for signal reception.
Check the ON/OFF switches of the camera and the receiver.
Make sure the power plugs are pushed all the way in.
Check the power switch of the TV.
Check all cable connections.
Make sure the same channel is selected on the camera and the receiver.
If you connect the receiver to the TV via an RF modulator, check whether the TV is set to the same channel as the
switch of the RF modulator (3 or 4).
You're getting a weak signal or there's interference
•
•
•
•
•
Reorient the antennas. Read p. 3 : “Orienting Devices”.
Se the same channel on the camera and the receiver.
Make sure there is no microwave oven between the camera and the receiver. If so, remove the microwave or turn it off.
The camera and the receiver should not be placed more than ± 100m apart.
Check the setting of the receiver's channel DIP switches.
10. Maintenance
• Protect your AVMOD9 or AVMOD10 from moisture. Water contains minerals that corrode electronic circuits.
• Do not store this device in dusty or dirty environment to avoid damage to moving parts.
• Do not store the device in a hot environment. High temperatures decrease the lifespan of electronic devices and plastic
can melt.
• Do not store the device in a very cold environment. When the device is then moved to a warmer environment this may
lead to condensation inside the housing.
• Do not try to open the housing. Have the device repaired or overhauled by a schooled technician.
• Do not drop the device and do not shake or hit it. Rough handling may damage internal circuits.
• Clean the device with a soft cloth and a mild detergent. Do not use solvents or abrasives.
• Only use the supplied net adapters.
These articles can be sold in Belgium
AVMOD9 & 10
:
(AVMOD9)
(AVMOD10)
4
GB