1
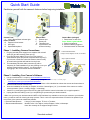
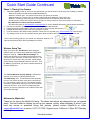
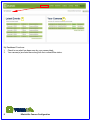
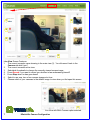
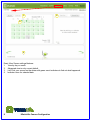
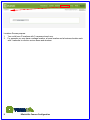
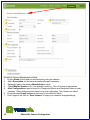
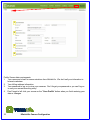
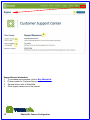
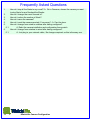
See What
Matters
iWatchLife Home Monitoring Camera
Watch Your Home over the Internet
Watches Your Home Faithfully while you are away!
December 9, 2009
1
iWatchLife Camera User Manual
iWatchLife Camera User Manual
1 - iWatchLife Camera
2 - Table of Contents
IWatchLIfe Camera Quick Start Guide
3 - Quick Start Guide
4 - Quick Start Guide Continued
iWatchLife Camera Configuration
5 - Resetting a Camera
6 - My Dashboard
7 - Live View
8 - Event View
9 - Locations
10 - iWatchLife Camera Management
11 - Profile
12 - Support
13 - Frequently Asked Questions
User Manual: (December 9, 2009)
This user guide has two main parts, IWatchLIfe Camera Quick Start Guide and iWatchLife
Camera Configuration. The first section is deliberately short for the customer to get set up very
easily and quickly. It will be placed in the packing box with the camera. The second part offers
details of the various menu tabs on the web site that a user can explore after gaining a bit of
confidence and curiosity. The entire manual will be placed as a free customer accessible PDF
document on the web site.
2
iWatchLife Camera User Manual
Quick Start Guide
Familiarize yourself with the camera's features before beginning installation.
E
F
A
B
I
J
C D
G
K
L
H
Camera Front
A. Lens & Status/Reset indicator light.
Future Features:
B. Passive Infrared sensor.
C. LED Light.
D. Speaker/Microphone.
Camera Back
E. Ethernet port.
F. Power port.
G. Threaded post.
H. 2 part base for flat
surface mounting.
Camera Back (enlarged)
I. Reset button to start over.
Green Status Lights indicate:
J. Power is plugged in.
K. Ethernet cable is plugged in.
L. Wireless network is connected.
Phase 1 - Installing Camera Connections:
1.
2.
3.
Plug the included power supply into a standard 120 volt wall
outlet (F2) and the camera's power port (F).
Plug your Ethernet cable (E1) into one of your router's**
spare Ethernet ports (E2) and the camera's Ethernet port (E).
If your home or business is wired for Ethernet, then this may
be a wall outlet jack that will lead back to the router.
This mandatory Ethernet cable connection (E) will be
temporary for initial installation if you are planning to use your
wireless network with the camera. You will be simply
unplugging it after a successful wireless installation.
** Recommended Routers:
Linksys, D-Link, Netgear, TP-Link, or Trendnet.
Only 2 wired connections!
E
F
E2
Camera Power supply
F2
E1
Phase 2 - Installing Your Camera's Software *
1.
2.
3.
4.
5.
6.
Use your web browser*** to open up www.iwatchlife.com/welcome .
Create your user account name and password by clicking on this link in step 1 of that page.
Click here to create your username and password .
Your confirmation e-mail will arrive momentarily. It will have a link embedded to activate the account and instructions to
download and install the camera utility.
Once the installation for the utility is complete, check the 3 status lights (J, K, L) on the back of the camera to confirm
correct operation. (Green - working, Orange - not working)
Check for a normal green glow on the LED ring light (A) around the camera's lens when it is in regular operation.
Unplug the Ethernet cable (E) now if you are planning to operate with your wireless network.
* Make sure you have your wireless network's WEP or WPA wireless key available to connect your camera to your wireless
router, you will be asked for it during the setup process. This is a one time request that does not need to be repeated if you
never reset (I) the camera to reinstall the software.
** Recommended Routers:
Linksys, D-Link, Netgear, TP-Link, or Trendnet.
*** Recommended Browsers: Mozilla Firefox 2.0 or higher, Internet Explorer, Safari, or Netscape.
Note: We currently do not support Google Chrome.
See what matters!
Quick Start Guide Continued
Phase 3 - Placing Your Camera
1.
2.
3.
4.
5.
6.
Choose an indoor location in your home or business that you want to monitor, like an entry door, walkway or window.
- Must not be outdoors as the camera is NOT weatherproof.
- Must be in a well lit area. The camera cannot show you pictures in the dark.
- Must be shake free. Don't mount it on a flimsy wall that will shake whenever a door opens, etc.
- Must be in reasonably close proximity to your wireless network or an Ethernet cable connection.
- Do not point the camera out a window at a busy road or at a busy entry door to avoid an excess of e-mail alerts.
Very Important: To reduce placement problems:
- See the online guide at www.iwatchlife.com/support/tips for a more detailed discusssion of best camera placements.
Remove the camera's mounting post (G) by unscrewing the threaded base (H).
H
Fasten the screw mounting plate inside onto a flat wall or ceiling securely with 2 screws.
Reinstall the mounting post (G) to the base (H) and the camera.
Point the camera in the desired viewing direction. Check your live view with your www.iwatchlIfe.com web site log in.
Try walking in front of your now working camera (green glow around the lens' LED ring) to trigger an e-mail alert.
Use the flat mounting plate (H) for vertical and horizontal surfaces. The
optional clamp mount (M) is ideal for grabbing onto a shelf.
G
M
Wireless Setup Tips
When you choose the "Go Wireless" option during the
software setup, you will see some additional configuration
dialogues come up. "Camera Wireless Settings " as
shown here will allow you to choose which wireless router
you want to use in the event you have more than one. Just
left click your mouse on the one you prefer, usually based
on the stronger "Signal Strength" shown to you here. Then
hit "Next" to go and enter your secure network password in
the next dialogue box.
The "Camera Wireless Security Settings " dialogue box
requires you to enter your WPA password in the
"Pre-Shared Key " box. This would have been optionally
set up in your secure wireless router when it was first set
up. You will enter it here once only. The camera will then
remember it permanently unless you reset and reinstall the
camera in the future. If you like to live dangerously and
opted to not set up a password on your wireless router, then
you will skip this page.
Welcome to iWatchLife!
Thank you for joining the iWatchLife family. The above instructions are designed to get you started
easily. We look forward to helping you set up your camera quickly, either wirelessly or wired. If you
have any issues or questions during this process, please contact iWatchLife at either
[email protected] or phone 1-877-217-7666. Support hours: 9:00am to 7:00pm EST Monday
to Friday.
See what matters!
Resetting a Camera
1.
2.
3.
4.
5.
6.
7.
8.
Press and hold the reset button (I) on the back during this entire process.
Press the reset button (I) on the back - hold it in.
Disconnect the power supply from the camera's back (F).
Wait 5 seconds.
Re-Connect the power supply to the camera. (F)
Wait for the indicator ring (A) around the camera lens to turn yellow.
Release the reset button (I) you have been holding on the camera's back.
Wait 5 to 10 minutes before you go through auto config at www.iwatchlife.com/welcome.
E
F
A
B
I
J
C D
G
K
L
H
Camera Front
A. Lens & Status/Reset indicator light.
Future Features:
B. Passive Infrared sensor.
C. LED Light.
D. Speaker/Microphone.
5
Camera Back
E. Ethernet port.
F. Power port.
G. Threaded post.
H. 2 part base for flat
surface mounting.
iWatchLife Camera Configuration
Camera Back (enlarged)
I. Reset button to start over.
Green Status Lights indicate:
J. Power is plugged in.
K. Ethernet cable is plugged in.
L. Wireless network is connected.
1
My Dashboard Functions:
1. Check to see what has been seen by your camera lately.
2. Your camera(s) are listed here along with their online/offline status.
6
iWatchLife Camera Configuration
2
1
3
4
5
2
7
6
Live View Screen Features:
1. The current camera's name showing in the main view (2). You did name it back in the
Cameras tab didn't you?
2. The current camera's active view.
3. Selectable thumbnails to change the currently viewed camera image.
4. Press Record if you want to record your brother-in-law embarassing himself!
5. Press Stop when he has gone home!
6. Select to see one, two or four camera images at a time.
7. Choose which of your cameras is the default image to view when you first open this screen.
6
Live View with Multi-Camera option selected.
7
iWatchLife Camera Configuration
1
2
3
4
Event View Screen settings/features:
1. View by day or month.
2. Advanced view is only current default.
3. Left Click your mouse on the dates with green event indicators to find out what happened.
4. Indicator icons for selected date.
8
iWatchLife Camera Configuration
Locations Screen purpose:
1. You could have 3 locations with 3 cameras at each one.
2. For example you may have a cottage location, a home location and a business location each
with 3 cameras to monitor various doors and windows.
9
iWatchLife Camera Configuration
1
2
3
4
5
6
7
iWatchLife Camera Management settings
1. Enter a Name for the area you are monitoring with your camera.
2. Add a Description for this camera monitored area if necessary.
3. Optionally type in the camera Manufacturer's name.
4. Check Monitor Events on , if not already turned on. Turn off to stop e-mail notices.
5. Alert Configurations need to be set for Foreground Motion and Recorded Video on most
cameras. Other settings can be turned on at user's discretion. Don't flood your inbox!!
6. Enter the exact E-mail addresses that want to be notified of Alerts.
7. Don't forget to left click on "Save Camera" to keep your camera's changes/settings.
10
iWatchLife Camera Configuration
1
2
3
4
Profile Screen data requirements:
1. Your name and e-mail for communications from iWatchLife. We don't sell your information to
Internet marketers.
2. Your billing address information.
3. Your password to log on to view your cameras. Don't forget your password or you can't log on
to see your camera's exciting story!
4. Don't forget to left click your mouse on the " Save Profile" button when you finish entering your
data or changes.
11
iWatchLife Camera Configuration
1
4
2
3
SupportScreen Information:
1. To purchase more cameras, click on Buy iWatchLife.
2. Phone number for Customer Service.
3. General phone calls to iWatchLife.
4. Other support resources on the Internet.
12
iWatchLife Camera Configuration
Frequently Asked Questions
1.
How do I stop all the Alerts to my e-mail? A. Go to Cameras, choose the camera you want
to stop Alerts for and Uncheck the Monitor
2.
How do I change the e-mail it sends to?
3.
How do I reduce the number of Alerts?
4.
How do I name the cameras?
5.
How do I reset the camera remotely if I am away? - A. Can;t be done.
6.
How do I change from wired to wireless after having configured?
6.1.
A. Redo the camera installation and configuration from scratch.
6.
How do I change from wireless to wired after having configured?
6.1.
A. Just plug in your network cable, No changes required, so this is the easy one.
13
iWatchLife Camera Configuration