1
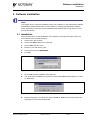
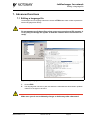
OPERATOR’S MANUAL
JobExchanger for network
Upon receipt of this product and prior to
initial operation, read these instructions
thoroughly, and retain for future reference.
Document No: MRS6515GB.0.U
Reference list
This manual is valid for software:
High Speed JobExchanger, version 4.2.1
Revision
050708
First release of this document.
Page 2
Revised: 05-07-08
NX_framsida eng.fm
JobExchanger for network
1.
General
5
Copyright .......................................................................................................6
High Speed JobExchanger-kit .....................................................................6
System requirements ....................................................................................6
2.
Software installation
7
Installation .....................................................................................................7
After installation .........................................................................................11
Uninstall .......................................................................................................12
3.
Communication setup
15
Hardware setup ...........................................................................................15
Personal computer ....................................................................................15
Ethernet hardware.....................................................................................15
Windows network setting .........................................................................15
Hardware key............................................................................................15
Cables for serial interface.........................................................................15
PC setup .......................................................................................................17
Target directory ........................................................................................17
Target program group...............................................................................17
Communication setup...............................................................................17
Robot controller setup ................................................................................20
Parameters ................................................................................................20
MOTOMAN NX100 ................................................................................20
MOTOMAN XRC....................................................................................20
YASNAC MRC........................................................................................21
4.
High Speed JobExchanger functions
23
File menu .....................................................................................................24
View menu ...................................................................................................24
Tools menu ..................................................................................................25
Setup .........................................................................................................25
Upload Batch Jobs....................................................................................27
Download Batch Jobs ...............................................................................27
Select language.........................................................................................28
Register License .......................................................................................29
Help menu ...................................................................................................30
High Speed JobExchanger Help...............................................................30
Robot Controller Help ..............................................................................30
Version .....................................................................................................31
5.
Program running
33
Start ..............................................................................................................33
File operation ..............................................................................................33
What to do ................................................................................................33
How to do it ..............................................................................................34
Confirm the file contents ............................................................................35
Display file content...................................................................................35
Print out ....................................................................................................35
MRS6515GB.0.UTOC.fm
Revised: 05-07-08
Page 3
JobExchanger for network
Cut and paste............................................................................................ 35
File type ....................................................................................................... 36
Batch process .............................................................................................. 36
Upload batch jobs .................................................................................... 36
Download batch jobs................................................................................ 37
Switch the target robot .............................................................................. 37
6.
Program structure
39
Initial files ................................................................................................... 39
Language files ............................................................................................. 39
High Speed Link Server ............................................................................. 39
About the server ....................................................................................... 39
Status Monitor.......................................................................................... 40
Delete the communication information ................................................... 40
Version ..................................................................................................... 41
7.
Advanced functions
43
Editing a language file ............................................................................... 43
Creating a new language file ..................................................................... 44
Language from the list ............................................................................. 44
New languages ......................................................................................... 44
Creating an icon ....................................................................................... 45
8.
Name of files
47
9.
Limitations
49
Port numbers used for TCP/IP ................................................................. 49
Access to the same file in a PC .................................................................. 49
Access from several PCs ............................................................................ 49
Storage of CMOS file, etc. ......................................................................... 50
10. Trouble shooting
51
Manufacturer .............................................................................................. 52
Page 4
Revised: 05-07-08
MRS6515GB.0.UTOC.fm
JobExchanger for network
JobExchanger for network
Valid for “High Speed JobExchanger” (JobExchanger for network), version 4.2.1
Motoman part No. 441112-99
Fig.1 Main window
1. General
High Speed JobExchanger is 32-bit PC-software for Windows environment.
The purpose of this product is....
One way communication from one PC to several Motoman robot controllers
Communicate with NX100, XRC MRC and/or ERC controllers via ethernet or serial
interface
Upload/download of JOB files from/to the robot controller
Removing/deleting JOB files from the robot controller or the PC
Expanded storage area for robot jobs in the PC
Editing the robot job is not possible by this program
This is a multi language version of the software which gives you the facility to switch
between different menu languages and even create new language files
For more basic information about installation and handling of the software,
icons, menu bars, etc. refer to the operator’s manual for Windows.
When in doubt, this manual should always be referred to.
This Operator’s Manual comprises information about:
Installation / Setup / Handling / operation
Text written in BOLD letters means command, icon or button.
Text written in ITALIC means text shown on display.
MRS6515GB-ch1.0.fm
Revised: 05-07-08
Page 5
JobExchanger for network
Copyright
1.1 Copyright
The CD for High Speed JobExchanger-software may not be copied or imparted to a third party
nor be used for an unauthorized purpose. Copies may be done only for own backup.
This manual may not be copied or imparted to a third party nor be used for an unauthorized
purpose.
1.2 High Speed JobExchanger-kit
High Speed JobExchanger-kit comprises
CD including software and drivers
One hardware key (parallel port or USB-port)
One user’s manual (this document)
One registration card
In standard version, license for two clients (two controllers) are included. As option, extra
clients can be added.
One extra client, Motoman Part No: 441121
High Speed JobExchanger-kit does not comprise
Ethernet boards for PC
Ethernet board for robot controller
Serial interface cables
Cables, Transceivers, Terminators, etc.
Further, you may have need for:
Manuals for your robot controller.
Ethernet function manual (incl. in the delivery of the board/function)
Operator's manual for Windows.
1.3 System requirements
Hardware
Personal computer type 486MHz or better including
64Mb RAM, 10Mb disk space.
CD-drive.
Ethernet I/F board
Microsoft Windows 98, NT, 2000, XP or newer
Protective hood, if the PC is installed in the workshop.
Robot controller
MOTOMAN ERC robot controller, or
MOTOMAN MRC robot controller, or
MOTOMAN XRC robot controller, or
MOTOMAN NX100 robot controller
Network
Ethernet cable, Connection cables, Transceiver, etc.
Serial interface cable
Page 6
Revised: 05-07-08
MRS6515GB-ch1.0.fm
Software installation
Installation
2. Software installation
Note!
This chapter shows a general installation phase of any software. In this example the software
FDDWIN32 is installed. Select the correct software by choosing the appropriate software
name. All software on the CD can be installed but the hardware key is only valid for one of
them (order based).
2.1 Installation
There are three ways to start installation of this software, all will give the same result. The
most common way is described below.
1.
2.
Put the CD in the CD-drive.
3.
Choose Run from the menu.
4.
Browse to your CD drive e.g. D:\
5.
Choose the file named SETUP.EXE
6.
Click OK.
Click on the Start button on the menu-bar.
Fig.2 Choose installation file
7.
Choose OK and the installation guide will start.
8.
You can quit the installation att any time by clicking the Cancel-button and then confirm
by Yes-button.
Fig.3 You can cancel installation at any time
9.
Mark the language you want to use during installation. Note! This will not influence the
language you use in the software later.
Software-installation.0.U.fm
Revised: 05-07-08
Page 7
Software installation
Installation
10.
Click on the OK-button.
Fig.4 Language selection during installation
11.
Pass this information screen by clicking the Next-button.
Fig.5 Information screen
Page 8
Revised: 05-07-08
Software-installation.0.U.fm
Software installation
Installation
12.
Read through the license agreement and accept by clicking on the Next-button.
Fig.6 License agreement. Accept by clicking Next.
13.
14.
Set directory for FDDWIN32. It’s advisable to install the software in the directory which
is set as default by the installation guide.
Accept by clicking Next-button.
Fig.7 Choose directory
Software-installation.0.U.fm
Revised: 05-07-08
Page 9
Software installation
Installation
15.
Accept installation process by clicking Next-button.
Fig.8 Start installation
16.
Installation starts.
Fig.9 Installation progress counter
17.
The installation is finished and the last screen appears.
18.
Accept installation by clicking the Finish-button.
Fig.10 Installation complete
19.
Page 10
Before it is possible to run the software, the hardware key must be installed on the
parallel port.
Revised: 05-07-08
Software-installation.0.U.fm
Software installation
After installation
20.
If you are running the JobExchanger on Windows NT, 2000 or XP you are requested to
install a virtual parallel port driver. This port is needed to access the physical hardware
key (attached to the parallel port).
2.2 After installation
After installation, fill in and return the enclosed registration card to Motoman
Robotics Europe AB.
During installation the main directory is automatically created and all necessary files are
installed in the specified drive.
In the end of the setup a program group (MOTOMAN) and a icon is created. To start the software, just double-click on the Start Menu.
If you want to create a shortcut to the software, see Windows manual for further information.
Software-installation.0.U.fm
Revised: 05-07-08
Page 11
Software installation
Uninstall
2.3 Uninstall
As in all WIN95/NT/XP software there are an uninstall facility if you want to remove the software from the hard disk.
1.
2.
Start the Control panel from the start menu. Select Add/Remove button from the menu.
3.
Click Add/Remove button.
Mark the line showing the software to remove in the menu.
Fig.11 Mark the software
4.
Activate uninstall guide by Next-button.
Fig.12 Automatic uninstall
Page 12
Revised: 05-07-08
Software-installation.0.U.fm
Software installation
Uninstall
5.
End the operation by clicking the Finish-button.
Fig.13 Uninstall
Software-installation.0.U.fm
Revised: 05-07-08
Page 13
Software installation
Uninstall
Page 14
Revised: 05-07-08
Software-installation.0.U.fm
JobExchanger for network
Hardware setup
3. Communication setup
3.1 Hardware setup
Communication can be performed either via ethernet or serial interface or via a mixed environment.
3.1.1 Personal computer
Add the network adapter to the personal computer. When you add the adapter, read its
manual and confirm that it works correctly in advance of using High Speed JobExchanger.
3.1.2 Ethernet hardware
To communicate with robot controller using High Speed JobExchanger, network hardware
must be set up correctly.
Details about how to set up the network is described in the following manual.
NX100: Ethernet function manual Motoman No. MRS6104GB.
XRC: Ethernet board (JANCD-XIF02) setup manual Motoman No. MRS50110.
MRC: Ethernet board (JANCD-MIF06) setup manual Motoman No. JANCD-MIF06.
3.1.3 Windows network setting
To be able to communicate with Ethernet in Windows system, settings related to the network
must be entered.
Contact your network administrator to set up the communication and entering the correct IPaddress.
Note!
IP address and subnet mask must be correct. Ask your network administrator
for the correct datas. The wrong setting of these parameters may cause the
incorrect communicaton, for example, the same IP address is assigned to
other PCs.
3.1.4 Hardware key
To be able to run the program it is necessary to apply the hardware key. Insert the hardware
key into the parallel port of the PC, or if using a USB hardware key, insert it in a suitable USBconnector.
3.1.5 Cables for serial interface
Communication between PC and robot controller via RS232C-serial interface.
Cable length are max 15 m to each robot-controller. It is possible to use short-distancemodem if the distance is longer.
Com1 and Com3 are normally 9-pin plugs.
Com2 and Com4 are normally 25-pin plugs.
MRS6515GB-ch3.0.fm
Revised: 05-07-08
Page 15
JobExchanger for network
Hardware setup
Cable layout 341779 (ERC/MRC)
(Grounding/shield)
1
2
3
1
2
3
4
5
6
7
8
13
20
25
4
5
6
1
2
3
4
5
6
7
8
9
7
8
9
20
25
Cable
Adaptor
ERC/MRC
PC 9-pin
PC 25-pin
Fig.14 Cables and adaptor
Cable layout 347377 (XRC/NX100)
1
2
3
1
2
3
4
5
6
7
8
9
4
5
6
7
8
9
(Grounding/shield)
XRC
Cable
PC 9-pin
Fig.15 Cable
Page 16
Revised: 05-07-08
MRS6515GB-ch3.0.fm
JobExchanger for network
PC setup
3.2 PC setup
3.2.1 Target directory
Together with this manual one CD is included. This CD contains the High Speed JobExchanger software in compressed form. High Speed JobExchanger software files are installed to the
Jobexchanger32 directory as shown in the following figure.
It is advisable to create separate directories for the robot jobs; name them, for example,
robot-1, robot-2, etc, as in the figure.
For more information, see Windows user's manual.
C:\
Program Files
Motoman
HsJobxcg
robot-1
robot-2
Fig.16 Directory layout
3.2.2 Target program group
When the installation is finished completely, “High Speed JobExchanger 4.2.1” program group
and icons are created under the “MOTOMAN” group. To start program click the program icon
in the start menu.
3.2.3 Communication setup
The connection protocol is very special, for more information see YASNAC ERC, YASNAC
MRC, MOTOMAN XRC, MOTMAN NX100 computer communication User’s manual.
1.
Choose Setup from the Tools menu.
MRS6515GB-ch3.0.fm
Revised: 05-07-08
Page 17
JobExchanger for network
PC setup
Adding a new robot to the list
Fig.17 Adding a new robot
1.
2.
Change the name of the robot (DEFAULT).
Press either “Add Back” or “Add Fwd” in order to add a robot to the list.
3. Choose a robot from the list and make the necessary setup. See items “Serial connection
and Ethernet connection.
Serial connection
Fig.18 Serial connectin dialogue
1.
2.
Page 18
Choose RS232C connection.
Select the controller type (ERC, MRC or XRC) from the drop list.
For NX100 select XRC.
Revised: 05-07-08
MRS6515GB-ch3.0.fm
JobExchanger for network
PC setup
3.
Choose the right com port and then press Port Setup.
Recom. values
Baude rate
9600
Data length
8
Parity
EVEN
Stop bit
1
Fig.19 Com port setup
4.
Enter the data according to table.
5.
Choose a Work folder for this particular robot. This is the folder from which all files are
moved to and from the robot controller.
Ethernet connection
Fig.20 Ethernet connection setup
1.
2.
Choose Ethernet connection.
3.
Enter the robot’s IP-Address.
4.
Choose a Work folder for this particular robot. This is the folder from which all files are
moved to and from the robot controller.
Select the controller type (ERC, MRC or XRC) from the drop list.
For NX100 select XRC.
MRS6515GB-ch3.0.fm
Revised: 05-07-08
Page 19
JobExchanger for network
Robot controller setup
3.3 Robot controller setup
3.3.1 Parameters
To communicate with the robot controller, IP address needs to be set as a communication
parameter. High Speed JobExchanger can save a multiple number of robots’ information (IP
address of robot controller, robot name, and directory). Robot name is specified by user.
Details of how to setup the communication parameters are described in a separate chapter.
See “Tools menu” on page 25.
3.3.2 MOTOMAN NX100
To communicate with MOTOMAN NX100 using TCP/IP protocol, the built-in Ethernet function
must be set up (IP address and subnet mask for NX100).
To setup the Ethernet function for MOTOMAN NX100, see the following manual.
Ethernet function manual (MRS6104GB).
Parameters
To establish communication between robot controller and PC some parameters have to be
set in the NX100.
Contact your MOTOMAN-representative if in doubt.
RS000= (*)
Protocol description #1
(*) Settings for parameter RS000:
0=
Not used
1=
Printer
2=
BSC LIKE protocol (used for Data Transmission)
3=
FC1 protocol
This parameters is used to describe the transmission protocol for Std port #1 or Ethernet function for NX100. If the Ethernet communication function is not to be used, RS000 and RS001
correspond to the Std port #1 and port #2 respectively. When the Ethernet communication
function plus Std port #1 is used, the parameter according to this port number must be set,
and the other parameter is used for Ethernet communication.
To run High Speed JobExchanger you must set RS000 to value ”2”.
Controller setup
Parameter FD3 must be set to “1” (initial setting is “0”).
Command Remote must be “Valid” (Pseudo Input Display).
For controller setup see “Data Transmission Function” manual.
3.3.3 MOTOMAN XRC
To communicate with MOTOMAN XRC using TCP/IP protocol, an Ethernet board is required.
Add the XIF02 board to MOTOMAN XRC, and describe the IP address and subnet mask for
XRC.
To setup the Ethernet I/F board for MOTOMAN XRC, see the following manual.
Ethernet board (JANCD-XIF02) setup manual MRS50110.
Parameters
To establish communication between robot controller and PC some parameters have to be
set in the NX100.
Contact your MOTOMAN-representative if in doubt.
Page 20
Revised: 05-07-08
MRS6515GB-ch3.0.fm
JobExchanger for network
Robot controller setup
RS000= (*)
Protocol description #1
(*) Settings for parameter RS000:
0=
Not used
1=
Printer
2=
BSC LIKE protocol (used for Data Transmission)
3=
FC1 protocol
This parameters is used to describe the transmission protocol for Std port #1 or Ethernet
board for XRC. If the Ethernet communication function is not to be used, RS000 and RS001
correspond to the Std port #1 and port #2 respectively. When the Ethernet communication
function plus Std port #1 is used, the parameter according to this port number must be set,
and the other parameter is used for Ethernet communication.
To run High Speed JobExchanger you must set RS000 to value ”2”.
Controller setup
Parameter FD3 must be set to “1” (initial setting is “0”).
Command Remote must be “Valid” (Pseudo Input Display).
For controller setup see “Data Transmission Function” manual.
3.3.4 YASNAC MRC
To communicate with YASNAC MRC using TCP/IP protocol, an Ethernet board is required.
Add the MIF06 board to YASNAC MRC, and describe the IP address and subnet mask for
MRC.
To setup the Ethernet I/F board for YASNAC MRC, see the following manual.
Ethernet board (JANCD-MIF06) setup manual.
Parameters
To establish communication between robot controller and PC some parameters have to be
set in the MRC.
Contact your MOTOMAN-representative if in doubt.
RS000= (*)
Protocol description #1
RS001= (*)
Protocol description #2
(*) Settings for parameter RS000 / RS001:
0=
Not used
1=
Printer
2=
BSC LIKE protocol (used for Data Transmission)
3=
FC1 protocol
These parameters are used to describe the transmission protocol for Std port #1, port #2 or
Ethenet board for MRC. If the Ethernet communication function is not to be used, RS000 and
RS001 correspond to the Std port #1 and port #2 respectively. When the Ethernet communication function plus either Std port #1 or port #2 is used, the parameter according to this port
number must be set, and the other parameter is used for Ethernet communication.
To run High Speed JobExchanger you must set RS000 or RS001 to value ”2”.
For example, If port #1 is already used for FC1 or FC2 and its parameter RS000 is set to
value “3”, RS001 is required to be set to value “2” to use High Speed JobExchanger.
MRS6515GB-ch3.0.fm
Revised: 05-07-08
Page 21
JobExchanger for network
Robot controller setup
NOTE!
The RS000/001 parameters can not have the same setting!
Ethernet communication function only supports the BSC LIKE protocol!
Page 22
Revised: 05-07-08
MRS6515GB-ch3.0.fm
JobExchanger for network
4. High Speed JobExchanger functions
Menu structure of High Speed JobExchanger is shown below.
High Speed JobExchanger
File
Copy
Move
Delete
Select All
Display File Contents
Print File
Exit High Speed JobExchanger
View
Large Icons
Small Icons
List
Details
Arrange Icons
Name
Refresh
Size
Date
Tools
Setup
Upload Batch Jobs
Download Batch Jobs
Select Language
Register License
Help
JobExchanger Help
Robot Controller Help
Version
Fig.21 High speed JobExchanger menu
MRS6515GB-ch4.0.fm
Revised: 05-07-08
Page 23
JobExchanger for network
File menu
Some of the operations are also available from the button on the toolbar.
Display File Contents
Copy
Move
Delete
Select All
Refresh
Arrange icons
Fig.22 File operation button on toolbar
4.1 File menu
Copy
Copy marked file from controller to the PC or vice versa.
Move
Moves marked file from controller to the PC or vice versa.
Delete
Deletes marked file in PC or in controller.
Select All
Selects all files in the active window.
Display File Contents
Opens the marked file in the right window.
Print File
To print out the contents in a job file you must first mark and open the file in the right window.
Exit High Speed JobExchanger
Terminates the software.
4.2 View menu
Arrange icons
Icons can be arranged according to Name / Data / file Size.
Icons in the list can also be displayed as Small Icons / Large Icons / List / Details for the file
list in PC, and displayed as Small Icons / Large Icons / List for the file list in robot controller.
Refresh
If files have been deleted from the controller via a mechanism other than the High Speed
JobExhcanger (for example FC1, FC2 or other communication program), file lists are out of
date and therefore must be refreshed BEFORE any further operations (copy, etc.).
Page 24
Revised: 05-07-08
MRS6515GB-ch4.0.fm
JobExchanger for network
Tools menu
4.3 Tools menu
4.3.1 Setup
Information corresponding to robot is stored in the file (robot.ini), and it is used to communicate with the robot controller. Robot name, IP address of robot controller and initial directory is
described for each robot to be registered.
Robot profiles tab
Fig.23 Robot registration
Robot List
The name of registered robots are shown. Clicking the robot name from the list, corresponding parameters (robot name, IP address of MRC, Initial directory in PC) are shown.
Add Back
A new robot can be added BEFORE the currently highlighted robot, and its details entered on
the right side of the dialogue.
Add Fwd
A new robot can be added AFTER the currently highlighted robot, and its details entered on
the right side of the dialogue.
Delete
Remove the robot from the list.
NOTE!
The robot currently being used cannot be removed!
Robot
Robot name to identify the robots.
MRS6515GB-ch4.0.fm
Revised: 05-07-08
Page 25
JobExchanger for network
Tools menu
IP address
IP address assigned to the robot controller.
Work Folder
The target directory in the PC is defined and related to the selected robot.
Ethernet/RS232C
Descide wether Ethernet or RS232C protocol is to be used.
When Ethernet is selected, IP-address must be entered.
When RS232C is selected, COM-port must be set up.
Robot type
Independently of the protocol, the controller type must be selected.
Controller type
Select in menu
Ethernet
RS232C
YASNAC ERC
ERC
Not available
Available
MOTOMAN MRC
MRC
Available
Available
MOTOMAN XRC
XRC
Available
Available
MOTOMAN NX100
XRC
Available
Available
Port setup
When using the RS232C protocol, the COM-port has to be set See “Serial connection” on
page 18..
Fig.24 Port setup
Page 26
Revised: 05-07-08
MRS6515GB-ch4.0.fm
JobExchanger for network
Tools menu
General tab
Fig.25 General setting
Automatic Transfer of Relative Jobs
If the marked job is a Related job (*.jbr) all related jobs (*.jbi) are transferred between PC and
controller.
Display/Print Job Header
When you open or print out a job, header information is included.
Do Not Save Current Settings
If this checkbox is marked, the current settings are reset to last settings when High Speed
JobExchanger is terminated.
Open Work Folder Automatically
If this checkbox is marked, the target directory in the PC is automatically selected when communication is opened with a robot in the main window.
This function is recommended as it minimise the risk to mix files from different robots in the
same directory.
If it is not marked, target directory must be selected manually.
4.3.2 Upload Batch Jobs
By selecting this from the Option menu and inputting the name of the file containing the
names of files to be uploaded, a multiple number of files can be uploaded. See 5.5 Batch Process for further information.
4.3.3 Download Batch Jobs
By selecting this from the Option menu and inputting the name of the file containing the
names of files to be downloaded, a multiple number of files can be downloaded. See “Batch
process” on page 36. for further information.
MRS6515GB-ch4.0.fm
Revised: 05-07-08
Page 27
JobExchanger for network
Tools menu
4.3.4 Select language
Each time JobExchanger is started it is possible to choose the appropriate language for
menus and buttons:
Fig.26 Choosing language for the menues etc.
1.
2.
Choose a language from the list.
Click OK.
JobExchanger is currently available in three languages: Swedish, English and German.
More languages
It is possible to translate the menu texts in other languages files. See “Editing a language file”
on page 43. Even single words in an existing translation can be changed in this way.
Ignoring language selection
Choose “Ignore language selection at program start” if you do not wish to make a language
selection each time the program starts.
Change fonts in menus etc
The default font used on buttons and menus are MS Sans Serif, but it is possible to change to
other fonts installed on your computor:
Page 28
Revised: 05-07-08
MRS6515GB-ch4.0.fm
JobExchanger for network
Tools menu
Fig.27 Changing the font
1.
2.
Choose Font.
3.
Press OK.
Use the dialogue to change fonts and/or font size.
4.3.5 Register License
As standard, High Speed JobExchanger allows communication with 2 different controllers
(clients). As option, extra clients can be added. Extra clients are added from Motoman Robotics Europe AB . In this menu the new serial No and check No. is entered. Restart the software and fill in the setup for the new controllers.
Fig.28 Register license
1.
Enter the serial number for JobExchanger. The serial number is obtained separately with
the original software CD-disk.
2.
Enter the check number.
3.
Press Update and close the window.
MRS6515GB-ch4.0.fm
Revised: 05-07-08
Page 29
JobExchanger for network
Help menu
4.4 Help menu
4.4.1 High Speed JobExchanger Help
From the help menu you’ll get short information about commands, functions, etc. which can
be helpful when you run the software.
Fig.29 Help topics
4.4.2 Robot Controller Help
From the help menu you’ll get short information about robot commands, functions, etc.
which can be helpful when you run the software.
Fig.30 Help topics
Page 30
Revised: 05-07-08
MRS6515GB-ch4.0.fm
JobExchanger for network
Help menu
4.4.3 Version
Product version is shown. Quit by clicking on OK.
Fig.31 Version information
MRS6515GB-ch4.0.fm
Revised: 05-07-08
Page 31
JobExchanger for network
Help menu
Page 32
Revised: 05-07-08
MRS6515GB-ch4.0.fm
JobExchanger for network
Start
5. Program running
Robot controller has to be set in REMOTE-mode.
(For XRC and MRC: TEACH-mode must be selected as well).
5.1 Start
1.
2.
Start the software by clicking the program icon in the program menu.
Choose if you want to connect to robot controller or run separately.
Click on the YES or NO-button. If you choose ”NO” you won’t be connected to a controller.
Fig.32 Connect to robot
3.
Now you will see the main window of High Speed JobExchanger .
The left side of the screen displays the PC side.
The right side of the screen displays the controller side.
Fig.33 Main window when connected to robot controller
5.2 File operation
5.2.1 What to do
The following file operations are available:
Copy
Copies selected files from controller to the PC or vice versa.
Move
Moves selected files from controller to the PC or vice versa.
MRS6515GB-ch5.0.fm
Revised: 05-07-08
Page 33
JobExchanger for network
File operation
Delete
Deletes selected files in PC or in controller.
View
Views a selected file in PC.
To view the files in the controller, those files must be uploaded to the PC in advance.
Refresh
If files have been deleted from the controller via a mechanism other than the High Speed
JobExhcanger (for example FC1, FC2 or other communication program), file lists are out of
date and therefore must be refreshed BEFORE any further operations (copy, etc.).
5.2.2 How to do it
To move, delete or use other functions, just select the file and then use the commands in the
File menu or the button in the tool bar.
Pull down menu
Fig.34 Pull down menu (File menu)
Toolbar
File Operation button
Fig.35 Toolbar
Drag and drop
To copy files from controller to PC or vice versa, just mark the file in the window and drag over
to the other window.
NOTE!
Make sure to access correct directory in the PC.
Page 34
Revised: 05-07-08
MRS6515GB-ch5.0.fm
JobExchanger for network
Confirm the file contents
Popup menu
By clicking the right button of the mouse in the file list window, a popup menu appears and the
file operations are available.
Fig.36 Popup menu
5.3 Confirm the file contents
If you want to display the header of the file, you have to mark the checkbox ”Display / Print
Job Header” in the Setup menu under the View command.
5.3.1 Display file content
This can be done in two ways:
Double-click on the file you want to open. The file will be opened in Windows Notepad.
Mark the file in the left window and then click on the Display File Contents-button. The file
will be opened in the right window.
5.3.2 Print out
Mark the file in the left window and then click on the Display File Contents-button. The file
will be opened in the right window.
And then, Printing out can be done in two ways:
1.
2.
Select Print File from the File menu.
Click the print button located in the right window.
Print button
Fig.37 Print out the file contents
5.3.3 Cut and paste
If you want to study the file on a print-out or use parts of the program in your documentation,
use the “cut & paste” method.
1. Mark the text you want to copy by holding down the mousebutton and pull the cursor over
the wanted text. The text is now marked with inverted color.
2.
Press Ctrl-key and C-key at the same time (Ctrl+C).
3.
Start up a word processing program like WORD, Write or Windows/Notepad.
4.
Paste the text in the document by pressing Ctrl-key and V-key at the same time (Ctrl+V).
MRS6515GB-ch5.0.fm
Revised: 05-07-08
Page 35
JobExchanger for network
File type
5.
It’s also possible to cut the text from the window by pressing Ctrl-key and X-key at the
same time (Ctrl+X).
Note! It is only the text as shown in the window which is affected, the original
files are left undamaged.
5.4 File type
To switch the file type to load or save, choose the file list from File Type combo box located
under the file window
Fig.38 List of file type in PC
The lists are different for the PC and the robot controller.
5.5 Batch process
Using a ‘job-list file’ created by an editor such as Notepad, a multiple number of files can be
uploaded from or downloaded to the robot controller. File name extension is “lst”
(e.g. BatchA.lst). The required format of the list file is shown below:
(Job List Format)
1. One file name must be described per line.
2. Both capital or lower-case characters can be used.
3. Files with no extension are regarded as .jbi
Fig.39 A list of jobs
5.5.1 Upload batch jobs
Select Upload Batch Jobs from the Option menu and input the name of the list file in which
the file names to be uploaded are described.
Page 36
Revised: 05-07-08
MRS6515GB-ch5.0.fm
JobExchanger for network
Switch the target robot
Fig.40 Input dialogue for uploading
Click OK to start uploading from the robot controller.
5.5.2 Download batch jobs
Select Download Batch Jobs from the Option menu and input the name of the file in which
the file names to be downloaded are described.
Fig.41 Input dialogue for downloading
Click OK to start downloading to the robot controller.
5.6 Switch the target robot
Click the Robot combo box in the main window and choose the robot name, the target robot
controller with which to communicate is switched. Registered IP address of robot controller
and initial directory corresponding to the robot name are used for communication.
Click and choose the robot
Fig.42 Dialogue for switching robot
NOTE!
When the robot is switched, the file list of robots in the window is not updated
automatically. Click Refresh in the robot window before performing file operations!
MRS6515GB-ch5.0.fm
Revised: 05-07-08
Page 37
JobExchanger for network
Switch the target robot
Page 38
Revised: 05-07-08
MRS6515GB-ch5.0.fm
JobExchanger for network
Initial files
6. Program structure
High Speed JobExchanger is a Windows based communication program for connection between a PC and MOTOMAN industrial robots, controller type NX100 (as well as ERC, MRC
and XRC).
6.1 Initial files
High Speed JobExchanger stores the environmental information in 2 files:
- HsJobx.ini
Information about environment such as Font, Start-Language, Window-size, etc..
- robot.ini
Information about registration of robots. Contents of the file are described in the Setup dialogue.
6.2 Language files
High Speed JobExchanger is prepared for 11 languages. Highlighted languages are included
at delivery.
(English, Swdish, French, German, Italian, Norwegian, Finnish, Spanish, etc. plus Japanese).
The language file can be edited, and created for new languages.
Details about how to modify it are described in a separate chapter. See “Advanced functions”
on page 43.
6.3 High Speed Link Server
6.3.1 About the server
To communicate with the robot controller via Ethernet, the server program HSLSRV32.EXE is
required. The server recieves the request from High Speed JobExchanger and sends/recieves the data.
The server program is started up from VRP32.dll when the High Speed JobExchanger starts
to communicate with the robot controller. When the communication is finished, click the High
Speed Link server from the task bar with the right button of mouse, and select Exit from the
menu to quit the server program.
Fig.43 High speed link server on taskbar
To transmit files between PC and robot controller, server program and related DLL files have
to be located in the same directory as the High Speed JobExchanger.
MRS6515GB-ch6.0.fm
Revised: 05-07-08
Page 39
JobExchanger for network
High Speed Link Server
6.3.2 Status Monitor
Communication status monitor is displayed when High Speed JobExchanger is started up.
Fig.44 Monitor dialogue
To hide the communication status monitor for some reason (for example, interrupting another
operation), select High Speed Link server from the task bar and click right button of the
mouse. The monitoring dialogue can then be toggled on or off, as shown below:
6.3.3 Delete the communication information
If a communication error occurs for any of the following reasons during communication, the
communication information may sometimes remain in the robot controller and/or PC.
Two possible causes of communication breakdown
1.
2.
Ethernet cable is removed during communication.
REMOTE-button on the playback panel of the robot controller is turned off during communication.
If communication cannot be continued, reset the communication information by the following
procedures.
(Controller side)
1.
Select RESET key if any error message is shown in the display of the programming pendant.
2.
Turn OFF the REMOTE button on the playback box once and then turn it ON.
(PC-side)
1.
2.
Press Delete button in the communication status monitor.
To reset information, input the IP address of the robot controller where the error occured,
and click OK.
Fig.45 Dialogue of deleting the information
Page 40
Revised: 05-07-08
MRS6515GB-ch6.0.fm
JobExchanger for network
High Speed Link Server
6.3.4 Version
Click the High Speed Link server from the task bar with the right button of the mouse and
choose About HSL server menu, the version information of the server is displayed.
Quit by clicking OK
Fig.46 Version display
MRS6515GB-ch6.0.fm
Revised: 05-07-08
Page 41
JobExchanger for network
High Speed Link Server
Page 42
Revised: 05-07-08
MRS6515GB-ch6.0.fm
JobExchanger for network
Editing a language file
7. Advanced functions
7.1 Editing a language file
The dialogue box for language selection includes an Edit-button which makes it possible to
edit the language files directly.
Do not attempt to edit these files unless you are an experienced PC operator. It
is very easy to damage the syntax so that the software does not function correctly.
Fig.47 Editing a language file
1.
2.
Choose Edit.
The language file is shown in plain text where the translated text found within quotation
marks is to the right on each line.
Make sure you do not accidentaly change or delete any other characters!
MRS6515GB-ch7.0.fm
Revised: 05-07-08
Page 43
JobExchanger for network
Creating a new language file
7.2 Creating a new language file
7.2.1 Language from the list
1.
2.
Highlight the language to start from.
3.
Save the file with its correct name. The file ending should be *.lng.
Danish = Danish.lng
Norwegian = Norwegian.lng
French = French.lng etc.
Save the new file in the folder “JobExchanger32”.
4.
Choose the new language from the list and edit it as desribed above.
Press Edit.
7.2.2 New languages
The language list contains an additional seven language choises called “User14” to “User20”.
If you want to add a language not found in the list do as follows:
1.
2.
Choose language to start from.
3.
Save the new file under the name you would like to see in the list. The file ending should
be *.lng and it should be saved in the folder “JobExchanger32”.
Press Edit.
In order to be able to choose the new language from the list it is necessary to add its name to
all the other (active) language files:
4.
First choose the System language file from the list and press Edit.
5.
Scroll down to the heading Country Name String and change the name from “User14” to
the name you would like to have in the list.
Fig.48 Adding a new language
Page 44
Revised: 05-07-08
MRS6515GB-ch7.0.fm
JobExchanger for network
Creating a new language file
6.
Make the same change in all the active language files. The text “User14” should be changed on two places on the same line.
7.
Choose the new language from the list and press Edit.
8.
Make changes to the text according to item above.
7.2.3 Creating an icon
A new icon, e.g. a country flag, can easily be created in a picture editing program.
1.
2.
Make a 16-coulour bitmap which is 32x32 pixels.
Give it the same name as its language file with a file ending *.ico and save it in the
JobExchanger32 folder.
MRS6515GB-ch7.0.fm
Revised: 05-07-08
Page 45
JobExchanger for network
Creating a new language file
Page 46
Revised: 05-07-08
MRS6515GB-ch7.0.fm
JobExchanger for network
8. Name of files
No
Group
1
Job
2
Condition
data
3
Universal
data
4
I/O
data
5
Customer
data
6
Parameter
MRS6515GB-ch8.0.fm
Contents
Single job
Related job (job + conditions)
Weaving data
Tool data
User coordinate data
Arc start condition data
Arc end condition data
COM-ARC3 condition data
COM-ARC3 data
Path correction condition data
CO2 laser processing condition data
Piercing condition data
Ultra Piercing condition data
Laser cutting condition data
Variable data
Arc condition auxiliary data
Phase offset value data
Concurrent I/O program
I/O name data
Welder characteristics data
Welder condition data
Reserved job name
SV monitor signal
Variable name
Robot calibration data
Specified point data
Absolute data
Arc condition guide data
Operation origin position data
Conveyor data
Conveyor characteristics aux. data
Paint characteristics data
Press characteristics data
Spot gun characteristics data
Spot welding characteristics data
Anticipation output data
COM-ARC3 sensing output 1
COM-ARC3 sensing output 2
Alarm history data
System information
All
Manipulator matching
System definition
Coordinate origin
System construction
concurrent I/O
Function definition
Application
Data communication
Data link
Printer
Sensor
Vision
Servo
Servo motor constant
Observer
Revised: 05-07-08
File name
job name.JBI
job name.JBR
WEAV.CND
TOOL.CND
UFRAME.CND
ARCSRT.CND
ARCEND.CND
COMSRT.CND
COMARC3.CND
SENSCOR.CND
LASER.CND
PIERCE.CND
UPIERCE.CND
CUT.CND
VAR.DAT
ARCSUP.DAT
PC1PC2.DAT
CIOPRG.LST
IONAME.DAT
WELDER.DAT
WELDUDEF.DAT
RJNAME.DAT
SVMON.DAT
VARNAME.DAT
RBCALIB.DAT
HOME2.DAT
ABSO.DAT
ARCGUIDE.DAT
OPEORG.DAT
CV.DAT
CVSUB.DAT
PGUN.DAT
PS.DAT
SGUN.DAT
SWELDER.DAT
ANT.DAT
COMSENS1.DAT
COMSENS2.DAT
ALMHIST.DAT
SYSTEM.SYS
ALL.PRM
RC.PRM
SD.PRM
RO.PRM
SC.PRM
CIO.PRM
FD.PRM
AP.PRM
RS.PRM
CM.PRM
SP.PRM
SE.PRM
VC.PRM
SV.PRM
SVM.PRM
OBS.PRM
Page 47
A
O
O
O
O
O
O
O
O
O
O
O
O
O
O
O
O
O
O
O
O
O
O
O
O
O
O
O
O
O
O
O
O
O
O
O
O
O
O
O
O
O
O
O
O
O
O
O
O
O
O
O
O
O
O
O
O
B
O
O
O
O
O
O
O
O
O
O
O
O
O
O
O
O
O
X
X
X
X
X
X
X
X
X
X
X
X
X
X
X
X
X
X
X
X
X
X
X
X
X
X
X
X
X
X
X
X
X
X
X
X
X
X
X
JobExchanger for network
Files loaded into the PC file system will get an extension of .jbi .jbr .dat .cnd .prm .lst or .sys
dependinng on type of file.
Allowed functions:
A= Possible to copy into PC.
B= Possible to copy into robot controller (reload) or to delete from robot controller.
( O : Possible, X : Impossible )
Note!
"Loading" of system parameters are by safety reason not permitted (use FC1,
FC2 or FDDWIN software for RS232C).
Page 48
Revised: 05-07-08
MRS6515GB-ch8.0.fm
JobExchanger for network
Port numbers used for TCP/IP
9. Limitations
9.1 Port numbers used for TCP/IP
High Speed JobExchanger uses TCP/IP as a communication protocol. For communication
with TCP/IP, service identification numbers called “port numbers” are used internally. With
High Speed JobExchanger, only port numbers from 10000 to 10008 are used for data transmission. When these numbers overlap with those of any other network device, normal communication becomes disabled. For use of this product, verify in advance that there is no
network device using the port numbers in the above range on the same network.
9.2 Access to the same file in a PC
Simultaneous access from different robot controllers to the same file in a PC is not possible.
JOB
JOB
Ethernet
Fig.49 Access from controllers to a PC
9.3 Access from several PCs
When High Speed JobExchanger is used, only one PC can transmit data per robot controller.
Transmission with more than one PC is not possible. (Simultaneous transmission between
one PC and more than one robot controller is possible.)
JOB
JOB
Ethernet
Fig.50 Access from PCs to a controller
MRS6515GB-ch9.0.fm
Revised: 05-07-08
Page 49
JobExchanger for network
Storage of CMOS file, etc.
9.4 Storage of CMOS file, etc.
Robot controller employs protocol conforming to BSC LIKE and FC1 protocol for transmission
with external devices. High Speed JobExchanger performs transmission using BSC LIKE protocol. Since FC1 protocol is used for storage, etc. of CMOS files, it cannot be executed with
High Speed JobExchanger. For storage, etc. of CMOS files, etc., use FC1 or FC2.
Page 50
Revised: 05-07-08
MRS6515GB-ch9.0.fm
JobExchanger for network
10. Trouble shooting
Hardware key problems
Check if the hardware key is mounted in right place, if there are several parallel ports try
another one. Mount a printer cable in the hardware key socket (does not need to be connected to a printer).
Fig.51 Missing hardware key
The control system in the wrong mode
This error appear if you try to delete or copy in the robot controller if it is not in REMOTE, or if
it is in PLAY-mode.
Fig.52 Error message
Connect to the robot controller
This error appear if you start JobExchanger without being connected to the robot controller.
Exit JobExchanger, connect the cable and restart JobExchanger.
Fig.53 Robot controller not connected
MRS6515GB-ch10.0.fm
Revised: 05-07-08
Page 51
JobExchanger for network
Manufacturer
Delete devided resources
A warning may occure when you are removing a software in Motoman group. A file in Windows systems is no longer used by any software. Accept to remove this file by clicking OK.
Fig.54 Warning message
10.1 Manufacturer
Address
Motoman Robotics Europe AB
Box 4004
SE-390 04 Kalmar
Sweden
+46-480-417 800
+46-480-417 999
Phone:
Fax:
Page 52
Revised: 05-07-08
MRS6515GB-ch10.0.fm
Notes
Headquarters:
Sweden
MOTOMAN Robotics Europe AB
Distributors:
Czech Republic
Box 4004, SE-390 04 Kalmar, Sweden
Tel: +46-480-417800, Fax: +46-480-417999
Group companies:
Denmark
MOTOMAN Robotics Europe AB
Anelystparken 47A, DK-8381 Tilst, Denmark
Tel: +45-7022-2477, Fax: +45-7022-2478
Finland
MOTOMAN Robotics Finland OY
Messinkikatu 2, FI-20380 Turku, Finland
Tel: +358-403000600, Fax: +358-403000660
France
MOTOMAN Robotics SARL
Rue Nungesser et Coli, D2A Nantes-Atlantique, F-44860 Saint-Aignande-Grand-Lieu, France
Tel: +33-2-40131919, Fax: +33-40754147
Germany
Germany
Boki robotizované systémy s.r.o.
Knezeves 178, CZ-252 68 Stredokluky, Czech Republic
Greece
Kouvalias Industrial Robots
Hungary
REHM Hegesztéstechnika Kft.
25, El. Venizelou Ave., GR-17671 Kallithea, Greece
Tel: +30-1-9589243-6, Fax: +30-1-9567289
Tápiószele, Jászberényi út 4., H-2766, Hungary
Tel: +36-30-9510065, Fax: +36-1-2562012
Israel
KNT Engineering Ltd.
9 Hapalmach Street, IL-Kfar Azar 55905, Israel
Tel: +972-3 9231944, Fax: +972-3 9231933
Norway
Polen
Roboprojekt Boc Sp.z.o.o
ul Kielecka 30, PL-42-470 Siewierz, Polen
Tel:+48 (0-32) 672 89 16, Fax: +48 (0-32) 672 88 08
South Africa
MOTOMAN Robotics UK (Ltd)
MOTOMAN Robotics Italia SRL
Switzerland
Via Emilia 1420/16, IT-41100 Modena, Italy
Tel: +39-059-280496, Fax: +39-059-280602
Netherlands
Portugal
MOTOMAN Robotics Iberica S.L. - Sucursal em Portugal
Z. Ind. Aveiro Sul, Lote 21, N. S. Fátima, PT-3810 Aveiro, Portugal
Tel: +351-234 943 900, Fax: +351-234 943 108
Slovenia
Messer SAG
Langweisenstrasse 12, CH-8108 Dällikon,
Switzerland
Tel: +41-18471717, Fax: +41-18442432
MOTOMAN benelux B.V
Zinkstraat 70, NL-4823 AC Breda, Netherlands
Tel: +31-76-5424278, Fax: +31-76-5429246
Robotic Systems S.A. PTY Ltd
P.O. Box 90741, Bertsham 2013, Johannesburg,
South Africa
Tel: +27-11-4943604, Fax: +27-11-4942320
Johnson Park, Wildmere Road, Banbury, Oxon OX16 3JU, Great Britain
Tel: +44-1295-272755, Fax: +44-1295-267127
Italy
ROBIA ASA
Industriveien 1, NO-3300 Hokksund, Norway
Tel: +47-32252820, Fax: +47-32252840
MOTOMAN Robotec GmbH
Im Katzenforst 2, DE-61476 Kronberg/Taunus, Germany
Tel: +49-6173-60-77-30, Fax: +49-6173-60-77-39
Great Britain
Kravarska 571/2, CZ-70900 Ostrava, Czech Republic
MOTOMAN Robotec GmbH
Kammerfeldstraße 1, DE-85391 Allershausen, Germany
Tel: +49-8166-90-0, Fax: +49-8166-90-103
Hadyna Internation Ltd
Turkey
Teknodrom Robotik Otomasyon San. Tic. Ltd Sti
Sultan Orhan Mah. 1150 Sok. No : 8/A, 41400 Gebze / Kocaeli
Turkey
Tel: +90 (0) 262 644 3 444, Fax: +90 (0) 262 644 4 480
RISTRO d.o.o.
Lepovce 23, SI-1310 Ribnica, Slovenia
Tel: +386-61-861113, Fax: +386-61-861227
Spain
MOTOMAN Robotics Iberica S.L.
Avenida Marina 56, Parcela 90, ES-08830 St. Boi de Llobregat (Barcelona),
Spain
Tel: +34-93-6303478, Fax: +34-93-6543459
Sweden
MOTOMAN Robotics Europe AB
Box 504, SE-385 25 Torsås, Sweden
Tel: +46-480-417800, +46-486-41410
www.motoman.se
a subsidiary of YASKAWA Electric Corporation
[email protected]