1
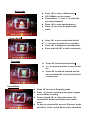
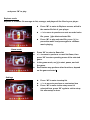
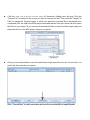
GC-1020 User’s Manual Operating Guide Index Introduction Knowing your player functions The controls and connections To Operate Your Player Step 1: Charge your player Step 2: Setting basic functions Step 3: Connecting to PC The Main Menu Basic controls Music mode Video mode Radio mode Photo mode Text Mode Record Mode Explorer mode Game mode Settings AVI Converter Tool AVI Converter Product Tool (for Firmware Upgrade) Safety & Upkeep Congratulations! You Element GC-1020 is a music and video player, Calendar, Clock, recorder, radio, photo album and game player, all in one. Increase your player’s capacity anytime by inserting a TF memory card. Before use your player, check what’s inside of your package: Accessories: z z z z z An USB cable An AC adapter An earphone A CD This user’s manual Knowing your Player Functions z 2.4” display Hi Definition True Color TFT Display z Supports MP3,WMA music formats z Supports Mini SD card up to 4GB z Supports MPEG AVI video format, 400*240 resolution. z Supports High Definition JPEG,BMP and GIF format photo browse z Built-in Microphone, Digital Voice Recorder z Multiple Playback Mode: Once / Repeat once / Folder once/ Folder repeat / All once / All repeat/Intro/Order/Shuffle z FM Radio Supports WIN2000,WIN XP,VISTA operating system USB 2.0 High Speed Supports E-Book Playback, and supports Chapter Mark Game z z z z The controls and connections z ON/OFF As the master switch to turn on or off the player z Power The local Power switch, press and hold the button to activate the player and turn the display on. The Power button can only work when the ON/OFF switch is set at ON position. z Hold Push upwards to disable all buttons z TF Card Memory Slot z Headphone Jack & USB port z Reset hole (RESET) z Control Buttons M– Press to select or confirm, or press and hold to exit to main menu. May perform other To reset player, insert a straightened paperclip or tip. functions, depending on menu opened. Press and hold to return to Main Menu - Press to change audio equalizer mode while playing music Direction Pad UP DOWN LEFT RIGHT – to increase audio volume - to decrease audio volume. This button is also used to exit to last menu. - to select next item in the menu - to select the previous item in the menu To operate your player: Step 1 Charge your Player Fully charge your player before 1st use Use the AC adapter to charge the player for minimum 4 hours at the 1st time. Charge from the USB port of a PC Turn on your PC, and make sure the PC is not in power saving mode while player is charging. Avoid using a USB hub (Note: while low battery icon appears, charge your player as soon as possible) To charge the unit via the USB cable, simply keep the cable plugged into the computer. On the bottom right of your computer screen on the taskbar you will see the “safely remove hardware” Icon. Left Click the icon and you will see the removable storage (MP4) and then left click again. This will remove the MP4 as a removable disk connection and now will charge the player. Step 2 Setting Basic functions Set menu language: Turn on the player, move to “Settings” modes, select “System”, and select “Language” option to set the language you want, then press “M” button to confirm your selection. Set the FM Radio Channels Select your radio reception region: z Enter to “Setting” and select “Radio” option z Move to FM region, and select the region for your radio reception. z Exit to Main menu by pressing “DOWM” button. In the main menu, go to “Radio” option and enter. In the Radio screen, press “M” button to pop the Radio Operation menu, and select “Auto”, then press “<” or “>” button to scan and store the radio channels in your region. The scanned and stored channels can be operated by the Operation menu and the buttons “<” and “>” . Press the buttons played radio music. and to adjustment the audio volume; use the button to record the Step 3 Connecting to the PC: the player can connect to a PC via the USB port, the player works as an USB Mass storage device when connecting to the PC. You can save the files from the player to the PC or vise versa. z The Player only works as USB Mass Storage Device when connecting to the PC. z z z The file(s) you saved to the player can be directly run by the corresponding mode(s) in the player The jpg photo files can be displayed in the “PHOTO” mode of the player; the MP3 music files can be played in the ‘MUSIC” model of the player,… and so on. The player is connected to the PC, the USB port from the PC will provide the power to charge on the player simultaneously. Removable Storage You also have the option to increase the memory by inserting a TF card. This MP4 player can support up to 4GB Inserting: Place the TF card and slightly push the card into the socket of the card, i.e. connecting the unit. Under this state, you can play the content on the card. Removing: Slightly push the TF Card, and it will spring back, you can then take it out. Caution: Please perform inserting and pulling operation when power is off! Otherwise, it will lead to the loss or damage to the files within the unit. The Main Menu ---to enter and operate in different function modes There are 9 function modes in your player. Main menu: (Turn ON the Player to show main menu ) Music mode: Video mode: Photo mode: Text mode: Game Mode: Setting Record mode: Radio mode: Explorer mode: Basic Controls M– Press to select or confirm; press and hold to exit to main menu. This button may perform other functions, depending on menu opened. - Press to change audio equalizer mode while playing music Direction Pad UP – to increase audio volume DOWN - to decrease audio volume LEFT - to select next item in the menu RIGHT - to select the previous item in the menu Music Mode Press “M” to enter to Music mode UP/DOWN to set the volume < / > to move to previous or next music file Press to start playing the selected music or pause the music. Press and hold “M” to exit to main menu Video Mode z Press “M” to enter to Music mode z UP/DOWN to set the volume z < / > to move to previous or next music file z Press “M” to start playing music, the music and play again. to pause Radio mode z z z z Press “M” to enter to Radio mode UP / DOWN to set the volume Press buttons “<” and “>” to select the pre-stored channels Press “M” to enter operating menu z Press music z z z z Press “M” to move to the photo file list < / > to move to previous or next photo Press “M” to display the selected photo, Press and hold “M” to exit to main menu z z Press “M” to enter the text file list < / > to move to previous or next list text file Press “M” to read the selected text file; press and hold “M” to exit to text file list or main menu to record the played radio Picture Mode Text mode z Record Mode z Press “M” to enter to Recording mode z Press to start recording, press again to pause or to continue recording Press and hold “M” to exit to main menu. The recorded file will be saved before exit to main menu. To play the recorded file, move to “Explorer” mode and select “Voice” option. Move to the selected file z z and press “M” to play. Explorer mode Explorer is a master file manager to list, manage, and player all the files in your player. z Press “M” to enter to Explorer screen, which is the master file list of your player. z < / > to move to previous or next recorded voice file; press z to delete selected file. Press “M” to play selected file; press to pause the music and press again to continue music playing. Game mode z z Press “M” to enter to Game list < / > to move to previous or next list Game, then press “M” to enter operating menu of the selected game. z In the game mode, use to start, pause, and exit the game. Each button may perform other functions, depend on the game selected z Settings z z z Press “M” to enter to setup list < / > to move to previous or next setup item Press “M” to enter to the setup menu of selected item, press “M” again to exit to setup list after setup is done. AVI Converter Tool The AVI Convert Tool in the enclosed CD provides you convert and save your media files in the player. First, install these software tools onto your computer: z Place the disk provided into your PC. z Enter to “AVI Tool” folder in the enclosed disk z Double click on the SETUP file in the folder z Follow the instructions for installing the program and open up once completed. AVI Converter This converter tool allows you to convert all type of media formats into AVI media format to save and play in your player. Before placing any movies on the MP4 player make sure that the movies are in AVI format, if they are not then use the AVI converter software provided to change them into the correct format, this software will also give you the option to select the MP4 player as the designated output drive which will automatically place the movie onto your player. In order to do this please follow these steps. Note: The detailed operating instructions are available in the “Help” file of the AVI software. Enter to the main screen of AVI converter, click “Add” in the AVI screen, the Conversion Setting screen will pop then click “Help” to see the detailed instructions. z Click the “Add” icon in the AVI Converter menu. A Conversion Setting menu will pop. Click the “Source File” to search for the movie you wish to convert into AVI. Then click the “Target File Path” to assign the Target file path, in which you want the converted file to be placed once completed (You can select the MP4 player removable device from here which will then place the file into your player) If you choose an alternative folder to send it to then simply copy and paste the file into your MP4 player using my computer. z Once you have selected the correct file and folder simply press the click the “Convert Now” icon, which will then start the conversion. Product Tool(for Firmware Upgrade) Use this tool to upgrade or restore the firmware in you player. z Enter to “Product Tool” folder in the enclosed disk z Double click on the SETUP file in the folder z Follow the instructions for installing the program and open up once completed. Safety and Upkeep z z z z z z z z Never attempt to fix the player yourself by opening and disassembling the unit as this will affect your guarantee. When cleaning the screen please use a soft dry cloth. Do not expose the player to direct sunlight for long periods of time. Do not expose the player to damp or moist conditions Do not dispose of this product in fire. Battery inside this product may explode or leak. Do not place near sharp objects as the screen can be easily scratched. When the player is not in use turn the player off to preserve the battery charge. This player uses a Lithium battery. When the battery is low, please charge the battery using the adaptor supplied Do not dispose of this product in your household waste. Contact your local authority for details of local recycling schemes