1
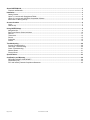
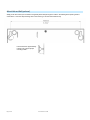
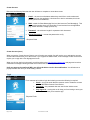
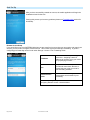
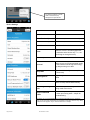
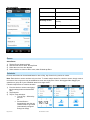
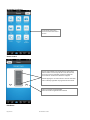
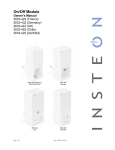
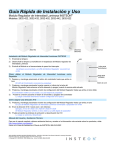
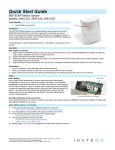
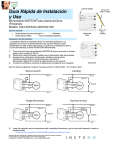
INSTEON® Hub Owner’s Manual 2242-222 (US) 2242-422 (EU) 2242-442 (UK) 2242-522 (AUS/NZ) Page 1 of 26 Rev: 9/27/2013 4:17 PM About INSTEON Hub ..................................................................................................................................................... 3 Features and Benefits.................................................................................................................................................. 3 Installation ..................................................................................................................................................................... 3 Getting Started............................................................................................................................................................. 4 Option 1: Use Hub with Smartphone/Tablet ................................................................................................................ 4 Option 2: Use Hub with INSTEON Compatible Software ............................................................................................ 4 Mount Hub on Wall (optional) ...................................................................................................................................... 5 Account Creation .......................................................................................................................................................... 6 Login ............................................................................................................................................................................ 7 Hub Set Up .................................................................................................................................................................. 8 Using INSTEON App ..................................................................................................................................................... 9 Navigation Bar ............................................................................................................................................................. 9 Device and Sensor Status Indicators ........................................................................................................................ 10 Devices ...................................................................................................................................................................... 11 Thermostat ................................................................................................................................................................. 14 Rooms ....................................................................................................................................................................... 15 Schedules .................................................................................................................................................................. 15 Scenes ....................................................................................................................................................................... 16 Troubleshooting .......................................................................................................................................................... 20 Account Troubleshooting ........................................................................................................................................... 20 Hub Setup Troubleshooting ....................................................................................................................................... 20 Scene Troubleshooting .............................................................................................................................................. 21 Network Reset ........................................................................................................................................................... 21 Factory Reset ............................................................................................................................................................ 21 Specifications .............................................................................................................................................................. 23 Certification and Warranty ......................................................................................................................................... 24 DECLARATION OF CONFORMITY .......................................................................................................................... 24 Certification (US) ....................................................................................................................................................... 25 FCC and Industry Canada Compliance Statement ................................................................................................... 25 Page 2 of 26 Rev: 9/27/2013 4:17 PM About INSTEON Hub INSTEON Hub makes adding customizable, fully dimmable INSTEON remote control to your lamps as easy as plug and play. It’s home control at its simplest and most convenient. Ethernet cable Power cable Paddle top (on/brighten) Status LED Factory reset (set button) Hub Ethernet port Power input Features and Benefits • • • • • • • Control your entire INSTEON network Receive cloud-based email and/or text alerts (leak, door, etc.) Setup scenes Run timers Do this all from your mobile device using a free iOS and Android Application No monthly fees Two-year warranty Installation CAUTIONS AND WARNINGS Read and understand these instructions before installing and retain them for future reference. This product is not designed or approved for use on powerlines other than 100-240VAC,50Hz or 60Hz, single phase. Attempting to use this product on non-approved powerlines may have hazardous consequences. Page 3 of 26 Rev: 9/27/2013 4:17 PM In the Box INSTEON Hub Power Cord Ethernet Cord Quick Start Guide Tools Needed Android or iOS smartphone or tablet Accessories INSTEON devices and sensors INSTEON IP Camera Getting Started Connect Hub to router using only the included Ethernet cable. Then connect Hub to wall outlet (not a power strip). What you’ll need • Available port on your router • Available wall outlet Hub WiFi router Plugging Hub directly into outlet will result in the greatest signal range and reliability Ethernet cable Option 1: Use Hub with Smartphone/Tablet 1) 2) Connect your smartphone/tablet to your router via WiFi Download the INSTEON for Hub app 3) Launch and follow the onscreen instructions What you’ll need • Smartphone or tablet running iOS or Android Once your INSTEON Hub has been configured and devices added, you may also access and have control of INSTEON devices from any browser by visiting https://connect.insteon.com Option 2: Use Hub with INSTEON Compatible Software Do not use this option if you are using or plan to use the Hub with the INSTEON for Hub app. HouseLinc, a powerful free software for managing INSTEON, can be downloaded from www.insteon.com/houselinc.html 1) 2) Install software Follow software instructions for adding Hub as a computer interface Page 4 of 26 Rev: 9/27/2013 4:17 PM What you’ll need • INSTEON compatible software (Like HouseLinc) that supports the Hub as a computer interface • Computer connected to the router (WiFi or Ethernet) Mount Hub on Wall (optional) Simply screw two screws (we recommend using #6 drywall screws) through the marks in the drawing below (leaving head of screw about ¼” from the wall) and hang Hub on the screws (you can then tear this sheet off). + + Leave head screw approximately 6.35mm (.25”) gap for proper mounting of Hub Page 5 of 26 Rev: 9/27/2013 4:17 PM Account Creation Login Selection Screen The first screen in the app when launching the application is the Login Selection Screen. You can select between one of the following: 1) Create New Account • Select this if you do not already have an INSTEON Hub account 2) I already have an INSTEON Account • Select this if you have already created an existing INSTEON Hub account. End User License Agreement After selecting “Create New Account” from the above screen you will be taken to the End User License Agreement (EULA). After reading, tap on the text “I have read and agreed to the license terms” to check the box (lower left corner). You will automatically be taken to the next page. NOTE: You will be unable to continue in the application without checking the box. Page 6 of 26 Rev: 9/27/2013 4:17 PM Create Account Below are the following fields that the user will have to complete to create the account: • Email* – the user's email address where they would like to receive alerts and notifications from the application, cloud service or device activations; this is the primary account email address. • SMS – stands for Short Messaging Service (also known as Text Messaging). This is the mobile number where you would like to receive alerts from the application (e.g., Motion detected, Garage opened, etc). • Password* – the minimum length for a password is 4 characters. • Reenter Password* – re-enter the password to verify. * Required Fields Create Account (cont.) When you tap the “Create Account” button you will receive two emails. One will require you to activate the account and the other will welcome you to the service. If you supplied an SMS number, a text message will also be sent and require you to reply with a four digit approval code. When you click on the link in the email, you will be taken to the http://connect.insteon.com web page and receive a confirmation message indicating that the account has been successfully created. Until you approve the email and SMS, you will not be able to receive alert notifications. You will also see a popup reminder each time you finish adding a device. Login For a customer to be able to login their existing account the following is required: • Email* – this is the email that the customer used to create the account with the INSTEON Connect Cloud Service. • Password* – the password that was used for the initial account creation. • Stay signed in – turning this on will keep you from having to enter your credentials each time you access the app. *Required Fields Page 7 of 26 Rev: 9/27/2013 4:17 PM Hub Set Up After you have successfully created an account, the mobile application will begin the installation wizard for the Hub. If during this process you have any problems please see Troubleshooting section for Hub Setup. Remote Access Setup If you would like to use your INSTEON Hub when you are away from home so that you can monitor and control your devices, you will need to configure Remote Access. This involves a process called port forwarding. A guide to configuring port forwarding can be found under Settings > House > Port Forwarding Guide. IP Address The static IP address you’ve assigned to the Hub. Assigning a static IP address can be done using your router or by specifying one here. Port The port on which the Hub will listen for inbound connections. Be sure to forward this port using your router’s port forwarding interface. Remote Access Guide Basic instructions to configure the most popular router brands for port forwarding. Call INSTEON Support if you are at all uncomfortable with configuring Remote Access: 1-866-243-8022 Page 8 of 26 Rev: 9/27/2013 4:17 PM Using INSTEON App Navigation Bar Navigation bar without thermostat: Navigation bar with thermostat: Favorites A customizable display for any devices you wish to have at your fingertips. Add lights, cameras, sensors and see them all in one alphabetically organized view. Rooms Display all rooms. The default rooms include: All Devices, Check-in and Favorites. Create more rooms to make organizing your house easy. Scenes Access scenes you have created. Scenes are a collection of devices that respond (on, off, 50%, etc.) to a single command. Check-In Allows you to quickly check status of sensors (motion, open/close, leak, smoke). See “Sensor Status Indicators” to understand the different sensor states. Temperature If you have an INSTEON thermostat, the temperature will be displayed here. Tapping the icon will take you directly to the thermostat control screen. Settings Allows you to edit the page you are on as well as access general settings. Page 9 of 26 Rev: 9/27/2013 4:17 PM Device and Sensor Status Indicators Spinning Getting status Green Device is on White Device is off / sensor is “OK” Red Sensor is activated Yellow Status is unknown Page 10 of 26 Rev: 9/27/2013 4:17 PM Devices To control a device, click on its icon. If you have more than nine devices, use your finger to swipe to the other pages. Tap All Devices to see every device in your home. Tap a device icon to control that device. Page 11 of 26 Rev: 9/27/2013 4:17 PM Control pop-up Choose between turning the device on or off. Tap + to enter the full device control screen for dimming and brightening. Tap in the background area to close the popup. Full Device Control Refresh status Current status On/Off control. Double-tapping On or Off for dimmers will instantly turn dimmers fully on or off (bypassing any programmed ramp rate and/or on level) Tap to increment bright/dim Press and hold to bright/dim until released Slide left and right to quickly adjust the light brightness (dimming devices only) Page 12 of 26 Rev: 9/27/2013 4:17 PM To view the settings or make edits to the device, tap settings then tap Edit This Device Settings Name Device name Icon Device icon Room Memberships Add to rooms, view room memberships Scene Memberships Add to scenes, view scene memberships Schedule Set a timer for the device Alerts Receive an alert (text message/email) when the device is activated (applicable to activation at the device only – i.e., not via the app or through a scene) Local Properties* On Level The level at which you would like the device to turn on to when activated locally – this could be used to help save energy by always turning on to 90%. Ramp Rate Speed at which the light turns on (0.1 sec to 8 minutes) LED Brightness Set the brightness of the devices local LEDs Beep on Button Press Enable this feature if you’d like your device to beep when activated locally. Local Programming Lock Enable this to prevent changes from being made at the device. Blink on INSTEON Traffic Enable this if you’d like the devices LED to blink upon seeing traffic – helpful for troubleshooting. * Available for most INSTEON devices shipped after March 2013. Features such as On Level and Ramp Rate are available for dimming devices only. Beep on Button Press applies only to devices that have a beeper. Page 13 of 26 Rev: 9/27/2013 4:17 PM Example of the On-Level and Ramp Rate adjustments: Thermostat Thermostat Control * Available for INSTEON devices shipped after March 2013 ** Dimmable devices only Use the up and down arrows to adjust your thermostat set points. Page 14 of 26 Rev: 9/27/2013 4:17 PM Thermostat Edit Name Device name Icon Device icon Room membership Add to rooms Humidity sensor Enable if thermostat supports humidity Units Select Fahrenheit or Celsius** ** Not currently supported for INSTEON Venstar Adapter Rooms Add a Room 1) 2) 3) 4) Tap the Rooms button and Add Give the new room a name, then tap Done Select the room icon, then tap Add Select a device or scene to add to room, when finished tap Done Schedules Devices and scenes can be activated based on time of day, day of week or by sunrise or sunset. Note: Each device or scene can have only one timer. To create multiple timers for a device or scene, simply create a new scene. Also, only scene may be scheduled to occur at a single point of time. We suggest either stagger your schedules or group all of your scheduled items into a single scene. Follow the steps below to create a schedule: 1) From the device or scene control page, tap the settings button and select Edit This 2) Tap Schedule 3) Tap On Time and select • Time of Day – followed by the time Or • Sunrise/Sunset – Automatically uses the geo location times for your area (automatically configured during Hub setup) Page 15 of 26 Rev: 9/27/2013 4:17 PM 4) Tap Done 5) Next select Off Time and select • Time of Day Or • Sunrise/Sunset 6) Tap Done 7) Select the days that you would like the timer to run by tapping on each day. By default, the entire week is pre-selected for you. 8) When finished tap Save to save your new schedule Scenes Scenes are a collection of INSTEON devices that can each turn on, off or dim when activated from either the app, a schedule or by activation from any other controller (motion sensor, keypad, switch, etc.) Note: some older INSTEON devices may require manually tapping of the set button during scene configuration. See Scene Troubleshooting for more info. Add a Scene 1) 2) 3) 4) From the Scene page, tap Add Give the new Scene a name, icon and room associations Tap each device that you’d like to add to the scene, when finished tap the Next button. The next page will display the list of your scene members broken up by room and will look something like this: Member Type Page 16 of 26 Member Response Rev: 9/27/2013 4:17 PM 5) Adjust the scene member response by tapping the green button or use the current state displayed. Example showing a dimmers’ on level and ramp rate 6) If you wish to also activate the scene from another INSTEON device (motion sensor, keypad, switch, etc.) tap the blue Responder button. If the button is grayed out (either Responder or Controller), this means the device can only be one or the other. Responder: member will only be activated by the scene Controller (grayed out): A controller-only device (e.g., motion sensor) Both: member will activate and be activated by the scene Controller: member will only activate the scene Responder (grayed out): A responder-only device (e.g., older plug-in module) 7) When finished tap Save Scene The app will begin linking to each scene member If a sensor was selected, follow the onscreen instructions for adding them to the scene as a controller 8) When finished, the app will ask if you want to turn the scene members off – this may be convenient if you have created an All Lights scene and you simply want to turn off all members. Page 17 of 26 Rev: 9/27/2013 4:17 PM Accessing Your Scene In the Scene view, tap a scene to access the control screen Scene Control Scene control differs from regular device control since devices within a scene may be set to turn off when the scene is turned on (activated). All devices within the scene will turn off when the off button is tapped. Double tapping the on button will turn all scene members full-on instantly regardless of programmed scene state. Tap to increment scene bright/dim Press and hold to bright/dim until released Edit Scene Page 18 of 26 Rev: 9/27/2013 4:17 PM Page 19 of 26 Scene name Device name Icon Device icon Room Memberships Add to rooms Schedule Set a timer for the scene Members Displays all memberships of the scene. Tap on a device to edit the state or tap the trash can icon to remove from the scene. Rev: 9/27/2013 4:17 PM Schedule Schedule To create a schedule for your scene, please refer to the Schedules section of this manual. Troubleshooting Account Troubleshooting Unable to Create Account • Verify that the mobile device is connected to Wi-Fi and has an external connection to the internet, try going to a website through the mobile device’s browser. • Verify that the email is properly formatted ([email protected]). Account Already Exists • Verify that you are using the correct password; if unsure try the Forgot Password option. Hub Setup Troubleshooting The following is a list of the various screens that are displayed if there are any problems during the Hub Setup Wizard. If you are unable to resolve your issue after reviewing these solutions, please send an email to [email protected] or call us at 1-866-243-8022 and be sure to include your INSTEON Hub ID (located on the bottom of the Hub) and your username. Not Connected to Wi-Fi o Make sure the mobile device has an external internet connection. An easy way to verify that would be to try a common website from the mobile device’s internet browser such as www.insteon.com. o Make sure that the mobile device is associated to a WiFi network. You may have turned off wireless network association. Go to the settings section for your mobile device and allow the mobile device to connect to your local WiFi. o Make sure “Airplane Mode” is turned off for the mobile device. o Check to make sure the router is able to make an external connection. If you have a computer on the network, check to see if you can go to a common website through the computer’s browser. Can’t Find Hub o Make sure that you have properly connected the Hub to the router and that the Hub is powered. o Make sure your mobile device is associated to the same local network that the Hub is physically connected to. There are some home networks that have multiple SSID’s that would prevent the application from detecting the Hub if they were on different networks. o The proper start-up sequence for the Hub is to plug the Ethernet cable to both router and Hub THEN apply power to the Hub. o Verify proper LED state on the rear of the Hub. There are 2 LEDs on the rear of the Hub that are located where the Ethernet cable is plugged in. o Attempt to find the Hub outside of the mobile application. On a computer that is connected to the same local network as the Hub, open an Internet browser and visist: Page 20 of 26 https://www.connect.insteon.com/getinfo.asp Rev: 9/27/2013 4:17 PM The web browser should show the Hub located at the URL above. Clicking on the IP address should access the Hub. NOTE: If you see multiple entries, locate the correct Hub by INSTEON ID, printed on the underside of the Hub o Verify that the Hub was given an IP address: On the bottom of the Hub you will find the MAC Address for the Hub. This MAC Address should be in the DHCP list for the router. If there is an IP address, click the link for that IP address. If the MAC Address is not on the list, the router may have not assigned an IP address to that device. • Cycle Power to the Hub • Try another Ethernet cable • Try another Port on the Router • Verify the LED behavior on the Hub • Attempt a Network Reset Scene Troubleshooting If you set your device to go to a dimmed level for a scene but when activated it goes to 100%, you are likely using an older INSTEON device. These devices will require an additional step during the scene setup process: 1) 2) 3) 4) 5) Go to Edit > Edit Settings > Scenes and select the scene to edit Tap on the device that isn't responding to the dim level Use the control panel to adjust it to the level you want for the scene Go to the physical device and tap its set button (the connected light may flash) Tap "Update Scene". The scene will be updated with the older devices' scene level. Network Reset If you have changed your network settings and cannot connect to the Hub, try performing a Network Reset. 1) Press and hold INSTEON Hub set button until it beeps LED will begin blinking green 2) Slowly tap the set button six times On the first tap the Hub will double beep and the LED will turn to blue On the fifth tap the Hub will start beeping and the LED will turn green On the sixth tap the Hub will stop beeping and the LED will turn blue 3) Remove power from INSTEON Hub and wait about 10 seconds 4) Re-apply power to INSTEON Hub Factory Reset If you have already set up the Hub in the app, you must first delete your account prior to factory resetting the Hub. If you have added any INSTEON devices to the app, it is strongly recommended that you factory reset those devices prior to deleting your account and factory resetting the Hub. Delete Account 1) Go to the Edit Settings page by tapping the settings button and selecting Edit Settings 2) Select Account 3) At the bottom of the page is a Delete Account button. Tap button to delete your account (this cannot be undone). Factory Reset Hub Page 21 of 26 Rev: 9/27/2013 4:17 PM 1) Remove power from INSTEON Hub 2) Press and hold INSTEON Hub set button. Do not let go. 3) While continuing to press and hold the set button, re-apply power to INSTEON Hub INSTEON Hub will begin to emit a long beep LED will turn red 4) After beep stops, release INSTEON Hub set button After a few seconds, INSTEON Hub will double-beep LED will turn blue LEDs on the Ethernet jack will flash Page 22 of 26 Rev: 9/27/2013 4:17 PM Specifications General Product name INSTEON Hub Brand/manufacturer INSTEON Manufacturer product number 2242-222 US 2242-422 Europe 2242-442 UK 2242-522 AUS/NZ UPC 813922012934 US 813922012941 Europe 813922012958 UK 813922012985 AUS/NZ Warranty 2 years, limited INSTEON INSTEON powerline mesh repeater Yes INSTEON RF mesh repeater Yes INSTEON controller Yes INSTEON responder Yes Maximum links/scenes 400 Blinks green once when all responders acknowledge (can be disabled via software) LED Blinks red once if any responder does not acknowledge Blinks red or green during setup Blinks red to indicate traffic (must be enabled via software) LED brightness Adjustable, from off to bright Commands supported as controller All Commands supported as responder All Software configurable Yes RF range Up to 50 meters (150 feet) open air Phase bridge detect beacon Yes INSTEON device subcategory 2242-222 (US, 915 MHz) 2242-422 (Europe, 869.85 MHz) 2242-442 (UK, 869.85 MHz) 2242-522 (AUS/NZ, 921.0 MHz) X10 X10 address 1 optional (comes unassigned) X10 transmitter Yes X10 receiver Yes X10 status response N/A X10 minimum transmit level 3.2 Vpp into 5 Ohms Page 23 of 26 Rev: 9/27/2013 4:17 PM 0x2B 0x2E 0x30 0x2F X10 minimum receive level 20mV into 5 Ohms X10 messages repeated Mechanical No Mounting Wall Mount Wires Screw clamp connections N/A N/A Case color White Set button 1 Plastic UV stabilized polycarbonate Beeper Yes LED 1, RGB Dimensions 7” H x 4” W x 1.5” D (17.8cm x 10.2cm x 3.8cm) Weight 5oz (142g) Operating environment Indoors Operating temperature range 0 to 40 C / 32 to 104 F Operating humidity range 0-90% relative humidity Storage temperature range -20 to 70 C / -4 to 158 F o o o o o o o o Electrical Voltage 100VAC to 240VAC Frequency 50/60Hz auto detected at power-up Retains all settings without power Yes, saved in non-volatile EEPROM Standby power consumption < 0.75 watts Safety approved CE, C-Tick, CTL/US EN 300 220-2, 301 489-3 Certifications AS/NZS 4268, CISPR 22 IEC 60669-2-1 FCC / IC Certification and Warranty DECLARATION OF CONFORMITY Hereby, INSTEON declares that this device is in compliance with the essential requirements and other relevant provisions of the following Directives: 1) Low Voltage Equipment Directive 2006/95/EC 2) Electromagnetic Compatibility Directive 2004/108/EC 3) Hazardous Substance Directive 2005/95/EC Technical data and copies of the original Declaration of Conformity are available and can be obtained from INSTEON; 16542 Millikan Ave, Irvine, CA, USA. User Information for Consumer Products Covered by EU Directive 2002/96/EC on Waste Electric and Electronic Equipment (WEEE) This document contains important information for users with regards to the proper disposal and recycling of INSTEON products. Consumers are required to comply with this notice for all electronic products bearing the following symbol: Page 24 of 26 Rev: 9/27/2013 4:17 PM Environmental Information for Customers in the European Union European Directive 2002/96/EC requires that the equipment bearing this symbol on the product and/or its packaging must not be disposed of with unsorted municipal waste. The symbol indicates that this product should be disposed of separately from regular household waste streams. It is your responsibility to dispose of this and other electric and electronic equipment via designated collection facilities appointed by the government or local authorities. Correct disposal and recycling will help prevent potential negative consequences to the environment and human health. For more detailed information about the disposal of your old equipment, please contact your local authorities, waste disposal service, or the shop where you purchased the product. DECLARATION OF CONFORMITY TO R&TTE DIRECTIVE 1999/5/EC for the European Community, Switzerland, Norway, Iceland and Liechtenstein Product category: general consumer (category 3). English: This equipment is in compliance with the essential requirements and other relevant provisions of the European R&TTE Directive 1999/5/EC Deutsch [German]: Dieses Gerät entspricht den grundlegenden Anforderungen und den weiteren entsprechenden Vorgaben der Richtlinie 1999/5/EU. Nederlands [Dutch]: Dit apparaat voldoet aan de essentiele eisen en andere van toepassing zijnde bepalingen van de Richtlijn 1999/5/EC. Svenska [Swedish]: Denna utrustning står I överensstämmelse med de väsentliga egenskapskrav och övriga relevanta bestämmelser som framgår av direktiv 1999/5/EG. Français [French]: Cet appareil est conforme aux exigences essentielles et aux autres dispositions pertinentes de la Directive 1999/5/EC Español [Spanish]: Este equipo cumple con los requisitos esenciales asi como con otras disposiciones de la Directiva 1999/5/CE. Português [Portuguese]: Este equipamento está em conformidade com os requisitos essenciais e outras provisões relevantes da Directiva 1999/5/EC. Italiano [Italian]: Questo apparato é conforme ai requisiti essenziali ed agli altri principi sanciti dalla Direttiva 1999/5/CE. Norsk [Norwegian]: Dette utstyret er i samsvar med de grunnleggende krav og andre relevante bestemmelser i EU-direktiv 1999/5/EF. Suomi [Finnish]:Tämä laite tÿttää direktiivin 1999/5/EY olennaiset vaatimukset ja on siinä asetettujen muiden laitetta koskevien määräysten mukainen. Dansk [Danish]: Dette udstyr er i overensstemmelse med de væsentlige krav og andre relevante bestemmelser i Direktiv 1999/5/EF. Polski [Polish]: Urządzenie jest zgodne z ogólnymi wymaganiami oraz szczególnymi warunkami okreslonymi Dyrektywą UE: 1999/5/EC In 2002, the European Union introduced the Directive on Waste Electrical and Electronic Equipment (WEEE). The main aim of the Directive is to ensure that WEEE is collected and treated separately. WEEE may contain hazardous substances that should not end-up in the (human) environment because it can have adverse effects on it.Furthermore, WEEE is a vast source of raw materials. With the ever-rising worldwide demand for new equipment and the ever-decreasing volume of raw materials in nature, letting this potential source of such materials go to waste is unacceptable. If equipment is collected separately, the equipment can be recycled and up to 85 to 90% of the equipment can be reused as new material, saving the use of virgin raw materials and energy of producing these. Separate collection and treatment of WEEE will thus decrease CO2 emissions as well. For the above reasons, INSTEON expects end-users to dispose of the material in an environmentally friendly way through separate collection and treatment. Electrical and Electronic Equipment is labeled with the following 'crossed out wheeled bin' symbol indicating that the equipment should be disposed of, by the end-user, separate from other types of waste. End-users should contact their dealer/distributor or our company on disposal, collection and recycling options in their country. Certification (US) This product has been thoroughly tested by Intertek ETL, a nationally recognized independent third-party testing laboratory. The North American ETL Listed mark signifies that the device has been tested to and has met the requirements of a widely recognized consensus of U.S. and Canadian device safety standards, that the manufacturing site has been audited, and that the manufacturer has agreed to a program of quarterly factory follow-up inspections to verify continued conformance. FCC and Industry Canada Compliance Statement This device complies with FCC Rules Part 15 and Industry Canada RSS-210 Operation is subject to the following two conditions: (1) This device may not cause harmful interference, and (2) This device must accept any interference, including interference that may cause undesired operation of the device. Le present appareil est conforme aux CNR d'Industrie Canada applicables aux appareils radio exempts de licence. L'exploitation est autorise aux deux conditions suivantes: (1) l'appareil ne doit pas produire de brouillage, et (2) l'utilisateur de l'appareil doit accepter tout brouillage radiolectrique subi, mme si le brouillage est susceptible d'en compromettre le fonctionnement. The digital circuitry of this device has been tested and found to comply with the limits for a Class B digital device, pursuant to Part 15 of the FCC Rules. These limits are designed to provide reasonable protection against harmful interference in residential installations. This equipment generates, uses, and can radiate radio frequency energy and, if not installed and used in accordance with the instructions, may cause harmful interference to radio and television reception. However, there is no guarantee that interference will not occur in a particular installation. If this device does cause such interference, which can be verified by turning the device off and on, the user is encouraged to eliminate the interference by one or more of the following measures: - Re-orient or relocate the receiving antenna of the device experiencing the interference - Increase the distance between this device and the receiver - Connect the device to an AC outlet on a circuit different from the one that supplies power to the receiver - Consult the dealer or an experienced radio/TV technician WARNING: Changes or modifications to this device not expressly approved by the party responsible for compliance could void the user’s authority to operate the equipment. Limited Warranty Seller warrants to the original consumer purchaser of this product that, for a period of two years from the date of purchase, this product will be free from defects in material and workmanship and will perform in substantial conformity to the description of the product in this Owner’s Manual. This warranty shall not apply to defects or errors caused by misuse or neglect. If the product is found to be defective in material or workmanship, or if the product does not perform as warranted above during the warranty period, Seller will either repair it, replace it, or refund the purchase price, at its option, upon receipt of the product at the address below, postage prepaid, with proof of the date of purchase and an explanation of the defect or error. The repair, replacement, or refund that is provided for above shall be the full extent of Seller’s liability with respect to this product. For repair or replacement during the warranty period, call 866-243-8022 with the Model # and Revision # of the device to receive an RMA# and send the product, along with all other required materials to: INSTEON ATTN: Receiving 16542 Millikan Ave. Irvine, CA 92606-5027 Limitations The above warranty is in lieu of and Seller disclaims all other warranties, whether oral or written, express or implied, including any warranty or merchantability or fitness for a particular purpose. Any implied warranty, including any warranty of merchantability or fitness for a particular purpose, which may not be disclaimed or supplanted as provided above shall be limited to the two-year of the express warranty above. No other representation or claim of any nature by any person shall be binding upon Seller or modify the terms of the above warranty and disclaimer. Page 25 of 26 Rev: 9/27/2013 4:17 PM Home automation devices have the risk of failure to operate, incorrect operation, or electrical or mechanical tampering. For optimal use, manually verify the device state. Any home automation device should be viewed as a convenience, but not as a sole method for controlling your home. In no event shall Seller be liable for special, incidental, consequential, or other damages resulting from possession or use of this device, including without limitation damage to property and, to the extent permitted by law, personal injury, even if Seller knew or should have known of the possibility of such damages. Some states do not allow limitations on how long an implied warranty lasts and/or the exclusion or limitation of damages, in which case the above limitations and/or exclusions may not apply to you. You may also have other legal rights that may vary from state to state. Protected under U.S. and foreign patents (see www.insteon.com/patents) © Copyright 2013 INSTEON, 16542 Millikan Ave., Irvine, CA 92606, 866-243-8022, www.insteon.com Page 26 of 26 Rev: 9/27/2013 4:17 PM