1
Combo Scan ll 5M 2.4
User Manual
l.
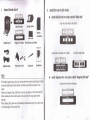
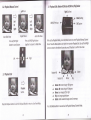
Unpock Combo Scan
ll
Slide Film Holder
m
Negative Film
Holder
USB/Video Cable
Note
^,'a
Power Core & Cable
o
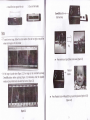
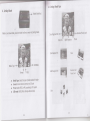
lnstall slide
film into the holder entitled "slides Only"
1. Open the slide holder as illustrated
Business
Card Fixture
Photo/Business Card Holder
qp
Fn
lnstoll film into the film holder
Backlight Holder
Lt!\
Combo Scan ll
il.
-
Clean Brush
E
2. Place slide in recessed slot in holder
3. Close the slide holder
User Manual
We strongly suggest using a clean, dry, non-alcohol cotton swab to clean the glass surface
on the back-light holder and the business card fixture periodically to produce a clear
image.
Make sure all negative films, slide films, cover trays and photos are free of dust and dirt
before inserling into the Combo Scanner as this may affect the image quality when
scanning.
When cleaning films, piease use a professionally recommended purger from a photo store
to avoid damaging old or precious films.
lnstall Negative Film into holder entitled "Negative Film Only"
1. Open the film holder as illustrated
2. lnstall film into negative film slot
3. Close the film holder
Down/Flip button
(Flip hard key)
+
Note
*
To avoid mirror image, follow the serial numbers (from left to right) on top of film
when install negative film into holder
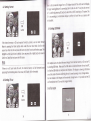
Flip
o
Press
hord key on top of device in live view [Figure
2'j]
Playback
lf the
inrage is upside down [Figure 2.2], lhe image can be corrected by pressr ng
button
Down/Flip button before capturing [Figure 2.3]. Alternative, enter the playback
mode and press Mode button to select Flip function IFigure 2'4]
.
Figure 2.2
4
Press Playbock
button
)
Mode/Setting to select Flip function (Refer to P'25)
[Figure 2.4]
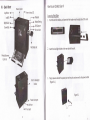
lll.
Quick Stort
Up/Mirror
How to use Combo Scan ll
Power button
Power status LED
Playback
Left/EV
Mode/Setting
Right/Color
Scon'ninq
Film
'ide
1.
Put Film into Film holder, and lnsert the film holder into the right side of the unit.
2.
lnsert the back light holder at the rear side of the unit.
OK/Capture
slot
Down/Flip
SD card
Film/Slide slot
Photo/Business
Card slot
Slot
for Backlight
holder
Plug in power cable to the power port on the unit and one end to the power outlet
(Figure 3.1).
Figure 3.1
Power core port
7.
4. Press Power button to power on the unit. Enter media type menu to select the correct
media for scanning. (Refer to P.29)
After capturing, take out the SD card which stored the saved images'
Power
button
Media
Type
5. Press OK/Capture button to capture the image.
8. Alternative to 7, saved picture can be read directly, without taking out the SD card,
from PC by entering MSDC mode. (Refer to P.31)
OK/Capture
button
6. Press on Playback button
to playback the saved images.
Playback
button
I
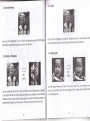
Sconninq Photo
1.
3.
lnsertthe photo holder intothe photo slot of the unit.
4.
Enter Media Type Mode to select the correct media for scanning. (Refer to P'29)
Remove the film/slide holder as well as the back light holder from the unit if either
one is attached,
Remove film/slide holder by exiting
the sliding to the left hand side.
Remove backlight holder by pressing
down the handle and pull it out.
'Media
2. Open the photo holder frame as illustrated, place the photo on the base of the
holder and close the photo holder frame.
Type
5.
Press OK/Capture
button to capture the image'
OK/Capture
button
Scannina Business Cord
1.
Follow step 1 from scanning photo to iemove the film/slide holder as well as the
back light holder in the previous pages.
2.
Open the photo holder frame
.,ld p1.." the business
4.
lnsertthephotoholderwithbusinesscardfixtureintothephotoslotoftheunit.
5.
Enter media type menu to select the correct media for scanning. (Refer to P.29)
card on the base of the photo
holder following the engraved guide line.
3.
Media
Put the business card fixture on the top of photo holder.
Type
6.
Press OK/Capture
button to capture the image.
OK/Capture
button
lV.
7. Live View Mode
Operotion Guide
Live View indicator
(flashing at 0.5sec rate)
Live View Mode
Capture Mode
After a quick display of welcome page, system will enter the Live View mode. A flashing
red dot appears on the top left hand corner indicating the state in Live View' (Note:
select correct media type (Refer to P.29) before capturing. By default the setting is at
Negative Film. Unit will reset back to the default setting after power off)
7.7 Mirror (Hord Key)
Save & Exit
Up/Mirror
OK/Capture
Up/Mirror
button
Playback Mode
Setting Mode
o
press
lhp/Mirror button to turn the imoge left to right, press ogoin vice verso
u
7.2 Flip (Hard Key)
d
Save & Exit
Down/Flip
Up/+
OK/Capture
button
fl
o
Press
Up/+ button to increose exposure(brightness) with ronges of -3 to 3
d
\
Down/button
o
Press
Down/Flip button to turn the imoge upside down, press ogoin vice verso
o
Press
Down/- button to decreose exposure(brightness) with ronges of -3 to 3
7.3 EV (Hard Key)
uP/+
teft/EV
7.4 Cotor (Hard KeY)
Save & Exit
OK/Capture
Down/-
o
Press
uPl+
{
I
Right/Color
Save & Exit
OK/Capture
Down/-
Lelt/EV button to enter EV(Brightness) control
o
Press
Right/Cotor button to enter color control
2. Capture Mode
d
Left/Go Previous
Up/+
toK/capturemode
button
.
Press
Right/Go Next
lJp/+ button to increose Color with ronges of -3 to 3
Once user presses the OK/Capture hard key, the live view image is selected and wait
2-3 seconds to enter the Capture mode shown with four icons on the display.
d
Selected image
Down/button
Save
o
Cancel
to Memory
Press Down/- button to decrease Color with ranges of -3 to 3
Rotate
Right/Go Next
teft/Go Previous
o
Press
orrow hord key Left and Right to move between
18
R, G, B
o
o
.
+90
Rotate -90
to Memory: sove selected image to memory
Rotote +90: rotote +90 degrees
Rotote -90: continue rotote -90 degrees
(this is for adjusting the user who took the portrait picture)
o Cancel: concel oll action and return to Live View
Sove
for
2.3 Cancel
2.7 Save to Memory
will be highlighted for user to confirm the saving by pressing the OK/Capture
button. After save action the display returns back to Live View'
Save icon
2.2
With Cancel icon highlighted, pressing the OK/Capture button to cancel all action and
return back to the state of Live View. Nothing will be saved onto the sD card.
2.4 Memory lull
Rotate +/-90 degrees
D
OK
r+
OK
button
button
User can manipulate rotate +90 or rotate -90 with the Left or Right button to highlight
on the rotate +90/-90 icon. Press OK/Capture button to do a clockwise or anti-clockwise
rotation and move to Save and Exit screen page. Press again the oK/capture button to
View'
save the rotated image or exit without save. The screen will return backto Live
once the internal memory or sD card is full, user can see a FULL icon showing on the
sD card
display. User can either upload the saved images to PC or replace with another
for continuing caPture.
2.5
SD
3. Playbock Mode
card locked
Right/Go Next
Playback
SD card locked icon
Mode/Setting
Left/Go Previous
lf the SD card is locked, press the OK/Capture button will show up a SD Card Locked icon
at the center of screen. Unlock the SD card by switching the bar to unlock position to
Press
-
the Playback button to enter the Playback Mode.
continue use of the SD card.
2.6
SD
-
card error
3.7 Playback Auto Slide Show
error
indicator
SD card
scanner cannot detect a good working SD card in the SD slot, a warning icon with
question mark will appear at the center of screen. Either format the SD card (Refer to
P.30) or replace with another good SD card for continue operation.
lf
Slide Show lndicator
Once user enters the playback mode, a slide show indicator is showing at the top left
hand corner of screen. The display will start playing all images stored in SD card or
internal memory with 2 seconds interval between saved images. User can pause the
slide show by pressing eitherthe Left or Right or Mode hard key.
3.2 Playback Mqnuol Control
MH K HKU
Sing/e Picture
Auto Slide Show
Left OR Right
button to scroll picture
Press
Right/Go Next
button
together to resume to Slide Show
H:".r#t
Left/GoPrevious
ff
Auto Slide Show
Press Left AND Right
Ler,&
3,4 Ploybock Edit: Rotate+90/Rotdte-90/Mi rror/Fli p/Delete
Right
Rotate +90
3.3 Playbock Exit
Rotate
&*?*
Press
-
While at the Playback Mode, press the Mode button to enter Playback Manual Control
Mode. Press the Mode button one more time to enter Playback Edit. Use Left and Right
button to move to the desired icons and press OK button to confirm the action.
the Playback button to exit the Playback Mode to return to Live View Mode.
a
a
a
o
a
Press
-90
Mirror
Flip
Rotote +90: rotote imoge +90 degrees
Rotate -90: rotate imoge -90 degrees
Mirror: turn image left to right
Flip: turn imoge uPside down
Delete: delete selected image stored in memory
the Mode button to resume back to Playback Manual Control Mode
3.7 Ployback: No Picture
3.5 Playback Edit Exit
+
Mode
button
press the Mode button while at the Playback Edit Mode the display will go back to
Playback Manual Control Mode on current selected picture'
3.6 Playbock: Delete
+
OK
button
'Delete
picture
With highlight on the Delete icon press OK button will delete the current selected
to
delete
continue
to
intends
lf
user
Mode'
and resume back to Playback Manual control
icon
to
delete
move
and
button
Mode
pressing
the
process
by
the
the images, repeat
again and press OK button to confirm.
tr+
Playback
button
lf there is no picture inside the internal memory or SD card when pressing the Playback
button, a page with Question Mark symbol at the screen center will show up. The page
will remain for 2 seconds and resume back to Live View Mode'
4.
Setting Mode
Mode (Hard KeY)
while in Live View Mode, press the Mode hard key to enter the setting Mode.
Business/Plastic card
Color Negative film
Slide film
Media Type
o
o
.
c
IJSB
Color Negative film
m
Photo
B&W Negative film
ffit
Business Card
Plastic Card
USB Mode
Media Type: Select the type of medio looded in holder
Formot: Format lnternol memory or SD card
TV out: select NTSC or PAL occording to TV system
mode: MSDC (Moss Storage Device Class)
B&W Negative
6
EI*S
LCD display
is able to view the images from a TV display instead of the unit's own
jet
one end
and
out
TV
unit's
to
cable
AV
the
connecting
tUr bigger viewing pleasure. By
The
system.
TV
to
matching
NTSC
or
PAL
select
to
button
oK
by
.pressing
rr r I V, confirm
edit
tV is nbw working as an alternative display to perform all tasks like scan, capture,
,rrrd playback.
llr|r
4.2 Setting: Formst
d
OK
button
4.4 Setting:
IJSB
Mode
d
lf the internal memory or SD card requires format by scanner, user can enter Format
Mode by pressing the Mode button while under the Live View Mode. scroll to the
second icon from the left and press OK button to enter format confirmation page. The
OK
button
highlight is at the Cancel icon by default. User can press Left or Right button to move to
Confirm or Cancel icon and press the OK button.
Note
SD card inside the unit, the internal memory will be formatted once
processing the Formatting action. Vice versa, the SD card will be formatted
lf there is no
4.3 Setting:
TV
out
card to PC
After capture user cah upload the saved images from internal memory or sD
and PC'
unit
the
between
is
connected
cable
usB
the
try selecting USB Mode. Make sure
USB status
a
is
showing
display
The
press
oK
button.
the
icon
and
Mode
Scroll to the USB
device'
icon at the center of screen confirming the unit is now becoming a mass storage
just
the sD
out
take
or
device.
user can review or edit images on the external storage
card from device into
r)
OK
button
Good bye poge
PC
to read the images directly'
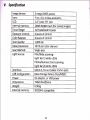
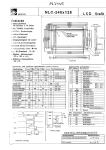
V. Specification
lmage Sensor;
Lens:
LCD:
lnternal memorv:
Focus Range:
Exposure Control:
Color Balance:
Scan Qualitv:
5 mega CMOS sensor
F no.=2.0, 4 Glass elements,
2.4" Color TFT LCD
24MB NAND Flash (for savine imaees)
2x Predefined Focuses
6 levels of control
6 levels of control
1,800 dpi
Data Conversion:
10 bit per color channel
Scan Methodl
Single pass
Light Source:
Film/Slide scanning:
Light bar (3 white LEDs)
Photo/Business Card scanning:
Lieht bar (8 white LEDS)
lnterface:
USB Confiquration:
Power:
TV-out (video 3.5mm iack)
Mass Storage Device Class/MSDC
5V adapter, or USB power
USB 2.0,
Dimensions:
190x145x205mm
Weisht:
External memorv:
0.90ke
SD/SDHC compatible