1
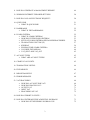
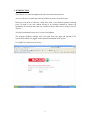
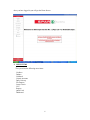
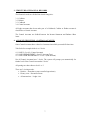
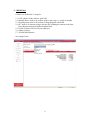
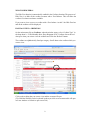
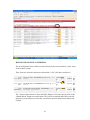
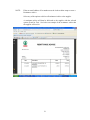
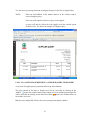
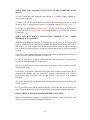
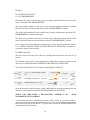
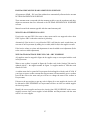
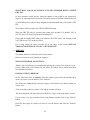
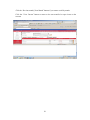
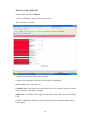
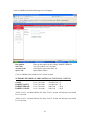
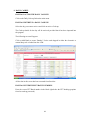
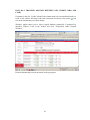
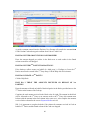
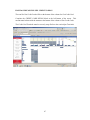
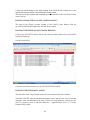
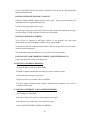
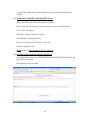
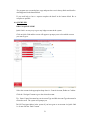
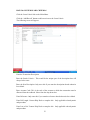
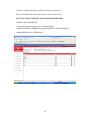
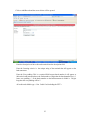
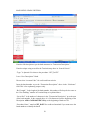
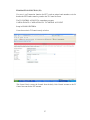
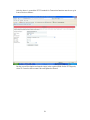
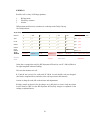
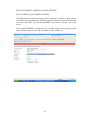
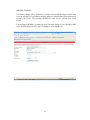
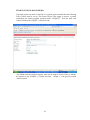
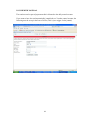
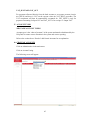
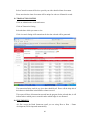
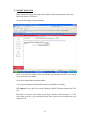
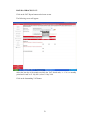
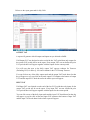
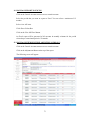
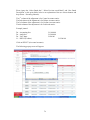
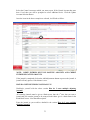
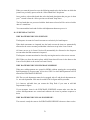
EASYACC
USER MANUAL
INDEX
1. INTRODUCTION
5
2. MENU ITEMS
6
3. STRUCTURE OF FINANCIAL RECORDS
7
4. ACCOUNT STRUCTURE – CONTROL ACCOUNTS
7
5. CREDITORS
8
• WHAT IS HIDE ZERO?
9
• HOW DO I VIEW A CREDITOR?
9
• HOW DO I RECONCILE A CREDITOR?
10
• CAN I RECONCILE A CREDITOR IF THE RECONCILE AMOUNT IS NOT
ZERO?
12
• HOW DO I VIEW RECONCILED ITEMS?
13
• HOW DO I ADD A CREDITOR?
14
• HOW DO I EDIT INFORMATION OF A CREDITOR?
16
• HOW DO I PAY A CREDITOR (FUTURE FEATURE)?
16
• HOW DO I ADD A TRANSACTION TO A CREDITOR (Debit or Credit)?
16
• HOW DO I “MOVE” A TRANSACTION TO ANOTHER ACCOUNT?
18
• HOW DO I CREATE A REMITTANCE ADVICE?
20
• HOW DO I GENERATE A QUERY TO A SUPPLIER?
22
• CAN I AT A LATER STAGE RETRIEVE A SUPPLIER QUERY
GENERATED?
23
• WHAT DOES THE NON-GRV COUNT NEXT TO THE CREDITORS NAME
MEAN?
24
• WHEN AND WHY DOES A TRANSACTION APPERAR IN DC – DROP
SHIPMENT OUTSTANDING?
24
• HOW TO RECON THE DC-SPAR DROPSHIPMENT ACCOUNT?
24
• WHEN AND WHY DOES A TRANSACTION APPEAR IN DC – SPAR
WAREHOUSE OUTSTANDING?
25
• HOW TO RECON THE DC-SPAR WAREHOUSE ACCOUNT?
26
• HOW DO I RECONCILE SPAR PAYMENTS IN SUSPENSE?
27
• WHAT TO DO IF THERE IS NO GRV?
27
• WHY DO TRANSACTIONS END UP IN COD – GRV SUSPENSE?
27
• WHAT MUST I DO IF AN INVOICE IS IN GRV-SUSPENSE WITH A SUFFIX
GRV FIX?
28
1
6. DEBTORS
28
• WHAT IS THE SHOW ALL BUTTON?
28
• HOW DO I VIEW A DEBTOR?
28
• HOW DO I ADD A DEBTOR?
30
• HOW DO I ADD A TRANSACTION TO A DEBTOR (Debit or Credit)?
31
• HOW DO I “MOVE” A TRANSACTION FROM ONE DEBTOR TO ANOTHER
DEBTOR?
31
• HOW DO I PRINT A DEBTOR STATEMENT?
31
• HOW DO I RECONCILE TRANSACTIONS IN A DEBTOR?
31
7. CASHBOOK
31
• WHY SHOULD THE LATEST DAILY CASHUP BE PROCESSED BEFORE I
IMPORT THE BANK STATEMENTS?
31
• HOW DO I TREAT CHEQUES?
32
• WHY DO ITEMS POST TO SUSPENSE?
32
8. CONTROL ACCOUNTS
• HOW DO I ACCESS A CONTROL ACCOUNT?
• HOW DO I MOVE TRANSACTIONS?
• HOW DO I RECONCILE A CONTROL ACCOUNT?
• HOW DO I ADD A DEBIT/CREDIT TO A CONTROL ACCOUNT?
• HOW DO I NAVIGATE THE BALANCE SHEET?
• HOW DO I ADD A CONTROL ACCOUNT – LEVEL1?
• HOW DO I ADD A CONTROL ACCOUNT – LEVEL2?
• HOW DO I ADD A CONTROL ACCOUNT- LEVEL 3?
• SUMMARY\EXAMPLE ON ADD CONTROL ACCOUNTS ALL 3 LEVELS
33
33
37
38
38
38
39
40
41
43
9. DAILY CASHUP
44
• HOW DO I ACCESS THE DAILY CASH-UP?
44
• HOW DO I RETRIEVE A DAILY CASH-UP?
44
• HOW DO I ENTER THE EFT BATCH NUMBER?
44
• HOW DO I TRANSFER AMOUNTS BETWEEN GEN. CREDIT CARD AND
CASH?
45
• HOW DO I ENTER AMOUNTS FOR CASH DROPPED?
46
• HOW DO I ENTER 3RD PARTY TRANSACTIONS?
46
• HOW DO I CREATE A 3RD PARTY?
46
• HOW DO I TREAT THE AMOUNTS RECEIVED ON BEHALF OF 3RD
PARTIES?
46
• HOW DO I RECONCILE GEN. CREDIT CARDS?
47
• HOW DO I KNOW THE ACCOUNT SALES BALANCE?
48
• HOW DO I VIEW THE ACCOUNT SALES DETAILS?
48
• HOW DO I VIEW THE DAILY SALES?
48
• HOW DO I FINALISE THE DAILY CASH-UP?
49
• HOW DO I ADD SPAR CASHIERS?
49
• HOW DO I SET SPAR TERMINALS\CREDIT CARD TERMINALS UP?
49
10. HOW DO I GENERATE REPORTS?
49
2
11. HOW DO I GENERATE A MANAGEMENT REPORT?
49
12. WINDOWS INTERNET EXPLORER SETTINGS.
50
13. HOW DO I LOG AN ELECTRONIC REQUEST?
50
14. QUICK LINK
• WHAT IS QUICK LINK?
51
51
15. DASHBOARD
• WHAT IS THE DASHBOARD?
52
52
16. LEARN CRITERIA
• WHAT IS LEARN CRITERIA?
• HOW DO I ENTER LEARN CRITERIA?
• SETUP OF LEARN CRITERIA-SPECIALISED PROCEDURES
• TRANSACTION JUNCTION (TJ)
• KWIKPAY
• PENSION FUND LEARN CRITERIA
• VOUCHER TRF JOURNAL
• VAT_SPLIT AND VAT_OUT
52
52
53
54
57
59
62
64
65
17. ACCOUNT TYPES
• WHAT ARE ACCOUNT TYPES?
65
65
18. CHART OF ACCOUNTS
65
19. TRANSACTION LISTING
66
20. FILE IMPORTS
66
21. IMPORT BANK FILE
67
22. ERROR MESSAGES
68
23. VAT PROCESSING
• HOW DO I ACCOUNT FOR VAT?
• HOW DO I PROCESS VAT?
• OUTPUT VAT
• INPUT VAT
• PROCESSING OF VAT
68
68
70
71
71
72
24. HOW DO I EXPORT TO EXCEL?
73
25. HOW DO I ENTER MULTIPLE ADJUSTING JOURNALS?
• HOW DO I SET RECURRING JOURNALS UP?
73
75
3
26. SUSPENSE ACCOUNTS
76
• WHY DO ITEMS END UP IN SUSPENSE?
76
• WHY DO ITEMS END UP IN PURCHASE SUSPENSE?
76
• WHY DO ITEMS END UP IN SALES SUSPENSE?
76
• WHAT MUST I DO IF THE CASH CONTROL ACCOUNT DOESN’T AUTORECON?
77
• WHY DO CREDIT CARD ITEMS ALLOCATE TO THE WRONG DATES IN
CASH CONTROL
77
4
1. INTRODUCTION
The software is a web based application with a user name and password.
Access to the site is secured and restricted with the necessary firewalls in place.
Back-ups of the data are done on a daily basis with a strict back-up protocol ensuring
peace of mind to the user without having to do back-ups themselves. Backed up
information are stored at more than one location to ensure data recovery in the event of a
disaster.
The data is maintained on servers in a secure environment.
The program facilitates multiple users each with their own login and password. The
system tracks which user logged in and captured information on the system.
User rights for each user can be set up.
5
Once you have logged in you will get the Home Screen.
2. MENU ITEMS
The system has the following menu items:
Creditors
Debtors
Cashbook
Control Accounts
Daily Cash-up
File Imports
Learn Criteria
VAT
Reports
Quick Link
Dashboard
6
3. STRUCTURE OF FINANCIAL RECORDS
The financial records are divided into 4 main categories:
3.1
3.2
3.3
3.4
Creditors
Debtors
Cashbook
Control accounts
All ledger accounts that do not make part of a Cashbook, Creditor or Debtor account is
classified as a Control Account.
The Control Accounts are divided between the Income Statement and Balance Sheet
items.
4. ACCOUNT STRUCTURE – CONTROL ACCOUNTS
Some Control Accounts have a three level structure into which you can drill down into.
Take Sales for example which is on 3 levels.
4.1 SALES = Level 1 (Control Account)
4.2 SALES DEPARTMENT = Level 2 (Account Type)
4.3 SALES SUB DEPARTMENT = Level 3 (Sub Account)
Not all Control Accounts have 3 levels. The system will prompt you automatically for
further levels if the Control Account has 3 levels.
All postings are done either at level 1 or 3.
There are 3 viewing modes:
• Default – Items that are not reconciled (open items)
• History view – Reconciled items
• All transactions – Ledger view
7
5. CREDITORS
Creditors are divided into 7 categories:
5.1
5.2
5.3
5.4
COD, which is all the creditors, paid COD.
Monthly Direct, which is all creditors paid at a later stage i.e. weekly or monthly.
Drop Shipment, which is all creditors on Drop Shipment with SPAR.
DC, which is all amounts owing to the Spar DC including the amounts on the Spar
Drop Shipment Statement and Development Fund.
5.5 Payroll Creditors which are all your employees.
5.6 Sundry Creditors.
5.7 All with Debit Balances.
See example below:
8
WHAT IS HIDE ZERO?
The Hide Zero function is automatically enabled in the Creditors function. The purpose of
Hide Zero is to hide all the creditor accounts with a Zero Balance. This will make the
creditor’s list shorter and more workable.
If you want to view or access a creditor with a Zero balance “un-tick” the Hide Zero box
and all the creditors will be displayed.
HOW DO I VIEW A CREDITOR?
On the main menu click on Creditors, when the window opens, select “Creditor Type” in
the drop down i.e. COD, Monthly direct, Drop Shipment or DC Creditors. Insert the end
date up to when you want to view the creditors and Click the “Refresh” button.
The creditors are alphabetically listed per category. Scroll down to the creditor which you
want to view.
Click on the creditor that you want to view and the account will open.
(Tip: Hold the Shift Key on the keyboard in when you click on an account and it will open
in a new window or Control to open a new Tab)
9
HOW DO I RECONCILE A CREDITOR?
The items displayed in the creditor account will only be the un-reconciled or “open” items
in the creditor account.
Three items are selected in the action column with a “tick” (See above and below).
659734
19-Jul2010
9514351700#ABI - SA BREWERIES-CR-2010-07-30
Creditor]
659736
19-Jul2010
9514340851#ABI - SA BREWERIES-INV-2010-07-30
Creditor]
606959
19-Jul2010
G-28910#GRV-9514340851ABI - SA BREWERIES
GRV Details] [Move Creditor]
[Move
-2,684.70
[Move 51,952.48
[View
-49,267.78
-4,658.70
47,293.78
-1,974.00
The 3 selected items balance to Zero and if they balance to Zero the user can click on the
“Manual Recon” button to reconcile them. They will be reconciled and will be removed
from the un-reconciled item screen (See screen below after the manual recon button was
clicked).
10
Tip: Click in the little Action block in the header if you want to reconcile all the
transactions in an account.
11
CAN I RECONCILE A CREDITOR IF THE RECONCILE AMOUNT IS NOT ZERO?
If an amount is setup for a recon variance in the creditor setup (see Add Creditor below)
then amounts can be reconciled even if the balance is not Zero, the recon balance must
however be less than the allowable recon variance as determined in the creditor set-up.
If the Manual Recon button is clicked and the recon variance is bigger than the allowable
amount the following message will appear:
If the recon variance is smaller than the allowable amount when the Manual Recon button
is clicked the item will be reconciled and a Recon Variance journal will automatically be
generated with the other leg going to a ROUNDING account in the Income Statement (No
VAT is calculated on this amount).
NOTE: Date of rounding = Date processed and not transaction date.
12
HOW DO I VIEW RECONCILED ITEMS?
If you want to view the reconciled items in the creditors account, click on the “History”
button.
Insert the date range (after you have clicked on “History”) for which you want to view the
history and click the “Refresh” button (See the screen below for an example of
history/reconciled items).
Two options: Date/Recon ID.
Items which are reconciled with the “Manual Recon” button will have the actual date on
which it was reconciled in the Recon column.
Click the “Previous month || Next Month” buttons if you want to scroll by month.
Click the “View Current” button to return to the un-reconciled or open items on the
account.
13
HOW DO I ADD A CREDITOR?
Click on the Creditors link on the Main Menu. The following screen will open:
Click the “Add Creditor” button at the top of the screen (Creditors can be added from any
category creditor screen).
14
The screen below will open (Ignore the Payroll Creditor section on the screen):
Complete all the required\applicable fields possible.
Select the correct Creditor Type on the drop down menu.
Complete all the applicable Code Boxes (See below for explanation)
1. C\O Code: is the Sigma code on the Checkout for COD creditors if they are paid out
of the Checkout.
2. D\S Code: is the Spar DC supplier code for Drop Shipment suppliers.
3. Sigma Code: is the supplier code in Sigma for the specific supplier.
4. Account Code: is the accounting code (Must be equal to Creditor Account code on
sigma in Supplier settings).
5. Allowable recon variance: is the amount by which a creditor reconciliation can be
out with and still be reconciled (refer to the section above CAN I RECONCILE A
CREDITOR IF THE RECONCILE AMOUNT IS NOT ZERO?)
Select a payment method.
Click the “Add Creditor” button once all required fields are completed and the creditor
will be added.
15
HOW DO I EDIT INFORMATION OF A CREDITOR?
Click edit record and change the applicable information.
Click update.
HOW DO I PAY A CREDITOR (FUTURE FEATURE)?
On the main menu click on Creditors.
Click the “Payments” button.
Click the “Outstanding Balances” button.
HOW DO I ADD A TRANSACTION TO A CREDITOR (Debit or Credit)?
Once in the creditor account (see above how to get into a creditor account) and you want
to add a debit or credit transaction click on the relevant button “Add Debit” or “Add
Credit” See screen below.
Note: A Debit will always be a Positive amount and a Credit will always be a Negative
amount in any Ledger Account.
16
The following screen will open for a Debit Transaction:
(The process is exactly the same for a Credit Transaction)
Debit\Credit Description:
Enter the description of the transaction in this field:
Debit Amount:
Enter the VAT Inclusive amount in this field.
VAT Amount:
Click on No VAT, Standard = 14% or Custom if VAT but
not equal to 14% of transaction value. Enter VAT value if
Custom is selected.
VAT Account:
Select VAT INPUT for Expenses or Purchases and VAT
OUTPUT for Sales or Income.
Transaction date:
Enter the date of the transaction. Never POST DATE
transactions!!!
Select the cross account:
Select the Control Account, Cashbook, Debtor or Creditor
for the double entry transaction. You can only select one
account per transaction. Some Control Accounts might have
an Account Type and Sub Account Type (Refer to the
section “ACCOUNT STRUCTURE” for an explanation).
Company specific\
All Accounts:
Leave on the default field.
Click on the “Add Invoice” Button to add the transaction.
17
If you want to abort the transaction do not click the “Add Invoice” button click on the
“Back” button or Back on the Explorer Browser Menu.
HOW DO I “MOVE” A TRANSACTION TO ANOTHER ACCOUNT?
The “Move Transaction” function is built into the software to easily correct allocation
errors of transactions.
To move a transaction from one account to another, click in the Box with a tick as
indicated in the example below:
18
Click on the Move Transactions button and the following screen will open:
Select the Creditor account to which you want to move the transaction to from the drop
down menu.
Click the “Move” button to move the transaction or the “Back” button if you want to abort
the move. You can move to any another Creditor Account or Control Account, Debtor
Account or Cashbook.
If an error occurred (for example a transaction was moved twice), click on history or go to
ID to see where the transaction came from and then correct the mistake.
19
HOW DO I CREATE A REMITTANCE ADVICE?
When making a payment to a supplier and you want to generate a remittance advice, click
in the creditors account next to the items that you are paying in the “Action” column.
Once you have selected all the items that must be included in the remittance advice click
on the Remittance Button.
The following screen will appear:
20
NOTE:
Either an email address of fax number must be in the creditor setup to create a
Remittance Advice.
Select any of the options to deliver a Remittance Advice to the supplier.
A remittance advice will then be delivered to the supplier with the selected
option (E-mail or Fax). See below an example of the remittance advice that
the supplier will receive:
21
HOW DO I GENERATE A QUERY TO A SUPPLIER?
When generating a query to a supplier, click in the creditors account next to the items that
you query in the “Action” column.
Once you have selected all the items that must be included in the query click on the SQ
(supplier query) button.
The following screen will appear:
22
You can enter any message that must accompany the query in the Note to Supplier Box.
NOTE:
Either an email address of fax number must be in the creditor setup to
create a Supplier Query.
Select any of the options to deliver a Query to the supplier.
A Query will then be delivered to the supplier with the selected option
(E-mail or Fax). See below an example of a Supplier query:
CAN I AT A LATER STAGE RETRIEVE A SUPPLIER QUERY GENERATED?
A record of all supplier queries generated will be kept in the database.
The notes entered in the Note to Supplier box will be accessible by clicking on the
“bubble”
next to the creditors name on the creditor list screen and the generated pdf file
will be accessible by clicking on the Scan Docs button
next to the creditors name on
the creditor list screen.
Both the notes and pdf file will have the same system generated query number.
23
WHAT DOES THE NON-GRV COUNT NEXT TO THE CREDITORS NAME
MEAN?
The only transactions that should be unreconciled in a creditorts ledger accounts are
invoices and credit notes.
To make it easy for the user to identify accounts with unreconciled items that is not an
invoice or a grv i.e. a payment the creditor is “red flagged” with the Non GRV Count =.
If you enter a creditor with a Non GRV Count = flag and you reconcile the un-reconciled
payments then the Non GRV Count = flag should disappear if you refresh the Creditors
Listing page.
WHEN AND WHY DOES A TRANSACTION APPERAR IN DC – DROP
SHIPMENT OUTSTANDING?
When the Drop-Shipment Statement is imported into Easyaccounts all the invoices that
relates to a supplier will be automatically posted to that supplier based on the D/S Code of
that supplier. I.e. if the supplier code on the drops-shipment statement aggress with the
D/S Code in Easyaccounts then the system will allocate that invoice to the corresponding
supplier.
If an invoice with a supplier code that is not on Easyaccounts is imported then that invoice
will be allocated to DC-Drop Shipments o\s Invoices.
Exactly the same process apply for credit noted but credit notes will be allocated to the
account DC-Drop Shipments o\s Credit Notes.
The invoices\credit notes in these account must be cleared as soon as possible after the
drop-shipment import.
If the invoice is valid then it should have been GRV’d the creditor to which it was GRV’d
must then de updated with the correct DC Supplier Code and the D\S Code in
Easyaccounts must correspond with the DC Supplier Code on the drop-shipment
statement.
The invoice must then be moved from the DC-Drop Shipments o\s Invoices account to the
correct account.
If it is an invalid invoice and the charge by the DC is wrong then the invoice must be left
in the DC-Drop Shipments o\s Invoices account and queried with the supplier and\or DC.
HOW TO RECON THE DC-SPAR DROPSHIPMENT ACCOUNT?
When the drop-shipment statement is imported the following journal is passed for each
and every transaction on the drop-shipment statement:
24
Example:
Dt: SUPPLIER ACCOUNT
Cr: DC-DROPSHIPMENT
Each and every entry is allocated to the correct supplier account and the other leg of the
entry is allocated to DC-DROPSHIPMENT.
The total amount payable for the week as per the drop-shipment statement excluding
DISCOUNT will as a result be allocated to the DC-DROPSHIPMENT account.
The system will automatically enter a double entry journal, debiting and crediting the DCDROPSHIPMENT account with the total.
The debit entry generated will auto-recon with all the individual entries and the credit
entry will remain in the un-reconciled items on the DC-DROPSHIPMENT account.
Once you receive the drop-shipment statements pass an entry for the discount and allocate
it to OTHER INCOME>OTHER INCOME>DISCOUNT RECEIVED. Remember to
account for output Vat on the entry.
EXAMPLE BELOW:
The total of all the invoices & credit notes excluding discount for the week was R 303
405.90.
The discount was R 2 589.35, enter manual entry (Add Debit) account for output Vat and
allocate it to OTHER INCOME>OTHER INCOME>DISCOUNT RECEIVED.
The amount of R 300 816.55 is the actual amount payable to SPAR DC.
659953
718827
718828
29-Jul2010
2010-07-30 - DROP SHIPMENT PAYMENT
DUE
30-Jul2010
SETTLEMENT DISCOUNT D65 - 30 07 2010
30-Jul2010
DROPSHIPMENT D65 - 30 07 2010
-303,405.90
23-Aug-303,405.90
2010
23-Aug-
2,589.35
-300,816.55
2010
23-Aug-
300,816.55
-0.00
2010
Once the discount is entered process a debit (Add Debit) for the total amount payable and
allocate it to the creditor account DC-SPAR PAYMENTS IN SUSPENSE.
WHEN AND WHY DOES A TRANSACTION APPEAR IN DC – SPAR
WAREHOUSE OUTSTANDING?
A transaction will not be automatically posted to this account. If you however have a
charge on the DC Warehouse statement which is not yours you can allocate the invoice to
this account and query it with the DC or you can leave it in the DC-SPAR WAREHOUSE
account and query it from there.
25
HOW TO RECON THE DC-SPAR WAREHOUSE ACCOUNT?
The entries in the DC-SPAR WAREHOUSE account should be all the invoices as GRV’d
on Sigma plus the standard (non-stock) charges by the DC i.e. Guild Fees, Food Audit etc
which will be generated automatically when the warehouse statement is imported.
Invoices on the warehouse statement for stock items which are not on Easyaccounts will
not be generated automatically as the only way for them to end up on Easyaccounts is by
way of the GRV process.
Once you receive you DC statements you must reconcile all the items in the DC-SPAR
WAREHOUSE account on Easyaccounts with the actual statement by ticking in the
reconcile block next to the item.
Any invoices on the statement not on Easyaccounts was either not GRV’d or not received.
If it was received and not GRV’d please follow the GRV process to import it into
Easyaccounts or query the invoice with the DC.
Please note that the DC Warehouse import does not auto-reconcile.
Once all the entries on Easyaccounts in the DC-SPAR WAREHOUSE account agrees with
the warehouse statement you must enter an entry equal to the amount payable for the
specific week in the DC-SPAR WAREHOUSE account and allocate it to the DC-SPAR
PAYMENTS IN SUSPENSE account.
See example below of DC-SPAR WAREHOUSE account:
All the invoices payable on the specific warehouse statement totalled R 99 565.04.
An entry WAREHOUSE - W70 - 03 09 2010 was entered for R 99 565.04 to make the balance Zero
and the was allocated\posted to DC-SPAR PAYMENTS IN SUSPENSE.
781343
830504
830506
3-Sep2010
G-30771#GRV-048193 SOUTH RAND
DISTRIBUTION CEN
3-Sep2010
DEVELOPMENT FUND - 354944
3-Sep2010
WAREHOUSE - W70 - 03 09 2010
-6,536.73
13-Sep-89,565.30
2010
-10,000.00
13-Sep-99,565.04
2010
99, 565.04
13-Sep0.00
2010
26
HOW DO I RECONCILE SPAR PAYMENTS IN SUSPENSE?
All payment to SPAR – DC out of the cashbook are automatically allocated to the account
DC-SPAR PAYMENTS IN SUSPENSE
These amounts must correspond with the amounts payable as per the warehouse and dropshipment statements that were allocated to the DC-SPAR PAYMENTS IN SUSPENSE
account.
Manual reconcile the amounts payable with the actual amounts paid.
WHAT TO DO IF THERE IS NO GRV?
If an invoice was not GRV’d for some or other reason and it was supposed to have been
GRV’d, please GRV it when the omission is picked up.
Alternatively if the invoice is very old and to GRV it will alter the stock records then you
can enter it on Easyaccounts by adding it as a credit (Add Credit) in the supplier account.
If the invoice relates to various sub-departments it must be added as an Adjustment. (Refer
to the section on Add Adjustments)
WHY DO TRANSACTIONS END UP IN COD – GRV SUSPENSE?
All suppliers must be mapped in Sigma in the supplier setup to correspond with the code
in Easyaccounts.
When a new creditor is opened in Sigma the Creditor code in the Settings Tab must be
updated with SC + the supplier number in Sigma. I.e. supplier number is 1420 then code
must be SC1420.
A creditor must also be opened in Easyaccounts for that Supplier with the code SC1420. If
you forget to open a creditor account then Easyaccounts will automatically open a creditor
but with the code as the name and you will have to change the name of the creditor in
Easyaccounts.
If however the user neglects to put any code in Sigma for a new supplier the invoice will
be allocated to GRV-SUSPENSE as Easyaccounts will have no idea as to which supplier
the invoice pertains.
Identify the correct supplier and move the invoice from GRV SUSPENSE to the correct
supplier account. Open a new supplier in both SIGMA and Easyaccounts with the same
code if it is a new supplier.
27
WHAT MUST I DO IF AN INVOICE IS IN GRV-SUSPENSE WITH A SUFFIX
GRV FIX?
In some instances certain invoices where the supplier is not coded are not exported by
Sigma to be imported into Easyaccounts. The latest versions of SIGMA eliminates this but
A verification process will pick it up and generate and automated entry with a suffix: GRV
FIX.
These entries will be posted to the GRV SUSPENSE account.
When the GRV FIX entry is generated the system does not know if it includes VAT or
not. The entry will always be generated excluding VAT.
Please pull the original GRV when you reallocate GRV FIX entries and account for the
VAT if there was VAT on those invoices.
Fix it using exactly the same procedure as set out above in the section WHY DO
TRANSACTIONS END UP IN COD – GRV SUSPENSE?
6. DEBTORS
The debtors function is almost the same as the creditors.
Debtors are however not divided up in categories.
WHAT IS THE SHOW ALL BUTTON?
Debtors with a zero balance are automatically hided by the system. If you want to view or
access a debtor with a zero balance click the “Show All” button. This is similar to the Hide
Zero function in creditors.
HOW DO I VIEW A DEBTOR?
On the main menu click on Debtors, when the window opens insert the end date up to
when you want to view the debtors. Click “Refresh”.
The debtors are alphabetically listed per category. Scroll down to the debtor which you
want to view.
Click on the debtor that you want to view and the account will open.
The items displayed will only be the un-reconciled or “open” items in the debtor account.
If you want to view the reconciled items in the debtors account, click on the “History”
button.
Insert the date range for which you want to view the history and click the “Refresh”
button.
28
Click the “Previous month || Next Month” buttons if you want to scroll by month.
Click the “View Current” button to return to the un-reconciled or open items on the
account.
29
HOW DO I ADD A DEBTOR?
On the main menu click on Debtors.
Click the “Add Debtor” button at the top of the screen.
The screen below will open.:
Complete all the required fields as far as possible.
Complete all the applicable Code Boxes (See below for explanation)
Our Account: is the accounting code.
Checkout Code: is the Sigma code on the Checkout for COD creditors if they are paid out
of the Checkout or for charges to Debtors.
Sigma Code: is the debtor code in Sigma for the specific debtor, the same as the Checkout
Code.
Click the “Add Debtor” button once all the required fields are completed and the debtor
will be added.
30
HOW DO I ADD A TRANSACTION TO A DEBTOR (Debit or Credit)?
Refer to “How do I add a transaction to a creditor (Debit or Credit)?” The procedure for
adding transactions to a debtor is exactly the same as adding transactions to a creditor.
HOW DO I “MOVE” A TRANSACTION FROM ONE DEBTOR TO ANOTHER
DEBTOR?
The same process as moving a Creditor – see above.
HOW DO I PRINT A DEBTOR STATEMENT?
Once in the debtor account click on “Statement” button.
Select the option that you want to use to transmit the statement to the debtor.
Note: Remember to have an email address or fax number setup for the debtor.
HOW DO I RECONCILE TRANSACTIONS IN A DEBTOR?
Refer to the section: How do I reconcile transactions in a creditor? The steps are exactly
the same for a debtor except for the recon variance. There is not a recon variance function
for debtors.
7. CASHBOOK
The bank statement is imported into Easyaccounts. No manual capturing takes place.
All the entries in the cashbook are allocated to the correct accounts when the bank
statement is imported according to the Learn Criteria that has been set up.
The cashbook balance should always be equal to the bank statement balance.
WHY SHOULD THE LATEST DAILY CASHUP BE PROCESSED BEFORE I
IMPORT THE BANK STATEMENTS?
The entries in the cashbook regarding credit card and EFT transactions get automatically
allocated to the cash control account for the day to which it relates.
In order for the system to know where to allocate the entries the latest daily cash-up must
be processed.
The bank statement import function will not import transactions with a date later than 1
day after the date of the last daily cash-up processed.
31
HOW DO I TREAT CHEQUES?
Due to the fact that cheques cannot be imported electronically all cheques must be captured
in the Cheque Register.
CASH & FLOATS>CASH & FLOATS>CHEQUE REGISTER
Cheques must be added as credits (Add Credit) in the Cheque Register account.
All cheques imported on the bank statement will then be debited from the cashbook to the
Cheque Register account to balance with the cheque captured.
All cheques captured in the Cheque Register account not yet through the bank will
comprise the outstanding cheques for bank reconciliation purposes.
WHY DO ITEMS POST TO SUSPENSE?
Please refer to the section WHY DO ITEMS END UP IN SUSPENSE?
32
8. CONTROL ACCOUNTS
HOW DO I ACCESS A CONTROL ACCOUNT?
Click on the Control Accounts link in the Main menu.
The following screen will appear:
Select a date range to view from a Start Date to an End Date in the drop down box:
Note: The income statement items will be for the selected period between the start and
end date and the balance sheet items will be up to the end date.
Select from the Select View drop down if you want to view all accounts or only Income
Statement or only Balance Sheet accounts.
Tick the Show Values Box.
Remember to click the Refresh button if every time you make changes to your selection
options.
33
Example:
Select Income Statement and click the “Refresh” button.
Income Statement Items for the Period 12-Jan-1999 to 31-Dec-2010
101
NOT SHOWN NOT SHOWN
I OTHER INCOME
I SALES
NOT SHOWN NOT SHOWN
NULL
I STOCK PURCHASES
NOT SHOWN NOT SHOWN
NULL
I ACCOMMODATION
NOT SHOWN NOT SHOWN
I ACCOUNTING FEES
NOT SHOWN NOT SHOWN
The above is an extract from an Income Statement that will appear on your screen.
The accounts with a
next to it have sub-accounts that total to the Control Account and
next to it, is a Control Account with no sub-accounts (Refer to the
the accounts with a
section ACCOUNT STRUCTURE – CONTROL ACCOUNTS for an explanation).
Click on Sales which is a 3 level Control Account (Tip: Hold the Shift Key in to open in a
new window).
Control Account Transactions - SDD Supermarket No 1 (Pty) Ltd - SALES
Select Company:
Dates from
:
SDD Supermarket No 1 (Pty) Ltd
12-Jan-1999
to :
Previous month || Current month || Next
month
31-Dec-2010
Records to Display:
Current Display: 1-
Show all transactions (History).
Manual Recon
ID
Transaction
Transaction Description
Date
AIRTIME SALES
-->S19
BAKERY SALES
-->S1
BAKERY SALES BUY OUT
BUTCHERY SALES
Amount
Total
Recon
R1,750,059.64
R2,247,727.85
R1,656,478.62
-->S1B
R4,634,073.71
-->S3
The above is an extract of Department Accounts on the 2nd level of Sales Accounts.
Click on BAKERY SALES.
Control Account Transactions - SDD Supermarket No 1 (Pty) Ltd - SALES - BAKERY SALES
Dates from :
1-Jan-1900
to :
31-Dec-2010
Records to Display:
34
Previous month || Current month || Next month
Current Display: 1-
Hide Zero Accounts
Manual Recon
ID
Transaction
Transaction Description
Date
Amount
Total
BAKERY BREAD
-->101
R -1,429,212.72
BAKERY CAKES
-->102
R -308,020.02
BAKERY CONFECTIONARY
BAKERY PIES
-->103
R -108,833.82
-->108
BAKERY SWISS ROLL
BAKERY TARTS
Recon
R -396,544.28
-->112
R -5,111.44
R -5.57
-->114
R -2,247,727.85
Opening Balance (Reconciled Items) - Level 3
(Count: 0)
0.00
0.00
Opening Balance (Reconciled Items) - Level 2
(Count: 0)
0.00
0.00
Control Account Total:
R -2,247,727.85
The above is an extract of Sub Department Accounts on the 3rd level of Sales Accounts.
35
Click on BAKERY BREAD to enter the transaction level of the account.
Control Account Transactions - SDD Supermarket No 1 (Pty) Ltd - SALES - BAKERY SALES - BAKERY
BREAD
Dates from :
1-Jan-1900
to :
31-Dec-2010
Previous month || Current month || Next month
Records to Display: 1-100 101-200 201-300 301-376
Current Display: 301-376
Manual Recon
ID
Transaction
Transaction Description
Date
Opening Balance (Reconciled Items) - Level 3
(Count: 0)
754027
26-Dec2009
B - SALES-BAKERY BREAD
754028
26-Dec2009
B - VAT-SALES-BAKERY BREAD
755369
27-Dec2009
B - SALES-BAKERY BREAD
36
Amount
Total
0.00
1,280,153.38
-4,348.64
1,284,502.02
522.78
1,283,979.24
-4,678.61
1,288,657.85
Recon
HOW DO I MOVE TRANSACTIONS?
If you are in a Control Account on the transaction level click in the box next to the
icon of the transaction that you want to move to another Account.
You can select one or more transactions to move to another Account at the same time.
Once you have ticked all the transaction that you want to move click on the “Move
Transactions” button.
37
The following screen will appear:
Select the account to where you want to move the transaction\s and click on the “Move”
button.
The system will automatically pass a journal entry to move the transaction with a full audit
trail.
HOW DO I RECONCILE A CONTROL ACCOUNT?
Put a reconciliation value in the reconciliation block. Click on the “Manual Recon” button.
A control account can be reconciled even if the reconcile balance is not zero.
HOW DO I ADD A DEBIT/CREDIT TO A CONTROL ACCOUNT?
Refer to the section “How do I add a transaction to a creditor”? The process is exactly the
same.
HOW DO I NAVIGATE THE BALANCE SHEET?
The principles and processes are exactly the same as for the Income Statement.
38
HOW DO I ADD A CONTROL ACCOUNT – LEVEL1?
Click on the Add Record button at the top of the Control Accounts screen.
The following screen will open: (This will only open the 1st level account)
Description:
Company Specific:
Bank Account:
Checkout Code:
Sigma Code:
Type:
FC Code:
Account code:
Report Link I\S:
Report Link B\S:
Enter the account description.
Ignore this field it will auto populate.
Ignore this tick.
Enter the Sigma code if this control account must link with the
check out.
Ignore only applicable to creditors.
Select the report to which this account pertains.
Select the financial category to which this account belongs to.
The code that the system will use to allocate imported
transactions (Must be unique or the system will not allocate the
transaction).
Call the help desk for assistance.
Call the help desk for assistance.
39
HOW DO I ADD A CONTROL ACCOUNT – LEVEL2?
Go into the Administration Menu>Account Types
The screen below will appear: (NB: The detail in the screen will differ for each set of
books)
40
Click on Add Records to add a Level 2 account. The following screen will appear:
Description:
Type Code:
Control Account:
Account code:
Spar Code:
Enter the level 2 account description.
Enter the Type Code – Please call the help desk for assistance.
Select the Level 1 Control Account to which this level 2
Control Account must be linked.
Enter the Account Code which is normally the same as the
Type Code:
Ignore – future feature.
Click on the Add Record button to add the new Level 2 Control Account.
HOW DO I ADD A CONTROL ACCOUNT- LEVEL 3?
Refer to all the detail in “How do I add a Control Account – Level 2?”
Example:
Level 1 Control Account is: SALES
Level 2 Control Account is: BAKERY SALES (Department)
I want to add a Level 3 Control Account: BAKERY BREAD (Sub Department).
Click on BAKERY SALES in the Manage Account Types screen (see above).
41
The following screen will appear:
(NB: Detail in the screen will be different for every set of accounts)
42
Click on Add Record and the following screen will appear:
Description:
Sub Code:
Account Code:
Spar Code:
Enter the description in this example: BAKERY BREAD
The code of the Level 3 Account
Normally the same as the Sub Code
Ignore-future feature
Click on Add Record to add the Level 3 control account.
SUMMARY\EXAMPLE ON ADD CONTROL ACCOUNTS ALL 3 LEVELS
SALES:
BAKERY SALES:
BAKERY BREAD:
BAKERY CAKES:
Level 1 Account:
Level 2 Account
Level 3 Account
Level 3 Account
Account Code = S
Account Type = S1
Sub Code
= S101
Sub Code
= S102
All the Level 2 Accounts linked to the same Level 1 Account will add up to the linked
Level 1 account.
All the Level 3 Accounts linked to the same Level 2 Account will add up to the linked
Level 2 account.
43
9. DAILY CASHUP
HOW DO I ACCESS THE DAILY CASH-UP?
Click on the Daily Cash-up link on the main menu.
HOW DO I RETRIEVE A DAILY CASH-UP?
Select the day you want to retrieve and click on retrieve Cash-up.
The Cash-up details for the day will be retrieved provided that it has been imported into
the program.
The following screen will appear:
Click on Add Batch to create “Batches” for the cash dropped in either the electronic or
manual drop safe or loaded into the ATM.
All the data in this screen has been extracted from Storeline.
HOW DO I ENTER THE EFT BATCH NUMBER?
Enter the correct EFT Batch number in the block right below the EFT heading (populate
from last cash-up processed).
44
HOW DO I TRANSFER AMOUNTS BETWEEN GEN. CREDIT CARD AND
CASH?
If amounts in the Gen. Credit Card and Cash columns need to be corrected\transferred as a
icon
result of the cashiers allocating credit card transactions incorrectly click on the
next to the amount that you want to change.
Windows might request you to allow scripted windows temporarily if prompted by
Windows Explorer. Look at the Toolbar and click “Temporarily Allow Scripted
Windows”.
Enter the amount that you want to transfer in the pop up box.
45
A positive amount entered into the Explorer User Prompt will transfer the amount from
Credit Card to Cash and a negative amount from Cash to Credit Card.
HOW DO I ENTER AMOUNTS FOR CASH DROPPED?
Enter the amount dropped per cashier in the block next to each cashier in the Batch
column created for cash dropped.
HOW DO I ENTER 3RD PARTY TRANSACTIONS?
If the business collects money on behalf of a third party i.e. Kwikpay or Lotto the 3rd
Parties must first be created in the 3rd Party Setup. Call the Help desk for assistance.
HOW DO I CREATE A 3RD PARTY?
Call the Help Desk.
HOW DO I TREAT THE AMOUNTS RECEIVED ON BEHALF OF 3RD
PARTIES?
Enter the amounts collected on behalf of the third parties in the blocks provided next to the
3rd Parties at the bottom of the Cash-up.
Complete the total amount received in the block at the far right. The amount in this block
will be allocated to the 3rd Party as an amount owed to the 3rd Party (this amount must
balance with the amount in the total column in the same row). Also complete the amounts
received in the column for the correct Payment Media received.
NB: It is important to complete both the Cash column for amounts received in Cash on
behalf of 3rd Parties and the Batch column if the Cash was dropped.
46
HOW DO I RECONCILE GEN. CREDIT CARDS?
The total for Gen Credit Cards will be at the bottom of the column for Gen Credit Card.
Complete the CREDIT CARD RECON block at the left bottom of the screen. This
amount must balance with the amount at the bottom of the column of Gen Credit Cards.
The Credit Card Terminals must be correctly setup: Refer to the section Spar Terminals.
47
Capture the batch number of the batch banked in the BATCH NO column next to the
appropriate terminal and the amount banked in the R column.
The total for all the terminals banked should agree with the Gen Credit Card Total Column
in the Cash-up.
HOW DO I KNOW THE ACCOUNT SALES BALANCE?
The total in the Charge Account column of the Cash-Up must balance with the
ACCOUNT SALES total right below the total in the column.
HOW DO I VIEW THE ACCOUNT SALES DETAILS?
Click on the ACCOUNT SALES link on the Cash-up and the detail of the ACCOUNT
SALES will open up.
See the screen below:
Close the screen if you want to exit the ACCOUNT SALES details.
HOW DO I VIEW THE DAILY SALES?
The total sales in the Total Column are the sales as recorded in Storeline or dStore.
The DAILY SALES amount reflected at the bottom of the Cash-up is the sales as recorded
in Sigma. These amounts must be the same. If there is a small difference it will go to sales
(level 1), suspense (level 2) and sales difference – Sigma/Storeline (level 3). Call the
helpdesk if they differ.
48
Click on the DAILY SALES link and the detailed sales for the day per Department\SubDepartment will open up.
HOW DO I FINALISE THE DAILY CASH-UP?
Click the “Update Cashup” button at the top of the screen. Never press enter because the
information you have typed will then be lost.
Follow the pop-up prompts on the screen.
The cash-up can’t be processed if the credit card and account sales amount do not agree
with the cash-up. Call the help-desk for assistance if they differ.
HOW DO I ADD SPAR CASHIERS?
You will not be required to add Spar Cashiers as the program will open them
automatically from Storeline\dStore with the correct cashier number.
To rename a cashier go to administration, cashiers and click on the edit icon of the cashier,
name the cashier and update.
Tip: Remember to keep the Shift key in if you want to open a new window.
HOW DO I SET SPAR TERMINALS\CREDIT CARD TERMINALS UP?
Contact the Help Desk to help with this process.
10. HOW DO I GENERATE REPORTS?
Click on the Reports link on the Main Menu.
Select the Company and the Date for which you want to create the report.
Click on the selected report to generate it.
The process take a few seconds “Please be Patient”.
The latest version of Adobe Acrobat must be installed on the computer as the report is
created in a PDF format.
11. HOW DO I GENERATE A MANAGEMENT REPORT?
Click on Reports on the Menu.
Select the Company for which you want to generate the report.
Select the date up to which you want to create the report.
Click on SPAR MONTHLY FINANCIAL REPORT.
49
A report will be generated in pdf format. Make sure you have the latest pdf version
available.
12. WINDOWS INTERNET EXPLORER SETTINGS
Please ensure that you have the latest version of Explorer.
Please ensure that your windows explorer settings are correct as described below:
Click “Tools” on Explorer.
Click\Select “Internet Options” on the list.
Click “Settings” at Browsing History.
Select “Every time I visit the web page” Click OK
Click the “Advanced” Tab
Untick the block: Show Friendly HTTP error messages.
13. HOW DO I LOG AN ELECTRONIC REQUEST?
On the Main Menu click on the SYSTEM ERROR/CHANGE REQUEST link at the top
right corner of the screen.
The following screen will appear:
50
If a program error occurred please copy and paste the error in the top block and describe
what happened in the bottom block.
If you need help or have a request complete the detail in the bottom block. Be as
complete as possible.
14. QUICK LINK
WHAT IS QUICK LINK?
Quick Link is an easy way to go to any ledger account in the system.
Click on Quick Link and the screen will appear to prompt you to select which account
you want to go to.
Select the account in the appropriate drop down i.e. Control Account, Debtor or Creditor.
Click the “Navigate” button to go to the selected account.
Tip: Some Control Accounts have an Account Type and Sub Account Type that must be
selected as well. The system will prompt you.
DO NOT navigate further in the system if you have gone to an account via Quick Link
i.e. do not click the “Back” button.
51
15. DASHBOARD
WHAT IS THE DASHBOARD?
The dashboard will provide you with a snap shot overview of the status of the financial
records.
The software works as such that all transactions imported into it will be accepted and will
be allocated.
If the software recognises the transactions it will auto allocate it to the correct accounts.
In the infrequent cases where the software does not recognise a transaction that
transaction will be allocated to a “SUSPENSE” account for cashbook transactions and a
“GRV SUSPENSE” for GRV transactions.
New accounts will automatically be opened if a transaction was processed on the
checkout or a new creditor created on Sigma provided that it was coded in Sigma for the
accounting system.
All exceptions will be flagged on the Dashboard and you will be able to resolve them
from the Dashboard.
All Cash Control Accounts that are not Zero will appear on the Dashboard to make it
easy to monitor and to take action if required.
The Cash Dropped account will also appear on the Dashboard to track that you have
received all the cash dropped in your bank account.
The Dashboard does not contain separate accounts but only a summary of the accounts
where you will most likely find exceptions that need daily attention.
You must still monitor all the accounts in the system to ensure that they are correct.
16. LEARN CRITERIA
WHAT IS LEARN CRITERIA?
Because all transactions are imported electronically from the Bank the system has built in
Artificial Intelligence to correctly allocate most transactions.
The Learn Criteria “tells” the program what the transaction is for and where to allocate it
to and if it must run another procedure i.e. allocate VAT on the transaction.
Learn Criteria is only applicable to Bank Transactions.
52
HOW DO I ENTER LEARN CRITERIA?
Click the Learn Criteria link on the Main Menu.
Click the “Add Record” button to add a new item to the Learn Criteria.
The following screen will appear:
Enter the Transaction Description.
Enter the Search Criteria – This would be the unique part of the description that will
always be the same.
Enter the New Description: Only enter this if you want the description altered otherwise
leave blank.
Enter Account Code: This is the code of the account to which the transaction must be
allocated from the cashbook. Select from the drop down box.
Enter Reference: Only enter this if you want the reference altered otherwise leave blank.
Enter Ref Length: Contact Help Desk to complete this. Only applicable when dynamic
and procedure.
Enter Len to Ref: Contact Help Desk to complete this. Only applicable when dynamic
and procedure.
53
Click the “Add Record” button to add the new Learn Criteria item.
Please call the help desk for assistance in the setup of Learn Criteria.
SETUP OF LEARN CRITERIA-SPECIALISED PROCEDURES
CREDIT CARD TERMINALS
Credit card terminals must be set up at 2 different places,
ADMINISTRATION>TERMINALS and MAIN MENU>LEARN CRITERIA
ADMININISTRATION>TERMINALS
54
Click on Add Record and the screen below will be opened:
Enter the description of the credit card terminal into the description field.
Enter the Learning criteria: i.e. the unique string of the terminal that will appear on the
bank statement.
Enter the Zero padding: This is a required field because batch number 9 will appear as
009 on the bank statement hence the total number of digits that the batch number has is 3,
hence zero padding = 3 if the batch number on the bank statement is 00009 i.e. 5 digits
long then the zero padding will be 5.
All credit cards Media type = Gen. Credit Card including the EFT’s.
55
MAIN MENU>LEARN CRITERIA
Enter the full description as per the bank statement in “Transaction Description:”
Enter the unique string as used for the Terminal setup above in “Search Criteria:”
“Type:” is dynamic if it relates to the procedure “GET_DATE:”
Leave “New Description:” blank.
Do not select “Account Code:” for credit card learn criteria.
Insert the batch number as per the “Transaction Description:” above in the “:Reference”
field. This is for explanatory purposes only.
“Ref. Length:” Is the length of the batch number, this number will always be the same as
the “Zero Padding:” number in Terminal Setup as explained above.
“Len to Ref:” is the number of characters in the “Transaction Description:” up to the start
of the batch number. In the example above it is 20 characters from the beginning of the
Description: ABSA CARD 00372987 128 up to the beginning of batch no 128.
“Procedure Name:” must be GET_DATE for credit card terminals if you want to use the
batch numbers to identify the batch.
56
TRANSACTION JUNCTION (TJ)
If a store is on Transaction Junction for EFT’s and no unique batch numbers exist for
batches the EFT batches must be posted to the TJ Control Account.
The TJ CONTROL ACCOUNT is a mandatory account:
CASH & FLOATS> CASH & FLOATS> TJ CONTROL ACCOUNT
Setup in LEARN CRITERIA:
Create learn criteria TJ Control exactly as below:
This Learn Criteria creates the Journal from the daily Cash Control account to the TJ
Control Account for the EFT amount.
57
After the above is created the EFT Terminals for Transaction Junction must be set up in
Learn Criteria as follows:
Put the correct Description and search criteria in the required fields for the EFT deposits,
select TJ Control as the Account Code and Update the Record.
58
KWIKPAY
Retailers sell a variety of Kwikpay products:
1.
2.
3.
Bill payments
Electricity vouchers
Airtime
Bill payments and electricity vouchers are cashed up on the Daily Cash-up.
See example below:
TOTAL SALES 109,816.46
104.03
56.85
9,920.04
108,682.27
107,960.00
722.27 228,579.65 3,244.00
KWIKPAY
0
2944
0
0
300
300
0.00
3,244.00
TOPS
0
0
0
0
0
0
0.00
0.00
LOTTO
0
0
0
0
0
0
0.00
0.00
OTHER 1
0
0
0
0
0
0
0.00
0.00
OTHER 2
0
0
0
0
0
0
0.00
0.00
720
0.00
720.00
FLOAT
BANKED
TOTAL
TAKINGS
109,816.46
3,048.03
56.85
9,920.04
ACCOUNT
SALES
108,982.27
9,920.04
108,980.00
2.27
DAILY SALES
In the above example the total for Bill Payments & Electricity was R 3 244.00 (Block to
far right completed with total liability)
How was the amount received?
R 2 944.00 was received via credit card, R 300.00 via cash and the cash was dropped.
(See blocks completed above and refer to the cash up section in this manual)
Airtime is charged via the tills to the Airtime sub-departments.
Kwikpay emails an Invoices for the charges on a daily basis to stores. Only the airtime
invoice must be GRV’d as the Bill Payments & Electricity charges are captured via the
cashup as explained above.
59
3244
231,823.65 3,244.00
228,579.65
SETUP OF KWIKPAY CHARGES IN LEARN CRITERIA
BILL PAYMENT & ELECTRICITY CHARGES
The Bill Payments & Electricity charges will be credited to a creditor account with the
code EASY hence the debit orders for Bill Payments & Electricity must also be allocated
to account code EASY. The procedure KWIKPAY must also be selected. See screen
below:
The procedure KWIKPAY accounts for the R 1.84 bank charge on every Kwikpay debit
order. Dt Bank charges & VAT and Cr Kwikpay creditor with R 1.84.
60
AIRTIME CHARGES
The Airtime charges will be credited to a creditor account with the unique account code
as set up in Sigma i.e. EASY hence the debit orders for Airtime must also be allocated to
account code EASY. The procedure KWIKPAY must also be selected (See screen
below).
The procedure KWIKPAY accounts for the R 1.84 bank charge on every Kwikpay debit
order. Dt Bank charges & VAT and Cr Kwikpay creditor with R 1.84.
61
PENSION FUND LEARN CRITERIA
If pension payouts are done via the tills on a separate payment media then the following
Learn Criteria must be set up. This Learn Criteria is the trigger to process a journal
journalising the pension payouts payment media “UNIQUE 1” from the daily cash
control account to the UNIQUE 1 control account.
The refunds from the Pension company must also be setup in Learn Criteria to allocate
the deposits to the UNIQUE 1 (Control Account). “Unique 1 is the generic pension
control account”.
62
In the above example the refunds from the pension company as the description SALES
07583 0106 041, however only SALES 07583 is the unique part of the description the
0106 041 is a batch number.
Enter the unique part SALES 07583 (in this example) in Search Criteria, Type =
Dynamic, Account code = UNIQUE1.
Select procedure name PENCOM-factor (The factor is the pension fund commission
charges, contact Easyaccounts help desk to help you set the correct factor up).
63
VOUCHER TRF JOURNAL
The vouchers total as part of payment media is allocated to the daily control account.
If you want to have the total automatically journalised to a Voucher control account, the
following must be set up in the Learn Criteria: (This is just a trigger for the journal)
64
VAT_SPLIT AND VAT_OUT
For payments allocated directly from the bank account to an expense account (invoice
not GRV’d) and there is VAT on the expense select the VAT_SPLIT procedure. The
VAT component will then be automatically accounted for. VAT_SPLIT is only for
payments accounting for Input VAT and VAT_OUT is for receipts i.e. Output VAT.
17. ACCOUNT TYPES
WHAT ARE ACCOUNT TYPES?
Account types is the “chart of accounts” of the system and must be administered by the
Help Desk to ensure correct allocation in the system and correct reporting.
Refer to the section above: How do I add Control Accounts for an explanation.
18. CHART OF ACCOUNTS
Click on Administration in the main menu.
Click on Account Listing.
The following screen will appear:
65
Select Control Accounts all levels to provide you with a detailed chart of accounts.
Please note that the chart of accounts will be unique for each set of financial records.
19. TRANSACTION LISTING
Click on Administration in the main menu.
Click on Transaction Listing.
Select the date which you want to view.
Click view and a listing of all transactions for the date selected will be generated.
The transaction listing total for any given date should be nil. Please call the help desk if
the balance at the bottom in the Balance column is not nil.
This report will have all transactions entered into the program for the selected date, it will
indicate who or which process created it and to which ledger it was allocated.
20. FILE IMPORTS
All files except the Bank Statements (until you are using Host to Host – Future
development) will be imported automatically.
66
21. IMPORT BANK FILE
Bank statements must be preferably downloaded on internet banking and saved in the
Microsoft Money OFX format.
Access the File Import on the main menu:
Click on the Browse button: Select the BANK yyyy\mm\dd_storecode.ofx file saved
above from the correct folder.
Click on the Import Bank Statement button.
A message will display if the Bank Statement was imported successfully.
CSV imports. If you don’t have internet banking with OFX download import the CSV
file.
Remember to select the date format on the import function in Easyaccounts i.e. if the
date format in the file is yyyy\mm\dd select the same format in Easyaccounts before you
import the file.
67
22. ERROR MESSAGES
DO NOT BE CONCERNED if the system gives you an error message.
Report the error by clicking on SYSTEM ERROR/CHANGE REQUEST. Refer to the
section: How do I log an electronic request?
A consultant\programmer will attend to the error and WILL rectify it. You will be
notified electronically once it is rectified.
23. VALUE ADDED TAX
HOW DO I ACCOUNT FOR VAT?
Output Vat on sales will automatically be allocated to the Output Vat account when sales
are imported.
Input Vat on all invoices GRV’d will automatically be allocated to the Input Vat account
when the GRV’s are imported.
Vat on entries captured, Add Debit and Add Credit will automatically be posted to the
correct Vat accounts as per the instructions on screen when the entries are captured.
(Refer to the sections How do I add a debit\Credit?)
If an entry in a ledger account is inclusive of Vat due to the fact that the Learn Criteria
did not make provision for Vat or the entry was allocated to Suspense and you want to
strip the Vat out of the transaction after it has been processed you must do the following:
Place the cursor on the amount in question. Right Click your mouse and a pop-up box
with Vat Input & Vat Output will appear. (See below for screen dump with Vat pop-up
box)
Select if you want to account for Input or Output vat by clicking on the correct one in the
pop-up box.
The Vat component @ 14% will be allocated to the correct Vat account.
68
69
HOW DO I PROCESS VAT?
Click on the VAT Report button on the home screen.
The following screen will appear:
Select the last day of the month on which the VAT Period ends, i.e. if it is a monthly
period and it ends on 31 July 2010, select 31 July 2010.
Click on the Outstanding VAT button.
70
Below see the report generated for July 2010:
OUTPUT VAT
A report will generate with all outputs and inputs not yet declared to SARS.
If all Output VAT was declared as at the end of the last VAT period then only outputs for
the current VAT period will be on the report. If any output VAT was not declared in prior
VAT periods then it will appear together with the outputs for the current period.
You will note that next to the daily output VAT appears columns for Turnover
(Excluding VAT) for Sales @ 14% and a column for the VAT Exempt Turnover.
You can click on any of the daily output totals and the output VAT break down for that
day will appear or you can click on the total output VAT amount at the bottom of output
VAT and the output VAT break down for the whole report will appear.
INPUT VAT
If all Input VAT was claimed as at the end of the last VAT period then only inputs for the
current VAT period will be on the report. If any input VAT was not claimed in prior
VAT periods then it will appear together with the inputs for the current period.
You can click on any of the daily input totals and the input VAT break down for that day
will appear or you can click on the total input VAT amount at the bottom of input VAT
and the input VAT break down for the whole report will appear.
71
PROCESSING OF VAT
If you are satisfied that all the information on the VAT Report is correct for the VAT
Period selected then click on the “Continue with VAT Processing” button.
All output and input VAT transactions will be transferred and reconciled from the Input
and Output Ledger Accounts to a Ledger Account - VAT Payable Control.
The balance on the VAT Payable Control will be the VAT amount payable for that
period.
The payment for VAT via the bank account must be allocated to the VAT Payable
Control Account which will make the balance on the VAT Payable Control Account
zero.
Example:
Cr Balance on VAT Output Account
R 500 000.00
Dr Balance on VAT Input Account
R 400 000.00
(use actual numbers per above report??)
Explanation of journals when VAT is processed:
Dr VAT Output Account
Cr VAT Payable Control
R 500 000.00
Dr VAT Payable Control
Cr VAT Input Account
R 400 000.00
R 500 000.00
R 400 000.00
Balance of VAT Payable Control will be Cr -
R 100 000.00
Amount payable to SARS = R 100 000.00 which will clear balance on VAT Payable
Control (If it is a debit balance, VAT will be refundable).
Note: The Input and Output Totals are transferred per day to the VAT Payable Control
account.
The entries in the VAT Payable Control account will auto reconcile leaving an unreconciled amount equal to the amount payable to SARS in respect of that VAT period.
72
24. HOW DO I EXPORT TO EXCEL?
Click on the Control Accounts menu to access control accounts.
Select the period that you want to export to Excel. You can select a maximum of 12
months.
Select view: All items
Click: Show Values Box
Click on the View MS Excel button.
An Excel report will be generated of all accounts in monthly columns for the period
selected up to a maximum period of 12 months.
25. HOW DO I ENTER MULTIPLE ADJUSTING JOURNALS?
Click on the Control Accounts menu to access control accounts.
Click on the Adjustments Button at the top of the report.
The following screen will appear:
73
Please ignore the “Select Batch date”, “Select Previous saved Batch” and “New Batch
Description” at this point (Refer below to an explanation of the use of these buttons and
drop downs – Recurring Journals).
The 1st column of the adjustment is for Control Accounts entries.
The 2nd column of the adjustment is for Debtor Accounts entries.
The 3rd column of the adjustment is for Creditor Accounts entries.
The 4th column of the adjustment is for Cash book entries.
Example journal:
Dr – Accounting fees
Dr – Audit fees
Dr – VAT Input
Cr – DWVS (Creditor)
R 1 000.00
R 2 000.00
R 280.00
R 2 280.00
Click on SELECT (for control accounts).
The following pop-up screen will appear:
74
Select the Control Account to which you want to post. If the Control Account has more
than 1 level then you will be prompted to select additional levels. Click the Update
Account Selection button.
Once the items in the above example are selected, it will look as follow:
NOTE: DEBIT ENTRIES MUST BE POSITIVE AMOUNTS AND CREDIT
ENTRIES NEGATIVE AMOUNTS.
If the journal is completed click on the Add Adjustments button to process the journal. A
journal will only process if the balance is zero.
HOW DO I SET RECURRING JOURNALS UP?
Familiarise yourself with the above section How do I enter multiple adjusting
journals?
All recurring journals must be given a Batch name, thus the 1st time that you enter a
journal and you want the journal to be recurred in the future give it a batch name in the
blank block next to “New Batch Description”
Enter the journal as you would as detailed in the section How do I enter multiple
adjusting journals?
75
When you want the journal to recur the following month select the last date on which the
journal was previously processed in the “Select Batch Date” drop down.
Once you have selected the batch date select the batch description that you gave it when
you 1st created it from the “Select previous saved batch” drop down.
The last batch that was processed with the batch name selected will be retrieved with a
date of 1 month later.
You can amend the batch and click the Add Adjustment button to process it.
26. SUSPENSE ACCOUNTS
WHY DO ITEMS END UP IN SUSPENSE?
The Suspense Account in Control Accounts are exclusively for bank imports.
When bank statements are imported into the bank account the items are automatically
allocated to the correct account provided that it has been set up in the Learn Criteria.
All items not set up in Learn Criteria will automatically be allocated to the Suspense
account when the bank statement is imported.
The Suspense account must then be cleared by moving the entries to the correct account.
NB!! When you clear the entries please add all items that will recur in the future to the
Learn Criteria (Refer to the section on Learn Criteria)
WHY DO ITEMS END UP IN PURCHASE SUSPENSE?
When new sub-departments are opened in SIGMA without opening the corresponding
Sub-Department in Easyaccounts all invoices GRV’d to that Sub-Department will be
allocated to PURCHASE SUSPENSE.
NB! The new sub department must also be mapped with a P and the sub department no.
I.e. new sub department 1590 must be coded P1590 in Sigma and Easyaccounts.
It is however advisable that you contact the Help Desk if you want to add Sub
Departments in Sigma.
If you encounter items in the PURCHASE SUSPENSE account make sure that the
correct Sub-Departments are created and reallocate the items in purchase suspense to
them.
WHY DO ITEMS END UP IN SALES SUSPENSE?
The reason is exactly the same as for PURCHASE SUSPENSE it however relate to sales.
76
WHAT MUST I DO IF THE CASH CONTROL ACCOUNT DOESN’T AUTORECON?
All the entries from the daily cash-up are posted to the daily Cash Control Account.
This account serves as a journal for most of the transactions other than the payments
media, i.e. EFT and General Credit Card.
Most of the transactions should balance to Nil on a daily basis and the system then autoreconciles them leaving only a few transactions in the un-reconciled window.
If for some or other reason the daily Cash Control does not auto-reconciled please log the
problem online by logging an error explaining the problem.
WHY DO CREDIT CARD ITEMS ALLOCATE TO THE WRONG DATES IN
CASH CONTROL?
It is important that the credit card terminals are set up properly. Please log request for
help in this regard.
It is also important to use the correct batch numbers on the daily cash-up as the system
use the batch number captured to allocate the credit card deposits.
77