1
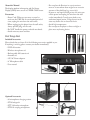
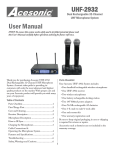
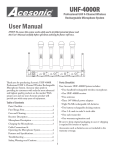
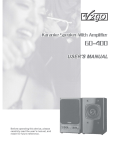
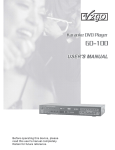
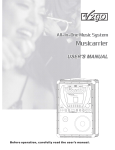
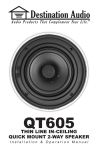
UHF-A6
Commercial UHF True Diversity Wireless Microphone System
User Manual
NOTE: To ensure this system works safely and to its fullest potential, please read the User Manual carefully before
use, and keep it handy for future reference. See important Safety Information on Page 5.
Thank you for purchasing Acesonic’s UHF-A6 Commercial UHF True Diversity Wireless Microphone System.
Acesonic takes pride in providing its customers with only the most advanced and highest quality products on
the market.
With proper care and use you will get many years of satisfying use from your Acesonic product. Be sure to keep
original packaging in case re-shipping is required for returns or repairs.
Care and cleaning: Use a slightly damp cloth to clean the front panel and other surfaces of the UHF-A6.
Do not use the device in areas that are wet or prone to dampness. Always allow enough room below and around
the device to provide sufficient air flow for cooling when it is being used.
Table of Contents
First Things First..................................................1
Included & Optional Accessories.........................1
Receiver Front and Rear Panel Functions.............2
Microphone Functions.........................................2
Body-Pack Receiver Functions.............................3
How to IR Sync...................................................3
Troubleshooting...................................................4
Safety, Warnings and Precautions.........................4
Important Safety Instructions..............................5
Company Contact Information............................6
About this Manual
The display window information and On Screen
Display (OSD) items are all in UPPER CASE letters.
• Do not place the Receiver in a moist environment or in area where there might be an excessive
amount of dust build up (e.g. near a fan).
• Power Cord: When you are away on travel or
won’t use the UHF-A6 for an extended period of
time, unplug the unit from the wall outlet.
• If water or any liquid should get into the unit, turn
off the power and unplug the unit from the wall
outlet immediately. Consult your dealer or an
authorized repair station. Using the unit in this
state may lead to fire or electrical shock.
• Do NOT handle the power cord with wet hands.
• Do not expose the player to direct sunlight or
place near any heating device.
Precautions
• Avoid high temperatures
• When unplugging the player from the wall outlet,
always pull the plug, not the cord.
• Avoid moisture, water and dust
First Things First
Included Accessories
Please check that you have all of the following accessories supplied to you.
If anything is missing, please contact your dealer immediately.
•UHF-A6 receiver
•Wireless microphones x2
•Rechargeable AA batteries x4
•Antennas x2
•12V AC Power adaptors
•¼” Microphone cable
•User manual
Optional Accessories
•20 microphones charging station
•PT10 body pack
•PTT-10 headset microphone
•PTH-10 ear plug microphones
1
Receiver – Front
4. IR Sync sensor
1. Power button – power ON/OFF
5. SQ – Connection distance controls
3. Channel selector – push button to manually
select channels
7. IR Sync buttons – Push Sync button to IR Sync
your receiver and microphone
6. Microphone Volume controls
2. Display panel
Receiver – Back
(3)(6) Channels A&B balanced audio output
(5) 12V AC Power connection
(1)(8) Antenna connection
(2)(7)(4) Channels A&B ¼” unbalanced audio
output
Microphone
1. Microphone cartridge
2. Display window
3. Power switch
4. Battery housing cover
5. IR Signal receiver
• Simply twist and remove battery housing
cover to access IR signal receiver or batteries
6. Battery compartment
• Uses two AA batteries with approximately
8 hours of continuous operation. Replace or
recharge batteries immediately when battery
indicators says battery power are low.
2
Body-Pack receiver
1. Antenna
2. Operating indicator lights:
• green – power is ON
• yellow – power ON & Muted
• flashing red – IR Syncing / low batteries (auto turn off )
3. Power switch – hold on 2 sec for power on/off,
push once to Mute/ Unmute
4. Microphone input
5. Display window
6. IR Signal receiver
Changing the batteries
•Press the sides of the battery cover as pictured.
•While maintaining pressure simply pull outward
to open cover.
•Change batteries, close, and press down until cover
clicks securely.
Carrying the Body-Pack receiver
•Easily clips on your belt, or if using a guitar, you can
attach it on the guitar sling vertically.
•Make sure to attach it securely flushed with your belt
to prevent it from falling off.
How to IR Sync
• Manual Sync – turn on the microphone,
select desired channel on the receiver, push
sync button once on receiver to syncing.
• Auto IR Sync
1. Make sure microphone is on
2. Remove battery housing cover so the
IR sync receiver is visible.
3. Position the IR sync of the desired
microphone so is faces the IR sync
sensor at approximately 8” from the receiver.
4. Press the IR Sync button once. This will make the channel blink on the display panel.
5. When blinking stops, RF/AF indicator bar should be full.
6. Your microphone and receiver are now fully synced.
•SQ setting - SQ setting can adjust the receiver coverage area. When SQ setting at maximum, distant is
at its farthest. You can adjust the best receiver coverage depending on the environment.
3
Troubleshooting
Problems
No audio or lights.
Possible Causes
Microphone power switch is OFF.
Receiver power button is OFF.
Antenna symbol on display panel is Microphone is on MUTE.
showing but no audio.
Receiver volume is turned all the
way down.
Receiver and Mixer/Amplifier not
connected.
Antenna symbol on display panel
Antennas might be loose and not
is not showing but Receiver and
attached properly.
Microphone are ON.
Metals objects surrounding the
Receiver.
Receiver and Microphones LineOf-Sight might be obstructed.
Receiver and Microphone are on
different channels.
Microphone indicator lights are red Low battery power.
or blinking.
The word “Incompatible” appears
Means Microphones and Receiver
on the Microphone display
are installed on different ranges.
window.
Sound distortion or constant
Microphone is too close to
feedback.
speakers or too close to additional
microphones and amplified
speakers.
Channel might have a lot of
interference.
Increased distortion.
Low battery power.
Microphone won’t turn ON.
Low battery power.
Safety, warnings and cautions
Solutions
Switch microphone power to ON.
Push power button to ON.
Un-MUTE the microphone.
Slowly dial up receiver volume.
Make sure Receiver is connected to
your Mixer/Amplifier.
Make sure antennas are screwed in
correctly and upright.
Receiver should be clear of any
metal objects that could cause
interference.
Receiver and Microphones should
have a direct unobstructed view
and clear of any barriers i.e. walls,
furnitures, bodies.
Make sure Receiver and Microphone are on the same channel.
Change or recharge batteries.
Please contact your dealer
immediately.
Make sure to keep a good distance
away from speakers when performing or speaking.
Change or try other channels.
Change or recharge batteries.
Change or recharge batteries.
The exclamation point within a triangle
alerts the user to important operating,
maintenance, and servicing information in
this User Manual.
Mises en garde, precautions et procedures de sûreté
CAUTION
To reduce the risk of electrical shocks, fire, and
possible injuries, you should not
The lightning-with-arrowhead symbol inside
a triangle alerts the user that potentially
dangerous voltage in the product enclosure
may constitute a risk of electric shock.
• remove screws, buttons, antennae, jacks, or any part
of the enclosure; or
• expose the product to rain or moisture.
4
FCC ADVISORY (U.S.A.)
radio electriques applicables aux appareils numeriques de
Classe B prescrites dans la normesur le materiel brouilleur
(“Appareils Numeriques, NMB-003” edictee par le
Ministre des Communications).
1. This equipment has been tested and found to
comply with the limits for a Class B digital device,
pursuant to part 15 of the FCC Rules. These limits
are designed to provide reasonable protection against
harmful interference in a residential installation.
Important safety instructions
1. Read and follow these instructions, keep them
handy for reference, familiarize yourself with the
product’s operation, and heed all safety warnings.
This equipment generates, uses, and can radiate radio
frequency energy and, if not installed and used in
accordance with the instructions, may cause harmful
interference to radio communications. However, there
is no guarantee that interference will not occur in a
particular installation. If this equipment does cause
harmful interference to radio or television reception,
which can be determined by turning the equipment
off and on, the user is encouraged to try correcting the
problem by one or more of the following measures:
2. Do not use this product near water, on wet surfaces,
or in places where moisture may accumulate. Do not
expose the device to dripping or splashing, and do
not place items filled with liquids – such as vases,
beverages, etc. – on top of the device. Clean only with
a dry cloth.
3. Do not block any ventilation openings or set device
on carpets or rugs. Maintain sufficient room on all
sides for airflow.
• Reorienting and/or relocating the receiving
antennae
• Increasing the distance between the radio/TV
equipment and the UHF-A6
4. Do not position the device on or near radiators,
stoves, or other electrical equipment (such as
amplifiers) that produce heat.
• Connecting the radio/TV equipment to an outlet
on a different circuit than the one into which the
receiver is plugged
5. Do not defeat the safety purpose of a polarized or
grounding-type plug. A polarized plug has two blades
with one wider than the other, while a grounding-type
plug has two blades and one prong. The wide blade
and the prong are safety features. If the provided plug
does not fit into your outlet, consult an electrician for
replacement of the obsolete outlet.
• If necessary, consulting the dealer or an
experienced radio/TV technician for help
2. IMPORTANT: When connecting the UHF-A6
to audio equipment, use only high-quality, shielded
cables such as what is supplied with this product.
Follow all installation instructions do not modify the
equipment in any way, as this could void your FCC
authorization to use the device in the U.S.
6. Protect the power cord from being walked on or
pinched, particularly where it is plugged in to an
electrical socket and the point where it exits from the
rear of the device.
FOR CANADA/POUR LE CANADA
7. Only use the attachments and accessories specified
by the manufacturer.
Caution: To prevent electric shock, match the wide
blade of the plug to the wide slot, and fully insert.
8. Use only with a cart, stand, tripod, bracket or table
specified by the manufacturer or sold with the device.
When using a cart, use caution when moving the cart.
Attention: Pour eviter les chocs electriques, introduire la
lame la plus large de la fiche dans la borne correspondante
de la prise et pousser jusquau fond.
9. Unplug the product during lightning storms or
when it will not be used for long periods of time.
This product does not exceed the Class B limits for
radio noise emissions from digital devices as set out
in the Canadian standard for interference-causing
equipment (“Digital Apparatus, ICES-003” from the
Department of Communications).
Cet appareil numerique respecte les limites de bruits
10. Refer all servicing to qualified service personnel.
Servicing is required when the unit has been damaged
5
in any way, such as when the power-supply cord or
plug is damaged, liquids have been spilled or objects
introduced into the enclosure, the device has been
exposed to rain or moisture, the product does not
operate normally or it has been dropped.
NOTE: With the proper care and maintenance, your
UHF-A6 Commercial UHF True Diversity Wireless
Microphone System will give you years of dependable,
enjoyable use. Make sure you are using freshly charged
batteries and good (unfrayed) cables at all times.
11. Never push objects of any kind into this product,
through jacks or other openings, as they may contact
dangerous voltage points or short-circuit components,
thus causing fire or electrical shock.
12. This product should be operated only from the
type of power source indicated on the product label
and in this User Manual. If you are not sure of the
type of power supplied to your home, consult your
product dealer or local utility.
UHF-A6
Commercial UHF True Diversity Wireless Microphone
System
One (1) Year Manufacturer Warranty
Lifetime Technical Support
Designed in U.S.A.
13. An outside antenna system should not be located
in close proximity to overhead power lines, or other
electric light or power circuits, or where it can fall
into such power lines or circuits. When installing an
outside antenna system, be extremely careful not to
touch such power lines or circuits, as contact with
them could be fatal.
Technical Support:
Call: (626) 820-0645
Email: [email protected]
Website: www.acesonic.com
14. Do not overload wall outlets or extension cord
as this can increase the risk of fire, power outages or
electrical shock.
Acesonic USA, Inc.
161 S. 8th Avenue
City of Industry
CA 91746-3208
U.S.A.
15. When replacement parts are required, be sure the
service technician has used replacement parts specified
by the manufacturer or with the same characteristics
as the original part. Unauthorized substitutions may
result in fire, electric shock or other hazards.
16. Following any servicing or repair of this product,
ask the service technician to perform the appropriate
safety checks to ensure the product is in proper
operating condition.
© 2012 Acesonic USA, Inc. • All rights reserved
17. The product should not be mounted to a wall or
ceiling except as recommended by the manufacturer,
with a mounting accessory recommended by the
manufacturer.
18. If your product is not operating correctly or
exhibits a marked change in performance, and you
are unable to restore normal operation by following
procedures in this User Manual, do not attempt to
service it yourself. Opening the enclosure may expose
you to dangerous voltage or other hazards. Refer all
servicing to qualified service personnel.
6