1
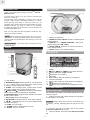
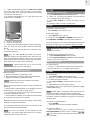
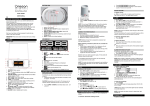
Sunrise Wake-up Clock Model: WS902 USER MANUAL EN EN INTRODUCTION Sunrise Wake-up Clock Model: WS902 USER MANUAL CONTENTS 1 Contents....................................................................1 Introduction ............................................................. 22 Overview................................................................... 22 Front View.............................................................. 32 Bottom View........................................................... 32 2 LCD Display........................................................... 3 Getting Start.............................................................. 2 3 Replacing Lamp..................................................... 32 Connect to Power Source...................................... 33 Clock.......................................................................... 53 Manually Set Clock................................................ 53 Radio......................................................................... 53 Soothing Nature Sounds......................................... 53 3 Adjust Volume.........................................................5 Alarm......................................................................53 Alarm with Wake up Light...................................... 54 Sleep Timer ................................................................ 54 Reading Lamp.......................................................... 54 4 Play Music................................................................. 5 4 LCD Backlight........................................................... 5 Reset......................................................................... 54 4 Spectifications.......................................................... 5 Main Unit................................................................ 54 Troubleshooting...................................................... 55 Precaution................................................................ 56 EU-Declaration of Conformity ................................ 66 About Oregon Scientific ......................................... 66 1 EN INTRODUCTION BOTTOM VIEW TM Thank you for selecting the Oregon 6FLHQWL¿FSunrise Wake-up Clock 2 Our body clock is often not in sync with the demands and rhythm of modern life. Our biological clock is affected by external cues, such as sunlight. Light at dawn stimulates production of cortisol, which gets the body ready to work and wake up. By simulating dawn, Oregon Scientific’s Sunrise Wake-up Clock (WS902) prepares the body to wake up by gradually increasing brightness to the set level in the 20 minutes prior to desired (set) alarm time. Start your day better and feel energised to tackle the day. Wake up as nature intended! 4 NOTE Please keep this manual handy as you use your new product. It contains practical step-by-step instructions, as well as technical VSHFL¿FDWLRQV and warnings you should know about. IMPORTANT 1. Battery compartment 2. :$.(83/,*+7212)): Enable / disable light for alarm sequence 3. ',63/$<%5,*+71(66/2:+,*+: Select LCD display brightness LOW / HIGH 4. AUDIO LINE-IN: Socket for connecting to external music storage device 5. RESET: Reset unit to default settings This device does not reduce the hours of sleep needed. OVERVIE FRONT VIEW 6 7 1&5 3 LCD DISPLAY 1 11 1 2 2 8 9 10 11 12 10 3 3 4 4 5 6 7 8 9 1. AM/PM 2. Beep / Radio / Bird chirp alarm selected 3. Alarm with wake up light enabled 4. Batteries low / no battery 5. Alarm time 6. Radio Mode is ON and frequency is displayed 7. Volume is displayed 8. Sleep mode is ON and remaining time is displayed 9. Nature sound selected (1-4) 10. Sound from external source plugged into unit 5 1. Lamp Holder 2. SNOOZE SENSOR: Motion sensor for snooze function 3. / : Adjust volume (only when radio / nature sound is playing); change values of the setting 4. SLEEP: View remaining time; enable sleep function with radio / nature sound / light; set sleep timer 5. RADIO TUNE : Enable auto-search for radio station; adjust radio frequency marginally (by 0.05MHz) 6. NATURE SOUND: Toggle through selection (Crickets / Brook / Ocean / Rain) 7. SET CLOCK: Enter clock settings 8. SET ALARM: View alarm status; enter alarm settings 9. / : Adjust brightness (only when LAMP function has been activated) 10. LAMP: Turn on/off light 11. ALARM: Enable / disable alarm function 12. RADIO: Turn on / off radio GETTING STARTED REPLACING LAMP For first time use, take out provided light bulb and go directly to step 2. 1. Unplug unit from wall socket and allow unit (bulb) to cool for approx. 15 minutes. CAUTION Always allow unit to cool for 15 minutes prior to cleaning, storing, replacing parts as unit can be very hot. 2. Turn the unit around to view back of the product (UNLOCK COVER tab facing you) 3. Using left thumb, press and hold UNLOCK COVER tab. 2 (1 4. While continuously pressing on UNLOCK COVER tab, place right hand around the side of the product. Push in the side of the cover (area above tab and hook) and lift up to release cover. (Left handed individuals can use right thumb and left hand if more comfortable). CLOCK MANUALLY SET CLOCK 1. Press SET CLOCK to enter setting mode. 2. Press + or - to change the settings or press and hold + / – to rapidly change the settings. 3. Press SET CLOCK to confirm and move to next setting. The settings order is: 12/24 hr format, time. RADIO To activate / deactivate radio: 3UHVVRADIO to turn radio on / off. UNLOCK COVER To set radio station: 1. Press RADIO to turn radio on. 2. Press and hold RADIO TUNE to auto search or press RADIO TUNE to manually select frequency. 5. Unscrew old light bulb. 6. Screw in new light bulb. 7. Holding cover, with the top part at a slight angle away from you, align the 2 front plastic tabs to the allotted space. 8. Tilt cover down and towards you until lamp cover clicks back into place. For your convenience, the volume and radio frequency will be stored in memory for the next time radio is turned on. SOOTHING NATURE SOUNDS NOTE Deactivate radio first. displayed on screen. RADIO OFF will be To activate / deactivate soothing sounds: 1. Press NATURE SOUND to play sounds. 2. Press NATURE SOUND repeatedly to select desired sound (1-4) or to turn sound off. NOTE This unit uses 60 W light bulbs. The built-in protection feature will automatically shut down the unit when the temperature inside the lamp cover is too high. Remove the power plug from the socket, and only plug in again after unit has cooled down sufficiently. ADJUST VOLUME To adjust volume: 3UHVV+ / – when radio or nature sound is turned on. TIP Press and hold + / – to rapidly adjust volume. IMPORTANT Please allow this unit to cool until the temperature inside is within a safe range. CONNECT TO POWER SOURCE ALARM Memory backup: 1. Remove the battery compartment cover. 2. Insert the batteries (2xAAA), matching the polarities. 3. Replace the battery compartment cover. To set the alarm: 1. Press SET ALARM to enter setting mode. 2. Press + / - to change the settings or press and hold + / – to rapidly change the settings. 3. Press SET ALARM to confirm and move to next setting. 4. Repeat steps 2-3 for all setting options. The settings order is: time, alarm sound (select from beep / radio / bird sound). NOTE Batteries should not be exposed to excessive heat such as sunshine or fire. Before selecting a location to place the unit, consider the following: (QVXUHWKHUHLVDSSUR[LPDWHO\FPEHWZHHQXQLWDQG closest object, such as walls or other objects. (QVXUHWKHUHLVDWOHDVWFPVSDFHDERYHWKHWRSRI the unit for ventilation purposes. (QVXUHGLVWDQFHEHWZHHQXQLWORFDWLRQDQGZDOOVRFNHW is not longer than the power cord itself. NOTE ,I UDGLR DODUP LV VHOHFWHG UDGLR ZLOO SOD\ IRU minutes at set alarm time at maximum volume level. If bird sound alarm is selected, bird sound will gradually increase in volume to maximum and play for 2 minutes at set alarm time . Batteries serve as a back-up power supply. To fully utilize all features, plug into wall socket. To activate / deactivate alarm: 3UHVVALARM. -:- - indicates alarm function has been disabled. To completely disconnect from power, the unit should be disconnected from the wall socket. To silence the alarm: :DYH\RXUKDQGXSWRFPLQFKHVLQIURQWRIWKH SNOOZE SENSOR to silence it for 8 minutes ( / / / will continue flashing to indicate snooze function has been activated) NOTE The main unit should not be exposed to wet conditions. No objects filled with liquid, such as vases, should be placed on the main unit. 3 EN ALARM WITH WAKE UP LIGHT LCD BACKLIGHT To activate / deactivate wake up light: 6OLGHWAKE UP LIGHT switch to ON / OFF. When wake up light has been activated, will be displayed next to ALARM on the LCD screen. To adjust brightness: 6OLGHDISPLAY BRIGHTNESS switch to LOW / HIGH. RESET 1. Remove and reinsert the batteries. 2. Press RESET to return to the default settings. NOTE Light will fade-in (gradually increase in brightness to maximum) 20 minutes prior to set alarm time. Light Will stay on (even after SNOOZE has been activated) after set alarm time for 60 minutes. SPECIFICATIONS TYPE SLEEP TIMER DESCRIPTION MAIN UNIT To adjust sleep timer setting: 1. Turn on desired option: Weight 257 x 199 x 140 mm (10.12 x 7.84 x 5.51 in) 386 g (13.6 oz) without battery FM 87.5 to 108 MHz Power Input: AC 230V 50Hz (EU version) Input: AC 100-120V 50/60Hz 86&DQDGD-DSDQYHUVLRQ 2 x UM-4 (AAA) 1.5V batteries (for backup) LxWxH OPTION PRESS: Radio RADIO Light LAMP 1DWXUHVRXQG1$785(6281' 2. Press SLEEP to activate. 3. Press SLEEP repeatedly to change the sleep timer setting (120, 90, 60, 30, 15, 0 min). After 5 seconds of inaction, the timer will automatically be confirmed and set. NOTE &RQQHFWLRQW\SHRIWKHVZLWFKİ 5DQJHRIODPSORDG/DPS:: 7KHDSSDUDWXVVKDOOQRWEHH[SRVHGWRGULSSLQJRU splashing. 7REHFRPSOHWHO\GLVFRQQHFWWKHSRZHULQSXWWKH mains plug of apparatus shall be disconnected from the mains. 7KH PDLQV SOXJ RI DSSDUDWXV VKRXOG QRW EH obstructed OR should be easily accessed during intended use. 1RQDNHGIODPHVRXUFHVVXFKDVOLJKWHGFDQGOHV should be placed on the apparatus. TIP Press SLEEP again to change sleep timer (120, 90, 60, 30, 15, 0 min). NOTE Ensure radio or sound and/or light has been selected to activate sleep timer. NOTE If light option has been chosen for sleep timer, light will fade out. READING LAMP To turn on / off light: 3UHVVLAMP. To adjust level of brightness: 3UHVVWRLQFUHDVHRUGHFUHDVHEULJKWQHVV TIP Press and hold / to rapidly change level of brightness (1-20). For your convenience, the level of brightness will be stored in memory for the next time reading lamp is turned on. NOTE Do not look directly at the light. PLAYING MUSIC Using a cable, plug one end to your music storage device and one end to AUDIO LINE-IN located at the back of unit. When cable has been successfully connected, will be displayed on the LCD screen and sound will emit from speakers. 4 EN TROUBLESHOOTING The below table lists out some of the problems you could encounter. If you are unable to solve the problem, contact the Customer Care Centre in your country. Contact us via www2.oregonscientific.com/service/support.asp Problem Possible cause Solution / Remarks The unit does not work Power supply? Ensure plug has been properly inserted into the wall socket Ensure there is no power failure. Check by connecting another appliance to the wall socket The unit does not work Normal use This is normal as the light bulb generates heat. However, ensure there is enough ventilation and vents are not covered as this can pose a fire hazard. When setting functions, the unit does not respond Normal use Press RESET at the base of the unit or remove and reinsert plug into wall socket. The appliance will then be reset to factory default settings. Light intensity is too low? Press Alarm function disabled? Ensure alarm time is displayed on LCD screen. Press ALARM to enable. Replace the light bulb. The light does not work Light bulb is defective? to increase light intensity Light bulb not properly screwed in? Unscrew and screw in the light bulb again. Lamp does not turn on again immediately after it has been switched off Normal operations Allow 3 seconds for the lamp to dim. Please wait until the lamp reaches the preset intensity level No sound when the alarm goes on Alarm function disabled? Ensure alarm time is displayed on LCD screen. If -:- - is displayed, press ALARM to enable. Radio is defective? If radio has been selected for alarm mode, check that radio works. Press RADIO after you disable the alarm or press ALARM. Positioning of external antenna? Change position of external antenna if necessary. Broadcast signal is weak? Press Alarm function disabled? Ensure alarm time is displayed on LCD screen. If -:- - is displayed, press ALARM to enable. Power failure? Perhaps there was a power failure which lasted longer than the capacity of the back up system? The display will show an incorrect time and alarm will be 00:00. Do settings again. The radio is defective / produces a crackling sound Alarm did not activate today, but it did yesterday RADIO TUNE to search for the correct signal. The light wakes me too early / late Location of unit is not suitable? It is recommended that the unit is not placed too far and not lower than your head while in a sleeping position. Make sure the light is not blocked by bed, duvet or pillow. Snooze does not work Distance? Wave your hand in front of the SNOOZE SENSOR at a distance range of approx. 1cm to 8cm (0.5 to 3 in). LCD backlight is too weak to see Display brightness? Slide DISPLAY BRIGHTNESS to HIGH. There is no sound after plugging to an external source External device? Make sure external device is playing. Connection? Make sure cable is firmly connected with the external device and the unit. 5 EN FCC STATEMENT PRECAUTIONS 'RQRWVXEMHFWWKHXQLWWRH[FHVVLYHIRUFHVKRFNGXVW WHPSHUDWXUHRUKXPLGLW\ 'RQRWFRYHUWKHYHQWLODWLRQKROHVZLWKDQ\LWHPVVXFKDV QHZVSDSHUVFXUWDLQVHWF 5HPRYH GXVW UHJXODUO\ ZLWK D GU\ FORWK $FFXPXODWHG GXVWSRVHVDSRWHQWLDOILUHKD]DUG 'RQRWLPPHUVHWKHXQLWLQZDWHU,I\RXVSLOOOLTXLGRYHULW GU\LWLPPHGLDWHO\ZLWKDVRIWOLQWIUHHFORWK 'RQRWFOHDQWKHXQLWZLWKDEUDVLYHRUFRUURVLYHPDWHULDOV 'RQRWWDPSHUZLWKWKHXQLW¶VLQWHUQDOFRPSRQHQWV7KLV LQYDOLGDWHVWKHZDUUDQW\ 2QO\XVHIUHVKEDWWHULHV'RQRWPL[QHZDQGROGEDWWHULHV ,PDJHVVKRZQLQWKLVPDQXDOPD\GLIIHUIURPWKHDFWXDO GLVSOD\ :KHQ GLVSRVLQJ RI WKLV SURGXFW HQVXUH LW LV FROOHFWHG VHSDUDWHO\IRUVSHFLDOWUHDWPHQW 3ODFHPHQWRIWKLVSURGXFWRQFHUWDLQW\SHVRIZRRGPD\ UHVXOWLQGDPDJHWRLWVILQLVKIRUZKLFK2UHJRQ6FLHQWLILFZLOO QRW EH UHVSRQVLEOH &RQVXOW WKH IXUQLWXUH PDQXIDFWXUHU V FDUHLQVWUXFWLRQVIRULQIRUPDWLRQ 7KH FRQWHQWV RI WKLV PDQXDO PD\ QRW EH UHSURGXFHG ZLWKRXWWKHSHUPLVVLRQRIWKHPDQXIDFWXUHU 'RQRWGLVSRVHROGEDWWHULHVDVXQVRUWHGPXQLFLSDOZDVWH &ROOHFWLRQRIVXFKZDVWHVHSDUDWHO\IRUVSHFLDOWUHDWPHQWLV QHFHVVDU\ 3OHDVHQRWHWKDWVRPHXQLWVDUHHTXLSSHGZLWKDEDWWHU\ VDIHW\VWULS5HPRYHWKHVWULSIURPWKHEDWWHU\FRPSDUWPHQW EHIRUHILUVWXVH NOTE 7KHWHFKQLFDOVSHFLILFDWLRQVIRUWKLVSURGXFWDQG 7KLV GHYLFH FRPSOLHV ZLWK 3DUW RI WKH )&& 5XOHV 2SHUDWLRQ LV VXEMHFW WR WKH IROORZLQJ WZR FRQGLWLRQV 7KLV GHYLFH PD\ QRW FDXVH KDUPIXO LQWHUIHUHQFH DQG 7KLV GHYLFH PXVW DFFHSW DQ\ LQWHUIHUHQFH UHFHLYHG LQFOXGLQJ LQWHUIHUHQFH WKDW PD\ FDXVH XQGHVLUHG RSHUDWLRQ WARNING &KDQJHV RU PRGLILFDWLRQV QRW H[SUHVVO\ DSSURYHG E\ WKH SDUW\ UHVSRQVLEOH IRU FRPSOLDQFH FRXOG YRLGWKHXVHU VDXWKRULW\WRRSHUDWHWKHHTXLSPHQW NOTE 7KLV HTXLSPHQW KDV EHHQ WHVWHG DQG IRXQG WR FRPSO\ZLWKWKHOLPLWVIRUD&ODVV%GLJLWDOGHYLFHSXUVXDQW WR3DUWRIWKH)&&5XOHV7KHVHOLPLWVDUHGHVLJQHGWR SURYLGH UHDVRQDEOH SURWHFWLRQ DJDLQVW KDUPIXO LQWHUIHU HQFHLQDUHVLGHQWLDOLQVWDOODWLRQ 7KLV HTXLSPHQW JHQHUDWHV XVHV DQG FDQ UDGLDWH UDGLR IUHTXHQF\ HQHUJ\ DQG LI QRW LQVWDOOHG DQG XVHG LQ DFFRUGDQFH ZLWK WKH LQVWUXFWLRQV PD\ FDXVH KDUPIXO LQWHUIHUHQFH WR UDGLR FRPPXQLFDWLRQV +RZHYHU WKHUH LV QRJXDUDQWHHWKDWLQWHUIHUHQFHZLOOQRWRFFXULQDSDUWLFXODU LQVWDOODWLRQ,IWKLVHTXLSPHQWGRHVFDXVHKDUPIXOLQWHUIHU HQFH WR UDGLR RU WHOHYLVLRQ UHFHSWLRQ ZKLFK FDQ EH GHWHUPLQHGE\WXUQLQJWKHHTXLSPHQWRIIDQGRQWKHXVHU LVHQFRXUDJHGWRWU\WRFRUUHFWWKHLQWHUIHUHQFHE\RQHRU PRUHRIWKHIROORZLQJPHDVXUHV 5HRULHQWRUUHORFDWHWKHUHFHLYLQJDQWHQQD ,QFUHDVHWKHVHSDUDWLRQEHWZHHQWKHHTXLSPHQWDQG UHFHLYHU &RQQHFWWKHHTXLSPHQWLQWRDQRXWOHWRQDFLUFXLW GLIIHUHQWIURPWKDWWRZKLFKWKHUHFHLYHULVFRQQHFWHG &RQVXOWWKHGHDOHURUDQH[SHULHQFHGUDGLR79 WHFKQLFLDQIRUKHOS WKHFRQWHQWVRIWKHXVHUPDQXDODUHVXEMHFWWRFKDQJH ZLWKRXWQRWLFH NOTE,IWKHH[WHUQDOIOH[LEOHFDEOHRUFRUGRIWKLVOXPLQDLU LVGDPDJHGLWVKDOOEHH[FOXVLYHO\UHSODFHGE\PDQXIDF WXUHURUKLVVHUYLFHDJHQWRUDVLPLODUTXDOLILHGSHUVRQLQ RUGHUWRDYRLGKD]DUG MANUALLY SET CLOCK ALARM 7KHIROORZLQJLQIRUPDWLRQLVQRWWREHXVHGDVFRQWDFWIRU VXSSRUWRUVDOHV3OHDVHFDOORXUFXVWRPHUVHUYLFH QXPEHUOLVWHGRQRXUZHEVLWHDW ZZZRUHJRQVFLHQWLILFFRPRURQWKHZDUUDQW\FDUGIRU WKLVSURGXFWIRUDOOLQTXLULHVLQVWHDG NOTE )RULQGRRUXVHRQO\ EU-DECLARATION OF CONFORMITY 9LVLWRXUZHEVLWHZZZRUHJRQVFLHQWLILFFRPWROHDUQ PRUHDERXW2UHJRQ6FLHQWLILFSURGXFWV,I\RX UHLQWKH 86DQGZRXOGOLNHWRFRQWDFWRXU&XVWRPHU&DUH GHSDUWPHQWGLUHFWO\SOHDVHYLVLW ZZZRUHJRQVFLHQWLILFFRPVHUYLFHVXSSRUWDVS )RULQWHUQDWLRQDOLQTXLULHVSOHDVHYLVLW ZZZRUHJRQVFLHQWLILFFRPDERXWLQWHUQDWLRQDODVS :H 1DPH 2UHJRQ6FLHQWLILF,QF $GGUHVV 6:WK$YH7XDODWLQ 2UHJRQ86$ GHFODUHWKDWWKHSURGXFW 3URGXFW1R :6 3URGXFW1DPH 6XQULVH:DNH8S&ORFN 0DQXIDFWXUHU L30&RQFHSWV/LPLWHG $GGUHVV %ORFN&).DLVHU(VWDWH 3KDVH0DQ<XH6W +XQJ+RP.RZORRQ+RQJ.RQJ COUNTRIES RTTE APPROVAL COMPLIED $OO(&FRXQWULHV6ZLW]HUODQGCH DQG1RUZD\ N ABOUT OREGON SCIENTIFIC LVLQFRQIRUPLW\ZLWK3DUWRIWKH)&&5XOHV2SHUDWLRQ LVVXEMHFWWRWKHIROORZLQJWZRFRQGLWLRQV7KLVGHYLFH PD\QRWFDXVHKDUPIXOLQWHUIHUHQFH7KLVGHYLFHPXVW DFFHSW DQ\ LQWHUIHUHQFH UHFHLYHG LQFOXGLQJ LQWHUIHUHQFH WKDWPD\FDXVHXQGHVLUHGRSHUDWLRQ +HUHE\ 2UHJRQ 6FLHQWLILF GHFODUHV WKDW WKLV 6XQULVH :DNH8S &ORFN 0RGHO :6 LV LQ FRPSOLDQFH ZLWK (0& GLUHFWLYH (& $ FRS\ RI WKH VLJQHG DQG GDWHG'HFODUDWLRQRI&RQIRUPLW\LVDYDLODEOHRQUHTXHVWYLD RXU2UHJRQ6FLHQWLILF&XVWRPHU6HUYLFH