1
SR8850
SR8855
Robotic Vacuum Cleaner
User Manual
!Before operating this unit, please read the instructions carefully.
!For indoor use only.
English
imagine the possibilities
Thank you for purchasing a Samsung product.
To receive a more complete service,
please register your product at
www.samsung.com/register
!"#$%&&'($)*+,-.!!!(
/&(&*/*/0!!!(1(21'$!34
Safety information
SAFETY INFORMATION
WARNING
WARNING
Ř%HIRUHRSHUDWLQJWKHDSSOLDQFHSOHDVHUHDGWKLVPDQXDOWKRURXJKO\DQGUHWDLQ
it for your reference.
Ř%HFDXVHWKHVHIROORZLQJRSHUDWLQJLQVWUXFWLRQVFRYHUYDULRXVPRGHOVWKH
characteristics of your vacuum cleaner may differ slightly from those described
in this manual.
CAUTION/WARNING SYMBOLS USED
WARNING
CAUTION
Indicates that a danger of death or serious injury exists.
Indicates that a risk of personal injury or material damage exists.
OTHER SYMBOLS USED
NOTE
Explains terms to help users understand how use the product properly.
2_ Safety information
!"#$%&&'($)*+,-.!!!/
/&(&*/*/0!!!(1(21'2!34
Safety information
IMPORTANT SAFETY INSTRUCTIONS
When using an electrical appliance, basic precautions should be observed, including the
following:
READ ALL INSTRUCTIONS BEFORE USING YOUR ROBOTIC VACUUM CLEANER.
Unplug from outlet when not in use and before conducting maintenance.
WARNING: to reduce the risk of fire, electric shock, or injury:
GENERAL
Ř8VHRQO\DVGHVFULEHGLQWKLVPDQXDO
ŘDo not operate the robotic vacuum cleaner or charger if it has been damaged in any way.
Ř,IWKHFOHDQHULVQRWZRUNLQJDVLWVKRXOGKDVEHHQGURSSHGGDPDJHGOHIWRXWGRRUV
or dropped in water, return it to a customer care center.
Ř'RQRWKDQGOHWKHFKDUJHURUURERWLFYDFXXPFOHDQHUZLWKZHWKDQGV
Ř8VHRQO\RQGU\LQGRRUVXUIDFHV
Ř7KLVDSSOLDQFHLVQRWLQWHQGHGIRUXVHE\SHUVRQV LQFOXGLQJFKLOGUHQ ZLWKUHGXFHG
physical,sensory or mental capabilities, or lack of experience and knowledge, unless
they have been given supervision or instruction concerning use of the appliance by a
person responsible for their safety.
Ř&KLOGUHQVKRXOGEHVXSHUYLVHGWRHQVXUHWKDWWKH\GRQRWSOD\ZLWKWKHDSSOLDQFH
BATTERY CHARGER
Ř'RQRWPRGLI\WKHSRODUL]HGSOXJWRƂWDQRQSRODUL]HGRXWOHWRUH[WHQVLRQFRUG
Ř'RQRWXVHRXWGRRUVRURQZHWVXUIDFHV
Ř8QSOXJWKHFKDUJHUIURPWKHRXWOHWZKHQQRWLQXVHDQGEHIRUHVHUYLFLQJ
Ř8VHRQO\WKHFKDUJHUVXSSOLHGE\WKHPDQXIDFWXUHUWRUHFKDUJH
Ř'RQRWXVHZLWKDGDPDJHGFRUGRUSOXJ
Ř'RQRWSXOORUFDUU\E\WKHFRUGXVHWKHFRUGDVDKDQGOHFORVHWKHGRRURQWKHFRUG
or pull the cord around sharp edges or corners. Keep the cord away from heated
surfaces.
Ř'RQRWXVHH[WHQVLRQFRUGVRURXWOHWVZLWKLQDGHTXDWHFXUUHQWFDUU\LQJFDSDFLW\
Ř'RQRWXQSOXJE\SXOOLQJRQWKHFRUG7RXQSOXJJUDVSWKHSOXJQRWWKHFRUG
Ř'RQRWPXWLODWHRULQFLQHUDWHEDWWHULHVDVWKH\ZLOOH[SORGHDWKLJKWHPSHUDWXUHV
Ř'RQRWDWWHPSWWRRSHQWKHFKDUJHU5HSDLUVVKRXOGRQO\EHFDUULHGRXWE\DTXDOLƂHG
customer care centre.
Ř'RQRWH[SRVHWKHFKDUJHUWRKLJKWHPSHUDWXUHVRUDOORZPRLVWXUHRUKXPLGLW\RIDQ\
kind to come into contact with the charger.
Safety information _3
!"#$%&&'($)*+,-.!!!0
/&(&*/*/0!!!(1(21'2!34
Safety information
ROBOTIC VACUUM CLEANER
Ř'RQRWSLFNXSKDUGRUVKDUSREMHFWVVXFKDVJODVVQDLOVVFUHZVFRLQVDQGHWF
Ř'RQRWXVHZLWKRXWDƂOWHULQSODFH:KHQVHUYLFLQJWKHXQLWQHYHUSXWƂQJHUVRURWKHU
objects into the fan chamber in case the unit accidentally turns on.
Ř'RQRWSXWDQ\REMHFWVLQWRRSHQLQJV'RQRWXVHZLWKDQ\RSHQLQJVEORFNHGNHHS
openings free of dust, lint, hair, and anything that may reduce air flow.
Ř'RQRWSLFNXSWR[LFPDWHULDOV FKORULQHEOHDFKDPPRQLDGUDLQFOHDQHUHWF Ř'RQRWSLFNXSDQ\WKLQJWKDWLVEXUQLQJRUFDXVLQJDVPRNHVXFKDVFLJDUHWWHV
matches, or hot ashes.
Ř'RQRWXVHWRSLFNXSƃDPPDEOHRUFRPEXVWLEOHOLTXLGVVXFKDVJDVROLQHQRUXVHRQ
areas where they may be present.
Ř'RQRWXVHURERWLFYDFXXPFOHDQHULQDQHQFORVHGVSDFHƂOOHGZLWKYDSRXUVJLYHQRII
E\RLOEDVHGSDLQWSDLQWWKLQQHUPRWKSURRƂQJVXEVWDQFHVƃDPPDEOHGXVWRURWKHU
explosive or toxic vapours.
Ř/HDNVIURPEDWWHU\FHOOVFDQRFFXUXQGHUH[WUHPHXVDJHRUWHPSHUDWXUHFRQGLWLRQV
,IWKHOLTXLGJHWVRQVNLQZDVKTXLFNO\ZLWKZDWHU,IWKHOLTXLGJHWVLQWRWKHH\HV
flush them immediately with clean water for a minimum of 10 minutes. Seek medical
attention.
4_ Safety information
!"#$%&&'($)*+,-.!!!5
/&(&*/*/0!!!(1(21'2!34
Contents
SAFETY INFORMATION
06
07
10
11
02
PRODUCT FEATURES
Power related
Before use
In use
Cleaning and maintenance
13 Product Features
13
ASSEMBLING THE CLEANER
15 Components
16 Name of each part
15
OPERATING THE CLEANER
20
20
20
21
22
23
24
25
27
27
28
29
30
31
32
33
34
35
20
MAINTAIN TOOLS AND FILTER
36 Cleaning robotic vacuum cleaner
36 Please keep the cleaning and
maintenance methods in mind
36 Cleaning the sensor window and the
camera
(PSW\LQJWKHGXVWELQTXLFNO\
&OHDQLQJWKHGXVWELQDQGWKHƂOWHU
39 Cleaning the power brush
&OHDQLQJWKHHGJHFOHDQLQJVLGHURWDWLQJ
brush
42 Cleaning the driving wheel
36
TROUBLESHOOTING
43 Checklist before svc calls
45 Troubleshooting for Error Codes
43
PRODUCT SPECIFICATION
46
!"#$%&&'($)*+,-.!!!'
Installing robotic vacuum cleaner
Installation order
Turning the power switch on or off
Installing the charger
Charging
About the battery
Setting the Time
Installing the VIRTUAL GUARD
Using robotic vacuum cleaner
Starting/stopping cleaning
Recharging
Auto cleaning
Spot cleaning
Max cleaning
Manual cleaning
Edge cleaning
Scheduled cleaning
Setting daily cleaning
3URGXFWVSHFLƂFDWLRQ
Contents _5
/&(&*/*/0!!!(1(21'2!34
Safety information
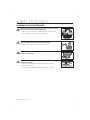
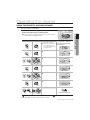
POWER RELATED
WARNING
Do not bend the power cord forcefully or place a
heavy object on it that could break it.
7KLVPD\UHVXOWLQƂUHRUHOHFWULFVKRFN
Make sure to remove any dust or water from the
power plug.
WARNING
)DLOLQJWRGRVRPD\UHVXOWLQDPDOIXQFWLRQRUHOHFWULF
shock.
WARNING
Do not pull the power plug by the cord or touch the
plug with wet hands.
7KLVPD\UHVXOWLQƂUHRUHOHFWULFVKRFN
WARNING
Do not use multiple plugs in a single socket.
(Do not leave the cord lying exposed on the floor.)
7KLVPD\UHVXOWLQƂUHRUHOHFWULFVKRFN
WARNING
Do not use a damaged power cord, plug, or a loose
power outlet.
7KLVPD\UHVXOWLQƂUHRUHOHFWULFVKRFN
6_ Safety information
!"#$%&&'($)*+,-.!!!#
/&(&*/*/0!!!(1/&1#!34
Safety information
BEFORE USE
CAUTION
CAUTION
CAUTION
CAUTION
CAUTION
01 SAFETY INFORMATION
CAUTION
Before activating the robotic vacuum cleaner, make sure
that the dust bin is assembled.
,IWKHGXVWELQLVQRWLQVHUWHGURERWLFYDFXXPFOHDQHUZLOOQRW
operate.
Never use robotic vacuum cleaner in locations with
combustible material such as:
/RFDWLRQVZLWKFDQGOHVRUGHVNODPSVRQWKHƃRRU
/RFDWLRQVZLWKXQDWWHQGHGƂUHV ƂUHRUHPEHUV /RFDWLRQVZLWKJDVROLQHGLVWLOOHGDOFRKROWKLQQHUDVKWUD\V
with burning cigarettes, and etc.
Robotic vacuum cleaner is for domestic use only. Do not use it in the following
locations.
$WWLFVEDVHPHQWVZDUHKRXVHVLQGXVWULDOEXLOGLQJVVHSDUDWHURRPVGLVWDQWIURPWKH
main building, locations exposed to wet or damp conditions such as bathrooms or
wash rooms, and narrow and highly situated locations such as tables or shelves. Critical
GDPDJH DEQRUPDORSHUDWLRQDQGEUHDNDJH PD\RFFXUZKHQXVHGLQWKHVHORFDWLRQV
Open all doors to clean all rooms.
:KHQDGRRULVFORVHGWKHURERWLFYDFXXPFOHDQHUZLOOQRWEHDEOHWRHQWHUWKDWURRP
However, make sure to close the doors to the main entrance, the veranda and the
bathroom, and any other rooms where the robotic vacuum cleaner may fall to a lower floor.
For carpets with long tassels, fold the tassels under the
carpet.
8QIROGHGWDVVHOVPD\UHVXOWLQFULWLFDOGDPDJHWRWKHFDUSHW
and the machine itself, as they get caught in the driving wheel
or the power brush.
When the cliff sensor is polluted, robotic
vacuum cleaner may be falling down from
entrance of stairs, handrail etc.
This may cause an injury of people and the
critical damage to the product.
For preventing from the risk, install the
VIRTUAL GUARDs(Fence Mode setting) in
front of dagerous areas. And clean the sensor
window and camera not to make a wrong
orders.
Safety information _7
!"#$%&&'($)*+,-.!!!6
/&(&*/*/0!!!(1/&12!34
Safety information
BEFORE USE
CAUTION
CAUTION
CAUTION
CAUTION
CAUTION
CAUTION
CAUTION
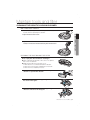
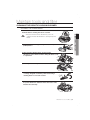
Remove small objects or brittle items from the area to be
cleaned in advance.
0DNHVXUHWRFOHDUDQ\REMHFWVEHIRUHFOHDQLQJ
0DNHVXUHWRUHPRYHIUDJLOHLWHPVVXFKDVFKLQDJODVVREMHFWV
flowerpots, and etc.
5RERWLFYDFXXPFOHDQHUGRHVQRWUHFRJQL]HFRLQVULQJVRURWKHU
valuable items such as jewelry.
Remove objects scattered on the floor before cleaning.
Robotic vacuum cleaner is designed to detect obstacles 5cm away
from them.
%DWKWRZHOVSDGVLQIURQWRIEDWKURRPVDQGVLQNVHQWUDQFHVXWLOLW\
rooms, power cords, table cloths or belts can become entangled in
the driving wheel or power brush. This can cause objects to fall from
the table.
Inform all family members (or relevant parties) to be cautious
before cleaning or when using the Scheduled Cleaning Mode.
5RERWLFYDFXXPFOHDQHUPD\UXQLQWRFKLOGUHQFDXVLQJWKHPWRIDOO
Ensure that children do not step or sit on the robotic vacuum.
&KLOGUHQPD\IDOODQGLQMXUHWKHPVHOYHVRUFULWLFDOGDPDJHPD\RFFXU
to the product.
When a child or pet is left alone, make sure to turn off the
Power Switch of the robotic vacuum cleaner.
5RERWLFYDFXXPFOHDQHUPD\DWWUDFWWKHLUDWWHQWLRQ
:KHQWKHURWDWLQJZKHHORUEUXVKFDWFKHVƂQJHUVIHHWFORWKLQJRUKDLU
this may result in injury.
,IDFKLOGRUDSHWLVLQWKHZD\RIWKHURERWLFYDFXXPFOHDQHULWPD\EH
LGHQWLƂHGDVDQREVWDFOHDQGWKHDUHDPD\QRWFOHDQHG
:KHQWKH3RZHU6ZLWFKLVWXUQHGRIILWZLOOFXWRIIWKHSRZHUVXSSO\DQG
deactivate all functions.
When installing the charger station, do not leave the power
cord exposed on the floor.
:
KHQWKHURERWLFYDFXXPFOHDQHUDXWRPDWLFDOO\UHFKDUJHVRUSDVVHV
by the charger station, it may drag the power cord around with it.
Always keep the power cord of the charger plugged into the
outlet.
$OWKRXJKWKHURERWLFYDFXXPFOHDQHUKDVDVHOIFKDUJLQJIXQFWLRQLI
the power cord of the charger station is unplugged, it cannot charge
its battery automatically.
8_ Safety information
!"#$%&&'($)*+,-.!!!$
/&(&*/*/0!!!(1/&1(/!34
Safety information
BEFORE USE
CAUTION
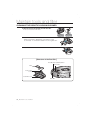
Objects in front of the charger will prevent the robotic
vacuum cleaner from auto-charging itself.
&OHDUWKHDUHD
01 SAFETY INFORMATION
CAUTION
Install the charger in a location that can be easily accessed
by the robotic vacuum cleaner.
,IWKHFKDUJHULVLQVWDOOHGLQDFRUQHUWKLVPD\FDXVHH[WUD
movements and may disturb the automatic recharging process.
.5m
ut 0
abo
m
0.5
out
ab
ab
ou
t1
m
There should be no obstacles 0.5 m to the left and
and within 1 m of the front.
WARNING right
.5m
ut 0
abo
.5m
ut 0
abo
ab
ou
t1
m
Do not short-circuit the charge pins with metal objects such
chopsticks, screwdrivers, and etc.
7KLVZLOOUHVXOWLQFULWLFDOGDPDJHWRWKHFKDUJHU
WARNING as
Make sure that there is no trace of liquids on the charger
station.
WARNING
)DLOLQJWRGRVRPD\UHVXOWLQƂUHRUHOHFWULFVKRFN
Make sure the robotic vacuum cleaner does not vacuum or
over liquids such as water, oil or pet litter.
This may result in critical damage to the product.
/LTXLGVPD\VSUHDGWKURXJKWKHZKHHOVUHVXOWLQJLQFRQWDPLQDWLRQ
WARNING move
Do not use the charger for other purposes.
WARNING 7KLVPD\UHVXOWLQFULWLFDOGDPDJHWRWKHFKDUJHURUFDXVHDƂUH
Safety information _9
!"#$%&&'($)*+,-.!!!2
/&(&*/*/0!!!(1/&1/&!34
Safety information
IN USE
CAUTION
CAUTION
CAUTION
CAUTION
CAUTION
WARNING
NOTE
You cannot use the robotic vacuum cleaner on thick carpets.
7KLVPD\UHVXOWLQSUREOHPVZLWKWKHURERWLFYDFXXPFOHDQHU
7KLVPD\UHVXOWLQGDPDJHWRFDUSHWV
Do not use the robotic vacuum cleaner on a table or other high
locations.
7KLVPD\UHVXOWLQGDPDJHZKHQWKHXQLWDFFLGHQWDOO\GURSV
Robotic vacuum cleaner may bump into furniture such as
chair legs, table legs, thin and long furniture, and etc. while
operating.
)RUDTXLFNHUDQGFOHDQHUSHUIRUPDQFHSODFHWKHFKDLUVRQWRSRI
the table.
Do not place any objects on top of the robotic vacuum cleaner.
7KLVPD\UHVXOWLQPDOIXQFWLRQ
Immediately remove any large pieces of
paper or plastic bags from the machine while cleaning.
8VLQJWKHPDFKLQHIRUDQH[WHQGHGSHULRGRIWLPHZLWKLWVLQOHWSRUW
obstructed, may result in critical damage to the product.
If an unusual sound, smell or smoke is emitted from the robotic
vacuum cleaner, immediately turn off the Power Switch and call
the customer care center.
Robotic vacuum cleaner may not be able to continue its
operation if it is stuck at the entrance or veranda doorsill.
5RERWLFYDFXXPFOHDQHUVWRSVRSHUDWLQJIRUVDIHW\UHDVRQVLILW
cannot move for more than 5 minutes.
7RUHVXPHRSHUDWLQJWXUQWKH3RZHU6ZLWFKRIIDQGWKHQRQDJDLQ
after moving it to a location where it can continue cleaning.
10_ Safety information
!"#$%&&'($)*+,-.!!!(&
/&(&*/*/0!!!(1/&10(!34
Safety information
IN USE
Robotic vacuum cleaner cannot completely clean
locations that it cannot reach, such as corners, and
spaces between sofas and walls.
3OHDVHFOHDQWKHVHORFDWLRQVRFFDVLRQDOO\
NOTE
Dust clusters may remain after cleaning, when the robotic vacuum cleaner fails to
pick up dust clusters that were formed while cleaning.
,QWKLVFDVHVZHHSXSWKHGXVWZLWKDQRWKHUFOHDQLQJWRRO
01 SAFETY INFORMATION
NOTE
CLEANING AND MAINTENANCE
CAUTION
When cleaning the product, do not spray water directly onto the
exterior or wipe it with a volatile material such as benzene,
thinner or alcohol.
7KLVPD\UHVXOWLQFULWLFDOGDPDJHWRWKHSURGXFW
CAUTION
Do not forcefully press the bumper on the robotic vacuum
cleaner.
,IWKHEXPSHUVHQVRUJHWVGDPDJHGWKHURERWLFYDFXXPFOHDQHUPD\
bump into walls or furniture.
CAUTION
The unit must not be disassembled or reconstructed by anyone
other than a qualified service engineer.
7KLVPD\UHVXOWLQGDPDJHWRWKHSURGXFW
WARNING
Remove any foreign substances accumulated on the Obstacle
and Cliff sensors on a regular basis. 락방지 센서
'LUWDFFXPXODWHGRQWKHVHQVRUVZLOOUHVXOWLQLQDFFXUDWHIXQFWLRQLQJ
of the sensors.
Cliff sensor
Obstacle
sensor
Safety information _11
!"#$%&&'($)*+,-.!!!((
/&(&*/*/0!!!(1/&105!34
Safety information
CLEANING AND MAINTENANCE
WARNING
When removing foreign substances, always use the cleaning
brush after turning the Power Switch off.
)DLOLQJWRGRVRPD\UHVXOWLQVXGGHQRSHUDWLRQRIWKHXQLWDQG
cause an injury or critical damage to the product.
WARNING
If the power cord is damaged, have it replaced by a qualified
service engineer from the customer care center.
)DLOLQJWRGRVRPD\UHVXOWLQƂUHRUHOHFWULFVKRFN
WARNING
WARNING
(GJH
cleaning
side brush
Power brush
Before cleaning the charger, make sure to disconnect the
power cord for safety.
Contact the Samsung Electronics customer care center to
replace the battery.
)DLOLQJWRXVHRULJLQDOEDWWHULHVZLOOUHVXOWLQSURGXFWIDLOXUH
" Battery information :
$$6L]H1L0+81,21683320RGHO+3< ($ 12_ Safety information
!"#$%&&'($)*+,-.!!!(/
/&(&*/*/0!!!(1/(15!34
Product Features
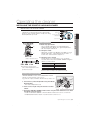
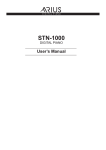
CONVENIENT VIRTUAL GUARD FUNCTION
<RXFDQFRQƂQHWKHURERWLFYDFXXPFOHDQHUWRDSDUWLFXODUVHFWLRQE\XVLQJWKH)HQFH YLUWXDO
ZDOO PRGHRUE\FOHDQLQJVHYHUDOVHFWLRQVRQHE\RQHXVLQJWKH*XDUG YLUWXDOGRRU PRGH
Ř:KDWLVFHLOLQJVKDSHUHFRJQLWLRQ
(Visionary mappingTM)?
7KLVIXQFWLRQUHFRJQL]HVWKHVKDSHRI
the ceiling using the camera on top
to identify the area to be cleaned and
determines the best way to pass over
and clean every section of the floor.
DELICATE CLEANING OF EVERY CORNER
6LQFHWKHURERWLFYDFXXPFOHDQHUFOHDQVWKHƃRRULQDVHTXHQWLDOZD\
DORQJWKHPDS
determined by the ceiling shape recognition function, it cleans every corner of the floor.
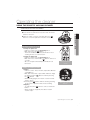
VARIOUS CLEANING MODES
About 1.5m
Various cleaning modes are provided to meet all your needs.
1. Auto Mode
2
1
3
About 1.5m
Cleans all rooms automatically.
2. SPOT MODE
&OHDQVDORFDOL]HGDUHDLQWHQVHO\,W
can be used to clean bread or cookie
crumbs.
3.
Max Mode
4
5
6
Runs until the battery is nearly
depleted.
4. Manual Mode
You can clean the floor manually by
moving the cleaning robot.
7
Tu
d
Mon e We
Thu Fri Sat
Sun ~
5. Edge Mode
!When the Obstacle Sensor detects an obstacle during the cleaning,
WKH5RERW&OHDQHUUHGXFHVLWVVSHHGWRPLQLPL]HWKHEXPSLQJLPSDFW
and the Bumper Sensor also helps it lower the bumping impact.
And, it cleans the corners by reaching to them as close as possible.
6. Scheduled Cleaning Mode
$WWKHVSHFLƂHGWLPHWKHFOHDQLQJURERWFOHDQVWKHƃRRU
7. Daily Cleaning Mode
7KHFOHDQLQJURERWFOHDQVWKHƃRRUHYHU\GD\DWWKHVSHFLƂHGWLPH
EASY DUST OUTLET
The dust output at the top enables emptying the dust bin easily using
a normal vacuum cleaner without dust flying around.
Product Features _13
!"#$%&&'($)*+,-.!!!(0
/&(&*/*/0!!!(1/(1(/!34
Product Features
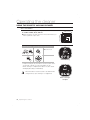
AUTO CHARGING
When the battery is low, the robotic vacuum cleaner is
automatically guided to the charger to enable it to perform a
TXLFNDXWRFKDUJH
EDGE-CLEANING SIDE ROTATING BRUSH
7KHHGJHFOHDQLQJVLGHURWDWLQJEUXVKFOHDQVGXVWIURPWKH
edges.
DOORSILL CROSSING
About 1 cm
Stair type
Vertical type
The robotic vacuum cleaner’s innovative driving system
makes it possible for it to cross over doorsills with a height of
about 1 cm and clean all rooms. The robotic vacuum cleaner
has been designed so that it does not cross over doorsills
that are higher than 1 cm for safety purposes.
ANTI-CRASH
The robotic vacuum cleaner detects and avoids obstacles
in 2 stages. First, the 7 obstacle sensors detect obstacles in
stage 1 and if the robotic vacuum cleaner does crash into an
obstacle, the 2 bumper sensors absorb the impact.
ANTI-FALLING
The 3 Cliff sensors detect downward steps such as stairs or
the front door threshold to prevent robotic vacuum cleaner
from falling down stairs.
SAFETY DEVICE
When robotic vacuum cleaner is lifted up while cleaning,
automatically driving wheels, power brush, suction motor,
side rotating brush are stopped by sensor’s detecting.
14_ Product Features
!"#$%&&'($)*+,-.!!!(5
/&(&*/*/0!!!(1/(102!34
Assembling the cleaner
COMPONENTS
Main Body
■
Remote Control
02 ASSEMBLING THE CLEANER
■
&KDUJHU 6WDWLRQ
■
■
Others Components
$$$7\SH%DWWHULHV
User Manual /
2 Battery
VIRTUALGUARD
Spare Filter
Remote Control
Cradle
6SDUH(GJH&OHDQLQJ6LGH
%UXVK Spare Power Brush
Cleaning Brush
Assembling the cleaner _15
Assembling the cleaner
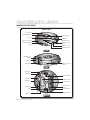
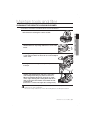
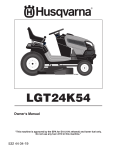
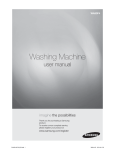
NAME OF EACH PART
[ Main unit ]
Dust Outlet
Operating Button
Display Panel
Camera
VIRTUAL
GUARD Sensor
Obstacle Sensor
Remote Control
Sensor
Obstacle Sensor
VIRTUAL GUARD
Sensor
Bumper Sensor
Front
Dust Bin Eject
Button
Dust Bin
Remote Control
Sensor
Dust Outlet
Side
Cliff Sensor
Side Brush
Driving Wheel
Charge Pin
Battery Cover
Cliff Sensor
Power Brush
Power Brush
Cover
Power Switch
Charge Pin
Roller
Driving Wheel
Cliff Sensor
Bottom
16_ Assembling the cleaner
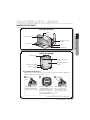
Assembling the cleaner
NAME OF EACH PART
[ Charger (Station) ]
Charging Lamp
Remote Control
Holder
Charge Pin
Vents
Catching Sill
[ VIRTUAL GUARD ]
Mode Lamp
Distance Detection
Sensor
Main Body Detection
Sensor
Mode/Power Button
Distance Control
Switch
■
Installing the batteries
Batteries are not supplied with the product. You have to purchase the batteries additionally.
,QVWDOOWKHDONDOLQHEDWWHULHV W\SH' EHIRUHXVH
1
2
3
Lift the cover of the
VIRTUAL GUARD while
pressing the locking tab.
Install the batteries into the
VIRTUAL GUARD as shown
E\WKHƂJXUHEHORZ ,IWKH
batteries are installed with
the incorrect polarity, the
9,578$/*8$5'ZLOOQRWZRUN
After inserting the tip of
the cover into the slot,
push the other end to
close it until it clicks into
place.
"6SHFLƂFDWLRQ$ONDOLQH7\SH' /5 EDWWHULHV
Assembling the cleaner _17
02 ASSEMBLING THE CLEANER
Power
Lamp
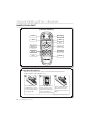
Assembling the cleaner
NAME OF EACH PART
[ Remote Control ]
Power
Recharging
Auto
Max
Spot
Directional
Buttons
Start/Stop
PRYLQJEDFNZDUGV
LVQRWVXSSRUWHG
■
Manual
Timer/Daily
Edge
Clock
Installing the batteries
Batteries are not installed in the remote control when purchasing the product.
,QVWDOOWKHEDWWHULHV W\SH$$$ EHIRUHXVH
1
2
3
Lift the battery
compartment cover at
the back of the remote
control, while pressing
the locking tab.
Install the batteries into the
remote control as shown
E\WKHƂJXUHEHORZ ,IWKH
batteries are installed with
the wrong polarity, the
UHPRWHFRQWUROZLOOQRWZRUN
After inserting the tip of
the cover into the slot,
push the other end to
close it until it clicks into
place.
"6SHFLƂFDWLRQ$$$W\SHEDWWHULHV
18_ Assembling the cleaner
Assembling the cleaner
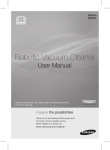
NAME OF EACH PART
[ Status Display Window]
7
4
3
6
Ⓐ
8
Ⓑ
Ⓒ
9
2
5
Ⓓ
10
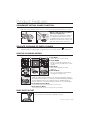
DISPLAY PART
1. Number Display
6KRZVWKHWLPHUGLVSOD\SURJUHVVVWDWXVDQGHUURUFRGHVXVLQJQXPEHUVOHWWHUVDQGJUDSKLFV
2. Battery Level Indicator
&KDUJLQJ6KRZVWKHFKDUJLQJSURJUHVVLQVWHSV
,Q8VH6KRZVWKHEDWWHU\FKDUJHOHYHO7KHEDWWHU\FKDUJHOHYHOLVUHGXFHGE\HDFKOHYHOIURP)8//
ZKLOHRSHUDWLQJ :KHQWKHEDWWHU\LVIXOO\GLVFKDUJHGRQHOHYHOZLOOƃDVKWRGLVSOD\œ/2Ŕ
3. Scheduled Cleaning
:KHQFOHDQLQJLVVFKHGXOHGWKH6FKHGXOHG&OHDQLQJLFRQLVOLW
4. Daily
:KHQGDLO\FOHDQLQJLVVFKHGXOHGWKH'DLO\LFRQLVOLW
5. Recharging
7KLVLFRQWXUQVRQZKHQWKHFOHDQLQJURERWUHWXUQVWRWKHFKDUJHUVWDWLRQWRFKDUJHLWVEDWWHU\
6. Cleaning Mode Display
(DFKWLPHWKH&OHDQLQJ0RGHEXWWRQLVSUHVVHGWKHFRUUHVSRQGLQJFOHDQLQJPRGHLVGLVSOD\HG
D $XWR0RGH7KLVLFRQWXUQVRQZKHQ$XWRFOHDQLQJPRGHLVVHOHFWHG
E 6SRW0RGH7KLVLFRQWXUQVRQZKHQ6SRWFOHDQLQJPRGHLVVHOHFWHG
F 0D[0RGH7KLVLFRQWXUQVRQZKHQ0D[FOHDQLQJPRGHLVVHOHFWHG
G 0DQXDO0RGH7KLVLFRQWXUQVRQZKHQ0DQXDOFOHDQLQJPRGHLVVHOHFWHG
H (GJH0RGHœ
ŔLVRQZKHQ(GJHFOHDQLQJPRGHLVVHOHFWHG
BUTTON PART
7. Start/Stop
3UHVVWRVWDUWVWRSFOHDQLQJ
8. Cleaning Mode
3UHVVWRVHOHFWDFOHDQLQJPRGH$IWHUVHOHFWLQJDFOHDQLQJPRGHSUHVVWKH
EXWWRQWRVWDUWFOHDQLQJ
9. Timer/Daily
3UHVVWRVHWDVFKHGXOHGRUGDLO\FOHDQLQJ
10. Recharging
:KHQWKLVEXWWRQLVSUHVVHGWKH5HFKDUJLQJLFRQLVWXUQHGRQDQGWKHFOHDQLQJURERWZLOOUHWXUQWRWKH
charger station to charge its battery.
Assembling the cleaner _19
02 ASSEMBLING THE CLEANER
1
Operating the cleaner
INSTALLING THE ROBOTIC VACUUM CLEANER
INSTALATION ORDER
1. Turning the Power Switch on or off
To use the robotic vacuum cleaner, you must turn on the Power Switch at the
bottom of the main unit.
2. Installing the Charger
7RFKDUJHWKHURERWLFYDFXXPFOHDQHU\RXPXVWƂUVWLQVWDOO
the charger.
Since the battery is discharged when the product is
purchased, you must fully charge the battery before use.
3. Charging the Battery
You should charge the battery completely before using the
robotic vacuum cleaner.
4. Setting the Time
You should set the time to use the scheduled and daily
cleaning options.
5. Installing the VIRTUAL GUARD
<RXFDQFRQƂQHWKHURERWLFYDFXXPFOHDQHUWRDSDUWLFXODUVHFWLRQE\XVLQJ)HQFH
YLUWXDOZDOO PRGHRUFOHDQVHYHUDOVHFWLRQVRQHE\RQHXVLQJ*XDUG YLUWXDOGRRU mode.
TURNING THE POWER SWITCH ON OR OFF
To use the robotic vacuum cleaner, you must turn the
Power Switch on.
If you turn the Power Switch off, all settings will be reset.
1. Turn over the main unit and turn the Power
Switch on.
,IWKHLFRQVDUHQRWWXUQHGRQLWLQGLFDWHVWKDWWKH
battery charge is depleted. In this case, dock the
robotic vacuum cleaner to the charger station after
turning the Power Switch on.
7KHFRQƂJXUHGWLPHPD\EHGLIIHUHQWIURPWKHFXUUHQW
WLPH,IWKHFRQƂJXUHWLPHLVLQFRUUHFWVHWWKHWLPHWR
the current time.
CAUTION
If the Power Switch is turned off, the robotic vacuum cleaner will not be charged
even if it is docked with the charger station.
20_ Operating the cleaner
!"#$%&&'($)*+,-.!!!/&
/&(&*/*/0!!!(1/(1'&!34
Operating the cleaner
INSTALLING THE ROBOTIC VACUUM CLEANER
INSTALLING THE CHARGER
Power Lamp
Charging Lamp
03 OPERATING THE CLEANER
1. Install the charger on a flat surface.
2. There should be no obstacles 0.5m to the left and
right and within 1 m of the front.
.5m
ut 0
abo
.5m
ut 0
abo
ab
ou
t1
m
3. Install the charger in a location where it can be easily
accessed by the robotic vacuum cleaner.
4. Arrange the power cord along the wall.
5. When the floor is made of wood, install the charger
in the same direction as the grain of the wood.
NOTE
Always keep the power cord of the charger
plugged into the power outlet.
,IQRSRZHULVVXSSOLHGWRWKHFKDUJHUWKHURERWLF
YDFXXPZLOOQRWEHDEOHWRƂQGWKHFKDUJHUDQGZLOO
not be able to charge automatically.
,IWKHURERWLFYDFXXPFOHDQHULVVHSDUDWHGIURPWKH
charger, the battery is automatically discharged.
Operating the cleaner _21
!"#$%&&'($)*+,-.!!!/(
/&(&*/*/0!!!(1/(1'0!34
Operating the cleaner
INSTALLING THE ROBOTIC VACUUM CLEANER
CHARGING
When the product is initially purchased, the battery
is fully discharged, and you must charge the robotic
vacuum cleaner manually.
Power Lamp
Charging Lamp
Turn on the Power Switch at the bottom of the product.
1. After aligning the charge pins of the main unit with
the charge pin of the charger station, press the main
unit until you hear a “Recharging power” sound from
the charger.
7KH&KDUJLQJ/DPSWXUQVJUHHQ
2. Check the charge status of the robotic vacuum
cleaner.
:KHQFKDUJLQJVWDUWVWKHEDWWHU\OHYHOLQGLFDWRUDQG
œ ŔZLOOEHGLVSOD\HGLQVHTXHQFHLQWKHGLVSOD\SDQHO
When charging is complete, the battery level indicator and
œ)8//ŔZLOOEHGLVSOD\HGLQWKHGLVSOD\SDQHO
Flash
■
■
Flash
NOTE
When the battery level display flashes
while cleaning, the robotic vacuum
cleaner stops vacuuming and
automatically charges itself at the charger.
Power
Lamp
Charging Lamp
Charging
Fully charged
<Charge display>
Charge
complete
Charging
5HTXLUHG
charging
:KHQWKHEDWWHU\OHYHOƃDVKHVDQGœ/2ŔLVGLVSOD\HGZKLOHFOHDQLQJ
robotic vacuum cleaner cannot be operated by the remote controller
or the buttons on the main unit. In this case, directly carry the robotic
YDFXXPFOHDQHUWRWKHFKDUJHUWRFKDUJHWKHEDWWHU\ 7KLVLVZKHQ
WKHEDWWHU\LVFRPSOHWHO\GLVFKDUJHG
! When the product is initially purchased, it will take about 120 minutes to fully charge the battery
and will run for about 90 minutes.
!:KHQFKDUJLQJWKHEDWWHU\ZKLOHWKHEDWWHU\LVRYHUKHDWHGWKHFKDUJLQJWLPHFDQLQFUHDVH
! Measures to take when charging is not smooth.
When the robotic vacuum cleaner cannot be automatically charged, check the following:
7XUQWKH3RZHU6ZLWFKDWWKHERWWRPRIWKHURERWLFYDFXXPFOHDQHURIIDQGRQ 5HVHW 5HSOXJWKHSRZHURIWKHFKDUJHU 5HVHW &KHFNZKHWKHUWKHUHDUHDQ\IRUHLJQVXEVWDQFHVRQWKHFKDUJHFRQQHFWRUDQGZLSHWKH
charge connector on the main unit and the charger with a dry cloth.
&KHFNZKHWKHUWKHUHDUHREMHFWVQHDUWKHFKDUJHUWKDWDUHVWURQJUHƃHFWRUV
! When separating the robotic vacuum cleaner from the charger, it will discharge naturally.
&KDUJHWKHURERWLFYDFXXPFOHDQHUWKURXJKWKHFKDUJHULISRVVLEOH :KHQOHDYLQJ\RXUKRPH
unattended for a long period of time due to a business trip, travelling etc., turn off the Power
6ZLWFKRIWKHURERWLFYDFXXPFOHDQHUDQGXQSOXJWKHSRZHURIWKHFKDUJHUWRVWRUHWKHP
22_ Operating the cleaner
!"#$%&&'($)*+,-.!!!//
/&(&*/*/0!!!(1//1'!34
Operating the cleaner
INSTALLING THE ROBOTIC VACUUM CLEANER
ABOUT THE BATTERY
7KHURERWLFYDFXXPFOHDQHULVSRZHUHGE\DQHQYLURQPHQWIULHQGO\1LFNHO0HWDO+\GULGH
1L0+ UHFKDUJHDEOHEDWWHU\DQGDQRYHUFKDUJHSUHYHQWLRQIXQFWLRQJXDUDQWHHVDQ
extended life time.
■ The battery warranty period is 6 months from the
date of purchase.
■ When purchasing a battery, ask the customer care
FHQWHUIRUWKHJHQXLQHSDUWV\PERO
DQG
model number before purchasing it.
" Battery information :
$$6L]H1L0+81,21683320RGHO+3< ($ ■
03 OPERATING THE CLEANER
7KLVEDWWHU\LVRQO\IRU6DPVXQJURERWLFYDFXXPV,WLVVWULFWO\SURKLELWHGWRXVHLWIRURWKHU
appliances or for other purposes.
'RQRWGLVDVVHPEOHRUPRGLI\WKHEDWWHU\
&KDUJHLWLQDORFDWLRQZLWKJRRGYHQWLODWLRQ
'RQRWH[SRVHWKHEDWWHU\WRƂUHDQGGRQRWKHDWLW
'RQRWFRQQHFWDQ\PHWDOOLFREMHFWVWRWKH RU WHUPLQDOVRIWKHEDWWHU\
.HHSLWLQGRRUV !~40! %HIRUH\RXGLVFDUGWKLVSURGXFWGLVSRVHRIEDWWHULHVLQDQHQYLURQPHQWDOO\VDIHPDQQHU
'RQRWGLVFDUGWKLVEDWWHULHVZLWK\RXUUHJXODUKRXVHKROGWUDVK
)ROORZDOOORFDOUHJXODWLRQVZKHQGLVSRVLQJRIROGEDWWHULHV
" If the battery is out of order, do not disassemble it. Contact your nearest customer care
center.
" An increased charging time and a shorter battery life indicates the near end of the battery
OLIH3OHDVHFRQWDFWDQDXWKRUL]HGFXVWRPHUFDUHFHQWHUWRUHSODFH\RXUEDWWHU\
The rechargeable battery incorporated in this product is not user replaceable.
For information on its replacement, please contact your service provider.
Operating the cleaner _23
!"#$%&&'($)*+,-.!!!/0
/&(&*/*/0!!!(1//1#!34
a.m.
a.m.
Operating the cleaner
a.m.
INSTALLING THE ROBOTIC VACUUM CLEANER
SETTING
THE TIME
a.m.
To use the Scheduled Cleaning and Daily Cleaning functions properly, setting
the time is necessary.
You can only set the time using the remote control.
■
You a.m.
can only set the time using the remote control.
a.m.
Remote Control
a.m.
Decrease
Increase
Configuration Sequence
Decrease
Increase
a.m. current time is 07:00
Suppose
1 (QWHUWKHFXUUHQWœKRXUŔ
Blinks
a.m.
a.m.
Decrease
Blinks
Decrease
Increase
Increase
2 Enter setup mode.
Decrease
Increase
Decrease
Increase
a.m.
a.m.
3 6HWWKHœKRXUŔ
Blinks
a.m.
Decrease
a.m.
Blinks
Decrease
Increase
Increase
4 (QWHUWKHFXUUHQWœPLQXWHVŔ
a.m.
a.m.
5 Finish the setting.
a.m.
3UHVVWKH EXWWRQLQVWHDGRIWKH7LPH6HWEXWWRQZKLOHVHWWLQJWKHWLPHWRH[LW7LPH
a.m.
Set mode.
:KHQD6FKHGXOHG&OHDQLQJLVVHW\RXFDQQRWFKDQJHWKHWLPHVHWWLQJ
a.m.
a.m.
a.m.
24_ Operating the cleaner
a.m.
!"#$%&&'($)*+,-.!!!/5
/&(&*/*/0!!!(1//1(/!34
a.m.
a.m.
Operating the cleaner
INSTALLING THE ROBOTIC VACUUM CLEANER
INSTALLING THE VIRTUAL GUARD
Mode Lamp
Distance Detection
Sensor
Main Unit Detection Sensor
Mode/Power Button
Distance Control Switch
2
3
Distance Detection Sensor
Button operations
1. Mode lamp operations
)HQFH YLUWXDOZDOO 0RGH7KHUHGODPSƃDVKHV
*XDUG YLUWXDOGRRU 0RGH7KHJUHHQODPSƃDVKHV
2II7KHODPSLVWXUQHGRII
03 OPERATING THE CLEANER
<RXFDQFRQƂQHWKHURERWLFYDFXXPFOHDQHUWR
DSDUWLFXODUVHFWLRQE\XVLQJ)HQFH YLUWXDOZDOO mode or clean several sections one by one using
*XDUG YLUWXDOGRRU PRGH
2. Setting the mode
:KHQHYHU\RXSUHVVWKH0RGH3RZHUEXWWRQ)HQFH
YLUWXDOZDOO PRGH#*XDUG YLUWXDOGRRU PRGH#
3RZHURIILVVHOHFWHGLQWKLVVHTXHQFH
3. Setting the Fence length
6HWWKHGLVWDQFHWRUHVWULFWWKHDFFHVVRIURERWLF
vacuum cleaner from the VIRTUAL GUARD using the
distance control switch.
Switch Setting
" The distance detection sensor
forms a virtual straight barrier of the
VSHFLƂHGIHQFHOHQJWK
Ř 6KRUW
ŘŘ 0HGLXP
ŘŘŘ /RQJ
Max
About 1~2m
About 2~3m
About 3~4m
"6HWWKHVZLWFKDFFRUGLQJWRWKHUHTXLUHGIHQFHOHQJWK
Forming a Fence (virtual wall)
VIRTUAL GUARD creates an invisible barrier that the
robotic vacuum cleaner cannot cross.
E.g. in front of pots, furniture, the front door, and so on.
1. Select Fence (virtual wall) mode using the Mode/
Power button.
7KHPRGHODPSƃDVKHVUHG
2. Set the fence length using the distance control
switch.
Distance
Sensor
$IHQFH YLUWXDOZDOO LV
formed.
3. Install the VIRTUAL GUARD in front of the area you want to block access from
the robotic vacuum cleaner.
,QVWDOOWKH9,578$/*8$5'VRWKDWWKHGLVWDQFHGHWHFWLRQVHQVRUFDQIRUPDQ
invisible barrier that the robotic vacuum cleaner cannot cross.
Operating the cleaner _25
!"#$%&&'($)*+,-.!!!/'
/&(&*/*/0!!!(1//1('!34
Operating the cleaner
Using Guard (virtual door) mode
The VIRTUAL GUARD forms an invisible door that the
robotic vacuum cleaner cannot cross until current room is
complete cleaned. The VIRTUAL GUARD opens the invisible
door when cleaning the room is complete.
Room 2
Room 1
1. Select Guard (virtual door) mode using the Mode/
Power button.
7KHPRGHODPSƃDVKHVJUHHQ
2. Set the fence length using the distance control
switch.
Room 3
Charger
VIRTUAL GUARD
3. Install the VIRTUAL GUARD at the entrance of the room to be cleaned.
,QVWDOOWKH9,578$/*8$5'VRWKDWWKHGLVWDQFH
detection sensor can form an invisible barrier that
the robotic vacuum cleaner cannot cross.
Distance Detection Sensor
NOTE
! When not using the VIRTUAL GUARD, turn the power off.
:KHQQRWXVLQJWKHURERWLFIRUORQJSHULRGVRIWLPH
VHSDUDWHWKHEDWWHULHVWRDYRLGGLVFKDUJLQJWKHP
! If the Mode/Power button does not work, it indicates
that the batteries have worn out. In this case, replace the
EDWWHULHV 6SHFLƂFDWLRQV7\SH' /5 DONDOLQHEDWWHULHV
! You can additionally purchase an VIRTUAL GUARD from
Samsung Electronics customer care Co., Ltd.
CAUTION
30cm
30c
0ccm
$JXDUG YLUWXDOGRRU LVIRUPHG
" Since an invisible barrier is formed
to prevent the robotic vacuum
cleaner from running against the
VIRTUAL GUARD, installing the
VIRTUAL GUARD within 30 cm of
the outside walls is recommended.
About the IrDA sensor.
[Infrared Signal Priority]
! The infrared signal transmission may
not be smooth in locations exposed to
halogen lamps or in outdoor locations.
! Robotic vacuum cleaner uses 3 types of
infrared devices and a device may not
Remote Control
Virtual guard
Charger
work in front of another device with a
higher priority.
! When controlling the robotic vacuum cleaner with the remote control, the robotic
vacuum cleaner may cross the virtual fence of the VIRTUAL GUARD or run against an
obstacle, because the remote control signal has a higher priority than the VIRTUAL
GUARD signal.
! When using the robotic vacuum cleaner in a small location or at a close distance,
it may malfunction due to interference of the infrared signals.
! Install the VIRTUAL GUARD away from the charger as auto charging may be
interrupted if the VIRTUAL GUARD is near the charger.
! ,IWKHIHQFHOHQJWKLVVHWWRDYDOXHORQJHUWKDQWKHUHTXLUHGGLVWDQFHWKHURERWLF
vacuum cleaner may fail to clean properly.
Set the fence length to an appropriate value using the distance control switch.
! If more than one robotic vacuum is used simultaneously, they may malfunction
due to interference of the infrared signals.
! Turn the VIRTUAL GUARD in another direction or set the fence length to an
appropriate value if the distance detection sensor of the VIRTUAL GUARD faces
the charger, as it may interrupt auto charging.
26_ Operating the cleaner
!"#$%&&'($)*+,-.!!!/#
/&(&*/*/0!!!(1//1/6!34
Operating the cleaner
USING THE ROBOTIC VACUUM CLEANER
STARTING/STOPPING CLEANING
You can run or stop all robotic vacuum functions.
Each robotic vacuum function only runs when the Power
Switch is turned on.
■
:KHQWKHURERWLFYDFXXPLVRSHUDWLQJSUHVVWKH
button to cancel the operation and select a function.
03 OPERATING THE CLEANER
■
Turning the power on or off
Turning the power on
5HPRWHFRQWURO3UHVVWKH[Power] button.
0DLQXQLW3UHVVWKH
EXWWRQ
7KHPDLQXQLWEXWWRQVEDWWHU\OHYHOLQGLFDWRUDQG
cleaning mode icons are turned on.
Turning the power off
5HPRWHFRQWURO3UHVVWKH[Power] button.
0DLQXQLW3UHVVDQGKROGWKH
EXWWRQGRZQIRU
seconds.
$
OOLFRQVH[FHSWIRUWKHEDWWHU\OHYHOLQGLFDWRUDUH
turned off.
Using the remote
control
Starting or stopping cleaning
Starting
5HPRWHFRQWURO3UHVVWKH$XWR6SRW0D[0DQXDO
or Edgebutton.
0DLQXQLW6HOHFW$XWR6SRW0D[0DQXDO(GJH
PRGHE\XVLQJWKH
EXWWRQDQGWKHQSUHVVLQJ
WKH
EXWWRQ
:KHQFOHDQLQJEHJLQVWKHURERWLFYDFXXPFOHDQHU
starts to move.
"3UHVVLQJWKH
EXWWRQZLWKRXWVHOHFWLQJFOHDQLQJ
mode starts to perform a Auto mode cleaning.
Stopping
7RVWRSSUHVVWKH
UHPRWHFRQWURORUPDLQXQLW
button.
:KHQFOHDQLQJLVVWRSSHGWKHURERWLFYDFXXP
cleaner stops.
Using the main unit
buttons
Operating the cleaner _27
!"#$%&&'($)*+,-.!!!/6
/&(&*/*/0!!!(1//1/2!34
Operating the cleaner
USING THE ROBOTIC VACUUM CLEANER
RECHARGING
You can have the robotic vacuum cleaner return
to the charger to charge the battery by using the
Recharging button.
■
When the robotic vacuum cleaner is operating, press
WKH
EXWWRQWRFDQFHOWKHRSHUDWLRQDQGSUHVVWKH
Recharging button.
1. Press the Recharging button.
LVWXUQHGRQDQGWKHURERWLF
7KHPDLQXQLWLFRQ
vacuum cleaner will return to the charger.
2. To stop the robotic vacuum cleaner while it is
returning to the charger, press the ( ) button.
3. To test the auto charge function, press the
Recharging button when the robotic vacuum cleaner
is less than 1.5 m from the charger.
Using the remote
control
Troubleshooting when the robotic vacuum cleaner
does not return to the charger
! Check the installation of the charger
:KHQWKHFKDUJHULVLQDORFDWLRQZKHUHWKHFKDUJHU
cannot guide the robotic vacuum cleaner to the
charger.
:KHQWKHFKDUJHULVPRUHWKDQPDZD\IURPURERWLF
vacuum cleaner.
,WPD\UHTXLUHDORQJHUWLPHIRUWKHURERWLFYDFXXP
cleaner to return to the charger.
! Manually charge the robotic vacuum cleaner in the following
cases.
:KHQWKHFKDUJHULVLQVWDOOHGLQDFRUQHU
:KHQWKHEDWWHU\LVIXOO\GLVFKDUJHG
:KHQWKHURERWLFYDFXXPFOHDQHULVWUDSSHGE\DQ
REVWDFOH IXUQLWXUHHWF
:KHQWKHURERWLFYDFXXPFOHDQHUFDQQRWSDVVRYHUWKH
doorsill to the location where the charger is installed.
7KHKHLJKWRIWKHGRRUVLOOVKRXOGEHDERXWFPRUOHVV Using the main unit
buttons
1,5 m
ahea
d
28_ Operating the cleaner
!"#$%&&'($)*+,-.!!!/$
/&(&*/*/0!!!(1/012!34
Operating the cleaner
USING THE ROBOTIC VACUUM CLEANER
AUTO CLEANING
■
If cleaning begins when the robotic vacuum cleaner is docked with
the charger station, the time to return to the charger is decreased
since the robotic vacuum cleaner remembers its original position
while moving.
■
If the battery level becomes too low while cleaning, the robotic
vacuum cleaner will automatically return to the charger station and
UHVXPHFOHDQLQJDIWHUFKDUJLQJLWVEDWWHU\ 1XPEHURIFOHDQLQJ
RSHUDWLRQVUHVXPHG2QFH
Main unit button
03 OPERATING THE CLEANER
The robotic vacuum cleaner will move by itself and
automatically clean the house until cleaning is completed
once.
Remote control button Configuration Sequence
1 Set the mode.
▶
1time
2 Cancel the mode.
While cleaning
NOTE
About the Resume Cleaning function
! If the robotic vacuum cleaner has evaluated
that cleaning is complete, the resume cleaning
function is not performed.
! If you move the robotic vacuum cleaner when it
is being charged or press a button, the robotic
vacuum cleaner judges cleaning to be complete
and does not resume cleaning.
When cleaning is
complete
CAUTION
Do not move the robotic vacuum cleaner when it is cleaning or press a button
while it is cleaning. Otherwise, the robotic vacuum cleaner judges cleaning to be
complete and starts cleaning again from the beginning.
Operating the cleaner _29
!"#$%&&'($)*+,-.!!!/2
/&(&*/*/0!!!(1/01(0!34
Operating the cleaner
USING THE ROBOTIC VACUUM CLEANER
SPOT CLEANING
You can conveniently clean a specific area that has a lot
of cookie crumbs, dust, and etc.
Move the robotic vacuum cleaner to the location where you
want to perform a spot clean.
Main unit button
About 1.5m
■
About 1.5m
Remote control button Configuration Sequence
1 Set the mode.
▶
2time
2 Cancel the mode.
While cleaning
,Q6SRWFOHDQLQJPRGHWKHURERWLFYDFXXPFOHDQHUFOHDQV
an area with a length of 1.5m and a width of 1.5m.
:KHQFOHDQLQJLVFRPSOHWHGWKHURERWLFYDFXXPFOHDQHU
will display End, Stop, and Stand by.
NOTE
When the robotic vacuum cleaner is docked with the
charger station, spot cleaning is not supported.
When cleaning is
complete
30_ Operating the cleaner
!"#$%&&'($)*+,-.!!!0&
/&(&*/*/0!!!(1/01('!34
Operating the cleaner
USING THE ROBOTIC VACUUM CLEANER
MAX CLEANING
■
If cleaning begins when the robotic vacuum cleaner is
docked with the charger station, the time to return to the
charger is decreased since the robotic vacuum cleaner
remembers its original position while moving.
■
If the battery level becomes low while cleaning, the robotic
vacuum cleaner automatically returns to the charger station
DQGUHVXPHVFOHDQLQJDIWHUFKDUJLQJWKHEDWWHU\ 1XPEHURI
UHVXPHGFOHDQLQJRSHUDWLRQV2QFH
Main unit button
03 OPERATING THE CLEANER
The robotic vacuum cleaner automatically moves and
cleans until the battery runs out and the battery level
flashes only one level.
Remote control button Configuration Sequence
1 Set the mode.
▶
3time
2 Cancel the mode.
While cleaning
NOTE
CAUTION
About the Resume Cleaning function
! If the robotic vacuum cleaner judges cleaning to be complete, resume cleaning is
not performed.
! If you move the robotic vacuum cleaner while it is being charged or press a button,
URERWLFYDFXXPFOHDQHUMXGJHVFOHDQLQJWREHFRPSOHWH FOHDQLQJLVQRWUHVXPHG Do not move the robotic vacuum cleaner while it is cleaning or press a button while
cleaning. Otherwise, the robotic vacuum cleaner judges cleaning to be complete and
starts cleaning again from the beginning.
Operating the cleaner _31
!"#$%&&'($)*+,-.!!!0(
/&(&*/*/0!!!(1/01(#!34
Operating the cleaner
USING THE ROBOTIC VACUUM CLEANER
MANUAL CLEANING
You can move the robotic vacuum cleaner to clean
a particular location directly by using the remote
control.
■
Move the robotic vacuum cleaner to the location where you
want to perform manual cleaning.
■
You can manually clean using the remote control only.
Main unit button
Remote control button Configuration Sequence
1 Set the mode.
▶
4time
2 Cancel the mode.
While cleaning
NOTE
CAUTION
! When the robotic vacuum cleaner is docked
with the charger station, manual cleaning is not
supported.
In manual cleaning mode, you can navigate to
locations such as areas with a fence tape or areas
ZLWKDULVNRIIDOOLQJ VWDLUVHWF XVLQJWKHUHPRWH
control.
Directional
Buttons
)RUZDUGV/HIW
5LJKW
A backwards
function
is not supported.
32_ Operating the cleaner
!"#$%&&'($)*+,-.!!!0/
/&(&*/*/0!!!(1/01/(!34
Operating the cleaner
USING THE ROBOTIC VACUUM CLEANER
EDGE CLEANING
03 OPERATING THE CLEANER
When the Obstacle Sensor detects an obstacle during
the cleaning, the Robot Cleaner reduces its speed to
minimize the bumping impact and the Bumper Sensor
also helps it lower the bumping impact. And, it cleans
the corners by reaching to them as close as possible.
(This Robot Cleaner is a touching type cleaner; to the
obstacles.)
The robotic vacuum cleaner will move by itself and
automatically clean the house until cleaning is completed once.
$
If cleaning begins when the robotic vacuum cleaner is docked
with the charger station, the time to return to the charger is
decreased since the robotic vacuum cleaner remembers its
original position while moving.
$
If the battery level becomes too low while cleaning, the robotic
vacuum cleaner will automatically return to the charger station
DQGUHVXPHFOHDQLQJDIWHUFKDUJLQJLWVEDWWHU\ 1XPEHURI
FOHDQLQJRSHUDWLRQVUHVXPHG2QFH
Main unit button
Remote control button Configuration Sequence
1 Set the mode.
▶
5time
2 Cancel the mode.
While cleaning
NOTE
CAUTION
About the Resume Cleaning function
! If the robotic vacuum cleaner judges cleaning to be
complete, resume cleaning is not performed.
! If you move the robotic vacuum cleaner while it is
being charged or press a button, robotic vacuum
FOHDQHUMXGJHVFOHDQLQJWREHFRPSOHWH FOHDQLQJLV
QRWUHVXPHG Do not move the robotic vacuum cleaner while it is
cleaning or press a button while cleaning. Otherwise,
the robotic vacuum cleaner judges cleaning to
be complete and starts cleaning again from the
beginning.
When cleaning is
complete
Operating the cleaner _33
!"#$%&&'($)*+,-.!!!00
/&(&*/*/0!!!(1/01/0!34
3time
Decrease
Increase
Operating the cleaner
3time
USINGDecrease
THE ROBOTIC
VACUUM CLEANER
Increase
SCHEDULED CLEANING
You can schedule robotic vacuum cleaner to start
3time from a particular time.
cleaning
■
Scheduled cleaning is only performed when robotic
Decrease
the charger station.
Decrease
Increase with
Decrease
vacuum
cleanerIncrease
is docked
Remote control button
Main unit button
3time
Decrease
Decrease
Increase
Increase
Configuration Sequence
1 Enter Scheduled
Decrease
Cleaning mode
and
confirm that the
configured time is
correct.
Increase
Example)
The current time: 07:00 a.m.
TheIncrease
desired cleaning start
time: 09:30 a.m.
2 Start the settings.
Blinks
3time
Decrease
Decrease
Decrease
Increase
Increase Increase
3 6HWWKHœKRXUŔ
Decrease
Increase
Blinks
4 &RQILUPWKHœKRXUŔ
Blinks
Decrease
Increase
Decrease
Decrease
Increase Increase
5 6HWWKHœPLQXWHVŔ
Decrease
Increase
Blinks
6 Complete the settings.
Cancel the settings.
The icon is turned off.
NOTE
:KHQFRPSOHWLQJWKHVHWWLQJVDQG\RXSUHVVWKH Daily button, Scheduled Cleaning mode is exited.
EXWWRQLQVWHDGRIWKH'HOD\
34_ Operating the cleaner
!"#$%&&'($)*+,-.!!!05
/&(&*/*/0!!!(1/0106!34
Operating the cleaner
USING THE ROBOTIC VACUUM CLEANER
SETTING DAILY CLEANING
You can schedule the cleaning robot to start
cleaning everyday from a particular time.
Daily cleaning is only performed when the cleaning robot
is docked with the charger station.
Decrease
Main unit button
Increase
Remote control button
Decrease
Increase
Decrease
Increase
Configuration Sequence
1 Enter Daily Cleaning
Decrease that
mode and confirm
the configured time is
FRUUHFW &KHFNWKHGDLO\
UHVHUYDWLRQWLPH
Example)
The current time: 07:00 a.m.
TheIncrease
desired cleaning start
time: 09:30 a.m.
2 Start the setting.
03 OPERATING THE CLEANER
■
Tu
d
Mon e We
Thu Fri Sat
Sun ~
Blinks
3time
Decrease
Decrease
Increase Increase
3 6HWWKHœKRXUŔ
Decrease
Increase
Blinks
Blinks
4 &RQILUPWKHœKRXUŔ
Blinks
Decrease
Increase
Decrease
Decrease
Increase Increase
5 6HWWKHœPLQXWHVŔ
Decrease
Increase
Blinks
6 Complete the settings.
Blinks
Decrease
Increase
Decrease
Increase
Cancel the settings.
3time
NOTE
:KHQFRPSOHWLQJWKHVHWWLQJVDQG\RXSUHVVWKH Daily button, Daily Cleaning mode is exited.
The icon is turned off.
EXWWRQLQVWHDGRIWKH'HOD\
Operating the cleaner _35
Blinks
!"#$%&&'($)*+,-.!!!0'
/&(&*/*/0!!!(1/015#!34
Maintain tools and filter
CLEANING THE ROBOTIC VACUUM CLEANER
PLEASE KEEP THE CLEANING AND MAINTENANCE METHODS IN MIND
When the Power Switch is damaged, please contact
the service agent so that it does not cause any
accidents.
■ Do not use any means or mechanical devices not
installed by the manufacturer that could accelerate the
deformation of the robotic vacuum cleaner.
■
■
Always turn off the power switch
at the bottom of the main unit
before cleaning the robotic vacuum.
The robotic vacuum cleaner could
operate suddenly and cause an injury.
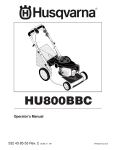
CLEANING THE SENSOR WINDOW AND THE CAMERA
You must turn off the Power Switch at the bottom of
the main unit before cleaning the robotic vacuum.
■
1HYHUVSUD\ZDWHUWKLQQHUEHQ]HQHHWFGLUHFWO\RQWRWKH
main unit of robotic vacuum cleaner.
■
Lightly wipe the sensor window or
camera using a soft cloth.
Display Panel
Camera
Front Sensor window
Front Sensor Window and
Camera
Cliff Sensor Window
Rear Sensor Window
36_ 0DLQWDLQWRROVDQGƂOWHU
!"#$%&&'($)*+,-.!!!0#
/&(&*/*/0!!!(1/01'&!34
Maintain tools and filter
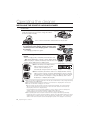
CLEANING THE ROBOTIC VACUUM CLEANER
EMPTYING DUST QUICKLY
■
You can easily empty the dust bin using a normal vacuum
cleaner, without separating the dust bin.
04 MAINTAIN TOOLS AND FILTER
1. Open the dust outlet cover.
2. If you hold the air inlet of the vacuum cleaner to the dust
outlet, it will vacuum the dust directly from the dust bin.
CLEANING THE DUST BIN AND THE FILTER
First, empty the dust bin before cleaning it.
When separating the dust bin, take care not to spill the
dust out of the dust bin.
■ Empty the dust bin in the following cases.
1. When dust has accumulated inside the dust bin.
2. When the suction power suddenly becomes weak.
3. When the noise suddenly increases.
■
1. Press the Dust Bin Eject (PUSH) button and pull the
dust bin to separate the dust bin.
2. Separate the dust bin cover by pulling it in the direction of
the arrow in the figure.
3. Separate the filter from the dust bin by pulling it in the
direction of the arrow in the figure.
0DLQWDLQWRROVDQGƂOWHU _37
!"#$%&&'($)*+,-.!!!06
/&(&*/*/0!!!(1/01'0!34
Maintain tools and filter
CLEANING THE ROBOTIC VACUUM CLEANER
4. Wipe the dust from the filter and the dust bin.
" You can wash them with water.
5. Install the filter into the dust bin.
0DNHVXUHWKDWWKHJULGSDWWHUQRIWKHƂOWHULVIDFLQJ
downwards. It cannot be installed in the wrong direction.
6. Close the dust bin cover and install it into the main unit.
[ Structure of the Dust Bin ]
'XVW%LQ(MHFW 386+ %XWWRQ
Filter
Dust Outlet
Dust Outlet
Cover
Dust Bin Cover
Dust Bin
38_ 0DLQWDLQWRROVDQGƂOWHU
!"#$%&&'($)*+,-.!!!0$
/&(&*/*/0!!!(1/01'#!34
Maintain tools and filter
CLEANING THE ROBOTIC VACUUM CLEANER
CLEANING THE POWER BRUSH
You must turn off the Power Switch at the bottom of the
main unit before cleaning the robotic vacuum.
04 MAINTAIN TOOLS AND FILTER
! Because the dust in the dust bin may come out,
CAUTION
VHSDUDWHWKHGXVWELQƂUVWEHIRUHFOHDQLQJWKHSRZHU
brush.
1. Separate the dust bin by pressing the Dust Bin Eject
(PUSH) button.
2. After checking whether there are any foreign
substances, press the hook that is fixing the brush cover
to separate it.
3, Lift the power brush up from the main unit.
4. Remove any foreign substances such as long hairs
or strings wrapped around the power brush using a
cleaning brush or a vacuum cleaner.
5. When cleaning is complete, fix the Power Switch side of
the power brush first and then fix the other side of the
brush in the same way.
0DLQWDLQWRROVDQGƂOWHU _39
!"#$%&&'($)*+,-.!!!02
/&(&*/*/0!!!(1/51&!34
Maintain tools and filter
CLEANING THE ROBOTIC VACUUM CLEANER
6. After inserting the 3 tips at the top of the cover,
push the other end in until it “clicks” into place.
! To prevent the robotic vacuum cleaner from becoming clogged, be careful not to
CAUTION
vacuum tooth picks or cotton swabs.
! :KHQUHPRYLQJIRUHLJQVXEVWDQFHVEHFRPHGLIƂFXOWFRQWDFWDFXVWRPHUFDUHFHQWHU
! Because the power brush vacuums the dust on the floor, long strings or hair can
become wrapped around the brush. Check and clean the power brush regularly.
40_ 0DLQWDLQWRROVDQGƂOWHU
!"#$%&&'($)*+,-.!!!5&
/&(&*/*/0!!!(1/51(!34
Maintain tools and filter
CLEANING THE ROBOTIC VACUUM CLEANER
&/($1,1*7+(('*(&/($1,1*6,'(527$7,1*%586+
You must turn off the Power Switch at the bottom of the
main unit before cleaning the robotic vacuum.
04 MAINTAIN TOOLS AND FILTER
1. Check whether the side rotating brush is bent or
whether there are any foreign substances stuck on the
brush.
2. Wearing rubber gloves, wrap the side rotating brush with
a cloth using hot water for about 10 seconds and wipe it
on the cloth.
3. Turning the side rotating brush, repeat the procedures
in Step 2.
4. If hair or string is wrapped between the main unit
and the side rotating brush, undo the screw of the
side rotating brush using a (+) driver to remove it.
When reassembling the brush, check the “L” mark
on the edge-cleaning side rotating brush and the “L”
mark on the main unit and then reassemble the side
rotating brush.
(Letter “R” is carved at the right side rotating brush.)
NOTE
L
Because the side rotating brush easily attracts hair and other foreign substances,
PDNHVXUHWRFOHDQLWIUHTXHQWO\
Excessive foreign substances on the side rotating brush can damage the brush.
0DLQWDLQWRROVDQGƂOWHU _41
!"#$%&&'($)*+,-.!!!5(
/&(&*/*/0!!!(1/510/!34
Maintain tools and filter
CLEANING THE ROBOTIC VACUUM CLEANER
CLEANING THE DRIVING WHEEL
You must turn off the Power Switch at the bottom of the
main unit before cleaning the robotic.
■,IWKHURERWLFYDFXXPFOHDQHUVXGGHQO\VWDUWVWR]LJ]DJWKHUH
may be foreign substances stuck on the driving wheel.
1. When cleaning the driving wheel, place a soft cloth
on the floor and flip the main unit, placing it down
carefully.
2. Check for foreign substances and remove them
using a stick or a pair of nippers that are not sharp
at the ends if necessary.
42_ 0DLQWDLQWRROVDQGƂOWHU
!"#$%&&'($)*+,-.!!!5/
/&(&*/*/0!!!(1/5105!34
Troubleshooting
CHECKLIST BEFORE SVC CALLS
SYMPTOM
Ř Is the dust bin assembled?
Ř Install the dust bin.
Ř Is the Power Switch
Ř Turn on the Power Switch.
turned on?
Ř ,VFOHDQLQJPRGH
LQWKH
display panel turned on?
Ř Is the battery level flashing
only one level and is ‘LO’
displayed in the display panel?
Ř Robotic vacuum cleaner will not
Robotic vacuum
cleaner stopped
operating while
cleaning.
The suction
power is weak
while cleaning.
MEASURE TO TAKE
Ř 3UHVVWKH
EXWWRQ 7RWXUQLW
RIISUHVVDQGKROGWKH
EXWWRQ
GRZQIRUVHFRQGVRUORQJHU
Ř Lift up the robotic vacuum
cleaner, and manually dock the
robotic vacuum onto the charger
to charge it.
Ř Replace the batteries in the
UHPRWHFRQWURO $$$W\SH
05 TROUBLESHOOTING
Robotic vacuum
cleaner does not
operate at all
before
cleaning.
CHECKLIST
operate when the battery in the
remote control is depleted.
Ř Is the battery level flashing only
Ř Lift up the robotic vacuum
one level and is ‘LO’ displayed in
cleaner, manually dock the
the display panel?
robotic onto
the charger to charge it.
Ř Has the robotic vacuum cleaner Ř Turn off the Power Switch and
become hooked on wires on the
remove the wires.
floor?
Ř Is the robotic vacuum cleaner
Ř Turn off the Power Switch and
stuck to the floor where there is a
move the cleaning robotic
height difference?
vacuum to another place to
7KHGULYLQJZKHHOLVOLIWHG
clean.
Ř ,VWKHUHDWKLQWRZHO FORWK Ř Turn off the Power Switch and
wrapped around the driving
remove the thin towel.
wheel?
Ř Is the robotic vacuum cleaner
Ř Turn off the Power Switch and
stuck on the doorsill?
move the robotic vacuum cleaner
to another place to clean.
Ř Check whether the dust bin
Ř Stop the robotic vacuum cleaner
is full of dust.
and empty the dust bin.
Ř Check whether the suction
Ř Turn off the Power Switch and
inlet is clogged by foreign
remove the foreign substances
substances.
on the suction inlet.
Ř &KHFNZKHWKHUWKHƂOWHULV
clogged.
Ř &OHDQWKHƂOWHUZHOO
Troubleshooting _43
!"#$%&&'($)*+,-.!!!50
/&(&*/*/0!!!(1/510'!34
Troubleshooting
CHECKLIST BEFORE SVC CALLS
SYMPTOM
Robotic vacuum
cleaner cannot
find the charger.
CHECKLIST
Ř Check whether the power
plug of the charger is plugged
correctly into the outlet.
Ř If there are any obstacles within
a range of about 1m in front of
the charger and about 0.5m
range to the left and right of the
charger, you should remove the
obstacles.
Ř If there are any foreign
substances on the change pin,
wipe them off with a dry towel.
Ř Is the VIRTUAL GUARD installed
near the charger?
Ř Is the distance detection
Robotic vacuum
cleaner passes
through the
VIRTUAL GUARD.
MEASURE TO TAKE
sensor of the VIRTUAL GUARD
facing
the charger?
Ř Are the batteries of the VIRTUAL
GUARD worn out?
Ř Move the VIRTUAL GUARD to
another
place so that the robotic
vacuum cleaner can charge
automatically.
Ř Change the direction of the
VIRTUAL GUARD or set the
distance to an appropriate value.
Ř Replace the batteries.
W\SH' /5 DONDOLQH
EDWWHULHV
Ř Is the VIRTUAL GUARD set to
Ř Set the VIRTUAL GUARD to
Ř Is the Mode lamp turned off?
Ř Check if the VIRTUAL GUARD
Guard
YLUWXDOGRRU PRGH"
)HQFH YLUWXDOZDOO PRGH
is turned off and then set the
VIRTUAL GUARD to a desired
mode.
Ř Are you using manganese drycell Ř Replace the batteries with new
The battery
usage time of the
batteries?
alkaline batteries.
VIRTUAL GUARD
W\SH' /5 DONDOLQH
is too short.
EDWWHULHV
Ř Is the robotic vacuum cleaner
Ř When the robotic vacuum
In the display
panel, From
forced to seperate from charger
cleaner is seperated or pressed
30,29,28,…
or pressed during charging?
during the charging, after
the number is
VHFRQGFRXQWVLWLVUHWXUQLQJ
counted down.
to the charger for recharging
automatically.
44_ Troubleshooting
!"#$%&&'($)*+,-.!!!55
/&(&*/*/0!!!(1/510#!34
Troubleshooting
TROUBLESHOOTING FOR ERROR CODES
CAUSE
SOLUTION
Ř Robotic vacuum cleaner is
Ř Turn off the Power Switch at the bottom
Ř
Ř
Ř
Ř
Ř
caught, stuck or trapped while
navigating.
$IRUHLJQVXEVWDQFH VWULQJ
SDSHUWR\HWF LVFDXJKWLQWKH
power brush.
$IRUHLJQVXEVWDQFH VWULQJ
SDSHUWR\HWF LVFDXJKWLQWKH
left driving wheel.
$IRUHLJQVXEVWDQFH VWULQJ
SDSHUWR\HWF LVFDXJKWLQWKH
right driving wheel.
Check bumper sensor.
Ř
Ř
Ř
and move the robotic vacuum cleaner to a
different location.
Turn off the Power Switch at the bottom
and remove the foreign substance from the
power brush.
Turn off the Power Switch at the bottom and
remove the foreign substance from the left
driving wheel.
Turn off the Power Switch at the
bottom and remove the foreign substance
from the right driving wheel.
Slightly pull the stuck bumper outward.
05 TROUBLESHOOTING
ERROR
CODE
Ř $IRUHLJQVXEVWDQFH GXVW
Ř Turn off the Power Switch at the bottom and
VWDLQHWF LVRQWKH2EVWDFOH
wipe the foreign substance from the front
sensor window.
and rear sensor windows using a soft cloth.
Ř $IRUHLJQVXEVWDQFH 'XVW
Ř Turn off the Power Switch at the bottom
VWDLQHWF LVRQWKH&OLIIVHQVRU
and wipe the foreign substance on the cilff
window.
sensor window with a soft cloth.
Ř Dust bin not inserted.
Ř ,QVHUWWKHGXVWELQXQWLO\RXKHDUDœ&OLFNŔ
sound.
Ř $IRUHLJQVXEVWDQFH 6WULQJ
Ř Turn off the Power Switch at the bottom and
FORWKHWF LVFDXJKWRQWKH
ZLSHWKHIRUHLJQVXEVWDQFHIURPWKHHGJH
HGJHFOHDQLQJVLGHURWDWLQJ
cleaning side rotating brush.
brush.
" If you press the Start/Stop button or turn off the Power Switch, the error code is cleared.
Troubleshooting _45
!"#$%&&'($)*+,-.!!!5'
/&(&*/*/0!!!(1/5106!34
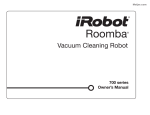
Product specification
PP +HLJKW
PP /HQJWK
PP :LGWK
Main Body
PP +HLJKW
PP :LGWK
PP /HQJWK
Charger(Station)
46_ 3URGXFWVSHFLƂFDWLRQ
!"#$%&&'($)*+,-.!!!5#
/&(&*/*/0!!!(1/510$!34
Product specification
CLASSIFICATION
Electrical
Specifications
DETAIL
Diameter
355mm
Height
93mm
Weight
4.0kg
Power voltage
$&9a+]
Charge power consumption
50 W
Main unit power consumption
40 W
%DWWHU\VSHFLƂFDWLRQV
14.4V / 2,000 mA
Dust bin capacity
About 0.6 ℓ
Charging type
Cleaning
Specifications
Cleaning mode
06 PRODUCT SPECIFICATION
Mechanical
Specifications
ITEM
Auto Charging/Manual
Charging
Auto, Spot, Max, Manual,
Edge, Scheduled Cleaning,
Setting Daily Cleaning
Charging time
About 120 minutes
Cleaning time
RQWKHEDVLVRIKDUGƃRRU
About 90 minutes
Cleaning method
Ceiling shape recognition
Main unit button type
Touch type
This Vacuum cleaner is approved the following.
Electromagnetic Compatibility Directive : 2004/108/EEC
Low Voltage Directive : 2006/95/EC
3URGXFWVSHFLƂFDWLRQ _47
!"#$%&&'($)*+,-.!!!56
/&(&*/*/0!!!(1/5102!34
Contact SAMSUNG WORLD WIDE
,I\RXKDYHDQ\TXHVWLRQVRUFRPPHQWVUHODWLQJWR6DPVXQJSURGXFWV
please contact the SAMSUNG customer care center.
Country
Customer Care Center !
6ZLW]HUODQG
6$0681* &+)PLQ
(%!"#$%&&'($)%78*+,--!!!5$
Web Site
www. samsung.com/ch
ZZZVDPVXQJFRPFKBIU )UHQFK
/&(&*/*/0!!!510&10$!34