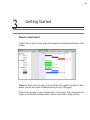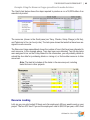
1
JCVGantt Pro 3.2 Gantt-Solution.com User ’s Guide JCVGantt Pro 3 User’s Guide by Charles Guerin - third edition. Original edition edited by Lyndsey Amott © 2007 - Gantt-Solution Inc and Charles Guerin Management Inc All rights reserved. Published simultaneously worldwide. All rights reserved. No part of this publication may be reproduced in any form or by any means without permission of the author. Reproduction or translation of any part of this work beyond that permitted by sections 107 and 108 of the U.S. copyright law without permission is unlawful. It is understood that papers submitted for publication have not been previously and will not be simultaneously published elsewhere. If accepted for publication papers will not be published elsewhere, in any language, without the written consent of the author. We assume no responsibility for statements, or views expressed in articles that appear on this site. Copies can be made for personal or educational uses. This consent does not extend to other kinds of copying, such as copying for general distribution, for advertising or promotional purposes, for creating new collective works, or for resale. Mindjet and MindManager are registered trademarks of Mindjet LLC. SmartMapX™ and SmartMapX Technology™ are trademarks of Mindjet. All other trademarks are property of their respective owners. JCVGantt® is a registered trademark of Gantt-Solution Inc. Charles Guerin Management Inc provides technical support services to Gantt-Solution Inc. The authors welcome corrections to this book, Please feel free to send comments on typographical, formatting, or other errors. Simply make a copy of the relevant page of the book, mark the error and e-mail it to [email protected] This boook is designed to be printed or viewed electronically in advanced PDF format. As a licensed user of JCVGantt products, you may print this book for your own uses. To print this book, we suggest printing on a full-duplex printer on 8.5” by 11” paper and binding using tight spiral binding or paperback. Table of Contents| iii Contents 1 20-Minute Quick Start 1 Create Tasks . . . . . . . . . . . . . . . . . . . . . . . . . . . . . . . . . 2 Create a Dependency. . . . . . . . . . . . . . . . . . . . . . . . . . . . . 4 Summary Tasks. . . . . . . . . . . . . . . . . . . . . . . . . . . . . . . . 5 Set Duration . . . . . . . . . . . . . . . . . . . . . . . . . . . . . . . . . 6 Cost the Project. . . . . . . . . . . . . . . . . . . . . . . . . . . . . . . . 8 Use Formulas. . . . . . . . . . . . . . . . . . . . . . . . . . . . . . . . 11 Add Color . . . . . . . . . . . . . . . . . . . . . . . . . . . . . . . . . . 13 Add Notes to a Task. . . . . . . . . . . . . . . . . . . . . . . . . . . . . 14 Create a Template. . . . . . . . . . . . . . . . . . . . . . . . . . . . . . 16 Track Completion of a Task . . . . . . . . . . . . . . . . . . . . . . . . . . 19 Change the Granularity of the View. . . . . . . . . . . . . . . . . . . . . . 19 Save a Project. . . . . . . . . . . . . . . . . . . . . . . . . . . . . . . . 21 Print a Project . . . . . . . . . . . . . . . . . . . . . . . . . . . . . . . . 22 2 5-Minute Quick Start 23 Using Mindmanager with JCVGantt Pro 3 . . . . . . . . . . . . . . . . . . . 23 3 Getting Started 31 What Is a Gantt chart?. . . . . . . . . . . . . . . . . . . . . . . . . . . . 31 The JCVGantt Pro 3 Window. . . . . . . . . . . . . . . . . . . . . . . . . . 34 The Pane Areas . . . . . . . . . . . . . . . . . . . . . . . . . . . . . . . 34 The View Menu. . . . . . . . . . . . . . . . . . . . . . . . . . . . . . . 35 Mouse Actions. . . . . . . . . . . . . . . . . . . . . . . 38 Change the Project View. . . . . . . . . . . . . . . . . . . . . . . . . . . 40 iv | Table of Contents Set the Display Size. . . . . . . . . . . . . . . . . . . . . . . . . . . . . 41 Scroll Through the Timeline . . . . . . . . . . . . . . . . . . . . . . . . . . 43 4 Customize Parameters 53 Fonts Tab. . . . . . . . . . . . . . . . . . . . . . . . . . . . . . . . . . 55 Calendar Tab. . . . . . . . . . . . . . . . . . . . . . . . . . . . . . . . 56 Multiple Calendars. . . . . . . . . . . . . . . . . . . . . . . . . . . . . . 59 5 Work with a Tablet PC or Vista 62 Ink Gestures. . . . . . . . . . . . . . . . . . . . . . . . . . . . . . . . . 64 6 Work with Resource Pools 66 Edit Resource Pools. . . . . . . . . . . . . . . . . . . . . . . . . . . . . 68 7 Work with Spreadsheets 71 Format Cells. . . . . . . . . . . . . . . . . . . . . . . . . . . . . . . . . 71 Add a Formula to a Cell . . . . . . . . . . . . . . . . . . . . . . . . . . . . 72 List of Excel-Compatible Functions . . . . . . . . . . . . . . . . . . . . . . 74 Customize Fields. . . . . . . . . . . . . . . . . . . . . . . . . . . . . . . 75 Rename Fields. . . . . . . . . . . . . . . . . . . . . . . . . . . . . . . . 75 Create Drop-Down Lists. . . . . . . . . . . . . . . . . . . . . . . . . . . 76 Hide Fields . . . . . . . . . . . . . . . . . . . . . . . . . . . . . . . . . 76 Change the Position of a Column. . . . . . . . . . . . . . . . . . . . . . . 76 Resize Columns. . . . . . . . . . . . . . . . . . . . . . . . . . . . . . . 77 Use the Shortcut Menus . . . . . . . . . . . . . . . . . . . . . . . . . . . 77 Paste Link. . . . . . . . . . . . . . . . . . . . . . . . . . . . . . . . . . 78 Change the Cell Type . . . . . . . . . . . . . . . . . . . . . . . . . . . . . 79 The Project Spreadsheet. . . . . . . . . . . . . . . . . . . . . . . . . . . 80 Edit the Project Spreadsheet . . . . . . . . . . . . . . . . . . . . . . . . . 80 Table of Contents| The Resource Spreadsheet . . . . . . . . . . . . . . . . . . . . . . . . . . 84 Remove a Resource From a Project. . . . . . . . . . . . . . . . . . . . . . . 86 Display Resource Costs on the Gantt Chart. . . . . . . . . . . . . . . . . . . 87 The Resource Usage Spreadsheet . . . . . . . . . . . . . . . . . . . . . . . 88 The Total Cost Spreadsheet. . . . . . . . . . . . . . . . . . . . . . . . . . 90 Copy a User Sheet. . . . . . . . . . . . . . . . . . . . . . . . . . . . . . 91 8 Work with Baseline Snapshots 92 Delete a Snapshot. . . . . . . . . . . . . . . . . . . . . . . . . . . . . . 93 Example: Using a Snapshot in a Spreadsheet Formula. . . . . . . . . . . . . . 93 9 Work with Gantt Parts 95 Save a Gantt Part. . . . . . . . . . . . . . . . . . . . . . . . . . . . . . 95 Insert a Gantt Part into a Gantt chart . . . . . . . . . . . . . . . . . . . . . 96 Insert a Gantt Part in a Specific Location. . . . . . . . . . . . . . . . . . . . 98 Manage Gantt Part Folders. . . . . . . . . . . . . . . . . . . . . . . . . 100 10 Export Data to External Programs 102 Why Export?. . . . . . . . . . . . . . . . . . . . . . . . . . . . . . . . 102 Export to MindManager . . . . . . . . . . . . . . . . . . . . . . . . . . 102 Export to Microsoft Project. . . . . . . . . . . . . . . . . . . . . . . . . 102 Export To Microsoft Excel. . . . . . . . . . . . . . . . . . . . . . . . . . 103 Export to HTML. . . . . . . . . . . . . . . . . . . . . . . . . . . . . . 104 11 Setting Parameters 105 v vi | Table of Contents Import From Earlier Versions of JCVGantt. . . . . . . . . . . . . . . . . . . 106 12 Dress Up the Gantt Chart 108 13 Using with MindManager 109 Differences in Durations. . . . . . . . . . . . . . . . . . . . . . . . . . . 113 Relationships. . . . . . . . . . . . . . . . . . . . . . . . . . . . . . . 113 14 Creative Ideas 116 Quick Start with Templates. . . . . . . . . . . . . . . . . . . . . . . . . 116 Hyperlinked Projects Board. . . . . . . . . . . . . . . . . . . . . . . . . 117 Executive Status Board. . . . . . . . . . . . . . . . . . . . . . . . . . . 118 Hyperlinked Status Board. . . . . . . . . . . . . . . . . . . . . . . . . . 118 Table of Contents| vii viii | Table of Contents | 1 20-Minute Quick Start We suggest the first thing you do after installing JCVGantt Pro 3 is to study this chapter. In 20-minutes, this tutorial walks you through all the major features of JCVGantt Pro 3. To begin, open JCVGantt Pro 3 by clicking on it’s launch icon. After a Welcome screen appears, click Start JCVGantt Pro 3, and this screen should appear: 1 2 | 20-Minute Quick Start Create Tasks Click the New Task icon. A new task and task bar appear on the chart. Double-click New Task. You can now edit the text. Tip: If you run out of typing space, grab the “splitter” bar between the tree column and the graph display area and drag it to the right a bit.. Type Build a deck then press Enter. Click the New Task icon. Double-click the entry and type Buy the wood. Press Enter then press Enter a second time. A new task is added at the same level. Create Tasks | Now instead of double-clicking, just type Buy the deck plan. The task name is changed instantly. Your screen should look like this: Since you’d probably buy wood after you buy the deck plan, let’s move Buy the deck plan. Switch menus to show the Task menu Click the Shift Task Up icon or press ALT + SHIFT + UP ARROW. JCVGantt Pro 3 User’s Guide 3 4 | 20-Minute Quick Start Your plan should look like this: Create a Dependency Now let’s link those two items together with a dependency. Why? Because the plan tells you how much wood to buy; therefore, buying the wood is dependent on the purchase of the deck plan. To create a dependency, we’ll “multi-select” the tasks. Press CTRL and select Buy the deck plan and while continuing to hold the CTRL key, select Buy the wood. It should look like this: Click the Link icon. Summary Tasks | The chart changes to look like this: Notice that the Buy the wood task bar automatically shifts to the right. This is because JCVGantt Pro 3 now knows that you intend to buy the wood after you’ve got the deck plan. Summary Tasks Notice that the Build a deck task bar now stretches across two days. The Build a deck task is a summary task. Summary tasks indicate the total amount of time allotted to the sub-tasks. Typically, company executives prefer to see executive summary charts, which display only the summary tasks. You can create an executive summary chart by clicking the minus icon in the task pane to hide the details of the main tasks. Click the plus icon to reopen the view. Now, let’s say that it takes you two days to find the deck plan (perhaps you needed two days of research on the Internet to find the right plan). Let’s write that on the Gantt by grabbing the right side of the Buy the deck plan task bar and stretching it to the right by one day. JCVGantt Pro 3 User’s Guide 5 6 | 20-Minute Quick Start When you release the mouse you’ll see that the bars have moved to the right and that the summary bar stretched with it. Set Duration Try grabbing the center part of the top bar and dragging it one day to the right. You’ll notice that, in the above example, we moved the start day from Wednesday to Thursday and, since our plan is now three days long, we crossed a weekend. JCVGantt Pro 3 automatically assumes that you don’t work on the weekend, so, in this example, it put the end date on Monday. This is one of the calendaring features you’ll read about in this manual. On your own, add the following tasks underneath Buy the wood: Find carpenter Carpenter builds deck Use Control+Mouse Click to select the new tasks, then click the Link icon again to link the new tasks to Buy the wood. Set Duration | The chart should now look something like this: Earlier, you changed the duration of a task by dragging its right border to the right. Now let’s try another way to set duration. Select the Build the deck task bar then click the Task Info icon. The Task Info window opens. Tip: Click the thumbtack to keep the Task info window it locked in place In the Duration: field, type 7d then press Enter. Tip: 7d means seven days. Likewise, 7w means seven weeks and 7h means seven hours JCVGantt Pro 3 User’s Guide 7 8 | 20-Minute Quick Start Notice that the task bar now shows a duration of seven days: Cost the Project How much is this project going to cost? To find out, you must enter some costs. Click the Resources tab. The Resources spreadsheet opens. Enter the following information into the spreadsheet (as you see in the grid below). In the Unit column, do the following: Leave Cost of plan and Cost of wood as flat. Set the unit cost for Carpenter to hourly by selecting the appropriate field and then clicking the arrow button. In the list, select hourly. The spreadsheet shows that the cost of the plan is $300, the cost of the wood is $450, and that the carpenter costs $30 per hour. Cost The Project | Now, switch back to the Gantt chart by clicking the Gantt chart tab. Select Buy the deck plan and then open the Task Info window. Click once in the Resources Name field then click the down arrow and select Cost of plan. This links the cost of plan task to the first task. In the Gantt chart, notice that the cost now appears to the right of the Cost of plan task bar: Select the Buy the wood task and create a dependency link to Cost of wood. Next, link Carpenter to Build the deck. JCVGantt Pro 3 User’s Guide 9 10 | 20-Minute Quick Start Your Gantt should look like this: Now add the cost per hour of your search for a carpenter—perhaps $20/hour—then link it to Find carpenter. What is the total cost of the project? To find out, click the Total cost tab. The Total Cost report will look something like this: Fixed costs are those that do not change over time. Variable costs are those that are affected by time. Use Formulas | 11 The total cost of the project is, at present, $2430. To see this in more detail, click the Project tab. The Project spreadsheet opens: Use Formulas All spreadsheets in JCVGantt Pro 3 have functions that are similar to those in Microsoft Excel® spreadsheets. To see how this works, we’ll sum the cost of the deck plan and the cost of the wood. Select the $300 then SHIFT + click the $450. Right-click to see the shortcut menu then select Copy. Switch menus to the Add-ins menu JCVGantt Pro 3 User’s Guide 12 | 20-Minute Quick Start Click the User sheets icon and select Add user sheet. A blank spreadsheet opens and a new tab appears: Right-click in cell A1 and select Paste Link. The amounts you copied appear along with a red square in the upper right corner of each cell. Double-click one of the red squares and you’ll see the formula that is used to calculate the value in the cell. Add Color | 13 Press Enter and notice that the cell reverts to the value of the formula. Now select cell A3 and type =SUM(A1:A2), then press Enter. The cell calculates the sum of A1 and A2. In the Resource spreadsheet, change the value of Cost of wood then press Enter. Now go back to the user sheet. You’ll see that the Cost of wood value in the user sheet reflects the change you just made in the Resource spreadsheet. In this manner, you can create your own real-time calculations from any data you find in the Projects or Resource spreadsheets. Add Color Now we’ll examine a few other features. Go to the Gantt chart and select the Buy the deck plan task. Switch back to the Task menu and click the Color icon button. A color palette appears: JCVGantt Pro 3 User’s Guide 14 | 20-Minute Quick Start Select the color orange and click OK. The task bar color changes to orange. Now on your own, use this feature a few more times to color-code your plan. Add Notes to a Task The Task Notes feature allows you to link any information to a selected task. Select Buy the deck plan then, using the mouse, point to the Task note at the bottom of the screen. The Task note window opens. icon Add Notes To A Task | 15 Type www.deckplans.com Now select the words you’ve just typed and click the Hyperlink window appears. icon. The Hyperlink In the Hyperlink field, type http://www.deckplans.com and click OK. In the Task notes window, add some text. Format the text using the desktop-publishing JCVGantt Pro 3 User’s Guide 16 | 20-Minute Quick Start icons in the toolbar. Create a Template Any plan you create can be reused in other projects. In the Task menu, find the Gantt Parts group and click the Save all tasks as Gantt Part icon. The Save as Gantt Part window opens. Create A Template | 17 Click Select folder. The Browse for Folder window opens. Select the Samples folder then click OK. In the Name your new Gantt Part field, type Build an entire deck and then click OK. The project is saved as a Gantt Part. At the right side of the screen, click the Gantt Parts JCVGantt Pro 3 User’s Guide 18 | 20-Minute Quick Start icon then click the thumbtack icon to keep the window open. In the Gantt Parts window, expand the Gantt Parts folder then select Samples. Notice that Build an entire deck appears in the bottom half of the Gantt Parts window. Drag the text onto the Gantt chart. The saved project is added to the bottom of the Gantt chart: Track Completion Of A Task | 19 You can now change the duration, start date, or any other property of the Gantt Part you just dragged in. All costing and project information will update automatically. Track Completion of a Task On the Gantt chart, select Build the deck and drag the left side of the task bar to the right. A black line appears in the middle of the bar and a percentage is displayed. Continue dragging all the way to the right until the task is marked as 100% complete. These percent-complete bars indicate how much of a task is complete. Open the Project spreadsheet. Notice that the Percent column indicates the percentage of completion for each task. If an x appears in the column, the associated task is complete. Change the Granularity of the View In the View Menu, find the Zoom group JCVGantt Pro 3 User’s Guide 20 | 20-Minute Quick Start Click the Zoom in icon. The timeline zooms out, as shown below: Click on the timeline and turn the scroll wheel on your mouse. The timeline scrolls to the right or left, depending on the direction you turned the wheel. Save A Project | 21 Save a Project Click the JCVGantt logo in the upper left Click to view the File menu The Save As window appears. In the File name field, type a name for your project and click Save. JCVGantt Pro 3 User’s Guide 22 | 20-Minute Quick Start Print a Project Do the following: In the File functions menu, select the arrow to the right of the word Print Select Print Preview to view a preview. You can then click the Print button to print. | 23 2 5-Minute Quick Start 5-Minute Quick Start for MindManager Users Using Mindmanager with JCVGantt Pro 3 Using DynaSync™ technology, changes you make in MindManager are shown immediately in JCVGantt Pro 3, and changes you make in JCVGantt Pro 3 show up immediately in MindManager. Here’s how you do it! First, start MindManager Pro 7. You’ll see a new ribbon bar labeled “JCVGantt Pro”. 24 | 5-Minute Quick Start for MindManager Users In MindManager, select a Topic and then click “Show Branch in JCVGantt”. then click Show JCVGantt. JCVGantt Pro will load behind MindManager 7. This allows you to continue brainstorming in MindManager while JCVGantt will loyally copy down everything you type as new Gantt tasks. Using Mindmanager With Jcvgantt Pro 3 | 25 Tip: You can use ALT + TAB to switch back and forth between JCVGantt Pro 3 and MindManager. In MindManager, in the center topic, type Things I need to do this week. In the Tools menu, start MindManager’s brainstorm mode Your screen will look like this: Click once in the Enter all your ideas box then type the following, pressing Enter after each entry: Write user’s manual Send to printer Send install to CD manufacturer Call distributors Go to sales meeting Call Debbie JCVGantt Pro 3 User’s Guide 26 | 5-Minute Quick Start for MindManager Users MindManager creates topics for everything you typed: Now, click once in the Enter group names box. The Brainstorming Group Names window opens. In the first three boxes, type the following: Must do Delegate Low priority Click OK. The following graphic appears: Using Mindmanager With Jcvgantt Pro 3 | 27 Drag and drop the tasks you brainstormed onto Must do, Delegate, and Low Priority so that your screen looks like this: Drag the Groups onto the main topic and click The screen should look something like this: JCVGantt Pro 3 User’s Guide 28 | 5-Minute Quick Start for MindManager Users Go to JCVGantt Pro 3. The screen will look something like this: On the Options menu, click Sync Fill Color. The colors displayed in MindManager are copied over to JCVGantt Pro 3. Edit the chart according to the techniques described in the 20-minute Quick Start chapter. Using Mindmanager With Jcvgantt Pro 3 | 29 Now pick any task and set the Percent of that task to 100%. Go to MindManager. Notice that the 100% turned into a checkmark and that the dependencies show up as relationships. In fact, anything you change in one program changes in the other. This is called real time synchronization and is a central feature of JCVGantt Pro 3. JCVGantt Pro 3 User’s Guide 30 | 5-Minute Quick Start for MindManager Users Enjoy the freedom to work in either program – you can shift back and forth at whim and your data will be saved. In MindManager, in the JCVGantt Pro ribbon tab you can choose which branches you wish to show or hide in JCVGantt using the Show Branch in JCVGantt and Hide Branch in JCVGantt icon buttons. Select any branches that you wish to show or hide then click the show or hide icon and those topics will be displayed or hidden as appropriate in JCVGantt Pro 3. The exception to this rule is the Central Topic which is not visible in JCVGantt and therefore has no visibility setting. Note one rule though… any topic that is marked as “Show Branch in JCVGantt” will automatically display its parent topics as summary tasks in JCVGantt. The reason for this is that a hierarchal relationship in a Gantt chart implies that a parent has a “summarizing relationship” with its children that must be maintained. When adding a new Topic to the Central Topic the default visibility setting is “Hide Branch in JCVGantt”. When adding subtopics, a subtopic is added with no visibility setting of its own and if for example its parent is hidden from JCVGantt the newly added subtopic will also be hidden from JCVGantt. The visibility setting of a subtopic may be set later on using the “Show Branch in JCVGantt” and “Hide Branch in JCVGantt” icon buttons. tting Started | 31 3 Getting Started Getting Started What Is a Gantt chart? A Gantt chart is a form of bar graph that shows how scheduled information interrelates. Tasks are listed in the tree pane on the left side of the graph. A timeline of days, weeks, months, and years is displayed along the top of the graph. Colored bars provide a visual representation of the tasks. Their placement and length on the timeline indicates when a task is scheduled to begin and end. 32 | Getting Started Dependency lines have an arrow pointing to the next task to show that one task is dependent on another task’s completion. A line embedded inside the colored bar, and a numerical value at the right of the bar, show a task’s percentage of completion. Milestones, represented by a small diamond, indicate that a particular phase of the project has been reached: Project managers often use milestones to indicate when it is desirable to track a project to see whether it is on target or delayed. A JCVGantt Pro 3 Gantt chart includes resources, costing information, float times, and percentage complete. Resources are either people who perform a task or activity, or the tools, such as a jackhammer or a front-end loader, for example, that are used to accomplish a task. Resource names are shown to right of Task bars A cost view, unique to JCVGantt Pro 3, shows the cost associated with the completion of a task. What Is A Gantt Chart? | 33 Float time, also called lag time or slack time, is time that is scheduled for mishaps and delays. Float times are indicated on the Gantt as extensions to the dependency lines. Dependency with float time or lag time indicated JCVGantt Pro 3 User’s Guide 34 | Getting Started The JCVGantt Pro 3 Window JCVGantt Pro 3 sports the new Windows “Vista” ribbon interface which merges toolbars and menus into a single tabbed “ribbon”. 5 basic menus called Home, Task, Format, View, Tools and Add-ins group functions together so that they’re easy to find. If you’re editing a task, odds are you’ll find a useful function in the Task menu. If you’re formatting a user sheet, check the Format menu. To change what you see, look in the View menu The Add-ins menu is a place where additional functions and third party developers can add their own new functions to JCVGantt Pro 3. The Pane Areas The basic window pane structure is shown in the illustration below. You will find it helpful to familiarize yourself with these areas before you use the application. The View Menu | 35 The View Menu A quick way to navigate between windows in JCVGantt Pro 3 is to use the Project views icons in the View menu. Just click anyway to change screens instantly. Name a Project To name a project and add a description In the File functions menu, click Properties. The Document Properties window opens. JCVGantt Pro 3 User’s Guide 36 | Getting Started 1.In the Name field, type the name of the project. 2. In the Description field, type a description of the project. 3. Click OK. Shortcut Menus Several panes in the program have shortcut menus, which you can access by right-clicking. The content of these menus depends on the screen you are on. For example, right-clicking in the tree pane shows the following menu: The View Menu | 37 Right-clicking in the Resources tab shows a similar menu: JCVGantt Pro 3 User’s Guide 38 | Getting Started Mouse Actions JCVGantt Pro 3 is a fairly mouse-intensive program that is designed for you to grab and drag items easily. Task Commands Mouse Action Click the middle of a task bar and drag it left or right. Click the right side of a task bar and drag it left or right. Result Moves the start or end date of a task Adjusts the end date of a task Click the left side of a task bar and drag it left or right. Adjusts the percentage complete of the task CTRL+click the middle of any task. Selects the task, and allows multi-selecting Double-click any task. Shows the Properties window Click the arrow icons. Repositions a task in the project hierarchy Timeline Commands Mouse Action Result Click the timeline bar then use the scroll bar. Moves the timeline back and forth Move the scroll bar at bottom of Gantt. Displays a different area of the Gantt chart Click Zoom In or Zoom Out. Adjusts the size of the view Customize the Quick Access Toolbar The top of the application window has a menu area called the QuickAccessToolbar For functions you use regularly, you can customize what’s displayed in it , and add functions to this bar for quick unfettered access. Mouse Actions | 39 To customize Quick Access toolbar Right-click anywhere on the ribbon bar and you’ll see this menu Click “Customize Quick Access Toolbar” and the Options dialog will appear. Click the dropdown list underneath Choose commands from: and select a menu where you’d like to grab an icon or function to show on the Quick Access toolbar. Click Add >> and Ok and you’re done! JCVGantt Pro 3 User’s Guide 40 | Getting Started Change the Project View The Project Views group in the View menu, shown above, permits you to display the project in six possible views: Toolbar Icon Function Shows the project as an interactive Gantt bar graph Allows you to edit resource definitions Allows you to rename fields and create drop-down lists Shows the project in a spreadsheet data entry format on an Excel-like spreadsheet Shows you how each resource is being allocated between multiple projects sharing a resource pool Shows “live” total cost calculations of the project Set The Display Size | 41 Set the Display Size The Zoom toolbar, shown above, allows you to set the display size of the Gantt chart. To set the zoom factor Do one of the following: Click the arrow button beside the percent field and select a percentage from the list. Click the Zoom In icon. Click the Zoom Out icon. Some examples of use: 100% shows your entire project from the earliest start date to the last end date. 50% shows your entire project in half the screen area. 200% shows half of your project on the screen. As you zoom in or out, notice that the timeline changes to show different levels of granularity: Years JCVGantt Pro 3 User’s Guide 42 | Getting Started Single year Weeks in month Days in month Single week Hours in a day Additionally, the button sizes to the nearest unit size that fits the entire Gantt chart into the current screen size area. Scroll Through The Timeline | 43 Scroll Through the Timeline Depending on the zoom setting or the size of the project, you might not be able to see the entire Gantt chart on your screen. To see the hidden parts of the screen Click the timeline then turn the scroll wheel of your mouse. The timeline moves back and forth according to the direction you turned the wheel. JCVGantt Pro 3 User’s Guide 44 | Getting Started Keyboard Shortcuts The following four basic keystrokes will come in handy as you use JCVGantt Pro 3. INSERT key ENTER key DELETE key Adds a new task as a child of the selected task Adds a new task as a sibling of the selected task Asks you if you’d like to delete the selected task ALT + SHIFT + ARROW key Moves the task up, down, left, or right depending on which cursor key you’ve pressed Change the Start Date of the Project To change the start date of a project 1.In the Tools menu, select Change start date of project. The Change Start Date of Project window opens . 2. Click the arrow button beside the date field. A calendar showing the current month appears. 3. Select a new start date. To see a different month, click the left or right arrow button. Click OK. The Gantt chart sets the earliest task item to the date you set.0. Scroll Through The Timeline | 45 Align the Chart with the Current Date or Task To align the chart with today’s date In the View menu, in the Gantt Chart View group, Click the icon. Today’s date is now at the leftmost side of the chart. To align the chart with a selected task Select the task then click the at the leftmost side of the chart. icon. The selected task is now Change the Display Language To change the display language for the user interface In the View menu, select Language then choose a language. Note: This change does not take effect until you exit and re-start the application. JCVGantt Pro 3 User’s Guide 46 | Getting Started Print a Gantt chart or Spreadsheet All print functions reside in the File Functions Menu. To view the menu, click the logo in the top left and you’ll see this… To print a Gantt chart or spreadsheet 1.In the File functions menu, do one of the following: Select Print. Click the Print icon on the Quick Access toolbar. 2. If required, click Properties to select the page orientation and other settings then click Ok. Scroll Through The Timeline | 47 To set print options for a Gantt chart 3. In the File functions menu, select the arrow to the right of Print, and click Print Options. The Printing Parameters window opens. 4. Select the Tasks Print tab. 5. If required, select Print margin lines on page or Always Print Header to print these items. 6. Do one of the following: Select Adjust to then set the percent to set the number of pages over which the chart will print. Select Fit then type the number of sheets across to set the number of pages over which the chart will print. Tip: If the text in the tree pane is truncated in printouts: on the chart, slide the bar that separates the tree pane and the task pane to the right until no text is covered, then, in the Printing Parameters window, set the Adjust to or Fit option to fit across several pages. 7.Under Date Parameters, set the start and end dates of the printed chart. Click OK. To set print options for a spreadsheet 1.In the File functions menu, select Print Options. The Printing Parameters window opens. 2. Select the Grid Print tab. 3. Select any of the check boxes to display those options in the printed spreadsheet. Click OK. JCVGantt Pro 3 User’s Guide 48 | Getting Started To preview the print job before printing 4. In the File functions menu, select Print Preview. 5. Use the buttons on the toolbar to examine the document. Click Close. Manage files Create a New Project To create a new project Do one of the following: In the File functions menu, click On the Quick Access toolbar, click the New icon. Press Ctrl+N. The Create New Document window opens. 6. Choose one of the four document types. If you have MindManager installed on your machine, you can also work with MindManager files. If you choose MindManager Scroll Through The Timeline | 49 6 or MindManager 7, all project data is stored in their files. Click Ok. A blank Gantt chart opens. Open an Existing Project Do one of the following: In the File functions menu, click Press Ctrl+O. The Open window displays. In the Look In field, navigate to the folder that contains the file you want to open. Select the file then click Open. Save a Project To save a project Do one of the following In the File functions menu, click Save. On the standard toolbar, click the Save Document icon. Press Ctrl+S. If the project is new, the Save As window opens: In the File name box, type a name for the file. Click Save. JCVGantt Pro 3 User’s Guide 50 | Getting Started To save a project under a new name In the File functions menu, click Save As. In the File name box, type a new name for the file then click Save. Close a Project To close a project Do one of the following In the File functions menu, click Close. In the File functions menu, click Open then choose a new project type. If this is a new document or if you’ve made changes to the document you’ll be asked to save it. If you do not save it, your changes will be lost. Scroll Through The Timeline | 51 Keyboard Commands Task Commands The following keyboard commands can be used when the cursor is in the tree pane Insert key Enter key Delete key Arrow keys * (Asterisk) key (keypad only) - (Minus) key (keypad only) + (Plus) key (keypad only) F2 key Ctrl+C Ctrl+V Ctrl+X SHIFT + ALT + arrow key Adds a sub-task to a task Adds a “sibling” task to a list of tasks Removes a task after asking if you would like it removed Allows you to navigate the tree Shows all tasks in a sub-project Hides subprojects Shows subprojects Allows you to edit a task’s name Copies Pastes Cuts Moves the task up, down, right, or left Note: These keystrokes are identical—intentionally so—to MindManager’s keystrokes so that MindManager users will feel comfortable brainstorming tasks and activities in JVCGantt Pro 3. Usersheet Commands The following keyboard commands can be used in the user sheets. Ctrl+C Copies Ctrl+V Ctrl+X CTRL + click CTRL + B CTRL + I CTRL + U Pastes Cuts Multi-selects Bolds the selected item Italicizes the selected item Underlines the selected item JCVGantt Pro 3 User’s Guide 52 | Getting Started View Recent Files In the File functions menu, by default the right panel shows Recent files. The system displays most recently opened or saved documents. Exit JCVGantt To Exit JCVGantt Do one of the following: In the File functions menu, click Exit. ….or…. Click the X in the upper right corner of the main window. If this is a new document or if you’ve made changes to the document, you’ll be asked to save it. If you do not save it, yor changes will be lost. | 53 4 Customize Parameters Customize Parameters The Parameters Dialog Many project management-related variables can all be set from one place - the Parameters dialog. These variables many aspects of the program including the appearance of graphs and grids, calendaring, calculation formulas used To open the Parameters dialog In the File functions menu, select Parameters. Main Tab The Main tab in the Parameters window allows you to set a variety of programwide variables. 54 | Customize Parameters Date format: Select the date format to be used in the grids and throughout the program. Default currency unit: Specify the unit displayed for currency items. Default duration unit: Set the default unit (hour, day, week, and year) that the application uses to indicate task duration. Regardless of the setting here, you can change the setting of any individual task. Show Resource Cost: When selected, the cost of each resource is displayed in the Gantt chart. Hours in a day: Specify the number of hours in a typical workday. The default is 8. Days in a week: Specify the number of hours in a typical workweek. The default is 5. Click the OK button to save your changes. Fonts Tab | 55 Fonts Tab The Fonts tab allows you to set the font used by four items in the spreadsheets. JCVGantt Pro 3 User’s Guide 56 | Customize Parameters To define a font 1. In the Item list, select the item for which you want to define a font, using the following as a guide: Group Tasks: The font used for tasks that have subtasks (also called parent or summary tasks) Tasks: The font used in task rows Resources: The font used in resource rows Default: The font used throughout the program in all other situations 2. Under Font, select the font name and the font size. 3. Under Colors, select background and foreground colors. 4. If required, select the Italic or Bold check box, or both. Click OK. Calendar Tab The Calendar tab allows you to specify how the system calculates nonworking times and dates. Calendar Tab | 57 Edit the Length of Working Days and Add Holidays The calendar displays the current month. If you have a company holiday or a Saturday where you expect to work, you can use the Set selected date(s) to area of the window to mark specific dates as working or nonworking. The standard working day in JCVGantt lasts 8 hours with two hours for lunch: 08:00 – 12:00 14:00 – 18:00 You can change the length of a standard working day, the length of the nonworking hours, and you can set holidays and nonworking days. To change the length of a standard day Select the date on the calendar and then select the Nondefault working time option. Next, enter the From and To time ranges in the From and To fields. You may enter up to three time ranges per day, which allows for two break periods JCVGantt Pro 3 User’s Guide 58 | Customize Parameters To change the length of working hours 1. Click Set up week template. The Week Template window opens. 2. Do one of the following To set working times, drag the mouse to select a region or regions then click the blue Set working time button. To set nonworking times, drag the mouse to select a region or regions then click the gray Set nonworking time button. Click OK. Note: The Week Template window uses a 24-hour clock. To mark a day as a holiday or a nonworking day Select the date of the holiday on the calendar then select the Nonworking time option. Multiple Calendars | 59 To return a date to its default settings Select the date then select the Use default option. Multiple Calendars In JCVGantt Pro 3, you can use different calendars for different resources. For example, you might use a particular calendar for employees who work non-standard shifts, such as part-time or holidays. If John works Monday through Friday and Helen works Saturday through Wednesday, you’d benefit by establishing several calendars. In JCVGantt Pro 3, you can import, export, add, and remove calendars. Import allows you to read a calendar definition XML file into the project. Export allows you to export a calendar definition file to an XML file that you can share with other project managers. Add new allows you to create new calendars and then adjust working and nonworking time, as well as your week templates. Remove allows you to remove a calendar from the project. One handy use for the XML import/export format is for JCVGantt users to be able edit and share their own unique schedules with project managers. Import a Calendar To import a calendar 1. Click the Import button. The Open window opens. 2. Select a Calendar file. 3. Click OK. The calendar is added to the list of calendars in the Select active calendar field. You may now use the other editing functions in the Calendar tab to edit the calendar you’ve imported. JCVGantt Pro 3 User’s Guide 60 | Customize Parameters Export a Calendar to XML To export a calendar to XML 1. In the Select active calendar field, click the arrow button then select the calendar that is to be exported. 2. Click the Export button. The Save as window appears 3. In the File Name field, type a name for the calendar. 4. Click OK. The file is saved as an XML file. Multiple Calendars | 61 Create a Calendar To create a calendar 1. Click Add new. The Create New Base Calendar window opens. 2. In the Choose Name field, type a name for the new calendar. 3. Do one of the following: Select Create a new base calendar. A blank calendar, in which all dates are set to the default time, is created. Weekends are marked as nonworking time. Select Make a copy of then click the arrow button and select a calendar from the list. Click OK. You may now use the other editing functions to edit the calendar you’ve created. Remove a Calendar To remove a calendar 1. In the Select active calendar field, click the arrow button then select the calendar that is to be removed. 2. Click the Remove button. A message box opens asking you to confirm the deletion. JCVGantt Pro 3 User’s Guide 62 | 5 Work with a Tablet PC or Vista Tablet PC Ink Work with a Tablet PC or VIsta If you’re using Windows Vista, Windows Tablet PC Edition, or the free Windows Tablet PC SDK (you can use it with a Wacom stylus), you are in for a treat! JCVGantt Pro 3 supports ink entry for entering new tasks, notes, and even supports gestures so that Tablet PC users never have to use a keyboard. To work in ink mode 1. In the Task menu, Input mode group, Ink icon 2. Double-click in the task pane. A window opens in which you can write a new task name. 3. Click anywhere outside of the window. The window closes and the task is added to the task pane. 4. In the task pane, select a task then click the Task note icon at the bottom of the screen. The Task Note window opens. | Work with a Tablet PC or VIsta Ink Gestures Many common actions can be done rapidly in JCVGantt Pro 3 using ink gestures. These actions include: adding new tasks adding subtasks copying tasks pasting tasks deleting tasks cutting marked parts Ink Gestures | 65 These actions are performed using the following ink gestures… These are the same gestures used in MindManager 7. JCVGantt Pro 3 User’s Guide 66 | 6 Work with Resource Pools Working with Resources In a project, a resource is anyone or anything that aids the project. JCVGantt Pro 3 lets you list the people involved in a project and the components you need to purchase in order to make the project happen. In general, resources have a cost, a schedule, and a load. For example, a lawyer might charge $150 per hour, be available for one week, and be able to work at 50% load. In a typical 40-hour week, this would mean 20 hours or $3000 (lawyers, eh?). Or, you might build a house that requires a $10,000 roof that takes two weeks to build. Most project managers handle several projects at the same time, often with the same people working on different projects. This can present several problems: Nobody likes to have to enter the same information over and over with each project. Some people may have different schedules and a different calendar. Some people may already be overloaded with work. Resource pools allow you to group resource information in the schedule so that all | Work with Resource Pools Edit Resource Pools To edit resource pools On the View menu, select Parameters. The Parameters window opens. Open button Opens a new pool file and uses it and its resource in the current project. Merge button Merges the projects contained within a pool file into the current pool. Save button Saves the current pool file in order to rename it or share it with other users. Edit Resource Pools | 69 Create New button Creates a new pool. Use this when you want to start a new pool, specifically for the current project. Remove Project button Removes a project from a pool. Use this if one of the projects has resources you’ve decided not to use in the current project. JCVGantt Pro 3 User’s Guide 70 | Work with Resource Pools | 71 7 Work with Spreadsheets Format Cells In user sheets, you can format the cells according to your own tastes and requirements using the Format menu With a little creativity, you can make a rather fancy sheet, suitable for printing and perhaps even framing! 72 | Work with Spreadsheets To format cells Select any cell or group of cells then use the Format toolbar to change the font size and color, the background and foreground colors, and to italicize or underline text or change it to bold, just as you would in Excel® or any other Microsoft Office program. If cells do not update automatically, click the Refresh icon.0. Note: The red squares do not print. Add a Formula to a Cell Any cell in a user-defined spreadsheet can contain a formula. To add a formula to a cell 1. Select the cell then type an equal’s sign followed by the formula. Press Enter. The result of the formula appears in the cell along with a small red square in the upper right corner Double-clicking the red square will show the formula so that you can edit it again. Note: The red square does not show up on printouts or if you export the sheet to Excel. Use Built-In Formulas The following formulas are built-in to JCVGantt Pro: =ProjectCost() - calculates the total cost of the project =ResourceCost(“name”) - calculates the cost of the resource. In this formula, you must replace name with the name of a resource; for example, Add A Formula To A Cell | 73 =ResourceCost(“Joe”) =ProjectDuration() - calculates the total project duration in hours You can use the column name from any spreadsheet in a formula. For example, =Project!’Task Name’3 will show you the third row of the Task Name column. Just put the column name in single quotation marks. JCVGantt Pro 3 User’s Guide 74 | Work with Spreadsheets List of Excel-Compatible Functions The following Excel®-compatible functions can be used in JCVGantt Pro 3 user spreadsheets. ABS EXP MINUTE SECOND ACOS FACT MOD SIGN ACOSH FIND MODE SIN ADD FLOOR MONTH SINH AND FV NEG SLN ASIN HOUR NOT SQRT ASINH IF NOW SQUARE ATAN INT NPER STDEV ATAN2 INVERSE ODD STDEVP ATANH ISBLANK OR SUBSTITUTE AVERAGE ISEVEN PERMUT SU CEILING ISNONTEXT PI SUMSQ CHAR ISNUMBER PMT SYD CLEAN ISODD POWER TAN CODE ISREF PRODUCT TANH COMBIN ISTEXT PROPER TIME CONCATENATE LEFT PV TODAY COS LEN RADIANS TRIM COSH LN RAND TRUNC DATE LOG RANK UPPER DAY LOG10 REPLACE URL DB LOWER REPT VAR DDB MAX RIGHT VARP DEGREES MEDIAN ROUND WEEKDAY EVEN MID ROUNDDOWN XROOT EXACT MIN ROUNDUP YEAR Customize Fields | 75 Note: We will be documenting these features more fully in a later release. In the meantime, you can read about the following JCVGantt Pro 3 features at Tech on the Net (http://www. techonthenet.com/excel/formulas/index.htm). Customize Fields The Field Name spreadsheet shows you the names of all the fields in the system. You can change the data in the Preferred Name column. The Project spreadsheet and the Resource spreadsheet automatically display the new information. For example, you might change Task Name to Goals or Incidents. Regarding the Drop Down Menu in Grid column: If an item has a gray background, you cannot edit it. The Percent Done row (row 6) lets you choose between Mindjet-style % done icon in the Project Grid or standard % text. Click the arrow to select a different choice. All other cells in this column may be edited using comma-separated values (e.g., 1,2,3,4,5). Rename Fields You can rename any column in the Field Name spreadsheet. The column names in the Project and Resource spreadsheets are automatically updated. Why? So that you can best manage project information in the language that suits your needs and those of your project. To rename a field Select the field then type the new name. JCVGantt Pro 3 User’s Guide 76 | Work with Spreadsheets Create Drop-Down Lists Comma-separated values show up in the Project or Resource grid as a drop-down list that displays the values you’ve entered. Using them can significantly decrease your data entry times. To create a drop-down list In the Field Names spreadsheet, click an empty cell and enter a comma-separated list. Do not insert spaces between the items in the list. Hide Fields In the Project and Resources grids, you can hide fields that are not relevant to your project. This feature can simplify a wordy page into something more readable. To hide a field In the Projects spreadsheet, right-click and select the Hide/Show option, then check or uncheck the columns you want to see. Change the Position of a Column You can change the position of the columns in the Resources and Snapshot spreadsheets. To move a column Drag a column title to the left or right to place the column in another location. Resize Columns | 77 Resize Columns To change column size Place the mouse cursor over the line that divides the column title from its neighbor. The cursor changes to a double-headed arrow. Click and drag to the right or left. Use the Shortcut Menus To open a shortcut menu Right-click in a cell. The contents of the shortcut menu differ according to the spreadsheet you are looking at. In the example below, the shortcut menu on the left is from the Projects spreadsheet and the one on the right is from a user sheet. Cut, Copy, and Paste The Cut, Copy, and Paste options work the same way as any Windows program with one exception. At present, Paste pastes only numeric information and not formatting information. Any formatting information must be added after pasting. JCVGantt Pro 3 User’s Guide 78 | Work with Spreadsheets Paste Link Paste Link pastes the contents of copied cells into another spreadsheet as a formula. The new cells are linked to the original cells. For example, if you copy the first Task Name cell in a user sheet and Paste Link it into a cell in another user sheet, the cell in the second user sheet will react to any changes you make to the original cell. In other words, changes to the original cell propagate instantly to the cell in the second user sheet. Clear Clear removes the contents of a cell and any formula that might be contained in it. Edit Names Let’s say that cell A3 in User sheet 1 contains a formula that converts US dollars to Canadian dollars. Normally, this formula would be written as: = 5.00 * A3 You might find it easier to understand the function of the cell if its formula were written as = 5.00 * US_TO_CAD This procedure allows you to change the name of a cell so that its name is more meaningful. To change the name a cell 1. Select a cell or a group of cells. 2. Right-click and choose Edit names. The Variables window opens displaying Variablen in the Variable field and, in the Value field, the range of cells that was selected. 3. In the Variable field, type a meaningful name for the selected cell or cells. Click OK. Now when you look at the formula for the selected cell(s), you will know what it does. Change The Cell Type | 79 To delete a variable In the Variable field, select a variable then press the Backspace key on your keyboard. Change the Cell Type Cell Type allows you to define the way a cell is calculated. For example, you might change a numeric cell to a currency cell in order to show a currency indicator (such as ‘$’) along with the number. Or you might decide to convert numbers to text. To change the cell type 1. Right-click a cell and select Cell Type. The Cell Type window appears with the cell’s current type highlighted. 2. Select the cell type that is to be applied to the cell.0. JCVGantt Pro 3 User’s Guide 80 | Work with Spreadsheets The Project Spreadsheet The Project spreadsheet displays all of the tasks in your project in columns and rows, with each row representing a different task. Here are some of the things you can do in the Projects spreadsheet: Create new tasks by clicking the Insert button on your keyboard. Double-click a cell to change the data in it. Slide and hide fields. Edit the Project Spreadsheet To create a subtask or a new task Do one of the following: To create a subtask, click a task name then press the Insert button on your keyboard. To create a new task, click a blank row in the Task Name column then press the Insert button on your keyboard. Edit The Project Spreadsheet | 81 To edit a task 1. In the Task Name column, double-click a task name. The Task Properties window opens. 2. In the Task Properties window, make the required changes then click OK. For instructions on using the Task Properties window, see Modify Task Properties.0. To change a task duration 1. In the Duration column, double-click the cell that is to be modified. 2. Change the duration value, indicating d for days, w for weeks, or m for months.0. To add a priority In the Priority column, double-click the cell that is to be modified. A priority number appears. The priority number increments by 1 each time you doubleclick the cell. To indicate the percent done In the Percent column, double-click the cell that is to be modified. A marker indicating the percent done appears in the white square each time you double-click the cell. To change the start or end date In the Start Date or End Date column, double-click the cell that is to be modified. Do one of the following: To change the entire date, simply start typing. To change the date one number at a time, click once on a number in the cell. Change the number then, if required, use the arrow keys on your keyboard to move to a different number. JCVGantt Pro 3 User’s Guide 82 | Work with Spreadsheets To select a date from a calendar, double-click the cell. A calendar appears from which you can select the new date. To edit resources 1. In the Resources column, double-click the cell that is to be edited. The Task Properties window opens. 2. In the Task Properties window, make the required changes then click OK. For instructions on using the Task Properties window, see Modify Task Properties.0. To edit costs You cannot edit costs in the Project spreadsheet. Costs can be edited in the Resources spreadsheet (the Resources tab). For more information, see To change data in the Resource Name, Cost, or Load column. Edit The Project Spreadsheet | 83 To change a dependency type 1. In the Depend column, double-click the cell that is to be edited. 2. Type the row number (at the far left of the spreadsheet) of the task on which this task depends Type the dependency type, as follows0. FS for a finish-to-start dependency SF for a start-to-finish dependency SS for a start-to-start dependency FF for a finish-to-finish dependency Changing the dependency type automatically updates the Gantt chart. To add or edit a link 1. In the Link column, double-click the cell that is to be edited or to which you want to add a link. 2. Type a new link. To edit the Issue, Details, Recommend, or Show column 1. In the appropriate column, click once in the cell that is to be edited. An arrow button appears. 2. Click the arrow button then select the appropriate name from the list, or type a new name. To create your own columns See Create Fields. JCVGantt Pro 3 User’s Guide 84 | Work with Spreadsheets The Resource Spreadsheet The Resource spreadsheet allows you to edit resource-related information. The Resource column lists either the name of a person who adds costs to the project or the name of an item that adds costs to the project. The Cost column indicates the cost of the resource. The Unit column indicates how a cost is calculated. The Load column indicates, as a percentage, the percentage of time a resource is available. For example, in the above spreadsheet, the painter costs $50 an hour. If he were available to work on the project for only half of each week, you would set his load to 50.00. Thereafter, the Total Cost spreadsheet (Total Cost tab) would display the painter’s costs at 50%. Add, Edit, or Delete Resources To add a resource in MindManager Open the Task Info window, and type a name in the Resources field. If you have more than one resource, separate the names by semi-colons, as shown below: Doug;John;Fred JCVGantt Pro 3 automatically imports all resources and their associated tasks. The Resource Spreadsheet | 85 To edit the Resource Name, Cost, or Load column To add data, select an empty cell and type the new data. To change the data, double-click a cell and type the new data. To delete the data, select a cell then press the Delete button on your keyboard. A message box appears, asking you to confirm the deletion. To edit the Unit column 1. Click the right-hand side of the cell that contains the data you’d like to change. A box appears listing the cost type. 2. Select a new unit cost, or type a word—such as Flat, for example—that describes the cost type. Note: JCVGantt Pro 3 treats manually entered cost types as fixed costs. To create your own columns See Create Fields. To edit the E-mail, Group, Code, User1, User2, User3, or User4 column To add data, select an empty cell and type the new data. To change the data, double-click a cell and type the new data. To delete the data, select a cell then press the Delete button on your keyboard. A message box appears, asking you to confirm the deletion. JCVGantt Pro 3 User’s Guide 86 | Work with Spreadsheets Remove a Resource From a Project To delete a resource from the project On the Resources tab, select a task and press the Delete button on the keyboard. A message box appears asking you to confirm the deletion. To delete a resource from the project using MindManager 1. In MindManager, select each item that is associated with a resource. 2. In the Task Info pane, delete the resource that is no longer required Display Resource Costs On The Gantt Chart | 87 Display Resource Costs on the Gantt Chart To display resource cost on the Gantt chart 1. On the Resources spreadsheet, enter a cost in a task’s Cost cell. 2. On the View menu, select Parameters. The Parameters window opens. 3. On the Main tab, select the Show Resource Cost checkbox. Resource costs display on the Gantt chart On the Gantt chart, stretch any task bar. Resource costs are instantly recalculated.0. JCVGantt Pro 3 User’s Guide 88 | Work with Spreadsheets The Resource Usage Spreadsheet The Resource Usage spreadsheet shows you the resource usage in all the projects in a particular pool. It displays the number of hours per day each resource has been allocated to a task. You cannot edit this report, but you can copy and paste the information it contains into another spreadsheet. Gray rows indicate the resources of the current resource pool. Color-coded boxes indicate the number of hours a resource has been allocated, as shown in the table below. RESOURCE CODE WHAT IT MEANS Resource is free for the number of hours indicated Resource has been allocated part time (in this example, for 6 hours out of 8 possible hours) Resource has been allocated 8 hours out of 8 possible (full- time resource) Resource has been overloaded (in this example, for 16 hours out of a possible 8) White rows in the spreadsheet indicate the tasks assigned to the resource. Color-coded boxes indicate the number of hours that have not been assigned to a resource, as shown in the table below. TASK CODE WHAT IT MEANS Holiday or other non-working day No task Number of hours for which a task is unassigned Day off The Resource Usage spreadsheet tells you instantly whether resources are overloaded or under loaded based on the information in the current project as well as all other projects in the project pool. You can see at a glance if other projects are using the resources in your current project. The Resource Usage Spreadsheet | 89 Example: Using the Resource Usage spreadsheet to make decisions The Gantt chart below shows the steps required to produce a run of 8,000 bottles of an essential oil product. The resources (shown in the Gantt pane) are Tracy, Charles, Setup Charge (a flat fee), and Technician’s Fee (an hourly rate). The task pane shows the tasks that have been assigned to each resource. The Resource Usage spreadsheet shows the number of hours that have been allocated to each resource. In the example above, Tracy has been over-allocated. Two full-day tasks were assigned to her on the Friday. Based on this information, you will probably decide to extend the due date for purchasing labels or mixing oil, or find another resource to take some load. Note: The task list includes all the tasks in the resource pool, including tasks that are in other projects. Resource Loading Let’s say you can only budget 20 hours out of an employee’s 40-hour week to work on your project. That’s a 50% load. If you set the employee’s cost to $25,000 per year, a 50% load JCVGantt Pro 3 User’s Guide 90 | Work with Spreadsheets will calculate 50% of any time spent by this resource. By adjusting loads, you can adjust both fixed and variable expenses from one location. Resource loading is equally useful when working with fixed expenses. Let’s say that lumber to build a 1000 square-foot room costs $2000. If you later decide to change the room to a 500 square-foot room, you can adjust the load to 50% and the total cost will calculate properly. The Total Cost Spreadsheet JCVGantt Pro 3 lets you perform dynamic total-cost calculations. Simply put, the Total Cost spreadsheet continually calculates and recalculates costs as you plan your project. It quickly shows you where a project stands according to all the data you’ve entered. Once you’re ready to tell the world about your project, you can easily and quickly produce quotations, invoices, and cost reports by creating custom documents that reference the cost calculations. The Fixed column sums all resources that were marked in the Gantt chart as fixed. The Variable column sums all resources that are paid on an hourly, daily, weekly, or annual basis. Copy A User Sheet | 91 Copy a User Sheet Although you can’t edit the Total Cost spreadsheet—because its data is based on data from the Gantt chart—you can copy the data and paste it into your own custom spreadsheets. There you can make any changes you require. To copy to a user sheet 1. Select the cells, then right-click and select Copy. The cells are copied to the clipboard. 2. Click the User Sheets opens. icon and select Add User Sheet. A user sheet 3. On the user sheet, right-click and select Paste. The Total Cost data is entered into the user sheet. You can now create your own calculations based on the data from the Total Cost report. Any changes you make in the Project spreadsheet are reflected in the Gantt chart, and vice versa. JCVGantt Pro 3 User’s Guide 92 | 8 Work with Baseline Snapshots Baseline snapshots allow you to see how the time and money have shifted from the budgeted amounts to the actual amounts. The multiple-base-lining feature allows you to get a true picture of your project budget as it evolves. The number of snapshots you take depends on the requirements of a particular project. You might need a snapshot only once a quarter, while others might need a monthly or bi-weekly snapshot. Once you have a number of snapshots, you can use the Export All feature to export multiple snapshots to Excel® where you can use Excel’s analysis tools to graph changes in the budget. Create a Snapshot To create a snapshot of the current baseline In the Add-ins menu, Click the icon, then select JCVGantt Pro 3 creates a spreadsheet storing all the values of the current project. This spreadsheet is named Snapshot_date(1) and the number in parentheses increases by one each time you take a snapshot on a particular date. A second snapshot, for example, would be named Snapshot_date(2). Delete A Snapshot | 93 Delete a Snapshot To delete a snapshot 1. Display the snapshot that is to be deleted by clicking the appropriate tab. 2. Click the icon then click A window appears, asking you to confirm the deletion. Example: Using a Snapshot in a Spreadsheet Formula 1. Take a snapshot of your project. 2. On the Project tab, select every item in the Duration column. 3. Right-click, then, in the quick menu, select Copy. 4. Click the User sheets icon and select Add user sheet. 5. In the user sheet, select a cell, then right-click. 6. In the quick-menu, choose Paste link. The items you copied now appear in the spreadsheet with a red square in each cell. 7. Double-click a red square. A formula such as =Project!B1 appears. 8. Edit the formula to read =Project!B1–Snapshot1!B1. 9. Right-click in a cell and, in the quick-menu, select Cell Type. The Cell Type window appears. 10. Under Formula, select Number then click OK. The window closes and the cell in Sheet 1 displays 0.00. 11. Click Save then open the Project tab. 12. Double-click one of the cells in the Duration column, then change the duration value, indicating d for days, w for weeks, or m for months. Click Save then open Sheet1. The value originally displayed has changed to show the erJCVGantt Pro 3 User’s Guide 94 | Work with Baseline Snapshots ror difference between the planned value and the actual tracked value.0. Using a similar technique you might instead show the percentage of error or any other comparison operation that is relevant to your project. | 95 9 Work with Gantt Parts Gantt Parts allow you to save snippets of projects to reusable files so that you can drag and drop them into new projects. All project information is saved, including resource, costing, and task information. Save a Gantt Part There are two types of Gantt Parts: All-tasks Gantt Part Selected-tasks Gantt Part To save a Gantt Part On the Standard toolbar, do one of the following: Click the Save All Tasks As Gantt Part icon. Click the Save Selected Tasks and Their Subtasks icon. The Save as Gantt Part window opens. 1. Click Select Folder. The Browse For Folder window opens. 96 | Work with Gantt Parts 2. Do one of the following: Select a folder. Click Make New Folder then type a folder name. 3. Click Ok. 4. In the Name your new Gantt Part field, type a name for your Gantt Part. 5. Click Ok. Insert a Gantt Part into a Gantt chart To insert a Gantt Part into a Gantt chart 1. At the right-hand side of the application window, click Gantt Parts. (If you do not see the Gantt Parts icon, open the View menu and select Toolbars then select Gantt Parts.) The Gantt Parts window opens. 2. In the Gantt Parts window, navigate through the folders and select the folder that contains the required Gantt Parts. The Gantt Parts in the selected folder display as thumbnails in the lower part of the window. Insert A Gantt Part Into A Gantt Chart | 97 If you point the mouse over a thumbnail—Event Tree Analysis, for example—a popup appears, displaying all the tasks associated with the item, as shown below. Do one of the following: Drag a Gantt Part thumbnail into the Gantt pane. The tasks associated with this Gantt Part are added to the tree pane and the Gantt pane displays a colored bar for each task in the Gantt Part. Double-click the Gantt Part that is to be inserted. The tasks from the Gantt Part are inserted on the day after the last day of the project. JCVGantt Pro 3 User’s Guide 98 | Work with Gantt Parts Insert a Gantt Part in a Specific Location To insert a Gantt Part as a subtask Drag the Gantt Part to the Gantt pane, adjusting the Gantt Part’s position until the parent task in the task pane is highlighted. The tasks from the Gantt Part are inserted on the same day as the parent task. Insert A Gantt Part In A Specific Location | 99 To insert a Gantt Part after a task Drag the Gantt Part onto the Gantt chart until the selected date and task are highlighted. To insert a Gantt Part before the first task Drag the Gantt Part onto the Gantt chart and position it above the first task To insert a Gantt Part on any date after the last date of the project Drag the Gantt Part onto the Gantt chart and position it over the empty space at the end of the project. Note: If you selected a non-working day to insert the Gantt Part, the tasks are inserted on the next available working day. JCVGantt Pro 3 User’s Guide 100 | Work with Gantt Parts Manage Gantt Part Folders You can add or remove folders in the Gantt Parts window by right clicking any folder except the Backgrounds folder. To add a folder 1. In the Gantt Parts window, right-click a folder then select Add folder. The Folder Name window opens. In the Input Folder field, type a name for the folder and click OK. The folder is added as a subfolder to the selected folder.0. To remove a folder 1. In the Gantt Parts window, right-click a folder then select Delete folder. A message box opens, asking you to confirm the deletion. 2. Click Yes to delete the folder, otherwise chick No. | 101| JCVGantt Pro 3 User’s Guide 102 | 10 Export Data to External Programs Why Export? Sometimes you might want to save a Gantt chart or spreadsheet to an independent file format so that you can simply double-click the file and see the Gantt. You may also own BizTalk servers or other data-conversion services that might benefit from having project management information stored in a nice, clean XML format to pump to and from your corporation’s databases. Export to MindManager To export a Gantt chart or spreadsheet to MindManager® 1. Open any tab in JCVGantt Pro 3. 2. In the File functions menu, point to Import/Export and select Export to MindManager. Note: This feature is disabled if MindManager is not installed on your machine. The Save as window opens. 3. In the File name field, specify the name of the exported file. 4. Click Save. Export to Microsoft Project To export a Gantt chart or spreadsheet to Microsoft Project® 1. Open any tab in JCVGantt Pro 3. Export To Microsoft Excel | 103 2. In the File functions menu, point to Import/Export and select Export to MS Project. Note: This feature is disabled if Microsoft Project is not installed on your machine. The Save as Tip: You must Microsoft Project installed on the same PC in order to run this function as it communicates directly with Microsoft’s program. window opens. 3. In the File name field, specify the name of the exported file. 4. Click Save. Export To Microsoft Excel To export a Gantt chart or spreadsheet to Excel® 1. Open any tab in JCVGantt Pro 3. 2. In the File functions menu, point to Import/Export, then do one of the following: To export the entire project to a single Excel file, select Export All To Excel. To export the active spreadsheet, select Export Sheet (activated only on spreadsheet tabs). The Save as window opens. 3. In the File name field, specify the name of the exported file. 4. Click Save. JCVGantt Pro 3 User’s Guide 104 | Export Data to External Programs Export to HTML The Export to HTML feature creates an image of your Gantt chart or spreadsheet and saves it as an HTML file, making it easy to send to other people. To export a Gantt chart or spreadsheet to HTML 1. Open any tab in JCVGantt Pro 3. 2. In the File functions menu, point to Import/Export and select Export to HTML document. The Save as window opens. 3. In the File name field, specify the name of the exported file. 4. Click Save. | 105 11 Setting Parameters Import From MindManager To import a Gantt chart or spreadsheet from MindManager® 1. In the File functions menu in JCVGantt Pro 3, point to Import/ Export and select Import from MindManager. Tip: If a file is open when you import data from an external program, the data is appended to the bottom of the open file. Note: This feature is disabled if MindManager is not installed on your machine. 2. The Open window opens. Navigate to the MindManager map you want to import and select it. The map name appears in the File name field. 3. Click Open. The map appears in JCVGantt. 4. In the File functions menu, select Save as. The Save as window opens. 5. Navigate to the folder in which you want to save the file then, in the File name field, enter a file name. 6. Click Save. 106 | Setting Parameters Import From Earlier Versions of JCVGantt To import a Gantt chart or spreadsheet from an earlier version of JCVGantt 1. In the File functions menu in JCVGantt Pro 3, point to Import/Export and select Import from JCVG. The Open window opens. Tip: If a file is open when you import data from an external program, the data is appended to the bottom of the open file. 2. Navigate to the JCVGantt file you want to import and select it. The file name appears in the File name field. 3. Click Open. The file appears in JCVGantt. 4. In the File functions menu, select Save as. The Save as window opens. 5. Navigate to the folder in which you want to save the file then, in the File name field, enter a file name. 6. Click Save. Import From Excel Importing from Excel® imports any text and formatting information contained in an Excel file and attempts to load it in a compatible format for JCVGantt Pro 3. One particularly useful way to use this feature is to import some of the free templates that come with Excel, such as the billing statement template, which can easily be modified to create some very nice-looking reports! To import a file from Excel 1. Click the User sheets opens. icon and select Add user sheet. A new user sheet 2. In the File functions menu, point to Import/Export and select Import from Excel. The Open window opens. 3. Navigate to the Excel file you want to import and select it. The file name appears in the File name field. Import From Earlier Versions Of Jcvgantt | 107 4. Click Open. The Excel Pages window opens. 5. In the Select pages box, select the page you wish to import. 6. Click OK. The sheet is imported into the user sheet. JCVGantt Pro 3 User’s Guide 108 | 12 Dress Up the Gantt Chart Change the Skin To change the skin 1. At the right-hand side of the application window, click Gantt Parts. (If you do not see the Gantt Parts icon, open the View menu and select Toolbars then select Gantt Parts.) The Gantt Parts window opens. 2. In the Gantt Parts window, open the Skins folder. The bottom half of the window displays two or more skins. Do one of the following: Double-click the icon that represents the desired skin. Drag the icon that represents the desired skin to the Gantt chart. The task bars on the Gantt chart display the new skin. | 109 Use JCVGantt Pro3 with MindManager 13 Using with MindManager In general, when dealing with task info (as it’s called in MindManager), all the functions and parameters that are available in MindManager have corresponding functions and parameters in JCVGantt Pro 3. There are a few exceptions to how various data is treated, but nothing that should get in your way. Total Synchronization One major feature of JCVGantt Pro when used with MindManager is the total synchronization between the two products. Edit something in MindManager and it immediately appears in JCVGantt. Edit something in JCVGantt Pro 3 and it immediately appears in MindManager. An important thing to understand about this feature is that all changes are stored in MindManager’s data model. This means that when you save a MindManager file, you’re also saving all the Gantt chart information along with it. That includes attachments, links, user spreadsheets, snapshots, and all project information1 This also means that you’ve got one file holding two views of the same information. 1 The one exception is certain Resource pool information which will be added later in 2007 110 | Use JCVGantt Pro3 with MindManager Colors Changing the brush, fill, or text color in MindManager automatically changes the task bar color in JCVGantt Pro 3. Similarly, unless you deselect the Automatic checkbox in the Properties window, changing the task bar color in JCVGantt Pro 3 affects MindManager. See also: Modify Task Properties Link Gantt Colors to MindManager Colors Sync Colors % Done The debate is raging...is it easier to track projects by setting the Percent Complete (%) in JCVGantt using your mouse to drag the left-hand slider or is it easier to double-click the Percent done icons in MindManager? We’re not sure. Our software developers prefer seeing the percent done in the Gantt chart, but most managers seem to prefer the convenience of the double-click icons in MindManager. Choose your favorite! Filtering In MindManager’s Task Info pane, you can filter the tasks so that you can look at the information in unique ways. | Use JCVGantt Pro3 with MindManager When coupled with JCVGantt Pro 3, this feature can produce some amazing views of a project. For example, this filter setting would show only tasks starting today that end this week that are greater than 5 hours in duration! Differences In Durations | 113 Differences in Durations MindManager can currently display only integer (non-decimal) durations. JCVGantt Pro 3, however, does store decimal durations. It even tricks MindManager into storing them, but, unfortunately, not into displaying them. You can use the h, d, and w (hours, days, and weeks) notation in either program. Some math for you... 3.5 d is the same as (24 x 3) + 12 hours = 84 hours 3 w = 21 days Note: We assume that a day equals 24 hours (not eight as in some calendaring systems) and that a week has seven days (not five as in some calendaring systems). One place where this may cause confusion is setting a duration in JCVGantt to less than 1 day may show in MindManager as 0 days. If this happens, switch the display in MindManager task info to hours to see the proper display. Relationships MindManager has the ability to show relationships among different topics using a dotted line and the Insert Relationships operation. As this is a direct metaphor for dependencies in a Gantt chart, you can synchronize JCVGantt Pro 3 and MindManager so that they work together. When you add relationships to a mind map, dependencies are automatically assigned in the Gantt chart. When you add dependencies in the Gantt chart, relationships are automatically shown in the mind map. To activate this feature, select the Synchronize MindManager Relationships option in the Options menu. JCVGantt Pro 3 User’s Guide 114 | Use JCVGantt Pro3 with MindManager Depending on your point of view, this is either really useful, or really ugly. In any case, the feature is there! Note: FS, SF, FF, and SS indicate Finish-to-Start, Start-to-Finish, Finish-to-Finish, and Start-toStart relationships. For more information, see Dependency Management. | 115| JCVGantt Pro 3 User’s Guide 116 | 14 Creative Ideas Quick Start with Templates MindManager comes with zillions of excellent best-practice templates to get you off to a running start. To open a MindManager template 1. In the Quick Access menu in MindManager, click the down-arrow to the right of the New icon . The New Map window opens. 2. Select From Styles and Templates. The New map dialog opens. 3. Select the Map Templates tab then select the template you’d like to use to start a new project. Hyperlinked Projects Board | 117 4. Click OK. Select the central topic in the map, and on the JCVGatntt ribbon bar, click “Show in JCVGantt Pro”, then click the Show JCVGantt Pro 3 icon. JCVGantt Pro 3 opens and the mind map is automatically entered into the JCVGantt fields. You can create your own map templates in MindManager to kick-start any projects and they’ll sync directly into JCVGantt Hyperlinked Projects Board You can hyperlink multiple MindManager maps to one central MindManager map. Due to the auto-refresh capability of JCVGantt Pro 3, you’ll be able to navigate to all of the projects in your company from this central map! JCVGantt Pro 3 User’s Guide 118 | Creative Ideas Executive Status Board Track all of your projects from one Gantt chart or mind map. You have a zillion details on your mind and often ten to fifteen projects running simultaneously. How do you track them without going insane? 1. Create a MindManager map that has a list of every project you’re currently working on. 2. Color-code each project branch with a different brush color. 3. For each item, enter a branch with the next five items. No more than five, however! This is for your own personal benefit. 4. Now schedule those items in the Gantt chart and add dependencies between projects and tasks as required. 5. Each day, set the % done on each item, add items when you delete items that are 100% done. 6. Try to maintain three to five Next actions. Why? Because three to five actions is about as many as most minds can focus on in one shot. 7. Print the Gantt chart and the MindManager map and display them in a prominent location! Hyperlinked Status Board Track your subordinate’s to-do lists and personal tasks. Hyperlink multiple MindManager maps to one central MindManager map, then ask your managers or subordinates to link you to their personal status boards. This gives you the luxury of being able to assign Next actions to them, which they’ll see the next time they open their Gantt chart. Hyperlinked Status Board | 119 JCVGantt Pro 3 User’s Guide Gantt-Solution.com