1
BackOffice 6.1.5 Manual
© 2009 Coherent Software Solutions
This page is deliberately left blank
Contents
3
Table of Contents
6
Part I Introduction
1 Software
...................................................................................................................................
Changes
7
10
Part II Getting Started
1 Navigating
...................................................................................................................................
Records
13
2 Quick
...................................................................................................................................
Start Checklist
17
20
Part III Activities
1 Stock
................................................................................................................................... 21
Count Stock
......................................................................................................................................................... 22
Purchase .........................................................................................................................................................
Stock
25
Return Stock
......................................................................................................................................................... 30
Manufacture
.........................................................................................................................................................
Stock
31
Discard Stock
......................................................................................................................................................... 35
Transfer Stock
......................................................................................................................................................... 37
2 Cashup
................................................................................................................................... 39
Em ployee .........................................................................................................................................................
Cashup
40
Till Shift Cashup
......................................................................................................................................................... 43
Shop Cashup
......................................................................................................................................................... 47
3 Get
...................................................................................................................................
Menus
48
4 Menu
...................................................................................................................................
Publish
49
5 Synchronise
................................................................................................................................... 49
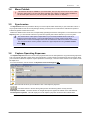
6 Capture
...................................................................................................................................
Operating Expenses
49
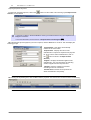
7 Transactions
...................................................................................................................................
(Purge NOMAD Log)
51
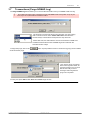
8 Export
...................................................................................................................................
(Data Exporter)
52
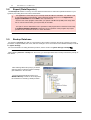
9 Backup
...................................................................................................................................
Database
52
10 Add-ins
................................................................................................................................... 53
Design Floors
......................................................................................................................................................... 53
Database Optim
.........................................................................................................................................................
iser
57
Database Purge
......................................................................................................................................................... 58
Street Sw eeper
......................................................................................................................................................... 61
11 Update
...................................................................................................................................
Customer Stats
63
66
Part IV Lists
1 Find
...................................................................................................................................
Invoices
66
2 Employees
................................................................................................................................... 68
Em ployee .........................................................................................................................................................
Categories
68
Em ployee .........................................................................................................................................................
Records
70
3 Suppliers
................................................................................................................................... 77
4 Customers
................................................................................................................................... 79
5 Survey
...................................................................................................................................
Questions
82
6 Menu
................................................................................................................................... 83
Departm ents
......................................................................................................................................................... 84
Categories
......................................................................................................................................................... 85
Item s
......................................................................................................................................................... 86
Picklists ......................................................................................................................................................... 100
Kitchen Printer
.........................................................................................................................................................
Wizzard
103
Item s Per.........................................................................................................................................................
Report Group
105
© 2009 Coherent Software Solutions
(Version: 6.1.5)
4
BackOffice 6.1.5 Manual
Item s Per.........................................................................................................................................................
Sales Location
107
7 Stock
................................................................................................................................... 109
Categories
......................................................................................................................................................... 110
Item s
......................................................................................................................................................... 111
Locations......................................................................................................................................................... 120
Item s per.........................................................................................................................................................
Location
121
8 Expenses
................................................................................................................................... 123
Expense .........................................................................................................................................................
Item s
123
Categories
......................................................................................................................................................... 125
9 Delivery
...................................................................................................................................
Areas
126
10 Streets
................................................................................................................................... 127
Street Nam
.........................................................................................................................................................
es
129
Suburbs ......................................................................................................................................................... 130
11 Over-ring
...................................................................................................................................
Codes
131
12 Discount
...................................................................................................................................
Codes
133
Auto Apply
.........................................................................................................................................................
Discounts
136
Tim e Based
.........................................................................................................................................................
Discounts
139
13 Tables
................................................................................................................................... 141
144
Part V Monitoring
1 Activities
................................................................................................................................... 144
2 Daily
...................................................................................................................................
Sales
145
3 Staff
................................................................................................................................... 145
Attendance
......................................................................................................................................................... 145
Perform ance
......................................................................................................................................................... 146
Statistics......................................................................................................................................................... 148
150
Part VI Preferences
1 System
...................................................................................................................................
Settings
150
Restore Settings
.........................................................................................................................................................
Feature
150
Specific Com
.........................................................................................................................................................
puter
151
All Com puters
......................................................................................................................................................... 162
Printers ......................................................................................................................................................... 178
2 Access
...................................................................................................................................
Permissions
179
List of Access
.........................................................................................................................................................
Perm issions
182
3 Restricted
...................................................................................................................................
Employee Categories
191
194
Part VII Help
1 Dialup
...................................................................................................................................
IP Address
194
2 Feature
...................................................................................................................................
Registration
194
3 ID...................................................................................................................................
Numbers
195
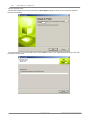
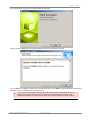
4 Check
...................................................................................................................................
For Updates
196
5 What's
...................................................................................................................................
New?
200
6 About
................................................................................................................................... 200
Part VIII Contact Details
202
Index
203
(Version: 6.1.5)
© 2009 Coherent Software Solutions
Part
Introduction
I
6
1
BackOffice 6.1.5 Manual
Introduction
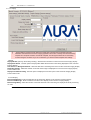
The Aura point-of-sale (POS) system includes much of the functionality you would expect in a typical POS system such as tight security controls, audit trails, stock movements, stock usage controls, tracking of accounted-for and
unaccounted-for stock losses, manufacturing of stock items, recipe-based sales and flexible gross profit reporting,
as well as the other operational reports you may require. What makes Aura different though, is its integration with
Enterprise Solutions: allowing you to collaborate menus and other information across all the outlets in the group.
In the restaurant environment, your POS software needs to understand the sometimes complex relationship
between products sold to the customer and stock purchased by the store. This could quite easily involve the
manufacture of product batches in-house, which are then used as ingredients for other products also made inhouse. No matter how complex or simple the stock system is in your business, Aura will be able to track your stock
usage, even across multiple locations.
Stock maintenance is controlled very tightly by the comparison of theoretical sales figures and actual sales figures.
These calculations allow you to monitor the stock usage levels by means of the reports; allowing one to keep
extremely accurate control on unnecessary wastage of stock caused by factors such as theft, stock wastage and poor
product assembly (for example: over-topping of a product).
The most notable features of Aura are the controls available to maintain and track customer orders; whether placed
in-store over the counter, or over the phone, there are specific options and settings dedicated to the correct handling
of that particular order. Specifically for the Collect and Delivery order types, a customer link must be created, saving
important information such as a contact name and number. When the same customer calls back again in the future,
their previous orders can be viewed, and duplicated if they desire. The added functionality of attaching customers to
orders plays a vital part in building better customer relations and therefore improving customer service satisfaction.
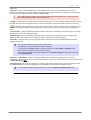
Notes for Navigating this Help Manual:
· Look out for and take special notice of notes, these are displayed in light blue and red boxes; these will give more
detail or important information on certain functions.
· All related topics will be displayed at the end of each section with a title and a page number (for example: current
page 6 ). You will see the page numbers alternating at the top of each page.
· Due to the sheer size of it, all information relating to the BackOffice reports has now been moved to it's own
manual. The reports manual is available for download on our website. If you need assistance with downloading
the manual, please contact our support department for assistance.
· Battling to find a specific setting or feature? Try checking the Index at the end of this manual.
· To contact us, go to the Contact Details Page
202 .
#
These are simply information or suggestions and you may use your own discretion as to whether
or not you make use of this or not.
!
Important notices and warnings will be displayed with this symbol. Read through these tips
carefully.
(Version: 6.1.5)
© 2009 Coherent Software Solutions
Introduction
1.1
7
Software Changes
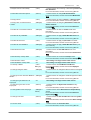
Aura 6.1.5 Changes (Bug Fix Release)
BackOffice
Fixed (ST-824) The Stock Items Per Location screen now hides the inactive stock items correctly.
Fixed (ST-823) Stock items were not retaining their links to Stock Locations correctly when BackOffice is run; this
has now been resolved.
Fixed (ST-819) The Return Stock feature was not automatically inserting all items as a negative value, causing
stock to be added instead of removed. This screen does not allow positive values anymore.
Fixed (ST-801, ST-828) When modifying settings for stock items, marking the 'Inactive' setting would not refresh the
list correctly without restarting BackOffice. Two steps are now carried out when the 'Save' button is pressed: the detail
fields will automatically update to show the correct details, and a recipe check will be performed on Menu and Stock
items. For more details on this step, see the section on Stock Items - Inactive 114 .
Fixed (ST-870) Stores that have never run the Aura Order Manager before tend to encounter certain errors upon it's
first run. BackOffice 6.1.5 will add the required fields in preparation for Order Manager.
Fixed (ST-825) The Menu Items With Recipes report has been seen to give an error when running the report. The
correct report file has now been included.
Fixed (ST-834) Changed option description in settings; "Prompt for Name on Counter Deliveries" has been updated
to say "Prompt for Name on Counter Orders".
Fixed (ST-856) We have found a few issues with the FIFO (First In First Out) stock costing calculation method; as a
result, the 'Opening Stock Unit' cost value was being calculated incorrectly. This calculation has been checked and
confirmed to be correct now.
Fixed (ST-871) The NAG screen was appearing when Order Manager was run, regardless of the license file
settings. This is now resolved.
Improved (ST-793) Menu items and manufactured stock items will now display a warning when the recipe contains
an inactive stock item. The inactive stock item in the recipe will also be shown with a grey background. For more
information, see the sections on either Menu Item Recipes 91 or Stock Item Recipes 118 .
Improved (ST-842) Navigation in Menu Items and Stock Items has been improved; to navigate to the previous or
next item within the current filter, hold Alt and press either the left or right arrow keys. For more information, see the
relative section: Menu Items 86 or Stock Items 111 .
Improved (ST-788) When purchasing stock using multiple locations, BackOffice now remembers the last purchase
location for each stock item and selects that automatically. For more information, see the section on Purchase Stock
28 .
Improved (ST-844) The Stock Items per Location screen now supports filtering the list of stock items by a "Search"
block. For more information, see the section on Stock Items per Location 121 .
Improved (ST-908) A new customer statistic has been introduced for reporting purposes; Average Calendar Month
Spend. Instead of simply taking the previous 30 days from the current point for an average, this will take the last
complete month from the 1st to either the 30th or 31st of the relative month.
Improved (ST-829) To assist with the creation and maintenance of manufacture and sub-menu items; recipe
controls have been added to the Stock Items list as well. For more information, see the section on Stock Items >
Recipe 116 .
Improved (ST-861) The reports are in the process of being verified for consistent and accurate information; certain
reports have been improved in this release, and more will follow with time to come.
Improved (ST-907) The database Purge and Optimise tools have been updated to better manage larger database
files.
© 2009 Coherent Software Solutions
(Version: 6.1.5)
8
BackOffice 6.1.5 Manual
Invoicing
Fixed (ST-846) When a negatively priced line item was added to an order, such as a refunded item, the VAT
calculation would not return the correct amount. This has now been resolved.
Fixed (ST-874) Waiters closing tables and cashiers paying tables from previous trading days was only possible by
setting the date back. This can now be done irrespective of the order's age.
Fixed (ST-841) A problem was found with flagging an order as late delivery when a delivery charge was associated
to the order. This has now been fixed.
Fixed (ST-837) NOMAD prompts are now set to 'always on top' and have a count down timer before they close.
Improved (ST-875) New access permission: To Close Any Table. With a combination of this and To Pickup All
Tables, a manager may now close any table order regardless of the cashier or waiter assigned to the order.
Improved (ST-873) When using the Pickup Tables feature in Invoicing, if the table had no waiter assigned the
display would show "UnAssigned". This has now been changed to "No Waitron" to be clear.
Improved (ST-707) It is now possible to specify the subtenant field for each till individually; this will help to separate
the transactions done at combo stores.
#
To find out more specific details of any bug fixes, please contact the Aura Helpdesk and quote the
relevant Software Tracking (ST-xxx) issue code.
Contact numbers can be found on our Contact Details 202 page.
(Version: 6.1.5)
© 2009 Coherent Software Solutions
Part
Getting Started
II
10
2
BackOffice 6.1.5 Manual
Getting Started
Getting started with Aura may seem to be a daunting task at first; however once you acquire a better understanding
of the software layout and methods for grouping components in Aura, navigation of the software will become a fair
amount easier. This section is designed to help break down the environment and provide a step-by-step introduction
to Aura BackOffice.
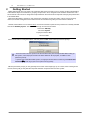
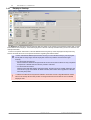
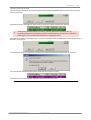
When Aura BackOffice is opened, a user password is required to access the system. This is done for security
reasons; and each activity performed in the Aura suite is recorded along side your user name for reference.
However, if BackOffice is run for the first time, one account with the required access permission is already activated
and named Added by System. The details for this login account are as follows:
First name: Added by
Last name: System
Employee Numb er: 001
Password: 001
If this is the first time running BackOffice, enter the password 001 at the following password prompt:
#
There are various access points in the Aura suite that are password protected. While setting up
the system, until unique passwords have been added for all employees, use 001 for each
password prompt.
If you are new to the BackOffice system, it is highly recommended to work though the Quick Start
Checklist 17 in order to get your store up and running quickly.
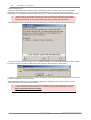
After this password prompt, you may possibly see a series of messages pop up on screen; these messages are
normal, and they will go away after the respective activities are performed in the Aura system.
(Version: 6.1.5)
© 2009 Coherent Software Solutions
Getting Started
11
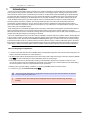
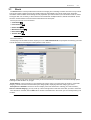
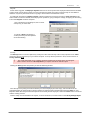
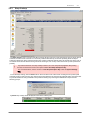
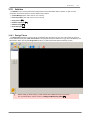
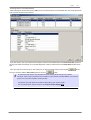
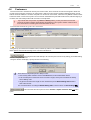
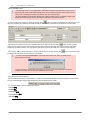
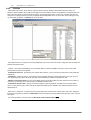
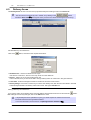
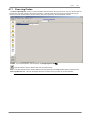
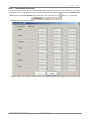
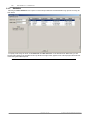
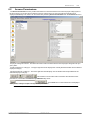
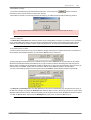
The main screen in BackOffice consists of a menu across the top, a toolbar down the left hand side and the main
screen area for the various BackOffice components to the right, as seen below:
BackOffice components have been grouped by type - for example, all activity type functions (for example: Performing
a Stock Count, Capturing Purchased Stock or doing a Performing a Cashup) are available on the Activities toolbar
and menu. List information (for example: Discount Codes, Menu Items, Stock Items, etc) can be found under the
Lists toolbar and menu.
At the bottom of this BackOffice home screen you will see a link labelled "Visit The Aura Website"; clicking on this
link will open your Internet Explorer and automatically take the browser to our CoSoft website.
For an overview of all options found under the different menus, see the relative section below:
· Activities
· Lists
20
66
· Monitoring
144
· Preferences
150
· Reports
· Help
194
© 2009 Coherent Software Solutions
(Version: 6.1.5)
12
BackOffice 6.1.5 Manual
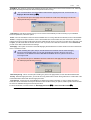
Toolb ar Navigation
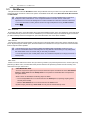
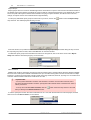
On the left hand side of all screens in Aura BackOffice, you will see the new navigation toolbar. This toolbar contains
the majority of options found under the standard menus along the top (Activities, Lists, Monitoring etc.). In order to
navigate to another screen, simply click once on the icon for the desired option. Most of the toolbar sections will have
too many links to display on one screen, in this case you will see a down arrow used to scroll further down the
toolbar. You will also notice when scrolling down that a second arrow will appear at the top to scroll back up. As seen
in the two screen shots 1a and 1b below:
1a:
1b:
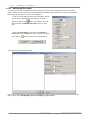
In order to switch between different menu lists, simply
click on the list name that you wish to expand. Doing this
will automatically compact any other icon list currently
displayed, and move it to it's relative position in the list. As
seen by the example images 2a, 2b and 2c to the right.
In example 2a, the Activities toolbar is active. When
switching to another toolbar, the currently active toolbar (in
this case, Activities) will compact and the newly selected
bar will expand. In example 2b, the Lists toolbar has been
selected and in 2c, the Reports toolbar has been
selected.
2a:
(Version: 6.1.5)
2b:
2c:
© 2009 Coherent Software Solutions
Getting Started
2.1
13
Navigating Records
In the Aura system, all information is store as individual 'records', much like separate pages in a book; as a result,
these records can be filtered and searched using various tools you will find throughout Aura BackOffice. Learning to
use these tools efficiently will make a large difference with maintaining your store.
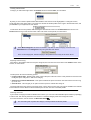
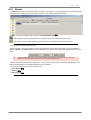
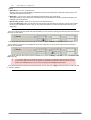
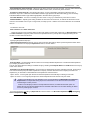
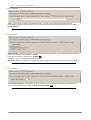
In many screens in BackOffice, you will see a Navigation bar; as seen here:
This toolbar allows you to navigate through different records in a list. Following is a description of each button's
functionality:
- First - Moves to the first record in the current filter
- Prior - Moves to the previous record in the current filter
- Next - Moves to the next record in the current filter
- Last - Moves to the last record in the current filter
- Insert - Adds a new record ready for new information
- Delete - Deletes the currently selected record
- Edit - Opens the selected record to be modified
- Post - Saves any changes done to the currently selected record
- Cancel - Undoes any changes done to the current record back to the last time it was saved
#
These are simply the standard controls found on the Navigation bar, certain sections in
BackOffice will have extra controls to the right of the Cancel button, each of which will be explained
in the relative section.
© 2009 Coherent Software Solutions
(Version: 6.1.5)
14
BackOffice 6.1.5 Manual
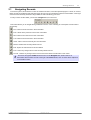
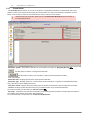
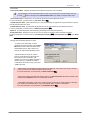
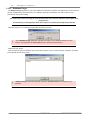
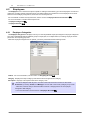
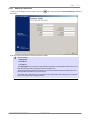
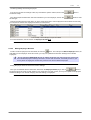
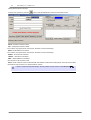
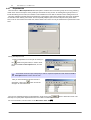
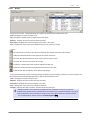
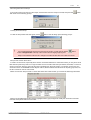
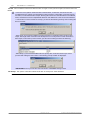
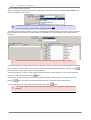
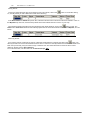
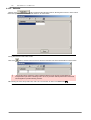
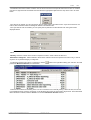
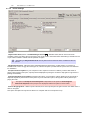
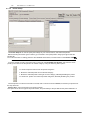
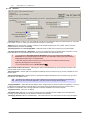
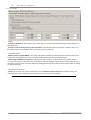
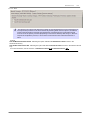
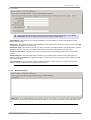
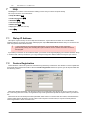
Locating Specific Records
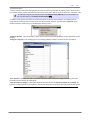
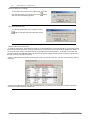
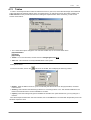
Certain toolbars also contain a search button, clicking this option will give you a chance to locate one specific record
within the data you are viewing. For instance, Menu Items or Stock Items.
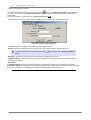
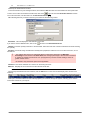
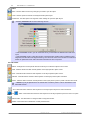
Clicking on the
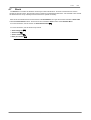
Locate button will present the following window:
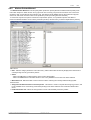
In order to search for a specific record, first select the field you wish to search. Click on the down arrow under the
'Fields' section and select a field name, as seen below:
!
These fields will be unique to each section of BackOffice (i.e.: Menu Items, Stock Items,
Customers, etc.). These will be covered in more detail for each section specifically.
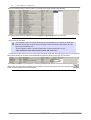
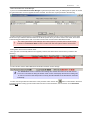
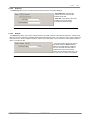
After selecting the desired field to search for, start typing the value you wish to search for in the Field Value block.
How the search window locates the record, is determined by the following criteria:
Case Sensitive - Selecting this option will drastically narrow the search to values matching the case. For example, if
the value you are looking for is 'PIZZA' and type in 'pizza' or 'Pizza' in the field value, it will not find the record.
Exact Match - The entire field (not just part of it) must be equal to the Field Value.
Partial Match at Beginning - The beginning part of the field must be equal to the Field Value.
Partial Match Anywhere - The field must just contain somewhere within it the Field Value.
(Version: 6.1.5)
© 2009 Coherent Software Solutions
Getting Started
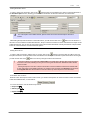
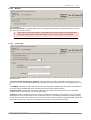
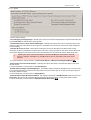
15
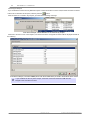
Dataset Filter
!
It is essential that you have an understanding of the menu items or stock items structure before
you can effectively use this tool. If you do not maintain your own menu in-store, and rather
download it from a central head office store, you may possibly not be able to make full use of this
feature: the Locate Specific Records feature described above will be better suited to your needs.
The dataset filter is an invaluable tool when updating a set of records; whether these are menu items or stock items,
this tool will assist in filtering the available items. By doing this, you can prevent accidental changes to items that you
do not need to update, or even use this tool to simply search for records.
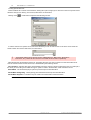
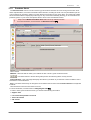
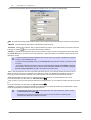
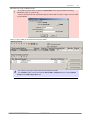
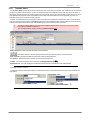
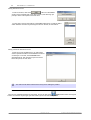
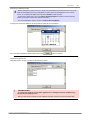
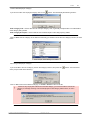
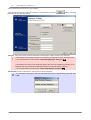
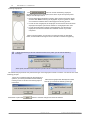
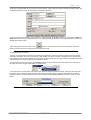
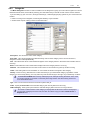
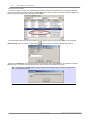
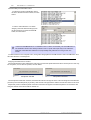
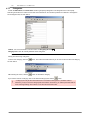
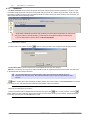
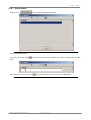
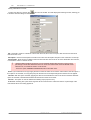
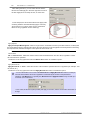
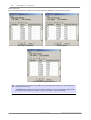
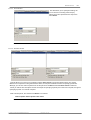
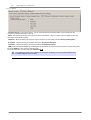
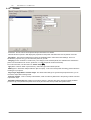
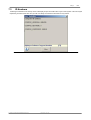
Clicking on the
Dataset Filter button will show the following window:
At first glance, you will see that the Code area of this window (located in the middle) has the same fields as found in
the Locating Records feature described just above. On the left hand side of the Dataset Filter window is a list of
'fields', (instead of the drop-down list as found in the Locating Records feature). This list can be sorted either
alphabetically, or logically, depending on your preference.
#
Field Order
Alphabetical Sorting - This sorting method displays the list of 'fields' in true alphabetical order.
Logical Sorting - This displays the 'fields' in the order in which they are stored in the database
directly.
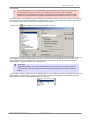
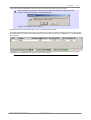
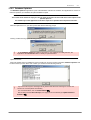
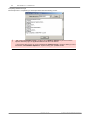
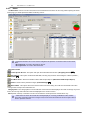
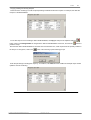
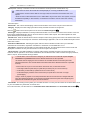
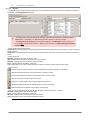
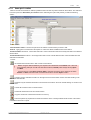
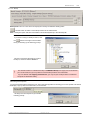
The first step in setting a dataset filter, is to select the field you wish to filter the results by: for example, all items with
certain letters in the 'code' field, or certain 'price' field ranges. In the following example, we will use the 'Size' field.
When selected, the line will be highlighted in blue, as seen here:
© 2009 Coherent Software Solutions
(Version: 6.1.5)
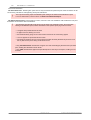
16
BackOffice 6.1.5 Manual
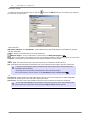
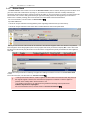
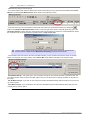
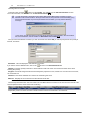
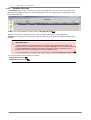
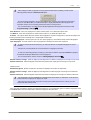
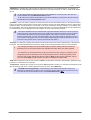
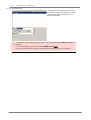
With the 'Field' selected that you wish to search in, enter the value you wish to search for in the 'Field Value' block, as
seen here:
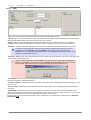
In the above example: We will filter the dataset by any items that begin with 'MED' in the 'SIZE' field, irrespective of
upper or lower case. (Please see the 'Search Type' description further above for more information.) Once all required
information is entered, click on the OK button to apply the filter.
Once the filter has been applied, you may navigate through the results as you would normally, keeping in mind that
only items matching your custom filter settings will be displayed.
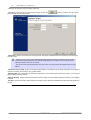
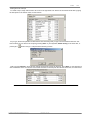
Once you are done with the filter, you may either open the 'Dataset Filter' options again and set a new filter (repeating
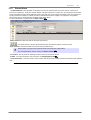
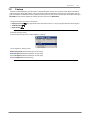
the steps above) or you may clear the filter. The filter is cleared by clicking the 'Clear' button next to the 'Field Value', as
seen here:
Once the 'Clear' button has been clicked, the 'Field Value' block will clear and the 'Fields' list will return to normal;
now click on the OK button on the right hand side to apply the currently set filter to the dataset.
#
If there is no specific filter set when clicking the OK button (as the screen will be when first
opened and after clicking 'Clear'), then a general filter will be applied, displaying all the items.
(Version: 6.1.5)
© 2009 Coherent Software Solutions
Getting Started
2.2
17
Quick Start Checklist
The following list is designed to give a structured and systematic approach to getting your store up and running in
the Aura POS software suite. These steps are only outlined briefly here, for more detailed information, you will need to
check the appropriate page reference mentioned in each section step.
Employee Setup
A large majority of activities in the Aura system are password protected; for obvious security reasons and for future
flexibility, it is recommended that each employee have their own unique password with which to access the system.
In addition to the security measures, this will also allow for employee-specific wages; which is necessary for setting
up an hourly wage.
· Employees
68
· Access Permissions
179
Menu Setup
Most stores will download a standard menu from their brand head office, while others may create and edit their own
unique menu. If the intension is to maintain your own menu, you should have received a separate booklet outlining
the menu design process. If you have not received this manual, please contact our Aura Help Desk and request one.
In order to download your stock and menu items, this is done from the Activities menu by selecting Get Menus >
Menu Download.
· Menu Download
· Menu Activate
48
48
Discount and Over-ring Codes
A very important area to check is the list of available discounts and over-ring codes. Discounts are used on a daily
basis for many different reasons, and at times you may also be required to over-ring an order; whether this is due to a
customer complaint or employee error, you should have these codes set up in case they are needed.
· Discount Codes
· Over-ring Codes
133
131
Setting up for Stock Purchases
Due to the way information is maintained in Aura, all stock movement in and out of the store must be accounted for.
When receiving stock, these purchases must be recorded in Aura, and linked to the corresponding supplier.
· Suppliers
77
Preparing for Customer Orders
One of the most powerful and useful features of the Aura POS suite is the customer marketing features. In order to
enter new customers quickly and easily when they call in to place an order, the infrastructure for delivery orders must
be set up first. This is a multiple step process; but, if done correctly, will only be required once.
· Streets
127
· Customers
79
© 2009 Coherent Software Solutions
(Version: 6.1.5)
This page is deliberately left blank
Part
Activities
III
20
3
BackOffice 6.1.5 Manual
Activities
The Activity menu contains the main interactive features of BackOffice; options found here will be used on a daily
basis. Each sub-menu here contains tools relative to the maintenance and recording of various important areas of
your store.
See a topic b elow for more information:
· Stock
21
· Cashup
39
· Get Menus
48
· Menu Publish
· Synchronise
49
49
· Capture Operating Expenses
49
· Transactions (Purge NOMAD Transactions)
· Export (Data Exporter)
· Backup Database
· Add-ins
51
52
52
53
· Update Customer Stats
· Show Main Screen
used.
11
63
- Note: Selecting this option will also clear any password in memory if 'Persist User' is
· Exit - This will quit Aura BackOffice.
(Version: 6.1.5)
© 2009 Coherent Software Solutions
Activities
3.1
21
Stock
The Stock features of Aura provide active controls for managing and controlling stock flow into and out of your store.
The range of options allow for almost any situation that may arise affecting your stock; ranging from automatic
calculation of the inevitable stock wastage in food preparation (for obvious reasons, this is easier to track on certain
stock types than it is on others), to the movement of stock between multiple locations, internal and external. These
functions are essential for correct stock flow information from the reports.
See a topic b elow for more information:
· Count Stock
22
· Purchase Stock
· Return Stock
25
30
· Manufacture Stock
· Discard Stock
· Transfer Stock
31
35
37
Stock Item Selector
The majority of stock related screens require you to use a Stock Item Selector to specify the stock item(s) you need
to work with. Below is a description of the operation of this window:
Search - Enter any part of the stock item name you wish to search for; the stock item list will automatically update
and begin to filter the items as you type.
Stock Category - If the stock item you are searching for has the same or a similar name to an item in a separate
category, you can narrow the search criteria by the category filter, displaying ONLY the category you select.
Description and StockNO - These two columns display a list of the stock items matching your search criteria (
Search and Stock Category), you may scroll up or down through this list and click on the item you wish to work with.
Once the item is selected, click the OK button to enter the selected item in the screen you are currently working in to
continue.
© 2009 Coherent Software Solutions
(Version: 6.1.5)
22
3.1.1
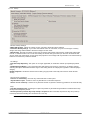
BackOffice 6.1.5 Manual
Count Stock
The Count Stock option allows you to enter a complete or controllable stock take for a specific date. The correct
capture of stock is essential for stock tracking, these stock takes are used in the calculation of variations in stock
levels, over-use versus under-use, and other features unique to the Aura POS System.
!
Before entering the stock take, please print out the Stock Take Worksheet report with which to
count the physical stock.
Stock Take Toolbar - This toolbar is described in more detail in the section on Navigating Records
13
.
- Use this button to save the currently active stock take.
- Use this button to start a new stock take, or edit a previously entered stock take.
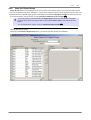
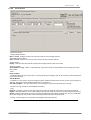
Stock Take Details
Stock Take Date - Displays the date of the currently active stock take.
Stock Take Type - Displays whether or not the currently active stock take is a complete or controllable stock take.
This is described in more detail further below.
Total Value of SOH - Displays the total monetary value of all stock accounted for in the currently active stock take.
Location - Displays whether the stock take is for your default location or for an alternative location.
For more information, see the section on Stock Locations 120 .
Sort Order - Change the sort order of the stock items in the currently active stock take. The same three sort options
are available when printing out the Stock Take Worksheet.
For more information, see the section on the Stock Take Worksheet.
(Version: 6.1.5)
© 2009 Coherent Software Solutions
Activities
23
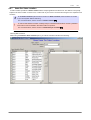
Item Details
Last Purchase Date - Displays the date that the selected stock item was purchased.
#
If you find there is an unreasonable value for one of your stock items in the stock take, you may
use the
button to the right of the Last Purchase Date to go directly to that purchase order.
Last Purchase Price - Displays the cost of the last purchase for the selected stock item.
For more information, see the section on Purchase Stock 25 .
Last Manufacture Date - If the selected item is a manufactured item as opposed to a purchased item, the last
manufacture date will show here.
Last Manufacture Cost - This field will display the last cost of manufacture for the selected stock item.
For more information, see the section on Manufacturing Stock 31 .
Waste % - This will display the preset wastage percentage of the selected stock item.
Prepped Unit Cost - Displays the cost to your store of using one measure of the selected stock item.
For more information, see the section on the Wastage Percentage 113 and Prepped Unit Cost 113 of your Stock
Items.
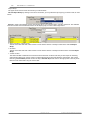
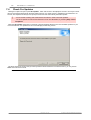
Starting New and Editing Old Stock Takes
To begin a new stock take, or edit a
previously posted stock take, click the New/
Edit button on the toolbar above the Stock
Take Details section. After a password
prompt, you will see the following screen:
Select the date for which you need to
enter or modify the closing stock figures,
the location for your stock take, and
whether or not it is a complete stock take (
All Stock Items) or a partial stock take (
Controllab le Stock Items Only). Then click
on OK to proceed.
!
Stock locations are available for advanced stock control from one section of the store to another,
or from your store to an external location and vice versa.
For more information, see the section on Stock Locations 120 .
Keep in mind that a stock take may only be done on an internal location; all external locations are
automatically excluded from the list of selectable location.
Controllable stock items can be set in order to speed up the daily stock take functions. Selecting
a stock take for controllable items only, will exclude all items not set as controllable.
For more information, see the section on Controllable Items 112 .
© 2009 Coherent Software Solutions
(Version: 6.1.5)
24
BackOffice 6.1.5 Manual
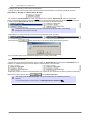
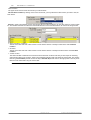
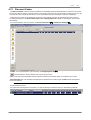
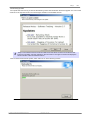
After successfully starting a new stock take, you should see a screen similar to the following:
Stock take details would be captured under the Prepped and Unprepped columns on the right.
Capturing Stock Take Data
#
The 'Prepped' column is used for stock that has been prepared for use already, ie: drinks that
have been moved from the store room to the fridge in front, flour that has been taken out of the
store room to the kitchen, etc.
The 'Unprepped' column is for bulk stock that has not been prepared for use yet.
Take careful note of the unit of measure ('Each', 'KG', 'Litre', etc.).
To capture stock take details into Aura, simply select the relative stock item and enter the figures using the keyboard.
With a field selected, the contents will automatically be replaced by the figure you type, as seen below:
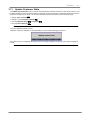
Press Enter or Return on your keyboard, or selecting a different field with the mouse will enter this figure into the
relative field. Once the entire stock take has been entered, ensure that the figures are correct, and click the
button on the top toolbar to save the stock take.
(Version: 6.1.5)
© 2009 Coherent Software Solutions
Activities
3.1.2
25
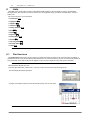
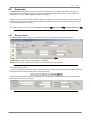
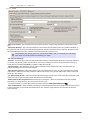
Purchase Stock
The Purchase Stock screen is used to enter any goods received vouchers for stock coming into the store. From
these captured GRVs, Aura stores information vital to that item, including the stock unit cost (calculated as per the
unit of measure for each item), which in turn ties directly to the recipes for your menu items. This automatic update
allows Aura BackOffice to display the profit margin on any menu item individually; allowing you to isolate the lower
performing items on your menu and optimise them to find a more cost effective method.
!
Keep in mind Manufactured Stock Items will not how up under this screen.
For more information, see the section on Manufacture Stock 31 .
GRV List Area
GRV Date - Select the date for which you would like to view or enter a goods received voucher.
- Use these buttons to browse through the previous and following dates one day at a time.
Colour Indicators - This colour legend displays the status of your GRVs as per the lines in the list of GRVs. This is
described in more detail below.
Keys - Use these shortcut keys to change the focus between the two areas of the Purchase Stock list for keyboard
shortcuts.
GRV Details Area and Stock Purchases Toolb ars
For more information, see the section on Navigating Records
13
.
In order to add a goods received voucher, you will need the following information:
· Supplier name
· List of items with quantities and costs
· Total order amount
· VAT amount
© 2009 Coherent Software Solutions
(Version: 6.1.5)
26
BackOffice 6.1.5 Manual
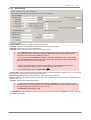
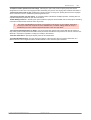
Selecting a Supplier
To capture a new goods received voucher, click the
for a new GRV, as seen below:
button in the GRV List section. This will bring up a prompt
GRV Information
GRV Number, GRV Date, and Shift Number - These fields will be automatically filled in by BackOffice as required.
Supplier Information
Supplier - Select your supplier name from the drop down list.
Add New Supplier - For more information, see the section on Adding New Suppliers 78 .
Ref # - Enter your purchase order reference number, it is generally accepted to use the order number on your invoice.
Telephone - This will pick up automatically from the selected supplier's contact number.
Cost
VAT Inc Total - The VAT Inclusive Total is the total order amount, including the full VAT amount.
VAT - BackOffice will automatically calculate the order amount before VAT according to the items purchased.
#
If you are purchasing items that are marked as VAT exempt, these items will not add any VAT
calculations in the purchase.
These figures now calculates automatically from the VAT exempt setting.
For more information, see the section on the VAT Exempt setting for Stock Items
114 .
Till
Paid From Till - Select whether or not this GRV will be paid using cash from a till shift or not. After clicking OK,
BackOffice will prompt you to select a till shift to pay the GRV from.
Amount Paid - This option will only be available if paid from till. Enter the amount paid from the till shift.
#
You can pay a GRV partially from a til and the balance from the safe, in this case, enter only the
portion of the amount paid from till, and leave the VAT Inc Total as the full amount.
(Version: 6.1.5)
© 2009 Coherent Software Solutions
Activities
27
Orders Generated from Order Manager
If you have used Aura Purchase Order Manager to generate a purchase order, you will be given an option to use the
pre-generated order once the supplier has been selected. This will show a prompt similar to the following:
The above window will display a list of all available purchase orders that have not been entered into the Purchase
Stock screen yet; select the desired order from the list and press OK. If you wish to create a new order, and not the
automatically generated orders, click on Cancel to return to the normal Create a New GRV window.
!
The orders generated in Order Manager are used to prepare a purchase, these should only be
entered into the Purchase Stock screen once the order has been placed and the stock arrives.
Adding Stock Items to the Purchase Order
Once you have successfully added a new supplier purchase, the GRV section should show up similar to the
following:
You should also see the Status Bar below the Stock Purchases section change:
#
The "Purch Price" column is the amount including VAT, and the VAT column is the VAT amount
on it's own. The status bar along the bottom of this screen now displays the amount including VAT.
In order to account for VAT exempt items correctly; the Value Added Tax is calculated on each item
individually.
You are now ready to add new stock items to the purchase order. Click on the
button on the toolbar in the Stock
Purchases section to bring up a list of items that can be For more information, see the section on the Stock Item
Selector 21 .
© 2009 Coherent Software Solutions
(Version: 6.1.5)
28
BackOffice 6.1.5 Manual
Once you have selected the desired stock item and clicked on OK, you should see the following:
GRV - This will automatically update with the GRV number of the purchase order that the stock item is being added
to.
GRV Date - This will show the date that the selected GRV will be saved on.
Stock Item - Displays the stock item that you have marked for purchase. If you selected the incorrect item and need
to change it, click the
button to go back to the Stock Item Selector.
Quantity - If you are purchasing items that come pre-packed in crates or boxes, it is likely that the stock item itself
has a Pack Size set up. If you are unsure of the pack size, or if the Pack option is unavailable, simply enter the Unit
quantity as normal.
#
If you are purchasing cans for example: each can will come in a six-pack. Therefore the pack size
for cans, may possibly be set to 6.
If you are purchasing 2 trays of cans (with 4 six-packs each), then the number of six-packs would
come to 8.
You will see with items that have a pack size, the pack field will update with multiples of the pack
size. Therefore, when buying cans (as per the above example) if 15 cans are purchased, the pack
field will display 2.5 packs (2 six-packs, and half a six-pack as loose).
Price - The price field has also been improved in this latest version; now showing Vat Excl as well as VAT Incl
values. Previously, the VAT was calculated on the GRV as a whole, now BackOffice calculates the VAT value
according to each stock item individually. If one field is filled in, the other will be calculated automatically.
BackOffice still takes the VAT Incl amount divided by the Unit of Measure to calculate the Stock Unit Cost.
For more information, see the section on Stock Unit Costs 113 .
Stock Location - If your stock is being purchased for a specific location, you can select a location from this from down
list.
For more information, see the section on Stock Locations 120 .
Location - To purchase a stock item directly into a stock location, instead of transferring stock afterwards, simply
select the appropriate stock location from this drop down list.
#
§ The selected stock item must exist in the location first. For more information, see the section
on Stock Items per Location 121 .
§ BackOffice remembers the last purchase location for each stock item individually, then
automatically selects this location the next time.
(Version: 6.1.5)
© 2009 Coherent Software Solutions
Activities
29
Enter in the desired information for the stock item to be entered, and click on OK to continue.
#
When entering item purchases, if the stock item costing has changed compared to the last
purchase, a warning similar to the following will appear:
If this is correct, click on Yes to continue.
Repeat this process until all stock items on the invoice have been entered.
If the figures entered balance correctly, the supplier line in the GRV List section will change from being red. As well
as the GRV Status bar at the bottom of the Stock Purchases section changing from 'UNDER BY R--.--' to 'BALANCED'.
As seen below:
This GRV is now completed. At this point, BackOffice has now automatically added the stock items to your stock
management, and updated the cost prices for the purchased items.
© 2009 Coherent Software Solutions
(Version: 6.1.5)
30
3.1.3
BackOffice 6.1.5 Manual
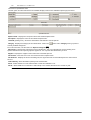
Return Stock
The Return Stock screen work the same as the Purchase Stock screen in reverse; allowing stock to be taken out of
your store room with a valid reason. By doing so, you will also be required to enter the monetary value that you
received in refund for these items; this figure will have an effect on your stock costing, as it has now changed the overall stock unit cost. If stock is being thrown away as opposed to being returned to the supplier (as in the case of
broken cans or bottles possibly), this stock should be recorded with the discard stock feature.
For more information, see the section on Discard Stock
35
.
Important differences:
· Stock can only be returned to the supplier they were originally purchased from (as seen below).
· Stock can only be returned on the same date or a date later than when it was purchased.
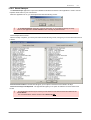
Below you can see a list of items that can be returned to the selected supplier. Notice how the list is very limited
even though the stock category filter (seen in the top right hand corner) is still set to display 'ALL'. This is due to the
fact that Aura will normally only allow items to be returned to a supplier if they were purchased from that supplier to
start with.
Follow the same procedure for selecting a supplier and adding stock items as found on the Purchase Stock
screen.
For more information, see the section on Purchase Stock 25 .
!
Under special circumstances, certain suppliers do allow stock to be 'returned' when they were not
the original supplier. However, this would obviously depend on whether or not the supplier in
question does actually deal in that stock item or not.
In a situation such as this, you will need to be granted the following access permission:
To Return Any Stock To Any Supplier
For more information on this, see the section on Access Permissions 179 .
(Version: 6.1.5)
© 2009 Coherent Software Solutions
Activities
3.1.4
31
Manufacture Stock
The Manufacture Stock screen provides an interface to accurately track stock items that are used in the
manufacture of other items. The term 'manufacture' is widely used as a term to describe the preparation of a
particular stock item; Any stock items that are used in your store are prepared in some way or other, whether by the
kitchen staff in store, or by the suppliers before delivery. If an item is prepared in-store by the kitchen staff, then it is
generally considered a Manufactured Stock Item.
A manufactured item may be anything from a simple salad dressing mixed in-store, to pizza or bread dough. Either
way, the manufactured item itself will require a recipe list so that Aura knows the quantities and items that are
required for the items to be manufactured.
For more information, see the section on Stock Item Recipes 116 .
!
Before you begin, please ensure that you have already manufactured the stock item and that
you have all the figures that were used in, and produced from this manufacture session. This
feature is designed to capture manufactured stock.
Manufactured Items
Toolbar - For more information, see the section on Navigating Records
13
.
List of Manufactured Items - Shows a list of items manufactured on the selected date.
Recipe for Manufactured Item - Displays the recipe used to manufacture the item selected above.
© 2009 Coherent Software Solutions
(Version: 6.1.5)
32
BackOffice 6.1.5 Manual
New Entry For Manufactured Item
To capture a manufactured item, begin by pressing the
button on the Manufactured Items toolbar at the top of
the screen. This will bring up the Stock Item Selector window, filtered to only show items that are available for
manufacture.
For more information, see the section on the Stock Item Selector 21 .
Select the item to enter from the list, and click on OK. This should bring you to the following screen:
In this exam ple, w e w ill use a cheese m ix
w ith half cheddar and half m ozzarella.
Location - Displays the location of the selected manufacture stock item.
Stock # - Displays the selected manufacture stock item, along with the code to the right hand side.
#
If the incorrect item has been selected, click the
screen.
button to return to the Stock Item Selector
Batch Qty. - Select the number of times the recipe will be repeated in this session.
Use Master Recipe - Select this option if you will be using the preset recipe, deselect it if you will add the recipe
manually for this session.
Batch Yield
If Use Master Recipe is ticked, this field will display the quantity that one batch of the master recipe will yield.
If Use Master Recipe is not ticked, you may enter the quantity that you produced from the recipe used; be careful with
this option, by doing so you will have to accurately record the quantities used in the recipe.
(Version: 6.1.5)
© 2009 Coherent Software Solutions
Activities
33
Manufacturing Using The Master Recipe
!
As we will see further down, the recipe for Cheese Mix uses 0.5kg of Cheddar and 0.5kg of
Mozzarella, giving us a yield of 1kg.
If we use enough cheese to manufacture 5kgs of Cheese Mix, we will use 2.5kgs of each cheddar
and mozzarella.
When you click on OK, you should see the following details:
#
The following may help to help understand the header line better:
In the Default location, we will manufacture Cheese Mix in a Measure of KG, using the Master
Recipe which Yields 1kg, 5 times over.
© 2009 Coherent Software Solutions
(Version: 6.1.5)
34
BackOffice 6.1.5 Manual
Manufacturing Using a Custom Recipe
If you find that the master recipe is different from what was actually used, you will need to manufacture the Cheese
Mix without selecting Use Master Recipe, which will show the following screen:
From this screen you can now create the recipe that was used in this manufacture session by clicking the
Button in the Recipe For Manufacture Item section on the lower part of the window. This will again bring you to the
Stock Item Selector window, this time showing items that can be added to a recipe for a manufactured item. Select
the stock item from the list and enter the quantity used in a single recipe yield.
#
Keep in mind that the quantity entered for the recipe, and the recipe yield for the manufactured
item will both be multiplied by the Manufactured Quantity to give you the end result.
Once all items have been added, and their quantities entered, you may review and revise the recipe as needed.
Below is an example of a recipe yielding 1kg of Cheese Mix using different quantities to the original recipe:
Paste Master Recipe - Using this option, you can reset the recipe for the currently selected manufacture item and
over-ride it with the master recipe for that item. After which you can add / remove / change quantities for any items in
the recipe.
Set As Master Recipe - If you wish to over-write the currently saved Master Recipe with the recipe you have just set
up, use this option.
View Master Recipe - If you would like to view what is in the Master Recipe without affecting the recipe you have
currently set up, use this option.
(Version: 6.1.5)
© 2009 Coherent Software Solutions
Activities
3.1.5
35
Discard Stock
The Discard Stock screen provides an interface to account for wasted stock. If for some reason, certain stock
becomes unusable (i.e.: burst cans, broken bottles, moisture in the flour or sugar, etc.), you will need to discard that
stock. Discarded stock should be captured in this screen with care, as any items 'discarded' in the Aura system are
simply recorded as wastage. If a batch of stock is instead returned to the supplier, as opposed to simply being
thrown away, then it should rather be captured under Return Stock.
For more information, see the section on Return Stock 30 .
Date Transferred - Select the date for the stock discard here.
- Use these buttons to browse through the previous and following dates one day at a time.
From Location - Select the location the stock is being discarded from.
#
Stock locations are part of the advanced stock control features of BackOffice.
For more information, see the section on Stock Locations
120 .
To Location - This is preset as 'Wastage' for this screen and cannot be altered.
Toolbar - For more information, see the section on Navigating Records
13
.
List of Stock Items - The lower section of this window lists all stock items that have been discarded on the selected
date.
© 2009 Coherent Software Solutions
(Version: 6.1.5)
36
BackOffice 6.1.5 Manual
New Entry for Discarded Stock Items
To send stock items to your wastage location, first select the Date the stock was discarded from the top left of this
screen. Once on the correct date for the discard, click on the
button to show the Stock Item Selector window.
For more information, see the section on the Stock Item Selector 21 .
After selecting the item you wish to discard, you should see the following screen:
Stock Item - This will display the selected item for discard.
If you wish to select a different item, click on the
to return to the Stock Item Selector.
Quantity - Enter the quantity of the item to be discarded. Take note of the unit of measure further down when entering
the quantity.
Prepped - If the stock being discarded has already been prepared, tick this box. If it is from the store room, do not
tick this box.
!
This setting will have a more noticeable effect on stock items that have a set Wastage
Percentage. As described under Stock Items, the wastage percentage is the amount of stock that
is 'wasted' in preparing the stock for use. A polystyrene cup would not have wastage, where as
grated cheese would.
Be careful to only select this option where applicable.
Comment - This field is available as a reason for discarding the stock.
Measure - Displays the unit of measure for the selected stock item.
Once the required fields have been entered, click the OK button to save. This should display a line similar to the
following:
At this point, Aura BackOffice will automatically update your stock list through the system, allowing you to see the
information entered on your reports.
(Version: 6.1.5)
© 2009 Coherent Software Solutions
Activities
3.1.6
37
Transfer Stock
The Transfer Stock screen allows stock to be moved from one location to another. This could be from one internal
location to another internal location, or from an internal location to an external location and vice versa. The uses of
this feature can be as simple as moving stock from a larger bulk store room to the smaller in-store store room. If you
have different employees that are responsible for each area, and stock takes are done separately for each, it is
advisable to set up two locations for this purpose.
Another use of this feature is the transfer of stock to another store, perhaps if a nearby store has run out of lettuce
and your store has some spare; by transferring the stock to this external location, the recorded amount of stock can
safely be removed from the store room without leaving any unaccounted for stock variances.
!
In order to use this feature, you must have multiple locations set up. If you do not, you will not have
any locations available to transfer to.
For more information, see the section on Stock Locations
120 .
Date Transferred - Select the date the stock was transferred.
- Use these buttons to browse through the previous and following dates one day at a time.
From Location - Select the location that the stock is being transferred from.
To Location - Select the location that the stock is being transferred to.
Toolbar - For more information, see the section on Navigating Records
13
.
Stock Item List - This will display a list of all items that have been transferred on the selected date.
Selecting Transfer Locations
To transfer stock, first select the locations to transfer to and from. Select each location from the drop-down list. As
seen below:
Select FROM Location
© 2009 Coherent Software Solutions
Select TO Location
(Version: 6.1.5)
38
BackOffice 6.1.5 Manual
Selecting Items to Transfer
To transfer stock, click the
button from the Toolbar. This will bring up the Stock item Selector screen.
For more information, see the section on the Stock Item Selector 21 .
#
In order to transfer a stock item from location A to location B, the same stock item must be
allowed to exist in both locations. Amongst other reasons, this prevents stock accidentally going
into the incorrect location. If you have just created a new location, you may see the following
message:
In this case, you will first need to go specify which stock items are available in the new location.
For more information, see the section on Stock Items Per Location 121 .
Once you have selected the stock item you wish to transfer and clicked OK, you will be prompted for the quantity to
transfer, as follows:
Stock Item - This will display the selected item for transfer.
If you wish to select a different item, click on the
to return to the Stock Item Selector.
Quantity - Enter the quantity of the item to be transferred. Take note of the unit of measure further down when
entering the quantity.
Prepped - If the stock being transferred has already been prepared for use, tick this box. If it is from the store room,
do not tick this box.
Comment - This field is available as a reason for transferring the stock.
Measure - Displays the unit of measure for the selected stock item.
Once the required information has been added, click on OK to add the stock item to the list of stock to transfer. This
should update the list to show similar to the following:
Repeat this process for each stock item until all stock that has been transferred is accounted for.
(Version: 6.1.5)
© 2009 Coherent Software Solutions
Activities
3.2
39
Cashup
At the end of the trading day, you will need to complete the store cashup. This process saves all the information
entered into the system during trade, and comparing that with the information entered by your employees, this will
give an indication of whether the store is gaining or losing money. This process can be done from Aura Invoicing or
BackOffice. This section outlines the cashup process as done from BackOffice.
The general cashup procedure is as follows:
· Employee Cashup
· Till Shift Cashup
· Shop Cashup
40
(Only applicab le if there are waiters, drivers, or any employees with time b ased wages)
43
47
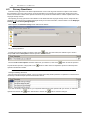
Accessing Cashup Screen
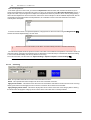
To access the cashup screen, select Activities > Cashup.
Colour legend for cashup screen:
White background: Normal (employee, till and shop)
Blue background: Selected (employee, till and shop)
Green background: Posted (employee, till and shop)
Purple background: Locked (till only)
© 2009 Coherent Software Solutions
(Version: 6.1.5)
40
3.2.1
BackOffice 6.1.5 Manual
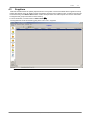
Employee Cashup
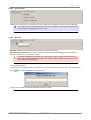
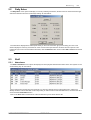
The Employee tab will show a list of employees that were active on the system for the selected cashup date. To view
information for each employee, select the employee from the list at the top and below that you will now see their own
cashup information.
To view more specific information, select the different tabs along the top of the 'Employee Cashup Summary'
section. Each tab will show more specific information regarding the relative section.
#
Drivers and Waiters must be posted before moving on to the till shift cashup. If your employees
are all paid an hourly wage, then all employees need to be posted to work out their wages
correctly.
§ For stores that do deliveries:
Drivers have their deliveries assigned to their clock in record, these orders are only completed
and paid into a till shift when the driver is posted to a till shift.
§ For stores that have tab les:
Waitrons have their table orders assigned to them, and they can close a table, allowing a new
order to be rung up on that table. As with the drivers, these orders are only paid into a till shift
when they are posted.
!
If a driver or waiter has for any reason clocked in more than once in a day, all instances of their
name in the cashup list must be posted. Invoicing treats each time clocked in as an individual
employee shift.
(Version: 6.1.5)
© 2009 Coherent Software Solutions
Activities
41
Payouts
As the name suggests, the Employee Payouts feature is an amount paid to the employee other than their standard
wages. There may be various reasons for using tis feature; however, through any of these, keep in mind that this
feature is only for any transaction that is not going to be recorded in another area of Aura.
For example: assigning an employee payout of R100 to purchase stock, then recording a stock purchase to the
value of R85 is incorrect. However, if the employee in question is going to keep the change, assigning the remaining
R15 to their Payouts would be accepted.
This is entered as a single figure, for the current
cashup only, as seen here:
If a figure of R100 is entered, the
Cashup Summary tab will update to
show the following:
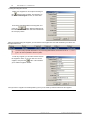
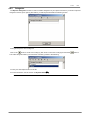
Surveys
The Surveys button is used to capture any surveys from the customer slips. This survey is printed out on Table
orders only and must be set up on your server computer. To set up these questions in Aura, see the section on
Survey Questions 82 .
!
The survey that prints out on customer invoices is taken from an image in the Aura program
folder. Please contact our Aura Helpdesk if you require assistance with this option.
Clicking the Survey button will present you with the following window:
Once the slip survey ratings have been added up for each employee (from the slips), select the block for the
appropriate rating for each question, type the number of customers that gave that rating and press Enter on your
keyboard. When the surveys have been captured successfully for this employee, click on the Close button to continue
with the cashup process.
These surveys are summarized in the reports; for more information, see the section on the Survey Ratings Report.
© 2009 Coherent Software Solutions
(Version: 6.1.5)
42
BackOffice 6.1.5 Manual
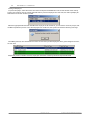
Posting an Employee
To post an employee, select their name from the list and press the Post button in the lower left side of the cashup
screen. This will show a list of currently active till shifts to post the employee into. Take note, this will only display till
shifts that have not been ended or posted:
Select the appropriate till shift and click OK. If the employee is still clocked in, you will see the clock out prompt, click
on OK to complete the process. Once the employee has clocked out, the system will show the following message:
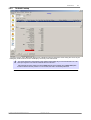
Once OK is pressed, Aura will refresh the screen and show the posted employees with a green background colour;
as seen here:
Repeat this process until all necessary employees have been cashed up into their respective till shifts.
(Version: 6.1.5)
© 2009 Coherent Software Solutions
Activities
3.2.2
43
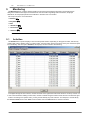
Till Shift Cashup
The upper section of the Till tab will display a list of all tills that are and have been active during the course of your
trading day, while the lower section will display a summary of the selected till.
#
For stores that have a shift change in the middle of the trading day, it is recommended to do a till
cashup and get the new cashier to activate their own till shift.
A till shift that has been ended, has both a Date (date and time started) and a Close Date (date
and time shift was ended). If there is no close date, the shift is most likely still active.
© 2009 Coherent Software Solutions
(Version: 6.1.5)
44
BackOffice 6.1.5 Manual
Cashup Procedure
In the Till Shift Summary section, you will see function shortcut keys to each section of the cashup:
Coupons (F1) - Used to enter an amount for a customer coupon. I.e.: A sale where the customer paid with a store
coupon, this accounts for the sales amount without needing to add to the Cash On Hand.
Credit Cards (F2) - This will list the credit card sales paid into this till shift, you can view or edit the amounts from this
option.
Cheques (F3) - This will list the cheque sales paid into this till shift, you can view or edit the amounts from this
option.
Cash On Hand (F4) - The cashier should use this option to enter the cash amounts of each denomination into their
own till shift.
#
If the Till Float (F10) is shown in the till shift cashup summary, then the Cash On Hand (F4)
amount must include the float.
Debtors (F5) - If any customers have a prior arrangement with management for a tab or account of any sorts, and are
planning to pay the outstanding amount at a later stage, these sales should be marked in this section. Along with the
customer name and information.
Petty Cash (F6) - Petty cash entries are small amounts paid from the till for store related miscellaneous purchases.
#
This feature can be disabled if need be.
For more information, see the section on Disable Petty Cash under the System Settings
171 .
Employee Wages (F7) - Lists the wages of all employees posted into the selected till shift, these amounts can be
adjusted by a manager if needed.
Addit. Banking (F8) - Use this option to enter any additional banking if needed: this may possibly be an amount that
was outstanding from a previous day, that was paid in today.
Driver Floats (F9) - If your drivers get issued floats from the till shift, these amounts will need to be entered in here
for the till shift and the driver's wages to balance correctly.
Float Issues (F11) - If any other employees are issued with a float amount (such as for promotional work, or a kiosk
sponsored and supported from the store), those loan float amounts must be entered here.
Till Float (F10) - This is the float amount for the selected till shift.
#
If the till shifts have a set float amount everyday, you can set a Default Till Float amount in the
settings.
For more information, see the section on Invoicing Device Settings
(Version: 6.1.5)
160 .
© 2009 Coherent Software Solutions
Activities
45
Posting and Locking Till Shifts
Once the till shift is balanced, you may now post the shift by pressing the Post button in the lower left corner of the
screen, as seen here:
Repeat this process until all tills are balanced and posted (They will show green when posted):
!
When posting the final till shift in the cashup, Invoicing will check to see if there are any
outstanding orders before allowing the shift to be ended and posted. This process is described
further below, for now we will assume there are no outstanding orders.
After all tills have been successfully posted, you may now lock them. Press the Lock button in the lower left corner of
the screen, as seen here:
This will prompt you for your password, and then ask for confirmation before locking the shift, as seen here:
Once the selected till shift has been locked, the till shift will be shown in purple:
Repeat this process until all the day's till shifts have been posted and locked.
© 2009 Coherent Software Solutions
(Version: 6.1.5)
46
BackOffice 6.1.5 Manual
Cashup Safety Options
All invoices must be paid into a till shift in order to complete the cash up correctly; if there are any orders still
outstanding when attempting to end and post the last active till shift, Aura will check to see if any orders are
outstanding, or if any employees are not posted, and give you a chance to rectify the problem before ending the shift.
!
These checks for outstanding orders and un-posted employees are dependant on the cashup
settings; if the option to check for outstanding orders when locking the till shift is not ticked, then
Invoicing will not check for outstanding orders before ending and posting the final shift.
When attempting to post a till shift with orders still outstanding, you will see a prompt similar to the following:
As seen in the above example; delivery order 16, created on the 22th June 2009, is still outstanding. Click on 'Close'
to close this window and continue. Next Invoicing will present you with a prompt, as seen below:
To stop the cashup process in order to sort out the outstanding orders, click on Yes. You will need to open Invoicing
in order to complete the outstanding order.
If the outstanding order is from a previous day (and therefore not linked to the current day's cashup), you may
continue with posting and locking the last till shift.
!
If you see during the cashup that there are outstanding orders from previous days, and you are
unsure of how to resolve the issue, please contact the Aura Help Desk the following morning
before any till shifts have been activated.
(Version: 6.1.5)
© 2009 Coherent Software Solutions
Activities
3.2.3
47
Shop Cashup
The Shop Cashup screen consists of the Shop Cashup list and summary. This should only have one shop cashup
in the list, and this screen acts both as a summary of all till shift cashups, as well as providing the final step for
ending the trading day. Don't expect the whole shop cashup to balance perfectly every day of trade; due to the rush in
most businesses and the fact that change must be exchanged, it is not very common that a shop cashup balances
perfectly.
!
If you have more than one shop cashup in the list, or a new shop cashup appears after posting
the first, ensure there is a tick in the option labeled 'One Shop Cashup Per Day'.
For more information, see the section on One Shop Cashup Per Day under the System Settings
.
171
To end the day's trading, click the Post button in the lower left corner of the screen. Posting the shop cashup will
complete the shop cashup for the day, clearing all invoices linked to the posted and locked till shifts, and will prevent
any new till shifts from being activated on this particular trading day. Pressing the Post button will present the
following prompt:
A posted shop cashup will be displayed similar to the following line:
© 2009 Coherent Software Solutions
(Version: 6.1.5)
48
3.3
BackOffice 6.1.5 Manual
Get Menus
The options found under the Get Menus section are provided to ensure your store is as up to date with the latest
menu item prices at all times. Three main options are available under this menu; Menu Download, Menu Activate
and Menu Undo.
#
The exact function of these options is dependant on your currently installed version of the Aura
Enterprise Client; while version 1 runs a separate window on screen, version 2 has been
optimised to run more in the background in order to interfere less with the usual flow of business.
For more information on AEC, please contact our support department using the Aura Contact
Details 202 .
Menu Download
By selecting this option, Aura BackOffice will run the latest available version of the Aura Enterprise Client and check
to see if there are any newer menu versions available to you for download. Keep in mind that for larger store chains
you will most likely receive a message from your head office that a new menu will be available.
Menu Activate
Once the menu has been downloaded, it is first stored in a temporary table until you are ready to activate the new
prices. By selecting this activate option, the downloaded menu will then be set as your active menu and all relevant
items and prices will be updated.
#
Remember that you do not need to activate immediately after downloading a menu; if a new
menu is downloaded and the included prices are only valid for a future date, you may safely leave
the downloaded menu as inactive until you are ready to activate it.
For security reasons, the currently active menu is not deleted completed, but simply moved into a
'backup' table.
Menu Undo
If there is an issue with the new menu and you need to go back to your previously active menu, use this option. By
performing a Menu Undo, Aura will retrieve the price list stored in the previously mentioned 'menu backup', and
restore those as your active menu.
!
VERY IMPORTANT NOTE
Aura can only store 3 copies of your menu; these three copies are referred to as the downloaded
menu, the active menu and the backup menu. It is important to understand this concept before
using this feature.
When a menu is activated, the following steps are taken:
§ The currently active menu is moved to become the backup menu; replacing anything that is
currently in the backup.
§ Next the downloaded menu is moved to become the active menu.
By these steps, performing a menu undo can only use the current backup menu.
(Version: 6.1.5)
© 2009 Coherent Software Solutions
Activities
3.4
Menu Publish
!
3.5
49
This function will only be available to your head office, and you may never need to use it unless
otherwise instructed by an Aura Help Desk technician only. Without certain settings enabled on
the Aura Enterprise Server for your store profile, this option will not do anything.
Synchronise
The Synchronise feature is provided to allow your store to upload sales data history to your head office. This is a
very important feature of the Aura POS package; allowing a central point for a franchise to evaluate and optimise
sales throughout the entire brand name.
Without this feedback from each store, metaphorically speaking the brand is 'sailing blind'. In the introduction to the
Reports section, you will see that a failure to synchronise regularly has adverse effects on your Aura system.
#
The exact function of this option is dependant on your currently installed version of the Aura
Enterprise Client; while version 1 runs a separate window on screen, version 2 has been
optimised to run more in the background in order to interfere less with the usual flow of business.
For more information on AEC, please contact our support department using the Aura Contact
Details 202 .
3.6
Capture Operating Expenses
The Capture Expenses feature is used to enter payments that are not directly linked to any profit inducing expenses.
This may include utility bills, repairs to the store equipment, or various other store expenses that do not add or affect
your stock items. Before an expense may be captured in Aura though, a record must be created on the system to link
the expense to.
For more information, see the section on Expenses: Items and Categories
123 .
Date - Select the date for which you would like to view or add expense payments.
- Use these buttons to browse through the previous and following dates one day at a time.
Paid Expenses Toolbar - Use these buttons to navigate the expense payments entered on the selected date.
List of Expense Payments - This will display a list of all expense payments entered for the selected date.
© 2009 Coherent Software Solutions
(Version: 6.1.5)
50
BackOffice 6.1.5 Manual
Capturing Expense Payments
To capture an operating expense, click on the
Selector, as seen below:
#
button from the toolbar. This will bring up the Expense Item
If you have no items in the list available to select, you will first need to set up your expense item
categories and items.
For more information, see the section on Expense Items and Categories
123 .
After selecting the expense payment you wish to capture, click the OK button to continue. This will display the
following prompt:
Payment Date - This date is automatically
entered as the current date.
Expense Item - Displays the name of the
selected item to capture an expense item payment
for. (If you wish to select a different item, click on
the
button to return to the Expense Item
Selector.)
Supplier - Displays the default supplier for the
selected item. You may change this by selecting
another supplier from the drop down list.
Quantity - Enter the quantity for purchase
according to the unit of measure.
Amount Paid - Enter the amount paid for the
above selected item and quantity.
After entering the required figures, click on OK to save the payment. You should see a screen similar to the following:
(Version: 6.1.5)
© 2009 Coherent Software Solutions
Activities
3.7
51
Transactions (Purge NOMAD Log)
The Purge NOMAD Log feature allows you to remove older information from your NOMAD Credit Card log.
!
This option will only function correctly if you have a NOMAD Credit Card system set up in your
store, if you do not, this feature will have no effect.
The first step is to select the amount of information you wish to keep,
click on the down arrow next to <Delete older than> and select the
number of days of information to keep from the drop down list.
Please take note, this will select the amount of information to KEEP and
will delete all information from the NOMAD log that is older than the
selected number of days.
To begin the purge, click on the
continue with the purge.
button. A prompt will be shown to confirm the log purge; click on Yes to
This will now show a progress
bar for each log that it clears, do
not press any keys or try to close
this window until you see a
message confirming that the
purge was completed.
You may now press OK and then Close the NOMAD Purge window.
© 2009 Coherent Software Solutions
(Version: 6.1.5)
52
3.8
BackOffice 6.1.5 Manual
Export (Data Exporter)
The Data Exporter feature is used by our more advanced technicians to extract and update information in your
system by over-riding the Aura functions and features.
!
This application is used solely by our Aura Help Desk and Call-Out technicians. You will not need
to use this function in normal trade, unless otherwise instructed by one of our higher level
support technicians and then ONLY in the way instructed.
Incorrect use of this program could render your system unstable and possibly cause major data
loss. In a worst case scenario, your system may be unusable.
The right to reserve information on the operation of this program and it's features is held solely
by Coherent Software Solutions, instructions of the operation of this program may only be
provided to the customer if there is no other alternative.
3.9
Backup Database
It is important to backup your data on a regular basis. All your data is stored on the server, including your sales,
purchases, employee details, the menu, and store settings in Aura. The location for the database backup is set via
the System Settings.
For more information on setting the backup location, see the section on System Settings > Backup
175 .
When selecting Activities > Backup from the menus, you will be presented with a backup confirmation prompt, as
seen below:
After selecting Yes to this prompt, you will be
given the option to select a location to backup
your database to. As seen here:
The recommended backup location is: C:
\MSSQL7\Backup. Contact our Aura Help Desk
for assistance on selecting a backup location.
(Version: 6.1.5)
© 2009 Coherent Software Solutions
Activities
3.10
53
Add-ins
The Add-Ins menu contains features that were added to Aura BackOffice after it's release. To find out more
information about these features, see the relative section below:
· Contact Manager (This add-in has it's own manual)
· Purchase Orders (This add-in has it's own manual)
· Design Floors
53
· Database Optimiser
· Database Purge
58
· Street Sweeper
61
57
3.10.1 Design Floors
The Design Floors feature is used to set up an interactive floor plan layout of your store. This feature is aimed at
stores that deal mainly with Table Transactions to simplify the interface for waiters to ring up and maintain their own
table orders. When opening the Design Floors feature, you will be presented with the following screen:
!
Before setting up the floor plan, you will need to have a table list set up in your store.
For more information, see the section on Adding and Maintaining Tables
© 2009 Coherent Software Solutions
(Version: 6.1.5)
141 .
54
BackOffice 6.1.5 Manual
Top Toolbar
- Save - Use this button to save any changes you make to your floor plan.
- Load - Use this option to load the currently saved floor plan layout.
- Customize - Use this option to change the colour settings for your floor plan layout.
#
Selecting Customize will show the following window:
Under the Colours section, you can select the colour you would like the different items will show
up as.
Under the Times section, select the number of minutes before a table order is updated to show
Neglected, and then the Final Neglect warning. The Tab le Poll Time is the number of minutes that
it takes to update the screen with information entered from other computers.
Second Toolbar
- Select - Changes the mouse pointer function to allow you to select an object on the screen.
- Wall - Click this button and then click anywhere on the layout panel to place a wall.
- Door - Click this button and then click anywhere on the layout panel to place a door.
- Window - Click this button and then click anywhere on the layout panel to place a window.
- Portal - Click this button and then click anywhere on the layout panel to place a portal to another floor level.
#
A Portal may only be placed if there is another floor to create a portal to. This is described in more
detail further down.
- Text - Click this button and then click anywhere on the layout panel to place a custom text block.
and
- Table - Click this button and then click anywhere on the layout panel to place a round or a square
table.
- Select Table - Use this button to change a table’s assigned number.
- Delete - Click this button to delete the currently selected item.
(Version: 6.1.5)
© 2009 Coherent Software Solutions
Activities
55
Adding Ob jects
Begin by creating the outline of your store by adding the Walls to your floor plan. Once you have the outline, you may
begin to add your Tables to the layout.
#
If there are no tables available, or no more unused tables, you will be presented with the following
message:
This will present the Table Selection window for you to add more tables. For more information on
this window, see the section on Adding Tables 141 .
After adding either a Round Table or a Square Table, you will be prompted to assign a table number to that table, as
follows:
#
Table numbers that have already been assigned to another table will not show up in this list, in
the above example, table numbers 1 through 11 have already been assigned to tables in the
layout. After placing either a Wall, Door, Window, Portal, Text Block, or Table you may resize it
using the corners of the selected item, as seen here:
© 2009 Coherent Software Solutions
(Version: 6.1.5)
56
BackOffice 6.1.5 Manual
Adding New Floor Levels
To add a new floor, click on the
button from the Levels
section on the left hand side of your layout screen, this will bring up a
prompt to enter a description for the new floor:
You may add a second or third floor to the Levels. After which, you will be able to
switch between each floor by selecting the name on the left, as seen below:
Adding a Portal for New Floor Levels
Now that you have multiple floors, you will need to
create a portal to be able to switch between the floors
on the layout. To do this, click the Portal button
described above. This will prompt you for a level to
link to this portal, as seen here:
#
This will show all levels other than the level you are adding the portal to.
Once you are satisfied with the floor plan layout, be sure to click on the
(Save) button before closing this
screen. You will lose any changes you have made if you do not save the layout first.
(Version: 6.1.5)
© 2009 Coherent Software Solutions
Activities
57
3.10.2 Database Optimiser
The Database Optimiser application is part of the database maintenance software. This application is used to reindex and optimise your database for optimal database speed.
This section of the manual is simply to cover the main points to be careful of and shows a description of the
optimise process.
You should only run this application at the direct request of a qualified Aura Help Desk technician.
When the optimiser is run, you will be presented with the following prompt:
Clicking on Yes will bring up the following prompt:
!
As the Database Optimiser updates information in your database, for safety reasons, the
application will not continue unless a backup is performed first.
Optimise Process
Please be patient while your database is being backed up. Once the backup completes, Database Optimiser will
continue with it's process. At the end of which, you should see the following window:
!
If you encounter any error messages at all, please leave the error message on screen and
contact our Aura Help Desk immediately.
For more information, see our Contact Details
202 .
After working with the Street Sweeper, it is highly recommended that you Update Customer
Statistics 63 .
© 2009 Coherent Software Solutions
(Version: 6.1.5)
58
BackOffice 6.1.5 Manual
3.10.3 Database Purge
The Database Purge application is part of the database maintenance software. This application is used to remove
old and outdated trading information from your database, keeping your database at an optimal size for best
performance and system stability.
This section of the manual is simply to cover the main points to be careful of and shows a description of the
purge process.
You should only run this application at the direct request of a qualified Aura Help Desk technician.
When the purge is run, you will be presented with the following screen:
!
As the Database Purge application changes information in your database directly, for safety
reasons, the application will not continue unless a backup is performed first.
Datab ase Purge Screen
Click on Yes to backup your database and proceed to the options screen. Once the backup completes, you will be
presented with the following screen:
!
Database Purge will not allow any data newer than 18 months old to be removed from your
database.
(Version: 6.1.5)
© 2009 Coherent Software Solutions
Activities
Performing a Datab ase Purge
#
Before starting the purge process, it is highly recommended that you first make sure of how far
back the information goes in your database. For best results and avoiding the most common
errors, do not attempt to delete any more than 3 months of data at a time.
A good way to check this is to run the Invoice Summary Report for a period covering the time
period you suspect contains the earliest information.
For more information, see the section on Invoice Summary Report.
To begin, first select the date from the drop down list calendar, as seen below:
Once you have selected the desired date, click on the
button to continue.
Datab ase Purge Process
While the purge is running, you will see the following screen:
!
VERY IMPORTANT:
Do NOT press any keys, run any other applications or attempt to close this window at any
stage during the purge process.
Doing so will cause corruption in your database, and thus cause you to lose important data.
© 2009 Coherent Software Solutions
(Version: 6.1.5)
59
60
BackOffice 6.1.5 Manual
Completing Datab ase Purge
Once the process is completed, you will be presented with the following screen:
!
After running the Database Purge, you MUST run a Database Optimise. If you do not run the
optimise after the purge, the physical database size will not be altered.
If we compare this process to using spreadsheets: Database Purge is equal to clearing a row of
information, while Database Optimise is equal to saving your spreadsheet file.
(Version: 6.1.5)
© 2009 Coherent Software Solutions
Activities
61
3.10.4 Street Sweeper
The Street Sweeper application is part of the database maintenance software. This application is used to remove
duplicate street entries in your customer list.
When this application is run, you will be presented with the following screen:
!
As the Street Sweeper application changes information in your database directly, for safety
reasons, the application will not continue unless a backup is performed first.
Street Sweeper Home Screen
After the backup completes, you will be presented with the following screen, listing all your current street names and
suburbs:
Correct Version of Street - The left hand list gives you an option to select the correct street to be kept.
Incorrect Version(s) to be Replaced - The right hand list gives you an option to select the incorrect streets to be
moved.
!
This application should only be used if you have street names that cannot be removed from the
List of Streets.
For more information, see the section on the Street List
© 2009 Coherent Software Solutions
(Version: 6.1.5)
127 .
62
BackOffice 6.1.5 Manual
Identifying and Selecting Correct and Incorrect Streets
To begin, first look for the correct street name in the left hand list of streets. In the following example, we have
Amsterdam Cr., Brooklyn and Amsterdam St., Brooklyn.
Let us assume that Amsterdam Cr. is the correct street name, whereas Amsterdam St. is the incorrect street
name, but both have customers assigned to them, and so the incorrect street cannot be removed from the street list.
In order to replace Amsterdam St. with Cr., click on the correct street on the left hand side:
#
Notice how the street name that you select on the left as the correct street, automatically
disappears from the list on the right.
Now select the incorrect street name from the list on the right hand side, as below:
And click on the
button at the bottom. This will now bring up the following prompt:
If you are certain that you have selected the street names correctly, click on Yes.
Replacing Incorrect Streets
This has now re-assigned all information that was linking to "Amsterdam St." and moved it to "Amsterdam Cr.". To
confirm this, check the list again to ensure that the incorrect street is in fact removed:
Repeat this process for each incorrect street name you may find in your customer's list. When you have successfully
replaced all incorrect streets, click on
#
to exit the Street Sweeper.
After working with the Street Sweeper, it is recommended that you update the customer
statistics.
For more information, see the section on Updating Customer Statistics
(Version: 6.1.5)
63
.
© 2009 Coherent Software Solutions
Activities
3.11
63
Update Customer Stats
The Update Customer Stats option is used to manually prompt a refresh of the links to the various areas in your
customer database. Even though these links (for example; last order placed) are updated automatically when the
customer is assigned to an order, it is still recommended to refresh this after any of the following steps:
§ Adding a New Customer
79
§ Editing a current Customer's Details
§ Running Database Purge
58
§ Running Street Sweeper
61
79
and Optimize
57
Customer Statistics Update Process
While the customer's statistics are being updated, you will see the following progress bar:
Once this process is completed, this progress bar will simply disappear and allow you to continue working as
normal.
© 2009 Coherent Software Solutions
(Version: 6.1.5)
This page is deliberately left blank
Part
Lists
IV
66
4
BackOffice 6.1.5 Manual
Lists
The Lists menu contains the functions of BackOffice relating directly to the information stored in your database.
Amongst others, this includes your Full Customer List, your Supplier Listing, your Menu and Stock Items, and your
Tables List.
See a topic b elow for more information:
· Find Invoices
· Employees
· Suppliers
66
68
77
· Customers
79
· Survey Questions
· Menu
83
· Stock
109
· Expenses
123
· Delivery Areas
· Streets
126
127
· Over-ring Codes
· Discount Codes
· Tables
4.1
82
131
133
141
Find Invoices
The Find Invoices feature gives you the option to go back and review invoices from any previous date, regardless of
whether the invoice is part of a posted and locked till shift or not. From this feature, you can not only view the order that
was processed, along with any discounts applied, but also re-print a duplicate copy of the invoice if needed.
Selecting Date to Browse Invoices
To access this information, select Lists > Invoices > Find Invoice from the menus along the top.
This will display the following window:
To begin, first select the date from the calendar drop down list, as seen here:
(Version: 6.1.5)
© 2009 Coherent Software Solutions
Lists
67
Browsing Orders on the Selected Date
After selecting the desired date, click on OK to show a list of all invoices on the selected date. You will be presented
with a window similar to the one below:
From this window, you may now browse through the orders for the selected date in the Previous Orders section at
the top of the window. Selecting an invoice will display the contents of that invoice in the Order Detail section below
that.
Once you have found the invoice you are looking for, you may re-print the order by pressing the
Once you are done with the Order History window, click on
#
button.
button.
In order to print the invoice, you will need to have an invoice printer set up on your server
computer. If your server computer does not have an invoice printer currently installed, you may also
print to one of your till computer's invoice printers.
Contact the Aura Help Desk for assistance with setting up an invoice printer.
For more information, see the section on the Invoice Printer Settings
© 2009 Coherent Software Solutions
(Version: 6.1.5)
157 .
68
4.2
BackOffice 6.1.5 Manual
Employees
The Employees menu contains the options specific to adding and maintaining your store employee's records and
categories. Including specific employee wages, and staff meal discount restrictions. Each employee record must
have the correct category assigned to it, this is done for security reasons.
For more details on these security measures, see the section on Employee Access Permissions
179 .
For more information, view the relative topic b elow:
· Employee Categories
· Employee Records
4.2.1
68
70
Employee Categories
The Employee Categories list displays a list of your currently available employee categories. Employee categories
are used to differentiate between different groups of employees, for multiple reasons; including employee access
permission and reporting purposes.
When the employee categories list is opened, you will be presented with the following screen:
Toolbar - For more information, see the section on Navigating Records
13
.
Category - Displays the unique category code that has been assigned to the category.
Description - Displays a description linked to the category code.
#
The list of categories will vary from one store to the next, but the most common will include
Franchisee (or owner), Cashier, and Manager. You can add or remove any category as you wish.
Take note, however, that you will not be able to remove a category if there is an employee
assigned to that category.
For more information, see the section on Employee Records
(Version: 6.1.5)
70
.
© 2009 Coherent Software Solutions
Lists
69
Create a New Employee Category
If you wish to add a new employee category, click on the
button. This will display the following window:
Enter category code - Use this field to enter a unique category code, a generally accepted value is an abbreviation
of the category being added.
Enter category description - Use this field to enter a full description of the category being added.
Click on OK to save the category. Once added successfully, you should now see the new category in the list, as seen
below:
In this example, Trainee Manager w as added
Removing an Employee Category
If you would like to remove a category, click on the category in the list, and press the
see a prompt similar to the following:
button. You should now
Click on Yes to remove the selected category, or click No or Cancel to return to the list.
!
If there are any employees linked to the selected category, you will not be able to remove the
category. A message showing a list of all employees in that category will be shown, as seen
below:
© 2009 Coherent Software Solutions
(Version: 6.1.5)
70
4.2.2
BackOffice 6.1.5 Manual
Employee Records
The Employees list is used to maintain a list of your current employees. From this screen, you may add new
employees, edit existing employees, or remove employees. Below is an example of a list of employees for the
purpose of this manual:
Toolbar - For more information, see the section on Navigating Records
13
.
Show (Located in the top right hand corner) - Select to display either active or inactive employees.
Employee List - Displays a list of employees currently in the system, along with any details assigned to each
employee.
!
IMPORTANT NOTE
Certain employees, even though having access to BackOffice, should not have rights to edit
employee records of a higher level of staff. For example, a manager should not be able to maintain
or create a franchisee employee record. Allowing a manager to do so would create serious
security issues in your store that will prove to be very difficult to trace.
For more information on preventing this, see the section on Restricted Employee Categories
191 .
For more information, see the relative topic b elow:
· Adding New Employees
71
· Editing Employee Records
75
(Version: 6.1.5)
© 2009 Coherent Software Solutions
Lists
4.2.2.1
71
Adding New Employees
To add a new employee, from the toolbar, click on the
seen below:
button. This will start the Insert New Employee wizard, as
Enter the required information for the employee being added.
#
Required fields:
· Employee #
· First Name
· Last Name
The Employee # must be unique to this particular employee. Aura BackOffice will not allow you to
save this employee if this employee number is already in use.
Although the remaining fields are optional, it is recommended for legal and security reasons to
store the extra information in your Aura system.
Also, take note of the status bar on the left hand side of the wizard, this will give you an indication
of the current step and the step that follows.
© 2009 Coherent Software Solutions
(Version: 6.1.5)
72
BackOffice 6.1.5 Manual
Employee Discount and Access Control Settings
Once you have enough information to identify your new employee, click on the
presented with the following window:
button. You will be
Category - Click on the down arrow and select the new employee's category from the drop down list.
!
If the category you are trying to assign is not in the list, you may need to set up the category first.
For more information, see the section on Maintaining Employee Categories
68
.
If the category you need is in the employee category list, but is not available when adding a new
employee, you may not have the required permissions to select the desired category.
For more information, see the section on Restricted Employee Categories
191 .
Set Password - Click on this button to set a password for the employee.
#
You will need the employee to enter his desired password twice in the following screen then click
on OK:
(Version: 6.1.5)
© 2009 Coherent Software Solutions
Lists
#
73
If the setting to enable a separate Invoicing password has been enabled, you will see the
following button below the Set Password option:
This secondary password is an Invoicing only access code, the code set here will not allow
access to Aura BackOffice. For added security, it is highly advisable that all managers and
franchise owners set a secondary password for their Invoicing access.
For more information on setting, look for 'Enable Separate Invoicing Password' found under
Program Settings > General 166 .
Does Deliveries - If the new employee is a driver, tick this option. If not, leave this option clear.
Is a Waitron - If the new employee is a waiter, tick this option. If not, leave this option clear.
Kl Colour - This option affects the Aura Kitchen Items application: any items assigned to a specific employee will
show up with their colour to identify who is responsible for that order.
Check/Set Fingerprint - Use this option to scan in a new fingerprint, or check the currently scanned fingerprint.
Clear Fingerprint - Use this option to clear any fingerprint currently scanned for this employee.
#
In order to use the above two functions, you will need to have a compatible fingerprint scanner
installed.
Contact our Aura Help Desk for more information on fingerprint scanners.
In order to save the fingerprints correctly, you will need to save the employee without a fingerprint,
and edit the employee afterwards to scan a fingerprint.
For more information, see the section on Editing Employee Records
75
.
Max Discount Percentage - Enter the highest percentage discount that this employee can assign to any invoice.
Max Discount Value - Enter the highest rand value discount that this employee cam assign to any invoice.
Staff Discounts
Max Monthly Spend - Enter the maximum amount this employee can receive in staff meals.
Max Discount Percentage - Enter the highest percentage discount this employee can assign as a staff meal
discount.
Max Discount Value - Enter the highest rand value discount this employee can assign to a staff meal discount.
#
If you leave the Invoice and Staff Discount fields blank, there will be no restrictions on the amount
of discounts this employee can apply to an order.
If the employee will not have any access to ring up any orders (for instance, a driver), you can
safely leave these fields blank.
Once you have selected the category and entered a password, you will have the option to save the employee. Click
on the Finish button from the bottom bar to save the employee. As seen below:
© 2009 Coherent Software Solutions
(Version: 6.1.5)
74
BackOffice 6.1.5 Manual
Setting Up Automatic Employee Wages (Optional)
Alternatively, If you wish to set up employee's wages, click on the
presented with the following screen:
button to continue. You will now be
Hourly Rate - Enter a rand value as an hourly pay rate. This figure will reflect at the end of the day in the employee
cashup screen.
#
Setting an hourly wage means the employee will be paid according to their time period clocked
into the Aura system. Please ensure that the employee knows to clock in as soon as their shift
starts and clock out as soon as it ends.
The clock in and out procedures are done from Aura Invoicing and are described in the Invoicing
Manual.
Commission Percentage - Enter a commission percentage for any orders rung up by this employee. Only applies to
cashiers or waiters with access to ring up table orders.
Shifts-To-Date - If the employee has worked here previously, and is returning to his previous position, you may enter
his/her shifts previously worked.
Rate per Delivery - Enter a fixed rate to add to the driver's wages for each delivery assigned to him/her. Only applies
to drivers.
Km Rate - Enter a fixed rate to add to the driver's wages for each kilometer traveled during their shift. Only applies to
drivers.
(Version: 6.1.5)
© 2009 Coherent Software Solutions
Lists
75
Confirming Settings and Saving Employee
If you wish to go back and change a field, or just review the options entered, click on the
move back a step.
button to
Once all the required information has been entered for your new employee, click on the
the changes.
button to save
This will save the employee and return you to the employee records. If the employee has been added successfully,
you should now see the new employee in the list, as seen below:
In this example, Trainee Manager has just been added
For more information, see the section on Employee Records
4.2.2.2
70
.
Editing Employee Records
To edit a current employee, from the toolbar, click on the
button. This will open the Edit an Employee wizard, as
with adding a new employee. From this screen, you may now update the information relating to the selected
employee.
#
Do not change the Employee # value for an existing employee, this unique number is used to link
the selected employee to trading information, clock-in and out records, and activity records in your
Aura system. Changing this number may cause issues for the selected employee.
Editing Employee Discount and Access Control Settings
Once you are satisfied with the information entered on the Employee Details page, click on
button to
proceed to the second step, as with adding a new employee. From this screen, you may now update the employee's
individual settings: such as their category, discount settings, or fingerprint.
© 2009 Coherent Software Solutions
(Version: 6.1.5)
76
BackOffice 6.1.5 Manual
Scanning Fingerprints
The
button is used for maintaining employee
fingerprints. Before using fingerprints, there are a couple of important points
that you should keep in mind:
§ Ensure that both the fingerprint scanner's glass and the employee's finger
are both clean before scanning the fingerprint. Any dirt or grease on either
one will have an adverse effect on the fingerprint scanning process.
§ In order to save a fingerprint, the employee record must first be saved. Each
employee will require a password; whether or not fingerprints are used.
§ In order for the fingerprint system to work effectively, you will require a
fingerprint scanner to be installed and activated on each of your POS
computers.
When using this feature, you will see one of the messages as described
below, see the relative message for more information on what is happening.
#
If the fingerprint being scanned matched another user's profile, you will see the following
message:
At this point, ensure that the employee in question does not already have another accoiunt in Aura
.
The selected employee must now press their finger on the fingerprint scanner to continue. You will see one of the
following prompts:
If there is no saved fingerprint for the employee in
question, you will be presented with the following
message. Click on OK and scan the fingerprint 3
more times.
Remember to press the
If the user's fingerprint has already been saved
correctly, you will see the following message:
button to save the changes and close the window.
(Version: 6.1.5)
© 2009 Coherent Software Solutions
Lists
4.3
77
Suppliers
All Goods Received Vouchers (GRVs) captured into the Aura system must be associated with a supplier record. By
creating this vital link, Aura can better manage and track the stock flow from supplier to store, as well as ensuring the
correct functioning of the Return Stock feature. Certain stock purchase and control reports also use this information
to categorize and group information for easier viewing.
For more information, see the section on Return Stock 30 .
The suppliers list can be accessed by going to the menu Lists > Suppliers.
© 2009 Coherent Software Solutions
(Version: 6.1.5)
78
BackOffice 6.1.5 Manual
Creating New Supplier Record
Adding new suppliers is as simple as clicking on
the
button from the toolbar. This will bring up
the Insert a New Supplier screen, as seen here:
Enter in the required details for the supplier, and
press the
button. Note that OK will only
be available after information has been entered into
the Company Name.
After successfully saving the supplier, you will see the new supplier in the list with all details you entered. For
example, Bob's Food:
!
Do not use any special characters in any of the suppliers details, characters such as ' " : ; / ? > <
{ } etc, will cause problems with the system.
To edit any supplier, you can either double-click on
the supplier's name, or you can click once on the
supplier, and press the
button. This will allow
you to edit the supplier's details.
Once you have a supplier successfully added, you may now create a purchase order from this supplier.
(Version: 6.1.5)
© 2009 Coherent Software Solutions
Lists
4.4
79
Customers
The customer's list is essential for delivery and collect orders, but a customer can also be assigned to tab le and
counter orders. Assigning customers to orders plays a vital role in the customer related marketing features of Aura;
without customer details, If a customer complains or comments on that order, it becomes very difficult to link this back
to the exact order. A customer may also come in and ask what drinks they had with the last order; without assigning a
customer, the order history feature will not function correctly either.
!
If your store does not process any collect or delivery orders, you may not need to access the
customer list and this feature will quite likely be disabled on your system. Please contact Aura for
more information on enabling the customers feature in Aura.
To access the customer list, go to Lists > Customers.
Along the top you will see the standard toolbar, followed by a filter to show active or inactive customers. Next to
these options are two buttons designed for customer maintenance.
- Pressing this button will attempt to fix customer phone numbers by adding your default dialing
code to incomplete numbers.
Using this feature will display a prompt similar to the following:
#
There are a few important points to keep in mind:
§ This will only affect numbers stored in the Phone field, as described further below.
§ It will not alter phone numbers that are more than 7 digits, as they are considered to already
have a dialing code.
§ Any phone numbers with 7 digits or less will have the preset Default Dialing Code added to
start of the number.
For more information on setting the Default Dialing Code, see the section on Store Settings
- This will invoke the same process as the Activities > Update Customer Stats
option.
© 2009 Coherent Software Solutions
(Version: 6.1.5)
63
163 .
menu
80
BackOffice 6.1.5 Manual
Adding New Customer Records
To add a new customer, press the
button. This will display the Customer Information screen.
Phone - A telkom contact number.
Cell - A cell phone contact number.
Do not leave any spaces in the cell numb er, this field is used for marketing.
Email - Email address for contact.
Do not leave any spaces in the cell numb er, this field is used for marketing.
F/Name - First name of customer.
L/Name - Last name of customer.
Addr. - Street address of customer.
This will print on the customer's slip.
Street - Enter a street number in the first field, and select the street from the drop down list in the second field.
This field links the customer to a street inside the system.
#
If you do not have the required street in the list, please see the section on the Street List
(Version: 6.1.5)
127 .
© 2009 Coherent Software Solutions
Lists
81
Enter in the required fields to save the customer information. If this has been entered correctly for delivery orders, the
customer information screen should display similar to the following:
If your store will not be delivering to this customer, or they only wish to do collect orders, you may leave the Addr and
Street fields blank. Doing so will prevent Aura Invoicing from allowing deliveries to be assigned to this customer, but
will still allow collect orders.
After setting up the customer, click on the
button on the right hand side to save the changes. If the Post
button is greyed out, then the changes have already been saved.
Setting Customer as 'Inactive'
At times, a currently active customer may wish to be removed from your Aura system for some reason. If they have
orders placed with the store any time in the past, their details may not be removed completely as there are previous
orders linked to their customer details record, but their customer record may be set to 'Inactive'; essentially preventing
any new orders from being assigned to the selected customer.
Firstly, locate the customer record in the Customer List. Once the customer's name has been found, right click on
the name and select 'Toggle Active Status', as seen below:
If the customer is currently active, this will set their customer record to 'inactive' However, if they are currently under
the inactive list of customers, doing this will set their record to 'active' again. To switch between the list of active or
inactive customers, select the desired option from the drop down list labelled View at the to of the screen, as seen
below:
© 2009 Coherent Software Solutions
(Version: 6.1.5)
82
4.5
BackOffice 6.1.5 Manual
Survey Questions
Customer survey questions have been implemented in Aura in order to get the customer's opinion of the service
they received in your store. The survey is set up and printed on your invoices as a footer image, printing out on the
footer of each invoice. These same questions must be set up inside Aura BackOffice in order to capture these in the
employee cashup screen.
The capturing of survey questions is described in more detail under the employee cashup screen. A report is also
available to view a summary of captured employee surveys. For more information, see the sections on the Employee
Surveys 41 and the Survey Ratings Report.
When opened, the Customer Survey screen will show as follows:
Set Up Survey Questions
To insert a new survey question to the list, click on the
button from the toolbar, this will allow you to enter a
unique code and the description for the first question, as seen below:
Once the code and description have been entered as you want them, click on the
Top add another question, simply click on the
questions have been inserted.
button to save the question.
button to add a new line. Repeat this process until all required
Viewing and Editing Questions
Once you have the questions entered, you may go back and modify certain questions to rephrase or correct errors if
necessary. Take the example questions below for instance:
If you wish to edit any of the questions, you may either double click on the question with your mouse, or select the
question and click on the
button. Remember to click on the
(Version: 6.1.5)
button to save the changes.
© 2009 Coherent Software Solutions
Lists
4.6
83
Menu
Menu contains a list of features specific to maintaining your Invoicing menu items. Amongst others, this includes:
menu categories, menu items, picklists, and production printer association.
For more information, see the relative topic b elow:
· Menu Departments
· Menu Categories
· Menu Items
· Picklists
84
85
86
100
· Kitchen Printer Wizard
103
· Items Per Report Group
105
· Items Per Sales Location
107
© 2009 Coherent Software Solutions
(Version: 6.1.5)
84
4.6.1
BackOffice 6.1.5 Manual
Departments
The introduction of Menu Departments adds the option to create custom menu item groups for Invoicing, allowing
certain menu items to be kept in close proximity to each other for easy access. As creating these groups does not
involve the editing of menu items, this feature is also available to stores that are locked out from editing their menu.
The other notable functionality of these departments is the ability to select which departments are shown by default
on each till ID when starting a new order. This is especially helpful if your store has a till point in key areas of the
store; such as a bar area and a meals area, where certain menu items can only be ordered from special areas of the
store.
Adding New Departments
Creating a department is as simple as clicking on
the
button along the toolbar, in order to enter
the desired code and description fields; as seen
here:
#
These fields must be unique, attempting to add two separate departments with either the code or
description fields the same will not work.
After you have entered the desired code and
description, click on the
changes. As seen here:
button to save the
Once you are satisfied with the list of departments, simply click on the
next step is to specify which departments each menu item is included in.
For more information, see the section on the Menu Items Other Tab
(Version: 6.1.5)
98
button to leave this screen. The
.
© 2009 Coherent Software Solutions
Lists
4.6.2
85
Categories
The Menu Categories window is used to maintain a list of categories to group your menu items together. For stores
that download the menu, these will be preset by your head office and you should not ever need to use this window.
If you are setting up your own menu, amongst other things, a well thought grouping system for your menu items will
result in:
· Easier Invoicing menu navigation, increasing the efficiency of your cashiers.
· Clearer sales reports, making it easier to find information.
Description - This shows the name of the category.
Sort Order - This column displays the selected sorting order for each category. If the sort order is left as 0,
categories will be sorted alphabetically.
Font - This selects the colour of the text that will appear on the category button in the touchscreen interface of Aura
Invoicing.
Brush - This selects the colour of the button background for the category button in Invoicing.
Grid Font - This will affect the text colour of the menu items as the cashier's ring them up inside Invoicing.
Indent - This setting will force an indentation on a new order for all items assigned to this category.
Hot Key - Inside Invoicing, this feature is to set a shortcut key to go to the desired category, regardless of what
category you are currently viewing. You may select any of the function keys (F1 through F12), number keys or letters.
#
In Touch Screen Mode these hot keys will display as an extra panel along the bottom of the of the
menu items display, in the order in which they are assigned here. See the Invoicing manual for
more information on this.
Type - This is a new function which has not been implemented yet.
Order - Specify the Sort Order for the selected category; this will only affect Aura Invoicing.
Hidden Category - Ticking this option hides the selected category button from the Invoicing selection.
#
This does not remove items in the category, it simply hides the items from view. If an employee
(such as the manager) knows the code, the item can still be rung up in either Touch Screen or
Keyboard mode.
© 2009 Coherent Software Solutions
(Version: 6.1.5)
86
4.6.3
BackOffice 6.1.5 Manual
Items
The Menu Items screen is used to add, remove and maintain all menu items for Invoicing. When opening the menu
items page, you will be presented with the following screen:
#
Keyboard shortcuts can now be used to navigate to the previous or next menu item in the current
filter.
"Alt + left arrow" To move to the previous record.
"Alt + right arrow" To move to the next record.
Navigation Toolbar
Locate Specific Record - This option will open the locate field value window. (Navigating Records
14
)
Filter Dataset - This opens an advanced data filter, showing only the menu items fitting the criteria specified. (
Dataset Filter 15 )
Print Menu Items - Shortcut to the Menu Items With Recipes Report. (Menu Items With Recipes Report)
Picklist - Shortcut to the picklist manager. (Picklist Manager
100 )
Refresh Data - This option will force a refresh of the menu items listing. This will also recalculate menu item
costing from the recipes associated to them.
Category Filter - The category filter is used to filter the menu items that are displayed. This will not change any menu
items, this will only restrict the items that are displayed for the current session.
Show (Active / Inactive) - This filter is used to show either the currently active or inactive items only.
#
Active items are menu items that will currently display on Invoicing, available for sale. Inactive
items are menu items that are no longer sold, but cannot be removed from the Aura system due to
links in previous invoices.
(Version: 6.1.5)
© 2009 Coherent Software Solutions
Lists
87
Menu Item
Item Code - This is a unique alphanumeric code or PLU (Price Look Up) code to identify the item. This is of
particular importance when using the keyboard interface of Aura. Cashiers are able to quickly go to a section of the
menu as soon as they key in the first character of the Item Code.
!
Item codes must be unique to each menu item, BackOffice will not allow you to save a menu item
if the code entered is already in use by another item.
Category - Displays the menu category for the selected menu item. The menu category contains certain information
regarding the menu items assigned to them, as well as grouping the menu items inside a new sale in Invoicing.
- To the right of the category drop down list, you will see a button to open a full list of the menu categories. The
only benefit of using this over the normal drop down list is that you can see the sort order of your categories more
easily.
Inv. Description - This line will determine the description of the item as it displays inside Invoicing, the menu item
related reports, and on the customer's till slip.
Slip Description - This line will determine the description of the item as it will print out on the production slip.
Size - The size option works as a sub-category inside the currently selected main category.
Sort Order - Using this option you may select the order in which the menu items will be displayed inside the
category on Invoicing.
#
The above two options are optional and may be left out.
The Size option is recommended for certain categories.
For example, in the Drinks category, assigning sizes to your Cans, 500ml or 2l Bottles would
make it easier to navigate the menu inside Invoicing.
Take note, these will both only make a difference in Touch Screen Mode and will have no bearing
on the Keyboard Mode.
RSP (Incl.) and RSP (Excl.) - These are the Retail Selling Price including and excluding the VAT amounts.
Cost Price - This is the cost to store according to the stock item recipe. For more information on this, see the section
on Stock Item Recipe 89 .
Item Gross Profit - Items with a recipe (cost to company) and a sales price (income to store) has an effect on the
store Gross Profit figures. This pie chart gives you an indication of how each item will affect your GP.
#
For a complete list of these GP pie charts, you may run the Menu Items With Recipes report.
© 2009 Coherent Software Solutions
(Version: 6.1.5)
88
BackOffice 6.1.5 Manual
Adding New Menu Items
The following section is only applicable to stores that create and manage their own menus. For
larger franchise chains that download their menu from a central head office store location; these
options will most likely be locked out by default, and cannot be changed.
!
All steps hereafter are described with the assumption that the menu is not locked for editing and
that you have the required access permissions to enter the required information.
In order to add a new menu item, begin by clicking on the
button from the top navigation bar. After doing so, you
will notice the Menu Item fields become blank, ready for the new item information to be entered, as seen below:
After adding all required information in the fields above, you will need to click on the
button to save the item.
Keep in mind an item must be saved before a recipe can be added for this item, this is to ensure the recipe and
menu item are linked correctly. You may view the links below for more information on extra menu item options.
You may also edit a current menu item if needed; with the item on screen, click on the
for editing. This will allow you to edit the item information.
button to unlock the item
You cannot change the item code on a currently active menu item, doing so will show the
following error message:
!
If for some reason a menu item does require a new item code, this menu item must first be
marked as 'inactive', and a new item created with a new code.
Extra Menu Item Specific Options
Below the Menu Item section of the window, you will be presented with additional options relating to the menu item.
You can switch between theses extra features by using the following row of tabs:
For more information, see the relative topic b elow:
· Recipe
· Other
89
94
· Colouring
98
· Screen Saver
· Barcode
99
99
(Version: 6.1.5)
© 2009 Coherent Software Solutions
Lists
4.6.3.1
89
Recipe
Recipe for ab ove item - The left half of this tab contains the recipe for the selected menu item.
Code - Displays the unique stock item code.
Qty - Displays the quantity of the stock item used in the recipe.
Measure - Displays the unit of measure for the stock item.
Description - Displays the named description of the items in the recipe.
Cost - Displays the cost to store of the specified stock item as used in the recipe.
Toolb ar
- Use this button to search for all menu items that have the selected stock item in their recipe.
- Adds the selected stock item to the recipe for the current menu item.
- Removes the selected stock item on the left from the menu item recipe.
- Removes ALL items from the menu item recipe.
- Copies the current recipe to the computer clipboard for later use.
- Pastes the recipe currently in the clipboard into the current menu item.
- Scale all stock item quantities in the recipe by a percentage.
Stock items availab le for recipes - The right half of this tab lists all your stock items that can be used in a recipe. This
list includes items that are purchased and items that are manufactured in store.
Code - Displays the unique stock item code.
Measure - Displays the unit of measure for the stock item.
Description - Displays the named description of the item.
Cost - Displays the cost to store of the specified stock item.
Category - Displays the category that the specified stock item belongs to.
#
With both sections of the recipe tab, the Cost columns are worked out from the purchases
entered for the specific stock. If a stock item shows a R0.00 cost, it may be that the item has not yet
been purchased or was purchased incorrectly. In this case, please check your stock purchases.
For more information, see the section on Purchasing Stock
© 2009 Coherent Software Solutions
(Version: 6.1.5)
25
.
90
BackOffice 6.1.5 Manual
Adding Items to a Recipe
To create a recipe for a menu item, start with the Stock items availab le for recipes section on the right hand side.
Search for the desired stock item by typing the description in the 'Search:' block. As you type, the list will update and
select the first item matching what you type, as seen below:
Once the desired stock item has been located, you can add it to the recipe by pressing Enter on your keyboard,
double clicking on the stock item, or pressing the
button. Doing so, will present the following window:
Take note of the Measure, and enter the quantity required for this recipe. Press Enter on your keyboard or click on
OK when done. You should now have the stock item in the recipe for the selected menu item.
#
If the stock item already exists in the item recipe you are trying to create or edit, you will be shown
the following message:
(Version: 6.1.5)
© 2009 Coherent Software Solutions
Lists
91
Removing Items from a Recipe
If you need to remove an item from the recipe, select the item from the recipe on the left, and press the
This will show the following prompt:
button.
Clearing the Entire Recipe
To clear the recipe block and start again, use the
!
button. This will bring up the following prompt:
If you accidentally clear the recipe, and need to undo this, you will need to click the
from the Navigation Bar at the top of the screen before changing anything else.
button
Keep in mind that this will undo ALL changes since the last time this menu item was saved.
Recipes and Inactive Stock Items
In certain circumstances, especially where menus are downloaded from a central head office, you may find a stock
item that was previously used is no longer needed. Once a stock item has been purchased, discarded, or used in a
stock or menu item recipe, it cannot be removed completely from the Aura system. In a situation such as this, the
stock item will be set to inactive instead. By this method, the item details are still stored for reporting purposes, but
the item cannot be used as it is inactive.
Where a menu item recipe contains a stock item that is then made inactive, you will see the following information:
Notice how the affected stock item itself is highlighted with a grey background. Ideally this stock item should be
removed and replaced with the correct item.
© 2009 Coherent Software Solutions
(Version: 6.1.5)
92
BackOffice 6.1.5 Manual
Searching for Recipes
If you would like to know how many different recipes a certain stock item is used it: First, find the stock item in the list
of Stock Items Availab le for Recipes, and then press the
button.
If the stock item is not used in any recipes, you will see the following message:
In the above exam ple, 'Straw s Branded' is not found in any recipes.
If the item is found in one or more recipes, a list of all menu items using that stock item will be displayed. Similar to
the following:
In the above exam ple, stock item GR048 (w hich w as Sw eet Chilli Sauce) is found in all the m enu item s listed.
#
If you would like to view any of the recipes, select the menu item and click on OK. This will
navigate to the selected menu item.
(Version: 6.1.5)
© 2009 Coherent Software Solutions
Lists
93
Copying, Pasting and Scaling Recipes
These functions are design to make recipe duplicating for different size items simpler. For example, let's take the
recipe for a 'Health Breakfast':
To use this recipe in aid of creating a 'Giant Health Breakfast', first Copy the recipe to the clipboard with the
button. Now use the Navigation Bar to navigate to the 'Giant Health Breakfast' menu item, and click the
paste the recipe.
button to
Because the 'Giant Health Breakfast' is twice the size of the standard one, it will require twice the quantity of items in
the recipe. To change this, click on the
button. This will bring up the following prompt:
Enter the percentage to multiply the recipe by. To double it, enter 200% and click on OK. Our example recipe should
update to show the following:
© 2009 Coherent Software Solutions
(Version: 6.1.5)
94
4.6.3.2
BackOffice 6.1.5 Manual
Other
Menu Item - The following are extra options for customizing the selected menu item.
Inactive - If you do not use a certain menu item any longer, and are unable to delete it, marking the item as 'inactive'
will remove the selected item from both Invoicing and from your reports.
Display - With this option selected, it will cause the selected menu item to display inside Invoicing. With it deselected, the item will still be available from a picklist, but will not display as an item on it's own in the menu.
Child Item - Selecting 'Child Item' changes the way that the selected menu item prints to the production printer.
#
If you have a menu item that is only ever rung up through a picklist, and never on it's own, it is
advisable to de-select Display and select Child Item. This will prevent the item from being
available from Invoicing, and will highlight the item on the production slip, making it clearer on the
slip that it is a child of item above it.
Don't Print - Selecting this option will prevent this item from printing on the customer's slip. This is most often used
on instructions for the kitchen staff.
!
Keep in mind that by law the customer must see all paid-for items on their slip, and therefore this
option is only available to menu items that have the price set to zero (R0). If "Don't Print" is ticked
on an item with a price above R0, when saving the following message will be shown:
Optional Item - This option is used in large chains of stores with a single head office to manage the menu. This
feature is described in more detail further on.
Prompt for Quantity - Selecting this option will make Invoicing bring up a quantity prompt whenever this item is rung
up on an order.
Price is Locked - Selecting this option prevents cashiers and managers from overriding the price of the selected
menu item.
Report Group - With report groups set up, it is possible to categorise the menu items with more flexibility on the
reports. These groups can be created for many different reasons, the most common of these however is for a 'combo
store'; where two different stores share a property and a single server computer.
Items can also now be assigned to Report Groups by a wizard. For more information, see the section on Items Per
Report Group 105 .
(Version: 6.1.5)
© 2009 Coherent Software Solutions
Lists
95
Sales Location - With larger stores and restaurants, it is quite likely that multiple locations are available for the stock
to be stored. In these situations, certain menu items can be set to pull their stock from one specific location; as
opposed to the default location.
Items can also now be assigned to Sales Locations by a wizard. For more information, see the section on Items Per
Sales Location 107 .
Item Commission - Setting a menu item commission value, will cause this menu item to be shown on the
Commission Per Menu Item Report. Remember that by setting this option, it will not affect the employee wages, this
will only show on the commission report. This feature is for incentive calculations only, and is not linked to the wages
in any way.
For more information, see the section on the Commission Per Menu Item Report.
Percentage - Selecting this tick-box will change the commission figure from a rand value to a percentage of the
menu item price.
VAT Exempt - Selecting this option will mark the selected item as exempt from value added tax.
#
Notice how the RSP Incl and RSP Excl fields at the top of the window change when this option is
applied. After ticking this option, ensure that the sales price is still correct.
Printers - This block lists the available production printers set up in the Aura software. Aura Invoicing will print the
selected menu item to any kitchen printers that are ticked here. You can use this list to assign or clear single items,
menu categories, or the entire menu to production printers. These features are described in more detail further down.
Departments - Once departments have been set up, you may specify which departments a menu item is a part of.
This will not only open up categorizing options for Invoicing, but for the reports as well.
For more information, see the section on Menu Item Departments 98 .
Images
!
This section refers to settings used by an old Aura application called Aura Imaging. This
application is no longer in use.
Optional Items
Menu items set as optional items are active and available from Aura BackOffice at any time, but only from Aura
Invoicing once it has been marked as an 'Optional Item In Use'. To set an item as an 'Optional Item', tick the box
shown below:
Once an item is ticked as an 'Optional Item', you will see a new option in the Menu Item Description section at the
top of this window. As seen in the below example:
!
If your store is part of a larger chain and your menu is downloaded from head office, you will most
likely be locked out and be unable to edit menu items. If this is the case, you will not be able to
change the 'Optional Item' field, but you will still be allowed to check and uncheck 'Optional Menu
Item In Use' as you wish.
© 2009 Coherent Software Solutions
(Version: 6.1.5)
96
BackOffice 6.1.5 Manual
Report Groups
Report groups allow a much more versatile approach to information on reports. One of the most beneficial results of
an effective report group feature is the ability to accommodate for multi-brand restaurants to run effectively off a single
server computer. This layout minimizes the overheads of buying computer hardware, and allows each to access,
change, and report on their own individual stock usage effectively.
To set up any alternative report groups for each side of your store, click on the
drop down list. This will display the following window:
button next to the Report Group
From this window, it is possible to add and remove different report groups using the toolbar along the top. Once all
the required groups are inserted, click on the OK button to close this window.
To select the report group for the selected menu item to be assigned to, click on the down arrow next to Report
Group and select the desired report group, as seen below:
Sales Locations
Multiple stock locations have been a large part of the Aura POS system, and the features that were already available
have now been revamped to facilitate more flexible set-ups. The idea of being able to record stock stored in multiple
locations is a great way to keep track of stock spread over a large restaurant; however, by doing so it can create some
confusion with the locations that stock is taken from for sales.
!
Important Note
You may notice that Sales Locations and Stock Item Locations are in fact the same list; this is
due to the fact that the 'Sales Locations' specify the location that the stock is retrieved from when a
sale is processed.
To set up and maintain Sales Locations, click the
take you directly to the Stock Locations screen.
button next to the drop down list. This will
In order to specify the location the stock it retrieved from for a sale, with the desired menu item displayed, click the
down arrow next to Sale Locations; as seen below:
(Version: 6.1.5)
© 2009 Coherent Software Solutions
Lists
97
Production Printers
This list contains all the production printers currently set up in the Aura system. By placing a tick in the box next to
one of these printers, the the selected menu item will be set to print to that printer when added to a customer's order.
#
This process may also be done by means of the Kitchen Printer Wizard; for more information on
this, see the section on the Kitchen Printer Wizard 103 .
In addition to assigning menu items to production printers one item at a time, all items in a category can be
assigned to a production printer at once. To access this and other functions, you will need to right click on the
desired production printer. Doing so will display the following menu:
Assign to all items - This will assign ALL items in your menu to print to this production printer, regardless of their
category.
Assign to a category - This will bring up a menu category selection window, similar to the one seen below:
Clear all items - Selecting this option will clear ALL items from this printer, thus setting no items to print to this
production printer until they are reassigned.
Clear all items in a category - This option will show the same window as Assign to all items in a category, but
selecting a category will then stop all items in the selected category from printing to the selected production printer.
© 2009 Coherent Software Solutions
(Version: 6.1.5)
98
BackOffice 6.1.5 Manual
Menu Item Departments
In the lower right corner of this tab, you will see a Departments selection block; this selection block allows you to
specify which department a particular menu item is a part of. As mentioned in the Menu Item Departments section, a
single menu item may be assigned to multiple menu departments without a problem; this is done by simply ticking
all the desired departments for the current item. Seen below is the example of a list of available departments; this list
only displays the description field of the departments, the code field is used to ensure that the items are linked
correctly to the description.
In order to include an item in a specific department, simply browse to the menu item using the Navigation Bar
and tick the desired department(s). As seen here:
!
13
,
There is no need to tick 'Default', as all items are automatically included in default automatically.
You will need to repeat the above process for each menu item to be included in a department. Once this is done, the
next step involves specifying which departments are displayed on each till. Keep in mind that this department setting
is set on each till individually, and will only affect Aura Invoicing.
For more information, see the section on System Settings > Specific Computer > Invoice Settings 153 .
4.6.3.3
Colouring
Font - This specifies the button font colour for the selected menu item.
Brush - This specifies the button background colour for the selected menu item.
Apply to Current Filter - This button shows the colour scheme that the selected menu item will use inside Invoicing.
Clicking this button here will apply the colour scheme to all menu items within the current filter.
Apply Category Colour to Item - This button displays the colour scheme set for the menu category button. Clicking
this button here will apply the category colour scheme to the menu item that is currently selected.
(Version: 6.1.5)
© 2009 Coherent Software Solutions
Lists
4.6.3.4
99
Screen Saver
Select items to export to the Aura screen saver, this setting must be selected for each menu item individually.
#
4.6.3.5
The screen saver is not activated by default in an Aura installation. Contact the Aura Help Desk for
more information on setting up the screen saver.
Barcode
Barcode - Displays the barcode currently scanned to the selected menu item.
Read Quantity From Barcode - This feature is used to read the quantity of the selected item directly from the
barcode when an item is rung up in this manner.
!
International standards for barcodes do not allow space for the quantity as well, therefore this
feature will only be available to stores that have custom barcodes created either in store or by the
store's head office (if applicable).
Scanning New Barcodes
If you have any items with barcodes on the label, you may scan them in here. In order to scan a new barcode, click
on the
button. This will display the following prompt:
At this prompt, activate your barcode scanner and scan the product.
© 2009 Coherent Software Solutions
(Version: 6.1.5)
100
4.6.4
BackOffice 6.1.5 Manual
Picklists
With certain menu items, the customer may have various options relating to the specific item they chose. For
example: with a breakfast, they could have the eggs soft or hard boiled, a choice of vegetables or mashed potato, etc.
This is done by creating a customized list of options, and assigning that list to a menu item. A picklist may also be
assigned to a category, allowing Invoicing to display the desired picklist once any menu item in that category is rung
up. These lists of options, or Picklists can be set up here.
Items With Picklists - The panel on the very left displays a list of menu items and menu categories that currently have
picklists assigned to them.
Picklists - The centre panel displays a list of picklists that are currently available to assign to a menu item. With
picklist-specific options at the bottom.
Picklist Selection Price - By selecting one of these three options, you may choose how the items in this picklist are
charged for.
Compulsory - Inside Invoicing, it is possible to cancel a picklist, allowing only the parent item to be rung up on it's
own. By selecting this option, the menu item will only be added if the picklist is completed as well.
Number of selections allowed - If you have multiple options inside this picklist, and the customer has an option to
choose two or three of them, set the number of available selections here.
Picklist Item Selection Size - Seeing as an entire category may be specified in a picklist, as you will see further
down, you may specify only a certain size group inside that category to be available. This will be described in more
detail further on.
Menu Items / Categories - The panel on the very right hand side contains a list of menu items and menu categories
that can be assigned to a picklist. The Menu Items can be searched by entering either the unique item code, or by the
description.
For more information, see the section on Menu Item Codes and Descriptions
(Version: 6.1.5)
86
.
© 2009 Coherent Software Solutions
Lists
101
Creating a New Picklist
To begin, you will need to right-click in the Picklist column and select New, as seen below:
By doing so, this creates a picklist called 'New Picklist'. This should now be highlighted. To change the name,
simply left click on the name again. You should now be able to edit the picklist name. Type in the desired name, and
press Enter on your keyboard, as seen below:
To add menu items to the picklist, click and drag the desired menu item from the Menu Items list onto the new
Picklist and then let go of the mouse button. Take note of the mouse pointer, as seen below:
#
Entire Menu Categories can also be included in a picklist. To add a category, switch from the
Menu Items list to the Categories list by using the tabs seen below:
Once on the category list, add the category to the picklist the same way as the menu items.
Adjusting Picklist Pricing
If the items in the picklist need to have a price assigned, this can be done in the bottom of the Picklist section of the
window, as seen below:
The drop down list has the following options:
§ Largest of Same Type - Selecting this option, will set the price of all menu items in this picklist to be the same as
the highest price of any item in that same category.
§ Same Price as Selected Menu Item - This option will leave the price of the menu item the same as if it was rung
up on it's own.
§ Override Price - This will give you an option to select a price to override the charge to.
The option below the drop down list (currently show -1 in the above screen shot), will only be available with 'Override
Price' selected. Use this field to enter the desired price for each item in the selected picklist.
Selecting Size Filter
If you include a category instead of individual menu items, you can narrow the available options further by specifying
a size as well. This will only work if the menu items in a selected category have sizes assigned to them.
For more information, see the section on Menu Item Sizes
#
87
.
The size setting will only affect the category currently selected inside the picklist.
© 2009 Coherent Software Solutions
(Version: 6.1.5)
102
BackOffice 6.1.5 Manual
Assigning a picklist to a menu item
Firstly, you will need a menu item to assign the picklist to. Select the desired menu item from the list on the right
hand side, and click-and-drag that item to the left hand side. Release the mouse button when the cursor is over Menu
Items With Picklists, as seen below:
Once the item is added to the Items With Picklists sections, you can now assign the picklist to the item. Click and
drag the desired picklist from the Picklists column to the Items With Picklists column, as seen below:
In the end, you should see the following structure under the Items with Picklists:
In the above example: From Invoicing whenever the selected menu item is rung up, a picklist called 'Example
Picklist' will prompt for a 'Sit Down' or 'Take Away' instruction to be.
Assigning a picklist to a menu category
As with assigning a picklist to menu item, we can also assign a picklist to a category. Doing so will automatically
apply the same picklist to all menu items included in that category.
Firstly, change the list on the very right to display the categories, then click-and-drag the category over to the Items
with Picklists column on the left. Release the mouse button once the mouse pointer is over Categories with
Picklists, as seen below:
You can now assign the picklist to the category on the left. This is done by dragging the picklist from the middle
Picklists column over to the category that has just been assigned to the Categories With Picklists on the left.
Resulting in a similar structure to what is shown below:
(Version: 6.1.5)
© 2009 Coherent Software Solutions
Lists
4.6.5
103
Kitchen Printer Wizzard
The Kitchen Printer Wizard is used to specify which production printer (otherwise called a 'kitchen printer') each
menu item will print to. When an item is rung up inside Aura Invoicing, two print commands are sent: one for the
customer's slip, and another for the production slip. The Kitchen Printer Wizard picks up the production slip print
command, and sends each menu item to the production printer (according to the list set here).
A menu item may be set to print to more than one production printer, or no production printer at all. But it is
recommended that all items are sent to the production printer (or at least one if you have multiple kitchen printers).
Menu Items
§ Filter - Select a category to filter the menu item list by. Take note that this list will only display items that are NOT
currently assigned to any production printers.
§ Select
- Click on the All button to select all items in the current category filter.
- Click on the None button to deselect all items. This is only available once an item has been selected.
§ Menu Items List - Below the filter is a list of all menu items matching the currently selected category filter.
Kitchen Items
§ Assign all selected menu items to selected printer - This button is used to complete the assigning process, and
is only available once menu item(s) and kitchen printer(s) have been selected. This will be described further
down.
§ Production Printer List - Below the assign button is a list of all available production printers.
© 2009 Coherent Software Solutions
(Version: 6.1.5)
104
BackOffice 6.1.5 Manual
Alternative Ways to Select Menu Items
To select menu items individually, click in
the box to the left of the menu items, as seen
below:
In order to select all items in a certain
category, select the desired category from
the drop down list, and then click the All
button, as seen below:
#
Notice how the None button is not available when no items are selected, just as the All button is
not available if all items are already selected. This is a quick and simple way to see if all items
within the current filter are selected or not; especially handy if the list is too long to fit on one
screen.
To select all items in the complete menu, change the category filter back to All and then click on the All button. This
will select all items in all categories.
Assigning Selected Items to Printers
Once the desired items are selected, the next step is to select the printer that those items need to print to. This may
be one printer, or more than one printer, as seen below:
One printer selected
Tw o printers selected
Once the printers have been selected, click the button above to assign the items. This will assign the selected item
(or items) to the selected printer (or printers), after which the assigned items will be removed from the list on the left.
Repeat this process until all required menu items have been assigned to the desired printers. Once all items are
assigned, the list on the left should be cleared out.
(Version: 6.1.5)
© 2009 Coherent Software Solutions
Lists
4.6.6
105
Items Per Report Group
Report Groups allow more versatility in the summary reports; when viewing reports, you will notice certain reports
have a second option in the menu labelled as "<report name> By Report Group". Aimed mainly at combo-stores; one
beneficial feature of separate report groups is the ability to have different Royalty Percentages for each report group.
For more information, see the section on setting Royalty and Advertising Percentages
#
164 .
Your Aura system must have at least one Report Group set up before this feature is available.
Currently, this must be done by the option found in Lists > Menu > Items under the tab labelled
"Other".
For more information, see the section on Menu Item Report Groups
96
.
Working With Report Groups
When using the Items Per Report Group option, you will see a screen similar to the following:
© 2009 Coherent Software Solutions
(Version: 6.1.5)
106
BackOffice 6.1.5 Manual
Report Group
The upper-most section of this window has you main features:
Current Report Group: By clicking on the down-arrow here, you may select the report group you wish to edit; as seen
below:
Search: In order to simplify the process of assigning items, you may also type in a word to search for. This will filter
both the included and excluded list of items for the report group; as seen in the image below:
§ Items Included in <report group>
The list on the left hand side of this window is a list of items that are currently included in the selected Report
Group.
§ Excluded
The list on the left hand side of this window is a list of items that are currently excluded from the selected Report
Group.
§ Central Toolb ar
The vertical toolbar in between the Included and Excluded lists contains tools that you will require for including
and excluding items from groups. Keep in mind that these buttons will work within the search filter. This means
that using the Include All (double arrow to the left) or Exclude All (double arrow to the right) buttons will only move
items that are visible after using the search filter.
(Version: 6.1.5)
© 2009 Coherent Software Solutions
Lists
4.6.7
107
Items Per Sales Location
A sales location specifies the Stock Location that the recipe ingredients are taken from. This feature is only really
helpful in the case of either a combo-store, or if the stock in your store is counted and managed in two separate stock
locations.
#
As the Sales Locations options link menu items to Stock Locations, these locations must exist
in your Aura system before continuing.
For more information, see the section on Stock Locations
!
120 .
In order for this feature to function correctly, keep in mind that the stock items used in a particular
menu item must be included in the stock location in question.
For more information, see the section on Stock Items per Location
121 .
Working With Locations
When using the Items Per Sales Location option, you will see a window similar to the following:
© 2009 Coherent Software Solutions
(Version: 6.1.5)
108
BackOffice 6.1.5 Manual
Sales Location
The upper-most section of this window has you main features:
Current Sales Location: By clicking on the down-arrow here, you may select the sales location you wish to edit; as
seen below:
Search: In order to simplify the process of assigning items to sales locations, you may also type in a word to search
for. This will filter both the included and excluded list of items for the selected location; as seen in the image below:
§ Items Included in <location>
The list on the left hand side of this window is a list of items that are currently included in the selected Sales
Location.
§ Excluded
The list on the left hand side of this window is a list of items that are currently excluded from the selected Sales
Location.
§ Central Toolb ar
The vertical toolbar in between the Included and Excluded lists contains tools that you will require for including
and excluding items from locations. Keep in mind that these buttons will work within the search filter. This means
that using the Include All (double arrow to the left) or Exclude All (double arrow to the right) buttons will only move
items that are visible after using the search filter.
(Version: 6.1.5)
© 2009 Coherent Software Solutions
Lists
4.7
109
Stock
The Stock menu contains the features necessary for stock maintenance. Just as the stock items are used in
recipes for the menu items, they are also used in recipes for manufactured stock items. It is essential to ensure that
the stock items are set up correctly for these functions to operate accurately.
Extra stock control features are located outside of the Stock Menu, amongst others these include the Stock Take
and the Purchase Stock function. These can be found under the Stock section of the Activities Menu.
For more information, see the section on Active Stock Control
For more information, see the relative topic b elow:
· Stock Categories
· Stock Items
110
111
· Stock Locations
120
· Items per Location
121
© 2009 Coherent Software Solutions
(Version: 6.1.5)
21
.
110
4.7.1
BackOffice 6.1.5 Manual
Categories
As with the Menu Items, the Stock Items are also grouped by categories. The categories are set to simplify
searching stock items for active stock control and maintenance. This window provides an interface to manage the
stock categories list, as seen below:
Toolbar - For more information, see the section on Navigating Records
13
.
Category Lists- Lists all currently available stock categories.
Adding and Removing Categories
To add a new category, click the
as seen below:
After entering the name, click the
button. This will insert a blank line for you to enter a name for the new category,
button to activate the category.
If you need to remove a category, click on the desired category and click the
!
button.
A category can only be removed if there are no stock items assigned to it, whether active or
inactive. If you try to remove a category that still contains stock items, you will be presented with an
error message stating "This code is in use and cannot be removed".
(Version: 6.1.5)
© 2009 Coherent Software Solutions
Lists
4.7.2
111
Items
The Stock Items screen is used to maintain your currently active and inactive stock items. If you maintain your own
stock items, for example: adding or removing your own items, you will use this screen. If your store downloads a
menu from a head office store, the stock items will be downloaded alongside that menu; in this case you will not be
able to change many of the settings you see here.
#
Keyboard shortcuts can now be used to navigate to the previous or next stock item in the current
filter.
"Alt + left arrow" To move to the previous record.
"Alt + right arrow" To move to the next record.
Navigation Toolbar
Locate Specific Record - This option will open the locate field value window.
For more information, see the section on Navigating Records 14 .
Filter Dataset - This opens an advanced data filter, showing only the menu items fitting the criteria specified.
For more information, see the section on Dataset Filter 15 .
Refresh Costs - This button forces a refresh of all the calculations for the stock costing. Clicking this button will
update all stock items with their last known purchase price, overriding any manual price settings or price errors.
Category Filter - The category filter is used to filter the menu items that are displayed. This will not change any menu
items, this will only restrict the items that are displayed for the current session.
© 2009 Coherent Software Solutions
(Version: 6.1.5)
112
BackOffice 6.1.5 Manual
Show (Active / Inactive) - This filter is used to show either the currently active or inactive items only.
#
Active items are menu items that will currently display on Invoicing, available for sale.
Inactive items are menu items that are no longer sold, but cannot be removed from the Aura
system.
When an item is taken off the menu, if it is still linked to any invoices in the Aura system, it cannot
be deleted completely. In this situation, it is marked as 'inactive' to remove it from the currently
active menu.
Item Description
Stock Code - This code is the identifying code for the stock items and must be unique to each stock item.
Category - Displays the stock category that the currently selected stock item is assigned to.
Click the
button next to the drop down list to access the Stock Categories
110 .
Stock Type - Displays whether the currently selected stock item is a 'Food Cost' or 'Non Food Cost' item. Food cost
items will be treated differently to the non food cost items in certain sales reports. This will be explained in each
report affected by the stock item pricing.
Desired Level - Enter the desired level of stock o be kept on hand at any given point in time. This feature works hand
in hand with the Stock Issues report as well as the Order Manager application, with a more detailed description found
under each section.
Exclude from Worksheets - Selecting this option will remove the selected stock item from your stock take
worksheets and stock takes, regardless of whether it is marked as a controllable item or not.
Description - Displays the full description for the selected stock item. This description will be used to locate and
display the stock items in every list of stock items in the Aura system and reports.
Unit of measure - This field identifies the counting method for the selected stock item. Ensure that the unit of
measure used is optimal for correct stock calculations, this will affect the flow of this stock item through purchases,
returns, recipes, and stock takes amongst others.
!
If a stock item's unit of measure is changed, you will need to ensure that all required recipes,
stock takes and purchases that use the affected stock item are also updated.
Be careful when changing the unit of measure as it will take at least one full life cycle of the
selected stock item to ensure that all the information linked to the affected stock item is updated
correctly.
A 'Stock Item Life Cycle' is a full circulation of the stock item, as describ ed b elow:
· This begins with the purchase (to update the purchase price per unit of measure)
· Followed by a stock take (to update the stock on hand value)
· Followed finally by a refresh of the menu items (to update the cost of sale vs margin
percentages)
Keep in mind any reports run for the period before the unit of measure was changed will NOT
show the updated information, as the trading information before the point when everything was
updated was calculated using the old unit of measure.
Controllable - This setting will only affect your stock take functions. You may use this feature to set which items show
on your controllable-only stock take, and which don't.
For more information, see the sections on Controllable Stock Take Worksheet and Controllable Stock Take 22 .
(Version: 6.1.5)
© 2009 Coherent Software Solutions
Lists
113
Manufacture - Selecting this options marks the selected stock item as a manufactured item, as opposed to a
purchased item. This will change the behaviour of this item in the stock purchases as well as certain stock related
reports.
#
An item that is marked as 'Manufacture will not be available for a stock purchase, this item will
only be available from the Manufacture Stock screen.
An item that is not marked as 'Manufacture' will not be available for manufacture, this item will only
be available from the Purchase Stock screen.
Sub Menu - A sub menu item is treated in a similar manner to the auto manufacture items, in the sense that these
sub menu stock items also require a master recipe to function correctly. The main difference comes in with the way
that theses items are handled by the Aura system: a sub menu stock item is simply a collection of stock items with
preset quantities. These items are designed to simplify the design of a menu by eliminating the need to duplicate 3
or 4 standard items over 10 different menu item recipes, as seen in the following example:
#
Let's take a standard meal in a restaurant with a garnish of tomato, lettuce, a few onion rings and
some seasoning. If for example, there are 10 meals that use the same garnish on the side, these
aforementioned stock items can be grouped together in the recipe for a sub menu item called
'Garnish'. By doing this, you may now add Garnish to the menu item recipe as opposed to each of
the four items in the garnish, Aura Invoicing will automatically fetch the preset stock amounts from
each item in the garnish when a meal is processed that requires it.
Wastage % - Displays the average percentage of the stock item that is lost during the preparation of the selected
stock item. This will be the difference between the 'Prepped' and 'Unprepped' values shown in the stock takes.
!
The wastage percentage can be calculated by taking a certain quantity of the item before it is
prepared for use, and comparing that to the quantity that remains after is has been prepared.
For example: if you purchase cheese in bulk (unit of measure: KG), and then it is grated in-store.
The grating process is referred to as the 'stock preparation process'. While being grated, small
amounts of the cheese will fall away and be wasted. If 5kgs of bulk cheese is prepared, and you
come out with 4.75kgs of grated cheese, this gives a wastage percentage of 5%.
Bulk Cost - Displays the cost per unit of measure before it is prepared. This field is automatically updated from the
purchase or manufacture cost of the item.
Prepped Cost - Displays the cost per unit of measure after preparation. If there is no wastage percentage set for an
item (for example, with cans or bottles) this figure will be the same as the Bulk Cost.
#
If the Bulk Cost or Prepped Cost is incorrect and you are unable to edit the value, there is an
alternative to updating the stock item cost. The easiest way to find the last known purchase for any
stock item is from the Item Details section of the Count Stock Screen 23 .
© 2009 Coherent Software Solutions
(Version: 6.1.5)
114
BackOffice 6.1.5 Manual
Inactive - Items marked as inactive are items that are no longer in use by the Aura system, but which cannot be
deleted.
#
Due to the Aura system's advanced stock control features, a stock item cannot be removed
completely from the system if it is still linked to stock purchases, stock takes, menu item recipes
and sales, or manufactured item recipes. Allowing this will cause a miscalculation in the affected
areas, and therefore cause unexplainable variances and differences in the stock control features.
If a stock item is used in at least one recipe, you will see the following warning when marking this
item as 'Inactive':
At this point, you may click on Yes to see a list of the menu / stock items that use this in their
recipe. The length of the menu items list will depend on how many items use this stock item in
their recipe, but from the top of the window, you will see something similar to the following:
Alternatively, if you had selected No for this first prompt, this would assume that you want to
proceed with making the item inactive. The following prompt will then be displayed:
IMPORTANT: Ensure you have the correct stock item code before clicking on Yes.
Vat Exempt - This options marks the selected stock item as 'exempt from value added tax'.
(Version: 6.1.5)
© 2009 Coherent Software Solutions
Lists
115
Adding New Stock Items
In order to add a new stock item, click on the
button from the top navigation bar, doing so will clear all fields in
the Item Description section, allowing you to insert the information for the new stock item, as seen below:
#
For a description of the different fields, please check the screenshot description above this
section.
After adding all required information in the fields above, you will need to click on the
button to save the item. If
this item is to be marked as a 'Manufactured Item', keep in mind the stock item must be saved before a recipe can be
added for this item. This is done to ensure the recipe and stock item are linked correctly. See the list of topics further
below for more information on extra stock item options.
Editing Stock Items
In order to edit a stock item, with the item on screen, click on the
button to open the item for editing. This will
keep the information currently saved for the selected item and allow you to edit the required information. Once again,
you will need to click on the
!
button to save any changes made to the stock item.
Aura will not allow you to change the stock code on an active item, allowing this will cause errors
in the menu structure; affecting not only Aura Invoicing but all stock item theoretical sales related
reports as well.
If changes require a new item code, this stock item must be marked as inactive and created with
a new unique item code. Marking the item as 'inactive' is done by ticking the Inactive box just below
the Prepped Cost field. See the main screenshot at the top of this topic for more information.
Extra Stock Item Controls
Below the Item Description section of this screen, you will find extra options for each stock item. These are located
under three different tabs, as seen below:
For more information, see the relative topic b elow:
· Recipe Tab
116
· Ordering Tab
· Deposit Tab
119
119
© 2009 Coherent Software Solutions
(Version: 6.1.5)
116
4.7.2.1
BackOffice 6.1.5 Manual
Recipe
The Recipe tab is used to create the master recipe for a manufactured stock item. This is essential for the correct
calculation of the Auto Manufacture feature.
!
The features under this tab will only be available if the selected stock item is marked as either
'Manufacture' or 'Sub Menu'. For standard stock items, there is no need for a recipe.
The Copy, Paste and Scale options are taken directly from the Menu Item recipes control. For
more details on what these functions o, please see the section on Copying, Pasting and Scaling
Recipes 93 .
Recipe for Manufactured Stock Item
Recipe Yield - This field displays the resultant quantity that the below recipe will create, as per the current stock item's
unit of measure.
Recipe Cost - This filed displays the cost of the manufactured item as per the cost of the items included in the recipe
below.
Recipe Items List
StockNo - Displays the unique stock item code.
Qty - Displays the quantity of the stock item used in this recipe.
Measure - Displays the unit of measure for the stock item.
Desc. - Displays the full description of the item.
Cost - Displays the cost to store of the specified stock item as per the quantity entered in the recipe.
Centre Toolb ar
- Use this button to search for all menu items that have the selected stock item in their recipe.
- Adds the selected stock item to the recipe for the current menu item.
- Removes the selected stock item on the left from the menu item recipe.
- Removes ALL items from the menu item recipe.
- Copies the current recipe to the computer clipboard for later use.
- Pastes the recipe currently in the clipboard into the current menu item.
- Scale all stock item quantities in the recipe by a percentage.
Stock List (The right half of this tab lists all your stock items that can be used in a recipe)
StockNO - Displays the unique stock item code.
Desc. - Displays the full description of the item.
Measure - Displays the unit of measure for the stock item.
Cost - Displays the cost to store of the specified stock item.
(Version: 6.1.5)
© 2009 Coherent Software Solutions
Lists
117
Adding Items to a Recipe
To create a recipe, begin with the Stock items list on the right hand side. Search for the desired stock item by typing
the description in the 'Search' block, as seen below:
As you type, the list will update and select the first item matching what you type. Once the desired stock item has
been located, you can add it to the recipe by pressing Enter on your keyboard, double clicking on the stock item, or
pressing the
button. Doing so, will present the following window:
Take note of the Measure, and enter the quantity required in the recipe for this item. Press Enter on your keyboard or
click on OK when done. You should now have the stock item in the recipe for the selected menu item, as seen below:
© 2009 Coherent Software Solutions
(Version: 6.1.5)
118
BackOffice 6.1.5 Manual
Removing Items from a Recipe
If you need to remove an item from the recipe, select the
item from the recipe on the left, and press the
This will show the following prompt:
button.
Clearing the Entire Recipe
To clear the recipe block and start again, use the
button. This will bring up the following prompt:
Recipes and Inactive Stock Items
In certain circumstances, especially where menus are downloaded from a central head office, you may find a stock
item that was previously used is no longer needed. Once a stock item has been purchased, discarded, or used in a
stock or menu item recipe, it cannot be removed completely from the Aura system. In a situation such as this, the
stock item will be set to inactive instead. By this method, the item details are still stored for reporting purposes, but
the item cannot be used as it is inactive.
Where a manufactured stock item master recipe contains an inactive stock item, you will see the following warning
message:
Notice how the affected stock item itself is highlighted with a grey background. Ideally this stock item should be
removed and replaced with the correct item.
(Version: 6.1.5)
© 2009 Coherent Software Solutions
Lists
4.7.2.2
119
Ordering
The Ordering tab is used to set required order size used by the Aura Order Manager.
Unit of Measure - Displays the
selected unit of measure for the
selected stock item.
Pack Size - This figure is the order
quantity increment for orders
generated by Order Manager.
4.7.2.3
Deposit
The Deposit tab allows you to enter a deposit value for a single measure of the selected stock item. Certain stock
items that must be captured in the GRV (Goods Received Voucher) screen, are required to return to the supplier at a
later point in time. These suppliers require a deposit on the item while in your possession. One example of these
items is a crate from ABI.
The deposit value comes into effect in
the GRVs under the Returns feature.
Returning an item that has a deposit
set on it, will credit the store with the
required amount per unit returned.
Please ensure that the value here is for
one unit and not a batch when entered.
© 2009 Coherent Software Solutions
(Version: 6.1.5)
120
4.7.3
BackOffice 6.1.5 Manual
Locations
The Stock Locations can be used to keep track of stock in multiple stock locations separately. For instance, if you
would like to keep track of the cold room stock (meats, dairy products, etc.) and the dry goods (flour, sugar, salt, etc.)
separately, you will first need to set up the different locations. When opening the stock locations for the first time, you
will be presented with the following screen:
!
Stock levels of External stock areas will not affect your normal Gross Profit report, in order to see
the gross profit for a specific location, you will need to run the Gross Profit by Location report.
For more information, see the section on Gross Profit Report.
Adding New Stock Locations
In order to add a new location, click the
button from the top toolbar. This will present the following window:
Location Description - Use this field to enter a descriptive name for the new category.
External - If so desired, you may set an external location. This will separate the stock in this location from the stock
in the default and other internal locations.
#
Any stock transferred to an external location will not be included in the default reports or
calculations for the stock items. Also take note that this option is password protected for extra
security.
Button - Clicking this button will display a hidden feature of the stock locations called Commission. This feature
is no longer in use, and should be removed in the next release of the Aura software.
Removing and Editing Stock Locations
To remove a stock location, highlight the stock location and press the
button. To edit a location, use the
button. Editing a location will bring up the same window as found when creating a new location. Simply change the
information you need, and click the OK button to save.
(Version: 6.1.5)
© 2009 Coherent Software Solutions
Lists
4.7.4
121
Items per Location
When a second stock location is added, by default it does not have any stock included in the location. This will need
to be set up from the Stock Items per Location screen. Selecting this option will present you with the following
screen:
Stock Location
Current Stock Location - Use this drop down list to select the stock location you wish to edit.
Search - Typing part of a stock item's description or code in this block will filter the lists found below.
Stock Included in <location> - On the left hand side is a list of stock items that are currently included in the selected
stock location.
Stock Excluded from <location> - On the right hand side is a list of stock items that are current excluded from the
selected stock location.
Toolb ar
- Check that all stock items are in their correct stock locations.
!
Before using this feature effectively, it is important to understand how Locations work. Let's look
at the following example: we will work with three locations, Default (which always exisits), Alpha
and Beta.
If a menu item is in the Sales Location "Alpha", while the stock items in it's recipe are in either "
Default" or "Beta", this feature will move these stock items into the "Alpha" location.
- Includes only the selected stock item on the right into the current location. Same as double-clicking on an
item in the 'Excluded' list.
- Excludes only the selected stock item on the left from the location. Same as double-clicking on an item in the
'Included' list.
- Include all stock items in the current location.
- Exclude all stock items from the current location.
- Copy the current list of included stock items to memory.
- Paste the previously copied list of included stock items to the currently selected stock location. This will be
unavailable until a list is copied.
© 2009 Coherent Software Solutions
(Version: 6.1.5)
122
BackOffice 6.1.5 Manual
Editing Contents of Stock Locations
Begin by selecting the stock location you wish to edit. Click on the down arrow next to Current stock location to see
which are available, as seen below:
#
If the desired location is not found in the list, you will first need to add it to the stock locations.
For more information, see the section on Stock Locations
120 .
Once the desired location is selected, you will be presented with all items included in the location on the left, and all
items excluded from the location on the right. Below is an example of a new stock location, with no stock currently
included:
!
Be careful with including inactive items; these will be shown with a grey background colour.
In the above example, in order to add stock to the 'Cold Room' location, scroll through the list of excluded stock items
on the right and look for the items that need to be included in this location. Select the first item, and click on the
button. This will include only the currently selected stock item.
If the stock location is not only for certain types of stock but rather as a bulk storage room, you may also include all
stock items. This is done by pressing the
button.
If you wish to remove a stock item from the currently selected location, select the item on the left hand side, and
press the
button. This will move only the selected stock item on the left out of the current location.
To remove all items from the current location and start over, use the
!
button.
Any changes made here are automatically saved, there is no 'undo' function for editing stock item
locations.
(Version: 6.1.5)
© 2009 Coherent Software Solutions
Lists
4.8
123
Expenses
The Expenses tracking feature of Aura may be used to maintain a log of payments made from the store for nonsales related items. This may be anything from staff transport arrangements, utility accounts, or even repairs and
maintenance to in-store facilities (tables and chairs for example).
Before an expense may be captured correctly in Aura, first a category must be in place for the expense, and then an
expense item for that particular type of expense will need to be added. Once these requirements have been met, you
may capture the expense as required.
For more information, see the sections on Expense Categories
4.8.1
125 ,
Expense Items
123 ,
or Capturing Expenses
49
.
Expense Items
The Expense Items screen gives you an interface to set up and maintain the available expense items.
Toolbar - For more information, see the section on Navigating Records
13
.
Category Filter - Select a category to filter the items displayed.
Show (Active / Inactive) - Select whether to filter out the currently active or inactive items.
Adding New Expense Items
To add a new expense payment item, click the plus button on the toolbar at the top. This will clear all the fields under
the Item Description and change the toolbar to display as follows:
Enter all the necessary fields for the new expense item, and click on the tick button on the toolbar to save the item.
See below screen shot for an example:
© 2009 Coherent Software Solutions
(Version: 6.1.5)
124
BackOffice 6.1.5 Manual
Field View vs Spreadsheet View
Use this option to switch between the two available display modes for the available expense payment items.
Field View
Spreadsheet View
Expense Code - Displays the unique ID code for the selected expense item.
Description - Displays the name for the selected expense item.
Last Paid (spelling error) - Shows the date that the selected item was last paid for.
Category - Displays the category for the selected item. Click on the
currently available categories.
For more information, see the section on Expense Categories 125 .
button next to Category to bring up a list of
Subcategory - Displays the subcategory for the selected item. This is an optional item used for making more
specific selections when capturing expense payments. You may leave this field blank if you wish.
Supplier - Displays the supplier of the service for the selected expense.
Vat Inclusive - Enter the cost of one unit of measure for this expense item.
Vat Exclusive - Displays the amount excluding VAT, this figure will work out automatically from the VAT Inclusive
amount.
Order Quantity - Select the default quantity for the selected item.
Active - Select whether or not the selected item is active and available or not.
Vat Ex. - Select whether or not the item is VAT exempt or not. If ticked, the item does not have any VAT.
(Version: 6.1.5)
© 2009 Coherent Software Solutions
Lists
4.8.2
125
Categories
The Expense Categories window is used to maintain categories for your expense records. If you have no expense
categories entered, upon opening this feature, you will be presented with the following screen:
Adding New Expense Item Categories
Click on the
button to create a new category, then enter a name for the category and click the
save. With categories added, you should see something similar to the following:
You may now add expense items to the list.
For more information, see the section on Expense Items
© 2009 Coherent Software Solutions
123 .
(Version: 6.1.5)
button to
126
4.9
BackOffice 6.1.5 Manual
Delivery Areas
The Delivery Areas window is used to set up specific delivery area settings to link to the Street List.
#
This can also be accessed by Lists > Streets, or by clicking on the
button
inside the Street List 127 ; allowing this same process to be carried out through Aura Invoicing.
Add New Delivery Area Reference
Click on the
button, and enter in the required information.
§ Grid Reference - Used as a reference from maps.
If the area is in Column C, Row 6 on the map, enter C6 in the reference.
§ Deliver? - Select Yes or No from the drop down list.
If No is selected, then you will not be able to assign delivery orders to customers in this grid reference.
§ Travel Time - Enter the average time taken to travel from the store to this location.
§ Delivery Charge - If the area is outside of your store's free delivery area, then the amount entered in here will
automatically be added to all delivery orders in this area. This figure includes VAT.
Editing A Delivery Area Reference
If you need to edit a current delivery area, select the delivery area reference from the list and click the
After making the necessary changes, click on the OK button to save.
#
button.
If any delivery areas are updated in any way, you will be required to refresh the customer
information before the change takes full effect.
For more information, see the section on Updating Customer Statistics
(Version: 6.1.5)
63
.
© 2009 Coherent Software Solutions
Lists
4.10
127
Streets
The Street List contains all the street names and suburb associations for your delivery setup. It is essential that the
streets are set up correctly to ensure that the customers can be added without any problems.
Toolbar - For more information, see the section on Navigating Records
13
.
- This button will open the "locate field value" window to allow you to search for a street record.
- This option is used to create a filter for the street list. This is described further down in this topic.
Preparing to Add a New Street Reference
Before inserting a new street, there are a few steps to take first. These steps involve setting up the list of street
names, suburbs, and delivery areas. These are available by the buttons to the right of the standard toolbar, as seen
below:
!
If the required street name, suburb and delivery area reference is already set up in the Aura
system, you may skip this step and move on to Adding Streets below.
Clicking each of these three buttons will take you o a new window in order to set up the required information. The
Delivery Areas feature is also available directly from the Lists Menu.
For more information, see the relative topic b elow:
· Street Names
· Suburbs
129
130
· Delivery Areas
126
© 2009 Coherent Software Solutions
(Version: 6.1.5)
128
BackOffice 6.1.5 Manual
Adding Streets
To set up a street reference with current street names and suburbs, click on the
so, should present you with a blank line similar to the following:
button on the toolbar. Doing
In the Street Name and Suburb drop down lists, select the desired name and which suburb it is located in. Then on
the Map Ref drop down list, select the map reference that the selected street is found in on your map.
Once all the required information has been entered for this street reference, click on the
button to save. The
Deliver? and Travel Time fields will automatically update with the information linked to the selected Map Ref, as seen
below:
Removing Streets
If you need to remove a street for any reason, select the street reference in the list and click on the
button. You
will only be able to remove a street reference if there are no customers currently linked to the street. If the streets have
been set up incorrectly, and you need to merge customers from two street references and remove the incorrect
reference, please use the Street Sweeper.
For more information, see the section on the Street Sweeper 61 .
(Version: 6.1.5)
© 2009 Coherent Software Solutions
Lists
129
4.10.1 Street Names
Clicking on the
button will present the following window:
Adding New Street Names
From this screen click on the
below:
button to add a new street, this will allow you to enter in a street name. As seen
After entering the name, click on the
© 2009 Coherent Software Solutions
button and then click on Close to return to the Street List.
(Version: 6.1.5)
130
BackOffice 6.1.5 Manual
4.10.2 Suburbs
Clicking on the
button will present the following window, allowing the functions to enter suburb
names and postal codes to link the street names to. As seen below:
Adding New Sub urb s and Postal Codes
Click on the
!
button, and then enter the Sub urb Name and Postal Code in the blank fields as shown below:
The postal code is required in order to allow the labels to print correctly. As the labels are
incorporated as part of the marketing side or Aura, any suburbs without postal codes stored will
not be eligible for postal marketing services.
After entering the name and postal code, click on the Close button to return to the Street List
(Version: 6.1.5)
127 .
© 2009 Coherent Software Solutions
Lists
4.11
131
Over-ring Codes
The Over-ring Categories screen is used to maintain a list of reasons for any order to be over-rung. These reasons
will vary from one type of store to the next. For instance, a counter order only store would not need to over-ring an
order on account of a late delivery. For this reason, the over-ring reasons can be altered as needed.
Toolbar - For more information, see the section on Navigating Records
13
.
- Click this button to force a refresh of the over-ring reasons list.
View - The view drop down list is used to filter the over-ring reasons list to display either active or inactive codes.
Over-ring Reasons List - This list will display all active or inactive over-ring codes as per the view filter.
© 2009 Coherent Software Solutions
(Version: 6.1.5)
132
BackOffice 6.1.5 Manual
Adding Over-ring Reasons
To insert a new Over-Ring code, click on the
button from the top toolbar.
Description - This is the description that will show on the reports; this name will be displayed in Invoicing.
Reference - The reference code; generally accepted as an abbreviation of the description (see example below), is
displayed on reports relating to over-rings.
Active - If this is selected, then this Over-Ring Reason will be available from Invoicing. Otherwise it will not be
accessible.
Hoax - This over-ring category option is for reporting purposes.
After setting up the Over-Ring reason, click on the
button. After adding all the required Over-Ring
reasons, please close Aura Invoicing and open it again to refresh the changes.
Editing Over-ring Reasons
To edit a current discount code, either double click on the over-ring reason line, or select it and press the
on the toolbar.
button
When editing a current over-ring reason, you will see the following window:
If the over-ring reason has been applied to an invoice before, you will not be able to change the 'Hoax' setting.
(Version: 6.1.5)
© 2009 Coherent Software Solutions
Lists
4.12
133
Discount Codes
The Discount Codes screen is used to maintain a list of available preset and variable discount reasons. Discounts
are used for various reasons; ranging from the most common discounts for store specials (for example: "buy two, get
one free") and also including less common, more specialised reasons (for example: customer complaints).
These discount codes can be applied to any type of invoice; although access to apply these discounts codes is
controlled by settings in the Access Permission and the Employee Record settings, as described in each section
respectively.
For more information, see the sections on Access Permissions
179
and Employee Settings
Toolbar - For more information, see the section on Navigating Records
13
73
.
.
- Click this button to force a refresh of the over-ring reasons list.
Filter - This drop down list will filter the list of discount codes to show either active or inactive discount codes.
Discount Codes List - The list below will display a list of the discount codes as per the Filter above. Descriptions
can be found below.
Existing Discount Codes
If any discounts already exist in the system, you will see the layout of the discount as in the following example:
© 2009 Coherent Software Solutions
(Version: 6.1.5)
134
BackOffice 6.1.5 Manual
Adding a New Discount Code
To add a new discount, click on the
button from the toolbar. This will display the following window, allowing you
to enter the desired settings for the discount:
Ref - This field is used for a reference code for this discount, this must be unique to this discount and cannot be
used more than once.
Description - Enter a full description for the discount code. This description will print on the customer's invoice slip.
Discount Amt - Enter the amount that this discount will work with. Discounts can be set to either take off an amount,
or override the order to a certain amount.
!
Before entering the discount amount, you must decide whether this discount is going to be a
percentage or rand value based discount. You must also decide if this discount will take off the
said amount, or override the order to a set amount.
These two option, Override and Is Percent, are found further down.
Fixed - If you would like Invoicing to apply the discount with the exact amount that is entered above, tick this option. If
this option is de-selected, Invoicing will prompt for the discount amount/percentage when the discount is applied.
Override - With this option selected, applying this discount will override the order to the amount selected. With this
option de-selected, it will take the abovementioned amount off the current order.
Voucher - This option is used for statistical marketing report purposes only.
Is Percent - Selecting this option will change the discount amount from a fixed rand value to a percentage of the
order that the discount is being applied to.
(Version: 6.1.5)
© 2009 Coherent Software Solutions
Lists
135
Staff Meal - This option is used to help separate the discount reasons from normal customer discounts. Selecting
this option will change the way this discount responds inside Invoicing.
#
For more information on how this affects staff members applying discounts, see the section on
Employee Discount Settings 73 .
!
Any discount set up as 'Auto Apply' cannot be made into a staff meal; attempting to do this will
display the following message:
Late Delivery - If the discount being set up is to be used to mark a delivery as 'late' according to your individual
store's requirements, select this option.
Active - If this is selected, this discount will be available from Invoicing. With this de-selected, it will not be available.
Status - In larger store chains where a menu is downloaded from a head office store; the menu items, stock items
and discounts are most often locked and cannot be edited by each store. If your menu is locked, and a discount is set
as Open, you will still be able to edit this discount code. If your menu is locked and a discount is set as Controlled,
you will not be able to edit the discount settings.
Auto Apply - This option can be set to automatically apply the desired discount when certain menu items have been
met in a customer's order.
#
When selecting this option, keep in mind that due to the methods used to check and apply
discounts automatically, these can only ever be applied as line item discounts. For more
information on the difference between line item and invoice discounts, please see the Aura
Invoicing manual.
!
Any discount set up as a 'Staff Meal' cannot be made into a auto apply discount; attempting to do
this will display the following message:
Outermost pairing - This is an extra option relating only to the auto apply feature, and is described further below.
Priority - With auto apply discounts, you can tell Invoicing what order to search through the list for a valid match. This
is described further below with the auto apply discounts.
Time Specific - If a discount is only available for a certain time period of each day, or only on certain days of the
week, this can be restricted here. Any time the discount list inside invoicing is opened, it will only allow discounts that
are set to be available during the current day and time.
For more information, see the sections on Auto-Apply Discounts 136 and Time Based Discounts 139 .
© 2009 Coherent Software Solutions
(Version: 6.1.5)
136
BackOffice 6.1.5 Manual
4.12.1 Auto Apply Discounts
Invoicing can be set to automatically check the line items in an order and see if they match a preset discount
reason. If that is the case, the discount will be applied automatically and a notification message will be displayed.
That process is described in the Aura Invoicing Manual.
To set up an auto apply discount in Aura BackOffice, first set
up and save the standard discount. After that, select the
discount and press the
button on the toolbar. This will
take you back to the Edit Discount Code window, as seen
here:
Now tick the Auto Apply box, notice how the Outermost
Pairing option is now available as well. To edit the auto apply
rules, click the
button, as seen in the example below:
This will bring up the following window:
The name bar along the top of this window will display the reference code and name of the discount these settings
apply to; In this case, "Edit AutoApply rules for [123] Buy two, get one free!!"
(Version: 6.1.5)
© 2009 Coherent Software Solutions
Lists
137
The left hand side of this window contains a list of current rule sets for the specific discount to look at. To create a
new rule set, right click in the left hand side and select the appropriate option from the drop down menu. As seen
below:
Once the rule is created, you can right click on the rule called 'New' and select rename. If you have more than one
rule set, this will make it easier to distinguish between the different sets.
Once you have the rule set created, you can specify the requirements for the selected rule. Using the section
displayed below:
Match
Quantity - Enter the number of menu items required to match in order to allow the discount.
Menu Items / Categories - Select whether to allow those matches need to be specific menu items only, or can be
any items in a specified category or categories.
To select the desired menu items or categories, click the
present the Menu Item Selector, as seen below:
button to the right after making your selection. This will
There are two methods for selecting items: one is to click in the box on the left, placing a tick in the box, the second
is to highlight the item using the arrow keys on the keyboard and press the space bar to tag the item. Once all desired
items have been selected, click the OK button to close the Menu Item Selection window.
© 2009 Coherent Software Solutions
(Version: 6.1.5)
138
BackOffice 6.1.5 Manual
After adding the items, you can review the list of items
this discount will apply to in the lower right hand corner of
the Auto-Apply Discount setup window, as seen here:
In this example, the discount that these auto-apply rules
are being added to will automatically apply to one item (
Apply Discount To: section) when any two of the listed
items are rung up (Match: section at the top).
Apply Options
Apply to Cheapest Matching Item - When a range of items are added to the list of possible matches, it is likely that
they have different prices. Selecting this option will cause the discount to be applied to the cheapest items matching
the requirements, therefore leaving the more expensive items at full cost.
Get For Free
Get <x> items for free - Select the number of items that are marked down to a zero value, regardless of what
discount amount is specified.
Tick the box on the very right hand side of the Get For Free section to activate this option.
Apply Discount To
Apply discount to <x> items - Select the number of items that the specified discount is applied to (for example: 10%
off, R20 off, etc.).
Tick the box on the very right hand side of the Apply Discount To section to activate this option.
#
You can select either one or both of the Get For Free and Apply Discount To sections, but keep in
mind the items that the discount is applied to is restricted by the number of required items.
Therefore, with Match set to a quantity of 2, Get For Free and Apply Discount To may not add up to
more than 2, as seen below:
In this case, the discount (set up earlier) will apply to one item, and the second item will be free of
charge.
(Version: 6.1.5)
© 2009 Coherent Software Solutions
Lists
139
4.12.2 Time Based Discounts
If you wish to have certain discount codes available only during certain hours of the day, or even only on specified
days of the week, you will need to set a time schedule for the discount. Near the lower section of the Edit Discount
Code window, tick the Time Specific box to enable this option. Then click on the
button to, as seen below:
This will present the following window:
Using this window, you may select when the discount is available, below is a description of how each field works.
© 2009 Coherent Software Solutions
(Version: 6.1.5)
140
BackOffice 6.1.5 Manual
Options:
§ Whole Week - Tick b ox in top left corner.
Selecting this option will automatically activate the discount for all seven days of the week, after which you can
select the time period for each day.
§ Whole Day - Column of tick b oxes immediately to the right of the days of the week.
Ticking this option for any specific day, will make the discount available from the first minute of that date, up to
midnight on the selected day.
§ Specific Time Section - Three columns of tick b oxes with time b locks.
Next to the Whole Day option you will see three sets of tick boxes and times for each day. If you do not want the
discount to be available 24 hours a day, you may select anywhere up to three active time periods during your
trading day..
Once one of the three time periods has been activated, you may select an opening and closing time for the selected
discount, as seen below:
In the above example, this discount will only be available between 5:00 PM and 8:00 PM on Monday night.
If you require this discount to be available for more than one period, you may also tick the second or third time
periods, as seen below:
In the above example, this discount will be available for the period of Midday to 2:00 PM, as well as 5:00 PM to 8:00
PM on Monday.
!
Do not allow these time periods to overlap. For example, if the first time period ends at 2:00 PM,
do not set the start time for a second period any earlier than 2:00 PM on the same day. This may
cause an unsatisfactory outcome in Aura Invoicing for the overlapping time period.
Once all the desired time periods and days have been set up, click on the Apply button at the bottom of this window
to save the changes.
(Version: 6.1.5)
© 2009 Coherent Software Solutions
Lists
4.13
141
Tables
In order to accurately track table orders for seated customers in your store, and to take advantage of the advanced
waiter and table management features of the Aura POS system, you will need to assign the orders to tables. The
Table Selection screen provides the features for adding the required tables. When accessed, you will see the
window shown below:
§ Sort - These three option change the sort order of the tables list, as we will see further down.
[F2] Table Number
[F3] Status
[F4] Smoking
§ Toolbar - For more information, see the section on Navigating Records
13
.
§ Table List - This will list the currently available tables in the system.
Adding New Tab les
To insert a new table, click on the
button from the toolbar, this will display the following window:
§ Number - Enter the table ID number. If your store already has table numbers on the physical table, use these
numbers here.
§ Smoking - Select whether the table being entered is in a smoking section or not. This defaults to No due to the
fact that not all stores have a section available for smokers.
§ Capacity - Enter the seating arrangement available for the table. This option defaults to 4, you may change it if
need be.
Once all the required information has been entered, click on the OK button to save the table. Repeat this process for
all tables required in store.
© 2009 Coherent Software Solutions
(Version: 6.1.5)
142
BackOffice 6.1.5 Manual
Sorting Tab le List
Once all the tables have been added, you can sort the list by the Sort options at the top of the screen.
Sorted by Table Num ber
Sorted by Status
Sorted by Sm oking / Not Sm oking
#
In this window, you may also use the Fx (F2, F3 and F4 function keys) keys on your keyboard as
shortcuts to sort the list.
The Status column displays as 'Closed' when the table is not in use, and displays 'Open' when
an order is currently active on that table. As you see for table 1 in the above tables.
(Version: 6.1.5)
© 2009 Coherent Software Solutions
Part
Monitoring
V
144
5
BackOffice 6.1.5 Manual
Monitoring
The Monitoring menu contains features relating to the store's active trading information. These features are
designed to allow the managers and franchisee to see information regarding sales information, employee
attendance, and employee performance statistics in real time from one location.
See a topic b elow for more information:
§ Activities
144
§ Daily Sales
145
§ Staff
§ - Attendance
145
§ - Performance
§ - Statistics
5.1
146
148
Activities
The Activities menu option displays a list of currently active orders. Depending on the types of orders, this list may
contain table orders, delivery orders, or collect orders. Counter orders will not show here, as they are closed and paid
for immediately. This first option, Activities, will display a window similar to the following:
To navigate through the list of orders, use the scroll bar on the right hand side of this window to scroll up or down. Or
to see more information relating to each order, use the scroll bar along the bottom of this window to scroll left or right.
To aid in searching for a specific order, you may sort the data by any of the columns. For example, to sort the list by
the invoice amount, click on the 'Total' column header. Press the Close button to close this window.
(Version: 6.1.5)
© 2009 Coherent Software Solutions
Monitoring
5.2
145
Daily Sales
The Daily Sales menu option will display a summary of trading information, broken down into each transaction type,
and with a total amount for the current day's trading. As seen below:
The information displayed here will depend heavily on the main transaction type processed by your store. This
window displays a summary of all sales as of the moment it was opened. If the window has been open for a few
minutes and you wish to see the latest information, click the Refresh button. Click on either OK or Cancel to close this
window.
5.3
Staff
5.3.1
Attendance
The Staff > Attendance menu option will display a list of employees that have been active in the Aura system on the
current trading day. As seen below:
If the employee has clocked in and is still active, you will see a date and time under the In column. If they have
already clocked out and ended their current day's shift, you will see a time under the Out column, as well as the value
'True' under the Clocked Out column.
Click on the Close button at the bottom of the window when you are done with this list.
© 2009 Coherent Software Solutions
(Version: 6.1.5)
146
5.3.2
BackOffice 6.1.5 Manual
Performance
The Staff > Performance window displays the sales performance information of your waiters and cashiers. This will
display the employees that are responsible for processing customers orders; if a waiter has permission to start a
new table order, they will show here as well.
As the window is opened, you will see a screen similar to the following:
On the Daily Cashier Performance Comparison tab (as seen above), all employees matching the requirements will
display in the list at the top, as well as in the bar graph below that.
On the bar graph, the numbers up the left hand side are rand values, whereas the numbers along the bottom of the
graph are employee numbers to identify the employee.
(Version: 6.1.5)
© 2009 Coherent Software Solutions
Monitoring
147
On the Cashier Performance History tab, you have the option to check the cashier / waiter performance records for
a selected date range. Set the range you wish to check by selecting the From date and Until date fields. Below that, a
list of employees in that time period will be displayed, summarised on the line graph below that. To the right of this
graph is the legend, showing which colour line applies to which employee.
© 2009 Coherent Software Solutions
(Version: 6.1.5)
148
5.3.3
BackOffice 6.1.5 Manual
Statistics
Selecting the Staff > Statistics menu option is used to keep active track of all staff meals rung up from Invoicing. As
seen below:
To specify a date range to check, set the Date from and Date until fields on the left hand side. Below that, you will
see the totals relating to the staff discounts only. While to the right of that, appears a list of all employees that had staff
meals during the selected period.
(Version: 6.1.5)
© 2009 Coherent Software Solutions
Part
Preferences
VI
150
6
BackOffice 6.1.5 Manual
Preferences
The Preferences menu contains features relating to the maintenance of your Aura installation. If these are set up
correctly, you will not need to access any of these options in a normal trading day.
See a topic b elow for more information:
· System Settings
150
· Access Permissions
179
· Restricted Employee Categories
6.1
191
System Settings
The System Settings window contains all the settings relating to the running of your installation of Aura. Aside from
physical hardware configuration such as printer type and location of printers, these settings also change the
behaviour of the product.
!
These settings are vital to the correct operation of your Aura system, do not change settings
unless you are certain you understand the setting's meaning, or unless instructed to do so by an
Aura Help Desk Support Technician.
For more information, see the relative section b elow:
· Specific Computer
· All Computers
· Printers
6.1.1
151
162
178
Restore Settings Feature
During an Aura program upgrade, there are many components of the program and the database that need to be
adjusted in order for the new version to function correctly. As the database is active almost all the time, this leaves
your system settings vulnerable during an upgrade.
It is for this very reason that all Aura application must be closed before attempting to upgrade. Even so, there is a
small possibility that certain settings may be inadvertently changed or lost during the database upgrade; the Restore
System Settings feature is designed to provide a solution for this in the unlikely case that there is a problem. The
'Restore' button can be found inside the System Settings, in the bottom left corner of the window. As seen highlighted
here:
#
There are a few points to keep in mind while using this feature:
§ Ensure that all Aura applications are closed before restoring settings.
§ This does not undo the software upgrade, it simply restores settings and attempts to complete
the upgrade properly.
§ This button will restore ALL settings stored in the System Settings, including settings found
under the 'Specific Computer' and 'All Computers' tabs.
§ This feature will cause BackOffice to close and re-open automatically.
(Version: 6.1.5)
© 2009 Coherent Software Solutions
Preferences
6.1.2
151
Specific Computer
All settings found under Specific Computer will affect only the current computer, regardless of other any other
computer settings.
For more information, see the relative section b elow:
· Invoicing Settings
· Printer Settings
· Printer Setup
160
· Reports
161
· Credit Card
154
156
· Touch Screen
· Devices
152
159
161
© 2009 Coherent Software Solutions
(Version: 6.1.5)
152
6.1.2.1
BackOffice 6.1.5 Manual
Invoicing Settings
General:
Form Look (Normal / Touch Screen) - In a new invoice: Normal will require cashiers to ring up menu items with
typing in the code, Touch Screen will show the menu as buttons.
Opening Form (Main / GUI) - Main will open Invoicing into the normal screen, with the two tool bars along the top,
and the invoices listed below. GUI will open by default to the Table Floor Plan, click here for more information on
setting up the floor plan.
Default Transaction Type (Counter / Collect / Table / Delivery) - From the drop down list, select the transaction type
that your cashier's will use most often as the default. This can still be changed from inside the order if need be.
Float - This float amount will be automatically inserted into this till shift. This figure can still be adjusted in the
cashup screen.
Payment Screen Delay - Select the number of seconds that the customer payment screen shows for before closing.
!
This controls the close down timer after entering the cash amount from the customer, and also
displays the change. 5 seconds is a generally accepted figure for this.
If your till drawer is opened automatically by Invoicing, do not set this to 0 seconds. It has been
known to cause problems with not allowing the command to open the till drawer enough time to
get through, preventing the till drawer from opening automatically.
Persist User - When selected, this will force Invoicing to take the first password entered, and for that invoicing
program session and will automatically insert that same password at every password prompt. Invoicing will continue
to assume that the first employee is working at this computer until either Invoicing is closed, or until Secure Till is
clicked.
Convert Delivery to Collect if Address Fails - If an order is rung up as a delivery, but the customer's address does
not have the required information for a delivery; Invoicing will show a warning about the address and then convert the
delivery to a collect. If this option is not selected, then Invoicing will simply show the warning about the address being
invalid and prevent the order from being processed until transaction type is changed or the address issue is
resolved.
Prompt for Name on Counter Orders - By selecting this option, Invoicing will prompt for the customer details on
counter orders as it does for collect and delivery orders.
(Version: 6.1.5)
© 2009 Coherent Software Solutions
Preferences
153
Warn If Duplicate Customer Exists - When trying to add a customer from this computer, Invoicing will automatically
search and see if there are any other customers with the same name, surname or phone number.
Prompt for Transaction Type - By selecting this option, Invoicing will display a prompt to select the type of
transaction to process. Take note of the default transaction type (found to the left of this setting), as the currently
selected default transaction type will be highlighted in the transaction type prompt.
Use Table Numbers - This is an old setting; if a tab le order is rung up, it automatically uses tab le numb ers.
Grid Size Modifier - Adjusting this setting modifies the size of the list of invoices, as well as the line items inside
invoices. The modifier counts up in 0.5 segments; next step up from 1 will be 1.5 times the thickness of a standard
line, etc.
Confirmation Amounts
New Customers and Other Customers
- These two amounts are monetary values for the order values of respective customers. If a New Customer's order
or a Other Customer's (regular) order is below the specified amount, a prompt will be displayed asking for the
cashier to confirm the order amount.
Specifying Department Displays
If Menu Item Departments have been set up; when accessing this settings tab, the previously blank section at the
bottom of the tab will now display a Departments section; as seen below:
Departments
Selection Block - On the left of this block is the list of currently available departments. Tick the desired department
(s) to display by default on this till.
You can see which till these settings will affect easily by checking the Computer Name and Till ID fields at the very top
of this same window.
Remember Last Selected Department - Once at least one department has been selected for this till, processing a
new invoice will first prompt for which department to display. If a sales till has bee set to display more than one
department, you are able to switch between two departments inside the order.
Option Ticked - Invoicing will open the last accessed department automatically on starting a new order.
Option Un-Ticked - Invoicing will prompt for the desired department at the start of every new order.
#
If a till is set to display only one department, it is recommended to tick Remember Last Selected
Department as it will prevent having to press an extra button to see the menu items, therefore
streamlining the order process.
If a till is set to display more than one department however, it is better to leave this option unticked; this way, the desired department can selected at the start of a new order allowing for faster
access to preset groups of items.
For more information on setting up Departments, see the sections on Menu Item Departments
Items to Departments 98 .
© 2009 Coherent Software Solutions
(Version: 6.1.5)
84
or Assigning
154
6.1.2.2
BackOffice 6.1.5 Manual
Printer Settings
General:
Only Print New Items (Relies on Enable Editing of Invoices 166 ) - With this ticked, after an invoice has been
modified, only the new items will print out again. This can be used to avoid the kitchen staff making a double order if a
cup of coffee is added to a table order and printed out again.
#
The setting for Only Print New Items will only affect invoices that have been modified and then reprinted.
Group Items On Invoice - Will group items indented below their parent items on table orders. For instance, a
breakfast with a choice of eggs and sausages etc, will have the options printed below the parent item and indented
for clarification.
Prompt To Print On Payment - If your computer is set to reprint an invoice for a delivery / collect / table order on
paying; Then by ticking this option, a prompt will be displayed for printing the customer's slip again as opposed to it
printing automatically.
Print Assigned Invoices On Payment - By ticking this option, once a delivery / collect / table order is paid into till, a
duplicate slip will be printed to the invoice printer. If you de-select this option, nothing further will be printed upon
paying the order.
!
The option for Prompt To Print On Payment is dependant on the option for Print Assigned
Invoices On Payment; for the prompt to be displayed, both these options must be ticked.
Print On Assigning Driver - With this option selected, the invoice slip will print out again with the new details when a
driver is assigned.
This option will option will only have an effect on a computer with an invoice printer set up.
(Version: 6.1.5)
© 2009 Coherent Software Solutions
Preferences
155
Allow Reprint - With this option selected, Aura Invoicing will allow you to re-print any order's customer and
production slip from the current day's trading.
Keep in mind that ** Duplicate Copy ** will be printed on any order that is re-printed in this way; this is for security
reasons.
Print Waiter Details on Slip - Prints the name and employee number of a waiter assigned to a table, on the
customer order for that table.
Print Gratuity Line - Leaves a space on the customer's slip for the customer to add a tip.
Print Customer Survey - Prints customer survey image at the end of certain order types.
Paper Type - This option only affects the older wide-profile A4 dot-matrix printers, and will have no effect on the
newer narrow thermal and dot-matrix printers.
Contact the Aura Help Desk for more information.
Copies - This is a dead setting; printer copies are handled for each printer individually under Printer Setup.
Print Office Code - This code is printed out on each and every invoice by default. It contains system information
about the order in the following structure: "<order number>/<cashier first name>/<total order amount>". De-selecting
this option will stop this code from being printed on invoices from this computer.
Print Invoice Logos - This option affects the invoice slip header that is printed out on each invoice; if this option is
de-selected, the invoice slips printed from this specific computer will not print the header image.
Other Printers
Report - Select your A4 reports printer from a drop-down list.
This option is only required on the server computer for Aura BackOffice.
Label - Select your label printer from a drop-down list.
This option is only needed in the computer that has the label printer installed on it; such as the kitchen computer.
Label Margin - Set the margin size of the labels that are being printed; this margin is the distance from the edge of
the sheet up to the edge of the label itself.
Side-by-side - If the roll of labels being used have all labels in one column, leave this option de-selected. If there are
two columns of labels on the sheet, select this option.
This option ensures the labels are printed in the correct order.
© 2009 Coherent Software Solutions
(Version: 6.1.5)
156
6.1.2.3
BackOffice 6.1.5 Manual
Printer Setup
The Printer Setup tab is used to specify the settings for your invoice, kitchen, and credit card printers.
Before selecting the devices (port or drivers), you will need to set up the printer's category and type inside the
Printers tab.
For more information on adding printers to the 'Available Aura Printers', see the section on the Printers Tab 178 .
In order to activate a printer, select the printer on the right under Available Aura Printers, and press the arrow
pointing to the left to move the printer to it's relative category. Using the following button panel:
<< - Moves all printers left into their respective categories.
< - Moves the selected printer into it's selected category.
> - Moves the selected printer to the right out of it's category, effectively disabling the printer.
>> - Moves ALL printers out of their respective categories, effectively disabling ALL printers.
Once the printer is under the correct tab on the left, click on the down arrow for Device, and select your printer from
the drop down list.
Direct to Port - (Recommended for Production Printers)
This option forces Aura to bypass the printer drivers, and print directly to the port that has the printer attached to it.
(Version: 6.1.5)
© 2009 Coherent Software Solutions
Preferences
157
6.1.2.3.1 Invoice Printers
This tab allows you to specify the settings for
your customer invoice slip printer. Simply
select your invoice printer from the drop down
list in Device.
6.1.2.3.2 Production Printers
This tab allows you to set up your production printer. Direct to Port is recommended because of it's speed
difference as compared to using the Windows drivers, but requires a different method of specifying the device.
Although, you can also select a printer from the drop down list in Device and leave Direct to Port unselected.
Above you will see two example: the left is an example of specifying a printer port on the local computer, the right is
specifying a printer on a remote computer.
With a remote printer, the context for the Device is as follows:
\\<full computer name>\<printer share name>
© 2009 Coherent Software Solutions
(Version: 6.1.5)
158
BackOffice 6.1.5 Manual
6.1.2.3.3 Credit Card Printers
This specifies the device you wish to use for
your credit card printer, this will print the credit
card slip to this printer depending on your
system configuration.
!
This printer is only used effectively of you have a credit card system called NOMAD installed and
configured.
For more information, see the section on the NOMAD Settings
161 .
If you use any other credit card system, it will need to be separately from the Aura system.
(Version: 6.1.5)
© 2009 Coherent Software Solutions
Preferences
6.1.2.4
159
Touch Screen
Transaction Screen
Category Buttons Panel
Rows and Cols - Select the number of rows and columns for the category buttons.
Menu/Sizes Buttons Panel
Rows and Cols - Select the number of rows columns for the menu item buttons.
Button Images
Display - This will select the method to display the scrolling buttons inside a new order.
Button Font Size
Small / Medium / Large - Allows to select between 3 preset font sizes for the text labels on the category and menu
item buttons.
Other
Keep List Open
If selected: After ringing up a menu item, Invoicing will keep that category open for the cashier to select another item
in the same category.
Overlap Buttons
If selected: In a new invoice, the menu category buttons will fill the lower left corner of the screen, until a category is
selected. Then the list will be replaced with the list of menu items.
Use Order Navigator - This is a new feature of Aura, ticking this option will only affect Aura Invoicing.
See the Invoicing manual for more detailed information.
Logo
Filename - Click the [...] button to the right of this line to select an image to use for the touch screen background.
Display - Select this option to turn on the background image. De-select this option to turn the background image off.
Stretch - Selecting this option will cause Invoicing to stretch the image to fit the available size. This is not advisable
for smaller images as they will be unclear and badly distorted if they are stretched too far.
Preview - This block gives you a preview of the background image selected.
© 2009 Coherent Software Solutions
(Version: 6.1.5)
160
6.1.2.5
BackOffice 6.1.5 Manual
Devices
Till Drawer Device - If there is one connected, this would be set to the device that your till cash drawer is connected
to (ie: COM1, or LPT2, or select your printer if that is where it is connected).
Monitor (Primary / Secondary / Tertiary) - Select the main display output for the Aura system. Unless you have
multiple displays, leave this on Primary.
Pole Display Device and Pole Display Make - Select the make, model and connection for your pole display.
Use Fingerprint for Invoicing or BackOffice - If you have a fingerprint scanner installed in this computer, you can
select this option to bring up a fingerprint scanner prompt instead of the password prompt.
!
Do not select the Use Fingerprints for BackOffice until you have verified that a manager or
franchisee has a working fingerprint scanned into Aura BackOffice. Setting this option without a
valid fingerprint will lock you out of BackOffice.
If this does happen, please contact our Aura Help Desk for assistance with temporarily
bypassing the fingerprint scanner prompt.
For more information, see our Contact Details
202 .
Auto-Prompt for Barcode Scanner - Selecting this option automatically brings up the prompt for the bar code
scanner when a new invoice is started.
Kitchen Item Font - Use this option to specify the text display colour of invoices rung up on this computer for Aura
Kitchen Items.
Kitchen Item Background - Use this option to specify the background display colour of invoices rung up on this
computer for Aura Kitchen Items.
#
The above two settings will only make a difference to the invoices as displayed in Aura Kitchen
Items. If you do not use this application, you will not need to change these settings.
Imaging IP Address - Select the network address of the 'Images' folder in relation to the Aura application. '127.0.0.1'
is called a loop-back address, telling Windows to look at the computer where the program is run from. With a
standard Aura installation, the Invoicing application is always installed on the server computer.
Log System Times - This is an old setting.
Phone Extension (Optional) - If you have an advanced phone switchboard with multiple lines and extensions,
including a phone at each till, you can enter the extension number here.
CLI Ringing Timeout (Caller Line Identification) - This will be the time in minutes before an incoming call expires.
(Version: 6.1.5)
© 2009 Coherent Software Solutions
Preferences
6.1.2.6
161
Reports
Report Settings
Use Slip Printer Reports - By selecting this option, you may print certain reports to a narrow slip printer, similar to
your invoice or production printers.
!
6.1.2.7
Take note that not all reports will run correctly with this format, it is highly recommended that the
reports are always printed to a full size A4 printer such as an HP, Canon or Lexmark printer.
Credit Card
Prompt for Gratuity Amount - This option enables a prompt for the cashier to capture the waiter's tip through a credit
card transaction.
Timeout for Credit Card Dialogs (0 - Disabled) - When processing a credit card payment, the dialogs can have a
timeout count down. Default is 20 seconds on inactivity before the dialog closes, but this can be adjusted as you see
fit.
Use NOMAD - Selecting this option will enable Invoicing to integrate the NOMAD credit card system, and enable the
two options below. Disabling this option will use the manual credit card capture interface.
Nomad DLL Path - The path to the Nomad DLL (Dynamic Link Libraries) must be entered here. For the sake of
simplicity, these should be kept in your Aura program folder.
Subtenant - Where combination stores are involved, especially when sharing a server computer, it is very possible
that all brands in the store will make use of the credit card system as well. Setting a 'Subtenant' specifies a category
for the credit card sales. These subtenants are sent to your bank's credit card system to help differentiate which sales
comes from which brand in your store. In a standard store layout, you may leave this field blank.
© 2009 Coherent Software Solutions
(Version: 6.1.5)
162
6.1.3
BackOffice 6.1.5 Manual
All Computers
All settings found under All Computers will affect all till computers connected to this network.
For more information, see the relative section b elow:
· Store Settings
163
· Head Office Settings
· Program Settings
165
· Network Settings
177
164
(Version: 6.1.5)
© 2009 Coherent Software Solutions
Preferences
6.1.3.1
163
Store Settings
Company Settings
Business Name - Enter your company or franchise name here.
Vat Reg # - Enter your VAT registration number here, this is for legality purposes.
Telephone # - Enter the store contact number here.
Trade Until - Select a time in the morning before you begin trading.
!
The Trade Until feature separates one day's trading from the next, and this marks the time during
the day that the current day's trading is allowed to start. Anything done before that time will be
displayed on the previous day's trading information.
For example, with the Trade Until set to 05:00, if a till shift is started before 5am, it will have the
current date and time but will show under the previous day's cashup date. If the till shift is started
after 5am, it will be on the current trading day.
5am is a recommended time as it gives ample time for stores that sometimes trade past
midnight, and leaves enough of a time margin for opening in the morning.
For more information, see our Contact Details
202 .
Delivery Time - Enter a default travel time for delivery orders. If a delivery area has a travel time set up, Invoicing will
use that time, if not it will revert to the default time set here.
Default Dialing Code (Optional) - Enter the dialing code for your store's area here.
Branch - Enter the unique identifying branch name here. This is generally accepted as the area or shopping centre
that your store is in.
Vat Rate - Enter the value added tax rate here.
!
As the Aura POS system is available world wide, the VAT Rate option can be changed to fit the
requirements of your country. Please ensure that this percentage is set correctly, if it is not you may
be at risk of being found guilty of tax evasion or fraud.
In South Africa, the vat rate is 14%.
Vat Rate Not Zero - By selecting this option, Aura will prevent the aforementioned Vat Rate from being accidentally
set to a zero percentage.
© 2009 Coherent Software Solutions
(Version: 6.1.5)
164
BackOffice 6.1.5 Manual
Disable 'Pay' on Delivery Invoices - Outstanding orders (delivery, collect and tables) can normally be paid into the till
by the operator of a till shift. Selecting this option will prevent delivery orders from being paid into the till before the
driver assigned to the order has been cashed up.
#
Selecting this option may help avoid confusion with driver cashups at night by paying all the
driver's deliveries into a single till shift.
For example, if a driver has 3 deliveries assigned to him, the first two are paid into till shift A, and
then he is posted into till shift B: his amount owed will need to be split accordingly between the two
till shifts. By preventing cashiers from manually paying a delivery order, you can prevent this
scenario.
For more information, see the section on the Employee Cashup
40
.
Food Preparation Period - Enter the maximum time that it takes for an average item to be prepared by the kitchen
staff.
Maximum Delivery Time - Enter that maximum time that a driver may take on a delivery.
Oven Cook Time\ - Enter the time required for cooking a menu item.
Show Vat Excl on Invoice (optional) - Selecting the option displays the 'Vat Excl' line on an invoice as well as the vat
and total amounts.
Store Square Feet (Optional) - You may enter the store's size here if you wish.
Min Order Amount for Delivery - If you have a minimum amount required for a customer to qualify for a delivery order,
enter that mount here. Invoicing will not allow any order below this amount to be set as a delivery order.
Purchase Orders
Address lines 1 and 2 - These two lines are available to enter your store's shop and street address lines.
Contact - Enter a contact number for the person responsible for receiving the orders.
City - Enter the city name here.
Area Code - Enter the area code here.
6.1.3.2
Head Office Settings
Report Group - Select the menu items report group you would like to set or view the advertising and royalty
percentages for.
!
The report groups are set up for each menu item individually, used specifically in a combo-store
with two or more franchises running on one system. In that scenario, it is highly likely that each
store chain would have different advertising and royalty percentages.
For more information, see the section on setting up Report Groups
94
.
Advertising % - Enter the percentage of your gross profit that head office receive to cover their advertising costs.
Royalty % - Enter the percentage of your gross profit that head office require as a royalty.
(Version: 6.1.5)
© 2009 Coherent Software Solutions
Preferences
6.1.3.3
165
Program Settings
The Program Settings tab contains various settings relating to the running of your store. These range from display
modes to options available in Invoicing.
For more information, see the relative section b elow:
· General
166
· Invoicing
168
· Reports
169
· Cashup
171
· Imaging
172
· Stock
173
· Search
174
· Backup
175
· PoleDisplay
· Picklists
176
· Updates
176
· Email
176
177
© 2009 Coherent Software Solutions
(Version: 6.1.5)
166
BackOffice 6.1.5 Manual
6.1.3.3.1 General
Note for all invoices - This message will print out at the top of the customer slip, just below your business name /
logo.
Deliv Driver Message - This message will print on the customer slip for delivery orders only. Note the variables on
the right hand side: Invoicing will automatically replace %1 with the name of the driver assigned to the delivery, and
will replace %2 with the number of deliveries that particular driver has done so far.
#
Both variables are optional, there is no need to enter either or both. For example, you could simply
have "Driver %1 had the pleasure of delivering your order".
Min. Value for Alt Image Round to: - Price rounding is the most widely accepted method for simplifying the exchange of cash and change for
a customer. The rounding steps are set here as a unit value; meaning one of your country's standard currency. In
South Africa, this would be the Rand. To set 10c, set this value to 0.10.
Customer Notes - Was previously used to enable or disable printing of customer notes, customer notes are
enabled by default now and cannot be changed.
Auto Restart Transaction - Select this option to start a new transaction as soon as one is completed. This would
work well for a waiter-only computer; where the waiters have access to ring up their table orders, but the rest would
be left up to the cashiers.
Use Alternate Slip Header - If there are two till slip header images set up on the server computer, selecting this will
make Invoicing use the secondary header instead of the normal header.
Enable Separate Invoicing Password (Used mainly for managers) - Allows an employee to have two separate
passwords, one for general use, and a second for Invoicing only.
For more information on setting this password, see the section on Adding New Employees
73
.
Save Credit Card Info - When selected, processing a credit card payment will show a credit card information screen
to enter information such as credit card holder name, CRC numbers, expiry date etc. Not necessary to have this
option selected.
(Version: 6.1.5)
© 2009 Coherent Software Solutions
Preferences
167
Prompt for Cashier password for Over-Rings - Selecting this option will prevent anybody except the cashier
assigned to an invoice from over-ringing the order. Preventing one person over-ringing other cashier's transactions.
Cannot print collect order on pay - Selecting this option will stop Invoicing from printing the customer's slip again
when a customer comes to collect their previously placed order.
Only primary operator can open the till - In a situation where a till shift has multiple operators, selecting this will
only allow the primary operator to open the cash drawer.
Enable Editing of Invoices - Selecting this option will allow employees to edit a table order for the purpose of adding
more items to the bill if the customer orders any further.
!
The option "Enable Editing of Invoices" may possibly not be shown on your settings; depending
on how your store was set up when it was installed. This is a hidden setting which can only be
activated by one of our software support technicians in the Aura Help Desk.
Force Password Change Every <x> Day(s) - Forces all employees passwords to expire after the set number of
days, asking them at that point to enter their current password, and select a new password in order to continue. This
affects ALL employees, regardless of category or activity in the software.
Franchise Print Device - Specify the reports printer for Aura BackOffice.
Print Extended Kitchen Slip - Changes the layout settings of all production slips to show the information in a
different format. The manager will need to decide whether or not to have this option selected.
© 2009 Coherent Software Solutions
(Version: 6.1.5)
168
BackOffice 6.1.5 Manual
6.1.3.3.2 Invoicing
Tab les
Prompt for Head Count - When starting a new table order, Invoicing will automatically display a prompt asking for a
table head count.
Prevent a waiter clocking out if they have open tables - Selecting this option will not allow a waiter to clock out of
the system if they have any tables that are not closed or paid into a till shift.
Transaction Screen
Alphapos Classic Keyboard Mode - This option will enable or disable the classic keyboard shortcuts in both touch
screen and normal (keyboard) mode. It is recommended to keep this option selected all the time.
Auto-Prompt to Add New Till Operators - Selecting this option works in conjunction with a new feature of Aura
Invoicing. If this option is selected and a non-operator on a till shift attempts to put through a counter order, Invoicing
will ask if a second operator should be added. By clicking yes to that prompt, it follows the same procedure as adding
an operator manually.
Payment Tender Amounts
Tender 1 to 4 - These four options create buttons on the Customer Payment Screen found inside Invoicing. For
more information on the application of these buttons, please see the Invoicing Manual.
(Version: 6.1.5)
© 2009 Coherent Software Solutions
Preferences
169
6.1.3.3.3 Reports
General Report Settings
Use Trading Day for Royalty Report - Selecting this option will cause the Royalty Report to separate the trading day
by the Trade Until time instead of the computer date.
Use Stocktake Times in Stock Variance/GP Reports - Selecting this option allows you to specify the times when
entering a stock take. This allows the Aura system to calculate the stock variances and stock on hand calculations
more accurately.
Calculate GP an Inverse of FC - On the Gross Profit report: Food Cost calculations are taken from the sales
information stored in the database compared to the menu item costing calculations. The Gross Profit is taken from
the margins displayed for each menu item. These are described in more detail on the Gross Profit report page.
!
Selecting this option will force BackOffice to calculate the GP figure as the balance of the FC
figure. For example, if the FC is 40%, the GP will show as 60%, regardless of the menu items
margins.
For more information, see the sections on Gross Profit Report and Menu Item Costing/Profit Margin
86
.
Show Vat Excl amounts in Sales Reports - Selecting this option will include a 'VAT excluded' figure in the sales
reports as well.
For more information, see the section on the Sales Reports.
Exclude Delivery Charges from Royalty Report - The delivery charge is legally considered a form of income to the
store, and therefore will be included in the royalty report. If for some reason you do not wish to include this figure in
the royalty, select this option.
For more information, see the section on Royalty Report.
Automatically Calculate Manufactured Stock - This setting is linked to the Auto Manufacture feature found in the
Stock Items, the reports will only display the automatically manufactured items correctly if this option is ticked.
For more information, see the section on Auto Manufacture Stock Items 111 .
© 2009 Coherent Software Solutions
(Version: 6.1.5)
170
BackOffice 6.1.5 Manual
Stock Cost Calculation
Use Fixed Stock Cost - Selecting this option will use only the last known purchase price of the stock items for all
stock costing calculations. Disregarding stock price fluctuations.
!
The only stock costing report not affected by this setting is the Stock Price Fluctuations report.
For more information, see the section on Stock Price Fluctuation Report.
Use FIFO for Stock Costing - FIFO stands for 'First In, First Out'. This cost calculation method takes the cost price
fluctuations of stock items into consideration.
!
The following example will simply show how the stock cost calculation works. Any information
relating to the different reports, will be described on the specific report page in this manual.
· 10 apples are purchased at R0.50 each
· 5 apples are sold, leaving 5 in stock
· Stock take entered, giving stock on hand value of R2.50 for the 5 remaining apples
· 10 more apples are purchased at R0.75 each
· If another stock take is done now, there will be 5 apples at R0.50 (SOH R2.50) each and 10 at
R0.75 (SOH R7.50) each. Giving a total value of R10.
Using 'Fixed Stock Cost' will take the 15 apples on hand and multiply by the last known purchase
price, making the calculations mush faster.
Using 'FIFO' will take each apple at the specified price for each day in the reports, making it more
accurate.
(Version: 6.1.5)
© 2009 Coherent Software Solutions
Preferences
171
6.1.3.3.4 Cashup
General Cashup Settings
- Modify Old Cashups - Affects the cashup screen, it is best to leave this option selected.
- Driver Gets Delivery Charge - If your store does deliver orders to customers, and your store charges a delivery
charge, that charge will be added to the driver's wages for each order.
- Blind Cashup - Prevents the cashup screen from showing the NET Sales, Gross Sales, Credit Cards, GRVs paid
from till, or whether the till is over / under. Essentially, the cashier doing the cashup on their own till will enter their
cash on hand, their credit cards, and any petty cash payments. The manager will only be able to see if the till cashup
balanced once the till is posted and locked.
Till Settings
- Tills Cashed Up Separately - This option is no longer applicable, as all tills are cashed up separately by default
now.
- Disable Employee Wages - If your employees are paid either an hourly wage, commission, or delivery charges,
selecting this option will disable all those wages. This setting affects ALL employees regardless of their employee
category.
Disable Petty Cash - Disallows cashiers from entering any payments in the Petty Cash section of their till shift
cashup.
Tills cannot b e LOCKED if:
- Invoices are outstanding - Check for any orders that have not been paid.
- Any till shifts are open - Checks to see if any till shifts are not ended and posted.
- Drivers are not cashed up - Checks for any drivers that have not yet been cashed up (posted into an active till shift).
Shop
- One Shop Cashup Per Day - Selecting this option will prevent any till shifts being activated on a date that the shop
cashup has already been posted.
- Cannot open tills if previous days shop cashup is un-posted - When selected, the previous day's shop cashup
must be posted before trading can commence for a new day.
© 2009 Coherent Software Solutions
(Version: 6.1.5)
172
BackOffice 6.1.5 Manual
6.1.3.3.5 Imaging
!
These settings will only have an effect if you have each computer set up with the necessary
hardware and software for the Aura Imaging application to function correctly. This hardware setup
requires two computer monitors on each till computer, one facing the cashier and a secondary
monitor facing the customer. If you do not have this, you will not need to adjust these settings.
General
Display Monitor (Primary / Secondary / Tertiary) - Select the monitor that is used for the customer imaging display.
Display Item Details - Tick this option to display extra details about the menu item being displayed on the customer
imaging display.
Text Colour and Background Colour - Select the text colour and background colour for the customer imaging display.
Rotate Image Delay - Select the number of seconds each image is displayed for in the customer imaging display
screen saver mode.
Display Price While Scrolling - Tick this option to display the menu item price in the customer imaging display
screen saver mode.
Invoice Display
Invoice Item Message - Enter a header line for the menu item display on the customer imaging display.
Invoice Total Message - Enter a header line for the invoice display on the customer imaging display.
Browse Image Delay - Select the number of seconds that each menu item image is displayed for while processing
an order.
(Version: 6.1.5)
© 2009 Coherent Software Solutions
Preferences
173
6.1.3.3.6 Stock
#
The following two options are designed to speed up and simplify both the stock manufacture and
stock purchase processes in the Aura software. By selecting either of these options, the affected
section will have all items previously manufactured or purchased into the current date with a 0
amount set as the yield or purchase (depending on the section affected). After doing so, all that is
required to complete the process, is to insert the correct amounts in the desired stock item or
items.
AutoFill
Auto Fill Manufactured Stock Grid - Selecting this option will affect the Manufacture Stock screen in the
aforementioned way.
Auto Fill Stock Purchases Grid - Selecting this option will affect the Stock Purchases screen in the aforementioned
way.
For more information, see the sections on Manufacture Stock
© 2009 Coherent Software Solutions
(Version: 6.1.5)
31
and Stock Purchases
25
.
174
BackOffice 6.1.5 Manual
6.1.3.3.7 Search
Customer Search - Using these options, you can select which customer detail fields can be searched in the
Customer Lookup window from Invoicing.
Email - This allows searching by the customer's set email address. This is not a very common detail, but may be
used in the case of online orders.
Cellphone - Allows searching the customer by the number set in the 'Cellphone' field. Recommended option.
First Name - Allows searching by customer first name. Recommended option.
Last Name - Allows searching by customer surname. Recommended option.
CRM (Customer Related Marketing) - Selecting this option allows the Customer Search screen to search information
inside the CRM tab in the Customer Details screen.
For more information, see the section on Customers 79 .
#
De-selecting an option will not prevent Invoicing from displaying or accessing that particular field,
it will affect only the search window.
(Version: 6.1.5)
© 2009 Coherent Software Solutions
Preferences
175
6.1.3.3.8 Backup
Backup Path 1 and 2 - These two lines display the currently set database backup paths.
- Use this button to select a new backup location for the selected line.
Auto - Ticking this option will cause BackOffice to automatically backup to the selected path.
If you wish to change a backup location, click
the
button to the right of each location.
Doing so will bring up the following prompt:
Browse to and select the folder you wish to
backup to, and then click the OK button.
!
The default location for a database backup is C:\MSSQL7\Backup. It is highly recommended that
you use this folder, but you may select a second backup location as an alternative.
If you are familiar with mapping network drives, you may set your backup location to a different
computer for added data safety.
Removing a b ackup Path
To remove a backup path and clear the line, click in the backup path line. Hovering your mouse pointer over the line
will display a pop-up with more information, as seen below:
Clicking in the line will present you with the
following prompt:
© 2009 Coherent Software Solutions
(Version: 6.1.5)
176
BackOffice 6.1.5 Manual
6.1.3.3.9 PoleDisplay
Line 1 - If you have any customer pole displays set up in your store, then the message typed in here will
automatically scroll on the display when not in use. A recommended message would be along the lines of "Next
customer please...".
6.1.3.3.10 Picklists
Enable Picklists - By ticking this option, Invoicing will allow the use of picklists. If you de-select this option, all menu
items will be forced to ignore picklists completely.
For more information, see the section on Picklists 100 .
Columns To Use (Only applies to keyboard interface)
Code / Price / Size - This setting is no longer in use, and should be removed in the next release of the Aura software.
6.1.3.3.11 Updates
Check Update Frequency - This option is to set the number of days before the Aura Updater is automatically run.
For more information, see the section on Help > Check For Updates
(Version: 6.1.5)
196 .
© 2009 Coherent Software Solutions
Preferences
177
6.1.3.3.12 Email
#
Take note that these details are specific to each store; all settings with exception of the Fax To
Email Host field must be obtained from your email service provider directly.
Email Address - This field is for your own email address, much like setting up a return email address inside
common email clients.
Mail Server - This field must contain the public address for the email server; these most commonly start with smtp,
but even this may vary from one to the next.
Mail Server Login - This field must contain your login user name; generally provided to your by the service provider.
Often this is just your username, but certain email servers use the full email address as a login name.
Mail Server Password - This field must contain your login password; generally provided to your by the service
provider.
Mail Sending Port - This field needs the port number for your email service provider's server; although this is
generally accepted as port 25 for outgoing mail servers. If port 25 does not work, you will need to confirm this with
your service provider.
Fax To Email Host - Fax-to-Email is a popular service that allows a user to email a message to a virtual email
address, and have it delivered to a linked fax number instead.
6.1.3.4
Network Settings
IP Addresses - The notepad-like block on this page is used to store notes on your system setup. Originally intended
to keep a list of all computer's network addresses (IP Address), you may store any notes on the setup of your store
here.
© 2009 Coherent Software Solutions
(Version: 6.1.5)
178
6.1.4
BackOffice 6.1.5 Manual
Printers
All Printers - This is a list of current printer setups inside the Aura software.
Selected Printer Properties - Will display the properties for the printer selected from the list of printers on the left.
Description - The name that will display in the list of available printers under New Printer Settings. This is for
identification purposes only, you can name the printer as you like.
Category (Invoice / Production / Credit Card) - The category for the selected printer, this will determine whether the
printer can be activated as an invoice, production, or credit card printer under Printer Setup.
For more information, see the section on Printer Setup 156 .
Type (None / Narrow / Wide / Impact Narrow) - Select the type of the selected printer.
Model (Epson / PosiFLEX / StarposTSP700 / Epson Impact) - To ensure correct printer formatting, please select the
model type of your printer.
Page Length, Page Width and Footer Height - The above three settings are governed by the printer drivers, you do
not need to adjust these settings at all.
Print Late Voucher - This is currently a dead feature, it will not make any difference to the printing of either customer
or production slips.
Extended Production Slip (Only applies to production printers) - Selecting this option will print a slightly modified
production slip, with parent items printed more clearly and their child items printed directly below them.
(Version: 6.1.5)
© 2009 Coherent Software Solutions
Preferences
6.2
179
Access Permissions
The Access Permissions screen provides the features to restrict the level access each employee category has to
the Aura system. For security and consistency reasons, permissions are set up by category instead of each
employee individually. This screen can be accessed by selecting Access Permissions from the Preferences menu.
Employee Categories Section - The left hand section of this window lists all current employee categories set up in
your system.
Allowed Activities for <category> - The upper right hand side displays the currently allowed activities for the selected
employee category.
Denied Activities for <category> - The lower right hand side displays a list of activities that are prohibited for the
selected employee category.
- This toolbar is used to either allow or disallow the selected access
permissions, under either the allowed or prohibited activity codes.
- The search bar is used to filter the list of displayed
activity codes, making it simpler to assign access permissions.
© 2009 Coherent Software Solutions
(Version: 6.1.5)
180
BackOffice 6.1.5 Manual
Editing Employee Access Permissions
To view and edit the permissions for a certain category, first select the desired category from the list on the left. If you
do not have the category here that you are looking for, it can easily be added without having to leave the Employee
Permissions screen.
#
To do this, right click on an empty space on the left hand side. Doing so will display the following
options:
The above three options are also accessed directly from the Employee Categories window. For
more information, see the section on Employee Categories 68 .
Refresh - If the list of categories was edited through the menu option, and the access
permissions screen was still open, you may need to refresh the list to continue. Use the Refresh
option to do so.
To either allow or deny any particular activity code, first select the permission and use the appropriate function as
described in the introduction to this section. Below is an example of a selected access permission:
Multiple permissions can also be selected by use of the shift or ctrl (control) buttons on your keyboard. Below is an
example of selecting multiple permissions using the ctrl key:
#
For a list of the available access permissions and a description of their functions, see the section
on List of Access Permissions 182 .
(Version: 6.1.5)
© 2009 Coherent Software Solutions
Preferences
181
Rolling Back Changes
If you made a mistake during the aforementioned process, you may press the
permissions to the point at which this screen was opened.
button to reset all
If BackOffice was able to successfully roll back all changes, you will be presented with the following window:
!
Be very careful with accidentally pressing the Rollback button, you cannot undo an 'undo'.
Grant All vs Deny All
The Grant All and Deny All buttons are there to allow more quickly editing a category. For example, if you are adding
a new 'Trainee Manager' category, and you wish the manager to have access to the majority of the system but not
unlimited: the quickest procedure would be to grant all permissions, and then remove the desired permissions.
Access Permission List Filter
The list of access permissions may now be filtered to simplify searching for a specific permission. In between the
list of allowed and prohibited activities, you will see the Search area; as seen here:
Simply begin typing a keyword that you would like to search for in the Search block; you will notice the list of both
allowed and prohibited activities will be filtered as you type. As the list is filtered, the background will change from
white to yellow, indicating the list is filtered. The filter is applied as a partial match anywhere filter; which means if you
search for the word 'menu', the filter will show all items with the word 'menu' anywhere in the description.
As seen in the following example, the list of permissions for Cashier has been filtered using the keyword 'till':
The Deny All and Grant All buttons now take this filter into account as well; affecting only the permissions shown in
the filter. For example; if we press the Grant All button while the filter is set as in the image seen above; only the items
displayed will be added to the list of allowed activities, any other permissions that are not shown will not be included.
To clear the Search block, either press the BackSpace key a few times, or press the Esc key once.
© 2009 Coherent Software Solutions
(Version: 6.1.5)
182
6.2.1
BackOffice 6.1.5 Manual
List of Access Permissions
During an Aura upgrade, a newer version of BackOffice or Invoicing may require new activity codes to be added, this
is done automatically during the upgrade process. With the exception of certain access permissions, new
permissions will default to being prohibited from most employees; including the default FRCH (franchisee) employee
category. In addition to this; due to information links in the database, activity codes that are no longer in use in a new
version may not be removed completely.
#
Aura Version 6 does perform maintenance on this list and clear out many of the older and
unused activities, the list found here is the currently active list of permissions found in Aura
BackOffice 6.
These access permissions are allowed or prohibited from each employee category, as
described in the section on Access Permissions 180 .
!
While reading through this list of permissions, each permission is structured to give the most
useful information possible. Next to each access permission, a suggested minimum access
permission level is shown in brackets (described below). Keep in mind that these are only
suggestions; you may still grant or deny any of these permissions as you see fit.
Admin is shown if the permission requires a high level of access (such as store owners or
technicians) and should not be changed by the average user. Permissions marked as 'admin'
have a large effect on the trading or security of your store.
Manager is shown where the store manager may need access to ensure that the store can be
maintained effectively.
User is shown for permissions that are safe for any employee with access to Aura. These would
include cashiers, drivers, or waiters where applicable.
List of Activity Codes
Name or Access Permission
Recommended Short Permission Description
Access Level
To Ab andon An Invoice
(Manager)
Controls access to cancelling an order that has not yet
been completed and saved.
For more information, see the Aura Invoicing Manual.
To Access Expense Categories
(Admin)
Controls access to the Expense Categories screen.
For more information, see the section titled Expense
Categories 125 .
To Access Expense Items
(Admin)
Controls access to the Expense Categories screen.
For more information, see the section titled Expense
Items 123 .
To Access Expense Payments
(Manager)
Controls access to the Expense Item Payments screen.
For more information, see the section titled Capture
Operating Expenses 49 .
To Access Menu Items
(Manager)
Controls access to the Menu Items screen.
For more information, see the section titled Menu Items
86 .
To Access Stock Items
(Manager)
Controls access to the Stock Items screen.
For more information, see the section titled Stock Items
111 .
To Access The Menu Item Selector
(User)
Controls access to the Menu Item Selector.
For more information, see the Aura Invoicing Manual.
To Activate Or Disab le Plugins
(Admin)
Controls access to the Aura Plug-ins window.
For more information, see the Aura Invoicing Manual.
To Add An Expense Payment
(Manager)
Controls access to processing a new Expense Payment.
For more information, see the section titled Capture
Operating Expenses 49 .
To Add New Menu Items
(Admin)
Controls access to adding new Menu Items.
For more information, see the section titled Menu Items
86 .
(Version: 6.1.5)
© 2009 Coherent Software Solutions
Preferences
183
To Adjust Invoice Line Quantity
(User)
Controls access to increasing or decreasing Invoice Line
Item Quantities.
For more information, see the Aura Invoicing Manual.
To Alter Menu Item Descriptions
(Admin)
Controls access to change Menu Item Names.
For more information, see the section titled Menu Items
86 .
To Assign Driver
(User)
Controls access to assign a Driver to a Delivery Order.
For more information, see the Aura Invoicing Manual.
(Manager)
Controls access to assigning Stock Items to External
Stock Locations.
For more information, see the section titled Items Per
Location 121 .
To Authorise a Transaction Refund
(Manager)
Controls access to refund a NOMAD credit card
transaction.
For more information, see the Aura Invoicing Manual.
To Authorise Any Staff Meal
(Manager)
Controls access to apply a Staff Meal Discount to an
order.
For more information, see the Aura Invoicing Manual.
To Authorise Discounts
(User)
Controls access to apply any Discount to an order.
For more information, see the Aura Invoicing Manual.
To Authorise Own Staff Meal
(Manager)
Controls access to apply a Staff Meal Discount to your
own meal only.
For more information, see the Aura Invoicing Manual.
To Browse Old Invoices
(Manager)
Controls access to View Old Orders from Aura
BackOffice.
For more information, see the section titled Find Invoices
66 .
To Browse Shop Cashup Data
(User)
Controls access to access the Cashup screen.
For more information, see the section titled Cashup
To Assign Item To External Stock
Location
To Browse Stock Takes
n/a
This setting is no longer active in this version.
To Browse Waiter Cashup Data
n/a
This setting is no longer active in this version.
To Cashup A Waiter
To Change Assigned Tab le
(User /
Manager)
39
.
Controls access to Post Waiters and Drivers.
For more information, see the section titled Employee
Cashup 40 .
(Manager)
Controls access to change the table an order is assigned
to.
For more information, see the Aura Invoicing Manual.
To Change Invoice Allocation Between
Waiters
(Manager)
Controls access to change the waiter assigned to a table
order.
For more information, see the Aura Invoicing Manual.
To Change Login Details For An
Employee
n/a
To Change Logout Time For An
Employee
(Admin)
To Change Menu Item Groupings
This setting is no longer active in this version.
(Manager /
Admin)
Controls access to adjust clock-out times for any
employee.
For more information, see the Aura Invoicing Manual.
Controls access to the Menu Items Per Report Group
wizard.
For more information, see the section titled Items Per
Report Group 105 .
To Change VAT Rate
(Admin)
Controls access to alter the VAT rate inside the System
Settings.
For more information, see the section titled Store Settings
163 .
To Close A Tab le
(User)
Controls access to close off a table.
For more information, see the Aura Invoicing Manual.
© 2009 Coherent Software Solutions
(Version: 6.1.5)
184
BackOffice 6.1.5 Manual
To Close Off Someone Else's Till Shift
(Manager)
Controls access to end a till shift started by any other
employee.
For more information, see the Aura Invoicing Manual.
To Confirm Credit Card Override
(Manager)
Controls access to manually process a credit card
transaction if the automatic transmission fails.
For more information, see the Aura Invoicing Manual.
To Convert Delivery Order To Collect
(User)
Controls access to change a delivery order to a collect
order.
For more information, see the Aura Invoicing Manual.
To Delete A Customer Record
(Manager)
Controls access to remove a customer record.
For more information, see the section titled Customers
.
To Delete A Menu Item
(Admin)
To Delete An Attendee Record
n/a
To Delete An Expense Payment
(Admin)
To Delete Unsaved Invoice Line
To Determine Which Activities Require
Authorisation
(Manager /
User)
n/a
79
Controls access to remove a menu item.
For more information, see the section titled Menu Items
86 .
This setting is no longer active in this version.
Controls access to removing an operating expense
payment.
For more information, see the section titled Capture
Operating Expenses 49 .
Controls access to remove an item from an order before
it is saved.
For more information, see the Aura Invoicing Manual.
This setting is no longer active in this version.
To Discard Stock
(Manager)
Controls access to the Discard Stock feature in Aura
BackOffice.
For more information, see the section titled Discard Stock
35 .
To Edit a Posted GRV
(Manager)
Controls access to edit the header for a GRV that is paid
from a till shift that is now posted.
For more information, see the section titled Purchase
Stock 25 .
To Edit An Already Assigned Invoice
(Manager)
Controls access to edit a delivery order that is assigned
to a driver.
For more information, see the Aura Invoicing Manual.
To Edit An Already Assigned Tab le
(Manager)
Controls access to edit a table order that is assigned to a
waiter.
For more information, see the Aura Invoicing Manual.
To Edit An Existing Stock Take
(Manager)
Controls access to open an already posted stock take
for editing again.
For more information, see the section titled Count Stock
22 .
To Edit An Expense Payment
(Manager)
Controls access to modify an expense payment after it
has already been entered.
For more information, see the section titled Capture
Operating Expenses 49 .
To Edit Or Delete An Invoice Line
(Manager)
Controls access to change quantity or remove an item
from an order that has already been saved.
For more information, see the Aura Invoicing Manual.
To Edit Posted GRV Lineitems
(Manager)
Controls access to edit the items for a GRV that is paid
from a till shift that is now posted.
For more information, see the section titled Purchase
Stock 25 .
To End A Till Shift
(User)
Controls access to close a till shift.
For more information, see the Aura Invoicing Manual.
(Version: 6.1.5)
© 2009 Coherent Software Solutions
Preferences
To Exclude External Location Sales
From Cashup
n/a
185
This setting is no longer active in this version.
To Exit GUI View
(Manager)
Controls access to exit from the Graphic User Interface
screen.
For more information, see the Aura Invoicing Manual.
To Issue waiter floats
(Manager)
Controls access to assigning a float to either a driver or
waiter.
For more information, see the Aura Invoicing Manual.
To Lock A Till Shift
(Manager)
Controls access to lock a posted till shift in the cashup.
For more information, see the section titled Till Shift
Cashup 43 .
To Maintain Access Control
(Admin)
Controls access to the Access Permissions screen.
For more information, see the section titled Access
Permissions 179 .
To Maintain Employee Categories
n/a
To Maintain Employee Details
(Manager)
Controls access to the Employee Records screen.
For more information, see the section titled Employee
Records 70 .
To Maintain Employee Passwords
(Manager)
Controls access to change an existing employee's
password.
For more information, see the section titled Editing
Employee Records 75 .
To Maintain Menu Categories
(Admin)
Controls access to the Menu Categories window.
For more information, see the section titled Menu
Categories 85 .
To Maintain Menu Prices
(Franchisee)
Controls access to alter the price of a menu item. This
permission is dependent on 'To Access Menu Items' and
the menu must be unlocked for this to work.
For more information, see the section titled Menu Items
86 .
To Maintain Over-Ring Reasons
(Manager)
Controls access to v\the Over-Ring Codes screen.
For more information, see the section titled Over-Ring
Codes 131 .
To Maintain Reporting Companies
n/a
To Maintain Stock Categories
(Admin)
Controls access to the Stock Categories window.
For more information, see the section titled Stock
Categories 110 .
To Make A Stock Location External
(Manager)
Controls access to set a stock location as external.
For more information, see the section titled Stock
Locations 120 .
To Manufacture Stock
(Manager)
Controls access to the Manufactured Stock screen.
For more information, see the section titled Manufacture
Stock 31 .
This setting is no longer active in this version.
This setting is no longer active in this version.
To Mark Any Invoice As A Late Delivery (Manager)
Controls access to mark a delivery order as a late
delivery.
For more information, see the Aura Invoicing Manual.
To Modify A Clock Period
Controls access to change the clock in / clock out time
of any active employee.
For more information, see the Aura Invoicing Manual.
To Modify Captured Surveys
To Modify Cashup Entries
© 2009 Coherent Software Solutions
(Admin /
Manager)
(Manager)
Controls access to open the capture employee survey
window in the cashup screen.
For more information, see the section titled Employee
Cashup 40 .
(Manager /
User)
Controls access to open the data capture windows in
the Till Shift Cashup screen.
For more information, see the section titled Till Shift
Cashup 43 .
(Version: 6.1.5)
186
BackOffice 6.1.5 Manual
To Modify Customer Pricing Level
(Manager)
Controls access to alter the pricing levels for customers
in the application settings.
For more information, see the section titled Invoicing
Settings 152 .
To Modify Discount Entries
(Manager)
Controls access to the Discount Codes screen.
For more information, see the section titled Discount
Codes 133 .
To Modify Invoices
(User)
Controls access to edit an existing order, this only
applies to table, delivery and collect orders.
For more information, see the Aura Invoicing Manual.
To Modify Menu Item Recipes
(Admin)
To Monitor Activity
(Manager)
Controls access to Monitoring > Activities.
For more information, see the section titled Monitoring
Activities 144 .
To Monitor Daily Sales
(Manager)
Controls access to Monitoring > Daily Sales.
For more information, see the section titled Monitoring
Daily Sales 145 .
To Monitor Staff Attendance
(Manager)
Controls access to Monitoring > Staff Attendance.
For more information, see the section titled Monitoring
Staff Attendance 145 .
To Monitor Staff Performance
(Manager)
Controls access to Monitoring > Staff Performance.
For more information, see the section titled Monitoring
Staff Performance 146 .
To Monitor Staff Statistics
(Manager)
Controls access to Monitoring > Staff Statistics.
For more information, see the section titled Monitoring
Staff Statistics 148 .
To Open The Till
(User)
Controls access to open the cash drawer from Aura
Invoicing.
For more information, see the Aura Invoicing Manual.
To Over-Ring An Invoice
(Manager)
Controls access to mark an order as over-rung.
For more information, see the Aura Invoicing Manual.
To Override Time Warning
(Manager)
Controls access to bypass the warning message "Your
system time appears to be incorrect, continue without
correcting?"
To Partially Pay From Till
(Manager)
Controls access to pay a GRV using some money from a
till shift and the rest from your safe.
For more information, see the section titled Purchase
Stock 25 .
To Perform A Backup
(Manager)
Controls access to backup the database.
For more information, see the section titled Backup
Database 52 .
To Perform A Stock Take
(Manager)
Controls access to the stock count screen.
For more information, see the section titled Count Stock
22 .
To Perform A Till Cashup
n/a
This setting is no longer active in this version.
To Perform The Daily Cashup
n/a
This setting is no longer active in this version.
To Pickup All Tab les
(Manager)
To Post Shop Cashup
n/a
To Print Old Invoices
(Manager)
Controls access to change the recipe for menu items.
Controls access to pick up anybody's table order.
For more information, see the Aura Invoicing Manual.
This setting is for logging purposes only.
Controls access to print any order from the browse old
invoices window.
For more information, see the section titled Find Invoices
66 .
(Version: 6.1.5)
© 2009 Coherent Software Solutions
Preferences
To Print Stock Manufacture Slip
To Process a Credit Card Transaction
To Process a Food Refund
To Process A Staff Meal Discount
187
(Manager)
Controls access to print out a manufactured stock item
slip.
For more information, see the section titled Manufacture
Stock 31 .
(Manager /
User)
Controls access to put through an order payment using
the NOMAD credit card system.
For more information, see the Aura Invoicing Manual.
(Manager)
(Manager /
User)
Controls access to refund a NOMAD credit card
purchase.
For more information, see the Aura Invoicing Manual.
Controls access to apply a staff meal discount to any
order.
For more information, see the Aura Invoicing Manual.
To Process GRVs
(Manager)
Controls access to create a new Goods Received
Voucher.
For more information, see the section titled Purchase
Stock 25 .
To Process Invoices
(User)
Controls access to start a new order inside Aura
Invoicing.
For more information, see the Aura Invoicing Manual.
To Re-Post A Previously Posted
Cashup
n/a
This setting is no longer active in this version.
To Re-Post A Previously Posted Shop
Cashup
n/a
This setting is no longer active in this version.
To Re-Print An Invoice
(Manager)
Controls access to print a duplicate copy of a customer's
order slip.
For more information, see the Aura Invoicing Manual.
To Reprint A Credit Card Slip
(Manager)
Controls access to re-print a NOMAD credit card slip.
For more information, see the Aura Invoicing Manual.
To Reprint A Stock Manufacture Slip
(Manager)
Controls access to print out a second copy of a
manufactured stock items slip.
For more information, see the section titled Manufacture
Stock 31 .
To Restore System Settings
To Restrict Employee Categories
To Return Any Stock To Any Supplier
To Run Activity Log Report
(Admin /
Manager)
Controls access to restore the settings backup using
the 'Restore' button in the Aura System Settings.
For more information, see the section titled Restore
Settings Feature 150 .
(Admin)
Controls access to the Restricted Categories feature of
Aura BackOffice.
For more information, see the section titled Restricted
Employee Categories 191 .
(Admin /
Manager)
Controls access to return stock items, even if they were
purchased from a different supplier.
For more information, see the section titled Return Stock
30 .
(Manager)
Controls access to run the aforementioned report.
To Run Average Sittings Per Tab le
Report
(Manager)
Controls access to run the aforementioned report.
To Run Average Takings Per Day
(Manager)
Controls access to run the aforementioned report.
(Manager)
Controls access to run the aforementioned report.
To Run Average Turnover By Tab le
(Manager)
Controls access to run the aforementioned report.
To Run Backoffice
(Manager)
Controls access to open Aura BackOIffice.
For more information, see the section titled Getting
Started 10 .
To Run Bottom Customers Report
(Manager)
Controls access to run the aforementioned report.
To Run Average Turnover By
Headcount
© 2009 Coherent Software Solutions
(Version: 6.1.5)
188
BackOffice 6.1.5 Manual
To Run Cash Tendered Report
(Manager)
Controls access to run the aforementioned report.
(Manager)
Controls access to run the aforementioned report.
To Run Category Sales By Hour Report (Manager)
Controls access to run the aforementioned report.
To Run Category Sales Report
(Manager)
Controls access to run the aforementioned report.
(Manager)
Controls access to run the aforementioned report.
To run Complaints report
(Manager)
Controls access to run the aforementioned report.
To Run Complete Cashup Report
(Manager)
Controls access to run the aforementioned report.
To Run Daily Control Sheet
(Manager)
Controls access to run the aforementioned report.
To Run Data Extractor
(Admin)
Controls access to run the Aura Data Extractor
application.
For more information, see the section titled Export (Data
Exporter) 52 .
To Run DB Optimiser
(Admin)
Controls access to the Aura Database Optimiser
application.
For more information, see the section titled Database
Optimiser 57 .
To Run DB Purge
(Admin)
Controls access to the Aura Database Purge application.
For more information, see the section titled Database
Purge 58 .
To Run Delivery Efficiency Report
(Manager)
Controls access to run the aforementioned report.
To Run Detailed Discount Report
(Manager)
Controls access to run the aforementioned report.
To Run Detailed Waitron Cashup
Report
(Manager)
Controls access to run the aforementioned report.
To Run Discounts Summary Report
(Manager)
Controls access to run the aforementioned report.
To Run Driver Deliveries Report
(Manager)
Controls access to run the aforementioned report.
To Run Employee Cashup Summary
By Date Report
(Manager)
Controls access to run the aforementioned report.
To Run Employee Cashup Summary
Report
(Manager)
Controls access to run the aforementioned report.
To Run Employee Wages Report
(Manager)
Controls access to run the aforementioned report.
To Run Expenses Paid By Supplier
Report
(Manager)
Controls access to run the aforementioned report.
To Run Expenses Paid Report
(Manager)
Controls access to run the aforementioned report.
To Run Full Customer Listing Report
(Manager)
Controls access to run the aforementioned report.
To Run Gross Profit Report
(Manager)
Controls access to run the aforementioned report.
To Run Grv Vouchers Report
(Manager)
Controls access to run the aforementioned report.
To Run GUI Designer
(Manager)
To Run Income Statement
(Manager)
Controls access to run the aforementioned report.
To Run Invoice Efficiency Report
(Manager)
Controls access to run the aforementioned report.
To Run Invoice Maker Report
(Manager)
Controls access to run the aforementioned report.
To Run Invoice Management Report
(Manager)
Controls access to run the aforementioned report.
To Run Invoice Summary Report
To Run Cashier Sales Performance
Report
To Run Commission Per Menu Item
Report
Controls access to the floor plan designer.
For more information, see the section titled Design Floors
53 .
(Manager)
Controls access to run the aforementioned report.
To Run Item Sales By Category Report (Manager)
Controls access to run the aforementioned report.
To Run Item Sales By Date By Shift
(Manager)
Controls access to run the aforementioned report.
To Run Item Sales By Date By Till
(Manager)
Controls access to run the aforementioned report.
To Run Item Sales By Hour Report
(Manager)
Controls access to run the aforementioned report.
To Run Item Sales By Size Report
(Manager)
Controls access to run the aforementioned report.
(Version: 6.1.5)
© 2009 Coherent Software Solutions
Preferences
189
To Run Item Sales By Till
(Manager)
Controls access to run the aforementioned report.
To Run Kitchen Management Report
(Manager)
Controls access to run the aforementioned report.
To Run KPI Report
(Manager)
Controls access to run the aforementioned report.
To Run Lapsed Customers Report
(Manager)
Controls access to run the aforementioned report.
To Run Late Deliveries Report
(Manager)
Controls access to run the aforementioned report.
To Run Menu Items Report
(Manager)
Controls access to run the aforementioned report.
(Manager)
Controls access to run the aforementioned report.
To run Monthly Financial Analysis report (Manager)
Controls access to run the aforementioned report.
To Run Net Sales Summary
(Manager)
Controls access to run the aforementioned report.
To Run New Customers Report
(Manager)
Controls access to run the aforementioned report.
To Run New Vs. Old Customers Report (Manager)
Controls access to run the aforementioned report.
To Run NOMAD Transactions Report
(Manager)
Controls access to run the aforementioned report.
To Run Order Manager
(Manager)
To Run Orders b y Area report
(Manager)
Controls access to run the aforementioned report.
To Run Overring Summary Report
(Manager)
Controls access to run the aforementioned report.
To Run Petty Cash report
(Manager)
Controls access to run the aforementioned report.
(Manager)
Controls access to run the aforementioned report.
To run Purchases b y Supplier report
(Manager)
Controls access to run the aforementioned report.
To Run Returns By Supplier Report
(Manager)
Controls access to run the aforementioned report.
To Run Review Stock Take Report
(Manager)
Controls access to run the aforementioned report.
To Run Royalty Schedule Report
(Manager)
Controls access to run the aforementioned report.
To Run Sales By Cashier
(Manager)
Controls access to run the aforementioned report.
To Run Sales By Hour By Shift
(Manager)
Controls access to run the aforementioned report.
To Run Sales By Hour By Till
(Manager)
Controls access to run the aforementioned report.
To Run Sales By Report-Group Report
(Manager)
Controls access to run the aforementioned report.
To Run Sales Effectiveness Report
(Manager)
Controls access to run the aforementioned report.
To Run Sales Month on Month
(Manager)
Controls access to run the aforementioned report.
To Run Sales Summary Report
(Manager)
Controls access to run the aforementioned report.
To Run Shop Cashup Detail Report
(Manager)
Controls access to run the aforementioned report.
To Run Shop Cashup Summary Report (Manager)
Controls access to run the aforementioned report.
To Run Sittings Per Tab le Report
(Manager)
Controls access to run the aforementioned report.
To Run Stock Issues Report
(Manager)
Controls access to run the aforementioned report.
To Run Stock Items Report
(Manager)
Controls access to run the aforementioned report.
To Run Stock Location Exception
Report
(Manager)
Controls access to run the aforementioned report.
To Run Stock Manufacture Exceptions
Report
(Manager)
Controls access to run the aforementioned report.
(Manager)
Controls access to run the aforementioned report.
(Manager)
Controls access to run the aforementioned report.
To Run Stock Price Fluctuation Report
(Manager)
Controls access to run the aforementioned report.
To Run Stock Profile Report
(Manager)
Controls access to run the aforementioned report.
(Manager)
Controls access to run the aforementioned report.
To Run Stock Purchases Report
(Manager)
Controls access to run the aforementioned report.
To Run Stock Recipes Report
(Manager)
Controls access to run the aforementioned report.
To Run Menu Items With Recipes
Report
To Run Product Sales By Cashier
Report
To Run Stock Movement Report
To Run Stock Movement Vouchers
Report
To Run Stock Purchase Exceptions
Report
© 2009 Coherent Software Solutions
Controls access to run the Aura Purchase Order Wizard.
For more information, see the section titled Add-ins 53 .
(Version: 6.1.5)
190
BackOffice 6.1.5 Manual
To Run Stock Return Detail Report
(Manager)
Controls access to run the aforementioned report.
To Run Stock Take Worksheet Report
(Manager)
Controls access to run the aforementioned report.
To Run Stock Transfers Report
(Manager)
Controls access to run the aforementioned report.
To Run Stock Variance Report
(Manager)
Controls access to run the aforementioned report.
To Run Stock Wastage Report
(Manager)
Controls access to run the aforementioned report.
To Run Stock Wastage Summary
Report
(Manager)
Controls access to run the aforementioned report.
To Run Store Commission Report
(Manager)
Controls access to run the aforementioned report.
To Run Street Sweeper
(Manager)
Controls access to run the aforementioned report.
To Run Supplier Listing Report
(Manager)
Controls access to run the aforementioned report.
(Manager)
Controls access to run the aforementioned report.
To Run Theoretical Stock Sales Report (Manager)
Controls access to run the aforementioned report.
To Run Till Cashup Detail Report
(Manager)
Controls access to run the aforementioned report.
To Run Till Cashup Summary Report
(Manager)
Controls access to run the aforementioned report.
To run Time and Attendance report
(Manager)
Controls access to run the aforementioned report.
To Run Top Customers Report
(Manager)
Controls access to run the aforementioned report.
To Run Total Sales By Hour Report
(Manager)
Controls access to run the aforementioned report.
To Run Turnover Per Tab le Report
(Manager)
Controls access to run the aforementioned report.
To Run VAT Report
(Manager)
Controls access to run the aforementioned report.
To Run Voided Items Report
(Manager)
Controls access to run the aforementioned report.
To Run Survey Rating By Cashier
Report
To Set The Royalty Or Advertising
Percentage
(Admin)
Controls access to adjust the royalty or advertising
percentage in the system settings.
For more information, see the section titled System
Settings > Program Settings > Head Office Settings
164 .
To Split or Group an Invoice
(Manager /
User)
Controls access to split a table order over two tables, or
to join two table orders into one table.
For more information, see the Aura Invoicing Manual.
To Start A New Till Shift
(Manager /
User)
Controls access to start a new shift inside Aura Invoicing
to process orders.
For more information, see the Aura Invoicing Manual.
To Transfer Stock
(Manager)
Controls access to transfer stock from one location to
another.
For more information, see the section titled Transfer
Stock 37 .
To Transfer Tab le
(Manager)
Controls access to change the table number assigned to
a table transaction.
For more information, see the Aura Invoicing Manual.
To View Or Change Glob al Settings
(Manager)
Controls access to the Aura System Settings.
For more information, see the section titled System
Settings 150 .
To View Or Change Invoice Settings
n/a
To Void An Invoice Line
(Manager)
Controls access to set a single lineitem on an order as
'voided'; this removes the quantity and cost of the item
without removing the name from the slip.
For more information, see the Aura Invoicing Manual.
To Close Any Tab le
(Manager)
With this permission allowed, a manager may close off
any table order regardless of the cashier or waiter
assigned.
This setting is no longer active in this version.
(Version: 6.1.5)
© 2009 Coherent Software Solutions
Preferences
6.3
191
Restricted Employee Categories
The Restricted Employee Categories window was designed to prevent an employee from editing or adding a new
employee to a category that is higher than his/her own. For example: when set up correctly, a manager will not be
allowed to edit a current, or add a new employee record using the category of franchisee.
Employee Categories - The left hand list displays a list of your currently available categories. Select the category you
wish to edit here.
Restricted Categories - Displays a list of categories that are restricted from the selected category's access.
Controls - This toolbar contains functions used to maintain the restricted / unrestricted categories list.
Unrestricted Categories - Displays a list of categories that are available to edit by the selected category.
Restricting Categories
To prevent a trainee manager from adding a franchisee record for himself and gain access to the entire system, we
will need to restrict that category from his range of access. To begin, select the trainee manager category from the left
hand side. After this, we need to move the categories from Unrestricted Categories to Restricted Categories one at a
time: select the category on the right, and press the
button. As seen below:
This will move the selected category to the Restricted Categories list. To move any category back to Unrestricted
Categories, use the
button.
For more information on how these settings work, see the section on Employee Records
© 2009 Coherent Software Solutions
(Version: 6.1.5)
70
.
This page is deliberately left blank
Part
Help
VII
194
7
BackOffice 6.1.5 Manual
Help
The Help menu contains more information relating to Aura and your server computer directly.
See a topic b elow for more information:
· Dialup IP Address
194
· Feature Registration
· ID Numbers
194
195
· Check for Updates
· What's New?
196
200
· Help (Opens this user manual)
· About
7.1
200
Dialup IP Address
This option may be used by our Aura Help Desk technicians. If your internet connection is a normal Telkom
telephone dial-up connection, this option will display the unique Internet Protocol address that your connection has
been assigned for that internet session.
!
If your computer is not connected to the internet, or you have an ADSL or DSL connection
(permanently online), then selecting this option will show an error. Please check the connection
and try again.
If your dial-up connection is connected and active, you will see a message displaying your current IP address. Keep
in mind that with a dial-up IP address, you may possibly be assigned a different address every time you connect.
7.2
Feature Registration
Certain features of the Aura system are restricted and governed by a license file. This feature is used to update that
license file with encrypted information. When the Feature Registration window is opened, you will be presented with
the following screen:
When doing feature registration over the phone with an Aura technician, they will ask you for user codes one and
two. Then using those two codes, two registration keys will be generated to update the required data in your license
file.
The license file is used to keep the cashup enabled, allow access to customer lists and orders, and authorise the
number of tills that are allowed to connect to this server computer. For this reason, it may be necessary that the
feature registration is done more than once.
(Version: 6.1.5)
© 2009 Coherent Software Solutions
Help
7.3
195
ID Numbers
Selecting ID Numbers from the help menu will display unique information about your server system. This will only be
required by our Aura technicians and you will most likely not need this information for any reason.
© 2009 Coherent Software Solutions
(Version: 6.1.5)
196
7.4
BackOffice 6.1.5 Manual
Check For Updates
Clicking this option will open up the Aura Updater , which will connect to the Alphapos servers to check your current
version of the Aura Software again the latest release version. If a newer version is available for download from our
servers, Aura Updater will alert you and prompt to download and automatically install the updates.
!
You must have a working and active internet connection in order to check for updates.
The Aura Updater can also be launched from inside Aura BackOffice, by selecting Help > Check
for Updates.
When the Aura Update application is launched, it will automatically attempt to check for available updates for your
Aura POS software. If no updates are found it will display the following screen:
The above message confirms that you already have the latest released Aura software version, you may click on
Close and continue as normal.
(Version: 6.1.5)
© 2009 Coherent Software Solutions
Help
197
Downloading Updates
If an update has been found, you will see the following screen with information about the upgrade. You can use the
scroll bar on the right hand side to see all changes and fixes in the available version:
#
Keep in mind that the section inside the white block of the above screen shot contains a brief
summary of updates, changes and fixes in the new version. The upper most line will display the
version number of the new software version.
Click on Next to download the update, which will move on to the following window:
© 2009 Coherent Software Solutions
(Version: 6.1.5)
198
BackOffice 6.1.5 Manual
Applying Upgrade Patch
Once the required files have been downloaded, the Aura Update application will close, and will run the patch that
has been downloaded:
Once BackOffice and Invoicing are both closed, click on Start to continue. This will display the following screen with
a progress bar of the patch:
(Version: 6.1.5)
© 2009 Coherent Software Solutions
Help
199
If the patch applies correctly, you will see the following message:
When you click on Finish, the Aura Update application will show the following message:
Click on Finish to complete the update, this will automatically return you to AEC and open BackOffice. Please wait for
BackOffice to open completely before running Invoicing.
!
If you get an error message at any stage during the patch process, please leave the error on
screen or write it down word-for-word and contact our Aura Help Desk for assistance. Our
technicians need the error message to be able to diagnose the problem and find a solution.
© 2009 Coherent Software Solutions
(Version: 6.1.5)
200
7.5
BackOffice 6.1.5 Manual
What's New?
Selecting the What's New? option will open a webpage listing the changes, updates and bug fixes made to the
latest version of Aura currently available. This information is also available in the What's New section of this help
manual.
For more information, see the section on the What's New Section 7 .
!
7.6
This feature requires a working and active internet connect to function correctly.
About
(Version: 6.1.5)
© 2009 Coherent Software Solutions
Part
Contact Details
VIII
202
8
BackOffice 6.1.5 Manual
Contact Details
Office Contact Details
Aura Help Desk
086 100 AURA (2872)
Midlands Branch (Head Office)
033 343 2135
Aura Helpdesk Hours
6:00am to 11:00pm, 7 days a week
In order to ensure that all calls taken have been logged and are treated with the importance and
urgency each one rightfully deserves, please keep the following points in mind when consulting with our
helpdesk:
§ Ensure that the technician you are speaking to knows which store you are calling from, and that you
get the name of the technician you speak to.
§ Be clear and concise with what the problem is and when it started appearing. The more information
you can provide, the better.
§ If the technician does not offer you a reference number for your call, you may should ask for one.
This not only makes it easier to follow up on an issue later, but also ensures that your call is logged
and is being / has been attended to properly.
§ Most importantly, please keep in mind that Coherent Software Solutions provide the Aura Point of
Sales Suite; for any other problems such as your email, internet, anti-virus software and the like,
please contact the software distributor or supporter related to that application. These contact details
can generally be found under the application's Help > About or Help > Contact Us options.
Help Manual Author Contact Details:
If you have any queries or suggestions regarding the help manual, please contact our Midlands CoSoft branch.
(Version: 6.1.5)
© 2009 Coherent Software Solutions
Index
Database Optimiser
57
Database Purge
58
Dataset Filter
13
DB Backup
52
Default Transaction Type
152
Delivery Areas
126
Departments (Menu Items)
84
Design Floor Plan
53
Devices Settings
160
Dialup IP Address
194
Disable Employee Wages
171
Disable Petty Cash
171
Discard Stock
35
Discount Reasons
133
Discounts: Auto Apply
136
Discounts: Time Based
139
Driver Cashup
40
Driver Gets Delivery Charge
171
Index
-AAbout Aura Screen
200
Access Permissions per Category
179
Activities Menu Overview
20
ADC
49
Add Aura Printers
178
Add-ins Menu Overview
53
Advertising / Royalty Percentages
164
Allow Reprint
154
Assign Items to Kitchen Printer
103
Auto Apply Discounts
136
Auto Backup Feature
175
Auto Prompt to Add Operators
168
Auto Restart Transaction
166
Auto-fill Form Settings (Stock Purchases and
Manufacture)
173
-E-
-BBackup Database
52
Backup Settings
175
Blind Cashup
171
Business Settings
163
Button Sizes (Menu Items and Categories)
-CCapture Operating Expenses
49
Cashup Overview
39
Cashup Settings
171
Categories (Employee)
68
Categories (Menu Items)
85
Categories (Stock Items)
110
Check For Updates
196
Clear NOMAD Log File
51
Contact Details
202
Count Stock
22
Credit Card Printers Setup
158
Credit Card Setup (NOMAD)
161
Customer List
79
Customer Notes
166
Customer Search Fields
174
Customer Slip Printers Setup
157
Daily Sales (Monitoring)
Data Exporter
52
159
Edit Employee
75
Email Server Settings
177
Employee Cashup
40
Employee Categories
68
Employee Category Access Permissions
179
Employee Records
70
Employees - Add New
71
Employees - Edit Records
75
Employees Menu Overview
68
Enable Editing of Invoices (Mainly Table Orders)
166
Expense Item Categories
125
Expense Items
123
Expense Menu Overview
123
-FFeature Registration
194
Find Previous Invoices
66
Fingerprint Access
160
Fingerprints (Add Employee Login)
Fingerprints (Edit Employee Login)
Float Setup
152
Floor Plan Designer
53
Force Password Change
166
Form Look: Touchscreen / Normal
-G-
-D145
© 2009 Coherent Software Solutions
203
General Report Settings
General Settings
166
Get Menus
48
(Version: 6.1.5)
169
71
75
152
204
BackOffice 6.1.5 Manual
Getting Started
10
Goods Received Voucher, GRV
Gratuity Line
154
Grid Size Modifier
152
Group Items on Invoice
154
Monitor Daily Sales
145
Monitor Staff Activity
144
Monitor Staff Attendance
145
Monitor Staff Performance
146
Monitor Staff Statistics
148
Monitoring Menu Overview
144
Multiple Shop Cashups
171
25
-HHead Office Settings
Help Menu Overview
-N-
164
194
-IImaging Settings
172
Internet Connection Address (Dial-up Only)
Introduction
6
Invoice Notes (All Slips and Delivery Only)
Invoice Printers Setup
157
Invoice Settings
152
Invoicing Settings
168
Items per Location
121
-KKeep List Open
159
Kitchen Printer Wizard
Kitchen Printers Setup
166
161
-OOne Shop Cashup Per Day
171
Only Print New Items
154
Operating Expenses
49
Optimise Database
57
Overlap Buttons
159
Over-ring Reasons
131
-P-
103
157
-LLabel Printer Setup
154
Large Order Scroller (Order Navigator)
List Old Invoices
66
Lists Menu Overview
66
Locate Specific Record
13
Locations (Stock Items)
120
194
Navigation Toolbar
13
Network Settings Overview
177
New Employee
71
NOMAD Credit Card System Setup
NOMAD Transactions Log
51
159
-MMake-Line Printers Setup
157
Manufacture Stock
31
Map Grid References
126
Menu Download
48
Menu Item Categories
85
Menu Item Departments
84
Menu Item Picklists
100
Menu Items Menu Overview
83
Menu Items Overview
86
Menu Items: Barcode Settings
99
Menu Items: Button Colour Settings
98
Menu Items: Other Settings
94
Menu Items: Screen Saver Details
99
Menu Items: Setup Recipe
89
Menu Publish
49
Pack Size (Stock Items)
119
Password (Add Employee Login)
71
Password (Edit Employee Login)
75
Password Lifetime Setting
166
Path for Backup
175
Payment Screen Close Delay
152
Persist User
152
Picklist Settings
176
Picklists
100
Pole Display Settings
176
Pole Display Setup
160
Preferences Menu Overview
150
Print Customer Survey
154
Printer Settings
154
Printer Setup Overview
156
Production Printer Assigning
103
Production Printers Setup
157
Program Settings Overview
165
Prompt for Head Count (Table Orders Only)
Prompt to Print On Payment
154
Purchase Orders Delivery Address
163
Purchase Stock
25
Purge Database
58
(Version: 6.1.5)
168
© 2009 Coherent Software Solutions
Index
-QQuick Payment Tender Amounts Settings
Quick Start Checklist
17
-RRecipe for Menu Items
89
Recipe for Stock Items
116
Remove Duplicate Streets
61
Reports Printer Device
154
Reports Settings
169
Restore Settings Backup
150
Restricted Employee Categories
191
Return Stock
30
Royalty / Advertising Percentages
164
-SSearch Settings
174
Set Stock Items in Locations
121
Set Up Streets for Deliveries
127
Settings: All Computers Overview
162
Settings: Printers Overview
178
Settings: Restore
150
Settings: Specific Computer Overview
151
Shop Cashup
47
Slip Printer Reports Settings
161
Software Changes
7
Software Licensing
194
Software Settings
150
Software Updates
196
Staff Activity
144
Staff Attendance (Monitoring)
145
Staff Performance (Monitoring)
146
Staff Statistics (Monitoring)
148
Stock Costing Settings (FIFO / Fixed)
169
Stock Item Categories
110
Stock Item Locations
120
Stock Item Selector
21
Stock Items Menu Overview
109
Stock Items Overview
111
Stock Items: Deposits
119
Stock Items: Ordering Packs
119
Stock Items: Recipe Recipe
116
Stock Overview
21
Stock Settings
173
Stock Suppliers
77
Stock Take
22
Store Settings
163
Street List
127
© 2009 Coherent Software Solutions
168
Street Names
129
Street Sweeper
61
Suburb Names
130
Supplier List
77
Survey Questions
82
Synchronise
49
System Settings
150
-TTables
141
Till Drawer Device
160
Till Post / Lock Settings
171
Till Shift Cashup
43
Time Based Discounts
139
Touch Screen Settings
159
Trade Until Time Setting
163
Transfer Stock
37
-UUpdate Customer Stats
63
Updates Software Settings
176
Upload Menu
49
Use Fingerprints
160
-VVAT Rate
163
Version Changes
7
-WWaiter Cashup
40
What's New
7
What's New in Version....?
(Version: 6.1.5)
200
205