1
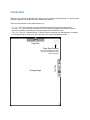
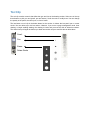
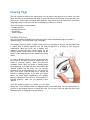
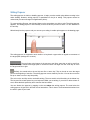
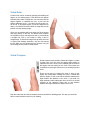
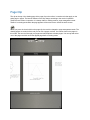
Tactilis
version 1.0 : User Manual
Contents
Introduction!
3
Tool Clip!
4
Drawing Page!
5
Detailing Popover!
5
Writing Popover!
6
Virtual Ruler!
7
Virtual Compass!
7
Page Clip!
8
Introduction
Tactilis lets you use iPad for drawing in the same way you would use pencil and paper. It is aimed at quick
drawings, diagrams and doodles and has a minimal user interface.
The three main elements of the tactilis interface are :
• Tool Clip : The tool clip contains controls that define the type and size of the drawing strokes.
• Drawing Page : This is the main area where you draw. The drawing page also responds to special
gestures for detailing, handwriting and creating straight lines and perfect circles.
• Page Clip : This clip - located at the top - contains controls to manage your drawing pages. It changes
its tools depending on whether you are in drawing mode or page management mode.
Page Clip
Page Style Selector
Drawing Page
Tool Clip
Scroll on the selector to change
the page style between plain,
ruled or squared.
Tool Clip
The tool clip contains controls that define the type and size of the drawing strokes. Select one of the top
three buttons to pick your tool (pencil, pen and eraser). Scroll the tools to modify them. You can change
the opacity of the pencil, the size of pen, or size of eraser.
The last button on tool clip is the delete button for the strokes. It deletes the last pencil, pen or eraser
stroke. You can delete up to 20 last strokes. However, if you move to page management mode, clear
drawing, or begin emailing drawing, the drawing is frozen and you wonʼt be able to delete last strokes.
The stroke history will again be built as you draw new strokes and you would be able to delete them.
Pencil
Pen
Eraser
Delete Stroke
Drawing Page
The main element of tactilis is the drawing page. You can draw on the page just as you draw on normal
paper. However, the strokes drawn with finger (or even with stylus) on iPad are not very precise like a real
pencil or pen. Tactilis helps you mitigate these problems using various tools. All of these tools are initiated
using finger gestures and so do not have corresponding tool buttons or controls.
There are four types of tools available :
• Detailing Popover
• Handwriting Popover
• Virtual Ruler
• Virtual Compass
Detailing Popover
Note : the instructions available in the tactilis app use the name ʻmagnification popoverʼ instead of
detailing popover. This will be fixed in the next update.
The detailing popover is used to magnify smaller areas of your drawing so that you can draw details into
it. Tactilis uses a different approach than the standard approach of zooming in entire page for
magnification. When you zoom into a drawing, your
context is lost and it is hard to imagine where you are
drawing. Instead, Tactilis allows you to magnify only the
portion of your drawing that you are interested in putting
details.
To create a detailing popover, put your two fingers at the
two corners of the area you wish to magnify and do a
pinch-out (zoom-in) gesture. When you pinch-out
sufficiently (about 120%) the border of detailing panel
starts appearing. If you pinch-out more (about 200%) the
detailing popover will be ready. You can continue
pinching-out for more magnification. You can also move
(pan) your fingers while pinching-out to change the
location of detailing popover. If you leave your fingers
before you reach 200% magnification, the detailing
popover is dismissed. This is done to avoid creating unintended popovers, when you are performing other
gestures.
Once the detailing popover is created, you can draw
directly into it. Your drawing strokes are mapped correctly to the main paper. You can again pinch-in or
pinch-out in the detailing popover to change the scale. You can also scroll and adjust the area inside
detailing popover by dragging two fingers inside it.
Writing Popover
The writing popover is similar to detailing popover. It helps you write smaller print without zooming in the
entire drawing. However, writing popover is specialized for the job of writing. This popover cannot be
resized and you cannot change its magnification (400%).
To create a writing Popover, tap with two-fingers on the area where you wish to write. The writing popover
appears. The writing popover is tied vertically to the area where you need to write. It is also attached to
the tool-clip.
Write directly into the popover and you can see your writing in smaller print appear on the drawing page.
The writing popover is supposed to work similar to a key-board or type-writer as regards to movement of
the target point (analogous to a cursor).
The scroll-strip at the bottom of the pop-over acts like a space bar as well as scroll bar.
Tap on the strip to advance the target point for next word. Move one finger over the scroll-strip to move
the target area left or right.
Similarly, the central-tab on the tool-clip acts like a ʻreturn keyʼ. Tap on the tab to move the target
point to the beginning of next line. The writing popover moves ahead by one line. You can also move the
tab up or down to move to any line quickly.
The tools on the tool-clip can be used while writing. The most useful tool while writing is the delete key.
The key acts like a back-space key on a keyboard. While you are writing, if you wish to delete a letter or
word, delete the back-space key and it removes the last strokes.
You can dismiss the popover by tapping on the area above the writing popover. The area below the
writing popover is ignored for all kinds of user interactions. This is done to avoid unintended touches from
the wrist or palm of your hand.
Virtual Ruler
A virtual ruler can be created by pressing and holding two
fingers on the drawing page. A thin blue line will appear
indicating the position of target line. You can move the two
fingers together to reposition the line. If you hold the
fingers sufficiently close ( < 2 inches) the line snaps to 0,
30, 45, 60, or 90 degree angles. If your two fingers are far
away (> 2 inches) then the line does not snap and you can
position it at any arbitrary angle.
Once you are satisfied with your target line lift the fingers
and trace directly on the line. The actual touch positions
are modified to fall on the target line and so you would get
a straight line. This is very similar to using a ruler or
straight-edge. To dismiss the target line tap away from line
or simply start drawing elsewhere. You can start tracing
the line while you are holding the line. However one you
start tracing the line position remains fixed.
Virtual Compass
Virtual compass works similarly. Rotate two fingers to create
a target circle. You can move the fingers while rotating to
reposition the circle. Once you are satisfied with the circle lift
the fingers and start tracing on the circle. The touches are
constrained to the target circle and so you would get perfect
circle.
There are two ways of creating the circle. If both of your
fingers are moving while rotating, the circle is created with
both the fingers on the circle and the distance between the
finger defines the diameter of the circle. If you hold one
finger stationary while rotating the other, the circle is created
centered at the stationary finger and so the distance
between the fingers defines the radius of the circle.
Both the virtual ruler and virtual compass can be used inside a detailing panel. This way you would be
able to create miniature circles in your drawing.
Page Clip
The clip at the top of the drawing page is the page clip or the toolbar. It contains tools that apply on the
entire page or pages. The last two buttons on the clip change according to the mode of operation.
Tactilis has two modes of operation. It is always either in drawing mode or page management mode.
Tactilis is in drawing mode when the page appears full-size and covers almost the entire screen.
When you press the circular disk on the page clip, the mode is changed to page management mode. The
drawing pages are scaled to 50% and you can see 3 pages at a time. You cannot draw on the pages in
this mode. You can scroll through your pages and add, duplicate or delete pages. You can tap and select
one of the pages and this moves the tapped page back to drawing mode.
The fist tool creates a new page and makes it current page for drawing.
The second tool is used to duplicate page. Duplicate page tool creates a copy of current page and makes
it the current page for writing. If many of your drawings need a template, you could draw the template
once and use duplicate page to create different drawings.
The third and fourth tools on the page clip change depending on the mode.
Drawing mode :
The third tool is used to email drawing. The current page can be emailed directly from within the tactilis
application.
The fourth tool is used to clear page. This erases all the strokes from the current page.
Page management mode :
The third tool is the action tool. When you select this, you get the choice of either Email Drawing or Save
to Photos. Email Drawing works similar to the tool in drawing mode. Save to Photos, saves the drawing to
Photos Album on iPad.
The fourth tool is used to delete the page. This completely removes the page as opposed to simply
clearing it.
Notes :
Tactilis saves the pages internally, as PNG images. When you are exporting the pages using either Email
Drawing or Save to Photos, the image is modified slightly and is used for exporting. The email drawing
will use the PNG image without the grid (ruled or squared page style). Save to Photos saves the PNG
image to Photos Album with the grid (if you had picked one for that page).
You can change the name of the page by tapping on its name in the page management mode.