1
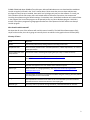
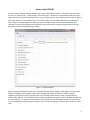
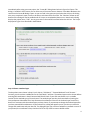
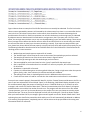
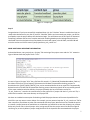
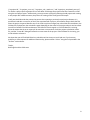
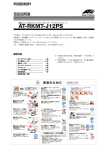
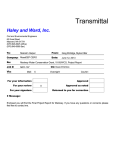
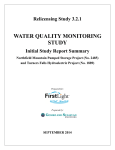
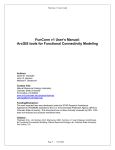
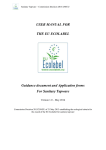
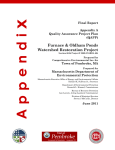
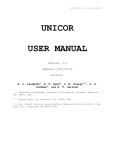
CAPS: Conservation Assessment and Prioritization System
CAPS-IBI User’s Manual
Version 1.0 – July 2015
Preface
Acknowledgements:
Funding for the development of CAPS-IBI was provided by the Massachusetts Department of Environmental
Protection and the U.S. Environmental Protection Agency under section 104 (b)(3) of the U.S. Clean Water Act.
Thanks to the “R Project for Statistical Computing,” the developers of the “Python” programming language and
the “QT Project” for making their excellent open-source software available to all.
License of this document:
Permission is granted to copy, distribute and/or modify this document under the terms of the GNUFree
Documentation License.
Questions and Comments:
Technical Support Questions about CAPS-IBI
Bob English
Daystar
…computing and research services
367 Four Mile Brook Rd.
Northfield, MA 01360
Phone: (413)834-1841; Fax: (978)882-0243
[email protected]; http://edaystar.com
Questions about the Conservation Assessment and Prioritization System
Scott Jackson
Department of Environmental Conservation
Holdsworth Hall
University of Massachusetts
Amherst, MA 01003
Fax: (413) 545-4358; Phone: (413) 545-4743
Email: [email protected]
Dr. Kevin McGarigal
Department of Environmental Conservation
Holdsworth Hall
University of Massachusetts
Amherst, MA 01003
Fax: (413) 545-4358; Phone (413) 577-0655
Email: [email protected]
Links:
More information about the Conservation and Prioritization System can be found at
http://www.umasscaps.org.
The Microsoft Windows (CAPS-IBI_1.0_setup.exe) can be found at
https://sourceforge.net/projects/capsibi/files/
The complete source code for CAPS-IBI is available at
https://sourceforge.net/p/capsibi/code/ci/master/tree/
Please report bugs or feature requests at
https://https://sourceforge.net/p/capsibi/tickets/
A copy of the license for this manual can be found at
http://www.gnu.org/copyleft/fdl.html
i
Table of Contents
Preface
i
Overview
What is CAPS?
What is CAPS-IBI?
How do I install CAPS-IBI?
Who should read this manual?
Glossary of Terms
1
How to Use CAPS-IBI
The Project Menu
Step 1:
Step 2:
Step 3:
Step 4:
Step 5:
3
SOME ADDITIONAL IMPORTANT INFORMATION:
7
ii
Overview
What is CAPS
The Conservation Assessment and Prioritization System (CAPS) is an ecosystem-based (coarse-filter) approach
for assessing the ecological integrity of lands and waters and subsequently identifying and prioritizing land for
habitat and biodiversity conservation. We define ecological integrity as the ability of an area to support
biodiversity and the ecosystem processes necessary to sustain biodiversity over the long term. CAPS is a
computer software program and an approach to prioritizing land for conservation based on the assessment of
ecological integrity for various ecological communities (e.g., forest, shrub swamp, headwater stream) within an
area.
The first step in the CAPS approach is the characterization of both the developed and undeveloped elements of
the landscape. With a computer base map depicting various classes of developed and undeveloped land, we
then evaluate a variety of landscape-based variables (“metrics”) for every point in the landscape. A metric
may, for example, take into account the microclimatic alterations associated with “edge effects,” intensity of
road traffic in the vicinity, nutrient loading in aquatic ecosystems, or the effects of human development on
landscape connectivity.
Various metrics are applied to the landscape and then integrated in weighted linear combinations as models
for predicting ecological integrity. This process results in a final Index of Ecological Integrity (IEI) for each point
in the landscape based on models constructed separately for each ecological community.
What is CAPS-IBI?
Over the course of several years UMass Amherst has been collecting biological data in forested wetlands and
using data collected by the MA Office of Coastal Zone Management and MassDEP in salt marshes and wadable
streams. These data were used to create and test Indices of Biotic Integrity (IBIs) for CAPS IEI and metrics. 1
CAPS-IBI is software that allows cooperating agencies, organizations and businesses to input field-collected
biological data and output IBI scores for IEI and some of the CAPS metrics for forested wetlands, salt marshes
or wadable streams.
CAPS-IBI can be used to:
•
•
•
•
Evaluate the biological condition of particular sites and assess whether IBI scores meet expectations
for wetlands in their specific landscape contexts
Identify whether site specific stressors (e.g. chemical dumping) are affecting the biological condition of
wetlands beyond the general stressors associated with the surrounding landscape
Assess progress and the success of wetlands mitigation projects
Assess the impact of wetland restoration projects
How do I install CAPS-IBI?
CAPS-IBI currently is intended to run primarily on Microsoft Windows operating systems (XP, Vista and
Windows 7 and Windows 8), although files are available that make it possible for very experienced computer
users to run the software on nearly any operating system. Hardware requirements include a minimum of
1
For information about IBI development see “Empirically Derived Indices of Biotic Integrity for Forested Wetlands,
Coastal Salt Marshes and Wadable Freshwater Streams in Massachusetts” available at
http://umasscaps.org/pdf/CAPS%20IBI%20Report%20Sept%2015%202013%20Final.pdf.
1
512MB of RAM and about 300MB of free disk space. Microsoft Windows users can download the standalone
installer using the link found in the “Links” section above. Please note that you must have Administrator
privileges to install, but once installed, those with ‘user’ privileges only may use the software. To install, just
click or double click the file to open the install wizard and then follow the instructions. We recommend
installing the software using the default settings. For windows users, the default installation will create a folder
in the program files list and the program can be opened just like any other Windows program. CAPS-IBI is
written in the Python programming language and makes use of the Quantum GIS API and the Inno Setup 5
installer program.
Who should read this manual?
We hope that all users of the software will read this manual carefully. The CAPS-IBI software appears fairly
simple on the surface, but a lot is going on internally that is not obvious in the graphical user interface (GUI).
Glossary of Terms
Term
Definition
Action
The function performed by clicking a button or choosing a menu item.
Compliance Level
There are three possible results: “Exceeds expectations,” “Meets expectations,” or “Fails to
meet expectations.”
Comma Separated Value
(CSV) data file
The file that contains the biological sampling data (see “Step 4:” below for format)
IBI Metric
See http://www.umasscaps.org/pdf/CAPS-Landscape-Metrics.pdf for individual metric
definitions
IBI Score
The score calculated by statistical modeling based on the field-collected biological data
IBI Table
The table that appears in the main window when CAPS-IBI is opened
Metric Type
Either “Stressor” or “Integrity/Resiliency” see http://www.umasscaps.org/pdf/CAPSLandscape-Metrics.pdf
Percentile
The percentage of values that is expected to fall below the given value (e.g. IBI score) based
on training data used to create the IBIs
Target Score
The expected IBI score based on the metric or IEI score calculated by the CAPS model for
the CAPS cell nearest the GPS coordinates of the sampling site
Wetland Type
Currently users may choose among Salt Marsh, Forested Wetlands or Streams.
2
How to Use CAPS-IBI
As seen in Figure 1 below, the Main Window has a single menu named “Project.” The project menu has three
actions in it: “New Project,” “Open Project” and “Save Project.” The buttons on the toolbar perform the same
three actions as the items in the project menu. You may notice that the “Save” button on the toolbar is ‘grayed
out,’ which means it is not available to use. The “Save” button is only available when there is something to
save. In Figure 1, looking below the toolbar you see the IBI Table. When an IBI has been completed, the
calculation results will be displayed in the IBI Table. Please note that the number of output metrics will vary
depending on the wetland type being assessed.
Figure 1 – The Main Window
After opening the software for the first time the Main Window shown in Figure 1 will appear, and you should
begin by clicking the “New Project” button. A file dialog will open that will allow you to save a project
anywhere you choose on your file system. After you name the project and click “Save,” the program will
automatically add the “.ibi” extension to your file name and display the project name in the Main Window title
bar. Files with the “.ibi” extension are simple text files that store information about the status of your project,
so you can partially complete a project and then return to it later by using the “Open Project” button or menu
item.
3
Immediately after saving your new project, the “Create IBI” dialog shown below in Figure 2 will open. This
dialog is ‘modeless’ which means you can select any of the menu items or buttons in the Main Window at the
same time the Create IBI dialog is open. As you can read in the green text just below the title bar, this dialog
asks you to complete 5 steps in order to be able to calculate results for an IBI. The “Calculate” button at the
bottom of the dialog will not be enabled until all 5 steps are completed without errors. Note that the dialog
displays the project name, “9.ibi”, also in green text on the second line of text below the title bar. The 5 steps
displayed in Figure 2 are described in detail below.
Figure 2 – The Create IBI Dialog
Step 1: Choose a wetland type.
The drop down menu shown in Step 1 has 3 choices, “Salt Marsh,” “Forested Wetlands” and “Streams.”
Currently, we do not have credible IBIs for the “Salt Marsh” selection. The wetland type must be chosen before
entering GPS coordinates in Step 2 because CAPS-IBI will check if your GPS coordinates are in a suitable
location for the wetland type you have chosen. The wetland type must also be chosen before choosing the
Comma Separate Value data file in Step 4 because the software will check if the ‘wetland.type’ listed in the
data file is consistent with the wetland type you have chosen. If you attempt to change the wetland type after
you have entered GPS coordinates or chosen a data file, a dialog will appear to warn you that you must also
change GPS coordinates and your data file. The dialog will give you a choice of whether to proceed or cancel. If
you proceed, the coordinates in Step 2 ad the CSV file in step 3 will be reset to default values.
4
Step 2: Enter the GPS coordinates of your sample location in decimal geographic coordinates (WGS84, EPSG:
4326)
The coordinates listed in parentheses after the “Latitude” label and “Longitude” label are the coordinates for
the maximum extents of Massachusetts, so your coordinates must be between those limits to be valid. You
also must enter 6 digits beyond the decimal place in order for the latitude and longitude text boxes to accept
your entry as valid. Once you have entered valid coordinates and hit the tab or enter key, the software will
check your GPS coordinates against a built-in database of suitable locations for the wetland type you have
chosen, and will display green text indicating that the location is suitable or red text indicating that it is not
suitable. For those who are interested, CAPS-IBI constructs a box of suitable size around your GPS coordinates
and finds any CAPS cells that fall within that box. If no CAPS cells of the designed wetland type are found
within the box then the location is not suitable. If CAPS cells matching your wetland type are found, the
software then identifies the appropriate CAPS cell closest to your GPS point and indicates that the location is
suitable. If the location is suitable, the software also displays the distance between your GPS point and the
nearest suitable CAPS cell. The box size is based on an assumption that GPS coordinates will be accurate to
within 30 meters.
Step 3: Click the links below and check the boxes to confirm your sample location on a Google Map.
Once you have entered acceptable GPS coordinates, CAPS-IBI will generate two blue colored links to Google
Maps. One link will display the location of your GPS point, and the other will display the location of the nearest
CAPS cell for your wetland type. We ask that you click on each link and verify that your GPS coordinates
accurately represent the location where you took your sample. A marker will appear on the Google map that
indicates the location of your GPS coordinates or the location of the nearest CAPS cell depending on which link
you have clicked. The coordinates will either appear near the marker or in the search box of the map, and the
marker shape or color may differ depending on your operating system and/or web browser. Please note that
you can change the map from a map view to a satellite image view if necessary.
After you have clicked a link, the check box labeled “GPS coordinates OK,” or “Nearest point OK” will become
active. You must check those checkboxes before you can proceed with your calculations.
Step 4: Browse to a Comma Separated Value (CSV) file that contains your data.
Probably the easiest way to create your CSV data file is to type the column headings and other data into
separate cells in Microsoft Excel, or Open Office Calc and then choose to save the file as a CSV file. However,
the file can also be created in a text editor if you prefer. If you do use a text editor, please do not use Unicode
encoding for your file; however, UTF 8 or ASCII will work fine. An example for creating the CSV data file in
Microsoft Excel is illustrated in Figure 3 below.
Figure 3 – Create Data File using MS Excel
5
FIGURE 4 – Proper CSV Data File Format
Figure 4 above shows an example of the CSV file format that must actually be submitted. The first line has the
column names separated by commas. As illustrated by the column name line, there is no comma after the last
item in the line if all columns have a value. In other words, there should be 9 commas delineating the 10
possible entries for each line. Each line represents one record in the data set, and missing items are indicated
by adjacent commas. Note that each line ends with a carriage return, but if you open your CSV file in a text
editor, the carriage return markers may or may not show depending on your text editor settings. There cannot
be any carriage returns before the column names or after the end of the last line or record. Lastly you should
not use commas within an item (say a site name containing a comma). If you must use commas within your
text, please learn how to delimit the text properly or simply use Excel, which will write the file properly for you.
The following bulleted list describes what errors CAPS-IBI checks for in the CSV data file. Please note that the
checking process is case insensitive.
•
•
•
•
•
•
•
•
•
•
Wetland.type and sample.type are required for all records.
The “wetland.type” entries must be the same as the name of the wetland type you have selected.
The sample.type must be one of the three entries shown in Figure 5 below.
The sample.type must agree with the wetland.type you have chosen.
The taxa supplied for each record must be in the “group” specified for the sample.type
Site is required for all records and can be a number or a name as you prefer, but it must be the same
for all records.
Abundance is required for all records.
If species is indicated then genus must be supplied. Otherwise, listing a single taxon other than species
(genus, family, order, class or division) is sufficient and will pass validation.
The spelling of each taxon is checked against the built-in database and must be correct.
If more than one taxon is listed for a record then the combination must be found in our database.
Once you have created a properly formatted CSV data file, click the “Browse” button and browse to the file. As
soon as you have selected the file and clicked “Open” in the file dialog, CAPS-IBI will display the path to your
file and automatically begin the process of checking for errors. If CAPS-IBI finds errors, it will write an error
message in red next to the “Result of data check:” label and a new window titled “Error Report” will appear
and describe the error and the line number for each error. The program will also write an error file named
“yourprojectname_error.txt” to the same directory as the project file in case you choose to save the project
and continue later. The error file can be displayed at a later time by clicking the “View Error Report” button.
After you have fixed the CSV file, a message in green text will appear next to the “Result of data check:” label
indicating that your data file has passed the check and the error file will automatically be deleted. In addition,
a file named “yourprojectname_completed_taxa.csv” will be written to the project folder with missing taxa
information filled in for reference.
6
Figure 5 – sample.type
Step 5:
Congratulations! If you have successfully completed Steps 1-4, the “Calculate” button is enabled and you are
ready to do calculations for your IBIs. If you click “Calculate” before you have saved your project, you will be
prompted to save the project before the calculations begin. The calculations use the ‘R Project for Statistical
Computing’ software and consist of complex statistical modeling based upon the biological data you have
submitted. Once the calculations have completed, the results will appear in the IBI Table, and CAPS-IBI will
write the results to a CSV file named “yourprojectname_calc_results.csv.”
SOME ADDITIONAL IMPORTANT INFORMATION:
As described above, every project has a “project” file consisting of the project name and the “.ibi” extension.
Figure 6 below shows the project file for “9.ibi.”
Figure 6 – A Sample Project File
As seen in Figure 6, Project “9.ibi” has a CSV Data File stored in “C:/download/TestAbundanceData_fixed.csv,”
but it does not have an {{Error Report}} file because the CSV Data File passed the checking projects as
described on the {{DATA_CHECK_RESULT}} line, and as mentioned above the error report file is automatically
deleted once the CSV data file has passed the checking process. Because project 9.ibi has successfully passed
all the steps needed to calculate the IBIs, the project probably also has a calculation results file,
“9_calc_results.csv,” stored in the same directory as the project file. If project 9.ibi had a “9_error.txt” file, it
would also be stored in the same directory as the project file.
We have not included a menu option for deleting a CAPS-IBI project because of the several possibilities for
which files you may want to save or delete. For example, you may want to keep the “9_calc_results.csv“ file for
later comparison, but delete any other files associated with the project. We also have not included the option
to rename a project because we would have to ask whether you would like to save the old project or perhaps
delete only certain files in the old project. Also, having several files that use the same CSV data file might be
confusing. So, to entirely delete a project simply delete all of the 4 possible files associated with the project
7
(“myproject.ibi,” “myproject_error.txt,” “myproject_calc_results.csv,” and “myproject_completed_taxa.csv”).
To rename a project open myproject.ibi in a text editor and change the project name then rename the 4 files
using the new project name.“ Alternatively, you may rename a project by deleting the old project and creating
a new project with a different name; the process of creating an IBI is fairly quick and simple.
Finally we should describe the process that occurs when opening a previously saved project. Because it is
possible to hand edit or move any of the 3 files associated with a project, the software always checks the files
when the project is opened. Because any of the 3 files may have changed, we recheck the GPS coordinates, the
CSV data file, and perform the calculations again depending on the status of the project when it was last saved.
You will be notified if the GPS coordinates or CSV data file have changed, or if the CSV data file is missing.
Please be aware that the error report will be rewritten or overwritten as will the projects calculation results
file, and the “Create IBI” dialog will reflect the current state of the project. If the CSV data file is missing, you
will be asked to relocate it.
We hope that you will find CAPS-IBI to be a valuable tool that is easy to install and use. If you have any
problems, or have requests for additional functionality, please submit a “ticket” using the link provided in the
“Preface” section above.
Thanks,
Bob English and the CAPS team
8