1
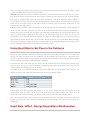
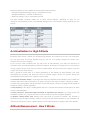
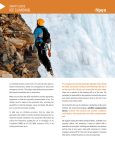
Aerobic and Anaerobic Exercise
The working ability of a muscle depends on sufficient blood flow, and oxygen and nutrition
intake.
The body uses two different systems to supply energy to muscles:
1) Aerobic system: Carbohydrates and fat are used with oxygen and metabolized to carbon dioxide and
water.
2) Anaerobic system: Carbohydrates are used for energy production without oxygen and metabolized
to lactic acid.
At lower training intensities, your muscles' use of oxygen matches your oxygen intake. This kind of
activity can be sustained for long periods of time. At high intensities, however, your heart and lungs
cannot supply enough oxygen to keep up with the demands of your muscles. As a result, your muscles
begin to work anaerobically.
The problem with anaerobic energy production is that after a few seconds, waste products like lactate
rapidly build up. Lactate blocks fat metabolism and forces the body to stop the exercise. The metabolic
turning point at which the body shifts from the aerobic to the anaerobic energy system is called the
anaerobic threshold (AT).
Your Anaerobic Threshold (AT) is the exercise intensity at which you begin to go anaerobic and build up
lactate. If you want to improve your performance, itís useful to train for short periods (three to five
minutes) at a heart rate just below your AT in order to raise it.
If you're out of shape, your AT might be at 70-80% or less of your maximum heart rate. However, if
your training progresses intensively, your AT will increase, so that in very fit competitive athletes it
might be at 90% of their maximum heart rate.
What is Aerobic Fitness?
Aerobic (or cardiovascular) fitness is one of the most important components of overall physical fitness. It
reflects the amount of oxygen in the blood pumped by the heart and transported to the working muscles,
as well as the muscles' efficiency in using that oxygen.
When you're working hard, your body's metabolism increases. When faced with increasing energy
demands, your body eventually reaches a limit for oxygen consumption/uptake (represented as VO2). At
this point VO2 reaches a peak value referred to as your aerobic capacity, or maximal oxygen uptake
(maximal aerobic power, VO2max).
Increasing your aerobic fitness means increasing your heart and cardiovascular system's capacity to
perform their most important task, supplying oxygen and energy to your entire body.
The best way to improve your aerobic fitness is through activities that put the body's large muscle
groups to work dynamically-for example, walking, jogging, running, swimming, skating, cycling, climbing
and cross-country skiing.
Although your exercise habits have a big affect on your aerobic fitness, it's also related to age, gender
and heredity. Maximum fitness values occur between the ages of 15 and 30, decreasing progressively
with age. With a sedentary lifestyle, VO2max decreases by 10% per decade but if you maintain an active
lifestyle, you can bring that number down to less than 5% per decade.
Why Monitor Heart Rate during Outdoor Sports
You may be familiar with heart rate monitoring in running and road cycling, but it is just as valuable
during other outdoor sports. There are many reasons to monitor your heart rate:
Pace - You can use heart rate as a speedometer to set a pace that you'll be able to maintain. The
personalized nature of heart rate means the pace will be right for you.
Energy expenditure - Measuring heart rate allows the determination of energy expenditure so that you
know how many calories to ingest to keep going.
Adaptation - Heart rate responds to internal and external factors, giving you a way to monitor your
internal condition (energy expenditure, aerobic fitness and indirectly - hydration) and the effects of
altitude and weather. The Polar HRrest test can help you determine how you're adapting.
Intensity - Heart rate is an accurate measure of the intensity of an activity - you'll know how hard you
are working.
Safety - Monitoring heart rate can keep you from pushing too hard, thus reducing your risk of injury.
Progress - Heart rate allows you to objectively measure improvements in your level of fitness.
Planning - A plan that includes how hard to exercise, measured using heart rate, will help you
accomplish your goals. Use the Polar Fitness Test to measure changes in your level of fitness and
evaluate your plan.
Variety - You may think that monitoring your heart rate is too much science and not enough play, but it
can actually increase your enjoyment. You can be extremely creative with your time and avoid the pitfall
of doing the same thing day after day.
Factors that Influence Heart Rate during Outdoor Sports
In addition to exercise intensity and your level of aerobic fitness, the following factors affect your heart
rate during outdoor sports:
Activity. Heart rate can change across activities, due to different muscle mass involved, level of
experience and technical proficiency. Running typically elicits the highest maximum heart rate during a
stress test, whereas cycling and paddling maximum heart rates can be 10-15 beats lower during a
similar test. This means that you may need to adjust your training heart rate intensities by 5-10 beats
for activities other than running.
Heat and Humidity. Temperature and humidity will influence your heart rate. As the environment gets
warmer and more humid, heart rate will gradually increase throughout your activity, even if your pace
doesn't change. This is due to your "air-conditioning" and level of hydration. You produce a lot of energy
in the form of heat when you move and this heat needs to be dissipated, typically via sweating. Humidity
reduces the effectiveness of sweating, resulting in an increase in body temperature, and thus an increase
in heart rate. Even if the humidity is low, heart rate will still be elevated, due the extra work the heart
must do to help cool your body. It's not uncommon for heart rates to be 5-10 beats above normal ranges
in these conditions. Use your heart rate combined with perceived exertion and subjective feeling to set
an appropriate pace.
Hydration.Failing to stay hydrated can result in an increase in heart rate, as your blood volume
decreases and your body runs low on the fluids needed to maintain body temperature. Dehydration can
occur in cold as well as hot environments. If you notice your heart rate increasing with no change in pace
or other variables, then increase your fluid intake.
Altitude. The lower air pressure at altitude means there is less pressure to drive oxygen into your lungs.
Less pressure means your heart has to work harder to deliver enough oxygen to your working muscles.
The result is a higher heart rate at a given pace. Fortunately, your body adapts to higher altitude in
several days to 2 weeks, but if you're only at altitude briefly, you'll need to slow your pace to keep your
heart rate in the proper range. It also takes longer to recover from a hard effort at altitude, so rest
periods may need to be longer.
Fuel.Your body is always using a combination of carbohydrates, fats and proteins for energy production.
As the exercise intensity increases, you burn more carbohydrates and less fat (protein metabolism is
always fairly small). Even at low intensities, you need some carbohydrate to burn fats (fats burn in the
flame of carbohydrate). What does this have to do with heart rate? If you start to run low on
carbohydrate, it will become difficult to maintain your pace at a given heart rate. Your perceived exertion
and subjective feeling will increase, but your heart rate will be falling. This is informally called "bonking"
and can be remedied by eating foods high in carbohydrate. As a rule of thumb, always bring along some
form of ingestible energy on any outing lasting more than 2 hours.
Using Heart Rate to Set Pace in the Outdoors
One of the most valuable reasons for monitoring heart rate during outdoor activities is to set a pace that
will get you where you want to go. Your tendency may be to charge up the first hill on a long hike, but if
you were monitoring heart rate you would see that the effort required on that first hill would probably
limit your ability to maintain a good pace later in the day.
In general, the lower the heart rate, the longer you can maintain the pace and the fewer calories you'll
burn per unit of time. For most individuals, monitoring heart rate keeps them from going too fast
initially, rather than pushing them to go harder.
The table below lists recommended heart rate ranges depending on the duration of the activity. The
shorter the outing, the higher the pace and heart rate you'll be able to sustain.
The tendency when using a heart rate monitor is to look at the number, but not adjust pace. You may
notice that to keep your heart rate in the recommended range you'll need to move fairly slowly if you're
going uphill with a heavy backpack. You may not come close to the upper levels shown above.
Also, you may find that if you're walking at a comfortable pace that your heart rate is lower than 50%
HRmax. You won't gain improvements in aerobic fitness at this intensity, but you still get to where you
need to go.
Heart Rate - Effort - Energy Expenditure Relationships
Monitoring heart rate isn't just to see how fast your heart is beating; it also provides information about
the relative intensity of the activity, the rate of energy expenditure, and, indirectly, the physiological
systems that are being used to provide energy (aerobic/anaerobic).
There is a direct, linear relationship between heart rate, effort (intensity) and energy expenditure. In
general, the higher the heart rate (i.e. intensity) during exercise, the greater the rate of energy
expenditure. Also, high intensities are usually associated with short exercise durations.
Determining Maximum Heart Rate
Your heart rate has an upper limit, or maximum rate, called HRmax. HRmax is not a good predictor of
fitness level or performance (it's mostly genetic), but it is used to quantify levels of intensity (as a % of
HRmax).
You can determine maximum heart rate a number of ways:
1. Have your HRmax measured in a laboratory during a stress test.
2. Do a maximal effort and record the highest heart rate (not recommended for untrained individuals).
This will give you a fairly accurate maximum heart rate, but is difficult to do properly. Remember that
HRmax depends on the activity, so establish HRmax in the sports you do most often.
3. Estimate your maximum heart rate based on the formula 220 - age. This will give you a rough
estimate, but is not nearly as accurate as the other methods described above.
For most individuals, maximum heart rate declines with age and values are usually between 170-200
bpm.
Determining Resting Heart Rate
The Polar HRrest test feature of the Polar Outdoor Computer allows you to determine your resting heart
rate. It will determine your baseline resting heart rate and monitor changes over time (gap between
current resting and baseline).
You can also determine your resting heart rate by recording your resting heart rate during a period of
relaxation (early morning works well).
Repeat this process for 5 days and average the readings for an average resting heart rate. Resting heart
rates typically range from 60-80 beats/min (bpm) for most individuals, with elite endurance athletes
having resting heart rates as low as 30 bpm.
Resting Heart Rate
Resting heart rate is a good indicator of your level of fitness. As your fitness improves, your resting heart
rate decreases, due to an increase in heart size which pumps more blood with each beat. Resting heart
rate varies among individuals, so monitor changes over time instead of comparing to others.
Resting heart rate can be affected by 4 other factors: altitude, recovery, overtraining and illness.
1. Altitude
When you go to high altitude (above 1500m or 5000ft ), your body responds by increasing heart rate (at
rest and during exercise). This elevation in heart rate can be temporary and should decrease with
acclimatization to the altitude (see section on altitude below).
2. Recovery
Your resting heart rate increases if your body is still recovering from a high level of stress. If you find
that resting heart rate is elevated, reducing the day's planned volume and/or intensity of exercise is
suggested. Continuing to push the body when it is unable to recover can result in overtraining (see
below).
3. Overtraining
Overtraining can occur when the stress placed on the body is greater than its ability to adapt. The stress
can be physical (i.e. exercise) or mental (i.e. job, sleep, etc.). Overtraining typically results in an
increase in resting heart rate (over several days) and reducing the planned volume and/or intensity of
exercise is recommended.
4. Illness
If you are coming down with an illness (cold, flu, etc.) your resting heart rate may be elevated. In this
case rest or a reduction in exercise stress is recommended.
ALTITUDE
Why Monitor the Environment during Outdoor Sports
The primary reasons for monitoring the environment are enjoyment, performance and safety. Also, you'll
be able to see the relationship between your body and the environment. For example, you'll notice that
your heart rate increases as your rate of ascent increases.
Enjoyment
Looking at a map to get a sense of where you are and where you've been is a good feeling. When you
know your altitude and changes in elevation, you have an even greater sense of what you've
accomplished. It's also more fun when you're prepared and using the barometer function will help you
plan for changes in the weather.
Performance
You may be the type of person who likes to challenge himself or herself, with every outdoor adventure
being a new opportunity for achievement. Recording rates of ascent/descent, total vertical meters/feet,
maximum vertical speed and time can all be done easily with the Polar Outdoor Computer, giving you all
the data you need to compare one outing with another.You can use the data to improve your
performance, especially when you use the Polar Precision Performance Software to analyze the
information stored during your activities.
Safety
There is always a degree of uncertainty when you step outside, and the longer you're planning on being
out, the more likely the environment will change. Monitoring barometric pressure and temperature and
having a compass mean that you can anticipate changes in conditions or navigate through bad weather
more effectively.
Using Altitude and Rates of Ascent/Descent
Measuring altitude is most valuable in the following outdoor activities:
- Hiking/Trekking/Snowshoeing in hilly or mountainous terrain.
- Skiing/Snowboarding - downhill or backcountry
- Adventure Racing in hilly or mountainous terrain.
The Polar Outdoor Computer allows you to select various displays, depending on what you are
measuring. The following are the recommended settings when in the altimeter mode, depending on the
activity:
Acclimatization to High Altitude
Elevations above 1500m / 5000ft are considered high altitude. If you alpine ski or hike in the mountains,
you will most likely be at high altitudes and you can use your outdoor computer to monitor your
elevation and limit your exposure.
If you are from lower elevations and you plan to be at high altitudes, your body will need time to
acclimate to the reduced atmospheric pressures at altitude. As elevation increases, there is less pressure
driving oxygen into the lungs, thus you have to breathe harder and your heart rate is higher to get the
oxygen you need to keep moving.
Over a period of several days to 2 weeks (depending on the altitude) at high altitudes, your body
acclimatizes by increasing red blood cell count to increase oxygen delivery to muscles. During the
acclimatization process there are 4 general rules to follow:
1. Increase elevation slowly. 'Climb high and sleep low' facilitates acclimatization and increases the
elevation that can be gained each day. It is good to spend several nights at 2500m / 8000ft to 3000m /
10,000ft before going higher. Abrupt increases of more than 600m / 2000ft in sleeping altitude should be
avoided at 2500m / 8000ft and higher.
2. Eat properly. A diet high in carbohydrates and low in fat and salt and that includes plenty of water
will aid in acclimatization.
3. Slow your pace, stay at the same elevation or descend if you feel ill. If you begin to feel sick
(headache, nausea, etc.), stop or descend to a lower elevation until the symptoms disappear.
4. Monitor resting heart rate. Resting heart rate tends to increase at altitude. The increase is
significantly larger at higher altitudes, however resting heart rate should decrease as you acclimate. This
means that resting heart rate is a good indicator of your body's progress in getting used to the altitude.
Altitude Measurement - How It Works
The measurement of altitude relies on a simple principle: atmospheric pressure decreases as elevation
increases. The Polar Outdoor Computer determines altitude by measuring air pressure with a sensor.
A rule of thumb for the altimeter correction is that the pressure drops about 1 hectopascal (hPa) /
millibar (mbar) for each 8 meters altitude gain. If you're using inch of mercury (inHg), the correction is 1
inHg for each 1000- foot of altitude gain. These rules of thumb work pretty well for elevations or
altitudes of less than two or three thousand feet.
Atmospheric pressure changes can be caused by changes in weather and temperature. Because the
altitude calculation is based on the air pressure at a normal temperature, there are errors in altitude
calculation if the current air temperature differs from the normal temperature. For example, a
thunderstorm can cause a pressure change of up to 80 hPa / 2.36 inHg, which means a change of
approximately 700m / 2000ft in the calculated altitude.
You can also see from the graphs that small changes in temperature can have a significant effect on the
altitude measurement. The standard atmosphere graphs below show the relationship between air
pressure and temperature. You can think of these values as averages for the entire Earth over the course
of a year.
Calibrating your altimeter often will ensure correct readings. The calibration process allows you to enter a
known altitude, which establishes the pressure/altitude relationship, making the altitudes displayed much
more accurate. Set the reference altitude whenever a reliable reference, such as a peak or a topographic
map, is available. It is also recommended that you check the altitude at home and other common
starting points.
Altitude - Why Measure It
Thankfully, the world isn't flat. If you prefer places that present vertical challenges, whether it's on dirt
or snow, knowing your elevation will help.
There are 4 main reasons for monitoring altitude:
1. Pace. Altitude monitoring means you'll know rates of ascent/descent and you can set your pace not
just by speed, but also by elevation.
2. Acclimatization. You'll know when you've entered high altitudes (above 1500m or 5000ft) and can
plan your exposure to acclimatize properly. For example, you can determine when to stop for the day (a
predetermined elevation) based on elevation gain.
3. Navigation. You can determine your location on a map not only by position but also by elevation,
making your navigation more accurate. This can be especially helpful in poor weather, when visual
landmarks are hard to find.
4. Performance. You can measure your maximum altitude, elevation change, rates of ascent and
descent and number of runs (if you're a skier) for a particular outing or season. All of this altitude related
performance data allows you to make individual comparisons or see how you compare to your friends.
Barometric Pressure - Why Measure It
The main reason to measure barometric pressure is if you're interested in changes in the weather. At a
constant altitude, changes in barometric pressure can signify changes in weather. Poor weather is usually
accompanied by low-pressure systems, while fair weather is typical during times of high pressure.
By monitoring barometric pressure you can see changes over time, which will help you forecast the
weather. The most typical times to measure barometric pressure are:
1. Before you leave on a backcountry outing. Ideally, you'll see a steady or rising barometer,
indicating a good chance of fair weather.
2. In the evenings of an overnight backcountry trip. You can observe the trend in pressure over the
evening to predict the upcoming day's weather.
3. When you stop due to uncertain weather. If you think the weather is going to change, you can
stop and check the trend in barometric pressure. This will give you some indication of what's to come.
(Reminder: you can't follow altitude and pressure at the same time.)
Rule of Thumb
A 1 hPa/hour (or 0.03 inHg) drop in pressure can mean deteriorating weather.
A 2-3 hPa (or 0.06-0.09 inHg) drop in pressure over 2-3 hours means there is a good chance the
weather will deteriorate.
Measuring Temperature
You can also measure temperature with a Polar Outdoor Computer. It is displayed when measuring
barometric pressure. Because the sensor is in the computer, take it off your wrist to get an accurate
reading of external temperature.
If you're out in cold conditions, pay attention to the combination of wind speed and temperature - to
reduce the risk of frostbite and/or hypothermia (abnormally low body temperature).
Navigation - Knowing Where You Are Heading
No outdoor adventurer should be without a good map and compass and no outdoor computer would be
complete without a compass.
You'll need a compass if you're doing any of the following:1. Going into a backcountry area without wellmarked trails.2. Traveling in an area prone to poor visibility (fog, etc.).3. Exploring an area that you are
not familiar with.4. Assessing avalanche danger (N facing slopes are more prone to avalanche).
In order to ensure correct compass readings you'll need to do two things:
1. Calibrate the compass
This process makes sure the readings you're getting are accurate in terms of a heading. Because the
compass measures a magnetic field, any exposure to strong external magnetic fields (television, audio
speakers, power lines) will affect the readings. Be sure to calibrate the compass before any extended
outdoor trip (see user manual).
2. Adjust for declination
Adjusting for declination (difference between true and magnetic north) means that your map and
compass are measuring the same directions. Use an up-to-date map as declination changes over time.
When setting declination, add declination if it's west and subtract if it's east (the Polar Outdoor Computer
uses declination as east or west, so it's easy to set the declination).
You can use a compass to determine two important things:
1. Find out the direction you are heading.
2. Determine the direction you should be headed (as long as you have a map).
Preparing for Adventure Races
The biggest challenge is in preparing for the physical demands and involves scheduling the activities.
As a first step, estimate the time you'll spend doing each particular activity, this will give you an idea of
how to prioritize your workouts and how much time to spend in each activity.
For example, assume the event includes mountain biking and trail running, total event time is 4 hours
and estimated bike time is 2 hours and run time is 1 hour (other events make up the other hour).
Plan to spend about 50% of your training time mountain biking and 25% running, as these percentages
relate to the percentage of time each discipline will take during the event. This will force you to focus on
all the activities instead of doing the things you like (and do well) the most and avoiding the things
you're not good at.
There are most likely going to be segments that will be difficult to prepare for, due to limited time or no
access nearby. If so, plan to spend at least 1 day per week practicing the technical skills you'll need, and
focus on getting your fitness from the activities you can do regularly. This is especially important if you
are a novice in a particular segment, climbing or kayaking are good examples.
If you're doing a team event, make sure that at least two people of your team are proficient in each
activity.
Training Principles
In order to make a plan to help you accomplish your goals, you need to know:- How often to exercise
(frequency)- How long to exercise (duration)- How hard to exercise (intensity)- What types of exercise to
do (specificity)- How to modify your exercise to continue improving (progression)
Frequency
Plan to spend at least 3 days per week exercising. This is considered the bare minimum amount of
exercise you'll need to improve your level of fitness, anything less and you may hold on to your current
levels, but you won't improve. The upper limit is 5-6 days per week, per activity.
Duration
The duration of your workouts depends on your fitness level and what you are preparing for. It increases
as you progress in your training plan.
Intensity
Is harder really better? That depends on what you're trying to accomplish. Different levels of effort or
intensity elicit different physiologic adaptations. As a result, intensity is identified in levels.
Specificity
Here's an obvious one, if your objective is to improve in a particular sport, plan most of your workouts in
that activity (at least 3 per week). If you have lots of things you like to do and no particular performance
goals, then mix up your activities.
You'll minimize muscle soreness if you do the activities you like at least once every 10 days.
Progression
You'll only keep improving as long as you keep increasing the stress of your exercise sessions and allow
for proper rest and recovery. If you get in the habit of doing the same activity, duration and intensity
each workout, your fitness will "plateau" after 6-8 weeks. What you are trying to do with a plan is to
gradually increase the amount of stress your body can handle at a given time.
There are 5 exercise zones (described in the article Heart Rate and Levels of Intensity), each with a
particular level of effort, or heart rate range. A good plan will utilize workouts across different exercise
zones, depending on the goal.
Workouts for Outdoor Sports
Now we can take the basic principles and define specific types of exercise sessions that can be combined
each week and across activities to meet your objectives. The fundamental elements of each type of
workout don't change across various outdoor sports, which make it easy to plan effective and fun
workouts.
Base
Base workouts serve as the foundation from which higher levels of fitness are developed. These longer,
low intensity excursions are designed to develop a strong fitness base, and will teach you a sense of pace
required for long, outdoor adventures.
Base training should be 50-70% of your total exercise time each week. The length of your Base sessions
should gradually increase (no more than 10% per week) until you are able to do about 70% of your
estimated event or goal length.
Keep in mind these are easy efforts; avoid the temptation to up the intensity, especially if you're in hilly
terrain. You'll have to pay close attention to your heart rate during these workouts, as the tendency will
be to go too hard.
These are perfect sessions to combine 2 or more activities, especially if you're preparing for a multisport
adventure.
Endurance
Endurance workouts, done at 70-80% HRmax, improve both aerobic and anaerobic fitness. These types
of workouts often feel familiar, as they tend to be done at the intensity that you would train most of the
time without a plan. This is the "uncomfortably comfortable pace". They are valuable for teaching a
sense of moderate pace, burn more calories per minute, and add variety to your schedule.
The length of endurance sessions will depend on your level of fitness, overall time availability, time of
year and ultimate objectives.
Interval
Interval workouts will improve your ability to maintain a higher pace for a longer period of time. As the
name implies, Interval sessions are periods of high effort (80-90% of HRmax), followed by periods of
rest where you let your heart rate come back down to 50-60% of HRmax. Avoid the temptation to go all
out - these are not sprints.
Because the adaptation to this type of training is somewhat sport specific, Interval workouts should be
done using the activity(s) that are most important to your goal. Because interval sessions are performed
at a high intensity, it is important to warm-up and cool-down for 10-15 minutes by doing low intensity
exercise.
The length of interval sessions is typically between 15 and 45 minutes, not including warm-up and cooldown time and Interval training should be between 15-25% of your total training time each week
(depending on where you are in your program).
Strenght Training
Strength training should be considered an important part of preparing for outdoor sport adventures. You
should do some form of strength training at least twice per week, as it has been shown to improve sports
performance.
Strength workouts can be done at home using your bodyweight (push-ups, pull-ups, sit-ups, etc.) or in
the gym and should cover the major muscle groups that you use in your primary sports activities.
The table below outlines the 3 types of workouts:
Adventure Racing Tips - Pacing
The primary challenge in adventure racing is maintaining a pace that you can sustain for long periods.
The pace you select will depend on the length of the event, but if the event is longer than 4 hours, you'll
need to keep your intensity around 60-75% HRmax.
You may be able to sustain higher intensities, but you'll burn more fuel and will have to make sure you
can consume enough energy (50% of calories burned/hour) and stay hydrated, while making good
forward progress.
Also, keep in mind that the intensity levels may be different for each activity. As noted above, running,
snowshoeing and cross-country skiing intensity levels may be 5-10 beats higher than those for cycling,
swimming, kayaking, and other endurance sports.
Tips on Monitoring Hiking Pace via Monitoring Heart Rate
Monitor your heart rate to teach you a sense of pace while hiking. Think of your heart rate monitor as a
speedometer, the higher it is, the faster you are going (in terms of effort) and the shorter the hike will
be before you get tired.
Use the table below to help you plan the appropriate intensity. Don't assume that if you go harder at the
beginning, you'll be able to slow down later and enjoy the rest of the hike; you'll most likely be very tired
regardless of your final pace (read - looking at your feet and not the scenery).
You can also think of your heart rate monitor as a fuel gauge. The higher it is the faster you are
burning energy. If you're planning on hiking for more than 2 hours, plan to bring along something to eat
and snack every 30 minutes to keep your energy level high.
A good rule of thumb is you should consume approximately 50% of the calories burned each hour to
maintain your energy level. Obviously, the higher you maintain your heart rate, the more energy your
body will need to keep going, so you'll need to eat more.
Don't forget to stay hydrated, always bring water or a fluid replacement drink along on any hike,
regardless of length. The amount you drink will depend on the temperature, humidity, pace, and how
well you handle heat, but if you find yourself getting thirsty, that's an indication you are already
dehydrated and your performance will decline.
Plan on drinking 0.5 l / 16-20 oz. per hour, on average.
Paddling Technique
Obviously, there are differences in getting a canoe to move in the proper direction as compared to a
kayak, but there are also some similarities.
The General Principles
Use a relaxed grip. Gripping the paddle too tight wastes energy and can lead to blisters.
Effective power transfer. Angle the blade of the paddle so that it is perpendicular to the direction of
motion. If you want to move forward, make sure the face of the blade points to the rear and stays
vertical to the water's surface.
Face your work. Use the powerful muscles of your back and torso to generate power, not just your arms.
Accomplish this by rotating your torso and unwinding through the stroke, keeping your chest facing your
paddle (start by watching the blade as it moves through the water).
Three Main Paddling Strokes
There are 3 main paddling strokes to master; they are the forward stroke, the sweep and the scull. All
start with the proper grip on the paddle.
For canoeists, the side you want to paddle is called the "on-side". Grip the shaft with the on-side hand
and grip the top of the paddle with the other hand (this hand will control the angle of the blade). Your
hands should be about shoulder-width apart.
For kayakers, rest the paddle on the top of your head and grip the paddle such that your elbows form
right angles, making sure that your hands are an equal distance from each blade.
Snowshoe Technique
Snowshoeing has been billed as "the sport without a learning curve". "If you can walk, you can
snowshoe" is the general rule, but there are a few things that will make your initial snowshoeing forays a
pleasant experience.
Begin on packed snow and level terrain. Snowshoes provide flotation, but that doesn't mean you'll
be able to walk on top of deep, dry snow. By starting on packed snow you'll get the hang of it a little
quicker.
Start by walking, getting used to the snowshoes on your feet. You may feel a little awkward at
first but after a few steps you go from beginner to advanced intermediate.
Walk with a "normal stride width" and don't exaggerate foot lift. Avoid the tendency to walk like bigfoot, think efficiency of movement.
Use a strong arm-swing for propulsion and balance. Your arms will help move you forward and
keep you from losing your balance, especially if you're in powder snow.
For walkers, the addition of poles can assist you if you feel unbalanced or you are uncertain of the
terrain under the snow.
If you're running, use less emphasis on toe push-off.
Walking/Hiking Technique
You mean there is actually technique involved in walking? Don't worry, it's unlikely you've been doing it
the wrong way all these years, but here are few technique tips that you may find useful.
Use your arms. Your arm swing can help drive you forward, especially when climbing. Keep your
shoulder relaxed while you use an aggressive arm swing.
Really use your arms. Add poles to your arsenal of gear, especially if you have trouble balancing and
you hike in rough terrain. Don't just carry them along in case you lose your balance, use them to help
you climb and to help you brake on downhills.
Learn to feel the trail. Trail surfaces can be very uneven, but you don't want to spend all your time
trying to find the perfect place to put your foot. Instead, practice walking without focusing on where your
feet land (don't look at them), gradually taking on more rugged terrain.
Your proprioreception (balance and sense of where your limbs are in space) skills will improve, letting
your feet fend for themselves more often, improving your coordination and reducing the risk of injury.
Backcountry Skiing - Staying Safe
Backcountry skiing can be exceptional. Your reward for a difficult climb can be a long, untracked descent
in virgin snow.
Backcountry skiing does have risks though, primarily avalanches. It is beyond the scope of this manual
to address avalanche safety issues such as prediction, travel in avalanche prone areas and rescue
techniques. It is important to know some of the basic information regarding avalanche safety.
One common misconception is that avalanches only occur on very steep slopes. In fact, the most
common slope angles for avalanches are from 25-55°.
It is not difficult to find yourself on a 25° slope in the mountains. Avalanches are more prone on windloaded, north or east facing slopes but can happen on any slope if the snow and weather conditions are
right.
The basic rule of travel in avalanche prone areas: Avoid steep slopes when the snow is unstable; do not
enter them and do not cross below them.
Contact your local avalanche hotline for up-to-date avalanche information if you are heading
into the backcountry.
Here are some suggestions to keep you safe in the backcountry this winter:- Do not ski/snowboard alone
in the backcountry.- Tell someone who is not going with you where you are going and when you plan to
return.- Use avalanche beacons for travel in areas that have avalanche danger. Make sure you know how
to use them and that the batteries are fresh.- Cross avalanche prone areas only if absolutely necessary
and one at a time.
Nordic Ski Technique
Cross-country skiing is like a lot of sports, the best people make it look so easy that you get the
impression that it just can't be that hard to learn. But, like most technical skills, the reality sets in about
15 seconds after you get your skis on.
The best advice, and if you take it the rest of this will be extra credit: Take a Lesson.
Here are the basics of Nordic skiing, these apply whether you are classic (kick and glide) or skate skiing,
master them and you'll be well on your way.
The Basics of Nordic Skiing
Weight transfer from ski to ski. That means you shift your weight completely from left to right ski and
learn to balance and glide on one ski. Whether you are skating or skiing classic, as you step on to the
other ski, think about committing to that ski with all of your weight and letting that ski glide.
Hips high and forward, bending at the waist without sitting back. As you step from one ski to the other
one, think of stepping forward with your hips centered over your foot.
Timing of the arms and legs. Obviously, the timing of the arms and legs will vary depending on whether
you skate or classic ski, but understanding and developing the proper timing is a critical early step.