1
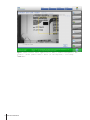
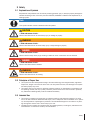
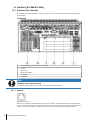
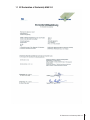
Operating Manual
Manual Aggregation Station
MAS 2.0
Table of Contents
1 General Information
1.1
1.2
1.3
1.4
1.5
1.6
Scope
Technical Support and Trainings
Language
Formatting and Meaning
Availability of Buttons and Screens
How to Use Screenshots
3
3
3
3
3
3
3
Explanation of Symbols
Principles of Proper Use
Intended Use
Organizational Steps
Qualifications of Personnel
Safety Instructions for Specific Phases of Operation
Normal Operation
Special Work, Maintenance Tasks and Correction of Malfunctions
Information About Specific Types of Danger
Electrical Power
Noise
Moving the System
Safety Regulations
5
5
5
5
6
6
6
6
7
7
7
8
8
8
2 Safety
2.1
2.2
2.3
2.4
2.5
2.6
2.6.1
2.6.2
2.7
2.7.1
2.7.2
2.7.3
2.8
3 System Description
3.1
Overview of the MAS
3.2
Technical Data
10
10
11
4 Components
4.1
4.2
4.3
12
12
12
12
Operational Area
Range of Application
Brief Description
5 Installation
13
6 Handling
6.1
6.2
6.3
6.4
6.5
6.6
6.7
7 Troubleshooting
7.1
7.2
7.3
Starting the System
Hand Scanner
Printer
Bundle to Case Aggregation
Case to Pallet Aggregation
PLM User Interface
System Shutdown
14
14
14
14
14
15
15
17
System Behavior After Loss of Power
Contact Technical Service
Alarm Messages
18
18
18
18
8 Cleaning and Maintenance
8.1
Visual Inspection and Cleaning of the System
8.2
Visual inspection of Gaskets/Seals
8.3
Spare Parts and Warranty
8.4
General Advice on Stainless Steel Maintenance
8.5
Cleaning the Touch Screen
19
19
19
19
19
20
9 Transport and Storage
9.1
Transporting the System
9.2
Preparing for Transport
9.3
Storing the System, Accessories and Spare Parts
21
21
21
21
Table of Contents
1
10 Interfaces [IPC B&R 910 Raid]
10.1
Overview of the Interfaces
10.1.1
Ethernet
10.1.2
USB
10.1.3
Keyboard Connection
10.1.4
Serial Ports (COM1, COM2 and COM3)
22
22
22
23
23
23
11 EC Declaration of Conformity MAS 2.0
25
Glossary
2
Table of Contents
26
1 General Information
1.1 Scope
This manual describes how to configure and use the Manual Aggregation Station (MAS). It is intended for
personnel who operate the MAS in order to perform one of the following aggregation steps:
• Bundle to case aggregation
• Case to pallet aggregation
For information on how to use the PLM software (if installed) see the Pilot Line Manager (PLM) Operating
Manual.
1.2 Technical Support and Trainings
At our website you find the latest information about our products and services. Please visit: http://
www.mt.com/pce
For any requests please do not hesitate to contact us via email or phone:
Service line: +49 (0) 6251 85 45 – 555 / Email: [email protected]
We provide extensive seminars and trainings that will help you get the most from your equipment. Our application seminars focus on industry and application issues. Individual trainings can be arranged on demand. Please contact us to request your individual training.
1.3 Language
This document is the original operating manual.
1.4 Formatting and Meaning
The formats used in this manual have determined meanings. If they are used they denote the following:
Formatting
Format
Meaning
PC
Menu Paths, Buttons at the screen surface, fixed tab
names, names of screens and dialogs
‘apostrophes’
Names of fields, checkboxes, modes, parameters
<angle brackets>
wildcard for tab names of devices (individual names
can be assigned)
1.5 Availability of Buttons and Screens
Always remember that many functionalities of the PLM need certain user rights. This means if your screen
does not offer buttons shown in the user manual it is likely that you need more user rights which have to be
assigned to your profile by an administrator. The usual way to assign user rights is to add a user to a user
group. Thus the user obtains all user rights belonging to that group.
1.6 How to Use Screenshots
Below each screen you see the path how to get there1. Additional actions that are to perform at this screen
are described below the screen2. Wildcard buttons3 and actions at the path4 are placed in brackets. See the
following example:
General Information
3
Figure 1: 1Home>(<select smart camera bar>)3 > Menu > Product management > New
product > (enter product name)4 > Enter (at the keyboard) > Live Image
2
4
Press Next.
General Information
2 Safety
2.1 Explanation of Symbols
Requirements and prohibitions for the sake of preventing personal injury or extensive property damage are
indicated according to their risk level by the terms CAUTION, WARNING or DANGER and emphasized by a
warning symbol.
Note
This symbol indicates a useful information about the product.
CAUTION
< Kind and source of risk >
Warns users about the risk of minor bodily injury or damage to property.
WARNING
< Kind and source of risk >
Warns users about the risk of severe bodily injury or major damage to property.
DANGER
< Kind and source of risk >
Warns users that major bodily injury resulting in death can occur if instructions are not observed.
DANGER
< Kind and source of risk >
Warns users about electrical hazards.
WARNING
< Kind and source of risk >
Warns users about the risk of crushing.
2.2 Principles of Proper Use
• This system has been developed according to the latest technology and recognized safety regulations.
Despite this, danger to life and limb of the user or of third parties can arise, and damage to the system
and other property may occur.
• The system must only be used in a technically flawless condition, as intended and in accordance with
the operating manual, and only by safety-conscious persons aware of the risks involved! In particular,
any malfunctions affecting safety must be remedied immediately.
2.3 Intended Use
• This system is intended to be used solely for labeling (marking) and verification purposes. Any other
use or use that exceeds the aforementioned scope is not in compliance with the intended use. In particular, the transportation of passengers is prohibited. The manufacturer/supplier is not liable for any damage arising from misuse. Risk is borne solely by the user.
• Intended use also includes the compliance with the operating manual, including any maintenance recommendations or instructions issued by the manufacturer.
Safety
5
2.4 Organizational Steps
• Always keep the operating manual close at hand in the location where the system is in use.
• In addition to the operating manual, observe all generally applicable legal and other mandatory provisions regarding accident prevention and environmental protection and instruct others to do so as well.
• Amend the operating manual by adding instructions, including supervisory and reporting duties, to allow for specific operational aspects, e.g. regarding the organization of work, processes, and assigned
personnel.
• It is mandatory that all personnel assigned to perform tasks involving the system have read the operating manual, above all the safety information chapter, prior to starting their work.
• Regularly check that personnel members are working in accordance with the operating manual in a
safety-conscious manner and are demonstrating risk awareness in doing so.
• Personnel members must refrain from wearing long hair in an open style and must not wear loose
clothing or jewelry, including rings. There is a risk of injury caused by these objects becoming caught in
the system.
• Make sure that all of the safety precautions / danger warnings are at/in/on the system and keep them in
a legible condition.
• Observe all safety precautions / danger warnings at/in/on the system.
• In the event of changes in the system or its operating behavior, immediately shut down the system and
report the malfunction to the appropriate department/person.
• Do not carry out any modifications, additions or retrofits to the system without manufacturer/supplier approval if they could impact the system's safety. This also applies to the installation and setup of safety
devices, as well as to any welding and drilling work on load-bearing parts.
• Spare parts must meet the technical requirements specified by the manufacturer. This is always guaranteed for original spare parts.
• Adhere to the deadlines for recurring inspections if these are specified in the operating manual.
• For the performance of maintenance work, the proper workshop equipment for the task at hand is absolutely necessary.
2.5 Qualifications of Personnel
For the purpose of these operating manual, a “qualified person” is one who is familiar with the operation of
the system and the hazards involved.
• Work at/using the system must only be performed by authorized personnel
• Only assign trained or instructed personnel to such tasks. Clearly define personnel responsibilities for
operating, setup, maintenance and repairs
• Make sure that only assigned personnel uses the system
• Define the machine operator's responsibilities and grant him/her the power to reject any instructions
from third parties which do not comply with safety regulations
• Only allow personnel that is currently being trained or instructed or is undergoing general vocational
training to use the machine under the supervision of a person with experience
• Work on the system's electrical equipment must only be carried out by qualified electricians or by instructed persons under the guidance and supervision of a qualified electrician in accordance with electrical engineering regulations!
• The personnel has to be trained in the proper care and use of protective equipment in accordance with
established safety practices
2.6 Safety Instructions for Specific Phases of Operation
2.6.1 Normal Operation
• Refrain from working in any manner that poses a safety risk.
• Take steps to ensure that the system is only operated in a safe and functional condition.
• Only operate the system if all safety and safety-critical devices, e.g. removable protective devices, emergency shut-off devices (optional) and sound insulation, are available and functional.
6
Safety
• Inspect the system for externally visible defects at least once per shift. Immediately report any changes
that occur (including changes in operating behavior) to the appropriate department/person. Shut down
and secure the system.
• Immediately shut off and secure the system in the case of malfunctions; have faults remedied promptly.
• Observe operating manual instructions for powerup and shut-off procedures and control displays.
• Before powering or starting up the system, make sure that personal safety cannot be endangered by the
system as it warms up.
2.6.2 Special Work, Maintenance Tasks and Correction of Malfunctions
• Comply with all setup, maintenance and inspection tasks and intervals prescribed by the operating
manual, including specifications for the replacement of parts or part assemblies. These tasks must only
be performed by qualified personnel.
• Inform operating personnel before starting any special work and maintenance tasks. Designate a supervisor.
• Follow the powerup and shut-off procedures and maintenance work instructions specified by the operating manual when performing any task involving the operation, production adjustment, changeover or
setting of the system and its safety-critical devices, as well as inspections, maintenance and repairs.
• If necessary, secure a large area around the location of the maintenance work.
• If the system is completely switched off for maintenance and repair work, it must be secured against unexpected restarts:
– Lock the main control devices and remove the key and/or
– Place a warning sign on the main power switch.
• Assign only experienced persons to the task of fastening loads and directing the operators of cranes or
industrial transport vehicles! The directing person must maintain visual or verbal contact with the operator.
• For overhead installation work, use either the climb-assistance equipment and work platforms provided
or other units that satisfy safety requirements. Do not use machine parts as a form of climb assistance!
Wear fall-arresting equipment when performing maintenance work at great heights.
• Keep all devices, steps, railings, landings, platforms and ladders clean.
• Before cleaning the system with water or other cleaning agents, cover or tape shut any openings into
which no water/fumes/cleaning agents is to enter for reasons of safety and proper system functioning.
Electric motors and switch cabinets, in particular, must be protected. Note the protection class.
• After cleaning the system, be sure to completely remove any covers/tape used.
• After cleaning the system, inspect all cable joints and compressed air connections for leaks or looseness, abrasion, and damage. Immediately remedy any defects found or have these remedied by the appropriate person.
• Always tighten screw connections that have been loosened during maintenance and repair work.
• If it is necessary to disassemble safety devices during setup, maintenance and repairs, the safety devices must be reassembled and inspected immediately following completion of the setup, maintenance
and repair work.
2.7 Information About Specific Types of Danger
2.7.1 Electrical Power
• Work on electrical systems or equipment must only be carried out by qualified electricians or by instructed persons under the guidance and supervision of a qualified electrician in accordance with electrical engineering regulations.
• Where required, machine and system parts that are to undergo inspection, maintenance or repairs must
be disconnected from the power supply. First, check that the disconnected parts are not live, then
ground and short-circuit them. Isolate any nearby live parts.
• The electric equipment of a system must be inspected regularly. Any defects – such as loose connections or charred cables – must be remedied immediately.
Safety
7
2.7.2 Noise
• If required by applicable noise control regulations, the operator must ensure that noise control equipment is present and in the proper protective position during operation of the system.
2.7.3 Moving the System
• Only use hoists and load suspension devices with sufficient load-bearing capacity during loading or
shipping.
• Designate competent personnel to direct the lifting procedure.
• Only lift machines properly, using a hoist according to the specifications contained in the operating
manual (fastening points for load suspension devices).
• Only use suitable transport vehicles with sufficient load-bearing capacity; carefully secure the load.
• Disconnect the system from all external power sources before moving it even a short distance. Before
putting the system back into operation, reconnect it properly to the power source and compressed air
supply.
• When putting the system back into operation, be sure to proceed according to the instructions contained
in the operating manual.
2.8 Safety Regulations
• Before connecting the system, check whether the voltage of your power supply system conforms to the
voltage specified on the system's type plate.
CAUTION
Risk of injury
In order to avoid accidents, the device must only be opened by trained personnel in accordance with applicable safety regulations.
DANGER
When using frequency converters, leakage currents may arise.
The sole use of residual-current circuit breakers is not permitted. Protective grounding is a mandatory requirement.The protective grounding must be configured in accordance with the current load of the connecting cable. Fixed wiring is required according to VDE 0160.
Install the protective grounding.
Configure the power supply fuse in accordance with the current load of the connecting cable.
8
Safety
DANGER
Risk of fatal injury from electrocution
Disconnect the power plug or switch off power to the system before opening the device or when performing
maintenance work.
If power to the system is switched off from a remote point (e.g. distribution box, fuse box or control box),
precautions must be taken to prevent an accidental system restart (e.g. lock the box and place a warning
sign on it).
If the system is factory-equipped with input or output conveyor belts which are separate from the system
and stand on their own frame, power is normally supplied to these conveyor belts from the base of the
system. Therefore, the system must be disconnected from the power source before an input/output conveyor belt or the entire system is moved or repositioned. The electric cables to the input or output conveyor
belt must be disconnected by a qualified electrician. When moving/repositioning is complete, the electric
cables must be reconnected by a qualified electrician.
Only operate the system if it is connected to a power source that is correctly grounded and complies with
the general safety regulations.
WARNING
If the system is operated in an improper or careless manner, injuries may occur as a result
of the running conveyor belts or conveyor chains.
Always be sure to maintain a proper safe distance from the machine if you have long hair or are wearing
loose-fitting clothing (wide sleeves, scarfs, shawls).
In the event of danger, immediately shut off the system and disconnect the power plug.
Safety
9
3 System Description
3.1 Overview of the MAS
Figure 2: Overview of the MAS
1
2
3
4
5
6
7
8
10
System Description
Touchscreen with 1 USB port
and 1LAN port
Camera with positioning unit
Hand scanner
Work table
Printer
Castors with full range of movement
Control Cabinet
Swivel arm
3.2 Technical Data
Technical Details
Manual Aggregation Station
Measures (HxWxD) in mm
1678 x793 x1035
Control cabinet (HxWxD) in mm
760 x 760 x 300
Power supply
115/230V VAC 50/60 Hz, Single Phase, ≥ 1000 VA
Working height (in mm)
The work table is adjustable to the following heights:
805 / 830 / 855 / 880 / 905 / 930 / 955 / 980
Interfaces
Serial (COM1, COM2 [and COM3]), RS232C, USB
(expandable via hub), Ethernet (RJ45)100/1000
MBit/s
System power consumption
Approx. 1000 VA; For designs with equipment: up to
2000 VA
System Description
11
4 Components
The MAS 2.0 contains the following components
• Central operation via HMI
• Smart Camera (SMC)
• High-performance LED lighting (maintenance-free)
• IPC (Windows-based)
• UPS
• Central main switch; 230V power supply unit
• Signal lamp (optional)
• Global hand scanner (Wireless)
• Aggregation hand scanner
The Pilot Line Manager PLM is the line management component of the Pilot Software Suite. It centrally controls and manages units such as printers, cameras and scanners on one line. The connected units are provided with statistical data (e. g. batch and EXP) at production start and with dynamic data (serial numbers)
in the production process. The operator is able to manage all devices on the line with minimum effort. The
selected settings are saved in the central format database (please consult the detailed information in the
PLM Operating Manual).
4.1 Operational Area
The verification of all items is performed by the code reading device. The data matrix codes are aggregated
by the PLM.
4.2 Range of Application
Depending on how the line is structured, aggregation is either conducted from bundle to case, from case to
pallet, or from bundle to pallet. The MAS 2.0 can also be used as a rework station.
4.3 Brief Description
The Manual Aggregation Station (MAS) is designed for the setup of the hierarchical levels in manual final
packaging.
Workflow
The hand scanner scans all labels on the packaging unit and sends them to the PLM for verification. The
PLM verifies the scanned data for correctness and automatically triggers the label print for the higher unit.
The printing system generates the label with the predefined characteristics, e.g. serial number, and prints it
out. The hand scanner is used to conduct a complete verification by verifying that the label is legible. Thus,
traceability is completely documented and verifiable up to the final packing step. The data can be transmitted to the primary IT system using the PCE Pilot Site Manager (PSM).
Module Structure
Standardized interface modules are available for this via SOA/Webservices. The generated data can be
scanned, managed and documented with data from other production sites. Thanks to its module structure,
the MAS can be individually adjusted to the current situation of the packaging line. The unit can be operated
via an independent PLM or via a PLM that is already integrated into the line.
Signal Light Color Meaning
If the system is provided with a signal light, the colors have the following meaning:
12
Components
Color
Meaning
Green
System running
Yellow
Teach-in
Red
System stopped
5 Installation
Connect the MAS to the power supply. The input voltage should be between 115 and 230 VAC.
The PLM is installed on the MAS before delivery. Adapt the PLM according to the desired formats. Take the
necessary steps detailed in the PLM operating manual.
Installation
13
6 Handling
6.1 Starting the System
§ Make sure the system is at the intended production position and the power supply cable is connected to
power source
1 Plugin the system power supply cable
2 Switch on the main switch
Figure 3: Main Switch
ð The IPC and the installed software are started after switching-on the power
3 Log-on at the system IPC with username and password.
ð The system and the software are started and ready for use.
6.2 Hand Scanner
Depending on the range of application two or three handheld scanners are available at the MAS for the various functions.
The hand scanners are configured depending on how the aggregation is going to be performed.
The scanner for general functions is generally a Bluetooth scanner. As an "information reader" this hand
scanner is used to book in/book out cases and/or pallets.
6.3 Printer
Bundle to Case Aggregation
Number of printers: 1
- Case label printer
Bundle to Case to Pallet Aggregation
Number of printers: 2
- Case label printer
- Pallet label printer
Note
For maintenance, refill and troubleshooting of the printer, refer to printer manual
For Maintenance, Refill and Troubleshooting and all other tasks concerning the printer, refer to printer manual.
6.4 Bundle to Case Aggregation
The bundles, which were previously and correctly labeled in the bundle station (e.g. PCE Advanced Bundle
Station), reach the MAS via the conveyer belt. The bundles are manually packed in a shipping carton. Each
bundle in a carton is scanned one after the other with the handheld scanner for bundles. Once the specified
14
Handling
number of bundles has been reached, the printer (e.g. Zebra label printer) prints the shipping carton label.
The label is attached manually to the shipping carton and scanned with the scanner for carton labels. The
shipping carton is thereby aggregated.
6.5 Case to Pallet Aggregation
All correctly labelled shipping cartons are scanned with the handheld scanner and packed on a pallet. Once
the pallet has reached the pre-defined number of shipping cartons, the label printer prints the label for the
pallet. Said label is attached to the pallet.
6.6 PLM User Interface
1 Press the main switch. The PLM or the remote desktop starts automatically.
2 Log in as a user.
3 Select the handheld scanner from the main menu (overview).
4 Take the hand scanner and scan the barcode for the bundle or the shipping carton.
Figure 4: Home>Hand Scanner
5 Perform one of the folowing options to get the wished Information
ð a) Click on the "Show information" button (Image 2) to display the code scanned by the hand scanner.
Handling
15
Figure 5: Home>Hand Scanner>(Scan Code)> Press 'Show information'
ð b) Click on "Show hierarchy" to display the placement of the current order's scanned code in the hierarchy. Hierarchy is shown in a tree format.
Figure 6: Home>Hand Scanner>(Scan Code)> Press 'Show hierarchy'
ð c) Click on "Show aggregation" to display the progress of the executed aggregation in the current aggregation step.
16
Handling
Figure 7: Home>Hand Scanner>(Scan Code)> Press 'Show aggregation'
ð Detailed information on the operating the PLM can be found in the PLM operating manual.
6.7 System Shutdown
To shut down the system, perform the following task.
Note
Make sure the order is suspended of finished before switching off the power
Switching of while an order is running may cause a loss of production data
§ Make sure the current order is suspended of finished
1 Switch off the power switch
Figure 8: Main Switch
ð System will shut down properly thanks to the uninterruptible power supply.
Handling
17
7 Troubleshooting
7.1 System Behavior After Loss of Power
When power to the system is restored, the system will automatically restart.
The operating procedure corresponds to the procedure used after the main power switch has been turned
on.
7.2 Contact Technical Service
If you encounter persistent problems and would like to call Technical Service or the service hotline, please
be ready to provide as much information as possible:
• Type (model)
• Serial number
• Year of manufacture
• PCE order number and order date (if known)
• Software version displayed on the terminal
• Wording of the error message displayed or a precise description of the problem this enables us to help
you more efficiently.
7.3 Alarm Messages
Plain-text alarm messages appear at the terminal in the info field of the basic display and provide information about particular processes or malfunctions. For Information about the alarm messages refer to the
Alarm List.
18
Troubleshooting
8 Cleaning and Maintenance
8.1 Visual Inspection and Cleaning of the System
Recommended inspection in- What needs to be done?
terval
Daily
Perform a general visual inspection.
WARNING
Cleaning the system when it is hot may cause severe damage.
Only clean the system with liquid when it is cooled down to room temperature.
WARNING
Careless cleaning may cause severe damage.
Never use a high pressure jet to hose down the system.
Do not use caustic cleaning agents containing solvents to clean the system and the terminal. Never use
pure alcohol or concentrated acid or lye.
Use particular care when cleaning in order to avoid damage and, above all, to prevent water from entering
the system.
• Clean the system and terminal using soft cloths dampened with a mild solution of soap and water or a
commercially available glass and plastic cleaner.
8.2 Visual inspection of Gaskets/Seals
Recommended inspection in- What needs to be done?
terval
Monthly
Perform a general visual inspection.
if necessary, clean the light barriers.
8.3 Spare Parts and Warranty
CAUTION
For safety and warranty reasons, only Technical Service or technical personnel authorized
by PCE are permitted to replace a motor or the terminal.
If you would like to perform these maintenance tasks yourself, please contact our service hotline for information about the required training for your personnel.
Note
Keep spare parts on hand
Keeping spare parts on hand – especially for wear parts – can help reduce downtime. Please contact us if
you have any questions.
8.4 General Advice on Stainless Steel Maintenance
Stainless steel generally provides much better protection against corrosion when compared with steel or
aluminium. Stainless steel, however, does not always remain rust-free. Stainless steel can also become
dirty or rusty to some extent, depending on the operational use and the conditions in the working environment. The most common causes are surface rust (fine iron particles in the air), active gases, the accumulation of sediments and the build-up of salts. These superficial damages can be easily removed by using a
stainless steel spray daily. After cleaning with soap and water, you should check that the residue is washed
off with a suitable amount of water.
Cleaning and Maintenance
19
8.5 Cleaning the Touch Screen
The display surface is made from glass and the casing from stainless steel. To ensure efficient operation,
the surface of the touch screen should be cleaned regularly. Only special cleaning wipes and cleaning
agents should be used:
• Commercial cleaners for computer equipment
• Alcohol-based disinfectants
CAUTION
Solvents can damage the display.
Never use diluting agents, benzene, abrasives or other strong solvents, as these can damage the display!
20
Cleaning and Maintenance
9 Transport and Storage
9.1 Transporting the System
CAUTION
Risk of injury and damage to property
When the system is transported using a lift truck or other similar vehicle, its upper section should be held
in place by one additional person (or two additional persons, if necessary) to prevent the system from tipping over.
The weight of the system is considerable, and its center of gravity varies depending on the specific structural
design desired by the customer. It is therefore difficult to provide recommendations for specific lifting points.
You can find more detailed (i.e. order-specific) information on the center of gravity in the accompanying
documents.
9.2 Preparing for Transport
• Shut off the system and have it disconnected from the power supply by a qualified electrician.
CAUTION
The system must never be subjected to major mechanical stresses (impacts, etc.). Impacts
– regardless of the direction from which they act on the system – or falls can destroy the
system.
Make sure that any protruding parts such as light barrier holders, etc. do not become bent and do not injure anyone.
Take particular care to protect plastic covers.
9.3 Storing the System, Accessories and Spare Parts
• Store the system upright in the original packaging in a clean and dry place until it is to be installed.
• Keep all electronic parts delivered in antistatic bags in their bags until the parts are to be used. This ensures that they are optimally protected.
Transport and Storage
21
10 Interfaces [IPC B&R 910 Raid]
10.1 Overview of the Interfaces
All interfaces are located on the IPC unit of the system. The unit is mounted inside the cabinet (depending
on the design).
IPC Overview
a
Power connector (24V AC-IN or phoenix plug)
b
DVI port
c
Display port
d
RS232 port (COM1)
e
2 x Ethernet
f
4x USB 3.0
Note
Interfaces are for internal use only
All interfaces are for internal use only and cannot not be used by operators.
10.1.1 Ethernet
Figure 9: Ethernet port
Ethernet is a computer networking technology for local networks. The ethernet interface is a pluggable connection. A connection (link) is indicated by a steady yellow LED (on right side of connector) and data transmission (active) is indicated by a green LED (on left side of connector, flashes during data transfer).
22
Interfaces [IPC B&R 910 Raid]
10.1.2 USB
Figure 10: USB port
USB is a serial I/O interface. The USB ports comply with the USB 2.0 specification and are located on the
IPC and on the outside of the control cabinet.
If you require more USB ports, then a USB hub can be used to expand one of the ports and to provide additional connections. PCE is responsible for the technical design of the hub.
10.1.3 Keyboard Connection
Figure 11: USB port
It is possible to connect a standard external keyboard to the System via USB port.
10.1.4 Serial Ports (COM1, COM2 and COM3)
Figure 12: Serial port
Depending on the IPC variant, the terminal has two or three serial ports: COM1, COM2, COM3, COM4).
Possible interface type: V24/RS232C interface, with or without handshake lines, with a maximum transmission distance of 10 m.
Note
All serial interfaces are for internal use only
Do not use interfaces for external purposes.
All used cables must comply with the following specifications:
• Shielded
• Twisted pairs
• Line resistance <125 ohm/km
• Line cross section >0.14 mm2
• Line capacitance <130 nF/km
COM1, COM2 (and COM 3):
D-sub, 9-pin (male). Required mating plug: D-sub 9 (female).
Note
RS232C with handshake lines
For data transmission without handshaking, the male connector should not use pins 7 (RTS) and 8
(CTS).
Interfaces [IPC B&R 910 Raid]
23
Figure 13: RS232 port allocation
24
1
- not used -
6
- not used -
2
RXD, system receive line
7
RTS
3
TXD, system send line
8
CTS
4
- not used -
9
- not used -
5
Ground / Gnd
Interfaces [IPC B&R 910 Raid]
11 EC Declaration of Conformity MAS 2.0
EC Declaration of Conformity MAS 2.0
25
Glossary
Bundle
A bundle is a packaging unit at the aggregation
process. It consists of several items. It is usually aggregated to a case or directly to a pallet.
SOA
Service-Oriented Architecture
TXD
System send line. This line is for the serial encoded
data sent from a computer to a device.
Case
A case is a packaging unit at the aggregation process.
It consists of several items or bundles. It is usually aggregated to a pallet.
COM
Serial interfaces for bidirectional data transfer between
the PC and peripheral devices.
DVI
Uninterruptible power supply
USB
Universal Serial Bus
VA
Volt-ampere
Digital Visual Interface
EXP
Expiration date
HMI
Human Machine Interface
HxWxD
Height x Width x Depth
IPC
Industrial PC
LED
Light-emitting diode
MAS
Manual Aggregation Station
Pallet
A pallet is a packaging unit at the aggregation
process. It consists of several cases.
PCE
Pharmacontrol Electronic GmbH
PLM
Pilor Line Manager
PSM
Pilot Site Manager
RS232
Standard for a serial interface
RXD
System receive line. This line is for the serial encoded
data received by a computer from a device.
SMC
Smart Camera
26
UPS
Glossary
VAC
Volt Alternating Current
www.mt.com/pce
Further information
Pharmacontrol Electronic GmbH
64673 Zwingenberg, Germany
Tel. +49 6251 8545-0
Fax +49 6251 8545-111
www.mt.com
Subject to technical changes.
© Pharmacontrol Electronic GmbH 2015-02-02
Version C