1
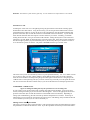
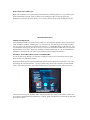
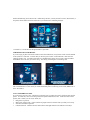
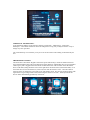
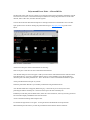
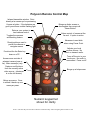
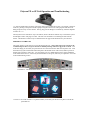
Polycom FX or SP Unit Operation and Troubleshooting
*** Note the small button just to the right of the camera is for technician use only. We suggest a sticker of
some sort, pointing to the power switch so people using the room for non-video purposes can shut it off.
Many people are wary of a live camera. This tag may prevent damage to a machine by someone desperate
to shut it off. ***
The Polycom can be controlled 3 ways: The remote, which is the most common way to control the system
and through a built in web page or Telnet. This text will concentrate on controlling the unit from the
remote. The Remote Control’s keys are detailed on the last page of this document for your reference.
POWERING UP THE UNIT
The power switch is on far right as you face the back of the unit. These units tend to run a bit hot so the
recommended procedure is to power the unit on Monday morning and turn it off for the weekend. One
of the first things you see when you power the unit on is the screen shown under the rear panel view. Note
the small icon(s) (the one that looks like home plate at the bottom center of the screen) under a picture of
the Polycom just below “video call”. *If your unit has a V.35 or ISDN interface, there will be additional
icons similar to the IP icon. If the icon(s) and checkmark are not green, there may be a problem. If so refer
to the troubleshooting section.
***NOTE*** The SP-model has fewer connections on the bottom row and there is no top row.
***Note*** On an SP unit there is no phone interface, so the Icon you will see in its place is one for the
speed-dial list.
Disclaimer: This leaflet is a quick reference guide only. It is not intended to be a replacement for a user manual.
PLACING A CALL
Assuming the “video call” icon is hi-lighted, pressing the green button on the remote will bring up the
manual dial screen shown below. Using the arrow keys you can navigate to the address book to use the
speed dial features. If there is no entry for the site in the speed-dial list, enter the number manually then
press the enter button (the one with the round icon in the middle of the arrow buttons). If your unit has
other network interfaces there will be place to choose which way to connect. Normally, you need do
nothing but choose the V.35 to get connected on that interface. Setting the Polycom to auto-answer and
setting the V.35 lead “DSR” to normal & answer, will auto-answer calls. If the direct connect conference
has been brought up before you powered the Polycom on, the unit may take up to 3 minutes to connect a
V.35 call after the “power on self test”. Be patient. ISDN BRI will have up to 4 “ball” icons.
This is the screen you’ll use to launch any calls not in your speed dial directory. (IP / V.35 / ISDN selection
box not shown) Here you enter a phone number or E.164 address and the video rate of the conference.
After the correct number is entered pressing the green button again to initiate the call. Navigating to the
“address book” icon and pressing enter (key in center of arrow keys) will take you to the speed dial screen.
The 123 icon will clear the entire numeric field, or you can use the left-arrow to backspace per character.
ANSWERING A VIDEO CALL
*If you are editing the dialing directory the system does not see incoming calls
If your system is set up to auto answer calls, incoming calls will be fully automatic. If not set for Auto
Answer, a dialog box asking if you want to answer the call appears. Arrow to the appropriate answer and
press the enter button (the one with the round icon in the middle of the arrow buttons). Depending on
settings (see troubleshooting), the call will come up with the microphone live or muted. It will ring 18
times before it gives up (from an Accord) more on point to point. After dialing, always assume the far end
can see and hear you even if you can’t see or hear them yet.
Sharing a Power Point® presentation.
This topic is covered on page 8 of this document. Your Polycom must be able to FTP from the PC housing
the presentation in order for this feature to work. If you have problems work with your local LAN admin.
DISCONNECTING THE CALL
When your conference is over, pressing the green button twice will hang up the call. If you hit the green
button inadvertently move the cursor so the box is surrounding the “Stay in Call” and press enter.
Remember to power the unit off on Fridays. You can also clear the call by simply shutting the unit off.
TROUBLESHOOTING
POWER UP SEQUENCE:
If the checkmark and IP icon are not green it indicates a LAN connection problem, which could be a loose
cable, an address conflict or something else. Try disconnecting / reconnecting the LAN (Ethernet) cable.
The V.35 Icon(s) will be to the left of the IP icon and have a 1 in the middle instead of the letters IP. This
icon should also turn green if your unit is set up to use V.35. If connected to an ISDN line(s) you will see a
slightly different set of icons. ISDN icons resemble 3-D balls and there will be 1 ball for each ISDN line
configured. These balls will turn green as each ISDN line (that is configured) initializes.
GENERAL TIPS WHEN THINGS DON’T WORK RIGHT:
If your call does not go through, or if someone is calling you and you are not answering, here are some
places to look to try and fix the problem:
Pressing the MENU button will bring up the main menu, from here choose the “System Info” icon. This
will bring up the screen shown here: To exit any menu and go back to the conference press the NEAR
button. You can also press the “near” button followed by the green button to return to the main screen.
This screen shows you your IP address and E.164 phone number (the number others need in order to call
you) which is separated from the IP address by a comma. Other information here includes the system name
and software version.
Most troubleshooting can be done in the “Admin Setup” menus: you may not have access to these menus, if
not please call the NOC and ask for assistance if you need to have something changed.
***NOTE**** On the SP-units the phone/audio is just audio.
CHECKING FOR VALID RATES:
If you are trying to place call and are unable to select the needed rate, it may be that it has not been defined
to the system as a valid rate. To check this you need to go first to the “Video Network”, then select the
“Dialing Speeds” icon. You then insure there is a checkmark next to the rate you need. There should be
checkmarks next to all rates you will be using. This setting is meaningless on incoming calls.
**NOTE** No Multi-point icon on most units unless the option was paid for.
The “Call Preference” icon is where you would tell the Polycom if connecting via the LAN, ISDN lines or
the V.35 interface.
AUTO ANSWER FUNCTION:
If you can hear your unit “ring”, indicating an incoming call, but it does not answer, check the auto-answer
option. To check this, select “User Setup” from the System information screen. Aside from auto answer
options, this is where you can set (or check) for:
• PIP (picture in picture)
• Mute Auto Answer Calls – Is best checked so people at the far end don’t hear you until you’re ready.
• Near/Far end camera operation
• Camera Direction – Defines how the camera moves left/right relation to the remote’s arrow keys.
ADDITIONAL INFORMATION:
Your Gatekeepers address can be found by selecting “System Info – Admin Setup – LAN.H.323 –
Gatekeeper”. This address should not need to be changed once set up, but you may be asked to verify or
change it by NOC personnel.
The “General Setup” icon will show you if you are set to auto-answer and if dialing is allowed from your
unit.
THE REMOTE CONTROL:
The remote has a full numeric keypad as well as the special function keys, which are detailed on the last
page of this document along with a brief discussion of their functions. Additionally there is a spring-loaded
“wake up” key that is triggered when the remote is lifted off the table. The left screen shows the remote
down on the table (asleep) while the screen on the right shows the remote active (lifted off the table). You
will notice there is a box around the TV (video call) icon when the remote is active. Once the remote is
asleep for three (3) minutes the system will go into full stand-by mode. This involves shutting off the video
signal to the TV (providing a black screen) and turning the camera to one side. The Polycom will still
have an amber LED flashing periodically on the front.
Polycom and Power Point – A Powerful Pair
The Polycom works with your PC to allow you to transmit a Power Point presentation without the need for
VGA/TV scan converters. This means the Polycom and the PC housing the presentation be on the same
network, and in some cases, the same network segment.
You will need a browser like Internet Explorer or Netscape, Power Point and Internet access to do this.
Open up the browser on the PC hosting the presentation and go to http://polycomIP to get the screen
below.
Click on Select a Presentation
At the next screen press “Select a Presentation for Viewing”
Next screen press “Press here to select a PowerPoint Presentation”
A PC Present dialog box will now appear. What you enter into the name field will be the name seen back
at the Polycom box. If you set a password (numeric only) it will be needed to access the presentation,
otherwise press enter at the password box. Then “Press here to select a PowerPoint Presentation” again.
At this point PowerPoint will open on your PC.
Select the presentation desired as you normally would when using PowerPoint alone.
A PC Presents Slides box will appear (filled with gray). This must stay active until you are done
presenting the slides at the Polycom. So the last few steps are all done at the Polycom.
Establish your call then press the slides button, select the correct slide show, enter any necessary password
and it will then display a thumbnail of the first few slides.
Arrow to the desired starting slide and press enter.
Use the left and right arrows to navigate. To navigate back to the thumbnail screen press menu.
When finished press the near key to clear the presentation and resume the normal conference.
Polycom Remote Control Map
Infrared transmitter window. Point
directly at a camera you're previewing
& press a button. If the batteries are
good you will see a white flashing light.
Returns your system to
local camera control.
Brings up dialer screen or
disconnects the current call.
"Green Button"
Allows control of camera at the
far end. If option is active
Toggles the cameras
autotracking feature.
Advances to next slide
when using Power Point.
Directional keys used to
pan/tilt the camera or
navigate menus.
Adjusts your local
receive volume. No
effect on transmit audio.
Functions like the Enter key
does on a PC.
Turns off the mic in your
local room. No audio is
transmitted. Press on/off
Access zoom controls of
selected camera (near or
far). Main camera(s) only.
Captures a still picture
from the currenly active
video source. (whatever
is on the left screen)
Brings up a help screen
Brings up menus. Once
in menus it backs up one
menu per press.
Numeric keypad not
shown for clarity
Note** The Near key also acts like a “Back to Conference Key” when navigating menus while in conf.