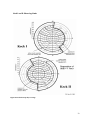
1
Cahill Remote Observing Facility User’s Manual v 7.1 rc1 28 October 2013 Table of Contents Cahill Remote Observing Facility User’s Manual..............................1 Table of Contents.........................................................................1 1.Introduction..............................................................................3 2.Cahill Building Layout................................................................4 2.1.Cahill First Floor Layout.................................................................4 3.Cahill Remote Observing Facilities Guidelines..............................5 3.1.Scheduling a Remote Observing Session.........................................5 3.2.ROF Demo Appointments................................................................6 3.3.Accessing the Remote Observing Facilities Rooms...........................6 4.Pre-Observing (Daytime & Nighttime) Tests & Coordination.........7 5.Using ROF Videoconferencing Equipment....................................8 6.Keck Remote Observing via VNC.................................................9 6.1.Starting a Remote Instrument Control VNC Session.........................9 6.2.Starting a Keck Remote Telescope Monitoring VNC Session............11 6.3.Retrieving Data from Keck............................................................12 6.4.Using the Sound Bar.....................................................................13 6.5.Ending a Keck Remote Observing Session......................................13 7.Palomar Remote Observing via VNC..........................................14 7.1.Preparing for a P200 Remote Observing Session............................14 7.1.1.Palomar Remote Observing Operations.......................................14 7.1.2.Starting the Remote Observing Computer................................................14 7.2.Starting the Instrument Control Computers...................................15 7.3.Accessing your data.....................................................................17 7.4Ending a P200 Remote Session......................................................17 8.ROF Shut-Down ......................................................................18 9.Useful Information...................................................................19 9.1.Temperature Control in Cahill ROF................................................19 9.2.User Laptops in Cahill ROF............................................................19 9.3 Printing/Scanning in Cahill ROF.....................................................20 9.4. Random Remote Observing Resources..........................................21 9.5.Relevant Remote Observing Links.................................................21 Keck I and II Observing Limits.............................................................23 9.6.Contact Numbers/Polycom IPs.......................................................24 9.7.Miscellaneous..............................................................................25 9.7.1.Time Difference:........................................................................................ 25 9.7.2.Fire Alarm:................................................................................................. 25 9.7.3.What to do if you get Locked Out of the Remote Observing Facilities:.....25 10.Troubleshooting:....................................................................26 Appendix A.................................................................................28 Document Change Log................................................................29 1. Introduction Caltech Astronomy and Caltech Optical Observatories (COO) maintain remote observing (RO) facilities in the Cahill Center for Astronomy and Astrophysics on the campus at Caltech. These facilities were developed and are typically used to support remote observing with the Keck Telescopes in Mauna Kea HI (§6), operated by the WM Keck Observatory (WMKO), but are used with other telescopes including the Palomar 200-inch (P200; §7). The Caltech Remote Observing Facilities (ROF) are in rooms 118 (ROF1) and 144 (ROF2) Cahill, on the first floor in Cahill (see the first-floor plan drawing below in Figure 1). The Cahill ROF are administered by COO; reservations for the use of the ROF are handled exclusively by COO, and should be booked at least two weeks in advance to coordinate user support, and to avoid possible room conflicts. Remote observing with the Cahill ROF and the Keck Telescopes is largely due to the development efforts of Judy Cohen (Caltech), and Robert Kibrick (UC Santa Cruz), whose vision and dedication have made Keck remote observing a reality all across the Keck consortia: at Caltech, Santa Cruz, Berkeley, UCLA, Irvine, other campuses in the UC system, the Lawrence Berkeley National Laboratory, and even now at Keck partners Yale University and Swinburne University of Technology. 2. Cahill Building Layout 2.1. Cahill First Floor Layout Figure 1: Cahill First Floor Layout The Cahill ROF are in 118 and 144 Cahill, located near the center of the Cahill first floor (in Figure 1 above, the ROF locations are labeled near the center of the building). Access to Cahill is through the Front/NE Entrance (top right above), and restroom facilities are at the East end of the floor. Electronic key cards are need at all times after 6pm Pacific time to access the front and hall doors (see Accessing the Remote Observing Facilities Rooms for more details). 4 3. Cahill Remote Observing Facilities Guidelines 3.1. Scheduling a Remote Observing Session Keck: Per WMKO policy, remote Keck observing with instrument control requests should be made not less than four (4) weeks in advance of the allocated observing nights; requests are made through a remote observation request web form linked from the WMKO Observer Login Page. WMKO remote observing instructions, including information required in the request message, are detailed at http://www2.keck.hawaii.edu/inst/common/mainland_observing.html. Per WMKO policy, remote Keck eavesdropping (i.e. no remote instrument control) requests should be made not less than two (2) weeks in advance of the allocated observing nights. Eavesdropping requests are similarly made through the web form linked from the WMKO Observer Login Page. Remote participation requests with videocon only can be made at an arbitrary time, and will be handled on a best-effort basis. [Remote observing requests made in email to [email protected] may continue to be serviced at WMKO’s discretion for the near future, but users are encouraged to use the WMKO web form described above.] Approval of a Cahill ROF remote observing request is granted jointly from both WMKO and Caltech COO, and is required to use the Cahill ROF. Please note that all non-Caltech users will have to submit a signed Facilities Use Agreement to use the ROF. Approved remote observers will receive an email approval from COO assigning them a Cahill remote observing room (either 118 or 144 Cahill) for their remote observing session. If the status of a pending request is unclear, users can request a status confirmation from [email protected] Palomar: Remote P200 observing must be requested at least two (2) weeks in advance of the schedule P200 observing run, and the request must be made in email to [email protected]. Palomar RO requests must be made by the named Principal Investigator (PI). Requesting observers will be notified on the status of their P200 RO request within three business days after their request is received. Approved P200 remote observers will receive an email approval from COO assigning them a Cahill remote observing room (either 118 or 144 Cahill) for their RO session. If the status of a pending request is unclear, users can request a status confirmation from [email protected]. Any subsequent follow-up support (demo, connectivity tests) can be scheduled through email to [email protected]. 5 3.2. ROF Demo Appointments Pending approval of an RO request, an ROF walkthrough/demonstration appointment (demo appointment) can be scheduled up to four days immediately preceding the observing date. If the observing date is on a weekend, then the demo appointment will (normally) be scheduled for the preceding Friday. Experienced remote observers may elect to forgo the demo appointment, but all first-time ROF users are expected and encouraged to attend the demo appointment. 3.3. Accessing the Remote Observing Facilities Rooms Some ROF users may not be on the access list for Cahill ROF rooms. For those individuals, ROF electronic key cards (keys) are available for temporary checkout from COO. The business day preceding a remote observing session it is incumbent upon the remote observer/participant to pick up keys they may need to access the Cahill ROF. Checkout of electronic keys to Cahill ROF is administered by Richard Walters (146 Cahill; [email protected]), or if Richard is not available Anna Marie Hetman (127 Cahill; [email protected]). These keys will provide access to both remote observing rooms (118 and 144 Cahill), the Cahill first floor hall fire doors, and the Cahill main (East) door entrance/exit. Observers should keep their keys on them at all times after 6pm when the building is locked. Observers are fully responsible for any keys they checkout, and are expected to return them to Marcia not more than three business days after their observing session. A history of unreturned keys may be considered when considering future ROF requests. 6 4. Pre-Observing (Daytime & Nighttime) Tests & Coordination There are often pre-observing tests & coordination discussions that are planned as part of any RO run. These are discussed below in this section: Keck: There are two coordination tests that are often run before Keck remote observing sessions. The first continuity test is typically conducted at 3 or 4pm pacific time. This test is used to verify the video (Polycom) and computer (vnc, for instrument monitoring and/or control) connections are working properly to support remote observing. New observer will be introduced to the ROF during this test and should use it to ask any questions they may have about remote observing. Observers may and are strongly encouraged to test their connection up to 5 days prior to the night of their run. A second coordination meeting is often held at 4pm HST (7pm PDT), and is used to coordinate among Mauna Kea summit personnel, Waimea observers and instrument support astronomers, and remote observers and participants. Typically operations from the previous night, and any existing operational issues are discussed, as is the general plan for the coming night’s observations. Your assigned Keck support astronomer will advise you of the tests and meetings you will need to attend as part of your remote observing; remote observers will participate in both these meetings from their assigned remote observing room. 4.1. Palomar There is typically a single coordination test run before Palomar observing sessions. The coordination test is typically conducted between 2 to 4pm pacific time the day of the observing. This test is used to verify the vnc and video (Polycom) connections between the remote observing room (Cahill 144) and the Palomar data room. The observer will typically begin there calibrations during this test in preparation for the telescope being turned over for their use at 4pm. At this time the support astronomer will provide any additional contact and operational information for the nights observing. 7 5. Using ROF Videoconferencing Equipment Figure 2: 118 Cahill Videoconference Equipment The Cahill ROF rooms have integrated videoconferencing equipment by Polycom (http://www.polycom.com/), the standard selected for Keck & Palomar videoconferencing. ROF users will use this equipment to communicate with personnel in Hawaii or Palomar during (preparations for) remote observing. A demonstration of how to use this equipment will be included in the demo appointment in the previous section – users unfamiliar with this system are encouraged to attend the demo appointment. Figure 2 shows an image of the 118 Cahill/ROF1 Polycom equipment in use during a multi-point conference. Under normal operating procedures the Polycom will already be powered up, either a blue or orange light in the middle of the Polycom base unit located on the shelf by the 118 Cahill door will indicate power-on status. Please note that it can take upwards to 25 seconds for the unit to come out of sleep mode. If no light is on, than it can be turned on by depressing the power button located on the front of the unit. The numbers for the Keck Remote Observing rooms can be found in the directory under favorites. The video display monitor is mounted on the wall in the ROF. The monitor’s button power switch is located on the left bottom of the unit (as viewed from the front). This switch must be in the ON position for videoconferencing; please turn the monitor OFF when not in use. Commonly used videoconference addresses (e.g. remote observing control rooms for Keck 1 and Keck 2, the P200 data room) are stored in the Polycom address book (see §9.6 on the ROF wall); these addresses can be used to initiate videoconference calls. 8 6. Keck Remote Observing via VNC Figure 3: 118 Cahill Observing Computer During a Remote/VNC Session 6.1. Starting a Remote Instrument Control VNC Session In order to remotely operate (or monitor) Keck instrumentation you will need to access the instrument control programs from computers in the ROF. WMKO uses VNC (Virtual Network Computing; http://en.wikipedia.org/wiki/VNC) to map displays generated by instrument control programs running at Mauna Kea to computer displays running in WMKO HQ in Waimea or at “remote” locations such as Cahill ROF. In addition, for offsite use Keck is understandably concerned that only authorized users have access to these control programs and the computers they run on. In order to establish a VNC connection for a Keck instrument from a Cahill ROF computer, follow these steps: STEP 1: Log on to the ROF instrument control computer (mugu in ROF1/manhattan in ROF2; see Figure 3). Select the appropriate user from the menu screen and then select the desired desktop environment from the options in the lower control panel bar. FVWM2 is recommended for most users although the gnome desktop environment can also be used. [Instructions for this manual are all based on the FVWM2 desktop environment.] 9 username: password: Please note that all passwords are sanitized from the on-line version of this manual; contact your Keck support astronomer and/or your ROF support personnel at [email protected] if you need password information. STEP 2: Open axterm window (we will call this “window1”; terminals can be open from the desktop by right clicking the background). To start a vnc session the instrument and instrument account number are needed. These can be found at http://www2.keck.hawaii.edu/observing/schedule/index.php. Account numbers 1-9 do not have any preceding zeros and should be entered as a single integer. See the example table below for the correct notation for the available Keck instruments. Avaliable Instruments HIRES LRIS OSIRIS kvnc abbreviation hires lris osiris MOSFIRE mosfire DEIMOS ESI deimos esi example [kvncinst instrument account#] kvncinst hires hires1 kvncinst lris lris2 kvncinst osiris osiris3 kvncinst mosfire mosfire4 kvncinst deimos deimos5 kvncinst esi esi6 NIRC2 nirc2 kvncinst nirc2 nirc7 NIRSPEC nirspec kvncinst nirspec nirspec notes when entering the account number only use "nirc" nirspec has no account numbers 10 > kvncinst instrument account_number Important Note: Password 1 is used to create a hole in the Keck firewall. This step will not always be needed if the session has already been authenticated. In that case the script will automatically continue until it reaches the prompt “Please enter the VNC password below”. At this point the user will enter password2 and then enter password2 again to confirm. STEP 3: Depending on your instrument 3-6 vnc desktops will begin to open on the screens. These windows can be arranged on the screen by clicking the virtual desktop in the lower left part of the screen. The user can click and drag the windows inside the virtual desktop to position them as desired. If the user is not using the FVWM2 desktop environment then the screens will appear right on top of each other. In this case the user can simply move the vnc window to another workspace desktop by right clicking the top bar of the vnc window and clicking the Move to Workspace Right/Left. The user can switch between workspaces by clicking them in the bottom right-hand corner of the screen. When observing is complete, shutdown VNC session by killing the vnc script – perform cntrl-c in “window1”. 6.2. Starting a Keck Remote Telescope Monitoring VNC Session In addition to direct instrument access, during observations it is often useful to have visibility into the operations of the telescope. At WMKO telescope parameters are monitored by means of the Keck Facilities Summary, or Keck FACSUM utility (see http://www2.keck.hawaii.edu/inst/common/facsum.html) FACSUM access requires a VNC connection to WMKO from a Cahill ROF computer. This can be accomplished as follows: Open a (second) terminal window “window2” on the monitor in which you want the FACSUM to appear. It is recommended that the script be run on the secondary ROF computers (seal in ROF 118/malibu in ROF 144), although it can be run from any monitor of the observer choosing. The username and passwords for the secondary ROF computers are the same as in section 6.1 11 Step 1. To start the script run the following command in window2 using the same instrument and account number as used in section 6.1 step 2.1: > kvnctel instrument account_number Important Note: Password 1 is used to create a hole in the Keck firewall. This step will not always be needed if the session has already been authenticated. In that case the script will automatically continue until it reaches the prompt “Please enter the VNC password below”. At this point the user will enter password2 and then enter password2 again to confirm. When observing is complete, shutdown VNC session by killing the vnc script – perform cntrl-c in “window2”. 6.3. Retrieving Data from Keck To retrieve data to your own machine you can use the firewall hole method to allow for sftp connections to WMKO from your computer (i.e. laptop). Your WMKO instrument support astronomer can advise you on where to find your data, and you can retrieve it with another hole in the firewall. 1) Using sftp: Please consult the printed manual for information on how to retrieve your data. 1 Please note that all passwords are sanitized from the on-line version of this manual; contact your Keck support astronomer and/or your ROF support personnel at [email protected] if you need password information. 12 > 6.4. Using the Sound Bar The computers for the ROF rooms have now been upgraded to allow verbal warnings to be piped directly to the local machines. Currently only HIRES is being supported but other will be coming online soon. The speakers are located on a sound bar that attaches to the bottom of the monitors. The volume can be adjusted by turning the knob located on the right of the speakers, clockwise. 6.5. Ending a Keck Remote Observing Session To end remote vnc sessions simply do a control C command in ”window1” (and “window2” if applicable). After ending the vnc session logout of the remote observing computers. Please make sure that the power is off on the Polycom and media display. If you will not be back during Caltech business hours please leave your ROF keys in the drop box inside 118 or 144 Cahill. In order to provide the best quality remote observing we ask that any problems and or suggestions be sent to [email protected]. Observers should make sure to clean up after themselves when there session is over. 13 7. Palomar Remote Observing via VNC Remote observing (RO) for the Hale/P200 Telescope at Palomar Observatory is available in both ROF1 & ROF2 in Cahill. Palomar RO support includes both videoconference (Polycom; §5) connection to the P200 control room and VNC computer desktop sharing for instrument control. At the time of this writing (August 2012) RO is supported for TripleSpec (Tspec) http://www.astro.caltech.edu/palomar/200inch/TSpec/TSpec_spec.html); Double Spectrograph (DBSP) and Wide-field Infra-Red Camera (WIRC) infrared camera. username: 7.1. Preparing for a P200 Remote Observing Session A Palomar RO session must be scheduled in advance using the procedures outlined in §3.1. If desired, observers should schedule demonstration of the ROF prior to the actual observing date (see §3.2), and physical access. On the day of the RO session a series of coordination tests may be scheduled (§4); your Palomar Support Astronomer will advise you on any required pre-observing tests or coordination. 7.1.1. Palomar Remote Observing Operations Starting a P200 RO session consists of (1) establishing a Polycom videoconference connection to the P200 data room to allow communication with the P200 telescope operator and support astronomer (see §5), (2) logging on to the ROF computers, (3) starting the remote desktops that allow the observer to control the instrumentation and telescope, (4) carrying out the observation program and (5) retrieving the data from the observatory computers. 7.1.2. Starting the Remote Observing Computer The computers that support both Palomar and Keck RO in ROF1 and ROF2 (e.g. Figure 3); you will need to login to these computers to remotely operate/monitor Palomar instrumentation. Further, similarly to WMKO, Palomar uses VNC (Virtual Network Computing; http://en.wikipedia.org/wiki/VNC) technology to map instrument control displays onto the RO workstations. In order to establish a VNC connection for a Palomar instrument from a Cahill RO workstation, follow these steps: STEP 1: Log on to the ROF instrument control computer (mugu in ROF1/malibu in ROF2; see Figure 3) as the Palomar user2: 2 Please note that all passwords are sanitized from the on-line version of this manual; contact your support astronomer and/or your ROF support personnel at [email protected] if you need password information. 14 STEP 2: Execute one of the instrument specific scripts (see below) to open the VNC desktops to the instruments at Palomar Observatory. If a VNC desktop is not used for a prolonged period of time it may spontaneously close. If a VNC desktop closes you can manually reopen the specific connection using the following 7.2. Starting the Instrument Control Computers The following instruments are currently supported for remote operations at Palomar Observatory: TSPEC, DBSP and WIRC. Each instrument requires a slightly different configuration of screens and is started by a separate shell script. The shell scripts automatically open VNC desktops to the currently active screens at the Observatory. The specific screen configuration may change from time to time as different instruments computers are used to support a given instrument. Responsibility for setup and configuration of the remote observing system is the responsibility of the remote observation support personnel at Caltech in concert with the support astronomers at Palomar Observatory. QUICK START: type the following for each instrument in a terminal window TSPEC – tspec DBSP – “dbsp” WIRC – “wirc” or “wirc_guide” 7.2.1. TSPEC CONFIGURATION Started by typing “tspec” in a terminal window or by pressing the TSPEC icon. TSPEC requires the following screens: TSPEC spectrometry control screen TSPEC imager control screen FACSUM display screen TSPEC iraf session control screen Typical configuration will place TSPEC SPEC and TSPEC IMAGER on two of the main screen (left side of the desk) and the TSPEC iraf control screen on the third monitor. FACSUM is typically displayed on the second computer with a single display. 7.2.2. DBSP CONFIGURATION Start by typing “dbsp” in a terminal window or by pressing the DBSP icon on the desktop. DBSP requires the following screens: 15 DBSP-RED and DBSP-BLUE control screens (single desktop) DBSP iraf session control screen FLI guider/slit image viewer control screen DBSP Guider display control screen FACSUM display screen Typical configuration will have DBSP-RED and DBSP-BLUE control screens on one of the main displays with the DBSP iraf session on the central panel and the FACSUM display screen on the third display. The FLI 3slit viewing camera and DBSP guider will appear on the second computer on separate desktops. During calibration and setup the grating angle of the DBSP instrument will require optimization, which requires communication with the support astronomer on duty while they adjust the grating angle in the Cassegrain cage. Observers may Skype the Palomar support astronomer’s laptop from the remote observing computers in Cahill 144. The support astronomer can communicate with the observers using a dedicated Skype account setup for this purpose. Palomar Observatory SKYPE contact information: SKYPE Contact Name palomarto Remote Observer palobserver Support Astronomer palomasupport Telescope Operator 7.2.3.WIRC CONFIGURATION Start by typing “wirc” or “wirc2” in the terminal window or by pressing the WIRC (or WIRC2) icon on the desktop. WIRC remote operation requires different setup depending upon the software interface selected for observation. The general purpose WIRC software used for dither imaging requires connecting directly to the instrument computer running the WIRCLabView code. The newly developed high precision guiding interface may be run from any of the observer computers and requires a slightly different setup. WIRC control software WIRC iraf session control screen FACSUM display screen Typical configuration with WIRC only requires the three main display screens although the DBSP guider The Xybion cameras used by the Palomar Shepherd Guider program cannot be accessed remotely due to the operating system the program runs on. Only the FLI slit-viewing camera can be used during remote operation of DBSP. Unfortunately, the camera image of the fiber optic guide head mounted on the XY stage for extend guide object selection cannot be accessed remotely. However, the guide head location and the guide star selection process can be monitored using the DBSP guider software. 3 16 display can be useful as a source for finder charts. 7.3. Accessing your data The data produced by the TSPEC, DBSP and WIRC are written to the local hard drive of the instrument computer running the server side of the instrument control software. The instrument control software runs on a set of 8 instrument control computers only 5 of which are in routine operation. The support astronomer on duty for your observing run will tell you which computer contains your data. However, the data drives for the instrument computers are all mounted as network drives that can be seen from any of the 8 instrument computers and the 3 observer computers. Your data may be retrieved by secure shell copy (scp) from the instrument computer where it is stored or from any of the systems with a slight change in path. DATA DIRECTORIES AND MOUNT LOCATIONS Please consult printed manual for data directories and mount locations. 7.4 Ending a P200 Remote Session Concluding a remote observing session requires (1) closing the remote instrumentation desktops, (2) logging out of the remote observing facility computers, (3) finalizing the videoconference and shutting off the video equipment. 17 8. ROF Shut-Down When you are done with an RO session at the end of the night we ask that you take a couple of minutes to do the following: 1. Pick-up after yourself: disposing of any leftovers & refuse appropriately, clean and store any dirty cups, dishes, and flatware. This usually goes without saying, but just in case… your attention to this point will be appreciated by all. 2. Finish your business on the ROF computers and log-out (or leave a note clearly indicating when you will log-out…) 3. End any videoconference with the remote site and power-down the plasma display (but note – not the Polycom unit!) 18 9. Useful Information 9.1. Temperature Control in Cahill ROF Both ROF rooms have thermostat control for your comfort during room use. The units are adjusted using the sliders on the bottom of the units; sliding to the left (right) will decrease (increase) the target temperature. ROF users should feel free to adjust the thermostat target temperature to their comfort. Figure 5: 118 Cahill Thermostat on N Wall 9.2. User Laptops in Cahill ROF Many/most users will bring laptops into Cahill ROF, and will want network connectivity while there. Network connections in the ROF are provided through Caltech facility wireless and Cahill wired connections. Caltech Wireless: wireless services are administered campus-wide by Caltech IMSS (Information Management Systems and Services). A general description of these services can be found within the IMSS documentation site at http://imss.caltech.edu/cms.php? 19 op=wiki&wiki_op=view&id=536. If you are a guest at Caltech, you will probably only be able to use the ‘Caltech Guest’ wireless network – which will limit the network services available to you. Wired Connection: Both observing rooms have Ethernet hubs on the worktables. These ports are DHCP-enabled, and should allow all users to have a full range of network services. 9.3 Printing/Scanning in Cahill ROF We have added printing (e.g. finder charts) and scanning (e.g. observing log) capability to our ROF. Printing: our ROF HP printers are on the Cahill printing network as color118 and color144. Cahill users and users logged into the instrument control machines should be able to access/print to these printers directly. (In addition we have a nearby high volume duplex printer bw135 in Cahill 135 – just West of the ROF rooms. Users are encouraged to use bw135 for larger jobs like science papers.) Scanning: both ROF printers can also scan documents into jpg format. This is most conveniently done through the printer’s web interface. To scan a document start at the printer URL: At each URL the “Information” tab will provide a link to the “Webscan” application (e.g. http://131.215.193.124/webScan.htm). To protect against outside intrusion, entry to the Webscan application is protected by a username/password entry requirement4: From this web interface you will be able to scan your original into a bitmap (jpeg) format and have the image returned to your browser (where you can save it or convert it into another format – e.g. PDF – for archiving – please note that you will have to enable popups from the printer URL in your browser). Alternatively the jpeg scan can be sent to an email account – this capability is provided through the printer control interface window directly on the printer unit. 4 Please note that all passwords are sanitized from the on-line version of this manual; contact your Keck support astronomer and/or your ROF support personnel at [email protected] if you need password information. 20 9.4. Random Remote Observing Resources We can’t tell you how to observe your program or use your instrument of choice, but we can provide you with some useful pointers that might make that easier (all links can be found on the website http://astro.caltech/remote_observing): Start at http://keckobservatory.org/observing for observing information such as instrument documentation and observing log sheets, exposure calculators, and things that are instrument-specific. The Mauna Kea Weather Center (http://hokukea.soest.hawaii.edu/ ) is your source for all things weather related for Hawaii Good sources for finding charts might be o IRSA/2MASS: http://irsa.ipac.caltech.edu/applications/FinderChart/) o Sloan: http://cas.sdss.org/astro/en/tools/chart/chart.asp Nearest food and services: In front of room 118 Cahill there is a full size refrigerator/freezer, microwave, and coffee machine available for use to all remote observers. Groceries: Vons/Pavilion 845 E California Blvd (near NW corner of Lake & California) Coffee: Starbucks 575 S Lake Ave (NW corner of Lake & California) Fast Food: Subway Sandwiches 526 S Lake Ave (E-side of Lake, 1 block N of Lake & California) Heart Disease: Pie’n Burger 913 E California Blvd (quickly followed by http://en.wikipedia.org/wiki/Angioplasty or other coronary intervention) Online Delivery Service: o http://www.LAbite.com ($20 minimum order but delivers from a wide variety or restaurants) 9.5. Relevant Remote Observing Links WMKO Mainland Observing Web Page: 21 http://www2.keck.hawaii.edu/inst/common/mainland_observing.html UC Berkeley Remote Observing Web Page: http://astro.berkeley.edu/facilities/keckremote/ UC Irvine Remote Observing Web Page: http://www.physics.uci.edu/~barth/remoteobserving/ Robert Kibrick’s Homepage: http://www.ucolick.org/~kibrick/ Cahill Printer Setup: http://wikis.astro.caltech.edu/groups/cahill/wiki/a09e4/Cahill_Printer_Install_Summary.html Cahill ROF Calendars: http://aries.caltech.edu/mrbs/month.php?room=24 (118 Cahill) http://aries.caltech.edu/mrbs/month.php?room=25 (144 Cahill) PolycomVideoconferencingInformation http://www.polycom.com/& http://www.polycom.com/global/documents/support/setup_maintenance/products/video/v iewstation_128_user_guide.pdf 22 Keck I and II Observing Limits Figure 6: Keck Telescope Sky Coverage 23 9.6. Contact Numbers/Polycom IPs If you are a local user and have a long distance code you can place a call by pressing 9 followed by 1 and the number you wish to dial. After entering your number you will need to enter a long distance code. For user without a long distance code a calling card will be provided during checkout. The calling card should be used for observing purposes only. Please consult printed manual for Keck polycom and support astronomer numbers. In addition the support numbers are posted above each work station in rooms 118 and 144. Name Caltech Remote Observing Support Keck Support Astronomers Office 626/395- Andy Boden 4035 Paul Carroad 6190 Jennifer Milburn 4817 Patrick Shopbell 4097 Richard Walters 5780 118 Cahill Phone 8882 144 Cahill Phone 8883 Name Office 808/881- Randy Campbell x3867 Al Conrad X3812 Scott Dahm X3847 Bob Goodrich X3869 Grant Hill X3865 Marc Kassis X3669 Jim Lyke X3673 Hien Tran X3807 Greg Wirth X3866 24 9.7. Miscellaneous 9.7.1. Time Difference: The Keck telescopes are located in the Hawaii Standard Time zone which is -3 hours Pacific Daylight Time (PDT), -2 hours Pacific Standard Time (PST) and -10 hours Coordinated Universal Time (UTC). 9.7.2. Fire Alarm: In the event of a fire alarm the remote observer is required to leave the building until the alarm has ended or the fire department has given the all clear. You should warn the summit of your situation. 9.7.3. What to do if you get Locked Out of the Remote Observing Facilities: Remote observers should note that the ROF are locked at all times and can’t be unlocked without a key. In the event that an observer is locked out of the ROF and it is before 9pm on a weekday, locate Richard Walters in room 136 Cahill and he will let you back in. If it is after 9pm you may try to locate an astronomy graduate/faculty on the 2nd floor, their keys should work for both 118 and 144 Cahill. 9.8. Using the iCrystal portable speakers. The remote observing rooms now come equipped with a portable speaker system that can be used with iPhones and iPods or any device that uses a 3.5mm standard headphone jack. If you are using an iPhone or iPod simply place the device on the cradle and start the music player. If you are using the 3.5mm headphone jack, connect the cord to your device and make sure the speakers are on. Sound should be played automatically. 25 10. Troubleshooting: Problem Step1 Step 2 Step 3 The TV has a blank screen. Check that the power is on. The power switch is located on the bottom left corner Check that the Polycom has power. The unit is on when the led is blue. If its yellow then it's in sleep mode Using the tv remote make sure that the tv is set to Component Remote observing site does not answer polycom. Hang up call and try again Try calling another remote observing site. If the call goes through call the original remote site and make sure the polycom is powered up on their end Unable to log into local computer Make sure that you are using the correct username and password. Consult the remote observing manual for these Try logging into the other remote observing computer. If successful then try switching the ethernet ports to determine if it is just a bad port. If so report to IMSS Computer desktop has no control panel. If using the gnome enviroment logout through the terminal by typing gnome-sessionsave --force-logout 26 kvnc scripts hang If the script has not been active for 5 or more minutes and shows no errors, hit ctrl-c and restart it if problem still persists and it's day time find out if the vnc servers are offline for maintenance and when they will be back up Polycom works but are unable to log onto the remote side Check that there is no maintenance going on Try pinging a remote computer using it's DNS name and also it's ip address. If only the ip address gets a return then call for assistance kvnc script does not work at all Check that you are correctly logged in under the right user name (remuser) Make sure that you are using the proper terminal commands. These can be found in section 6.1 If you get a response from both methods then try logging into a different vnc account. If the other accounts comes up contact your support astronomer and inform them of the situation with your account. 27 Appendix A Step by Step Screen Guide to Starting a Keck VNC Instrument Session The following guide shows how to bring up the control VNC windows for the lris instrument. It uses account number 1. Passwords are omitted in the guide but can be found in the remote observing manuals. 28 Document Change Log 17 June 2009: v3.0 of the ROF Manual 27 June 2009: v3.0.1 added Palomar polycom addresses, some figure & captions, mods from RSW 29 Jun 2009: v3.0.2 deleted redundant paragraph and formatted tables. 06 July 2009: v3.0.3 Added text boxes, and added KI remote observing section 07 August 2009: v3.0.4 Updated the passwords and procedure to undo typing mistakes in vnc pop-up window. 06 October 2009: v4.0.0 Updated the log on procedure for starting a remote vnc session. 08 December 2009: v4.1.0 Updated the passwords. 05 April 2010: v4.1.1 Updated Polycom instructions for room 144 9 May 2010: v4.1.2 Updated the sftp login procedure. 02 December 2010 : v5 Updated the procedure for requesting observing night, how to work the polycom, and the polycomip addresses. Included a section on how to print to the computers in each room and how to use the web scanner. Changed the account from remuser1 to remuser2. Added section numbers. Added other support information. Extensive format cleanup. 14 January 2011: v5.0.3 Redacted password construction information 18 February 2011: v6.0dev Initial integration of Palomar Remote Observing information 6 July 2011: v6.2 Updated passwords for the firewall and for the manhattan computer 28July Updated all the passwords for the local machines, added instructions on using the sound bars(6.4), adjusted the long distance calling instructions to now indicate that user who do not already have a comfac number will need to use calling cards. 14 February 2012: Added Trouble shooting section 22 August 2012: Complete rework of the Palomar section to support TSPEC,DBSP and WIRC instruments for remote operations 10 September 2012: Added instructions for selecting new desktop environments. Removed Keck interferometer section from manual. 12 January 2013 Added Appendix A showing an example kvncinst session 13 October 28th updated support astronomer information added webversion screen guide. 29 30