1
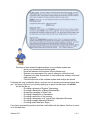
I’mOnIt! Quick Start Guide
Version 5.6
Table of Contents
Contents
Table of Contents ................................................................................................. 2
Welcome! .............................................................................................................. 3
Terminology ......................................................................................................... 5
Basic Relationship of Fixed Asset, Class, Job and Consumption ...................... 7
Workflow Diagram .............................................................................................. 8
Putting I’mOnIt! to Work for You ..................................................................... 9
A Typical Daily Operating Scenario ............................................................................................9
Organize your data according to your Operations Model ........................................................... 12
Walk-thru ............................................................................................................14
Setting Up the System ............................................................................................................... 14
Controlling the Cycle ................................................................................................................ 16
Control Panel ......................................................................................................16
System Navigation...............................................................................................17
Command Buttons..................................................................................................................... 17
Search Button............................................................................................................................ 18
How to use the Search Button ............................................................................................ 18
Keep in mind .......................................................................................................20
Version 5.6
Welcome!
I’mOnIt! is the most cost effective, easy-to-use, equipment and facilities maintenance &
compliance management system available. It's simplicity and flexibility allows you to
address a fundamental reality of every enterprise. You have resources that you need to
keep in proper order. These resources will deplete and wear through operations. You
could use an assistant to keep things running smoothly. If you know the level of their
use, you can be proactive in maintaining those resources to prevent unscheduled
breakdowns that create havoc with productivity. And while your at it, why not use the
same system to process ad hoc requests for service and provide an automatic audit trail
of your efforts to keep in compliance of regulations and corporate policy. I’mOnIt!
schedules jobs, prints work orders, captures and reports costs & activity for equipment
and events of all types. I’mOnIt! can forecast personnel and material requirements so
that you can better plan your operations. I’mOnIt! reminds you when inspections,
insurance and license renewals are due and even schedules follow-ups if desired, to
help insure completion and customer satisfaction. Non-scheduled task activity & costs
can be captured so that all costs are available for analysis and reporting. I’mOnIt! with
its broad array of E-mail capabilities allows your colleagues to request services,
provides you with the capabilities to send Work Orders, notes and observations,
reference documents and photos to keep all involved parties informed.
The purpose of this Quick Start Guide is to present in a concise fashion, the
basic functions that I’mOnIt! provides and the manner in which you can directs these
functions to improve the efficiency of your operations. The User Manual (which is also
contextually embedded in the product) provides a comprehensive presentation of the
product’s functions and features.
Version 5.6
~3~
The keys to the successful implementation of any software system are:
- Know your operations and desired goals
- Know the features and functions of the software tools
- Examine your processes & be open to change to utilize the tools
- Organize your data & processes to best match the software tools and
meet your goals
- Follow the process of the software system and analyze the results
Following the ‘keys’ presented above, we know no one knows your business better than
you. We want to focus on you quickly getting up to speed on the basics of I’mOnIt!.
We will do this by:
- Providing a glossary of System Terminology
- Providing a description of Basic Relationships
- Presenting a diagram of Work Flow
- Providing a description of Operations
- Providing a walk-thru of the controls
- Providing a description of a Typical Daily Operations Scenario
- Providing example Operations Models
- Providing Initial Data Input Steps
If you have reviewed the product and feel comfortable with the basics, feel free to move
on to the walk-thru.
Version 5.6
~4~
Terminology
Four basic data organization terms:
Fixed Asset This is the individual piece of equipment or item that has work
(shown as FA#) performed upon it. You provide the descriptive designation that
makes sense for your operation and the system will keep track of
the activity and costs against this FA#. FA# of PU-Ford-99-12345
would be suitable the Ford Pick-up Truck with a license plate of
12345. For H.R. compliance items, each person or personnel
groups can also be assigned a descriptive FA#. Facilities that
require maintenance tasks could just be their name, for example
WalkerBuilding
Class (shown as Each Fixed Asset must belong to a Class. Class grouping of
Class) Fixed Assets is key to reducing the “setup” work load and
streamline the formulation of meaningful reports. With all similar
Fixed Assets in the same Class you can define a Job one time
and have it automatically apply to all Fixed Assets in that Class.
Grouping items with similar maintenance, like trucks, forklifts, etc.
into their own Class reduces the setup effort.
Note: It is highly recommended that you set the System Master to
automatically assign a unique identifier, Class#, so that you just
work with the descriptive Class Name that you assign (it’s easier to
remember).
Job (shown as A Job is the list of work steps to be performed for a maintenance
Job#) procedure on a Fixed Asset. The Job# is a unique numeric
identifier within any Class. An example might be Job# 1001 ,
Job Name Engine3000 mi Service This one Job can be “bound”
to any number of Fixed Assets (i.e. many Ford vehicles have the
same procedure for 3000 mi service)
Note: It is highly recommended that you set the System Master to
automatically assign a unique identifier, Job#, so that you just work
with the descriptive Job Name that you assign (it’s easier to
remember).
Task When a Job is due for execution, this instance of the Job is termed
a Task.
For example, when the appropriate mileage has
accumulated on the Ford Pick-up Truck, the I’mOnIt! Control Panel
schedules the Task of the Engine3000 mi Service . The Work Order
for this Task will show all of the work steps copied from the Job
which serves as a template for this Task. (think of the Task as a
'Photocopy' of the Job. The Task gets 'used and passed around'
whereas the Job is the master sheet that 'stays in the book')
Version 5.6
~5~
A few process terms that you should be familiar with:
Consumption Think of this as a user defined “unit of measure” of
Type 'usage'(consumption) of a Fixed Asset. It is monitored to determine
when it is time to perform a Task. Some common Consumption
Types are hours, miles, cubic yards, loads or ByCalendar. Each FA#
can have up to 4 different Consumption Types that are set in the
Class that it belongs to.
Frequency This value is the frequency between 'instances' of a 'scheduled' Job
associated with the Consumption Type. An example would be if the
Job concerned an Engine3000 mi Service, the Consumption Type
would be “miles” and the Frequency would be 3000 (miles).
Current This value represents the “current state” of a consumption 'clock' of a
Consumption Fixed Asset. For our Ford Pick-up truck this would be the odometer
Value reading for Consumption Type "miles". (For Consumption Type
"ByCalendar", the current value is internal and not visible to the user).
Last This value is a “snapshot” of the Consumption Value associated with
Completed the Consumption Type as of the last time this Job was performed on
this Fixed Asset. The example of our Ford Pick-up truck. The
Engine3000 mi Service was last completed at 33,000 miles. The
Current Consumption Value is 35,000 miles. We would expect the Task
to be generated when the system was notified that the mileage reached
36,000 miles.
Version 5.6
~6~
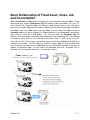
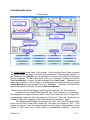
Basic Relationship of Fixed Asset, Class, Job
and Consumption
When a Fixed Asset is established it must belong to a grouping element termed Class. Proper
setup would have ‘similar’ Fixed Assets, (FA) be members of the same Class. Ex.) Chev_07,
Chev_08 and Ford_09 would be FAs in the Class we established as Delivery_Vans. With this in
place, we can setup a Job, associated with the Class, and that Job will then apply to all FAs in
that Class. (and to any FAs entered into that Class at a later date) This Job is termed a
Classwide Job and it will be triggered for Task scheduling by the designated Consumption
Type (Clock) in each FA in that Class . Ex. We can setup two Classwide Jobs for
Delivery_Vans (Oil change- every 5000 miles & Winterize- Every September 30th ) The ‘Mileage
Consumption Clock’ and the ‘By Calendar Consumption Clock’ in each of the Chev_07,
Chev_08 and Ford_09 will trigger a scheduling instance of the Job (a Task) as the FA’s own
condition would dictate. You can setup any number of regular Jobs for each individual Van,
and the system will schedule those Tasks based on the consumption recorded for that Van. In
addition to scheduled Jobs, you can handle non-scheduled Jobs (like "Immediate Job" &
“Demand Job”) for immediate execution. Very powerful, indeed.
Version 5.6
~7~
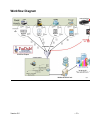
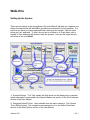
Workflow Diagram
Version 5.6
~8~
Putting I’mOnIt! to Work for You
A Typical Daily Operating Scenario
Let’s assume we come in first-thing in the morning and activate I’mOnIt! From the
Guide Screen you activate the Control Panel. The Control Panel will check the
parameters of all Fixed Assets, compile a list of Tasks that need attention and display
them with an icon and color scheme that indicates the timeliness of the Task. Some of
these are new Tasks, but many of them are from prior days. As a supervisor, this is
your starting point.
Get your Technicians started for the day
If you have Classes that include the automated consumption feature you will respond to
the System prompt when I’mOnIt! initiates or click the [Automate Consumption] button
when you decide it is the proper time to check for new Tasks. The Control Panel task
list will now include Tasks that have been triggered by Automated Consumption.
Review the Control Panel task list to see if there are Tasks that you want to cancel. If
so, checkmark them and click the [Cancel Task] button. These Tasks will have their
associated values reset, be recorded in history as ‘cancelled’, and will disappear from
the display. Now, review the list of Tasks on the Control Panel, consider your staffing,
desired work load, and priority of the items presented. To balance the load you can
easily change Technicians assigned to the Tasks if desired.
If you see Tasks that you want to give a “heads-up” to the Technician about some
“gotchas”, checkmark the Tasks, one at a time, and click on the [Task Information]
button under the Task Info Panel, where you can enter custom notes that will show on
the Work Order, and add e-mail address if you want to e-mail copies of the Work Order,
or attach documents to email with the Work Order.
The [Set Filter] button allows you change the criteria so that you can focus on the items
of interest. Clicking the column heading will cause the items to be displayed
alphabetically according to the entries in that column.
Now you can checkmark all of the Tasks for which you wish to produce Work Orders,
click the [Print Work Order] button or [E-Mail Work Order] button and Work Orders will
be produced and the Task status set to "WO" (Work Order) . Distribute the Work
Orders to the Technicians
Input the equipment usage (Consumption)
If you have a stack of operator reports or driver logs that show the usage (consumption)
Version 5.6
~9~
of individual pieces of equipment (FA#), you can either: Click the [Enter Consumption]
button and select from a Grid of FA#s, to make a “Batch Entry” of Consumption (usage)
-or- go to the Fixed Asset screen and adjust the Current Consumption Values with the
new meter readings . .
Recognize that the entry of Consumption may ‘trigger’ additional Tasks to appear. You
can act on these now by Clicking the [Exit] button to close the Control Panel, re-activate
the Control Panel again and a refreshed Task list is presented. Or, you can have as
your plan, that these new Tasks are considered as part of tomorrow's new work
Process Completed Tasks
Review the stack of completed Work Orders from prior days, checkmark the Task list
entries on the Control Panel for those Tasks that have been completed. If you have
‘Completed Task Notes’, ‘Completed Task Documents’ or you want to e-mail a
completion notice, click the [Task Information] button and make the desired entries. If
you see from the Completed Work Order that additional costs or additional parts were
used, record these events with the [Task Costs] button & the [Task Parts] button. -or- If
your operating scenario generates many additional cost entries, use the [Enter Costs]
button for a “Batch Entry” approach to cost data capture. When all is as desired, click
the [Complete Task] button, for the line items that you have checkmarked. These Tasks
will now have their associated values reset, be recorded in history as completed, be rescheduled and will disappear from the Control Panel.
Ad hoc or Immediate need situations
There are always unplanned events that occur at a busy facility. Let's look at typical
situations and how you can use IOI to help you handle them. One type situation might
be that of a driver who notes on his log that the windshield is cracked. In this case the
maintenance manager would create a 'OneTime Job'. A Task would be scheduled for
the repair but it would not create a repeating, periodic schedule. If a Work Order is
required to meet an immediate need like a plumbing emergency, the maintenance
manager can click the [Immediate Job] button. If you have the 'Demand Job' feature
activated, your colleagues can e-mail work requests which automatically appear on the
Control Panel. You will also, more than likely, have after-the-fact events like 'on-theroad' breakdown repairs. You capture these costs and activities with the entry of a
'Quick Job'. Some of the Tasks on the Control Panel can be the result of you setting the
'Follow-up' reminder feature. This causes a Task to automatically appear at the
designated interval after the original Task is marked as completed. Their purpose is
typically to remind the manager to contact the client as a "Customer Satisfaction" item
(“We Care” gesture) or to serve as a Quality Control reminder to the supervisor to make
an inspection for work evaluation
Version 5.6
~ 10 ~
Planning Tool
With the Technicians busy at work and the daily operation cycle under control, the
maintenance manager can now use I'm On It! for planning.
Jobs that have an entry in the ‘Lead Days’ field, will generate Tasks that appear on the
Control Panel prior to their due date (termed "Upcoming Jobs"). This provides a daily
reminder to the manager to examine this Task and consider steps to insure that the
required resources will be available to accomplish this Task when it comes due.
To help with planning, you can Forecast requirements. Reports can be produced (or
you can export to Excel for further data manipulation) for tasks that will be coming due,
by clicking [Forecast Tasks] Button. You set the calendar out to a desired time-frame
(ex. 6 weeks), review the report to get an idea of the required skills (check vacation
schedules, etc. & give the guys a ‘heads-up’ ) This same process is available from the
[Forecast Parts] Button to allow you to determine what parts will be required in the
future and to get them ordered if necessary.
Evaluation Tool
You can place "Labor Requirement" items in the Parts Table in addition to standard
parts. You can set-up Jobs to automatically bind to these items. This provides a way to
measure performance opposite “Job Standards” that you can establish
Example
Xstdlabor_J1the standard hours that it should take to accomplish this task
Xstdcost_J1 the standard cost for this task
Hint: If you are a service enterprise using I'mOnIt! to manage your service
operations, you can incorporate this same thinking to create a “doublecheck” to insure
that you bill for all activity & parts. Checking to see that your guys do not inadvertently
“leave anything on the table” through sloppy practices.
Reports that can help you gauge productivity are:
[Reports]; All FA#; Event type= Completed;Pick Date range = This Week ; “Task
Hours and Dollars”
[Reports]; All FA#; Event type= Completed;Pick Date range = This Week ; “Parts
Usage”
[Reports]; All FA#; Event type= Completed;Pick Date range = This Week ; “Job
Compliance”
[Export];Select items you want; Produce any Excel Spreadsheet or Graph
Version 5.6
~ 11 ~
Organize your data according to your Operations Model
By organizing the items to be worked on, (Fixed Assets), the work to be done and the
criteria for scheduling , (Jobs), the features in I’mOnIt! will help you efficiently manage
these areas:
Equipment Preventive Maintenance
The Operations Manager wants to keep the equipment operating, plan shop activity,
and capture costs & warranty data
Facilities Operations & Compliance
The Facility Manager wants to plan their operations, keep track of costs, and
demonstrate
compliance to regulatory agencies and company policy
Service Business Management (Servicer Business Assistant)
The Business Owner wants to schedule & execute cyclical services, know what billable
items have been consumed, and keep their business “in front” of the customer. Emailing completion notes, pictures, and documents to build the demand for more
service. I’mOnIt! can be scheduled to e-mail promotional material to your customers
too!
To Manage Equipment Maintenance you can structure the data elements as such;
Classes
Class
Class
Class
Let IOI assign the Class# (System parameter Generate Class# [Y])
you provide useful Class descriptions like:
Loaders
Dumps
Compressors
Fixed Assets
You assign descriptive FA# (alpha & numeric) like:
FA# Dmp-Ford-99-12345 Dump Truck with Tag 12345
Jobs
Job
Job
Let IOI assign the Job# (System Parameter Generate Job# [Y])
you provide useful Job descriptions like:
Engine_Service5000_mi
Winterization
Of course you could break items into more detail and IOI would handle more of the
burden.
For Facility Management & Policy Compliance a data structure like this will work:
Classes
Version 5.6
Let IOI assign the Class# (System Parameter Generate Class# [Y])
~ 12 ~
Class
you provide useful Class descriptions like:
Facility
Fixed Assets
Locations and Buildings fit well in a Facility Management scheme
FA# Campus
FA# Grounds
FA# AdminBldg
FA# Building2
FA# Warehouse1
FA# HumanResources
Jobs
Job
Job
Job
Job
Job
Job
Let IOI assign the Job# (System Parameter Generate Job# [Y])
you provide useful Job descriptions like:
HealthDept_Reporting
Security_Weekly_Checklist
Fire_Suppression_Cert
Grounds_Summer_routine
Grounds_Winter_prep
HR_Skill_Certification
A Service Business could organize data along these lines;
Classes
[Y])
Let the IOI assign the Class# (System Parameter Generate Class#
you provide descriptive division names
Class PlumbingServiceDept
Class RestaurantServiceDept
Fixed Assets
Customer locations that you service work fine
FA# AIG 12th Street
FA# Chez Theo
Jobs
Let IOI assign the Job# (Generate Job# [Y])
you name each type of service you provide
Job RefrigSystemService
Job HeatingSystemService
Job NewConstService
Version 5.6
~ 13 ~
Walk-thru
Setting Up the System
There are documents in the Appendices of the User Manual that help you organize your
data in the fashion that will allow IOI to provide the most benefit to your operation. It is
best that you have your data organized before setting up the system. Take the 'walk
before you run' approach. To start, why not put in a dozen or so Fixed Asset with a
handful of Jobs and work with them to learn the process. Here are the steps that you
will follow to 'set-up' I'mOnIt!
1) System Settings 'Tool Tips' explain the field values on the display and a complete
screen description is presented in the System Master sub-section of the File Processes
section of the User Manual
2) Designate Default Printer (also available from the menu selection File\ System
Tools\ Define Printer) The complete screen description is in the Define Printer subsection of the Other Options section of the User Manual
Version 5.6
~ 14 ~
3) Enter Technicians There must be at least 1 Technician. You can use "Tech" for the
entire department if it suits your operation. A complete screen description is presented
in the Technician sub-section of the File Processes section of the User Manual.
4) Enter Class Every Fixed Asset must belong to a Class. Grouping 'similar' Fixed
Assets in the same Class can provide a significant reduction in Job input effort. A
complete screen description and presentation of issues to consider is presented in the
Class sub-section of the File Processes section of the User Manual.
5) Enter Fixed Assets A complete screen description is presented in the Fixed Assets
sub-section of the File Processes section of the User Manual.
6) Enter Parts A complete screen description is presented in the Parts sub-section of
the Parts Maintenance section of the User Manual.
7) Create ClassWide Job A complete description of this process is presented in the
Class sub-section of the File Processes section of the User Manual.
8) Create Standard Job The [Create Standard Job] Button takes you to the Fixed
Asset Screen, where, highlighted in the lower right-hand corner are the 3 methods of
creating Jobs. A complete description of this process is presented in the Fixed Asset
sub-section of the File Processes section of the User Manual.
9) Enter E-mail Settings 'Tool Tips' explain the field values on the display and a
complete screen description is presented in the E-Mail settings sub-section of the File
Processes section of the User Manual
10) Your Company Logo A complete description of how to put your company identity
on the product is presented in the Application Graphics Appendix.
== You're Set-up! ==
Once the system is set up, you will typically use the Guide Screen to input new items
and Jobs, produce reports and planning data, but much of your activity will be handling
active Tasks, ("Today's work") The Control Panel is ready to help.
Version 5.6
~ 15 ~
Controlling the Cycle
Control Panel
The Control Panel is the ‘Heart’ of the system. Every time the Control Panel is started
the system checks the state of all items and presents the Tasks requiring attention, in
the Task List. The Task List can be presented in various sorted order by clicking the
Column Headings. To learn more about a Task you “checkbox” that line and use the
Task Info Buttons to direct the data displayed in the Info Panel. Operations that
impact the collection of active Tasks or provide general system functions are termed
Action Buttons and are grouped below the Task List. General use Buttons that
appear throughout the System are termed Command Buttons.
Recall from the Work Flow Diagram that the typical ‘Lifecycle’ of a Task is like this:
It appears on the Control Panel when it is ‘Due’ to be acted upon. (‘Consumption’
has happened to a degree that the ‘meter’ in the Fixed Asset has hit the ‘Trigger’ that
was established when the Job was created) A ‘Photocopy’ of the Job (‘Worksteps’) is
created (a Task) and it appears on the Control Panel with a status of “Open”
The Maintenance Manager will checkbox the Task, Click the [Print Work Order]
button and the Work Order will be produced. The status will change to “WO”. (The
system can be set to skip this step and make it so that when a Task appears, it goes
directly to “WO” status and a Work Order is automatically e-mailed.). When the
Version 5.6
~ 16 ~
Technician ‘turns-in’ the Work Order as completed, the Maintenance Manager will
checkbox the Task, Click the [Complete Task] button, and the Task will be removed
from the display, be captured for history and (a ‘scheduled Job’) will be rescheduled
based on the characteristics of the Fixed Asset and your completion direction.
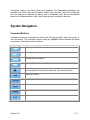
System Navigation
Command Buttons
Command buttons are activated by clicking the left mouse button when the cursor is
over the button. The command buttons used by I’mOnIt! follows standard Windows
conventions. The buttons work as follows:
Sends you to the first record
Sends you to the last record
Moves back one record
Moves ahead one record
Search for a specific record and set the Order in which the Arrow
buttons (above) will traverse the data base. (See example below)
Add a new record
Cancel your current action
Save the current record
Delete the current record
Exit from the current screen
Version 5.6
~ 17 ~
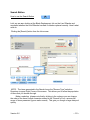
Search Button
How to use the Search Button
Let's say we were looking at the Blade Replacement Job on the Line1 Blender and
wondered whether the Line2 Blender has had it's blades replaced recently. Here's what
we'd do:
Clicking the [Search] button from the Job screen
NOTE: The items presented in the Search honor the "Browse Type" selection
Dropdown in upper Right Corner of the screen. This allows you to refine the population
of items that you browse through.
Make a selection (please note that by clicking in the columns you can change
the order of the items & each character entered in the "Search for" box narrows the
scope of items presented (type-a-matic search) This gets you though a large data pool
quickly
Version 5.6
~ 18 ~
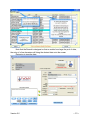
Note that the Search is designed so that no matter how large the pool of data,
the entry of a few characters will bring the desired data onto the screen
Returning to view the data.
Version 5.6
~ 19 ~
Keep in mind
You must have at least 1 Technician
set it to “Tech” if you want
Every Fixed Asset must belong to a Class
think about your operation, but you
could just have one, “Facility” if you
want
If you are going to assign Parts to Jobs
enter your Parts Master before entering
Jobs
When you enter a Job for the 1st time
you must set the “Last Completed”
value. the System will assume today or
0 and many times that is not what you
would like
When you create a ClassWide Job
if you want to ‘stagger’ the work, you
need to visit each Job/FA instance and
set the “Last Completed” value
Version 5.6
~ 20 ~