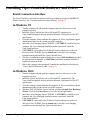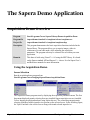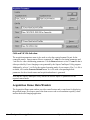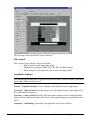
1
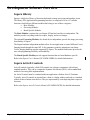
Coreco Inc. • 6969 Trans-Canada Hwy., Suite 142 • St-Laurent, Quebec, H4T 1V8 • Canada http://www.imaging.com Viper-CamLink User's Manual Part number OC-VIPM-CLU00 Edition 1.00 *OC-VIPM-CLU00 NOTICE © 2001 Coreco Inc. All rights reserved. This document may not be reproduced nor transmitted in any form or by any means, either electronic or mechanical, without the express written permission of Coreco Inc. Every effort is made to ensure the information in this manual is accurate and reliable. Use of the products described herein is understood to be at the user’s risk. Coreco Inc. assumes no liability whatsoever for the use of the products detailed in this document and reserves the right to make changes in specifications at any time and without notice. Microsoft and MS-DOS are registered trademarks; Windows, Windows NT, and Windows 2000 are trademarks of Microsoft Corporation. All other trademarks or intellectual property mentioned herein belong to their respective owners. Printed on: October 15, 2001 Document Number: OC-VIPM-CLU00 Printed in Canada Contents INTRODUCTION _________________________________________________________ 1 OVERVIEW OF THE MANUAL ........................................................................................ 1 ABOUT THE MANUAL ................................................................................................... 2 USING THE MANUAL .................................................................................................... 2 THE VIPER-CAMLINK ___________________________________________________ 3 ABOUT THE VIPER-CAMLINK ....................................................................................... 3 PCI Interface................................................................................................. 3 Area or Line-Scan Camera ........................................................................... 3 Pixel Processor ............................................................................................. 3 TAP Reversal................................................................................................. 3 CAB Architecture & System Topologies ....................................................... 4 Shaft-Encoder & Frame Reset I/O ................................................................ 5 Event Driven Captures .................................................................................. 5 Software Development .................................................................................. 5 System Requirements..................................................................................... 5 WHAT'S IN THE PACKAGE ............................................................................................. 6 DEVELOPMENT SOFTWARE OVERVIEW ........................................................................ 7 Sapera Library .............................................................................................. 7 Sapera ActiveX Controls ............................................................................... 7 INSTALLING THE VIPER-CAMLINK_______________________________________ 9 WARNING! (GROUNDING INSTRUCTIONS) .................................................................... 9 SAPERA LIBRARY INSTALLATION ................................................................................. 9 INSTALLING VIPER-CAMLINK HARDWARE AND DRIVER ........................................... 10 Board Connection Interface ........................................................................ 10 In Windows NT............................................................................................ 10 In Windows 2000......................................................................................... 10 Viper-CamLink Firmware Loader............................................................... 11 CONFIGURING THE VIPER-CAMLINK .......................................................................... 13 DISPLAYING VIPER-CAMLINK ONBOARD INFORMATION ............................................ 13 Viper-CamLink Viewer Windows ................................................................ 13 CONNECTING EMBEDDED PROCESSORS VIA CAB ...................................................... 16 CAMERA TO VIPER-CAMLINK CONNECTIONS ............................................................ 16 Viper-CamLink User's Manual Contents • i THE SAPERA DEMO APPLICATION_______________________________________ 17 ACQUISITION DEMO OVERVIEW ................................................................................. 17 Using the Acquisition Demo ....................................................................... 17 Acquisition Demo Main Window ................................................................ 18 CONFIGURING SAPERA ............................................................................................... 21 Viewing Installed Sapera Servers ............................................................... 21 VIPER-CAMLINK REFERENCE ___________________________________________ 23 VIPER-CAMLINK BLOCK DIAGRAM ........................................................................... 23 ACQUISITION .............................................................................................................. 24 Acquisition Modes....................................................................................... 24 Pixel Processor ........................................................................................... 24 Viper-CamLink Acquisition Constraints ..................................................... 25 Shaft Encoder Interface .............................................................................. 26 Virtual Frame Sync Interface...................................................................... 27 APPENDIX A: VIPER-CAMLINK SERVERS & RESOURCES __________________ 29 SERVERS AND RESOURCES ......................................................................................... 29 TRANSFER RESOURCE LOCATIONS ............................................................................. 30 APPENDIX B: TECHNICAL SPECIFICATIONS______________________________ 31 VIPER-CAMLINK SPECIFICATIONS ............................................................................. 31 CONNECTOR AND SWITCH LOCATIONS ...................................................................... 33 Connector List-CamLink Module................................................................ 34 Connector List-Main Board ........................................................................ 34 CONNECTOR AND SWITCH SPECIFICATIONS ............................................................... 34 Camera Link Connector View..................................................................... 34 J1: Camera Link Connector 1..................................................................... 35 J2: Camera Link Connector 2..................................................................... 35 J3: CamLink Module - RS-232 Port - Reserved.......................................... 36 J14: CamLink Module - I/O (LVDS) .......................................................... 36 SW1: Configuration & Test Switch ............................................................. 36 J7, J8, J13, J14: Not Applicable ................................................................. 37 J3: Pixel Processor Connector ................................................................... 37 J19, J21: Cab Interface............................................................................... 37 J500: General I/O ....................................................................................... 38 J22: Microcontroller Serial Port ................................................................ 38 Brief Description of Standards RS-232, RS-422, & RS-644 (LVDS) ......... 39 APPENDIX C: CAMERA LINK INTERFACE ________________________________ 41 CAMERA LINK OVERVIEW ......................................................................................... 41 Rights and Trademarks ............................................................................... 41 DATA PORT SUMMARY .............................................................................................. 42 CAMERA SIGNAL SUMMARY ...................................................................................... 42 CAMERA LINK CABLES .............................................................................................. 43 ii • Contents Viper-CamLink User's Manual APPENDIX D: TROUBLESHOOTING ______________________________________ 45 PCI CONFIGURATION ................................................................................................. 45 WINDOWS NT CONTROL PANEL DEVICES.................................................................. 46 LOG VIEWER .............................................................................................................. 48 OTHER TOOLS FOR WINDOWS NT .............................................................................. 49 SOLVING INTERRUPT ASSIGNMENT PROBLEMS (SWITCH 3 OF SW1) ......................... 49 CORECO IMAGING CONTACT INFORMATION____________________________ 51 SALES INFORMATION ................................................................................................. 51 Corporate Headquarters ............................................................................. 51 US Sales Office............................................................................................ 51 TECHNICAL SUPPORT ................................................................................................. 52 GLOSSARY OF TERMS __________________________________________________ 53 INDEX _________________________________________________________________ 55 Viper-CamLink User's Manual Contents • iii iv • Contents Viper-CamLink User's Manual Introduction Overview of the Manual The Viper-CamLink User's Manual covers the following topics: • The Viper-CamLink Description of the Viper-CamLink package and a brief summary of its capabilities. • Installing the Viper-CamLink Installation procedures for the Viper-CamLink board and driver under Windows NT or Windows 2000, as well as information pertaining to camera connectivity. • The Sapera Demo Application Using the Sapera Acquisition demo program to test the Viper-CamLink installation. • Viper-CamLink Reference Descriptions of Viper-CamLink hardware, block diagram, capabilities, optional components available, and configuration details. • Appendix A: Viper-CamLink Servers & Resources Specifications specific to the Sapera Imaging Library. • Appendix B: Technical Specifications Viper-CamLink and connector specifications. • Appendix C: Camera Link Interface Overview of the Camera Link specification. • Appendix D: Troubleshooting Tips for solving potential problems with the Viper-CamLink or software. • Coreco Imaging Contact Information Phone numbers, web site, and important email addresses. Viper-CamLink User's Manual Introduction • 1 About the Manual This manual exists in printed, compiled HTML help, and Adobe Acrobat (PDF) formats. The help and PDF formats make full use of hypertext cross-references and include links to the Coreco Imaging home page on the Internet, located at http://www.imaging.com, accessed using any web browser. For information specific to the Viper-CamLink, visit the Coreco Imaging web site at www.imaging.com/Viper-CamLink. Using the Manual File names, directories, and Internet sites will be in bold text (e.g., image2.bmp, c:\sapera, http://www.imaging.com). Text that must be entered using the keyboard will be in typewriter-style text (e.g., c:\temp). Menu and dialog actions will be indicated in bold text in the order of the instructions to be executed, with each instruction separated by bullets. For example, going to the File menu and choosing Save would be written as File•Save. 2 • Introduction Viper-CamLink User's Manual The Viper-CamLink About the Viper-CamLink The Viper-CamLink is a single PCI slot, high-performance acquisition and pre-processing board that captures images from digital cameras utilizing the industry standard Camera Link interface. Viper-CamLink supports all three Camera Link modes of operation (Base, Medium, and Full), allowing it to acquire images from one, two, four, or eight tap area and line-scan digital, monochrome, or RGB cameras. For additional Camera Link information see "Appendix C: Camera Link Interface" on page 41. PCI Interface The Viper-CamLink utilizes the Intel i960 RISC embedded processor and PCI interface device (PCI 2.1 compliant). An intelligent I/O controller, the i960 processor supports PCI bus master and scatter-gather for maximum PCI performance. Additionally, onboard memory allows images to be buffered during busy cycles on the PCI bus, ensuring no image data is ever lost. Area or Line-Scan Camera Capable of acquiring at rates up to 200 MB/sec, the Viper-CamLink features two 32-bit wide input channels providing 8, 16, or 32 bit/pixel formats. Acquiring pixels at 50MHz, the Viper-CamLink can transfer images directly into host computer system memory or to the Mamba via the CAB. The Viper-CamLink supports input resolutions from 32x32 to 64K pixels x 256K lines. Pixel Processor The Pixel Processor optional daughter card provides optimized hardware based image processing functions. The board features up to 64 MB of memory and a firmware programmable processor core. Acquired image data is pre-processed (filter, average, compress) before transfer to the host computer or a Mamba-100 (via the CAB). TAP Reversal Viper-CamLink supports a variety of multi-tap, tap reversal, and 4 quadrant cameras. Two variations on such data output formats are illustrated in the figure below. Viper-CamLink User's Manual The Viper-CamLink • 3 D ata out of C am era tap 1 R asterized D ata G rabbed tap 2 R asterization of 2 output center-tap form at cam eras D ata out of C am era tap 1 tap 3 R asterized D ata G rabbed tap 2 tap 4 R asterization of 4 quadrant output form at cam eras CAB Architecture & System Topologies The Coreco Auxiliary Bus (CAB) is an independent high-speed 32-bit wide data transfer bus that facilitates connections to the Mamba-100, Coreco Imaging’s embedded vision processor, or to our dedicated hardware accelerator, the Pixel Processor. The CAB system on the Viper-CamLink is designed to operate in two different configurations. These topologies allow developers to adapt their image processing algorithms to leverage multiple parallel processors or pipeline processing techniques to gain a significant increase in processing performance. For information concerning configuring and programming CAB transfers, see the Sapera CAB User's Manual (OC-SAPM-CABU0). Multicast Mode The CAB multicast mode sends images for concurrent processing from the Viper-CamLink to several Mamba-100 boards simultaneously. Multicast mode is also used for pipeline processing. Round Robin Mode The CAB Round Robin mode sends successive images from a Viper-CamLink to different Mamba-100 boards in the system for concurrent processing. For example, the Viper-CamLink while grabbing continuously transfers the first image to the first Mamba, the second image to the second Mamba, and so on, so that each Mamba has more then one frame time to complete the required processing. For information concerning configuring and programming CAB transfers, see the Sapera CAB User's Manual (OC-SAPM-CABU0). 4 • The Viper-CamLink Viper-CamLink User's Manual Shaft-Encoder & Frame Reset I/O Viper-CamLink features LVDS quadrature-shaft encoder inputs that facilitate accurate imaging using linescan cameras. Applications such as web inspection often require use of synchronization signals that match acquisitions to web speed. A LVDS or TTL Frame Reset input is available for camera control of event driven imaging. Viper-CamLink additionally provides TTL signal general-purpose I/Os for external process control and synchronization. Event Driven Captures Machine vision systems do not tolerate delayed operating system responses to real-world trigger events. The Viper-CamLink i960 system controller initiates command sequences providing an immediate response to external events. For example, on a trigger, the Viper-CamLink can reset the camera, grab the image data, and notify the host of the image in memory. Software Development Viper-CamLink applications are developed under Windows NT, Windows 2000, and Windows NT Embedded using the Coreco Imaging Sapera software development libraries. Coreco Imaging software development tools allow users to develop applications with C language DLLs, C++ classes, or ActiveX controls on Microsoft Visual C/C++ 6.0 (or higher) or Visual Basic 6.0 (or higher) development platforms. System Requirements The Viper-CamLink requires an Intel Pentium II/III or compatible computer system with 128MB of system memory and one free full-length PCI local bus slot (5 volt). The PCI bus must comply with the PCI 2.1 specification, supporting bus master devices and PCI burst mode data transfers. Viper-CamLink User's Manual The Viper-CamLink • 5 What's in the Package Viper-CamLink Package Item Product Number Viper-CamLink Frame Grabber - 8MB OC-VIP0-D0300 Sapera version 4.00 Sapera Imaging Development Library includes: 1. Sapera LT: Provides everything you will need to build your imaging application 2. Sapera: Over 600 optimized image processing routines 3. Current Sapera compliant board hardware drivers & documentation Option Modules Item Product Number Pixel Processor: OC-COB1-PP000 A multi-function processing engine capable of processing pixel data at rates up to 200MB/sec for realtime point-to-point, neighborhood, statistical, and morphological operations. Cables Item Product Number Camera Link Video Input Cable: 1 meter 2 meter OC-COMC-CLNK0 OC-COMC-CLNK6 LVDS I/O cable assembly (26-pin header to bracket assembly) OC-VIPC-CLGIO CAB interconnect cable for interfacing a Viper series board to a Mamba-100 or a Python. OC-COMC-CAB52 CAB interconnect cable for interfacing a Viper series board to two Mamba-100s. OC-COMC-CAB03 Contact Coreco Imaging for more supported CAB device combinations. 6 • The Viper-CamLink Viper-CamLink User's Manual Development Software Overview Sapera Library Sapera is a high-level library of functions dedicated to image processing and machine vision. The library API (Application Programming Interface) is composed of a set of C-callable functions classified into different modules that belong to one of three categories: • Basic Modules • Processing Modules • Board Specific Modules The Basic Modules constitute the core Sapera API and are board device independent. The modules provide everything needed to acquire, display, and access images. The optional Processing Modules, also board device independent, provide the image processing functionality of Sapera. The Sapera hardware independent modules allow for one application to control different Coreco Imaging boards through the same API. It also guarantees seamless migration to any future Coreco Imaging hardware product supported by Sapera. The modular architecture provides the user with programming flexibility and readability. The Board Specific Modules provide support functions that are board hardware specific. Refer to the Sapera User’s Manual (OC-SAPM-USER0) for detailed information. Sapera ActiveX Controls ActiveX controls (originally called OLE controls) are software components with a binary standard interface. They can be compared to dynamic link libraries (DLL) with a standardized method of accessing their implementation. An ActiveX control must be contained within an application called an ActiveX Container. Typically, ActiveX controls are inserted into a form or a dialog window and used as a standard control such as a button or an edit box. They are represented by icons depicting their respective functions. Refer to the Sapera ActiveX Controls Manual (OC-SAPM-AXCP0) for detailed information. Viper-CamLink User's Manual The Viper-CamLink • 7 8 • The Viper-CamLink Viper-CamLink User's Manual Installing the Viper-CamLink Warning! (Grounding Instructions) Static electricity can damage electronic components. Please discharge any static electrical charge by touching a grounded surface, such as the metal computer chassis, before performing any hardware installation. If you do not feel comfortable performing the installation, please consult a qualified computer technician. Never remove or install any hardware component with the computer power on. Installing Modules on the Viper-CamLink Any add-on modules, such as the Pixel Processor, must be installed on the Viper-CamLink board before being installed into a computer system. Sapera Library Installation Note: to install Sapera and the Viper-CamLink device driver, logon to the workstation as an administrator or with an account that has administrator privileges. The Sapera Development Library (or ‘runtime library’ if application development is not being performed) must be installed before the Viper-CamLink device driver. • Insert the Coreco Imaging Sapera CD-ROM. If AUTORUN is enabled on your computer, the Coreco Imaging installation menu is presented. • If AUTORUN is not enabled, use Windows Explorer and browse to the root directory of the CD-ROM. Execute launch.exe to start the Coreco Imaging installation menu and install the required Sapera components. • The installation program will prompt you to reboot the computer. Refer to Sapera User’s Manual for additional details about Sapera. Viper-CamLink User's Manual Installing the Viper-CamLink • 9 Installing Viper-CamLink Hardware and Driver Board Connection Interface The Viper-CamLink is sold with one interface bracket providing two Camera Link MDR-26 female connectors. See "Connector and Switch Specifications" on page 34. In Windows NT 1. 2. 3. 4. 5. 6. 7. Turn the computer off and open the computer chassis to allow access to the expansion slot area. Install the Viper-CamLink into a free full-length PCI expansion slot. Viper-CamLink supports the plug and play automatic configuration of the PCI specification. Close the computer chassis and turn the computer on. Driver installation requires administrator rights for the current user of the computer. Insert the Coreco Imaging Sapera CD-ROM. If AUTORUN is enabled on your computer, the Coreco Imaging installation menu is presented. Install the Viper-CamLink driver. If AUTORUN is not enabled, use Windows Explorer and browse to the root directory of the CD-ROM. Execute launch.exe to start the Coreco Imaging installation menu and install the Viper-CamLink driver. The driver installation program prompts you to select a Full Installation (needed for application development), or a Run Time installation (minimal installation required for target systems). Reboot the computer when prompted. Continue the installation as described in “Viper-CamLink Firmware Loader” on page 11. In Windows 2000 1. 2. 3. 4. 5. 6. Turn the computer off and open the computer chassis to allow access to the expansion slot area. Install the Viper-CamLink into a free full-length PCI expansion slot. The Viper-CamLink supports the plug and play automatic configuration of the PCI specification. Close the computer chassis and turn the computer on. Driver installation requires administrator rights for the current user of the computer. Windows 2000 will find the Viper-CamLink and start its Found New Hardware Wizard. Click on the Cancel button to close the Wizard Application. Insert the Coreco Imaging Sapera CD-ROM. If AUTORUN is enabled on your computer, the Coreco Imaging installation menu is presented. Install the Viper-CamLink driver. If AUTORUN is not enabled, use Windows Explorer and browse to the root directory of the CD-ROM. Execute launch.exe to start the Coreco Imaging installation menu and install the Viper-CamLink driver. 10 • Installing the Viper-CamLink Viper-CamLink User's Manual The driver installation program prompts you to select a Full Installation (needed for application development), or a Run Time installation (minimal installation required for target systems). 8. Reboot the computer when prompted. During the early stages of the Windows 2000 reboot, the Viper-CamLink firmware loader application starts. This is described in detail in the following section. Allow Windows to complete its reboot before proceeding. 9. Windows will display its Digital Signature Not Found message. Click on Yes to continue the Viper-CamLink driver installation. 10. Continue the installation as described in “Viper-CamLink Firmware Loader” on page 11. 7. Viper-CamLink Firmware Loader After Windows boots, the Firmware Loader program automatically executes. Click OK to automatically update the Viper-CamLink firmware. Note: if you are certain that the Viper-CamLink firmware is of the same version as the driver being installed, click on Cancel to bypass the update procedure. Choose a manual firmware upgrade when you have multiple Viper-CamLink boards installed and you want to select which board (from all installed in the computer) gets the firmware update. Viper-CamLink User's Manual Installing the Viper-CamLink • 11 Firmware Loader Status Window The figure below shows the Firmware Loader program’s status screen (with one Viper-CamLink installed). Information on all installed Viper-CamLink boards, their serial numbers, and their firmware components are represented. Additionally, a progress bar shows firmware programming status and a report tab lets the user view or print the firmware loader status report. When selecting a manual firmware update, the status windows permit selections via check boxes (shown below each board) allowing the installed Viper-CamLink to be reprogrammed. Note: the Firmware Loader status report may be requested by Coreco Imaging Technical Support to aid in troubleshooting installation or operational problems. 12 • Installing the Viper-CamLink Viper-CamLink User's Manual Executing the Firmware Loader from the Start Menu If required, the Viper-CamLink Firmware Loader program is executed via the Windows Start Menu shortcut Start•Programs•Coreco Imaging•Viper-CamLink Device Driver•Firmware Update. Run the Firmware Loader when adding or changing Viper-CamLink boards that do not have the current firmware. Configuring the Viper-CamLink The Viper-CamLink has no configuration program per se. Refer to the Sapera User’s Manual (OC-SAPM-USER0) for more information on configuring and developing applications with the Sapera library. Displaying Viper-CamLink onboard information The Viper-CamLink viewer program (VCamLinkView.exe) displays information about the firmware and hardware components of the Viper-CamLink board detected in your system. Run the program via the Windows Start Menu shortcut Start•Programs•Coreco Imaging•Viper-CamLink Device Driver•Viewer. Viper-CamLink Viewer Windows If multiple Viper-CamLink boards are installed, each one is represented by a different 1st level tab. The figure below shows one detected Viper-CamLink board identified as 'Viper-CamLink 1'. Viper-CamLink User's Manual Installing the Viper-CamLink • 13 Buttons located at the bottom of the window are common for all sub-tabs. The Save Settings Now button stores the file path of custom firmware components manually installed (as described in following sections on the accompanying sub-tabs). The Save Settings on Exit check box performs similarly when the Viewer program is closed. The Save Board Info button saves all board information into a text file. Finally, the Reset button allows you to reset the board currently selected. Close all Sapera applications using resources from the board before resetting it. Note: the Viper-CamLink Viewer report generated by the Save Board Info button may be requested by Coreco Imaging Technical Support to aid in troubleshooting installation or operational problems. Main Info For each board, the Main Info tab displays information relating to the Viper-CamLink board issue, revision, and ECO (engineering change order) level, along with the board serial number and optional ECO or CMI (customer modification instruction) applied. The Additional Information window displays supplemental design data about the Viper-CamLink. 14 • Installing the Viper-CamLink Viper-CamLink User's Manual Main Board The Main Board/Info tab displays information relating to the Viper-CamLink onboard firmware. The scroll window named Content provides firmware details such as version, release date, etc. Other tabs, such as Main Board/i960, provide the mechanism to manually upload custom firmware prepared by Coreco Imaging engineering for particular client solutions. The Browse button allows selecting custom firmware (path saved by the Save Settings button), while the Program button uploads the firmware to the Viper-CamLink. The Verify button checks the firmware checksum relative to its stored value. PixPro Info For Viper-CamLink boards with the optional Pixel Processor module installed, the PixPro Info tab displays information such as serial number and board revision of the Pixel Processor. Viper-CamLink User's Manual Installing the Viper-CamLink • 15 Connecting Embedded Processors via CAB For information concerning the installation and connection between a Mamba-100 and a Viper-CamLink via the CAB, see the Mamba-100 User's Manual (OC-MAMM-USER0). For information concerning configuring and programming CAB transfers, see the Sapera CAB User's Manual (OC-SAPM-CABU0). Camera to Viper-CamLink Connections Viper-CamLink 14 26 14 26 1 13 1 13 J1 J2 3M MDR 26 pin female connector 3M MDR 26 pin female connector The hardware installation process is completed with the connection of a supported camera to the Viper-CamLink board. The camera will have one or two Camera Link MDR-26 connectors plus a connector for an external power supply. Connect the camera to the Viper-CamLink J1 connector with a Camera Link cable. If required, connect the second camera connector to Viper-CamLink J2. Refer to section "Connector and Switch Locations" on page 33. Contact Coreco Imaging or browse our web site (www.imaging.com) for the latest information on Viper-CamLink supported cameras. 16 • Installing the Viper-CamLink Viper-CamLink User's Manual The Sapera Demo Application Acquisition Demo Overview Program Start•Programs•Coreco Sapera Library•Demos•Acquisition Demo Program file \sapera\demos\standard\vc\sacqdemo\release\sacqdemo.exe Project file \sapera\demos\standard\vc\sacqdemo\sacqdemo.dsp Description This program demonstrates the basic acquisition functions included in the Sapera library. The program allows you to acquire images, either in continuous or in one-shot mode, while adjusting the acquisition parameters. The program code may be extracted for use within your own application. Remarks This demo is built using Visual C++ 6.0 using the MFC library. It is based on the Sapera standard API and Sapera C++ classes. See the Sapera User’s and Reference manuals for more information. Using the Acquisition Demo Server Selection Run the acquisition demo program from Start•Programs•Coreco Imaging•Sapera•Demos•Acquisition Demo. The Acquisition Demo program starts by displaying the acquisition parameters menu. The first drop menu displayed permits selecting from any installed Sapera acquisition servers (installed Coreco Imaging acquisition hardware using Sapera drivers). The second drop menu permits selecting from the available input devices present on the selected server. In the following figure, the Viper-CamLink is the selected server along with itsand selected input device. Viper-CamLink User's Manual The Sapera Demo Application • 17 CAM and VIC file Selection The acquisition parameters menu is also used to select the required camera file pair for the connected camera. Sapera camera files are composed of *.cam files for timing parameters and *.cvi files for video conditioning parameters. Use the Browse button to select a *.cam file that is either provided by Coreco Imaging or one generated by the Sapera CamExpert Utility program. Additionally, select a *.vic file for the required operating mode of your camera. If no *.vic file is available, click on the Generate Default button. A vic file with corresponding default parameters for the selected camera and acquisition hardware is generated. Note that the Sapera CamExpert Utility can later be used to adjust cvi parameters for the required camera mode. Acquisition Demo Main Window The Acquisition Demo main window provides control buttons and a central area for displaying the grabbed image. Developers can use the demo source code as a foundation to quickly create and test the desired imaging application. 18 • The Sapera Demo Application Viper-CamLink User's Manual The following sections describe the various functions: File Control Three controls are provided for image file transfers. 1. New: Clear the current image frame buffer. 2. Load: Retrieves images in BMP, TIF, CRC, JPG, and RAW formats. 3. Save: Prompts for a file name, file save location, and image format. Acquisition Options Note that unsupported functions are grayed out and not selectable. Function support is dependent on the frame grabber hardware in use. General – Acquisition Settings: Allows enabling Viper-CamLink external trigger mode. Area Scan – Camera Control: Provides trigger, reset, and integrate control when supported by the current hardware and driver. Line Scan – Camera Control: Provides Line Scan camera controls such as external line/frame trigger selection, shaft encoder input selection, etc. when supported by the current hardware and driver. Composite - Conditioning: This dialog is not applicable to the Viper-CamLink. Viper-CamLink User's Manual The Sapera Demo Application • 19 Load CAM/VIC: Opens the dialog window Acquisition Parameters allowing the user to load a new set of camera files. This is the same window as when the Sapera Acquisition demo is started. Acquisition Control Click Grab - you will now see live digitized video from your video source. If your source is a camera, focus and adjust the lens aperture for the best exposure. Use a video generator as a video source to acquire reference images. Click Freeze - the Viper-CamLink will stop live grab mode. The grabbed image can be saved to disk via the File Control•Save control. Click Snap – a single video frame is grabbed. Abort – exits the current grab process immediately. If any video signal problem prevents the freeze function from ending the grab, click on the Abort button. General Options Buffer: Select from supported frame buffer counts, size, and types. Note: functions grayed out are not currently supported by the acquisition hardware. Count and Size: Provides selection of the number of frame buffers and the image size. Type – Contiguous: Frame buffers are allocated in contiguous system memory (single memory block - no segmentation). Type – Scatter-Gather: Frame buffers are allocated throughout system memory in noncontiguous memory (paged pool). Pages are locked in physical memory so a scatter-gather list can be constructed. This type allows the allocation of very large size buffers or large buffer count. 20 • The Sapera Demo Application Viper-CamLink User's Manual Type – Off-screen Video: The buffer is allocated in off-screen video memory and uses the display adapter hardware to perform a fast copy from video memory to video memory. Type – Overlay: The frame buffer is allocated in video memory where the display adapter overlay hardware uses color-keying to view the overlay buffer. Format: Allows selection of the frame buffer pixel type as supported by the hardware and driver. Configuring Sapera Viewing Installed Sapera Servers The Sapera configuration program (Start•Programs•Coreco Imaging•Sapera•Sapera Configuration) allows the user to see all available Sapera servers for the installed Sapera-compatible boards. The System entry represents the system server. It corresponds to the host machine (your computer) and is the only server that should always be present. As shown in the following screen image, server index 1 is the Viper-CamLink board installed. To update the server list, the Refresh button can be utilized at any time. The Contiguous Memory tab lets the user specify the total amount of contiguous memory to be reserved for Sapera objects allocation and Sapera messaging. The Requested value displays what has been requested while the Current value displays the amount of contiguous memory that has been allocated successfully. The current value for Sapera objects determines the total amount of contiguous memory reserved at boot time for the allocation of dynamic resources (e.g., buffers, lookup tables, kernel). Adjust this value according to your application's need for contiguous memory. The current value for Sapera messaging determines the total amount of contiguous memory reserved at boot time for the allocation of messages. This memory space is used to store arguments when a Sapera function is called. Increase this value if you are using functions with large arguments, such as arrays. Viper-CamLink User's Manual The Sapera Demo Application • 21 22 • The Sapera Demo Application Viper-CamLink User's Manual Viper-CamLink User's Manual 2 2 4 4 4 4 4 4 Shaft Encoder Frame Reset CLK + CLK - Data + Data - CLK + CLK - Data + Data - Camera 4 Control +/- TX +/RX +/- General I/O MDR26 #2 MDR26 #1 CLK + CLK - Data + Data - TTL I/O Controller LVDS ChannelLink Receiver ChannelLink Receiver LVDS Drivers and Receiver ChannelLink Receiver 28 28 24 RX TX UART Acquisition Control Unit Host PCI Bus i960RP Memory (64MB) Pixel Packer Pixel Packer MUX (optional) MUX Video to PCI Bridge Pixel Processor MUX To embedded Vision Processors CAB Viper-CamLink Reference Viper-CamLink Block Diagram Viper-CamLink Reference • 23 Acquisition Acquisition Modes The Viper-CamLink acquires at rates up to 200 MB/sec and features two 32-bit wide input channels providing 8, 16, or 32 bit/pixel formats. Acquiring pixels at 50MHz, the Viper-CamLink can transfer images directly into host computer system memory or to the Mamba via the CAB. The Viper-CamLink supports input resolutions from 4 pixels per tap by 32 lines to a maximum of 32K pixels by 256K lines. Variable frame rate capability allows data capture from high or slow frame rate cameras, where images are later analyzed or viewed. The Viper-CamLink is programmable, interfacing easily to a wide range of pixel clocks, vertical refresh rates, horizontal line rates, and scan type cameras. Viper-CamLink can reverse the data order acquired from each independent tap (or it can also reverse an entire image). Data reversal supports multi-tap cameras whose data output is reversed. Pixel Processor The Pixel Processor is an optional processing module designed for the Viper line of products as well as the Cobra/C6. It performs point-to-point and neighborhood operations on live images. Reference images can be acquired and stored in the pixel processor's onboard frame buffer for further operations. It also features a re-programmable processor unit with frame buffer memory that is used to buffer reference images, incoming images, and intermediate results. The Pixel Processor operates on pixels at rates up to 200 MB/sec. 24 • Viper-CamLink Reference Viper-CamLink User's Manual Viper-CamLink Acquisition Constraints DATA last8 first7 PCLK2 Pixel Clock Range: 20MHz up to 50MHz for 32-bits input LVAL/FVAL setup time1: Minimum 15ns LVAL3 (Hsync) Min/Max9 HB5 FVAL (Vsync) Min/Max4,9 VB6 1 The setup times for LVAL and FVAL are the same. Both must be high and stable before the rising edge of the Pixel Clock. 2 Pixel Clock must always be present. 3 LVAL must be active high to acquire camera data. 4 For line-scan cameras, the number of image lines must be a multiple of 32. 5 HB - Horizontal Blanking: 6 VB - Vertical Blanking: Minimum: 4 clocks/cycle Minimum: 1 line Maximum: no limits Maximum: no limits 7 First Active Pixel (unless otherwise specified in the CCA file – "Horizontal Back invalid = x" where ‘x’ defines the number of pixels to be skipped). 8 Last Active Pixel – defined in the CCA file under "Horizontal active = y" – where ‘y’ is the total number of active pixels per tap. Note: ‘y’ must be a multiple of 4. 9 Maximum Valid Data: 8-bits/pixel x 32K Pixels/line (LVAL) 16-bits/pixel x 16K Pixels/line (LVAL) 32-bits/pixel x 8K Pixels/line (LVAL) 64-bits/pixel x 4K Pixels/line (LVAL) 262,144 lines (FVAL) Viper-CamLink User's Manual Viper-CamLink Reference • 25 Shaft Encoder Interface Connector J14, dual balanced shaft encoder inputs: • • Input 1: Input 2: Pin 1 (PH0 +) & Pin 2 (PH0 -) Pin 3 (PH1+) & Pin 4 (PH1-) Web inspection systems with variable web speeds typically provide one or two synchronization signals from a web mounted encoder to coordinate trigger signals. These trigger signals are used by the acquisition line scan camera. The Viper-CamLink supports single or dual shaft encoder signals. Dual encoder signals are typically 90 degrees out of phase relative to each other and provide greater web motion resolution. When enabled, the camera is triggered and acquires one scan line for each shaft encoder pulse edge. To optimize the web application, a second Sapera parameter defines the number of triggers to skip between valid acquisition triggers. The figure below depicts a system where a valid camera trigger is any pulse edge from either shaft encoder signal. After a trigger the two following triggers are ignored (as defined by a Sapera parameter). K = Keep D = Drop or Skip K D D K D D K D D K D D K D D Shaft Encoder pulse #1 Shaft Encoder pulse #2 Line acquired Note: in this example, Number of trigger to drop = 2 Note that camera file parameters are best modified by using the Sapera CamExpert program. CVI File Parameters Used Shaft Encoder Enable = X, where: • If X = 1, Shaft Encoder is enabled • If X = 0, Shaft Encoder is disabled Shaft Encoder Pulse Drop = X, where: • X = number of trigger pulses ignored between valid triggers For information on Sapera Camera files (*.cam & *.cvi) see the Sapera Acquisition Modules Reference Manual (document number: OC-SAPM-AMR00). 26 • Viper-CamLink Reference Viper-CamLink User's Manual Virtual Frame Sync Interface The Virtual Frame Sync, when enabled, defines the start of a line scan acquisition into a frame buffer. Virtual Frame Sync is typically used with motion detectors or web object detectors. After receiving the frame sync, the Viper-CamLink starts the line scan acquisition and captures the number of lines specified by the frame buffer height. The Virtual Frame Sync can be TTL or RS-422 and be rising or falling edge active. The Virtual Frame Sync balanced inputs are on the Viper-CamLink connector J14 pin 5 (+) and 6 (-). The figure below depicts the synchronization signals for a virtual frame of 10 lines. FRAME RESET EXSYNC LVAL VIDEO Note: In this example, 10 lines are acquired The Maximum frame rate = Max. Line Rate / nb lines (Hz) Note that camera file parameters are best modified by using the Sapera CamExpert program. CVI File Parameters Used External Frame Trigger Enable = X, where: • If X = 1, External Frame Trigger is enabled • If X = 0, External Frame Trigger is disabled External Frame Trigger Detection = Y, where • If Y= 4, External Frame Trigger is active on rising edge • If Y= 8, External Frame Trigger is active on falling edge External Frame Trigger Level = Z, where • If Z= 2, External Frame Trigger is a RS-422/LVDS signal For information on Sapera Camera files (*.cam & *.cvi) see the Sapera Acquisition Modules Reference Manual (document number: OC-SAPM-AMR00). Viper-CamLink User's Manual Viper-CamLink Reference • 27 28 • Viper-CamLink Reference Viper-CamLink User's Manual Appendix A: Viper-CamLink Servers & Resources Servers and Resources Servers Resources Name Description Type Viper_CamLink_1 Viper-CamLink server Acquisition CAB Pixel Processor Viper-CamLink User's Manual Index: Name Description 0: Viper-CamLink Interface Digital acquisition device 0: Coreco Auxiliary Bus Coreco Auxiliary Bus 0: Pixel Processor Pixel Processor device Appendix A: Viper-CamLink Servers & Resources • 29 Transfer Resource Locations The following table illustrates all possible source/destination pairs in a transfer. The sources and destinations are presented vertically and horizontally respectively. Note: The transfer resource must always be located on the Viper-CamLink_1 server. Source Acquisition (Viper-CamLink_1) Destination Acquisition (Viper-CamLink_1) CAB (Viper-CamLink_1) Buffer (System) Pixel Processor (Viper-CamLink_1) no yes yes yes CAB (Viper-CamLink_1) no no no no Buffer (System) no no no no Pixel Processor (Viper_Digital_1) no yes yes no 30 • Appendix A: Viper-CamLink Servers & Resources Viper-CamLink User's Manual Appendix B: Technical Specifications Viper-CamLink Specifications General System Requirements for the Viper-CamLink • Pentium II/III or compatible computer systems with one free full-length PCI local bus slot supporting bus master devices (5 volt). • 33 MHz PCI bus clock for best performance. • Support of PCI burst mode for realtime acquisition into system memory. • Support of the PCI plug and play specification. Operating System Support Windows NT 4.0 SP6 and Windows 2000 SP1 Digital Video Input Number • 1 digital input (Camera Link – up to Full Mode) Pixel Format • Monochrome Up to 8 x 8-bit/pixel Up to 4 x 10-bit/pixel Up to 4 x 12-bit/pixel Up to 4 x 14-bit/pixel 1 x 16-bit/pixel • RGB 24-bit/pixel 30-bit/pixel • Progressive Multi-Tap Multi-Channel Four quadrant Tap reversal Scanning Viper-CamLink User's Manual Appendix B: Technical Specifications • 31 Resolution • Horizontal Minimum: 4 Pixels per tap • Horizontal Maximum: 8-bits/pixel x 32K Pixels/line 16-bits/pixel x 16K Pixels/line 32-bits/pixel x 8K Pixels/line 64-bits/pixel x 4K Pixels/line • Vertical Minimum: 32 lines • Vertical Maximum: up to 256K lines (262,144 lines) Sync and Control Pixel clock range • 20 MHz to 50 MHz for 32 bits total input 20 MHz to 25 MHz for 64 bits total input Viper-CamLink Physical Dimensions Approximately 12.25" W×4.125" H (31 cm W×10.5 cm H) [requires a full length PCI slot] Power Requirements +5 volts, 2.5 A Environment Ambient Temperature: 10° to 50° C (operation) 0° to 70° C (storage) Relative Humidity: 5% to 90% non-condensing (operating) 0% to 95% (storage) 32 • Appendix B: Technical Specifications Viper-CamLink User's Manual Connector and Switch Locations Viper-CamLink Connectors J10 J12 J6 J8 J7 J5 J4 J3 J1 J18 J17 J14 J2 J9 J11 Note that CamLink is shown attached to the main board with the connector side down. Viper-CamLink Main Board Connectors J500 J10 J12 J19 J6 J21 J22 J15 J14 J13 J504 J505 J11 Viper-CamLink User's Manual J24 J3 J8 J7 J9 SW 1 J16 J20 U37 Appendix B: Technical Specifications • 33 Connector List-CamLink Module Connector Description Connector J1 Camera Link connector 1 J3 J2 Camera Link connector 2 J4, J5 J6, J9, J10, J11, J12 J7, J8 Digital Camera Data transfer connectors to main board. RS-232 port – Reserved Reserved J14 Reserved Description Shaft Encoder/Frame Reset connector (right angle mount) J17, J18 Reserved Connector List-Main Board Connector J3 J7, J8, J13, J14 J6 J9, J10, J11, J12 SW1 Description Connector Description Pixel Processor Module Connector J16, J20, J24, J15 Reserved Reserved J19, J21 CAB Interface Camera Control Signals J22 Microcontroller Serial Port Digital Camera Data J500 General I/O Configuration & Test Switch J504, J505 Reserved Connector and Switch Specifications Camera Link Connector View Viper-CamLink 14 26 14 26 1 13 1 13 J1 J2 3M MDR 26 pin female connector 3M MDR 26 pin female connector 34 • Appendix B: Technical Specifications Viper-CamLink User's Manual J1: Camera Link Connector 1 Name Pin # Type Description BASE_X0- 25 Input Neg. Base Data 0 BASE_X0+ 12 Input Pos. Base Data 0 BASE_X1- 24 Input Neg. Base Data 1 BASE_X1+ 11 Input Pos. Base Data 1 BASE_X2- 23 Input Neg. Base Data 2 BASE_X2+ 10 Input Pos. Base Data 2 BASE_X3- 21 Input Neg. Base Data 3 BASE_X3+ 8 Input Pos. Base Data 3 BASE_XCLK- 22 Input Neg. Base Clock BASE_XCLK+ 9 Input Pos. Base Clock SERTC- 20 Output Neg. Serial Data to Camera SERTC+ 7 Output Pos. Serial Data to Camera SERTFG- 19 Input Neg. Serial Data to Frame Grabber SERTFG+ 6 Input Pos. Serial Data to Frame Grabber CC1- 18 Output Neg. Camera Control 1 CC1+ 5 Output Pos. Camera Control 1 CC2- 17 Output Neg. Camera Control 2 CC2+ 4 Output Pos. Camera Control 2 CC3- 16 Output Neg. Camera Control 3 CC3+ 3 Output Pos. Camera Control 3 CC4- 15 Output Neg. Camera Control 4 CC4+ 2 Output Pos. Camera Control 4 GND 1, 13, 14, 26 Ground J2: Camera Link Connector 2 Name Pin # Type Description MEDIUM _X0- 25 Input Neg. Medium Data 0 MEDIUM _X0+ 12 Input Pos. Medium Data 0 MEDIUM _X1- 24 Input Neg. Medium Data 1 MEDIUM _X1+ 11 Input Pos. Medium Data 1 MEDIUM _X2- 23 Input Neg. Medium Data 2 MEDIUM _X2+ 10 Input Pos. Medium Data 2 MEDIUM _X3- 21 Input Neg. Medium Data 3 MEDIUM _X3+ 8 Input Pos. Medium Data 3 MEDIUM _XCLK- 22 Input Neg. Medium Clock Viper-CamLink User's Manual Appendix B: Technical Specifications • 35 MEDIUM _XCLK+ 9 Input Pos. Medium Clock TERM 20 Term Resistor TERM 7 Term Resistor FULL_X0- 19 Input Neg. Full Data 0 FULL _X0+ 6 Input Pos. Full Data 0 FULL _X1- 18 Input Neg. Full Data 1 FULL _X1+ 5 Input Pos. Full Data 1 FULL _X2- 17 Input Neg. Full Data 2 FULL _X2+ 4 Input Pos. Full Data 2 FULL _X3- 15 Input Neg. Full Data 3 FULL _X3+ 2 Input Pos. Full Data 3 FULL _XCLK- 16 Input Neg. Full Clock FULL _XCLK+ 3 Input Pos. Full Clock GND 1, 13, 14, 26 Ground J3: CamLink Module - RS-232 Port - Reserved Pin Number Description 5 Serial IN 3 Serial OUT 9 Ground 1, 2, 4, 6, 7, 8, 10 not connected J14: CamLink Module - I/O (LVDS) Name Pin Number Description Shaft Encoder 0 + 1 Input SE0+ Shaft Encoder 0 - 2 Input SE0- Shaft Encoder 1 + 3 Input SE1+ Shaft Encoder 1 - 4 Input SE1- 5 Input Frame_Reset+ Frame Reset - 6 Input Frame_Reset- Reserved 7,8,9,10,11,12,15,16,1 7,18,19,20,21,22,23,25 Ground GND 1 Frame Reset + 13, 14, 24, 26 1. Type LVDS Frame Reset input is mutually exclusive with TTL Frame Reset input. SW1: Configuration & Test Switch 36 • Appendix B: Technical Specifications Viper-CamLink User's Manual 4 3 2 1 on Note: switch settings shown in factory default position. Switch Number Name Position Description 4 CFG0 ON Boot mode 3 CFG1 ON 2 CFG2 OFF Reserved 1 TEST ON Reserved OFF Function i960 boots from boot block i960 boots from application (default) PCI class Bridge device (default) OFF Multimedia device OFF Normal operation J7, J8, J13, J14: Not Applicable J3: Pixel Processor Connector See: Pixel Processor (page 24). J19, J21: Cab Interface See: The CAB User's Manual OC-SAPM-CABU0. Viper-CamLink User's Manual Appendix B: Technical Specifications • 37 J500: General I/O 2 1 4 3 ... ... 14 13 16 15 Pin Number Name Type 1 GIO_1 Output/Input 2, 4, 6, 8, 10, 12, 14, 16 GND 3 GIO_2 5 7 General IO Ground Output/Input General IO GIO_3 Output/input General IO GIO_4 Output/Input General IO 9 FRAME RESET Output Frame Reset Output 11 EXSYNC Output Control Frame Rate / Control Line Rate VOH=2.4V, VOL=0.4V, IOH=-4mA, IOL=12ma FRAME_RESET Input FORWARD/ REVERSE Output 1 13 15 1. Description Frame Reset - TTL level VIH = 2.0V, VIL = 0.8V IIH = 20µA, IIL =-0.6mA TDI Control (scan direction) VOH = 2.4V, VOL = 0.4V IOH = -4mA, IOl = 12mA TTL Frame Reset input is mutually exclusive with LVDS Frame Reset input. J22: Microcontroller Serial Port 10-pin male header connector. 9 10 7 8 5 6 3 4 Pin Number 1, 2, 4, 6, 7, 8, 10 1 2 Description Not connected 3 Receive* 5 Transmit* 9 Ground * RS232 standard 38 • Appendix B: Technical Specifications Viper-CamLink User's Manual Brief Description of Standards RS-232, RS-422, & RS-644 (LVDS) RS-232 Short for recommended standard-232C, a standard interface approved by the Electronic Industries Association (EIA) connecting serial devices. The standards for RS-232 and similar interfaces usually restrict RS-232 to 256kbps or less and line lengths of 15M (50 ft) or less. Transmitted Data (TxD) This signal is active when data is transmitted from the DTE device to the DCE device. When no data is transmitted, the signal is held in the mark condition (logic '1', negative voltage). Received Data (RxD) This signal is active when the DTE device receives data from the DCE device. When no data is transmitted, the signal is held in the mark condition (logic '1', negative voltage). DTE (Data Terminal Equipment) DCE (Data Communication Equipment) RS-422 RS-422 uses a twisted-pair wire (i.e., 2 wires) for each signal. The differential drive voltage swing is 0 to +5V. RS-422 does not have tri-state capability (its driver is always enabled) and it is therefore usable only in point-to-point communications. Although RS-422 is noise resistant, due to being differential data can still be damaged by EMI/RFI. A shielded cable can protect the transmitters/receivers from EMI/RFI. RS-664 (LVDS) LVDS (Low-Voltage Differential Signaling): method to communicate data using a very low voltage swing (about 350mV) over two differential PCB traces or a balanced cable. LVDS allows single channel data transmission at hundreds of Megabits per second (Mbps). Viper-CamLink User's Manual Appendix B: Technical Specifications • 39 40 • Appendix B: Technical Specifications Viper-CamLink User's Manual Appendix C: Camera Link Interface Camera Link Overview Camera Link is a communication interface for vision applications developed as an extension of National Semiconductor's Channel Link technology. The advantages of the Camera Link interface are that it provides a standard digital camera connection specification, a standard data communication protocol, and simpler cabling between camera and frame grabber. The Camera Link interface simplifies the usage of increasingly diverse cameras and high signal speeds without complex custom cabling. For additional information concerning Camera Link, see http://www.pulnix.com/CameraLink.html. Rights and Trademarks Note: The following text is extracted from the Camera Link Specification (October 2000). PULNiX America, Inc., as chair of this ad hoc Camera Link committee, has applied for U.S. trademark protection for the term "Camera Link" to secure it for the mutual benefit of industry members. PULNiX will issue a perpetual royalty-free license to any industry member (including competitors) for the use of the "Camera Link" trademark on the condition that it is used only in conjunction with products that are fully compliant to this standard. PULNiX will not require licensed users of the trademark to credit PULNiX with ownership. 3M™ is a trademark of the 3M Company. Channel Link™ is a trademark of National Semiconductor. Flatlink™ is a trademark of Texas Instruments. Panel Link™ is a trademark of Silicon Image. Viper-CamLink User's Manual Appendix C: Camera Link Interface • 41 Data Port Summary The Camera Link interface has three configurations. A single Camera Link connection is limited to 28 bits requiring some cameras to have multiple connections or channels. The naming conventions for the three configurations are: • Base: Single Channel Link interface, single cable connector. • Medium: Two Channel Link interface, two cable connectors. • Full: Three Channel Link interface, two cable connectors. A Camera Link port is defined as an 8-bit word. The "Full" specification supports 8 ports labeled as A to H. Camera Signal Summary Video Data Four enable signals are defined as: • FVAL Frame Valid (FVAL) is defined HIGH for valid lines. • LVAL Line Valid (LVAL) is defined HIGH for valid pixels. • DVAL Data Valid (DVAL) is defined HIGH when data is valid. • Spare A spare has been defined for future use. All four enables must be provided by the camera on each Channel Link. All unused data bits must be tied to a known value by the camera. Camera Controls Four LVDS pairs are reserved for general-purpose camera control, defined as camera inputs and frame grabber outputs. • Camera Control 1 (CC1) • Camera Control 2 (CC2) • Camera Control 3 (CC3) • Camera Control 4 (CC4) Note: the Viper-CamLink by default implements the control lines as follows (using DALSA Corporation terminology). (CC1) EXYNC (CC2) PRIN (CC3) FORWARD (CC4) HIGH 42 • Appendix C: Camera Link Interface Viper-CamLink User's Manual Communication Two LVDS pairs have been allocated for asynchronous serial communication to and from the camera and frame grabber. Cameras and frame grabbers should support at least 9600 baud. • SerTFG Differential pair with serial communications to the frame grabber. • SerTC Differential pair with serial communications to the camera. The serial interface protocol is one start bit, one stop bit, no parity, and no handshaking. Camera Link Cables For additional information on Camera Link cables and their specifications, visit the following web sites: 3M http://www.3m.com/us/electronics_mfg/interconnects/ (enter Camera Link as the search keyword) Nortech Systems http://www.nortechsys.com/intercon/CameraLinkMain.htm Viper-CamLink User's Manual Appendix C: Camera Link Interface • 43 44 • Appendix C: Camera Link Interface Viper-CamLink User's Manual Appendix D: Troubleshooting PCI Configuration The first item to verify when there is a problem with any PCI board is to examine the system PCI configuration and ensure that there are no conflicts with other PCI or system devices. The Coreco Imaging PCI Diagnostic program (cpcidiag.exe) allows examination of the PCI configuration registers and can save this information to a text file. Run the program via the Windows Start Menu shortcut Start•Programs•Coreco Imaging•Sapera•Tools•Coreco PCi Diagnostics As shown in the image below, a PCI device is selected in the first drop menu. Select the device Viper-CamLink PPB and Viper-CamLink ATU. Viper-CamLink User's Manual Appendix D: Troubleshooting • 45 Click on the Diagnostic button to view an analysis of your PCI configuration. The Information message box contains the diagnostic report. If there is a problem, click on the Save button. A file named ‘pcidiag.txt’ is created with a full dump of the PCI configuration registers. Email this file to the Coreco Imaging Technical Support group with a full description of your computer. For contact information see “Technical Support” on page 52. The most common problem is an invalid interrupt assigned to the Viper-CamLink. See “Solving Interrupt Assignment Problem” (page 49) for a possible solution. Windows NT Control Panel Devices The next step is to inspect Windows NT Control Panel Devices to make certain the appropriate Coreco Imaging drivers have started successfully during the boot sequence. Click on the Start•Settings•Control Panel, then double-click on the Devices item. Make certain the following drivers have started for the Viper-CamLink driver: Device Description CorVCamLink Viper-CamLink messaging CorLog Log viewer CorMem Memory manager CorPci PCI configuration 46 • Appendix D: Troubleshooting Viper-CamLink User's Manual The Devices dialog box should resemble the following screenshot. All other devices, except the ones mentioned in the table above, may differ on individual systems. The example below shows the driver for the Coreco Imaging Viper-CamLink is active. Coreco Imaging Technical Support may request that you check the status of these Coreco Imaging drivers as part of the troubleshooting process. Viper-CamLink User's Manual Appendix D: Troubleshooting • 47 Log Viewer The third step in the verification process is to save in a text file the contents of the Coreco Log Viewer. Run the program via the Windows Start Menu shortcut Start•Programs•Coreco Imaging•Sapera•Coreco Log Viewer. The Coreco Log Viewer lists information about Coreco Imaging drivers installed. Click on File•Save and you will be prompted for a text file name to save the Log Viewer contents. Email this text file to Coreco Imaging Technical Support when requested or as part of your initial contact email. Although the information collected by the Log Viewer seems complicated, you can make some initial diagnostics by checking the status of the Coreco Imaging driver. In the screen shot below, note the line: [ ... CORVCAMLINK.SYS INITDEVICES => Number of Viper_Cam_Link boards found: 1 ]. 48 • Appendix D: Troubleshooting Viper-CamLink User's Manual Other Tools for Windows NT Windows NT Event Viewer, under Start•Programs•Administrative Tools•Event Viewer, lists various events that have taken place during the Operating System (OS) boot sequence. If a driver generates an error, it will normally log an entry in the event list. Windows NT Diagnostics is an additional source for accessing system information. It is located under Start•Programs•Administrative Tools•Windows NT Diagnostics. This tool lists information related to a specific system. Coreco Imaging Technical Support may request this information. Solving Interrupt Assignment Problems (Switch 3 of SW1) With the switch set to ON (default), PCI function 0 of the i960 controller is set to PCI-PCI bridge device. In general, there is no reason to change this setting. With some older computers this configuration will cause the computer's BIOS to assign an invalid interrupt to PCI function 1 of the i960. By setting the switch to OFF, PCI function 0 of the i960 is set to Multimedia Device, and the computer BIOS should assign a valid interrupt. Possible side effects may be that the PCI diagnostic program may falsely detect a conflict. PCI-PCI Bridge Device Viper-CamLink User's Manual 4 4 3 3 2 2 1 1 ON ON Multimedia Device Appendix D: Troubleshooting • 49 50 • Appendix D: Troubleshooting Viper-CamLink User's Manual Coreco Imaging Contact Information Sales Information Corporate Headquarters Coreco Imaging Inc. 6969 Trans-Canada Hwy. Suite #142 St. Laurent, Quebec H4T 1V8 Canada Tel: Fax: (514) 333-1301 (514) 333-1388 US Sales Office Coreco Imaging Inc. 55 Middlesex Turnpike Bedford, Ma. 01730 Tel: Fax: (781) 275-2700 (781) 275-9590 Visit our web site: www.imaging.com Email: [email protected] Viper-CamLink User's Manual Coreco Imaging Contact Information • 51 Technical Support Technical support requests for imaging product installations and help with imaging applications can be made at: United States: (781) 275-2700 International: (514) 333-1301 Technical support requests for all camera related questions can be made at: US & International: (514) 333-1301 Or all requests can be submitted via our web site: www.imaging.com/support For product literature and driver updates: www.imaging.com/download 52 • Coreco Imaging Contact Information Viper-CamLink User's Manual Glossary of Terms Bandwidth Describes the measure of data transfer capacity. A computer system’s PCI expansion bus is rated for a maximum peak data bandwidth of 132 MB/sec. PCI devices must share the maximum PCI bus bandwidth when transferring data to and from system memory or other devices. CAM Sapera camera file that uses the file extension CCA by default. Channel Camera data path that includes all parts of a video line. checksum A value used to ensure data is stored without error. It is created by calculating the binary values in a block of data using some algorithm and storing the results with the data. CMI Client Modification Instruction. A client requested engineering change applied to a Coreco Imaging board product to support either a non-standard function or custom camera. Contiguous memory A block of physical memory, occupying consecutive addresses. CRC Proprietary Sapera raw image data file format that supports any Sapera buffer type and utilizes an informative file header. Refer to the Sapera Basic Modules Reference Manual “Buffer File Formats” section. Firmware Software such as a board driver that is stored in nonvolatile memory mounted on that board. Frame buffer An area of memory used to hold a frame of image data. A frame buffer may exist on the acquisition hardware or be allocated by the acquisition hardware device driver in host system memory. Grab Acquiring an image frame by means of a frame grabber. Viper-CamLink User's Manual Glossary of Terms • 53 Host Refers to the computer system that supports the installed frame grabber. Host buffer Refers to a frame buffer allocated in the physical memory of the host computer system. LSB Least Significant Bit in a binary data word. MSB Most Significant Bit in a binary data word. PCI Peripheral Component Interconnect. The PCI local bus is a 32-bit high-performance expansion bus intended for interconnecting add-in boards, controllers, and processor/memory systems. Pixel Picture Element. The number of pixels describes the number of digital samples taken of the analog video signal. The number of pixels per video line by the number of active video lines describes the acquisition image resolution. The binary size of each pixel (i.e., 8-bits, 15-bits, 24bits) defines the number of gray levels or colors possible for each pixel. RAW A Sapera data file format where there is no header information and that supports any Sapera buffer type. Refer to the Sapera Basic Modules Reference Manual “Buffer File Formats” section. RISC (Reduced Instruction Set Computer) A computer architecture that reduces chip complexity by using simpler instructions. Scatter Gather Host system memory allocated for frame buffers that is virtually contiguous but physically scattered throughout all available memory. Tap Data path from a camera that includes a part of or whole video line. When a camera tap outputs a partial video line, the multiple camera tap data must be constructed by combining the data in the correct order. VIC Sapera camera parameter definition file that uses the file extension CVI by default. 54 • Glossary of Terms Viper-CamLink User's Manual H Index HTML help 2 I image format 19 interface bracket 10 Internet 2 A Abort 20 acquisition parameters 17–18, 17–18, 20 ActiveX 5 add-on modules 9 administrator 9–10, 9–10 Area Scan 19 AUTORUN 9–10, 9–10 B BIOS 49 buffer 19–20, 19–20, 24, 27 buffer count 20 bus master 3, 5, 31 C CAB 3–4, 24 Camera file 18, 26–27, 26–27 Camera Link 3, 10, 16, 31, 41–42 Camera Link modes 3 CamExpert 18, 26–27 connectors 16, 27 Contiguous 20–21 Coreco Imaging web site 2 D development libraries 5 Digital Signature 11 F file transfers 19 Found New Hardware Wizard 10 frame buffer 19–20, 24, 27 freeze 20 Full Installation 10–11 Viper-CamLink User's Manual L Line Scan 19, 26–27 LVDS 5, 27, 42–43 M MAMBA-100 3–4, 16 MDR-26 10, 16 memory 3, 5, 20–21, 24, 31 N National Semiconductor 41 O overlay 21 P PDF 2 Pixel Processor 4, 9, 15 Q quadrature-shaft encoder 5 R Run Time installation 10–11 S Sapera ActiveX Controls manual 7 Sapera CAB User's manual 4, 16 Sapera CD-ROM 9–10 Sapera messaging 21 Sapera objects 21 Sapera User’s manual 7, 9, 13 Index • 55 Scatter-Gather 3, 20 serial numbers 12 server list 21 shaft encoder 5, 19, 26 Static electricity 9 T technical support 12, 14, 46–49 trigger 5, 19, 26 V Variable frame rate 24 viewer program 13–14 Viper-CamLink viewer 13 W Web inspection 5, 26 workstation 9 56 • Index Viper-CamLink User's Manual