1
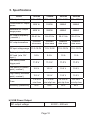
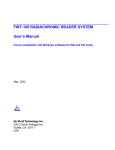
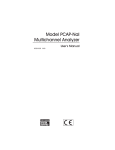
Digital Power
Inverter
OWNER’S MANUAL
1500W
1000W
(Model # 50-370)
IN
(Model # 50-371)
2000 W
2500 W
(Model # 50-372)
(Model # 50-373)
TERTEK
CM
C
LIS
TED
US
3069523
Customer Service Tel: 1-800-268-3319
© Superex Canada Limited, Toronto, M2H 3B8
Made in China
Table of Contents
Page
1. Safety Precautions ............................................ 1,2
2. Introduction ........................................................ 3,4
3. Operation Basics ............................................... 5
3.1. Digital Display.............................................. 6
3.2. Using Extension Cord ................................. 6
3.3.Battery Use................................................... 7
3.4. Optional Remote Control Switch ................. 7
3.5. Special Notes .............................................. 7
4. Trouble Shooting Guide ..................................... 8,9
5. Specifications .................................................... 10
6. Limited Warranty ................................................ 11,12
!IMPORTANT SAFETY INSTRUCTIONS
!SAVE THESE INSTRUCTIONS
1 Safety Precautions:
WARNING!
Incorrect installation or misuse of your DC to AC Power Inverter may result
in danger to the user or hazardous conditions. Please pay special attention
to the following important safety instructions.
WARNING!
Unit is not intended for permanent installation in a
vehicle. Unit must be disconnected from battery
when not in use.
WARNING! SHOCK HAZARD
·Do not open the case of the inverter. The high voltage inside your
DC to AC Power Inverter generates the same potentially lethal AC
power as a normal household wall outlet.
·Keep inverter away from children.
·Do not insert foreign objects into the power inverter's AC outlet or
vent openings.
·Do not, under any circumstances, connect the power inverter
directly to another AC power source.
·Do not use the inverter outdoors or expose to water, rain, snow or
spray. This inverter is designed for indoor use only.
·Do not operate the inverter with wet hands. The AC voltage of the
unit produces an electrical shock hazard if operated with wet
hands.
·Do not disassemble the inverter; refer to the warranty section of this
manual for instructions on obtaining service for the inverter.
Attempting to service the unit yourself may result in a risk of
electrical shock or fire.
WARNING! HEATED SURFACE
·The power inverter's housing may become uncomfortably warm
during operation. Allow at least two inches of clearance around the
inverter for airflow. To avoid a risk of fire, ensure the ventilation
openings on the unit are not obstructed. During operation, keep
away from materials that may be affected by high temperatures.
Page 1
WARNING! EXPLOSION HAZARD
·Do not use the inverter in the presence of flammable fumes or
gases, such as propane.
·Do not use the power inverter in an enclosure containing
automotive-type, lead-acid batteries. These batteries, unlike sealed
batteries, vent explosive hydrogen gas, which can be ignited by
sparks from electrical connections.
·A battery can present a risk of electrical shock, burn from high shortcircuits, and fire or explosion from vented gases. Observe proper
precautions.
CAUTION!
·Connect the power inverter only to batteries with a 12V nominal
output. A battery with 6V nominal output will not supply enough
voltage and a battery with 24V nominal output will damage the
inverter.
·Know the wattage requirements of your appliances. Use only those
appliances that do not exceed the capacity of this unit.
·When working on electrical equipment always ensure someone is
nearby to help you in an emergency.
·DO NOT operate the inverter if it has received a sharp blow, been
dropped or otherwise damaged in any way.
·If the inverter has been damaged, refer to the warranty section of this
manual.
Page 2
2 Introduction:
Your new DC to AC Power Inverter is one in a series of the most advanced
DC to AC inverters available today. It converts low voltage DC electricity from
a battery or other power source to standard 110 volt AC household power.
New soft start technology ensures trouble-free startup when powering your
electronic appliances and eliminates failed cold starts under load by ramping
up voltage gradually helping to prevent shutdowns from momentary
overloads during inverter startup. With proper care and appropriate usage, it
will give you years of dependable service in your car, truck, RV or boat.
When you turn on an appliance or a tool that operates using a motor or tubes,
it requires an initial surge of power to start up. This surge of power is referred
to as the “starting load” or “peak load”. Once started, the tool or appliance
requires less power to continue to operate. This is referred to as the
“continuous load” in terms of power requirements.
NOTE : Do not use the inverter with a product that draws a higher wattage
than the inverter can provide, as this may cause damage to the inverter and
product.
The wattage ( WATTS ) or amperes ( AMPS ) can normally be found stamped
or printed on most devices and equipment or in the user's manual.
Otherwise, contact the manufacturer.
If rated in amps
Multiply: AMPS x 110 (AC voltage) = WATTS
This formula yields a close approximation of the continuous load of your
appliances.
Multiply: WATTS x 2= Starting Load
This formula yields a close approximation of the starting load of your
appliances.
Most often the start up load of the appliance or power tool determines
whether your inverter has the capability to power it.
Page 3
The output waveform of this inverter is a MODIFIED SINEWAVE. If you
choose to measure the AC output voltage, you must use a TRUE RMS
VOLT METER. Using any other type of voltage measuring device will result
in an AC voltage reading of 20 to 30 volts lower than the rated value.
VOLTS PEAK
VOLTS RMS
O
INVERTER-MODIFIED SINEWAVE
! CAUTION !
Output non-sinusoidal
Some equipment including the types listed below, may be damaged
by the inverter’s modified sine wave output (non-sinusoidal).
Do not use the inverter with the following appliances
Electronics that modulate RF (radio frequency) signals on the AC
line will not work and may be damaged.
Speed controllers found in some fans, power tools, kitchen
appliances, and other loads may be damaged.
Some chargers for small rechargeable batteries can be damaged.
Small battery-operated appliances like flashlights, razors, and night
lights that can be plugged directly into an AC receptacle to recharge.
Some chargers for battery packs used in hand power tools. These
affected chargers display a warning label stating that dangerous
voltages are present at the battery terminals.
Note: If you are unsure about powering any device with the inverter,
contact the equipment manufacturer to determine the appliance’s
compatibility with the modified sine wave (non-sinusoidal) AC
waveform.
Page 4
3 Operation Basics:
The Power Inverter must be connected directly to the battery with
appropriate battery cables (not included). Make sure the On/Off switch
located on the front panel of the inverter is in the Off position. Connect colorcoded cables to terminals.
WARNING!
Be sure to connect positive terminal on inverter to positive terminal on
battery and negative to negative. Terminal must be screwed down tightly
in block to hold cables securely and ensure proper operation.
CAUTION!
Loose connectors may cause overheated wires and melted insulation.
Check to make sure you have not reversed the polarity. Damage due to
reversed polarity is NOT covered by the warranty.
NOTE : FOR 2500 WATT MODEL ONLY
The 2500 watt inverter is equipped with two sets of terminals to start up
large power loads. For loads > 1500 watts, two sets of the same size wires
must be used to connect the inverter to the same battery.
Warning: Failure to follow this procedure may cause damage to the
inverter and /or the load.
Grounding
This inverter has a lug on the rear panel for connecting the chassis of the
inverter to the ground. The chassis ground lug must be connected to a
grounding point, which varies depending on where the power inverter is
installed. Connect the chassis ground lug to the chassis of the vehicle, the
chassis of the boat or to earth if in a fixed location.
The ground terminals in the AC outlets on the front panel are also connected
to the ground lug.
Warning: Do not operate the power inverter without connecting it to ground.
Electrical shock hazard may result.
We recommend that the equipment or appliance switch be in the “Off”
position prior to plugging into the AC receptacle of the inverter.
Page 5
No devices should be plugged into the inverter until the inverter is
properly connected and the inverter's display shows adequate input
voltage .
Turn on the power by pressing the button located on the front panel of the
inverter. The Digital Display will show the input voltage of the power source.
If connecting more than one AC product to the inverter, turn on the larger
power product first.
The inverter should only be used to supply AC power to products that require
up to the rated load. If the output power exceeds the rated load, the overload
protection will automatically shut down the power and an error message "
OLP" will appear on the digital display. To reset the power, unplug the 110V
appliance, disconnect the inverter from the power source and reconnect
again. Power will automatically reset.
CAUTION!
Always check your appliances to make sure it does not exceed the rated output
that the inverter is designed for.
3.1 Digital Display
The digital display provides easy to read information about the operating
conditions of the inverter. When the inverter is operating, the display will
continuously alternate between showing the input voltage and the
estimated power output in watts of the appliance(s) plugged into the
inverter. Wattages below 30 are too low to register and will display as “O”. If
the power draw of the device plugged in fluctuates, the displayed power will
vary also with each cycle.
If the inverter experiences an error condition and shuts down, a digital code
will be displayed to show the nature of the fault. This will alert you to take the
appropriate action as outlined in the Trouble Shooting Guide 4 to correct
the problem.
3.2 Using Extension Cord
CAUTION!
Do not use an extension cord between the DC power source and the DC input
of the inverter. An extension cord on the DC input will create a voltage drop,
which results in a reduction of efficiency and output. We recommend that you
use an extension cord no longer than 100ft. between the AC output and AC
appliance. A longer cord may result in reduced output.
Page 6
3.3 Battery Use
If the input voltage exceeds 15.5 volts or is less than 10 volts, the voltage
protection will automatically shut down the power and the error message
“LUP” (low voltage) or “OUP” (over voltage) will be displayed. The
inverter will automatically reset once proper input voltage is restored.
CAUTION!
·Disconnect the inverter before operating a battery charger to
replenish your battery voltage. Failure to do so may result in an input
spike, which will damage the inverter
·Disconnect the Inverter from the battery when it is not in use.
CAUTION!
Damage due to connecting the inverter's input to a battery charger is NOT
covered by the warranty. Damage due to connecting the inverter to a DC
power source greater than 15.5V DC is NOT covered by the warranty.
3.4 Optional Remote Control Switch Jack: This model contains a Jack,
which interfaces with an optional remote control On/Off switch. The switch
may be obtained from an authorized dealer.
Caution: DO NOT plug a telephone into this jack as damage or improper
operation may occur.
3.5 Special Note:
Your DC to AC Power Inverter uses no interference technology to eliminate
buzzing sound from audio systems and snowy TV buzz and static lines.
When operating a TV monitor or TV/VCR combo, please note that picture
tubes have a degaussing coil, which uses a high initial surge of power to
light up the screen from a “cold start”. If the TV does not start up on the first
try, switch the TV on every 2-3 seconds until the screen comes on. Some
screens may take 2-5 tries before starting.
Page 7
4. Trouble Shooting Guide
PROBLEM
CAUSE
SOLUTION
Battery is defective
Replace battery
Blown fuse
Check and replace fuse
No power, no
indicator.
Loose cable connections
Check the connection to the
battery. Tighten as required.
Digital fault
codes
AC products connected
Reduce load.
are rated at more than the
Wattage load of the
OLP
inverter; overload
shutdown has occurred.
OLP
AC products at less than
Use a product with starting
the Wattage load of the
surge power within the
inverter, but high starting
inverter’s capability.
surge has caused
overload shutdown.
LUP
OCP
The voltage input from the
Charge the power source
DC power source is too
battery. Use heavier gauge
low (alarm is sounding).
wire. Keep length short.
Inverter is overheated due
Unplug inverter from DC
to poor ventilation and has
socket and allow to be cooled
shut down.
for 15 minutes. Remove
objects covering unit. Move
the inverter to a cooler place.
Reduce load if continuous
operation is required.
Restart.
OPP
Unplug appliance and have it
checked
Short Circuit
Page 8
Inverter runs
small loads but
Low voltage battery
Charge the battery
not large ones.
Disconnect the inverter and
Water entered
Water entered the unit
wipe immediately with a dry
cloth, or permanent damage
can occur.
Low voltage shutdown
Allow unit to cool. Improve air
( LUP ) or thermal
circulation around unit.
Alarm is
shutdown ( OCP) has
Locate unit to a cooler
sounding
occurred.
environment. Reduce load if
continuous operation is
required.
Standard “average-
Inverter’s “modified sine
reading” AC voltmeter
wave” output requires “true
Measured
used to measure output
RMS” voltmeter for accurate
inverter output is
voltage, resulting in an
measurements.
too low
apparent reading 5 to 15V
too low.
Battery run time
is less than
expected
Battery voltage is too low
Recharge battery
AC product power
Use a larger battery to make
consumption is higher
up for increased power
than rated.
requirement.
Battery is old or defective.
Replace battery
Battery is not being
Some chargers are not able
properly charged.
to fully recharge a battery.
Make sure you use a
powerful charger.
Page 9
5. Specifications
Model
1000W
1500W
2000W
105 - 125V
105 - 125V
105 - 125V
105 - 125V
Continuous AC output
power
1000 W
1500W
2000W
2500W
Maximum AC output
surge power
2000 W
3000W
4000W
5000W
AC output frequency
( nominal )
59~61 Hz
59~61 Hz
59~61 Hz
59~61 Hz
AC output waveform
Modified
sine wave
Modified
sine wave
Modified
sine wave
Modified
sine wave
DC input voltage range
11.0~15.0V
11.0~15.0V
11.0~15.0V
11.0~15.0V
Battery drain with no
AC load (at a 12V
input )
0.6 A
0.6 A
1.0 A
1.0 A
Low battery alarm
trigger point
11.0 V
11.0 V
11.0 V
11.0 V
Low battery shutdown
point ( nominal )
10.5 V
10.5 V
10.5 V
10.5 V
High battery shutdown
point ( nominal )
15.5 V
15.5 V
15.5 V
15.5 V
Fuse
5 x 25 A
mini fuse
AC output voltage
Efficiency (maximum)
85%
2500W
7 x 25 A
10 x 25 A
16 x 25 A
mini slip fuse mini slip fuse mini slip fuse
85%
85%
b) USB Power Output
DC output voltage
5V DC – 500 mA
Page 10
85%
5. Limited Warranty
Superex 1 Year Limited Warranty
Superex Canada Limited (Superex) warrants to the original purchaser that
this product is free from defects in material or workmanship for a period of
1year from the date of purchase. This warranty does not extend to
subsequent purchasers or users.
Superex will, during the warranty period, repair or replace the product free
of charge. A defective unit may be replaced with a new or reconditioned unit
of same or similar design. Superex will, at its option, use new or
reconditioned parts in performing warranty repairs.
This Superex product is not intended for commercial use and, if so used,
will immediately void the warranty.
Superex Canada Limited assumes no obligation to pay the consumer a
cash refund. This Warranty does not cover the failure of, or damage to the
product that results from accident, alternation, abuse, misuse, neglect,
normal wear and tear (e.g. scratches, chips, dents or discoloration) or
failure to follow operating instructions, nor does this Warranty cover
damage caused by the use of any attachment not originally equipment with
this product.
Superex Canada Limited disclaims any liability for any damages
resulting from delay or loss of use and service, or repair, or for any
incidental or consequential damages arising out of this expressed
Warranty, or any implied Warranty, even though it may be caused by
negligence or other fault on the part of Superex Canada Limited or
others. The implied Warranties on this product shall be in effect only for
the duration of the Expressed Warranty period as set forth above, and
thereafter there shall be no Warranties, either expressed or implied.
Local laws may vary respecting the limitation on incidental,
consequential or other damages, or the length of implied Warranties, so
the above limitations may not apply to you.
TO OBTAIN WARRANTY SERVICE:
In order to qualify for the warranty, a dated proof of purchase must be
provided.
Page 11
DO NOT return your product to the place of purchase for service.
If your product requires service please contact Superex directly:
By phone: 1-800-268-3319
(416) 497-2850
By fax:
(416) 497-4943
By email: [email protected]
You must obtain a Return Merchandise Authorization Number (RMA) and a
shipping address from Superex prior to returning the product. Please be
prepared to provide the Customer Service Agent with your name, address,
phone number, model number of the product, date of purchase and a brief
description of the problem.
TO RETURN THE PRODUCT:
Obtain the RMA from Superex and a shipping address.
Safely package the unit, preferably in its original packing and box, along
with a copy of your dated proof of purchase and a short note with your name,
address, phone number, the RMA number and a brief description of the
problem. Pack your unit properly as Superex will not be responsible for any
damages caused by shipping.
Ship the unit PREPAID to the address supplied to you. Make sure to clearly
mark the RMA number on the outside of the shipping carton.
You may also call our Customer Service Department at 1-800-268-3319
with questions about problems you may be having with the product. Have
the product near the phone and a customer service representative will try to
help you diagnose the problem.
Superex will examine your unit and, if covered by warranty, at its option
either repair or replace the unit. In either case, the unit will be returned to
you freight prepaid within 4 weeks of receipt. Unit not covered under the
warranty will be shipped freight collect in addition to any charges for nonwarranty repair.
Page 12