1
The COMPASS
User’s Manual
Compliance Assurance System
TaskTrakker Module
Process Data Control Corporation Arlington, Houston, Austin, TX
Copyright 1994–2009, PDC Corp. All Rights Reserved.
TABLE OF CONTENTS
CHAPTER
PAGE
1. INTRODUCTION.................................................................................................... 1
1.1
1.2
1.3
1.4
1.5
1.6
1.7
About TaskTrakker ........................................................................................... 1
System Requirements........................................................................................ 1
Installation Instructions ..................................................................................... 1
Using Help ........................................................................................................ 2
Getting Started with TaskTrakker..................................................................... 2
Logging Onto TaskTrakker .............................................................................. 2
Technical Support of TaskTrakker ................................................................... 3
2. OVERVIEW ............................................................................................................. 3
2.1
2.2
2.3
2.4
2.5
2.6
TaskTrakkerOverview ...................................................................................... 3
Title V Operating Permits (TVOPs) ................................................................. 3
About Databases ............................................................................................... 4
Data Entry Procedures ...................................................................................... 4
TaskTrakkerReports .......................................................................................... 5
Steps in Using TaskTrakker .............................................................................. 5
3. USER INTERFACE ................................................................................................ 6
3.1
3.2
3.3
3.4
3.5
3.6
3.7
About TaskTrakker User Interface ................................................................... 6
FrameBars and SheetBars ................................................................................. 6
File Menu .......................................................................................................... 7
Equipment Menu ............................................................................................... 8
Requirements Menu .......................................................................................... 9
Compliance Menu ........................................................................................... 10
Utilities Menu ................................................................................................. 11
4. COMPANY ............................................................................................................. 12
4.1
4.2
4.3
About the Company ........................................................................................ 11
Editing the Company Record .......................................................................... 12
Field Descriptions ........................................................................................... 13
TaskTrakker Module
i
5. OPERATING FACILITY ..................................................................................... 14
5.1
5.2
5.3
5.4
5.5
About Operating Facilities .............................................................................. 14
Selecting An Operating Facility ..................................................................... 14
Adding a New Operating Facility ................................................................... 15
Modifying an Operating Facility .................................................................... 15
Field Descriptions ........................................................................................... 16
6. EMISSION POINTS .............................................................................................. 17
6.1
6.2
6.3
6.4
6.5
6.6
6.7
About Emission Points .................................................................................... 17
Adding an Emission Point .............................................................................. 17
Modifying an Emission Point ......................................................................... 17
Forms Data ...................................................................................................... 18
Emission Points Requirement List .................................................................. 18
Adding a Comment to an Emission Point....................................................... 19
Field Listing .................................................................................................... 20
7. SOURCES ............................................................................................................... 21
7.1
7.2
7.3
7.4
7.5
7.6
7.7
7.8
About Sources ................................................................................................. 21
Adding a Source .............................................................................................. 21
Modifying a Source......................................................................................... 22
Create Process Unit ......................................................................................... 22
Source Requirements ...................................................................................... 23
Forms Data ...................................................................................................... 23
Adding a Comment to a Source ...................................................................... 24
Field Listing .................................................................................................... 24
8. CONTROL DEVICES........................................................................................... 25
8.1
8.2
8.3
8.4
8.5
8.6
8.7
About Control Devices ................................................................................... 25
Adding a Control Device ................................................................................ 25
Modifying a Control Device Record .............................................................. 25
Forms Data ...................................................................................................... 26
Control Device Requirement List ................................................................... 26
Adding a Comment to a Control Device ........................................................ 27
Field Listing .................................................................................................... 27
9. PROCESS UNITS .................................................................................................. 28
9.1
About Process Units ........................................................................................ 28
TaskTrakker Module
ii
9.2
9.3
9.4
9.5
9.6
9.7
Adding a Process Unit .................................................................................... 29
Modifying a Process Unit ............................................................................... 29
Adding or Modifying a Comment for a Process Unit .................................... 30
Process Unit Requirement List ....................................................................... 30
Forms Data ...................................................................................................... 31
Field Listing .................................................................................................... 31
10. EQUIPMENT RELATIONSHIPS ...................................................................... 32
10.1
10.2
10.3
10.4
About Relationships ........................................................................................ 32
Conceptual Basis for Relationships and Assignments ................................... 32
Displaying Relationships ................................................................................ 33
Building Relationships .................................................................................... 34
11. TITLE V OPERATING PERMITS (TVOPs) ................................................... 35
11.1
11.2
11.3
11.4
11.5
11.6
11.7
11.8
About TVOPs.................................................................................................. 35
Working with TVOPs ..................................................................................... 35
Adding a TVOP .............................................................................................. 35
Modifying an Existing TVOP ......................................................................... 35
Adding or Modifying a Comment .................................................................. 36
Assigning Process Units to TVOPs ................................................................ 36
TVOP Status ................................................................................................... 36
Field Listings .................................................................................................. 36
12. TEMPLATES, PERMITS, AND REPORTS ..................................................... 37
12.1
12.2
12.3
12.4
12.5
Using Templates ............................................................................................. 37
Permits ............................................................................................................ 40
Requirement List Reports ............................................................................... 42
Management Reports ...................................................................................... 43
Quality Control Reports .................................................................................. 44
13. DEFINITIONS ...................................................................................................... 44
14. COMPLIANCEMANAGEMENT ...................................................................... 46
14.1
14.2
14.3
14.4
Overview of Compliance Management .......................................................... 46
Compliance Forms .......................................................................................... 46
Compliance Management Plan ....................................................................... 47
Task Groups for Streamlining Compliance Recordkeeping ........................... 47
TaskTrakker Module
iii
14.4.1
14.4.2
14.4.3
14.5
14.5.1
14.5.2
14.5.3
14.5.4
14.6
Task Groups .................................................................................................... 49
"Templating" Tasks......................................................................................... 50
"Templating" Rules and Tasks........................................................................ 51
Entering and Keeping Track of Compliance "History" .................................. 53
Web-Based Compliance "History" ................................................................. 54
"History" Icon for Compliance "History" Data Entry .................................... 55
"Pending Task" Report Compliance "History" ............................................... 55
”Exception" (and Other) Reports for Compliance "History" ......................... 56
Summary of Compliance Menu Functions ..................................................... 56
15. PURPOSE OF TASKTRAKKER AND MANUAL PROCEDURES
THAT ARE USUALLY AFFECTED .................................................................. 57
TaskTrakker Module
iv
Chapter 1. INTRODUCTION TO TASKTRAKKER
1.1 About the TaskTrakker Module
The TaskTrakker Module is a part of the COMPliance ASsurance System - COMPASS. The
COMPASS facilitates the collection, storage, and reporting of Air Emissions data, including emissions
inventory, calculations, and Title V permitting. TaskTrakker is dedicated to compliance
demonstration, including task management and the acquisition of “history” records to prove that
required actions have been taken in accordance with applicable rules, permits, and enforcement orders.
TaskTrakker incorporates data from applicable rules and regulations, compliance tasks, and
compliance history. Many users rely on a program called IntelliRegs, an MS Access module
developed by PDC Corp, to administer their environmental permits, including Title V (federal
operating) permits. Users who license both IntelliRegs and TaskTrakker define their equipment,
business and process areas, regulatory requirements, and site data, in IntelliRegs, and then export data
to TaskTrakker both for initial database set-up and for periodic updates. For this reason, many
TaskTrakker functions would never be employed by users who license both IntelliRegs and
TaskTrakker. Pertinent sections of this manual are identified in the headings with the phrase “Not
used by IntelliRegs Users.” IntelliRegs users may either skip those sections or request a modified
version of the manual from PDC Corp, in which such sections have been removed.
1.2 System Requirements
The following platform is strongly recommended to operate the TaskTrakker application:
• Pentium or above class PC running at 900 MHz. with 1 gig of RAM and 200 megabytes of free
disk space.
The following platform is the minimum required to operate the TaskTrakker application:
• Pentium or AMD PC running at 600 MHz. with 1 gig of RAM and 100 megabytes of free disk
space to obtain reasonable performance.
The following operating systems are supported:
• Microsoft Windows 98, 2003 – 2008, XP, and NT, (all Trademarks acknowledged).
1.3 Installation Instructions
Directions for the installation are furnished in a separate document, “Installation Instructions,” which
is provided with this operations manual. TaskTrakker should always be loaded onto a local or network
hard disk under the directory structure: <drive>:\...\PDC\ACM\Permits. The installation program
creates this structure below the target installation folder chosen by the user.
PDC recommends the following “Go Live” testing methods to ascertain the status of TaskTrakker
operations following deployment:
The COMPASS-TaskTrakker - log into the main screen, select a database from the drop-down
list of available databases, view tasks under Compliance Plan management menu, view task
TaskTrakker Module
Page 1
groups under the same menu, and view data in the task Summary report. In anticipation of
testing e-mail and web page functionality, it is advisable to test TaskTrakker desktop
functionality by configuring one or more tasks in such a way that “history” will be due right
away, such as modifying a Primary Task‟s settings to be Frequency=”Daily” and Start Date =
Today‟s date. Them when e-mail notifications are received, web page functionality can be used
to update “history” and test several other functions in the web pages and desktop program (e.g.,
“history” and deviation reports)
The COMPASS-TaskTrakker E-mail Notifications - log into the main TaskTrakker screen and
view e-mail notifications in the E-mail Log to confirm proper functioning of this component.
The COMPASS-TaskTrakker Web Pages - log into the Admin screen, view security and other
settings, and enter “compliance history” into the “Add History” web page after accessing it
either from an e-mail link or from directly logging into the web pages and selecting a task for
which to provide “history.” Also, review a Task and History Report using web page
configuration options.
The COMPASS-TaskTrakker Process Historian “Bridge” program - log into the configuration
screen, review “compliance history” in TaskTrakker desktop screen to validate fetching of data
from the historian database, and view the historian
1.4 Using Help
Help is provided on-line with TaskTrakker, and it is as extensive as the printed documentation. The
on-line Help categorizes and defines words and phrases, giving you a clear picture as to what you are
doing.
When you click on the Help menu item, a dialog box will appear with selections for using the Help
features of the system. Users can search for a specific topic of interest using the Index or review
subject areas. Users may also review the version number of TaskTrakker.
1.5 Getting Started with TaskTrakker
The installation routine will automatically create Open DataBase Connectivity (ODBC) connections,
path adjustments, and a COMPASS folder with an icon for TaskTrakker. Certain databases, such as
Oracle, may be utilized through a driver other than ODBC.
From the Start menu on the Taskbar, point to Programs…COMPASS,…then click on the TaskTrakker
icon to directly access the TaskTrakker main screen.
1.6 Logging onto TaskTrakker
When you click on the TaskTrakker icon in the COMPASS folder, a logon window entitled
TaskTrakker Login will appear. If you are using an Oracle database, enter your User ID and Password.
Select “Oracle” from the selection list, and then click OK. This setting should also be used for
Adaptive Server. Your selection will be recalled by the system when you run TaskTrakker the next
TaskTrakker Module
Page 2
time.
1.7 Technical Support of TaskTrakker
Technical Support of the system is provided by PDC Corp. Please be aware that support technicians
will be handling many users, so you can help them by doing the following:
Careful reading of printed and on-line documentation of the System. Please carefully read this
documentation to be sure that your question or problem has not been addressed.
Make sure that the Data Sources section in your control panel is configured properly to run the
TaskTrakker database, which is called ACM.db. If you are not using Oracle, then the drivers
for ODBC will also need to be loaded for proper program operation.
If you are running on a Network, check with your system administrator to make sure your
workstation is configured correctly to run the program and connect to the database. Also,
check that you have the rights to modify a file in the drive and directory where TaskTrakker is
loaded (namely, the database file ACM.db).
If your issue is not addressed in the documentation and you are satisfied that your system is
configured properly, then feel free to call PDC Corp. Please have information about your
system, including Windows version and type of network.
TaskTrakker Module
Page 3
Chapter 2. OVERVIEW
2.1 TaskTrakker Overview
TaskTrakker automates the collection, processing, storage, and retrieval of information that is used for
compliance. Although all companies must comply with the environmental rules and regulations that
they are subject to, plants that are subject to a Title V permit must annually certify compliance with all
Federally applicable requirements.
2.2 Title V Operating Permits (TVOPs)
Title V Operating Permit compliance requires a great deal of documentation. With TaskTrakker, this
documentation is reduced to electronic format for better storage, analysis, and reporting abilities. This
enables you to have an ongoing information system that can be utilized for many purposes, but
primarily for regulatory compliance.
2.3 About Databases
A database is a collection of related information. This data is stored in several tables of various sizes
and types, and is related together by the database engine built into the software. TaskTrakker collects
information regarding plant and source data, and provides you with the ability to build relationships
among that data. Since TaskTrakker runs under the Microsoft Windows Operating environment, you
have graphical tools to manipulate data and processes.
A database table is composed of 2 general elements: a field and a record. A field is one piece of
information that describes something in the database. For example, a personnel database would have
fields for employee‟s names, addresses, hire date, salary, etc. A record would be the entire entry for
each employee. If there were 100 total employees, then there would be 100 records. The database,
therefore, would be a collection of all related tables, forms, reports, and procedures resident in the
program, user application, or system.
2.4 Data Entry Procedures
When a dialog data entry form is opened, the data entry procedures for virtually all windows are the
same. Once in the data entry Detail window, the initial field you may modify, or edit, is highlighted. If
you are adding a record to the database, then this is usually the very first field in the form, and it is
blank. If a user is modifying a record, then the key field is often not editable and is therefore not
highlighted. In that case, the cursor (or highlight) is located on the initial field you can edit.
Use the Tab key to move forward to the next field, or position the mouse on the field to be modified.
From there, the Tab key takes you forward to the next field, and the <Shift> + Tab key combination
takes you backward. Clicking on a desired field with the mouse moves the cursor to that field as well.
Whether you use the Tab key or position the mouse, it makes no difference in editing.
Key fields generally cannot be modified. In fields that cannot be modified in TaskTrakker, you will
not be able to access these fields on the data entry dialog boxes. The Tab key will bypass fields that
may not be modified. Positioning the mouse and clicking the left button on these fields will also do
nothing. It is important for you to keep this in mind when inputting and modifying data.
TaskTrakker Module
Page 4
2.5 TaskTrakker Reports
TaskTrakker includes several reports that can assist users to quality assure their compliance
requirements and associated information in the system. The listing of these reports is on the FileAnalytical Reports menu, Requirements-Reports menu, and Compliance-Reports and Management
Reports menus, where you can select any or all reports to review or print.
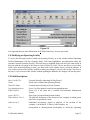
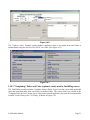
2.6 Steps in Using TaskTrakker
Step 1: Create Your Operating Facility
TaskTrakker may have been installed with one or more sample databases, such as
"PDC Chemical Plant". When you first run TaskTrakker, the program asks you to
select an operating facility. After this selection is made, you can change the operating
facility selection at any time by clicking on File and choosing Operating Facility List
from the drop down menu. When you are ready to create an operating facility for your
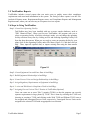
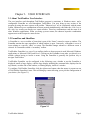
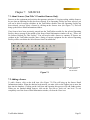
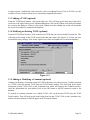
plant, click on the Operating Facility under File Menu (Figure 2.1) and then click on
Add. Then, input all required data, or import existing data using the data transfer
utility.
Figure 2.1
Step 2: Create Equipment Lists and Enter Data in IntelliRegs
Step 3: Build Equipment Relationships in IntelliRegs
Step 4: Create Process Units and Assign Relationships in IntelliRegs
Step 5: Assign Regulatory Requirements to Equipment in IntelliRegs
Step 6: Review and Edit Generic Compliance Tasks in IntelliRegs
Step 7: Assigning Process Units to Title V Permits in TaskTrakker(Optional)
Users can create one or more Title V permits (TVOPs) so that the program can correctly
separate requirements in large plants by TVOP. This is done by selecting the TVOP icon,
choosing or creating a TVOP, and clicking on the With TVOP and Without TVOP icons to
list assigned and unassigned Process Units, respectively. Unassigned Process Units can be
assigned to the selected TVOP with an appropriate icon selection.
TaskTrakker Module
Page 5
Chapter 3. USER INTERFACE
3.1 About TaskTrakker User Interface
The user interface used throughout TaskTrakker program is consistent. A Windows menu and a
configurable FrameBar are used throughout TaskTrakker. You may bring up any section of the
program by using the menu system or the toolbar. "Shortcut keys" are in conjunction with the menu
system. Shortcut keys are combinations of letters pressed simultaneously with either the <Ctrl> key or
the <Alt> key to take you directly to a certain window. These key combinations work the same as in
other Windows applications. When you bring up most menus, the shortcut keystroke combination
appears next to their respective menu action.
3.2 FrameBars and SheetBars
A FrameBar is a row or toolbar of icons that is part of the “frame” around a screen or window. The
FrameBar remains the same regardless of which window is open. Conversely, a SheetBar is a row of
icons relating to a specific “sheet” or screen. The SheetBar changes whenever a different screen is
selected. It is sometimes called a “secondary” toolbar.
TaskTrakker FrameBar is a type of icon toolbar similar to those present in such Microsoft Windows
applications as Microsoft Word, and Excel. Clicking on the FrameBar icons takes you directly to a
module without having to invoke a menu. Using the FrameBar is generally the quickest way to
navigate TaskTrakker.
TaskTrakker FrameBar can be configured in the following ways: whether or not the FrameBar is
displayed; small or large display, with the large display including the command title; displayed at the
top, bottom, or either side of the window; or floating display, inside of a window.
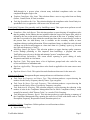
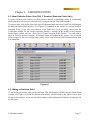
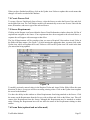
To configure TaskTrakker FrameBar, click the right mouse button when the mouse is present on one
of TaskTrakker FrameBar‟s items. That will bring up a menu allowing you to pick the configuration of
your choice. (See Figure 3.1)
Figure 3.1
TaskTrakker Module
Page 6
Please note that displaying the text along with the icons in the FrameBar does not in any way affect
the potential location of the FrameBar on the window. FrameBar selection shortcut keys are used in
conjunction with the <Ctrl> key. The letter to be used simultaneously with the <Ctrl> key is
underlined when the Show Text selection is invoked on the FrameBar configuration.
TaskTrakker SheetBar is an extension of the FrameBar that appears on Windows in which you have
already entered via a program function, such as Operating Facility or Points. The SheetBar also has
icons and follows the same configuration that is assigned by you to the FrameBar. The SheetBar is
used primarily for data update functions such as Insert, Update, and Clear, as well as adding comments
and closing the data entry/sub menu form windows. SheetBar selection shortcut keys are used in
conjunction with the <Alt> key. The letter to be used simultaneously with the <Alt> key is underlined
when the Show Text selection is invoked on the FrameBar configuration.
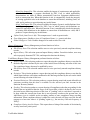
3.3 File Menu
As does virtually every Microsoft Windows application, TaskTrakker provides pull down menus at the
top of the window. These menus are present throughout the program operation. When the window,
Operating Facility Selection, is open and you have not selected a submenu or function, these menu
descriptions apply. File menu functions are explained in this section; other menu functions are
explained in subsequent sections.
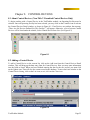
The File menu has the following items. (See Figure 3.2) Please note that also listed is the letter, which
when simultaneously pressed with the <Ctrl> key, will invoke the option as well.
Figure 3.2
Operating Facility List: This option takes you to the window that lists the available
installed Operating Facilities in TaskTrakker.
Operating Facility: This selection takes you directly to the Operating Facility
Maintenance window. <Ctrl F>
Company: This selection takes you directly to the Company Detail window. <Ctrl Y>
TVOP: This selection takes you directly to the TVOP Detail window. <Ctrl V>
Exit: You should execute this function when you are ready to exit the program. <Ctrl X>
Units: This option takes you to the available process units list. Users can add, delete, or
edit process units in this option.
TaskTrakker Module
Page 7
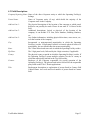
3.4 Equipment Menu (Non-Title V Permitted Equipment Only)
The Equipment menu allows the user to work with various types of equipment ("Entities"), such as
Sources, Points, Control Devices, and Process Units. The Equipment menu has the following items.
(See Figure 3.3) Please note that also listed is the letter, which when simultaneously pressed with the
<Ctrl> key, will invoke the option as well.
Figure 3.3
Source: This selection takes you directly to the SourceDetail Information window.
Point: This selection takes you directly to the Emission Points Detail window.
Control Device: This selection takes you directly to the Control Devices Detail window.
3.5 Requirements Menu (Reserved -- Not used by IntelliRegs Users)
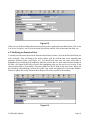
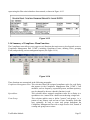
3.6 Compliance Menu
The Compliance menu allows you to open several functions that assist users to develop and oversee a
Compliance Management Plan ("CMP"), including Compliance Forms, defining Tasks, grouping
Tasks, and producing various management reports, as shown in Figure 3.5.
Figure 3.5
Task Management: Task Management menu performs several functions as below:
Compliance Management: This selection shows the assigned compliance tasks for each Entity
that appears in the Compliance Management Plan ("CMP"). The user may change Task
attributes such as Frequency, Responsible Person, and Data Repository.
Task Grouping: This selection enables users to group compliance tasks for specific Entities.
When tasks are identified in this function as "secondary tasks," the CMP is automatically
updated to show that compliance history will not be saved for the secondary tasks, and
compliance history will be saved for the primary task. One example of task grouping is a Unit
TaskTrakker Module
Page 8
Walk-through in a process plant, wherein many individual compliance tasks are often
completed through a single event.
Template Compliance Mgt. Items: This selection allows a user to copy tasks from one Entity
(Source, Control, Point, or Unit) to another.
Task Mgt Spreadsheet By Unit: This selection displays the compliance tasks for an Entity in a
spreadsheet view, as opposed to a full-screen view for each task.
Task QA/QC Reports (Not generally used by IntelliRegs users): This report menu performs several
functions as below:
Compliance Plan Audit Report: This selection produces a report showing all compliance tasks
that are pending for the Entities that are included within the scope of the report filter, which is
defined by the user on the initial screen following selection of this icon. A "pending" task is a
task that is expected to be done within the current time frame but is not necessarily overdue at
the present time. An Add History icon is available on the secondary toolbar to enter
compliance history tracking information. When compliance history is added for a task, the task
will drop out of the list and reappear at a later time when it is "pending" again (e.g., the next
day if the task frequency is "daily").
IntelliRegs Import QA Report: This selection produces a report showing quality assurance
review findings pertaining to files imported from IntelliRegs, a program that some
TaskTrakker users rely on to develop and maintain "generic" compliance tasks.
Entity/Task/Limit Spreadsheet: This screen allows reporting or quick editing of tasks,
frequencies and limits in a list format.
Duplicate Tasks: This report shows a list of duplicates grouped and color coded for easy
review and deletion of redundant tasks.
Duplicate Applicability: This report shows rules listed as applicable to the same source more
than once.
Duplicate Generic Tasks: This option lists tasks listed more than once for the same rule.
Management Reports: Management Reports menu performs several functions as below:
Task Count By Frequency and Source Type: This selection produces a report showing the
number of tasks first by Frequency then by Source Type categories.
Task Count By Source Type and Frequency: This selection produces a report showing the
number of tasks first by Source Type then by Frequency categories.
Task Reduction By Grouping: This selection produces a report showing the reduction in the
number of tasks in the Compliance Management Plan for which "compliance history" would
normally be entered, called "Primary Tasks," as a result of Task Grouping.
Task Management Summary Report: This selection produces a report showing a summary of
the Compliance Management Plan, meaning the entire list of Tasks with details such as Task
Description, Frequency, Responsible Person, Retention period, etc.
Compliance Utilities: Compliance Utilities performs several functions as below:
Import IntelliRegs Data
TaskTrakker Module
Page 9
Select Reg Import File: This selection enables the import of requirements and applicable
rules from IntelliRegs, a program distributed by PDC Corp, in which applicability
determinations are made to Entities automatically based on equipment characteristics,
such as construction date. When this function is run, it automatically checks the integrity
of existing applicable rules in the database to ensure that all Entities, including Units, are
valid, and it produces a report showing any invalid items.
Select Task Import File: This selection enables the import of generic task definitions from
IntelliRegs, a program distributed by PDC Corp, in which generic task definitions are
created for applicable rules. When this function is run, it automatically checks the integrity
of existing task definitions in the database to ensure that all definitions are valid, and it
produces a report showing any invalid items.
Update Tasks from Generic Info: This compares user‟s tasks to generic tasks.
Form Management: Enables review of Compliance Forms, i.e., generic task data.
Global Changes to Tasks: Enables changes to be made to tasks site-wide.
History Management: History Management performs function as below:
Edit History Data: This selection enables users to revise previously entered compliance history
records.
Import History: This selection opens an Import History window. From this window, users may
select a properly formatted TXT file, and import the data into the history.
Task/History Reports: History Management performs function as below:
History Report: This selection produces a report showing the compliance history event data for
the data range that is defined by the user on the initial screen following selection of this icon.
The compliance history data may be modified by users.
Edit History Data: This selection enables users to revise previously entered compliance history
records.
Deviation: This selection produces a report showing only the compliance history event data for
which Status indicates a deviation condition for the data range defined by the user on the initial
screen following selection of this icon.
Permitted Emissions: This selection produces a report showing actual and permit-allowable air
emissions providing that this data is available for the selected year and Account in the
Emission Inventory module.
Pending: This selection produces a report showing all compliance tasks that are pending for the
Entities that are included within the scope of the report filter, which is defined by the user on
the initial screen following selection of this icon. A "pending" task is a task that is expected to
be done within the current time frame but is not necessarily overdue at the present time. An
Add History icon is available on the secondary toolbar to enter compliance history tracking
information. When compliance history is added for a task, the task will drop out of the list and
reappear at a later time when it is "pending" again (e.g., the next day if the task frequency is
"daily").
Compliance Rating Analysis Report: This report shows a listing of the number of deviations by
severity based on a point system.
TaskTrakker Module
Page 10
Task Grouping Report: This displays primary tasks together with their secondary tasks.
3.7 Utilities Menu
Utilities menu will bring up several functions that are intended to be used under special circumstances, as shown in Figure 3.6.
Figure 3.6
Entity Type Selection: This function enables users to "customize" their list of Source and Point
Types to more closely conform to the actual types at their site. For example, if a user has no
Storage Tanks, the "Tank" Source Type can be hidden from all program drop-down lists.
SCC Selection: This function enables users to "customize" their list of Source Classification
Codes (SCCs) to more closely conform to the actual SCCs for equipment at their site.
Associate Permits with Entities: This selection automatically associates Entities with
applicable New Source Review permits based on the permitted emissions that have been
entered in COMPASS-EI ("WinCeis") module.
3.8 Security Menu
The Security menu is shown in Figure 3.7.
Figure 3.7
Security Setup is for assigning user ID and passwords, etc.
Import Security Data allows the user to import data from a security file.
Configure Notifier allows entry of server name, domain, environmental email address, etc.
Review Email Log permits viewing of previously sent emails.
Email Job shows pertinent data on the user‟s email job.
TaskTrakker Module
Page 11
Chapter 4. COMPANY
4.1 About the Company
The Company is defined as the Corporate entity that owns or operates the plant. There can be no more
than one company listed in TaskTrakker.
4.2 Editing the Company Record
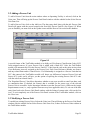
To enter or edit the data in the Company record, select Company from the File menu, or press the key
combination <Ctrl Y>. That will bring up the Company detail window. (See Figure 4.1)
Figure 4.1
All fields in this data entry screen may be edited regardless of whether data is resident, that is, if the
Company record has previously been added and needs changing. If data is resident in the database,
then the first field listed, Company Reporting Name, will be highlighted. Otherwise, all fields will be
blank. If only selected fields need to be edited, then the user should single click on any part of the data
element of that field which will highlight the entire entry. Any further editing will overwrite that entry
with new data. Using the Tab key will sequentially move to the next field and will highlight the
current entry if data is present. After you have edited the record to your satisfaction, click on the
Update icon. That will update the record and record the changes in the database. If this function is not
performed, changes made will not be written to the database.
If you wish to make a complete change to the data that is present, click on the Clear icon, which will
remove all data from view, and move the cursor location to the Company Reporting Name field.
Again, when you have finished entering the data, click on the Update icon. Please note that clicking on
the Update icon will update all current information listed in the fields to the database. Please make
sure the information is correct before clicking on the Update icon.
TaskTrakker Module
Page 12
4.3 Field Descriptions
Company Reporting Name: Name of the direct Corporate entity to which the Operating Facility(s)
belongs.
Parent Name:
Name of Corporate entity (if any) which holds the majority of the
Corporate stock in the Company.
Address Line 1:
The physical description of the location of the company to which parcel
deliveries can possibly be made. Please do not enter P. O. Boxes in this
field.
Address Line 2:
Additional descriptions, logical or physical, of the location of the
company. It can include P. O. Box, Suite Numbers, Building Numbers,
etc.
Address Line 3:
Any further information, including physical directions, cross streets, etc.,
as to the location of the company.
City:
Incorporated or unincorporated municipality in which the Operating
Facility(s) resides. If Operating Facilities are outside physical limits of a
municipality, the user should enter the nearest municipality.
State:
The 2 letter abbreviated state code in which the Operating Facility resides.
Zip/Zone:
The 5 digit postal code, followed by the 4 digit extension, if applicable.
County:
The physical county or parish in which the Operating Facility(s) resides. If
the Operating Facility(s) spans multiple counties, list the in. county in
which the municipality entered in the City field resides.
Contact:
Employee of the Company responsible for overall operation of the
Operating Facility(s). The person listed in this field will be the responsible
party listed on the Title V Permit applications.
Title:
Employment description or explanation of person listed in Contact field
Contact Phone: Area code and local number of person listed in Contact
field.
TaskTrakker Module
Page 13
Chapter 5. OPERATING FACILITY
5.1 About Operating Facilities
The Operating Facility is the second tier in the TaskTrakker module hierarchy right below the
Company. An Operating Facility is bound to a single company but can potentially hold multiple Title
V Operating Permits, Process Units, Points, Control Devices, and Emission Units. An Operating
Facility is a logically contiguous plant site or a section of a plant site. While a single plant site may
hold multiple Operating Facilities, a single Operating Facility must be contained within one plant site.
Once an Operating Facility is defined in the TaskTrakker module, it becomes the highest level of
reporting. TVOPs, Process Units, Emission Units, Points, and other entities are contained within but
may not span across multiple Operating Facilities. The Master Requirement List and standard tables
for Monitoring, Record Keeping, Reporting, Operating Scenarios, and Equipment Standards do span
across Operating Facilities.
5.2 Selecting an Operating Facility
Upon entering the TaskTrakker module after signing on, a window entitled Operating Facility List
allows you to select the desired Operating Facility. There will be no interaction with the system unless
an Operating Facility is chosen at that time. To choose an Operating Facility, you should click on the
desired entry, which will then be highlighted. (See Figure 5.1) Once the Operating Facility is
highlighted, it will remain resident throughout the program operation, provided you do not select
another Operating Facility from the list under the File menu.
Figure 5.1
If only one Operating Facility is resident in the TaskTrakker module, then it will automatically load
when you enter the TaskTrakker module. This will allow you further interaction with the TaskTrakker
module and there will be no highlighted Operating Facility–only the title of the resident Operating
Facility at the top of the main window. Please note that the Operating Facility List selection window
will be displayed only when you enter the TaskTrakker module or you may access it by going to the
Operating Facility List under the File menu.
5.3 Adding a New Operating Facility
Before beginning any editing activity relating to the Operating Facility, you must be within a defined
Facility. Click on the file menu and go to Operating Facility Maintenance detail window. To insert a
new Operating Facility, click on the Add icon. This will bring up a State selection window. After
selecting a state, a blank data entry box will be displayed. (See Figure 5.2)
TaskTrakker Module
Page 14
Figure 5.2
It is important that you enter information in all fields. Otherwise, an error may result.
5.4 Modifying an Operating Facility
To access the data entry form to modify an Operating Facility, go to the window entitled Operating
Facility Maintenance with the Company Name: field entry highlighted, and information about the
currently selected Operating Facility. This field may be modified along with all of the other fields in
this box with the exception of the Name or Oper Facility ID: field. You are not able to access these
fields. After needed modifying is done, you must click on the Update icon to record the changes. If
you wish to exit out of this window without recording any changes, you may click on the Close icon at
any time. If you exit out of this window without updating the database, the changes will not take place.
5.5 Field Descriptions
Oper Facility I.D.:
Name:
Plant Site Name:
Non-Attainment Area:
EMS Certified:
Agency ID No.:
Plant Address: Line 1:
Address Line 2:
City:
TaskTrakker Module
Uniquely identifies Operating Facility Record.
Name used to identify the Operating Facility.
Common name referring to the site location.
Select Yes if the plant is located in non-attainment area.
Select Yes if the plant has a certified Environmental Management
System.
State agency assigned identification number.
The physical description of the location of the company to which parcel
deliveries can possibly be made.
Additional descriptions, logical or physical, of the location of the
company. Can include P. O. Boxes, Suite Numbers, etc.
Incorporated or unincorporated municipality in which the Operating
Page 15
State:
Zip:
County:
Plant Telephone:
Business Type:
UTM Zone:
UTM E. Meter:
UTM N. Meter:
Plant Latitude:
Plant Longitude:
SIC Code 1:
SIC Code 2:
Operating Days Per Week:
Operating Hours Per Day:
Operating Weeks per Year:
Summer Operating Percent:
Fall Operating Percent:
Spring Operating Percent:
Winter Operating Percent:
Summer Operating Percent:
Plant Contact Info
Name:
Title:
Phone:
Fax:
TaskTrakker Module
Facility resides.
The 2 letter abbreviated state code in which the Operating Facility
resides.
The 5 digit postal code followed by the 4 digit extension, if applicable.
The physical county or parish in which the Operating Facility resides.
Area code and local number of main Plant site.
State type of business that is conducted at Operating Facility.
Universal Transverse Mercator Zone Number.
Primary plant benchmark east coordinate.
Primary plant benchmark north coordinate.
Degrees north Latitude measurement.
Degrees west Longitude measurement.
Primary Standard Industry Classification Code for Operating Facility.
Secondary Standard Industry Classification Code for Operating Facility.
Represents number of days entire site operated during each week for the
year covered for the compliance.
Represents the number of hours entire site operated everyday for the year
covered for the compliance.
Represents the number of weeks entire site operated during the calendar
year for the year covered for the compliance.
Represents the actual percentage of the operation that occurred in the
combined months of June, July and August.
Represents the actual percentage of the operation that occurred in the
combined months of September, October and November.
Represents the actual percentage of the operation that occurred in the
combined months of March, April and May.
Represents the actual percentage of the operation that occurred in the
combined months of December, January and February.
Represents the actual percentage of the operation that occurred in the
combined months of June, July and August.
Name of employee responsible for Title V Permitting and Reporting for
this particular Operating Facility.
Description of duties of Person listed in Facility Rep Name field.
Direct area code and business telephone number of person listed in
Facility Rep Name field, code, and telephone number.
Direct area of fax machine of person listed.
Page 16
Chapter 6. EMISSION POINTS
6.1 About Emission Points (Non-Title V Permitted Emission Points Only)
To select a Point to work with, be sure that you have selected an Operating Facility. If no Operating
Facility has been selected, you will not be able to navigate into the TaskTrakker module.
To select a point, click on the Point icon or go to Equipment menu and select Points This will bring up
the Emission Points Detail window. (See Figure 6.1) Contained in this window is a current listing of
Emission Points, if any have been entered. If no Points have been previously entered into the
TaskTrakker module for the selected Operating Facility, a message in the middle of the Emission
Points Detail window will say, “There Are No Points Assigned to this Facility!” You will need to
enter an Emission Point to continue. If Emission Points are resident in the system, a list of current
Points assigned to the selected Operating Facility will be seen below the Select Emission Point from
List subtitle bar.
Figure 6.1
6.2 Adding an Emission Point
To add an Emission Point, click on the Add icon. This will bring up a blank Emission Points Detail
window. (See Figure 6.2) When the data has been entered, you must click on the Update icon to store
the data in the database. If you exit out of this window without updating the database, the changes will
not take place.
TaskTrakker Module
Page 17
Figure 6.2
When you are finished adding Emission Points and you have updated the last added Point, click on the
List icon to “back out” one level to the Points list with the subtitle, Select Emission Point from List.
6.3 Modifying an Emission Point
To modify an Emission Point from the Emission Point Detail window, click on the Emission Point you
wish to modify. That will bring up the detail window with the resident data record regarding that
particular Emission Point. (See Figure 6.3) You should note that since the entire field entry is
highlighted, any modifying will completely delete the current data. To make only character changes in
the data, click again in the field to remove the highlighting, then use the arrow keys to move to the
character that needs to be modified. This action holds true for all fields in this entry form. When you
have finished with modifying, click on the Update icon, which will update the record in the database.
Failure to update this record will mean that changes will not be recorded to the database.
Figure 6.3
TaskTrakker Module
Page 18
6.4 Forms Data (optional and not often used)
6.5 Emission Points Requirement List
The full list of requirements assigned to the Emission Points are shown by clicking on the Reqmts icon
from within the Emission Point Detail window. (See Figure 6.4)
Figure 6.4
The list of Requirements will be complete when you enter a Required Value and an Actual Value in
the fields with these names. The other fields cannot be edited. After entering the appropriate data,
click on the Update icon to update the record. Failure to click on the Update icon will result in the data
you entered not being updated. While the Requirement will still be listed, the values in the Required
Value and Actual Value fields will not be updated in the database.
You have the ability in this window to detach Requirements from the Emission Point. Click the mouse
on the Requirement you wish to delete from the list, then click on the Delete icon. This will remove
this Requirement from the Emission Point, although this Requirement may be attached to another
entity. Deleting the Requirement here will not affect the status of the Requirement relating to other
entities.
6.6 Adding a Comment to an Emission Point
A Comment, or memo, may be added to a new or current Emission Point. A comment would be a
description of pertinent data that does not belong in a field listed on the data entry form or certain
information that would explain a particular entry in a field that is listed.
To add a comment record on a new Emission Point, click on the Comment icon during data entry on
the new Point record. This will open a free form text box in which you may enter any data necessary.
This text box has the word wrap feature built in, so you only need to press the Enter key when you
TaskTrakker Module
Page 19
wish to begin a new paragraph or line. When you are finished entering the comment record, click on
the OK button to save the data entered. Clicking on the Cancel button will exit out of the Comment
window without saving the record and take you back to the Emission Point Detail window. Clicking
on the Delete button will delete the comment. Clicking on the Clear Text button will delete any text
entered, but remain in the Comment window.
To add or modify a comment on an existing Emission Point, click on the desired Point in the Emission
Point Detail window. Then, click on the Comment icon on the data entry form.
Selection of text with the mouse for modification and/or deletion purposes works the same as with any
Microsoft Windows text editor or word processor. Highlight the text using the mouse or hold down the
<Ctrl> and <Shift> keys simultaneously and use any of the “location” keys (arrow keys, Page Down,
Page Up). Once the text is highlighted, you may overwrite that text by entering the new text, or you
may delete the entire portion of highlighted text. Please note that there is no drag and drop, or cut and
paste features within the Comment window.
6.7 Field Listing
Point ID:
Key field in Point database. Uniquely identifies the Emission Points
record.
Description:
Name or description of the Emission Point for this record.
Facility Designation: This is optional field on this screen.
Stack Height:
Height of the emission point
Effluent Flow Rate: Effluent flow rate off of the emission point.
Discharge VOC’s:
Tells user whether the emission point discharges VOC‟s or not?
UTM Zone:
Universal Transverse Mercator Zone Number.
East Meter:
Primary plant benchmark east coordinate.
North Meter:
Primary plant benchmark north coordinate.
Point Type:
Pull down list of various types of emission points. Click on the appropriate
type.
Shutdown:
Enter Y or N (Yes or No) to determine whether Point has been indicated
as shutdown to the agency. A Yes means the Point is shutdown.
TaskTrakker Module
Page 20
Chapter 7. SOURCES
7.1 About Sources (Non-Title V Permitted Sources Only)
Sources are the equipment and activities that generate emissions. To begin working with the Sources,
be sure that an Operating Facility has been selected. If no Operating Facility has been selected, you
will not be able to navigate elsewhere in the TaskTrakker module. Once the Operating Facility has
been selected, you may select a Source by clicking on the Sources icon. (See Figure 7.1) This will
bring up the Source Detail Information window.
If no Sources have been previously entered into the TaskTrakker module for the selected Operating
Facility, then a message in the middle of the Source Detail Information window will say, “There Are
No Sources Defined For This Facility!” You will need to add a Source to continue. If Sources are
resident in the TaskTrakker module, then a listing of current equipment for the selected Operating
Facility will be seen below the Select Source from List subtitle bar.
Either click on the desired
Source record or
use the Search
Figure 7.1
7.2 Adding a Source
To add a Source, click on the Add icon. (See Figure 7.2) This will bring up the Source Detail
Information window. When the data has been entered, you must click on the Update icon to store the
data into the database. Clicking on the Add icon and repeating this process will add further points.
When you are finished adding Sources, click on the List icon to “back out” one level. To exit
completely out of the Source Detail Information window, click on the Close icon.
TaskTrakker Module
Page 21
Figure 7.2
7.3 Modifying a Source
To modify a Source from the Select Source from List window, you should click on the currently listed
Source you wish to modify. That will bring up the Detail window with the resident data record
regarding that particular Source. (See Figure 7.3) You should note that since the entire field entry is
highlighted, any modifying will completely delete the current data. To make only character changes in
the data, click in the field again to remove the highlighting.
Figure 7.3
TaskTrakker Module
Page 22
When you have finished modifying, click on the Update icon. Failure to update this record means that
changes will not be recorded to the database.
7.4 Create Process Unit
To create a Process Unit directly from a Source, select the Source to make the Process Unit, and click
on the MakeUnit icon. The TaskTrakker module will automatically create a new Process Unit with the
name, ID number, and source type of the selected Source.
7.5 Source Requirements
Clicking on the Reqmts icon from within the Source Detail Information window shows the full list of
requirements assigned to the Source. If no requirements have been assigned to the selected Source, a
response box will appear with a message to that effect.
The list of Requirements will be complete when you enter a Required Value and an Actual Value in
the fields with these names. (See Figure 7.4) After entering the appropriate data, you must click on the
Update icon, which will update the record. Failure to click on the Update icon will result in the data
you entered not being updated.
Figure 7.4
To modify previously entered values in the Required Value and Actual Value fields, follow the same
directions as above, except you will be overwriting existing values. Click on the Update icon to update
the record to the database.
You have the ability in this window to delete Requirements from being attached to the Source. Click
the mouse on the Requirement from the list you wish to delete and click on the Delete icon. This will
remove this Requirement from the Source, although this Requirement may be attached to another
entity. Deleting the Requirement here will not affect the status of the Requirement relating to other
entities.
7.6 Forms Data (optional and not often used)
TaskTrakker Module
Page 23
In addition to the general Sources information fields shown at the top of the Detail screen, there may
be one or more specific "Form questions" shown in the lower portion of the screen. (See Figure 7.3)
The questions that appear in this section are conditional on the Source Type (e.g., engine, tank, etc.)
and the location of the site with respect to the regulatory agency responsible for the particular area. If
the Source that you selected has a Source Type for which a Form has been designated by the
regulatory agency responsible for your site‟s location, that Form and its questions will be displayed, as
shown in Figure 7.3. If more than one Sources Form has been designated by the regulatory agency
responsible for your site‟s location, then a drop-down list will appear for the user to select which form
to display.
7.7 Adding a Comment to a Source
A Comment, or memo, may be added to a new or current Source. A comment would be a description
of pertinent data that does not belong in a field listed on the data entry form or certain information that
would explain a particular entry in a field that is listed.
To add a comment record on a new Source, click on the Comment icon during data entry on the new
Source record. When you are finished entering the comment record, click on the OK button to save the
data entered.
To add or modify a comment on an existing Source, click on the desired Source in the Select Source
from List window. Then, click on the Comment icon on the data entry form. You may use the Clear
Text button to clear or delete the previous entry, or you may add information to what is resident. Click
on the OK button to save the data entered.
7.8 Field Listing
Source ID:
Description:
Common ID:
Location:
SCC Code:
Source Type:
Shutdown:
Uniquely identifies Source. If the Source is the same as a Facility in the emission
inventory for this Operating Facility, the FIN should be used here.
Name used to identify emission Source at the plant.
An optional unofficial ID for the source.
Tells user where the source located in the plant.
Source Classification Code that applies to this Source.
Description of Source from a drop-down list.
Choose Yes or No to determine whether Source has been indicated as nonoperating due to shutdown, property transfer, demolition, or other reason. A Yes
means that the Source is non-operating, and an No means the Source is active.
TaskTrakker Module
Page 24
Chapter 8. CONTROL DEVICES
8.1 About Control Devices (Non-Title V Permitted Control Devices Only)
To begin working with a Control Device in the TaskTrakker module, an Operating Facility must be
selected. Once an Operating Facility has been selected, you may click on the Controls icon to activate
the Control Devices Detail window, as shown in Figure 8.1. If no Devices are resident, the message,
“There Are No Devices Defined For This Facility!”, will appear. Otherwise, a list of current Control
Devices will be listed under the subtitle, Select Control Device from List. (See Figure 8.2)
Figure 8.1
8.2 Adding a Control Device
To add a Control Device to the current list, click on the Add icon from the Control Devices Detail
window. This will bring up the data entry form for Control Devices. Here you may enter information
into the fields as listed. When you have finished entering the data for the new record, you must click
on the Update icon. That will save the current record in the database. To move back one window to the
Control Device listing, click on the List icon; to exit, click on the Close icon.
Figure 8.2
TaskTrakker Module
Page 25
8.3 Modifying a Control Device Record
To modify a Control Device from the Control Devices Detail window, click on the currently listed
Control Device you wish to modify. That will bring up the Detail window, as shown in Figure 8.3.
Figure 8.3
When you have finished with modifying, you must click on the Update icon.
8.4 Forms Data (optional and not often used)
8.5 Control Device Requirement List
Clicking on the Reqmts icon from within the Control Devices Detail window shows the full list of
requirements assigned to the Control Devices. (See Figure 8.4)
Figure 8.4
The list of Requirements will be complete when you enter a Required Value and an Actual Value in
the fields with these names. The other fields cannot be edited. After entering the appropriate data, you
must click on the Update icon, which will update the record. Failure to click on the Update icon will
TaskTrakker Module
Page 26
result in the data you entered not being updated.
To modify previously entered values in the Required Value and Actual Value fields, follow the same
directions as above, except you will be overwriting existing values. Click on the Update icon.
You have the ability in this view to delete Requirements from being attached to the Control Device.
Click the mouse on the Requirement from the list you wish to delete and click on the Delete icon. This
will remove this Requirement from the Control Device, although this Requirement may be attached to
another entity. Deleting the Requirement here will not affect the status of the Requirement relating to
other entities.
8.6 Adding a Comment to a Control Device
A Comment may be added to a new or current Control Device. To add a comment record on a new
Control Device, click on the Comment icon during data entry on the new Device record. When you are
finished entering the Comment record, click on the OK button to save the data entered.
To add or modify a comment on an existing Control Device, click on the desired Control Device in the
Control Device Detail window. Then click on the Comment icon on the data entry form. Click on the
OK button to save the data entered.
8.7 Field Listing
Control Device I.D.:
Key field in database. Uniquely identifies the Control Device record.
If this Control Device is included in the emission inventory for this
Operating Facility, the CIN should be used here.
Device Name:
Name Control Device at plant location.
Device Type Code:
Pull down listing of specific description of type of abatement
equipment installed.
Device Type Description: Identifier used to describe a particular piece of abatement equipment
inside the plant.
Facility Designation &
Sequence No.:
Are optional fields for the on this screen.
Grandfathered:
Tells user whether the device is permitted or not?
Shutdown:
Choose Yes or No. Yes indicates that the Control Device is nonoperating due to shutdown, property transfer, demolition, or other
reason. No means that it is active.
TaskTrakker Module
Page 27
Chapter 9. PROCESS UNITS
9.1 About Process Units (Non-Title V Permitted Process Units Only)
Like Sources, Points, and Control Devices, Process Units can be added and modified in the
TaskTrakker module. However, unlike other entities, you have many more options after the
establishment of these Process Units. Under the Process Units section of the TaskTrakker module, you
can create relationships among the various Points, Sources, and Control Devices. These relationships
can further be assigned to the Process Units to which they belong. Then, Requirements can be
assigned to the entities involved.
Figure 9.1
When you click on the Units icon, Figure 9.1, the window entitled Process Unit Detail opens. If no
Process Units are resident for the selected Operating Facility, a dialog box will appear with the
message, “No Units on File. Select Add From Toolbar”. Otherwise, a listing of resident Process Units
is shown with the subtitle bar entitled Select Process Unit From List, as shown in Figure 9.2.
Figure 9.2
From this window, you can either add Process Units by clicking on the Add icon, modify resident
Process Units by selecting one from the list, or you can Close this function.
TaskTrakker Module
Page 28
9.2 Adding a Process Unit
To add a Process Unit from the main window where an Operating Facility is selected, click on the
Units icon. That will bring up the Process Unit Detail window with the subtitle list bar Select Process
Unit From List.
To add a Process Unit, click on the Add icon. The data entry detail sheet with the title Process Unit
Detail will appear with the cursor located in the first field, Process Unit ID. (See Figure 9.3) When
you are finished, you must click on the Update icon to add the Process Unit record to the database.
Figure 9.3
A special feature of the TaskTrakker module is its ability to fill in Source Classification Codes (SCC)
from assigned sources. If a new Process Unit is added with a blank SCC Code, the TaskTrakker
module will automatically fill in the Process Unit SCC Code from the code at the point in time when
Cross Reference items are assigned to the Process Unit. Each Cross Reference includes one Source
and any related Point and/or Control Device. If a Relationship is assigned to a Process Unit that has
SCC data entered, the TaskTrakker module will detect any differences between Process Unit and
Source SCC codes, and it will give you the option of replacing the existing Process Unit SCC code
with the code from related Source.
The “Regulated Process” check box determines whether or not users are able to enter Form data, such
as construction date. If checked, the Form(s) that is available for the source type of the selected
Process Unit is accessible. It also determines whether or not the Process Unit is visible on the Assign
Requirements screen (i.e., only regulated Processes may have applicable rules). To exit out of the data
entry form back to the Process Unit Detail window with the listing of current units, click on the List
icon. To exit completely out of the Process Unit Detail section of the TaskTrakker module, click on
the Close icon.
9.3 Modifying a Process Unit
To modify an existing Process Unit, click on the Units icon. That will bring up the Process Unit Detail
window with the subtitle list bar Select Process Unit From List, if there are Process Units resident in
the TaskTrakker module.
TaskTrakker Module
Page 29
From the list, you should click on the Process Unit you wish to modify. This will bring up the data
entry form with the entry in the field, Description: highlighted. (See Figure 9.4) Special features exist
in the TaskTrakker module for SCC codes, as discussed under Section 9.2 Adding a Process Unit.
Figure 9.4
When the record has been modified, you must click on the Update icon to update the Process Unit
record in the database.
9.4 Adding or Modifying a Comment for a Process Unit
Comments for Process Units work much the same as they do for other entities. You need to have the
Process Unit Detail window open to add or modify comments. To add a comment record on a new
Process Unit, click on the Comment icon once data on the new record has been updated. This will
open a free form text box in which you may enter any text necessary. Click on the OK button to save
the entry to the database.
9.5 Process Unit Requirement List
The full list of requirements assigned to the Process Unit may be displayed by clicking on the Reqmt
icon from within the Process Unit Detail window. (See Figure 9.5)
TaskTrakker Module
Page 30
Figure 9.5
9.6 Forms Data (optional and not often used)
9.7 Field Listing
Process Unit Id:
Key field. Uniquely identifies Process Unit. Once an ID has been updated to
the database, the field may not be edited or modified.
Description:
Description or Name of Process Unit.
PU Source Type: Determines whether or not Form(s) will be accessible for this Process Unit.
Check if Form data is needed; otherwise, leave blank.
Notifier On:
Master On/Off switch to generate e-mail notifications for pending compliance
tasks in the selected process unit.
PU SCC Code:
Source Classification Code pull down listing. Identifies the specific activity
which describes the source.
Source Type:
Drop down menu list of source types which, if selected, highlights a source
type under Assign Requirements procedure. Also determines which form(s)
will be accessible for Regulated Processes.
TaskTrakker Module
Page 31
Chapter 10. EQUIPMENT RELATIONSHIPS
10.1 About Relationships (optional and not often used)
In the TaskTrakker Module, the term Relationship may consist of either a Source by itself, a Source
with a related Point, or a Source with a related Point and Control Device. You must have set up all of
the entities involved in a Relationship before using the Relations icon to create the Relationship and
assign it to a Process Unit. After these Relationships have been created and are assigned to Process
Units, you can begin to identify the regulatory requirements for each Process Unit and, optionally, the
equipment that comprises it.
10.2 Conceptual Basis for Relationships and Assignments
A Process Unit can comprise many Relationship assignments. However, each Relationship can be
assigned to only one Process Unit. For example, a boiler with three stacks may be defined in the
TaskTrakker Module as three different Relationships (i.e., Boiler-Stack1, Boiler-Stack2, and BoilerStack3). All three of these Relationships may be assigned to a Process Unit called Boiler Complex.
Similar situations arise with multiple sources linked to a single Emission Point. A Relationship must
include a Source. It may, at your option, also include an Emission Point and Control Device.
In some instances, the same Source may be represented in different Relationships and in different
Process Units. For example, a loading rack, ID LR001, may be one of twelve racks that are subject to
an emission cap requirement. It may also be subject to an applicable requirement by itself or in
combination with its Stack(s) and Control Device(s). In this instance, you may create twelve
Relationships, one for each rack under the emission cap, and assign all twelve to a Process Unit called
Loading Rack Cap. Simultaneously, another Relationship could be built consisting of LR001 related to
a Stack and a Control Device, and this item could be assigned to a Process Unit called Loading Rack
001 Complex. There is no restriction on the number of times each Source, Point, and Control Device
may be represented in Process Units.
10.3 Displaying Relationships
To display the relationships for any Process Unit, users should click on the Disp. Relat. icon that
appears on the Process Unit Detail screen. Relationships will be shown in a block flow diagram by
default (See Figure 10.1) and may be also displayed in a list.
TaskTrakker Module
Page 32
Figure 10.1
Icons are available on the secondary toolbar to display the block flow diagram or the list. (See Figure
10.2) Relationships for the entire Operating Facility may be displayed by clicking on the File menu,
"Build Relationships." This display will show all relationships by Unit.
Figure 10.2
10.4 Building Relationships (optional and not often used)
Relationship may be built and assigned to a Process Unit by clicking on the Relations icon in the main
toolbar. (See Figure 10.3) Please note that all pertinent Emission Points, Sources, and Control Devices
must be resident in the TaskTrakker Module before they can be related in this window.
TaskTrakker Module
Page 33
Figure 10.3
The Build Relationships screen has two windows. The window on the left shows existing
relationships, while the window on the right shows a list of Entities. (See Figure 10.4) The window on
the right side of the screen will display one of four different lists (i.e., Units, Sources, Control Devices,
or Emission Points), depending on which Entity has been highlighted by the user on the left side of the
screen. These are the complete lists of each Entity of the selected Type that were previously entered
into the TaskTrakker Module.
Figure 10.4
To add a new Relationship, you should click on the Add icon. To edit an existing Relationship, you
should click on the relationship that appears in the list on the left side of the screen. By default, the
Unit part of the Relationship will be highlighted first. However, Entities may be listed and added in
any order.
To fill in the desired Entity in the Relationship, the user should highlight the desired Entity on the right
side of the screen, and then drag the Entity across the screen and drop it into the correct portion of the
Relationship. (See Figure 10.5)
Figure 10.5
During the drag and drop procedure, a yellow triangle shape with an exclamation point will appear at
the cursor location. This symbol will confirm to the user that the desired Entity has been correctly
highlighted and is in the process of being dragged to the left side of the screen. You must Update after
each add or edit for the changes to be saved to the database.
TaskTrakker Module
Page 34
Chapter 11. TITLE V OPERATING PERMITS (TVOPs)
11.1 About TVOPs (optional)
A Title V Operating Permit (TVOP) is a listing, or codification, of all pertinent Federally applicable
guidelines relating to the operations and equipment at an Operating Facility. The scope of a TVOP in
the TaskTrakker module is defined by the grouping of Process Units that will be permitted together by
the regulatory agency. This grouping must adhere to certain guidelines set forth by the regulatory
agency. Please consult the agency instructions and policies for further explanation of these guidelines.
The TaskTrakker module requires that a TVOP be wholly contained within a single Operating
Facility. Each Operating Facility can contain multiple TVOPs, although regulatory agency rules
should be consulted to determine how to subdivide your plant into permitting areas.
11.2 Working with TVOPs (optional)
To begin working with TVOPs, click on the TVOP icon. (See Figure 11.1)
Figure 11.1
If there are no TVOP records on file, a dialog box with the message, "No TVOP Items On File, Please
ADD!" will appear. The TVOP Detail window opens with the list. Selecting a TVOP from the list will
bring up the data entry window where you may modify the current data. (See Figure 11.2)
Figure 11.2
Once in the TVOP Detail data entry window, you have several options as to how you wish to work
with TVOPs. The basic functions of adding, modifying, and working with Comments are the same as
TaskTrakker Module
Page 35
in other sections. Additionally, other functions, such as assigning Process Units to TVOPs, are also
available. Please read the sections below concerning assignment procedures.
11.3 Adding a TVOP (optional)
From the TVOP Detail window, click on the Add icon. This will bring up the data entry form with a
scroll bar to the right. When you are finished adding data, click on the Update icon which will update
the record to the database. Failure to click on the Update icon after editing any record will mean that
the record is not added or updated to the database.
11.4 Modifying an Existing TVOP (optional)
From the TVOP Detail window, click on the desired TVOP that you wish to modify from the list. This
will bring up the listing of that TVOP record in the data entry form. (See Figure 11.3) Once you have
made the necessary changes, click on the Update icon, which will update the record in the database.
Figure 11.3
11.5 Adding or Modifying a Comment (optional)
Adding or modifying a Comment record in TVOPs is the same as in other sections. To add a comment
to a TVOP, select the desired TVOP from the TVOP Detail window. This will bring up the detail
listing form of that TVOP. Click on the Comments icon, which will bring up the Comment window.
Once the information has been added, click on the OK button to add the comment record to the
database.
To modify an existing comment on a resident TVOP, click on the desired TVOP from the TVOP
Detail window. That will bring up the detail listing form for that TVOP. Click on the Comments icon,
and the current comment record will appear in the Comment window.
TaskTrakker Module
Page 36
11.6 Assigning Process Units to TVOPs (optional)
From either the list view or the detail view of the TVOP Detail window, there are three icons (All PU,
With TVOP and Wtout TVOP) used to display lists of assigned and unassigned TVOPs to Process
Units. (See Figure 11.4)
Figure 11.4
Clicking on the All PU icon will bring up a list entitled List All Process Units. This is just a listing;
you are not able to edit any data from this view. If you select a TVOP before opening this list, you
may either click on the TVOP Detail icon which will take you to the detail view of that TVOP, or the
List TVOP icon which will take you to the TVOP list.
To assign Process Units to TVOPs, you must select the desired TVOP from the list view of the TVOP
Detail window. Once the TVOP is selected, click on the Wtout TVOP icon. This will bring up the list
of Process Units that are not assigned to the currently selected TVOPs. To assign the current TVOP to
the Process Unit, click on the Assign icon. This will make the assignment in the database. There is no
need to click on the Update icon to update this because it is done automatically.
To unassign Process Units to the selected TVOP, click on the With TVOP icon. This will bring up the
list of Process Units that are currently assigned to the selected TVOP. Click on the desired assignment
from the list, and then click on the Unassign icon. This will delete the assignment. From there, click on
either the List TVOP icon to display the list of TVOPs or the TVOP Detail icon to display the detail of
the currently selected TVOP. Please note that these lists that are displayed by clicking on either the
With TVOP or the Without TVOP Icons are the ONLY place that the Assign and Unassign icons will
perform their functions.
11.7 TVOP Status (optional and useful only when permit[s] are in work)
The TVOP Status window (that is engaged by clicking on the Status icon) is a project management
tool in the TaskTrakker module that records various dates. (See Figure 11.5) This tool is a log or status
overview of where you are in relation to the Title V project. This screen is self-explanatory, as much
of what is entered consists of dates and percentage of completion estimates.
TaskTrakker Module
Page 37
Figure 11.5
A scroll bar to the right of the screen will take you to the necessary status. Click the mouse on the
appropriate field you wish to edit. Once the pertinent data is entered, click on the Update icon, which
will update the record to the database. You may also add comments to the status topics, as in other
sections of the TaskTrakker module.
11.8 Field Listings
TVOP System ID:
Key field in detail listing. Unique identification for TVOP
record.
Description:
Description of TVOP record.
Application ID:
Agency identification number for Title V Application.
Permit Number:
Agency Identification number for Permit, which will often
be the same as Application ID.
Permit Effective Date:
List the date the Permit went into effect.
Compliance Assessment:
Choose one selection from the list of 5 items.
Acid Rain:
Applies Select either Yes or No.
Compliance Plan Status:
Select either Yes, No, or Not Applicable, depending on the
status of your Compliance plan.
Risk Management Plan Status:
Select either Yes, No, or Not Applicable, depending on the
status of your Risk Management Plan.
Confidential Information:
Select either Yes or No as to whether there is confidential
information included in your permit application.
Reason for Application:
Select the most appropriate reason for the Title V
application from the list of the 7 items.
Is Affected State Review Required? Select either Yes or No as to whether the Affected states‟
regulatory agency needs to review the application.
Affected State 1,2,3:
Enter in the necessary fields the state affected from the
permit application.
TaskTrakker Module
Page 38
Chapter 12. TEMPLATES, PERMITS, AND REPORTS
12.1 Using Templates (optional; rarely used by IntelliRegs users)
The System has three types of templates that may be used to speed up the process of assigning
requirements to equipment. A template is used to copy a set of requirements from one Entity to
another Entity. Enter the template section by clicking on the Template icon which will take you to the
Entity Type window. (See Figure 12.1) The Template icon is in the drop-down list under Management
Plan.
Figure 12.1
The first type of template is the Cross Ref. template, which takes the whole set of Requirements for
one Process Unit and copies them to another Process Unit in the same Operating Facility. You select
the “From” Process Unit (the one with the desired requirements) from the list and then click the "To"
and then the Process Unit from the list (the one without requirements that you want requirements
copied into), and all the requirements get copied when the process is updated to the database. The
Cross Reference template can only be used within a plant site.
The Entity Type template is the second type of template and copies only those requirements specific to
the Process Unit and entity(s) that you select. For example, there may be certain requirements you
want copied for Points but not for Control Devices. Under the Entity Type template, you select the
entity types to which you wish to have requirements copied. If a “From” Requirement is associated
with an Operating Scenario that does not exist on the “To” side, then that scenario is automatically
templated to the “To” side. You may also select whether or not to template the tasks associated with
the requirements. The Entity Cross Reference template may be used to copy requirements from one
operating facility to another.
The final type of template is the Scenario template, which is similar to the Entity Type template but
copies scenarios from one operating facility to another based upon the user‟s directions.
To exit each section, click on the Close icon.
12.2 Permits (optional and not often used)
Permit assignment to Process Units, Emission Units, Emission Points, and Control Devices takes place
under the Detail window for each entity type. The standard list of Permits is maintained in the Permit
Assignment module. To enter the Permit Assignment module, click on the Permits icon. From there
TaskTrakker Module
Page 39
you will be able to either view, add, modify, or delete Permits that have been entered under the major
headings of Standard Exemption, Special Exemption, and several types of construction and operating
permits (e.g., PSD, NSR, etc.) (See Figure 12.2)
Figure 12.2
After entering Permits, the user may enter Permit Requirements using the Make Req icon. These
requirements will be added to the Master Requirements List with a Source Type of “Permit
Requirements.” Requirements may be edited using the maintenance functions that are provided under
the Requirements Maintenance main menu selection at the top of the main screen.
The data entry sub form for Exemptions and Permits is the same. The Permits data entry form
comprises the following fields, all of which require entries.
Permit Type:
Permit Number:
Description:
Permit Auth.:
Notify 3 Mo Prior
to Expiration:
Issue Date:
Exp Date:
Type of construction or operating permit.
List the identification number of the applicable permit or approved exemption,
including version identifier where applicable.
List a description of the applicable permit.
List the two-letter abbreviation for the State that the permitting agency represents.
Indicate Yes/No to set an e-mail reminder to notify user 3 months prior to the
associated permit expiration date.
List the date the applicable permit for this equipment was issued.
List the permit expiration date.
To assign a Permit or an Exemption to a piece of equipment or Process Unit, select the entity from the
appropriate list and click on the Permits icon. A window entitled Permits Assignment Window will
appear with the subtitle Permits For This Facility. (See Figure 12.3)
TaskTrakker Module
Page 40
Figure 12.3
There will be a list of Permits, if previously added, that fit under the type of Permit that you selected to
open the list. If there are no permits, there will, of course, be no list. Select Cancel to go back to the
Detail window. Additional buttons at the bottom of the screen provide Add and Remove functions.
The OK button updates the assignment.
12.3 Requirement List Reports
Reports are available in several sections of the TaskTrakker module. Some reports are intended to be
viewed on-screen or printed for a "quick review," while other reports are designed to be used in a more
formal way.
Requirement List reports are frequently used to review applicable rules that have been assigned to
Entities and Process Units. The Reqmts icon brings up these reports when in any Entity Detail screen.
They can also be produced at each step of the Assign Requirements procedure (Assign Req icon). The
Requirement List report is meant for a quick review. When produced at the Unit level, the
Requirement List report shows all applicable rules for all equipment in the Unit by Operating
Scenario. When produced at the Entity level, the Requirement List report shows all applicable rules
for the selected piece of equipment by Operating Scenario for all Units in which the rule was found to
be applicable, along with Actual and Required Values. Figure 12.4 shows a typical Requirement List
report for a Source.
TaskTrakker Module
Page 41
Figure 12.4
12.4 Management Reports
Management Reports, which are found under the Compliance menu selection on the COMPASSTaskTrakker main screen, provide more formal reports showing applicable rules. There are numerous
other management reports available under Requirements menu, which will show applicable rule
assignments by Unit, Entity, Reg, Permit, etc. Figure 12.5 shows the toolbar that appears when
Management Reports are accessed.
Figure 12.5
Figure 12.6 and Figure 12.7 show typical Management Reports, showing applicable rules by Process
Unit and by Entity, respectively.
TaskTrakker Module
Page 42
Figure 12.6
Figure 12.7
12.5 Analytical Reports
Analytical Reports may be available depending on the specific version of TaskTrakker you are using.
TaskTrakker Module
Page 43
Chapter 13. DEFINITIONS
The following is a list of terms and definitions pertinent to the TaskTrakker module. Each user‟s
regulatory agency may interpret these terms differently from the definitions shown below.
Air Dispersion
Modeling:
Applicable
Requirement:
Clean Air Act:
Compliance
Certification:
Emission Unit:
Federally Applicable
Requirements:
Federal
Implementation Plan:
Federal Operating
Permit:
FrameBar:
Master
Requirement List:
Simulation to determine if an area will meet specific guidelines in the future.
Agency modeling is conducted for large areas and takes into account
information gained from the emission inventory, mobile source inventory,
and biogenic sources.
A federal or state regulatory citation, or permit provision, that regulates
equipment and activities at a site.
Enacted in 1970, amended in 1977, and overhauled in 1990, which
federalized air pollution control regulation. The 1990 supplement added
permit programs and strengthened enforcement provisions of the act.
A signed assurance by a company‟s senior officer that acknowledges good
faith adherence to regulatory requirements.
Any Entity (Source, Point or Control Device), which can be either a piece of
equipment or an activity (e.g. Boiler, Painting, Engine, etc.), that has been
assigned one or more federally applicable rules that appear in a company‟s
Title V Permit.
Guidelines established by Federal Law (such as the Clean Air Act,) Permits
issued by Federal Agencies in Ozone Attainment areas, or State
Implementation Programs. These requirements are federally enforceable.
Imposed upon states by the EPA if submitted State Implementation Plan is
inadequate, not enforced, or state fails to submit any such plan. Must be
imposed by EPA within 2 years after the date that the state was required to
have submitted proper plan.
A Title V Operating Permit which requires ongoing regulatory compliance to
applicable regulations. State rules determine which facilities must be
permitted.
A feature of the System that has toolbar type “buttons” resident on the
Windows. The FrameBar may be configured to user specification.
The complete listing of regulatory requirements relating to source types,
including those supplied with the System Application and others entered by
you.
New Source
Performance Standards: Regulations for operating new or modified plant processes, or sources of
emissions. Must be addressed in Title V.
TaskTrakker Module
Page 44
Operating
Facility:
Operating
Requirements:
Requirement:
Potential
Requirement:
Process Unit:
Relationship:
SheetBar:
Stage I
Ozone Controls:
Stage II
Ozone Controls:
Stage III
Ozone Controls:
State Implementation
Program:
Technology Based
Standards:
Title V:
Title V
Operating Permit:
TaskTrakker Module
A contiguous plant that contains one or more areas subdivided into one or
more Title V Operating Permit Areas.
Procedures and protocols relating to monitoring, record keeping, reporting,
and other plant operations.
In the System, a Regulatory citation or data item relating to plant equipment
or operations.
Procedure that would be Applicable if not for certain conditions as specified
by the applicant.
A collection of Entities consisting of Sources and may also include a Point
and/or Control Device.
An equipment configuration unique Cross Reference that has been assigned
to a Process Unit. A collection of Entities consisting of a Sources and may
also include a Point and/or Control Device.
A „sub menu‟ toolbar that relates to the specific functions of listing and data
entry.
Regulations that affect industry directly and rarely impact consumers, such as
pressure vacuum, and other plant equipment standards.
Regulations that have some impact business directly and consumers
indirectly, including emission decreasing equipment that people interact
with, such as hoses on gasoline pumps.
Regulations that have direct impact on consumers, such as lawn mowing or
outdoor grilling standards.
Documents signed by each state‟s governor setting forth what actions the
state will take to bring its air quality under federally acceptable standards.
Once approved by the EPA, these programs are federally enforceable.
Control requirements for the building of Emission Units and other
equipment.
Section of the Clean Air Act that deals with Federal Operating Permits.
A listing, or codification, of all pertinent federally applicable guidelines
relating to a source, point, or other piece of equipment, or a group of sources,
points, or other pieces of equipment. In the System, the pertinent equipment
may be grouped together for the purpose of listing guidelines.
Page 45
Chapter 14. COMPLIANCE MANAGEMENT
14.1 Overview of Compliance Management
Title V Operating Permits have changed the way many companies keep track of compliance. A
company may need to certify its compliance with applicable rules on a periodic basis, usually twice
per year. Equipment and operations that are not yet in compliance with applicable rules must be listed
in deviation reports in the case of Title V-permitted facilities, along with explanatory information and
planned remedies. Civil and criminal penalties may be assessed for a company‟s failure to file accurate
and timely reports. These developments, along with ISO 14000 and industry initiatives, have
established a high standard of performance for compliance assurance systems such as the COMPASS.
The COMPASS-TaskTrakker module is designed to meet the needs of companies who are interested
in secure, thorough, and continuous recordkeeping of regulatory compliance assurance information.
Deviation reporting based on compliance "history" data stored in the COMPASS database can save the
company time in producing compliance reports while improving accuracy.
A complete and detailed regulatory applicable analysis of the company‟s facility is a fundamental step
in achieving the goal of continuous compliance. PDC Corp provides an automated system, IntelliRegs,
to determine applicable rules based on guidelines published by the TCEQ, a state agency in Texas that
deals extensively with air quality issues. Applicable rules and associated Entities may be uploaded into
TaskTrakker from IntelliRegs, if that tool was used, or uploaded from a user-supplied data file.
Otherwise, applicability may be entered into the COMPASS directly. The use of applicability
templates in the COMPASS can speed up this process significantly and, at the same time, assist users
to standardize their baseline information.
After establishing the applicability of regulatory citations, permit provisions, and any other rules to all
Entities in the facility (by operating scenario, if necessary), users are ready to create a master plan to
define compliance verification procedures and schedules. In the TaskTrakker module, this master plan
is referred to as the Compliance Management Plan, or "CMP." This plan contains all of the tasks that
must be performed, as well as the names or job descriptions of responsible staff, standard methods to
be followed, and the required frequency for completing all tasks ("task attributes").
Several different approaches may be used to develop the CMP in the TaskTrakker module. IntelliRegs,
from PDC Corp, offers an efficient and standardized methodology for creating a CMP and enables
direct update when rules are amended by the regulatory agencies for management of change. The full
text of applicable rules can be used to define tasks and task attributes in IntelliRegs, and convenient
drop-down lists of previously defined attributes, such as method and data retention time, help
standardize all aspects of compliance task definition.
These generic task lists and task attributes can be uploaded into the TaskTrakker module and used to
create equipment-specific task lists with a high degree of precision and standardization.
14.2 Compliance Forms (Non-Title V Permit Rules Only)
In order to standardize the list of tasks for each applicable rule, the TaskTrakker module uses a rulespecific task list that is either created by the user in the COMPASS, or loaded into the system from
IntelliRegs. This list contains the tasks that will, by default, be loaded into the CMP for each Entity
that is subject to the rule. Companies can customize both the task list and the task attributes for each
TaskTrakker Module
Page 46
instance where the rule is applicable to an Entity, but the Compliance Form helps to standardize task
lists. It also greatly accelerates the process of task assignments in the CMP when a user decides that a
rule is applicable to an Entity.
Compliance Forms are created, modified, viewed, and removed from the database through the Forms
icon which appears on the left side of the Compliance toolbar, as shown in Figure 14.1.
Figure 14.1
Toolbar selections enable users to add new Forms, add data elements (i.e., generic tasks) to Forms,
and perform other maintenance activities, as shown in Figure 14.2.
Figure 14.2
14.3 Compliance Management Plan
The next icon to the right from the Forms icon is the Management icon, which enables users to view
currently assigned compliance tasks and modify the task attribute information, such as Frequency or
TaskTrakker Module
Page 47
Responsible Staff. Figure 14.3 shows a typical Compliance Management Maintenance display screen.
Figure 14.3
14.4 Task Groups for Streamlining Compliance Recordkeeping
Compliance "history" will be collected for numerous compliance tasks in your facility to demonstrate
compliance with applicable rules and to identify potential areas of non-compliance for deviation
reporting. In a large facility this recordkeeping, and the processing of data that is required, will be
likely to create a substantial burden on both manpower and computing resources. Hence, it is
advisable to keep the actual number of tasks for which "history" will be maintained as small as
possible, without compromising the overall goal of certifying compliance.
In the TaskTrakker module, this goal is met by task grouping, a function in which multiple compliance
tasks for an Entity are aligned with a single activity that will be performed, and for which "history"
will be maintained.
For example, the unit operator in a chemical plant often performs a walk-through of the unit at the
beginning of each shift. During a typical unit walk-through a variety of conditions are checked,
including visual, auditory, and olfactory inspections of equipment. An assortment of housekeeping,
safety, and operational items may be checked as well. Each of these items may have been defined as
compliance tasks due to the fact that a rule or permit requires that they be done. However, by defining
a Task Group with the "Unit Walk-through" task as "Primary" and all others defined as "Secondary,"
the compliance recordkeeping is substantially reduced. A walk-through of the unit may satisfy dozens
of discrete tasks that, in effect, make up a portion of the standard operating procedure for a Unit walkTaskTrakker Module
Page 48
through in the plant.
When tasks are identified in this function as "secondary tasks," then the Management Plan will
automatically be updated to show that compliance history will not be saved for the secondary tasks,
and that compliance history will be saved for the primary task.
14.4.1 Task Groups
To access the Task Grouping functions, click on the Compliance menu from the TaskTrakker main
screen, and then go to Task Management > Task Grouping. This opens a Task Mapping window with
a Task Picklist on the left and two windows on the right. (See Figure 14.4)
Figure 14.4
The top window is for assigning primary tasks, and the bottom window is for assigning secondary
tasks. Primary tasks are tasks for which history will be kept, such as "Keep a record of daily flare
inspections." Secondary tasks are informational tasks which relate to the primary task, but do not have
history kept, such as "Make the records readily available for inspection upon request." Columns in the
Task Picklist window include the Entity Type (such as Source, Point, or Control Device), Entity ID,
Description of the task, Task ID, Primary Task, Rule, and Frequency. You can sort the columns in the
Task Picklist window by clicking on the column headings.
To assign a primary task, select the task and click on the right arrow > next to the top (Primary Tasks)
window to move the task into that window. You may move more than one task at a time by holding
down the CTRL key and then selecting all the tasks you wish to move. To assign a secondary task to a
TaskTrakker Module
Page 49
primary task, make sure the correct primary task is highlighted in the upper window. Select the task
you want to assign as a secondary from the Task Picklist. Click the right arrow > next to the bottom
(Secondary Tasks) window to move the task. When assigning secondary tasks, it is helpful to look at
the Rule number of the tasks to determine which tasks belong to the same citation group.
You may assign as many secondary tasks as you wish to a primary task, but you must click the
Refresh button to save the data before selecting another primary task. Once you have saved, the
primary and secondary tasks will again be displayed in the Task Picklist window with the Primary
Task highlighted in yellow and the Secondary Task highlighted in turquoise to show that it has been
assigned. The primary task number will be displayed in the Primary Task column allowing you to see
which tasks have been assigned as secondary tasks. You may unassign tasks by highlighting them and
clicking on the left arrow < next to the window, but you must save again after this step. If you try to
close the Task Mapping window without saving, you will be asked if you want to save the changes
you made.
The Report icon provides a report showing primary tasks and the secondary tasks assigned to each
primary.
14.4.2 "Templating" Tasks (optional; rarely used by IntelliRegs users)
Tasks may be "templated" (i.e., copied) from one Unit, Source, Point, or Control Device to another
Unit, Source, Point, or Control Device. Equipment is collectively referred to as "Entities" in the
TaskTrakker module. A Template icon appears on the main toolbar that provides access to all of the
options for "templating" tasks. The template selection screen is shown in Figure 14.5. Each type of
template is shown in subsequent screen displays.
Figure 14.5
The "Tasks by Entity" Template option shown in Figure 14.6 can be used to template tasks from one
type of Entity to a different type of Entity, e.g., from a Point to a Source. It is the only option that may
be used to copy tasks to a dissimilar Entity type. The tasks to be copied to the "Target" window may
be selected and done as a group. If all tasks will be templated, the Copy All command button should
be used.
TaskTrakker Module
Page 50
Figure 14.6
The "Tasks by Unit" Template option enables compliance tasks to be copied from one Entity to
another Entity using the Process Unit ("PUN") as a filter. (See Figure 14.7)
Figure 14.7
14.4.3 "Templating" Rules and Tasks (optional; rarely used by IntelliRegs users)
The TaskTrakker module includes a template feature (Entity Type icon) that copies both applicable
rules and associated tasks from one Entity to another Entity. The screen looks very similar to the
"Template Tasks by Unit" screen, but it copies both selected applicable rules and all associated tasks
from the "From" Entity to the "To" Entity, as shown in Figure 14.8.
TaskTrakker Module
Page 51
Figure 14.8
Once the Entities have been selected and the Update button clicked, a screen appears to select the rules
to template. The rules can be copied individually, or the Select All button can be used to copy all of
the rules at one time.
14.5 Entering and Keeping Track of Compliance "History"
In some plants, the compliance "history" will be maintained in an external database, such as a Plant
Historian or Fugitive Emissions data management system. It is preferable to access data that is stored
in an external database for analysis or reporting, as opposed to copying the data into the COMPASS.
If the Data Repository for compliance "history" has been indicated as "External Database" for the task
displayed on the Compliance Management Maintenance screen, users may wish to identify more
precisely where data is stored by filling in information in the "Link to External Data" field, located at
the bottom of the screen. (See Figure 14.3) To do a batch upload from a spreadsheet, etc., click on the
Add History icon, then on the Import icon, and specify the file name and location.
Compliance "history" will be collected for numerous compliance tasks in your facility to demonstrate
compliance with applicable rules. There are several different ways in which compliance history may
be entered, including web-based and software-based approaches, as explained below.
14.5.1 Web-based Compliance "History"
PDC Corp distributes web programs that connect to the TaskTrakker module database and provides
both task lists, by person, department, etc., and "history" data entry screens. The program operates
entirely on the server side ("servlet") to enhance performance and ensure that processing is handled in
a reliable and efficient manner. Both J2EE-compliant and ASP.NET versions are available.
14.5.2 Software-based Compliance "History"
Compliance "history" may be entered using the Edit History icon on the Compliance secondary
TaskTrakker Module
Page 52
toolbar. Users have various dropdowns for selecting Tasks. Dropdowns such as Business Unit, Entity
Type, Entity, Task Category, etc., can also be used as shown in Figure 14.9.
Figure 14.9
The results of compliance reviews for permit allowable emissions may also be entered using the
Edit History icon. Users should click on the Edit History icon, make appropriate selections of Year,
Account, and Permit Number that appear on the next screen and then click on "Get Report" to see the
actual and allowable emission rates for the selected permit and year.
14.5.3 "Pending Task" Report Compliance "History"
Users may enter their compliance "history" using the Pending Tasks report. This selection produces a
report showing all compliance tasks that are pending for the Entities that are included within the scope
of the report filter. This filter is defined by the user.. A "pending" task is a task that is expected to be
done within the current time frame, but is not necessarily overdue at the present time. If the user
wishes to add task results, an Add History icon is available on the secondary toolbar to enter
compliance history tracking information. When compliance history is added for a task, the task will
drop out of the list and reappear at a later time when it is "pending" again (e.g., the next day, if the task
frequency is "daily"). Figure 14.10 shows the report filter screen
Figure 14.10
Figure 5.11 shows how the screen changes when a specific task is highlighted and the Add History
icon is selected from the secondary toolbar.
TaskTrakker Module
Page 53
Figure 14.11
14.5.4 "Exception" (and Other) Reports for Compliance "History"
Users can enter their compliance "history" using the Exceptions report, which shows tasks that are
overdue based on the planned frequency of the task and the date of the report. After clicking on the
Exceptions icon, the user will see a filter screen, as shown in Figure 14.12. The Task Frequency,
Account, Department or Unit, and Responsible Person may all be entered in this screen.
Figure 14.12
When completed, the user clicks on the "Get Report" icon on the secondary toolbar to retrieve the
TaskTrakker Module
Page 54
report using the filter criteria that have been entered, as shown in Figure 14.13.
Figure 14.13
14.6 Summary of Compliance Menu Functions
The Compliance menu allows you to open several functions that assist users to develop and oversee a
Compliance Management Plan ("CMP"), including Compliance Forms, defining Tasks, grouping
Tasks, and producing various management reports (See Figure 14.14)
Figure 14.14
These functions are summarized in the following paragraphs:
Compliance Management Plan: This selection shows the assigned compliance tasks for each Entity
that appears in the Compliance Management Plan ("CMP"). Task
attributes, such as frequency, responsible person, and data repository,
may be changed by the user when this function is used.
Spreadsheet:
This selection shows assigned compliance tasks for an Entity in a
spreadsheet view, instead of in a detail screen showing a single task.
Form Group:
This selection enables users to define "generic" task groups, i.e., a
pattern of one Primary task and one or more Secondary tasks that
may, optionally, be used to create task groups throughout the
Compliance Management Plan with a single mouse click, instead of
creating task groups one at a time.
TaskTrakker Module
Page 55
Forms Management:
Edit History:
Time Needed:
IMP QA Reports:
Pending:
Exceptions Report:
History:
Deviation:
Permitted Emissions:
Task Summary:
Dup Task and Dup Rules:
TaskTrakker Module
This selection allows the user to create or edit Compliance Forms. A
Compliance Form is a relationship between a Requirement and one or
more compliance tasks. A rule can be associated with one and only
one Compliance Form.
This selection enables users to modify previously entered task
performance records.
This selection enables users to produce reports showing how much
effort is required to maintain compliance records, based on the entry
of a duration time, in minutes, for each task. The time required to
perform non-repetitive tasks may be entered using an estimated
time/day alternate feature, as explained in the task detail screen.
This selection enables users to review quality assurance data for
compliance "history" data that is being imported from a spreadsheet.
This selection produces a report showing all compliance tasks that are
pending for Entities that are included within the scope of the report
filter. This filter is defined by the user on the initial screen following
selection of this icon. A "pending" task is a task that is expected to be
done within the current time frame but is not necessarily overdue at
the present time. An Add History icon is available on the secondary
toolbar to enter compliance history tracking information. When
compliance history is added for a task, the task will drop out of the
list and reappear at a later time when it is "pending" again (e.g., the
next day if the task frequency is "daily".)
The selection produces a report showing the compliance tasks that are
overdue for the Entities that are included within the scope of the
report filter. This filter is defined by the user on the initial screen
following selection of this icon. Entities may be restricted based on
Frequency, Unit, Responsible Staff, or Entity. An Add History icon is
available on the secondary toolbar to enter compliance history
tracking information.
This selection brings up a secondary toolbar for reviewing and adding
new compliance history, i.e., entries into the database showing that
compliance tasks were completed and any information related to the
task completion event.
This selection produces a report showing the compliance task
performance records (compliance "history") for those records that
have a Status that indicates a Potential Deviation.
This selection produces a report showing actual and allowable air
emissions for a selected year, provided that the emissions data has
been provided in the COMPASS-EI module.
This selection produces a report showing a summary of the
compliance tasks in the Compliance Management Plan.
This selection is used to identify cases where compliance tasks for the
same underlying rules were assigned to equipment multiple times.
Page 56
Chapter 15. PURPOSE OF TASKTRAKKER AND MANUAL
PROCEDURES THAT ARE USUALLY AFFECTED
The main purpose of TaskTrakker and related components is summarized below:
The COMPASS-TaskTrakker – enables the development of a compliance management system
that includes notifications of pending and overdue tasks, data entry by plant staff to track task
performance data, and reporting of “compliance history” for deviations reporting.
The COMPASS-TaskTrakker E-mail Notifications – provides a simple and intuitive method
for accessing the “Add History” web pages used to update task performance information, alerts
users to overdue assignments, and apprises designated staff when potential compliance
deviations have been recorded.
The COMPASS-TaskTrakker Web Pages - provides a simple and intuitive method for users to
interface with the TaskTrakker database to update their task performance information or
produce reports.
The COMPASS-TaskTrakker Process Historian “Bridge” program – enables automated and
unattended “compliance history” data to be acquired from process historians as well as
automated functions to compare statistics such as in, max, and average values, to permit limits
and other regulatory requirements so that reports can be developed efficiently and corrective
actions may be taken in a timely manner.
Deployment of the COMPASS-TaskTrakker module may change the following work practices if they
were formerly performed using paper-based systems.
1. Detecting and Managing Changes Made by Agencies to CPC‟s Applicable Rules – quarterly
updates provided to Regulatory Management of Change (RMOC) subscribers may be used to
maintain regulatory text and citation numbers in TaskTrakker to match the most recently
published version of CPC‟s applicable rules. Similarly, IntelliRegs updates to environmental
permits, such as NSR and Title V Permits, following a modification or re-issuance of a permit,
can be used to update TaskTrakker through the same “import and auto-generate” mechanism as
is sued for RMOC updates. CPC‟s reconnaissance of federal and state rules to detect changes
in the text or citation numbering of applicable regulations can be discontinued, as well as
manual procedures involved with processing changes that are detected to ensure that
compliance tasks are current, and any obsolete (i.e., no longer applicable) tasks are promptly
removed from active task lists used by CPC staff.
2. Documenting Compliance – usage of TaskTrakker web pages and the process historian
“Bridge” component will augment, and in most cases, replace, the work processes formerly
used to document compliance in CPC facilities. This applies both to the documentation of task
TaskTrakker Module
Page 57
performance by individuals in the plant, as well as the management of compliance records by
supervisory personnel at multiple levels up to, and including, the Responsible Plant Official.
3. Assigning Recordkeeping Protocols – manual procedures formerly used to develop and assign
recordkeeping protocols to assess and document Title V Permit compliance have been replaced
by an enterprise-wide system based on “Ops Activities.” These generic recordkeeping protocols
were defined and assigned to CPC‟s applicable requirements through consensus-building
process (please see attached technical paper entitled “AIChE - Rapid-GlobalStds_TechPaper.doc” for more information). A PDF file that shows all state and federal rules
that are applicable to CPC plants located in Borger, Cedar Bayou, Orange, Port Arthur, and
Sweeny, along with Ops Activity assignments, may be found at this link:
https://www.pdccorp.com/general/CPC_OpsAct_Master_List.pdf. An XLSX file that includes
all of the variations from the “standard” Ops Activities deployed at CPC plants may be found at
this link: https://www.pdccorp.com/general/CPC_OpsAct_Master_List.xlsx
4. Deviation Reporting – manual procedures formerly employed to detect Title V Permit
deviations for inclusion in a required semi-annual report have been augmented by automated
processes used in TaskTrakker that allow “compliance history” to be filtered to detect potential
deviations more easily. In addition, manual procedures for recording deviation-related
information and producing it later for reporting to agencies, such as duration, corrective actions
taken, and root cause, have been augmented by automated processes used in TaskTrakker to
record these data when incidents occurred and to access them later for reporting purposes.
5. Assigning Tasks to CPC personnel – the automated process in TaskTrakker used to assign tasks
to CPC staff will replace similar functions that may have been done manually or using systems
such as MS Excel.
6. Monitoring Compliance and Notify CPC Staff when Needed – TaskTrakker provides
automated monitoring of “compliance history” that is acquired either through web page updates
from CPC staff, or from queries run against process historian databases. In either case,
TaskTrakker can monitor compliance with regulatory limits automatically, and when potential
deviations are identified, e-mail notifications are sent to the designated CPC within 24 hours.
These features will replace or augment manual procedures formerly used to monitor
compliance, such as by viewing process historian data summaries or reading sheets, and
evaluate compliance by comparing results to regulatory limits.
TaskTrakker Module
Page 58